

Page 1

User's Guide
TrueImage 6.0
Compute with confidence
www.acronis.com
Page 2

Copyright © SWsoft, 2000-2002. All rights reserved.
Linux is a registered trademark of Linus Torvalds.
OS/2 is a registered trademarks of IBM Corporation.
Windows and MS-DOS are registered trademarks of Microsoft Corporation.
All other trademarks and copyrights referred to are the property of their
respective owners.
Distribution of substantively modified versions of this document is prohibited
without the explicit permission of the copyright holder.
Distribution of the work or derivative work in any standard (paper) book form
for commercial purposes is prohibited unless prior permission is obtained
from the copyright holder.
DOCUMENTATION IS PROVIDED «AS IS» AND ALL EXPRESS OR IMPLIED
CONDITIONS, REPRESENTATIONS AND WARRANTIES, INCLUDING ANY
IMPLIED WARRANTY OF MERCHANTABILITY, FITNESS FOR A PARTICULAR
PURPOSE OR NON-INFRINGEMENT, ARE DISCLAIMED, EXCEPT TO THE
EXTENT THAT SUCH DISCLAIMERS ARE HELD TO BE LEGALLY INVALID.
Page 3

Table of Contents
INTRODUCTION ................................................................................................... 4
CHAPTER 1. INSTALLING ACRONIS TRUEIMAGE AND GETTING STARTED .6
1.1 ACRONIS TRUEIMAGE SYSTEM PACKAGE ...................................... 6
1.2 SYSTEM REQUIREMENTS ................................................................. 6
1.3 INSTALLATION................................................................................. 6
1.4 REPAIRING/UPGRADING ACRONIS TRUEIMAGE.............................. 7
1.5 REMOVING THE SOFTWARE............................................................. 7
1.6 USER INTERFACE ............................................................................. 7
1.7 STARTING WORK WITH ACRONIS TRUEIMAGE ............................... 8
CHAPTER 2. CREATING DISK/PARTITION IMAGES ........................................ 9
2.1 SELECTING PARTITIONS TO IMAGE ............................................... 10
2.2 IMAGE ARCHIVE LOCATION .......................................................... 11
2.3 COMPRESSION LEVEL.................................................................... 13
2.4 IMAGE ARCHIVE SPLITTING .......................................................... 14
2.5 PROTECTING AN ARCHIVE FILE WITH A PASSWORD ..................... 15
2.6 IMAGE ARCHIVE COMMENTS ........................................................ 16
2.7 AN ARCHIVE FILE CREATION SCRIPT............................................ 17
CHAPTER 3. RESTORING A DISK/PARTITION FROM AN IMAGE .................. 18
3.1 SELECTING AN ARCHIVE FILE ....................................................... 19
3.2 SELECTING A PARTITION TO BE RESTORED .................................. 21
3.3 SELECTING A DESTINATION PARTITION ........................................ 22
3.4 SELECTING THE RESTORED PARTITION TYPE AND FILE SYSTEM .23
3.5 RESIZING A PARTITION.................................................................. 25
3.6 SELECTING A PARTITION LETTER.................................................. 26
3.7 SELECTING THE NEXT PARTITION TO BE RESTORED ....................27
3.8 PARTITION RESTORATION SCRIPT WINDOW ................................. 28
3.9 PARTITION RESTORATION PECULIARITIES .................................... 29
3.10 PECULIARITIES OF RESTORATION FROM REMOVABLE MEDIA...... 30
CHAPTER 4. RESTORING INDIVIDUAL FILES................................................ 31
APPENDIX A. PARTITIONS AND FILE SYSTEMS.............................................. 36
A.1 HARD DISK PARTITIONS................................................................ 36
A.2 FILE SYSTEMS................................................................................ 36
A.2.1 FAT16...................................................................................................... 37
A.2.2 FAT32...................................................................................................... 37
A.2.3 NTFS........................................................................................................38
A.2.4 LINUX EXT2 .............................................................................................38
A.2.5 LINUX EXT3 .............................................................................................38
A.2.6 LINUX REISERFS ......................................................................................38
Acronis TrueImage
3
Page 4

Introduction
What is Acronis TrueImage
Acronis TrueImage is your ultimate data insurance policy! It takes an exact
image of your hard disk drive or separate partitions for complete backup, and
allows you to restore all of their contents, including operating systems,
programs, personal data and settings. In the event of fatal software or
hardware failure Acronis TrueImage protects your data, even when ordinary
file backup software does not work.
Acronis TrueImage stores disk images on hard and floppy disks, any
recordable CD/DVD media, ZIP®, Jaz® and other removable storage
devices, allowing to protect archives by a password with an extremely easy
Windows XP-like wizard-driven interface.
Acronis' exclusive innovative technology allows to create and restore
complete disk images online in Windows, so you don't have to deal with
annoying reboots to DOS or other systems, even when backing up system
partitions.
Archive File
Acronis TrueImage creates archive files, that is files containing images of
partitions and disks. The images contain both data of partitions and/or disks
and information, allowing you to restore a partition (disk) from the image.
Partition images include all its files and folders, irrespective of their attributes
(hidden, system, etc.), Master Boot Record (MBR), File Allocation Table
(FAT), and a root directory (Root).
Acronis TrueImage software stores only the data sectors of a hard disk in its
partition image.
Acronis TrueImage software creates an archive file with a ’.tib’ extension.
The .tib file can contain images of several partitions and/or disks.
An archive file of large disk partitions or several partitions (and disks) can
become quite large. In this case Acronis TrueImage will split the image into
more than one archive volume or archive volume files. Splitting an archive
into separate volumes may also be required for writing to removable media
Create an image of your hard disk in an archive file on any media, be it
another hard disk or CD-R, CD-RW. Install a new disk, boot with a CD (or
diskette) containing Acronis TrueImage, and restore the old disk contents from
the image to a new disk. You can also change disk partition size and location
along with their type and operating system if needed.
4
Introduction
Page 5

How to Find the Necessary Information in this Guide
Acronis TrueImage user’s guide contains the following main chapters:
• Chapter 1. «Installing Acronis TrueImage and Getting Started» and
Getting Started» - this describes how to install, run, and remove the
software;
• Chapter 2. «Creating Disk/Partition Images» - this describes how to
create an exact disk/partition image;
• Chapter 3. «Restoring a Disk/Partition from an Image» - this describes
how to restore the entire hard disk or individual partitions;
• Chapter 4. «Restoring Individual Files» - this describes how to restore
accidentally deleted or damaged files without restoring the entire hard
disk.
• Appendix A. «Partitions and File Systems» - this describes the hard
disk structures, and interaction with an operating system.
Software Usage Conditions
The conditions for Acronis TrueImage software usage are described in the
«License agreement», included with this package. The supplied registration
card is the confirmation of your legal purchase and usage of Acronis
TrueImage on your system. Each registration card has its own unique
registration number.
Under current legislation the «License agreement» is considered a contract
between a user (you) and a software manufacturer (Acronis Inc.). The
contract has legal effect and its violation may entail a court examination.
Illegal use and/or distribution of this software will be prosecuted.
Technical Support
Users of legally purchased and registered copies of Acronis TrueImage
receive free technical support from Acronis Inc. In case you have problems
with installation or use that cannot be solved with this guide or read-me file,
please visit our support web-site or e-mail our support department at the
addresses shown below. You must also send us the registration number of
your Acronis TrueImage copy. This number is written on a registration card
supplied with this product.
Support URL: http://www.acronis.com/support/
E-mail: support@acronis.com
Acronis TrueImage 5
Page 6

Chapter 1. Installing Acronis TrueImage
and Getting Started
1.1 Acronis TrueImage System Package
Acronis TrueImage system package includes:
• an installation disc,
• this guide,
• license agreement,
• registration card,
• advertising materials.
1.2 System Requirements
To take full advantage of Acronis TrueImage one should have:
• a PC-compatible computer with a Pentium CPU or similar,
• 32 MB RAM,
• a floppy or a CD-RW drive,
• VGA monitor,
• a mouse (recommended),
• free disk space for archive files.
1.3 Installation
To install the Acronis TrueImage:
1. Insert the Acronis TrueImage installation CD into CD-ROM drive and
start the installation procedure.
2. Carefully follow the installation program instructions on the screen.
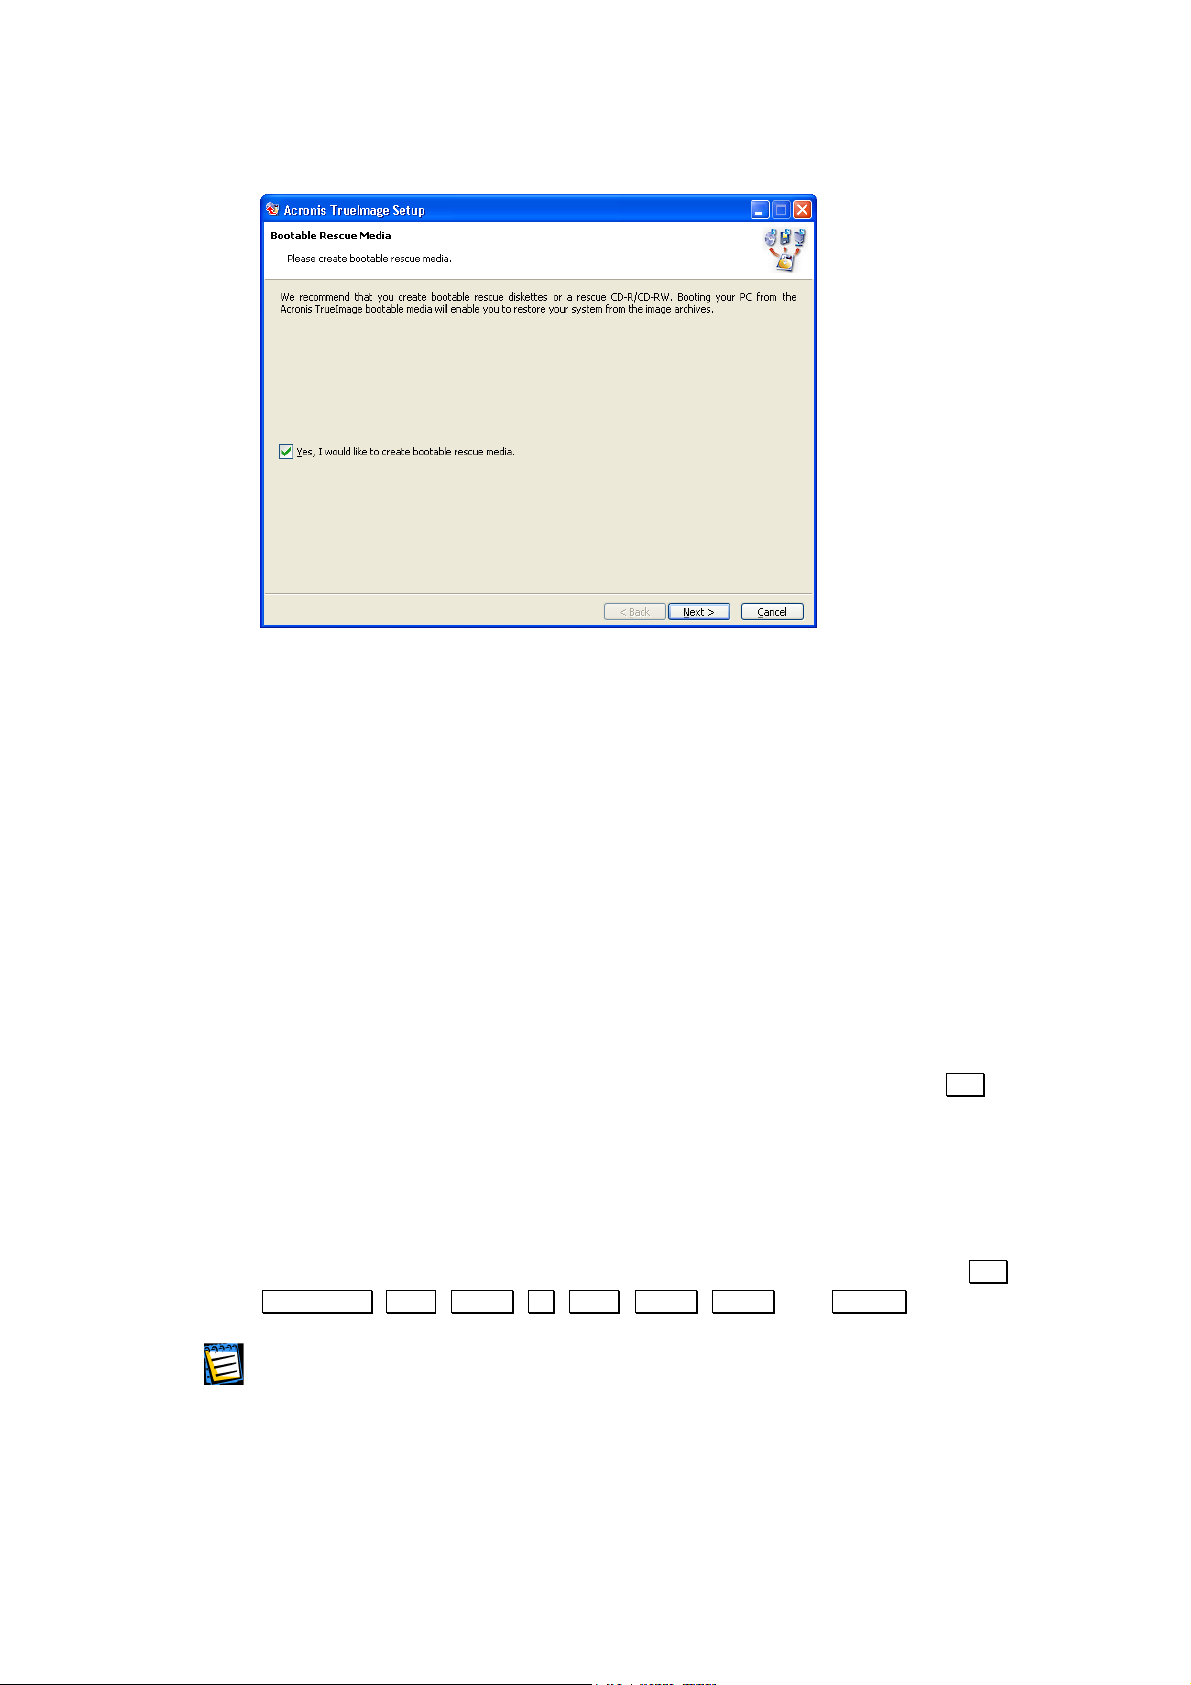
3. After making your installation choices and copying of Acronis
TrueImage files onto your hard disk, you will be offered to create a
bootable diskette or CD-R/W (you may omit this step if you have
purchased the boxed product that contains a bootable CD). While
TrueImage creates disk images in Windows, it might be necessary to
run restoration procedure from a bootable diskette or CD-R/W.
Therefore it is strongly recommended you create either of them. You
can also create the bootable diskette or CD-R/W when the set-up
process is finished.
6 Chapter 1 : Installing Acronis TrueImage and Getting Started
Page 7
After installation of Acronis TrueImage is completed, you should restart your
computer.
1.4 Repairing/Upgrading Acronis TrueImage
In order to upgrade or repair your software, start the TrueImage installation
program again. It will determine that TrueImage was already installed on
your computer and will ask you if you want to restore (update) the program
or completely remove it from disk.
1.5 Removing the Software
To remove the software select Acronis Æ TrueImage Æ Uninstall Acronis
TrueImage from the Programs menu. You will see a dialog box asking if you
really want to remove the software from your PC hard disk. Press
confirm removal. Acronis TrueImage software will be completely removed.
1.6 User Interface
Acronis TrueImage has an extremely easy to use wizard-driven Windows
graphical user interface and can be managed with a mouse or
Shift+Tab, Left , Right, Up , Down, Space , Enter , and Escape keys.
Yes to
Tab,
If you work with Windows, X Window, or OS/2 applications on a regular basis, you will
have no problems understanding and using Acronis TrueImage interface.
While working with a partition store and restore wizard, a user sees a
sequence of Wizard pages, on each of which he (she) selects from several
available actions, and thus sets switches to the desired state.
Acronis TrueImage 7
Page 8

g
g
The switches can be set with the mouse or keyboard.
Each dialog box contains detailed text comments for the dialog’s purpose and
switches (control elements) as well as for each switch state.
There is no Help button on Wizard pages. It is unnecessary because on each pa
there is detailed information about the purpose of the page and its controls.
Moreover, there is detailed information about what possibilities you
any of controls in any possible state.
Almost all Acronis TrueImage windows are Wizard pages.
1.7 Starting Work with Acronis TrueImage
Acronis TrueImage software runs in different modes during disk/partition
image creation or restoration, in case of a serious system malfunction or disk
filing structure damage.
To create a disk/partition image under Windows, select Start Æ Programs Æ
Acronis Æ TrueImage Æ Acronis TrueImage. You will immediately see a
welcome window containing the partition (disk) image creation and restoration
wizard.
If your operating system is damaged and you are unable to boot the PC from
its system partition, you should use the bootable diskette or CD-R/W that
you previously created, selecting Start Æ Program Æ Acronis Æ TrueImage Æ
Bootable Rescue Media Builder.
e
et if you select
8 Chapter 1 : Installing Acronis TrueImage and Getting Started
Page 9
Chapter 2. Creating Disk/Partition
Images
Acronis TrueImage software starts with the welcome page.
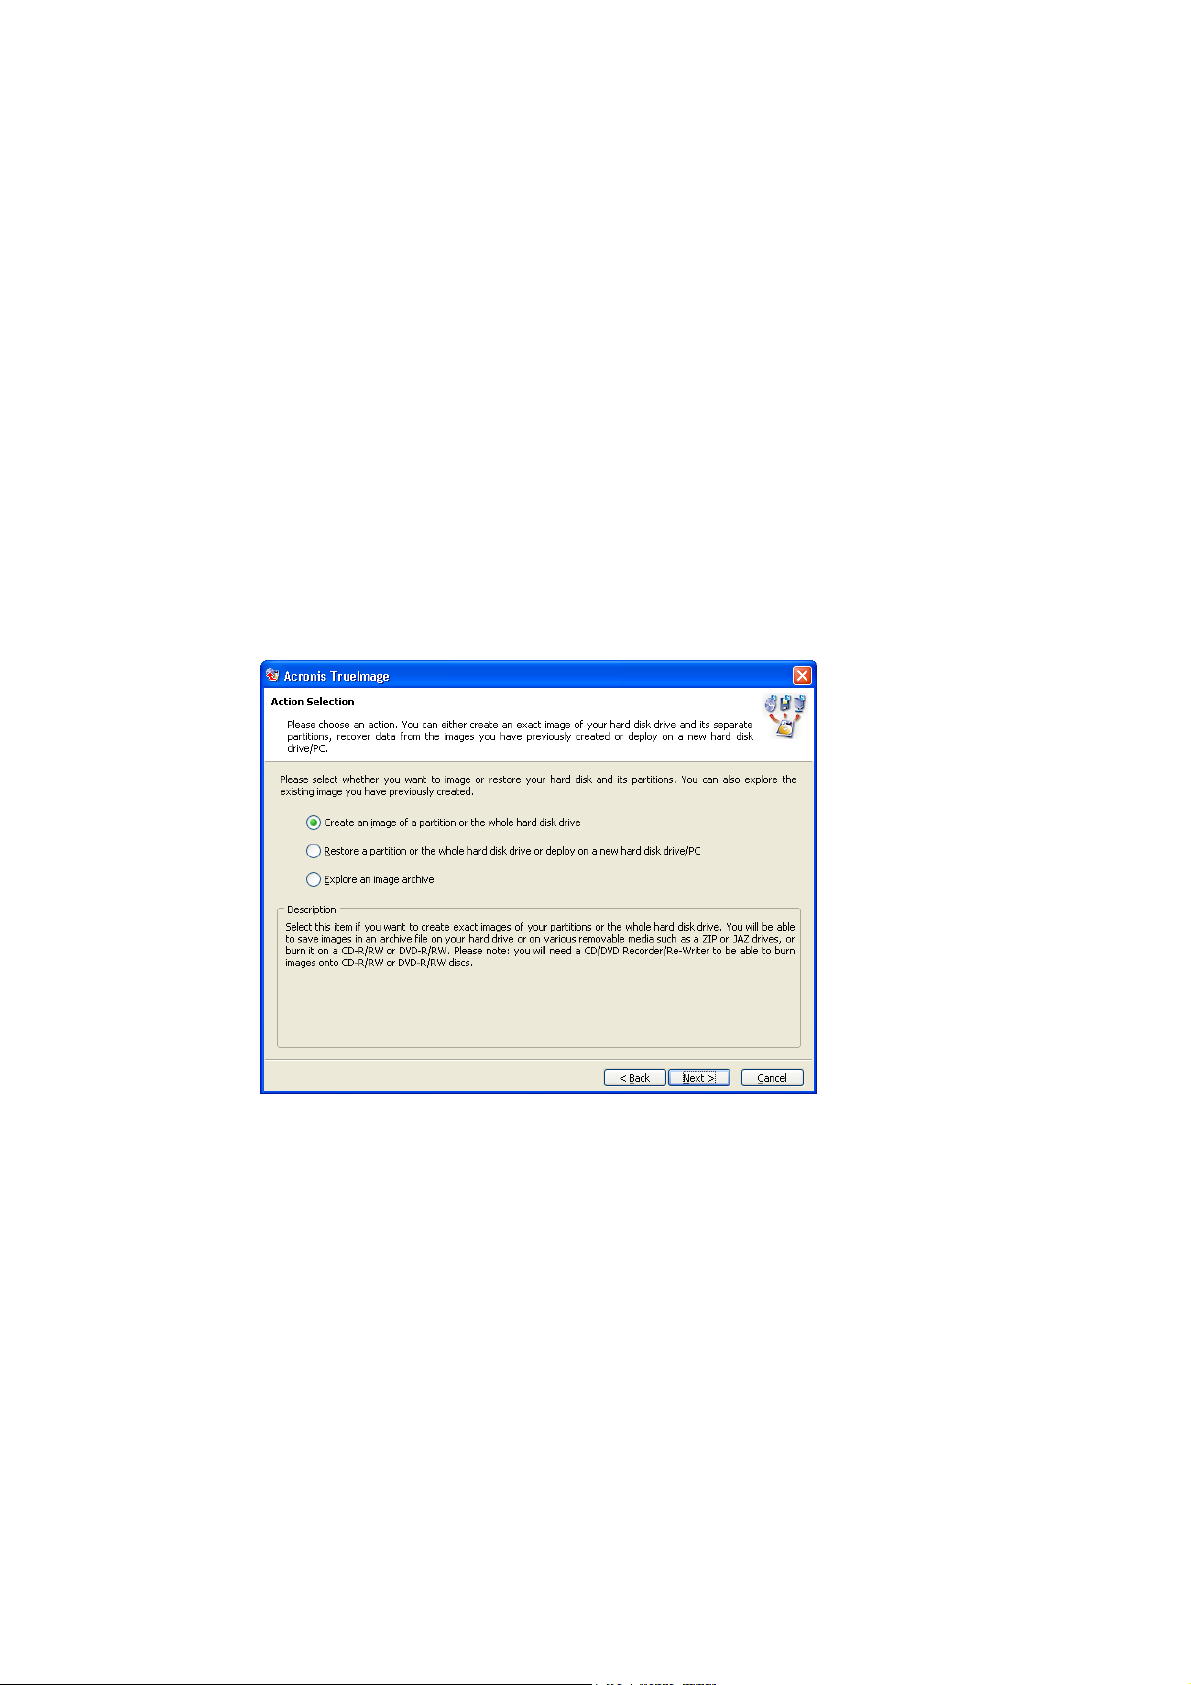
The next wizard window will offer you to select an action to perform with the
help of Acronis TrueImage. There are three actions available:
• create an image of a disk partition and/or the whole hard disk drive (a
group of partitions, several partitions);
• restore a partition (disk) from an image file, stored in an archive file;
• connect an image, stored in an archive file, as a temporary logical
drive to restore separate files and/or folders.
Action Selection window
Acronis TrueImage 9
Page 10
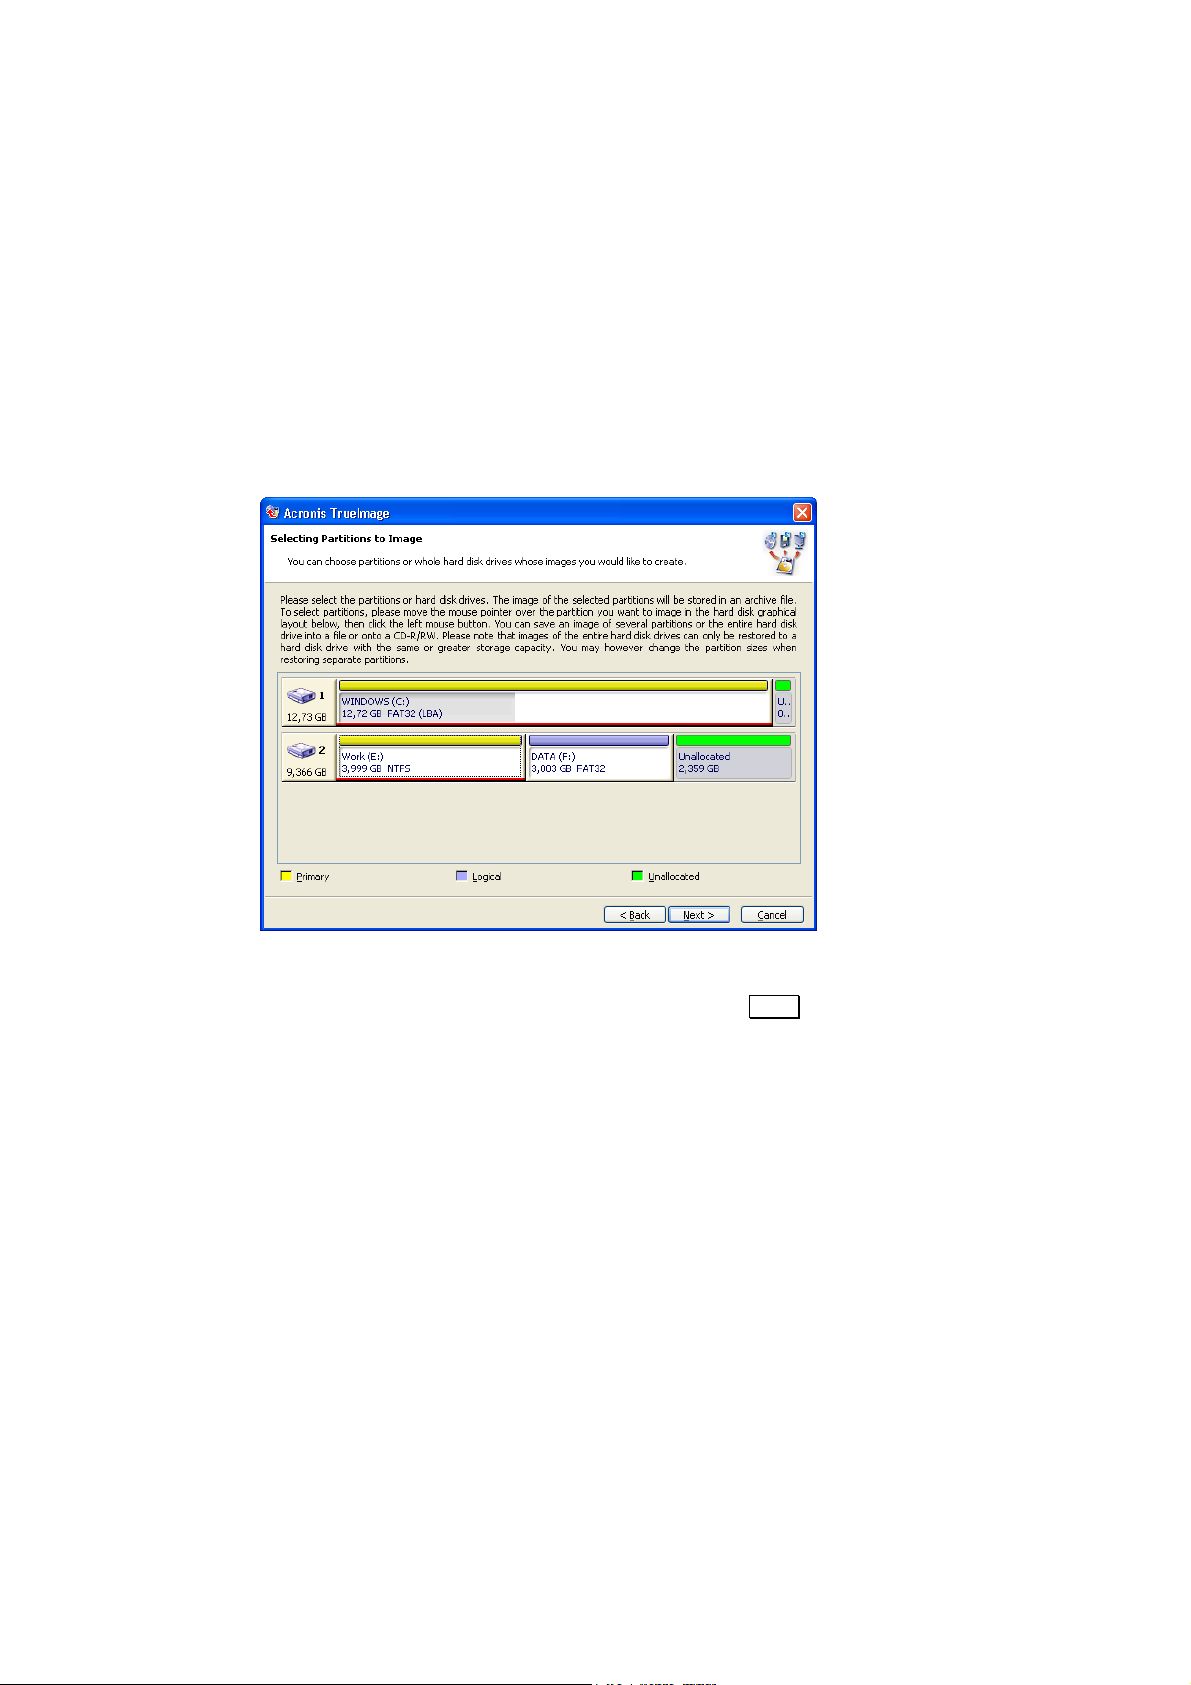
2.1 Selecting Partitions to Image
In the next Selecting Partitions to Image window you will see the structure of
the disks connected to your PC. Click a rectangle representing a partition to
select it. As a result this rectangle will become underlined red. You’ll be able
to consequently select several hard disk partitions and/or different disks.
Click a rectangle representing the whole hard disk (with an icon, disk number
and capacity) to select it for image creation. As a result all disk’s partitions
will become underlined red.
Selecting Partitions to Image window
Having chosen the partitions and/or disks, click Next to continue. Have in
mind that this button will be disabled until none of partitions and disks is
selected.
10 Chapter 2 : Creating Disk/Partition Images
Page 11
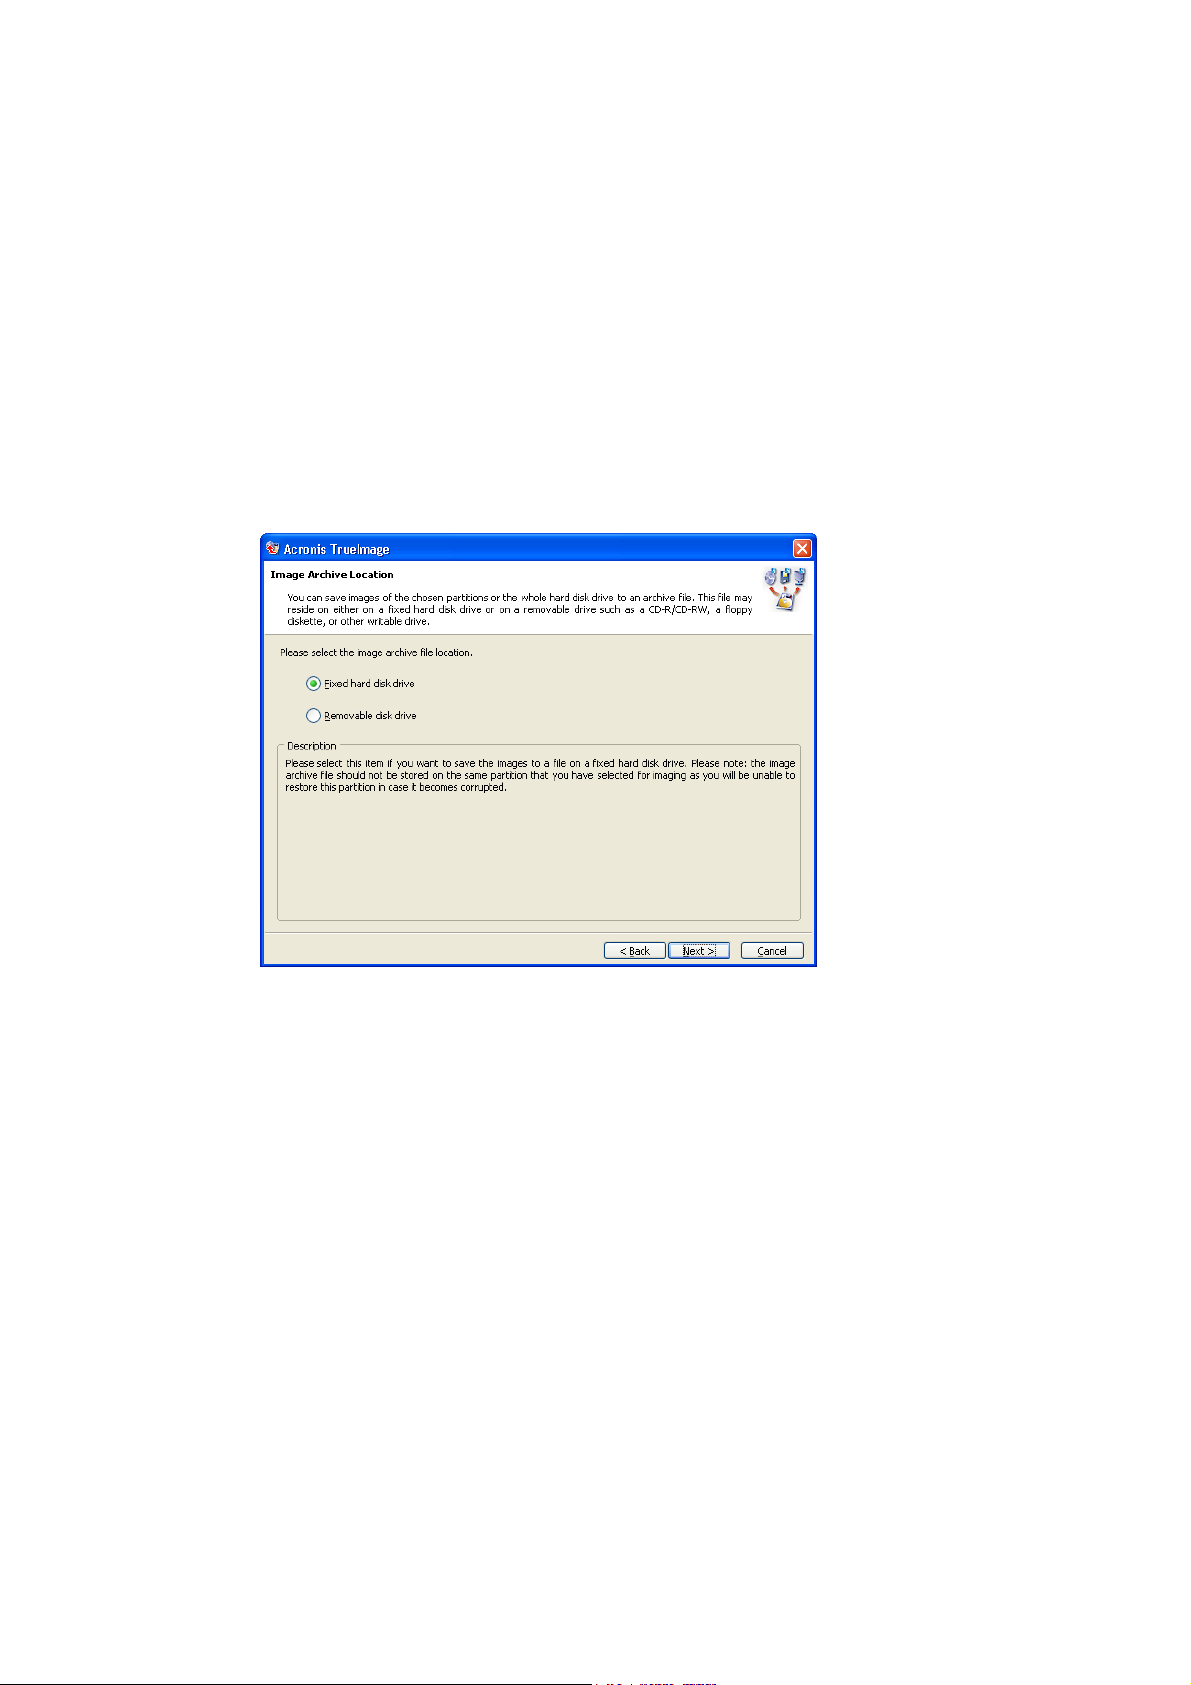
2.2 Image Archive Location
In the next Image Archive Location window you’ll need to select a type of a
device to create a disk/partition image. Acronis TrueImage supports three
device types:
• hard disks,
• network disks,
• removable media – CD-R/RW, DVD+RW, Iomega Zip, Iomega Jaz,
magneto-optical, and other drives.
Selecting Image Archive location
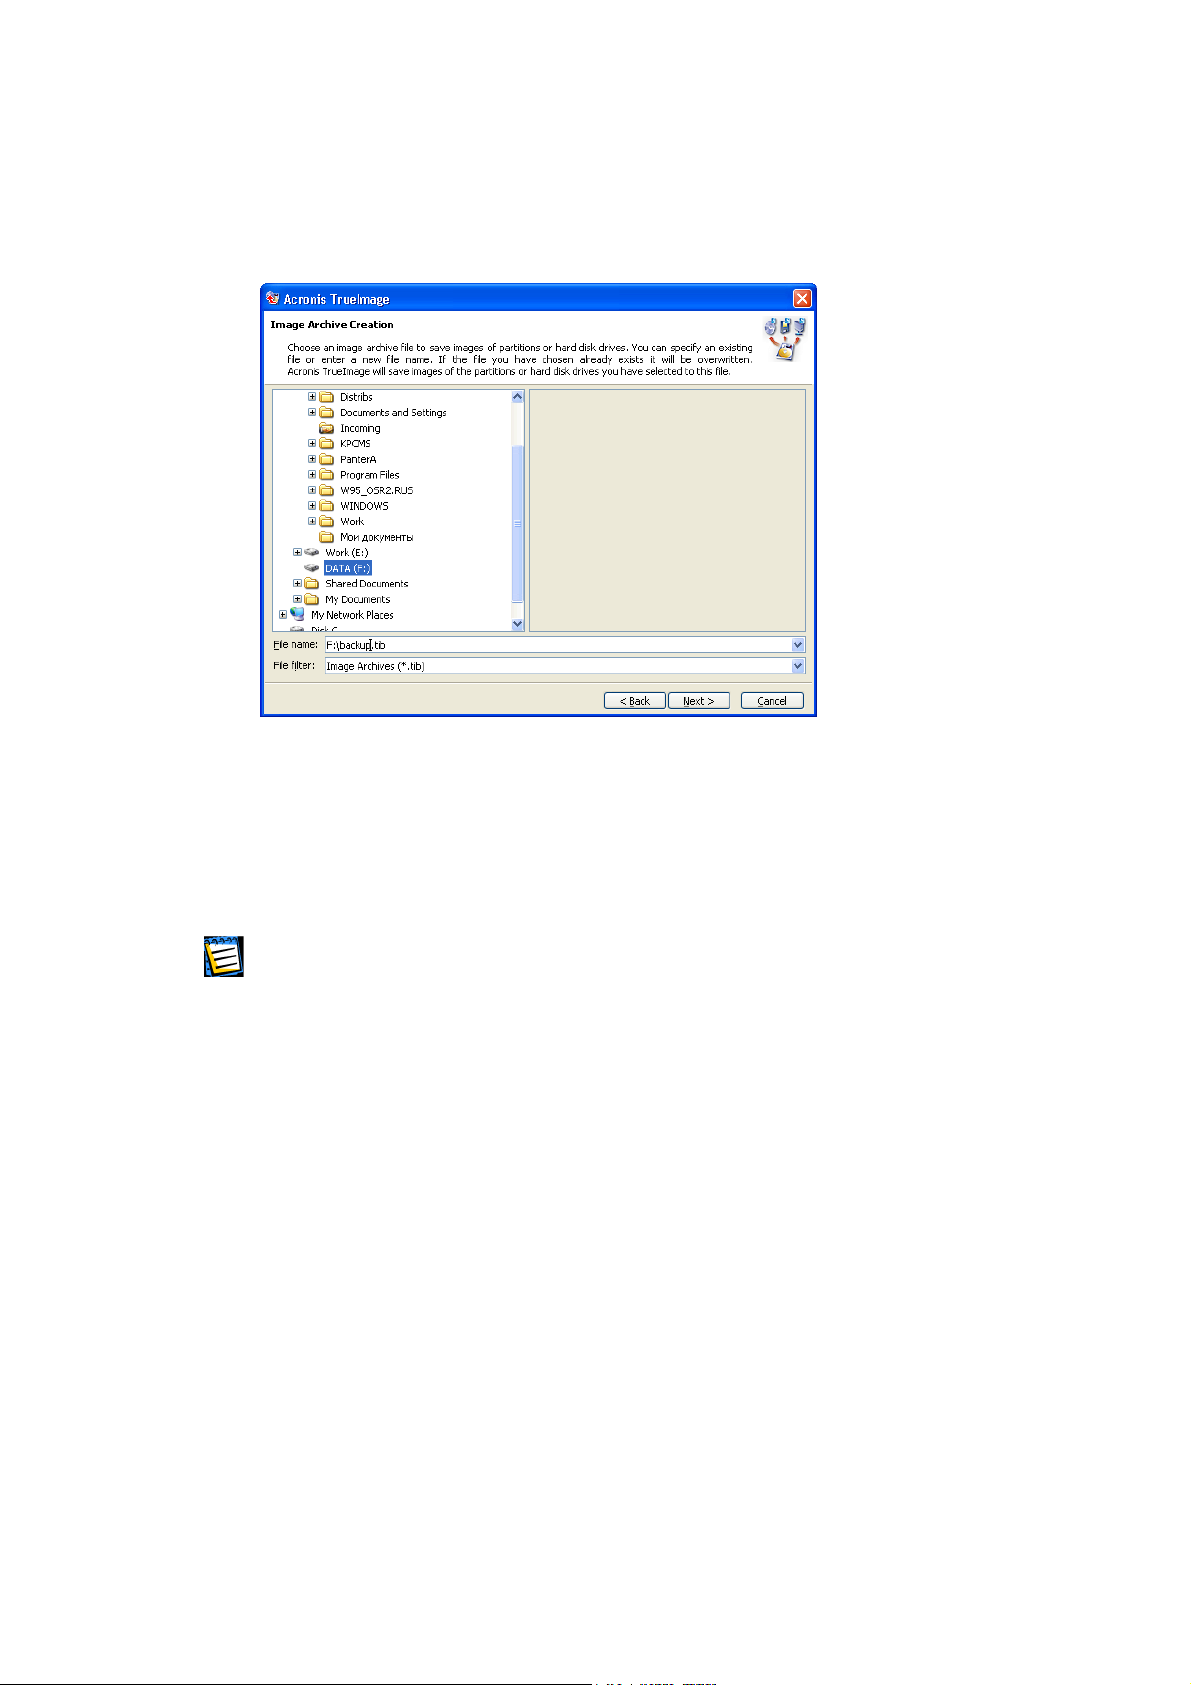
In the next Image Archive Creation window you’ll need to provide an archive
filename to store images of chosen partitions (disks) to as well as its full
path. Enter a filename to the File name field.
Acronis TrueImage 11
Page 12
g
g
You can also use a connected disks tree in the left part of the window to find
archive files (if previously created) and their locations.
Selecting a folder and an archive file name
If an archive file with the entered filename already exists in the chosen
folder, you’ll be prompted about it by Acronis TrueImage with a question if
you want to create a new file with the same name, that is to delete an old
archive file and create a new one instead.
You can store ima
can’t append images to an existin
an image of the partition (disk) on the same partition (disk), included into an archive, if
there’s enough free space.
es of several partitions or even disks in a single archive file, but you
archive file. You can also create an archive file with
There’s a simple rule: do not store archive files with partition images on the
same hard disk you create back-up copies of. As in case of filing structures
(for example, Partition Table) damage, you’ll just not be able to access these
images!
12 Chapter 2 : Creating Disk/Partition Images
Page 13

2.3 Compression Level
In the next Compression level window you’ll need to select a data compression level of a partition image. A compression level can be selected by moving the slider. If you select zero compression, files will be obviously moved to an archive file without any compression, which is inefficient. On the other hand the work speed might drop and image creation time might increase, if you select the maximal compression. Certainly, the optimal compression level depends on the type of files, stored on a disk/partition, and can only be determined empirically.
Image’s data compression level
Acronis TrueImage 13
Page 14
g
2.4 Image Archive Splitting
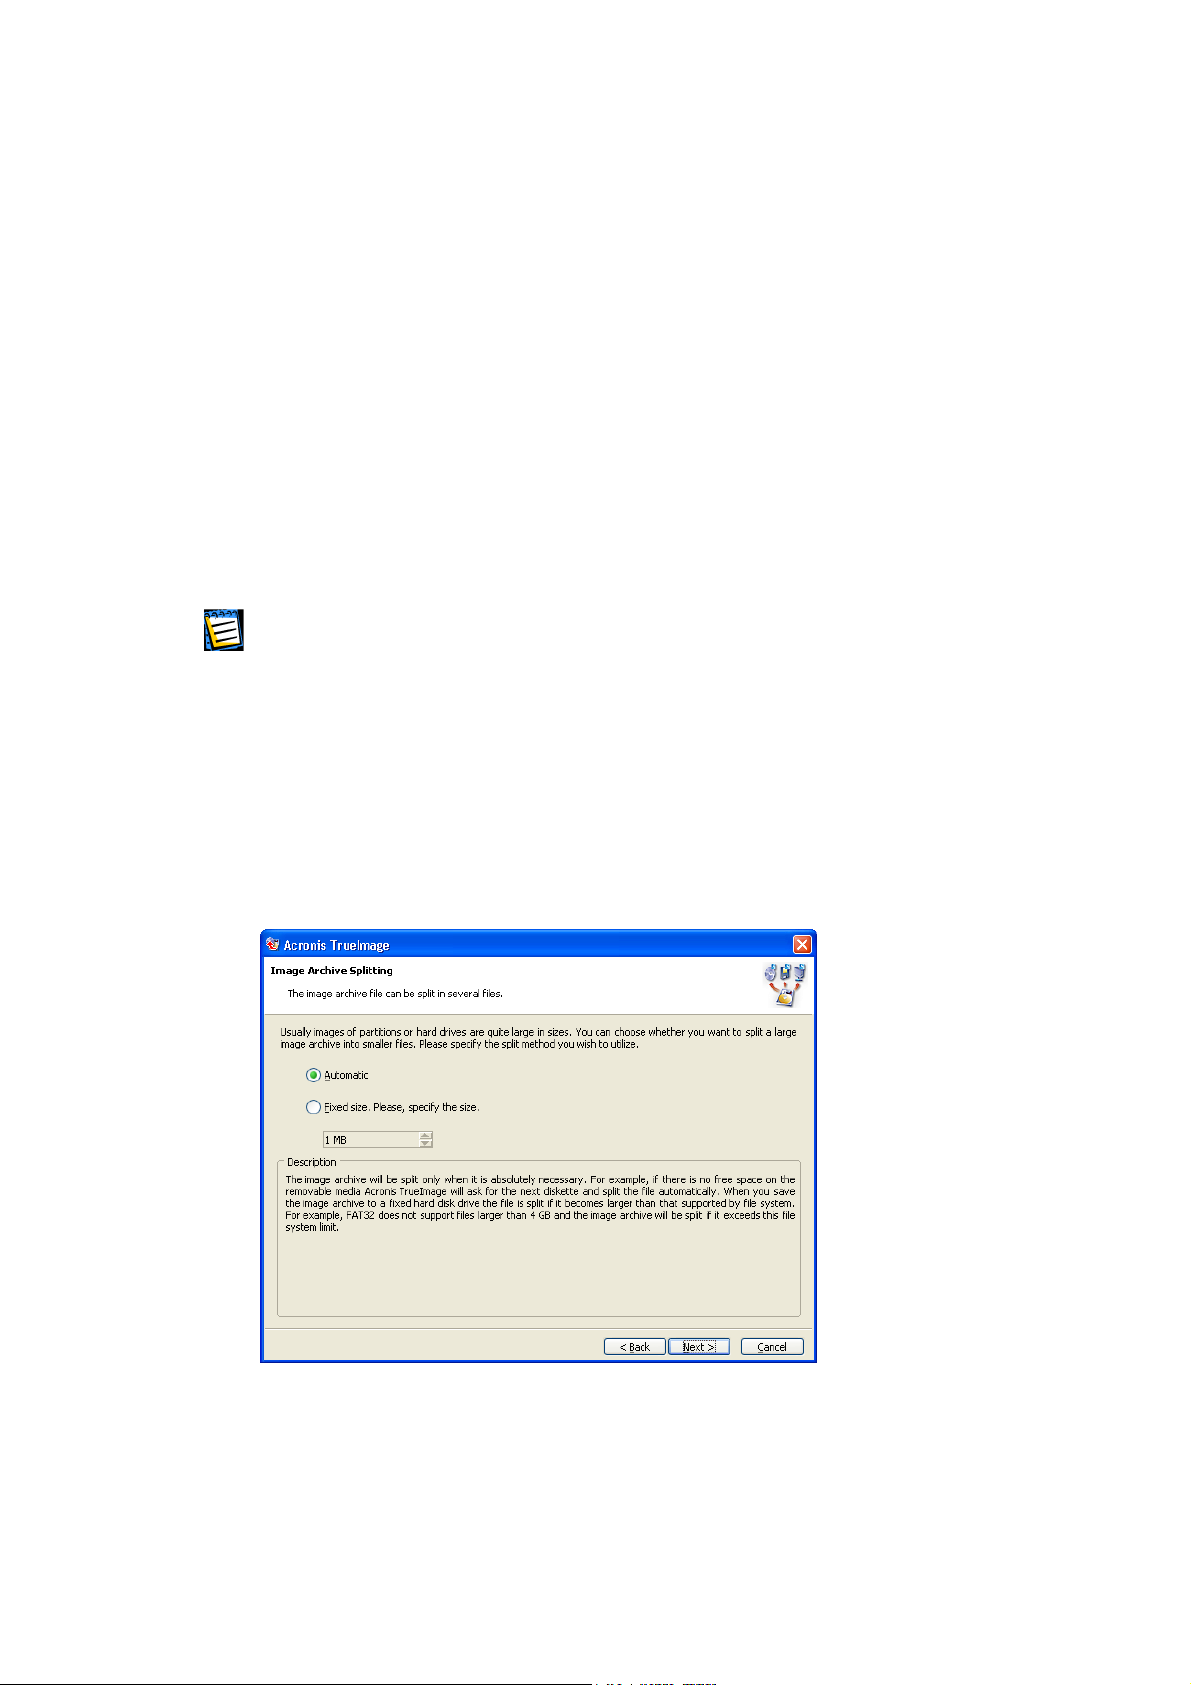
In the next Image Archive Splitting window you’ll be able to select if the
software should create a single archive file or split it into a number of
volumes. If you set the switch to Automatic, Acronis TrueImage will try to
determine settings for certain situations itself. If there’s enough space on a
hard disk that you’ve chosen for locating an image on, the software will
create a single archive file. If there’s not enough space, Acronis TrueImage
will prompt you a warning and wait for your actions. You’ll be able to try to
and free some additional space on the partition, where an archive file is
being created, and then continue the image creation. But you will also be
able to terminate Acronis TrueImage, prepare a partition for image creation,
and run the process anew.
FAT16 and FAT32 limit file sizes. In particular, the maximal file size of FAT16 and FAT32 is
4 GB. FAT32 file system is currently the most widespread in individual users’ PCs. At the
same time modern hard disks have 20 GB, 40 GB, and hi
maximal file size can be easily exceeded at creating an archive file. In this case Acronis
TrueImage will automatically split an archive file into separate volumes.
her capacities! Hence the
If you are creating an archive file on CD-R, CD-RW disks in Automatic mode,
Acronis TrueImage will simply pause and prompt you to insert a new disk into
the drive, if the current disk space is fully occupied.
You can also appoint a fixed archive size switching to Fixed Size and setting
the volume size manually.
Splitting an archive file into separate volumes
14 Chapter 2 : Creating Disk/Partition Images
Page 15

Splitting an archive file into separate fixed size volumes makes sense when storing it
on a hard disk as well, as you’ll be able to move archive volumes to CD-R/RW,
DVD+RW disks in the future. Creating an archive file directly on a to CD-R/RW,
DVD+RW disk would have taken much longer time then in case of a hard disk.
2.5 Protecting an Archive File with a Password
An archive file with a partition (disk) image can be protected with a
password. If you think a partition (disk), you create an image of, shouldn’t
be restored by anybody except you, enter a password and its confirmation
into the text fields of the next Image Archive Protection window. A password
should consist of at least 8 symbols and contain both letters (in the upper
and lower cases desirably), and numbers. (So it would be harder to hack it.)
Protecting an archive file with a password
When you try to restore a password protected partition (disk) from an image,
stored in an archive file, Acronis TrueImage will prompt you to enter it into
the appropriate window and won’t allow restoring it by a person without this
password.
Acronis TrueImage 15
Page 16

2.6 Image Archive Comments
In the next window you’ll be able to provide an archive file with any
comment that may include any information on the PC and its user, the hard
disk, partition data, image creation time, and any peculiarities and
conditions. For example:
True Image of Primary Partition HDD1:
OS:
Windows XP
Applications:
Office 2000 (Word, Excel, Outlook)
Adobe Photoshop
Adobe Acrobat
True Image of Primary Partition HDD2:
My work files
10 July 2002
Commenting an archive file
16 Chapter 2 : Creating Disk/Partition Images
Page 17

2.7 An Archive File Creation Script
In the next window you’ll see a partition (disk) image creation script (several
images, perhaps). It will contain a list of operations to be performed on
partitions (disks) along with their main features.
An archive file creation script
All operations of a partition (disk) image creation in an archive file are
delayed in Acronis TrueImage. A partition (disk) image creation script is
created first, and then it’s executed.
Now Acronis TrueImage software is ready to perform a procedure of image
creation in an archive file. If you click
Back, you’ll be able to select other
partitions and/or disks for image creation, other compression level, etc.
After pressing
Proceed Acronis TrueImage takes care of everything
automatically.
Acronis TrueImage 17
Page 18

Chapter 3. Restoring a Disk/Partition
from an Image
Partition or disk restoration from an image is a more complex procedure than
storing. When you store a partition, you can do it directly under Windows or
from a bootable CD. But your system is assumed inoperable in general.
If you need to restore individual files only, you’ll be able to work directly
under Windows.
However, if your system or a system partition (usually the primary one) is
damaged, it gets more complex. In this situation there’s only way to restore
everything: booting from a diskette, created with Acronis TrueImage, or from
a bootable CD with Acronis TrueImage.
You can run Acronis TrueImage from a CD and then replace a bootable disk
with an archive file CD, containing the image of a partition to be restored.
But an archive file can be possibly stored on a special back-up hard disk. In
this case you’ll have to connect it to PC.
So, the main thing for partition restoration is the availability of a bootable media
(a diskette or CD), created with Acronis TrueImage, and also the access to an
archive file with a partition image (on a hard disk or removable media).
After you ran the software from a diskette or a CD and got to Acronis TrueImage
welcome window, the further steps should not be of any difficulty to you.
18 Chapter 3 : Restoring a Disk/Partition from an Image
Page 19

3.1 Selecting an Archive File
To restore a disk/partition from an archive file you must set the switch to
Restore a partition or the whole hard disk drive or deploy a new PC in the Action
Selection window.
Selecting an action: restore a partition
In the next window Acronis TrueImage will show you the complete list of
storage devices connected to your PC, including hard disks as well as any
other storage drives. You’ll be able to navigate the files and folders tree,
using standard Windows controls, to find the archive file with the image of a
partition to be restored and select it by clicking.
Selecting an archive file
Acronis TrueImage 19
Page 20

If you commented the archive file when creating it, the description will help
you understand if you selected the right archive file or the partition image is
located in some other file. Your comment will be shown in the right part of
the Image Archive Selection window. Notice that a comment is available
without entering a password that protects an archive file. However, you
won’t be able to either restore, or browse archive file contents without a
password.
Contents of a password unprotected archive file
The more detailed is your comment, the more assured your actions would
be. In particular, you can store several system partition configurations in
archive files, if working intensively with your operating system,
experimenting with various applications or device drivers, to restore one of
them if needed.
Having made sure that you are to restore a partition from the right archive
file, click
Next to continue.
So, if an archive file is protected with a password, Acronis TrueImage will
prompt you for it in the next window. You won’t be able to move to the next
wizard page, i.e. to continue the restoration without entering a password, as
the
Next key will be disabled. If you enter the right password, you’ll be able
to move to the page of selecting a partition to be restored.
20 Chapter 3 : Restoring a Disk/Partition from an Image
Page 21

3.2 Selecting a Partition to Be Restored
One archive file may contain images of several disk partitions or the whole disks.
Therefore the next window will offer you the contents of the selected archive file.
Select a partition for restoration by clicking the appropriate rectangle. It will
become underlined red (by default).
Selecting a partition to be restored from an archive file
You can select several partitions and/or disks for restoration during a session
of Acronis TrueImage, but you’ll have to do it in turns, i.e. select one
partition (disk) and set restoration parameters for it first, and then repeat
this for all other. You’ll be able to return to the Source Partition Selection
window if needed after setting the partition restoration parameters and mark
another partition (disk) for restoration. A partition you set restoration
parameters of will be marked with an icon in the upper right corner.
Acronis TrueImage 21
Page 22

g
g
3.3 Selecting a Destination Partition
As it has been said above, you can restore a partition image, stored in an
archive file, to a new hard disk. In the same way you can restore contents of
a stored partition to another partition. For example, you could have stored
logical drive D: data in an archive file. You would like this data to be restored
to the logical drive E: on a new hard disk. Acronis TrueImage software allows
to do this as well. In the Restored Partition Location window click a partition,
to which you’d like to restore the data to. This partition will become
underlined red.
Selecting a destination partition
Acronis TrueImage software must obtain an exclusive access to a partition to
restore an image from an archive file to. It means no other software must
work with this partition during the restoration. Therefore it’s recommended
to close all applications for the restoration period. However, it’s not enough
for some cases, in particular if you restore a partition the operating system
was booted from.
We’ll discuss this situation later. It may appear at system partition restoration (the one
PC is currently booted from).
So, having selected the destination to restore a partition from an archive file,
Next to continue.
click
You can change the type of a partition from an archive file, while restoring it.
Read more about partition types in the Appendix A. We also note that an operatin
system is usually installed to a primary partition, and lo
partition are used for storing data files.
ical drives of an extended
22 Chapter 3 : Restoring a Disk/Partition from an Image
Page 23

3.4 Selecting the Restored Partition Type and File System
You can imagine the following example situation to understand what you
might have to change partition type for. Both system, and data files were
stored on a single damaged primary partition. Now you need to restore a
partition from a back-up copy to another hard disk with several partitions
and an operating system installed.
You need only the data of a stored partition, and need not another system
partition. In this case you can restore the partition as a logical to use its data.
In case you are restoring a system partition, you should select either the
active or primary type for it.
Selecting the restored partition type
Acronis TrueImage software allows to similarly change a partition file system at
restoration.
Let’s assume you are restoring a partition from a low capacity disk with the
FAT16 file system to a new higher capacity hard disk. It would be ineffective
(and just impossible in some cases) to use the FAT16 file system on a high
capacity hard disk. The fact is that FAT16 limits partition size to 4 GB, so you
won’t be able to restore a 4 GB FAT16 partition to a new disk of higher
capacity, as you’ll have to change the file system.
It would be logical to change FAT16 to FAT32 in the given case. Set the
switch to the appropriate position in the Restored Partition File System window
to do this.
Acronis TrueImage 23
Page 24

You should also remember that not all operating systems can boot from a
FAT32 partition. MS-DOS, Windows 95 Original, Windows NT 3.x, 4.x does
not support FAT32 and won’t work after restoration with a file system
change, i.e. they can be restored to a FAT16 partition only.
But you can freely convert a FAT16 partition with newer operating systems to
FAT32.
You can find file system comparatives in the A.2 «File Systems».
Selecting the restored partition file system
If your PC health was ruined, you might like to restore a partition to a new
disk and change the partition configuration and size comparing to what you
had before. Acronis TrueImage software is flexible enough to let you do this.
You’ll be able to change the size and disk location of a partition to be
restored in the following window.
24 Chapter 3 : Restoring a Disk/Partition from an Image
Page 25

3.5 Resizing a Partition
The information on a stored partition is kept in its image. The window shows
exactly this information. You can resize a partition to make it larger or
smaller (not smaller than the space occupied with its data.)
Resizing a partition
Having changed partition size and location if needed, click Next to continue.
Having restored a partition, Acronis TrueImage will «map» its contents,
stored in an archive file, to a logical drive.
Acronis TrueImage 25
Page 26

3.6 Selecting a Partition Letter
Windows operating system uses Roman alphabet letters for disk and partition
identification. Letters are automatically assigned during OS boot process.
Acronis TrueImage software lets you assign any unoccupied letter to a
partition (logical drive) to be restored under Windows NT/2000/XP. To do
this, set the switch to Yes, I want to assign a logical drive letter to the restored
partition on the following page and select a letter from the drop-down list. If
you do not set this switch, a logical drive will have its letter automatically assigned
by the operating system. This page will be omitted under Windows 9x/Me.
Selecting a partition letter
26 Chapter 3 : Restoring a Disk/Partition from an Image
Page 27

3.7 Selecting the Next Partition to Be Restored
You can restore several partitions at one session in the same way as you can
store several images. To do this, set the switch to Yes, I want to restore
another partition or hard disk drive in the Next Selection window.
Selecting the next partition to be restored
Having clicked Next , you’ll see the Source Partition Selection window again.
This time the upper right corner of a rectangle representing the partition,
which you have already worked with, will be ticked off. You’ll be able to
select the next partition to be restored and to perform actions, described
above.
Acronis TrueImage 27
Page 28
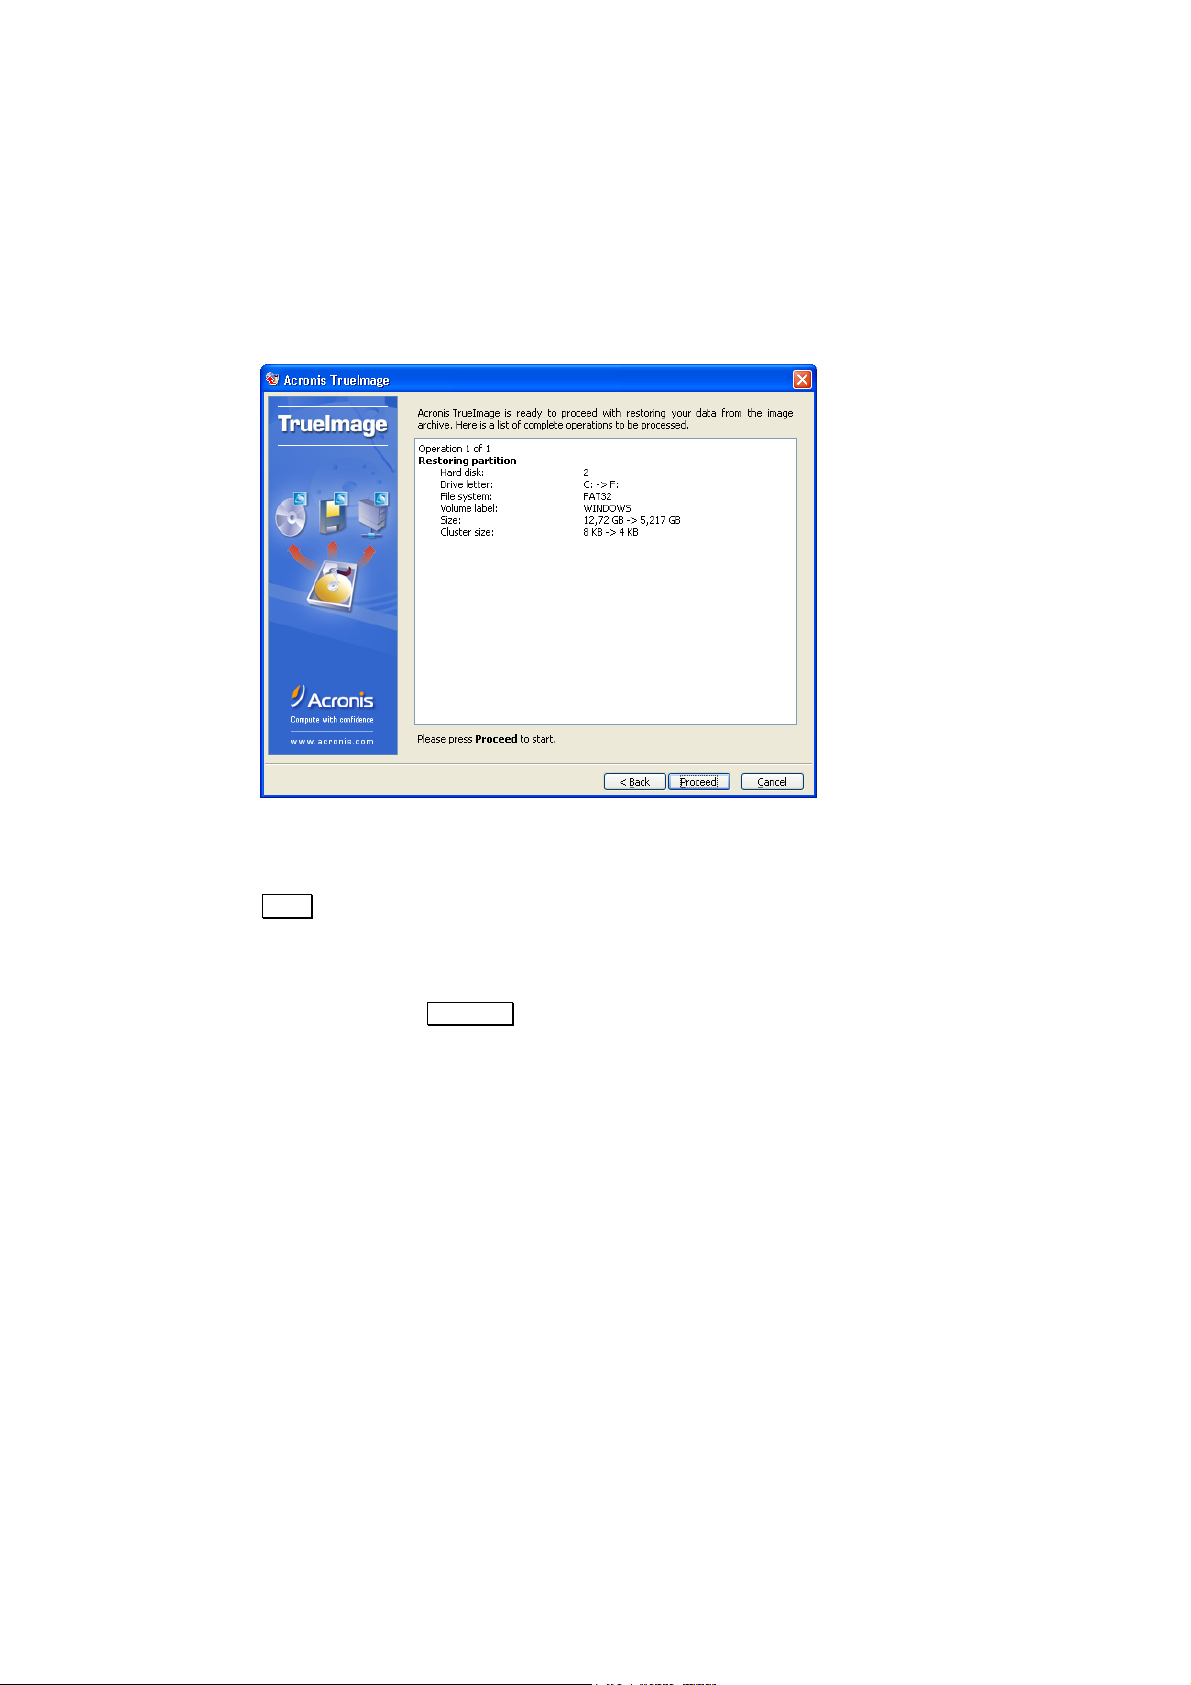
3.8 Partition Restoration Script Window
So, you’ll finally get a script again, but this time for restoring a partition from an
image instead of creating an image in an archive file.
Partition restoration script window
Now Acronis TrueImage software is ready for partition restoration. If you click
Back, you’ll be able to select other partitions and/or disks for restoration,
rethink partition size changes, its type and file system selection, in other words
to change any restoration parameters.
After pressing
Proceed Acronis TrueImage takes care of everything
automatically.
28 Chapter 3 : Restoring a Disk/Partition from an Image
Page 29

3.9 Partition Restoration Peculiarities
While restore hard disk or partition you might receive this warning:
Warning of unavailability of exclusive access to a logical drive at partition
restoration
This means the following. Operating system blocks logical drives for some
low-level operations that Acronis TrueImage tries to perform to restore a
partition. In particular, some application might work with this partition data.
Therefore, it is necessary to close all applications before restoring a partition.
In some cases Acronis TrueImage can unplug a logical drive, perform
restoration, and connect it again. (In the given situation
Reboot is replaced
by Dismount.) Sometimes it’s impossible to unplug a logical drive. Acronis
TrueImage then prompts you to reboot the PC. So, in the situation above you
can:
• close applications and click
Retry – retry to restore a partition from
an archive file,
• click
Dismount to force logical drive disconnection,
• click Reboot to reboot the PC.
You should remember that you can’t force any drive disconnection. For
example, an attempt to unplug a drive with an operating system or a swap
file would cause OS to crash.
You can unplug a logical drive in case of a data partition restoration.
Acronis TrueImage 29
Page 30

3.10 Peculiarities of Restoration from Removable Media
Restoring a partition (disk) from removable media is as easy as restoring it
from a hard disk. However please pay close attention to the procedure
outlined below.
If your partition (hard disk) image has been split into several volumes written
on CD-R/RW, DVD+RW or other removable discs, you should first insert the
last disc you created (this is called the Master volume). Further restoration
steps are the same as outlined above.
30 Chapter 3 : Restoring a Disk/Partition from an Image
Page 31

Chapter 4. Restoring Individual Files
As it has been said before, Acronis TrueImage software works with both hard
disk partitions, and the whole disks. In particular, you can store images of
several partitions or even disks in an archive file. However, if you have only
one or several files damaged (or accidentally deleted!) on the partition, it
would be inefficient to entirely restore it. A disk partition may already contain
many newer file versions than stored in the last image in an archive file along
with new files and folders. So, how to restore a separate file on a partition?
Acronis TrueImage is flexible enough to help you in this situation as well.
Acronis TrueImage features temporary logical drive connection from an image
for separate files restoration. Having connected a drive, you’ll be able to
access it as a usual hard disk. It means that:
• The list of your PC drives will be updated with a new one with a letter
assigned to it.
• You’ll be able to browse the files and folders tree of a partition, stored
in an archive file, with the Windows file managing tools (Explore,
etc.), as in case of a usual hard disk (or its partition).
• You’ll be able to use any file manager to find and copy any file (files
and/or folders) needed from a connected drive to a real one.
You’ll have the read access only to a connected drive, and won’t be able to
change it somehow.
Acronis TrueImage 31
Page 32

So, you’ll need to connect a temporary logical drive to restore a separate file
(a group of files, folders) from an image. To do this, set the switch to Explore
an image archive in the Action Selection window of Acronis TrueImage.
Exploring a partition image in an archive file
As in case of the whole disk partition (disk) restoration, the next window of
Acronis TrueImage will offer you the full list of storage devices, connected to
your PC, which you will have to browse for the archive file with the necessary
partition image.
Selecting an archive file to connect a logical drive
32 Chapter 4 : Restoring Individual Files
Page 33

If this archive file isn’t protected with a password, selecting it you’ll see the
previously created comment along with the list of stored partitions. If the file
is protected with a password, you’ll see the comment only.
In the next window you’ll be able to select one of the partition (disk) images
to connect as a temporary logical drive.
Selecting a partition and letter for a drive to be connected
A partition is selected by clicking the appropriate rectangle representing it. As
a result, the selected partition (rectangle) will become underlined red.
Another click will deselect the partition. You can select to connect several
partitions simultaneously. Each of them will be represented as a separate
logical drive with a letter assigned to it.
The same window will also allow to select a letter to assign to a drive to be
connected (Drive letter for the selected partition drop-down list).
If you want to change the letter assigned by default, you should select a
partition first by clicking it and then select a letter. (You can then select
another partition and letter if needed, etc.)
Acronis TrueImage 33
Page 34

In the next window you’ll see the temporary logical drive connection script.
The drive connection script window
If you do not have any doubts regarding the selected partitions (and its
letter), click
Proceed to continue.
You’ll find out a Windows window opened right after the message window,
with the contents of the connected drive (partition, stored in an archive file):
The Windows window with the temporary connected logical drive
Now you can easily copy any file (or file folder) from the connected logical
drive to replace the damaged one on your real hard disk.
You should unplug a temporary logical drive after restoring separate files and
folders. If you do not do this, it will disappear after reboot.
34 Chapter 4 : Restoring Individual Files
Page 35

Select Unplug in the context menu of a connected drive, invoked by right-
clicking the disk icon in the Windows window. As a result this disk will
disappear.
Additionally, having run Acronis TrueImage, you’ll find out another button in
the operation selection window – Unplug temporary logical drives.
A new operation in the Action Selection window
After selecting this operation and clicking Next , you’ll see the list of
connected temporary logical drives. Use it to select a drive to unplug.
Acronis TrueImage 35
Page 36

g
Appendix A. Partitions and File Systems
A.1 Hard Disk Partitions
It would be quite inconvenient if you could only access the entire hard disk,
so a mechanism was created that allows you to divide the hard disk into
several parts for storing different types of data or operating systems. This is
done by partitioning hard disks into partitions.
Partitioning hard disk is done by special applications. In MS-DOS and
Windows the widely known FDISK and Disk Administrator programs are used
for this purpose. They allow creating partitions, setting their size and labels.
Partitioning programs can perform the following functions:
• create a Primary Partition (up to 4);
• create an Extended Partition that can be divided into any number of
logical disks;
• mark a partition as active (only one primary partition can be active).
Information about partitions on a hard disk is stored in a special disk area – in the 1
sector of the 0th cylinder, header 0, which is called a Partition Table. This sector is
called the Master Boot Record, MBR.
A physical hard disk can contain up to 4 primary partitions. This limitation is due
only to the capacity of the Partition Table, which itself consists of only four
partitions. However, this does not mean that you can install only 4 different
operatin
more operating systems. For example, the Acronis OS Selector 5.0 Deluxe disk
manager to install up to 100 operating systems on one hard disk!
systems. Modern software disk managers allow the installation of many
A.2 File Systems
An operating system provides the user with ability to work with data by
supporting some type of file system on a partition.
All file systems are made of structures that are necessary to store and
manage data. These structures are usually comprised of operating system
boot sectors, folders, and files. File systems perform the following basic
functions:
1. track occupied and free disk space (and bad sectors, if any);
st
2. support folders and file names;
3. track physical location of files on disks.
36 Appendix A : Partitions and File Systems
Page 37

Different operating systems use different file systems. Some operating
systems are able to work with only one file system while other can use
several of them. Let us describe some of widely used file systems in detail.
A.2.1 FAT16
FAT16 file system is widely used by DOS (DR-DOS, MS-DOS, PC-DOS,
PTS-DOS and other), Windows 95/98/ME, Windows NT/2000/XP operating
systems and is supported by most other systems.
Main features of FAT16 are the file allocation table (FAT) and clusters. FAT is
the core of the file system. To increase data safety it is possible to have
several instances of FAT (there are usually 2 of them). A cluster is a
minimum data storage unit in FAT16 file system. One cluster contains a fixed
number (some power of 2) of sectors. FAT stores information about what
clusters are free, what clusters are bad, and also defines in what clusters
files are stored.
Maximum size of a FAT16 file system is 4 gigabytes, and the maximum
number of clusters is 65525, the largest cluster being 128 sectors. Usually
cluster size is selected as minimum as possible so that the resulting number
of clusters is less than 65526. The larger the partition size, the larger the
cluster has to be. Most of operating systems incorrectly perform with 128sector clusters, thus reducing the maximum FAT16 partition size to 2
gigabytes.
Usually the larger the cluster size the more disk space is wasted.
Like many others, FAT16 file system has a root folder. Unlike others
however, its root folder is stored in a special place and is limited in size
(standard formatting produces a 512-item root folder).
Initially, FAT16 had limitations to file names that could only be 8 characters
long, plus a dot, plus 3 characters of name extension. However, long name
support in Windows 95 and Windows NT bypasses this limitation. OS/2
operating system also supports long names, but does it in another way.
A.2.2 FAT32
FAT32 file system appeared in Windows 95 OSR2 and is also supported by
Windows 98/ME and Windows 2000/XP. FAT32 grew out of FAT16. The main
differences between FAT32 and FAT16 are 28-bit cluster numbers and more
flexible root folder implementation, which is not limited in size. The reason
for FAT32 is the necessity to support large (larger than 8 gigabytes) hard
disks and the inability to build any more complex file system into MS-DOS,
which is still in the core of Windows 95/98/ME.
Maximum FAT32 file system size is 2 terabytes.
Acronis TrueImage 37
Page 38

A.2.3 NTFS
NTFS file system is the main file system for Windows NT/2000/XP. Its
structure is closed, so no other operating system fully supports. Main
structure of NTFS is the MFT (Master File Table). NTFS stores a copy of the
critical part of the MFT to reduce the possibility of data damage and loss. All
other NTFS data structures are special files.
Like FAT, NTFS uses clusters to store files, but cluster size does not depend
on partition size. NTFS is a 64-bit file system, it uses Unicode to store file
names. It is also a journaling (failure-protected) file system, and supports
compression and encryption.
Files in folders are indexed to speed up file search.
A.2.4 Linux Ext2
Ext2 is one of the main file systems for the Linux operating system. Ext2 is a
32-bit file system. Its maximum size is 16 terabytes. Main data structure that
describes a file is an i–node. A place to store the table of all i-nodes has to
be allocated in advance (during formatting).
A.2.5 Linux Ext3
Officially introduced with their version 7.2 of the Linux operating system,
Ext3 is the Red Hat Linux journaling file system. It is forward and backward
compatible with Linux ext2. It has multiple journaling modes and broad
cross-platform compatibility in both 32- and 64-bit architectures.
A.2.6 Linux ReiserFS
ReiserFS was officially introduced to Linux in 2001. ReiserFS frees many Ext2
disadvantages. It is a 64-bit journaling file system that dynamically allocates
space for data substructures.
38 Appendix A : Partitions and File Systems
 Loading...