

Page 1

Getting Started
This short guide can help you to quickly start using Acronis True Image Home 2012. It describes just a few of
the key features of Acronis True Image Home 2012. For detailed program information, refer to the User’s
Guide which can be downloaded from the Acronis Web site at
http://www.acronis.com/support/documentation/index.html.
Page 2

Content
How to install Acronis True Image Home 2012 ................................... 3
Getting to know the program .......................................................... 6
How to back up a partition or disk .................................................... 9
How to use synchronization ........................................................... 12
How to schedule your backups ....................................................... 13
Creating an Acronis Rescue CD ....................................................... 15
Making sure that your rescue CD can be used when needed .............. 19
How to recover your system if your computer does not boot ............ 22
How to recover partitions and disks in Windows .............................. 25
How to recover files and folders ...................................................... 27
How to clone a disk ........................................................................ 29
Conclusion .................................................................................... 32
2
Page 3
How to install Acronis True Image Home 2012
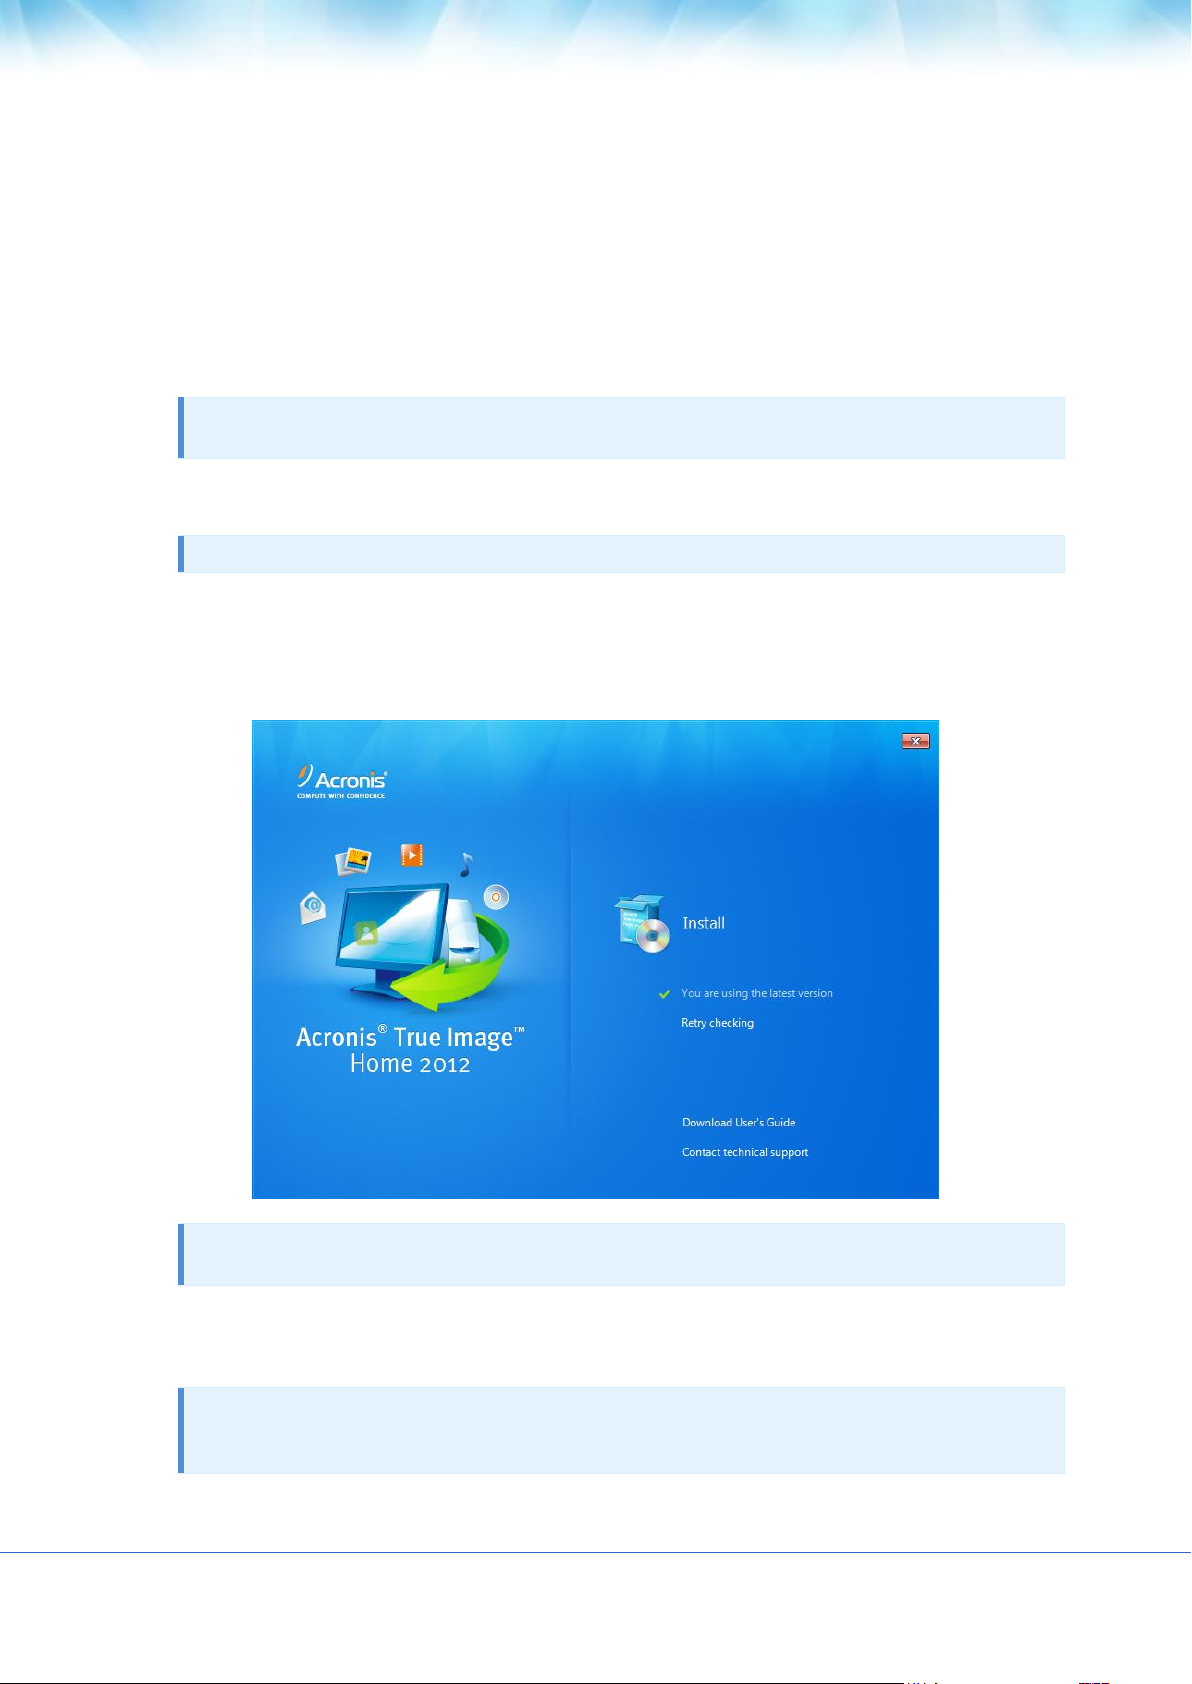
If you purchased Acronis True Image Home 2012 via the Internet, double-click the downloaded file. A
menu appears with the following options:
Install - install the program;
Retry checking - check if there is a new program version;
This is done automatically. If a new version exists, we recommend downloading and installing it.
If there is no Internet connect ion during installation, a "Cannot connect to the update server. Please try
again later" message appears. In this case, simply start the program installat ion.
Download User's Guide - Download and view the full User’s Guide;
Adobe Acrobat Reader is needed for viewing.
Contact technical support - go to the Acronis Support page.
To install the program:
1. Click Install.
If you purchased the box version of the program, the menu has addit ional options. However, for product
installat ion you should select the same menu opt ion.
2. Read the license agreement and then click I accept this agreement, to accept the terms of
the license agreement. Then click Next to continue installation.
Please note that one license permits you to install the program on one computer only.
The Family pack license permits you to install the program on three computers.
3
Page 4
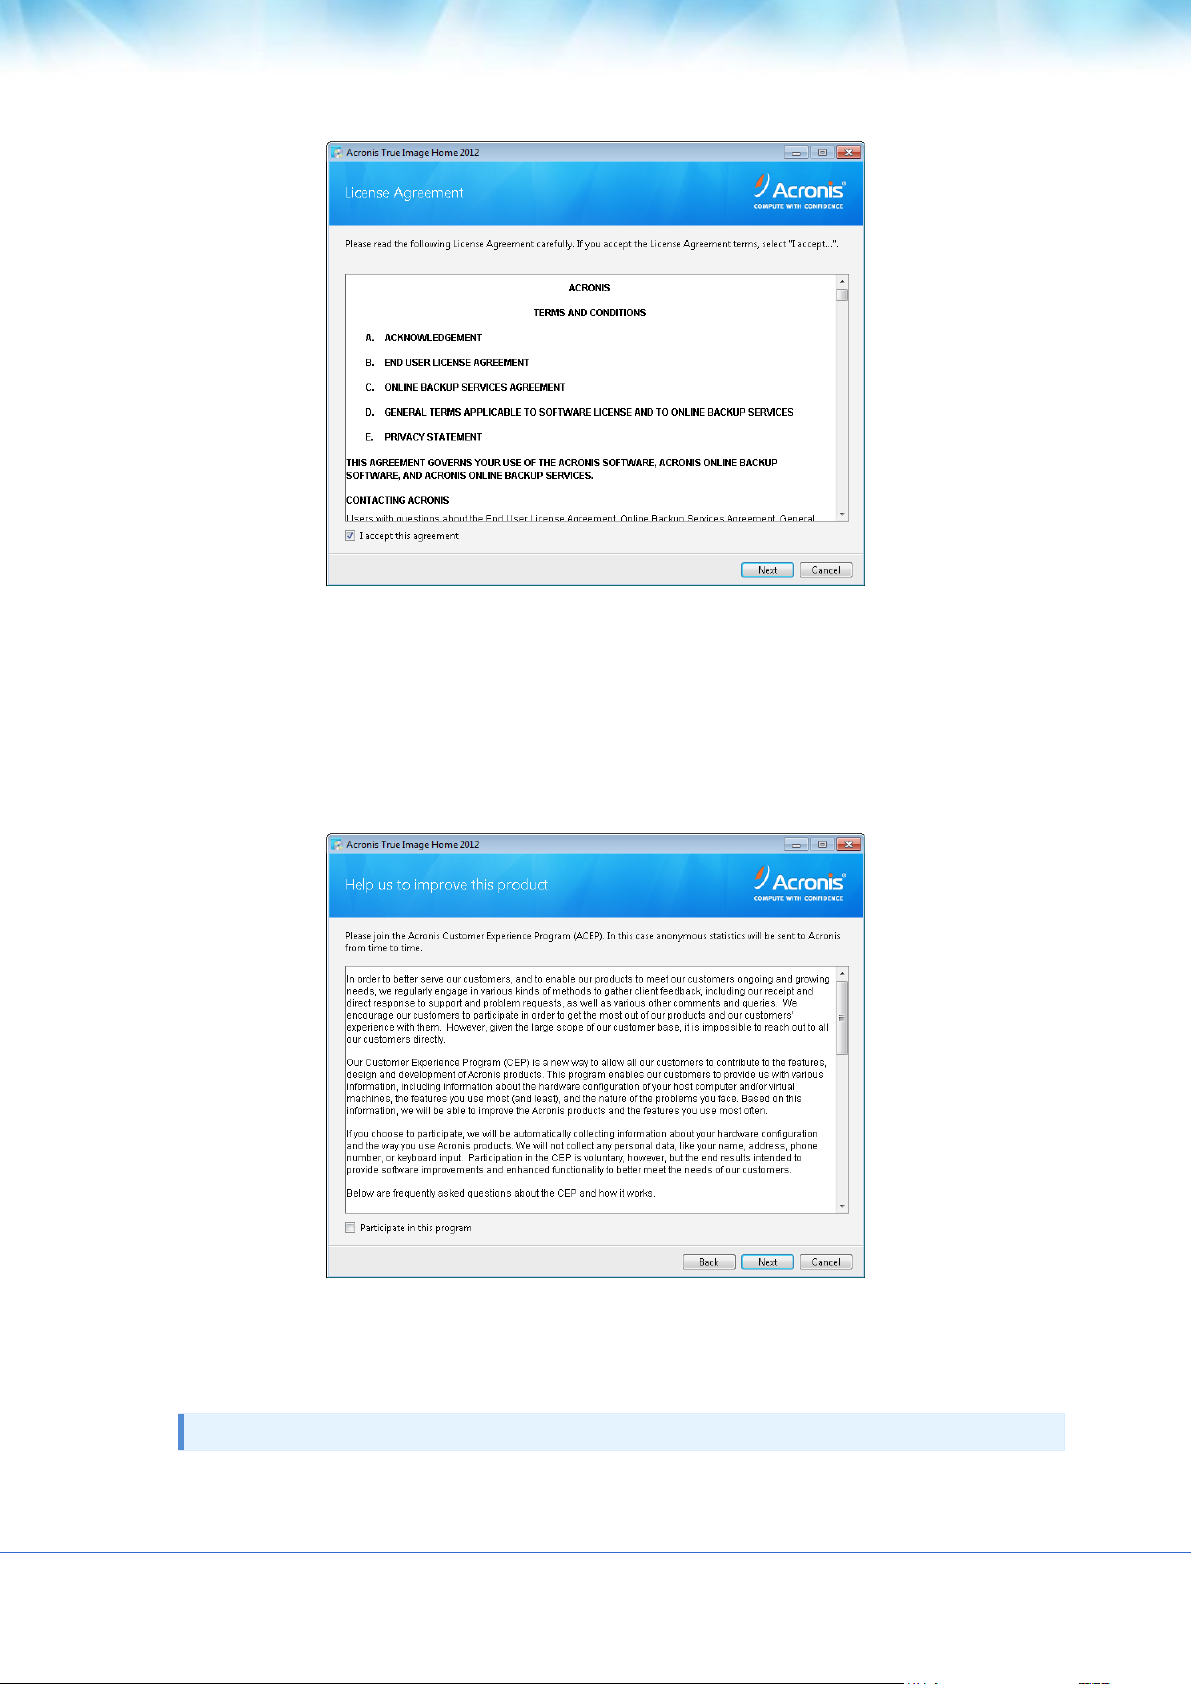
3. Read the participation terms of the Acronis Customer Experience Program (ACEP) and
select whether to participate.
The ACEP collects information about your computer and virtual machine configurat ions,
functions used most often, functions used less often, and problems faced by users. This data
helps us improve the products to meet your expectations.
We do not collect personal informat ion, such as name, address, telephone number, or keyboard
input.
4. Enter the product serial number to install the full product version.
If you purchased Acronis True Image Home 2012 via the Internet, the serial number should have
been automatically sent to the email address you provided at the time of purchase.
You can copy and paste the serial number in the entry field by using Ctrl-C and Ctrl-V.
4
Page 5
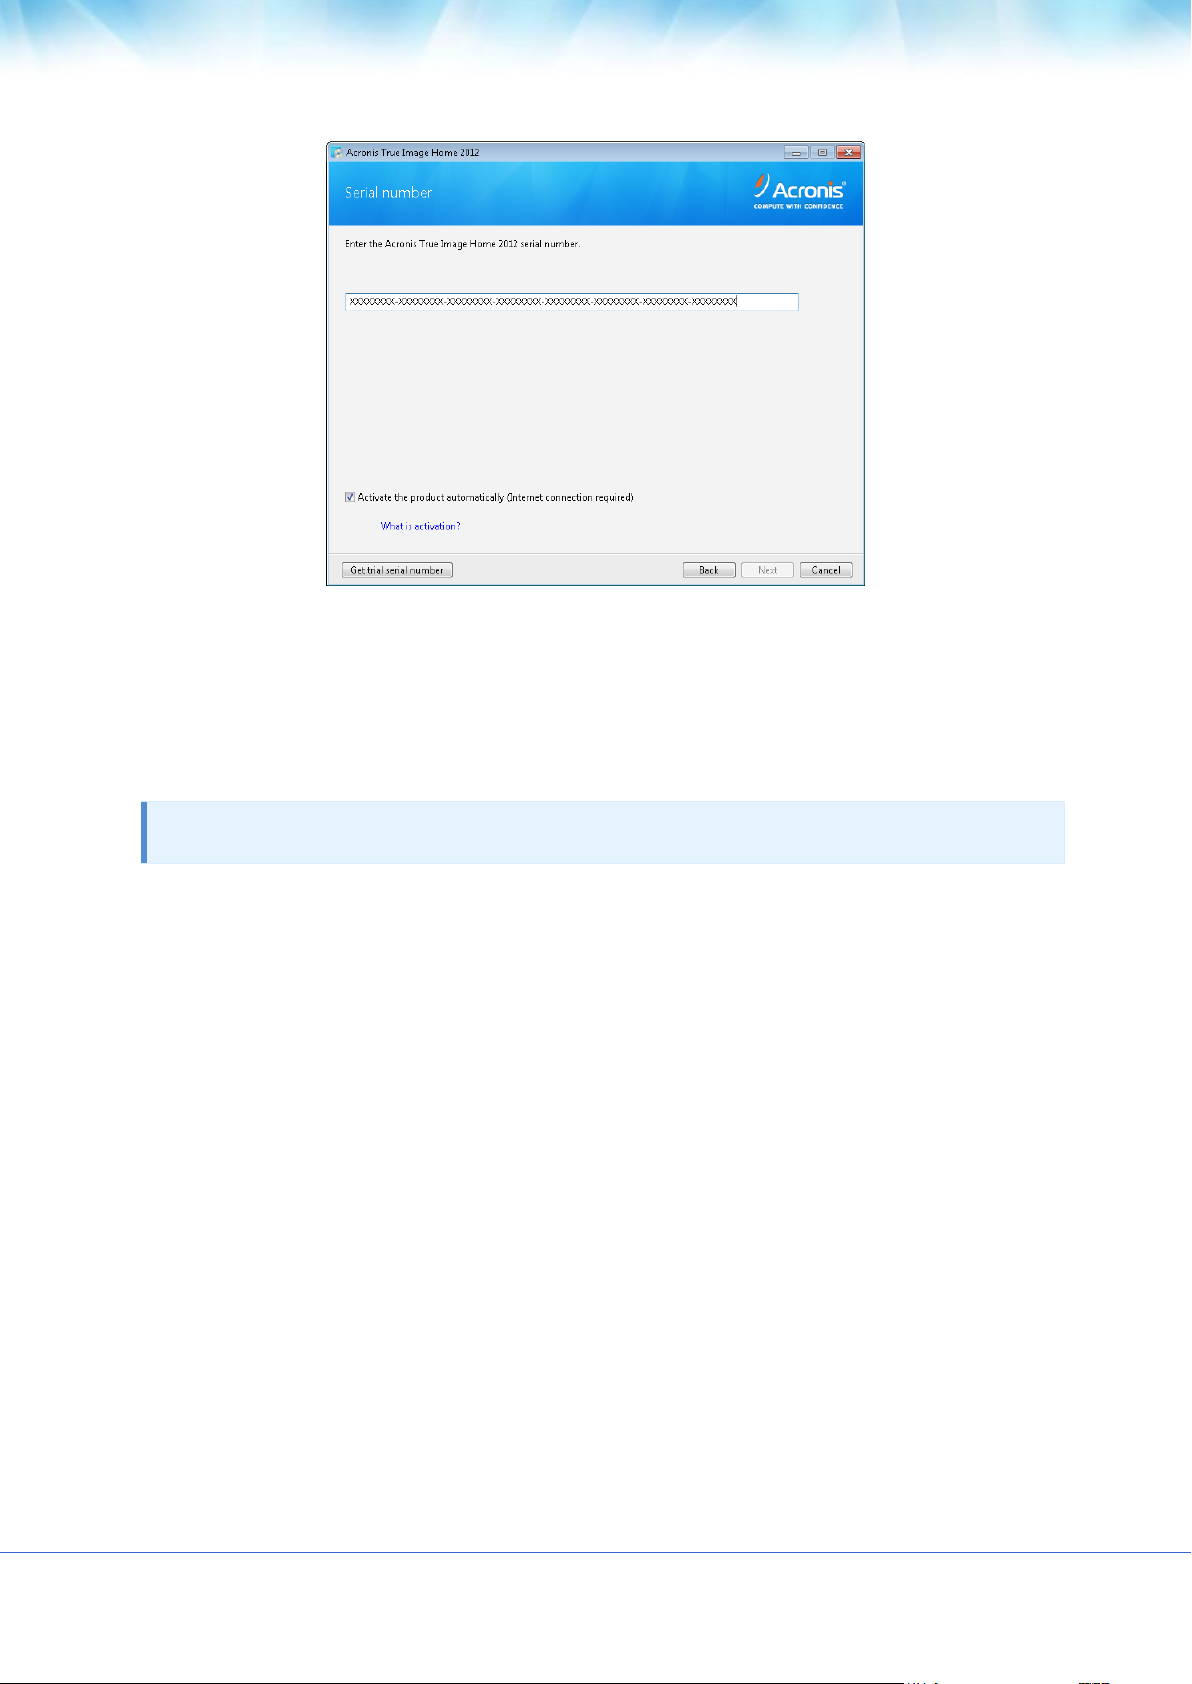
If you purchased the box version of the program, a sticker with the serial number is attached to
the back of the CD sleeve or to the inside of the DVD box. Use the keyboard to enter the serial
number.
The Activate Acronis True Image Home 2012 automatically check box is selected by default to
activate the product during the installation. You may clear the check box. In that case you will
need to activate the product within 30 days after installat ion.
The Installation wizard will guide you through the rest of the installation process. We recommend to not
change the default installation opt ions.
If you experience problems during installation, check Acronis Knowledge Base at
http://kb.acronis.com/ for possible solutions.
5
Page 6
Getting to know the program
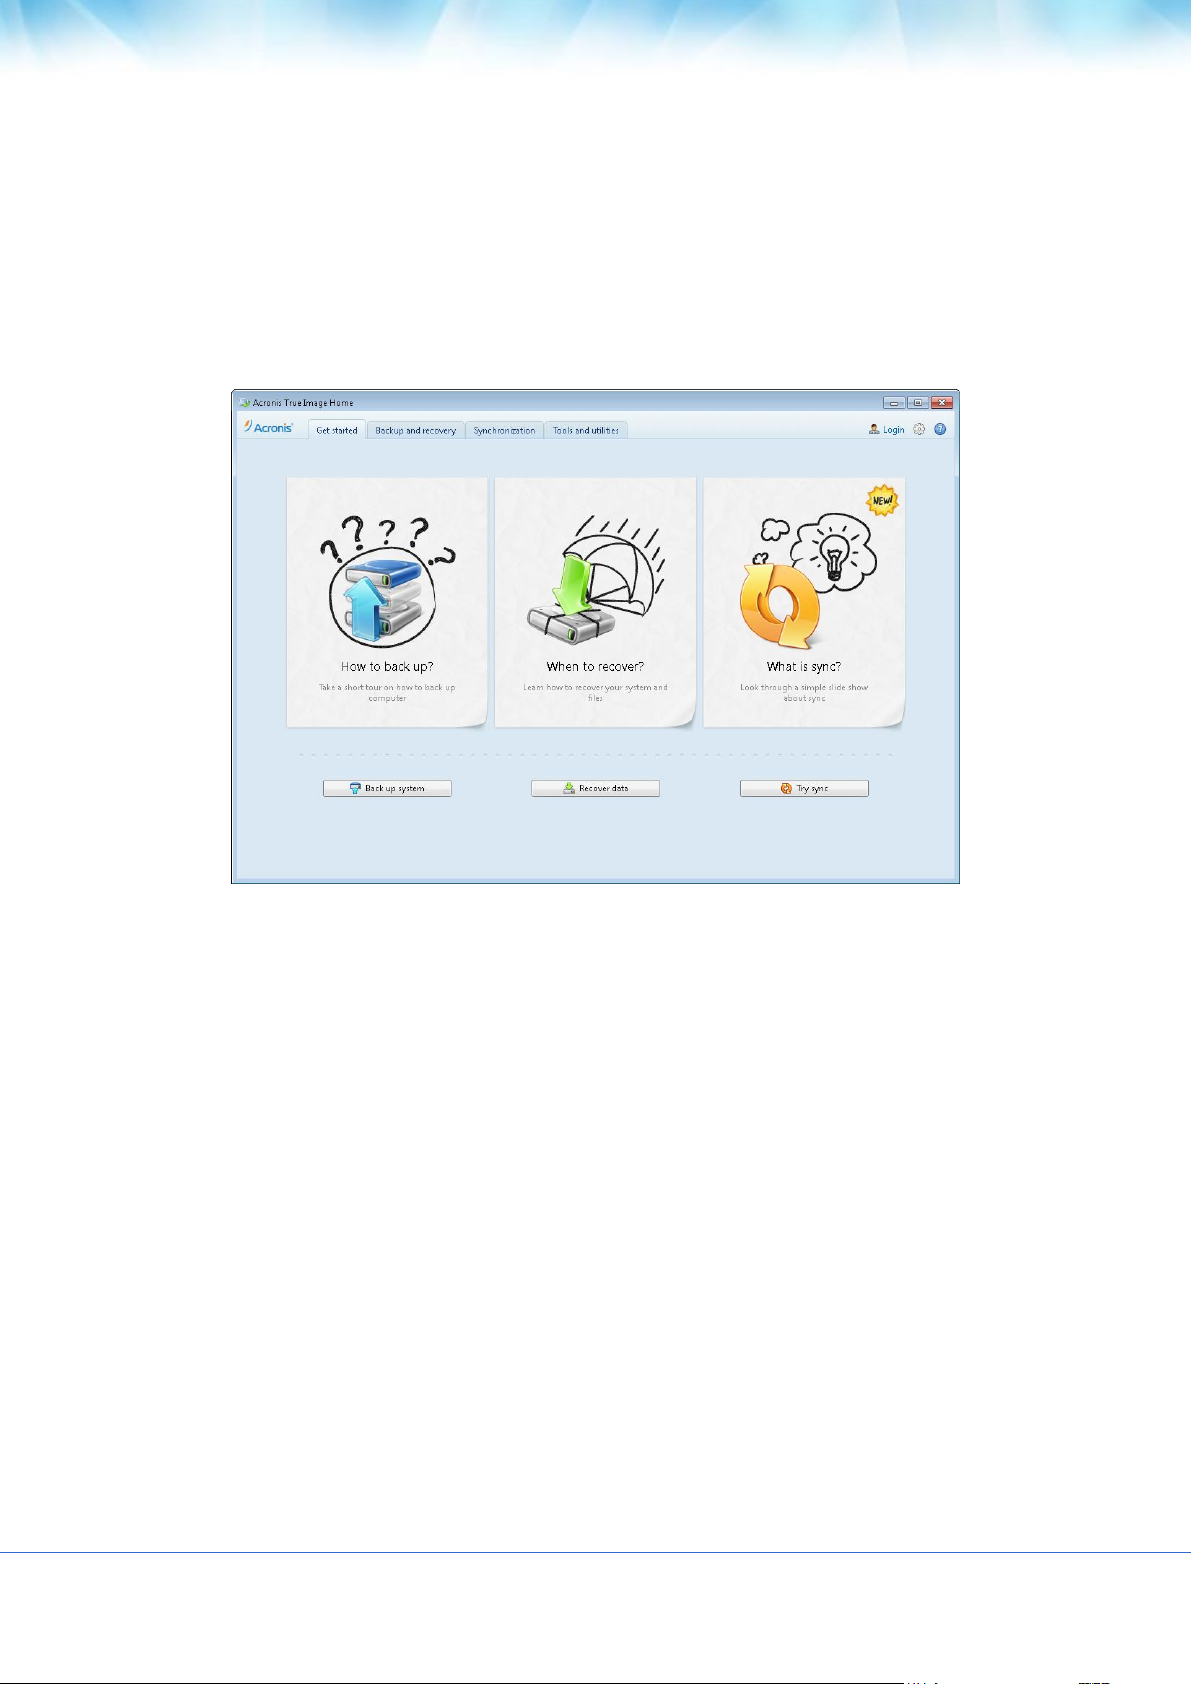
To start Acronis True Image Home 2012, double-click the icon on your desktop. The program starts
with the Get started tab selected.
The Get started tab will help you to begin using the main Acronis True Image Home 2012 features,
namely backup, recovery and synchronization. The program leads you through the act ions required
to perform those operations.
It is reasonable to start by learning how to back up your system. To go through the required steps,
click How to back up. This opens the first window which shows you how to start a backup
operation. To proceed to the next step, click the right arrow at the right-hand side of the screen.
You can review the recovery and synchronization features the same way. After you learn what data
you can back up and synchronize, you can proceed with actual operations.
Backup and recovery tab
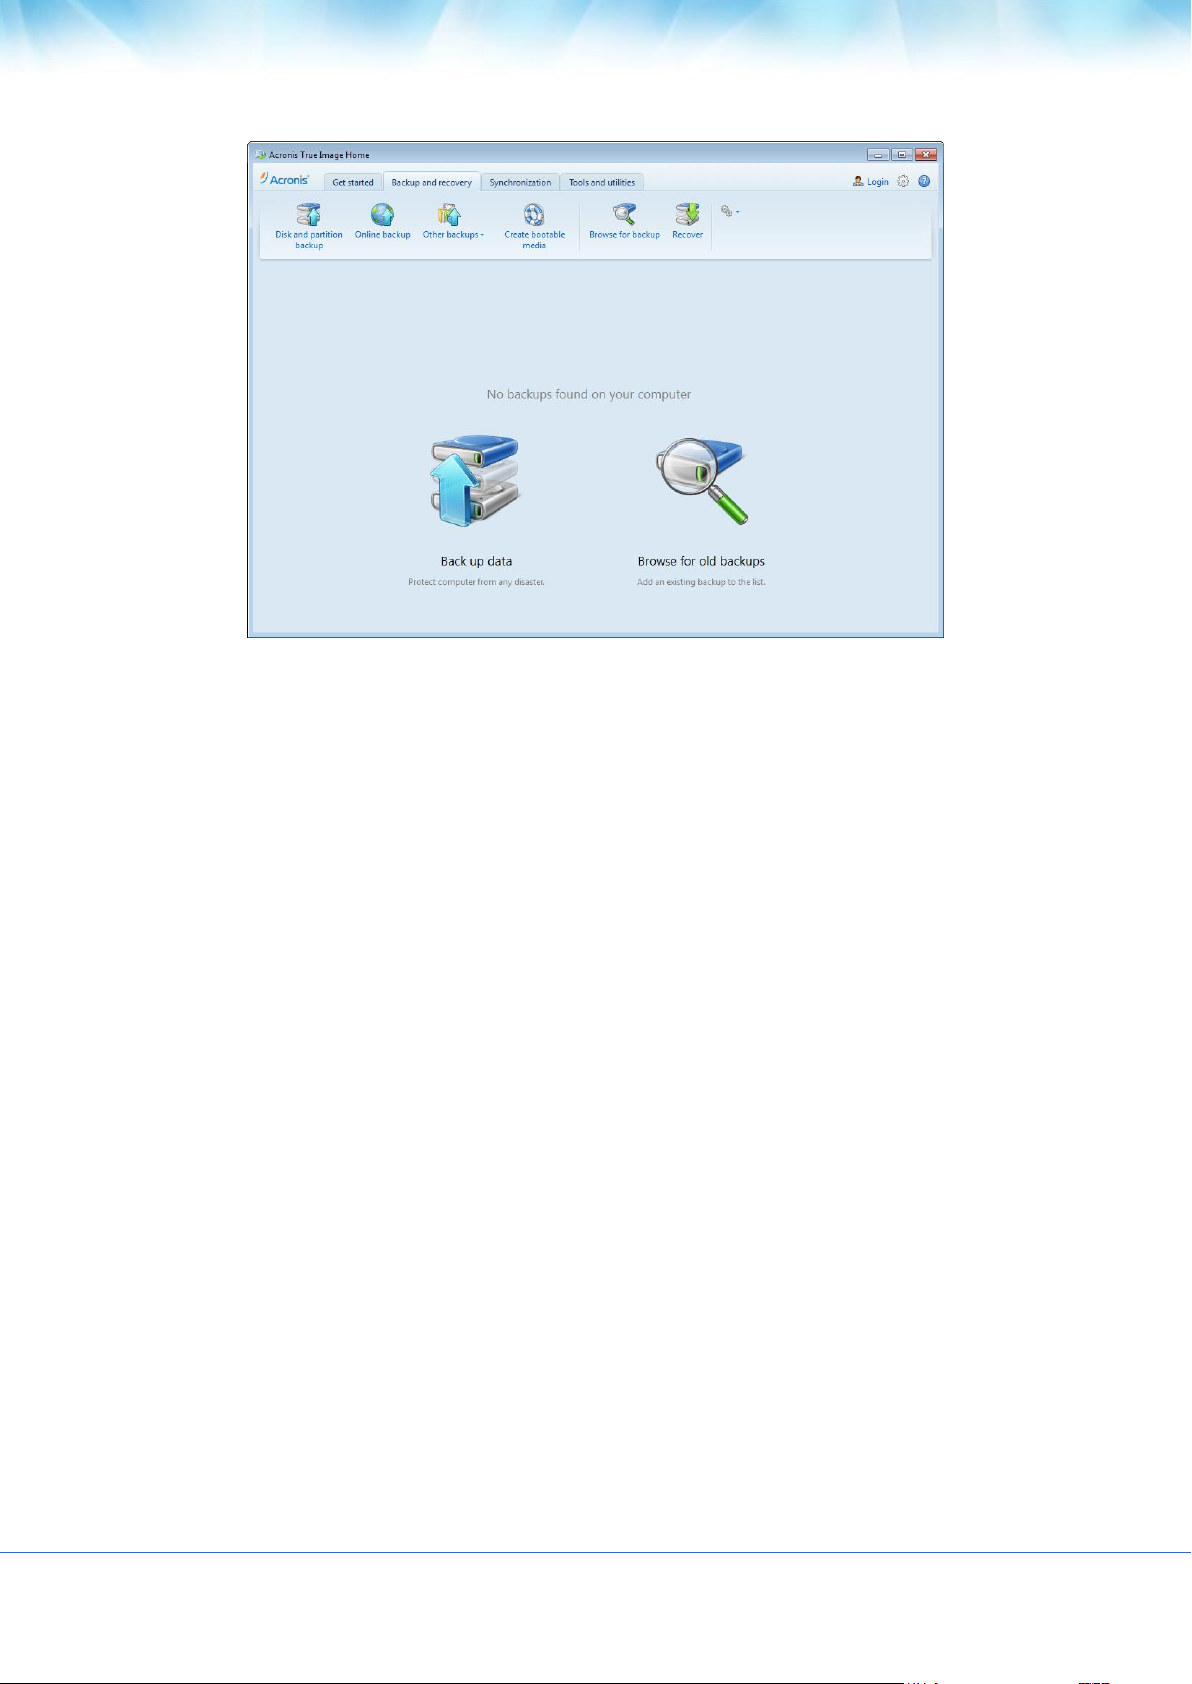
Let’s take a closer look at the program. To do this, start the program and then click the Backup and
recovery tab. If you have not yet created a backup, the tab looks as follows.
6
Page 7
Because the program is primarily designed for backing up, we begin with this operation.
To create a backup, select the desired backup type on the toolbar. Then, set the backup parameters.
For more information about creating backups and recovering data, see the later sections of this
guide.
You will be able to perform all operat ions with the backups from the Backup and recovery tab. For
example, to start a recovery operation from a backup, it is enough to simply click the appropriate
button.
7
Page 8
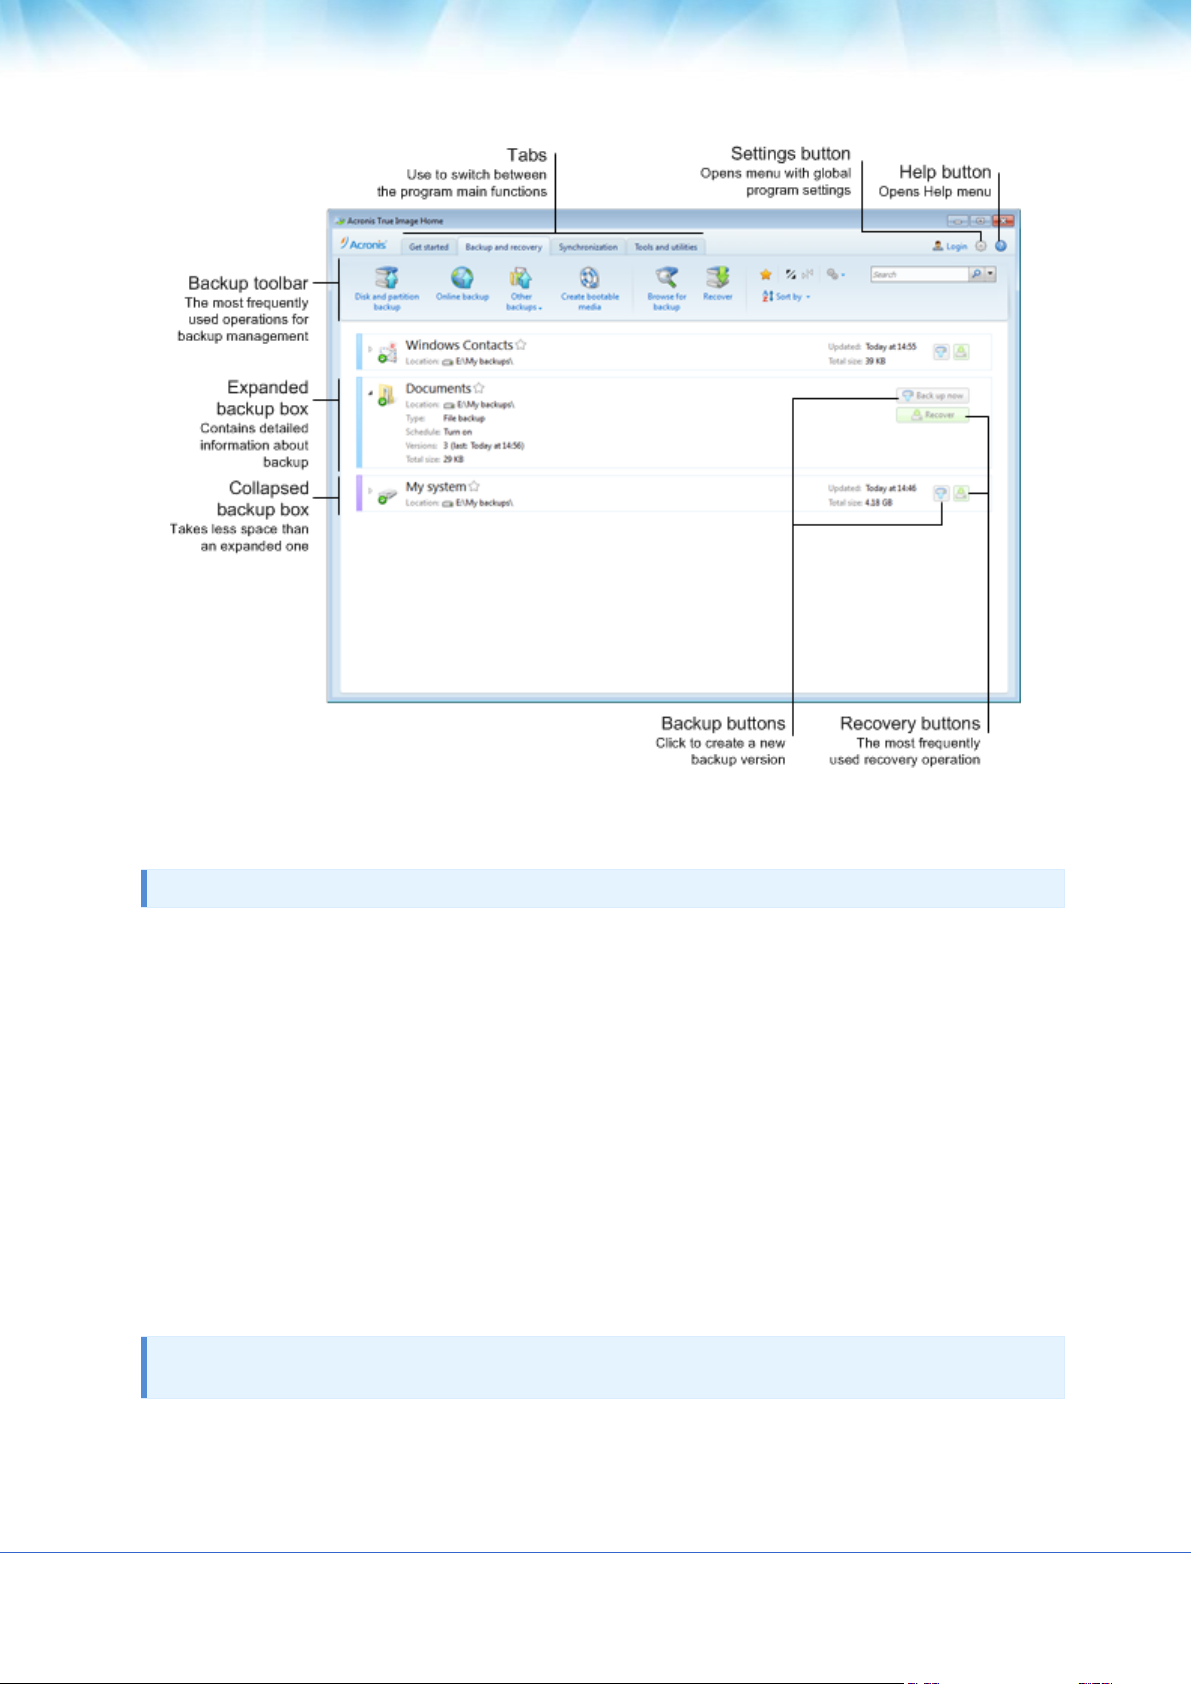
The above view of the program’s Backup and recovery tab shows the backup boxes with buttons for
backup and recovery.
Tip You can get additional help by opening the Help menu or by pressing F1.
Synchronization tab
With the Synchronizat ion feature you can keep data ident ical in two or more synchronized folders,
which may be located on different computers, a removable storage device, an NAS, etc. You can
share photos and videos with your relat ives and friends, use the same set of documents to work as a
team with your colleagues, or synchronize your files and folders between your home and work
computers. With Acronis True Image Home 2012, you can create as many data synchronizations as
you like. This feature has its own tab. For more information see How to use synchronization (p. 12).
Tools and utilit ies tab
Acronis True Image Home 2012 offers you quite a number of various tools and utilities. With them
you can enhance protection of your computer, ensure privacy and security of your personal data, try
system changes, and more. For detailed informat ion on the available tools and utilities, refer to the
User’s Guide. Here we describe only the Disk cloning tool.
After you begin using Acronis True Image Home 2012, it will start by displaying the tab that was selected when
you exited the program.
8
Page 9
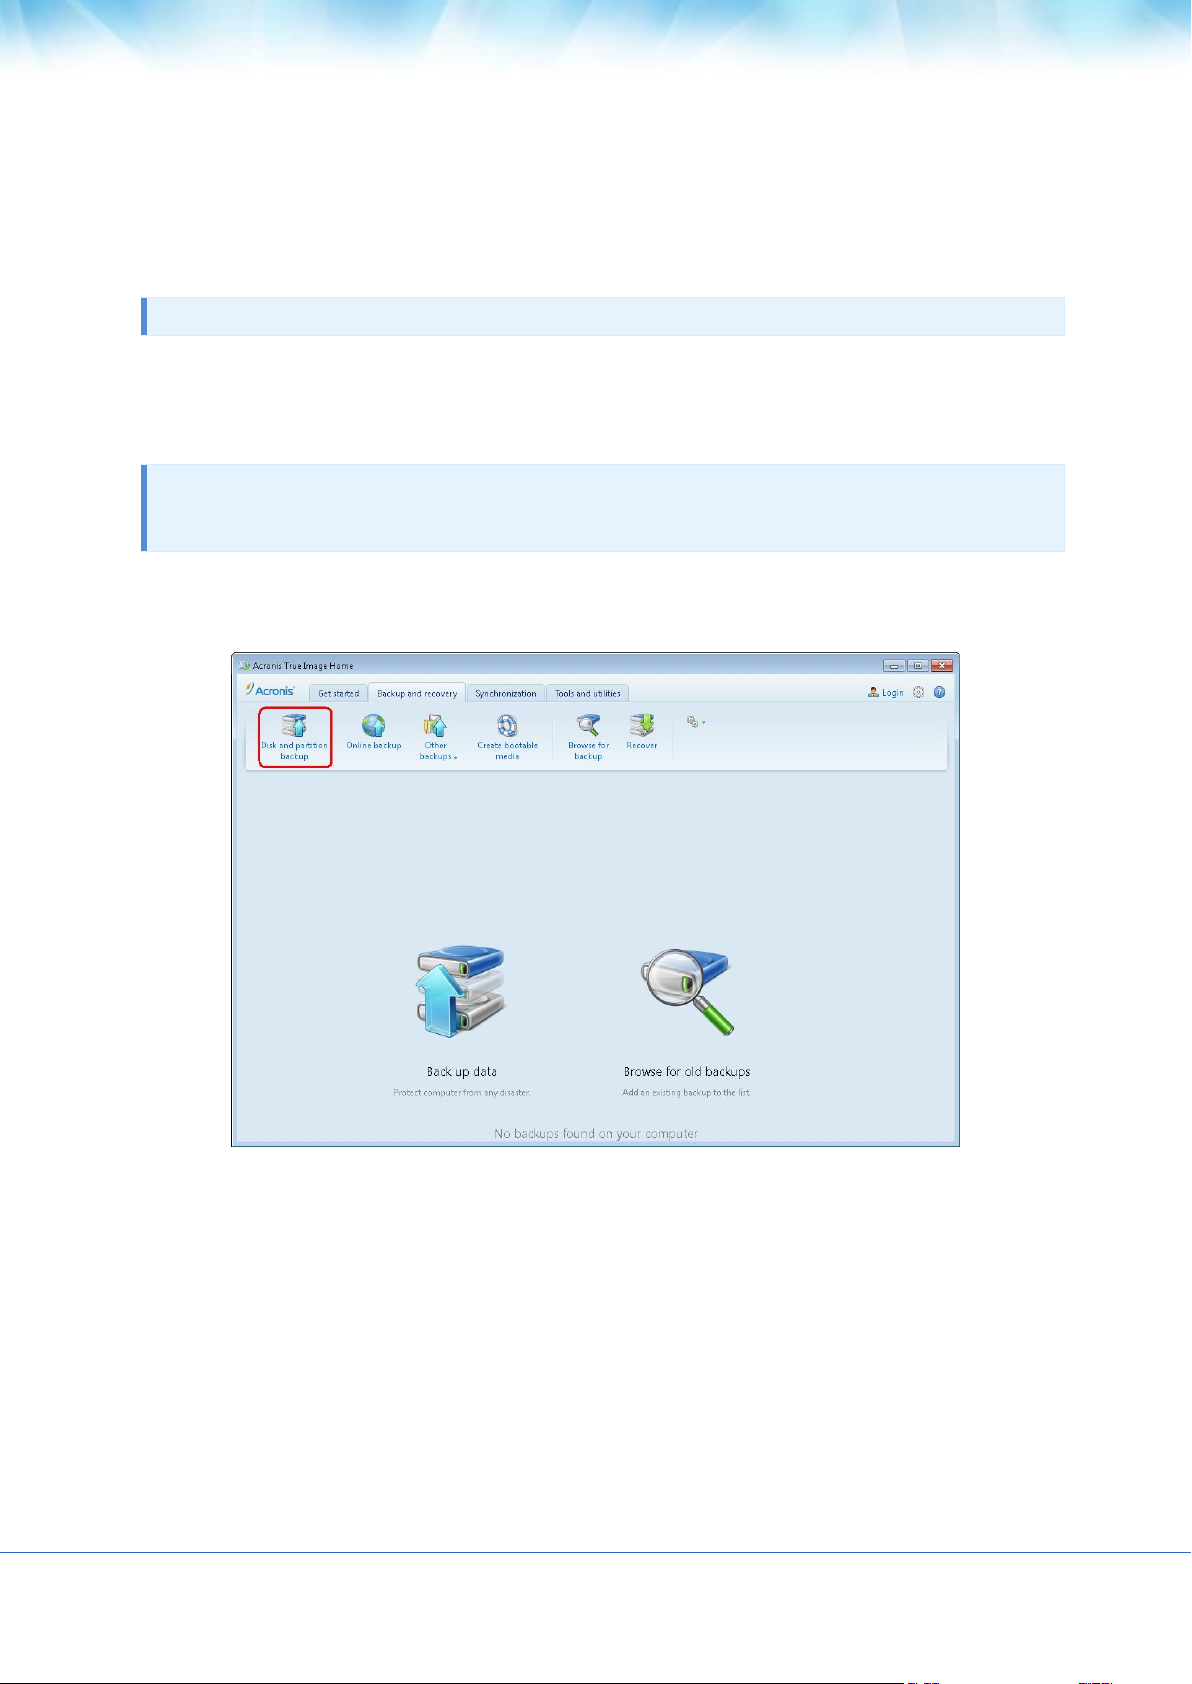
How to back up a partition or disk
Use the Disk and partition backup, if you want to back up the system partit ion (in most cases
designated with the letter C:).
Tip If you store your data on a separate partit ion, create a backup for this partition too.
A backup of your system partit ion is necessary so that you can quickly recover your system from a
backup instead of reinstalling the operating system and applicat ions from scratch. This could save
you hours and even days of effort recovering from a virus or malware attack.
Tip Usually, the system partit ion needs to be recovered when the operating system does not boot. Accordingly,
the system part ition backup will help only if you have a bootable rescue CD. For information on how to create a
rescue CD see Creating an Acronis Rescue CD.
1. Start Acronis True Image Home 2012, click the Backup and recovery tab and then click Disk
and partition backup.
9
Page 10
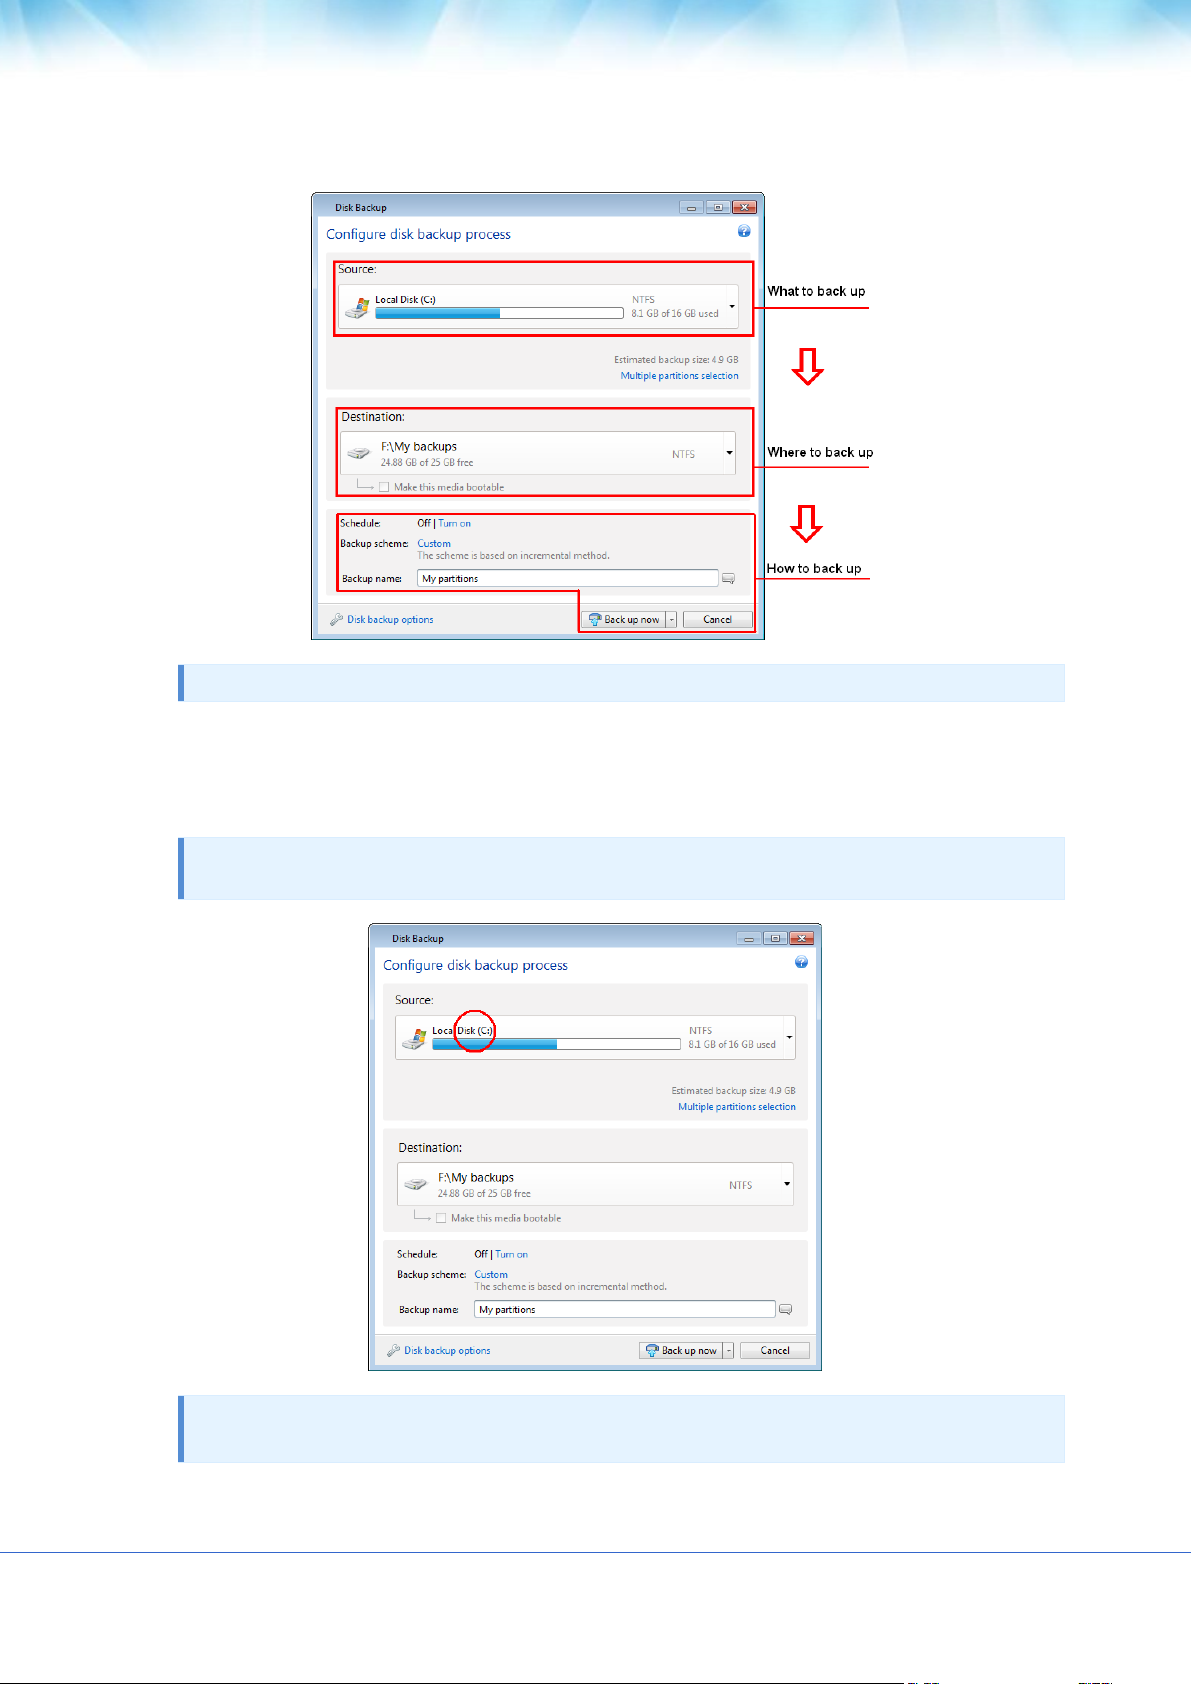
2. When configuring your backup, you need to make the following decisions.
In many cases, you can leave the default settings when deciding where to back up and how to back up.
The same is true when backing up files and folders.
3. In accordance with the above, begin by selecting what to back up. For example, select for
backup the system partition.
In case of Windows 7, the program will by default include the hidden System Reserved partit ion in the
backup. You may need to recover this part ition if the operating system stops working.
Tip If the disk has several partit ions and you want to back up the ent ire disk, click Multiple partition
selection, then click Switch to disk mode and select the disk.
10
Page 11

4. Destinat ion: - select where to save the backup. The program offers you to save the backup
in a location which it considers optimal, but you can change this location if necessary. To
change the location, click the right arrow and then click Browse... at the end of the list.
5. To schedule a backup, click Turn on next to Schedule:. For more information, see How to
schedule your backups.
Tip In most cases you can use the default backup options. To view or modify these default options, click
Disk backup options.
6. Click Back up now, to immediately start the backup. You can also delay the backup for up to
six hours. To do this, click the down arrow and select the desired time delay from the list
provided.
Tip If you used Scheduler and want to back up at the scheduled t ime, select Later.
11
Page 12

How to use synchronization
You can synchronize folders in various ways and in many locations. Here we describe how to
synchronize two folders located on two computers. In addition, we assume that you synchronize
data between your own computers.
To synchronize the data between computers, the following conditions should be met:
Acronis True Image Home 2012 is installed on both computers.
You have an Acronis account.
If you connect your computers through a local area network, local connection should be
established.
Both computers have connection to the Internet.
Steps to perform on computer 1 (that will own the sync):
1. Start Acronis True Image Home 2012.
2. On the Synchronization tab, specify your Acronis account credentials (your registration e-
mail address and password) and then click Log in.
You can leave the default computer name or assign another one.
Login is required only when you create your first sync. Afterwards, login is performed
automatically.
3. Click New sync.
4. In the opened window, select on the directory tree the folder that you want to synchronize,
and click Next.
To create a new folder for synchronization of its contents, click the New folder button and then
name the created folder before clicking Next.
12
Page 13

5. Select Other computers and online storage as an object with which you want to
synchronize your data, and click Next.
You can protect your data and the sync from unauthorized access. To do this, click Set
password, type a password, and then click the Save icon (green check mark).
Tip You can addit ionally synchronize the data with a local folder located, for example, on an external USB
drive. To do this, select the Local folder check box as well.
6. Select the Store f ile versions in the online storage check box in the next window, if you
want to store versions of your files on the remote Acronis server. This option allows you to
roll back to a previous file version when necessary. Note that Acronis True Image Online
service subscription is required for that task.
7. Click Create sync.
Tip You can also create a new sync using Windows Explorer. To do this, right-click the folder that you want to
synchronize and then select Sync this folder... in the shortcut menu.
Steps to perform on computer 2:
1. Start Acronis True Image Home 2012.
2. On the Synchronization tab, specify your Acronis account credentials and then click Log in.
3. Select the box of the required sync and click Join this sync.
4. In the opened window, select the folder that you want to synchronize from the directory tree
and then click OK.
How to schedule your backups
For your backups to be really helpful, they must be run on a regular basis. Our scheduler helps you to
perform regular backups automatically.
To schedule a backup, click Turn on to the right of Schedule: when configuring a backup.
13
Page 14

You can choose and set up one of the following backup frequencies:
Daily - the backup is executed once a day or more frequently depending on the settings you
make.
You can specify a backup start t ime. Enter hours and minutes manually, or set the desired start
time using the up and down buttons. You can also specify several start times by clicking Add.
Instead of a start time, you can set a daily backup periodicity. Select Every and choose the
desired periodicity from the dropdown list (for example, every 2 hours).
Weekly - the backup is executed once a week or several t imes a week on the selected days. To
select the days on which to execute the backup, click their names. Then, set the operation's start
time.
Monthly - the backup is executed once a month or several times a month on the selected dates.
14
Page 15

If you select Every, choose a numeral and the day of the week from the dropdown lists
(example: First Monday - the backup is performed on the first Monday of every month).
If you select On, choose the date or dates for backup execution.
Upon event - the backup is executed upon an event. Select the desired event. If you want to run
the backup only at the first occurrence of the event on the current day, select the Once a day
only check box.
Clicking the Do not schedule button turns off the scheduler for the current operation. In this case the backup
will run only when you click Back up now in the main window.
Creating an Acronis Rescue CD
We recommend recovering the system partit ion when boot ing from a rescue CD. Because of this,
you need to create a rescue CD.
Furthermore, you can run Acronis True Image Home 2012 from a bootable rescue CD on a failed
computer that cannot start Windows.
If you purchased Acronis True Image Home 2012 on the Web, you can create a bootable CD using the
Bootable Media Builder tool. You will need a blank CD-R/RW or a blank DVD+R/RW.
Tip With Acronis True Image Home 2012 you can also create an ISO image of a bootable rescue disc. You will be
able to burn it onto any kind of recordable opt ical disc using recording software.
Here, we'll show you how to create a rescue CD or an ISO image:
15
Page 16

1. Start the Acronis Media Builder wizard. To do so, click Create bootable media on the
Backup and recovery tab.
2. Click Next to go through the wizard's steps.
3. Select which components of Acronis True Image Home 2012 to place on the rescue CD by
selecting their check boxes.
Acronis True Image Home 2012 (Full version) - provides support of USB, PC Card and
SCSI interfaces along with the storage devices connected via them.
16
Page 17

Acronis System Report - with this component you can generate a system report that
is used for collecting information about your system in case of any program
problem. The generated system report can be saved to a USB flash drive.
4. At the next step you can set bootable media startup parameters to configure rescue CD boot
options for better compatibility with different hardware. These parameters are mainly
provided for advanced users, so just click Next to continue.
Tip If you encounter any hardware compatibility problems when booting from the rescue CD, it may be
best to contact Acronis Technical Support.
17
Page 18

5. Select a destination for bootable media creation:
CD-R/RW - if you are creating a CD, insert a blank disc so that the program can
determine its capacity.
ISO image - select this if you want to create an ISO image of a bootable rescue disc.
6. If you choose to create a bootable disk ISO image, specify the ISO file name and the folder
where to place it:
Select the destination folder on the folder tree.
Enter a name for the .iso file in the File name field. If you use the file name generator
(the button to the right of the line), the file is named AcronisMedia.iso.
18
Page 19

7. The bootable media creation summary displays the operations to be performed.
8. Click Proceed to start the rescue CD or ISO image creation process.
If you have created an iso image file, burn the f ile to a CD/DVD using a program that can handle iso files such
as Nero.
We strongly recommend you to test your rescue CD to make sure it boots on your computer and
recognizes all your storage devices and the network adapter. For more information, see Making sure
that your rescue CD can be used when needed.
Making sure that your rescue CD can be used when needed
To make sure that your rescue CD can be used for recovery, you must test that your computer can
boot from the CD. In addition, you must check that the rescue CD recognizes all your computer's
devices, such as the hard drives, the mouse, the keyboard, and the network adapter.
How to test the rescue CD
If you use external drives for storing your backups, you must attach the drives before booting from the rescue
CD. Otherwise, the program might not detect them.
1. Configure your computer to enable booting from the rescue CD. Then, make your rescue
media device (CD-ROM/DVD-ROM drive) the first boot device.
2. Press any key to start booting from the CD, when you see the prompt "Press any key to boot
from CD". If you do not press a key within five seconds, you will need to restart the
computer.
3. After the boot menu appears, choose Acronis True Image Home (Full version).
Tip If your wireless mouse does not work, try to replace it with a wired one. The same recommendation
applies to the keyboard.
Tip If you do not have a spare mouse or keyboard, contact Acronis Support. They will build a custom rescue
CD that will have drivers for your models of the mouse and keyboard. Please be aware that finding the
appropriate drivers and making the custom rescue CD may take some time. Furthermore, this may be
impossible for some models.
19
Page 20

4. When the program starts, we recommend you try recovering some files from your backup. A
test recovery allows you to make sure that your rescue CD can be used for recovery. In
addition, you will check that the program detects all the hard drives you have in your
system.
Tip If you have a spare hard drive, we strongly recommend you to try a test recovery of your system
partition to this hard drive.
How to test recovery, as well as check the drives and network adapter
1. If you have file backups, start Recovery Wizard by clicking Recovery -> File Recovery on the
toolbar.
If you have only disk and part ition backups, Recovery Wizard also starts and the recovery procedure is
similar. In such a case, you need to select Recover chosen files and folders at the Recovery Method
step.
20
Page 21

2. Select a backup at the Archive selection step and then click Next.
3. When recovering files with the rescue CD you are able to select only a new location for the
files to be recovered. Therefore just click Next at the Location selection step.
4. After the Destination window opens, check that all your drives are shown under My
Computer.
If you store your backups on the network, you should also check that you can access the network.
If no computers are visible on the network, but the Computers Near Me icon is found under My
Computer, specify network settings manually. To do this, open the window available at Tools &
Utilit ies
Options Network adapters.
5. Select the destination for the files and then click Next.
You can create a folder for the files to be recovered. To do this, click Create new folder on the toolbar
and then assign a name to the folder.
21
Page 22

6. Select several files for recovery by selecting their check boxes and then click Next.
7. Click Proceed on the Summary window to start recovery.
8. After the recovery finishes, exit the standalone Acronis True Image Home 2012.
Now you can be sure that your rescue CD will help you when needed.
How to recover your system if your computer does not boot
If Windows does not start, but you have a backup of your system partit ion or disk, you will be able
to recover your system with a help of the rescue CD and that backup.
Preparing for recovery
1. Attach the external drive if it contains the backup to be used for recovery and make sure that
the drive is powered on. This must be done before booting from the Acronis rescue CD.
2. Boot from the rescue CD.
When you use the Acronis rescue CD, the program assigns disk drive letters based on Linux. They might differ
from the way Windows identifies drives. For example, the D: disk identif ied in the standalone Acronis True
Image Home 2012 might correspond to the E: disk in Windows. Because of this, we recommend refreshing the
information about the locat ions of your backup f iles before starting operations on backups. To do this, click
Refresh backups on the Home screen.
Recovering your system
Here, we explain how to recover a corrupted system to the same hard disk.
1. Click Recovery on the sidebar of the Home screen and then select the system disk or
partition backup to be used for recovery.
Right-click the backup and then click Recover in the shortcut menu.
22
Page 23

2. Select Recover whole disks and partitions at the Recovery method step.
3. Select the system partition (usually C) on the What to recover screen. If the system partition
has a different letter, select the partition using the Flags column. It must have the Pri, Act
flags.
In case of Windows 7, the System Reserved partition has the Pri, Act flags. You need to select for recovery
both the System Reserved part ition and the System partition. The following screen shots were taken for a
Windows 7 backup.
23
Page 24

4. At the "Settings of partition 1-1" step (where the System Reserved partition is shown) check
the default settings and click Next. Do not change the settings if you are recovering the
backup to the same disk. Otherwise Windows may refuse to start after recovery.
5. At the "Settings of partition C" step (or the letter of the system partition, if it is different)
check the default settings and click Next if they are correct. Otherwise, change the settings
as required before clicking Next. You need to change the settings if you are recovering to a
new hard disk which has a different capacity.
6. Click Proceed to start recovery. When the operation finishes, exit the standalone version of
Acronis True Image Home 2012, remove the rescue CD and boot from the recovered system
partition. After making sure that you have recovered Windows to the state you need, restore
the original boot order.
24
Page 25

How to recover partitions and disks in Windows
As ment ioned in the previous section, it is better to recover your system partit ion when booting
from the rescue CD.
If you have backups of your data disk or partit ion, you can recover them in Windows.
Tip You can start recovering a partition or disk from an image backup both on the main screen and in Acronis
Backup Explorer.
1. To start recovery from the main screen, select the box of a backup containing the partition
image you need to recover and then click Recover.
2. The Disk Recovery window opens and shows the partitions available for recovery.
3. If you want to recover the partition to the state it was at an earlier date, click the down arrow
to the right of Version: and select from the list the backup version created on that date.
25
Page 26

4. Select the corresponding check box of the partition to recover.
5. In the recovery destination field below the partition label, select the destination partition. Those
partitions where the partition to be recovered can fit are marked by black lettering. Unsuitable
partitions are marked by red lettering. Note that all data on the destination partition will be lost
because it is replaced by the recovered data and file system.
6. After you finish with your selections, click Recover now to start recovery.
26
Page 27

How to recover files and folders
You will usually recover files and folders in Windows. Here, we describe how to recover f iles and
folders from a f ile backup. You can also recover individual files and folders from part ition or disk
backups. In such cases, the recovery procedure is similar.
1. Select on the main screen a file backup from which you want to recover files or folders. Click
Explore and recover.
2. Select in the Backup Explorer the check boxes of the files and folders you want to recover.
Click Recover to start recovery.
If you want to recover individual files and folders from a partition or disk backup, click the Files and
folders tab and then select the files and folders for recovery.
27
Page 28

3. This opens the File Recovery window.
When recovering a specif ic file version, you start recovery from the View Versions window. In either case,
starting recovery opens the File Recovery window.
4. Select the destination on your computer to where you want to recover selected files and
folders. You can recover data to its original location, or choose a new one, if necessary. To
choose a new location, click Browse....
5. When you choose a new location, the selected items are recovered by default without
recovering the original absolute path. You may wish to recover the items with their entire
folder hierarchy. In this case select the Recover absolute path check box.
6. To start the recovery process, click the Recover now button.
28
Page 29

How to clone a disk
You can use disk cloning when you need to transfer the operating system to another hard disk which
usually has a higher capacity.
Note that the description below is applicable only when you replace your hard disk drive on the
same computer, or when you plan to use the cloned disk on a computer with the same hardware as
the computer you have used for disk cloning. If you need to migrate your system to a new computer
with different hardware, please consider purchasing Acronis True Image Home 2012 Plus Pack. It
contains Acronis Universal Restore - a tool that allows you to restore your system from an image
backup to another computer regardless of its hardware.
Tip We strongly recommend that you create a backup of the ent ire original disk as a safety precaut ion. It could
be your data saver if something goes wrong with your original hard disk during cloning. For information on how
to create such a backup, see How to back up a part ition or disk. After creating the backup make sure that you
validate the backup when booted from the rescue CD.
As we have already recommended, it is safer to use the rescue CD for operat ions with the hard disk
containing your operating system.
Here, we describe how to clone the system disk using the rescue CD.
Tip For best results, install the target (new) drive where you plan to use it and the source drive in another
location (for example, in an external USB enclosure). This recommendation is particularly important for
laptops. More information on laptop disk cloning can be found at http://kb.acronis.com/content/2931.
1. Configure your computer to enable booting from the rescue CD. Then, make your rescue
media device (CD-ROM/DVD-ROM drive) the first boot device.
2. Press any key to start booting from the CD, when you see the prompt "Press any key to boot
from CD". If you fail to press a key within five seconds, you will need to restart the computer.
3. After the boot menu appears, choose Acronis True Image Home (Full version).
29
Page 30

4. When the program starts, click Tools & Utilities on the sidebar and then select Clone Disk.
5. When Clone Disk Wizard opens, select Automatic mode. This is recommended in most
cases. In this mode, the partitions of the original disk are resized on the new one according
to old and new disk capacity proportions. An exception is the hidden System Reserved
partition that exists on most computers with Windows 7. The size of this partition does not
change during cloning.
Manual mode can be useful if you have a disk with several part itions and need to set specif ic part ition
sizes on the new hard disk.
If the program f inds two disks, one partitioned and another unpart itioned, it automatically recognizes the
partitioned disk as the source disk and the unpartit ioned disk as the destination disk. In such a case, the
next steps are bypassed and you are taken to the cloning Summary screen.
30
Page 31

6. Select the source disk and then click Next.
Tip You can determine the source and destination disks using the information provided in this window
(disk number, capacity, model, part ition and file system informat ion). If the program finds several
partitioned disks, it asks you which is the source (that is, the old disk).
7. The previously selected source disk becomes grayed-out and disabled for selection. Select
the destination disk and then click Next.
At this point, the program checks to see if the destinat ion disk is free. If not, you are prompted
by the Confirmat ion window stating that the destination disk contains partitions that may
have useful data. To confirm delet ion of the partitions, click OK.
Be very careful when selecting the destinat ion disk and confirming the deletion. You may delete useful
data if you select the wrong disk.
31
Page 32

Note that no real changes or data destruct ion are performed at this t ime! Changes will be implemented
only when you click Proceed.
8. The disk cloning summary lists and briefly describes the operations to be performed on the
disks. Click Proceed to start disk cloning.
After you click Proceed, Acronis True Image Home 2012 starts cloning the old disk to the new disk,
indicating the progress in a special window.
Windows should not "see" both the new and old drive during the f irst boot after cloning. This could result in
problems when starting Windows. Therefore, disconnect the old drive before the f irst boot.
To disconnect the old drive, you need to turn off the computer. To do this automatically, select the
Shut down the computer when 'operation' is completed check box in the Operation Progress
window.
When the computer turns off, disconnect the old drive, remove the rescue CD and boot from the
cloned system disk. After making sure that Windows starts normally, restore the original boot order.
Conclusion
This document describes just a few of the features of Acronis True Image Home 2012. If you need
information on how to use other features, refer to the User’s Guide which can be downloaded from
the Acronis Web site at http://www.acronis.com/support/documentation/index.html.
You can also find additional information in Acronis Knowledge Base at http://kb.acronis.com/.
32
 Loading...