

Page 1

Acronis Snap Deploy 4
User Guide
Page 2

Copyright © Acronis, Inc., 2000-2011. All rights reserved.
“Acronis” and “Acronis Secure Zone” are registered trademarks of Acronis, Inc.
"Acronis Compute with Confidence", “Acronis Startup Recovery Manager”, “Acronis Active Restore”
and the Acronis logo are trademarks of Acronis, Inc.
Linux is a registered trademark of Linus Torvalds.
VMware and VMware Ready are trademarks and/or registered trademarks of VMware, Inc. in the
United States and/or other jurisdictions.
Windows and MS-DOS are registered trademarks of Microsoft Corporation.
All other trademarks and copyrights referred to are the property of their respective owners.
Distribution of substan tively modified versions of this doc ument is prohibited without the explicit
permission of the copyright holder.
Distribution of this work or derivative work in any standard (paper) book form for commercial
purposes is prohibited unless prior permission is obtained from the copyright holder.
DOCUMENTATION IS PROVIDED "AS IS" AND ALL EXPRESS OR IMPLIED CONDITIONS,
REPRESENTATIONS AND WARRANTIES, INCLUDING ANY IMPLIED WARRANTY OF MERCHANTABILITY,
FITNESS FOR A PARTICULAR PURPOSE OR NON-INFRINGEMENT, ARE DISCLAIMED, EXCEPT TO THE
EXTENT THAT SUCH DISCLAIMERS ARE HELD TO BE LEGALLY INVALID.
Third party code may be provided with the Software and/or Service. The license terms for such thirdparties are detailed in the license.txt file located in the root installation directory. You can always find
the latest up-to-date list of the third party code and the associated license terms used with the
Software and/or Service at http://kb.acronis.com/content/7696
2 Copyright © Acronis, Inc., 2000-2011
Page 3

Table of conte nts
1 Introducing Acronis Snap Deploy 4 .........................................................................................7
1.1 Overview .................................................................................................................................... 7
1.1.1 What is Acronis Snap Deploy 4....................................................................................................................... 7
1.1.2 Who needs Acronis Snap Deploy 4 ................................................................................................................ 7
1.1.3 Acronis Snap Deploy 4 infrastructure ............................................................................................................ 7
1.2 What you can do with Acronis Snap Deploy 4 ........................................................................... 7
1.2.1 Taking an image of the master system .......................................................................................................... 8
1.2.2 Deployment to specific machines (immediate, manual, and scheduled deployment) ............................. 8
1.2.3 Deployment to any rea dy machines (event-driven deployment) ............................................................... 9
1.2.4 Stand-alone de pl o yme n t ................................................................................................................................ 9
1.2.5 Deployment with individual deployment settings ........................................................................................ 9
1.2.6 User-initi a te d de plo yme n t (cu st o m de p l oym e nt) ...................................................................................... 10
1.2.7 Deployment of a disk volume and MBR ...................................................................................................... 10
1.2.8 Command-line mode and scripting under WinPE ...................................................................................... 10
1.3 Features of Acronis Snap Deploy 4 ..........................................................................................11
1.3.1 New: List of machines ................................................................................................................................... 11
1.3.2 New: List of deployment tasks ..................................................................................................................... 11
1.3.3 New: Per-deployment lic e nsing ................................................................................................................... 12
1.3.4 New: Support for the VHD format ............................................................................................................... 12
1.3.5 New: Graphical user interface in WinPE ...................................................................................................... 12
1.3.6 New: E-mail notifications about deployment ............................................................................................. 13
1.3.7 New: Compatibility with Acronis True Image, Acronis Backup & Recovery 10, and Acronis Backup &
Recovery 11 backups ................................................................................................................................. 13
1.3.8 New: Support for multiple network adapters ............................................................................................. 13
1.3.9 Multicast TTL and network bandwidth throttling ....................................................................................... 13
1.3.10 New: Falling back to unicast ......................................................................................................................... 13
1.3.11 Encrypted communication ........................................................................................................................... 14
1.3.12 Password protection ..................................................................................................................................... 14
1.4 Supported operating systems fo r im a ging and deployment ...................................................14
1.5 Licensing policy ........................................................................................................................15
1.5.1 Machine licenses and deployment licenses ................................................................................................ 16
1.5.2 Server licenses and workstation licenses .................................................................................................... 16
1.5.3 Lice nses for Ac ronis Univ ers al De ploy ......................................................................................................... 16
1.5.4 Trial version of Acronis Snap Deploy 4 ........................................................................................................ 17
1.6 Upgrading to Acronis Snap Depl oy 4 .......................................................................................17
1.6.1 Upgrading licenses ........................................................................................................................................ 17
1.6.2 Upgrading components ................................................................................................................................ 18
1.7 Technical Support ....................................................................................................................18
2 Understanding Acronis Snap Deploy 4 .................................................................................. 19
2.1 Terminology .............................................................................................................................19
2.2 Components .............................................................................................................................20
2.3 Support for file systems and storage media ............................................................................21
2.3.1 Supported file systems .................................................................................................................................. 21
2.3.2 Supported media ........................................................................................................................................... 21
2.4 Supported types of disk and firmware interface .....................................................................22
2.5 Usage .......................................................................................................................................23
3 Copyright © Acronis, Inc., 2000-2011
Page 4

2.5.1 Offline imaging .............................................................................................................................................. 23
2.5.2 Online imaging ............................................................................................................................................... 24
2.5.3 Deployment ................................................................................................................................................... 24
2.6 What is Acronis Universal Deploy ............................................................................................25
2.6.1 Acronis Universal Deploy purpose ............................................................................................................... 26
2.6.2 Acronis Universal Deploy general principles ............................................................................................... 26
2.6.3 Acro nis Universal Deploy and Microsoft Sysprep ....................................................................................... 26
2.6.4 Getti n g Acronis Univer sa l Deploy ................................................................................................................ 26
2.7 How to .....................................................................................................................................27
3 Getting started with Acronis Snap Deploy 4 .......................................................................... 28
4 Installation of Acronis Snap Deploy 4.................................................................................... 39
4.1 Supported operating systems ..................................................................................................39
4.2 Used ports and IP addresses ....................................................................................................39
4.3 Typical installation ...................................................................................................................40
4.4 Custom installation ..................................................................................................................40
4.4.1 Installation procedure ................................................................................................................................... 41
4.4.2 Common installation configurations ........................................................................................................... 42
4.4.3 Installation of components ........................................................................................................................... 43
4.5 Other ways of installation ........................................................................................................46
4.5.1 Installing components remotely .................................................................................................................. 46
4.5.2 Extracting the components of Acr onis Snap Depl oy 4 ............................................................................... 48
4.6 Upgrading Acronis Snap Deploy 4 ...........................................................................................48
4.6.1 Upgrading from a previous product version ............................................................................................... 48
4.6.2 Upgrading from the trial to full product version ......................................................................................... 49
4.7 Uninstalling Acronis Snap Deploy 4 .........................................................................................49
5 Using Acronis Snap Deploy 4 Management Console .............................................................. 51
5.1 Connecting to a machine .........................................................................................................51
5.1.1 Connect to a local machine .......................................................................................................................... 51
5.1.2 Connect to another machine ....................................................................................................................... 51
5.2 Browsing logs ...........................................................................................................................53
5.3 Checking for software updates ................................................................................................53
6 Using Acronis Snap Deploy 4 License Server .......................................................................... 54
6.1 Understanding Acronis Snap Deploy 4 License Server ............................................................54
6.2 Adding licenses by using Acronis Sn a p Deploy 4 Management Console .................................54
6.3 Viewing information about licenses ........................................................................................55
6.4 Removing licenses....................................................................................................................56
6.5 Adding licenses in the command-line mode ...........................................................................56
6.6 Using Acronis Snap Deploy 4 License Server Management Tool.............................................57
7 Deployment tools ................................................................................................................ 59
7.1 Bootable components .............................................................................................................59
7.2 Creating a bootable media ......................................................................................................59
7.2.1 Creating an Acronis bootable media ........................................................................................................... 60
7.2.2 Creating a WinPE-based bootable media .................................................................................................... 63
4 Copyright © Acronis, Inc., 2000-2011
Page 5

7.3 Configuring Acronis PXE Server ...............................................................................................66
8 Creating a master image ...................................................................................................... 67
8.1 Preparation of the master operating system ..........................................................................67
8.2 Online vs. offline imaging ........................................................................................................68
8.3 Performing online imaging ......................................................................................................68
8.4 Performing offline imaging ......................................................................................................68
8.5 Steps of the Master Image Creator wizard ..............................................................................71
8.5.1 Disks or volumes to image ............................................................................................................................ 71
8.5.2 Image name and location ............................................................................................................................. 72
8.5.3 Options of imaging ........................................................................................................................................ 73
8.5.4 Comments and summary ............................................................................................................................. 76
9 Validating a master image .................................................................................................... 78
10 Deploying a master image .................................................................................................... 79
10.1 Files supported as master images ...........................................................................................79
10.2 Licenses for deployment ..........................................................................................................80
10.3 Deployment templates ............................................................................................................80
10.3.1 Creati ng a de plo ym e nt tem pl a te ................................................................................................................. 80
10.3.2 Config u ri ng de fa ult de p lo ym e nt s e tt i ngs .................................................................................................... 98
10.3.3 Managing deployment templates................................................................................................................ 99
10.4 Deployment through a deployme nt t a sk .................................................................................99
10.4.1 Prerequisites ................................................................................................................................................ 100
10.4.2 Deployment to specific machines .............................................................................................................. 100
10.4.3 Deployment to any ready machines .......................................................................................................... 106
10.4.4 Booting the target machines ...................................................................................................................... 108
10.4.5 Opera tions wi t h deploym ent tasks ............................................................................................................ 111
10.4.6 Deployment behind an NAT device ........................................................................................................... 111
10.5 Stand-alone deployment .......................................................................................................112
10.6 User-initiated deployment (custom deployment) .................................................................113
10.6.1 Understanding user-initiated deployment ................................................................................................ 113
10.6.2 Considerations when using a PXE server ................................................................................................... 115
10.6.3 Setting up the user-initiated deployment mode ...................................................................................... 115
10.6.4 Changi ng pa r ame te rs of the use r -initiated deployment mode ............................................................... 118
10.6.5 Switching off the user-initiated deployment mode.................................................................................. 118
11 Managing the list of machines (the Machines view) ............................................................ 119
11.1 Adding machines....................................................................................................................119
11.2 Groups of machines ...............................................................................................................120
11.3 Actions on machines ..............................................................................................................120
11.4 States and results for machines .............................................................................................121
12 Individual deployment settings .......................................................................................... 122
12.1 Enabling, disabling, and resetting individual settings............................................................122
12.2 List of individual settings .......................................................................................................122
13 Managing deployment tasks (the Deployment tasks view) .................................................. 124
13.1 List of deployment tasks ........................................................................................................124
5 Copyright © Acronis, Inc., 2000-2011
Page 6

13.2 Actions on deployment tasks.................................................................................................124
13.3 States and results for deployment tasks ...............................................................................125
14 Command-line mode and scripting under WinPE ................................................................ 126
14.1 Command-line syntax ............................................................................................................126
14.1.1 Supported commands ................................................................................................................................ 126
14.1.2 Common parameters (parameters common for most commands) ....................................................... 128
14.1.3 Specific parameters (parameters specific for individual commands) ..................................................... 129
14.1.4 Usage examples ........................................................................................................................................... 134
14.2 Sample scenarios ...................................................................................................................134
14.2.1 Deploying images assigned to target machines ........................................................................................ 134
14.2.2 Creating images assigned to target machines .......................................................................................... 135
15 Collecting system inf o rma tion ............................................................................................ 137
6 Copyright © Acronis, Inc., 2000-2011
Page 7

1 Introducing Acronis Snap Deploy 4
1.1 Overview
1.1.1 What is Acronis Snap Deploy 4
Acronis Snap Deploy 4 is a flexible, efficient software solution for deployment of a fully configured
operating system (with or without application software and any other data) to multiple machines.
Because the product uses disk imaging technology, it is ideal for rapid bare-metal installations and
flexible centralized provisioning.
1.1.2 Who needs Acronis Snap Deploy 4
Acronis Snap Deploy 4 is primarily designed to be used by:
§ Small and medium-size businesses:
§ IT service providers
§ Hardware retailers
§ IT departments of larger corporations
§ Schools and universities
§ R&D and software testing labs
The enterprise features of Acro nis Snap Deploy 4 (scheduled deploy ment, support for Preinstallat io n
Environment, command-line interface, and scripting, to name a few) can help automate the tasks of
the IT department in large enterprise environments.
1.1.3 Acronis Snap Deploy 4 infrastructure
Components of the Acronis infrastructure are installed on Windows machines. Managing the Acronis
infrastructure is performed by using Acronis Snap Deploy 4 Management Console.
A reference image, called the master image, can be taken in Windows, in the Acronis environment,
or in Windows Preinstallation Environment (WinPE) that contains components of Acronis Snap
Deploy 4.
Deployment is performed in the A c ronis environment or in WinPE that contains components of
Acronis Snap Deploy 4. In either environment, Acronis Snap Deploy 4 provides the graphical user
interface (GUI). In addition, command-line mode and scripting are supported in WinPE.
A dedicated bootable utility enables fully-functional deployment with GUI on a stand-alone machine
(a machine that is isolated from th e ne twork or is included in a network without Acronis Snap Deploy
4 infrastructure).
1.2 What you can do with Acronis Snap Deploy 4
This section describes typical usage scenarios for Acronis Snap Deploy 4.
7 Copyright © Acronis, Inc., 2000-2011
Page 8

1.2.1 Taking an image of the master system
First, you create the desired system configuration and save the image of the system hard disk to a
network folder, detachable media (such as a USB hard d rive) or removable media (such as a DVD). An
image, also called a master image, is a file that contains the system in a packaged form.
Scenarios
Scenario 1
Each department in your organization, such as accounting, sales, and technical support, uses a
fixed set of applications for daily work.
You create a library of master images. For example, you create one image for each department.
You then deploy these images to new hardware without having to manually configure the
operating system and applications.
Scenario 2
You need to deploy a standard configuration included in a master image, to machines with
different hardware.
You use the separately-sold Acronis Universal Deploy add-on. This add-on configures Windows
system drivers so that Windows is able to boot on dissimilar hardware. Without this add-on, the
motherboard, processors, and mass-storage devices of the imaged and the target hardware must
be identical. The same applies to non-Windows operating systems.
1.2.2 Deployment to specific machines (immediate, manual, and scheduled deployment)
You can perform deployment to a specific list of machines with known physical addresses (called
MAC addresses). The deployment can run immediately after you set it up, on a sched ule, or when
you start it manually.
These ways of deployment are also known as manual deployment and scheduled deployment.
When the deployment is about to start, the software will power on the target machines with
predefined MAC addresses by usin g the BIOS Wake-on-LAN (WOL) functionality.
Machines in another subnet can be woken u p through a component called Wake-on-LAN Proxy,
which is delivered with Acronis Snap Deploy 4. The machines typically boot into the PXE server that is
installed in the same subnet.
Machines that do not support Wake-on-LAN can be booted into the Acron i s environment manually
before the deployment starts. Such machines will also be deployed, provided that they are listed for
deployment.
Scenarios
Scenario 1. An organization receives a shipment of machines from a manufacturer along with the list
of their MAC addresses. The IT department has to deploy the operating system to the new hardware.
Scenario 2. An Internet café, school or university lab has 100 machines with known MAC addresses.
The nightly deployment of the initial standard image on these machines is needed.
8 Copyright © Acronis, Inc., 2000-2011
Page 9

1.2.3 Deployment to any ready machines (ev ent -driven deployment)
You can set up deployment to star t wh en a specific number of any machines become ready. Unlike
deployment to specific machines (p. 8), this way of deployment does not require knowing the MAC
addresses of the machines.
The software counts how many machines have connected to the deployment server and starts
deployment when the number of machines you specified (for example, 10) is connected.
This way of deployment is also called event-driven deployment or deployment upon an event.
You can specify a time-out period. After the time-out, deployment will start on the machines that are
ready despite the fact that the predefined number is not reached.
Scenario
Your organization receives 100 machines from a manufacturer. You want to deploy the operating
system and programs to all these machines at once.
1. You set up a deployment operation that waits until any 100 machines are ready.
2. You boot each machine into the Acronis environment, by using either Acronis bootable media or
Acronis PXE (Preboot Execution Environment) Server.
3. Acronis Snap Deploy 4 uses multicasting to perform the deployment to all machines at once.
1.2.4 Stand-alon e deployment
The administrator might need to perform deployment to a machine that is isolated from a network
or is included in a network without an Acronis Snap Deploy 4 infr ast ructure (such as the deployment
server or the license server). A dedicated bootable utility enables a fully-functional deployment with
the graphical user interface on a stand-alone machine.
The master image for deployment can be located in a network folder or on a removable drive (such
as a DVD) on the machine you are performing deployment to. The image cannot be located on the
local hard disk of the machine, because deployment usually involves overwriting the contents of the
disk.
The Universal Deploy add-on is unavailable for stand-alone deployment.
1.2.5 Deployment with individual deployment settings
You can set up individual deployment settings (p. 122) for a machine. These settings will override the
general settings of the deployment operation (the deployment template).
Scenarios
Scenario 1
You want to perform deployment to several machines. For each machine, you want to assign a
specific name, rather than an automatically-generated name.
1. You enter the MAC addresses of the machines so that they all appear in the list of machines.
2. You select each machine in the list and specify an individual setting: the machine name.
3. You set up a deployment operation. Other deployment settings will be the same for all machines.
9 Copyright © Acronis, Inc., 2000-2011
Page 10

Scenario 2
You want to perform deployment to a big number of machines. For one of those machin es, h owever,
you need to perform deployment to the second hard disk, rather than to the first har d disk.
1. You enter the MAC addresses of all machines so that all machines appear in the list of machines.
2. You specify an individual setting for the correspondi n g machine: to deploy to the second hard
disk.
3. You set up a deployment operation to perform deployment to the first hard disk. Deployment to
that specific machine will be performed to the second hard disk.
1.2.6 User-initiated deployment (custom deployment)
Acronis Snap Deploy 4 can be configured in such a way that users will be able to deploy and redeploy their machines with o n e click on the boot menu.
This way of deployment is also called custom deployment.
Scenarios
Scenario 1
Software testers have to deploy clean operating systems or preconfigured systems on test
machines.
A test team leader creates a custom bootable media or a PXE package that provides a fixed set of
choices on the target side. A test team member reboots a test machine and selects what to
deploy from the boot menu with one click. The deployment starts immediately. The choices can
be various operating systems, various editions of the same operating system, the same operating
system with various settings or various applications, to name a few. The deployment proceeds
independently on each machine.
Scenario 2
In a university or school lab, switching between exercises requires reconfiguring the machine
entirely. Students can switch or restart exercises without the teacher’s assistance. If a student
messes up the machine (for example, deletes a file or changes configuration), the student can
choose a self-restore option from the boot menu.
1.2.7 Deployment of a disk volume and MBR
You do not necessarily have to deploy the entire disk. Provided that the master and the target disks
have a similar partitioning scheme, you can image and deploy only the system volume or only the
data, depending on your needs.
When deploying a volume, Acronis Snap Deploy 4 can also deploy the master boot record (MBR) of
the disk on which the original volume is located.
1.2.8 Command-line mode and scripting under WinPE
Acronis Snap Deploy 4 provides a com mand-line utility that can be added to a bootable media based
on Windows Preinstallation Environment (WinPE). The administrator can create such media on a
physical drive or place it to the PXE server.
10 Copyright © Acronis, Inc., 2000-2011
Page 11

Having booted a machine into Windows Preinstallation Environment, the administrator can perform
imaging or deployment in the command-line mode or execute scripts.
Scenarios
Scenario 1
The administrator needs to deploy a different image to each machine on the network.
The administrator writes a deployment script that can read the target machine’s MAC address
(for example, 01-02-03-04-05-06) and pull an image whose name matches the MAC address (for
example, image-01-02-03-04-05-06.tib) The image can be located in any convenient location,
such as a network share.
The administrator then runs the script on any number of target machines to deploy the
corresponding image to each of them.
Scenario 2
The administrator needs to start imaging or deployment automatically each time a machine
boots from the PXE server.
The administrator creates an imaging or deployment script, adds the script to the PE and includes
the script in the startnet.cmd file. On booting into the PE, the operation will be performed
automatically.
Scenario 3
The administrator needs to automatically execute pre-deployment operations (disk partitioning,
for example) on the machines on the network.
The administrator creates a script that performs pre-deployment operations, adds the script
along with deployment script to t he PE and includes both scripts in the startnet.cmd file. On
booting into the PE, both operations will be performed automatically.
1.3 Features of Acronis Snap Deploy 4
1.3.1 New: List of machines
Acronis Snap Deploy 4 provides the Machines view (p. 119). T his view contains a list of all machines
that you added for deployment or that have ever been deployed.
In this view, you can:
§ View and edit the list of machines.
§ Check which machines are ready for deployment.
§ Examine the current state of the deployment operation, and the result of the last deployment.
§ Add machines for subsequent deployment by specifying the machines’ MAC addresses.
§ Specify individual deployment settings (p. 9).
§ Set up deployment for one or more machines.
§ Organize machines into groups.
1.3.2 New: List of deployment tasks
Centralized deployment is performed by a deployment task. Acronis Snap Deploy 4 provides a list of
deployment tasks in the Deployment tasks (p. 124) view.
11 Copyright © Acronis, Inc., 2000-2011
Page 12

In this view, you can:
§ View and edit the list of tasks, i n cluding scheduled tasks and tasks that perform deployment
when a specified number of machines are ready.
§ Edit tasks; for example, to change the list of machines to perform deployment to.
§ Start any task manually; for example, to perform deployment outside the normal schedule.
§ Examine the current state of the task and the result of the last run of the task.
1.3.3 New: Per-deployment licensing
In addition to per-machine licensing, Acronis Snap Depl oy 4 supports per-deployment licensing.
A deployment license enables you a single successful deployment to a particular machine. A machine
license enables you an unlimited number of deployments to a particular machine.
For more details, see “Licensing policy” (p. 15).
Scenario
You provision machines to end use rs by deploying the operating system with the necessary software
to a machine and then shipping the machine to the end user. Because you are planning to perform
deployment to each machine only once, you want a cheaper license for the machine.
You buy a number of deployment licenses based on the number of machines that you want to
provision. A deployment license becomes used only if the deployment to the corresponding machine
has been successful.
1.3.4 New: Support for the VHD format
In addition to using its own format for an image, Acronis Snap Deploy 4 can perform deployment
from a Virtual Hard Disk (VHD) file. Such file stores contents of one or more disks. It can be created in
Windows Server 2008 and Windows 7.
Scenario
You saved the disks of one of your machines to a VHD file by using the Windows Backup program.
Now you want to deploy that machine to other machines.
When setting up the deployment, you specify the VHD file as you would specify an image file created
by Acronis Snap Deploy 4. When performing the deployment, the softwa re c an change the settings
for the machines being deployed.
1.3.5 New: Graphical user interface in WinPE
A bootable media based on Windows Preinstallation Environment (WinPE) now provides a graphical
user interface (GUI) similar to that in an Acronis bootable media.
By using the GUI, you can take a master image and perform deployment.
You may want to use a WinPE-based media if the Acronis media cannot recognize a specific device,
such as an exotic storage device.
A WinPE-based bootable media also provides a command-line utility (p. 10) for performing imaging
and deployment.
12 Copyright © Acronis, Inc., 2000-2011
Page 13

1.3.6 New: E-mail notifications about deployment
When using the command-line mode (p. 10), you can set up e-mail notifications about the result of
each deployment operation.
Scenario
In Scenario 1 or Scenario 2 described in “Command-line mode and scripting under WinPE” (p. 10), the
administrator also wants to receive e-mail notifications about deployment.
The administrator includes in the deployment script a command that set s up the parameters of the
e-mail notifications, such as the administrator’s e-mail address and the parameters of the mail
server.
An e-mail notification is sent after each deployment command. Each notification contains the MAC
address and IP address of the corres p onding machine and whether the deploy ment h a s been
successful.
1.3.7 New: Compatibility with Acronis True Image, Acronis Backup & Recovery 10, and Acronis Backup & Recovery 11 backups
Acronis Snap Deploy 4 can use as a master image a disk-level backup created by the Acronis True
Image, Acronis Backup & Recovery 10, or Acronis Backup & Recovery 11 product family.
1.3.8 New: Support for multiple net work adapters
A machine license is bound to the machine’s network adapter (also known as network interface card,
NIC).
If the machine has more than one netwo rk adapter, Acronis Snap Deploy 4 ensures that only one
license is assigned to the machine. No extra license will be consumed if you add or remove a network
adapter.
To make sure that only one license is assigned to the machine, do not remove all network adapters at
once.
When using the Wake-on-LAN functionality for the machine, the software sends a special packet,
called the magic packet, to all network adapters of the machine.
1.3.9 Multicast T TL and network bandwidth throttling
Deployment configuration has a parameter that specifies time to live (TTL) for multicast packets. By
using this setting, you can limit the distribution of multicast packets via gateways.
By setting the permitted bandwidth, you can limit the network usage during d eployment.
1.3.10 New: Falling back to unicast
To make deployment to multiple machines faster, Acronis Snap Deploy 4 multicasts the contents of
the master image (the deployment stream) across the network. This way, deployment can run
simultaneously on all machines ev en though the deployment stream is sent only once.
13 Copyright © Acronis, Inc., 2000-2011
Page 14

If the network restricts multicasting, Acronis Snap Deploy 4 can automatically switch to the use of
unicast instead.
When using unicast, Acronis Snap Deploy 4 sends a copy of the deployment stream to each machine.
This way, the network becomes more loaded, so the deployment process may take longer.
1.3.11 Encrypted communication
Components of Acronis Snap Deploy 4 communicate to each other by using the Sec u r e Sockets Layer
(SSL) cryptographic protocol. Encryption starts on the first (earliest) stage of the connection attempt,
so all data transferred in the next steps (including data required for client authentication) is
encrypted.
After the components of Acronis Snap Deploy 4 are installed, encrypted communication between the
components is enabled automatically.
The contents of the master image are transferred unencrypted.
1.3.12 Password protection
Master images taken with Acronis Snap Deploy 4 can be protected with a password to prevent
unauthorized deployment.
Acronis Snap Deploy 4 also supports password-protected backups created with the Acronis True
Image, Acronis Backup & Recovery 10, and Acronis Backup & Recovery 11 product family.
To prevent Acronis bootable components from unauthorized execution, the bootable components in
the Acronis boot menu can also be protected with a password. The user will be asked for the
password when selecting a bootabl e component. No password is required to start the operating
system on the machine.
1.4 Supported operating systems for imaging and
deployment
Acronis Snap Deploy 4 provides f u l l-featured imaging and deployment of the operating sys tems listed
in the table that follows.
For most operating systems, yo u can change settings such as the name that the mac hines will have
after the deployment.
Deploying an operating system requires a license. Depending on the type of operating system, you
need a server license or a workstation license. For details about licensing, see “Licensing policy” (p.
15).
Operating system Imaging and
deployment
Changing
settings
License type
Windows Server 2 0 08 R2 Yes Yes Server
Windows Server 2008 (x86, x64) Yes Yes Server
Windows Server 2003 Service Pack 2 (x86, x64) Yes Yes Server
Windows Server 2003 R2 (x86, x 64) Yes Yes Server
14 Copyright © Acronis, Inc., 2000-2011
Page 15

Windows Small Business Server 2011 Yes Yes Server
Windows Small Business Server 2003 Yes Yes Server
Windows Storage Server 2003 R2 Yes Yes Server
Windows Server 2003 x64 Editions Yes Yes Server
Windows 7 Home Basic (x86, x64) Yes Yes Workstation
Windows 7 Home Premium (x86, x64) Yes Yes Workstation
Windows 7 Professional (x86, x64) Yes Yes Workstation
Windows 7 Ultimate (x86, x64) Yes Yes Workstation
Windows Vista Home Basic (x 86, x 64) Yes Yes Workstation
Windows Vista Home Premium (x86, x64) Yes Yes Workstation
Windows Vista Business (x86, x64) Yes Yes Workstation
Windows Vista Ultimate (x86, x64) Yes Yes Workstation
Windows XP Home Yes Yes Workstation
Windows XP Professional Yes Yes Workstation
Windows XP Professional x64 E dition Yes Yes Workstation
Windows XP Professional Service Pa ck 2 Yes Yes Workstation
Windows XP Professional Service Pack 3 Yes Yes Workstation
Windows 2000 Server Yes No Server
Windows 2000 Advanced Server Yes No Server
Windows 2000 Professional S ervice Pack 4 Yes No Workstation
Windows NT/4.0 Server Yes No Server
Windows 98/Me Yes No Workstation
Linux (kernel: 2.4.9 – 2.6.x) Yes No Server
Acronis Snap Deploy 4 enables, with certain limitations (some operations or options will not be
available), imaging and deployment of any PC-based operating system. For example, Windows
98/NT/ME, NT/4.0 Server, Windows 2000, and Linux (kernel: 2.4.9 – 2.6.x) can be deployed only as is;
on-the-fly settings adjustment is not performed.
The Acronis Universal Deploy option is not applicable to the Win dows 2000, Windows 98/NT/ME,
and Windows NT/4.0 Server oper ating systems.
1.5 Licensing policy
Acronis Snap Deploy 4 licensing is based on the number of machines (servers or workstations) that
you deploy. For example, to deploy a system on 100 machines, you need 100 licenses.
15 Copyright © Acronis, Inc., 2000-2011
Page 16

1.5.1 Machine licenses and deployment licenses
In terms of the number of allowed deploym ents, a license can be one of two types:
§ A machine license enables an unlimited number of deployments to a particular machine. You
may want to use this type of license if you perform deployment to the same machine on a
regular basis.
§ A deployment license enables a single successful deployment to a machine. You may wa nt to
use this type of license if you perform deployment to the same machine once or infrequently. If
deployment under a deployment license fails, you can perform another deployment under the
same license.
You can obtain a license key that corresponds to a number of deployment licen ses .
When setting up a deployment o peration, you can choose (p. 94) whether a deployment license can
be automatically used instead of a machine license, or conversely.
1.5.2 Server licenses and workstation licenses
In terms of the operating system you can deploy, a license can be one of two types:
§ A server license enables deploying a server operating system.
§ A workstation license enables deploying a workstation operating system. A workstation license is
needed to deploy a disk or volume that does not contain an operating system, if the target
machine has not been assigned a machine license before.
Linux is considered as a server operating system. See also the complete list of supported server and
workstation operating systems (p. 14).
If Acronis Snap Deploy 4 fails to identify the type of operating system, the operating system is
considered as a workstation operating system.
When setting up a deployment o peration, you can choose (p. 94) whether a server license can be
automatically used instead of a workstation license for deploying a workstation operating system.
1.5.3 Licenses for Acronis Universal Deploy
Acronis Universal Deploy is an add-on to Acronis Snap Deploy 4 and has its own license keys .
The Acronis Universal Deploy licenses are counted, used and upgraded i n the same way as the
Acronis Snap Deploy 4 licenses:
§ Acronis Universal Deploy has licenses for server and workstation operating systems.
§ A Universal Deploy license can be per-machine (allowing an unlimited number of Universal
Deploy steps) or per-deployment (allowing a single Universal Deploy step).
You need one Universal Deploy license per target machine.
You do not need a license to install Universal Deploy. However, do not forget to add the Universal
Deploy licenses to the license server before starting the deployment. If the licenses are not found
during deployment, the Universal Deploy step will be skipped.
16 Copyright © Acronis, Inc., 2000-2011
Page 17

1.5.4 Trial version of Acronis Snap Deploy 4
The Acronis Snap Deploy 4 trial version has all the functionality of the full version.
To use the trial version, you need to obtain a trial license. You can obtain a server or workstation trial
license.
A trial license enables you an unlimited number of deployments on up to five machines for 15 days.
No trial license for Acronis Universal Deploy is available.
To upgrade from the trial to full version you do not need to re-download the software. Simply buy
the full licenses and import them to the license server. Acronis Snap Deploy 4 will start using a full
license as soon as the corresponding trial license expires.
1.6 Upgrading to Acronis Snap Deploy 4
To upgrade from Acronis Snap Dep l oy 3 to Acronis Snap Deploy 4, upgrade both the licenses and the
software components.
1.6.1 Upgrading licenses
To upgrade the licenses of Acronis Snap Deploy 3, buy the necessa ry number of upgrade licenses and
import them to the license server.
You should buy one upgrade license for Acronis Snap Deploy 4 (ASD4) per eac h l icense for Acronis
Snap Deploy 3 (ASD3) that you have. After you import the upgrade licenses to the license server, you
will be able to perform deployment to any machine by using Acronis Snap Deploy 4.
It does not matter whether the ASD3 license is itself an upgrade license for an even earlier version.
The following table illustrates how the various combinations of licenses will be upgraded. Use this
table to calculate the number of upgrade licenses that you need.
You have You buy and import You now can
ASD3 full license
Available
ASD3 full license
Assigned to Machine1
ASD3 upgrade license
License(s) for an earlier version
Available
ASD3 upgrade license
License(s) for an earlier version
ASD4 upgrade license Perform deployment to any ta r g et machine
ASD4 upgrade license Perform deployment to any ta r g et machine
ASD4 upgrade license Perform deployment to any ta r g et machine
ASD4 upgrade license Perform deployment to any target machine
Assigned to Machine1
No license ASD4 full license Perform deployment to any ta r g et machine
17 Copyright © Acronis, Inc., 2000-2011
Page 18

1.6.2 Upgradi ng compo nen ts
Install the components of Acronis Snap Deploy 4 over those of Acronis Snap Deploy 3.
If all components of Acronis Snap Deploy 3 are installed on the same machine, simply run the setup
program of Acronis Snap Deploy 4 on that machine. During installation, you can add the upgrade
licenses.
If components are installed on different machines, upgrade t h e license server first, by running the
setup program of Acronis Snap Deploy 4. When upgrading the license server, import the upgrade
licenses. Then, upgrade other components on the machines.
Upgrading Acronis PXE Server remov es any components of Acronis Snap Deploy 3 th a t ar e uploaded
to the PXE server. To continue using the PXE server, you need to upload the new components (p. 66)
to it.
Components of versions of Acronis Snap Deploy earlier than 3 are incompatible with Acronis Snap
Deploy 4. You need to remove those components before installing Acronis Snap Deploy 4.
1.7 Technical Support
Maintenance and Support Program
If you need assistance with your Acronis product, please go to http://www.acronis.com/support /
Product Updates
You can download the latest updates for all your registered Acronis software products from our
website at any time after logging into your Account (https://www.acronis.com/my) and registering
the product. See Registering Acronis Products at the Website (http://kb.acronis.com/content/4834)
and Acronis Website User Guide (http://kb.acronis.com/content/8128).
18 Copyright © Acronis, Inc., 2000-2011
Page 19

2 Understanding Acronis Snap Deploy 4
This section describes the com pon ents of the Acronis Snap Deploy 4 infrastructure and their
interaction.
2.1 Terminology
The following table lists the common terms and descriptions used in this document.
Master system The system to be deployed.
Master image (Image)
Online imaging Taking a master image while the master system is in a production state (the operating
Offline imaging Taking an image while the master machine is bo oted into the Ac r onis environment or
Deployment Transferring the operating system, applications, and data from t he master image file to
Stand-alone
deployment
Target disk The physical disk to be deployed to (an internal hard disk of the target machine).
A file that contains the master system in a pack aged form. The file has the .tib
extension.
system is running on the master machine).
Windows Preinstallation Environment.
a physical hard disk (see “Target disk”). In most cases, deployment is performed by
multicasting th e master image t hrough the net work.
Deployment to a machine isolated from a network or included in a network without
Acronis Snap Deploy 4 infrastructure. Stand-alone deployment is performed locally by
using a bootable component of Acronis Snap Deploy 4.
Target machine
(Target)
Deployment template
(Template)
The hardware to perform deployment to.
Configuration parameters of the deployment operation:
§ Path to the master image
§ The operation mode, such as whether to use multicast or unicast and how to handle
the target disk free space
§ Settings to be applied to the deployed systems, such as machine names and user
accounts
§ Operations to be performed on the deployed systems, such as transferring files,
running applications, shutting down, or restarting
Once you save a deployment template, you can use it in the future.
19 Copyright © Acronis, Inc., 2000-2011
Page 20

Administrator
User-initiated
deployment mode
User
The person who has rights to manage the Acronis Snap Deploy 4 infrastructure.
The mode when deployment can be initiated on the side of the target machine.
The person on the side of the target machine who starts the user-initiated deployment.
This term relates to the user-initiated deployment mode only.
2.2 Components
Acronis Snap Deploy 4 includes the following components:
Components for Windows
These are components that are installed on machines running Windows a nd pro vi de Acronis Snap
Deploy 4 infrastructure.
§ Acronis Snap Deploy 4 Management Console is an administrative tool for remote access to
Acronis servers and Acronis Snap Deploy 4 Management Agent.
When disconnected from the Acronis components, the console allows only for the installation of
product components on remote machines and for the creation of bootable media.
§ Acronis Snap Deploy 4 OS Deploy Server (the deployment server) is a component that performs
centralized deployment t hro u gh the network with the help of Acronis Snap Deploy 4 Agents. The
deployment server is installed with the Acronis Universal Dep lo y add-on, which enables
hardware-independent deployment of an operating system.
§ Acronis Snap Deploy 4 Management Agent is a component that takes an image of the master
system in Windows environment und er the administrator’s control through Acronis Snap Deploy
4 Management Console.
§ Acronis PXE Server allows booting machines over the network into Acronis Snap Deploy 4 Agent,
Acronis Snap Deploy 4 Master Image Creator, or Windows Preinstallation Environment. The
machines must support PXE. Using Acronis PXE Server considerably reduces the time required for
booting multiple machines as compared to using bootable media. It also eliminates the need to
have a technician onsite to install the bootable media into the system that must be booted.
§ Acronis Wake-on-LAN Proxy is a component that enables Acro n i s Snap Deploy 4 OS Deploy
Server to wake up the target machines located in another subnet.
§ Acronis Snap Deploy 4 Licens e Server is a component that tracks licenses of Acronis products.
Bootable components
These are components that are available in the Acronis environment or Windows Preinstallation
Environment. A machine must boot into the corresponding compone nt w hen you need to perform
imaging or deployment.
§ Acronis Snap Deploy 4 Agent is a bootable component that performs deployment to a target
machine under the control of Acronis S nap Deploy 4 OS Deploy Server.
There are two ways to load Acronis Snap Deploy 4 Agent on target machines: locally from
bootable media or remotely by using Acronis PXE Server.
20 Copyright © Acronis, Inc., 2000-2011
Page 21

§ Acronis Snap Deploy 4 Master Image Creator is a bootable, locally controlled component that
creates an image of the master system.
There are two ways to load Acronis Snap Deploy 4 Master Image Creator on a master machine:
directly from bootable media or remotely by using Acronis PXE Server.
§ Acronis Snap Deploy 4 Standalone Utility is a bootable component that enables fully-functional
deployment with a GUI on a stand-alone machine (a machine isolated from the network or
included in a network without Acronis Snap Deploy 4 infrastruct u r e).
The only way to load Acronis Snap Deploy 4 Standalone Utility is from an Acronis bootable media.
§ Acronis System Report is a bootable component that collects information about the machine
and saves this information to a locally-attached USB drive.
There are two ways to load Acronis System Report: directly from an Acronis bootable media or
remotely by using Acronis PXE Server.
2.3 Support for file systems and storage media
2.3.1 Supported file systems
Acronis Snap Deploy 4 provides f u l l-featured imaging and deployment of the following file systems:
§ FAT16
§ FAT32
§ NTFS
§ Ext2
§ Ext3
§ Ext4
§ ReiserFS
§ Reiser4
§ Linux SWAP
§ XFS
§ JFS
Acronis Snap Deploy 4 can perform imaging and deployment of corru pted or unsupported file
systems by using a sector-by-sector approach. This approach usually leads to a bigger size of the
master image and makes the imaging or deployment process longer. A volume with an unsuppor te d
file system cannot be resized during deployment.
2.3.2 Supported me dia
Acronis Snap Deploy 4 Master Imag e Creator and Acronis Snap D eploy 4 Management Agent can
save an image:
§ In a network folder.
§ On an internal hard disk of the master machine.
§ On USB and FireWire (IEEE-1394) storage devices (hard drives, flash drives) attached to the
master machine.
§ On DVD+R/RW, DVD-R/RW, CD-R/RW, or recordable Blu-ray Discs (BD-R, BD-RE) loaded in the
media drive of the master machine.
21 Copyright © Acronis, Inc., 2000-2011
Page 22

A sizeable image can be split between multiple media automatically.
Acronis Snap Deploy 4 O S Deploy Server can deploy images located:
§ In network folders.
§ On an internal hard disk of the deployment server.
§ On USB and FireWire (IEEE-1394) storage devices (hard drives, flash drives) attached to the
deployment server.
§ On DVD+R/RW, DVD-R/RW, CD-R/RW, or recordable Blu-ray Discs (BD-R, BD-RE) loaded in the
media drive of the deployment server.
The best practice is keeping images on the deployment server’s hard d i sk. This minimizes network
traffic during deployment.
The image created on removable media has to fit into one media disk. To deploy an image spread
over two or more CDs, DVDs or other media, copy all parts of the image to the same folder on the
deployment server or to a network folder.
Acronis Snap Deploy 4 Standalone Utility can deploy images located:
§ In network folders.
§ On USB and FireWire (IEEE-1394) storage devices (hard drives, flash drives) attached to the
managed machine.
§ On DVD+R/RW, DVD-R/RW, CD-R/RW, or recordable Blu-ray Discs (BD-R, BD-RE) loaded in the
media drive of the managed machine.
The image created on removable media has to fit into one media disk. To deploy an image spread
over two or more CDs, DVDs or other media, copy all parts of the image to the same folder on an
external drive or to a network folder.
2.4 Supported types of disk and firmware interface
Acronis Snap Deploy 4 can perform imaging and deployment of basic disks whose partitioning
scheme is master boot record (MBR). Such disks are also called basic MBR disks.
You can perform deployment to a basic MBR disk or to an empty, uninitialized disk.
Dynamic disks and disks whose partitioning scheme is GUID Partition Table (GPT) are not supported
for imaging and deployment.
To be able to boot into the operating system after the deployment, the machine must have the basic
input/output system (BIOS) firmware interface. Booting a machine that has the Unified Extensible
Firmware Interface (UEFI) mode enabled is not support ed.
Tip: To perform imaging and deployment of UEFI-enabled machines or of dynamic and GPT disks, you can use
the Acronis Backup & Recovery 11 product. Namely, you can “image” the machine by creating a disk-level
backup of it, and then perform “deployment” to the target machine by recovering data from the backup. This
way, you can image a supported operating system on a BIOS machine and deploy it to a UEFI-enabled machine.
For more information, including the list of supported operating systems, refer to Help for Acronis Backup &
Recovery 11 (look for “UEFI”).
22 Copyright © Acronis, Inc., 2000-2011
Page 23

2.5 Usage
This section gives a general ide a of using the product and does not contain the detailed instruction s
on how to perform operations. Never theless, advanced users are welcome to use this section as a
step-by-step quick start guide. The details can be found in the further sectio ns.
2.5.1 Offline imaging
Offline imaging means that the master system is stopped and the master machine boots into the
Acronis environment or into Windows Preinstallation Environment (WinPE).
To perform offline imaging
1. Configure the master system.
2. Install Acronis Snap Deploy 4 Management Console.
3. Do one of the following:
§ Create a bootable media (either an Acronis media or a WinPE-based media) with Acronis
Snap Deploy 4 Master Image Creator.
OR
§ Install Acronis PXE Server, connect the console to the PXE server and upload Acronis Snap
Deploy 4 Master Image Creator.
4. Depending on your choice in the previous step, boot the machine i n to Acronis Snap Deploy 4
Master Image Creator from the bootable media or from the PXE server.
5. On the master machine, follow the instructions of the Master Image Creator wizard to configure
and launch the imaging operati on. The image can be saved in a network folder, on detachable
media (such as a USB drive), or removable media (such as a DVD). To access the network from
the bootable environment, you must have a DHCP server or configure the network settings of the
master machine manually.
Offline imaging
23 Copyright © Acronis, Inc., 2000-2011
Page 24

2.5.2 Online imaging
Online imaging means that the master system is imaged live (without restarting the machine or
suspending operations). Online imaging can be performed remo te l y whenever you need. The
disadvantage is that you have to install imaging software that is included in the master image. This is
not always rational.
To perform online imaging
1. Configure the master system.
2. Install Acronis Snap Deploy 4 Management Console.
3. Install Acronis Snap Deploy 4 Management Agent on the master system either locally by using
the setup program, or remote ly by us ing Acronis Snap Deploy 4 Manageme nt Conso le.
After Acronis Snap Deploy 4 Management Agent is installed, you can image the master system
online (without restarting the machine) at any time.
4. Connect the console to the master system, click Create image -> Next -> A master ima ge . Follow
the instructions of the Master Image Creator wizard to configure and launch the imaging
operation. The image can be saved in a network folder, on detachable media (such as an USB
drive) or on removable media (such as a DVD).
Online imaging
2.5.3 Deployment
This section illustrates the Acronis components functionality by the example of deployment that you
start manually. For details about the ways of deployment, see “Deploying a master image” (p. 79).
This procedure presumes that you have installed Acronis Snap Deploy 4 Management Console and
created a master image.
To perform deployment
1. Install Acronis Snap Deploy 4 License Server. Import licenses to the license server. Install Acronis
Snap Deploy 4 OS Deploy Server.
24 Copyright © Acronis, Inc., 2000-2011
Page 25

2. Do one of the following:
§ Create bootable media (either Acronis media or WinPE-based media) with Acronis Snap
Deploy 4 Agent.
OR
§ Install Acronis PXE Server, connect the console to the PXE server , and then upload Acronis
Snap Deploy 4 Agent.
3. Depending on your choice in the previous step, boot the targe t mac hines into Acronis Snap
Deploy 4 Agent from the bootable media or from the PXE server.
You must have a DHCP server or configure the network settings of the target machines manually
to enable the target machines to connec t to A cronis Snap Deploy 4 OS Deploy Server.
4. Connect the console to Acronis Snap Deploy 4 OS Deploy Server. Go to the Machines view.
5. Make sure that the target machines are displayed in the list and have the Ready state. This
means that the machines are connected and ready for deployment.
6. Select th e mach in es , clic k Deploy image on the toolbar, and then follow the Create Deployment
Task Wizard instructions to configure and launch the deployment operation. When prompted
about when you want to run the deployment, select Now.
Deployment that starts manually
2.6 What is Acronis Universal Deploy
This section describes the Acronis proprietary technology that helps you to deploy and boot
Windows on dissimilar hardware. Acronis Universal Deploy saves you from configuring a new master
system for each make of hardware you need to perform deployment to.
If you plan to deploy Windows to multiple machines that are identical to each other but differ from
the master machine hardware, deploy the master image to one of the identical machines by using
Acronis Universal Deploy. This will adjust Windows to the dissimilar hardware. Then, create a master
image of the adjusted system and d eploy that image to the identical machines.
The Acronis Universal Deploy option is not available in the stand-al one deployment (p. 9) mode.
25 Copyright © Acronis, Inc., 2000-2011
Page 26

2.6.1 Acronis Universal Deploy purpose
An image of a system can be deployed easily on the hardware where it was created or to identical
hardware. However, if you change a motherboard or use another process or version, the deployed
system could be unbootable. An attempt to transfer the system to a new, much more powerful
machine will usually produce the same result. This is because the new hardware is usually
incompatible with the most critical drivers included in the image.
Using Microsoft System Preparation Tool (Sysprep) does not solve this problem, because Sysprep
permits adding drivers only for Plug and Play devices (such as sound cards, network adapters, and
video cards). As for the system Hardware Abstraction Layer (HAL) and mass-storage device drivers,
they must be identical on the source and the target machines; see Microsoft Knowledge Base,
articles 302577 and 216915.
Acronis Universal Deploy techn ology provides an efficient solution for hardware-independent system
deployment by adding the crucial Hardware Abstraction Layer (HAL) and mass-storage device drivers.
2.6.2 Acronis Universal Deploy general principles
Automatic HAL and mass-storage drivers selection
Acronis Universal Deploy searches the Windows default driver storage folders (in the master image
being deployed) for HAL and mass-storage device drivers and installs drivers that better fit the target
hardware. You can specify a custom driver repository (a network folder or a CD) which will also be
used for driver searches.
Tip: The Windows default driver storage folder is determined by the DevicePath value in the
HKEY_LOCAL_MACHINE\SOFTWARE\Microsoft\Windows\CurrentVersion registry key. This storage folder is
usually WINDOWS\inf.
Manual selection of mass-storage device driver
If the target hardware has a specific mass-storage controller (such as a SCSI, RAID, or Fibre Channel
adapter) for the hard disk, you can install the appropriate driver manually, bypassing the automatic
driver search-and-install procedure.
Installing drivers for Plu g an d Pla y dev ic es
Acronis Universal Deploy relies on built-in Plug and Play discovery and configuration process to
handle hardware differences in devices that are not critical for the deployed system startup, such as
video, audio and USB. Windows tak es control over this process during the logon phase, and if some
of the new hardware is not detected, you will have a chance to install drivers for it later manually.
2.6.3 Acronis Universal Deploy and Microsoft Sysprep
Acronis Universal Deploy is not a system preparation tool. You can apply it to any system image
created by Acronis products, but you cannot apply it to images of systems prepared with Microsoft
System Preparation Tool (Sysprep).
2.6.4 Getting Acronis Universal Deploy
Acronis Universal Deploy is an add-on to Acronis Snap Deploy 4. It is purchased separate ly and has its
own license.
26 Copyright © Acronis, Inc., 2000-2011
Page 27

For information about purchasing Universal Deploy, visit the Acronis Snap Deploy Web page.
2.7 How to
How to image a machine without installing additional software to it?
Perform offline imaging (p. 68).
How to image a machine without restarting it?
Perform online imaging (p. 68).
How to prepare deployment tools?
Create bootable media (p. 59) with Acronis Snap Deploy 4 Agent. The machines will boot from
these media.
How to deploy an image to a list of specific machines?
Use the The machines listed below option in the Create Deployment Task wizard (p. 102).
Specify the list of machines to perform deployment to.
How to deploy an image to a number of any machines?
Use the Any machines ready for deployment option in the Create Deployment Task wizard (p.
106). Specify the number of machines to wait for.
How to deploy an image in the absence of a network connection?
Use Acronis Snap Deploy 4 Standalone Utility (p. 112).
How to enable users to start deployment on t he ir own?
Set up user-initiated deployment (p. 113).
How to view the status of mass deployment?
Open the Deployment tasks view (p. 124).
How to view the list of machines?
Open the Machines view (p. 119).
How to add or remove licenses for de ployment?
Open the Licenses view (p. 54).
27 Copyright © Acronis, Inc., 2000-2011
Page 28

3 Getting started with Acronis Snap Deploy 4
This section describes how to install Acronis Snap Deploy 4 and perfo rm a simpl e deployment.
By following the procedures in this section, you will:
a) Install and start Acronis Snap Deploy 4.
b) Create a master image of a machine.
c) Deploy the master image to the same or a different machine.
Step 1. Installing Acronis Snap Deploy 4
In this step, you will install Acronis Snap Deploy 4 in a typical conf i guration. For the complete
description of installation methods and procedure s, see t he installation section (p. 39).
Before installation, make sure that:
§ You have a machine running a modern version of Windows, such as Windows 7 Professional. For
the list of operating systems where you can install Acronis Snap Deploy 4, see “Supported
operating systems” (p. 39).
§ You have the setup program . You can download the setup program from t h e Acro n i s product
download Web page.
§ You have one or more license keys for Acronis Snap Deploy 4. You can buy full license keys or
obtain trial ones by going to the Acronis Snap Deploy 4 Web page. The type of license (“for
Server” or “for Workstatio n”) determines the type of operating system that you can deploy.
On the machine where you want to install Acronis Snap Deploy 4, do the followin g:
1. Log on as an administrator and start the setup program.
2. Click Install Acronis Snap Deploy 4.
3. Accept the terms of the license agreement, and then click Next.
4. Click Typical.
28 Copyright © Acronis, Inc., 2000-2011
Page 29

5. Click Add license, and then specify the license keys. You can type the license keys manually or
import them from a text file.
6. Specify whether the machine will participate in the Customer Experience Program (CEP).
7. Click Install.
Step 2. Starting Acronis Snap Deploy 4
On the machine where you installe d Acronis Snap Deploy 4:
§ On the desktop, click Acronis Snap Deploy 4.
When Acronis Snap Deploy 4 starts, the welcome screen appears.
Step 3. Creating a bootable media
In this step, you will create a bootable media that enables creating master images and performing
deployment.
On the machine where you installe d a n d started Acronis Snap Deploy 4, do the fol l owing:
29 Copyright © Acronis, Inc., 2000-2011
Page 30

1. On the Tools menu, click Create bootable media.
2. In the list of comp onents, s elec t Acronis Snap Deploy 4 Agent and Acronis Snap Deploy 4 Master
Image Creator.
3. In Network settings, in Server name/IP, specify the name of the machine where you installed
Acronis Snap Deploy 4.
4. Choose to create the media on a CD or DVD. Insert a blank CD-R/RW or DVD-R/RW.
Tip. If no CD-RW, DVD-RW, or a similar optical disc drive is present on the machine, you can
choose to create an ISO file that you can later burn to an optical disc on another machine. You
can also create the media on a USB drive. For details, see “Creating a bootable media” (p. 59).
5. Click Create.
Step 4. Creating a master image
In this step, you will create an image of a machine and save the image to a USB hard disk.
Choose a machine whose image you want to create. No license is required for imaging the machine.
However, a server or a workstation license will be used for deploying the machine, depending on
whether the machine is running a server operating system (such as Windows 2008 Server or Linux) or
a workstation operating system (such as Windows 7). For the list of server and workstation operating
systems, see “Supported operating systems for imaging and depl oyment” (p. 14).
30 Copyright © Acronis, Inc., 2000-2011
Page 31

On the machine whose image you want to create, do the following:
1. Make sure that the CD or DVD drive has a higher boot priority than the hard disk drive. You may
need to open the BIOS setup utility of the machine and adjust the boot priority setting, similarly
to what is shown in the followi ng p i cture.
2. Attach the USB hard disk drive to the machine.
Tip. Alternatively, you will be able to save the image to a network folder, as described later in
this procedure.
3. Boot the machine from the bootable media you created.
4. On the boot menu, click Acronis Snap Deploy 4 Master Image Creator.
5. In the pop-up window, click Cancel or wait until that window closes.
31 Copyright © Acronis, Inc., 2000-2011
Page 32

6. Select the volumes that you want to include in the master image. You can leave the default
selection, which normally inclu des the volumes that contain the operating system.
7. Specify a folder on the USB hard disk where you want to save the image.
Alternatively, specify a network folder, and the user name and password to access that folder.
8. Keep clicking Next until the summary screen appears. Click Create in that screen.
Acronis Snap Deploy 4 starts creating the image.
After the image is created, the machine will restart.
Step 5. Performing deployment
In this step, you will deploy the created master image to a single machine (the target machi ne ).
Tip: For getting started, we recommend performing deployment to the same machine from which you created
the image, or to a machine with identical hardware. This way, no extra steps, such as using the Universal
Deploy option, are required.
32 Copyright © Acronis, Inc., 2000-2011
Page 33

Preparing the target machine
On the target machine, do the followin g:
1. Make sure that the CD or DVD drive has a higher boot priority than the hard disk drive. You may
need to open the BIOS setup utility of the machine and adjust the boot priority setting.
2. Boot the machine from the bootable media you created.
3. On the boot menu, click Acronis Snap Deploy 4 Agent.
4. In the pop-up window, click Cancel or wait until that window closes.
5. Make sure that the machine is ready for deployment. The window should look similar to the
following picture.
Details. The target mac hine becomes ready for deployment wh en it conne cts to A cron is Snap
Deploy 4 OS Deploy Server. This server is part of Acronis Snap Deploy 4. If the machine does not
connect to the server, you may need to adjust network settings, as described in “Booting the
target machines” (p. 108).
33 Copyright © Acronis, Inc., 2000-2011
Page 34

After the target machine is ready, you can deploy the master image to it.
Deploying the mast e r image
On the machine where you installed Acronis Snap Deploy 4, do the following:
1. Attach the USB hard disk drive with the master image to the machine. Optionally, copy the image
to the local hard disk of the mac h i n e.
2. Click the Machines view. Make sure that the target machine you prepared is shown in the list
and has the Ready state.
3. Right-click the target machine, and then click Dep lo y i ma ge.
4. Keep clicking Next until the template selection window appears. Click Create new in that
window.
5. Click Create a new template, and then click Next.
6. Select the master image (the .tib file) that you created, and then click Next.
7. In the deployment settings window, click Next.
34 Copyright © Acronis, Inc., 2000-2011
Page 35

Note. If you imaged a machine running a workstation operating system (such as Windows 7) but
you only have server licenses (such as Acronis Snap Deploy 4 for Server – Trial License), you may
want to allow the software to use this type of license to deploy the machine. To do so, click
Licensing in the deployment sett i n gs window, and then click Use a server license automatically.
Alternatively, you can add a workstation license before starting the deployment, by opening the
Licenses view and clicking Add license on the toolbar.
8. Keep clicking Next until the summary window appears. Click Save in that window.
Details. You have created a deployment template. It determines how to perform deployment.
You can reuse this template in other deployment tasks.
9. Select the deployment template you created, and then click Next.
35 Copyright © Acronis, Inc., 2000-2011
Page 36

10. When asked about when to run the deployment, select Now and type the user name and
password that you use to log on to Windows.
11. Keep clicking Next until the summary window appears. Click Create in that window.
36 Copyright © Acronis, Inc., 2000-2011
Page 37

You can view the progress of the de ployment both on the machine where you installed Acronis Snap
Deploy 4 and on the target machine.
Viewing the deployment progress on the machine with Acronis Snap Depl o y 4
Viewing the deployment progress on the target machine
What you can do next
In the navigation pane, you can open the corresponding views to navigat e across the software.
§ To run the deployment again, open the Deployment tasks view, select the task you creat ed, and
then click Run on the toolbar.
For details about the Deployment tasks view, see “Managing deployment tasks” (p. 124).
§ To add more machines, open the Machines view and then cli ck Add machines. You can add
machines by their physical addresses, known as MAC addresses.
37 Copyright © Acronis, Inc., 2000-2011
Page 38

Another way to add a machine to this view is to boot the machine so that it becomes ready for
deployment, as described in “Preparing the target machine” earlier in this section. You can then
turn off or restart the machine wit hout performing deployment. The machine remains in the
view.
For details about the Machines view, see “Managing the list of machines” (p. 119).
§ To add more licenses for deployment, open the Licenses view and then click Add license on the
toolbar. Clicking Obtain license opens the Acronis Sn ap D eploy 4 Purchasing Web page.
For details about managing licenses, see “Using Acronis Snap Deploy 4 License Server” (p. 54).
For information about license types, see “Licensing policy” (p. 15).
§ To set up network booting of machines (instead of booting them from a media), open the PXE
server view, click Upload components to PXE, and then follow the steps similar to those
described in “Creating a bootable media” earlier in this section.
For details about setting up the network booting, see “Configuring Acronis PXE Server” (p. 66).
38 Copyright © Acronis, Inc., 2000-2011
Page 39

4 Installation of Acronis Snap Deploy 4
4.1 Supported operati ng s yst e ms
This section lists the operating systems where components of Acronis Snap Deploy 4 can be installed.
Any components for Windows can be installed in the following operating systems:
§ Windows Server 2008 R2
§ Windows Server 2008 (x86, x64)
§ Windows Server 2003 Service Pack 2 (x8 6, x6 4)
§ Windows Server 2003 R2 (x86, x64)
§ Windows Small Business Server 2011
§ Windows Small Business Server 2003
§ Windows Server 2003 x64 Editions
§ Windows 7 Professional (x86, x64)
§ Windows 7 Ultimate (x86, x64)
§ Windows Vista Business (x86, x64)
§ Windows Vista Ultimate (x86, x64)
§ Windows XP Profe ss ional
§ Windows XP Professional x64 Edition
§ Windows XP Professional Service Pack 3
In addition to the above-listed operating systems, Acronis Snap Deploy 4 Management Console and
Acronis Snap Deploy 4 Management Agent can be installed in any of the following operating
systems:
§ Windows 7 Home Basic, Windows 7 Home Premium
§ Windows Vista Home Basic, Windows Vista Home Premium
§ Windows XP Home
4.2 Used ports and IP addresses
The Acronis Snap Deploy 4 OS Deplo y Server and Acronis Snap Deploy 4 Management Console
components use the following po r ts and IP addresses for remote operation:
§ UDP port: 9876
§ TCP port: 9876. If this port is busy, the deployment server and the ma nagement console choose a
port at random
§ IPv4 multicast addr ess: 239.255.21 9.45
§ Acronis Snap Deploy 4 Managem ent Console UDP port: 9877. If this port is busy, the
management console chooses a port at random
Acronis PXE Server uses the following ports and IP addresses:
§ UDP port: 67, 68, 69
§ Broadcast address : 255.255.255.2 55
39 Copyright © Acronis, Inc., 2000-2011
Page 40

For a remote installation (p. 46), the TCP port 25001 is used.
If you are using a firewall, you may need to set the appropriate access options.
4.3 Typical installation
With typical installation, all components of Acronis Snap Deploy 4 that are needed for deployment
and offline imaging will be installed on the same machine.
Acronis Snap Deploy 4 will be installed with the following functionality:
§ Performing deployment through the network
§ Booting of the target machines over the network
§ Managing the deployments by using the management console
§ Creating a bootable media for deployment
§ Creating a bootable media for taking a master image
§ Storing and managing licenses of Acronis Snap Deploy 4
The following components will be installed on the machine:
§ Acronis Snap Deploy 4 OS Deploy Server (including the Acronis Universal Deploy (p. 25) add-on)
§ Acronis Snap Deploy 4 License Server
§ Acronis Snap Deploy 4 Management Console
§ Acronis PXE Server
To install Acronis Snap Deploy 4 Management Agent or Acronis Wake-on-LAN Proxy, and for more
flexible installation, use custom installation (p. 40).
To install Acronis Snap Deploy 4 (typical installation)
1. Log on as an administrator and start the setup program.
2. Click Install Acronis Snap Deploy 4.
3. Accept the terms of the license agreement, and then click Next.
4. Click Typical.
5. Click Add license, and then type the license keys for Acronis Snap Deploy 4 or import them from
a file. You must provide at least one license key (either a machine license or a deployment
license).
Note: The licenses will not be used until you start deployment.
6. Specify whether the machine will participate in the Customer Experience Program (CEP).
You will be able to change this setting at a later time by starting Acronis Snap Deploy 4 and
clicking Help -> Customer Experience Program (CEP).
7. Click Install.
4.4 Custom installation
With custom installatio n , you can select which components of Acronis Sn a p Deploy 4 to install. You
can also specify additional parameters. For example, you can change the default folder for
installation.
40 Copyright © Acronis, Inc., 2000-2011
Page 41

You may want to use custom installation in the following cases:
§ Installing Acronis Snap Deploy 4 Management Agent to take a master image of a machine
without restarting it (p. 24)
§ Installing Acronis Wake-on-LAN Proxy to wake up machines that are loca te d in another subnet
§ Installing different components on different machines, such as installing Acronis Snap Deploy 4
OS Deploy Server on one machine and Acronis PXE Server on another. For examples, see
“Common installation configurations” (p. 42).
4.4.1 Installation procedure
Preparation
To be able to install Acronis Snap D eploy 4 OS Deploy Server, you need to have at least one machine
license or deployment license on Acronis Snap Deploy 4 License Server. The license can be trial or
full.
§ If you are installing both Acronis Snap Deploy 4 License Server and Acronis Snap Deploy 4 OS
Deploy Server on the same machine, you will be able to provide the license keys during
installation.
§ If Acronis Snap Deploy 4 License Server is installed on a different machine, load the license keys
to that license server before installing the deployment server.
The license key just needs to be available on the license server. It will not become used until you start
deployment.
Installation of other components does not require licenses.
To install Acronis Snap Deploy 4 (custom installation)
1. Log on as an administrator and start the setup program.
2. Click Install Acronis Snap Deploy 4.
3. Accept the terms of the license agreement, and then click Next.
4. Click Custom.
5. In the list of components, select the componen ts tha t you wan t to insta ll. For det ail s about
installing the componen ts, see “Installation of components” (p. 43).
6. If you selected Acronis Snap Deploy 4 License Server for installation, provide the license keys of
Acronis Snap Deploy 4.
7. If you selected Acronis Snap Deploy 4 OS Deploy Server without selecting Acronis Snap Deploy 4
License Server, specify the name or IP address of the machine where the license server is
installed.
8. Specify the folder where the components will be installed.
9. If prompted, specify the following:
§ Whether to install the components for all users on the machine (recommended) or only for
the current user
§ Whether the machine will participate in the Customer Experience Program (CEP). You will be
able to change this setting at a later time by starting Acronis Snap Deploy 4 and clicking
Help -> Customer Experience Program (CEP).
10. Click Install.
41 Copyright © Acronis, Inc., 2000-2011
Page 42

4.4.2 Common installation configurations
Acronis Snap Deploy 4 components can be installed in various configurations, to distribute various
components and features a mong th e machi nes on the network.
a) The minimal configuration that enables only offline imaging (p. 23) and stand-alone deployment
(p. 9) consists of:
§ Acronis Snap Deploy 4 Management Console
b) The minimal configuration that enables offline imaging, stand-alone deployment, and
deployment through the network with Acronis Snap Deploy 4 OS Deploy Serv e r consists of the
following components:
§ Acronis Snap Deploy 4 Management Console
§ Acronis Snap Deploy 4 License Server
§ Acronis Snap Deploy 4 OS Deploy Server
On the target machines, no Acronis components are required.
c) The configuration that adds the network boot of the target m achines to the functionality
described in (b):
§ Acronis Snap Deploy 4 Management Console
§ Acronis Snap Deploy 4License Server
§ Acronis Snap Deploy 4 OS Deploy Server
§ Acronis PXE Serve r
The components can be installed all on the same machine, or on different ma chines. On the
target machines, no Acronis components are required.
This is the recommended elementary configuration that enables most of the Acronis Snap Deploy
4 functionality. This is the configuration for typical installation (p. 40).
If physical access to the powerful server is limited, you can install the console on a separate
machine. Another common co n f iguration is:
Workstation:
§ Acronis Snap Deploy 4 Management Console
Server:
§ Acronis Snap Deploy 4 License Server
§ Acronis Snap Deploy 4 OS Deploy Server
§ Acronis PXE Serve r
Generally, you can install all Acronis servers on separate machines. In this case, you will have to
connect the management console to each server separately to manage the server. With all
servers on one machine, only o ne console connection is needed.
d) To add to any configuration (a)–(c) the onlin e ima g ing (p. 24) ability and the abili ty to validate
images integrity, install Acronis Snap Deploy 4 Management Agent.
Online imaging means that the master system is imaged live (without restarting the machine or
suspending operations). You can perform online imaging remotely, by connecting the console to
the management agent installed on the master machine. The management agent will be included
in the master image and deployed to all target machines.
However, having excess software in the master image is not always rational.
We recommend that you create a master image by using the bootable component called Acronis
Snap Deploy 4 Master Image Creator. Nevertheless, having at least one management agent on
42 Copyright © Acronis, Inc., 2000-2011
Page 43

the network (not necessarily on the master machine) makes sense. You will be able to validate
(check) the integrity of your images (p. 78) by using the management agent.
e) To add to Acr onis Snap Deploy 4 OS Deploy Server an abil ity to perform deployment in another
subnet (across a network switch) in configuration (b) or (c), install Acronis Wake-on-LAN Proxy
on any server in the subnet where the target machines are. No additional actions are required.
Acronis Wake-on-LAN Proxy has to be installed only if:
§ You are going to perform deployment to a specific list of machines.
AND
§ All or some of the target machines are in a subnet other than Acronis Snap Deploy 4 O S
Deploy Server.
4.4.3 Installation of components
The setup program of Acronis Snap Deploy 4 includes the following components and component
features:
§ OS Deploy Server, which includes:
§ Acronis Snap Deploy 4 OS Deploy Server
§ Acronis Universal Deploy
§ License Server, which inc l udes :
§ Acronis Snap Deploy 4 License Server
§ The Acronis Snap Deploy 4 Lic ense Server Management Tool command-line utility
§ Management Console, which i ncludes:
§ Acronis Snap Deploy 4 Management Console
§ Media builders for creating an Acronis bootable media and a WinPE-based bootable media
§ PXE Server
§ Management Agent
§ Wake-on-LAN Proxy
43 Copyright © Acronis, Inc., 2000-2011
Page 44

The list of components
4.4.3.1 Installation of Acronis Snap Deploy 4 Management Console
Acronis Snap Deploy 4 Management Console is an administrative tool for local and remote access to
Acronis servers and Acronis Snap Deploy 4 Management Agent. Install Ac ro nis Snap Deploy 4
Management Console on any machine from which you prefer to operate.
Installation of Acronis Snap Deploy 4 Management Console also includes the media builders for
creating an Acronis bootable media and a bootable media based on Windows Preinstallation
Environment (WinPE).
Once Acronis Snap Deploy 4 Management Console is installed, you can install other components
remotely (p. 46).
4.4.3.2 Installation of Acronis Snap Deploy 4 License Server
Acronis Snap Deploy 4 License Server is a component that tracks licenses of Acronis products. Install
Acronis Snap Deploy 4 License Server on a machine accessible to Acronis Snap Deploy 4 OS Deploy
Server. Consider installing both products on the same machine.
Installation of Acronis Snap Deploy 4 License Server also includes Acronis Snap Deploy 4 License
Server Management Tool. This is a command-line utility for controlling the license server.
Alternatively, you can control the license server by using Acronis Snap Deploy 4 Management
Console.
Note: If you have already installed a license server that came with another Acronis product, you will still need to
install Acronis Snap Deploy 4 License Server. You can install both license servers on the same machine. The
machine will then act as a common license server for all Acronis products.
After installation, Acronis Snap Deploy 4 License Server launches automatically as a Windows service.
44 Copyright © Acronis, Inc., 2000-2011
Page 45

When installing Acronis Snap Deploy 4 License Server, you can add the license keys to it. You can add
license keys at a later time, either by using the management console (p. 54) or in the command-line
mode (p. 56).
4.4.3.3 Installation of Acronis Snap Deploy 4 OS Deploy Server
Acronis Snap Deploy 4 O S Deploy Server is a component that pe r fo rms centralized deployment
through the network with the help of bootable components called agents.
Before installing Acronis Snap Deploy 4 OS Deploy Server, you need to install Acronis Snap Deploy 4
License Server (p. 44) and import license keys to it. You can install both servers on the same machine.
If Acronis Snap Deploy 4 License Server is not installed on the machine where you are installing
Acronis Snap Deploy 4 OS Deploy Server, the setup program will ask you to specify a license server.
Browse to the server, or enter its name or IP address.
Note: We recommend specifying the license server by its machine name. If you specify the license server by its IP
address, Acronis Snap Deploy 4 OS Deploy Server will not be able to find the license server if this address
changes.
Installation of the deploymen t server does not decrease the number of licenses. The software just
checks the availability of the licenses and stores the specified parameters of Acronis Snap Deploy 4
License Server to be able to access the license server at the time of deployment.
Important: If you are planning to use more than one deployment server, make sure that each particular
machine is deployed only by one of them. Otherwise, each deployment server may use a separate license for the
machine.
4.4.3.4 Installation of Acronis PXE Server
Acronis PXE Server allows network booting of the target machines for performing deployment.
Using Acronis PXE Server considerably reduces the time required for booting the machines as
compared to using bootable media. It also eliminates the need to have a technician onsite to install
the bootable media into the system that must be booted. This allows for unattended scheduled
deployment.
Using Acronis PXE Server makes sense if there is a Dynamic Host Control Protocol (DHCP) server in
your network, so that the machines can automatically obtain IP addresses at boot. Without a DHCP
server, you cannot boot machines from PXE.
We recommend that you have only one PXE server within a subnet to ensure predictability of the
booting machines’ behavior.
Acronis PXE Server starts running as a service immediately after installation. It will automatically
launch at each system restart. You can stop and start this service in the same way as other services.
4.4.3.5 Installation of Acronis Wake-on-LAN Proxy
Acronis Wake-on-LAN Proxy enables Acronis Snap Deploy 4 OS Deploy Server to wake up the target
machines located in another su bn et.
45 Copyright © Acronis, Inc., 2000-2011
Page 46

You need to install Acronis Wake-on-LAN Proxy only if:
§ You are going to perform deployment to specific machines (deployment to any ready machines
does not involve waking up the machines by the deployment server)
AND
§ All or some of the target machines are in a subnet other than Acronis Snap Deploy 4 OS Deploy
Server.
Install Acronis Wake-on-LAN Proxy on any server in the same subnet as the target machines. No
additional actions are required.
Acronis Wake-on-LAN Proxy runs as a service immediately after installation. Later on it will
automatically launch at each system restart. You can stop and start this service in the same way as
other services.
4.4.3.6 Installation of Acronis Snap Deploy 4 Management Agent
Installation of Acronis Snap Deploy 4 Management Ag e nt adds the online imaging ability and the
ability to validate integrity of the master images.
Online imaging means that the master system is imaged live (without restarting the machine or
suspending operations). You can perform online imaging remotely by connecting the console to the
management agent installed on the master machine. The management agent w ill be included in the
master image and deployed on all target machines.
However, having excess software in the master image is not always rational.
We recommend that you create a master image by using the bootable component called Acronis
Snap Deploy 4 Master Image Creator. Nevertheless, having at least one management agent on the
network (not necessarily on the master machine) makes sense. You will be able to validate (check)
the integrity of your images (p. 78) by using the management agent.
4.4.3.7 Installation of Acronis Universal Deploy
Acronis Universal Deploy is an add-on to Acronis Snap Deploy 4. It is installed automatically when
you install Acronis Snap Deploy 4 OS Deploy Server (p. 45).
Universal Deploy requires a separate license (p. 16).
Note: You do not need a license to install Acronis Universal Deploy. However, do not forget to add the Acronis
Universal Deploy licenses to the license server before starting deployment. If the licenses are not found during
deployment, the Acronis Universal Deploy step will be skipped.
4.5 Other ways of installation
4.5.1 Installing components remotely
By using Acronis Snap Deploy 4 Management Console, you can install the following components of
Acronis Snap Deploy 4 remotely:
§ Acronis Snap Deploy 4 Management Agent
§ Acronis Wake-on-LAN Proxy
46 Copyright © Acronis, Inc., 2000-2011
Page 47

§ Acronis PXE Serve r
§ Acronis Snap Deploy 4 License Server
§ Acronis Snap Deploy 4 OS Deploy Server
4.5.1.1 Preparation
Before proceeding with remote installation, prepare the remote machines as follows:
§ Simple file sharing. For a successful installation on a remote machine running any version of
Windows XP, the option Control panel > Folder options > View > Use simple file sharing must be
disabled on that machine.
§ User Account Control. For a successful installation on a remote machine running Windows Vista
or later, User Account Control (UAC) must be disabled. To access this option, go to Control panel
> User Accounts > Change User Account Control Settings.
§ File and Printer Sharing must be enabled on the remote machine. To acces s this option:
§ On a machine running Windows XP with Service Pack 2 or Windows 2003 Server: go to
Control panel > Windows Firewall > Exceptions > File and Printer Shari ng.
§ On a machine running Windows Vista, Windows Server 2008, or Windows 7: go to Control
panel > Windows Firewall > Network and Shar ing Center > Change advanced sharing
settings.
§ Ports. Acronis Snap Deploy 4 uses TCP ports 445 and 25001 for remote installation. Make sure
that these ports are added to exceptions in the firewall settings on the remote machines. TCP
port 445 is added to exceptions automatically by Windows Firewall when you enable File and
Printer Sharing.
To add a port to exceptions:
§ In Windows XP, Windows 2003 S erver, and Windows Vista: go to Contr ol panel > Windows
Firewall > Exceptions > Add Port
§ In Windows 7: go to Control panel > Windows Firewall > Adv anced settings > Inbound
Rules > New Rule > Port
Tip: If the remote machines are members of an Active Directory domain and use no firewall other than
Windows Firewall, you can add TCP port 25001 to exceptions by using Group Policy. On a domain
controller, create a Group Policy object, then go to Administrative Templates > Network > Network
Connections > Windows Firewall > Domain Profile > Windows Firewall: Define port exceptions (or: Define
inbound port exceptions), and then add the following port exception:
25001:tcp:*:enabled:Acronis remote install
You can exclude both ports from exceptions after the remote installation is complete.
4.5.1.2 Installation procedure
To install a component of Acronis Snap Deploy 4 remotely
1. Start Acronis Snap Deploy 4 Management Console.
2. On the Tools menu, click Install components remotely.
3. Select the location from which the installation packages of the components will be taken.
The selection The registered components corresponds to the default folder:
%ProgramFiles%\Common Files\Acronis\SnapDeploy\RemoteInstall
4. Select th e co mpon en t that you wan t to insta ll.
47 Copyright © Acronis, Inc., 2000-2011
Page 48

5. If you are installing Acronis Snap Deploy 4 OS Deploy Server, specify the name or IP address of
the machine with Acronis Snap De p l oy 4 License Server. That license server must contain at least
one available license.
6. In Machine, specify the name or IP address of the machine where you want to insta ll the
component. To open the list of machin es on your network, click Browse.
7. To allow restarting the remote machine if it is required for installation, select the Restart the
machine automatically when requi red check box. If you clear this check box, you may need to
restart the remote machine later for the component to start working.
8. In User name and Password, specify the user name and password of an administrator on the
remote machine.
9. Click Install.
Updating a component
To update a component on a remote machine, perform the same procedure.
4.5.2 Extracting the components of Acronis Snap Deploy 4
When you install Acronis Snap Deploy 4 Management Console, all installation files (.msi files) of
Acronis Snap Deploy 4 components are placed in the %ProgramFiles%\Common
Files\Acronis\SnapDeploy\RemoteInstall folder. As a result, you will be able to install a component
remotely (p. 46) by using the management conso l e; or install, modify, or repair a com p onent by using
the msiexec program.
To extract one or more components
1. Run the Acronis Snap Deploy 4 setup program.
2. Click Extract instal lation files.
3. Select the check boxes for the components whose installation files you want to extract.
4. Select a location for the installation files, and then click Extract.
4.6 Upgrading Acronis Snap Deploy 4
This section describes how to u pgrade Acronis Snap Deploy 4.
4.6.1 Upgrading from a previous product version
Prerequisites
Before proceeding with the upgrade fr om a previous version of Acronis Sna p Deploy, make sure that
you have one or more license keys for Acronis Snap Deploy 4. These can be either standard license
keys or upgrade license keys.
An upgrade license key enables yo u to continue using a license key for t he previous version (“old”
license key). The old license key cannot be reassigned to a different machine.
You need at least one license key for Acronis Snap Deploy 4 (no matter which type) to be able to
upgrade Acronis OS Deploy Server. This license key will remain available.
To upgrade from Acronis Snap Deploy 3
Perform the following steps on eac h machine where any component of Acronis Snap Deploy 3 is
installed. Start with the machine where Acronis License Server is installed.
48 Copyright © Acronis, Inc., 2000-2011
Page 49

1. Start the setup program of Acronis Snap Deploy 4.
2. Click Install Acronis Snap Deploy 4.
3. Click Update.
4. If you are upgrading Acronis License Server, provide the license keys for Acronis Snap Deploy 4.
The license keys for Acronis Snap Deploy 3 remain stored on the license server.
5. If you are upgrading Acronis OS Deploy Server apart from Acronis License Server, specify the
machine with the license server.
6. Revi ew th e installation summary, and then click Install.
Upgrading Acronis PXE Server removes all components of Acronis Snap Deploy 3 that are uploaded to
the PXE server. To continue using the PXE server, you need to upload the new components by
connecting to the PXE server and clicking Upload components. For details, see the “Configuring
Acronis PXE Server” (p. 66) section of the built-in Help.
Upgrading from older versions
Components of versions of Acronis Snap Deploy earlier than 3 are incompatible with Acronis Snap
Deploy 4. To perform the upgrade:
1. Prepare a list of license keys that includes the license keys for the older version, and standard or
upgrade license keys for Acronis Snap Deploy 4.
2. Uninstall all components of the older version.
3. Install Acronis Snap Deploy 4. For example, you can perform a typical installation (p. 40). When
prompted, specify all license keys from your list.
4.6.2 Upgrading from the trial to full product version
To upgrade from the trial to a full version of the software, buy the full licenses and import the license
keys to Acronis Snap Deploy 4 License Server.
To upgrade to the full product version
1. Start Acronis Snap Deploy 4 Management Console.
2. Click Licenses. If prompted, specify the machine where the license server is installed.
3. Click Add license, and then provide the full license keys.
Acronis Snap Deploy 4 will start using the full licenses as soon as the trial ones expire.
4.7 Uninstalling Acronis Snap Deploy 4
To uninstall Acronis Snap Deploy 4, you should use the setup program.
To uninstall some or all components of Acronis Snap Deploy 4
1. Start the setup program of Acronis Snap Deploy 4.
2. Click Install Acronis Snap Deploy 4.
3. Do one of the following:
§ To uninstall all components, click Remove.
§ To uninstall individual components, click Modify, and then clear the check boxes for the
components that you want to uninstall.
4. Proceed with the uninstallation.
49 Copyright © Acronis, Inc., 2000-2011
Page 50

Data remaining after uninstallatio n
Uninstalling Acronis Snap Deploy 4 License Server does not delete license keys. If you later reinstall
the license server, all license keys automatically appear on the new license server. Used licenses
remain used.
Uninstalling Acronis Snap Deploy 4 OS Deploy Server does not delete the deployment tasks,
deployment templates, the list of machines, and individual deployment settings. If you later reinstall
the deployment server, this data will be available to the new deployment server.
50 Copyright © Acronis, Inc., 2000-2011
Page 51

5 Using Acronis Snap Deploy 4 Management
Console
5.1 Connecting to a machine
5.1.1 Connect to a local machine
When started, Acronis Snap De plo y 4 Management Console connects to the local machine if there is
a manageable component of Acronis Sn a p De p l oy 4 (such as Acronis Snap Deploy 4 OS Deploy
Server) on this machine. You can manage any Acronis server or Acronis Snap Deploy 4 Management
Agent installed on the same machine without any additional actions.
The welcome screen of the management console
5.1.2 Connect to another machine
Acronis Snap Deploy 4 Management Console can connect over the netw ork to a machi ne wh er e one
or more of the following components are installed:
§ Acronis Snap Deploy 4 OS Deploy Server
§ Acronis Snap Deploy 4 License Server
51 Copyright © Acronis, Inc., 2000-2011
Page 52

§ Acronis PXE Serve r
§ Acronis Snap Deploy 4 Management Agent
Once connected, you can manage the Acronis server or perform operations by using Acronis Snap
Deploy 4 Management Agent.
To connect to an Acronis compone n t, you need the administrator’s privil eges on the remote
machine.
To connect to a component
1. On the Connect menu, click Connect.
2. In Machine, specify the name or IP address of the machine where the component is installed. To
open the list of machines on your network, click Browse.
3. In User name and Password, specify the user name and password of an administrator on that
machine.
4. To save the password for the user name, select the Save password check box.
Alternatively, you can co nnec t to the corresponding component when you open the Machines,
Deployment tasks, PXE server, or Licenses view. In the welcome screen, you will be asked to connect
to Acronis Snap Deploy 4 OS Deploy Server if this component is not installed on the local machine.
Connecting to a component on a remote machine
Connection to a component is needed to perform the following operations:
§ Managing deployment (p. 79): connect to Acronis Snap Deploy 4 OS Dep loy Server.
§ Creating a master image of a machine without restarting it (p. 68): connect to Acronis Snap
Deploy 4 Management Agent.
§ Validating a master image (p. 78): conne ct to Acronis Snap Deploy 4 Management Agent.
§ Managing licenses (p. 54): connect to Acronis S nap Deploy 4 License Server.
§ Configuring Acronis PXE Server (p. 66): connect to Acronis PXE Server.
52 Copyright © Acronis, Inc., 2000-2011
Page 53

No connection is needed to perform the following operations:
§ Creating an Acronis bootable media (p. 60) or a WinPE-based bootable media (p. 63)
§ Installing Acronis components remotely (p. 46)
5.2 Browsing logs
Acronis Snap Deploy 4 OS Deploy Server and Acronis PXE Server store the log of the operations they
have performed.
The view the log of Acronis Snap Deploy 4 OS Deploy Server
1. Connect the management console to the machine with Acronis Snap Deploy 4 OS Deploy Server.
2. Do either of the following:
§ In the left pane, click Deployment tasks, and then click Log on the too lbar.
§ On the Help menu, click View log.
3. In the left pane, select a log. In the right pane, examine the events recorded in the log.
The left pane shows up to 50 log entries. If there are more log entries, you can browse the list by
using the buttons with the left and right arrows.
To delete a log entry, select it and click the Delete the selected log entry button.
If any step was terminated by an error , the corresponding log entry will be marked by a red circle
with a white “X” inside.
The right window shows the list of events contained in the selected log entry. The three buttons to
the right control message filters: the white “X” in the red circle filters error messages, the
exclamation sign in a yellow triangle filters warnings, and the “i” in a circle filters information
messages.
To select columns to display (su ch as the date and time of an event), right-click the table header, and
then select the columns.
To sort the events by a particular column, click the desired column name. To reverse the sort order,
click the column again.
You can also change column width by dragging the borders.
To view the log of Acronis PXE Server
1. Connect the management console to the machine with Acronis PXE Server.
2. In the left pane, click PXE server.
3. Examine the log entries in the lower part of the view.
5.3 Checking for software updates
Each time you start the management console, Acronis Snap Deploy 4 checks whether a new version
of the software is available on the Acronis Web site. If so, the software provides a link for
downloading the setup program of the new version.
To check for updates manually, start the management console and then click Help -> Check for
update. In that window, you also can di sable the automatic checks for updates.
53 Copyright © Acronis, Inc., 2000-2011
Page 54

6 Using Acronis Snap Deploy 4 License Server
This section contains general information necessary for understanding Acronis Snap Deploy 4 License
Server and covers operations with licenses.
6.1 Understanding Acronis Snap Deploy 4 License Server
Acronis Snap Deploy 4 License Server is a mechanism that tracks licenses of Acronis products. Acronis
Snap Deploy 4 licensing is based on the number of machines (servers or work sta tions) that you
deploy. For example, to deploy a system to 100 machines, you need 100 licenses.
Acronis Universal Deploy (p. 25) is an add-on to Acronis Snap Deploy 4 and has its own license key.
Acronis Snap Deploy 4 License Se rver tracks the licenses using a MAC address, which is unique for
each network interface card (NIC). Although a MAC address is usually hardwired to the NIC, some
operating systems offer a way to change it. It is important to note that attempting to change the
MAC address on a system may impede the Acronis Snap Deploy 4 License Server operation and
prevent you from other deploym ents to the same machine.
When installing Acronis Snap Deploy 4 OS Deploy Server, you need to specify a license server. After
the license server is found, the software checks for available licenses on the server and stores its
network address to be able to access the license server later, when deployment is launched.
When starting a deployment, Acronis Snap Deploy 4 OS Deploy Server checks for available licenses
on the license server. If an appropriat e license is available for a machine, the deployment operation
will run on the machine. The number of available licenses will decrease by the number of systems
being deployed.
If deployment under a deploymen t license has failed, that license becom es available again. A
machine license remains used by the machine regardless of the result of deployment.
Acronis Snap Deploy 4 License Server can import multiple license keys from .txt or .eml files, saving
you from the time-consuming procedure of typing each number.
When upgraded, recovered or reinstalled, the license server keeps all the imported licenses intact.
However, it is recommended that you copy the files with license keys to removable media, or create
a hard copy of those files and keep it in a safe place. This ensures that you have license data available
in case of hardware failure.
6.2 Adding licenses by using Acronis Snap Deploy 4
Management Console
You can add the licenses when you are installing Acronis Snap Deploy 4 License Server. After the
license server is installed, you can add licenses by using Acronis Snap Deploy 4 Management Console,
as follows.
To add one or more license keys to the license server
1. Run Acronis Snap Deploy 4 Management Console.
2. Click Licenses. If the license server is installed on a different machine, click Connect to Acronis
Snap Deploy 4 License Server, and the n ty p e the name or IP address of that machine.
54 Copyright © Acronis, Inc., 2000-2011
Page 55

3. Click Add License.
4. In the Add Licenses window, type the license key or the path to a .txt or .eml file containing the
license keys; or, you can browse to the file.
5. Click Add. Acronis Snap Deploy 4 License Server performs the operation and reports the number
of newly-added licenses.
The license server has 10 license keys of various types. The license corresponding to the highlighted
license key has already been used for deployment. The bottom license key corre sponds to 100
deployment licenses.
6.3 Viewing information about licenses
To view information about licenses
1. Run Acronis Snap Deploy 4 Management Console.
2. Click Licenses. If the license server is installed on a different machine, click Connect to Acronis
Snap Deploy 4 License Server, and the n ty p e the name or IP address of that machine.
55 Copyright © Acronis, Inc., 2000-2011
Page 56

This will display all license keys available on Acronis Snap Deploy 4 License Server. One license
key can correspond to multiple licenses.
The license server contains 10 server licenses and five workstation licenses
3. Right-click the column headings bar to choose the details to display: license key, import date,
expiration date (for trial licenses), the total number of licenses assigned to each license key, how
many of them are available (that is, free), and how many are used. For example, if one license
corresponds to one license key, Total=1, Available=1, Used=0 (if the license is free) or
Available=0, Used=1 (if the license has been allocated).
6.4 Removing licenses
To completely remove a license from Acronis Snap Deploy 4 License Server, select the corresponding
license key from the list, and then click Remove license on the toolbar.
The following licenses cannot be removed:
§ Used licenses
§ Trial licenses
When a trial license expires, Acronis Snap Deploy 4 will use an available full license of the
corresponding type.
6.5 Adding licenses in the command-line mode
As an alternative to the graphical user interface, you can add licenses in the command-line mode, by
using Acronis Snap Deploy 4 License Server Management Tool.
To add licenses in the command-line mode
1. Run cmd.exe to open the Command Prompt window.
2. Go to the folder where Acronis Snap Deploy 4 License Server is installed. By default, the folder
name is: %Program Files%\Acronis\SnapDeploy\LicenseServerConsole
56 Copyright © Acronis, Inc., 2000-2011
Page 57

3. Run the following command:
LicenseServerCmdLine --import-file <server name> <file name>
In this command:
§ <server name> is the name of the machine where Acronis Snap Deploy 4 License Server is
installed.
§ <file name> is the name of the .txt or .eml file with the license keys.
For the complete syntax of Acronis Snap Deploy 4 License Server Management Tool, see “Using
Acronis Snap Deploy 4 License Server Management Tool” (p. 57).
Example
The following command adds the license keys from the file C:\Licenses.txt to the license server
mymachine:
licenseservercmdline --import-file mymachine c:\Licenses.txt
6.6 Using Acronis Snap Deploy 4 License Server
Management Tool
Acronis Snap Deploy 4 License Server Management Tool is a command-line utility for controlling
Acronis Snap Deploy 4 License Server. The tool is the LicenseServerCmdLine.exe file located in
the installation folder. By default, the folder name is
%ProgramFiles%\Acronis\SnapDeploy\LicenseServerConsole.
The management tool uses the following syntax:
LicenseServerCmdLine <command> <option1> <option2> …
The management tool supports the fo l lowing commands and parameters:
--list
Displays the list of license servers found on the local network.
--status <server name or IP address>
Displays the status of the specified license server, which is the number of total and available
licenses for each Acronis prod uct.
--import <server name> <lic ense key>
Adds a new license key. You can specify multiple license keys by separating them with a space.
57 Copyright © Acronis, Inc., 2000-2011
Page 58

--import-file <server name> <file name>
Imports license keys from a .txt or an .eml file.
--help
Shows usage information.
58 Copyright © Acronis, Inc., 2000-2011
Page 59

7 Deployment tools
Before deployment, each target machine must boot into a dedicated bootable component of Acronis
Snap Deploy 4. An example of such component is Acronis Snap Deploy 4 Agent.
The machine can boot into the component in either of these ways:
§ From a physical media (such as a DVD or a USB drive) that contains the component. Such media
is called a bootable media.
§ Over the network, by using Acronis PXE Server with the component uploaded to it.
This section describes how to create a bootable media or configure the PXE server.
7.1 Bootable components
Acronis Snap Deploy 4 has a number of bootable components that can perform operations on any
PC-compatible hardware, including bare metal and machines with unsupported file systems.
§ Acronis Snap Deploy 4 Agent boots on a target machine to enable deployment performe d by
Acronis Snap Deploy 4 OS Deploy Server (p. 99).
§ Acronis Snap Deploy 4 Master Image Creator boots on a master machine and creates an image
of the syst em (p. 68).
§ Acronis Snap Deploy 4 Standalone Utility boots on a target machine and performs deployment
on its own (p. 112).
§ Acronis Snap Deploy 4 Command-Line Utility provides a command-line interface (p. 126) for
performing imaging and deployment, and for sending e-mail notifications about deployment.
§ Acronis System Report boots on a machine, collects information about the machine, and saves
this information to a removable USB drive (such as a USB flash drive). For details, see “Collecting
system information” (p. 137).
7.2 Creating a bootable media
You can create two types of bootable media:
§ Acronis bootable media (recommended in most cases) is based on a Li nu x kernel and contains
bootable components of Acronis Snap Deploy 4. To create this type of media, use the Acronis
Snap Deploy 4 Bootable Media Builder wizard (p. 60).
§ WinPE-based bootable media is base d on Windows Preinstallation Environment (WinPE) and
contains bootable components of Acronis Snap Deploy 4. To create this type of media, use the
Acronis Snap Deploy 4 PE Builder wizard (p. 63).
Both types of media provide similar graphical user interface but differ in the set of bootable
components they contain. Generally, you can use an Acronis medi a. You may want to use a WinPEbased media if the machine’s hardware, such as network adapters, is not properly recognized from
the Acronis media, or if you need to us e t he command-line interface.
You can create a bootable media on a physical media, such as a DVD or a USB drive. Acronis PXE
Server with uploaded bootable components can also be thought of as a kind of bootable media. That
is why you can create a bootable media or upload bootable components to the PXE server by using
the same wizards. Alternatively, you can configure the PXE server directly (p. 66).
59 Copyright © Acronis, Inc., 2000-2011
Page 60

7.2.1 Creating an Acronis bootable media
Acronis bootable media is a physical media (CD, DVD, USB flash drive, or other media supported by
the machine’s BIOS as a boot device) that contains bootable com pon ents of Acronis Snap Deploy 4.
You can create an Acronis bootable media containing one or more of the following bootable
components (p. 59):
§ Acronis Snap Deploy 4 Agent
§ Acronis Snap Deploy 4 Master Image Creator
§ Acronis Snap Deploy 4 Standalone Utility
§ Acronis System Report
To create a bootable media
1. Start the management console.
2. On the Tools menu, click Create bootable media.
3. Select the bootable components that will be placed on the media.
For example, if you select Acronis Snap Deploy 4 Agent and Acronis Snap Deploy 4 Master Image
Creator, you will be able to use such bootable media to perform deployme nt by using Acronis
Snap Deploy 4 OS Deploy Server, and to create a master image.
Selecting bootable components
4. Under When booting from the media, automatically start, select the component that will start
automatically after a time-out you specify. Such component is also referred to as the default
boot menu item. The possible choices are the following:
§ One of the components on the media: The component will start after the time-out.
60 Copyright © Acronis, Inc., 2000-2011
Page 61

§ No autostart: The Acronis loader will display the boot menu and wait for someone to select
whether to boot the operating system or one of the Acronis components.
§ Start operating system: The operating system, if present on the booting machine’s hard disk,
will start after the time-out. This option is designed to make the target machine boot into the
deployed operating system after deployment. The main usage scenario is as follows.
You use this wizard to configure the PXE server for deployment on a schedule (p. 100).
You set up Acronis Snap Deploy 4 Agent to start automatically. After the de p l oyment is
completed, the target machine reboots into the agent again and might be de p lo ye d by
another deployment operation. How to avoid this situation?
To ensure that the target machine boots into the deployed operating system after the
deployment, choose the Start operating system option in this step of the wizard. To
ensure that the target machine boots into the agent befo re the deploym en t, tune the PXE
server to work with your deployment server when setting up the deployment (p. 102).
5. Under Start automatically after, specify the time-out interval in seconds. For example, if you
choose to automatically start Acronis Snap Deploy 4 Agent, and set this parameter to 10, the
agent will launch 10 seconds after the boot menu is displayed.
6. If you are placing Acronis Snap Deploy 4 Agent on the media, specify wheth er th e agent will
connect to a particular Acronis Snap Deploy 4 OS Deploy Server. This setting allows you to have
multiple deployment servers that perform different functions on the same network.
To specify a deployment server, type its name or IP address in Server name/IP.
The deployment server (along with the network settings for the agent) can also be specified
onsite (on the target machine’s side) when booting the agent. To be able to configure the agent
onsite, set up a reasonable delay before the default network settings will be applied. For details,
see “Booting the target machines” (p. 108).
If not configured in either way, the deployment server will be found automatically. The agent will
start the search after the number of seconds you specify in Timeout (sec).
61 Copyright © Acronis, Inc., 2000-2011
Page 62

Settings for Acronis Snap Deploy 4 Agent
The option to save the agent’s log to the deployment server is designed primarily for
troubleshooting. The log will be available on the deployment server in the following folder:
%AllUsersProfile%\Application Data\Acronis\DeployServer\AgentsLogs
7. Select the type of bootable media to create. You can:
§ Create a CD, a DVD, or other media such as a USB flash drive if the hardware BIOS allows for
booting from such media.
§ Create an ISO image of a bootable disc to burn it later onto a blank disc or writing it to a USB
flash drive.
§ Upload the selected com ponent s to Acronis PXE server. The previously uploaded
components will be deleted from the PXE server before uploading the newly selected ones.
Note: Acronis Snap Deploy 4 Standalone Utility can be placed on a physical media only. This component is
not designed to boot from a PXE server.
If you have chosen to create a physical media, insert a blank disc (so the software can determine
its capacity) or attach a USB flash drive.
If you have chosen to create an ISO image of a bootable disc, specify the name of the ISO file and
the folder in which to place it.
If you have chosen to upload the components to a PXE server, specify the name of the machi n e
with the PXE server and provide the user name and password of an administra tor on that
machine.
62 Copyright © Acronis, Inc., 2000-2011
Page 63

8. [Optional.] Protect the components being uploaded to the PXE server with a password to prevent
the components from unauthor ized execution. The password prompt will come up when
selecting a bootable component. No password is required to start the operating system on the
machine.
Protecting the bootable components with a password
9. Click Create. After you create the disc, mark it and keep it in a safe place.
Note: Components on an Acronis bootable media are based on a Linux kernel and are equipped with the Linux
system and device drivers. Acronis regularly supplements the driver set with drivers for new devices. However,
there may be a chance of drivers being incompatible with your hardware, so a bootable component cannot
start, stops responding or cannot access the necessary device. In this case, consider creating a WinPE-based
bootable media (p.
63) instead.
7.2.2 Creating a WinPE-based bootable media
Windows Preinstallation Environment (WinPE) is a minimal Windows system based on the Windows
Vista, the Windows Server 2008, or the Windows 7 kernels. WinPE is commonly used by original
equipment manufacturers (OEMs) and corporations for deployment, test, diagnostic and system
repair purposes.
Similarly to creating an Acronis bootable media (p. 60), you can create a bootable media that is based
on WinPE and includes bootable components of Acronis Snap Deploy 4.
You may want to use a WinPE-based media instead of an Acronis bootable media for the following
purposes:
§ Performing imaging or deployment to machines whose hardware is not properly recognized from
the Acronis bootable media (whi ch is based on a Linux kernel)
63 Copyright © Acronis, Inc., 2000-2011
Page 64

§ Performing deployment in the command-line mode (p. 126); for example, to deploy different
master images to different target machines (p. 134)
§ Sending e-mail notifications about deployment
7.2.2.1 Components included in the bootable media
Each WinPE-based bootable media contains the following bootable components (p. 59):
§ Acronis Snap Deploy 4 Agent
§ Acronis Snap Deploy 4 Master Image Creator
§ Acronis Snap Deploy 4 Command-Line Utility
The media also contains the Acronis Universal Deploy (p. 25) add-on.
7.2.2.2 Acronis Snap Deploy 4 PE Builder
Acronis Snap Deploy 4 PE Builder is a dedicated tool for creating a WinPE-based bootable media. The
PE Builder is installed with Acronis Snap Deploy 4 Management Console.
The PE builder creates the bootable media by adding components of Acronis Sn ap Deploy 4 to a
source file called a PE image.
A PE image is normally a .wim file. The PE builder can create a PE image automatically or use a PE
image you provide. The PE image can be based on WinPE 2.x or WinPE 3.0.
The term “image” in “PE image” is unrelated to the notion of “master image.”
7.2.2.3 Creating a boota ble m edia ba sed on Win PE 2 .x or 3. 0
Installing Windows AIK
To be able to create a bootable media based on WinPE 2.x or WinPE 3.0, you must have Windows
Automated Installation Kit (AIK) installed. For this purpose, install Acronis Snap Deploy 4
Management Console on a machine where W indows AIK is installed. If you do not have such
machine, do the following:
1. Download Windows AIK; for example, from the Windows AIK 3.0 Web page.
2. Burn the AIK to a DVD or write it to a USB flash drive.
3. Attach the flash drive or insert the DVD in the media drive of a machine running Windows.
4. From this kit, install:
a. Microsoft .NET Framework 2.0 (NETFXx86 or NETFXx64, dep ending on your hardware).
b. Microsoft Core XML Services (MSXML) 5.0 or 6.0.
c. Windows AIK.
5. Install Acronis Snap Deploy 4 Management Console.
Creating the bootable media
A bootable media based on WinPE 2.x requires at least 256 MB of memory to work. The
recommended memory size for such medi a is 512 MB. A bootable media based on WinPE 3. 0
requires at least 512 MB of memory to work.
The PE builder supports only 32-bit (x86) WinPE 2.x or 3.0. These WinPE distributions can also work
on 64-bit (x64) hardware.
64 Copyright © Acronis, Inc., 2000-2011
Page 65

To create a bootable media based on WinPE 2.x or WinPE 3.0
1. Start Acronis Snap Deploy 4 Management Console.
2. On the Tools menu, click Create PE image.
3. Do one of the following:
§ If you do not have a PE image to base the media on, cli c k Create Windows PE 2.x or 3.0
automatically.
§ If you want to base the bootable media on a specific PE image, click Use WinPE files located
in the folder I specify, and then specify the folder with the WIM file of the image.
4. In Network settings, s pecify whether Acronis Snap Deploy 4 Agent will connect to a particular
Acronis Snap Deploy 4 OS Deploy Server.
5. In Autostart, specify whether to start Acronis Snap Deploy 4 Agent automatically after a time-
out.
6. Select how you want to create the bootable media.
§ If you want to create a physical media, select ISO ima ge . The software will create an ISO file
that you can later burn to a DVD or write to a USB drive.
§ If you want to upload the bootable components to Acronis PXE server, select Acronis PXE
Server.
§ If you want to create a PE image (a WIM file) to later upload it to the PXE server (p. 65),
select WIM image. You may want to select this setting if you are planning to use
Preinstallation Enviro nment for unattended deployment to specific machines (p. 100) . If so,
make sure that you have selected to start the agent automatically (see the previous step).
Tip: The setting WIM image enables you to create a PE image for any future purpose, such as for
adding other tools in addition to Acronis components.
7. Do one of the following:
§ If you have chosen to create an ISO or a WIM file, specify the full path to the resulting file,
including the file name.
§ If you have chosen to upload the com p onents to Acronis PXE Server, spec ify the machine
with the PXE server and provide the user name and password of an administra tor on it.
8. [Optional.] Specify the storage controller drivers and/or network adapter drivers that you want
to add to the media. Click Add and s pecify the path to the necessary .inf file for a corresponding
SCSI, RAID, SATA controller or a network adapter. You will have to repeat this procedure for each
driver you want to be included in the bootable media.
9. Check your settings in the summary screen, and then click Create.
10. If you have chosen to create an ISO file, burn the file to a DVD by using a third-party tool, or write
the file to a USB drive.
7.2.2.4 Uploading a PE image to A cron is P XE Server
You can upload a WIM file of WinPE 2.x or WinPE 3.0 to Acronis PXE Server. Such file is called a PE
image. We recommend creating the WIM file by using Acronis Snap Deploy 4 PE Builder (p. 64).
To upload a PE image
1. Start Acronis Snap Deploy 4 Management Console.
2. Click PXE se rve r. If prompted, specify the machine where Acronis PXE Server is installed.
3. Click Upload PE image.
4. Specify the path to the WIM file of WinPE 2.x or 3.0 that you want to upload.
65 Copyright © Acronis, Inc., 2000-2011
Page 66

5. Check your settings in the summary screen, and then click Create.
7.3 Configuring Acronis PXE Server
You can configure Acronis PXE server:
§ When creating an Acronis bootable media (p. 60) or a WinPE-based bootable media (p. 63).
§ When creating a bootable media for user-initiated deployment (p. 115).
Alternatively, you can use direct server configuration, as follows.
To perform a direct configuration of the PXE server
1. Start Acronis Snap Deploy 4 Management Console.
2. In the navigation pane, click PXE server.
3. If the PXE server is installed on a different machine, click Connect to the PXE server, and then
specify the name or IP address of t hat machine. In logon settings, specify the user name and
password of an administrator on that machine.
When connected to the PXE server, you can perform the following operations by clicking the
corresponding butto ns on the toolbar:
§ Upload components: Upload bo otable components (p. 59), such as Acronis Snap Deploy 4 Agent,
in the same way as when creating an Acronis bootable media (p. 60). The previously uploade d
components will be deleted from the PXE server before uploading the newly selected ones.
§ Upload PE image to PXE: Upload the Preinstallation Environment (PE) image (a .wim file) that
was previously created with Acronis Snap Deploy 4 PE builder. For details, see “Uploading a PE
image to Acronis PXE Server” (p. 65).
§ Remove: Remove a component or PE image from the PXE server.
§ Disable PXE Server: Disable the PXE server. The service does not stop, but no longer responds to
incoming requests.
§ Enable PXE Server: Enable the previously disabled PXE server.
Two bootable components of Acronis Snap Deploy 4 are uploaded to the PXE server .
66 Copyright © Acronis, Inc., 2000-2011
Page 67

8 Creating a master image
To be able to deploy a system, you need to create the desired system configuration and then to save
an image of the system’s hard disk or volume to a network folder, detachable media (such as a USB
drive) or removable media (such as a DVD).
This section describes how to create a master image by using Acronis Snap Deploy 4.
In addition, Acronis Snap Deploy 4 can use any of the following files as a master image:
§ Backups created with the Acronis True Image, Acronis Backup & Recovery 10 , and Acronis Backup
& Recovery 11 product family, including password-protected backups
§ Virtual Hard Disk (VHD) files
For information about deploying an image, see “Deploying a master image” (p. 79).
8.1 Preparation of the master operating system
In the Acronis environment and Window s Preinstallation Environment (any case except the
command-line mode (p. 126)), Acronis Snap Deploy 4 automatically configures each of the deployed
systems by using the deployment settings you specify.
Alternatively, you can prepare a master operating system by using the Microsoft System Preparation
Tool (Sysprep) before creating the image of the system. Acronis Snap Deploy 4 does not configure
the deployed systems in this case.
The Sysprep tool is designed for corporate system administrators, original equipment manufacturers
(OEMs), and others who need to deploy and automatically configure operating systems on multiple
machines.
After an operating system that wa s prepared with Sysprep is deployed to machines, Sysprep
configures settings that are normally unique to each machine. In particular, Sysprep does the
following:
§ Generates a unique security identifier (SID) for the new machines
§ Initiates Windows mini-setup for Plug and Pl ay devices
§ Applies the machine name, doma i n or workgroup membership, and other sett ings specified in
the Sysprep.inf answer file
You can either download Sysprep from the Microsoft Web site, or extract it from the deploy.cab file,
which is located on the installati on disk of Windows NT, Windows 2000, Wi ndows XP, and Windows
Server 2003. In Windows Vista, Windows 2008, and Windows 7, the Sysprep tool is located in the
folder Windows\System32.
Important: If you are planning to use Sysprep, we strongly recommend that you read articles about Sysprep and
disk duplication in the Microsoft Knowledge Base.
67 Copyright © Acronis, Inc., 2000-2011
Page 68

8.2 Online vs. offline imaging
You can create the master image in either of these ways:
§ In Windows, by using Acronis Snap Deploy 4 Management Agent installed on the master
machine. This type of imaging is called online imaging.
§ By using a bootable media (either Acronis media or WinPE-based media) with Acronis Snap
Deploy 4 Master Image Creator, or by using the command-line utility in a WinPE-based bootable
media. This type of imaging is called offline imaging.
This section describes imaging with Acronis Snap Deploy 4 Management Agent and Acronis Snap
Deploy 4 Master Image Creator. For information about imaging in the command-line mode, see
“Command-line mode and scripting under WinPE” (p. 126).
8.3 Performing online imaging
Online imaging means that the master system is imaged live (without restarting the machine or
suspending operations). Online imaging can be performed remo te l y whenever you need. The
disadvantage is that you have to install imaging software that is included in the master image. This is
not always rational.
To perform online imaging
1. Install Acronis Snap Deploy 4 Management Console.
2. Configure the master system.
3. Install Acronis Snap Deploy 4 Management Agent on the master system either locally by using
the setup program, or remotely by using Acronis Snap Deploy 4 Managem ent Console. Once
Acronis Snap Deploy 4 Management Agent is installed, you can image the master system online
(without a restart) at any time.
4. Start the Acronis Snap Deploy 4 Management Console.
5. Connect to the master machine.
6. Click Create image -> Next -> A master image.
Tip: The alternative selection, A bootable media, enables you to create a bootable media (p. 60) for offline
imaging (p. 68).
7. Follow the steps of the Master Image Creator wizard (p. 71).
8.4 Performing offline imaging
Offline imaging means that the master system is stopped and the master machine boots into the
Acronis environment or into Windows Preinstallation Environment.
To perform offline imaging
1. Install Acronis Snap Deploy 4 Management Console.
2. Do one of the following:
§ Create a bootable media (p. 59) that contains Acronis Snap Deploy 4 Master Image Creator.
OR
§ Install Acronis PXE Server, connect the console to the PXE server (p. 66), and upload Acronis
Snap Deploy 4 Master Image Creator. Make sure that network booting is enabled on the
master machine (p. 102).
68 Copyright © Acronis, Inc., 2000-2011
Page 69

Tip: While creating the bootable media or uploading Acronis Snap Deploy 4 Master Image Creator to the
PXE server, you can configure the image creator to start automatically after a time-out.
3. Configure the master system.
4. Depending on your choice in step 2, boot the master machine into Acronis Snap Deploy 4 Master
Image Creator from the bootable media or from the PXE server.
The boot menu appears on the master mac h i n e.
The boot menu on the master machine
5. In the boot menu, click Acronis Snap Deploy 4 Master Image Creator.
6. The master image creator establishes a network connection to be able to save the image in a
network folder. A dialog box appears asking whether you want to configure the network
connection that will be used by the image creator.
By default, Acronis Snap Deploy 4 Master Image Creator uses DHCP auto configuration. Ignore
the prompt (click Cancel) if there is a DHCP server on the network or the image has to be placed
on a local hard disk or a removable media.
Prompt for configuring the master image creator
The master image creator can be preconfigured to apply the default network settings
automatically after a time-out.
69 Copyright © Acronis, Inc., 2000-2011
Page 70

The manual configuration is needed if automatic configuration is not possible (no DHCP server on
the network) or does not succeed. To configure the network connections manually, click OK in
the prompt window.
Acronis Snap Deploy 4 Master Image Creator configuration: networ k sett i ngs
Set the preferable values and click OK.
70 Copyright © Acronis, Inc., 2000-2011
Page 71

7. When Acronis Snap Deploy 4 Master Image Creator starts, it displays the Master Image Creator
welcome window.
Master Image Creator Wizard: welcome window
8. In this window, click Next, and then follow the steps of the Master Image Creator wizard (p. 71).
8.5 Steps of the Master Image Creator wizard
This section describes the steps of the Master Image Creator wizard in the order that they appear.
Use the Next and Back buttons to go between steps.
8.5.1 Disks or volumes to image
Select the disks or volumes that you want to include in the master image.
You can select any set of disks and volumes. The master boot record (MBR) will be also included in
the image.
71 Copyright © Acronis, Inc., 2000-2011
Page 72

Important: An operating system includes a loader: a small program that loads the main part of the operating
system. The loader and the rest of the operating system may reside on different volumes. For example,
Windows 7 and Windows Server 2008 R2 place the loader on a hidden volume called System Reserved. If your
operating system and its loader reside on different volumes, always include both volumes in the image. A
volume with the loader is usually marked as the active volume and is shown with the Act. flag in the list. The
volumes must also be deployed together; otherwise, there is a high risk that the operating system will not start.
Selecting disks and volumes to image
Limitations
The following disks, and a ny volumes on such disks, cannot be includ ed in the master image:
§ Dynamic disks
§ Disks whose partitioning scheme is GUID partition table (GPT)
8.5.2 Image name and locat ion
Acronis Snap Deploy 4 Master Image Creator can save an image in any of the following locations:
§ In a network folder
§ On an internal hard disk of the master machine
§ On a USB or FireWire (IEEE-1394) storage device (such as a flash drive) that is attached to the
master machine
72 Copyright © Acronis, Inc., 2000-2011
Page 73

§ On a DVD+R/RW, DVD-R/RW, CD-R/RW, or recordable Blue-ray Disc (BD-R, BD-RE) that is loaded
in the media drive of the master machine
A sizeable image can be split between multiple media automatically.
Select the image location in the device tree. In File name, type the file name of the image. To
generate a file name that is unique in the selected location, click Generate a name for the file.
Selecting the image location
8.5.3 Options of imaging
You can set up the following options for creating the master image.
Protection
Defines whether to protect the master image with a password. You may want to use this option
to prevent unauthorized depl oyment.
The preset is: No password
To specify a password, type it in the Enter the password and Confirm the password fields.
Setting up a password does not lead to encrypting the contents of the image.
73 Copyright © Acronis, Inc., 2000-2011
Page 74

Compression
Defines the compression level for the image.
The preset is: Normal
A higher compression level may lead to a smaller size of the image, but creating the image will
take longer. The default Normal level is recommended in most cases.
Selecting the data compression level
Process priority
This option is available only for online imaging (p. 68).
The preset is: Low
Defines the priority of the imaging process.
74 Copyright © Acronis, Inc., 2000-2011
Page 75

The priority of any process running in th e operating system determines the amount of CPU usage
and system resources allocated to that process. Decreasing the image creation priority will free
more resources for other programs. Increasing the image creation priority could speed up the
imaging by taking resources from the other running processes. The effect will depend on the
total CPU usage and other factors.
Setting up the process priority
Splitting
Defines how to split a sizable image into two or more files that together make up the original
image.
The preset is: Only when it is required
With this setting, the program will act as follows.
When creating the image on a hard disk
If the selected disk has enough space and its file system allows the estimated file size, the
software will create a single image file.
If the storage disk has enough space, but its file system does not allow the estimated file size,
the image will automatically be split into two or more files. Such might be the case when the
image is placed on FAT16 and FAT32 file systems that have a 4-GB file size limit.
If free space on the disk runs out while creating an image, the operation will stop with an
error.
When creating an image on a CD-R/RW, DVD-R/RW, DVD+R/RW, or recordable Blu-ray Disc (BDR, BD-RE)
Acronis Snap Deploy 4 Master Image Creator will ask you to insert a new disc when the
previous one is full.
75 Copyright © Acronis, Inc., 2000-2011
Page 76

Alternatively, you can click Always, into the files of fixed size and type the desired file size or
select it from the list. The image will then be split into multiple files of the specified size. This
comes in handy when creating an image that you plan to burn to multiple discs later on.
You can enter the file size in bytes (B), kilob y tes (KB), meg ab y tes (MB), gigabytes (GB), or
terabytes (TB).
Note: Creating images directly on CD-R/RW, DVD-R/RW, DVD+R/RW, or record able Blu-ray Discs usually
takes more time than it would on a hard disk.
Error handling
Defines how to handle errors that may occur during imaging.
Ignore bad sectors
The preset is: Disabled
When the option is disabled, the software will display a pop-up window each time it comes
across a bad sector and ask for a user decision as to whether to continue or stop imaging.
Enable silent mode (no prompts during imaging)
The preset is: Disabled
With the silent mode enabled, the software will automatically handle situations requiring
user interaction (except handling bad sectors, which is define d b y the Ignore bad sectors
option). If an operation cannot continue without user interaction, it will fail. Details of the
operation, including er ro rs, if any, can be found in the operation log.
In case of error, re-attempt in (minutes)
The preset is: 5
When a recoverable error occurs, the software re-attempts to perform the unsuccessful
operation. You can set the time interval between attempts. The attempts will be stopped as
soon as the operation succeeds.
For example, if the location of the image on the network becomes unavailable or not
reachable, the software will attempt to reach the destination every five minutes. The
attempts will be stopped as soon as the connection is resumed.
Additional settings
Check the image when it is created
The preset is: Disabled
If enabled, the program will check t he integrity of the just-created image.
You c an perform this check after imaging (p. 78).
8.5.4 Comments and summary
We recommend providing a comment for easy identification of the master image.
After you click Next, the summary of the imaging procedure appears. Check the settings and then
click Proceed.
76 Copyright © Acronis, Inc., 2000-2011
Page 77

The imaging operation starts and its progress is displayed.
Acronis Snap Deploy 4 is taking the master image
77 Copyright © Acronis, Inc., 2000-2011
Page 78

9 Validating a master image
You can ensure that the master image is not damaged by validating it.
To validate a master image
1. Start Acronis Snap Deploy 4 Management Console.
2. Connect the management console to a machine where Acronis Snap Deploy 4 Management
Agent is installed.
3. On the Action menu, click Validate image.
4. Select the master image that you want to validate.
5. Click Validate in the summary window.
The validation operation starts. You can stop the ope rat i on if need be, by clicking Cancel.
After the validation is complete, the software shows the result.
78 Copyright © Acronis, Inc., 2000-2011
Page 79

10 Deploying a master image
This section describes how to deploy a master image to one or more machines.
Caution: Deployment to a machine involves deleting some or all data that is currently stored on that machine.
Make sure that you are performing deployment to the correct machines and to the correct disks on those
machines.
10.1 Files supported as master images
Acronis Snap Deploy 4 can perform deployment from any of the following files:
§ A master image created by Acronis Snap Deploy 4 or by an earlier version of the software
§ A disk-level backup created by the Acronis True Image, Acronis Backup & Recovery 10, or Acronis
Backup & Recovery 11 product family
§ A Virtual Hard Disk (VHD) file
Support for Acronis True Image, Acronis Backup & Recovery 10, and Acronis Backup
& Recovery 11 backups
These Acronis products save the disks and volumes of a machine to a file called a backup.
Similarly to master images, backups are stored as .tib files. You can specify such file as you would the
master image.
Some backups (known as incremental a n d d i fferential backups) depend on oth er backups. To ensure
that Acronis Snap Deploy 4 finds all of the backups it needs, we recommend le aving the backup in the
location where it was created by your Acronis product.
If the backup is split into two or more parts, make sure that all these parts are in the same folder. To
specify such a backup, specify a n y one of these parts.
The backup can contain disks o f various types, but only basic disks whos e partitioning scheme is
master boot record (MBR) are available for deployment.
Support for VHD files
These files store disks and volumes of a machine. Such a file can be created by the following
programs:
§ Microsoft Virtual PC 2007 SP 1.0, Windows Virtual PC, and Microsoft Virtual Server
§ Windows Backup (in Windows 7 )
§ Acronis True Image Home 2010 and later
You can perform deployment from a VHD file that contains both basic and dynamic volumes.
However, any dynamic volumes, such as simple or spanned volumes, will be deployed as basic
volumes. You can deploy only disks whose partitioning scheme is master boot record (MBR).
Important: If you created the VHD file by using the Windows Backup program, we recommend leaving such a
file in its original location. If you must move the VHD file to a new location, make sure to move the entire folder
containing this file, including subfolders and supplementary files such as .xml files. Otherwise, the deployment
operation may fail.
79 Copyright © Acronis, Inc., 2000-2011
Page 80

If the VHD file is split into two or more parts, make sure that all these parts are in the same folder. To
specify the VHD file, select any one of these parts.
10.2 Licenses for deployment
Acronis Snap Deploy 4 OS Deploy Server performs deployment to a machine by using an available
machine license or deployment license (p. 16). Once used by one machine, the license cannot be
reused by another machine.
A machine license becomes used w hen t h e first deployment to the machine starts. The licen se
remains used regardless of the result of deployment.
Normally, a deployment licens e becomes used if the deployment has bee n successful. If the
deployment has failed, Acroni s Snap Deploy 4 OS Deploy Server can use the license for another
deployment to the same machine or to a different machine.
In some cases, a deployment license becomes used even if the deployment ha s failed . Acronis Snap
Deploy 4 OS Deploy Server will use the license for the next deployment to the same ma chi ne.
10.3 Deployment templates
A deployment template is a set of configuration parameters of the deployment operation. These
parameters include:
§ A path to the master image.
§ The operation mode (multicast or unicast, how to handle the target disk free space, and so on).
§ Settings to be applied to the deployed systems (for example, machine names and user accounts).
§ Operations to be performed o n the deployed systems (transfer fi les , run applications, shut dow n,
restart).
All deployment templates are saved on Acronis Snap Deploy 4 OS Deploy Server. You can use a saved
template in the future.
When setting up a deployment o peration (deployment task), you must specify a deployment
template. You can simply select a saved template and set up the condition for starting deployment.
Alternatively, you can create a new template.
Templates also enable user-initiated deployment (p. 113). In this mode, users can perform one-click
deployment to their machines without the administrator’s assistance. To set up this mode, the
administrator must create one or more deployment templates.
To view or edit the list of saved templates, open the Templates window (p. 99).
10.3.1 Creating a deployment template
You can create a deployment template when you create a deployment task or set up user-initiated
deployment (p. 115).
Alternatively, you can create a deployment template in the Templates window (p. 99).
This section describes how to use the Create Deployment Template Wizard.
80 Copyright © Acronis, Inc., 2000-2011
Page 81

10.3.1.1 Master image s election
In this step, specify the following:
§ The master image
§ The user name and password for the network folder if the image is on the network. The best
practice is to map the network folder as a local drive (on the desktop, right-click Computer or My
Computer, and then click Map Network Drive)
In addition to images created by Acronis Snap Deploy 4, you can perform deployment from disk-level
backups created by Acronis True Ima ge, Acronis Backup & Recovery 10, Acronis Backup & Recovery
11, and from Virtual Hard Disk (VHD) files. For details, see “Files supported as master images” (p. 79).
Image location
Acronis Snap Deploy 4 O S Deploy Server can deploy an image located:
§ In a network folder.
§ On the internal hard disk of the deployment server.
§ On a USB or FireWire (IEEE-1394) storage device (such as a flash drive) attached to the
deployment server.
§ On DVD+R/RW, DVD-R/RW, CD-R/RW, or recordable Blu-ray Discs (BD-R, BD-RE) loaded in the
media drive of the deployment server.
The best practice is keeping images on the deployment server’s hard disk. This minimizes network
traffic during deployment.
The image created on removable media has to fit into one media disk. To deploy an image spread
over several CDs, DVDs or other media, copy all parts of the image to the same folder on the
deployment server or to a network folder.
Acronis Snap Deploy 4 Standalone Utility can deploy images located:
§ In a network folder.
§ On a USB or FireWire (IEEE-1394) storage device (such as a flash drive) attached to the managed
machine.
§ On DVD+R/RW, DVD-R/RW, CD-R/RW, or recordable Blu-ray Discs (BD-R, BD-RE) loaded in the
managed machine’s media drive.
81 Copyright © Acronis, Inc., 2000-2011
Page 82

The image created on removable media has to fit into one media disc. To deploy an image spread
over several CDs, DVDs or other media, copy all parts of the image to the same folder on an external
drive or to a network folder.
Selecting a master image
82 Copyright © Acronis, Inc., 2000-2011
Page 83

10.3.1.2 Disk and volume selection
If the image contains more than one disk, specify the disk that you want to deploy, and then click
Next. You can select only one disk.
Selecting a disk from the master image
83 Copyright © Acronis, Inc., 2000-2011
Page 84

If the disk you selected contains more than one volume, specify the volumes that you want to
deploy. You can sel ec t one or more volumes.
Selecting disk volumes to deploy
The further steps will depend on how man y volumes you select.
§ If you deploy only one volume, it is assumed that the target disk has volumes, so you can select
the target volume, to deploy over it. Other volumes will remain untouched in this ca se.
Alternatively, you can choose to delete all volumes that currently exist on the target disk.
§ Deploying more than one volume will delete all volumes on the target disk. Only the newly
deployed volumes will exist on the disk after deployment.
The master boot record (MBR) is always deployed from the image regardless of your choice.
Important: An operating system includes a loader: a small program that loads the main part of the operating
system. The loader and the rest of the operating system may reside on different volumes. For example,
Windows 7 and Windows Server 2008 R2 place the loader on a hidden volume called System Reserved. If your
operating system and its loader reside on different volumes, always include both volumes in the image. A
volume with the loader is usually marked as the active volume and is shown with the Act. flag in the list. The
volumes must also be deployed together; otherwise, there is a high risk that the operating system will not start.
10.3.1.3 Deployment settings
In this step, specify the deployment settings.
The default values for these settings are taken from the default settings (p. 98).
84 Copyright © Acronis, Inc., 2000-2011
Page 85

Most settings are related to configuring the operating system of the target machine. Such settings
are unavailable if the volumes you selected do not contain an operating system for which changing
settings is supported (p. 14). You always can specify general settings such as the disk to perform the
deployment to.
These settings can be overridden by individual settings (p. 122) for a machine.
Target disk layout
This setting determines the target disk for deployment, and what space on the target disk will be
available for deploying the master image.
The preset is: Default disk
The selection Default disk means that the image will be deployed to the hard disk whos e number in
the BIOS is 1. (Note for advanced users: for such disk, the hexa dec imal value known as the physical
drive number is 0x80.)
You can specify a different disk by clicking Disk number in BIOS and then typing or selecting the d i sk
number.
Selecting the target disk and volume
If you selected a single volume (p. 83) for deployment, specify how to place that volume on the
target disk:
85 Copyright © Acronis, Inc., 2000-2011
Page 86

§ Replace all volumes: All existing volumes on the target disk will be deleted, and the entire disk
space (including the currently unallocated space) will be available for the volume you are
deploying.
§ Replace volume: Only the volume with the selected number will be deleted. If the target disk
contains only one volume, the entire disk space (including the currently unallocated space) will
be available for the volume you are deploying. Otherwise, only the space that was occupied by
the selected volume will be available for the volume you are deploying; currently unallocated
space will remain unallocated.
Note: The active volume of the target disk will remain active. Even if you deploy an active volume side by
side with an already present active volume, the newly deployed volume will not become active. Therefore,
you need to deploy an active volume to an active volume if you want to boot from the deployed volume.
Tip: To deploy a single volume to unallocated space or bare metal, first create a target volume of a desired
size by using a third-party partitioning tool, such as Microsoft Disk Management or Acronis Disk Director.
In either case, the size of the deployed volume will depend on the setting in Disk space utilization (p.
86).
The When deploying a single volume setting is not effective when you deploy multiple volumes. In
this case, all existing volumes on the target disk are always deleted, and the entire disk space is
available for the volumes.
Disk space utilization
This setting determines whether to change the size of the volumes you are deploying according to
the available space on the target disk. The available space depends on the size of the target disk and
on whether you selected to replace all volumes or only a particular volume (see the Target disk
layout (p. 85) setting).
The preset is: Resize volumes to fit target disk
The settings are the following:
§ Resize volumes to fit target disk: The software will proportionally extend or reduce each of the
deployed volumes according to the available space on the target disk.
The following examples assume that you have a 300-GB target disk that already contains two
volumes: the first volume is 50 GB in size, and the second volume is 250 GB in size.
Example 1. You are deploying a single 100-GB volume. In Target disk layout, you selected to
replace all volumes on the target disk. In this case, the size of the deployed volume will be
300 GB.
Example 2. You are deploying a single 100-GB volume. In Target disk layout, you selected to
replace the second (250-GB) volume on the target disk. In this case, the size of the deployed
volume will be 250 GB. The first volume on the target disk will remain intact.
Example 3. You are deploying two 50-GB volumes. Because you are deploying more than one
volume, all volumes on the target disk will be deleted; see “Target disk layout” (p. 85). Each
of the deployed volumes will be 150 GB in size.
Example 4. You are deploying a 10-GB volume and a 20-GB volume. All volumes on the target
disk will be deleted. The deployed volumes will be 100 GB and 200 GB in size, respectively.
Example 5. You are deploying a 1000-GB volume and a 2000-GB volume, both of which
contain little data. All volumes on the target disk will be deleted. The deployed volumes will
86 Copyright © Acronis, Inc., 2000-2011
Page 87

be 100 GB and 200 GB in size, respectively. If either volume contains too much data to be
reduced to the respective size, the deployment will fail.
§ As in the master image: Each deployed volume will have the same size as in the master image.
Any excess available space on the target disk will become unallocated. If the target disk does not
contain enough available space for placing the volumes, the deployment will fail.
Settings preference
The Settings preference setting determines whether individual deployment settings of a machine (p.
122) can override the deployment settings in the template.
When the Settings preference setting is enabled and you set up an indivi d ual setting for a machine,
deployment to that machine will be performed with the individual setting, ignoring the
corresponding setting in t he t emplate.
When the Settings preference setting is disabled, deployment to all machines will be performed with
the settings in the template, ignoring any individual settings.
Machine name and membership
This setting determines the machine names, also known as NetBIOS name s, of the target machines; it
also determines the name of the workgroup or the Active Directory domain to which the target
machines will be added after the deployment.
The preset is: The same name and membership as those of the machine in the master image
87 Copyright © Acronis, Inc., 2000-2011
Page 88

By default, all deployed machines will have the same name as the machine in the master image.
Alternatively, you can specify a name pattern for the machines.
Specify whether the machine will be a member of a workgroup or an Active Directory domain. If you
have selected the domain membership, specify the user name and passwor d of a domain
administrator.
Name patterns
A name pattern determines the names that the target machines will have after the deployment.
To specify a single name for all target machines, type that name in Machine name pattern. For
example, type: DeployedMachine
To generate different names for the target machines, include either of the following wildcards or
their combination.
{start}
Generates consecutive nu mb ers sta rtin g with start. Each machine name will have its unique
number.
For example, the pattern {1} generates the names 1, 2, 3, and so on up to the number of target
machines. Similarly, the pattern {5} generates the names 5, 6, 7, and so on.
It makes sense to use only one such wildcard in the pattern.
{start,count}
Generates count consecutive numbers starting with start.
For example, the pattern {1,5} generates the names 1, 2, 3, 4, and 5. Similarly, the pattern {8,5}
generates the names 8, 9, 10, 11, and 12.
Make sure that the value of count is big enough. If the number of target machines exceeds count,
deployment to the remaining machines will fail.
You can use two or more of these wildcards. See examples later in this section.
In the wildcards, the value of start must be 0 or greater. The value of count must be 1 or greater.
You can use the wildcards alone or accompany them with text, as in the following examples.
Examples
Machine{1}
This pattern generates the names Machine1, Machine2, …, MachineN, where N is the number of
target machines.
Name{1,3}
This pattern generates the names Name1, Name2, and Name3.
{1,3}{1,4}
This pattern generates the names 11, 12, 13, 14; 21, 22, 23, 24; 31, 32, 33, and 34
{1,9}{0,10}
This pattern generates 90 names: 10, 11, 12, …, 19; 20, 21, 22, …, 29; …; 90, 91, 92, …, 99
88 Copyright © Acronis, Inc., 2000-2011
Page 89

Machine{2,3}{5,4}
This pattern generates the names Machine25, Machine26, Machine27, Machine28, Machine35,
Machine36, Machine37, Machine38, Machine45, Machine46, Machine47, Machine48
Name{0}{0,10}
This pattern generates the names Name00, Name01, …, Name09, Name10, Name11, Name12,
…, Name100, Name101, and so on. Each machine will have a unique na me.
Considerations when using name patterns
Patterns are most effective when you need to easily create different names for the target machines,
no matter which machine gets which name. If you need to specify a particular name for a particular
machine, you may want to use an individual deployment setting (p. 122) for that machine instead.
There is no order in which the names from the pattern are assigned to the machines. The same
machine may be assigned a differen t name the next time you perform deployment.
TCP/IP properties
This setting determines the network settings for the target machines, such as the Internet Protocol
(IP) addresses.
The preset is: The network settings of the master system
You have the options to:
§ Use the network settings of the master system.
§ Set up the target machines to obtain IP addresses automatically from a DHCP server.
89 Copyright © Acronis, Inc., 2000-2011
Page 90

§ Specify a range of static IP addresses, a subnet mask, and a default gateway for the target
machines. You may want to use this option if your network does not have the DHCP capability.
Each machine will be assigned an IP address from the range. Make sure that the range is big
enough. If there are more target machines than IP addresses in the range, deployment to the
remaining machines will fail.
TCP/IP propert ies
If you have not selected to preserve the network settings of the master system settings, you can
specify the DNS server. You can specify the IP address of the DNS server, such as 192.168.0.1; or the
network name of the DNS server in Host name and Domain name, such as dns and example.com
respectively if your DNS server is dns.example.com.
You will be able to change the network settings later when you start the operating system on the
deployed machine.
User accounts
This setting determines the local user accounts that will be created on the target machines in
addition to the accounts that exist in the master system.
Each user account can be added to the Administrators, Power Users, or Users group. Here you have
an opportunity to add a unifie d a d ministrator’s account to all the systems, if needed. The Remove
and Remove all buttons are provid ed to remove the accounts you speci f ied.
The password complexity has to meet the password policy set for the master machine. To view or
edit the password policy on the master machine:
1. Click Start -> Control Panel -> Administrative Tools -> Local Security Policy.
90 Copyright © Acronis, Inc., 2000-2011
Page 91

2. Under Account Policies, click Password Policy.
Security identifiers
This setting determines whether Acronis Snap Deploy 4 will generate unique security identifiers
(SIDs) for the target machines.
The preset is: Generate a unique SID for each target machine
Generating unique SIDs should normally be enabled. We recommend not to change the SID only if
you are deploying the image to the same machine from which the image was created.
You can keep the SID unchanged if there is no machine with the same SID in the same work gro u p or
domain. Such is the case when the master machine is no longer on the network.
New SIDs will be generated for the target machines.
Action after deployment
This setting determines what to do with the target machines after the deployment is complete.
The preset is: Shut down
Choose whether to shut down or restart the target machine after the deployment and all associated
operations, such as transferring files (p. 92), are completed.
91 Copyright © Acronis, Inc., 2000-2011
Page 92

Files to transfer
This setting determines the list of files, such as installation files, to be transferred to all target
machines after the deployment.
Each file must be located in a network folder. When adding the file, specify the credentials to the
network folder.
The destination of each fil e must be on one of the volumes you are deploying.
To run the file after it is transferred, select the Run the file on target machines check box. The file
will run when Windows first starts on the target machine.
Example
You want the target machines to use a particular Plug and Play device driver, such as a video adapter
driver, so that Windows automatically recognizes the device at boot. In this case, do the following:
1. Create a network folder, such as \\server\share, and place the driver files to it. Driver files usually
include an .inf file and a .sys file.
2. Specify both files in the Files to transfer setting, with the following p a ths in the Destination field:
§ For the .inf file: C:\Windows\inf
§ For the .sys file: C:\Windows\System32\drivers
If the operating system in the master image resides on a different volume, change the drive
letter in these paths accordingly.
During the deployment, the files are placed in the corresponding folders. When starting on the target
machine, Windows discovers the new device and finds your driver for it.
Applications to run
This setting determines the applications, such as service applications, that will run on the target
machines after the deployment is complete.
To add an application, click Add, and then specify the path to the application and the parameters the
application will run with.
The application must be locat ed on one of the volumes you are deploying.
The application will run when Windows first starts on the target machine.
Network utilization
This setting determines the data transfer mode for the deployment.
The preset is: Multicast
With the Multicast transfer mode, Acronis Snap Deploy 4 OS Deploy Server sends data to a group of
recipients simultaneously.
When the Switch to unicast if multi cast fails during deployment check box is selected, the
deployment server will automatically switch to using the unicast transfer mode if the network
hardware, such as a router, does not allow multicasting or limits the distribution of multicast packets
across the network. Switching to unicast may take up to one minute. After switching to unicast, the
deployment server continues deployment.
92 Copyright © Acronis, Inc., 2000-2011
Page 93
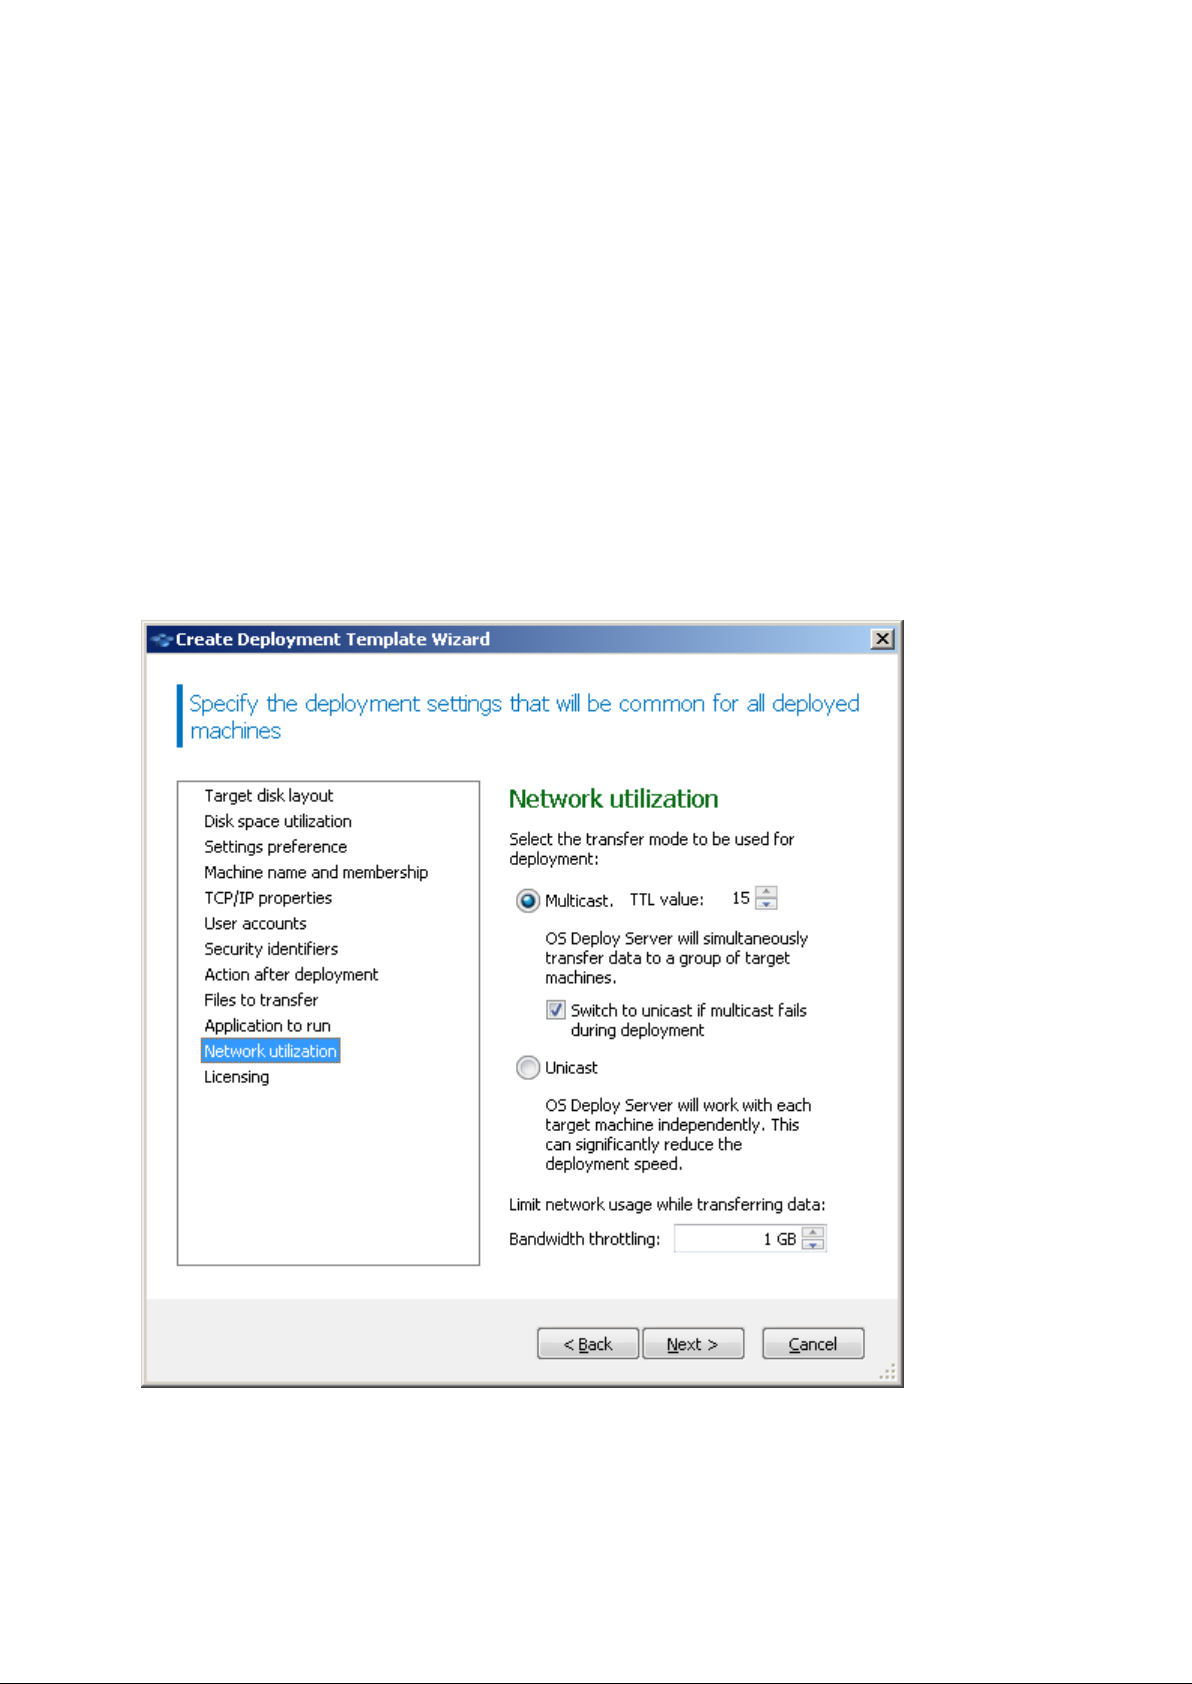
Using the Unicast transfer mode, the server sends a copy of the data to each recipient. This can
significantly reduce the deployment speed.
For example, suppose that you have a bandwidth of 100 MB per second, and you want to deploy a
system to 10 target machines.
§ With the Unicast mode, the server divides the speed am ong 10 machi nes. Ther e fore, the data
transfer speed will be 10 MB per second for each target machine.
§ With the Multicast mode, the server sends one copy of dat a to a multicast address, and each
client will receive data at a speed of 100 MB per second.
Multicast configuration has a parameter that specifies the time to live (TTL) for multicast packets.
Use this parameter to limit multicast packets distribution via gateways.
The default value is 15. In practice, this enables the packets to pass up to 15 hops which may be
treated as an unlimited distance. The minimal value 1 will limit the packets circulation to one subnet.
By setting the permitted bandwidth, you can limit the network usage during d eployment. The default
value is 1 gigabit (Gbit) per second.
Adjusting network utilization settings
Acronis Snap Deploy 4 uses Internet Group Management Protocol (IGMP) for multicasting. Therefore,
all network hardware (such as routers or network switches) must be IGMP-capable and correctly
93 Copyright © Acronis, Inc., 2000-2011
Page 94

configured. The specific information on configuring any particular router or network switch is usually
available in the documentation provided with the hardware.
If there is no IGMP-capable hardware (or you cannot configure it correctly) in the network, use the
Unicast data transfer mode.
Licensing
This setting determines which type of license to use for deployment to a target machine and what to
do when no appropriate license is available on the license server.
The preset is:
§ Use a deployment license of the corresponding type (a server license or a workstation license)
§ If no such deployment li cense i s found, use a machine license of the same type
§ Stop deployment other wise
Specifying licensing settings
Based on your selection, the software will use a deployment license (which enables a single
successful deployment) or a machine license (which enables an unlimited number of deployments to
94 Copyright © Acronis, Inc., 2000-2011
Page 95

a machine). Based on the operating system you are deploying, a workstation license or a server
license will be used.
If no appropriate license is available on the license server, the software can either stop deployment
to the machine, or use an alternative license.
Tip: To force a machine license to be used for a particular machine, you can specify the Licensing setting as an
individual setting (p. 122) for that machine.
When you deploy a workstation operating system (p. 14) and you selected the Use a server license
automatically option, the software will use a server license if no workstation license can be used.
The Licensing setting also applies to the Acronis Universal Deploy licenses independently from the
main licenses. For example, if a workstation license for performing deployment is found, but a
workstation license for applying Acronis Universal Deploy is not, Acronis Snap Deploy 4 may use a
server license for Acronis Universal Deploy, but still use a workstation license for performing
deployment.
Example
Suppose that you are deploying a work station operating system. Consider the following settings:
§ During deployment: Us e deployment licenses
§ If there are no deployment licenses: Use a machine license automatically
§ If the license server is out of workstation licenses: Use a server license automatically
With these settings, the software will use a license based on the following priority:
a) Deployment workstation license
b) Machine workstation license
c) Deployment server license
d) Machine server license
If you change the second settin g f ro m Use a machine license automatically to Stop deployment, the
software will use only deployment licenses. The software will use the following priority:
a) Deployment workstation license
b) Deployment server license
10.3.1.4 Using Acronis Universal Deploy
Specify whether you want to use Acronis Universal Deploy during dep lo yment.
Acronis Universal Deploy is an add-on to Acronis Snap Deploy 4. It requires a separate license.
Skip this section if either of the following is true:
§ You do not have a license for Acronis Universal Deploy.
§ You want to deploy an image that does not contain Windows.
To configure this setting:
1. Select whether to use Acronis Universal Deploy.
Acronis Universal Deploy will help you to create a bootable Windows clone on different
hardware by automatically installing the necessary system drivers. Use Acronis Universal Deploy
when deploying Windows to a machine with a dissimilar processor, different motherboard or
95 Copyright © Acronis, Inc., 2000-2011
Page 96

other mass-storage device than in the imaged system. For detailed information, see “What is
Acronis Universal Deploy” (p. 25).
Select whether to use Acronis Universal Deploy
Acronis Universal Deploy uses three sources for drivers:
§ The Windows default driver storage folder (in the master image being deployed)
§ The driver repository, which is one or more network folders or removable media
§ The mass-storage device driver specified by the user
The software will find the most suitable drivers of all available drivers and install them into the
deployed system. However, the driver defined by the user will have the priority. It will be
installed, with appropriate warnings, even if the software finds a better driver.
2. [Optional] Specify the driver repository.
Specify a driver storage to search for HAL and storage device drivers during the automatic
search-and-install procedure. You can add network locations and enable a search of removable
media for drivers.
96 Copyright © Acronis, Inc., 2000-2011
Page 97

Adding a driver storage
3. [Optional] Specify the mass-storage driver.
If the target hardware has a specific mass-storage controller (such as a SCSI, RAID, or Fibre
Channel adapter) for the hard disk, explicitly specify the appropriate driver for that controller.
The driver will be installed in any case, bypassing the automatic driver search-and-install
procedure.
Use this option only if the automatic search-and-install procedure was unsucc essful.
Tip: When deploying the system to a virtual machine that uses SCSI hard drive controller, make sure to
specify SCSI drivers for the virtual environment. For example, VMware requires Buslogic or LSI logic drivers.
Use drivers bundled with your virtualization software or download the latest driver versions from the
software manufacturer’s Web site.
97 Copyright © Acronis, Inc., 2000-2011
Page 98

10.3.1.5 Summary window
Check your settings in the summary window, and then click Save.
The summary window
10.3.2 Configuring default deployment settings
In the Default Deployment Settings window, you can specify the values that will be used by default
when you create a deployment template (p. 80).
To view or change the default deployment settings
1. Start Acronis Snap Deploy 4 Management Console.
2. On the Tools menu, click Configure default settings. If prompted, specify the name or IP address
of the machine where Acronis Snap Deploy 4 OS Deploy Server is installed, and the user name
and password of an administrator on that machine.
Each default setting has a preset value. To reset all default settings to their preset values, click Reset
all.
List of default settings
The following is the list of default deployment settings and their preset values.
§ Target disk layout (p. 85)
The preset is: Perform deployment to the first hard disk in th e BIOS
98 Copyright © Acronis, Inc., 2000-2011
Page 99

§ Disk space utilization (p. 86)
The preset is: Extend or reduce the volumes being deployed, according to the available space on
the target disk
§ Machine name and membership (p. 87)
The preset is: The same as of the master system
§ TCP/IP properties (p. 89)
The preset is: The network settings of the master system
§ User accounts (p. 90)
The preset is: Create no additional user accounts
§ Security identifiers (p. 91)
The preset is: Generate a unique security identifier (SID) for each target machine
§ Action after deployment (p. 91)
The preset is: Shut down the machine after the deployment
§ Network util ization (p. 92)
The preset is:
§ Perform deployment by us ing m u l ticast
§ Switch to unicast if multicast fails
§ Licensing (p. 94)
The preset is:
§ Use a deployment license of the corresponding type (a server license or a workstation
license)
§ If no such deployment li cense i s found, use a machine license of the same type
§ Stop deployment other wise
10.3.3 Managing deploymen t templ ates
In the Templates window, you can create, view, edit, and delete the deployment templates that are
saved on Acronis Snap Deploy 4 OS Deploy Server.
To open this window, click Actions -> Manage templates. If prompted, specify the name or IP
address of the machine with the deployment server, and the user name and passwor d of a n
administrator on that machine.
To create a deployment template
1. Connect the management console to Acronis Snap Deploy 4 OS Dep lo y Server.
2. On the Actions menu, click Manage templates.
3. Click Create new, and then follow the steps of the Create Deployment Template Wizard (p. 80).
10.4 Deployment through a deployment task
By using a deployment task, you can perform deployment in either of these ways:
§ Deployment to a specified list of machines (p. 100). Acronis Snap Deploy 4 will use the Wake-on-
LAN functionality to wake up the machines that are turned off and thus are not ready for
deployment.
99 Copyright © Acronis, Inc., 2000-2011
Page 100

§ Deployment as soon as a specified number of any machines become read y for deployment (p.
106). You (or users in your organization) will need to make the machines ready.
A machine becomes ready for deployment after it boots to Acronis Snap Deploy 4 Agent from a
bootable media or a PXE server, and then connects to Acronis Snap Deploy 4 OS Deploy Server.
In addition, you can run any deployment task manually from the Deployment tasks view (p. 124).
A deployment task runs according to a deployment template (p. 80). When creating the task, you can
create a deployment template or specify an existing one.
10.4.1 Prerequisites
Before proceeding with the deployment, make sure that:
§ You have installed the following components: Acronis Snap Deploy 4 Management Console,
Acronis Snap Deploy 4 License Server, Acronis Snap Deploy 4 OS Deploy Server, and (optionally)
Acronis PXE Server. All these components are already installed if you performed a typical
installation (p. 40).
§ You imported a sufficient number of licenses (p. 15) to Acronis S nap Deploy 4 License Server.
§ You created a master image by using either bootable media (offline imaging (p. 68)) or Acronis
Snap Deploy 4 Management Agent (online imaging (p. 68)).
Procedures in this section assume that you have performed these steps.
10.4.2 Deployment to specific machines
Deployment to a specified list of machines can run immediately, manually, or on a schedule.
When the deployment is about to start, the software uses the Wake-on-LAN (WOL) functionality of
the BIOS to wake up (turn on) the machines in the list.
Acronis Snap Deploy 4 wakes up each machine by sending a special packet, called the magic packet,
to all network adapters of the machine.
Machines in another subnet can b e woken up through the Acronis Wake-on-LAN Proxy component,
which is delivered with Acronis Sn a p Deploy 4.
The woken up machines then boot into Acronis Snap Deploy 4 Agent.
You can manually boot machines that do not support Wake-on-LAN, before the task starts. Such
machines will also be deployed, provided that they are listed for deployment.
A best practice for this type of deployment is to use Acronis PXE Server for booting the machines.
Alternatively, you can boot the machines by using a bootable media.
10.4.2.1 Preparation steps
This section describes how to prepare deployment to a specified list of machines.
Getting MAC addresses
Media Access Control address (MAC address) is a 48-bit physical (hardware) address of a network
device. In Windows, the physica l address can be obtained by running the command ipconfig /all
100 Copyright © Acronis, Inc., 2000-2011
 Loading...