

Page 1

MOUNTING GUIDE
NON-WATERPROOF RIBBONLYTE
Complete Integrated LED Lighting Solutions Tech Support: 212.629.6830
Page 2
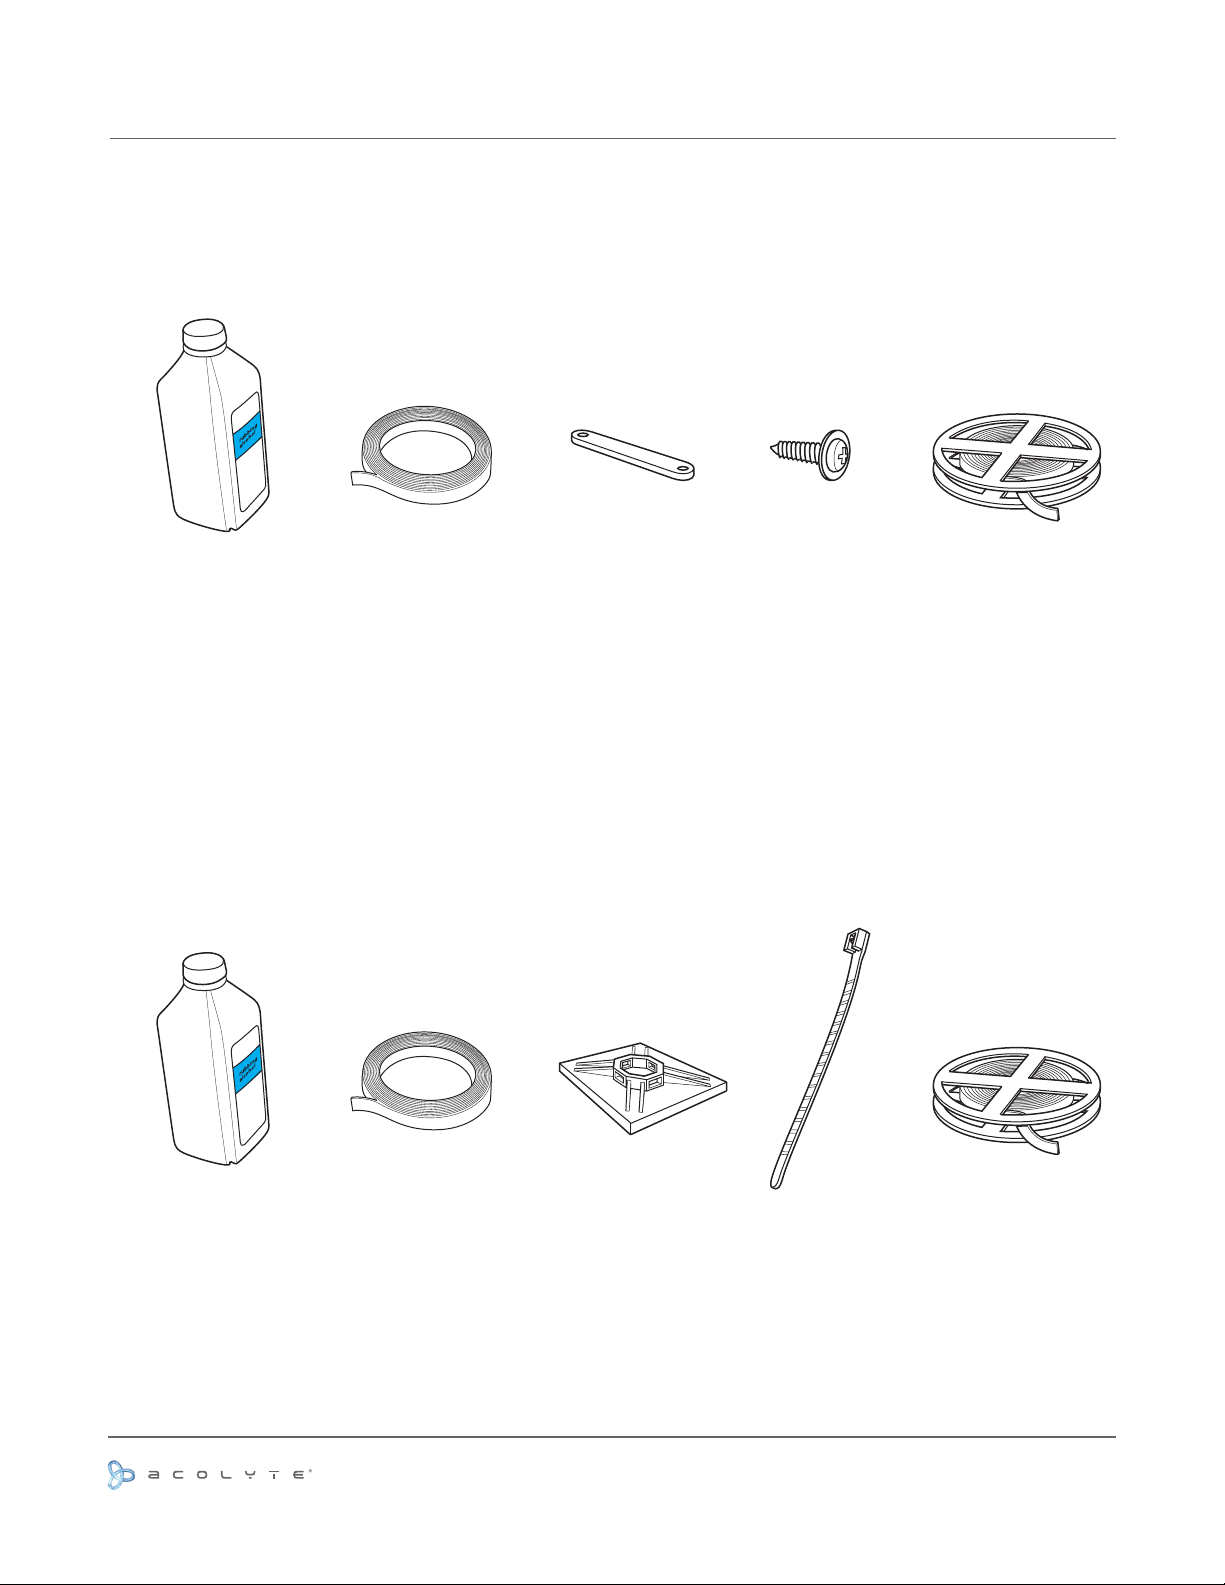
MATERIAL LIST
INSTALL A - SILICONE PADS
(A)
Rubbing Alcohol
(for metallic surfaces)
Double Sided Tape
(B)
INSTALL B - ZIP TIE PADS
(C)
Silicone Pad
(D)
Screws
(E)
RibbonLyte
(A)
Rubbing Alcohol
(for metallic surfaces)
(B)
Double Sided Tape
Use or reprinting prohibited unless explicitly approved by Acolyte Industries.
All artwork and images copyright Acolyte Industries Inc.
(C)
Zip Tie Pad
(D)
Zip Tie
(E)
RibbonLyte
PAGE 1
Page 3

INSTALL A - SILICONE PADS
PREFERRED METHOD
BETTER LOOKING
INSTALL B - ZIP TIE PADS
ALTERNATE METHOD
EASIER TO INSTALL
Use or reprinting prohibited unless explicitly approved by Acolyte Industries.
All artwork and images copyright Acolyte Industries Inc.
PAGE 2
Page 4
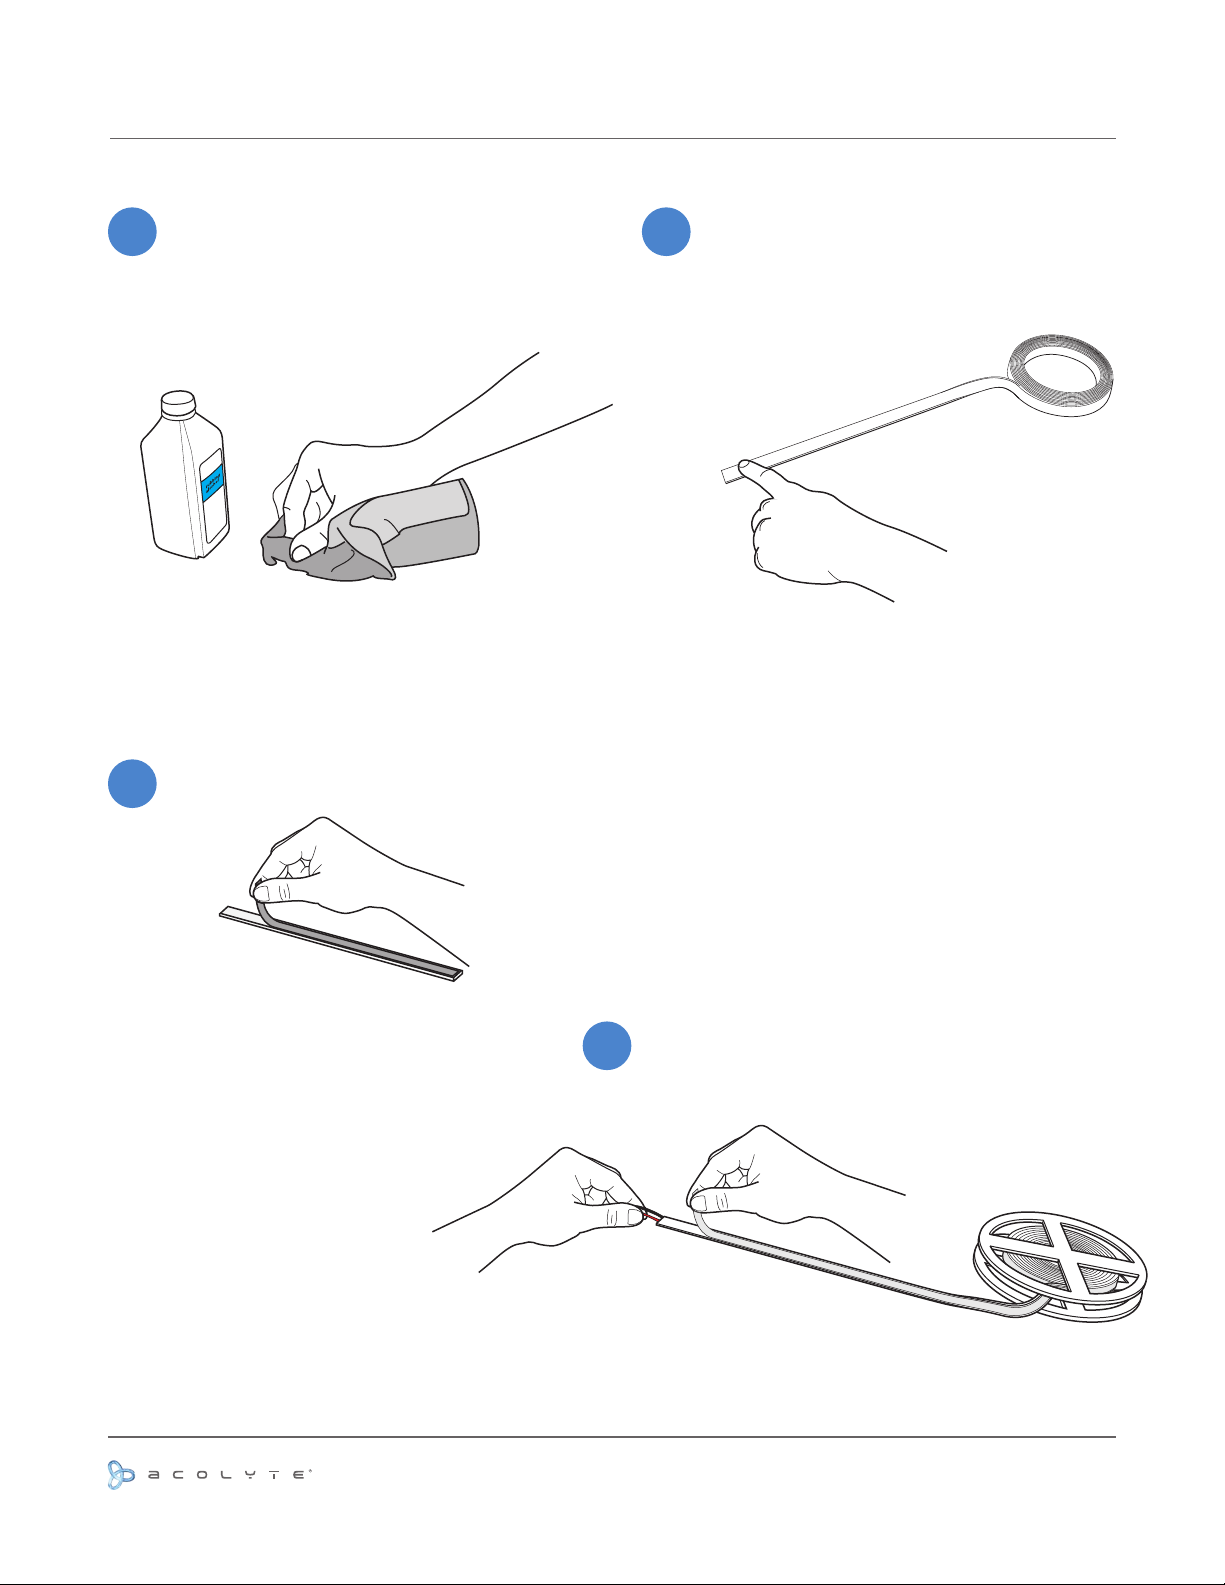
A - MOUNT NON-WATERPROOF RIBBONLYTE WITH SILICONE PADS
Clean the mountain surface free of dust
1
and debris using a wet cloth. For metal
mounting surfaces use rubbing alcohol (A)
to wipe clean.
(A)
Remove backing from double-sided tape
3
(B).
After surface is dry, apply 1/16” double-sided
2
tape (B) to the desired mounting path of
your RibbonLyte. If mounting to a wall, use
a level to ensure a straight line.
(B)
(B)
Remove the backing from the RibbonLyte
4
(E) that you are going to be applying atop
the double-sided tape.
Use or reprinting prohibited unless explicitly approved by Acolyte Industries.
All artwork and images copyright Acolyte Industries Inc.
(E)
PAGE 3
Page 5
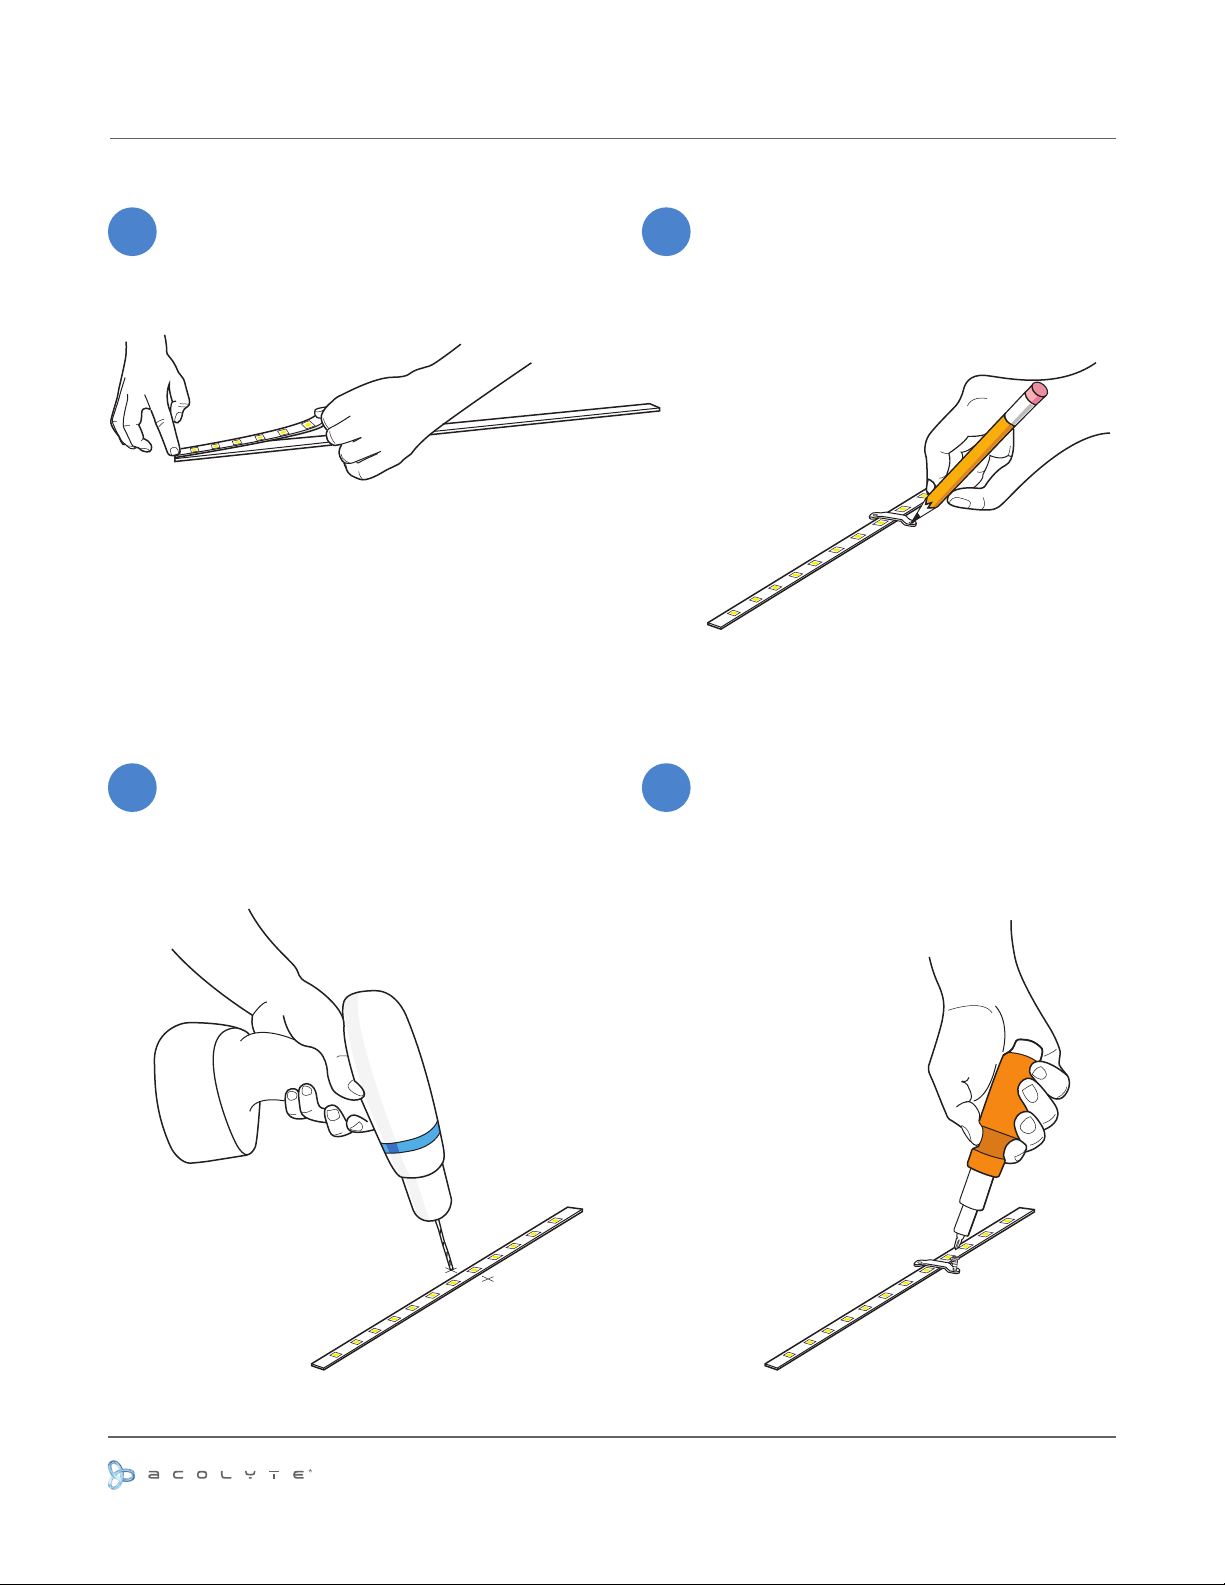
INSTALL A -- STEPS 5-8
Apply the RibbonLyte (E) by placing one
5
end of the strip at the end of the doublesided tape (B) inside the channel then slide
your nger along the RibbonLyte (E) to
make sure there is rm contact and that the
tape adheres well.
(E)
Drill pilot holes at the center of each mark
7
you made.
(B)
Every 12 inches place a silicone pad (C) over
6
the RibbonLyte (E) and use a pencil to mark
where each pilot hole will be drilled. DO
NOT place the pad above an LED. Place it
as close to 12 inches as possible, while not
touching any LEDs.
(C)
(E)
Tighten the screws (D) through the silicone
8
pads (C) until all of the pads are secure and
the RibbonLyte (E) is held tightly in place.
Use or reprinting prohibited unless explicitly approved by Acolyte Industries.
All artwork and images copyright Acolyte Industries Inc.
(C)
(D)
(E)
PAGE 4
Page 6
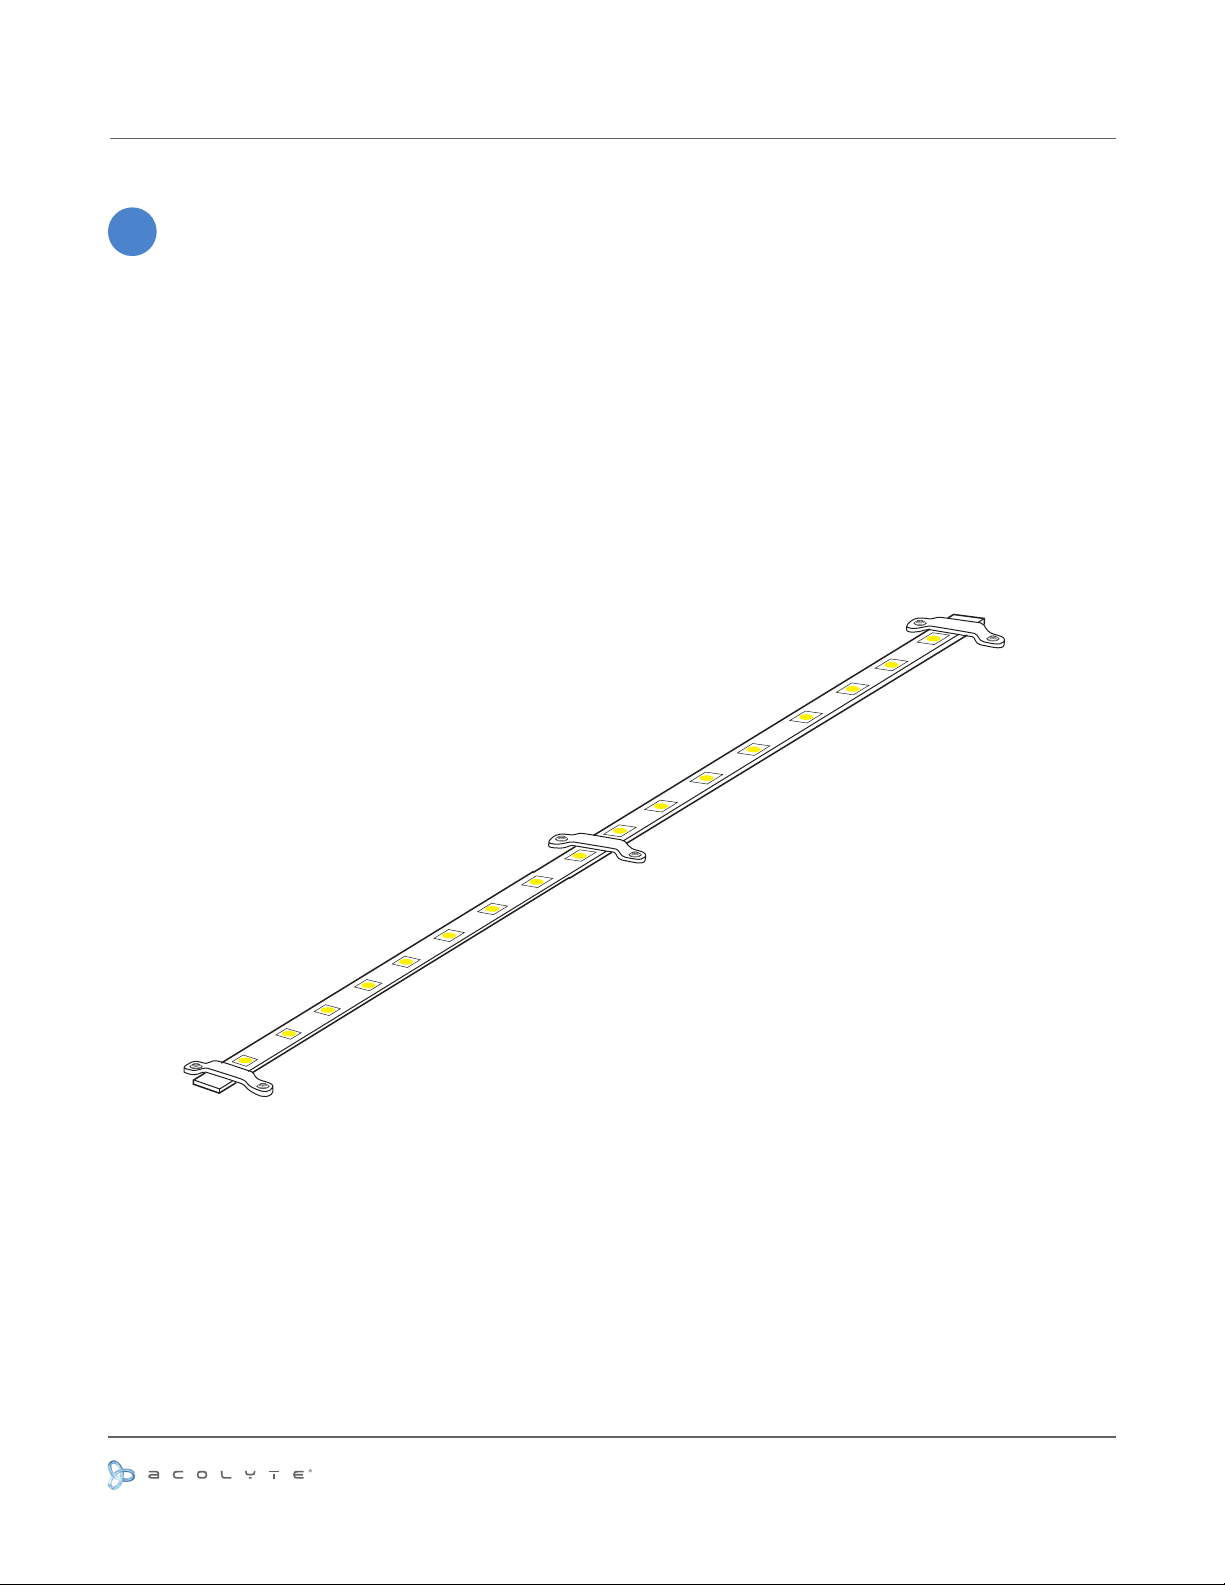
INSTALL A -- COMPLETE
Your RibbonLyte installation is complete.
9
Use or reprinting prohibited unless explicitly approved by Acolyte Industries.
All artwork and images copyright Acolyte Industries Inc.
PAGE 5
Page 7
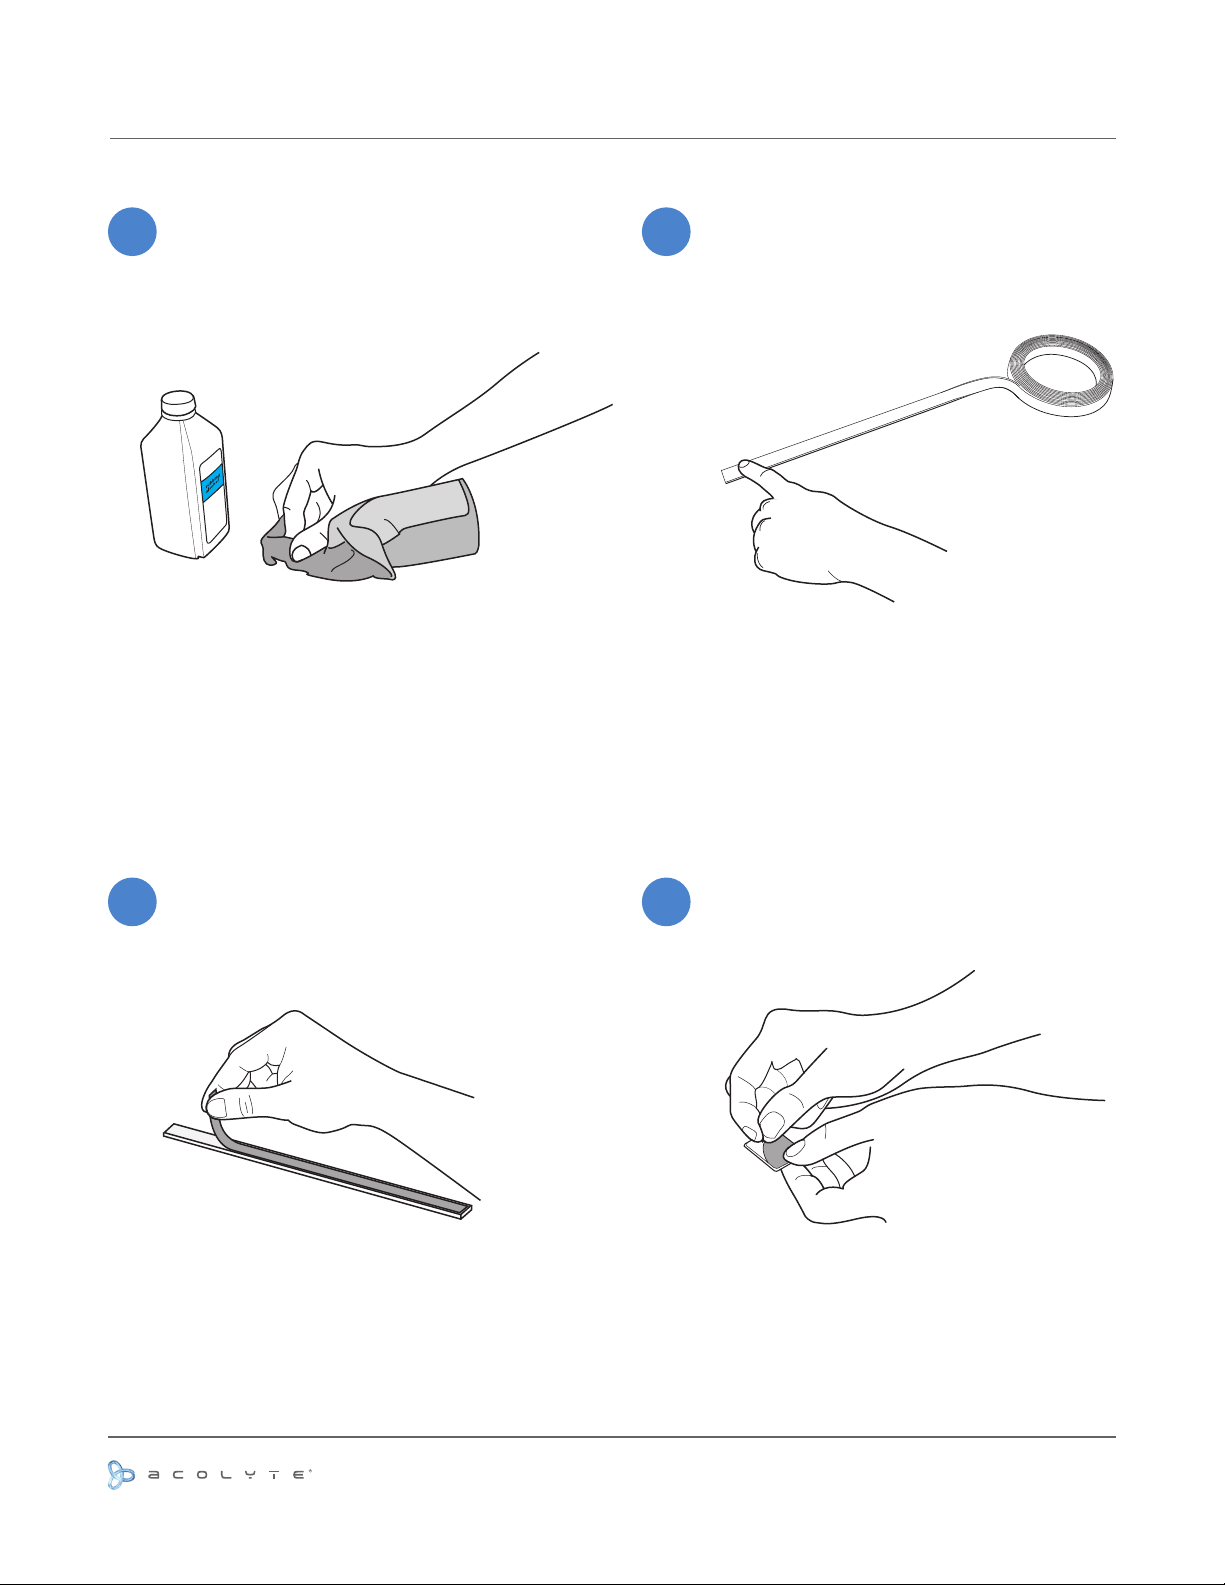
B - MOUNT NON-WATERPROOF RIBBONLYTE WITH ZIP TIE PADS
Clean the mountain surface free of dust
1
and debris using a wet cloth. For metal
mounting surfaces use rubbing alcohol (A)
to wipe clean.
(A)
After surface is dry, apply 1/16” double-sided
2
tape (B) to the desired mounting path of
your RibbonLyte. If mounting to a wall, use
a level to ensure a straight line.
(B)
Remove backing from double-sided tape
3
(B).
(B)
Take the backing off the zip tie pads (C).
4
(C)
Use or reprinting prohibited unless explicitly approved by Acolyte Industries.
All artwork and images copyright Acolyte Industries Inc.
PAGE 6
Page 8
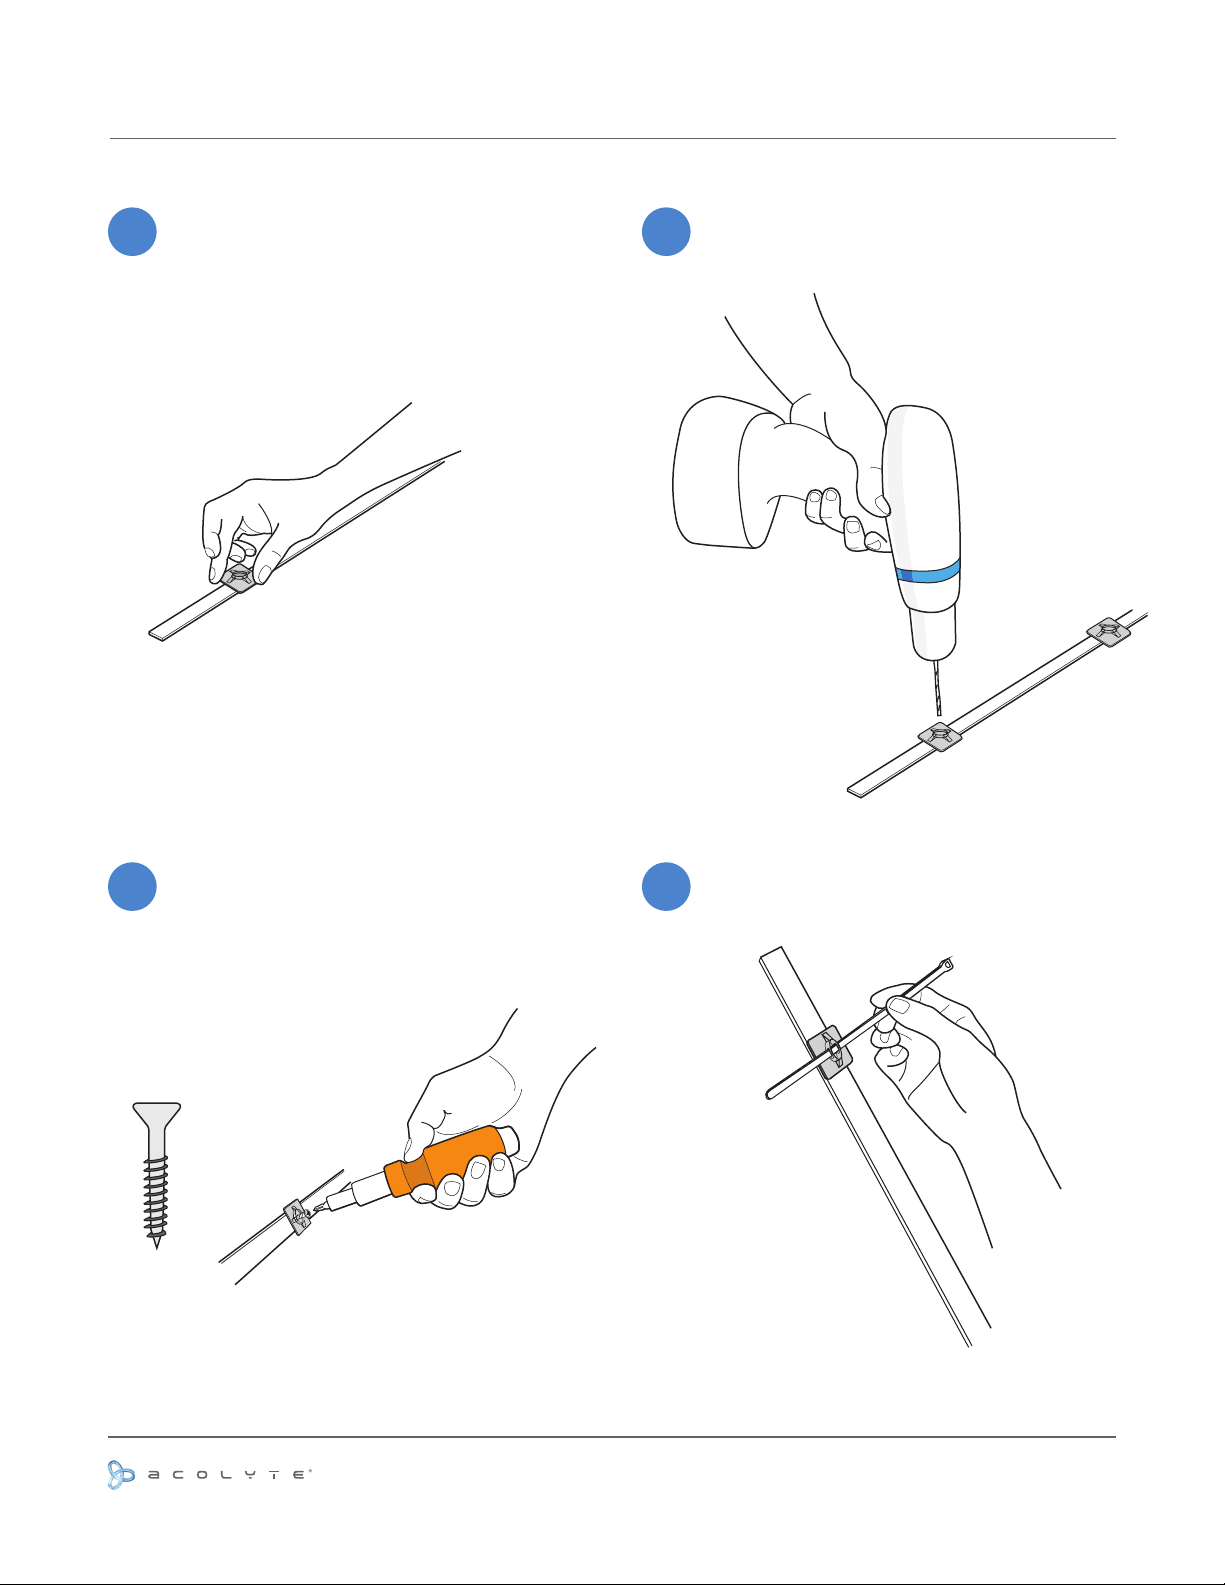
INSTALL B -- STEPS 5-8
Apply the zip tie pads (C) directly over the
5
double-sided tape (B) on your mounting
surface, approximately every 12 inches.
Drill a pilot hole through the center of each
6
zip tie pad (C) into the mounting surface
where they are positioned.
Screw the zip tie pad (C) into place with a
7
size 8 counter sunk at head screw.
Size 8
Slide zip ties (D) through the openings
8
in each of the zip tie pads (C) but do not
connect the ends of the zip ties.
Use or reprinting prohibited unless explicitly approved by Acolyte Industries.
All artwork and images copyright Acolyte Industries Inc.
PAGE 7
Page 9
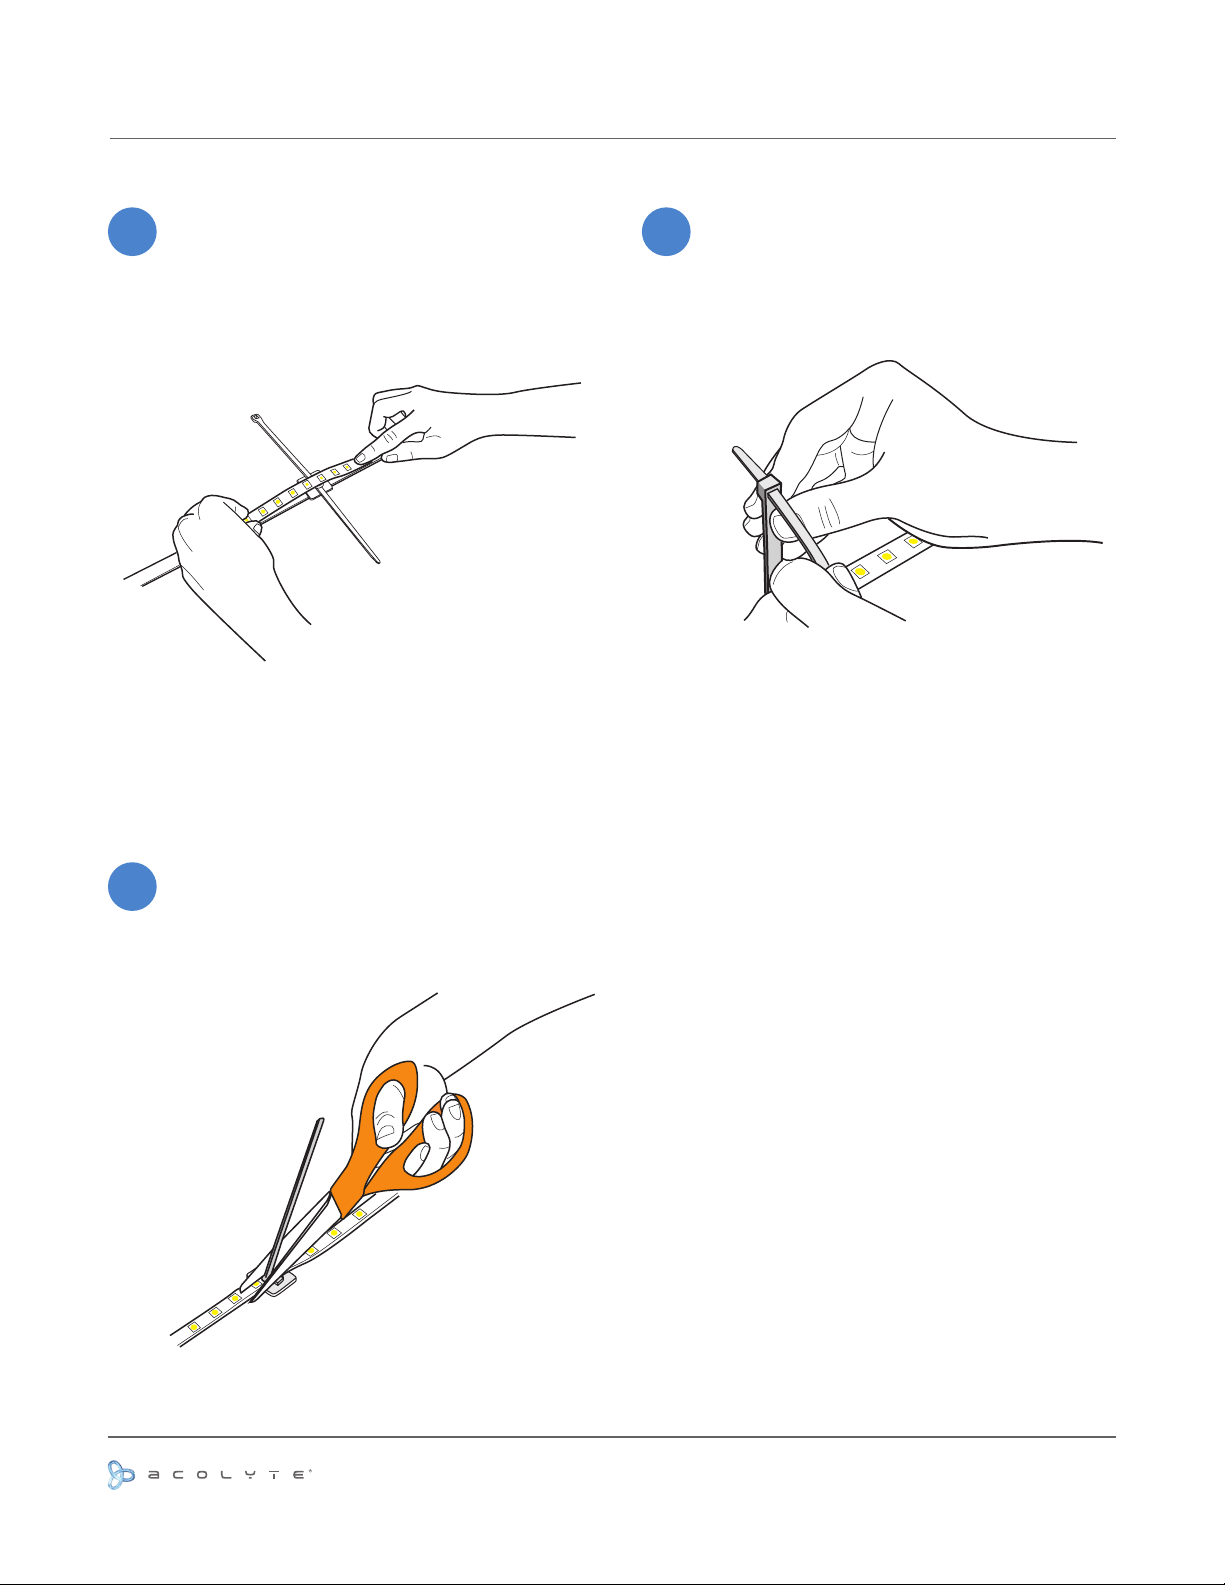
INSTALL B -- STEPS 9-11
Apply the RibbonLyte (E) by placing one
9
end of the strip at the end of the double-
sided tape, then slide your nger along the
RibbonLyte (E) to make sure there is rm
contact and that the tape adheres well. The
RibbonLyte (E) should go directly over the
top of the zip tie pads (C).
10
Wrap the zip tie (D) around the RibbonLyte
(E) and slide the tail of the tie through the
other end until it holds its position and has a
snug t.
11
Snip the tail off the zip tie (D) with scissors
or wire snips.
Use or reprinting prohibited unless explicitly approved by Acolyte Industries.
All artwork and images copyright Acolyte Industries Inc.
PAGE 8
Page 10
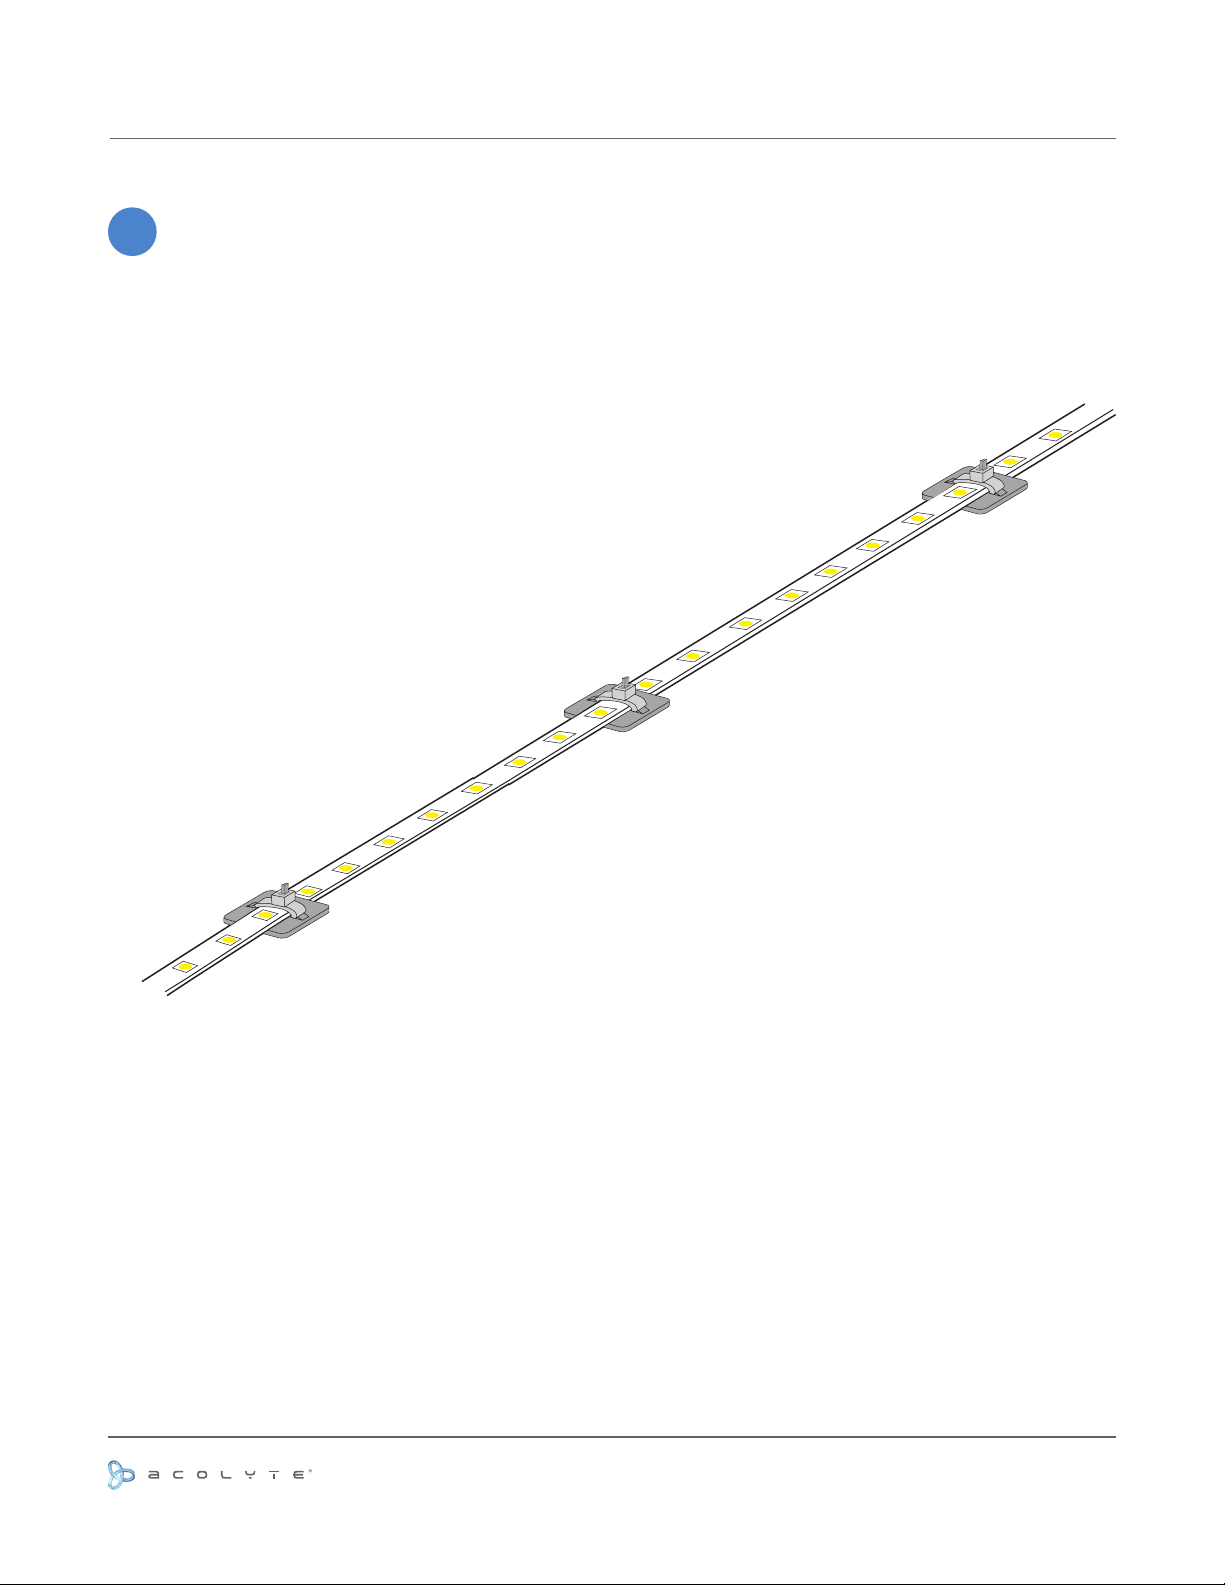
INSTALL B -- COMPLETE
12
Your RibbonLyte installation is complete.
Use or reprinting prohibited unless explicitly approved by Acolyte Industries.
All artwork and images copyright Acolyte Industries Inc.
PAGE 9
 Loading...