

Page 1

Acer Altos G300 Series
User’s guide
Page 2

Copyright © 2003 Acer Incorporated
All Rights Reserved.
Acer Altos G300 Series
User’s guide
January 2003
Changes may be made periodically to the information in this publication without obligation
to notify any person of such revision or changes. Such changes will be incorporated in new
editions of this manual or supplementary documents and publications. This company makes
no representations or warranties, either expressed or implied, with respect to the contents
hereof and specifically disclaims the implied warranties of merchantability or fitness for a
particular purpose.
Record the model number, serial number, purchase date, and place of purchase information in
the space provided below. The serial number and model number are recorded on the label
affixed to your computer. All correspondense concerning your unit should include the serial
number, model number, and purchase information.
No part of this publication may be reproduced, stored in a retrieval system, or transmitted, in
any form or by any means, electronic, mechanical, photocopy, recording, or otherwise,
without the prior written permission of Acer Incorporated.
Model Number : _________________________________
Serial Number: ___________________________________
Purchase Date: ___________________________________
Place of Purchase: ________________________________
Acer and the Acer Logo are registered trademarks of Acer Inc. Other company’s product
names or trademarks are used herein for identification purposes only and belong to their
respective companies.
Page 3

Notices
FCC notice
This device has been tested and found to comply with the limits for a
Class B digital device pursuant to Part 15 of the FCC Rules. These limits
are designed to provide reasonable protection against harmful
interference in a residential installation. This device generates, uses,
and can radiate radio frequency energy and, if not installed and used
in accordance with the instructions, may cause harmful interference to
radio communications.
However, there is no guarantee that interference will not occur in a
particular installation. If this device does cause harmful interference to
radio or television reception, which can be determined by turning the
device off and on, the user is encouraged to try to correct the
interference by one or more of the following measures:
• Reorient or relocate the receiving antenna
• Increase the separation between the device and receiver
• Connect the device into an outlet on a circuit different from that
to which the receiver is connected
• Consult the dealer or an experienced radio/television technician
for help
iii
Notice: Shield cables
All connections to other computing devices must be made using
shielded cables to maintain compliance with FCC regulations.
Notice: Peripheral devices
Only peripherals (input/output devices, terminals, printers, etc.)
certified to comply with the Class B limits may be attached to this
equipment. Operation with noncertified peripherals is likely to result
in interference to radio and TV reception.
Caution! Changes or modifications not expressly approved by the
manufacturer could void the user’s authority, which is granted by
the Federal Communications Commission, to operate this
computer.
Use conditions
Page 4

iv
This part complies with Part 15 of the FCC Rules. Operation is subject to
the following two conditions: (1) this device may not cause harmful
interference, and (2) this device must accept any interference received,
including interference that may cause undesired operation.
Notice: Canadian users
This Class B digital apparatus meets all requirements of the Canadian
Interference-Causing Equipment Regulations.
Remarque à l’intention des utilisateurs canadiens
Cet appareil numérique de la classe B respected toutes les exigences du
Règlement sur le matériel brouilleur du Canada.
Important safety instructions
Read these instructions carefully. Save these instructions for future
reference.
1 Follow all warnings and instructions marked on the product.
2 Unplug this product from the wall outlet before cleaning. Do not
use liquid cleaners or aerosol cleaners. Use a damp cloth for
cleaning.
3 Do not use this product near water.
4 Do not place this product on an unstable cart, stand, or table. The
product may fall, causing serious damage to the product.
5 Slots and openings in the cabinet and the back or bottom are
provided for ventilation; to ensure reliable operation of the
product and to protect it from overheating, these openings must
not be blocked or covered. The openings should never be blocked
by placing the product on a bed, sofa, rug, or other similar surface.
This product should never be placed near or over a radiator or
heat register, or in a built-in installation unless proper ventilation
is provided.
6 This product should be operated from the type of power indicated
on the marking label. If you are not sure of the type of power
available, consult your dealer or local power company.
7 Do not allow anything to rest on the power cord. Do not locate
this product where persons will walk on the cord.
8 If an extension cord is used with this product, make sure that the
total ampere rating of the equipment plugged into the extension
cord does not exceed the extension cord ampere rating. Also,
Page 5

make sure that the total rating of all products plugged into the
wall outlet does not exceed the fuse rating.
9 Never push objects of any kind into this product through cabinet
slots as they may touch dangerous voltage points or short out
parts that could result in a fire or electric shock. Never spill liquid
of any kind on the product.
10 Do not attempt to service this product yourself, as opening or
removing covers may expose you to dangerous voltage points or
other risks. Refer all servicing to qualified service personnel.
11 Unplug this product from the wall outlet and refer servicing to
qualified service personnel under the following conditions:
12 When the power cord or plug is damaged or frayed
a If liquid has been spilled into the product
b If the product has been exposed to rain or water
c If the product does not operate normally when the operating
instructions are followed. Adjust only those controls that are covered
by the operating instructions since improper adjustment of other
controls may result in damage and will often require extensive work
by a qualified technician to restore the product to normal condition.
d If the product has been dropped or the cabinet has been damaged
e If the product exhibits a distinct change in performance, indicating a
need for service.
f Replace the battery with the same type as the product's battery we
recommend. Use of another battery may present a risk of fire or
explosion. Refer battery replacement to a qualified serviceman.
13 Warning! Batteries may explode if not handled properly. Do not
disassemble or dispose of them in fire. Keep them away from
children and dispose of used batteries promptly.
14 Use only the proper type of power supply cord set (provided in
your accessories box) for this unit. It should be a detachable type:
UL listed/CSA certified, type SPT-2, rated 7A 125V minimum, VDE
approved or its equivalent. Maximum length is 15 feet (4.6
meters).
v
Laser compliance statement
The CD-ROM drive in this computer is a laser product. The CD-ROM
drive’s classification label (shown below) is located on the drive.
Page 6

vi
CLASS 1 LASER PRODUCT
CAUTION: INVISIBLE LASER RADIATION WHEN OPEN. AVOID
EXPOSURE TO BEAM.
APPAREIL A LASER DE CLASSE 1 PRODUIT
LASERATTENTION: RADIATION DU FAISCEAU LASER INVISIBLE EN CAS
D’OUVERTURE. EVITTER TOUTE EXPOSITION AUX RAYONS.
LASER KLASSE 1
VORSICHT: UNSICHTBARE LASERSTRAHLUNG, WENN ABDECKUNG
GEÖFFNET, NICHT DEM STRAHLL AUSSETZEN
PRODUCTO LÁSER DE LA CLASE I
ADVERTENCIA: RADIACIÓN LÁSER INVISIBLE AL SER ABIERTO. EVITE
EXPONERSE A LOS RAYOS.
ADVARSEL: LASERSTRÅLING VEDÅBNING SE IKKE IND I STRÅLEN
VARO! LAVATTAESSA OLET ALTTINA LASERSÅTEILYLLE.
VARNING: LASERSTRÅLNING NÅR DENNA DEL ÅR ÖPPNAD ÅLÅ
TUIJOTA SÅTEESEENSTIRRA EJ IN I STRÅLEN
VARNING: LASERSTRÅLNING NAR DENNA DEL ÅR ÖPPNADSTIRRA EJ
IN I STRÅLEN
ADVARSEL: LASERSTRÅLING NAR DEKSEL ÅPNESSTIRR IKKE INN I
STRÅLEN
Lithium battery statement
CAUTION
Danger of explosion if battery is incorrectly replaced. Replace only with
the same or equivalent type recommended by the manufacturer.
Discard used batteries according to the manufacturer’s instructions.
ADVARSEL!
Lithiumbatteri - Eksplosionsfare ved fejlagtig håndtering. Udskiftning
må kun ske med batteri af samme fabrikat og type. Léver det brugte
batteri tilbage til leverandøren.
ADVARSEL
Eksplosjonsfare ved feilaktig skifte av batteri. Benytt samme
batteritype eller en tilsvarende type anbefalt av apparatfabrikanten.
Brukte batterier kasseres i henhold til fabrikantens instruksjoner.
VARNING
Explosionsfara vid felaktigt batteribyte. Anvãnd samma batterityp eller
Page 7

vii
en ekvivalent typ som rekommenderas av apparattillverkaren. Kassera
anvãnt batteri enligt fabrikantens instruktion.
VAROITUS
Päristo voi räjähtää, jos se on virheellisesti asennettu. Vaihda paristo
ainoastaan laitevalmistajan suosittelemaan tyyppiin. Hävitä käytetty
paristo valmistajan ohjeiden mukaisesti.
VORSICHT!
Explosionsgefahr bei unsachgemäßen Austausch der Batterie Ersatz
nur durch denselben oder einem vom Hersteller empfohlenem
ähnlichen Typ. Entsorgung gebrauchter Batterien nach Angaben des
Herstellers.
Page 8

Page 9

1 Getting started 1
Overview 3
Processor 3
Memory 4
System chipsets 4
ServerWorks GC-SL chipset 4
LAN subsystem 4
Expansion slots 5
PCI bus 5
Hardware management support 5
Features summary 6
Preinstallation requirements 7
Selecting a site 7
Checking the package contents 7
Basic connections 8
Connecting the keyboard 8
Connecting the mouse 9
Connecting the VGA monitor 10
Connecting to the network 10
Connecting the power cable 11
System startup 12
Power-on problems 13
Connecting options 14
Printer 14
USB devices 14
Tower-to-rack option 16
ix
2 System tour 17
External and internal structure 19
Front panel 19
Rear panel 21
Internal components 22
System board layout 23
Control Panel (JP3) 26
Jumper Setting (J13) 26
Diagnostics LED (Port80LED) 27
3 Upgrading your system 29
Installation precautions 31
ESD precautions 31
Preinstallation instructions 31
Post-installation instructions 32
Opening your system 33
Page 10

x
Removing the front panel 33
Removing the side panels 34
Installing and removing storage devices 36
Replacing a 3.5-inch or a 5.25-inch storage device 36
Installing a hard disk 38
Installing a DLT 39
Installing and removing the CPU 40
Installing a CPU 40
Removing a CPU 41
Installing and removing memory modules 43
Reconfiguring the system 44
Installing expansion cards 45
4 Setup utility 47
Introduction 49
Setup Menu 50
Setup submenu: Main 51
Setup submenu: Advanced 52
SuperIO Configuration 53
IDE Configuration 54
Auto Detect Hard Disks 55
Primary IDE Master (if attached Hard Disk) 56
Secondary IDE Master (if attached ATAPI
CDROM) 58
Secondary IDE Slave (if none attached) 58
Floppy Configuration 59
OnBoard Devices Configuration 60
PCIPnP Configuration 61
Boot Settings Configuration 63
Event Log Configuration 64
View Event Log 66
System Health Monitoring Hardware 66
Hardware Monitor Setup Page 66
System Hardware Monitor 67
Remote Access Configuration 69
Setup submenu: Power 70
Setup submenu: Boot 71
Boot Device Priority 72
Hard Disk Drives 73
Removable Devices 74
ATAPI CDROM Drives 75
Setup submenu: Security 76
Setup submenu: Exit 77
Page 11

Auto Configuration with Optimal Settings 77
Auto Configuration with Fail-Safe Settings 78
5 Configuring IDE Software RAID 79
Configuring Arrays 81
Configuration Strategies 81
Assigning RAID Levels 81
Selecting a RAID Level 82
Configuring Arrays 83
Using the IDE Software RAID Setup Utility 84
Auto Configure Stripe (F1) 85
Auto Configure Mirror (F2) 85
Auto Configure RAID 10 (F3) 86
Create Array (F4) 86
Delete Array (F5) 88
Restore Old Configuration (F6) 88
Save and Exit (F10) 88
Installing Windows NT 4.0 and Windows 2000 Drivers 89
Updating the Windows NT 4.0 or Windows 2000
Driver 89
Confirming the Windows NT 4.0 or Windows 2000
Driver Installation 90
IDE Software RAID Configuration Console Installation 91
Supported Internet Browsers 91
Installation Steps for Windows 91
Using IDE Software RAID Configuration Console 95
IDE Software RAID Configuration Console 95
Config View 100
RAID Controller Properties 101
Property Description 102
Physical Drive 103
Array 105
Log Data 112
Advanced 113
Backplane 115
Close Server 116
xi
Appendix A: AMIBIOS
POST Checkpoint Codes 117
AMIBIOS POST Checkpoint Codes 119
Uncompressed Initialization Codes 119
POST Checkpoint Codes 120
Bootblock Recovery Codes 120
Page 12

xii
Uncompressed Initialization Codes 121
Bus Checkpoint Codes 129
Additional Bus Checkpoints 130
High Byte 130
Appendix B: ASM
quick installation guide 131
Installing ASM 133
System requirements 133
ASM Agent 133
ASM Console 133
System setup 133
Installing ASM Agent 134
Installing ASM Console 134
Appendix C: Rack
installation guide 135
System rack installation 137
Vertical mounting hole pattern 138
Screw types for rack installation 139
Installing cage nuts 139
Installing the system into the rack 141
Page 13

1 Getting started
Page 14

The Acer Altos G301 is a PCI bus based single
processor system loaded with a host of new
and innovative features. The system offers a
new standard for flexible productivity ideal
for local or wide area networks and multiuser
server environments.
Page 15

Overview
The Acer Altos G301 is a PCI bus based single processor system board
built on an extended ATX baseboard. It comes with a single mPGA478
processor socket utilizing an Intel
with the ServerWorks GC-SL chipset. The system board also integrates
the Intel
(Wake on LAN) for better remote site management.
For expandability, the system board using ATI Rage XL integrated with
8MB memory, one 32bit/33MHz 5V PCI bus slot, four 64bit/33MHz 3.3V
PCI bus slots and four DIMM sockets that allow memory installation to
a maximum of 4GB using four 1GB Registered DDR SDRAM
(Synchronous DRAM) with ECC DIMMs.
For connectivity, the system board supports two USB (Universal Serial
Bus) connectors, one UART NS16C550 serial ports, one enhanced
parallel port with Enhanced Parallel Port (EPP)/Extended Capabilities
Port (ECP) support, two PS/2 port, a diskette drive interface, three
embedded hard disk interfaces, one RJ-45 network port and a 9-pin
connector for video output.
The system is fully compatible with MS-DOS V6.X, Novell Netware 6.0,
RedHat Linux 7.3/8.0, Windows NT 4.0 server, and Windows 2000
server.
®
82540EM Gigabit Ethernet controller that supports WOL
®
Pentium® 4 processor integrated
3
Processor
The Pentium® 4 processor implements Intel® NetBurstTM micro
architecture, Hyper-Pipelined Technology, Advanced Dynamic
Execution, Enhanced Floating-Point and Multimedia Unit, Streaming
SIMD Extensions 2 (SSE2) Instructions. Based on Intel
architecture, the Pentium 4 processor offers higher-performance
processing than ever before. Built with Intel's 0.13-micron technology,
the Pentium 4 processor delivers significant performance gains for use
in home computing, business solutions and all your processing needs.
This system board supports 400/533MHz system bus frequencies for one
Pentium 4 processor supporting frequencies starting at 1.8GHz.
®
NetBurstTM micro
Page 16

4
1 Getting started
Memory
The four DIMM sockets on board allow memory upgrade to a
maximum of 4GB using four 1 GB DDR SDRAM (Synchronous DRAM)
DIMMs. For data integrity, the default setting of the ECC (errorcorrecting code) function of the memory system in BIOS is enabled.
The system board supports DDR266 SDRAMs; PC-133, PC-100, PC-66
MHz SDRAMs are not supported.
System chipsets
ServerWorks GC-SL chipset
The ServerWorks GC-SL+SL chipset was specifically designed to meet
the needs of high performance systems. It consists of two components:
SeverWorks CMIC-SL (North bridge) and ServerWorks CSB6 (South
bridge).
• ServerWorks CMIC-SL(North bridge) supports Intel
CPU with mPGA478 package. Build-in features include main
memory interface with optimized support for DDR SDRAM, 64-bit,
33MHz primary PCI bus interface (PCI) with integrated PCI arbiter,
I2C bus support and other related functions.
• ServerWorks CSB6 (South bridge) integrates support for ACPI, USB
1.1, SMBus, PCI master, PCI arbiter, LPC bus controller, LPC arbiter,
seven channel 8237 compatible DMA controller and DMA 66/100
on primary & secondary IDE with DMA66 on third IDE and other
standard PC functions.
®
Pentium® 4
LAN subsystem
Another cost-effective feature for network solution is the integration
of Intel
Advanced Configuration and Power Interface (ACPI) 2.0 based power
management, advanced System Management Bus (SMBus) based
manageability, Wired for Management (WfM) 2.0 compliance, TCP/
UDP/IP checksum calculation and segmentation, PCI 2.2 compliance,
and PC 2001 compliance.
®
82540EM Gigabit Ethernet controller which supports
Page 17

Expansion slots
PCI bus
The system board has one PCI buses that support 32-bit/33 MHz/5V PCI
devices and four PCI buses supporting 64-bit/33 MHz/3.3V PCI devices.
Hardware management support
The system board supports the power-management function that
conforms to the power-saving standards of the U.S. Environmental
Protection Agency (EPA) Energy Star program. It also offers Plug-andPlay. This feature saves the user from configuration troubles, thus
making the system more user-friendly.
Additional features include hardware support for ASM (Advanced
Server Management). ASM detects CPU thermal condition problems,
CPU working voltage detection (±12V/±5V/3.3V/1.5V), and PCI bus
utilization calculation. It also detects if the CPU fan or the chassis fan
malfunctions.
5
Page 18

6
1 Getting started
Features summary
The main board has the following major components:
• Utilizes a mPG478 processor socket that supports a Pentium
processor running at 1.8 GHz and future generations of Pentium
CPUs
• ServerWorks GC-SL chipset which includes the north and the south
bridge
• Onboard Gigabit Ethernet chip that supports WOL and AOL
• Four DIMM sockets that accept 128-, 256-, 512-, and 1-GB DDR
SDRAMs with a maximum memory upgrade of 4-GB
• On-board ATI Rage XL and 5 PCI bus slots with 4 supporting 64-bit
PCI
• System clock/calendar with battery backup
• IDE hard disk and diskette drive interfaces
• Auxiliary power connector for 300W SPS and ATX power supply
• Advanced Server Management (ASM)
• External ports:
• 2 USB connectors • RJ-45 jack
• PS/2-compatible keyboard port • Parallel port
• PS/2-compatible mouse port • Serial port
• SVGA video port
4
Page 19

Preinstallation requirements
Selecting a site
Before unpacking and installing the system, select a suitable site for
the system for maximum efficiency. Consider the following factors
when choosing a site for the system:
• Near a grounded power outlet
• Clean and dust-free
• Sturdy surface free from vibration
• Well-ventilated and away from sources of heat
• Secluded from electromagnetic fields produced by electrical
devices such as air-conditioners, radio and TV transmitters, etc.
Checking the package contents
Check the following items from the package:
• Acer Altos G300 (model G301) system
• Acer Altos G300 Series user’s guide
• EasyBUILD CD
• Acer Altos G300 Series accessory box
• System keys (hung inside the front panel door)
7
If any of the above items are damaged or missing, contact your dealer
immediately.
Save the boxes and packing materials for future use.
Page 20
8
1 Getting started
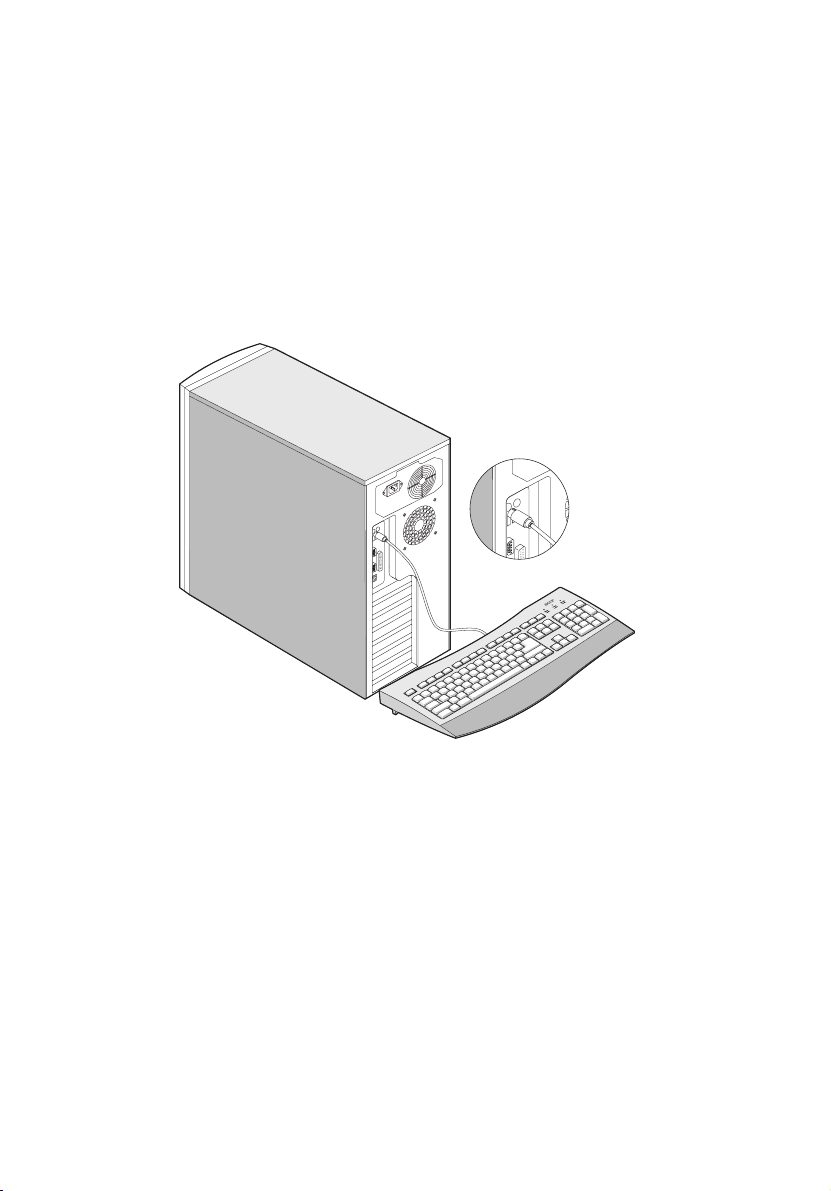
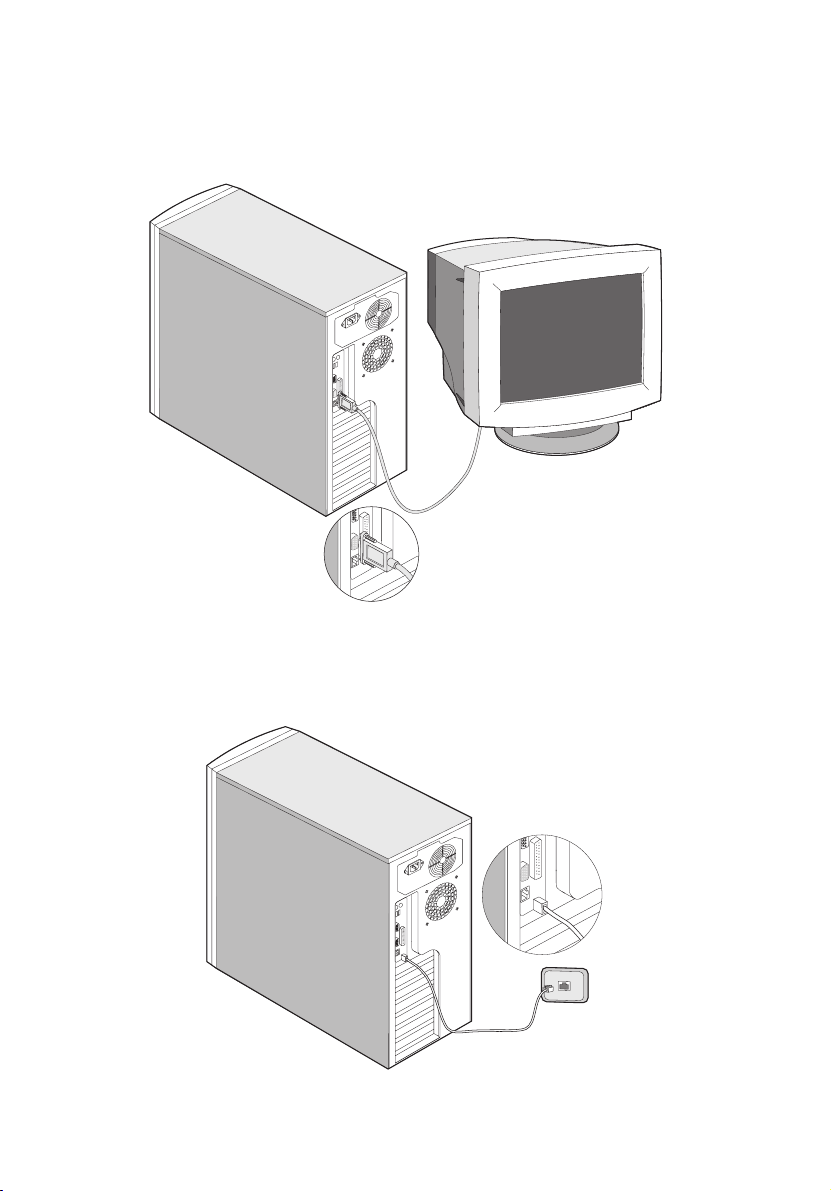
Basic connections
The system unit, keyboard, mouse, and monitor constitute the basic
system. Before connecting any other peripherals, connect these
peripherals first to test if the system is running properly.
Connecting the keyboard
Page 21
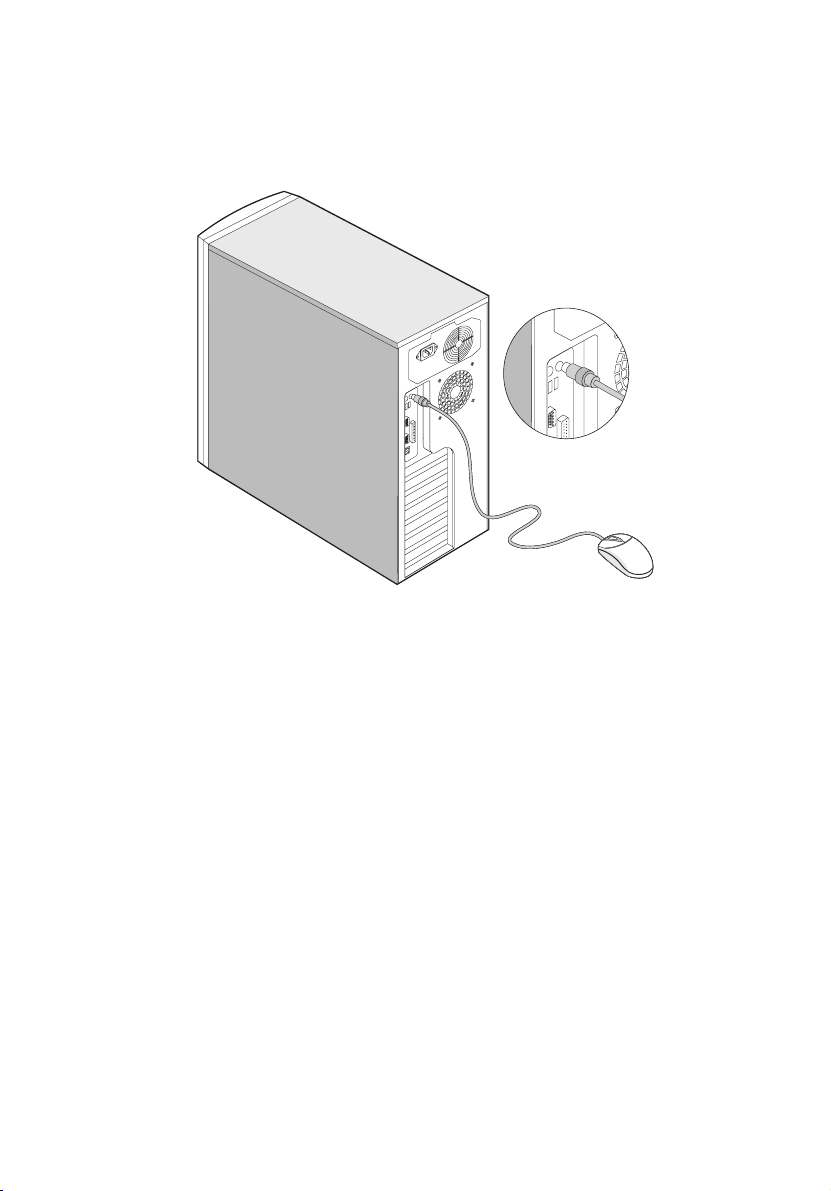
Connecting the mouse
9
Page 22
10
Connecting the VGA monitor
1 Getting started
Connecting to the network
Page 23
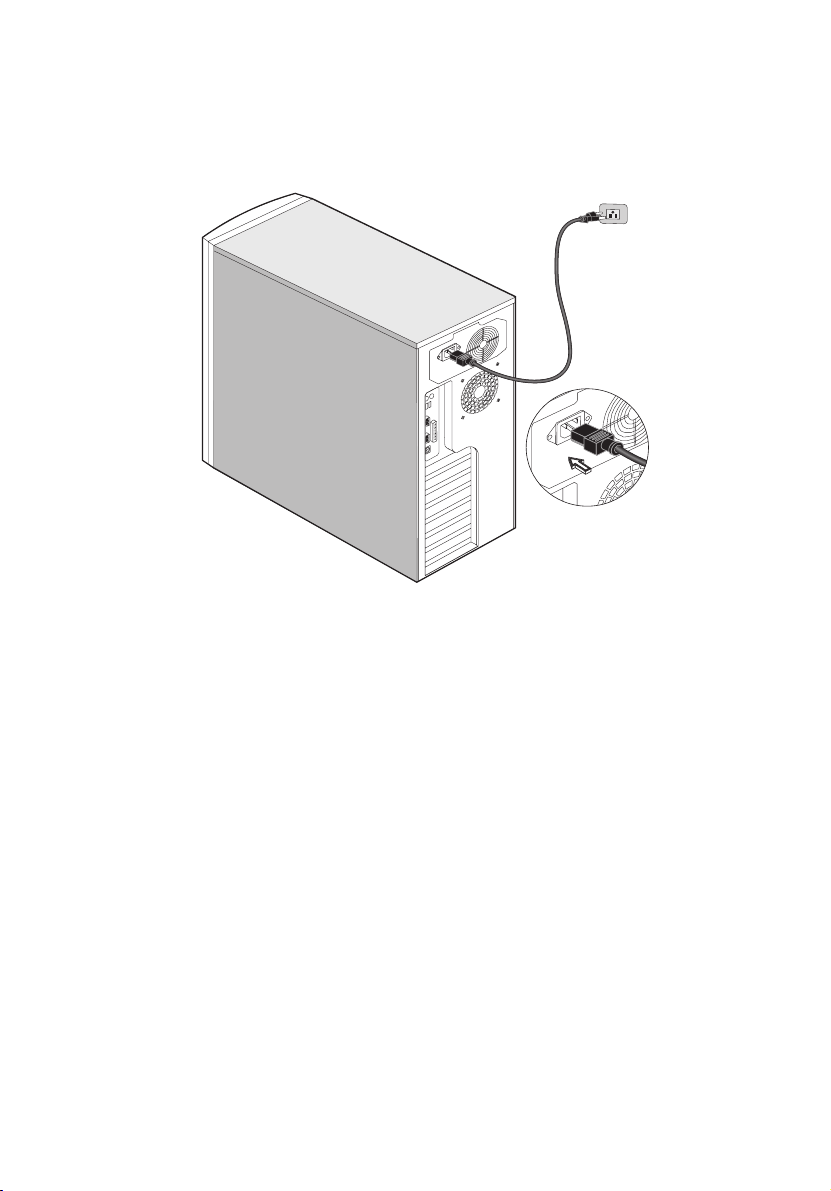
Connecting the power cable
11
Page 24

12
1 Getting started
System startup
After making sure that you have set up the system properly and
connected all the required cables, you may now apply power to the
system.
To power on the system:
Open the front panel door and press the power button. The system
starts up and displays a welcome message. After that, a series of
power-on self-test (POST) messages appears. The POST messages
indicate if the system is running well or not.
Note: If the system does not turn on or boot after pressing the
power button, go to the next section for the possible causes of the
boot failure.
Aside from the self-test messages, you can determine if the system is in
good condition by checking if the following occurred:
• Power indicator LED on the front bezel lights up (green)
• Power, Num Lock, and Caps Lock LED indicators on the keyboard
light up
Page 25

Power-on problems
If the system does not boot after you have applied power, check the
following factors that might have caused the boot failure.
• The external power cable may be loosely connected.
Check the power cable connection from the power source to the
power socket on the rear panel. Make sure that each cable is
properly connected to each power supply.
• No power comes from the grounded power outlet.
Have an electrician check your power outlet.
• Loose or improperly connected internal power cables.
Check the internal cable connections. If you are not confident to
perform this step, ask a qualified technician to help you.
Warning! Make sure all power cords are disconnected from
the electrical outlet before performing this task.
Note: If you have gone through the preceding actions and the
system still fails to boot, ask your dealer or a qualified technician
for assistance.
13
Page 26
14
1 Getting started
Connecting options
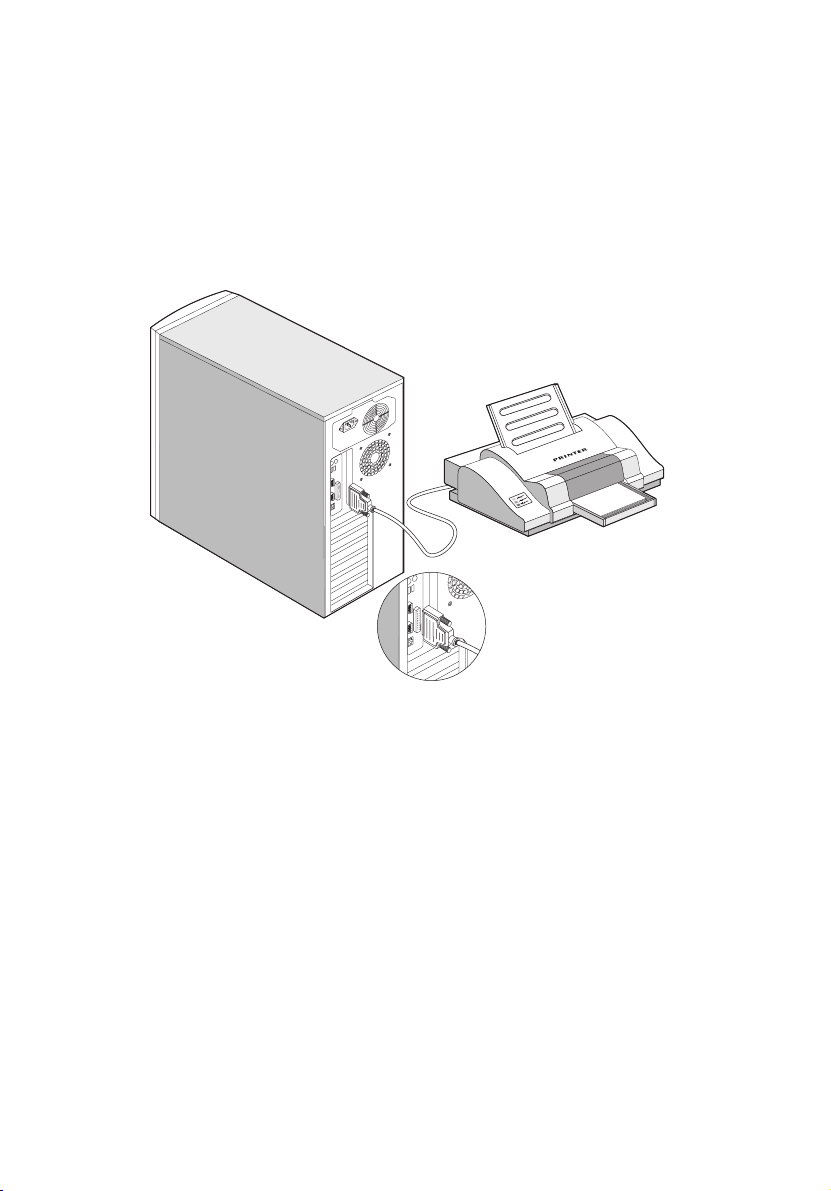
Printer
To connect a printer, plug the printer cable into the parallel port
located on the rear panel of your computer.
USB devices
Universal Serial Bus (USB) is a new serial bus design that is capable of
cascading low-/medium-speed peripherals (less than 12 Mbps) such as a
keyboard, mouse, joystick, scanner, printer and modem. With USB,
complex cable connections can be eliminated.
Your computer comes with two USB ports. These ports allow you to
connect additional serial devices to your computer without using up its
system resources.
Page 27
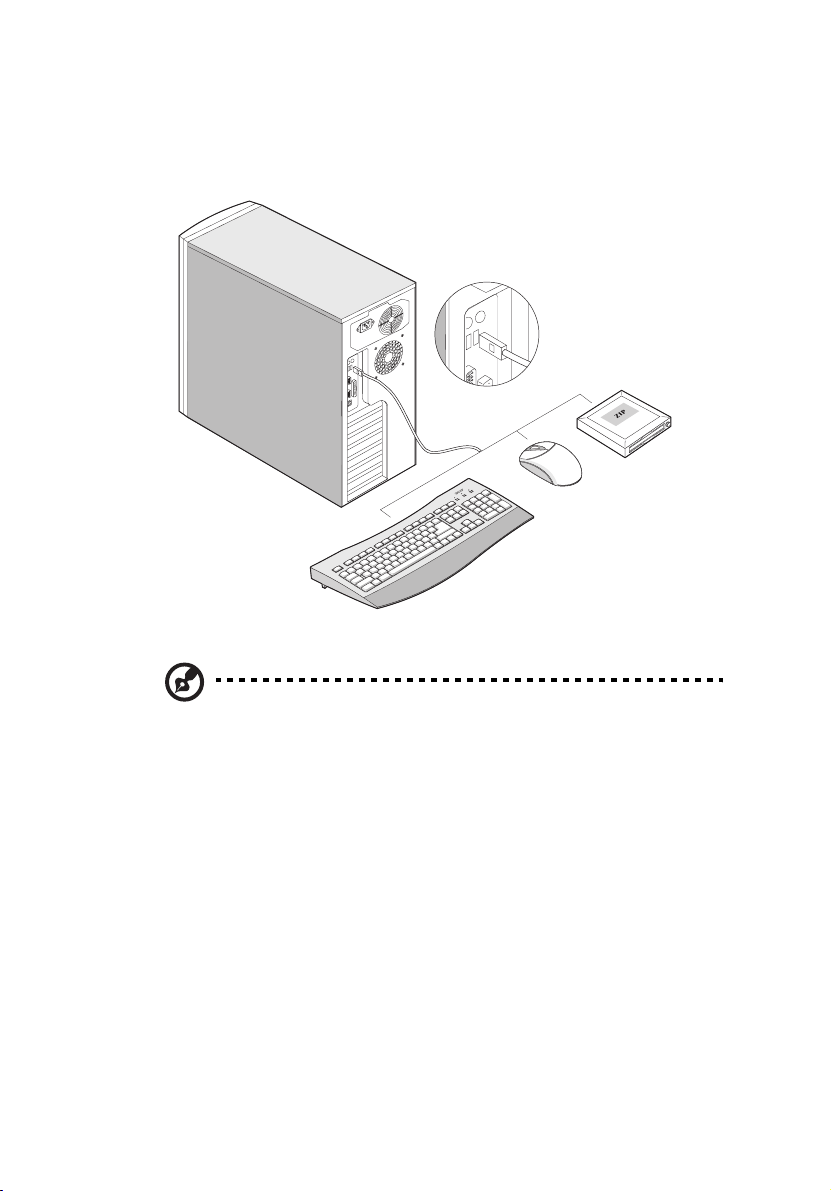
To connect a USB device, simply plug the device cable into any of the
USB ports.
15
Note: Most USB devices have a built-in USB port which allows you
to daisy-chain other devices.
Page 28

16
1 Getting started
Tower-to-rack option
Aside from its tower configuration, the Acer Altos G300 (model G301)
server can also be mounted in a rack-model position. A rack mount kit
is available for customers who want to convert a tower-mounted
system to a rack-model design.
Note: Please refer to Appendix C to this manual for installing the
optional rack mount kit.
Page 29

2 System tour
Page 30

This chapter discusses the features and
components of your computer.
Page 31

External and internal structure
Front panel
19
No. Description
1 CD-ROM drive stop/eject button
2 CD-ROM drive play/forward button
3 CD-ROM drive LED
4 and 6 CD-ROM volume control
5 CD-ROM drive tray
7 CD-ROM drive earphone socket
8 Altos EasyStor Cage (Removable
HDD tray)
9 Floppy disk drive tray
Page 32

20
2 System tour
No. Description
10 Floppy disk drive eject button
11 Power button
12 System power LED
13 Hard disk access LED
14 Warning LED
Note: The positions and features of items (1) - (7) above may
differ depending on the optical drive module installed
Page 33

Rear panel
21
No. Description
1 Power cable socket
2 Power Supply Fan
3System fan
4 PS/2 mouse port
5 PS/2 keyboard port
6 USB ports
7 Serial port
8 Parallel port
9 VGA port
10 LAN port
11 PCI expansion card slots
Page 34

22
Internal components
2 System tour
No. Description
1 Power supply
2 System board
3 5.25-inch drive bays
4 Altos EasyStor Cage
(Removable HDD tray)
5 System fan
6 PCI expansion card slots
Page 35

System board layout
23
Item Description
KM1 PS/2 Keyboard & PS/2 Mouse
USB1 USB Connectors
COM1 Serial Port
CN3 VGA Port
Page 36

24
2 System tour
Item Description
LPT1 Parallel Port
LAN1 RJ45 LAN Port
U11
®
Intel
82540EM Gigabit Ethernet
Controller
U20 ATI RageXL
CN2 Power Connector (4-pin)
CN1 Power Connector (20-pin)
JF1 Rear System Fan
JF2 EasyStor cage Front Fan
JF5 CPU FAN
J1 DDR DIMM A
J2 DDR DIMM B
J3 DDR DIMM C
J4 DDR DIMM D
U6 P4 CPU Socket 478
U5 North Bridge (CMIC-SL)
U9 South Bridge (CSB6)
JP2 Third IDE Channel
J5 Floppy Connector
JP3 Control Panel
JP7 Primary IDE Connector
JP5 Secondary IDE Connector
J7 64-bit/33MHz/3.3V PCI Slot 5
Page 37

Item Description
J8 64-bit/33MHz/3.3V PCI Slot 4
J10 64-bit/33MHz/3.3V PCI Slot 3
J11 64-bit/33MHz/3.3V PCI Slot 2
J12 32-bit/33MHz/5V PCI Slot 1
J13 Jumper Setting
J18 Power Connector
J19 Reset Connector
J16 SCSI HDD Access LED Indicator
JP8 Feature Connector
25
J14
2
I
C Connector
U44 BIOS
BT1 Battery
BZ1 Buzzer
Port80LED Diagnostics LED
Page 38

26
Control Panel (JP3)
Jumper Setting (J13)
2 System tour
Function Default setting
PIN 1-2 Clear password ON
Page 39

Function Default setting
PIN 3-4 Clear NVRAM OFF
PIN 5-6 Recover BIOS ROM OFF
Diagnostics LED (Port80LED)
27
Note: Diagnostics LED show POST checkpoint codes when BIOS
performs the Power On Self Test. See page 120.
Page 40

Page 41

3 Upgrading
your system
Page 42

This chapter contains instructions on how to
upgrade your computer.
Page 43

31
Installation precautions
Before you install any system component, we recommend that you
read the following sections. These sections contain important ESD
precautions along with preinstallation and post-installation
instructions.
ESD precautions
Electrostatic discharge (ESD) can damage your processor, disk drives,
expansion boards, and other components. Always observe the
following precautions before you install a computer component:
1 Do not remove a component from its protective packaging until
you are ready to install it.
2 Wear a wrist grounding strap and attach it to a metal part of the
computer before handling components. If a wrist strap is not
available, maintain contact with the computer throughout any
procedure requiring ESD protection.
Preinstallation instructions
Always observe the following before you install any component:
1 Turn off your system and all the peripherals connected to it before
opening it. Then unplug all cables from the power outlets.
2 Open your computer according to the instructions on page 33.
3 Follow the ESD precautions described above before handling a
computer component.
4 Remove any expansion boards or peripherals that block access to
the DIMM sockets or component connector.
5 See the following sections for specific instructions on the
component you wish to install.
Warning! Not turning off the computer properly before
you start installing the components may cause serious
damage.
Do not attempt the procedures described in the following
sections unless you are a qualified service technician.
Page 44

32
3 Upgrading your system
Post-installation instructions
Observe the following after installing a computer component:
1 See to it that the components are installed according to the step-
by-step instructions in their respective sections.
2 Replace any expansion boards or peripherals that you removed
earlier.
3 Replace the computer cover.
4 Connect the necessary cables and turn on your computer.
Page 45

Opening your system
Caution: Before you proceed, make sure that you have turned off
your computer and all peripherals connected to it. Read the
“Preinstallation instructions” on page 31.
You need to open your computer before you can install additional
components. See the following section for instructions.
Removing the front panel
1 Unlock the door lock.
2 Insert your hand in the opening under the front panel. Reach for
the panel handle and press it to release the cover from the
housing frame.
3 Pull the cover to detach it completely from the frame.
33
Page 46

34
3 Upgrading your system
Removing the side panels
The system housing has one front panel and two removable side
panels. Always observe the following ESD (electrostatic discharge)
precautions before installing any system component:
1 Do not remove any system component from its packaging unless
you are ready to install it.
2 Wear a wrist grounding strap before handling electronic
components. Wrist grounding straps are available at most
electronic component stores.
Danger! DO NOT attempt the procedures in the following
sections unless you are confident of your capability to
perform them. Otherwise, ask a service technician for
assistance.
A microswitch is allocated on the right side of the front chassis. It helps
indicate whether the panel is removed or intact. Also, a security lock
secures the front panel to protect against unauthorized access.
To remove the side panels:
1 Turn off the power to the system unit and unplug all cables.
2 Place the system unit on a flat, steady surface.
3 Remove the front panel. See page 33.
4 Remove the one front screw with a Phillips screwdriver to remove
one side panel. Keep them in a safe place for later use.
Page 47

5 Detach the side panel.
6 Repeat steps 4 to 5 to remove the other side panel.
35
Page 48

36
3 Upgrading your system
Installing and removing storage devices
The housing supports four 5.25-inch, and three internal 3.5-inch
storage devices. The empty drive bays allow you to install additional
drives such as a CD-ROM drive, digital audio tape (DAT) drive or
another hard disk drive.
Note: Your basic system comes with a CD-ROM drive, a 3.5-inch
diskette drive, and a hard disk drive already installed.
Replacing a 3.5-inch or a 5.25-inch storage device
To replace a 3.5-inch storage device:
1 Open the front panel door and pull down the door of the Altos
EasyStor Cage.
2 Remove the thumb screws from the Altos EasyStor Cage.
3 Pull out the Altos EasyStor Cage.
4 Disconnect the power cable of the hard disk fan.
5 Disconnect the power and signal cable from the old drive.
Page 49

6 Remove the four screws with a Phillips screw driver and remove
the old drive from the 3.5-inch hard disk tray.
37
Note 1: Pull down the door of the EasyStor Cage till it clicks into
place.
Note 2: Pull it out in horizontal position. EasyStor Cage will
become heavy when containing more than 2 hard disks.
Remember pull it out carefully with both hands for its heavy
weight.
Page 50

38
3 Upgrading your system
Installing a hard disk
To install a hard disk drive into the hard disk frame:
1 Insert the drive tray.
2 Secure the drive tray with two screws.
3 Connect the power and signal cables.
Page 51

Installing a DLT
To install a DLT drive into the 5.25-drive frame.
1 Insert the DLT.
2 Secure the DLT with two screws.
3 Connect the power and signal cables.
Note: DLT drive should be installed in the 1st or 2nd 5.25-inch
drive tray.
39
Page 52

40
3 Upgrading your system
Installing and removing the CPU
The Pentium 4 comes in a mPGA478 package. The mPGA478 package is
designed for the new breed of sleek, high performance, small form
factor PCs.
The system board supports a Pentium 4 processor running at 1.8 GHz
and future generations of Pentium CPUs.
Caution: Always observe the ESD precautions when installing or
removing a system component. Refer to page 31.
Installing a CPU
Follow these steps to install a CPU:
1 Remove the processor from its protective packaging.
2 Insert the new CPU into the CPU socket. Make sure that pin 1
(indicated by a notched corner) of the CPU connects to hole 1 of
the socket.
Push down the socket lever to lock the new CPU into the socket.
Page 53

41
3 Attach one side of the fan/heatsink metal bracket to the CPU
socket and then gently push down the other side of the metal
bracket until it locks in place.
4 Connect the 3-pin fan/thermal cable to the system board. Refer to
section “System board layout” on page 23 for the location of the
fan/thermal connectors.
Note: The heatsink becomes very hot when the system is on.
NEVER touch the heatsink with any metal or with your hands.
Removing a CPU
Follow these steps to remove a CPU:
1 Disconnect the 3-pin fan/heatsink cables from the system board.
2 Unhook one side of the fan/heatsink metal bracket and gently lift
it before removing the other side.
Page 54

42
3 Upgrading your system
3 Gently push the socket lever down to release the lever and then
pull it up.
4 Remove the CPU.
Page 55

Installing and removing memory modules
The four 184-pin sockets onboard support DDR SDRAM-type DIMMs.
You may install 128-MB, 256-MB, 512-MB, or 1-GB DIMMs for a
maximum of 4-GB system memory.
This system board supports DDR266 266MHz SDRAM.
Each of the DIMM socket is independent from the others. This
independence allows you to install DIMMs with different capacities to
form different configurations.
To install a DIMM, align it to an empty slot and press it in until the
holding clips secure the DIMM in place.
43
Note: The DIMM socket is slotted to ensure proper installation. If
you slip in a DIMM but it does not completely fit, you may have
inserted it the wrong way. Reverse the orientation of the DIMM.
Page 56

44
To remove a DIMM, press the holding clips on both sides of the socket
outward to release the DIMM.
Note: Place your forefingers on the top of the DIMM before you
press the holding clips to gently disengage the DIMM from the
socket.
3 Upgrading your system
Reconfiguring the system
The system automatically detects the amount of memory installed. Run
Setup to view the new value for total system memory and make a note
of it.
Page 57

Installing expansion cards
There are two kinds of expansion slots available in this system board.
These are 32-bit PCI (Peripheral Component Interconnect) and 64-bit
PCI.
To install expansion cards:
1 Locate an empty expansion slot on the system board.
2 Remove the metal bracket located opposite the empty expansion
slot using a Phillips screwdriver.
45
3 Insert an expansion card into the slot. Make sure that the card is
properly seated.
Page 58

46
3 Upgrading your system
4 Secure the card to the housing with a screw.
When you turn on the system, BIOS automatically detects and assigns
resources to the new device.
Note: BIOS detects and configures only PnP (Plug n Play)
expansion cards.
Page 59

4 Setup utility
Page 60

This chapter gives information about the
system BIOS and tells how to configure the
system by changing the settings of the BIOS
parameters.
Page 61

49
Introduction
Most systems are already configured by the manufacturer or the
dealer. There is no need to run Setup when starting the computer
unless you get a Run Setup message.
The Setup program loads configuration values into the battery-backed
nonvolatile memory called CMOS RAM. This memory area is not part of
the system RAM.
Note: If you repeatedly receive Run Setup messages, the battery
may be bad. In this case, the system cannot retain configuration
values in CMOS. Ask a qualified technician for assistance.
Before you run Setup, make sure that you have saved all open files. The
system reboots immediately after you exit Setup.
Page 62

50
4 Setup utility
Setup Menu
The computer employs the latest AMI BIOS CMOS chip with support for
Windows Plug and Play. This CMOS chip contains the ROM Setup
instructions for configuring the mainboard’s BIOS. The BIOS (Basic
Input and Output System) Setup utility is a menu driven utility that
enables you to make changes to the system configuration and tailor
your system to suit your individual work needs. BIOS is a ROM-based
configuration utility that displays the system’s configuration status and
provides you with a tool to set system parameters. These parameters
are stored in non-volatile battery-backed-up CMOS RAM that saves this
information even when the power is turned off. When the system is
turned back on, the system is configured with the values found in
CMOS.
Configure such items as:
• Hard drives, diskette drives, and peripherals
• Password protection from unauthorized use
• Power Management Features
This Setup utility should be executed under the following conditions:
• When changing the system configuration
• When a configuration error is detected by the system and you are
prompted to make changes to the Setup utility
• When redefining the communication ports to prevent any conflicts
• When making changes to the Power Management configuration
• When changing the password or making other changes to the
security setup
BIOS Setup Options at Boot
The user will be able to initiate SETUP by pressing the respective keys.
<CTRL>-<ALT>-<ESC>Enter the BIOS Setup
Page 63

Setup submenu: Main
Parameter Description Options
51
AMIBIOS
Version
BIOS Build
Date
BIOS ID The version of current BIOS. N/A
System Time Use these items to set the correct time. [HH:MM:SS]
System Date Use these items to set the correct date. [mm/dd/yyyy]
System
Information
Product
Information
The core version of AMI BIOS. N/A
The date when the BIOS build. N/A
Display the system information. N/A
Display the product information. N/A
Page 64

52
Setup submenu: Advanced
Parameter Description
4 Setup utility
SuperIO
Configuration
IDE Configuration Configure the IDE device(s).
Floppy
Configuration
OnBoard Devices
Configuration
PCIPnP
Configuration
Boot Settings
Configuration
Event Log
Configuration
System Health
Monitoring
Hardware
Configure SuperIO Chipset Nat414.
Configure the Floppy drive(s).
OnBoard devices control Enable/Disable.
Legacy USB control and PCI slot IRQ preference
assign.
Boot Settings Configuration.
Configure Event Logging.
Configure System Health Monitoring Hardware
parameters.
Page 65

Parameter Description
53
Remote Access
Configuration
Configure Remote Access.
SuperIO Configuration
• Onboard Serial Port 1
Use these items to disable the serial ports or to assign a port
address and IRQ to the ports.
• Onboard Parallel Port
Use this item to disable the parallel port or assign a port address to
the parallel port.
• Parallel Port IRQ
Use this item to determine the IRQ of the parallel port.
• Parallel Port Mode Select
Use this item to determine the mode of the parallel port. You can
select Normal, Bi-directional, EPP (Enhanced Parallel Port) or ECP
(Extended Capabilities Port).
• Parallel Port DMA Channel
These items are not available in most circumstances. If they are
available, use them to allocate DMA (Direct Memory Access)
channel for the parallel port.
Page 66

54
Enable or disable software
IDE Configuration
BIO S SETU P UT IL IT Y
Advanced
IDE Configuration
_____________________________ ______________________
IDE Software RAID [Disabled]
> Primary IDE Master [Hard Disk]
> Primary IDE Slave [Hard Disk]
> Secondary IDE M aster [ATAPI CDRO M]
> Secondary IDE Slave [ATAPI CDROM ]
> Tertiary IDE Master [Hard Disk]
> Tertiary IDE Slave [Hard Disk]
Hard Disk Write Protect [Disabled]
V02.03 ©Copyright 1985-2000, American Megatrends Inc.
Parameter Description Options
RAID.
ЧШ
ХЦ
+ - Change Option
F1 General Help
F10 Save and Exit
ESC Exit
Sele c t S c r e e n
Sele c t Ite m
4 Setup utility
IDE Software
RAID
Primary IDE
Master
Slave
Secondary IDE
Master
Secondary IDE
Slave
Third IDE
Master
Third IDE Slave Device detected as third IDE
This item enables or disables
the software RAID in primary
IDE channel and secondary
IDE channel.
Device detected as primary
IDE master.
Device detected as primary
IDE slave.
Device detected as secondary
IDE master.
Device detected as secondary
IDE slave.
Device detected as third IDE
master.
slave.
Enabled
Disabled
Manual configure IDE
device parameters if
device could not been
detected by BIOS.Primary IDE
Page 67

Parameter Description Options
55
Hard Disk
Write Protect
Disable/Enable device write
protection. This will be
effective only if device is
accessed through BIOS.
Disabled
Enabled
Auto Detect Hard Disks
This item automatically detects and installs any hard disk drives
installed on the primary and secondary IDE channels. Most modern
drives can be detected. If you are using a very old drive that can’t be
detected, you can install it manually.
Page 68

56
Primary IDE Master (if attached Hard Disk)
Parameter Description Options
Type Configure the driver type. Auto
CDROM
ARMD
Not Installed
4 Setup utility
LBA/Large
Mode
Block Mode Auto: The Data transfer from and to
Select the hard disk drive translation
method. For drivers with more than
504MB, the LBA mode is necessary.
the device occurs multiple sectors at a
time if the device supports it.
Disable: The Data transfer from and
to the device occurs one sector at a
time.
Auto
Disabled
Auto
Disabled
Page 69

Parameter Description Options
57
PIO Mode Select PIO (Programmed Input/
DMA Mode Select DMA Mode:
S.M.A.R.T. Enable or disable the S.M.A.R.T (Self-
32Bit Data
Transfer
ARMD
Emulation Type
Output) Mode. Mode 0 to 4 provide
successive increase of performance.
Auto: Auto detected
SWDMAn: SingleWordDMAn
MWDMAn: MultiWordDMAn
UDMAn: UltraDMAn
Monitoring, Analysis and Reporting
Technology) in the internal hard disk.
If ‘Auto’ is selected, the BIOS will
enable the S.M.A.R.T if the drive
supports it.
Enable/disable 32bit data transfer. Enabled
Select ARMD device emulation type
by BIOS.
Auto
0
1
2
3
4
Auto
SWDMAn
MWDMAn
UDMAn
Auto
Disabled
Enabled
Disabled
Auto
Floppy
Hard Disk
Page 70

58
4 Setup utility
Secondary IDE Master (if attached ATAPI CDROM)
Secondary IDE Slave (if none attached)
Page 71

Floppy Configuration
Parameter Description
Floppy Drive A Select the floppy drive type
59
• Floppy Drive A
If you have one floppy drive installed change the item Floppy Drive
A so that it describes the characteristics of the drive.
Page 72

60
4 Setup utility
OnBoard Devices Configuration
Parameter Description Options
OnBoard LAN Enable or disable onboard LAN. Enabled
Disabled
OnBoard PCI
VGA
Enable or disable onboard VGA. Enabled
Disabled
Page 73

PCIPnP Configuration
No: lets the B IO S
configure all the
Yes: lets the operating
system configure Plug
and Play (PnP) devices
not required for b oot if
your system h as a Plug
and Play operating
PCIPnP Configuration
Plug & Play O/S [No]
Reset Configure Data [No]
PCI Latency Timer [64]
USB Function [Enabled]
Legacy USB Support [Disabled]
ARMD Em ulation Type [Hard Disk]
PCI Slot-1 IRQ Preference [Auto]
PCI Slot-2 IRQ Preference [Auto]
PCI Slot-3 IRQ Preference [Auto]
PCI Slot-4 IRQ Preference [Auto]
PCI Slot-5 IRQ Preference [Auto]
Advanced
V02.03 ©Copyright 1985-2000, Am erican Megatrends Inc.
Parameter Description Options
BIOS SETUP UTILITY
devices in the system .
system.
S e le c t S c re e n
ЧШ
S e le c t It e m
ХЦ
+ - C hange O p tion
F1 General Help
F10 Save and Exit
ESC Exit
61
Plug & Play
O/S
Reset
Configure
Date
PCI Latency
Timer
USB Function On/Off to enable/disable the USB function
Legacy USB
Support
No: lets the BIOS configure all the devices
in the system.
Yes
No
Yes: lets the operating system configure
Plug and Play (PnP) devices not required for
boot if your system has a Plug and Play
operating system.
NO: does not force the PnP data to be
cleared on boot.
Yes
No
YES: clears PCI/PnP Configuration Data
stored in Flash on next boot.
Value in units of PCI clocks for PCI device
latency timer register.
Enabled
in Chipset.
Disabled
Enables support for legacy USB. Enabled
Disabled
Page 74

62
Parameter Description Options
4 Setup utility
ARMD
Emulation
Typ e
PCI Slot-1 IRQ
Preference
PCI Slot-2 IRQ
Preference
PCI Slot-3 IRQ
Preference
PCI Slot-4 IRQ
Preference
PCI Slot-5 IRQ
Preference
Sets the emulation type for USB ZIP drive.
Manually set the PCI slot IRQ value slot-1. Auto
3
Manually set the PCI slot IRQ value slot-2.
Manually set the PCI slot IRQ value slot-3.
Manually set the PCI slot IRQ value slot-4.
Manually set the PCI slot IRQ value slot-5.
4
5
7
9
10
11
12
14
15
Page 75

Boot Settings Configuration
BIOS SETUP UTILITY
Advanced
Boot Settings Configuration
____________________________________________________
Quick Boot [Enabled]
Qu ie t B o o t [Ena b led ]
BootUp Num-Lock [On]
PS/2 Mouse Support [Enabled]
W ait F o r ‘F1 ’ If Er ro r [E n a b le d ]
Mem ory Test [Enabled]
CPU Frequency to Bus Ratio [Disabled]
HyperThreading [Enabled]
V02.03 ©Copyright 1985-2000, American Megatrends Inc.
Parameter Description Options
Allo w s BI O S to s k ip
certain tests wh ile
bo o t in g . T h is will
decrease the time
nee d e d to b o o t th e
system.
Se le c t S c r e e n
ЧШ
Select Item
ХЦ
+ - Change Option
F1 General Help
F10 Save and Exit
ESC Exit
63
Quick Boot Allows BIOS to skip certain tests while
booting. This will decrease the time needed
to boot the system.
Quiet Boot Disabled: Displays normal POST messages.
Enabled: Displays OEM Logo instead of
POST messages.
Bootup Num-
Select Power-on state for NumLock On
Lock
PS/2 Mouse
Enable/Disable PS/2 mouse support by BIOS. Enabled
Support
Wait For ‘F1’
if Error
Enable/Disable ‘F1’ key wait if some POST
error occurred.
Memory Test Perform memory read/write test duing
POST when enabled
Off
Disabled
Enabled
Disabled
Enabled
Disabled
Page 76

64
: Al lo w lo gg in g o
4 Setup utility
Parameter Description Options
CPU
Frequency to
Bus Ratio
CPU/Bus ratio of the system. The clock
speed of the bus does not necessarily equal
the CPU’s. Typically, the system bus clock
speed is slower than that of the CPU.
Hyper
Threading
Enabled: Enable CPU Hyper-Threading for
HT enabled processor(s).
Disabled: Disable CPU Hyper-Threading for
HT enabled processor(s).
Event Log Configuration
BIOS SETUP UTILITY
Advanced
Event Log Configuration
____________________________________________________
Event Log Area: Space Available
Event Log Data: Valid
Event Logging [Enabled]
BIOS POST Event Logging [Enabled]
ECC Event Logging [Disabled]
PCI Device Event Logging [Enabled]
Intrusion Event logging [Enabled]
Clear Intrusion Status [No]
Clear All Event Logs [No]
Reset Disabled M emory Bank [No]
> View Event Log
V02.03 ©Copyright 1985-2000, American Megatrends Inc.
Enabled
events.
ЧШ
ХЦ
+ - Change Option
F1 General Help
F10 Save and Exit
ESC Exit
Disabled
16 to 1
Enabled
Disabled
Select Screen
Select Item
Note: If there are any event logs recorded, “View Event Log” will
appear. If no events are recorded, this option will NOT appear.
Parameter Description Options
Event Log
Area
The space utilization of event log
NVRAM. If space is full, no new
event type could be record.
Page 77

Parameter Description Options
65
Event Log
Data
Event
Logging
BIOS POST
Event
Logging
ECC Event
Logging
PCI Device
Event
Logging
Intrusion
Event
logging
Clear
Intrusion
Status
Clear All
Event Logs
The state of event log data. The
event log data is only available if
‘valid’.
Allow/Not allow logging of events. Enabled
Disabled
Allow/Not allow logging of BIOS
POST events.
Allow/Not allow logging of ECC
events.
Allow/Not allow logging of PCI PERR
error events.
Allow/Not allow logging of chassis
intrusion events.
Clear chassis intrusion status and set
this value as ‘disabled’ at next time
system boot if this item is enabled.
Clear event log area and set this
value as ‘disabled’ at next time
system boot if this item is enabled.
Enabled
Disabled
Enabled
Disabled
Yes
No
Yes
No
Reset
Disabled
Memory
Bank
View Event
Log
Enable all memory banks on next
boot. Memory DIMM might be
disabled by memory reduction
feature.
This allows user to see the detail
BIOS and IPMI event.
N/A
Page 78

66
4 Setup utility
View Event Log
This allows user to see the detail BIOS and IPMI event.
00/00/00 00:00:33 CMOS Battery Failure
00/00/00 00:02:15 CMOS System Options Not Set
90/03/01 00:13:04 CMOS System Options Not Set
90/03/02 00:07:50 CMOS System Options Not Set
90/03/10 00:55:37 CMOS System Options Not Set
90/03/12 00:58:37 CMOS System Options Not Set
View Event Log
System Health Monitoring Hardware
Hardware Monitor Setup Page
This page lets you install hardware monitoring parameters so that the
system can warn you when critical parameters are exceeded.
Page 79

67
System Hardware Monitor
If your mainboard supports hardware monitoring, these items are
auto-detected and the results are reported. You cannot make changes
to these items.
Parameter Description
Case Status The current status detected by chassis intrusion
Current CPU
Tem p
Current System
Tem p
Current CPU
Fan Speed
Current System
Fan 1 Speed
Current System
Fan 2 Speed
switch.
Current CPU temperature detected by the sensor
on the board.
Current board temperature detected by the
sensor on the board.
Current CPU Fan speed detected.
Current System Fan 1 speed detected.
Current System Fan 2 speed detected.
Page 80

68
Parameter Description
4 Setup utility
Voltage
monitoring
Voltage monitoring
Press ‘Enter’ to view the voltage monitored.
Page 81

Remote Access Configuration
Parameter Description Options
69
Remote Access Select remote access type. Disabled
Serial (ANSI)
Serial Port
Mode
Select Serial Port setting. 115200 8,n,1
57600 8,n,1
19200 8,n,1
9600 8,n,1
Page 82

70
Yes: It allows ACP I aware
O/S to assume control
over some of power
management operations
Setup submenu: Power
BIOS SETUP UTILITY
M a in A d vanc e d Pow er Boot S ecurity E x i t
ACPI Aware O /S [Yes]
Power Management [Enabled]
AC Lost H and ling [Last State]
Pow e r B u tto n M o d e [O n /Off]
V0 2 .0 3 © Co pyr ig ht 1 9 8 5 - 2 0 0 0, Am eric a n Mega tre nd s In c .
Parameter Description Options
on this system.
Se le c t S c reen
ЧШ
Se le c t It e m
ХЦ
+ - Chan g e Optio n
F1 General Help
F10 Save and Exit
ESC Exit
4 Setup utility
ACPI Aware
O/S
Power
Management
AC Lost
Handling
Power Button
Mode
Enable / Disable ACPI support for
Operating System.
Enabled
Disabled
ENABLE: If OS supports ACPI.
DISABLE: If OS does not support ACPI.
Enable or disable APM support. Enabled
Disabled
This sets the power state after a
shutdown due to an unexpected
interrupt of AC power. If the value is
Last State
Stay Off
set to Stay OFF, the system remains
turned off. If the value is set to Last
State, the system returns to the last
power state.
If this item is set to On/Off, the power
button acts as a standard on/off
switch. If you set this item to
On/Off
Suspend
Suspend, pressing the power button
enters the system into a power-saving
suspend mode.
Page 83

Setup submenu: Boot
Parameter Description
71
Boot Device
Priority
Hard Disk Drives Specifies the available hard disk drives boot
Removable Devices Specifies the available removable devices boot
ATAPI CDROM
Drives
Specifies the boot sequence from the available
devices.
sequence. Only first drive could boot the system.
sequence. Only first drive could boot the system.
Specifies the available CD-ROM drives boot
sequence. Only first drive could boot the system.
Page 84

72
Boot Device Priority
Parameter Description Options
4 Setup utility
st
Boot Device
1
2nd Boot
Device
...
Nth Boot
Device
Configure the first boot device type. Available
boot device
type.
Configure the second boot device
type. If first boot device fail to boot
the system, BIOS will try to boot the
system from 2
Configure the N-th boot device type.
If N-1 boot device fails to boot the
system, the BIOS will try to boot the
system from N-th boot device.
nd
boot device.
Page 85

Hard Disk Drives
Parameter Description
73
st
Hard Drive
1
nd
Hard Drive Configure the 2nd hard drive. Note that
2
Configure the hard drive to boot the
system.
st
only 1
hard drive could boot the system.
Page 86

74
Removable Devices
Parameter Description
st
Removable
1
Dev
4 Setup utility
Configure the 1st removable device to
boot the system.
Page 87

ATAPI CDROM Drives
Parameter Description Options
75
st
ATAPI
1
CDROM
Configure the first ATAPI CDROM to
boot the system. Only first CDROM
could boot the system.
CD-ROM
available to
the system.
Page 88

76
Setup submenu: Security
Parameter Description
4 Setup utility
Change User/
Supervisor
Password
Clear User
Password
You can install a Supervisor password, and if you
install a supervisor password, you can then install a
user password. A user password does not provide
access to many of the features in the Setup utility.If
you highlight these items and press Enter, a dialog
box appears which lets you enter a password. You
can enter no more than six letters or numbers.
Press Enter after you have typed in the password.
A second dialog box asks you to retype the
password for confirmation. Press Enter after you
have retyped it correctly. The password is required
at boot time, or when the user enters the Setup
utility. The characters allow for password are [‘a’’z’, ‘A’-’Z’, ‘0’-’9’]. Six characters are allowed for a
password.
Highlight this item and type in the current
password. At the next dialog box press Enter to
disable password protection.
Page 89

Setup submenu: Exit
Parameter Description
77
Exit Saving
Changes
Exit Discarding
Changes
Load Optimal
Defaults
Load Failsafe
Defaults
Discard Changes Discard changes.
Exit system setup with saving the changes.
Exit system setup without saving the changes.
Load Optimal Defaults.
Load Failsafe Defaults.
Auto Configuration with Optimal Settings
If you highlight this item and press Enter, a dialog box asks if you want
to install optimal settings for all the items in the Setup utility. Press the
Y key to indicate Yes, and then press Enter to install the optimal
settings.
Page 90

78
The optimal settings default values are quite demanding and your
system might not function properly if you are using slower memory
chips or other kinds of low-performance components.
4 Setup utility
Auto Configuration with Fail-Safe Settings
If you highlight this item and press Enter, a dialog box asks if you want
to install fail-safe settings for all the items in the Setup utility. Press the
Y key to indicate Yes, and then press Enter to install the fail-safe
settings.
The fail-safe settings default values are not demanding so a system
should be able to operate with the fails safe settings even if it is
installed with slower memory chips or other kinds of low-performance
components.
Page 91

5 Configuring IDE
Software RAID
Page 92

This chapter gives information about
configuring RAID IDE and arrays, assigning RAID
levels, planning the arrayconfiguration,
optimizing storage and using the RAID IDE
Setup Utility.
Page 93

81
Configuring Arrays
Organize the physical disk drives in arrays after the drives are
connected to IDE software RAID. And array can consist of one to four
physical disk drives, depending on the RAID level.
Configuration Strategies
The most important factors in RAID array configuration are drive
availability (fault tolerance), and drive performance.
Maximizing Drive Availability - You can maximize the drive
availability by increasing fault tolerance. Use RAID 1 or mirror
configuration to maximize availability.
Maximizing Drive Performance - You can optimize drive
performance by using striping. Select RAID 0 or striping to configure an
array for optimal performance.
Performance and Availability - You can achieve both drive
performance and availability. Select RAID 10 for this configuration. You
will need four drives to configure RAID 10.
Assigning RAID Levels
Only one RAID level can be assigned to each array. The drives required
per RAID level is
RAID
Level
0One Four
1Two Two
10 Four Four
Minimum Number of Drives Maximum Number of Drives
Page 94

82
5 Configuring IDE Software RAID
Selecting a RAID Level
To ensure the best performance, you should select the optimal RAID
level when you create a system drive. The optimal RAID level for your
disk array depends on the following factors:
• Number of drives in the disk array
• Capacity of the drives in the array
• Need for data redundancy
• Disk performance requirements
The factors you need to consider when selecting a RAID level are listed
below.
RAID
Level
Description
and Use
Pros Cons Number of
Drives
Fault
Tol era nt
0 Data divided
in blocks and
distributed
sequentially
(pure
striping). Use
for noncritical data
that requires
high
performance.
1Data
duplicated on
another disk
(mirroring).
Use for readintensive
fault tolerant
systems
10 Data divided
in blocks and
distributed
sequentially
and each
block is
duplicated to
another disk.
High data
throughput
for large files.
100 percent
data
redundancy
100 percent
data
redundancy
and High data
throughput.
No fault
tolerance. All
data lost if
any drive
fails.
Double disk
space.
Reduced
performance
during
rebuilds.
A minimum
of four drives
required.
One to
Four
Two Ye s
Four Yes
No
Page 95

Configuring Arrays
After you have enabled IDE Software RAID in BIOS and have attached
all physical disk drives, perform the following actions to prepare a
RAID disk array
Step Action
1 Press <CTRL>+<M> to run the IDE Software RAID Manager
2 Define and configure one or more logical drives.
3 Create and configure one or more system drives (logical drives).
4 Save the configuration.
83
5 Initialize the system drives. After initialization, you can install the operating
system.
Creating a Mirrored Array From an Existing Drive
To build a new mirrored array from an existing drive, connect the
current drive and a new drive to the RAID card. Perform the following
steps.
• Turn on the computer and Press <CTRL>+<M> to start the IDE
Software RAID manager.
• Create an array by using Option F4. Change the array type to
Mirror.
• Now include the existing drive and the new drive to this array.
You can identify the existing drive and the new drive by their
connection location.
• Start the rebuilding process by pressing <ENTER>. The setup will
prompt for the target drive name. select the newly connected
drive as the target drive by pressing <SPACE> and then <ENTER>.
• The rebuilding process will start. If there are any errors during
the building of the array, you will be prompted with a message
box. You can choose to ignore the error and proceed or stop the
building process.
Page 96

84
5 Configuring IDE Software RAID
Using the IDE Software RAID Setup Utility
The Setup window has three sections:
• Array Information
• Physical Drive Information
•Help
Only the Array Information and Physical Drive Information windows
are active. The Array Information window can be edited, the Physical
Drive Information window cannot.
To access the IDE Software RAID setup utility, press <CTRL>+<M>
during boot-up.
Array Information - This section of the screen displays all the disk
arrays configured. Use this section to create, delete or edit the existing
configurations. The disk arrays are displayed as a node in a tree, as in
Windows Explorer. When opened, each node displays the properties of
the array. Press <UP ARROW> and <DOWN ARROW> no navigate the
properties and press <ENTER> to edit your selection.
• Array configuration type or RAID level (Stripe, Mirror, RAID 10,
or spare pool)
• Drive numbers of the physical drives included in the array
• Stripe size (32 KB to 4 MB) which is valid for stripe and RAID 10
configurations only.
• Whether the system is bootable from one of the configured
arrays
• Build Array function, which is valid for Mirror and RAID 10
arrays. This option is used to build one drive from another.
Note: The minimum stripe size allowed for RAID 10 configuration
is 64 KB.
Physical Drive Information - This section displays all the physical
drives connected to the IDE channels and their properties. The <UP
ARROW> and <DOWN ARROW> are used to navigate the Physical
Drive Information window.
• Channel ID (Primary or Secondary)
• Connection ID (Master or Slave)
• Disk array that the physical drive is a part of
Page 97

85
• Model number
• Size in MB of each drive
• The status of each drive (online, failed, or rebuilding)
Note: Information listed in the Physical Drive Information window
cannot be edited. Only the <TAB>, <UP ARROW>, and <DOWN
ARROW> keys will work when the control is in the Physical Drive
Information window.
Physical Drive Options - In the top right corner of the Physical Drive
Information window are the Physical Drive Options. The following
options are available:
• Enable/Disable write cache
• Boot sector virus protection
• DMA transfers
Note: These options apply to all drives attached to the IDE
software RAID.
Help Section - The help section of the Setup window displays hints on
available options. The help section also provides a list of keys that you
can use to perform tasks, such as auto-configuring or creating or
deleting an array.
Auto Configure Stripe (F1)
Press the <F1> key to auto configure a stripe array. When you do this,
IDE Software RAID automatically creates a Stripe based array based on
the available physical drives attached. The Stripe size is set for the
optimum level (64 KB).
Auto Configure Mirror (F2)
Press the <F2> key to run auto configuration. When you do this, IDE
Software RAID automatically creates arrays based on the available
physical drives. A minimum of two free physical drives are required for
mirroring.
Page 98

86
5 Configuring IDE Software RAID
Auto Configure RAID 10 (F3)
Press the <F3> key to auto configure the drives for a RAID 10 array. A
minimum of four free physical drives are required for the RAID 10 auto
configuration.
Note: All previous settings will be lost when running Auto
Configuration for Striping, Mirroring, or RAID 10.
Create Array (F4)
Press the <F4> key to create a disk array. When you create an array, a
default array template is created. You must edit the array properties to
complete the array creation. Use the arrow keys to highlight a property
field and press <ENTER> to edit that property.
Array Type - By default arrays are created in Stripe mode. When you
select this field, a pop-up window displays the following options:
• RAID mode
•STRIPE
•MIRROR
•RAID 10
• SPARE POOL
Select the intended RAID mode by using the arrow navigation keys and
pressing <ENTER>. The SPARE POOL option is not a RAID mode, but a
way to assign a physical drive as a hot spare to be used n case of a
mirror failure. When a mirror configured array has a drive failure, a
spare drive can be used to replace the failed drive and rebuild the
array.
Note: To rebuild a drive from the SPARE POOL, the size of the
physical drive in SPARE POOL must be the same or larger than the
smallest drive in the array.
Page 99

87
Drive(s) - There is no default setting for this field. You must select the
drives for the configured array. When this field is selected, a pop-up
window will display all the available physical drives with check boxes.
Drive Selection Box
[ ] Cntlr 0 - Primary Master
[ ] Cntlr 0 - Primary Slave
[ ] Cntlr 0 - Secondary Master
[ ] Cntlr 0 - Secondary Slave
Use the arrow navigation keys and press <SPACE> to select or deselect
the drive or drives to be put into the array. Press <ENTER> when done.
If you select Mirror mode as the array type, you must select two drives
to be in the array. This pop-up window will appear only when
configuring RAID 0 (Stripe) and RAID 1 (Mirror) arrays. A RAID 10 array
contains drives in each Stripe of the array and only two drives are
allowed in each stripe. The maximum amount of Stripes is limited to
four.
Stripe Size - This field applies to Stripe mode arrays only. By default,
an array is set up with 64 KB stripes. Edit this field to change the
default stripe size. The size options are:
• 32 KB
• 64 KB
• 128 KB
• 256 KB
• 512 KB
• 1024 KB
• 2048 KB
• 4096 KB
Note: You cannot change the Stripe size of an array that has
already been configured.
Bootable - This determines which of the configured arrays should be
used for booting the system. The options are YES or NO.
You can select the boot device from the system BIOS Setup. Only one
array is allowed to be bootable in a system.
Page 100

88
Drive Size - This field cannot be edited. It displays the size of the array.
When the array type is Stripe, the drive size is the total of all the drives
selected (one or more drives). When Mirror, drive size is shown by an
individual drive, and for Spare Pool, drive size shows the total drive
capacity.
Build Array - The build array option is valid for RAID 1 (Mirror) and
RAID 10 arrays only. It is used to rebuild the array from the SPARE
POOL. When Build Array starts, it will prompt the user to select the
target drive. It does this because both drives can still be online. Once
the target drive is selected, the rebuild will start.
Note: A drive rebuild can take a long time, depending on the size
of the drive. A 2 GB drive takes about two minutes to rebuild
when DMA mode is enabled.
5 Configuring IDE Software RAID
Delete Array (F5)
Press the <F5> key to delete a currently configured array. Use the
arrow navigation keys to highlight the array you want to delete and
then press <F5>.
Warning: Use this option with caution. When you delete an
array, you lose the array configuration and the data stored
in the array.
Restore Old Configuration (F6)
Press the <F6> key to restore the configuration that was in use before
you entered the RAID setup utility.
Save and Exit (F10)
When you have completed array configuration, press <F10> to save the
configuration and exit the utility. If you do not want to save the
configuration or any changes that you have made, press <ESC>.
Subsequent message boxes ask for confirmation; respond
appropriately. Note that when a new array is configured, its partition
record is invalidated.
 Loading...