

Page 1

AcerPower SV
User’s manual
Page 2

Copyright © 2003 Acer Incorporated
All Rights Reserved
AcerPower SV
User’s manual
Changes may be made periodically to the information in this publication without obligation
to notify any person of such revision or changes. Such changes will be incorporated in new
editions of this manual or supplementary documents and publications. This company makes
no representations or warranties, either expressed or implied, with respect to the contents
hereof and specifically disclaims the implied warranties of merchantability or fitness for a
particular purpose.
Record the model number, serial number, purchase date, and place of purchase information in
the space provided below. The serial number and model number are recorded on the label
affixed to your computer. All correspondense concerning your unit should include the serial
number, model number, and purchase information.
No part of this publication may be reproduced, stored in a retrieval system, or transmitted, in
any form or by any means, electronic, mechanical, photocopy, recording, or otherwise,
without the prior written permission of Acer Incorporated.
Model Number :__________________________________
Serial Number:___________________________________
Purchase Date: ___________________________________
Place of Purchase: ________________________________
Acer and the Acer Logo are registered trademarks of Acer Inc. Other company's product
names or trademarks are used herein for identification purposes only and belong to their
respective companies.
Page 3

iii
FCC notice
This device has been tested and found to comply with the limits for a
Class B digital device pursuant to Part 15 of the FCC Rules. These limits
are designed to provide reasonable protection against harmful
interference in a residential installation. This device generates, uses,
and can radiate radio frequency energy and, if not installed and used
in accordance with the instructions, may cause harmful interference to
radio communications.
However, there is no guarantee that interference will not occur in a
particular installation. If this device does cause harmful interference to
radio or television reception, which can be determined by turning the
device off and on, the user is encouraged to try to correct the
interference by one or more of the following measures:
• Reorient or relocate the receiving antenna
• Increase the separation between the device and receiver
• Connect the device into an outlet on a circuit different from that
to which the receiver is connected
• Consult the dealer or an experienced radio/television technician
for help
Notice: Shielded cables
Notice: Shielded cables
Notice: Shielded cablesNotice: Shielded cables
All connections to other computing devices must be made using
shielded cables to maintain compliance with FCC regulations.
English
Notice: Peripheral devices
Notice: Peripheral devices
Notice: Peripheral devicesNotice: Peripheral devices
Only peripherals (input/output devices, terminals, printers, etc.)
certified to comply with the Class B limits may be attached to this
equipment. Operation with noncertified peripherals is likely to result
in interference to radio and TV reception.
Use conditions
Use conditions
Use conditionsUse conditions
This part complies with Part 15 of the FCC Rules. Operation is subject to
the following two conditions: (1) this device may not cause harmful
interference, and (2) this device must accept any interference received,
including interference that may cause undesired operation.
Notice: Canadian users
Notice: Canadian users
Notice: Canadian usersNotice: Canadian users
This Class B digital apparatus meets all requirements of the Canadian
Interference-Causing Equipment Regulations.
Page 4

English
iv
Remarque à l’intention des utilisateurs canadiens
Remarque à l’intention des utilisateurs canadiens
Remarque à l’intention des utilisateurs canadiensRemarque à l’intention des utilisateurs canadiens
Cet appareil numérique de la classe B respected toutes les exigences du
Règlement sur le matériel brouilleur du Canada.
Page 5

FCC notice iii
System Tour 1
Front panel 1
Rear panel 2
System Features 4
Performance 4
Multimedia 4
Connectivity 4
System peripherals 5
Mouse 5
Keyboard 5
Speakers 6
System upgrade 6
Open the computer 6
Set up new components 7
Setting up your computer 9
Necessary to know before Setup 9
Select location 9
Open package 9
Connecting the peripherals 10
Starting your computer 10
Shutting down your computer 11
Upgrading your computer 13
Installation Precautions 13
Reminder for guarding against static electricity 13
ESD Guard 13
Pre-installation Instructions 13
Post-installation Instructions 14
Opening your Computer 14
Remove the side panel 14
Replace the side panel 14
Replacing the HDD 14
Upgrade the HDD 14
Installing PCI cards 15
Install PCI card 15
Remove PCI card 15
Installing additional memory 15
Install DDR DIMM 15
Remove DDR DIMM 16
Contents
Page 6

To reconfigure your computer 16
Upgrading CPU 16
Remove CPU 16
Install and upgrade CPU 17
Troubleshooting 19
Taking Care of your computer 23
Important tips 23
Cleaning and servicing 23
To clean your computer and keyboard 23
To clean your pointing device 24
To clean your optical mouse 24
To clean your monitor 24
When to contact a service technician 24
Asking for technical assistance 24
Remark: All the drawings in the Guide are diagrams. About
components’s quantity and style, substances shall take precedence.
Page 7
1
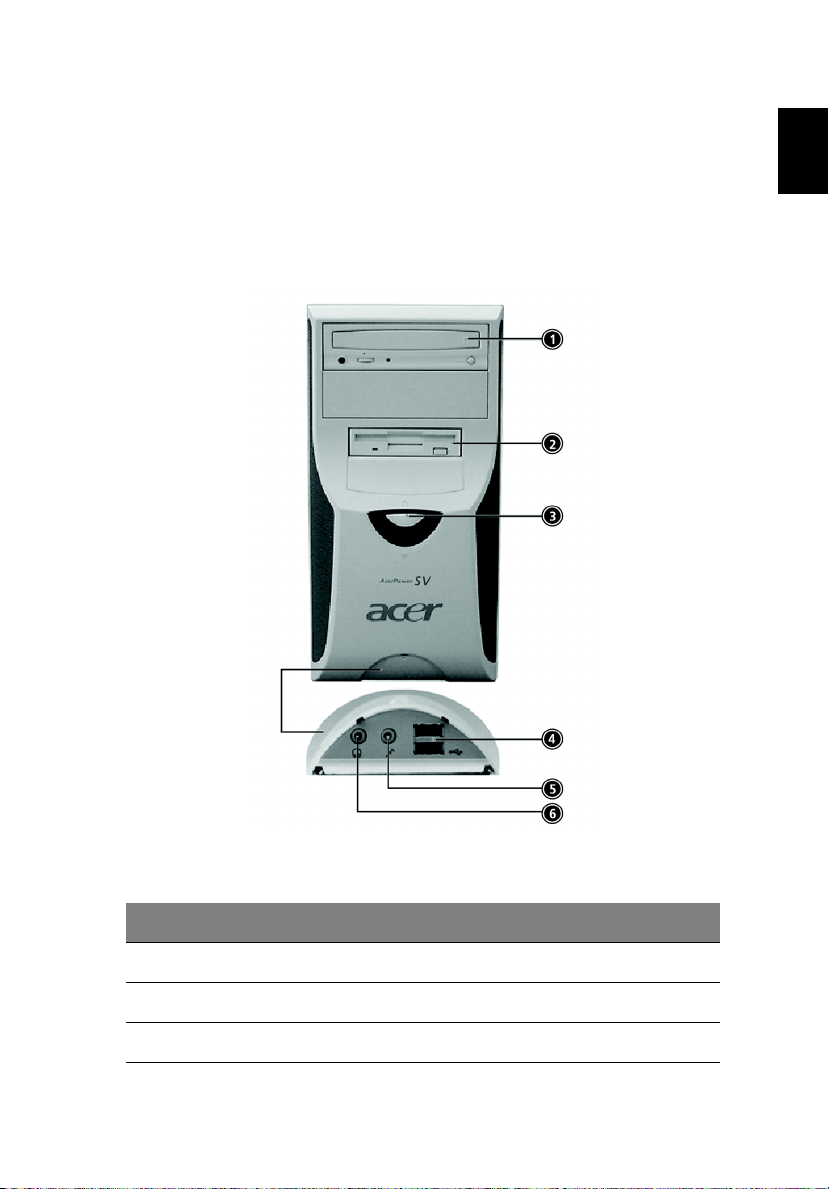
System Tour
Your computer’s front panel consists of the following:
Front panel
English
No.
No. Description
No.No.
1 Optical Drive
2 Floppy Drive
3 Power button
Description
DescriptionDescription
Page 8
No.
No. Description
No.No.
Description
DescriptionDescription
System Tour2
English
4 Universal Serial Bus (USB) Ports
5 Microphone Jack
6 Speaker or Headphone Jack
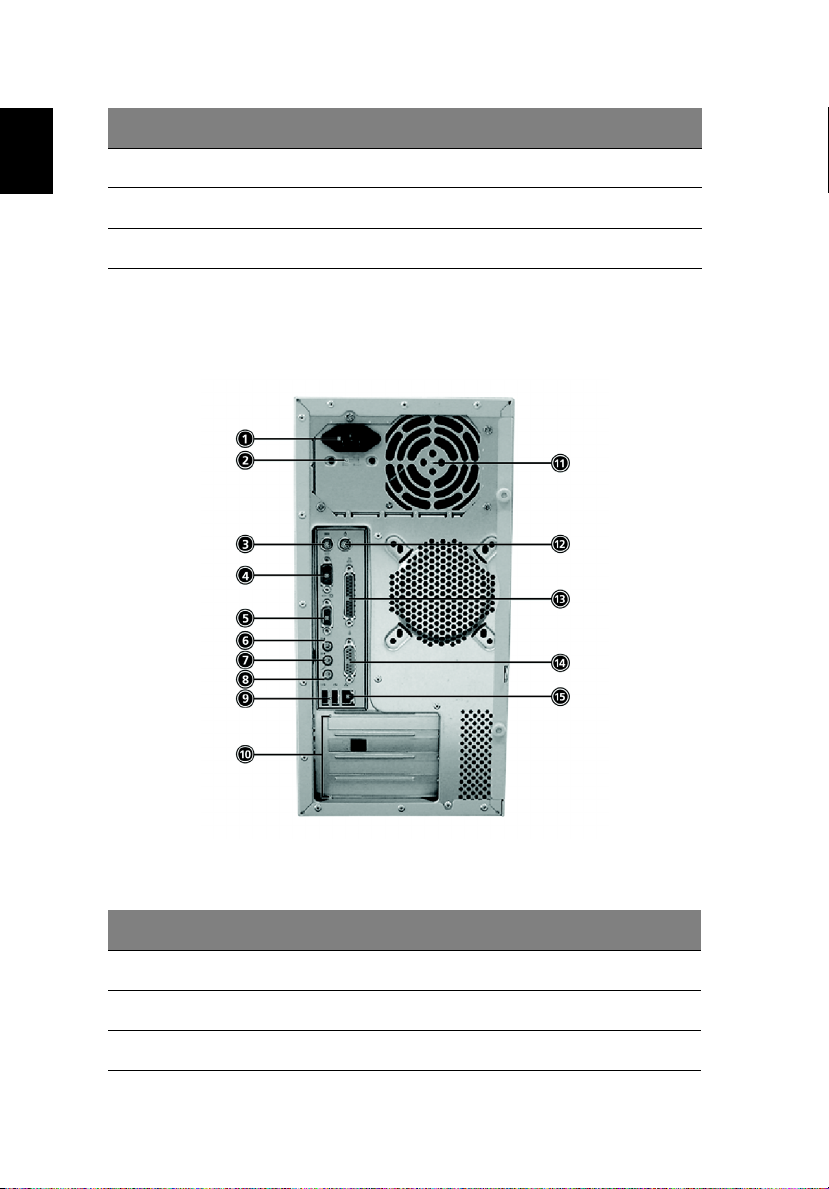
Rear panel
No.
No. Description
No.No.
1 Power cord socket
2 Voltage selector switch
3 PS/2 Keyboard Port
Description
DescriptionDescription
Page 9

3
No.
No. Description
No.No.
4 Serial Connector
5 Monitor Connector
6 Line-out Jack
7 Line-in Jack
8 Microphone Jack
9 USB Connector
10 PCI Card Slot
11 Fan Aperture
12 PS/2 Mouse Connector
13 Printer Connector
14 Game/MIDI Port
15 RJ-45 Ethernet Connector
Description
DescriptionDescription
English
Page 10

System Features
System Tour4
English
Your computer features:
Performance
• Intel Pentium 4/Celeron CPU
• Intel 845GV/ICH4
• System Memory DDR 266/333, 2 DIMM Slots, expandable to 2GB
• Power management function
• 3.5 inch floppy drive
• CD-ROM, DVD-ROM or CD-RW (52X/24X) drive
• High-capacity, Enhanced-IDE drive
• Support USB 2.0 high performance peripherals
Multimedia
• 3D quality audio system via onboard audio controller
• Audio-in/Line-in, Audio-out/Line-out, Headphone out and external
Microphone in jacks
Note:
Note: the system has two Microphone-in Jacks (front and rear)
Note:Note:
However, you can not use both of them at the same time. By
default, you system enables your microphone-in jack in front and
disables the one at the back.
Connectivity
• Two PS2 ports for keyboard and mouse
• One serial port
• One Parallel port
• One VGA port
• Four USB 2.0 ports (two on the front, two on the rear panel)
• High speed V92, 56K fax/Data modem (optional)
• 10Base-T/100Base-TX Ethernet Network support with "wake on
LAN"
Page 11

5
System peripherals
The AcerPower SV computer consists the system itself, and system
peripherals, like a mouse, a keyboard and a set of speakers (optional).
This section provides a brief description of basic system peripherals.
Mouse
The included mouse is a standard two-button wheel mouse. Connect
the mouse to the PS2 mouse port on the back panel of the system.
Keyboard
English
Connect the keyboard to the PS2 keyboard port on the back panel of
the system.
Page 12

Speakers
System Tour6
English
For systems bundled with speakers, before powering on the system,
connect the speaker cable to the audio out (external speaker) port on
the back panel of the system.
For more detailed information about the speakers, please refer to the
included operating instructions.
Note:
Note: speakers are optional and the appearance might be
Note:Note:
different depending on the actual product.
System upgrade
You can expand your AcerPower SV system quickly and easily by
adding components. You can also upgrade the components of your
AcerPower SV system.
Open the computer
Before removing any panels or covers, please make sure to shut off the
computer and unplug the power cord from the outlet.
• Remove the two screws on the side panel.
• Slide the panel back and off.
Page 13

7
Set up new components
You can only use components compatible with AcerPower SV
computers. Before you choose new components, please ask your
authorized Acer dealer whether the part will operate within your
AcerPower SV system.
In order to ensure proper setup and installation, please consult the
instructions provided with your new components.
Probable upgrades are:
- Upgrade to High Capacity HDD
- Expand high-level memory
- Upgrade from a CD-ROM drive to CD-RW, DVD-ROM, or DVDRW
- Install additional interface cards in empty PCI slots e.g., PCI
fax/modem card
English
Page 14

English
System Tour8
Page 15

9
Setting up your computer
AcerPower SV is a versatile, high-power system, supporting Intel Socket
478 CPUs. The computer uses Peripheral Component Interface (PCI) and
Accelerated Graphics Port (AGP) design. This improves system
efficiency and helps the system support varied multimedia and
software applications.
Your AcerPower SV has standard I/O (Input/Output) interfaces such as a
serial port, parallel port, PS/2 keyboard and mouse ports, the system
includes four USB ports, two microphone ports (one at front and one
at rear panel), a stereo line-in Jack, a stereo line-out jack and a Game/
Musical Instrument Digital Interface (MIDI) port. The system can
accommodate extra peripheral equipment through those I/O ports.
Your system can also support an optional high-speed fax/data modem
or an additional LAN (local area network) card.
Furthermore, the system is compatible with Windows XP Home,
Windows XP Professional operating systems.
Necessary to know before Setup
Prior to setting up your AcerPower SV System:
• Select a location
• Open package
English
Select location
Selecting the optimum location for your computer:
• Don't place the system too close to other electrical equipment.
• Don't place the system in high traffic areas or where the power
cord or other cords may be stepped on.
• Avoid placing the system in any location that is excessively dusty or
damp.
Open package
Open the package carefully and keep all packing materials for later
use.
Page 16

English
Setting up your computer10
Ensure that all items are present and in good condition. If any of the
following items are missing or appear damaged, contact your dealer
immediately.
• Acer Power SV Series
• PS2 keyboard
•PS2 mouse
• Spearkers ( for selected models only)
• User's Guide and Starter poster
Other user documentation and third party software.
Connecting the peripherals
Note:
Note: Don't connect system power cord before connecting all
Note:Note:
peripherals to the system.
After everything is connected, plug the power cord into the system and
insert the other end into a power outlet.
Starting your computer
After connecting all the peripheral equipment, start your computer
according to the below steps:
Page 17

11
1 Power on all peripheral equipment, such as monitor, printer, fax,
speakers etc.
2 Turn on the system. Once the start-up process is complete, you can
begin to use the computer.
Shutting down your computer
From the "Start" Menu, select "Shut Down" and click OK.
In the event of a system crash, press and hold the power button on the
front of the system for four seconds. After the system has shut down,
turn off all peripheral devices.
English
Page 18

English
Setting up your computer12
Page 19

13
Upgrading your computer
Installation Precautions
Reminder for guarding against static electricity
Protect your system from power surges, read following section before
installing any components. This section contains important ESD
(Electrostatic discharge) precautions.
ESD Guard
ESD can damage the CPU, drives, expansion circuit boards and the
other components. Before you install components, please observe the
following precautions:
1 Do not remove new components from their protective packaging
until you are ready to install them into the system.
2 Wear a wrist grounding strap and touch it to a metal part of the
computer before installing the components. If a wrist grounding
strap is not available, please maintain contact with the system case
throughout any procedure requiring ESD protection.
Pre-installation Instructions
English
Always observe the following before you install any component:
1 Turn off your computer and any peripheral devices connected to it
and unplug all cords from the system before you install any
component into computer.
2 Open your computer system according to instruction setup
manual.
3 Follow ESD precautions described above before handling any
computer components.
4 Remove any expansion boards or peripherals that block to the
DIMM sockets or component connectors.
Warning!
Warning! If the system is not properly shut down before you start
Warning! Warning!
to install components, your system may be damaged.
Page 20

English
Upgrading your computer14
Certain components of your computer are upgradeable such as the
memory, the hard disk, the CPU and the expansion card. However, for
safety purpose we do not recommend performing these upgrades
yourself. If you want to replace or upgrade any of the components,
contact your dealer or a qualified service technician.
Post-installation Instructions
After installing or upgrading any component:
1 Check whether all the components had been installed following
the step by step instructions in their respective sections.
2 Replace any other components previously removed to allow access.
3 Replace the external panels.
4 Reconnect all peripheral cables and turn on the system power.
Opening your Computer
This chapter introduces how to open the external panels when you
need to install or upgrade components.
Remove the side panel
1 Turn off your computer and unplug all peripheral devices.
2 Place the system on a flat, steady surface.
3 Remove the two screws on the side panel.
4 Slide the panel towards the back of the system and gently remove
it.
Replace the side panel
1 Put the cover back on the system.
2 Lock the panel with previously removed screws.
Replacing the HDD
Upgrade the HDD
1 Remove all the HDD wires from the system's mainboard.
Page 21

15
2 Remove the 4 screws fixing HDD to the chassis.
3 Gently remove the HDD from the drive bay.
4 Reinstall the HDD:
a Insert the HDD into the bay.
b Replace the 4 screws to secure the drive.
5 Connect the cables to the mainboard.
Installing PCI cards
Install PCI card
1 Find an empty PCI slot on the motherboard.
2 Remove the screw holding the bracket to back panel and remove
the bracket.
3 Take the new PCI card from its protective bag.
4 Position the PCI card in the slot and gently press to insert it.
5 Secure the card to your computer with the screw removed earlier.
When you restart the system, BIOS (Basic Input/Output System) will
automatically detect and allocate the resources to the new PCI device.
Remove PCI card
English
To remove PCI card, you only need to open the computer and remove
the undesired card.
Installing additional memory
Memory can be upgraded to a maximum of 2 GB. This can be done by
adding the additional 128MB, 256MB, 512MB or 1GB PC 2100/2700
DDR DIMM to two of the 184-pin DDR sockets locate on the
motherboard. See below.
Install DDR DIMM
1 Align the DDR DIMM with the socket.
2 Push the DDR DIMM into the socket until the clips lock onto the
DDR DIMM.
Page 22

English
Upgrading your computer16
Remark:
Remark: The DDR DIMM sockets are slotted to ensure proper
Remark:Remark:
installation. If you insert a DDR DIMM but it does not fit easily into
socket, you may have inserted it incorrectly. Turn the DDR around
and try to insert it again.
Remove DDR DIMM
1 Press the holding clips on both sides of the DDR socket outward to
release the DDR.
2 Gently pull the DDR out from the socket.
To reconfigure your computer
The system will automatically detect the amount of memory installed.
Run the BIOS utility to view the new value for total system memory
and make a note of it.
Upgrading CPU
Re mo ve C PU
Remark:
Remark: Please follow the pre-installation instructions to guard
Remark:Remark:
against static electricity while installing or removing any system
parts.
To remove the CPU from the motherboard:
1 Find the CPU on the motherboard
Page 23

17
2 Disjoin the connectors attached to the fan and the heat sink.
3 Remove the fan and the heat sink.
4 Unlock the socket lever to release the CPU.
5 Gently pull the CPU from the socket.
6 Install and upgrade CPU.
Install and upgrade CPU
To install or upgrade the CPU, complete the following steps:
1 Unlock the socket lever.
2 Install the CPU chip into socket.
3 Return the lever to locked position.
English
Page 24

English
Upgrading your computer18
4 Attach the fan/heat sink on top of the CPU.
5 Attach the fan/heat sink connectors to the connectors with marked
with "CPU FAN".
Warning!
Warning! The CPU and heat sink may be hot if the system has
Warning! Warning!
been running. Also, there might be sharp pins and edges on some
boards and/or chassis parts.
Page 25

19
Troubleshooting
The following questions are possible situations that may arise during
the use of your computer and each is followed by simple answers and
solutions to the situation.
Q: I pressed the power switch but the system did not boot up.
Q: I pressed the power switch but the system did not boot up.
Q: I pressed the power switch but the system did not boot up. Q: I pressed the power switch but the system did not boot up.
A: Check the LED located above the power switch.
If the LED is not lit, no power is being applied to the system. Do any of
the following:
• Check if the voltage selector switch located on the rear panel of
the computer is set to the correct voltage.
• Check if you properly plugged the power cable into an electrical
outlet.
• If you are using a power strip or AVR, make sure that it is plugged
in and turned on.
If the LED is lit, check the following:
• Is a non bootable (non system) diskette in the floppy drive? If yes,
remove or replace it with a system diskette and press Ctrl + Alt +
Del to restart your computer.
• The operating system files may be damaged or missing. Insert the
startup disk you created during Windows setup into the floppy
drive and press Ctrl + Alt + Del
automatically diagnose your system and make necessary fixes.
However, if the diagnostic utility still reports a problem, then you
may have to perform the recovery process to restore your system
to its original factory default settings.
Ctrl + Alt + Del to restart your computer. This will
Ctrl + Alt + DelCtrl + Alt + Del
English
Q: Nothing appears on the screen.
Q: Nothing appears on the screen.
Q: Nothing appears on the screen. Q: Nothing appears on the screen.
A: Your computer's power management function automatically blanks
the screen to save power. Press any key to turn the display back on.
If pressing a key does not work, your computer. If restarting your
computer does not work, contact your dealer or the technical support
center for assistance.
Q: The printer does not work.
Q: The printer does not work.
Q: The printer does not work. Q: The printer does not work.
A: Do the following:
Page 26

English
Troubleshooting20
• Make sure that the printer is connected to a power outlet and that
it is turned on.
• Make sure that the printer cable is connected securely to the
system's parallel port and the corresponding port on the printer.
• For additional information concerning the printer, refer to the
printer's documentation.
Q: No sound comes out from the speakers.
Q: No sound comes out from the speakers.
Q: No sound comes out from the speakers. Q: No sound comes out from the speakers.
A: Check the following:
• The volume may be muted. Look for the Volume icon on the
taskbar. If it is crossed-out, click on the icon and deselect the Mute
option. You can also press the volume control/mute knob on your
USB keyboard to toggle the mute function.
• If headphones, earphones, or external speakers are connected to
the line-out jack of your computer, the internal or built-in
speakers are automatically turned off.
Q: System cannot read diskette, hard disk, CD or DVD information.
Q: System cannot read diskette, hard disk, CD or DVD information.
Q: System cannot read diskette, hard disk, CD or DVD information. Q: System cannot read diskette, hard disk, CD or DVD information.
A: Check the following:
• Make sure that you are using the correct type of media.
• Check if the diskette is formatted correctly. If not, format it again.
Caution:
Caution: If you reformat a diskette, you will lose any data on it.
Caution:Caution:
Make sure the diskette, CD or DVD is inserted into the drive correctly.
• Check if the CD or DVD is clean and not scratched.
• Check your drive by using a good (i.e., undamaged) diskette or a
good disc. If your floppy drive, CD or DVD drive can not read the
information on the good diskette, CD or DVD there may be a
problem with the drive. Contact your dealer or technical support
center for assistance.
Q: System cannot write diskette, hard disk or disc.
Q: System cannot write diskette, hard disk or disc.
Q: System cannot write diskette, hard disk or disc. Q: System cannot write diskette, hard disk or disc.
A: Check the following:
• Make sure the media is not write-protected.
• Make sure that you are using the correct type of diskette. Check if
the diskette is formatted correctly. If not, format it again.
Page 27

Caution:
Caution: If you reformat a diskette, you will lose any data on it.
Caution:Caution:
21
English
Page 28

English
Troubleshooting22
Page 29

23
Taking Care of your computer
Please read the important instructions listed in this section. Following
these instructions will help you maximize the durability of your
computer.
Important tips
• Do not expose the computer to direct sunlight. Do not place it
near sources of heat, such as a radiator.
• Do not subject the computer to magnetic fields.
• Do not expose the computer to rain or moisture.
• Do not spill water on the computer.
• Do not subject the computer to heavy shock or vibration.
• Do not expose the computer to dust and dirt.
• Never place the system on uneven surfaces.
• Do not step on the power cord or place heavy objects on top of it.
Carefully route the power cord and any cables away from personal
traffic.
• When unplugging the power cord, do not pull on the cord itself
but pull on the plug.
• The total ampere rating of the equipment plugged in should not
exceed the ampere rating of the cord if you are using an extension
cord. Also, the total current rating of all equipment plugged into a
single wall outlet should not exceed the fuse rating.
• Check the documentation that came with your software programs
to see if you can select other combinations of resolution and color.
These adjustments could make viewing the screen more
comfortable.
English
Cleaning and servicing
To clean your computer and keyboard
1 Turn off the computer and unplug the power cord.
2 Use a soft cloth moistened with water and gently wipe the exterior
of the computer and the keyboard. Do not use liquid or aerosol
cleaners.
Page 30

To clean your pointing device
Taking Care of your computer24
English
To clean your mouse (with rubber ball)
1 Open the circular cover underneath the mouse.
2 Take out the rubber ball and wipe it with a soft, damp cloth.
3 Put the ball back and replace the cover.
To clean your optical mouse
For users of an optical mouse, refer to the documentation that came
with your mouse for maintenance instructions.
To clean your monitor
Make sure that you keep your screen clean. For cleaning instructions,
refer to the documentation that came with your monitor.
When to contact a service technician
• If you dropped and damaged the computer.
• If liquid has been spilled into the computer.
• If the computer is not operating normally.
Asking for technical assistance
For technical assistance, contact your local dealer or distributor. You
may also access the Acer Web site (www.acersupport.com) for
information on how and where to contact the service centers available
in your area.
 Loading...