

Page 1

Isssue 2.0
1 May, 2004
Page 2

Altos RAIDWatch User Guide
The information in this document is subject to change without notice.
While every effort has been made to ensure that all information in this document is accurate, the Authors accept no
liability for any errors that may arise.
No part of this document may be transmitted or copied in any form, or by any means, for any purpose, without the
written permission of the Authors.
Issue 2.0 1 May, 2004
• Infortrend and the Infortrend logo are registered trademarks of Infortrend Technology, Inc. Altos RAIDWatch
is a trademark of Infortrend Technology, Inc.
• PowerPC is a trademark of International Business Machines Corporation and Motorola Inc.
• Microsoft, Windows, Windows NT and MSDOS are registered trademarks of Microsoft Corporation in the
U.S. and other countries.
• Novell and NetWare are registered trademarks of Novell, Inc. in the U.S. and other countries.
• SCO, OpenServer, and UnixWare are trademarks or registered trademarks of The Santa Cruz Operation, Inc.
in the U.S. and other countries.
• Solaris and Java are trademarks of Sun Microsystems, Inc.
• All other names, brands, products or services are trademarks or registered trademarks of their respective
companies.
ii
Page 3

Contents
Preface .................................................................................................................................................. ix
Conventions .......................................................................................................................................... xi
Reference Information ......................................................................................................................... xi
Revision History ................................................................................................................................... xii
A.1 Product Description ...................................................................................................................................... 1
A.2 Feature Summary ......................................................................................................................................... 1
A.3 Featured Highlights ...................................................................................................................................... 3
A.3.1 Graphical User Interface .................................................................................................................... 3
A.3.2 Enclosure Management ...................................................................................................................... 3
A.3.3 Powerful Event Notification Function ............................................................................................... 4
A.3.4 Java-based Remote Management ....................................................................................................... 4
A.3.5 Password Protection ........................................................................................................................... 4
A.4 Conceptual Foundation ................................................................................................................................ 5
2.1 System Requirements ................................................................................................................................... 7
2.1.1 Server Running Altos RAIDWatch .................................................................................................... 7
2.1.2 Local Client Running Altos RAIDWatch Manager ........................................................................... 8
2.2 RAID Chart .................................................................................................................................................. 8
2.3 Platform Requirements ................................................................................................................................. 9
2.3.1 Platform Limitations .......................................................................................................................... 9
2.3.2 Solaris Platforms ................................................................................................................................ 9
2.3.3 Windows Platforms .......................................................................................................................... 12
2.4 Software Setup ........................................................................................................................................... 14
2.4.1 Before You Start .............................................................................................................................. 14
2.4.2 Installing Altos RAIDWatch ............................................................................................................ 14
2.4.3 Installing Out of Band Components ................................................................................................. 17
2.4.4 Installing In-Band Components ....................................................................................................... 19
2.4.5 Applet-Only Installation .................................................................................................................. 22
2.5 List of Filenames ........................................................................................................................................ 25
2.6 Program Updates ........................................................................................................................................ 26
2.7 In-band SCSI ............................................................................................................................................. 26
2.7.1 Configuring a RAID Controller to Use In-band SCSI ..................................................................... 27
3.1 Introduction ................................................................................................................................................ 31
3.2 Accessing the Configuration Panel ............................................................................................................ 31
3.2.1 Using Windows – Altos RAIDWatch Installed as In-Band ............................................................. 31
3.2.2 Using Web Browser – Altos RAIDWatch Installed as Applet ........................................................ 32
3.3 Primary Agent Configuration ..................................................................................................................... 33
3.3.1 Base Settings .................................................................................................................................... 33
iii
Page 4

3.3.2 Managed Secondary Agent Settings ................................................................................................ 35
3.4 Secondary Agent Settings .......................................................................................................................... 36
3.5 NPC Settings ............................................................................................................................................. 37
3.5.1 Agent ............................................................................................................................................... 37
3.5.2 Event Log ........................................................................................................................................ 38
3.5.3 Pager Settings .................................................................................................................................. 39
3.5.4 Email Settings .................................................................................................................................. 40
3.5.5 SNMP Settings ................................................................................................................................ 42
3.5.6 Broadcast Settings ........................................................................................................................... 43
3.6 Rebooting the Controller ........................................................................................................................... 45
4.1 Starting Altos RAIDWatch ........................................................................................................................ 47
4.1.1 Starting Altos RAIDWatch Agents ................................................................................................. 47
4.2 Starting Altos RAIDWatch Manager ........................................................................................................ 48
4.2.1 Starting Altos RAIDWatch Manager Locally or via LAN under the Windows (95/98/Me/NT/2000/
XP) Environment ............................................................................................................................... 48
4.2.2 Starting Altos RAIDWatch Manager for Remote Management via Web Browser (any supported OS)
49
4.2.3 Starting Altos RAIDWatch Manager Locally or via a LAN under a Unix or AIX Workstation (Solaris
7 (SPARC, x86); Red Hat Linux 6.1) Environment .......................................................................... 49
4.3 Connecting and Disconnecting from a Disk Array ................................................................................... 50
4.3.1 Connecting to a RAID System while Working from the Local Primary Agent Host ..................... 50
4.3.2 Connecting to a RAID System from a Distant Host ....................................................................... 51
4.3.3 Disconnecting from a Disk Array System ....................................................................................... 53
4.4 Setting Up Security .................................................................................................................................... 53
4.4.1 Setting a Password for Altos RAIDWatch Controller Access ........................................................ 53
4.4.2 Setting TCP Port Numbers .............................................................................................................. 54
4.5 Look and Feel ............................................................................................................................................ 55
4.5.1 Look and Feel Overview ................................................................................................................. 55
4.5.2 Navigation Menus ........................................................................................................................... 55
4.5.3 Tool Bar ........................................................................................................................................... 56
4.5.4 Common Commands ...................................................................................................................... 56
4.5.5 Menu Commands ............................................................................................................................ 57
4.5.6 Windows Display Area ................................................................................................................... 57
4.6 Using the RAID View Window ................................................................................................................ 58
4.6.1 Accessing the RAID View Display ................................................................................................. 58
4.6.2 Using the Configuration View ........................................................................................................ 60
4.6.3 Using the Logical View ................................................................................................................... 60
4.6.4 Using the Physical View ................................................................................................................. 62
4.7 Using the Enclosure Window .................................................................................................................... 64
4.7.1 Accessing the Enclosure Display .................................................................................................... 64
4.7.2 Using the Enclosure Window .......................................................................................................... 65
4.8 Event Window ........................................................................................................................................... 66
4.8.1 Accessing the Event Log Display ................................................................................................... 66
4.8.2 Using the Event Log to Monitor the System ................................................................................... 66
4.9 The Statistics Window ............................................................................................................................... 67
4.9.1 Accessing the Statistics Window .................................................................................................... 67
4.9.2 Using the Statistics Window ........................................................................................................... 67
4.9.3 Arranging Windows ........................................................................................................................ 68
4.10 Exiting Altos RAIDWatch Manager ......................................................................................................... 69
iv
Page 5

Contents
4.10.1 Exiting from Altos RAIDWatch Manager ....................................................................................... 69
4.10.2 Exiting from Altos RAIDWatch Manager Connected via Web Browser ........................................ 69
5.1 Background Information ............................................................................................................................ 71
5.1.1 Definition of Terms .......................................................................................................................... 72
5.2 Operating With Spare Drives ..................................................................................................................... 72
5.3 Operating Without Spare Drives ................................................................................................................ 73
5.4 Before You Start ........................................................................................................................................ 73
6.1 Configuring the Controller ......................................................................................................................... 75
6.2 Accessing Controller Configuration Options ............................................................................................. 76
6.3 Caching ...................................................................................................................................................... 76
6.4 Host-Side .................................................................................................................................................... 77
6.5 Drive-Side .................................................................................................................................................. 78
6.6 RAID .......................................................................................................................................................... 79
6.7 Controller ................................................................................................................................................... 79
6.8 Communication .......................................................................................................................................... 82
7.1 Accessing Channel Configuration Options ................................................................................................ 85
7.2 User-Configurable Channel Parameters ..................................................................................................... 86
7.2.1 ID pool / PID / SID .......................................................................................................................... 86
7.3 Setting the Configuration of a Channel ...................................................................................................... 86
8.1 Scanning in Drives ..................................................................................................................................... 89
8.1.1 Scanning in a Drive .......................................................................................................................... 89
8.2 Logical Drive Management ........................................................................................................................ 90
8.2.1 Accessing the “Create Logical Drive” Window .............................................................................. 90
8.2.2 Creating Logical Drives ................................................................................................................... 91
8.2.3 Expanding a Logical Volume .......................................................................................................... 95
8.2.4 Dynamic Logical Drive Expansion .................................................................................................. 98
8.2.5 Adding and Deleting Spare Drive Assignments ............................................................................ 101
8.2.6 Rebuilding Logical Drives ............................................................................................................. 104
8.2.7 Deleting a LD ................................................................................................................................. 105
8.3 Creating and Deleting Logical Volumes .................................................................................................. 108
8.3.1 Accessing the “Create Logical Volume” Window ......................................................................... 108
8.3.2 Creating Logical Volumes ............................................................................................................. 109
8.3.3 To Expand a Logical Volume ........................................................................................................ 113
8.3.4 Delete a Logical Volume ............................................................................................................... 115
8.4 Partitions .................................................................................................................................................. 116
8.4.1 Overview ........................................................................................................................................ 116
8.4.2 Partitioning a Logical Drive (LD) .................................................................................................. 116
8.4.3 Partitioning a Logical Volume (LV) .............................................................................................. 118
9.1 Accessing the LUN Map Table ............................................................................................................... 121
9.2 LUN Mapping .......................................................................................................................................... 123
9.2.1 Mapping a Complete LD or LV ..................................................................................................... 123
v
Page 6

9.2.2 Map a logical drive or volume partition to a host LUN ............................................................... 125
9.2.3 Deleting a host LUN mapping ....................................................................................................... 128
9.3 Extended LUN Mapping ......................................................................................................................... 129
9.3.1 Preliminaries .................................................................................................................................. 129
9.3.2 Extended LUN Mapping ............................................................................................................... 129
9.3.3 Adding a WWN Name .................................................................................................................. 131
9.3.4 Deleting an Extended LUN Mapping or WWN Name ................................................................. 132
10.1 S.E.S. Monitoring .................................................................................................................................... 135
10.1.1 Accessing SES Monitoring ........................................................................................................... 135
10.1.2 SES Management Device .............................................................................................................. 136
10.2 Defining Enclosures ................................................................................................................................ 138
10.2.1 Creating an Enclosure ................................................................................................................... 139
10.2.2 Removing a Drive from an Enclosure ........................................................................................... 141
10.3 Displaying the Event Log ........................................................................................................................ 142
10.4 Monitoring Statistics ............................................................................................................................... 142
11.1 Before You Begin .................................................................................................................................... 146
11.1.1 About NPC ................................................................................................................................... 146
11.1.2 Platform Requirements .................................................................................................................. 146
11.2 Basic Running Requirements .................................................................................................................. 146
11.3 Redundant NPC Modules ........................................................................................................................ 147
11.4 Severity Levels ........................................................................................................................................ 147
11.4.1 Level 1 Severity Events (examples) .............................................................................................. 147
11.4.2 Level 2 Severity Events (examples) .............................................................................................. 148
11.4.3 Level 3 Severity Events (example) ............................................................................................... 148
11.5 Configuring Notification Options ............................................................................................................ 148
11.5.1 Configuring Modem Settings ........................................................................................................ 148
11.5.2 Configuring Fax Notification ........................................................................................................ 149
11.6 Configuring Pager Notification ............................................................................................................... 152
11.7 Configuring Broadcast Message Notification ......................................................................................... 152
11.8 Configuring E-Mail Notification ............................................................................................................. 153
11.9 Configuring SNMP Trap Notification ..................................................................................................... 154
12.1 Event Monitor Features ........................................................................................................................... 158
12.1.1 Feature Summary .......................................................................................................................... 158
12.1.2
12.1.3 Event Monitor Considerations ....................................................................................................... 158
12.2 Before You Begin .................................................................................................................................... 159
12.2.1 Basic Running Requirements ........................................................................................................ 159
12.3 Starting Event Monitor ............................................................................................................................ 160
12.3.1 Starting Agents and NPC .............................................................................................................. 160
12.3.2 Running the Program: ................................................................................................................... 161
12.4 Exiting Event Monitor ............................................................................................................................. 163
12.4.1
12.4.2
12.5 Connecting and Disconnecting from a Disk Array ................................................................................. 164
12.5.1 Connecting to a RAID System while working from the Local Primary Agent Host .................... 164
vi
Page 7

Contents
12.5.2 Connecting to a RAID System from a Distant Host ...................................................................... 165
12.5.3 Disconnecting from a Disk Array System ..................................................................................... 166
12.6 Using the Event Monitor .......................................................................................................................... 167
12.6.1 Display Controls ............................................................................................................................ 167
12.6.2 Basics ............................................................................................................................................. 167
12.6.3 Using the Connection View ........................................................................................................... 168
12.6.4 Using the Event List ....................................................................................................................... 169
12.6.5 Event Severity Levels .................................................................................................................... 171
A.1 Menu Commands ..................................................................................................................................... 173
A.2 Before You Begin .................................................................................................................................... 174
A.3 Command Buttons .................................................................................................................................... 175
B.1 Common Oversights ................................................................................................................................. 177
B.2 Error Codes .............................................................................................................................................. 178
B.3 Error Messages ......................................................................................................................................... 179
B.3.1 Under Channel Settings ................................................................................................................. 179
B.3.2 Under Logical Drive Creation ........................................................................................................ 180
B.3.3 Under Logical Drive Settings ........................................................................................................ 180
B.3.4 Under RAIDView .......................................................................................................................... 180
C.1 RAID Description .................................................................................................................................... 183
C.2 Non-RAID Storage ................................................................................................................................... 183
C.3 RAID 0 ..................................................................................................................................................... 184
C.4 RAID 1 ..................................................................................................................................................... 184
C.5 RAID 1(0+1) ............................................................................................................................................ 185
C.6 RAID 3 ..................................................................................................................................................... 186
C.7 RAID 5 ..................................................................................................................................................... 186
Glossary .............................................................................................................................................. 189
vii
Page 8

viii
Page 9

Preface
Preface
What is in this Manual
This manual provides information on preparing, installing, configuring, and using the Altos
RAIDWatch management program to manage disk array systems incorporating Fibre-to-SATA
controllers.
Altos RAIDWatch allows you to control and monitor disk array systems, either from a local host, or
from a remote station connected through a local area network (LAN) or the Internet.
An independent monitoring program, Event Monitor, is bundled with newer release of this
manager. The configuration and use of the program is discussed in Chapter 12 on page 157.
In addition to Altos RAIDWatch, you can also use the on-board RS-232 menu interface available for
various operating systems to manage disk array systems incorporating disk array controllers. For
information about these programs, see the documentation that comes with your hardware.
Who should use this Manual
This manual is intended for system administrators. Use this manual to:
• Gain a basic understanding of the Altos RAIDWatch software.
• Learn how to install, configure, and run the Altos RAIDWatch software in Linux, IRIX and
Windows environments.
• Learn about hardware and software requirements.
• Learn how to use the GUI to operate the Altos RAIDWatch software.
Structure of this Manual
This user guide contains the following chapters and appendices:
• Chapter 1 , ”Introduction”, on page 1 Provides information about Altos RAIDWatch, including
a product description, a features summary and highlights, and section on basic concepts.
• Chapter 2 , ”Installation”, on page 7 Discusses how to install Altos RAIDWatch in your systems.
Discussions include the system requirements, setting up hardware, software installation, and
how to update your software by downloading updates from the FTP site.
• Chapter 3 , ”Configuration Options”, on page 31 describes the Altos RAIDWatch configuration
options. There are a number of different items that users can configure. These include primary
and secondary agents and the Notification Processing Center.
• Chapter 4 , ”Operation”, on page 47 Discusses basic operations at system startup. These
include starting Altos RAIDWatch, connecting and disconnecting from a disk array system,
ix
Page 10

Altos RAIDWatch User Guide
• Chapter 5 , ”Array Management”, on page 71 Provides information on disk array
• Chapter 6, ”Controller Configuration”, on page 75 describes those disk array controller
• Chapter 7, ”Channel Configuration”, on page 85 describes those channel configuration
• Chapter 8, ”Drive Management”, on page 89 describes those drive management features
setting up system security, display controls, working with various disk array windows, and
exiting from the program.
management, including defining enclosures, setting the controller and channel
configurations, scanning in drives, creating, expanding and deleting logical drives, assigning
spare drives, rebuilding logical drives, creating and deleting logical volumes, defining volume
partitions, mapping logical volumes to host LUNs, deleting LUN mappings, displaying the
contents of the log file, and monitoring the disk array statistics.
configuration features and information displays which can be set or modified with Altos
RAIDWatch Manager
features which can be set or modified with Altos RAIDWatch Manager
which can be set or modified with Altos RAIDWatch Manager
• Chapter 9, ”LUN Mapping”, on page 121 explains LUN Mapping features, including accessing
the LUN map table, mapping a complete Logical Drive or Logical Volume, deleting a host LUN
mapping, Extended LUN mapping, adding a WWN name and deleting an Extended LUN
Mapping or WWN Name.
• Chapter 10, ”System Monitoring and Management”, on page 135 describes system monitoring
and management features, including SAF-TE, SES monitoring, defining enclosures, displaying
the Event Log and monitoring statistics.
• Chapter 11, ”The Notification Processing Center”, on page 145 describes The “Notification
Processing Center” (NPC), a notification application that enables users to configure
notifications that are transmitted when various disk array events occur.
• Chapter 12 , ”Event Monitor”, on page 157 Describes how to use this monitoring utility as an
all-time window onto system status.
• Appendix A , ”Command Summary”, on page 173 Summarizes the available commands and
command buttons in Altos RAIDWatch.
• Appendix B, ”Troubleshooting”, on page 177 Provides troubleshooting tips for some problems
you may encounter while using Altos RAIDWatch.
• Appendix C , ”RAID Levels”, on page 183 Provides information about the various RAID levels.
• , ”Glossary”, on page 189. Provides information and definitions of key technology terms used
in this guide.
x
Page 11

Preface
Conventions
This Getting Started guide uses several conventions to help explain how to use the Altos RAIDWatch
management program.
Convention Definition
Controller RAID array controllers;
Altos RAIDWatch The entire program and all of its modules.
Altos RAIDWatch
Manager
Primary Agent The element of the software which permits one station to manage
Secondary Agent The part of the software which allows the local RAID controller to talk to
Event Monitor A software utility that runs separately from Altos RAIDWatch Manager. It
Refers only to the management interface, not to any of the other parts of
the software.
multiple RAID systems. The Primary Agent gets information from and
sends commands to one or multiple Secondary Agents.
the Primary Agent (and thus to Altos RAIDWatch Manager). A Secondary
Agent communicates with the RAID controller via SCSI bus or Fibre
channel (using “In-band” technology), or even via an RS-232 serial port.
Secondary Agents are the intermediaries between the Primary Agent and
the RAID controllers.
requires agents to communicate between controller and management
station. It also shares with Altos RAIDWatch Manager a part of Java class.
Therefore, Altos RAIDWatch Manager should be installed even if the user
prefers Event Monitor. Hardware and software requirements for
installing the program is the same as those for Altos RAIDWatch.
Reference Information
The following information may be useful in creating and operating a RAID controller and in using
Altos RAIDWatch and Altos RAIDWatch Manager.
Java Runtime Environment
•
JRE (Java Runtime Environment) is a shareware product from Sun/Solaris. Two websites that
may be of use relative to JRE are:
The main Java website URL
The JRE download website URL l
Altos RAIDWatch Updates & Upgrading
•
Please contact your supplier for Altos RAIDWatch agent and Altos RAIDWatch Manager
updates.
Uninstalling Altos RAIDWatch
•
xi
Page 12

Altos RAIDWatch User Guide
Revision History
1.0 May, 2004 Initial Release
Altos RAIDWatch agents and Altos RAIDWatch Manager can be uninstalled. Choose the
Uninstall icon in the Altos RAIDWatch group or
subdirectory under Unix-based systems
type
“uninstall”
in the
usr/hybrid/bin
xii
Page 13

Preface
xiii
Page 14

Altos RAIDWatch User Guide
xiv
Page 15

Introduction
Chapter 1
Introduction
This chapter provides information about the Altos RAIDWatch management program, including
the following topics:
• Product Description, A.1 on page 1.
• Feature Summary, A.2 on page 1.
• Feature Highlights, A.3 on page 3.
• Conceptual foundation, A.4 on page 5.
A.1 Product Description
The GUI RAID Manager,
in managing disk array systems implemented using standalone RAID controllers (GUI is an acronym
of “Graphic User Interface.”)
Altos RAIDWatch provides a user-friendly interface that facilitates understanding of the
relationship between disk array elements and simplifies the normally complicated process of array
configuration. Altos RAIDWatch also provides real-time reporting on the status of the entire array,
thus making the task of monitoring disk arrays virtually effortless. Since the release of software
revision 1.31, Event Monitor is supplemented for use with a constant monitoring of multiple disk
arrays.
“Altos RAIDWatch,”
is a Java-based program specifically designed for use
A.2 Feature Summary
The list below summarizes Altos RAIDWatch features.
• User-friendly graphical interface running under operating systems compatible with the Java
Run-time Environment (JRE).
1
Page 16

Altos RAIDWatch User Guide
• Internet browser access to full program functionality provides worldwide management
• Supports Fibre-to-SATA RAID controllers (Altos S205F)
• Communicates with the controllers over a LAN, the Internet, over the SCSI bus or Fibre channel
• Supports multiple instances of RAID managers over the network, allowing multiple
• Illustrates graphically and clearly the relationship between various disk array elements
• At a glance monitoring of the entire disk array status by Altos RAIDWatch and constant
• Supports remote management over the network of an agent running Windows, Solaris, or
• Provides standard disk array functions, including examining and modifying controller
capability
management sessions with a disk array system
monitoring of multiple systems by Event Monitor
Linux via the TCP/IP protocol (future versions will support additional protocols)
configuration; viewing and monitoring configuration and status of physical drives; scanning in
new physical drives; creating, deleting, and monitoring configuration and status of logical
drives rebuilding logical drives; defining spare drives; creating, deleting, and partitioning
logical volumes; and mapping logical drive and volume partitions to specific host
channels/LUNs
• Enclosure management functions, including defining multiple customized enclosures,
dimensions, and number of drives; monitoring physical drive, power supply, fan, and
temperature status; displaying the relative location of failed physical drives for reduced risk of
replacing the wrong drives
• Supports redundant configuration of important Altos S205F modules to avoid
single-point-of-failure
• RAID controller real-time event notices provide information about various event occurrences,
including the time when an event occurs, event severity, and event description.
• Selectable event notification via SNMP traps by severity levels
• Supports statistics monitoring for displaying I/O throughput and cache hit rate
• Provides innovative, user-configurable event notification functions
• Pager notification via a local modem
• E-Mail notification via the MAPI service of Windows; or built-in SMTP for Unix systems
• Broadcast notification over the LAN:
– Broadcasts user-configurable message along with the event description (Broadcast
notification currently not supported on cross-OS, e.g., Unix to Windows, platforms.)
• Facsimile (Fax) notification via a local Fax/modem:
2
Page 17
– User-configurable fax messages sent along with the event description
– Automatic message retransmission in the event previous transmission attempts fail
• Provides password protection for guarding against unauthorized modification of disk array
configuration.
A.3 Featured Highlights
This section explains in greater detail the important features of Altos RAIDWatch.
A.3.1 Graphical User Interface
Altos RAIDWatch’s graphical interface is designed for ease-of-use. It uses symbolic icons to
represent physical and logical drives, and logical volumes on the screen; and to identify the current
configuration of a disk array system. Pull-down and pop-up menus are used with all command
options listed.
Introduction
Users need only point and click a mouse button to select an icon or command. The program also
identifies the current status of various drives by changing the colors of their respective icons.
With an easy-to-use interface, complicated disk array operations such as logical drive and logical
volume creation, drive partitioning, and drive partition mapping to host channels/LUNs can be
completed with only a few mouse clicks.
A.3.2 Enclosure Management
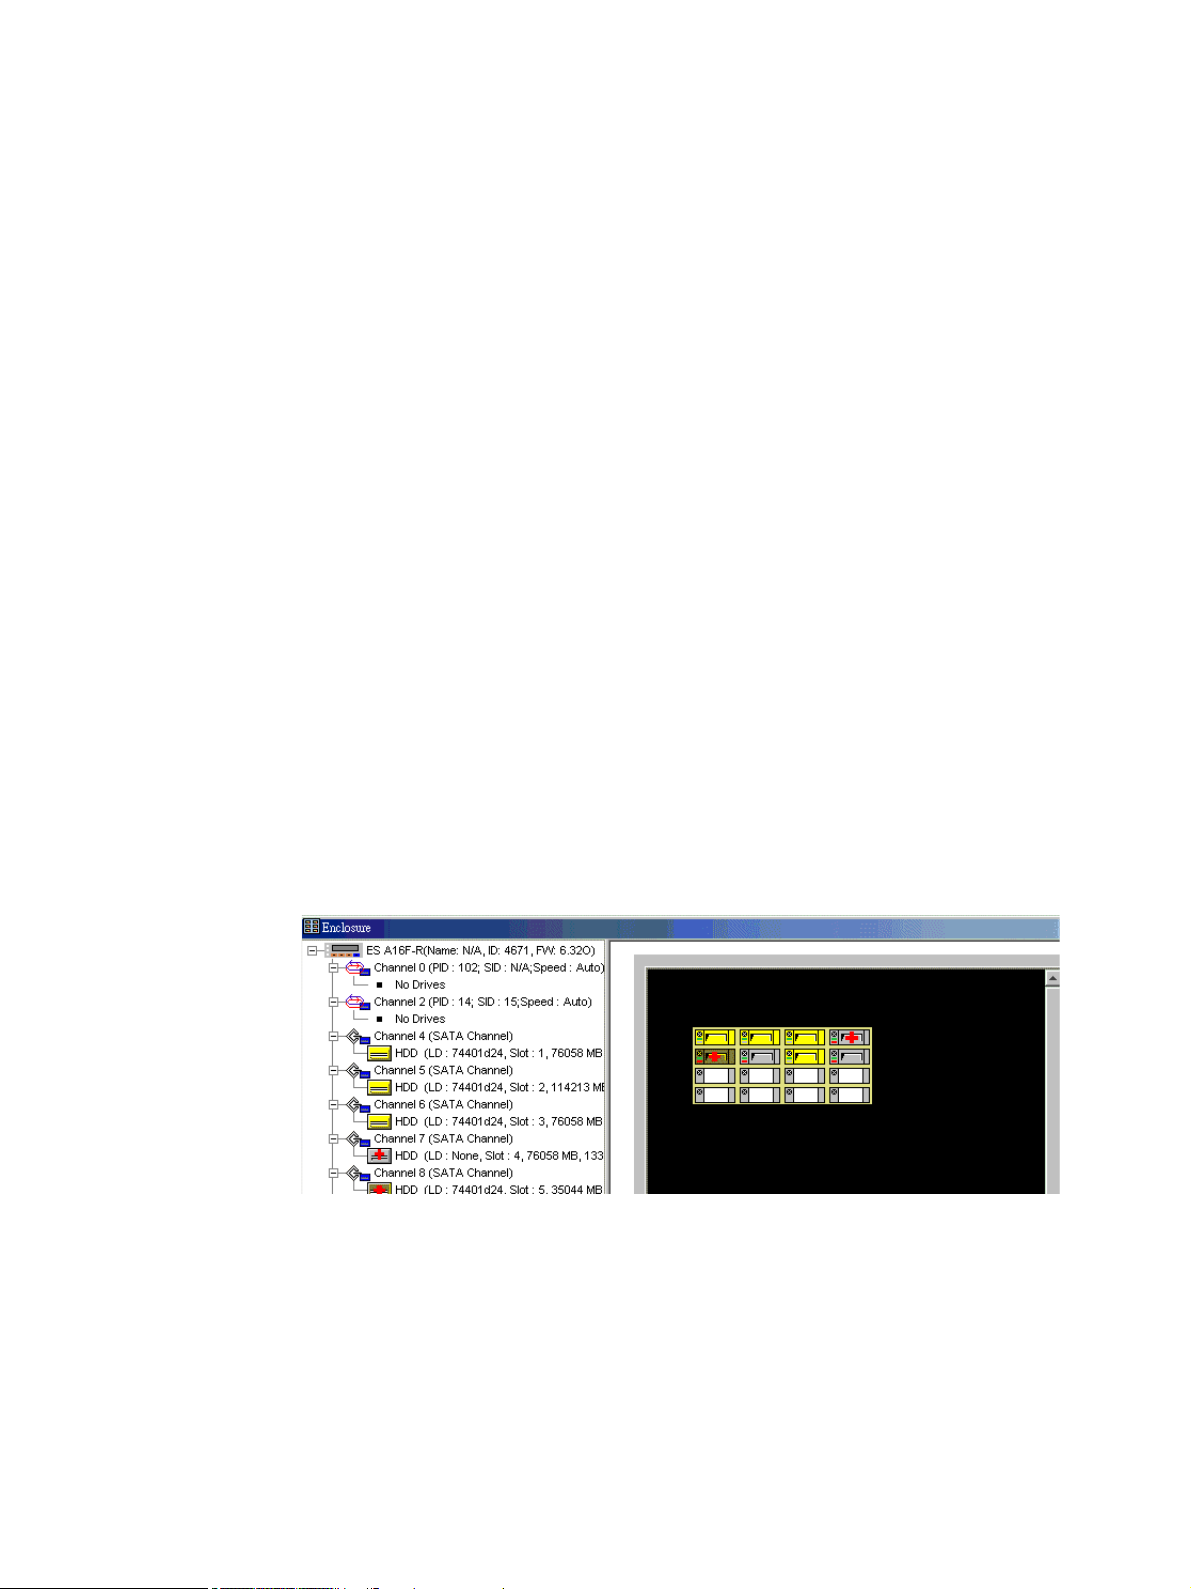
Figure A–1 Enclosure Window
The enclosure window provides real-time reporting of the status of the connected physical drives.
When a drive fails, the system highlights the corresponding icon of the failed drive by placing a red
X mark on it; when you remove a drive, its icon is removed from the enclosure window. This feature
is particularly useful in cases where a drive fails, and you need to identify its exact location for
subsequent replacement.
3
Page 18
Altos RAIDWatch User Guide
The enclosure window also includes Logical view as a sub-function. The Logical view displays the
logical relationship among member drives of a logical configuration. Drives belonging to the same
logical unit will be displayed in the same color for ease of identification.
A.3.3 Powerful Event Notification Function
Altos RAIDWatch can notify system administrators of event occurrences and status changes in the
disk array system. Notifications can be sent via a modem to a pager, via the Internet as E-mail
messages, via a LAN as a broadcast message, SNMP traps, or via fax/modem as fax messages.
A.3.4 Java-based Remote Management
Altos RAIDWatch supports remote management of disk array controllers over a LAN/WAN or the
Internet using the TCP/IP protocol. Management over the LAN is achieved through data exchanges
between a remote Altos RAIDWatch Manager station and Altos RAIDWatch agents on the host
server(s). Figure A–2 shows a typical connection:
Typical Altos Altos RAIDWatch Connection
A.3.5 Password Protection
Altos RAIDWatch Manager comes with password protection to prevent unauthorized users from
modifying the configuration of the disk array system. With the password security feature, you have
the luxury of leaving your Altos RAIDWatch station unattended knowing that the currently
managed disk array system is safe from any unauthorized modifications because the correct
password must be entered for each modification.
4
Page 19

A.4 Conceptual Foundation
In order for Altos RAIDWatch to function properly, different software modules must be correctly
installed on different servers and stations in a given LAN or WAN. Assuming that a given network
has multiple RAID systems, one RAID connected server will need to be chosen as the main server.
This point is particularly important if Altos RAIDWatch will be operated via web browsers as the
main server will need to be a web server.
The main server will need to have the Primary agent and Secondary agent (if the main server is also
a RAID host), and Notification Processing Center (NPC) if it will be used. The main server will also
need Java Run-time Environment (JRE) installed if it is a Altos RAIDWatch Manager or Event
Monitor site. Subsequent installations at other RAID servers will only need the Secondary agent
installed.
Table A–1 on page 5 provides a guide to what modules need to be installed on which server.
Note items in the bottom five rows of the table are not included with Altos RAIDWatch and must be
installed or modified by system users:
For more information about specific platform requirements, see 2.3, ”Platform Requirements”, on
page 9.
*
Altos RAIDWatch Module Requirements
Introduction
Primary Agent
Secondary Agent
Altos RAIDWatch Manager
NPC
JRE
OS drivers
OS patches
Web browser
Edit browser preferences
Web server
* If Altos RAIDWatch is to be operated or installed through web browsers, the web server must be
the main RAID server.
5
Page 20

Altos RAIDWatch User Guide
Notes 1 OS drivers are required for Solaris servers.
The requirements for installing Event Monitor are exactly the same as those for Altos RAIDWatch
Manager.
2 OS patches are required to run JRE on Solaris, AIX and Linux servers.
3 Browser preferences must be edited for browsers running under Windows systems.
6
Page 21

Installation
Chapter 2
Installation
This chapter contains information about installing the Altos RAIDWatch software (including its sub-
module Event Monitor) for local and remote management. The chapter includes the following
topics:
• System requirements, 2.1 on page 7.
• RAID network charting, 2.2 on page 8.
• Platform-specific requirements, 2.3 on page 9.
• Software setup, 2.4 on page 14.
• List of file Names, 2.5 on page 25
• Program Updates, 2.6 on page 26
• In-band SCSI, 2.7 on page 26.
2.1 System Requirements
The minimum hardware and software requirements for Altos RAIDWatch are listed below.
2.1.1 Server Running Altos RAIDWatch
• Pentium or above compatible (or equivalent PC) running Windows NT 4/Windows 2000/XP;
Solaris 7 & 8(SPARC, x86); AIX 4.3; or Red Hat Linux 6.1 (kernel v2.2.xx); Red Hat 7, SUSE 7
• At least one available RS-232 port.
• Hayes-compatible modem (if pager/telephone/mobile phone event notification is desired) or
fax/modem (if fax event notification is desired). [Note: fax command class 2.0 support only.]
7
Page 22

Altos RAIDWatch User Guide
• SNMP service for Windows (if SNMP remote management is desired)
• Windows Messaging (MAPI) for Windows (if support for pager or fax notification is needed)
• Windows NetBEUI support for Windows (if network broadcast support notification is needed)
2.1.2 Local Client Running Altos RAIDWatch Manager
• Pentium or above compatible (or equivalent PC) running Windows NT 4/Windows 2000/
• SNMP service for Windows NT (if SNMP agent is under the Windows NT environment)
• Windows Messaging (MAPI) for Windows NT/95/98/2000/XP (if support for pager or fax
• Windows NetBEUI support for Windows NT/95/98/2000/XP (if network broadcast support
Windows XP; Solaris 7 & 8 (SPARC, x86); AIX 4.3; or Red Hat Linux 6.1 (kernel v2.2.xx); Red Hat
7/8/9 Advanced server, SUSE 7, Windows 95/98, Windows Me.
notification is needed)
notification is needed)
2.2 RAID Chart
Before installing Altos RAIDWatch and its various agents and modules, it is helpful for users to chart
their RAID systems. Users who operate a single RAID from a local or remote workstation may skip
this section. For users with multiple RAID systems, the following information provides guidelines for
t
Table 2–1 RAID Systems Chart
Example HQ Win NT 205.163.
• ID/Name: User designated; an ID or name should be a unique identifying label.
• Where: a specific geographic reference (e.g., Headquarters, building 3, equipment room 100).
charting existing RAID systems.
Main RAID
164.111
server
Yes
• OS: the operating system running on the particular system.
•IP Address: if available
• Role: the purpose, relative to RAID operations, fulfilled by the particular system.
8
Page 23

• Internet Capable: if a server is an internet server, the answer to this is, “Yes.” If a workstation
will manage RAID systems through a browser, note the particular browser software and its
version number.
2.3 Platform Requirements
Altos RAIDWatch supports various operating systems both for servers (RAID management hosts or
web servers) and for client management stations (Altos RAIDWatch Manager workstations).
Support for Java, however, varies from OS to OS. This section explains what steps need to be taken
depending upon which OS will be used.
2.3.1 Platform Limitations
Installation
Important The Java installation program, INSTALL.JAR,
Internet Explorer 4.0 (or above) under Windows NT Server 4.0 (Windows 95/98/2000/XP) and
Netscape 4.5 (or above) under Solaris (x86, SPARC).
The Altos RAIDWatch Manager program, GRM.JAR,
Microsoft Internet Explorer 5.1 (or above) under Windows NT Server 4.0 (Windows 95/98/Me/2000/
XP), or Netscape 4.5 (or above) under Solaris (x86, SPARC).
2.3.2 Solaris Platforms
Altos RAIDWatch supports both Solaris 7 and 8 x86 and SPARC servers and workstations. Prior to
running the installation procedure for Altos RAIDWatch on a Solaris machine, complete the
following steps:
1 Mount installation CD
2 Add agents: Please add necessary agents to the system shell script. These agents will be loaded
when the system initiates. The following is an example of how to add agents to the system shell
script:
Append the following strings to /etc/profile:
/usr/hybrid/bin/secondary > /dev/null 2>&1
/usr/hybrid/bin/primary > /dev/null 2>&1
ONLY
supports Netscape 4.5 (or above), Microsoft
ONLY
supports Netscape 4.5 (or above),
3 If the Solaris machine is a web server, (Apache server software default subdirectories are used to
illustrate), copy the “common” file folder from your Altos RAIDWatch installation CD to the Apache
html directory and type the following:
#cp –r /cdrom/common /usr/local/apache/htdocs/
4 Modifying browsers for remote installation:
No configuration change is needed for systems using Internet Explorer. If the browser used on a
particular machine is Netscape Navigator or Hot Java and Altos RAIDWatch will be installed
remotely via the internet, you will have to modify your browser configuration as follows:
9
Page 24

Altos RAIDWatch User Guide
Note HotJava will create a.hotjava directory under the user's home directory when it is run for the first
time. Netscape will create a.netscape directory under the user's home directory when it is run for
the first time.
5 Required Java Patch Files:
a For Netscape on a Solaris system, append the string:
user_pref(“signed.applets.codebase_principal_support”, true);
to
~/. netscape/preferences.js
b For HotJava on a Solaris system, append the string:
hotjava.default.security=low
to
~/.hotjava/properties
In order to use Java scripts under the Java Runtime Environment (JRE) on your Solaris machine, you
will need to download certain Java patch files.
To download JRE patches for Solaris 7, and make the files accessible, complete the following steps:
1 Use a web browser to open
http://www.sun.com/software/solaris/jre/download.html
2 Click on the HTTP hotpoint that corresponds with your Solaris version. For example, if your
platform is a SPARC workstation, and the Solaris is an English edition, click Solaris SPARC
Platform Edition: English to open the next HTML page.
3 The web server will then ask you to sign in. Please sign in.
4 When you see the license agreement, please click OK.
5 Click the appropriate message to download your patches. For example, if your system is a
SPARC platform, please select the file below to download:
Download Patches for Solaris 7 REQUIRED for 1.2.2_05a, Solaris/Intel 8.93 MB)
The file name is 1[1].2.2_05a_patches_i386_5.7.tar
10
If your system is an x86 platform, please select the file below to download:
Download Patches for Solaris 7 REQUIRED for 1.2.2_05a, Solaris/SPARC 1.04 MB)
The file name is 1[1].2.2_05a_patches_sparc_5.7.tar
Page 25

Installation
6 Put the patch files in the right directory. The install shell script (intall.sh) needs for you to put
the patch files in your system. For example in a Solaris SPARC workstation, if the patch file
name is 2.2_05a_patches_sparc_5.7.tar
Enter the following:
#mkdir /usr/patches
#cp 2.2_05a_patches_sparc_5.7.tar /usr/patches
#cd /usr/patches
#tar xvf 2.2_05a_patches_sparc_5.7.tar
You have now tarred the patch files in the /usr/patches directory.
Note Patches displayed here are only examples. Patches are continuously updated on Sun's web site.
Altos RAIDWatch also supports Red Hat Linux 6.1 servers and workstations.
1 Mount installation CD
2 Add agents: Please add necessary agents to the system shell script. These agents will be loaded
when the system initiates. The following is an example of how to add agents to the system shell
script:
Append the following strings to /etc/profile:
/usr/hybrid/bin/secondary > /dev/null 2>&1
/usr/hybrid/bin/primary > /dev/null 2>&1
3 If your Red Hat Linux 6.1 host is a web server:
Make sure that web server software is already installed on your Linux server. The default web
directory will be /usr/home/httpd. Allow the Altos RAIDWatch installation package to be accessed
from /usr/home/httpd/html.
a Mount the Altos RAIDWatch installation CD to /cdrom:, type the following and press Enter
to proceed (assuming that the CD-ROM drive is /dev/hdc):
#mount /dev/hdc /cdrom
b Copy the “common” file folder from the installation package CD to the Apache html
directory, type the following and press Enter to proceed:
#cp –r /cdrom/common /home/httpd/html/
4 Modifying browsers for remote installation:
No configuration change is needed for systems using Internet Explorer. If the browser used on a
particular machine is Netscape Navigator or Hot Java and Altos RAIDWatch will be installed
remotely via the internet, you will have to modify your browser configuration as follows:
a) For Netscape on a Linux system, append the string:
11
Page 26

Altos RAIDWatch User Guide
Note HotJava will create a.hotjava directory under the user's home directory when it is run for the first
time. Netscape will create a.netscape directory under the user's home directory when it is run for
the first time.
2.3.3 Windows Platforms
Altos RAIDWatch supports Windows NT 4.0, 2000 and 2003 for servers and Windows 95/98/Me/NT/
user_pref(“signed.applets.codebase_principal_support”, true);
to
~/. netscape/preferences.js
b) For HotJava on a Linux system, append the string:
hotjava.default.security=low
to
~/.hotjava/properties
2000/XP for workstations.
1 In order to use Netscape in Windows, append the string:
user_pref(“signed.applets.codebase_principal_support”, true);
to
c:\winnt\profiles\<username>
(for Windows NT or Windows 2000)
-or-
c:\Program_Files\Netscape\Users\<username>
(for Windows 95/98/Me/XP)
2 SNMP Service
SNMP service for Windows NT (if the SNMP agent is under a Windows NT environment) must be
enabled.
Locate “Services” under the Windows Control Panel. Enable or install SNMP services. Refer to your
Windows documentation for more information.
3 MAPI for Windows
12
Windows Messaging (MAPI) for Windows NT/95/98/Me/2000/XP (if support for pager, fax, or e-mail
notification is needed) must be enabled. Refer to your Windows documentation for more
information.
4 NetBEUI support
Page 27

Installation
Windows NetBEUI support for Windows NT/95/98/Me/2000/XP (if network broadcast support
notification is needed) must be enabled. Refer to your Windows documentation for more
information.
13
Page 28

Altos RAIDWatch User Guide
2.4 Software Setup
This section discusses how to install Altos RAIDWatch in your system. Before proceeding with the
2.4.1 Before You Start
• TCP/IP must be installed and running with a valid IP address assigned to each primary and
• Your system display must be running in 256 color mode or some configuration items will not
• Your RAID controller must either be defined as a peripheral device or logical drives mapped to
• Be certain that your system meets the minimum hardware and software requirements listed in
setup procedure, read through section 2.4.1, ”Before You Start” below.
Before starting the installation, read through the notes listed below.
secondary agent station, even if Altos RAIDWatch Manager is being used on the local host.
be visible.
host LUNs, otherwise Altos RAIDWatch will be unable to locate the controller.
the System Requirements section.
• Check to be certain that the RAID disk arrays and controllers are installed properly. For the
installation procedure, see the documentation that came with the controller.
• Follow the directions provided in the Platform Requirements section to prepare for installation
and operation under different OS environments.
2.4.2 Installing Altos RAIDWatch
Follow these steps to install Altos RAIDWatch on your server(s) and RAID systems (the installation
procedure for Altos RAIDWatch Manager and Event Monitor is explained in section 2.4.3):
1 Insert the Altos RAIDWatch installation CD into your CD-ROM drive.
2 If installing on a Unix system, mount the Altos RAIDWatch CD to /mnt.
3 If you are currently running other applications, close them before proceeding with the setup
process. This will minimize the possibility of encountering system errors during setup.
4 To install Altos RAIDWatch, run the install script file related to the OS you are using to start the
installation process. (Each OS has its own subdirectory.) This method will open a command line
window and ask first if you want to install Java Runtime Environment (JRE). Enter “N” for No unless
you are also installing Altos RAIDWatch Manager. The installation script will then ask if you want
to install Altos RAIDWatch. Type “Y” for a first install, reinstall, or reconfigure of the program.
14
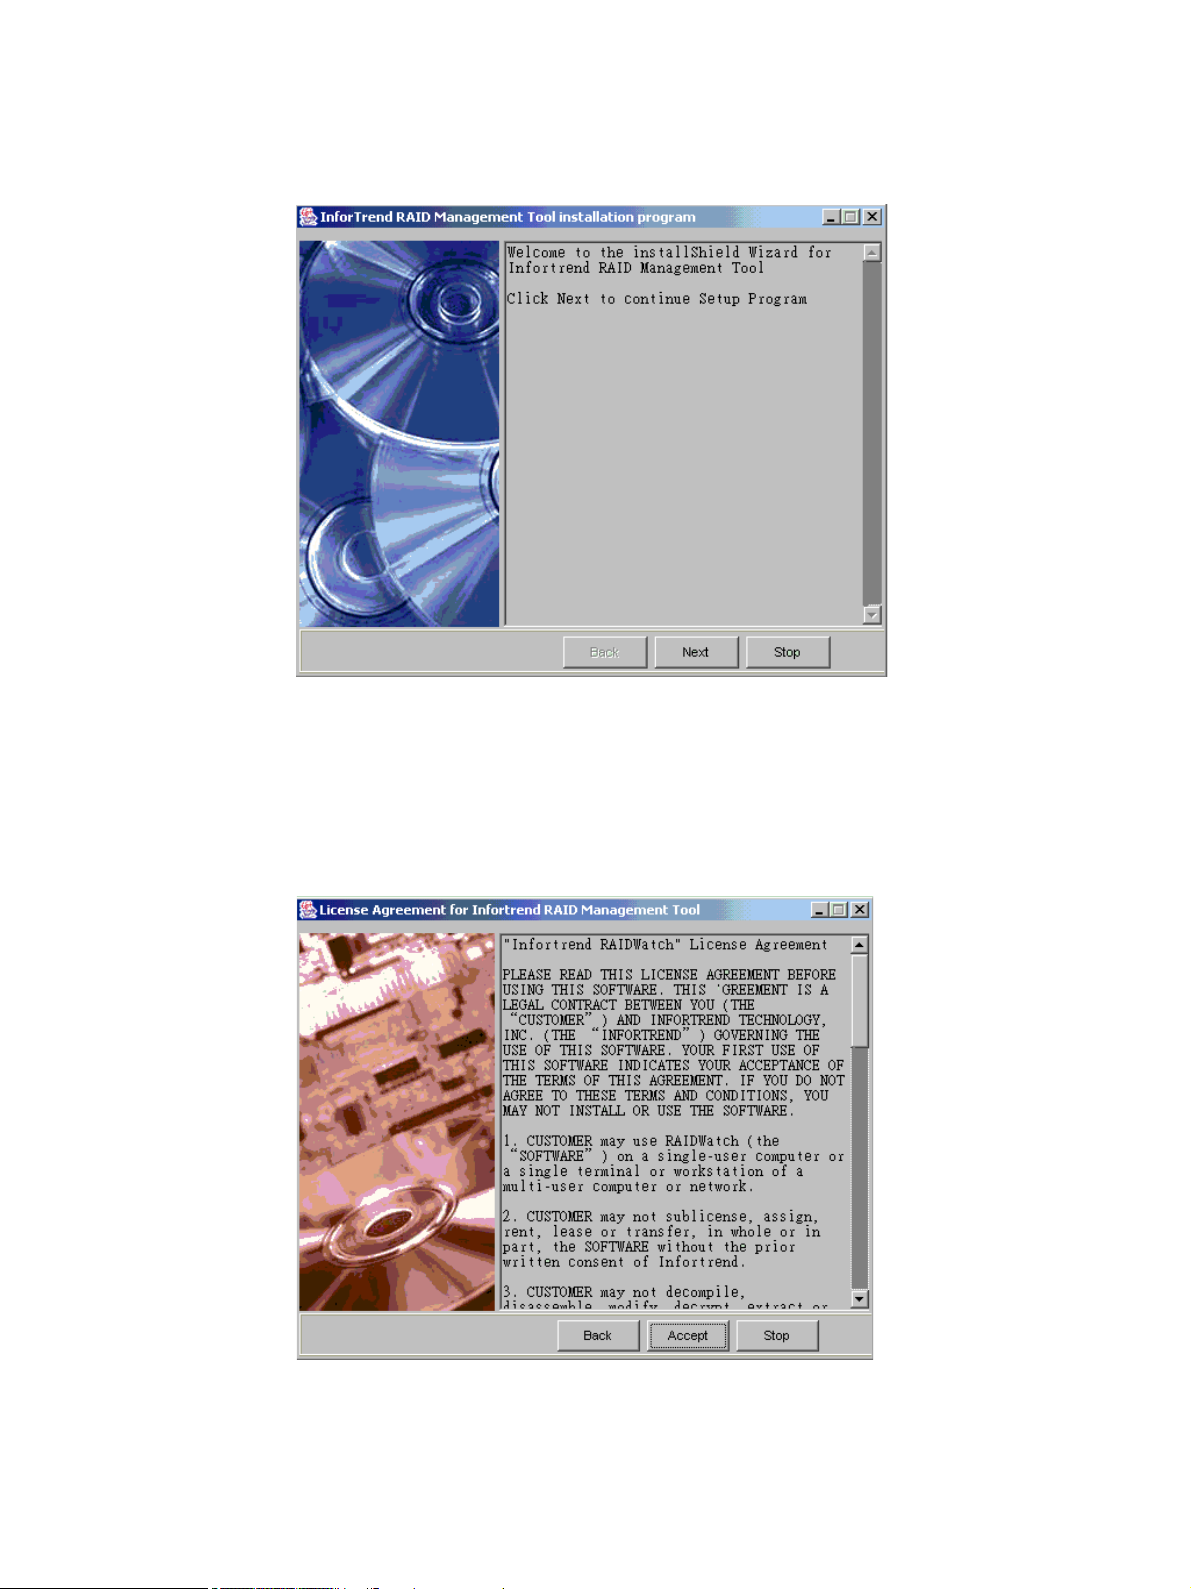
5 After opening the install shield, the following welcome screen, shown in Figure 2–1, will appear.
To continue installing Altos RAIDWatch, click the “Next” button at the bottom of the window. If
you do not wish to continue with the installation process, select the “Stop” button.
Page 29
Installation
Figure 2–1 Welcome to the Install Shield Window
6 If you selected the “Next” button on Figure 2–1, the License Agreement window seen in Figure 2–
2. First read through the License Agreement. If you are in agreement with the specified terms and
wish to continue installing the Altos RAIDWatch program, select the “Accept.” If you do not wish
to continue with the installation process then select the “Stop” button.
Figure 2–2 Licence Agreement
15
Page 30
Altos RAIDWatch User Guide
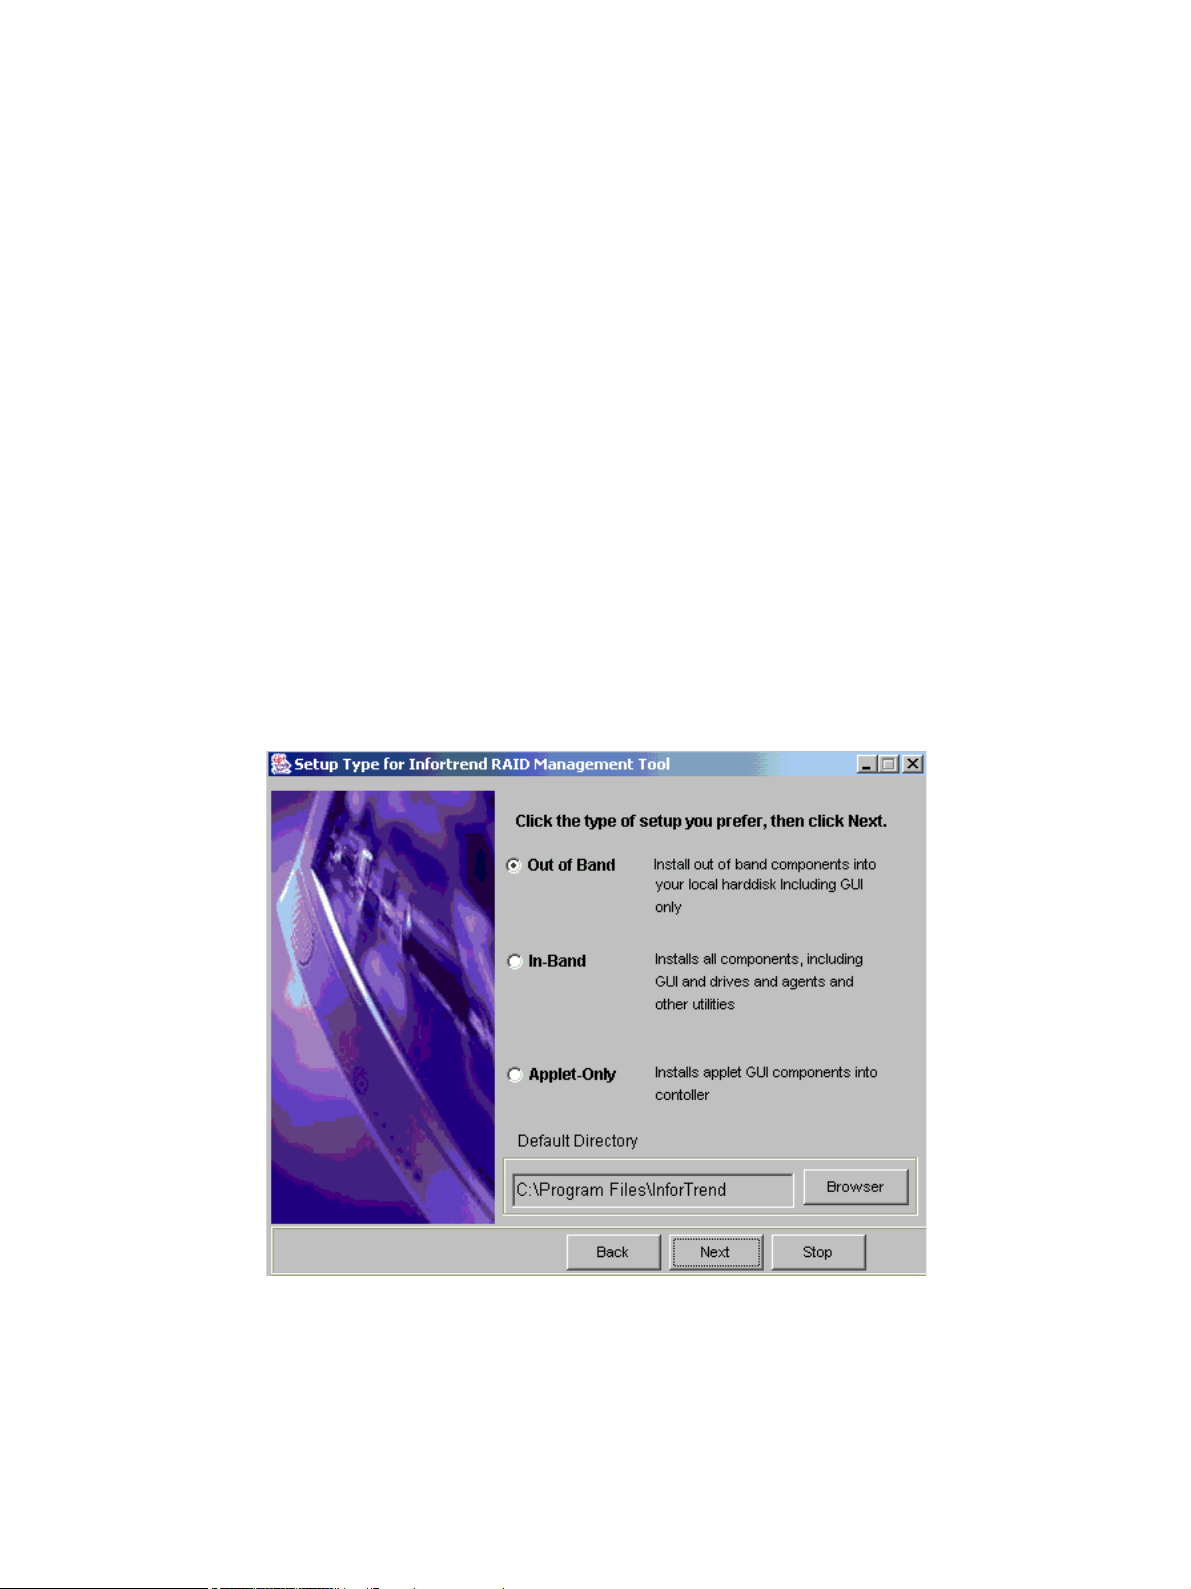
7 If you accepted the License Agreement in Figure 2–2, a new window with three installation options
will appear. These options, shown in Figure 2–3, are Out-Band, In-Band, and Applet Only.
• Out of Band: Selecting this option allows you to install the Altos RAIDWatch GUI and the
Event Monitor on the local computer. If this option is selected then none of the primary or
secondary agents will be installed and it will be necessary to access the controller through
a LAN.
• In-Band: Selecting this option will result in the installation of the In-Band SCSI driver and
associated agents and configuration tools as well as the Altos RAIDWatch GUI on the local
computer. This option should only be selected when the controller is connected directly to
the local computer via the serial port.
• Applet Only: This will install the GUI onto the controller itself. Prior to selecting this option,
a user must reserve space on the controller. After the space has been reserved, and if this
installation option is selected, then the associated Altos RAIDWatch files will automatically
be installed on the controller.
If the Applet Only installation was selected, a user will have to use a web browser to
connect to the Altos RAIDWatch program. To do this, a web browser is opened and the
controller IP address entered. The Altos RAIDWatch program can then be accessed and use
to manage the storage array.
16
Figure 2–3 Installation Options
Page 31

2.4.3 Installing Out of Band Components
If you wish to install the Out of Band components only please follow these steps.
1 Use the cursor to select the “Out of Band” option in Figure 2–3. The application and the files
associated with the GUI will be stored in the
C:/Program Files/Acer/raid
directory. If you wish to change the directory, select the “Browser Button” and choose the directory
you wish to use.
Installation
2 Once you have selected the directory in which you wish to install the
if you wish to continue installing the
screen shown in Figure 2–4 will appear.
If you wish to discontinue the installation process, select the “Stop” button. If you wish to re-read
the License Agreement, select the “Back” button.
Out of Band
components, select the “Next” button and the
Out of Band
components and
Figure 2–4 Additional Components
3 From Figure 2–4 above, additional components can be selected. The default option selects all the
additional components, if you wish to de-select the additional components, then use your mouse
to de-select those components you do not wish to install.
17
Page 32

Altos RAIDWatch User Guide
Once the additional components have been selected, and if you wish to proceed with the
installation process, select the “Next” button. If you do not wish to proceed with the installation
process, select the “Stop” button and if you wish to re-select the installation options, then select
the “Back” button.
Figure 2–5 Installing Active
4 If the “Next” button from Figure 2–4 was selected, the Install Active window shown in Figure 2–5
will appear. If you wish to stop the installation procedure, then click the “Stop” button. If you wish
to continue installing the
Out of Band
components, allow the installation shield to continue the
installation process uninterrupted.
5 Once the
Out of Band
components have been successfully installed, a window indicating the
successful installation, shown in Figure 2–6, will appear. To complete the process and to make the
window disappear, click on the “OK” button.
18
Page 33

Installation
Figure 2–6 Successful Installation
2.4.4 Installing In-Band Components
If you wish to install the In-Band components only please follow these steps.
1 Use the cursor to select the “In-Band” option in Figure 2–3. The application and the files associated
with the GUI will be stored in the
C:/Program Files/Acer/raid
directory. If you wish to change the directory, select the “Browser” button and choose the directory
you wish to use.
2 Once you have selected the directory in which you wish to install the In-Band components and if
you wish to continue installing the In-Band components, select the “Next” button and the screen
shown in Figure 2–7 will appear.
If you wish to discontinue the installation process, select the “Stop” button. If you wish to re-read
the License Agreement, select the “Back” button.
19
Page 34

Altos RAIDWatch User Guide
Figure 2–7 Additional Components
3 From Figure 2–7 above, additional components can be selected. The default option selects all the
additional components, if you wish to de-select the additional components, then use your mouse
to de-select those components you do not wish to install.
Once the additional components have been selected, and if you wish to proceed with the
installation process, select the “Next” button. If you do not wish to proceed with the installation
process, select the “Stop” button and if you wish to re-select the installation options, then select
the “Back” button.
20
Page 35

Installation
Figure 2–8 Installing Active
4 If the “Next” button from Figure 2–7 was selected, the
Install Active
window shown in Figure 2–8
will appear. If you wish to stop the installation procedure, then click the “Stop” button. If you wish
to continue installing the
In-Band
components, allow the installation shield to continue the
installation process uninterrupted.
5 Once the
In-Band
components have been successfully installed, a window indicating the successful
installation, shown in Figure 2–9, will appear. To complete the process and to make the window
disappear, click on the “OK” button.
21
Page 36

Altos RAIDWatch User Guide
Figure 2–9 Successful Installation
2.4.5 Applet-Only Installation
2.4.5.1 Reserved Space
If the
Applet Only
controller and therefore space for these files must be reserved. If you have not already reserved the
1 Stop the Altos RAIDWatch Installation Program. To do this, use the cursor to click the “Stop” button
in Figure 2–3.
2 Use either the MUI or the terminal emulation program, to access the pre-installed firmware on the
controller.
3 Use the FW to create a logical array (please refer to your RAID Controller Operating Manual). Make
sure that you reserve a space of at least 256MB. This reserved space is required for the Altos
RAIDWatch Files that will be transferred to the RAID Controller.
Caution If you do not reserve a space of at least 256MB, you will not be able to transfer the necessary Altos
RAIDWatch files to the controller and will therefore be unable to use the Altos RAIDWatch
Program.
option is selected, Altos RAIDWatch files will be installed directly onto the
space on the controller then do so now. Follow these steps:
22
2.4.5.2 Applet Only Installation
1 Once space has been reserved on the controller, follow the instructions outlined in Section 2.4.2
until the
Installation Options
screen shown in Figure 2–3 appears.
Page 37

Installation
2 Use the cursor to select the “Applet” option in Figure 2–3. The application and the files associated
with the GUI will be stored in the
C:/Program Files/Infortrend
directory. If you wish to change the directory, select the “Browser” button and choose the directory
you wish to use.
3 Once you have selected the directory in which you wish to install the
wish to continue installing the
Applet
components, select the “Next” button and the screen shown
Applet
components and if you
in Figure 2–8 will appear.
If you wish to discontinue the installation process, select the “Stop” button. If you wish to re-read
the License Agreement, select the “Back” button.
Figure 2–10 Input IP and Controller Password
4 As shown in Figure 2–10 above, enter the IP address or the host name of the controller and the
controller password in the respective fields. The default controller is blank and it needs to be
configured in Altos RAIDWatch.
Once IP (or host name) and the controller password have entered, and if you wish to proceed with
the installation process, select the “Next” button. If you do not wish to proceed with the
installation process, select the “Stop” button and if you wish to re-select the installation options,
then select the “Back” button.
23
Page 38

Altos RAIDWatch User Guide
Figure 2–11 Installing Active
5 If the “Next” button from Figure 2–11 was selected, the
Install Active
window shown in Figure 2–
12 will appear. If you wish to stop the installation procedure, then click the “Stop” button. If you
wish to continue installing the Applet components, allow the installation shield to continue the
installation process uninterrupted.
Applet
6 Once the
components have been successfully installed, a window indicating the successful
installation, shown in Figure 2–12, will appear. To complete the process and to make the window
disappear, click on the “OK” button.
24
Page 39

Installation
Figure 2–12 Successful Installation
7 If you wish to immediately access the Altos RAIDWatch manager then open a web browser and type
in the IP address that you used in Figure 2–10 with the associated filename.
i.e. To run the
bar of the web browser:
http://www.xxx.yyy.zzz/grm.htm
or, to run the Event Monitor, enter the following into the address bar of the web browser.
http://www.xxx.yyy.zzz/grem.htm
where www.xxx.yyy.zzz is the IP address entered in Figure 2–10.
Altos RAIDWatch Manager
from the controller, enter the following into the address
2.5 List of Filenames
Below is a list of key Altos RAIDWatch files installed during the installation process. All files should
be found in the
Altos RAIDWatch Manager access:
/usr/hybrid/bin/
(default) directory or the directory you chose during the
installation.
1 GRM.JAR --> executable.jar Java file
25
Page 40

Altos RAIDWatch User Guide
2 GRM.HTM --> browser accessible HTML file
Event Monitor access:
1 GREM.JAR -- executable.jar Java file
2 GREM.HTM -- browser accessible HTML file
Executable Agent files:
1 PRIMARY.EXE -- to start the Primary Agent
2 SECONDARY.EXE -- to start the Secondary Agent
3 NCP EXE - to start the Notification Processing Center
Configuration and Install files:
1 CONFIGURE.JAR --> executable.jar Java file
2.6 Program Updates
As a valued customer, you are entitled to free program updates. You can download the latest
version of Altos RAIDWatch from FTP sites. For more information about this service, call your
2.7 In-band SCSI
What is it and what is it used for?
These days more and more external devices require communication with the host computer for
device monitoring and administration. This is usually done through RS-232C ports.
An alternative means of communication is now available for FC-to-SATA RAID controllers – in-band
SCSI. The traditional way for SCSI controllers to communicate with the host computer has been via
software (such as Altos RAIDWatch) using an RS-232C connection. With in-band SCSI, integrators
have more flexibility. They may use RS-232C or the existing FC cable instead.
In-band SCSI is particularly useful when creating a new RAID. In order for a host to “see” the
controller, and thus for Primary and Secondary agents, and Altos RAIDWatch Manager to manage
the controller, it must first be configured as a peripheral device. In-band SCSI allows you to do this
using a terminal emulation program.
supplier.
26
Page 41

2.7.1 Configuring a RAID Controller to Use In-band SCSI
2.7.1.1 RAID Controller Adjustments
Some adjustments must be made to the RAID controller settings before the two can communicate
using SCSI commands. The RAID controller settings can be changed using the RS232.
Installation
From the Main Menu, press *up or
Configuration Parameters.”
Press <Enter>; and then use the *
Parameters.” Then press <Enter>.
You will need to make adjustments in the following four submenus: Peripheral Device Type,
Peripheral Device Qualifier, Device Support for Removable Media, and LUN Application. Different
host operating systems require different adjustments. Look at the table below to find the proper
settings for your host operating system.
7
Table 2–2 Peripheral Device Type Parameters
Windows NT® 4.0 0x1f connected disabled All Undefined
NetWare® 4.x/
Windows 2000/XP
SCO OpenServer
5.0x
SCO
UnixWare 2.1x,
UnixWare 7
0x03 connected disabled All Undefined
0x7f connected either is okay All Undefined
0x03 connected either is okay All Undefined
down
up
arrows to select “View and Edit
or
down
arrows to select “Host-side SCSI
View and Edit
Config Parms
Host Side SCSI
Parameters . .
LUNs
LUNs
LUNs
LUNs
Solaris™ 2.5.x/2.6
(x86 and SPARC)
Linux 0x03 connected enabled All Undefined
Up and Down
*
0x7f connected either is okay All Undefined
Arrows
LUNs
LUNs
27
Page 42

Altos RAIDWatch User Guide
Table 2–3 Peripheral Device Type Settings:
No Device Present 0x7f
Direct-access Device 0
Sequential-access Device 1
Processor Type 3
CD-ROM Device 5
Scanner Device 6
MO Device 7
Storage Array Controller Device 0xC
Unknown Device 0x1f
Example: Settings for Windows NT 4.0
The settings for Windows NT 4.0 are provided here as an example. For the settings under other
operating systems, please refer toTable 2–2, ”Peripheral Device Type Parameters” above.
up
or
down
On the front panel, use *
Parameters”; and then press <Enter>.
(For this example, we assume that there are cu rrent l y no peri pher al d evi ces. Device Typ e -
up
or
down
Press
Press <Enter> to confirm the selection. Now that we have changed the Peripheral Device Type, let
us set the Peripheral Device Qualifier. Press <Esc> to return to the sub-menus mentioned above. Use
the arrow keys to scroll down to Device Qualifier, press *
Qualifier Connected.”
The default setting is “Connected.” If your Front Panel reads “Disconnected,”
press <ENT> and you will be prompted to change to “Connected.”
If your Device Qualifier setting reads “Connected,” press <Esc> to return to the
host-side SCSI submenus
arrows to choose “Set Device Type? Unknown (0x1f)”. Set Device Type
arrows to select “Peripheral Device Type
)
up
or
down
arrows to select “Device
Periph Dev
Type Parameters
No Device (0x7f)
Unknown (0x1f)
Device Qualifier
Connected
28
Use
up
or
down
arrows to select Support for Removable Media. The default
setting is “Disabled.” If the LCD reads “Enabled,” press <Enter> and you will be
prompted
to accept a change. If the screen reads “Disabled,” press <Esc> to return to the
host-side SCSI submenus.
Support Removable
Media Disabled
Page 43

Installation
up
or
down
Press *
The default setting is “All Undefine LUN.”.
Press <Enter> and use *
Press <Enter> to accept. The screen should display the following message. LUN Application
The RAID controller adjustments necessary to use in-band SCSI have been completed.
If an Out-of-Band connection is being used, then it is recommended Peripheral Device Type is set to
No Device (0x7F)
arrows to select “LUN Application”; and then press <Enter>.
up
or
down
arrows to select “Undefine LUN-0’s.” Applies to ?
LUN ApplicationAll Undefine LUN
Undefine LUN - 0’s
Undefine LUN - 0’s
29
Page 44

Altos RAIDWatch User Guide
30
Page 45

Chapter 3
Configuration Options
3.1 Introduction
This chapter describes the Altos RAIDWatch configuration options. There are a number of different
items that users can configure. These include primary and secondary agents and the Notification
Processing Center.
Configuration Options
Note If during installation (see section 2.4, ”Software Setup”, on page 14), you selected the Out of Band
option, since neither the primary nor secondary agents were installed and only the GUI was
installed, these configuration options will not be available to you.
• Accessing the Configuration Panel, 3.2 on page 31,
• Primary Agent Configuration, 3.3 on page 33
• Secondary Agent Settings, 3.4 on page 36,
• NPC Settings, 3.5 on page 37
• Rebooting the Controller, 3.6 on page 45
3.2 Accessing the Configuration Panel
3.2.1 Using Windows – Altos RAIDWatch Installed as In-Band
If, during the installation process outlined in Chapter 2, the In-Band option was selected, the InBand SCSI driver, associated agents and configuration tools were installed on the local computer.
To access the configuration tools using Windows, please do the following:
1 Open the directory in which the Altos RAIDWatch GUI was installed. This default directory was
selected during the installation process.
31
Page 46

Altos RAIDWatch User Guide
2 If you are using Windows, first selecting “Start” then opening the “Programs” menu and finally
opening the default menu can easily access the configuration panel. Once the default directory has
been successfully opened select the configure option.
3 Once “Configure” has been selected, the “Configuration Panel”, shown in Figure 3–1 will appear.
Users can configure the following Items:
• Primary Agent
• Secondary Agent
• Notification Processing Center (NPC)
32
Figure 3–1 In-Band Configuration Panel
3.2.2 Using Web Browser – Altos RAIDWatch Installed as
Applet
If, during the installation process outlined in Chapter 3 on page 31, the
selected, the Altos RAIDWatch GUI must be accessed through a web browser. To access the
configuration panel shown in Figure 3–2, type in the controller IP address (see Section 2.4.5 on
page 22) followed by “configure.htm.” i.e. if the controller IP Address is ww.xx.yy.zz, in the address
line of the web browser type:
http://ww.xx.yy.zz/configure.htm
The screen shown in Figure 3–2 will appear.
“Applet Only”
option was
Page 47

Configuration Options
Figure 3–2 Applet Only Configuration Panel
It can be seen that the difference between Figure 3–1 and Figure 3–2 is the “Enable SSL.”
Note Enabling the SSL can only be done when the GUI is installed on the controller as an Applet Only.
3.3 Primary Agent Configuration
To configure the Primary agent settings, select
of Figure 3–3. Two sub-tabs, “Base Settings” and “Managed Secondary List”.
3.3.1 Base Settings
The “Base Settings” are shown in Figure 3–3.
• Port Number: This is the port number the Altos RAIDWatch Manager stations will use to
communicate with the Primary Agent.
• Enable Redundant: This is selected to enable primary agent/NPC on another server for the
precaution that a Primary Agent/NPC might fail and, as the consequence, fatal system events
might then occur unnoticed.
• SSL Enable: This option, only available if the controller is installed as an applet on the
controller, enables the Secure Sockets Layer (SSL). To enable it just point the mouse to the
square and double click. To disable it, do the same.
“Primary Agent”
tab from the tab menu at the top
33
Page 48

Altos RAIDWatch User Guide
3.3.1.1 Redundant Modules
It is recommended to install Primary and NPC Agents redundantly on different servers to avoid the
blind time when the Primary Agent or NPC module is down. Once the Primary Agent or NPC is
down, the Primary Agent installed on another server will take over instantly allowing NPC to work.
Primary Agent and NPC should be installed manually on different servers. The configuration utility
does not automatically add these modules to the selected RAID server.
If Enable Redundant is selected, the following options shown in Figure 3–3 will appear.
Figure 3–3 Enable Redundant Options
• Mode: assign the preferred mode for the Primary Agent installed on current server as active or
standby. There exists an active-standby relationship between Primary Agents and the
relationship can be automatically resolved between agents.
• Peer Host: enter the IP address.
• Peer's Port Number: A use should enter the same port number as that on the current Primary
Agent host.
• Negotiation Interval: This is the duration of time (in seconds) for Primary Agents to negotiate
for the active-standby status. A Primary Agent might wait for seconds for its peer agent to start
up.
Important At least one Primary Agent and one Secondary Agent must be installed in a network managed by
Altos RAIDWatch. RAID controllers are managed by Secondary Agents which are in-turn managed
by the Primary Agent. Without Secondary Agents associated with each RAID, it will be impossible
to manage RAID systems.
Event Monitor
The
record system events and report system status.
Even if the system only has one RAID and all Altos RAIDWatch components are installed on a single
server, both a Primary Agent and a Secondary Agent must be installed.
also requires Primary and Secondary Agents to be running on RAID servers to
34
Page 49

3.3.2 Managed Secondary Agent Settings
To configure the “Managed Secondary List” settings, select the “Managed Secondary List” sub-tab
shown in Figure 3–3. The “Managed Secondary List” shown in Figure 3–4 will appear.
Configuration Options
Figure 3–4 Managed Secondary List
This part of the Primary Agent configuration, lists each Secondary Agent RAID server that will be
managed through the Primary Agent where you are installing Altos RAIDWatch.
• Host names: These are IP addresses for each RAID server.
• Port Number: The settings that should be the same for all Secondary Agents but should they
should be from the Primary Agent port setting and otherwise unique to the Secondary Agents.
Important The Primary Agent default port setting should be changed to a network-unique assignment. The
default TCP port setting is 58632. Any port number between 49152 and 65535 can be used.
Also, Managed Secondary Agents should all use a different, common-to-all Secondary Agents, TCP
port setting from that of the Primary Agent.
35
Page 50

Altos RAIDWatch User Guide
3.4 Secondary Agent Settings
To configure the Primary agent settings, select the “Secondary Agent” tab from the tab menu at
the top of Figure 3–3. The “Secondary Agent” screen shown in Figure 3–5 will appear.
Figure 3–5 Secondary Agent Settings
Important Local Secondary Agents must be installed at all RAID hosts managed by Altos RAIDWatch.
• Host Name/IP Address: The IP address for the current RAID server.
• Port Number: The TCP port to be used by all secondary agents.
• Event Polling Period: The time interval (in seconds) for event queries from the Secondary Agent
to the RAID controller.
36
Page 51

3.5 NPC Settings
Configuration Options
To configure the
Setting” tab from the tab menu at the top of Figure 3–3. the “Notification Process Center” screen
shown in Figure 3–6 will appear.
Notification Process Center (NPC)
settings, select “Notification Process Center
Figure 3–6 NPC Settings
There are seven sub-tabs at the top of the
five different (Fax, Pager, Broadcast, Email, and SNMP Traps) means of informing RAID managers
that an event has occurred, the Agent and the Event Log can also be configured by the user.
In order to use fax or pager notification, Modem parameters must also be set. For NT servers,
Widows Messaging and Personal Fax must be installed and running for NPC to work. If NPC will not
be used, skip these steps.
3.5.1 Agent
After opening the NPC Settings window shown in Figure 3–6, the Agent window will immediately
appear. The
• Host Name: This is the controller’s IP address.
• Port Number: This is the port number the Altos RAIDWatch Manager stations will use to
communicate with the Primary Agent.
Host Name
and the
NPC Settings
Port Number
window shown in Figure 3–6. Along with
must be configured.
37
Page 52

Altos RAIDWatch User Guide
3.5.2 Event Log
To open the “Event Log Configuration” window, first open the
Figure 3–6, and then select the Event Log sub-tab. The
Figure 3–7 will appear.
Figure 3–7 Select NPC
NPC Settings
window shown in
Event Log Configuration
window shown in
To open the “FAX” window, first open the
select the FAX sub-tab. The FAX configuration window shown in Figure 3–8 will appear. There are
two sub-tabs in the FAX configuration window, “Base Settings” and “Phone Number List”
Figure 3–8 : Enable device
3.5.2.1 Base Settings
To open the “Base Settings” configuration window, select the
3–8.
• Enable: In the center of the
notification device click on the square next to “Enable.” See Figure 3–8.
NPC Settings
FAX
settings window there is an enable option. To configure the
window shown in Figure 3–6, and then
Base Setting
sub-tab shown in Figure
38
3.5.2.2 Phone Number List
To open the “Phone Number List” configuration window, select the
shown in Figure 3–8. The window shown in Figure 3–9 will appear:
Phone Numbe
r list sub-tab
Page 53

Configuration Options
Figure 3–9 FAX Phone Number List
• Phone Number: The phone number for an event message receiving fax machine. (Note that
any access dialing requirements, such as accessing an outside line, must be included in the
phone number. For example: 9,,,2241603 wherein “9” is access for an outside line and “,,,”
indicates a pause.)
• Severity is the parameter used to determine what levels of events to be sent via FAX (1, all
levels; 2, Warning and Alert; 3, only Alert).
• Available phone numbers: A list of all phone numbers that the NPC will use to send a message
to. The numbers and the severity of the messages that will be sent to the number shown are
listed.
3.5.3 Pager Settings
To open the “Pager” window, first open the
Pager
select the
are two sub-tabs in the Pager configuration window, “Base Settings” and “Phone Number List”
Figure 3–10 Enable device
sub-tab. The
NPC Settings
Pager
configuration window shown in Figure 3–10 will appear. There
window shown in Figure 3–6, and then
39
Page 54

Altos RAIDWatch User Guide
3.5.3.1 Base Settings
To open the “Base Settings” configuration window, select the
3–10.
• Enable - In the center of the
3.5.3.2 Phone Number List
To open the “Phone Number List” configuration window, select the “Phone Number” list sub-tab
shown in Figure 3–10. The window shown in Figure 3–11 will appear:
Base Setting
FAX
settings window there is an enable option. To configure the
notification device click on the square next to “Enable.” See Figure 3–10.
sub-tab shown in Figure
Figure 3–11 Pager Phone Number List
• Phone Number: The phone number for an event message receiving pager. (Note that any
access dialing requirements, such as accessing an outside line, must be included in the phone
number. For example: 9,,,2241603 wherein “9” is access for an outside line and “,,,” indicates
a pause.)
• Severity is the parameter used to determine what levels of events to be sent via Pager (1, all
levels; 2, Warning and Alert; 3, only Alert).
• Available phone numbers: A list of all phone numbers that the NPC will use to send a message
to. The numbers and the severity of the messages that will be sent to the number shown are
listed.
3.5.4 Email Settings
To open the “Email” window, first open the
Email
select the
are two sub-tabs in the
sub-tab. The
NPC Settings
Email
configuration window shown in Figure 3–12 will appear. There
Email
configuration window, “Base Settings” and “Mail Address List”
window shown in Figure 3–6, and then
40
Page 55

Figure 3–12 Email Settings
3.5.4.1 Base Settings
To configure the “Base Settings” select the
configuration options shown in Figure 3–12 will appear.
Base Settings
Configuration Options
sub-tab from Figure 3–12 and the
• SMTP Server: The mail server used to send event notifications via e-mail.
• Sender’s Email: The “From” part of e-mail notification messages. It must be a valid internet email address.
• Enable: Enables the email settings, select the click on the “Enable” box in the middle of the
Broadcast Settings
• Subject: Allows users to add a subject to event notification emails.
3.5.4.2 Mail Address List
To configure the “Email Address List” select the
configuration options shown in Figure 3–13 will appear.
window.
Email Address List
sub-tab from Figure 3–12. The
41
Page 56

Altos RAIDWatch User Guide
Figure 3–13 Email Settings
• Receiver’s Email: Allows users to enter multiple event notification e-mail recipients with
messages for each. Each entry must be a valid internet e-mail address.
• Severity: The parameter used to determine what levels of events to be sent via Email (1, all
levels; 2, Warning and Alert; 3, only Alert).
• Available Addresses: Shows a list of all the email addresses that the NPC will use to send a
message to. Both the email addresses and the severity of the messages that will be sent to the
addresses shown are listed.
3.5.5 SNMP Settings
To open the “SNMP” window, first open the
SNMP
select the
are two sub-tabs in the
Figure 3–14 SNMP Base Settings
sub-tab. The SNMP configuration window shown in Figure 3–14 will appear. There
NPC Settings
SNMP
configuration window, “Base Settings” and “SNMP Traps List”.
window shown in Figure 3–6, and then
42
3.5.5.1 Base Settings
To configure the “Base Settings” select the “Base Settings” sub-tab from Figure 3–14 and the
configuration options shown in Figure 3–14 will appear.
Page 57

Configuration Options
• Enable: To enable the SNMPTrap settings, click on the “Enable” box in the middle of the
Settings
• Community: This is just a string authentication and can be seen as a plain text password.
window.
3.5.5.2 SNMP Trap List
To configure the “SNMP Trap List” select the
configuration options shown in Figure 3–15 will appear.
SNMP Trap List
SNMP
sub-tab from Figure 3–14. The
Figure 3–15 SNMP Trap List Settings
• Host IP: The port number of the agents listening for traps. Click Add to avail agents to the
Receiver List
• Severity is the parameter used to determine what levels of events to be sent via SNMP (1, all
levels; 2, Warning and Alert; 3, only Alert).
• Host Name: A list of listening SNMP agents.
Important Agent and NPC configuration parameters can be reconfigured later using the installation program.
Run the installation program and select Configure Only from the Start menu to reconfigure Agent
and NPC settings.
.
Trap
3.5.6 Broadcast Settings
To open the “Broadcast Settings” window, first open the
6, and then select the
shown in Figure 3–16 will appear. There are two sub-tabs in the
window, “Base Settings” and “Broadcasting List”.
Broadcast Settings
sub-tab. The
NPC Settings
window shown in Figure 3–
Broadcast Settings
Broadcast Settings
configuration window
configuration
43
Page 58

Altos RAIDWatch User Guide
Figure 3–16 Enable Broadcast settings
3.5.6.1 Base Settings
To configure the “Base Settings” select the
configuration options shown in Figure 3–16 will appear.
Base Settings
sub-tab from Figure 3–16 and the
• Enable: To enable the broadcast settings, select the “Enable” box in the middle of the
Broadcast Settings
3.5.6.2 Broadcasting List
To configure the “Broadcasting List” select the
configuration options shown in Figure 3–17 will appear.
window.
Broadcasting List
sub-tab from.Figure 3–16. The
44
Figure 3–17 Broadcasting List Settings
• Host IP/Name: The IP address a broadcast message will be sent to.
• Severity: The parameter used to determine what levels of events to be sent via Broadcast (1,
all levels; 2, Warning and Alert; 3, only Alert).
• Host Name: Shows a list of all the IP addresses that the NPC will use to send a message to. Both
the IP addresses and the severity of the messages that will be sent to the address shown are
listed.
Page 59

3.6 Rebooting the Controller
After the configurations settings have been made, for them to take affect the controller must be
rebooted. If the controller is not rebooted after the configuration settings have been made then
the settings may not take effect.
Configuration Options
45
Page 60

Altos RAIDWatch User Guide
46
Page 61

Operation
Chapter 4
Operation
This chapter discusses basic Altos RAIDWatch Manager operations. We recommend that you review
it to learn the basic organization and functions of the program. This chapter includes the following
topics:
• Starting Altos RAIDWatch, 4.1 on page 47.
• Starting Altos RAIDWatch Manager,4.2 on page 48
• Connecting and disconnecting from a disk array, 4.3 on page 50.
• Setting up security, 4.4 on page 53.
• Look and Feel, 4.5 on page 55.
• Using the RAIDView Window, 4.6 on page 58
• Using the Enclosure Window, 4.7 on page 64
• Event Window, 4.8 on page 66
• the Statistics Window, 4.9 on page 67
• Exiting Altos RAIDWatch Manager, 4.10 on page 69.
4.1 Starting Altos RAIDWatch
4.1.1 Starting Altos RAIDWatch Agents
4.1.1.1 Under Windows (NT 4, or 2000/XP) Operating Systems
The Primary Agent and Secondary Agents start automatically under Windows Operating Systems
each time the host computer is reset.
47
Page 62

Altos RAIDWatch User Guide
4.1.1.2 Under Unix or AIX Operating Systems (Solaris 7 SPARC or x86, HP UX 11, or
Red Hat Linux 6.1)
Under Unix systems the Primary Agent, Secondary Agent and NPC (which are all installed on the
host computer) must be started manually each time the host computer is reset. These items must
be started in the following order:
• First start the secondary agent,
• Second start the primary agent,
• Third start the NPC
To start the Primary Agent, Secondary Agent(s) under a Unix system:
1 At the host computer, change directories to:
/usr/hybrid/bin/ (or whatever directory you chose during the installation if not the default)
2 Then at the command line, type:
primary <Enter>
secondary <Enter>
npc <Enter>
Altos RAIDWatch is now running. The next step is to start the GUI part of the software, Altos
RAIDWatch Manager.
-- to start the Primary Agent
-- to start the Secondary Agent
-- to start the Secondary Agent
4.2 Starting Altos RAIDWatch Manager
The GUI management interface, Altos RAIDWatch Manager, needs to be started by a network or
RAID systems manager regardless of which OS is being used.
Depending on your setup, you can start Altos RAIDWatch Manager in various ways.
For both local and distant management, and under various Operating systems, starting the
program is fairly simple. Please refer to the appropriate sub-section below for information.
4.2.1 Starting Altos RAIDWatch Manager Locally or via LAN
under the Windows (95/98/Me/NT/2000/XP)
48
Environment
1 From the Start menu, select
or,
Programs --> Altos RAIDWatch Manager
.
Page 63

Double-click the Altos RAIDWatch Manager icon either in the group folder or from the desktop if
a shortcut was added during the installation process. The Altos RAIDWatch Manager
RAID Agen
2 Enter the IP address and TCP port assignment of the disk array system where the Primary Agent was
installed. If you are running Altos RAIDWatch Manager at the Primary Agent host machine (i.e.,
“locally”) and want to manage a RAID hosted by the Primary machine, click the Default button.
3 Double click on a RAID host IP you would like to manage, then double click on the controller icon,
then double click on the connection method (e.g., In-Band SCSI), to connect to the disk array system.
For more information on how to connect, see section 4.3, ”Connecting and Disconnecting from a
Disk Array”, on page 50.
t prompt window should appear on the screen.
4.2.2 Starting Altos RAIDWatch Manager for Remote Management via Web Browser (any supported OS)
1 Start your web browser and enter the IP address of the Primary Agent host followed by GRM.HTML
as your URL (e.g., 222.212.121.123\GRM.HTML). After a brief delay while the Java Applet starts, the
Altos RAIDWatch Manager main connection window appears on the screen.
Operation
Connect to
2 Double click on a RAID host IP you would like to manage, then double click on the controller icon,
then double click on the connection method (e.g., In-Band SCSI), to connect to the disk array system.
For more information on how to connect, see section 4.3, ”Connecting and Disconnecting from a
Disk Array”, on page 50.
4.2.3 Starting Altos RAIDWatch Manager Locally or via a LAN under a Unix or AIX Workstation (Solaris 7 (SPARC, x86); Red Hat Linux 6.1) Environment
1 Open a terminal application or command line window.
2 Change directory to /usr/hybrid/bin/ (or whatever directory you chose during the installation if not
the default).
3 At the command prompt, type:
java -jar grm.jar
The Altos RAIDWatch Manager main connection window should appear on the screen.
4 Enter the IP address and TCP port assignment of the disk array system where the Primary Agent was
installed. If you are running Altos RAIDWatch Manager at the Primary Agent host machine (i.e.,
“locally”) and want to manage a RAID hosted by the Primary machine, click the Default button.
5 Double click on a RAID host IP you would like to manage, then double click on the controller icon,
then double click on the connection method (e.g., In-Band SCSI), to connect to the disk array system.
49
Page 64

Altos RAIDWatch User Guide
For more information on how to connect, see section 4.3, ”Connecting and Disconnecting from a
Disk Array”.
4.3 Connecting and Disconnecting from a Disk Array
Before management can be performed on a particular disk array system, you need to first establish
a connection between your Altos RAIDWatch Manager station and the Primary Agent host. Once a
connection is established successfully, management can be started.
Disconnection is used for breaking the link between the Altos RAIDWatch Manager station and the
array. This option is particularly useful in cases where multiple disk arrays are being managed at the
same time instead of restarting the Altos RAIDWatch Manager every time you need to switch to
another system, you just need to disconnect from the current array and then connect to another.
The following discusses how to connect to a disk array. Information on disconnection is provided at
the end of this section.
4.3.1 Connecting to a RAID System while Working from the Local Primary Agent Host
1 From the File menu, select Connect.
Click on the Connect command button. The following prompt will appear on the screen:
Figure 4–1 Connect to RAID Agent
Click the Default button.
2 The connection screen shown in Figure 4–2 will appear. Select the IP address of the RAID you would
like to monitor or manage from the Connection View list. Double click the IP address. Double click
the controller icon. Double click the connection method (e.g., In-Band SCSI).
or
50
Page 65

Operation
Figure 4–2 Click the connection Method, e.g. In-Band SCSI
3 You will be prompted for a password to access the controller. Enter the password (there is no
default password) and click OK. The connection is successful when the RAID View Introduction
window appears and the tool bar buttons are activated.
Figure 4–3 Enter Password
4.3.2 Connecting to a RAID System from a Distant Host
1 In the screen shown in Figure 4–4, select the IP address of the RAID you would like to monitor or
manage from the Connection View list. Choose and double click on an IP address. Double click the
controller icon for that IP address. Choose and double click the connection method (e.g., In-Band
SCSI).
51
Page 66

Altos RAIDWatch User Guide
Figure 4–4 Click the connection Method, e.g. In-Band SCSI
2 You will be prompted for a password to access the controller. Enter the password (there is no
default password) and click OK. The connection is successful when the Introduction window
appears and the tool bar buttons are activated.
Figure 4–5 Enter Password
52
Page 67

4.3.3 Disconnecting from a Disk Array System
• From the File menu, select “Disconnect”. Or, click the Disconnect button on the toolbar.
Figure 4–6 Disconnect from Altos RAIDWatch
All toolbar buttons, except the Connect command button, turn gray signifying disconnection from
the disk array system. Altos RAIDWatch Manager should return to the Connection View window.
Operation
4.4 Setting Up Security
Altos RAIDWatch provides password protection to prevent unauthorized access to RAID controllers
or controller setting modifications. This protection, which is implemented by the Altos RAIDWatch
Primary Agent, prompts a user for the station password the first time he or she attempts to connect
to a controller through a Secondary Agent.
By default, Altos RAIDWatch comes without passwords, so when prompted for a password the first
time, just press Enter. After gaining control, set a password to provide security to the managed disk
arrays.
4.4.1 Setting a Password for Altos RAIDWatch Controller Access
1 Display the Configuration window by clicking on the Configuration button under the introduction
in the RAIDView, see section 4.5.4 on page 56.
2 From the Configuration window, click on the controller tab, under Controller, click on the
operation tab, under Operation, choose the Password tab. The Change Password dialog box
appears as shown in Figure 4–7.
53
Page 68

Altos RAIDWatch User Guide
Figure 4–7 Enter a New Password
3 Type in a New Password.
4 Re-type the password in the Verify Password field to confirm.
5 Click OK.
4.4.2 Setting TCP Port Numbers
A security related setting that should be considered is the TCP port setting of Primary Agent hosts.
TCP port assignments must be made in order for Altos RAIDWatch to work. Modifying TCP port
settings to something other than the default will increase system security.
Altos RAIDWatch is shipped with a default TCP port setting for the Primary Agent: 58632. It is
recommended that users change the default TCP port setting to a less commonly used TCP port
assignment.
TCP ports can be assigned any number between 1 and 65535, but as some of the smaller possible
assignments are commonly used for other purposes, we recommend using a port number between
49152 and 65535. Refer to section 2.4.2, ”Installing Altos RAIDWatch”, on page 14 for information
on configuring Primary Agent TCP port numbers.
54
Page 69

4.5 Look and Feel
4.5.1 Look and Feel Overview
Because Altos RAIDWatch Manager is a Java-based GUI program, it can accommodate the “Look
and Feel” standards of various Operating Systems (OS) At present, three different interface
appearances are supported: Windows, Unix, and Java.
Altos RAIDWatch Manager will auto-detect and configure to match the Operating System where it
is currently running.
In the event of a compatibility problem or under unknown Operating Systems or OS versions, the
program will default to Java look and feel.
Just like other GUI-based applications, Altos RAIDWatch Manager works entirely with windows,
buttons, and menus to facilitate various disk array operations. These windows follow the standard
Windows and Unix OS “Look and Feel” specifications, thus steps for manipulating elements and
windows within any Altos RAIDWatch Manager window generally conform to standard procedures.
The management sessions are best displayed in the 800x600 screen resolution.
Operation
Note Screen captures throughout this document show the Windows look and feel.
4.5.2 Navigation Menus
The menu bar shown in Figure 4–8 displays the available menus.
Figure 4–8 : Menu Bar
All menus provide a list of commands (shown in Figure 4–10) for invoking various disk array and
display-related operations. Most commonly used commands such as
have command buttons to facilitate their execution. You can either select the command from the
menu, or click on its toolbar command button. For a summary of commands, see Appendix A
, ”Command Summary”, on page 173.
Statistics and Event Log
also
55
Page 70

Altos RAIDWatch User Guide
4.5.3 Tool Bar
Altos RAIDWatch Manager provides a toolbar located just beneath the menu bar for displaying key
command buttons. These buttons serve various purposes, which are described in detail in this
section.
Figure 4–9 Tool Bar
4.5.4 Common Commands
The following commands appear both in the Navigation Menus described in Section4.5.2 and the
Tool Bar described in section 4.5.3.
• The Connect command button is used for connecting to a disk array system. This button has
the same function as the Connect command under the File menu.
Note Multiple simultaneous Altos RAIDWatch Manager connects to one Secondary agent is not a
supported function.
•The Disconnect command button is used for disconnecting from a disk array system. This
button has the same function as the Disconnect command under the File menu. (Note that
Disconnect does not close Altos RAIDWatch Manager.)
•The Enclosure command button displays the Enclosure window for displaying and configuring
custom enclosures. This button provides the same function as the Enclosure command under
the Open menu.
•The RAID View command button displays the configuration and control window for the
controller and drives. This button provides the same function as the RAID View command
under the Open menu.
•The Event Log command button opens the Event Log window for displaying the array event
log. This button provides the same function as the Event Log command under the Open menu.
•The Statistics command button displays the Statistics window for viewing activity (Cache hits
or Read/Write) on the disk array system. This button provides the same function as the Statistics
command under the Open menu.
56
•The Tile command button arranges the displayed windows by giving each an equal share of
the available application window space. This button has the same function as the Tile InWindow command under the View menu. (Note: The Tile In-Sequence function listed under
View is not currently available.)
Page 71

4.5.5 Menu Commands
The following commands only appear in the
shown in Figure 4–10.
Figure 4–10 Menu Commands
•The Agent command under the Connect menu brings up the “Connect to RAID agent” prompt.
This command is only available when Altos RAIDWatch Manager is not currently connected to
any agents.
Navigation Menus
Operation
described in section 4.5.2 and
•The Exit command under the Connect menu is always available and is used to end the current
Altos RAIDWatch Manager session.
•The Contents command under the Help menu brings up the main navigation window for the
Altos RAIDWatch Manager help file.
•The About command under the Help menu brings up a window that provides Altos RAIDWatch
version information.
4.5.6 Windows Display Area
The windows display area is where the system displays Altos RAIDWatch Manager windows. You
have the option to arrange the displayed windows on this area in various ways depending on your
specific needs.
•The View menu provides you with commands to arrange windows. For information on how to
do this see section 4.9.3, ”Arranging Windows”, on page 68
• Controller Time, shown at the top right hand corner of the screen, shows the current controller
date and time settings (see Figure 4–11).
.
Figure 4–11 Controller Time
•The status bar at the bottom of the Window (see Figure 4–12) displays the results of various
disk array operations.
57
Page 72

Altos RAIDWatch User Guide
Figure 4–12 Status Bar
•The scroll bars let you move parts of a window into view when the entire window does not fit
into the windows display area.
4.6 Using the RAID View Window
The RAID View window provides the configuration, installation, management, and monitoring
functions available in Altos RAIDWatch. The RAID View window includes a Navigation Panel and a
Content Panel.
4.6.1 Accessing the RAID View Display
To open the RAID View display either select the RAID View icon from the navigation toolbar shown
in Figure 4–9 or select the RAID View command from the Open Menu Shown in Figure 4–10.
When the RAID View display is opened, the screen shown in Figure 4–13 should appear.
58
Page 73

Figure 4–13 RAID View Display
Operation
•The Navigation Panel provides a tree organization display of logical and physical drives
managed by the current controller. The Navigation Panel also has a sub panel for displaying
longer information trees.
•When RAID View first opens, the Navigation panel in the upper left quadrant of the window
will display icons for the controller, Logical View and Physical View.
•The Content Panel displays information about controller settings, logical drive settings, and
physical drives as selected in the Navigation Panel.
The large Contents panel to the right will display an Introduction with access buttons for
Configuration, Logical View and Physical View. Each of these primary function windows will be
described below and in detail in Chapter 4.The following describes the various control and display
components found in the RAID View window:
59
Page 74

Altos RAIDWatch User Guide
4.6.2 Using the Configuration View
Configuration functions can only be accessed by clicking the Configuration button under the
Introduction in the RAID View window.
Figure 4–14 select Configuration
Once in the Configuration view, all windows are accessed via window tabs.
Each tab corresponds with a controller configuration setting, option, or readout; and most tabs
include various sub-functions.
Figure 4–15 Configuration View Window Tabs
See section 6.1, ”Configuring the Controller”, on page 75 and the controller’s user documentation
for more information about controller settings.
4.6.3 Using the Logical View
Logical View is where you perform management on the logical drives and logical volumes of the
disk array system. Logical drives (LDs) are combinations of physical drives, which are used to create
logical volumes (LVs). These volumes (or their partitions) can then be mapped to various host LUNs.
A sub-function of the RAID View window, Logical View allows you to create, expand, and delete
existing LDs and LVs. It uses unique colors to distinguish between logical drives. When a physical
drive within a logical drive fails, the system notifies you by darkening the color of the affected
logical drive. The logical drive will remain in this state until either a spare is detected and an
automatic rebuild is started, or the drive is replaced and a rebuild is manually initiated.
After a rebuild is complete, the logical drive will display its normal color, signifying an on-line
condition.
To display the Logical View, you can either click on the Logical View button in the RAID View
Introduction or select the Logical View icon in the navigation panel of the RAID View window.
60
Page 75

Operation
Figure 4–16 Select View Button
Figure 4–17 Select Logical View Icon
A window similar to the one shown in Figure 4–18 will appear in the Content Panel and the icons
shown in Figure 4–19 will appear in the navigation panel.
Figure 4–18 Logical View Content Panel information
61
Page 76

Altos RAIDWatch User Guide
Figure 4–19 Logical View Navigation Panel icons
Note that the symbols in the initial Logical View content panel are not interactive. To select a
Logical Drive or Logical Volume, click on the appropriate icon in the navigation panel.
If you need information about a particular logical drive, just let the mouse pointer hover over its
corresponding icon. A message similar to the one in Figure 4–20 will appear:
Figure 4–20 Logical Drive message tag
This message displays the controller assignment, ID number, RAID level, total capacity, and current
status of the logical drive.
For more information on how to create, delete, and rebuild logical drives and logical volumes, see
Chapter 5 , ”Array Management”, on page 71
4.6.4 Using the Physical View
Physical View under the RAID View window is where you can view and modify the configuration of
drive and host channels and physical drives.
To display the Physical View, you can either click on the Physical View button (see Figure 4–21) in
the RAID View Introduction or select the Physical View icon (see Figure 4–22) in the navigation
panel of the RAID View window. A window similar to the one below will appear.
62
Figure 4–21 Select the Physical View Button
Page 77

Operation
Figure 4–22 Select the Physical View Icon
A window similar to the one shown in Figure 4–23 will appear in the Content Panel and the icons
shown in Figure 4–24 will appear in the navigation panel.
Figure 4–23 Physical View Content Panel information
Figure 4–24 Physical View Navigation Panel icons
Note The symbols in the Physical View initial content panel are not interactive. To select a channel, status
display, or physical drive, click on the appropriate icon in the navigation panel.
Letting the mouse pointer hover over a channel displays a message tag similar to the one shown in
Figure 4–25
63
Page 78

Altos RAIDWatch User Guide
Figure 4–25 Physical view navigation Panel Icons Message Tag
The message tag shown in Figure 4–25 provides information such as primary and secondary IDs, and
the current transfer clock rate.
The Physical View also allows you to modify the configuration of the drive and host channels, and
scan in newly added or replaced physical drives. It also provides host channel LUN configuration;
and remote enclosure monitoring SES.
To display host channel LUN configuration information, click on a host channel icon in the
navigation panel, then click on the channel ID in the sub-navigation panel (lower-left quadrant of
the window). For more information about modifying these configurations, see Chapter 5 , ”Array
Management”, on page 71
4.6.4.1 SES
In addition to displaying drive and host channels, the Physical View can also display
Management devices
devices” icon in the
SES is an interface by which signals from enclosure sensors are passed to the RAID controller. It
provides a basic status report on enclosure devices and system parameters like power supplies, fans,
and voltage.
Altos RAIDWatch Manager will display the SES Management devices under Physical View. Click on
the icon to show status. SES is not user configurable via Altos RAIDWatch Manager.
. To open view the
Physical View
SES Management devices
navigation panel.
click on the “SES Management
4.7 Using the Enclosure Window
The Enclosure window allows you to define enclosures for creating an exact replica of the disk
array’s drive bay arrangement, displaying the exact location of the physical drives and controllers.
4.7.1 Accessing the Enclosure Display
To open the Enclosure window display either select the Enclosure icon from the navigation button
shown in Figure 4–9 or select the Enclosure command from the Open menu shown in Figure 4–10.
The command allows you to access the pre-configured enclosure(s). If multiple enclosures have
been defined by system vendor, you may select your enclosure from the selection box shown in
Figure 4–26
SES
64
Page 79

Figure 4–26 Enclosure Selection Box
Select your enclosure and start adding devices into the empty spaces in the enclosure window.
4.7.2 Using the Enclosure Window
Both enclosure windows allow you to assign locations for different components. The Enclosure
window is particularly useful in monitoring the status of the physical drives. It provides you with a
real-time report on the drive status, using symbols and colors to represent various conditions. The
following figures exemplify how Altos RAIDWatch Manager represents various drive conditions:
Operation
Figure 4–27 Identifying Spare Drives
Spare drives appear with their colors darker (shaded) than normal drives and have a red cross
superimposed on them (see Figure 4–27).
Figure 4–28 Identifying Failed Drives
The red cross is larger on Global spares and smaller on Local spares. When you remove a drive from
the drive bay, its corresponding icon on the Enclosure window disappears. The system places a large
red “X” mark on the icon of a failed drive.
Note Physical View under the RAID View window also provides a real-time report on drive status, using
the same symbols and colors to represent various conditions. What you see in the Enclosure window
65
Page 80

Altos RAIDWatch User Guide
is also reflected in the Physical View. These windows, however, differ in the way physical drives are
presented; in the Enclosure window, the drives should be arranged according to their actual
locations in the drive bays, while in the Physical View, the drives are arranged according to channel
connections.
You can also display some information about a particular drive by simply placing the mouse pointer
on its respective icon. A readout similar to the one shown in Figure 4–29 appears.
Figure 4–29 Drive Information Message Tag
This readout displays the current configuration of the drive, including the channel number of the
connector on the controller to which the drive’s cable is connected, the ID number where the drive
is installed, the drive’s capacity, transfer rate, and current status.
4.8 Event Window
The Event Log window displays controller and array events since the last time Altos RAIDWatch
Manager was started. The Event Log can be accessed through either the Event Log command
button on the tool bar or under the Open menu. If you need to read event logs recorded before
Altos RAIDWatch is started, consult your Event Monitor.
Event Log items include critical alerts, warnings, and notifications regarding the RAID controller;
drives status; logical device status; and enclosure elements like power supplies, fan, and
temperature. Events are not always failures. Some events, such as controller setting changes, are
displayed for information purposes.
4.8.1 Accessing the Event Log Display
To open the Event Log window display either select the Event Log icon from the navigation toolbar
shown in Figure 4–9 or select the Event Log command from the Open Menu shown in Figure 4–10.
If you need to read event logs recorded before Altos RAIDWatch is started, consult your Event
Monitor.
4.8.2 Using the Event Log to Monitor the System
When events occur, Altos RAIDWatch will display a waving Event Flag command button on the tool
bar.
66
Clicking on the Event Flag button will open the Event Log window. Event Log entries include the
time of occurrence and a description of what event took place.
Page 81

4.9 The Statistics Window
The Statistics window includes separate displays for cache hits and for sustained read/write
performance.
4.9.1 Accessing the Statistics Window
To open the Statistics window display either select the Statistics icon from the navigation toolbar
shown in Figure 4–9 or select the Statistics command from the Open Menu shown in Figure 4–10.
4.9.2 Using the Statistics Window
When selecting the Statistics window command in the Menu or the toolbar, a user can select either
“Cache Hits” or “Disk R/W.”
4.9.2.1 Cache Hits
If you select Cache Hits, a window similar to the one shown in Figure 4–30 will appear.
• Cache hits Average and history provides information about the current operating performance
of the RAID controller and disk array.
Operation
Figure 4–30 Cache Hits Performance Statistics window
• Cache Hits Average is a measure of data read or write cache accesses at the most recent
moment of sampling. It indicates what percentage of data I/O is cache accessed.
• Cache Hits History shows cache read and write hit data over the last few minutes and indicates
data caching consistency and frequency.
4.9.2.2 Disk R/W
If you select Disk R/W, a window similar to the one shown in Figure 4–31 will appear.
67
Page 82

Altos RAIDWatch User Guide
Figure 4–31 Cache Hits Performance Statistics window
• Sustained Read/Write Performance is also displayed as both an average and historically. Read/
write performance is another way to evaluate the current RAID controller and disk array I/O
throughput.
• Read/Write Average is a measure of the average data throughput, in MB/second, at the most
recent data sample.
• Read/Write History shows read/write performance over the last few minutes and indicates data
throughput consistency.
The read/write data display scale can be modified using the Adjust button at the bottom-center of
the Read/Write Statistics window. Scales from 10MB/second to 200MB/second are available.
4.9.3 Arranging Windows
The View menu provides you with a command for rearranging the currently open Altos RAIDWatch
Manager windows. You can manually manipulate the window frames to display them as you like,
or use the Tile In-Window command under the View menu to arrange open windows to fit next to
each other on the screen. Tile In-Window is also available via a command button on the tool bar.
Note Currently, the Tile In-Sequence function under the View menu is not supported.
68
Page 83

Operation
4.10 Exiting Altos RAIDWatch Manager
Exiting from Altos RAIDWatch Manager terminates the current management session with the disk
array system.
4.10.1 Exiting from Altos RAIDWatch Manager
• From the File menu, select Exit.
or,
• Click the Close button on the program window.
4.10.2 Exiting from Altos RAIDWatch Manager Connected via Web Browser
• From the File menu, select Exit. (Recommended method.)
or,
• Exit the browser application.
or,
• Change the browser HTTP address to a URL or IP other than that of a Altos RAIDWatch Primary
Agent.
69
Page 84

Altos RAIDWatch User Guide
70
Page 85

Array Management
Chapter 5
Array Management
This chapter describes how to manage a disk array system. Topics covered include the following:
• Background information about disk array management, 5.1 on page 71.
• Operating with Spare Drives, 5.2 on page 72
• Operating without spare drives, 5.3 on page 73.
• Before you start, 5.4 on page 73.
If this is your first time to manage a disk array system, we recommend that you read through section
5.1, ”Background Information”, to get basic information about disk array management. You will
need this basic knowledge to be able to effectively use Altos RAIDWatch Manager.
5.1 Background Information
Redundant Arrays of Independent Disks (RAID) is a storage technology used to improve the
processing capability of storage systems. This technology is designed to provide reliability (i.e.,
“fault tolerance”) in disk array systems and to take advantage of the performance gains multiple
disks can offer.
RAID comes with a redundancy feature that ensures fault-tolerant, uninterrupted disk storage
operations. In the event of a disk failure, disk access will still continue normally with the failure
transparent to the host system.
RAID has six levels: RAID 0 ~ 5. RAID levels 1, 3 and 5 are the most commonly used levels, while RAID
levels 2 and 4 are less popular. Appendix C , ”RAID Levels”, on page 183 gives information about
these levels, including the benefits of each.
Disk array controllers support hot-swapping where a failed drive can be replaced while the disk
array system continues to function. Spares can also be assigned so that, as soon as a drive fails, the
spare will be automatically configured into the array and reconstruction will commence.
71
Page 86

Altos RAIDWatch User Guide
5.1.1 Definition of Terms
This section describes some of the disk array terms used in this documentation.
• Physical drives. These are the actual drives installed in the enclosures.These drives are displayed
• Spare drives. These are physical drives that serve as backups. When a drive fails, the spare is
• Replacement drives. These are physical drives that are manually configured into the array to
• Failed drives. These are physical drives that fail due to some type of error. Failed drives appear
in Physical View under the RAID View window.
automatically configured into the array, and data reconstruction will commence immediately.
Spare drives appear in darker (shaded) colors than normal drives and have a red cross
superimposed on them. Large red crosses indicate Global spares, smaller ones represent Local
spares.
replace failed drives. In the absence of spare drives, you will need to use replacement drives to
replace defective drives before rebuilding. If a spare drive has been used to rebuild the array,
you will also need to replace the failed drive manually to create another spare with the
precaution that another drive might fail.
with large red X marks on their respective icons.
• Logical drives. These drives are created using physical drives. Combining physical drives into
logical drives gives you a disk array with a certain RAID level. To view logical drives, use Logical
View under the RAID View window.
• Logical volumes. These volumes are created using logical drives. Combining logical drives into
logical volumes gives you a single logical unit with even larger capacity. Logical volumes or
their partitions are mapped to various host LUNs. To view logical volumes, use Logical View
under the RAID View window.
5.2 Operating With Spare Drives
You can assign spare drives to a particular logical drive to serve as backup drives. When a drive fails
within the logical drive, one of the spares will be automatically configured into the logical drive,
and data reconstruction onto it will immediately commence.
The following are guidelines for disk failure recovery when a spare drive is available:
• If a spare drive exists in the same logical drive, the controller will automatically mount the
spare drive and start data rebuilding in the background.
• Depending on the design of the system external to the controller, it may be possible to remove
a defective drive and replace it with a new drive without shutting down the system (hotswapping). Alternatively, the system can be shut down at a convenient time and the failed
drive replaced.
72
• The replacement drive must then be assigned as a new spare drive.
Page 87

Array Management
5.3 Operating Without Spare Drives
The following are guidelines for disk failure recovery when a spare drive is not available:
• Depending on the design of the system, it may be possible to remove a defective drive and
replace it with a new drive without shutting down the system (hot-swapping). Alternatively,
the system can be shut down at a convenient time and the system administrator can replace
the failed drive.
• If the replacement drive is installed on the same channel and ID, you can then proceed with
data rebuilding.
• If the replacement drive is installed on a different channel or ID, you need to scan in the new
drive first then assign it as a spare drive of the logical drive which has had a drive failure. Data
rebuilding will have to be manually initiated.
Important Although the RAID system provides uninterrupted disk access even after a disk failure, do not leave
a failed drive unattended to. Without replacement, the system will not survive a second physical
drive failure on the same logical drive. A defective drive must be promptly replaced and data
rebuilt.
Caution When performing hot-swapping, be sure to remove only the defective drive. Removing the wrong
drive will result in complete, unrecoverable data loss. Use the Enclosure window or Physical View
to locate exactly which physical drive has failed.
5.4 Before You Start
Altos RAIDWatch Manager comes with password protection that prevents unauthorized
modification of the disk array configuration. During each attempt at modifying the system
configuration, the configuration will be password protected.
By default, Altos RAIDWatch Manager station comes without any password. For information on
how to set a password and other security features, see section 3.4, ”Secondary Agent Settings”, on
page 36.
73
Page 88

Altos RAIDWatch User Guide
74
Page 89

Controller Configuration
Chapter 6
Controller Configuration
This chapter describes how to modify the configuration of a disk array controller. Topics covered
include the following:
• Setting controller configuration, 6.1 on page 75.
• Accessing Controller Configuration Options, 6.2 on page 76
• Caching, 6.3 on page 76
• Host-Side, 6.4 on page 77
• Drive-Side, 6.5 on page 78
• RAID, 6.6 on page 79
• Controller, 6.7 on page 79
• Communication, 6.8 on page 82
6.1 Configuring the Controller
Altos RAIDWatch Manager enables you to modify the configuration of the disk array controller
from your manager console. You can set caching optimization parameters of the system, set I/O
queue limitations, set drive optimization parameters, set RAID verification options, get information
about current system and board status, download firmware or NVRAM data to the controller, set
redundant controller options, and modify the RAID system password among other variables.
75
Page 90

Altos RAIDWatch User Guide
6.2 Accessing Controller Configuration Options
To be able to access controller configuration options either use the RAID View toolbar icon or select
the
been opened select the Configuration button from the content window. For more information on
accessing the controller configuration options, please refer to section 4.6, ”Using the RAID View
Window”, on page 58.
The following is a complete list of configuration controls and information displays that users will
have available once the Controller Configuration option has been selected.
More information about many of these variables is available in the controller hardware and
firmware documentation.
6.3 Caching
RAID View
command from the Open menu to open the RAID View. Once the RAID View has
To be able to configure the data cache, select the “Caching” tab, as shown in Figure 6–1, from the
Configuration View Window Tabs.
Figure 6–1 Select the Caching Tab
The data cache can be configured for optimal I/O performance using the following variables:
• Caching Policy (choose one from Figure 6–2):
Figure 6–2 Caching Policy
–Cache Write Back. (Default controller setting.) Recommended operating mode, provides
better performance.
– Cache Write Through. Used primarily if no cache battery backup is installed and there is
increased likelihood of a power failure.
• Optimization Policy (choose one):
Important Optimization settings should not be changed after logical drives are created. Under some
circumstances, changing the optimization setting after logical drives have been created will destroy
existing data on those drives.
76
Page 91

Figure 6–3 Optimization Policy
• Optimization for Random I/O. More common setting. Use this option for environments (e.g.,
database maintenance) with smaller I/O transactions.
• Optimization for Sequential I/O. Used for large I/O environments such as video recording and
editing. Particularly useful where I/O read/write must be in sequential order.
6.4 Host-Side
To be able to configure the Host-Side, select the “Host-Side” tab, as shown in Figure 6–4, from the
Configuration View Window Tabs.
Controller Configuration
Figure 6–4 elect the Host-Side Tab
• Host-side SCSI Parameters (choose from each range as shown in Figure 6–5):
Figure 6–5 Host-side SCSI Parameters
• LUNS per Host ID. Allows you to control the LUNS assigned to each ID. The number of LUNS
that can be assigned to an ID are: 1, 2, 4, 8 (default), 16 and 32.
• Maximum Queued I/O Count. Allows you to control the maximum size of the I/O queue.
Available size selections: Auto, 1, 2, 4, 8, 16, 32, 64, 128, 256, 512, 1024.
77
Page 92

Altos RAIDWatch User Guide
6.5 Drive-Side
To be able to configure the Drive-Side, select the “Drive-Side” tab, as shown in Figure 6–6, from the
Configuration View Window
Figure 6–6 Select the Drive-Side Tab
Tabs.
Figure 6–7 Drive -side SCSI Parameters
• Drive Side Parameters (choose from each range as shown in Figure 6–7):
• SCSI Motor Spin up. Available selections: Disabled or Enabled.
• Maximum Tag Count. Available selections: Disabled, 1, 2, 4, 8, 16, 32, 64, 128.
• Disk Access Delay Time (Sec.). Available selections: No Delay, 5, 10, 15, 20. . .75.
• I/O Drive Timeout (Sec.). Available selections: Default(7.0), 0.5, 1, 2, 4, 6, 8, 10.
• Drive Check Period (Sec.). Available selections: Disabled, 0.5, 1, 2, 5, 10, 30.
• SAF-TE Device Check Period (Sec.). Available selections: Disabled, 0.05, 0.1, 0.2, 0.5, 1, 2, 5.
• Drive Fail Swap Check Period (Sec.). Available selections: Disabled, 5, 10, 15, 30, 60.
• SMART. Available selections: Disabled, Detect Only, Clone only, Clone & Replace.
• Auto Assign Global Spare Drive. Available selections: Disabled and Enabled.
78
Page 93

6.6 RAID
To be able to configure the Disk Array parameters, select the “RAID” tab, as shown in Figure 6–8,
from the Configuration View Window Tabs.
Figure 6–8 Select the RAID Tab
Figure 6–9 Disk Array Parameters
Controller Configuration
• Disk Array Parameters (choose from each range as shown in Figure 6–9):
• LD Rebuild Priority. Available selections: Low, Normal, Improved, High.
• Write Verify On LD Initialization. Choose Enabled or Disabled.
• Write Verify On LD Rebuild. Choose Enabled or Disabled.
• Write Verify On Normal Drives Access. Choose Enabled or Disabled.
6.7 Controller
To be able to view and configure the Controller parameters, select the “Controller” tab, as shown
in Figure 6–10 from the
Figure 6–10 Select the Controller Tab
Configuration View Window
Tabs.
79
Page 94

Altos RAIDWatch User Guide
Figure 6–11 Change Name
• Password: A user-configurable security setting. Note, the password and name fields combined
• Time: Allows you to select the Time Zone and to input the current time in your area. See Figure
have a maximum size of 16 characters.(For more information see section 3.3 on page 33).
6–12.
Figure 6–12 Change Time
• Download: An user can select
Download NVRAM, Upload NVRAM, Download BIOS
Download Firmware, Download Firmware/Bootrecord,
. All of the Download functions will
prompt for a file source from the current workstation. Upload NVRAM will prompt for a file
destination at the current workstation.
• System: system functions are shown in Figure 6–13 and described below:
Figure 6–13 Available System Functions
• Name: A user-configurable identifier for the controller.
80
Note: The name and password fields combined have a maximum size of 16 characters, see
Figure 6–11.
Page 95

Controller Configuration
• Mute Beeper: temporarily mutes the controller beeper if it is currently sounding;
• Reset Controller: resets the controller (similar to a PC reset), allowing configuration
changes to take effect.
• Shutdown Controller: Shutdown the controller
• Force Failure: Allows a controller to be forced to fail.
• Redundant:
– Controller Unique Identifier: This unique ID is used by controller to generate a controller-
unique WWPN. WWPN is a Fibre channel port name. If redundant controller configuration
is preferred and host interface is Fibre channel. Each controller in redundant controller
configuration MUST be assigned with a unique ID from 1 to FFFFF.
– Redundant Controller Configuration: Enabled or Disabled depending on whether or not
the current RAID has controller redundancy;
– Redundant Controller Channel: sets the communication channel for redundant controllers.
– ECC Function: Select either “Disable” or “Enable” as shown in Figure 6–14.
Figure 6–14 ECC function
81
Page 96

Altos RAIDWatch User Guide
6.8 Communication
To be able to configure the Communication settings, select the
Figure 6–15, from the Configuration View Window Tabs.
Figure 6–15 Select the Communication Tab
• TCP/IP: To set the TCP/IP settings, select the
• Network Hardware MAC: A DHCP client identifies itself to the server using its network
hardware (MAC) address. See Figure 6–16.
Figure 6–16 Setting the Network Hardware MAC
• Set IP Address: IP settings are shown in Figure 6–17.
TCP/IP
tab.
Communication
tab, as shown in
82
Figure 6–17 Set IP Address
– IP Assignment: Select any of the following options: Static, DHCP, BOOTP, RARP, or NONE.
– IP Address: Input the IP Address assigned to the subsystem.
– Subnet Mask: Enter a Subnet Mask that will be used by the subsystem e.g. 255.255.0.0.
– Default Gateway: Enter the default value into this field e.g. 192.168.1.254.
• RS232 Port: To set the RS-232 serial port settings, select the RS-232 tab.
• COM Port Select: Select the serial port that will be used for serial port connection. please refer
to Figure 6–18.
Page 97

Controller Configuration
Figure 6–18 COM Port Select
• RS232 Configuration: To set the appropriate RS-232 serial port settings below, please refer
to Figure 6–19.
Figure 6–19 RS-232 Configuration Options
• PPP Routing Status: Select “Disable” or “Enable”.
• Terminal Emulation Status: Select “Disable” or “Enable”.
• Current Baudrate: Select the Baudrate from the following range: 2400, 4800, 9600, 19200,
and 38400.
83
Page 98

Altos RAIDWatch User Guide
84
Page 99

Channel Configuration
Chapter 7
Channel Configuration
Using Altos RAIDWatch Manager, you can modify the configuration of any channel on the
controller. There are 20 channels available. Channels 4 through 19 are SATA drive channels.
Channel 0 is used for inter controller communciation and Channel 3 is used for expansion. Channels
1 and 2 are host ports which are configurable as explained below.
Channel configuration settings are available under Physical View in the RAID View window. This
chapter describes the following Channel Configuration features:
• Accessing Channel Configuration Options, 7.1 on page 85
• User-Configurable Channel Parameters, 7.2 on page 86
• Setting the configuration of a channel, 7.3 on page 86
The following describes user-configurable channel parameters:
7.1 Accessing Channel Configuration Options
Channel configuration options are available in the Physical View window, which is found in the
RAID View environment.
To be able to access the Physical View either use the RAID View toolbar icon or select the RAID View
command from the Open menu to open the RAID View. Once the RAID View has been opened
select either the Physical View button from the content window or the Physical View icon in the
Navigation Panel.
For more information on accessing the controller configuration options, please refer to 4.6, ”Using
the RAID View Window”, on page 58
85
Page 100

Altos RAIDWatch User Guide
Once the Physical View has been opened and channel icons, have appeared under the Physical View
icon in the Navigation Panel, select the channel that needs to be configured.
7.2 User-Configurable Channel Parameters
Once the channel has been selected, the content window will appear. The different options are
discussed below.
7.2.1 ID pool / PID / SID
This parameter sets the ID of the channel. Each channel must have a unique ID in order to work
properly. ID ranges from 0 up to 15, with 0 assigned as the default value for host channels, and 7
for drive channels.
It is necessary to create a SID on every I/O channels in redundant controller configuration. The
default are 6 for SID and 7 for PID on drive channels. The default values for Infortrend's dualredundant configuration are 8 for SID and 9 for PID. For more information, please refer to the
hardware documentation that came with your controller.
7.3 Setting the Configuration of a Channel
1 Display Physical View by clicking on the Physical View command button under the RAID View
introduction or by selecting Physical View from the RAID View Navigation Panel. (See Section 3.3
on page 33
2 From Physical View double-click on the corresponding Channel icon of the target channel. Channel
icons are displayed in the navigation panels on the left side of the RAID View window. The Channel
Settings configuration will appear in the RAID View content panel.
3 If you want to assign a different ID to the selected channel, choose the new ID from the ID pool
scroll menu shown in Figure 7–1.
86
 Loading...