

Page 1

FotoPrisa 300P/U Photo Printer
User’s Manual
Page 2

Copyright
K
Disclaimer
Copyright 1999 by Acer Peripherals, Incorporated (Acer
Peripherals). All rights reserved. No part of this publication may
be reproduced, transmitted, transcribed, stored in a retrieval
system or translated into any language or computer language,
in any form or by any means, electronic, mechanical, magnetic,
optical, chemical, manual or otherwise, without the prior written
permission of Acer Peripherals.
Brands and product names are trademarks or registered
trademarks of their respective companies.
Acer Peripherals, Incorporated (Acer Peripherals) makes no
warranty of any kind with regard to this material, including, but
not limited to, the implied warranties of merchantability and
fitness for a particular purpose. Acer Peripherals assumes no
responsibility for any error that may appear in this document.
Acer Peripherals makes no commitment to update nor to keep
current the information contained in this document.
Safety Information
This device is designed to provide safe and convenient
operation. However, in order to prevent possible personal
injuries or property loss; please pay attention to the following
O
safety cautions before or during the operation of this device:
Connect the power cord to power outlet firmly before use. Loose
connection may cause short circuit.
Do not cut, bend the power cord or put heavy objects on it. Do
not place power cord near heat source.
There is no user serviceable part inside the device. Do not try to
disassembly or fix the device. Contact your dealer if problem
occurs.
Page 3
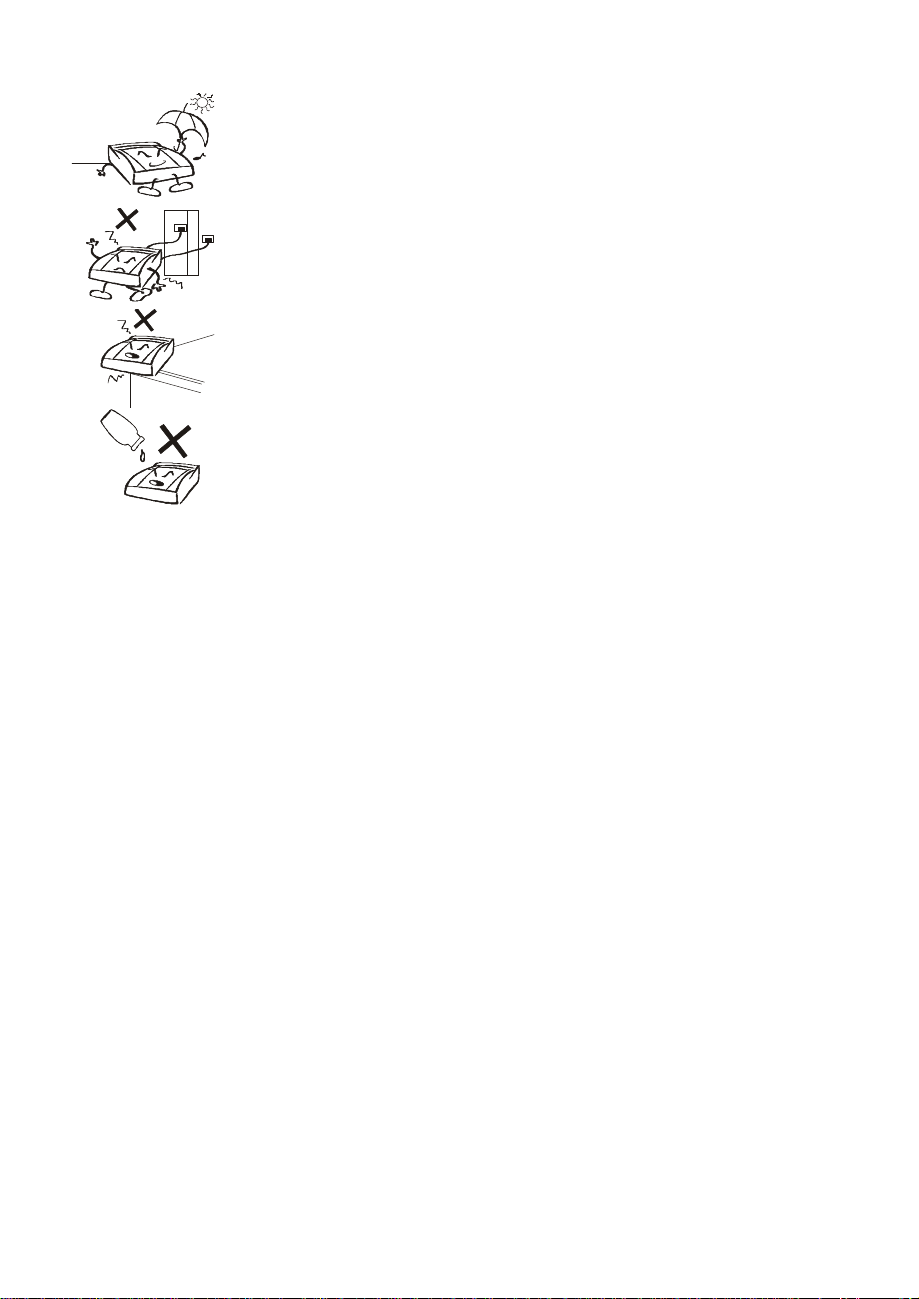
Do not block the ventilation holes on the device. Keep away
from liquid, heat, dust and direct exposure to sunlight or strong
electromagnetic field.
Before you move the device, make sure that all power or cable
connections are disconnected.
Place the device on a flat and stable surface. Avoid moving the
device during operation.
Do not clean the device with thinner or other corrosive liquid.
Use only damp soft cloth to clean this device. When cleaning,
avoid dropping water into the device.
Regulatory Information
This device complies with the following regulatory certifications:
Safety Certifications:
UL, CSA, TÜV, SEMKO, DEMKO, FIMKO, NEMKO
EMI Certifications:
FCC Class B computing device (USA), EMC Directive 89/336/EEC
(European Community), VCCI (Japan), C-tick (Australia)
FCC Compliance Statement
This equipment has been tested and found to comply with the
limits for a Class B digital device, pursuant to Part 15 of the FCC
Rules. These limits are designed to provide reasonable
protection against harmful interference in a residential
installation. This equipment generates, uses, and can radiate
radio frequency energy and, if not installed and used in
accordance with the instructions, may cause harmful
interference to radio or television reception. However, there is
no guarantee that interference will not occur in a particular
installation. If this equipment does cause interference to radio
and television reception, which can be determined by turning
the equipment off and on, the user is encouraged to correct the
interference by one or more of the following measures:
Page 4

Reorient or relocate the receiving antenna.
Increase the separation between the equipment and receiver.
Connect the equipment into an outlet on a circuit different from
that to which the receiver is connected.
Consult an experienced radio/TV technician for help.
CE Declaration
This device complies with the requirements of the EMC directive
89/336/EEC
EN55022 (Class B, 1994) EN-50081-1 (1992)
EN61000-3-2 (1995) IEC801-2 (1984)
EN61000-3-3 (1995) IEC801-3 (1984)
EN50082-1 (1992) IEC801-4 (1988)
Canadian Department of Communications Regulatory Statement
This digital apparatus does not exceed Class B limits for radio
noise emissions from digital apparatus set out in the Radio
Interference Regulations of the Canadian Department of
Communications.
Notice on using copyrighted materials
Before you print and redistribute a copyrighted material
(whether an image file, photo copy or any other intellectual
properties), make sure you have obtained the permission from
the copyright holder in advance. Reproduction of copyrighted
material without prior permission can be illegal and lead to
lawsuit in most countries.
Page 5

Table of Contents
CHAPTER 1. GETTING STARTED.......................................................................1
1.1 INTRODUCTION TO FOTOPRISA PRINTER..................................................................1
1.2 FAMILIARIZE YOURSELF WITH FOTOPRISA PRINTER ..................................................... 2
Front View................................................................................................ 2
Rear View (FotoPrisa 300P)......................................................................... 4
Rear View (FotoPrisa 300U)......................................................................... 5
1.3 SOFTWARE INTRODUCTION.................................................................................. 6
FotoPrisa driver ......................................................................................... 6
Photo Express ........................................................................................... 6
1.4 PREPARE TO PRINT...........................................................................................7
Step 1- Turn on the printer power................................................................ 7
Step 2- Replace ribbon cartridge (when necessary)......................................... 7
Step 3- Load Paper .................................................................................... 8
Step 4- Print ............................................................................................10
CHAPTER 2. FOTOPRISA DRIVER...................................................................11
2.1 INTRODUCTION TO FOTOPRISA DRIVER ..................................................................11
2.2 PROPERTY WINDOW........................................................................................12
2.2.1 The "Setting" tab..................................................................................12
About...................................................................................................... 12
Help........................................................................................................12
Orientation ..............................................................................................13
Tile.........................................................................................................13
Preview...................................................................................................13
Copies..................................................................................................... 13
Media Type..............................................................................................14
Source .................................................................................................... 14
Resolution ...............................................................................................14
2.2.2 The "Print Area" tab..............................................................................15
2.3 PREVIEW WINDOW .........................................................................................16
Preview Area............................................................................................16
Ruler and Unit Button................................................................................16
Scaling Box..............................................................................................16
“Print” button...........................................................................................17
“Cancel” button........................................................................................17
“Help” button........................................................................................... 17
“Information” button................................................................................. 17
"Setting" tab............................................................................................17
"Reload" button........................................................................................17
“Center” Button........................................................................................ 17
"Image Quality" tab ..................................................................................18
CHAPTER 3. PHOTO EXPRESS ........................................................................ 19
3.1 GETTING STARTED..........................................................................................19
3.2 APPLICATIONS...............................................................................................22
Create a personalized greeting card ................................................................22
Make a unique invitation for your friends ......................................................... 24
Prepare an amazing postcard for your relatives................................................. 26
Create stickers.............................................................................................27
Create a special name card............................................................................28
i
Page 6

CHAPTER 4. SOME USEFUL TIPS FOR PRINTING ............................................29
4.1 CAUTIONS ON USING RIBBON CARTRIDGES AND PAPER..................................................29
4.2 CHOOSING THE RIGHT FILE FORMATS FOR THE PRINTING OUTPUT .....................................31
*.bmp (Bitmap)............................................................................................31
*.gif (Graphics Interchange Format)................................................................31
*.jpg (JPEG – Joint Photographic Experts Group) .............................................. 31
*.tga (Targa)...............................................................................................32
*.tif (Tagged Image File Format)....................................................................32
4.3 CHOOSE THE APPROPRIATE IMAGE SOURCE FOR THE FILE TO BE PRINTED.............................33
Image size .................................................................................................. 33
Aspect ratio.................................................................................................34
Image dimension and resolution.....................................................................35
How to check the image dimension before you print ......................................35
How to adjust the resolution and dimension of an image................................37
Quality of original image................................................................................38
4.4 PRINTING STICKERS.........................................................................................38
4.5 CHOOSE APPROPRIATE WEB PAGE IMAGE FOR FULL-SIZE PRINTING .................................... 38
4.6 MAKE YOUR OWN ID PHOTOS .............................................................................39
1. Get the right image...................................................................................40
If you are using a digital still camera ...........................................................40
If you are using a scanner (you already have a 2” x 1.5” photo on hand)..........40
2. Arrange the 6 tiled ID photos on one photo paper......................................... 40
CHAPTER 5. TROUBLESHOOTING AND FAQ....................................................41
5.1 TROUBLESHOOTING.........................................................................................41
5.1.1 Paper Jam...........................................................................................41
5.1.2 LED Messages......................................................................................42
Non-Error Messages..................................................................................42
Error Messages......................................................................................... 42
5.1.3 Printer (parallel) port settings (For FotoPrisa 300P) ................................... 43
How to check and change the parallel port mode of your computer..................43
5.1.4 USB port settings (For FotoPrisa 300U)...................................................44
5.2 FAQ..........................................................................................................45
1. What is dye sublimation printing? ............................................................... 45
2. What is the difference between dye-sublimation printing and inkjet printing? ....45
3. What type of printing material is used?........................................................46
4. Can I print on both sides of the paper?........................................................46
5. What kind of paper should I use?................................................................46
6. Why does the paper go in and out of the printer while printing?......................46
7. What is the difference between a YMC ribbon cartridge and a YMCO ribbon
cartridge?....................................................................................................47
5.3 SERVICE AND INFORMATION ...............................................................................48
CHAPTER 6. APPENDIX................................................................................... 49
ACER PERIPHERALS GENUINE PRINTING MEDIA SERIES......................................................49
PRODUCT SPECIFICATIONS ...................................................................................... 50
ii
Page 7

iii
Page 8

iv
Page 9

1
Chapter 1. Getting Started
1.1 Introduction to FotoPrisa Printer
Thank you for choosing the true photo-quality FotoPrisa Printer
by Acer Peripherals, Inc. Designed to bring you excellent photo
printing quality and high printout durability, FotoPrisa Printer is
bound to be the best partner to turn your masterpieces into
beautiful photos, postcards and stickers. It is equipped with the
following key features:
Cool in style and compact in size
You will no longer need bulky printers to print real photo-quality
pictures. You can use FotoPrisa Printer with a computer as
"personal digital darkroom" to create your masterpiece at home.
Daisy-chain solution (Parallel port model)
You can connect and operate most parallel devices (such as a
second printer) through the “Other Device” port on the
FotoPrisa Printer.
FotoPrisa
Convenient USB connection (USB port model)
The USB connection design allows you to have more flexibility in
connecting and using your printer and other peripheral devices.
Real photo quality with great resolution and durability
Unlike common inkjet printers, FotoPrisa Printer delivers real
photo-quality printouts by employing the Dye-Sublimation
printing technology. With its capability of producing images with
16.77 million colors with 300dpi (dots per inch) on various
printing media, FotoPrisa Printer can achieve real photo-like
printing result on a durable, waterproof photo paper or sticker.
You can always keep your memory fresh and vivid with
FotoPrisa Printer.
Powerful software tools
FotoPrisa Printer comes together with two powerful software
tools that help to turn your creativity into excellent works easily
Page 10

2
FotoPrisa
Ribbon cartridge cover
Paper cassette slot
LED panel
Ribbon cartridge
Paper cassette
Ribbon cartridge hook
and quickly. The Photo Express image editing software allows
you to get and edit image from various sources, such as from
the web, through the digital camera or from scanner. You can
also open image files that are already stored in your computer.
After you finish getting and editing images in Photo Express, you
can adjust and print the edited images through the FotoPrisa
driver and share your idea and creativity on photo printouts,
stickers or postcards with your family, relatives or loved ones.
1.2 Familiarize Yourself with FotoPrisa Printer
To fully understand the function of each part on FotoPrisa
Printer, please refer to the following figures and description:
Front View
socket
Ventilation holes
Manual paper feeding slot
Page 11

3
FotoPrisa
Manual paper feeding slot
The FotoPrisa Printer provides two paper-feeding methods:
manual feeding and paper cassette feeding. You can feed photo
paper manually through this slot. While the FotoPrisa Printer is
in printing process, the paper will go back and forth in the paper
feeding slot for 3 or 4 times.
LED panel
The LED panel consists of two LED indicators: “READY” and
“STATUS”. “READY” LED indicator blinks when the printer is
powered on and under self-test. When self-test is successful, the
“READY” LED remains on indicating that the printer is ready to
print. The “STATUS” LED indicator is used to display error
messages if the printer detects problems under self-test or
during operation. Please refer to Chapter 5 for more information
on the error messages.
Ribbon cartridge socket
This is where you insert the ribbon print cartridge. Pay attention
to the direction of ribbon cartridge when you insert.
Ribbon cartridge cover
This cover keeps dust or other objects from contaminating the
thermal printing head and ribbon inside the printer. Remember
to close the ribbon cartridge cover as soon as you remove or
insert the ribbon cartridge.
Paper cassette slot
You can insert the paper cassette here when you feed paper
with paper cassette. Pay attention to the direction of paper
cassette when you insert.
Paper cassette
The paper cassette can contain up to 25 sheets of photo paper.
When the printer is not in use, please also leave the paper
cassette in the paper cassette slot to keep dust away from the
inside of the printer.
Page 12

4
Other device
Power inlet
Power switch
FotoPrisa
Ventilation holes
These holes are designed to carry heat out of the machine. Do
not block these holes while using the printer.
Rear View (FotoPrisa 300P)
Connector to PC
Power inlet
Connect the power cord here. This power inlet accepts AC
power 100-240V, 50/60Hz.
Power switch
Turns the printer power on or off.
Connector to PC
This connector is marked "PC" on the rear panel. Use this
connector to connect to your computer.
Connector to other peripheral devices
This connector marked “Other device” is a pass-through parallel
connector. If you need to connect another parallel device (such
as a second printer or ZIP drive) to your computer, use this
connector to connect them.
Specification label
The specification label describes printer specifications and is
located at the bottom of the printer.
Connector to other
peripheral devices
Page 13

5
Power inlet
Power switch
USB connector
FotoPrisa
Rear View (FotoPrisa 300U)
Power inlet
Connect the power cord here. This power inlet accepts AC
power 100-240V, 50/60Hz.
Power switch
Turns the printer power on or off.
USB Connector
Use this connector to connect the FotoPrisa 300U Printer to the
USB port of your computer with a USB cable.
Specification label
The specification label describes printer specifications and is
located at the bottom of the printer.
Page 14

6
1.3 Software introduction
Your FotoPrisa Printer comes with two powerful software tools:
FotoPrisa driver
FotoPrisa driver is designed specifically for making it
easier and more efficient to print images in various
formats with FotoPrisa Printer. Its multifunctional
capability and easy-to-use interface allows you to
adjust print settings and image easily and intuitively.
For more detailed information on how to use the
FotoPrisa driver, please refer to the descriptions in
Chapter 2.
FotoPrisa
Photo Express
Photo Express is a powerful image editing software.
With Photo Express, you can open, edit and save
images in various formats from different image
sources and create birthday cards, greeting cards
easily and quickly with its built-in templates. Its userfriendly interface makes it easy and efficient for you
to edit images even if you are a novice in image
editing. For more information on how to use Photo
Express, please see Chapter 3.
Page 15

7
Ribbon cartridge hook
“READY” LED
“STATUS” LED
Do not replace the ribbon cartridge while
FotoPrisa
1.4 Prepare to print
This section shows you how to prepare the printer for printing
images. Follow these steps when you use the FotoPrisa Printer
to print images.
Step 1- Turn on the printer power
Turn the power switch ON and wait until the printer completes
its self-test. The “READY” LED indicator will first blink for a few
seconds then remain on. If you find the “STATUS” LED indicator
blinking red intermittently after the self-test, go to Chapter 5 to
check if problem occurs within your printer.
Step 2- Replace ribbon cartridge (when necessary)
If the print ribbon cartridge is used up, you can replace the old
cartridge with a new one after the printer is powered on. Refer
to the following steps to change ribbon cartridge:
the READY LED indicator blinks.
1. Open the ribbon cartridge cover. Lift the ribbon cartridge
hook to release the ribbon cartridge.
2. Gently pull the ribbon cartridge out by holding the handle on
the cartridge.
3. Before loading the new ribbon cartridge into the printer,
take up the slack by rotating the ribbon roller as shown in
the figure. When doing so, keep away from dust and do not
touch the ribbon.
Page 16

8
FotoPrisa
Printing side
Marked side
Do NOT touch the printing side of the
4. Push the new ribbon cartridge all the way into the ribbon
cartridge socket. When the cartridge goes into its place, you
will hear a click from the ribbon cartridge hook. Close the
ribbon cartridge cover.
Step 3- Load Paper
Load photo paper and postcards
Please note that photo paper and postcards are two-sided and
only one side can be used for printing. You can either load
paper through the manual paper-feeding slot or into the paper
cassette:
paper when you load. Fingerprints on the
printing surface will spoil the image
printout.
Load paper through manual paper feeding slot
Insert photo paper horizontally into the manual paperfeeding slot one by one with the marked side face
down.
Align the position of the paper so it can be inserted
straightly into the slot by the center. Push the paper
all the way into the slot. The paper will first be
stopped by the mechanism inside and then rolled into
the printer. Do not insert more than one sheet each
time.
Page 17

9
FotoPrisa
Sticker (4x4)
Sticker (single)
Load paper through paper cassette
Before you load the paper into the paper cassette,
ruffle the paper to separate each sheet.
Open the paper cassette cover and load photo paper
with the marked side face down into the paper
cassette. You can load up to 25 sheets of photo paper
into the paper cassette.
Insert your finger into the opening at the back of the
paper cassette to hold the paper inside the cassette,
then insert the paper cassette into the paper cassette
slot. You will hear a click when the paper cassette is
pushed into its place.
Load stickers
Load stickers only through the manual paper-feeding slot. Do
not load the stickers with paper cassette, as it will cause
malfunction to the printer. Make sure that the marked side of
the sticker faces down when you load.
Page 18
10
FotoPrisa
Step 4- Print
Print images from your image editing software. The FotoPrisa
driver Preview Window will pop up if you have checked
“Preview” in the Property Window (please see Chapter 2 for
details). You can adjust the print settings from the Preview
Window. When FotoPrisa Printer is printing, the paper will go
back and forth for several times. When printing job is
completed, the FotoPrisa Printer stops printing and you can take
the printout out of the printer.
DO NOT remove the paper cassette or open the
ribbon cartridge cover while printing.
Page 19

11
Chapter 2. FotoPrisa driver
This section gives you a comprehensive description on the
FotoPrisa driver functions and how to adjust printer settings and
image quality in the Preview Window.
2.1 Introduction to FotoPrisa driver
FotoPrisa driver is an integrated part of your FotoPrisa Printer.
The FotoPrisa driver works as a bridge between the printer and
application software (such as Photo Express). Before you
actually print, you can adjust various print settings in the
FotoPrisa driver. Below is a general description of what
FotoPrisa driver can do:
Adjust your FotoPrisa Printer settings
FotoPrisa driver allows you to print images in different
orientations, styles or on different media. You can choose to
print images in a portrait or landscape orientation, tile the image
or print on photo paper and stickers. Besides, you can also
select the paper source and resolution you want to apply when
you print.
FotoPrisa
Set print area
With this function, you can adjust the position and size you want
the image to appear on the paper.
Trim image quality
This feature allows you to adjust the image quality when you
preview the image. The options include image brightness,
contrast, hue and saturation.
Page 20

12
The FotoPrisa Printer driver can be divided into two parts:
Property Window and Preview Window.
2.2 Property Window
FotoPrisa
This is where you can adjust the print
settings and print area. After the
FotoPrisa driver is installed successfully,
there are two ways to access the
Property Window:
You can double-click the "Printer" icon in
Windows "Control Panel". On the
"FotoPrisa 300 Series" icon, right-click
your mouse and choose "Properties" in
the submenu. Or, in Photo Express, click
the icon on the Shortcut Bar when
you print. The Property Window will pop
up automatically.
You will find two extra tabs added to the regular Printer
Properties Window:
2.2.1 The "Setting" tab
"Setting" tab contains the following printing options:
About
Displays the version number and other related information about
the driver.
Help
You can click this button to read the on-line help.
Page 21

13
FotoPrisa
Orientation
This option allows the image to be printed on the paper in two
orientations: landscape and portrait. You can choose the proper
printing direction that fits the image style.
When “Resolution” is set to “300x600dpi”, the
“Orientation” is unchangeable in Preview Window.
Tile
This option is useful when you want to multiply the image on
the paper or print on a sticker. If you choose "1", the printer
uses the whole available print area to print the image. When
you choose "4", the print area will be divided into 4 equal parts
and each single part will be used to print the whole minimized
image. You will get 4 identical (and minimized) images on one
sheet of paper. The "16" option produces quite similar result,
with the difference that the print area is divided into 16 parts
instead of 4.
The Tile function can be limited by the media type
(please see below) you use. If you choose "Sticker
(4x4)" as the media, the "1" and "4" option will be
disabled automatically. That is, if you are printing on a
4x4 sticker, only "16" is applicable.
Preview
When this option is checked, the FotoPrisa driver will bring up
Preview Window when you click "Print" in the application
software. If you leave this box empty, the printer driver will skip
the Preview Window and print images using the latest settings.
Copies
This item decides the number of the image copy. You can either
enter the number (up to 25) directly in the box or push the
increase/decrease button to set the number.
Page 22

14
FotoPrisa
Media Type
You can choose between Photo Paper, Sticker (4x4) and Sticker
(Single) in this item. If you use photo paper or postcard for
printing, choose "Photo Paper". If you are printing images on
stickers, please choose "Sticker (4x4)" or “Sticker (Single)”.
If you choose "Photo Paper" as the media, you can tile
(see above) the image in 1, 4 or 16 on the paper, and
the paper can be loaded either manually or
automatically. However, if you choose "Sticker (4x4)"
as the media, only "16" is applicable in the "Tile"
option and you can only load the sticker manually.
Source
Select the paper source of the printer: Auto-Feed Cassette or
Manual Feed. You can choose to load the paper automatically
(from the paper cassette) or manually (from the manual paper
feeding slot).
If "Sticker (4x4)” and “Sticker (Single)" is chosen in
"Media type", only "Manual Feed" is applicable.
Resolution
You can choose either 300x300 dpi or 300x600 dpi as the
printing resolution. Higher resolution creates image with better
quality.
When “Resolution” is set to “300x600 dpi, the
“Orientation” is unchangeable in Preview Window. For
parallel port model, you will have to set the transfer
mode to ECP to use the resolution of 300x600 dpi. For
details, please see page 43 in Chapter 5.
Page 23

15
FotoPrisa
2.2.2 The "Print Area" tab
According to the settings in “Orientation”, “Tile” and “Media
Type” in the "Setting" tab, the "Print Area" tab displays the
available print area options and their related information. For
example, if you chose landscape in "Orientation" and "1" in
"Tile" in the "Setting" tab, the “Print Area” tab will show three
available options:
You can click any one of the three thumbnails to choose.
Meanwhile, the related information including image height/width
and border size will be displayed below the thumbnails. You can
choose the gauge unit between “mm” and “inch” from the “Unit”
drop-down listbox. When the unit is changed the Height/Width
and border information will also be updated simultaneously.
If you choose "Sticker (4x4)" as the media type in
"Setting" tab, you will see only one option in the
"Print Area" tab, and no Height/Width or Border
information will be shown.
Page 24

16
2.3 Preview Window
Preview Area
The preview area is where you can get a idea of what the image
will look like before you actually print. Any modification made to
print setting will also be reflected here. You can adjust the
image position by first moving the mouse cursor on the image,
when the cursor becomes a hand, click and drag the image to
the desired position.
FotoPrisa
The Preview Window only appears
when you have checked "Preview"
in the "Setting" tab in Property
Window:
The gray line in the “Preview Area” will not be printed
on the paper.
Ruler and Unit Button
Two rulers are located at the left and upper side of the “Preview
Area” to provide you a reference for actual image size. You can
change the ruler unit either to inch or millimeter by pushing the
Unit Button. "m" represents Millimeter, while "i" represents
"Inch".
Scaling Box
Increase/decrease the scale of the preview image. You can key
in the scaling number (from 25 to 400) directly in the box or
push the increase/decrease button to change the preview image
scale. Please note that when you enlarge the scale, the image
quality may decrease and become blur.
Page 25

17
FotoPrisa
“Print” button
Click this button to print.
“Cancel” button
Click this button to cancel.
“Help” button
You can click this button to read the online help content.
“Information” button
Click this button to display the related information about the
FotoPrisa driver.
"Setting" tab
The options in the "Setting" tab works just like the options in the
"Setting" tab of the Property window. In this tab, only
Orientation, Tile, and Source options are adjustable here. Please
refer to the Property Window section for more descriptions.
"Reload" button
Push this button to reset the scaling value to 100% and image
preview position to default setting.
“Center” Button
Press this button to center the image in the print area.
Page 26

18
FotoPrisa
"Image Quality" tab
The Image Quality tab provides the following tools to adjust the
image quality before you print. The setting change will be
applied in the preview area in real-time.
Brightness:
Drag the slider to the left to decrease the overall brightness of
the image. To lighten the image, move the slider to the right.
Contrast:
This tool can control the difference between the lighter and
darker part of the image. If you move the slider to the right, you
will find that the difference between the lighter and darker part
of the image is enhanced and thus makes the image look
sharper. The image blurs if when you move the slider to the left.
Saturation:
This tool can adjust the intensity of color in the image. For
example, if you drag the slider to the right to increase the
saturation of the image, the intensity of color in the image
becomes higher. For example, red becomes redder and blue
becomes bluer.
Hue:
Use this function to adjust the overall hue of the color in the
image. If you move the slider over the blue section, the whole
image will become bluish. This is useful when you want to
correct the color of an image in which certain color appears to
be stronger.
Resolution:
Displays the current resolution you use for printing. You can
change it in the Property Window-“Setting” tab.
Default Button:
Reset all settings in the “Image Quality” tab to system default
value.
Page 27

19
Chapter 3. Photo Express
In this chapter you will be presented a general introduction to
the functions of Photo Express. For more detailed descriptions,
please first install Acrobat Reader by searching and doubleclicking the file “ar32e301.exe” located in the software disc,
then open the file “pe2.pdf” to read the complete electronic
manual.
3.1 Getting Started
Photo Express is the ultimate tool for adding that extra spark of
life to your photos - it gives you the power to take ordinary,
everyday pictures and turns them into high-quality works of art.
With its guided workflow and intuitive interface, you’ll be
printing out personalized birthday cards, calendars, and posters
in no time at all!
Photo Express brings a whole new attitude to photo editing.
With its professional-quality templates and easy-to-use editing
and management tools added to an all new interface, photo
editing has never been easier or this much fun. High-end tools
in a home environment put the power of a photo studio right at
your fingertips.
With Photo Express, you can:
FotoPrisa
♦ Repair cherished pictures with powerful touch-up and clone
tools.
♦ Realistic paint tools turn any scene into a work of art.
♦ Use templates to create outstanding calendars, birthday
cards, greeting cards, invitations…, etc.
♦ Organize and manage all your digitalized photographs with
Album.
Before you run Photo Express, make sure that the monitor
display is at a resolution of 800 x 600 pixels or 1024 x 768 pixels
and Hi Color (16 bit or higher) or True Color (24 bit) mode.
Page 28

20
FotoPrisa
You can run Photo Express by either double-clicking the
icon on your desktop or from the shortcut in the Windows
“Start” menu. After Photo Express is launched, the following
main screen will appear:
WorkspaceTool Bar Options Panel
Mode Tabs Command Panel
Global Viewer and Thumbnail Scroll
Shortcut Bar
Page 29

21
FotoPrisa
Below is an introduction to each part of the Photo Express main
screen:
Mode Tab: The Mode tabs switch Photo Express
between Photo mode and Project mode. Photo mode
is where the majority of your work is done, while the Project
mode lets you make greeting cards, name cards, and other fun
things based on templates.
Command Panel: The Command panel lists all of the available
categories in Photo Express necessary for getting the most out
of your creativity when working on photos. Each category
contains a specific set of tools.
Options Panel: The Options panel shows you all
the different options available for any given tool.
Tool Bar: The Toolbar contains all of the tools
you need to edit your photos. Each group of
tools is divided into categories - when you
select a new category, the tools on the Toolbar change
accordingly. Categories can be selected from the Command
panel.
Shortcut Bar: The Shortcut bar makes
available to you all the most commonly
used menu commands. These commands
vary depending on the Command panel category you are
currently in. Click the green arrow to hide the Shortcut bar.
Thumbnail scroll: The Thumbnail scroll opens from the
Global Viewer and lists all the images you currently have
open with the topmost image displayed in the window below
the Command panel.
Workspace: The Workspace is where your photo is placed as
you work on it.
Page 30

22
3.2 Applications
In the sections below, we will show you how to make your
personalized postcards, invitations, greeting cards, name cards
and stickers with your FotoPrisa Printer and the templates in
Photo Express. Photo Express allows you to import images
various sources, including a file, a scanner or a digital camera. It
will be more amazing and interesting if you can use these
imaging devices to create your own masterpieces.
Leave the FotoPrisa software CD in the CD-ROM drive when you
want to use the templates in Photo Express.
In the sections below, we do not intend to give you a
comprehensive instruction on using Photo Express.
For more details, please refer to the Photo Express
on-line help and electronic user’s manual.
Create a personalized greeting card
This section describes how to create a personalized greeting
card using the image acquired from a scanner. Make sure the
scanner is turned on and installed properly before you go.
FotoPrisa
1. Click Project on the Mode Tab.
2. On the Options Panel, click Greeting Card.
3. The templates will appear in the Workspace. Double-click
to choose the template you like.
4. Click on the image you want to replace and click Scanner
on the Tool Bar.
5. In the Select data source drop-down listbox on the
Options Panel, choose the scanner driver to use and click
Replace.
Page 31

23
FotoPrisa
6. The scanner driver will pop up. Scan the image you want to
use. When finished, the image will automatically replace the
one in the template. You can adjust the size of the image by
moving the handles on it.
7. Now we want to edit the text on the greeting card. Click
Text on the Command Panel.
8. Click the text on the template and a box will appear on it.
Click and drag to adjust the position of the text box.
9. On the Tool Bar, click Add/Edit.
10. Enter new text or edit the existing text on the Options
Panel. Click New or Update to complete.
11. Now you are ready to print the template with your FotoPrisa
Printer. Choose Print from the Command Panel. Select
Normal from the Tool Bar and FotoPrisa 300 Series
from the Options Panel.
12. Click Print. The FotoPrisa Preview Window will appear
after a few seconds. If everything looks OK, click
button to start printing your greeting card.
Page 32

24
FotoPrisa
Make a unique invitation for your friends
Aside from getting images from a scanner, you can also use a
digital still camera to capture images and import them into
Photo Express. You can then use the templates in Photo Express
to edit them and output them as unique invitations for your
friends!
1. Click Project on the Mode Tab.
2. On the Options Panel, click Invitations.
3. The templates will appear in the Workspace. Double-click
to choose the template you like.
4. Click the image you want to replace and click Camera on
the Tool Bar.
5. In the Select data source drop-down listbox on the
Options Panel, choose the camera to use and click
Replace.
6. The camera driver will pop up. Follow the instructions of the
camera driver to import the image into the template.
7. Now we want to edit the text on the greeting card. Click
Text on the Command Panel.
8. Click the text on the template and a box will appear on it.
Click and drag to adjust the position of the text box.
9. On the Tool Bar, click Add/Edit.
10. Enter new text or edit the existing text on the Options
Panel. Click New or Update to complete.
11. Now you are ready to print the template with your FotoPrisa
Printer. Choose Print from the Command Panel. Select
Normal from the Tool Bar and FotoPrisa 300 Series
from the Options Panel.
Page 33

25
FotoPrisa
12. Click Print. The FotoPrisa Preview Window will appear
after a few seconds. If everything looks OK, click
button to start printing your invitation.
Page 34

26
FotoPrisa
Prepare an amazing postcard for your relatives
If you have already had a file stored in your computer that is
suitable to be output with FotoPrisa Printer, you can also use it
to create an amazing postcard.
1. Click Photo on the Mode Tab.
2. Click File on the Tool Bar. Click on the Options
Panel to look for the file you want to use. The thumbnails
will then appear on the Options Panel. Choose the
thumbnail by clicking on it and click Open to Workspace.
3. Click Open. The image will appear in the Workspace.
4. Click Print on the Command Panel. Choose Normal on
the Tool Bar and select FotoPrisa 300 Series from the
Printer Name drop-down listbox on the Options Panel.
5. Click Print. The FotoPrisa Preview Window will pop up a
few seconds later.
6. Load postcard paper either manually or through the paper
cassette. If everything looks OK, click to start printing
your postcard.
Make sure that the print side faces up when you
load.
Page 35

27
FotoPrisa
Create stickers
With your FotoPrisa Printer and the specially designed 4x4
sticker, you can create your original stickers and put them on
your books, cellular phone or other personal goods. You can
also give them to your friends to share your creativity.
1. Click Project on the Mode Tab.
2. Click to choose a template to use on the Options
Panel. The templates will appear in the Workspace.
Double-click the thumbnail you like to open it.
3. Replace the images in the template either from a
scanner, digital camera of an image file by clicking
Scanner, Camera or File on the Tool Bar.
4. Click Print on the Command Panel. Choose Normal
on the Tool Bar and select FotoPrisa 300 Series from
the Printer Name drop-down listbox on the Options
Panel.
5. Click the icon on the Shortcut Bar to bring up
the FotoPrisa Property Window. Change the Media
Type to Sticker (4x4) then click OK.
6. Click Print on the Options Panel. The FotoPrisa
Preview Window will pop up. Click to start
printing the sticker.
Page 36

28
FotoPrisa
Create a special name card
Don’t you find your name card too dull and serious? Use your
FotoPrisa Printer and the templates in Photo, you will be able to
create vivid and high-quality name cards for yourself.
1. Click Project on the Mode Tab.
2. On the Options Panel, click Name cards. The templates
will appear in the Workspace.
3. Double-click to choose the template you want to use. The
template will be enlarged in the Workspace.
4. Click on the image to replace and click Scanner, Camera
or File…, etc. on the Tool Bar to get the image you want
to use in the template.
5. After you replace the image in the template, you can start to
edit the text. Click the text you want to edit and click Text
on the Command Panel.
6. Click Add/Edit on the Tool Bar and edit the text on the
Options Panel. When finished, click Update or New.
7. Now you are ready to start printing your name card. Click
Print on the Command Panel and then click Tile on the
Options Panel.
8. Select FotoPrisa 300 Series from the Printer name
drop-down listbox and choose the tile and layout options to
adopt the name cards to the size of the paper.
9. Click Print. The FotoPrisa Preview Window will pop up a
few seconds later. If everything looks OK, you can click
to print your name card.
Page 37

29
FotoPrisa
Chapter 4. Some Useful Tips for Printing
To achieve the best print quality:
Use only genuine FotoPrisa Printer consumables. Genuine
FotoPrisa Printer ribbon cartridges and paper are exclusively
designed for the FotoPrisa Printer to provide the best printing
result. Avoid using any third-party ribbon cartridges or paper as
they may cause malfunction to the FotoPrisa Printer.
4.1 Cautions on using ribbon cartridges and paper
The side without Acer Peripherals logo (or stamp mark) is the
printing side. Load the paper with the printing side face up.
Proper printing is impossible if the surface is dusty or dirty.
Handle the paper with care so you would not touch the printing
side with your fingers. Fingerprints on the printing surface can
cause poor printing results.
Do not print with folded or bent paper. It may cause paper jam
or printer malfunction.
Do not drop the ribbon cartridge or otherwise apply strong
impact on it.
Please do not write or type on the printing surface of the paper
or sticker before you print. You can write or draw on the
printing surface with an oil ink pen after you finish printing.
Avoid storing the printouts with printing surfaces contacting with
each other or with rubber or plastic objects (including vinyl
chloride or plasticizer). Prolonged contact with these objects will
cause the ink on the printouts to transfer on to them.
To prevent damage to the printer, please do not replace the
ribbon cartridge when READY LED indicator blinks.
Page 38

30
FotoPrisa
Keep the photo paper/sticker and ribbon cartridge away from
high temperature, humidity and direct sunlight.
Please flatten the paper in packed status if it is curled up (See
figure 1).
Before you print, ruffle the photo paper/sticker to release the
static electricity and separate each sheet. When doing so, avoid
touching the printing surface of the photo paper/sticker (See
figure 2). Otherwise, the fingerprint will spoil the final printout.
Figure 1
Figure 2
Please do not leave too many printouts on the output tray while
printing. Keep the output tray fully drawn out to prevent
blocking the paper path (See figure 3).
Figure 3
Page 39

31
FotoPrisa
4.2 Choosing the right file formats for the printing
output
Like in Photo Express, in many image editing software, more
than one image file format are supported for editing and output
use. But which formats are good enough for the printing? Here
you will be introduced some ordinary formats and which ones
are appropriate for FotoPrisa Printer output.
*.bmp (Bitmap)
It’s the simplest way to store the data by mapping the
digitalized image into a grid of pixels. Each Pixel contains 3
values of R(Red), G(Green), B(Blue) which are defined by a
specific number of bits (usually it’s 8 bits for each color for most
of popular image editing software which support 24 bits of color
processing). It expresses the most real quality but has the
biggest data size.
*.gif (Graphics Interchange Format)
A format widely used in World Wide Web for efficient
communication. The limitation of this format is that it can only
express 256-color image. Most of the time, we see the banners,
animated pictures and icons in this format.
*.jpg (JPEG – Joint Photographic Experts Group)
A compression method that was developed to create a standard
for sending images over digital communication lines. Most high
and true color images compressed with it show little or no
degradation; thus it has become one of the most popular
formats in use today.
Page 40

32
FotoPrisa
BMP image (600 x 399 pixels,
*.tga (Targa)
This format, one of the principal True Color image formats, can
store image data with up to 32 bits per pixel. Compared to TIF
and JPEG, which are other options for True Color images, TGA is
relatively simple and therefore widely used in imaging programs.
The only drawback to this format is that it lacks a good
compression scheme.
*.tif (Tagged Image File Format)
This is a standard file format for many imaging programs that
support all data types from monochrome up to 24-bit True
Color, as well as many color models and compression schemes.
An even more power aspect of TIF is that its files can move
easily between platforms like a PC or a Mac, making it an ideal
format for storing image data.
702KB), converted to :
(1)GIF format : 135KB
(2)JPG format : 85KB (varies
according to the compression ratio)
(3)TIF format : 577KB
To vividly express the photographic image through Photo
Express, it’s recommended to use the lossless files like *.bmp or
*.tif.
By recording 24-bit color data, JPG is another option for the
image source if you can carefully filter out the images that are
somewhat lossy. As for GIF, only keeping data of 256-color, it’s
not appropriate as source to express the “True Color” on the
photo paper from the point of eyesight.
You may find many unfamiliar file format supported in the
imaging programs when you want to “Save As”, like EPS, PIC,
SCT, RAW…etc. They are developed to be adapted to some
Page 41

33
FotoPrisa
specific programs or equipments. Here we don’t recommend
these formats for FotoPrisa Printer.
4.3 Choose the appropriate image source for the file
to be printed
To get a perfect printout with FotoPrisa Printer, first, there are 3
points needed to really take care of for choosing an appropriate
image input:
Image size
Before we go into the topic, there are several important terms
to know in advance.
A digital image is composed of a minimum unit called pixel.
With the variation of pixel properties, you can create various
effects to the image. To measure the density of pixels (or
resolution) in an image, we use dpi (dots per inch) to see
how delicate the image will be to our eyes. If an image is
composed of more pixels, it has larger image size. If the image
has higher resolution, it will seem more delicate and details in
the image can be presented more clearly.
FotoPrisa Printer is a 4" x 6" photo printer at a resolution of 300
x 300dpi or 300 x 600 dpi. Actually the maximum print area (full
size) is about 4” x 5”, or 1200 pixels (=300dpi x 4”) x 1500
pixels (=300dpi x 5”). Therefore, in order to have a full-size,
true-color printout, it’s better to find out an original image of
which data size is bigger than the wanted maximum image size
(resolution x print area, that is, larger than 1250 pixels x 1500
pixels). Thus we can fully utilize the advantage of the 300dpi
resolution offered by the printer.
Of course, it's hard to always get an image bigger than what we
need to print. Indeed that will not be a big matter if we got a
somewhat smaller image size, the printout can be still vivid to
our eyesight via FotoPrisa Printer. However, if the image size
you choose is much smaller (under half of the wanted maximum
image), either you sacrifice the resolution to have a more blur
printout or you can only get a smaller size of printout without
Page 42

34
FotoPrisa
choosing “Keep aspect ratio”.
sacrificing the resolution. In order to obtain the best printing
results, it is recommend that the source image size be large
than 800 pixels x 1000 pixels. If you are using a digital camera
as the image source, make sure that the camera is capable of
taking pictures at 1.3 mega pixels.
Aspect ratio
Take the full size printout as an example, the ratio of height to
width in Portrait mode is 5:4. To keep possibly each part of the
original image printed out in the paper, it's important to have an
image with appropriate aspect ratio, better close to 5:4.
Otherwise, even if the image size is big enough, the image can't
be printed out through out the whole paper, unless the aspect
ratio is changed on purpose to fit the paper dimension by having
a distortion.
Original image in the Preview
Area.
Fit the image width to the print area
by magnifying the image and
Fit the whole image to the print
area by applying “Fit to page”
without choosing “Keep aspect
ratio” in Photo Express. Distortion
occurs.
Page 43

35
FotoPrisa
Image dimension and resolution
Image dimension indicates the very dimension of an image you
will see on physical printouts. The difference between image
dimension and image size is that image size is the absolute size
of the image, while image dimension is subject to change by
applying different printing resolutions when you print the image.
If you enlarge the image dimension without changing the image
resolution, you will see that although the image dimension
becomes larger, its quality becomes rather degraded.
Below you will be shown how to adjust the resolution and
dimension of an image with Photo Express to best-fit full-size
FotoPrisa Printer printing use.
How to check the image dimension before you print
In Photo Express, you can check the image dimension by doing
the following:
1. Open an image from either a file or from the Album.
2. On the Command Panel, click “Edit”, then “Adjust”.
3. On the Tool Bar, click “Size”.
4. The related information will be shown on the Options
Panel. Here you can check the dimension of the image.
There are various ways to check image
dimension in different image editing
software. Please refer to the instructions of
your image editing software.
Page 44

36
FotoPrisa
Different images in different dimensions
The actual printout size shown in FotoPrisa Preview window
Page 45

37
FotoPrisa
How to adjust the resolution and dimension of an image
Now you have chosen an image with appropriate image size and
aspect ratio according to our discussion above, the next step is
to adjust the resolution and dimension of the source image.
The easiest way to adjust image resolution and dimension is to
use the Adjust function provided by your application software.
For example, now you have an image with resolution at 120dpi
and dimension of 8” x 10”, and you want to make a full-size (4”
x 5”) print on the paper in portrait mode at 300x300 dpi:
1. On the Command Panel, click “Edit”, then “Adjust”.
2. Click “Size” on the Tool Bar.
3. On the Options Panel, click User Defined and Keep
aspect ratio and then key in the dimension you want the
image to be resized into. Since we want to make a full-size
print on the paper with FotoPrisa Printer, in this case, enter
Width=4, and Height will be set to “5” automatically
(because the aspect ratio is kept fixed) and set the Unit to
“Inch”.
4. Set the Resolution. In this case, enter 300 and set the unit
to Pixels/In.
5. Click Apply to finish.
Page 46

38
Quality of original image
The printer reflects the image we want to print out. If the
original image's quality is not good enough (e.g. with smearing
and unwanted dots or scribbles), of course, the printout will not
be satisfactory as well.
4.4 Printing stickers
When you want to print an image into 4x4 stickers, you don’t
necessarily need to choose an image with a size larger than 800
x 1000 pixels. However, we do recommend that the image size
be no smaller than 224 x 307 pixels and resolution below 300
dpi.
When you want to print full-size images on single stickers, follow
the tips mentioned above. In addition, you can also print images
on a single sticker and cut them off as separate stickers.
FotoPrisa
4.5 Choose appropriate web page image for full-size
printing
Often you find many beautiful images on the Internet web page
and may want to print them out with your FotoPrisa Printer.
According to the discussions above, we know that it takes
several important factors to make a good full-size printout.
Commonly, one single pixel on the screen represents one pixel
in the image, so we can follow the simple and quick way below
to judge if the size of an image on a web page is suitable for
FotoPrisa Printer full-size printing.
Firstly, please check the resolution of your computer display (as
to how to check the display resolution, please refer to the
documents that comes with your computer or display system).
Generally, the resolution modes most commonly used today are
800 x 600 pixels and 1024 x 768 pixels.
Page 47

39
FotoPrisa
Secondly, maximize your browser window and you can
approximately judge if the image size is suitable for FotoPrisa
Printer full-size printing by comparing with the size of window
visible area.
For example, if your display resolution is 800 x 600 pixels:
The image width is about 1/4, and length is
about 1/3 of the screen visible area width and
length, therefore, the image size is about 200 x
200 pixels, the image printout dimension is
about 0.67”x 0.67” at 300dpi.
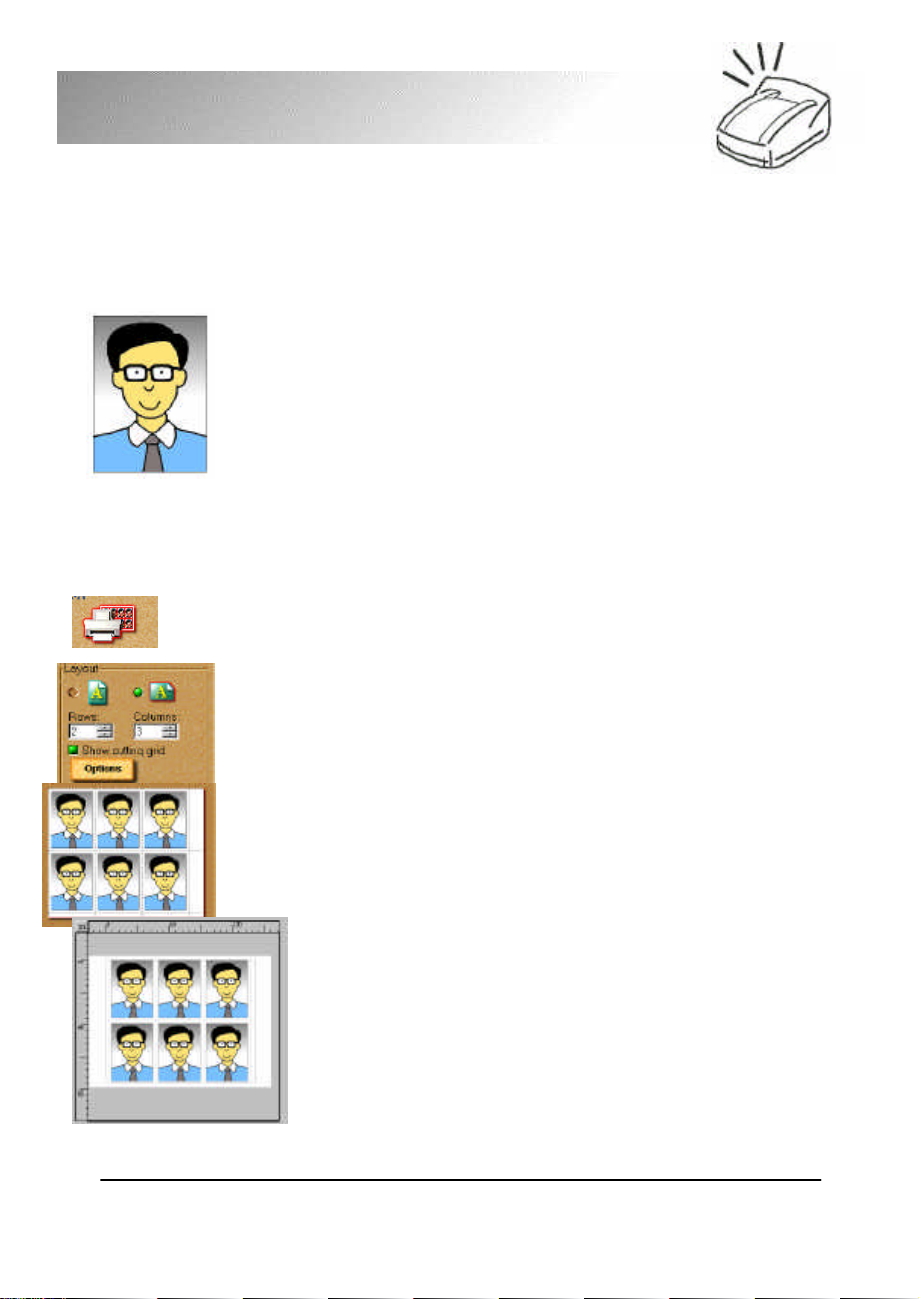
4.6 Make your own ID photos
Based on the maximum print area of FotoPrisa Printer, one
photo paper can exactly adopt six 2”x1.5” ID photos.
From the above illustration, it’s easy to do a calculation about
how large the image size is needed under the condition: print
area 101.5mm x 125mm; resolution at 300dpi (dot per inch) –
Image size for a 1.5” x 2” ID photo = 450 pixels x 600 pixels
Now there are two important steps to follow:
The image width is about 1/2, and length is
about 1/4 of the screen visible area width and
length, therefore, the image size is about 400 x
150 pixels, the image printout dimension is
about 1.3”x 0.5” at 300dpi.
Page 48
40
FotoPrisa
1. Get the right image
If you are using a digital still camera
B
A
A : B = 4 : 3
It’s better to choose the camera with aspects ratio of 4:3, like
640 x 480 (minimum requirements bigger than 600 x 450),
800 x 600, 1024 x 768…, etc.
Then download to the PC to save as appropriate file in the
image-editing program (such as Photo Express). If the aspect
ratio is not exactly 4:3, use to the Crop function to remove
the longer side as to fit the ration of 3 to 4.
If you are using a scanner (you already have a 2” x 1.5”
photo on hand)
Select only the part of the whole ID photo and do the scanning
at 300dpi. Of course, the real ID photo usually has an aspect
ratio slightly deviated from 4:3.
To adopt the scanned image within the range of 2” x 1.5”,
adjust the dimension of the relatively longer side (compared to
the standard ratio 4:3) to either 2” or 1.5” by fixing the
resolution at 300dpi. Then we got a similar dimension of image
for the ID photo printout.
2. Arrange the 6 tiled ID photos on one photo paper
If the “Tile” function is available like in the options of Print in
Photo Express, just choose “Landscape” as orientation and set 2
Rows and 3 columns, then click “Print”. It’s so easy to
make 6 ID photos!
If in other programs, please open a new image file of
1250 pixels x 1500 pixels, same as the maximum print
area. Then use Copy and Paste functions to make a
new image with 6 ID photos just like shown in the
illustrative figure. Then save it to your album! And from
that on every time you need to develop new ID photos,
just load the file and print, then it’s done!
Page 49

41
FotoPrisa
WARNING: DO NOT TOUCH THE COMPONENTS
Chapter 5. Troubleshooting and FAQ
5.1 Troubleshooting
5.1.1 Paper Jam
If you encounter paper jam during the operation of the printer,
please refer to the following instructions to remove.
1. Power off your printer and then remove the paper cassette
from the printer.
2. Turn the printer upside down. Slide the output tray open
and you will see the paper jam door.
3. Open the paper jam door.
4. Pull the jammed paper out of the printer.
INSIDE THE PRINTER.
5. Replace the paper jam door and printout tray. Turn the
printer back to its place and turn on the power.
Page 50

42
FotoPrisa
5.1.2 LED Messages
The LED indicators on the printer provide information on the
status of your printer. The on/off/flash of each LED indicator
represents certain error or process that occur within your
printer. Please refer to the following table to identify the
meaning of the LED messages.
Non-Error Messages
Status READY STATUS
Initialization (Self test) Blink Green Off
Printing On Green Blink Green
Ready On Green Off
Power saving mode Blink every 2 seconds Off
Error Messages
Status READY STATUS
flash count
Paper jam On Green 2, Red Remove the paper jam.
Out of paper On Green 3, Red Load paper.
Out of ribbon On Green 4, Red Replace the ribbon
cartridge with a new one.
Paper jam door
open
Data transfer
timeout
Printing head
overheat
If you find the LED indicators display messages that are
not listed in the table above, please power off the
printer immediately and contact your dealer for service.
On Green 6, Red Close the paper jam
door.
On Green 7, Red Terminate all other
applications in use or
restart the system.
Blink Green On Red Wait till the printing head
cools down.
What to do
Page 51

43
FotoPrisa
5.1.3 Printer (parallel) port settings (For FotoPrisa
300P)
FotoPrisa 300P is designed to work with your computer in all
parallel port modes, but is optimized for ECP-mode connection
with the parallel port of your computer. If the FotoPrisa Printer
is not working under ECP mode with your computer, the printer
will not be able to output images in 300x600 dpi.
Generally, there are presently four parallel connection protocols
adopted by the industry: EPP, ECP, Bi-Directional and SPP.
EPP (Enhanced Parallel Port) and ECP (Enhanced Capability
Port) are high-speed parallel transmission protocols (about
600KB/sec to 1MB/sec) supported by almost all Pentium or
higher-level models. Bi-Directional and SPP (Standard Parallel
Port) have lower transmission speed (about 100KB/sec to
200KB/sec) but they are supported by all 386 or higher PCs.
How to check and change the parallel port mode of your
computer
In order to obtain the highest printing speed and efficiency, we
suggest that you change the parallel port mode into ECP in the
BIOS (Basic Input and Output System) of your computer. You
can follow the steps below to change the parallel port settings in
the BIOS:
1. Restart your computer and pay attention to the self-test
message on the screen that directs you to press certain hot
key to enter BIOS:
If the BIOS manufacturer of your PC is Then press the following hotkey
AMI “Delete”
Award “Delete”
Phoenix “F2”
Acer “Ctrl+Alt+Esc”
2. Try to find the setting option of the parallel port (or printer
port).
3. Change the parallel port setting to ECP.
4. Save the setting change and exit BIOS.
Page 52

44
FotoPrisa
5.1.4 USB port settings (For FotoPrisa 300U)
The FotoPrisa 300U Printer is connected to your computer via
USB port. USB is short for Universal Serial Bus, a connection
interface capable of transmitting signal at 12Mbit per second.
Besides, it is a real plug-and-play interface type, which means
that you don’t have to power on a USB device before you turn
on your computer to use it. Whenever you want to use a USB
device, simply power on the device and your computer will
detect it automatically.
However, it takes the hardware and software support of your
computer to use a USB device. That is, you need to have a USB
port in your computer running USB-support operating system.
Besides, you will need to enable the USB port in your system
BIOS (Basic Input/Output System) if it is not enabled.
To enable the USB port in your system BIOS:
1. Follow the instructions described in the 5.1.3 to enter the
BIOS of your computer.
2. According to the BIOS you use, set the "USB Interface" field
under "Peripheral Configuration" or "Advanced Setup" or
"PCI Control" to “enabled”.
3. Save the change and exit BIOS.
4. For details, we recommend that you consult the document
of instructions that comes with your computer, as improper
setting changes made to the BIOS will result in malfunction
of your computer.
Page 53

45
5.2 FAQ
1. What is dye sublimation printing?
Dye sublimation works in much the same way as thermal wax
transfer. Thermal wax transfer creates images by selectively
heating colored wax from a ribbon so that it will adhere to paper
or film. The ink is impregnated in the wax. When heat is
applied, the wax melts and is transferred along with the ink to
the paper or film. As an image is printed it goes through a
three-color process and the individual colors yellow, magenta,
cyan (YMC) are each printed to the page. Three-color ribbons
are most commonly used today as black is created by
overlapping the three subtractive colors (YMC), thus eliminating
the final black panel shortens the printing time. Dye sublimation
works in much the same way as thermal wax transfer, but adds
an additional step, which is the sublimation process. Variable
amount of ink would be vaporized depending on the heat
applied to each dot and smooth it into continuous tone photorealistic images.
FotoPrisa
2. What is the difference between dye-sublimation
printing and inkjet printing?
As mentioned in Q1, a dye-sublimation printer creates images by
selectively heating wax on a ribbon and then transfer the ink on
the paper. This enables each dot in the image to have smooth
and continuous tone and thus makes the whole image look
much like a real photo. An inkjet printer can not create such
continuous tone because an inkjet printer outputs image by
jetting C, M, Y (and K) ink and adjusting the size and position of
each ink dot on the paper to simulate the graduation and tone
of colors. However tiny the dots become, you can still discover
them in the image output. Therefore, when it comes to real
photo-quality output, dye-sublimation is an ideal choice.
Page 54

46
FotoPrisa
3. What type of printing material is used?
In contrast to traditional types of liquid ink, ink cartridges,
crayon ink and dry toner, dye-sublimation printers utilize ink
ribbons which look like rolls of colored cellophane. Each roll
contains panels of cyan, magenta and yellow and the printer
works like a four-color printing press (CMYK). Black is derived as
a subtractive color and therefore a separate black panel is
unnecessary. The beauty of using ribbon is that they are
incredibly neat and clean.
4. Can I print on both sides of the paper?
No. The ribbon should be printed on the coated side of the
photo paper. There might be some problems, like paper jam,
occurs for printing on wrong side.
5. What kind of paper should I use?
To get the best image out of dye sublimation, you should use
special paper designed for FotoPrisa Printer. FotoPrisa Printer
offers various options for your application: coated photo paper,
4x4-sticker paper, single sticker paper and postcard. All options
would offer true photo quality printouts.
6. Why does the paper go in and out of the printer
while printing?
The way FotoPrisa Printer print images is quite different from
the popular inkjet printers. FotoPrisa Printer prints images on
the paper by selectively heating the ribbon in the cartridge and
it takes three different ribbon-heating procedures (Cyan,
Magenta and Yellow) to complete printing the image. Therefore
when FotoPrisa Printer completes printing image in one color, it
will first eject the paper and then retrieve the paper back for the
next ribbon heating procedure. This is why you see the paper
going in and out of the printer when printing.
Page 55

47
FotoPrisa
7. What is the difference between a YMC ribbon
cartridge and a YMCO ribbon cartridge?
There are two different kinds of ribbon cartridges available for
using with your FotoPrisa Printer: the ribbon cartridge without
overlayer (YMC) and with overlayer (YMCO).
The overlayer is mainly designed to protect the printout by
printing another layer of transparent material on the paper after
Y, M and C are printed. Therefore, if you need to take the
printout with you all the time, we recommend that you use the
YMCO ribbon cartridge while printing. If you only keep the
printout in your photo album, the YMC ribbon cartridge will be
the choice.
Page 56

48
5.3 Service and Information
For more information, please contact your local
For more information on the imaging products of Acer
Peripherals, Inc., on-line technical support and software
updates, please visit our web site at
http://www.acerperipherals.com (USA)
http://www.acerperipherals.nl (Europe)
http://www.acerperipherals.com.tw (Taiwan)
If you encounter problems using the printer or its driver
program, please contact your local dealer or send e-mail to:
USA:
APAweb@apa.acer.com
Europe:
Scanner.Fae@acerperipherals.nl
FotoPrisa
Asia:
FaeImg@api.com.tw
Try other imaging products from Acer Peripherals!
Acer Peripherals, Inc. has launched a series of high-performance
scanner products which can deliver vivid and accurate scanning quality.
dealer or visit:
http://www.acerperipherals.com
http://www.acerperipherals.nl
http://www.acerperipherals.com.tw
Page 57

49
Chapter 6. Appendix
Acer Peripherals Genuine Printing Media Series
Standard Kit – Photo
Ribbon cartridge / Photo Paper 25 sheets
Option Kit - Sticker
Ribbon cartridge / Sticker (4x4) 25 sheets
Option Kit – Sticker
Ribbon cartridge / Sticker (Single) 25 sheets
Option Kit - Postcard
Ribbon cartridge / Postcards 25 sheets
*The print media kit can be stored for 18 months under the
temperature of 25 °C at cool dark place in packed status.
FotoPrisa
Page 58

50
FotoPrisa
Product Specifications
Item Description
Print Method Dye sublimation
Resolution 300 x 600 dpi
Printable Colors 16.77 million, 256 gradations each of C, M , Y
Ribbon Cartridge Type YMC (yellow/magenta/cyan)
Paper size 101.5 x 148mm
Print area 101.5 x 125mm
Paper Cassette Capacity 25 sheets
Interface Parallel Port (ECP, Compatibility Mode), USB
Power Consumption 135 Watt maximum ; 15 Watt maximum for standby
Power Supply Voltage 100, 110, 220 or 240V AC Frequency 50/60 Hz
Dimension 228 x 287 x 115.5mm
Net Weight 3.2kg
Operating System Windows 95, Windows 98
Operating Environment Temperature 10 °C~35 °C
Relative Humidity 20% to 85% RH
* Specifications subject to change without notice.
 Loading...