

Accurist 6W50 Operating Instructions Manual

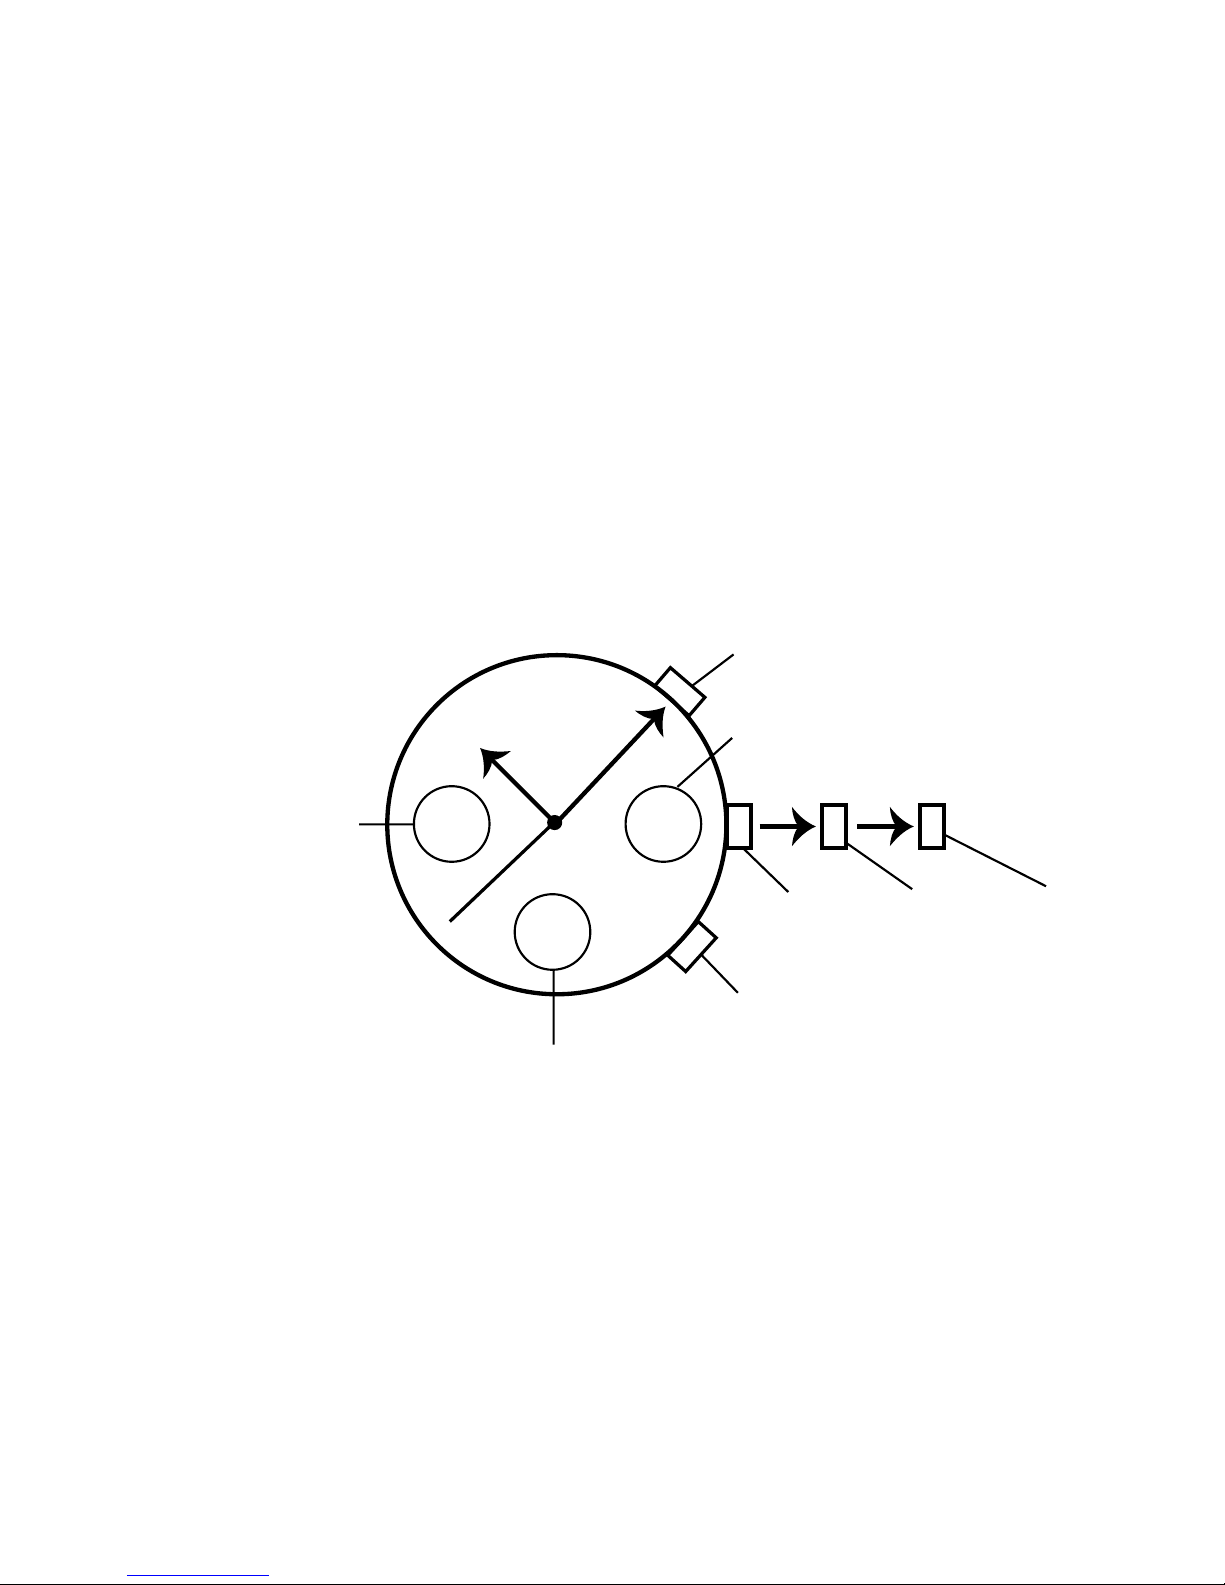
Caseback markings
w
MB 119
CAL 0T10
SR927W
Accurist Watches Logo
Model Number
Calibre Number
Battery Number

Ho
w to use these instructions
This booklet contains setting instructions for the Accurist Chronograph Alarm
series of watches. Each section describes a particular calibre (also called watch
movement) which offers a unique set of functions and features. As such, it is
necessary to identify the correct calibre of your watch before proceeding to the
appropriate section (see diagram opposite).
Further information
The latest setting instructions, technical manuals and interactive instructions
are available from our web site at www.accurist.co.uk
When on the web site please refer to ‘After sales service/download manuals’
The Accurist technical helpline is also available during office hours:
+44 (0)20 7447 3941 or email service@accurist.co.uk

Position A
24 Hour
Indicator
Dial
Calendar month dial
Stop watch dial
Timer minute dial
Mode Indicator dial
Bottom Right (BR)
Bottom Left (BL)
Top Left (TL) Top Right (TR)
Position B
6W50 Operating Instructions

Calibration of watch:
Before use, please be sure watch is calibrated to ‘0’ position.
1. Press BR Button to set the ‘Mode Indicator Dial’ to ‘0’.
All hands should go to 12 o’clock position. Please note the hands on the 24-hour
indicator dial will go to 24hr position.
If not, then:
2. Gently pull BR Button to Position B.
3. Press TR Button to adjust seconds.
4. Press BL Button to adjust hour and minutes.
5. Press TL Button to adjust calendar month indicator dial. Press the relevant but-
ton continuously for fast adjustment.
6. Push BR Button to Position A, to show next required function.

6W50 Operating Instructions continued . . .
To set the time:
1. Press BR Button to select time ‘TME’ on Mode Indicator Dial.
2. Gently pull BR Button to Position B.
3. Press TR Button to zero second hand.
When second hand is between 30-59 seconds, the minute hand will advance to the
next full minute.
4. To adjust minutes and hours:
Press TL Button to move hands forwards (clockwise). Press BL Button to move hands
backwards (anti-clockwise).
5. To adjust the 24 hour indicator dial: Press TL or BL Button until minute and hour
hands show correct time with correct 24 hour indication.
6. Press BR Button to Position A, to show next required function.

To set calendar:
1. Press BR Button to select ‘CAL’ mode.
2. Gently pull BR Button out to Position B.
3. Press TL Button until ‘Calendar month indication dial’ shows correct month.
4. Press TR Button until seconds hand indicates correct date, along the edge of
the main dial.
5. Press BR Button to Position A, to show next required function.
Additional Feature: Instant date check (whilst in time mode ‘TME’)
1. Press TR Button for date display.
Returns to time mode automatically in 10 seconds.

6W50 Operating Instructions continued . . .
To set quick alarm: AL-1
1. Press BR Button to select ‘AL-1’ mode.
2. To adjust minutes and hours for alarm time.
Press TL Button to move hands forward (clockwise)
Press BL Button to move hands backward (anti-clockwise)
3. Alarm is now set. Press TR Button to cancel alarm.
4. Push BR Button in to Position A, to show next required function.
Additional Feature: Instant date check (whilst in time ‘TME’ function)
1. Press TL Button for daily alarm display. Returns to time mode automatically
in 10 seconds or by pressing TL or BL Buttons simultaneously.

To set daily alarm: AL-2
1. Press BR Button to select ‘AL-2’ mode.
2. Gently pull out BR Button to position B. The hands will move automatically
to the previous alarm setting.
3. To adjust minutes and hours for alarm time.
Press TL Button to move hands forward (clockwise)
Press BL Button to move hands backward (anti-clockwise)
Please ensure alarm time has been set according to the 24hr indicator dial.
4. Alarm Sound:
For Loud Alarm: Press TR Button, second hand indicates 21 seconds past hour.
For Soft Alarm: Press TR Button, second hand indicates 23 seconds past hour.
To cancel Alarm: Press TR Button, second hand indicates 19 seconds past hour.
continued...

6W50 Operating Instructions continued . . .
To set daily alarm: AL-2 continued . . .
5. Alarm is now set. It will sound every day for 15 seconds or until TR Button is
pressed.
6. Push BR Button in to Position A, to show next required function.
Chronograph measurement:
1. Press BR Button to select chronograph ‘CHR’ mode.
2. Press TR Button to start.
3. Press TR Button to stop.

Split timing:
1. Pressing BL Button allows time to be checked for 10 seconds. After which it
will automatically continue uninterrupted.
2. After stopping the timing by pressing TR Button, either:
3. Hold down TL Button to read off fractions of second on stopwatch dial recorded
in total time, or
4. Press BL Button to zero stopwatch.
To set the timer:
1. Press BR Button to select timer function ‘TMR’
2. Press TL Button to select number of minutes on timer minute dial.
3. Press TR Button to start and stop timer function.
Once TR Button is pressed, press BL Button to return to zero and
re-start the countdown instantly. Note, alarm sounds for 5 seconds.
4. Press BR Button to show next required function.

6W50 Operating Instructions continued . . .
To set local time:
1. Press BR Button to select the local time function ‘L-TM’
2. Gently pull BR button out.
3. Press TL Button to move hands forward (clockwise)
Press BL Button to move hands backward (anti-clockwise)
Note, minute hand moves in 30-minute increments only, the
second hand is not adjustable.
4. Press BR Button to show next required function.

All reset function:
1. Gently pull BR Button out.
2. Press and hold TR, TL and BL Buttons simultaneously for 3 seconds.
3. Release all buttons, confirmation ‘bleep’ will sound.
4. Push BR Button in to Position A.
5. Press BR Button to set the functional dial to ‘0’ position.
Set up watch by referring to section ‘Calibration of Watch’.
Position A
Mode Function hand
Bottom Right (BR)
Function hand
Top Right (TR)
Position B Position C
24 hour hand
AS10 Operating Instructions

To set the time:
1. Turn the crown and align the mode function hand to ‘TME’ mode.
2. Gently pull out crown to position C.
3. Turn crown either way to correct time.
Turning the crown rapidly either way (continuously clicking two or more times)
causes the hands to automatically advance rapidly. When stopping the hands,
click the crown once to the right or left. When the hands are not stopped
manually, they stop automatically after being corrected by 12 hours.
4. Push in crown to position A.

AS10 Operating Instructions continued . . .
To set the calendar/date:
1. Turn the crown and align the mode function hand to ‘TME’ mode.
2. Gently pull the crown to Position B.
The second hand rapidly advances to the month display position stored in
memory.
3. Press BR Button to align second hand to correct month.
Interpretation of Month/Position of Second Hand
January: 1:00 position
February: 2:00 position
March: 3:00 position
December: 12:00 position
 Loading...