

Page 1
Document 482394
Model XMSF
Direct Drive Supply Fan
Installation, Operation and Maintenance Manual
Please read and save these instructions for future reference. Read carefully before attempting to assemble, install,
operate or maintain the product described. Protect yourself and others by observing all safety information. Failure
to comply with these instructions will result in voiding of the product warranty and may result in personal injury
and/or property damage.
General Safety Information
Only qualified personnel should install this unit.
Personnel should have a clear understanding of these
instructions and should be aware of general safety
precautions. Improper installation can result in electric
shock, possible injury due to coming in contact with
moving parts, as well as other potential hazards. Other
considerations may be required if high winds or seismic
activity are present. If more information is needed,
contact a licensed professional engineer before moving
forward.
1. Follow all local electrical and safety codes, as well
as the National Electrical Code (NEC), the National
Fire Protection Agency (NFPA), where applicable.
Follow the Canadian Electrical Code (CEC) in
Canada.
2. The rotation of the wheel is critical. It must be free
to rotate without striking or rubbing any stationary
objects.
3. Motor must be securely and adequately grounded.
4. Do not spin fan wheel faster than the maximum
cataloged fan rpm. Adjustments to fan speed
significantly affects motor load. If the fan RPM is
changed, the motor current should be checked to
make sure it is not exceeding the motor nameplate
amps.
5. Do not allow the power cable to kink or come in
contact with oil, grease, hot surfaces, or chemicals.
Replace cord immediately if damaged.
6. Verify that the power source is compatible with the
equipment.
7. Never open blower access doors while the fan is
running.
DANGER
Always disconnect power before working on or near
a unit. Use appropriate lockout tagout procedures to
prevent accidental power up.
CAUTION
When servicing the unit, motor may be hot enough
to cause pain or injury. Allow motor to cool before
servicing.
WARNING
Improper installation, adjustment, alteration,
service or maintenance can cause
property damage, injury or death. Read the
installation, operating and maintenance
instructions thoroughly before installing or
servicing this equipment.
Direct Drive Supply Fan 1
Page 2

Table of Contents
General
Receiving ..................................3
Handling ...................................3
Unpacking ...............................3
Storage
Indoor ..................................3
Outdoor .................................3
Inspection and Maintenance .................3
Removing from Storage ....................3
Installation
Outdoor Unit Mounting
Standard Curb ............................4
Electrical Wiring
Optional Exhaust Fan Starter ................5
Line Voltage ..............................5
Pre-Start-Up
Checklist
Tool List .................................6
Motor Identification ........................6
Pre-Start-Up Checklist .....................6
Start-Up
Checklist
Start-Up Checklist .........................7
Maintenance
General
Filters ...................................8
Fan Wheels ..............................8
Motors ..................................8
Reference
Vari-Green
Vari-Green Motor Features ..................9
1/2 HP and 1 HP Motors ....................9
2 HP Motors ............................10
Variable Frequency Drives (VFD) ...............11
VFD Features ............................11
Changing the VFD Access Level .............11
Operation ...............................11
Changing VFD Speed Settings ..............11
Maintenance Log .................... Backcover
Our Commitment .....................Backcover
®
Motors
Direct Drive Supply Fan2
Page 3

General
Receiving
This product may have been subject to road salt during
transit. If so, immediately wash off all visible white
reside from all exterior surfaces. Upon receiving the
product, check to ensure all line items are accounted
for by referencing the delivery receipt or packing list.
Inspect each crate or carton for shipping damage before
accepting delivery. Alert the carrier if any damage is
detected,
make notation of damage (or shortage of items) on the
delivery receipt and all copies of the bill of lading should
be countersigned by the delivering carrier. If damaged,
immediately contact your manufacturer’s representative.
Any physical damage to the unit after acceptance is not
the responsibility of the manufacturer.
do not refuse shipment
. The customer shall
Handling
Units are to be rigged and moved by the lifting brackets
provided or by the skid when a forklift is used. Location
of brackets varies by model and size. Handle in such
a manner as to keep from scratching or chipping the
coating. Damaged finish may reduce ability of unit to
resist corrosion.
Unpacking
Verify that all required parts and the correct quantity
of each item have been received. If any items are
missing, report shortages to your local representative to
arrange for obtaining missing parts. Sometimes it is not
possible that all items for the unit be shipped together
due to availability of transportation and truck space.
Confirmation of shipment(s) must be limited to only
items on the bill of lading.
Storage
Units are protected against damage during shipment. If
the unit cannot be installed and operated immediately,
precautions need to be taken to prevent deterioration of
the unit during storage. The user assumes responsibility
of the unit and accessories while in storage. The
manufacturer will not be responsible for damage during
storage. These suggestions are provided solely as a
convenience to the user.
The ideal environment for the storage of units and
accessories is indoors, above grade, in a low humidity
atmosphere which is sealed to prevent the entry of
blowing dust, rain, or snow. Units designed for outdoor
applications may be stored outdoors. All accessories
must be stored indoors in a clean, dry atmosphere.
Indoor
Maintain temperatures evenly to prevent condensation.
Remove any accumulations of dirt, water, ice, or snow
and wipe dry before moving to indoor storage. To
avoid condensation, allow cold parts to reach room
temperature. Leave coverings loose to permit air
circulation and to allow for periodic inspection.
The unit should be stored at least 3½ in. (89 mm) off
the floor. Clearance should be provided to permit air
circulation and space for inspection.
Outdoor
The fan should be placed on a level surface to prevent
water from leaking into the unit. The unit should be
elevated so that it is above water and snow levels.
Ensure sufficient support to prevent unit from settling
into soft ground. Locate parts far enough apart to
permit air circulation, sunlight, and space for periodic
inspection. To minimize water accumulation, place all
unit parts on blocking supports so that rain water will
run off.
Do not cover parts with plastic film or tarps as these
cause condensation of moisture from the air passing
through heating and cooling cycles.
Inspection and Maintenance
While in storage, inspect fans once per month. Keep a
record of inspection and maintenance performed.
If moisture or dirt accumulations are found on parts,
the source should be located and eliminated. At each
inspection, rotate the fan wheel by hand ten to fifteen
revolutions to distribute lubricant on motor. If paint
deterioration begins, consideration should be given to
touch-up or repainting. Fans with special coatings may
require special techniques for touch-up or repair.
Machined parts coated with rust preventive should be
restored to good condition promptly if signs of rust
occur. Immediately remove the original rust preventive
coating with petroleum solvent and clean with lint-free
cloths. Polish any remaining rust from surface with
crocus cloth or fine emery paper and oil. Do not destroy
the continuity of the surfaces. Wipe thoroughly clean
with Tectyl
hard to reach internal surfaces or for occasional use,
consider using Tectyl® 511M Rust Preventive, WD-40®
or the equivalent.
®
506 (Ashland Inc.) or the equivalent. For
Removing from Storage
As units are removed from storage to be installed
in their final location, they should be protected and
maintained in a similar fashion, until the equipment goes
into operation.
Prior to installing the unit and system components,
inspect the unit assembly to make sure it is in working
order.
1. Check all fasteners, set screws on the fan, wheel,
bearings, drive, motor base, and accessories for
tightness.
2. Rotate the fan wheel(s) by hand and assure no parts
are rubbing.
Direct Drive Supply Fan 3
Page 4
Installation
Sealant
Ductwork
Lifting Area
(4 places)
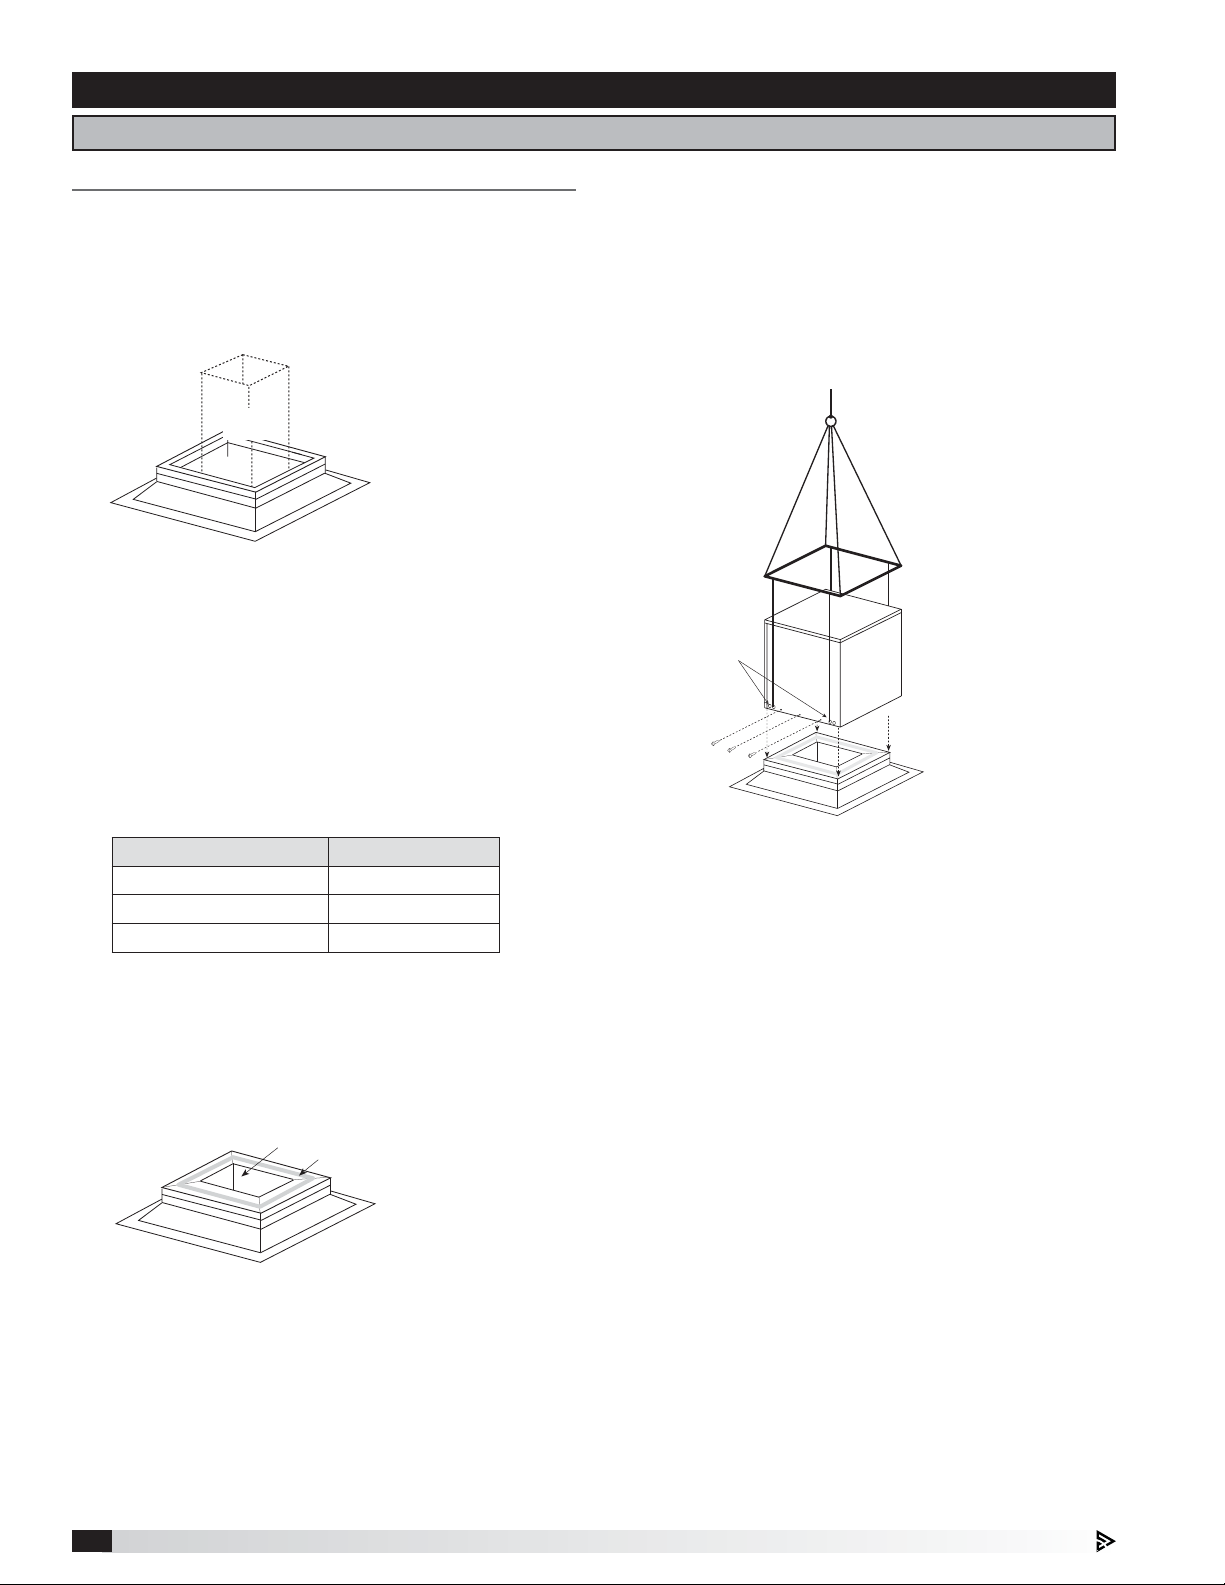
Outdoor Unit Mounting
Standard Curb
1. Install Curb
Position curb on the roof (reference the CAPS submittal
for placement in relation to the unit). Verify that unit is
level, shim if necessary. Attach curb to roof and flash
into place using appropriate methods.
Supply
Ductwork
by Others
2. Install Ductwork
Good duct practices should be followed for all
ductwork. All ductwork should be installed in
accordance with SMACNA and AMCA guidelines,
NFPA96 and all local codes. Reference the CAPS
submittal for ductwork sizes.
The use of a duct adapter is recommended on a
downblast (DB) arrangement to align the ductwork with
the supply unit. The duct adapter is only a guide and is
not to be used as a support for the ductwork.
4. Install Unit
Use a crane and a set of spreader bars hooked to the
factory lifting lugs to lift and center the unit on the curb.
The use of all lifting lugs and a set of spreader bars is
mandatory when lifting the unit.
Fasten the unit to the curb using appropriate methods.
The installer is responsible for determining appropriate
support and fastening methods to ensure compliance
with all applicable codes.
Model Duct Size
XMSF-P113-H10 13x13
XMSF-P115-H20 15x15
XMSF-P117-H30 17x17
3. Apply Sealant
Apply an appropriate sealant around the perimeter of
the curb and duct adapter(s) to isolate fan vibration and
prevent water penetration.
Direct Drive Supply Fan4
Page 5

Installation
Electrical Wiring
Before connecting power to the unit, read and
understand the following instructions and wiring
diagrams. Complete wiring diagrams are attached on
the inside of the control center door(s).
All wiring should be done in accordance with the latest
edition of the National Electric Code ANSI/NFPA70
and any local codes that may apply. In Canada, wiring
should be done in accordance with the Canadian
Electrical Code.
The equipment must be properly grounded. Any
wiring running through the unit in the airstream must
be protected by metal conduit, metal clad cable or
raceways.
If replacement wire is required, it must have a
temperature rating of at least 105ºC.
High voltage electrical input is needed for this
equipment. This work should be performed by a
qualified electrician.
Any wiring deviations may result in personal injury or
property damage. Manufacturer is not responsible for
any damage to, or failure of the unit caused by incorrect
final wiring.
Manufacturer’s standard control voltage is 24VAC.
Control wire resistance should not exceed 0.75ohms
(approximately 285 feet total length for 14gauge wire;
455 feet total length for 12gauge wire). If the resistance
exceeds 0.75 ohms, an industrial-style plug-in relay
should be wired in place of the remote switch. The relay
must be rated for at least 5 amps and have a 24VAC
coil. Failure to comply with these guidelines may cause
motor starters to chatter or not pull in, resulting in
contactor failures and/or motor failures.
Optional Exhaust Fan Starter
1. Verify Exhaust Fan Compatibility
Compare the voltage, frequency, and phase on the unit
label with the exhaust fan label. Additionally, compare
the exhaust HP on the unit label with the exhaust fan
label. The unit has been sized to provide power for the
exhaust fan and all values must match.
2. Determine the Size of the Exhaust Fan Power
Lines
Size the exhaust fan power lines appropriately per the
exhaust fan voltage, and amps.
3. Connect power to the Exhaust Fan
Connect the power lines to the exhaust fan disconnect
switch. The electrical supply line must conform to local
and national electrical codes. Electrical wires must be
located so as not to rub on moving components.
Line Voltage
1. Determine the Size of the Main Power Lines
The unit’s nameplate states the voltage and the unit’s
MCA. The main power lines to the unit should be sized
accordingly.
CONFORMS TO UL STD 705
58310
VOLTS
MCA
SUPPLY MOTOR
SUPPLY MOTOR LOCKED ROTOR CODE
EXHAUST MOTOR#1
EXHAUST MOTOR#2
SUITABLE FOR OUTDOOR USE
FOR GENERAL VENTILATION USE ONLY
DO NOT USE TO EXHAUST DIRT, DUST, GREASE
2. Install Solid State Speed Controller
If the unit was supplied with a ship loose solid state
speed controller, it must be installed to control the fan
RPM.
NOTE: Units with VG or VFD in the model name or units
with a control center do not require a field installed solid
state speed controller.
3. Connect the Main Power
Connect the main power lines to the disconnect switch.
The electrical supply must be compatible with the fan
motor with regards to voltage, phase, and amperage
capacity. Moreover, the electrical supply line must
be properly fused and conform to local and national
electrical codes. Electrical wires must be located so as
not to rub on moving components.
NOTE: If fan motor is not thermally protected, remote
overload protection must be installed having the
adequate rating as to voltage, frequency horsepower,
and full load current per phase.
POWER VENTILATORS
PHASE
HP
HP
HP
OR LINT-LADEN AIR
HZ
MOP
AMPS
AMPS
AMPS
695066
Direct Drive Supply Fan 5
Page 6

Pre-Start-Up
Checklist
Tool List
• Voltage Meter (with wire probes)
• Amperage Meter
• Tachometer
WARNING
Disconnect and lock-out all power and gas before
performing any maintenance or service to the unit.
Failure to due so could result in serious injury or death
and damage to equipment.
WARNING
Check the housing, blower, and ductwork for any
foreign objects before running the blower.
Motor Identification
Check the metal nameplate located near the disconnect
for the model number.
Suffix of the model number will identify the motor type
that is referenced in the Start-Up, Checklist, Start-Up
Checklist sections:
• XMSF-P1##-H## (no suffix) - refer to PSC motor
with solid state speed control
• XMSF-P1##-H##-VG - refer to Vari-Green® motor
• XMSF-P1##-H##-VFD - refers to Variable
Frequency Drive (VFD) controlled motor
Pre-Start-Up Checklist
1. Check Fasteners for Tightness
Check fasteners, set screws and locking collars on the
fan, motor base and accessories for tightness.
2. Check the Voltage
Before starting the unit, compare the supplied voltage,
hertz and phase with the unit and motor nameplate
information.
3. Check Wheel Overlap
Wheel position is preset and the unit is tested at the
factory. Movement may occur during shipment and
realignment may be necessary. Wheel and inlet cone
overlap can be adjusted by loosening the setscrews in
the wheel and moving the wheel to the desired position.
Model Overlap
XMSF-P113-H10
1/4 in.XMSF-P115-H20
XMSF-P117-H30
Overlap
A
Radial
Gap
Wheel
Inlet
Cone
4. Wheel Rotation
Rotate the wheel by hand
and make sure the wheel
does not rub on any parts.
Verify wheel rotation by
momentarily energizing the
unit. Rotation should be
clockwise as shown below
and correspond to the
rotation decal on the unit.
Motor Type _______________
Check fastener tightness
Check Supply Voltage L1 - L2 _________ Amps
L2 - L3 _________ Amps
L1 - L3 _________ Amps
Check Wheel Overlap
Wheel Rotation
Direct Drive Supply Fan6
e
s
i
w
k
c
o
l
C
Page 7

Start-Up
Checklist
Start-Up Checklist
1. Set Fan and Motor RPM
Motors with either solid state speed control or
Vari-Green motor must be field balanced to the
design fan RPM.
PSC Motor with Solid State Speed Control
(XMSF-P1XX-HXX)
To adjust the speed of a motor with solid state speed
control, adjust the speed controller dial until the fan is
at its design fan RPM. The speed controller is shipped
loose on units without a control center and is factory
mounted and wired on units with a control center.
Vari-Green Motor (XMSF-P1XX-HXX-VG)
To adjust the speed of a Vari-Green motor, adjust the
built-in potentiometer on the motor. To increase the
speed, rotate the dial clockwise. To decrease the speed,
rotate the dial counterclockwise.
VFD Controlled Motor (XMSF-P1XX-HXX-VFD)
The VFD will be factory programed for the design
fan RPM. If VFD adjustments are required please see
the Variable Frequency Drive section for additional
information.
2. Check for Vibration
Check for unusual noise, or vibration. Excessive
vibration may be experienced during initial start-up.
Left unchecked, it can cause a multitude of problems,
including structural and/or component failure.
Generally, fan vibration and noise is transmitted to other
parts of the building by the ductwork. To minimize this
undesirable effect, the use of heavy canvas connectors
is recommended.
3. Motor Check
Measure the motor’s voltage, and amps. Compare to
the specifications. Motor amps can be reduced by
lowering the fan and motor RPM
4. Air Volume Measurement and Check
Measure the unit’s air volume (cfm) and compare it
with its rated air volume. If air volume does not match
the rated air volume, adjust the fan and motor RPM as
necessary. The most accurate method for measuring
the air volume is a pitot traverse method downstream of
the blower. Other methods can be used, but should be
proven and accurate.
Unit Model Number ________________________________
Unit Serial Number _________________________________
(e.g. 10111000)
Start-Up Date _____________________________________
Start-Up Personnel Name __________________________
Start-Up Company _________________________________
Phone Number ____________________________________
(e.g. XMSF-P113-H10)
Start-Up Blower Checklist
Check line voltage L1-L2 _______________
L2-L3 _______________
L1-L3 _______________
Check blower rotation
Check for vibration
Supply fan RPM _____________ RPM
Motor nameplate amps _____________ Amps
Actual motor L1 _____________ Amps
L2 _____________ Amps
L3 _____________ Amps
Actual CFM delivered _____________ CFM
Direct Drive Supply Fan 7
Page 8

Maintenance
General
Filters
Filter maintenance is generally limited to cleaning and
replacement.
If aluminum mesh filters are installed, they can be
washed in warm soapy water.
An adhesive spray can be added to aluminum mesh
filters to increase their efficiency.
If disposable filters are installed, they can be checked
by holding up to a light source. If light cannot pass
through the filter, it should be replaced.
When reinstalling filters, be sure to install them with the
airflow in the correct direction. An airflow direction arrow
is located on the side of the filters.
Replacement filters should be from the same
manufacturer and the same size as the original filters
provided with the unit.
Model Filter Size Filter Qty
XMSF-H10 19x19x1 2
XMSF-H20 21x21x1 2
XMSF-H30 24x24x1 2
Motors
Motor maintenance is generally limited to cleaning and
lubrication (where applicable).
Cleaning should be limited to exterior surfaces only.
Removing dust and grease build-up on the motor
assures proper motor cooling.
Motors supplied with grease fittings should be
greased in accordance with the manufacturer’s
recommendations.
Do not allow water or solvents to enter the motor or
bearings. Motors and bearings should never be sprayed
with steam, water or solvents.
Greasing motors is only intended when fittings are
provided. Many motors are permanently lubricated,
requiring no additional lubrication.
Fan Wheels
Wheels require little attention when moving clean air.
Occasionally oil and dust may accumulate on the wheel
causing imbalance. When this occurs, the wheel and
housing should be cleaned to assure proper operation.
Direct Drive Supply Fan8
Page 9

Reference
Vari-Green® Motors
Vari-Green® Motor Features
The Vari-Green motor is an electronically commutated
(EC) motor that uses AC input power and internally
converts it to a DC power supply which provides built-in
control of motor speed down to 20% of design RPM.
Soft Start
All motors feature soft start technology which eliminates
inrush current at start-up. The motors will reliably start
at any speed setting
Overload Protection
If the motor becomes overloaded, it will automatically
reduce its speed until it is no longer overloaded. This
means that the motor will never operate in the “service
factor” which is possible with many AC motors. The
motor and control are electrically protected with
lightning surge protection.
1/2 HP and 1 HP Motors
These motors have both a potentiometer dial on the
motor for speed adjustment and the ability to accept a
0-10 VDC signal for remote speed control.
Electrical Wiring
The motor is
prewired at
the factory
and cannot be
changed inside
the motor.
Connect singlephase power
at the voltage
listed on the
nameplate. If
remote control
is desired,
connect the
0-10 VDC and
24V signal for
remote speed control.
Operation
There is a 4 second delay between the application of
power and the motor starting. Motor speed is controlled
as follows:
0-10V (RED)
24V (BLACK)
COM (WHITE)
UNIT DISCONNECT
115/208/230/277 VAC INPUT
TO MATCH MOTOR NAMEPLATE
Dial on Motor
A small screwdriver can
be used to make speed
adjustments. To increase speed,
rotate the dial clockwise. To
decrease speed, rotate the dial
counterclockwise. There is no
need to connect the control
wires.
Speed
Adjustment Dial
0-10 VDC Signal
The dial on the motor will act as a maximum speed
limiter. During start-up this should be adjusted for rated
air volume.
24 VAC/DC power is required to control the motor
with a 0-10 VDC signal. Without the 24 VAC/DC power
the motor will be controlled by the dial on the motor.
The motor will consume 0.7VA at 24 VAC or 25mA at
24VDC.
From 0-1.9V the motor will be off. From 2-10V the motor
will operate.
A low voltage wiring harness is needed to supply the
0-10V signal to the motor. This harness is available from
the factory if conversion is necessary.
Direct Drive Supply Fan 9
Page 10

Reference
Vari-Green® Motors
2 HP Motors
These motors have both a potentiometer dial on the
motor for speed adjustment and the ability to accept a
0-10 VDC signal for remote speed control.
Electrical Wiring
All high and low voltage wiring connections are made
inside the motor control box at the factory. Normally,
there is no reason to enter the control box of the motor.
If there is a need to enter the control box, disconnect
power and wait at least five minutes to allow the
capacitors to discharge.
The motor is prewired at the factory and cannot be
changed inside the motor. Connect single-phase power
at the voltage listed on the nameplate. If remote control
is desired connect the 0-10 VDC signal for remote
speed control. Inside the control motor control box
wiring will be dependent on the selected operation:
Dial on Motor - the dial
is factory-wired into the
low voltage terminal block
inside the control box.
The wires are connected
as shown.
Dial on motor connection inside control box
If the motor needs to be tested before the 0-10 VDC
signal is available, a jumper can be placed between
terminals 1 and 2. This will force the motor to run at full
speed.
Operation
There will be up to a 30 second delay between the
application of power and the motor starting. The motor
will “rock” back and forth upon startup as part of its
normal operation.
Dial on Motor
Turn the dial with your fingers to adjust. To increase the
speed, rotate the dial clockwise. To decrease the speed,
rotate the dial counterclockwise. Turning the dial fully
counterclockwise will turn the motor off.
0-10 VDC signal
From 0-1.9 V the motor will be off. From 2-10V
the motor will operate. 10V will correspond to the
nameplate motor RPM, regardless of the position of the
dial on the motor.
0-10 VDC Signal - a two-wire
pigtail is factory-wired into the
low voltage terminal block.
The wires are connected
as shown.
0-10 VDC signal connection inside control box
Direct Drive Supply Fan10
Page 11

Reference
Variable Frequency Drives (VFD)
VFD Features
The factory installed wired and programmed VFD is
used to control the speed of the fan as either a constant
speed, multi-speed or modulating speed control. A
Yaskawa model J1000 VFD will be located in the unit
control center. This section contains basic information
on operation and changing VFD speed settings. For
more detailed information including fault codes see the
Yaskawa VFD manual. For additional information on
wiring please refer to the unit specific wiring diagram
located inside the unit control center.
MA MB MCACAMAC+VA1SCS5S4S3S2S1
J1000
Changing the VFD Access Level
With factory default settings, the VFD will be configured
to restrict access to the majority of the VFD parameters.
To view or change any of these parameters, change the
access level (A1-01) to 2. This will allow access to the all
VFD parameters.
Operation
VFDs will be configured from the factory to operate in
one of three modes:
Constant Speed
The VFD will control the motor to operate at constant
speed. The VFD will run at Frequency Reference 1 (D1-
01). The factory default setting is unit specific for design
fan RPM.
Changing VFD Speed Settings
Before making any changes, ensure the drive is stopped
and the access level (A1-01) is set to 2.
Maximum and Minimum Frequency Limits
Maximum frequency will be indicated by a label on the
unit.
Minimum recommended frequency is 18 Hz.
SUPPLY FAN
MAX FREQUENCY
Constant Speed and Multi-Speed
Maximum speed – Change frequency reference 1 (D1-
01) to the desired frequency. If the desired frequency
is greater than 60Hz, adjust the max output frequency
(E1-04) to the desired frequency first.
Minimum speed (multi-speed only) – Change frequency
reference 3 (D1-03) to the desired frequency.
Modulating
Maximum Speed (Desired frequency ≥ 60Hz) – Change
the upper reference (D2-01) and the terminal A1 gain
(H3-03) to 100%. Adjust the max output frequency (E1-
04) to the desired frequency.
Maximum Speed (Desired frequency <60Hz) - Change
the upper reference (D2-01) and the terminal A1 gain
(H3-03) to desired % of 60 Hz (i.e. for 48 Hz set to
80%).
Minimum Speed – Change the lower reference (D2-02)
and the terminal A1 bias (H3-04) to the desired % of 60
Hz (i.e. for 24 Hz set to 40%)
XX
PRD ORDER
Hz
695064
Multi-Speed
Digital contact closures (by others) command the VFD
to run at multiple speed settings:
• Open – VFD runs at frequency reference 1 (D1-01).
Factory default is unit specific for design fan RPM.
• SC to S5 – VFD runs at frequency reference 3 (D1-03).
Factory default is unit specific for one-half design fan
RPM.
Modulating
A 0-10 VDC signal wired in the field by others varies the
speed of the fan. 10V results in design fan RPM and
0V results in one-half design fan RPM, per the factory
default settings.
Direct Drive Supply Fan 11
Page 12

Reference
Maintenance Log
Date ___________________Time _____________ AM/PM
Notes: ___________________________________________
_________________________________________________
_________________________________________________
_________________________________________________
_________________________________________________
Date ___________________Time _____________ AM/PM
Notes: ___________________________________________
_________________________________________________
_________________________________________________
_________________________________________________
_________________________________________________
Date ___________________Time _____________ AM/PM
Notes: ___________________________________________
_________________________________________________
_________________________________________________
_________________________________________________
_________________________________________________
Date ___________________Time _____________ AM/PM
Notes: ___________________________________________
_________________________________________________
_________________________________________________
_________________________________________________
_________________________________________________
Date ___________________Time _____________ AM/PM
Notes: ___________________________________________
_________________________________________________
_________________________________________________
_________________________________________________
_________________________________________________
Date ___________________Time _____________ AM/PM
Notes: ___________________________________________
_________________________________________________
_________________________________________________
_________________________________________________
_________________________________________________
Our Commitment
Our Commitment
As a result of our commitment to continuous improvement, Accurex reserves the right to change specifications
without notice.
Product warranties can be found online at accurex.com, either on the specific product page or in the Warranty
section of the website at Accurex.com/Resources/Warranty.
P.O. Box 410 Schofield, WI 54476
Phone: 800.333.1400 • Fax: 715.241.6191
Parts: 800.355.5354 • accurex.com
12
482394 • XMSF Direct Drive Supply Fan , Rev. 1, March 2017 © 2017 Accurex, LLC12
 Loading...