

Page 1

OpEasy® Basic Provisioning User Guide
Release 4.0
2827-006
fm
2811 Internet Blvd
Frisco, Texas 75034-1851
Tel +1 469 365 3000
Tel +1 800 468 3266
www.aastrausa.com
Clearspan OpEasy® Basic Provisioning User Guide R4.0 Aastra – 2827-006
2014 Clearspan® is a Registered Trademark of Aastra Technologies Ltd. Page 1 of 34
Page 2

Clearspan OpEasy® Basic Provisioning User Guide R4.0 Aastra – 2827-006
2014 Clearspan® is a Registered Trademark of Aastra Technologies Ltd. Page 2 of 34
Page 3
Revision
Number
Date
Completed
Point of Contact
Description
2827-001
04/25/2013
Aastra Technical
Publications
Initial release of this publication.
2827-002
07/08/2013
Aastra Technical
Publications
Updates and revisions for R 3.5.
2827-003
09/04/2013
Bev Marsh
Aastra Pubs
Updates and Revisions for R3.6.
2827-004
04/2014
Aastra Technical
Publications
Updates and Revisions for R3.9.
2827-005
06/2014
Aastra Technical
Publications
R3.10
2827-006
08/2014
Aastra Technical
Publications
R4.0
6th Edition (August 2014)
© Copyright 2014 Aastra USA Inc. All rights reserved.
Information in this manual may change with product revisions. Aastra® may add features or
enhancements to the product(s) and/or program(s) described in this manual at any time.
Technical Publications freezes the information in this manual based on the specified software and
hardware releases. Publications writers incorporate such changes into newly released publication
editions. Publications writers will incorporate any modifications provided to them after the
publication release date into the next scheduled release of the publication.
Aastra furnishes the application described in this manual under a license agreement and
customers may use or copy information in the manuals only in accordance with the terms of the
agreement.
Contact Information
Address any reader comments to:
Aastra USA Inc.
Technical Publications Manager
2811 Internet Boulevard
Frisco, TX 75034-1851
You may also send e-mail to techpubs@aastrausa.com
What to Expect when Contacting Company
Technical Publications will e-mail responses to customers within seven business days of the
contact. Note that product support is not available through this e-mail address. For product support,
contact Aastra Customer Technical Support (ACTS) at 1-800-729-1872. Aastra may use or
distribute review comments and information without incurring obligation.
Trademarks and Acknowledgements
Product registered trademarks and copyrights of the products included in this publication include
Clearspan® and OpEasy® as registered trademarks of Aastra Technologies Ltd.; Microsoft®
Excel as a registered trademark of Microsoft Corporation.
Revision History
The following represents the revision history of this publication:
Clearspan OpEasy® Basic Provisioning User Guide R4.0 Aastra – 2827-006
2014 Clearspan® is a Registered Trademark of Aastra Technologies Ltd. Page 3 of 34
Page 4

Table of Contents
6th Edition (August 2014) ................................................................................................................ 3
Contact Information .......................................................................................................................... 3
What to Expect when Contacting Company ................................................................................... 3
Trademarks and Acknowledgements ............................................................................................. 3
Revision History ............................................................................................................................... 3
1 Overview ...........................................................................................................................................6
1.1 Administration Modes ............................................................................................................ 6
1.2 Basic Provisioning .................................................................................................................. 6
1.3 References ............................................................................................................................. 6
2 Logging In .........................................................................................................................................7
3 Adding a Single User .......................................................................................................................8
3.1 User Add Page ....................................................................................................................... 8
3.1.1 Optional Tab ........................................................................................................... 10
3.1.2 Phones Tab ............................................................................................................ 11
3.1.3 User: Primary Phone Device View ........................................................................ 13
3.1.4 User: Phone Template Page ................................................................................. 14
3.1.5 SCA Options Tab ................................................................................................... 15
3.2 New User E-mail Notification ............................................................................................. 15
4 Modifying a Single User ............................................................................................................... 17
5 Deleting a Single User .................................................................................................................. 18
6 Adding Multiple Users with Import ............................................................................................... 19
6.1 Opening a Worksheet ......................................................................................................... 19
6.2 Adding Users in the Worksheet ......................................................................................... 20
6.3 Correcting Validation Failures ............................................................................................ 22
6.4 Importing the Worksheet .................................................................................................... 22
6.5 Viewing Import Results ....................................................................................................... 24
6.5.1 Users Tab ............................................................................................................... 24
6.5.2 Voicemail Tab ......................................................................................................... 25
6.5.3 Error Examples on the Results Worksheet........................................................... 25
6.5.4 Results .................................................................................................................... 26
7 Removing Multiple Users with Import .......................................................................................... 27
8 Scheduling an Import .................................................................................................................... 29
8.1 Viewing Scheduled Imports ................................................................................................ 32
8.2 Restarting a Scheduled Import .......................................................................................... 34
8.3 Deleting a Scheduled Import .............................................................................................. 34
Clearspan OpEasy® Basic Provisioning User Guide R4.0 Aastra – 2827-006
2014 Clearspan® is a Registered Trademark of Aastra Technologies Ltd. Page 4 of 34
Page 5

Table of Figures
Figure 1 Explorer Search Box with URL ................................................................................................ 7
Figure 2 OpEasy Main Page for Department Administrators ............................................................... 7
Figure 3 Provisioning Main Page ........................................................................................................... 7
Figure 4 Users Main Page ...................................................................................................................... 8
Figure 5 User Add Page – Populated with Show Details Button .......................................................... 9
Figure 6 Show/Hide Details ................................................................................................................. 10
Figure 7 User Add Page – Optional Tab ............................................................................................. 11
Figure 8 User Add – Phones Tab ........................................................................................................ 12
Figure 9 User: Primary Phone Device View ....................................................................................... 13
Figure 10 User: Phone Template Page .............................................................................................. 14
Figure 11 User Add – SCA Options Tab ............................................................................................. 15
Figure 12 User General Settings: New User E-mail Notification ....................................................... 16
Figure 13 Search for User ................................................................................................................... 17
Figure 14 Users Page – Edit Link ........................................................................................................ 18
Figure 15 Get Worksheet Button ......................................................................................................... 19
Figure 16 Clearspan Import Worksheet .............................................................................................. 20
Figure 17 Worksheet Validated ........................................................................................................... 21
Figure 18 Validation Failure 1 .............................................................................................................. 22
Figure 19 Validation Failure 2 .............................................................................................................. 22
Figure 20 Import Page - Top Half ........................................................................................................ 23
Figure 21 Import Page – Progress Messages and Results ............................................................... 24
Figure 22 Results Worksheet .............................................................................................................. 24
Figure 23 Voice Mail Tab ..................................................................................................................... 25
Figure 24 Progress Messages Error ................................................................................................... 25
Figure 25 Validation Status Column - Failure ..................................................................................... 26
Figure 26 E-mail Message Sent Message .......................................................................................... 26
Figure 27 Worksheet – Validation ....................................................................................................... 27
Figure 28 Voice Mail Tab on Remove Worksheet ............................................................................. 27
Figure 29 Remove User Worksheet Process Starting ....................................................................... 28
Figure 30 Scheduling Request: Import: Basic Page – Top Half ........................................................ 29
Figure 31 Selecting the Schedule Type .............................................................................................. 30
Figure 32 Schedule Run Once ............................................................................................................ 30
Figure 33 Schedule Repeated ............................................................................................................. 30
Figure 34 Schedule Hourly .................................................................................................................. 30
Figure 35 Schedule Daily ..................................................................................................................... 31
Figure 36 E-mail Notification Section - Setup ..................................................................................... 31
Figure 37 Status Section ...................................................................................................................... 32
Figure 38 Scheduling Page ................................................................................................................. 33
Figure 39 Worksheet Waiting to start a Run ....................................................................................... 33
Figure 40 Worksheet Run Failed......................................................................................................... 33
Figure 41 Scheduling Results – Basic Import ..................................................................................... 34
Clearspan OpEasy® Basic Provisioning User Guide R4.0 Aastra – 2827-006
2014 Clearspan® is a Registered Trademark of Aastra Technologies Ltd. Page 5 of 34
Page 6

1 Overview
The primary purpose of the OpEasy® Provisioning application is to simplify the process of adding
users, features, and devices to the Clearspan® system.
1.1 Administration Modes
There are two administration modes:
Basic OpEasy Admin–Has little or no expertise on Clearspan, but can easily use Basic
Provisioning to add, modify, and delete users on the Clearspan system. For this document,
the Basic OpEasy Admin is a Department Administrator (DA) and has all of the possible
functions that can be enabled for a DA.
Advanced OpEasy Admin–Has considerable expertise with the Clearspan system. This
administrator lays the groundwork for manipulating users such as creating devices, profiles,
templates, etc. All of this is necessary for Basic Administrators to do their job. This
administrator is usually a System Administrator (SA), an Enterprise Administrator (EA), or a
Group Administrator (GA).
1.2 Basic Provisioning
This document provides instructions on adding, modifying, and deleting one Clearspan user and
user’s phone device at a time. It also provides instructions on adding and deleting multiple
Clearspan users with their phone devices using Import.
1.3 References
Advanced provisioning topics such as assigning user features, exporting, phone templates, phone
management, and group settings are covered in the Clearspan OpEasy Advanced Provisioning
User Guide.
Clearspan OpEasy® Basic Provisioning User Guide R4.0 Aastra – 2827-006
2014 Clearspan® is a Registered Trademark of Aastra Technologies Ltd. Page 6 of 34
Page 7
2 Logging In
Your system administrator will provide your username and password. Your system administrator
will also provide the URL for your login, shown in red below.
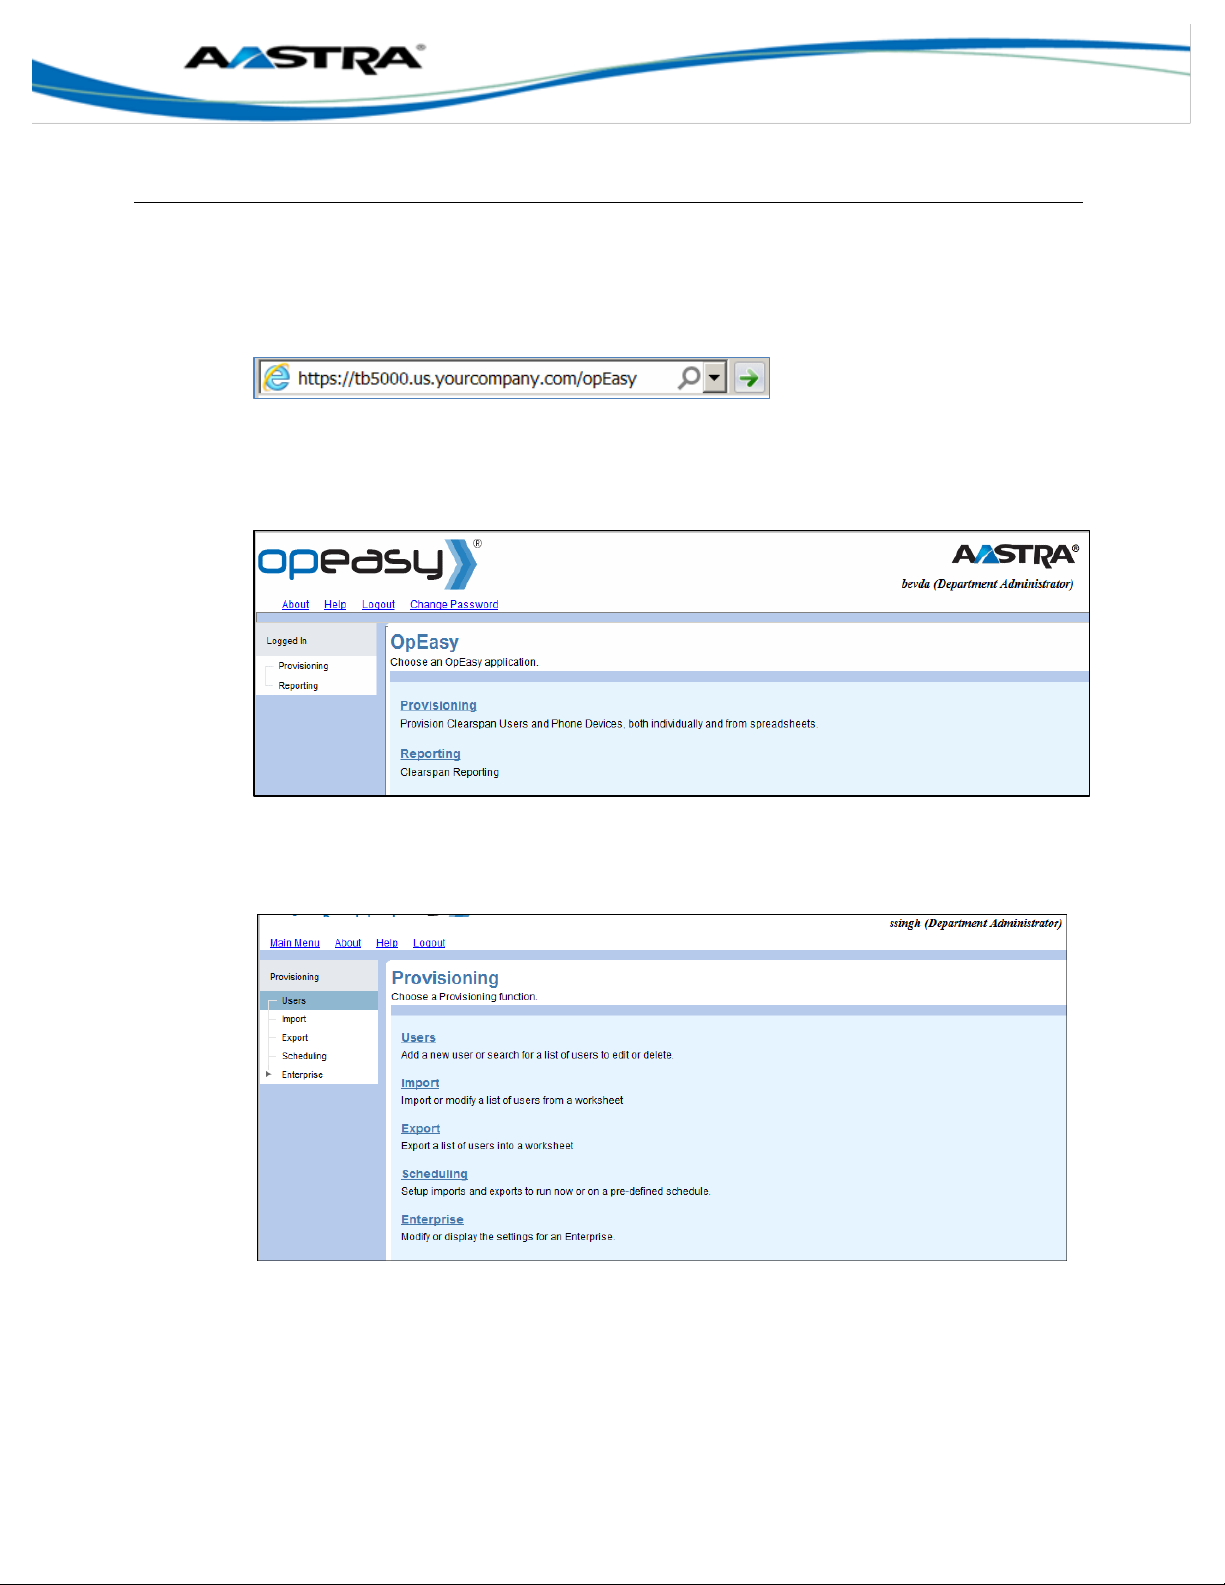
1) Enter the URL (case sensitive) into your web browser. It will be similar to the following:
http://<Fully Qualified Domain Name> or <IP Address>/opeasy/
Figure 1 Explorer Search Box with URL
2) Enter the User Name and Password provided by your system administrator.
3) Click Login. The OpEasy main page displays as the following image.
Figure 2 OpEasy Main Page for Department Administrators
4) Click on Provisioning. The Provisioning page displays as in Figure 3 Provisioning Main
Page.
Figure 3 Provisioning Main Page
The options that you see, both on the main page and in the pages that follow for each function,
depend upon licensing and your assigned user privileges. Direct any questions to your system
administrator.
Clearspan OpEasy® Basic Provisioning User Guide R4.0 Aastra – 2827-006
2014 Clearspan® is a Registered Trademark of Aastra Technologies Ltd. Page 7 of 34
Page 8

3 Adding a Single User
This chapter describes the process of adding a single Clearspan user.
When a new user is created, an email goes out to the user with instructions for phone setup.
3.1 User Add Page
1) From the OpEasy main menu, click Provisioning.
2) From the Provisioning page, click Users from the menu tree on the left, or click Users from the
Provisioning menu. The Users page displays as in the following image.
Figure 4 Users Main Page
The Enterprise and Group associated with this DA’s login are displayed. If the login is other
than a DA, you may be prompted to select this information.
3) Select Basic for the User Mode.
4) Click Add. The User Add page displays. If no license is available, an error displays.
5) Select the User Profile from the drop-down list. You can select User Profiles for Aastra and
Polycom phones when the Polycom Phone Support system license for Clearspan is installed.
Click the View Template button if you want to see the template that has been assigned to the
phone. The template assignment was made in the User Profile that you selected.
6) Enter the Last Name, First Name and E-mail Address of the user to add.
7) Select the Department and Phone Number.
Click the View Phone Template button if you want to see the template for the primary phone.
8) Enter the Phone Location. This can be the address, building, office, or any type of description
the system administrator has set for this value.
If the Emergency Gateway Manager is in use, then this field must contain the Emergency
Response Location (ERL) that is defined in the Emergency Gateway. In this case, your
System Administrator will assist in providing the ERL.
If the Emergency Gateway Manager is not in use, enter the physical location of this user’s
phone device.
9) Enter the Voice Portal Passcode. It should be a numeric value, four to eight digits in length.
Clearspan OpEasy® Basic Provisioning User Guide R4.0 Aastra – 2827-006
2014 Clearspan® is a Registered Trademark of Aastra Technologies Ltd. Page 8 of 34
Page 9
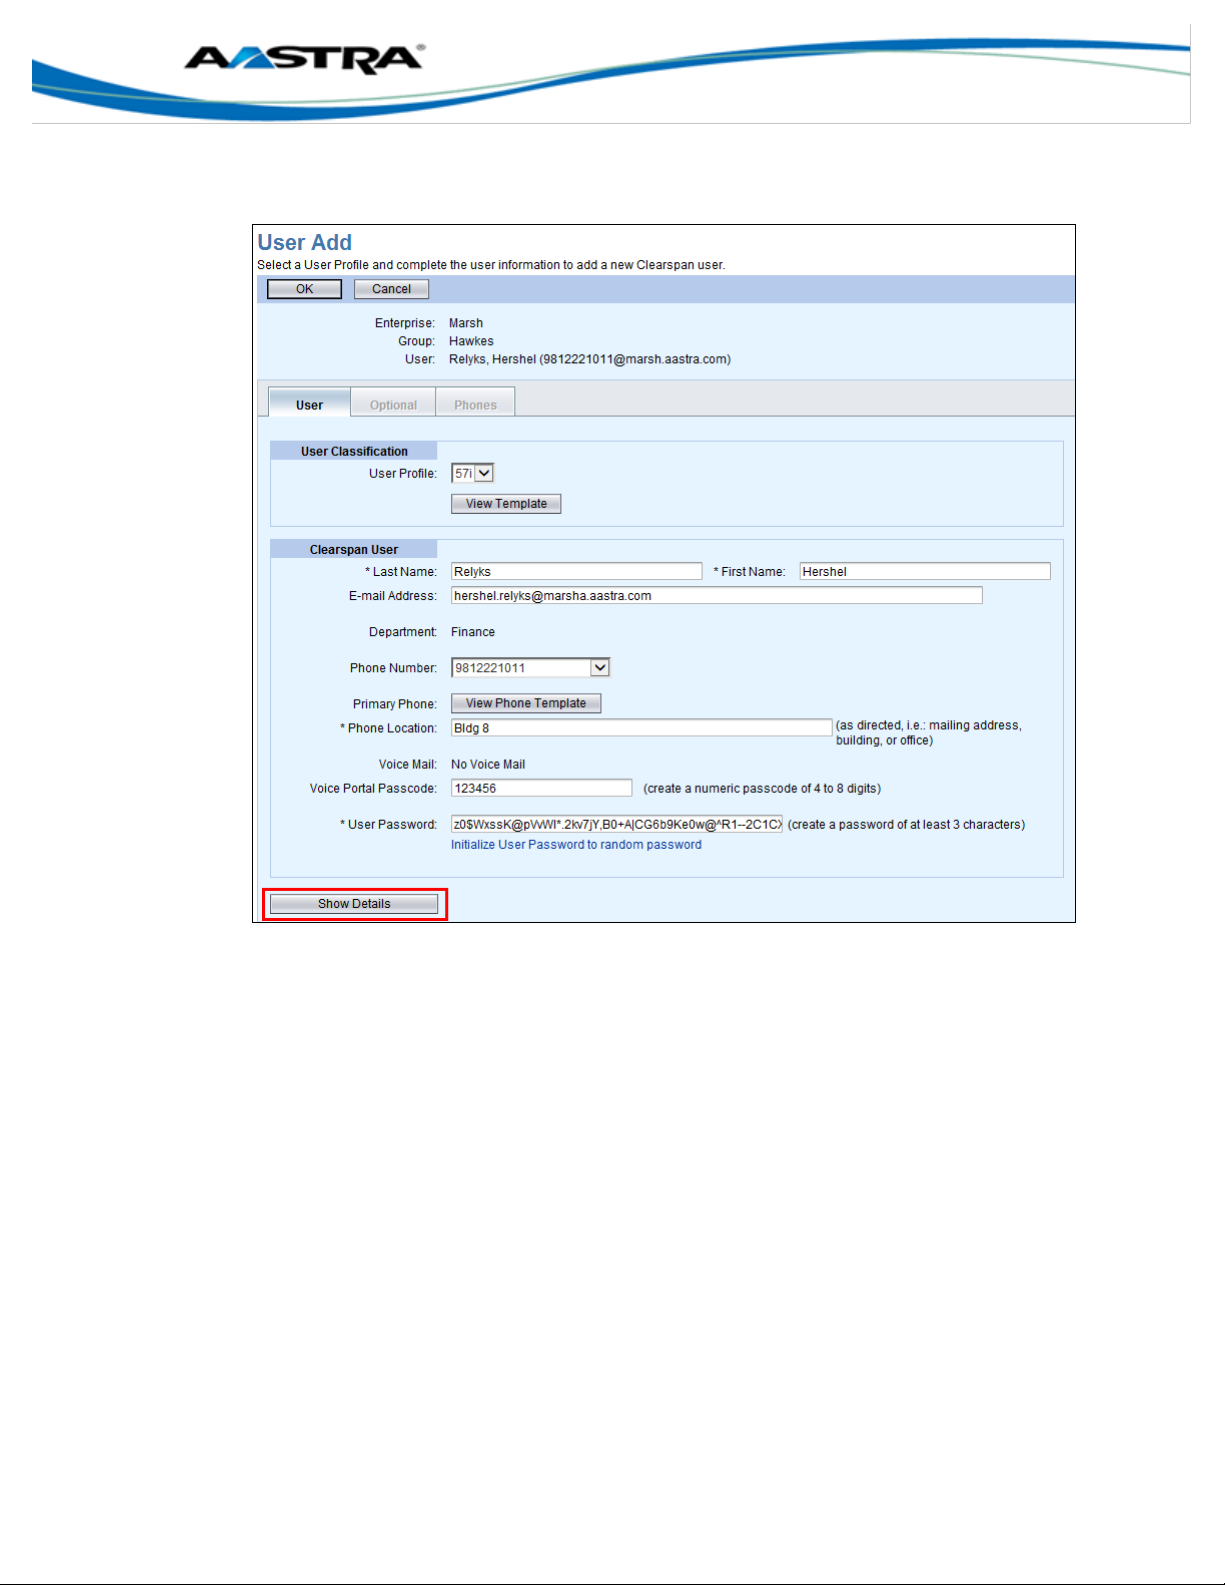
10) Enter the User Password. It must be at least six characters; the number of characters to enter
is set by the administrator. You can click Initialize User Password to random password to
protect the user from unauthorized access in cases where the password will not be used.
Figure 5 User Add Page – Populated with Show Details Button
11) Click Show Details at the bottom of the page if you want to see additional details of the User
Add page. The hidden information is automatically generated as you enter user information on
the top half of the page. There is no need to change any of this information.
There are four sections of additional information.
User Information–The User ID and Extension.
Calling Party ID–The Calling Party ID name and number.
Authentication–User Name and automatically generated password.
Primary Phone Device–The device name, line/port, and MAC address, and the Device
Access Username and Password for Polycom devices. If the device is an Aastra phone,
enter a temporary MAC Address, typically the user’s extension. If the device is a Polycom
phone, enter a true MAC Address or leave that field blank.
Clearspan OpEasy® Basic Provisioning User Guide R4.0 Aastra – 2827-006
2014 Clearspan® is a Registered Trademark of Aastra Technologies Ltd. Page 9 of 34
Page 10
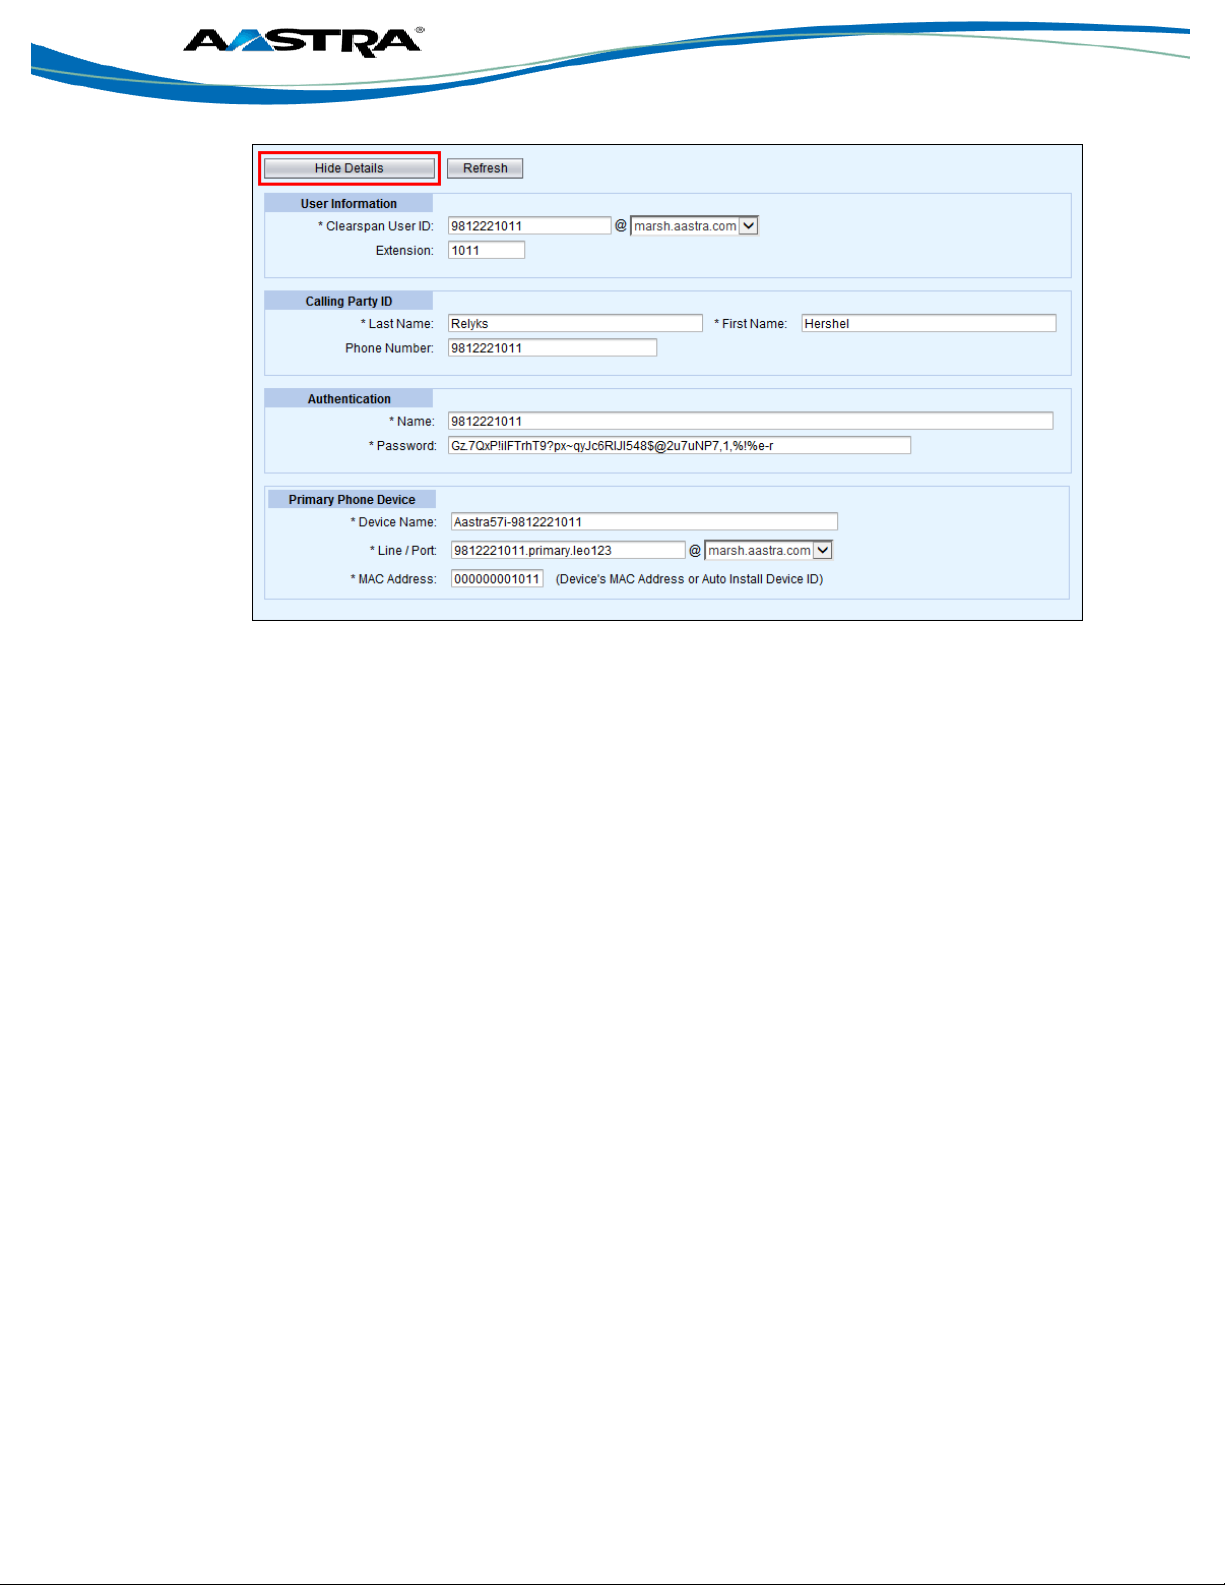
Figure 6 Show/Hide Details
12) Click OK .
You can click OK without viewing the other tabs, or you can go to the Optional tab and Phones
tab. If you click OK, all input up to this point is validated and saved, the user is successfully
added to Clearspan, and you are returned to the previous Users page where the new user
appears in bold text in the user list.
3.1.1 Optional Tab
Click on the Optional tab of the User Add page to view or change optional values such as Contact
Information, Time Zone, Language information, and Aliases used to place and receive calls.
Clearspan OpEasy® Basic Provisioning User Guide R4.0 Aastra – 2827-006
2014 Clearspan® is a Registered Trademark of Aastra Technologies Ltd. Page 10 of 34
Page 11
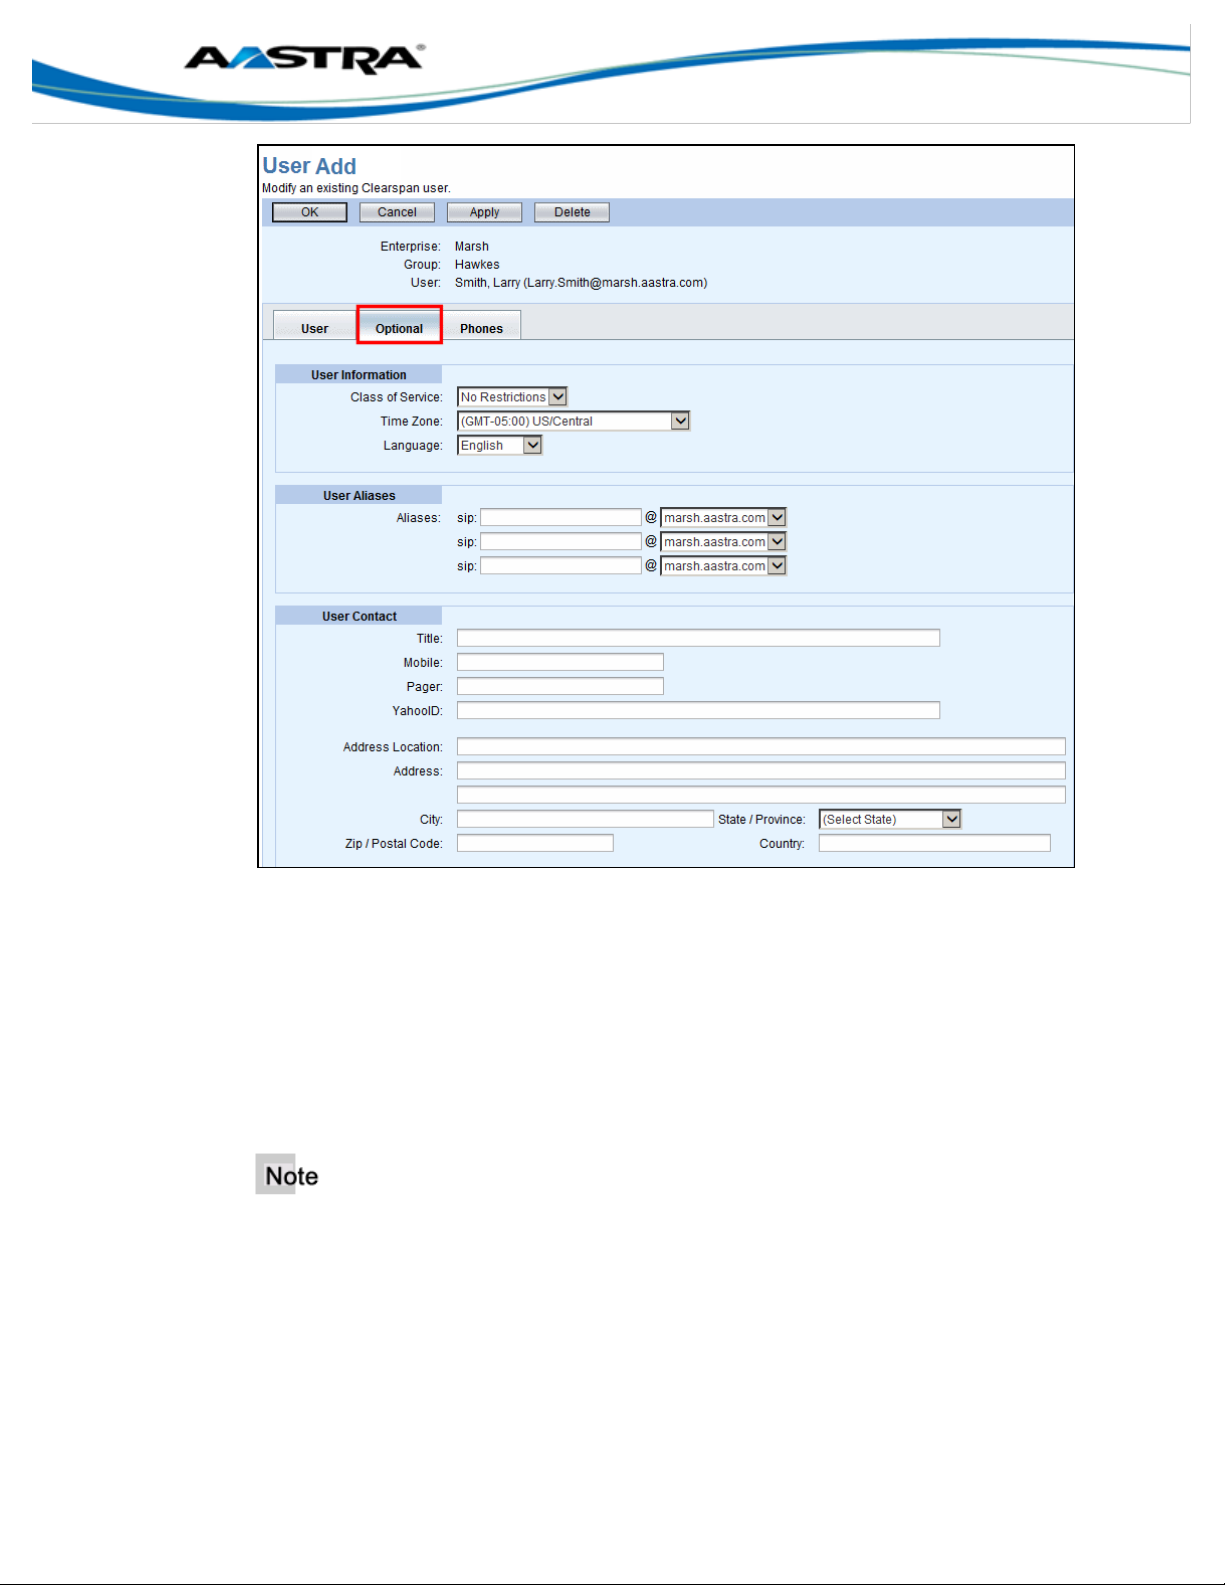
Figure 7 User Add Page – Optional Tab
3.1.2 Phones Tab
Click on the Phones tab of the User Add page to view or change the Phone Configuration and
Shared Call Appearances, and view the primary phone device. (The Restart Selected Phones
button is not available when creating a phone. It is only available when modifying a phone.)
View–Takes you to the User: Primary Phone Device View.
View Template–Takes you to the User: Phone Template page.
SCA Options (Shared Call Appearance)–Takes you to the SCA Options tab.
There are two View links in the Phone Devices table. The View button takes you to the User:
Phone Template page, and the View link in the last column takes you to the User: Primary Phone
Device View page.
Clearspan OpEasy® Basic Provisioning User Guide R4.0 Aastra – 2827-006
2014 Clearspan® is a Registered Trademark of Aastra Technologies Ltd. Page 11 of 34
Page 12

Figure 8 User Add – Phones Tab
Clearspan OpEasy® Basic Provisioning User Guide R4.0 Aastra – 2827-006
2014 Clearspan® is a Registered Trademark of Aastra Technologies Ltd. Page 12 of 34
Page 13

3.1.3 User: Primary Phone Device View
The User: Primary Phone Device View page is read only and has five sections, as follows.
Figure 9 User: Primary Phone Device View
Phone Device–Device Name and Device Type, the Template Name and Description.
User Line–Displays the line/port and where the line appears on the phone.
Device Description–Additional information about the device in Clearspan, including the
Physical Location.
Device Configuration–Additional information about the device in Clearspan, including MAC
address and Device Access information, when applicable.
Phone Device Users Table–This table contains information about the line and where it
appears on the phone.
The View Template button takes you to the User: Phone Template page.
Clearspan OpEasy® Basic Provisioning User Guide R4.0 Aastra – 2827-006
2014 Clearspan® is a Registered Trademark of Aastra Technologies Ltd. Page 13 of 34
Page 14

3.1.4 User: Phone Template Page
The User: Phone Template page is read only. This display is the phone device/template of this
user’s phone. The following information is displayed:
The Enterprise and Group associated with the user.
The Phone Device Type and the Template name. These values come from the User Profile
which is created by the Advanced OpEasy Admin.
Photo of the phone device, along with the soft key/hard key descriptions.
Detail of the lines that appear as hard keys on the phone.
Figure 10 User: Phone Template Page
Clearspan OpEasy® Basic Provisioning User Guide R4.0 Aastra – 2827-006
2014 Clearspan® is a Registered Trademark of Aastra Technologies Ltd. Page 14 of 34
Page 15

3.1.5 SCA Options Tab
Shared Call Appearances are created by advanced administrators. When you click on the SCA
Options button, the SCA-related settings appear, but they are not modifiable.
Figure 11 User Add – SCA Options Tab
3.2 New User E-mail Notification
After a new user is created, an optional e-mail goes out to the user containing instructions for
setting up the new phone. The User Profile specifies whether or not the e-mail will be sent. A DA
cannot change the content of this message but can view it.
1) From the main menu, select Provisioning and then Users.
2) Click General Settings. The User General Settings: New User E-mail Notification page
displays.
3) Click OK to exit General Settings.
Clearspan OpEasy® Basic Provisioning User Guide R4.0 Aastra – 2827-006
2014 Clearspan® is a Registered Trademark of Aastra Technologies Ltd. Page 15 of 34
Page 16

Figure 12 User General Settings: New User E-mail Notification
Clearspan OpEasy® Basic Provisioning User Guide R4.0 Aastra – 2827-006
2014 Clearspan® is a Registered Trademark of Aastra Technologies Ltd. Page 16 of 34
Page 17

4 Modifying a Single User
The User Modify page displays when you access a user after it is created. The options are the
same as in the User Add pages. You can modify those items that need to be changed.
1) From the main menu, select Provisioning and then Users.
2) Find the user to modify using the search fields. The default is to search for all users.
However, you can narrow the search by adding search criteria as shown in the following
illustration.
Figure 13 Search for User
3) Click on the Edit link at the far side of the user’s row. The User Modify page displays. (The
View link opens the Advanced: User View page, which displays user details that cannot
change.)
4) Make any necessary changes to any part of the user’s parameters. If no license is available
when attempting to edit a user, an error displays and the user cannot be modified until
additional licenses are allocated in the Enterprise.
5) Click Apply. The Saved indication displays over the OK button.
6) Click OK. The Users page displays.
Clearspan OpEasy® Basic Provisioning User Guide R4.0 Aastra – 2827-006
2014 Clearspan® is a Registered Trademark of Aastra Technologies Ltd. Page 17 of 34
Page 18

5 Deleting a Single User
You can delete a user after it has been created.
1) From the main menu, select Provisioning and then Users.
2) Click Search to obtain the list of users.
3) Click the Edit link on the far right of the row of the user you wish to delete.
Figure 14 Users Page – Edit Link
The User Modify page displays with a Delete button.
4) Click Delete.
5) Click OK in the confirmation dialog box. The Users page displays. The user and phone
device are deleted. Deleting a user makes available any licenses that were allocated to the
user.
Clearspan OpEasy® Basic Provisioning User Guide R4.0 Aastra – 2827-006
2014 Clearspan® is a Registered Trademark of Aastra Technologies Ltd. Page 18 of 34
Page 19

6 Adding Multiple Users with Import
One or more Clearspan users can be added, deleted, or modified by importing Microsoft Excel
worksheets into the Clearspan system. If you add a user in the worksheet, those fields are added
to Clearspan. If you remove a user in the worksheet, all information regarding that user is deleted
from Clearspan. Saved worksheets provide records for reference.
Users and features can be processed depending upon your assigned privileges. In the Basic
worksheet, only users and their voice mail options are generated. This document addresses the
Import Basic type. The Import Advanced option is presented in the Clearspan OpEasy Advanced
Provisioning User Guide.
6.1 Opening a Worksheet
To add or remove users using import, you must first open and prepare an Excel worksheet to use.
1) In OpEasy, click Import from the menu tree or from the main Provisioning menu.
2) Select Import: Basic from the Import Type drop-down list on the Import page.
3) Click Get Worksheet to open a new spreadsheet, or click E-mail Worksheet to have a new
spreadsheet sent in an E-mail message, as shown in the following example.
Figure 15 Get Worksheet Button
4) Click Open. The new worksheet opens. Do not try to edit the worksheet until you have
cleared all of the Windows security warnings.
5) Cl ick Enable Editing.
Clearspan OpEasy® Basic Provisioning User Guide R4.0 Aastra – 2827-006
2014 Clearspan® is a Registered Trademark of Aastra Technologies Ltd. Page 19 of 34
Page 20

6) Click Enable Content.
The worksheet is now available for editing as shown in the following figure.
Figure 16 Clearspan Import Worksheet
The following is a description of the basic worksheet starting at the top.
The Basic worksheet has two tabs:
Users–There are only 10 fields that must be entered on the worksheet. The commands
are Add, Remove, and Done.
Voice Mail–The voice mail fields are generated automatically.
The Advanced Import worksheet has 10 tabs. Within each tab are all possible commands that
can be used and the definitions of those commands. The Advanced Import function is
addressed in the 287704 CS Advanced Provisioning User Guide.
The name of the new worksheet, which is shown centered at the top, is
“ClearspanImportBasic_” followed by the Enterprise name and Group name. You should save
this file to another name that is more meaningful to you. There are tags displayed that you can
use if desired.
In row 2 are the Enterprise Name and Group Name headers and below the headers are the
actual enterprise and group associated with this worksheet.
To the right of the Enterprise and Group name headers is the Validate button. It is used to
perform validation of data that is entered in the worksheet.
In row 4, the “Uploaded at” field will always be followed by “(not yet loaded)” when looking at
a Clearspan Import worksheet that has not been processed (or “run”). However, once a
worksheet is run, a Results worksheet is generated, and on the Results worksheet the “(not
yet loaded)” will be replaced with the date and time the worksheet was processed.
The value in row 5, column N is the version number (e.g. v217) of the worksheet.
Rows 7 and 8 identify the required information that will be needed to create Clearspan users.
6.2 Adding Users in the Worksheet
After you have retrieved and opened an Excel worksheet to use, fill it in with the changes you want
to import.
1) Click on a cell in column B and select Add from the Command drop-down list. You can only
Add or Remove users in the Basic worksheet. The Done command ends the processing at
the row where it appears.
2) Enter the Last Name and the First Name. Most characters are acceptable but the first
character cannot be a ‘+’. The combination of first and last name must be at least 5
characters.
3) Enter the E-mail Address. The address must contain the ‘@’ symbol.
Clearspan OpEasy® Basic Provisioning User Guide R4.0 Aastra – 2827-006
2014 Clearspan® is a Registered Trademark of Aastra Technologies Ltd. Page 20 of 34
Page 21

4) Click in the Department column and select the Department, if necessary, from the drop-down
list.
5) Enter an available Phone Number. The System Administrator must provide the phone
number range.
6) Click in the User Profile column and select the User Profile from the drop-down list.
7) Select the Voicemail Account type from the drop-down list. If no voice mail is associated with
this user, the column does not have a drop-down list.
8) Enter the Physical Location. This information is provided by the system administrator. If the
Emergency Gateway Manager is in use, then this field must contain the Emergency Response
Location (ERL) that is defined in the Emergency Gateway. In this case, the System
Administrator will assist in providing the ERL. If the Emergency Gateway Manager is not in
use, enter the physical location of this user’s phone device (i.e. the address, building, office, or
whatever rule the system administrator has set for this value.).
9) Enter the Voice Portal Password. If your user will be given the ability to retrieve voice mail
messages from his or her phone, a voice portal password is required. The value must be
numeric and the system administrator typically sets the length between four and eight digits.
This password is entered from the phone to allow entry to the voice mail portal. This portal is
used for more than just voice mail access; for this reason, the worksheet allows entry of a
password even if voice mail is not enabled.
10) Enter the Clearspan Password. The value can be alphanumeric and the minimum is usually
six characters. This password is used to allow Clearspan user access to the Clearspan web
portal, if authorized.
11) Repeat Steps 1-10 to enter other users, and then go to Step 12.
12) Select Done from the Command column drop-down list on the last row when you have
entered all of the users for this worksheet.
13) Click the Validate button to validate the user data entered. If the validation is successful, two
things will happen.
The Validation Status column, Column A on the far left of the row, will show Ok for each
row where a command (other than Done) was issued.
Below the Validate button, the text “Pass, valid” along with the date and time of validation
appears.
Figure 17 Worksheet Validated
14) Save the Worksheet locally to another descriptive name because you will be using this
worksheet later. For example, you might want to save it as
“ClearspanImportBasic_Marsh_Hawkes_Add_3_Users_20140410.xlsm”.
Clearspan OpEasy® Basic Provisioning User Guide R4.0 Aastra – 2827-006
2014 Clearspan® is a Registered Trademark of Aastra Technologies Ltd. Page 21 of 34
Page 22

6.3 Correcting Validation Failures
If validation fails, three things happen:
The text “Failed, invalid” followed by the date and time of validation will appear under the
Validate button.
A character with a blue background will appear in the Validation Status cell(s).
The cell(s) with invalid data will be highlighted.
Example 1:
In this example, I9 and I10 are marked for errors. The failure is duplicate phone numbers. You
can correct the error and Validate again.
Figure 18 Validation Failure 1
Example 2:
In this example, J10 is flagged because there is no data for the User Profile column entered. You
can correct the error and Validate again.
Figure 19 Validation Failure 2
6.4 Importing the Worksheet
The Import page allows you to set up Worksheet processing and view results.
1) In OpEasy, select Provisioning and then Import.
2) Select Import Basic from the Import Type drop-down list.
Clearspan OpEasy® Basic Provisioning User Guide R4.0 Aastra – 2827-006
2014 Clearspan® is a Registered Trademark of Aastra Technologies Ltd. Page 22 of 34
Page 23

Figure 20 Import Page - Top Half
3) Select the Enterprise/Group, if necessary. These do not display until you select an Import
type. Entering this information is dependent upon your selection:
Enterprise–Entered when you select Import Advanced.
Enterprise and Group–Entered when you select Import Basic.
4) Enter the filename of the Provisioning Spreadsheet that you wish to run, or use Browse to
locate it.
5) Check the Notification check box to have an E-Mail notification sent to you with processing
results.
6) Check the Attach Excel Spreadsheet box if you wish to receive the results spreadsheet.
7) Enter the Attachment File Name in the text box or keep the default. The system will rename
the results file for you. You can also use the suggested tags in the filename.
8) Enter the Retrieve File Name or keep the default. The system will rename the results file for
you. You can also use the suggested tags in the filename.
9) Click Start Import. Worksheet processing starts and the Progress Messages box is
updated to reflect the text “Import waiting to start…”.
A User License is required for each added user, and a Polycom Phone License is required for
each added Polycom phone. The import aborts on a line where a license could not be obtained.
You can restart the import after adding the appropriate number and type of licenses to the
Enterprise.
Clearspan OpEasy® Basic Provisioning User Guide R4.0 Aastra – 2827-006
2014 Clearspan® is a Registered Trademark of Aastra Technologies Ltd. Page 23 of 34
Page 24

10) Click Refresh while processing is active to get status updates. The “Import Basic completed
successfully” message displays when processing is complete.
Figure 21 Import Page – Progress Messages and Results
6.5 Viewing Import Results
After the import has processed, the “SUCCESSFUL: Import Basic completed successfully” text
displays at the bottom of the Import page.
1) On the Import page, click Retrieve Results after processing a spreadsheet.
2) Click Open. An Excel spreadsheet with the filename similar to
“ClearspanImportBasicResults_443_20130911-094209.xlsm” opens, where 443 is the
schedule ID, 20130911 is the date, and 094209 is the time.
6.5.1 Users Tab
The Status column shows Success. This is an indication that each command was
successfully performed.
The Processing Error column for each user shows no errors.
Figure 22 Results Worksheet
3) Save the Results worksheet to a new filename, if desired, as a record of the changes that
have been performed.
Clearspan OpEasy® Basic Provisioning User Guide R4.0 Aastra – 2827-006
2014 Clearspan® is a Registered Trademark of Aastra Technologies Ltd. Page 24 of 34
Page 25

6.5.2 Voicemail Tab
The Voicemail tab appears when at least one user is created that specifies a VMail account type.
As shown in Figure 23, the Status column shows Success in the first column of the Voicemail Tab.
The voicemail information has been updated successfully.
Figure 23 Voice Mail Tab
6.5.3 Error Examples on the Results Worksheet
The following example shows you what happens when an error is introduced in the worksheet.
This example adds a user that has the wrong phone number.
The following example shows the error found during processing.
Figure 24 Progress Messages Error
On the Results worksheet in Figure 25 , the first column indicates “Failure”. Scroll to the right of the
worksheet to view the Processing Error column content. The Error column indicates “OCI Error:
[Error 4201] Phone number is not available for assignment: +1-9785551001.” This error means
that the phone number is used by someone else or is not assigned to this group. The solution is
to enter a valid phone number for the user.
Clearspan OpEasy® Basic Provisioning User Guide R4.0 Aastra – 2827-006
2014 Clearspan® is a Registered Trademark of Aastra Technologies Ltd. Page 25 of 34
Page 26

Figure 25 Validation Status Column - Failure
6.5.4 Results
Results can be retrieved immediately or sent by E-mail. The E-mail parameters on the Import page
determine how the E-mail will be handled. Click Email Last Results or Email Results to send the
results of the current worksheet that was processed. To retrieve the results immediately, click
Retrieve Last Report or Retrieve Report on the OpEasy Import page. The import results
spreadsheet opens.
The Provisioning application does not validate the E-mail address. Even if the E-mail address is
not valid, the message in blue will still display because the attempt to send the E-mail was made.
Figure 26 E-mail Message Sent Message
Clearspan OpEasy® Basic Provisioning User Guide R4.0 Aastra – 2827-006
2014 Clearspan® is a Registered Trademark of Aastra Technologies Ltd. Page 26 of 34
Page 27

7 Removing Multiple Users with Import
If you have used a worksheet in the past to add multiple users, you can use that same worksheet
and change the operation to “Remove” to perform the delete on those users.
When using Basic Import, you must start with the worksheet that was used to add the user(s)
originally. If you do not have the original worksheet, then you must use Advanced Import, which
allows specification of User ID.
1) Open the worksheet that was used to originally add the user(s) that you want to remove.
2) Select Remove from the Command drop-down list in column B. Do this for each user that you
wish to delete.
3) Select Done from the drop-down list when you are finished.
4) Clear the values in the Status column. See the following example.
Figure 27 Worksheet – Validation
5) Click Validate. Validation will remove the data in the Voice Mail tab automatically and will
provide a new status in the Status column.
Figure 28 Voice Mail Tab on Remove Worksheet
6) Save the spreadsheet with a new name.
7) In OpEasy, select Provisioning from the main menu, and then select Import.
8) Click Browse on the Import page to locate the Provisioning Spreadsheet that you just saved.
9) Click Open. The Provisioning spreadsheet box is populated.
10) Click Start Import. The Status message box opens with the “Waiting to start…” message.
Clearspan OpEasy® Basic Provisioning User Guide R4.0 Aastra – 2827-006
2014 Clearspan® is a Registered Trademark of Aastra Technologies Ltd. Page 27 of 34
Page 28

Figure 29 Remove User Worksheet Process Starting
11) Click Refresh to view the progress messages. The “Import Basic completed successfully”
message displays when processing is complete. The users are deleted.
Clearspan OpEasy® Basic Provisioning User Guide R4.0 Aastra – 2827-006
2014 Clearspan® is a Registered Trademark of Aastra Technologies Ltd. Page 28 of 34
Page 29

8 Scheduling an Import
You can schedule an Import on the Import page after you have selected a worksheet to process.
The Scheduling page displays imports that have already been scheduled to run now or on a predefined schedule.
1) From the OpEasy main menu, select Provisioning, and then select Import.
2) Select Import: Basic as the Import Type.
3) Browse for the worksheet that you wish to schedule for import.
4) Make changes to the file names, if desired.
5) Click Schedule Import. The Scheduling Request: Import: Basic page opens as shown in
Figure 30.
Do not use the Start Import button until you have provided the Schedule information.
Figure 30 Scheduling Request: Import: Basic Page – Top Half
6) Select the Schedule type from the Schedule drop-down menu.
Clearspan OpEasy® Basic Provisioning User Guide R4.0 Aastra – 2827-006
2014 Clearspan® is a Registered Trademark of Aastra Technologies Ltd. Page 29 of 34
Page 30

Figure 31 Selecting the Schedule Type
If you selected Run Once:
Enter the Start Time: The date, a space, and the time (hour and minute). The Import
runs only one time.
Figure 32 Schedule Run Once
If you selected Repeated:
Enter the Initial Start Time: The date, a space, and the time (hour and minute).
Enter the Repeat Run: The Import runs every (number of minutes).
Enter the Maximum Number of Runs. Leave the box blank or enter 0 if there is no limit.
Figure 33 Schedule Repeated
If you selected Hourly:
Enter the Start After time: The date, a space, and the time (hour and minute).
Enter an Hourly Schedule: A list of minutes within the hour. Example: 00:15, 00:45. The
import runs at 15 minutes, and another at 45 minutes.
Enter the Maximum Number of Runs. Leave the box blank or enter 0 if there is no limit.
Figure 34 Schedule Hourly
Clearspan OpEasy® Basic Provisioning User Guide R4.0 Aastra – 2827-006
2014 Clearspan® is a Registered Trademark of Aastra Technologies Ltd. Page 30 of 34
Page 31

If you selected Daily:
Enter the Start After time: The date, a space, and the time (hour and minute).
Enter the Daily Schedule: A list of times within the day using the 24-hour clock. See the
following example.
Enter the Maximum Number of Runs. Leave the box blank or enter 0 if there is no limit.
Figure 35 Schedule Daily
7) Set up E-mail notification parameters. E-mails are sent to the E-mail address associated with
your OpEasy Admin login. For worksheet imports that are successful and not successful,
select whether to send an E-mail notification, specify the From address and Subject, and
select whether to attach a spreadsheet. See Figure 36 for an example.
Figure 36 E-mail Notification Section - Setup
8) Click the Start Import button. The import will complete on schedule.
After you click Start Import, the screen refreshes and includes a Status section containing the
current status of the Import as in Figure 37.
Click Stop to stop the schedule.
Click Delete to delete the schedule.
Click OK to exit the page.
Clearspan OpEasy® Basic Provisioning User Guide R4.0 Aastra – 2827-006
2014 Clearspan® is a Registered Trademark of Aastra Technologies Ltd. Page 31 of 34
Page 32

Figure 37 Status Section
8.1 Viewing Scheduled Imports
The Scheduling page displays imports and exports that have been scheduled to run now or on a
pre-defined schedule. You can also delete a schedule on this page.
1) Click on Provisioning and then Scheduling in the menu tree, or click on the Scheduling
button on the Import page. The Scheduling page displays with the current imports scheduled,
finished, waiting to run, etc.
2) Select the Scheduled Task from the drop-down list. This filters the list of schedules.
Clearspan OpEasy® Basic Provisioning User Guide R4.0 Aastra – 2827-006
2014 Clearspan® is a Registered Trademark of Aastra Technologies Ltd. Page 32 of 34
Page 33

Figure 38 Scheduling Page
The following example illustrates a scheduled worksheet that is waiting to start.
Figure 39 Worksheet Waiting to start a Run
The following example illustrates a worksheet that failed when it was processed.
Figure 40 Worksheet Run Failed
3) Click Refresh to bring the screen up to date.
4) Click on the Results link in the row of the schedule for which you would like to see the results.
The Schedule Results: Import: Basic page displays as in Figure 41 .
5) Click OK to return to the Scheduling page.
Clearspan OpEasy® Basic Provisioning User Guide R4.0 Aastra – 2827-006
2014 Clearspan® is a Registered Trademark of Aastra Technologies Ltd. Page 33 of 34
Page 34

Figure 41 Scheduling Results – Basic Import
8.2 Restarting a Scheduled Import
1) From the main menu, select Provisioning and then Scheduling.
2) Click on the Edit link in the row of the schedule you want to edit. The Scheduling Request:
Import: Basic page displays. The spreadsheet is already chosen. The status is marked as
“Finished”.
3) Click Restart Import. The Import restarts.
8.3 Deleting a Scheduled Import
1) From the main menu, select Provisioning and then Scheduling.
2) Check the Delete box next to the schedule(s) to delete.
3) Click Apply and then OK. The schedule(s) are deleted from the list.
Clearspan OpEasy® Basic Provisioning User Guide R4.0 Aastra – 2827-006
2014 Clearspan® is a Registered Trademark of Aastra Technologies Ltd. Page 34 of 34
 Loading...