

Page 1
Ascotel Office 1600IP
User's Guide
Ascotel IntelliGate Telecommunication Systems
Page 2

Office 1600IP
Page 2
Content
Security information................................................................................................ 3
Before you get started ............................................................................................ 5
Customise the phone to meet your needs............................................................ 13
Make general settings ..................................................................................... 14
Make media settings (Office 1600IP only) ...................................................... 16
Make advanced media settings
(Office 1600IP only) ........................................................................................ 17
Set tones and melodies (Office 1600IP only) .................................................. 18
Setting up the voice mailbox ........................................................................... 19
Telephony made simple ....................................................................................... 20
You are receiving a call ................................................................................... 21
You want to place a call .................................................................................. 24
During the call ................................................................................................. 31
Learn about the journal ................................................................................... 33
Use the phone like a professional ........................................................................ 36
Use convenience functions ............................................................................. 37
Use functions during a call .............................................................................. 39
Manage absence............................................................................................. 42
Cope with special situations............................................................................ 44
Use number keys ............................................................................................ 45
Use team keys ................................................................................................ 47
Use function keys ............................................................................................ 50
Use function codes.......................................................................................... 54
Use text messages............................................................................................... 58
Send text messages........................................................................................ 59
Receive text messages ................................................................................... 61
Maintain contacts ................................................................................................. 63
Create a new contact ...................................................................................... 64
Edit a contact .................................................................................................. 67
External phone book ...................................................................................... 68
Call within the group............................................................................................. 69
Member in a workgroup .................................................................................. 70
Enter phone calls ............................................................................................ 75
Manage workgroups........................................................................................ 77
Page 3

Office 1600IP
Security information
Page 3
Security information
Notes on these instructions
Please read this manual before you use your Office 1600/1600IP in your daily work.
Your system administrator has fitted your PC containing Office 1600/1600IP with a
media device. This could be a telephone handset, headset, or a Bluetooth device.
Depending on the type of system, operation of your Office 1600/1600IP may differ
slightly from these instructions.
These instructions are also available online in HTML format in Office 1600/1600IP
under ?/Help.
Compare the version of this document with the version of the online document. If
the versions are not the same, download the PDF document again by clicking on
the relevant link in the online document.
Document no.: Document: eud-0002, Version 2.0
Notes on the product
Purpose
This softphone is a system terminal and can only be used in conjunction with the
appropriate PBX systems. The software can only be run if an appropriately configured PBX system is recognized. The PC telephone is suitable for use as a featurephone on a stationary or mobile workstation or as a telephone for workgroup
agents. It can be operated in twin mode together with a mobile phone.
Functional scope
In addition to the many additional functions specific to a PC and team telephone,
the functional scope mainly corresponds to that of a Office 35 system terminal.
However, it cannot be used as a key telephone.
Page 4

Office 1600IP
Security information
Page 4
Availability
The availability of the softphone depends on a functioning PC with power supply,
and the availability of the data network and the telecommunication system (including the OIP server). If the softphone is not available, calls are diverted to an alternative destination set up by your system administrator.
Additional equipment
The Office 1600IP has been tried and tested with a series of corded and cordless
media devices (including Bluetooth equipment). Only use media devices expressly
recommended by the manufacturer.
Exclusion of liability
This product was manufactured in accordance with ISO 9001 quality criteria. The
accompanying user information was assembled with utmost care. The product's
functions have been tested and approved after comprehensive conformity tests.
Nonetheless errors cannot be entirely excluded. The manufacturers shall not be liable for any direct or indirect damage that may be caused by incorrect handling,
improper use, or any other faulty behaviour on the part of a product. Potential hazards are mentioned in the relevant places in the User Guides. Liability for loss of
profit shall be excluded in any case.
Page 5

Office 1600IP
Before you get started
Page 5
Before you get started
Welcome to Office 1600/1600IP. With its user-friendly interface the intuitive softphone expands the limits of Office system terminals and perfectly integrates your
PC environment.
Designed as a team phone for small to medium-sized workgroups it offers powerful
group functions, making it the ideal professional tool for users of your hotline for
example.
Whether you use the softphone as an Office 1600 together with an Office system
terminal or as an Office 1600IP with a PC media device via the IP network: You will
appreciate the wide range of features it has to offer.
The IP version (Office 1600IP) also provides tried and tested support for individual
users with high mobility requirements. Thanks to central information management,
Office 1600IP users have direct access to call lists, phone books, messages and so
on from home, the office or any location via a connection to the company’s IP network.
Topics overview
Flexible use of Office 1600/1600IP . . . . . . . . . . . . . . . . . . . . . . . . . . . . . . . Page 5
Operating Office 1600/1600IP. . . . . . . . . . . . . . . . . . . . . . . . . . . . . . . . . . . Page 7
Flexible use of Office 1600/1600IP
With its two modes of operation (Office 1600 / Office 1600IP) and its array of features the softphone highly versatile, adapting to a wide range of uses.
Use Office 1600/1600IP on an individual workstation
Office 1600/1600IP offers many advantages over conventional telephones for people who use the PC often: Fast and easy dialling by name, easier handling of call
lists using the journal, an unlimited number of private contacts, direct access to the
contacts database, and much more. At the same time, you also have all the userfriendly functions of Office system terminals in the high quality that you have come
to expect.
Page 6

Office 1600IP
Before you get started
Page 6
Use of Office 1600/1600IP as a group tool
If several people deal with customer matters on the phone, it makes sense to create
workgroups. Regardless of whether you work in a booking office, on a help desk,
for an info line or customer service centre, Office 1600/1600IP is a user-friendly
group tool. For more information on this, see "Call within the group", Page 69.
Note: The group functions are not included in the standard licence of the
Office 1600/1600IP.
Use Office 1600/1600IP on multiple workstations
You can set up your personal Office 1600/1600IP on multiple PCs. The calls are
then offered automatically on the PC you are currently using. Do you sometimes
work from home, and have a connection to your company’s IP network? At soon
you start Office 1600IP, the calls are offered automatically. If you display a connection, the person you are calling sees your office number on their display.
Note: Your Office 1600/1600IP can be open on only one PC at a time. When
you start the softphone on a second PC, you are asked whether the
application at the other PC is to be closed automatically.
Use Office 1600IP on a portable PC
If you installed your Office 1600IP on a portable PC, you can use the phone anywhere where you can log on from your PC to the company network with the
Office 1600IP server. As soon as you start the softphone, the calls are automatically
offered to you, wherever you are. If you display a connection, the person you are
calling sees your office number on their display.
Use Office 1600/1600IP together with a mobile system terminal
If you’re not already using a mobile system terminal (cordless DECT handset) as a
media device for your Office 1600, you can also use your Office 1600/1600IP in
Twin mode with the handset: While the handset is in the charging bay, the calls are
diverted to Office 1600/1600IP. As soon as you remove the handset from the charging bay, calls are forwarded to the handset.
In Twin Comfort mode, your handset also copies the entries of the call lists, the lastnumber redial entries and the private telephone book entries (max. 100 entries).
Page 7

Office 1600IP
Twin and Twin Comfort are also available if you use Office 1600/1600IP as group
tool.
Before you get started
Page 7
Alternative destination if your Office 1600/1600IP is not started
If your Office 1600/1600IP is not started, the calls are forwarded to preconfigured
destinations. You can of course forward the calls yourself to the alternative destination you want before exiting the program.
Operating Office 1600/1600IP
Starting Office 1600/1600IP
Your Office 1600/1600IP is installed as standard so that it is opened automatically
when the PC starts up. You can also use the program icon on your desktop to start
Office 1600/1600IP manually.
Each time you start Office 1600/1600IP, the system checks whether the latest software version of the program is being used. If the system does not find the latest version, the program is updated automatically.
The first time you start the application, you are asked to enter your user name and
PIN. Under User name, enter the internal call number of your Office 1600/1600IP.
Next change the preset PIN (0000) with a PIN of your choice. Click Remember PIN
if you do not want to see the message next time you start the application.
Note: Remember that a stored PIN can be retrieved for malicious purposes
and that your phone can then be used without your consent.
Click OK. Your Office 1600/1600IP is started.
Page 8
Office 1600IP
Before you get started
Page 8
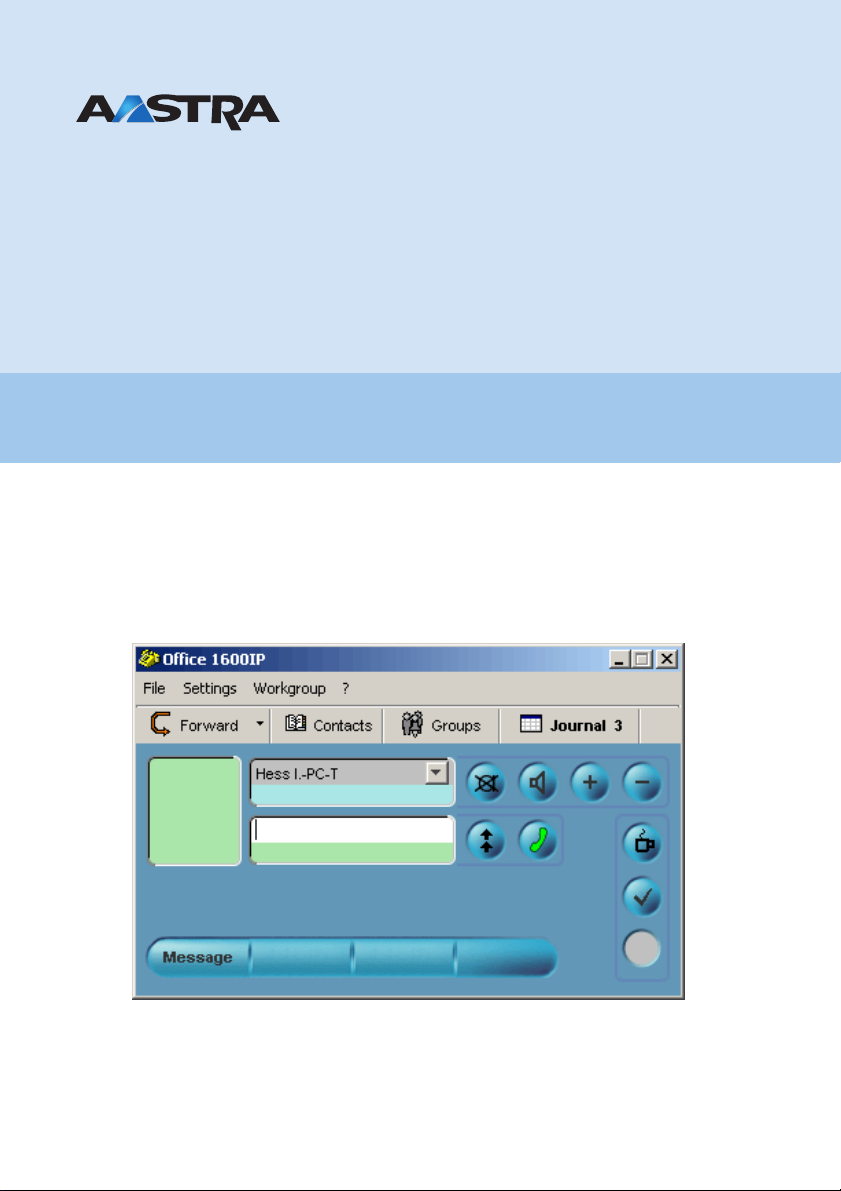
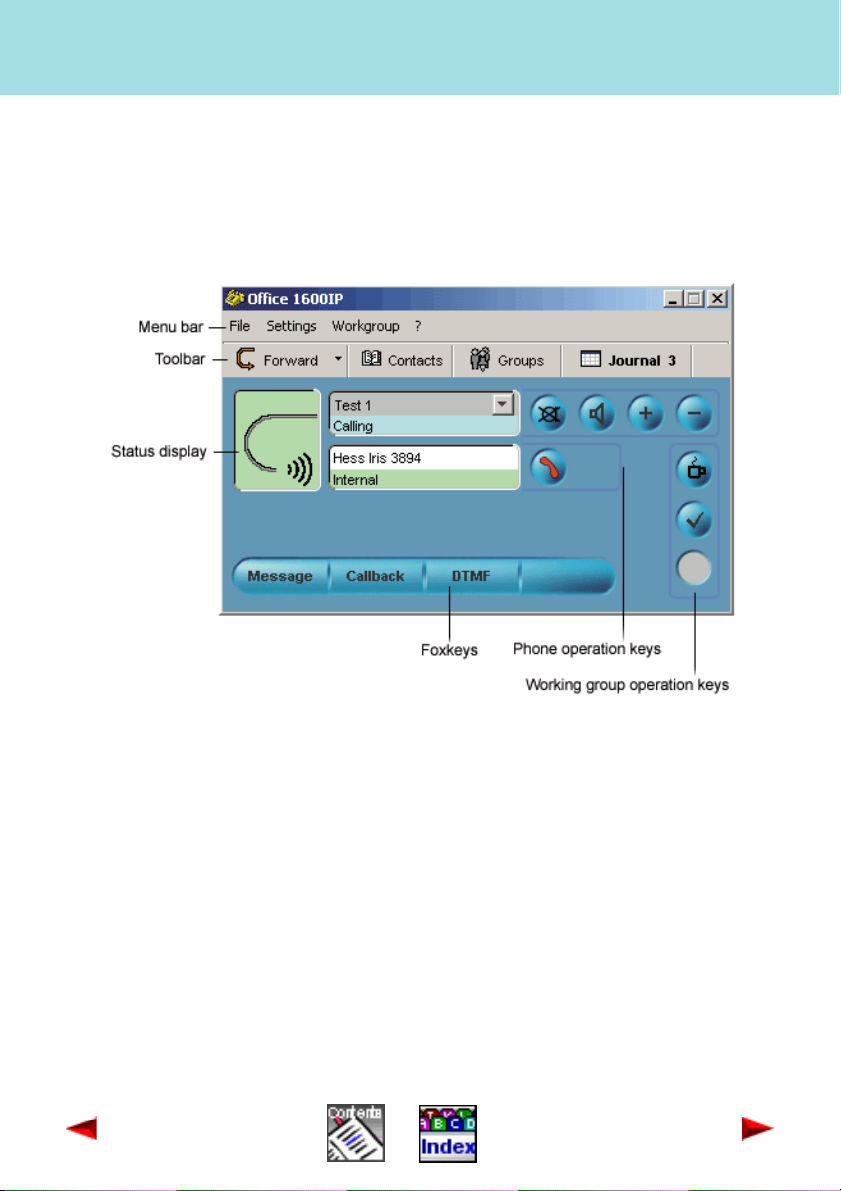
Learn about the graphical user interface
The main view is the central user console in Office 1600/1600IP. From here, you
place your calls or open additional views to access the message editor, contacts,
groups or the journal.
The Status display shows the phone's current state.
Use the Operation keys to operate the phone and the workgroups.
The Foxkeys are context-sensitive and provide additional functions.
Page 9

Office 1600IP
You use toolbar to activate a forwarding destination (see "Forward call (call forwar-
ding)", Page 42) or open additional views of Office 1600/1600IP:
• Contacts opens your phone book (see "Maintain contacts", Page 63)
• Group opens key fields for Number keys, Team keys and Function keys (see
"Use number keys", Page 45, "Use team keys", Page 47 and "Use function
keys", Page 50). If you belong to workgroups, you also see the other group mem-
bers and their current status here (see "Call within the group", Page 69). The
keys used most frequently can be dragged from the group field into the desktop.
• Journal opens the log in which all incoming and outgoing calls and text messages are entered (see "Learn about the journal", Page 33). If you belong to
workgroups, you can also open and edit work tickets here (see "Call within the
group", Page 69).
Before you get started
Page 9
Learn about the Media device (Office 1600)
Your system administrator has coupled your Office 1600 softphone with a corded
or mobile hardphone from the Office family. This means that calls are signalled
acoustically on this device and that you can use the device as a receiver/speaker
system.
You can initiate and answer your calls either on the PC using the mouse or keyboard or with the hardphone.
While this User’s Guide describes the procedure for handling calls on the PC, it
applies accordingly for the coupled hardphone, too. If you have questions about the
operation of the hardphone, please refer to the relevant User’s Guide. The Guide
can be downloaded from the internet from the Ascom Docfinder.
Familiarizing yourself with the media device (Office 1600IP)
Your system administrator has fitted your PC containing Office 1600IP with a media
device. This could be a telephone handset, headset, or a Bluetooth device.
Depending on the type of system, operation of your Office 1600IP may differ slightly
from these instructions. Ask your system administrator to explain the correct operation in each case.
Page 10

Office 1600IP
Before you get started
Page 10
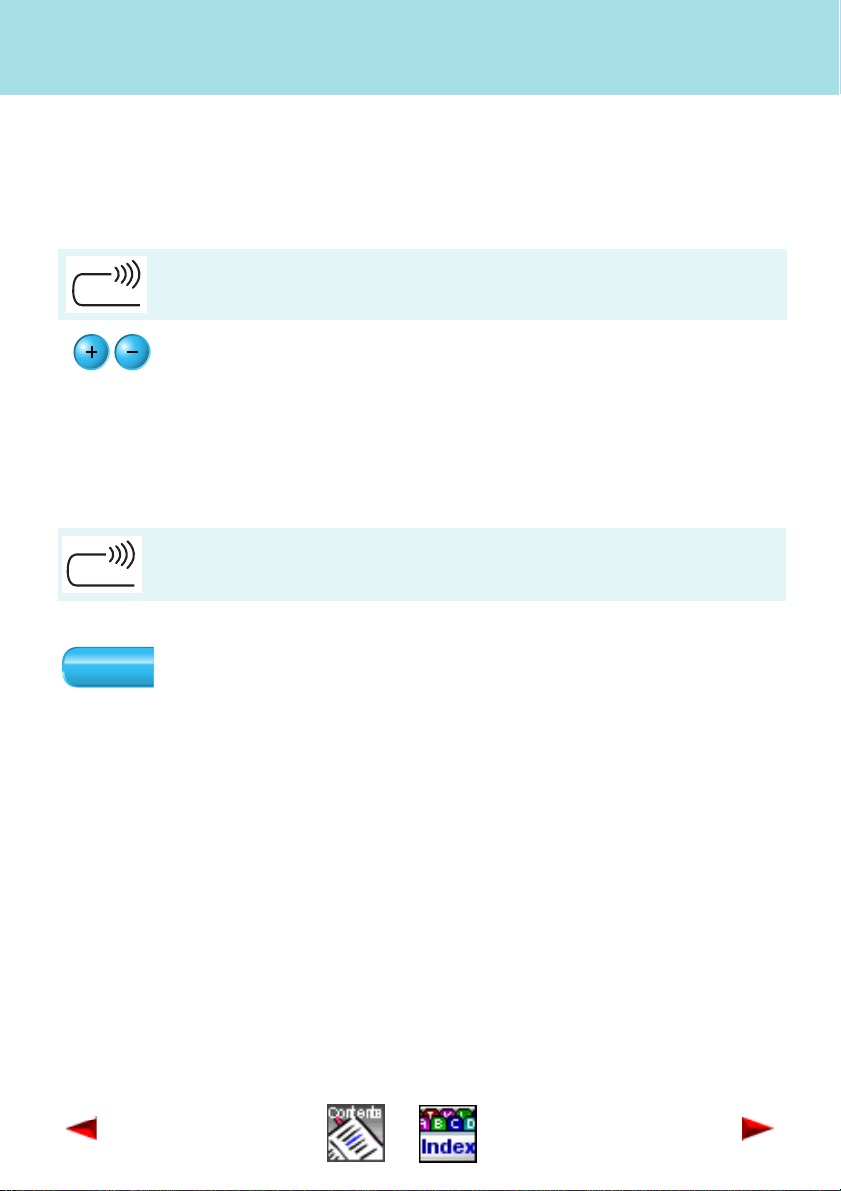
Learn about Operation keys/Foxkeys
You use the operation keys to execute the basic functions. The Foxkeys are context-sensitive and provide the most useful telephony functions:
.
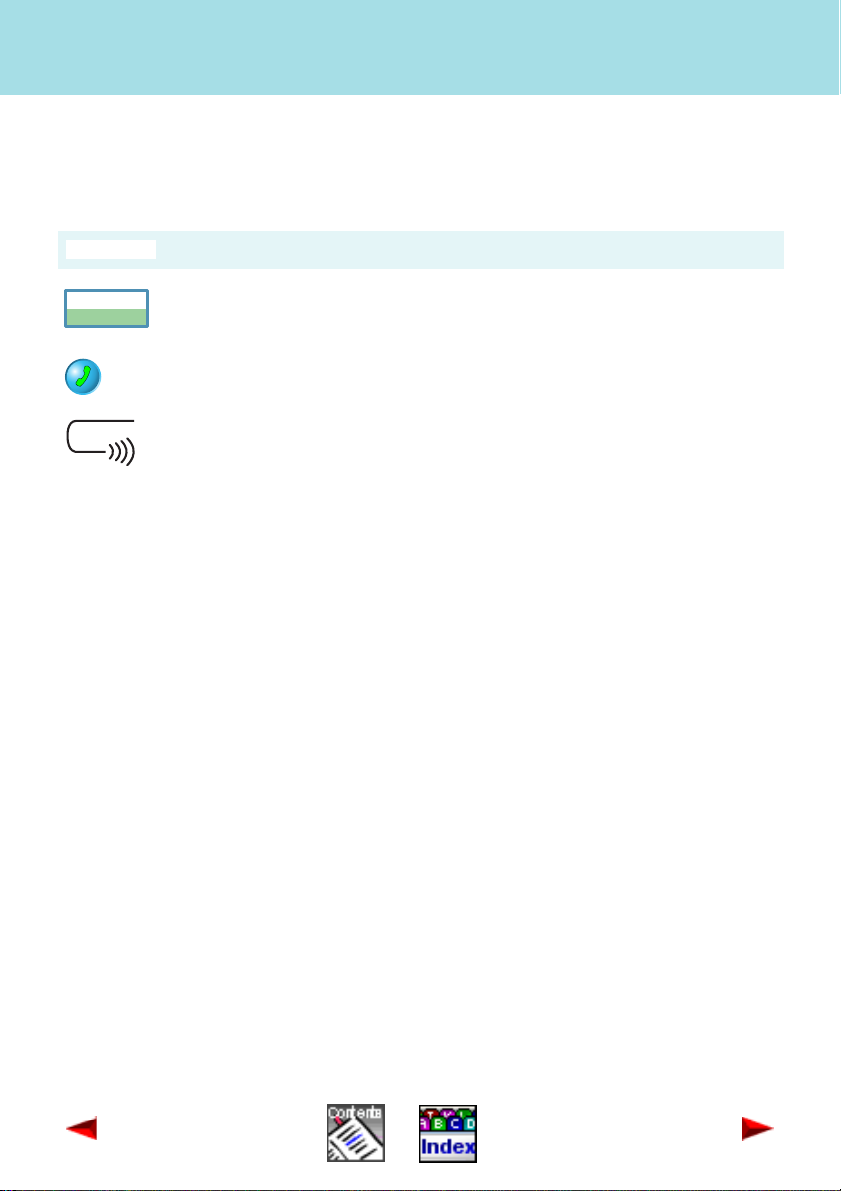
Click the Call key to initiate or terminate a call.
.
The Last-number redial key gives you access to the last 10 call
numbers dialled.
.
Use the Open listening key to hear your call party through your
PC's sounder (is not currently available).
.
Click the Mute key if you do not want your call party to hear what you
are saying to a third party in the room.
.
Depending on when you click the Volume keys you are changing
the volume of the dialling tone or the voice reception volume.
.
This key is visible only while you are logged into a workgroups (see
"Call within the group", Page 69).
If you click the Break key, incoming calls to the workgroup are no
longer offered on your Office 1600/1600IP until you click the key
again.
This key is visible only while you are logged into a workgroup (see
"Call within the group", Page 69).
.
The Continue key gives you the option to exit the wrap up time
early. This key is visible only while you are logged into a workgroup.
This key is visible only while you are logged into a workgroup (see
"Call within the group", Page 69).
.
The Foxkeys provide you with context-sensitive telephony functions.
Page 11

Office 1600IP
Before you get started
Page 11
Learn about key combinations
Key combinations help you to carry out recurring operating steps more efficiently.
Your Office 1600/1600IP provides you with the following key combinations for making calls:
Key combination Situation Action
<Enter> Incoming call Answer call
<Enter>
<Enter>
<Escape> Open selection list
<Escape> During the call Call is terminated
<Escape>
<Escape> While there is a call waiting Call rejected
<Ins> In call
<Space> followed by
the entry of letters
<Break> Call on hold Call taken back
<Break> During the call Call put on hold
<Arrow pointing up> Focus in the input field
The input field contains a
call number
The input field does not
contain a call number
While a call is being signalled
Focus in the input field
Call being set up
Ring back tone sounding.
Numbers entered now are
transmitted immediately
(overlap dial)
List is closed and selection
discarded
Call rejected
Activate and deactivate DTMF
mode
Selection list is opened and
the system searches for
entries that have the same
first few letters of the second
name
Last-number redial list is
opened.
Page 12

Office 1600IP
Key combination Situation Action
Before you get started
Page 12
<Arrow pointing
down>
<Back> Focus in the input field
Entry of letters Focus in the input field
Focus in the input field
Last-number redial selection
list is opened
Entry deleted character by
character
Selection list is opened and
the system searches for
entries that have the same
first few letters (dialling by
name)
Page 13

Office 1600IP
Customise the phone to meet your
needs
Customise the phone to meet your needs
You can adjust the behaviour of Office 1600/1600IP to meet your requirements so
that making calls is combined with the other activities on your PC in the most effective way.
Some settings are used to adjust Office 1600/1600IP to the hardware components
you use.
The information provided here explains how you can make the settings, and what
effect they have.
Most of the settings are distributed among 3 tabs in the Settings menu.
Note: Please do not make any changes to the Advanced tab. These settings
are for fine tuning and are reserved for the system administrator.
The settings for the workgroups can only be accessed by the group administrator,
and can be found in the Workgroup / Manage workgroups... menu (see "Manage
workgroups", Page 77).
Topics overview
Make general settings . . . . . . . . . . . . . . . . . . . . . . . . . . . . . . . . . . . . . . . . Page 14
Make media settings (Office 1600IP only). . . . . . . . . . . . . . . . . . . . . . . . . Page 16
Make advanced media settings (Office 1600IP only) . . . . . . . . . . . . . . . . Page 17
Set tones and melodies (Office 1600IP only) . . . . . . . . . . . . . . . . . . . . . . Page 18
Setting up the voice mailbox . . . . . . . . . . . . . . . . . . . . . . . . . . . . . . . . . . . Page 19
Page 14

Office 1600IP
Customise the phone to meet your
needs
Make general settings
Make general settings
The settings are located under Settings / General.
Change PIN
Proceed as follows to change your PIN:
1. Enter the current PIN under Current PIN, and the new PIN under New PIN and
under Confirm PIN.
A 2 to 10 digit combination is allowed as a PIN.
2. Click Remember PIN if you do not want to enter your PIN when you start the
application in future.
3. Click Apply to save the settings.
Note: Remember that a stored PIN can be retrieved for malicious purposes
and that your phone can then be used without your consent.
Determine view behaviour
You can determine which views are opened when you start Office 1600/1600IP:
• Open on startup:
The views selected are automatically opened when you start the Office 1600/
1600IP.
• Minimized (only in combination with Open on startup):
The views selected are displayed minimized as a pushbutton on the taskbar
when you start the Office 1600/1600IP.
• Pop Up (main view):
Main view is displayed in the foreground of the screen when the phone rings.
• Pop Up (message):
The menu window is opened when a message is received.
• Pop Up (group):
In workgroups: Opens the workgroups window as soon as a call is offered to another member (the function is not available if the key of a workgroup member is
dragged onto the desktop).
• On Top:
Keys on the desktop are always in the foreground of the screen.
Page 15

Office 1600IP
Customise the phone to meet your
needs
Make general settings
To set the response of the views, proceed as follows:
1. Select the options you want by clicking the check boxes
2. Click Apply to save the settings.
Change user language
You can change the user language without having to restart Office 1600/1600IP:
1. Under Language, select the language required.
2. Click Apply to save the setting.
The user language is changed.
Enter address of Internet phone book
In the contacts view, you can open a phone book on the Internet. Enter the address
as follows:
1. In the Web phone book address, enter the Internet address of the directory
you want (for example, "http://www.tel.search.com").
2. Click Apply to save the setting.
Enter own email address
You can also send text messages as emails (see "Use text messages", Page 58).
To do so, you must enter your own email address:
1. In the Local email address field, enter your own email address (for example,
charlie.chaplin@provider.co.uk).
2. Click Apply to save the setting. The next time you send a text message as an
email, this sender address is entered.
Page 16

Office 1600IP
Customise the phone to meet your
needs
Make media settings (Office 1600IP
Make media settings (Office 1600IP only)
The Media Devices tab contains the settings for the connected Media Devices
such as the handset, headset, and speakers. In most cases, your system administrator will have already made these settings for the devices you use.
Select voice reproduction
You use these settings to define which media device is to be used:
1. Under Handset/Headset, select one of the available devices.
2. Select the appropriate sound device under Connected to (e.g. a USB sound
device or a sound card).
Select ring devices
Calls can ring on the internal PC sounder, the media device or another connected
speaker (external speaker):
1. On the Ring devices tab, select the devices that you want the calls to ring on.
2. If you selected External speaker, in the pull down menu you select which
sound device is to be used (e.g. a sound card) to control the external speaker.
3. Click Apply to save the settings.
Note: If you are not sure whether your PC is fitted with a sound card, ask your
system administrator.
Set volume
You use the three slider controls to define the volume that is set when you start your
Office 1600/1600IP:
1. Under Microphone adjust the volume of the microphone of your handset or
headset if your call partners find your voice too loud or too quiet.
2. Under Earpiece, adjust the volume of your handset or headset speakers if you
find the voices of your call partners too loud or too quiet.
3. Under Speakers, adjust the volume of the internal speakers if the ring device is
too quiet.
4. Click Apply to save the settings.
Note: You can also adjust the volume temporarily on the main view (see
"Learn about Operation keys/Foxkeys", Page 10)
Page 17

Office 1600IP
Customise the phone to meet your
needs
Make advanced media settings
Make advanced media settings (Office 1600IP only)
The settings for the media stack and the AIN bandwidth area are found in the Media
devices tab behind the Advanced... pushbuttons.
Note: Only make changes to these settings in consultation with your system
administrator.
Select bandwidth area
Here, you can choose the bandwidth area in the IP network in which your
Office 1600/1600IP is located. If you always use the softphone in the same location,
leave the setting as it is. If you also use the softphone outside the company LAN,
select the appropriate bandwidth area each time you start the Office 1600/1600IP.
Your system administrator knows which bandwidth areas you need to set and
where.
Make media stack settings
Usually, the media stack uses the optimum settings automatically. If you want to
change the settings manually, proceed as follows:
1. Deactivate Automatic Configuration.
2. Choose AGC (Automatic Gain Control) if you want your voice to be amplified on
the microphone if you are speaking quietly or the microphone is further away.
3. Select AEC (Automatic Echo Cancellation) if your call parties can hear the echo
of their own voice.
4. Choose VAD (Voice Activity Detection) if you want surrounding noise to be fil-
tered out when you speak into the microphone.
5. Click Apply to save the settings.
Page 18

Office 1600IP
Customise the phone to meet your
needs
Set tones and melodies (Office 1600IP
Set tones and melodies (Office 1600IP only)
In the Sound tab, you can select tones and melodies that Office 1600/1600IP plays
to signal a call or the receipt of a message.
You can listen to the tones and melodies under Ring test.
1. In the Ring devices column, set the tones/melodies that you want played on
the external speaker and on the handset/headset.
When doing so, check whether the devices required have been selected under
Ring devices in the Media devices tab (see "Select ring devices", Page 16).
2. In the PC sounder column, set the tones/melodies that you want played on the
internal PC sounder.
When doing so, check whether the internal PC sounder has been selected
under Ring devices in the Media devices tab (see "Select ring devices",
Page 16).
3. Click Apply to save the settings.
If you want to set the tones and melodies back to the factory setting, click Set
defaults.
Page 19

Office 1600IP
Customise the phone to meet your
needs
Setting up the voice mailbox
Setting up the voice mailbox
The Voice Mailbox tab allows you to manage your mailbox greetings: You have a
choice of three personal greetings, which can be activated, recorded and monitored
here.
Note: Your voice mailbox must first be set up by your system administrator.
Activate / deactivate greeting
You can record three personal greetings (e.g. one for short absences, one for
absences of a whole day, and one for longer absences).
1. To activate the appropriate greeting, select it in the Active Greeting frame.
Select Standard Greeting if you want callers to obtain the standard company
greeting instead of a personal greeting.
2. Click Apply to save the settings.
Playing back a personal greeting
To play greetings that have already been recorded, proceed as follows:
1. Select the relevant greeting from the dropdown menu in the Edit Greeting
frame
2. Click Listen
The greeting is now played back.
Record personal greeting
To record a personal greeting, proceed as follows:
1. Select the relevant greeting from the dropdown menu in the Edit Greeting
frame
2. Click Record
You will hear a signalling tone
3. Start recording the greeting at the end of the signalling tone.
A signalling tone similar to the busy tone will tell you that the maximum recording time has been reached.
4. Click Apply to save the settings.
Page 20

Office 1600IP
Telephony made simple
Page 20
Telephony made simple
Office 1600/1600IP is user-friendly and easy to use. With just a few mouse clicks
or keyboard commands, you can answer a call or establish a call connection.
Here you learn how to work with Office 1600/1600IP straight away, and learn about
the main user prompts.
Note: The description here may differ slightly from actual operation, depen-
ding on the media device used. For example, some handsets support
the initiation and conclusion of a call by removal of the handset from the
mount. The following description assumes that this function is not
available.
Topics overview
You are receiving a call . . . . . . . . . . . . . . . . . . . . . . . . . . . . . . . . . . . . . . . Page 21
You want to place a call . . . . . . . . . . . . . . . . . . . . . . . . . . . . . . . . . . . . . . Page 24
Learn about the journal . . . . . . . . . . . . . . . . . . . . . . . . . . . . . . . . . . . . . . . Page 33
Page 21
Office 1600IP
Telephony made simple
You are receiving a call
Page 21
You are receiving a call
Order no.: Set volume of the ringing signal (Office 1600IP only)
You want to change the volume of the ringing signal.
Your Office 1600/1600IP is calling.
If the ringing signal is too loud or too quiet, click several times on the
relevant Volume key, until the signal is at the level you require. To
adjust the volume in general for all calls, change the media settings
(see "Set volume", Page 16).
Suppress ringing signal (discrete ringing) - (Office 1600IP only)
You want to suppress the ringing signal without immediately answering the call.
Your Office 1600/1600IP is calling.
Discrete rin-
ging
Click the Discrete ringing Foxkey. The ringing signal for the current
call is suppressed.
Page 22

Office 1600IP
Telephony made simple
You are receiving a call
Page 22
Answer a call
Your Office 1600/1600IP is calling.
Hold the media device to your ear and click the Call key or press the
Enter key on your keyboard.
The connection is established.
Note: For keyboard operation: Depending on the operating system (Windows
2000, Windows XP) the focus is not automatically placed on the
Office 1600/1600IP when it calls. If so, use the key combination
<Alt>+<Tab> to place the focus on the Office 1600/1600IP pictograph
and then answer the call with <Enter>.
Adjust volume of voice reproduction (Office 1600IP only)
See "Set the call volume (Office 1600IP only)", Page 31 if you want to adapt the
volume for the current call only.
See "Set volume", Page 16 if you want to adapt the volume in general for all calls.
End a call
You are taking the call.
Click the Call key or press the Escape key on your PC keyboard.
The call is terminated.
Page 23

Office 1600IP
Telephony made simple
You are receiving a call
Page 23
Save the caller's name and call number
You have terminated a call and want to save the caller's number and call number.
Your Office 1600/1600IP is idle.
Click Journal in the toolbar and select the call entry of the subscriber
required.
Click Save in Contacts and edit the input fields.
Click Save and close to save the data and return to the main view.
Page 24
Office 1600IP
Telephony made simple
You want to place a call
Page 24
You want to place a call
Dial with the call number
Your Office 1600/1600IP is idle.
Enter the call number in the input field.
Hold the media device to your ear and click the Call key or press the
Enter key on your keyboard.
The subscriber is called.
Note: You can enter numbers in international format (+4112345678) or natio-
nal format (0012345678). You only need to enter the leading digit for
exchange access if you use national format (in the example, this is the
leading 0).
To make the number easier to read, you can use spaces and hyphens
(0-01 234 5678). Office 1600/1600IP does not understand any other
characters.
Page 25
Office 1600IP
Dial by name
Your Office 1600/1600IP is idle.
Enter the first few letters of the required name in the input field:
• If the name you are looking for is listed under the surname in the
• If the name you are looking for is listed under the first name in the
• To look for a combination of first name and surname, type the first
The selection list then displays all the names that match your input.
Click the name you were looking for. The name is copied to the input
field and the selection list is closed.
Hold the media device to your ear and click the Call key.
Telephony made simple
You want to place a call
Page 25
phone book, enter the first few letters of the surname.
phone book, enter the first few letters of the first name.
few letters of the first name followed by a space and the first few letters of the surname (e.g. "Mi Ba" for "Mike Ballantine").
The subscriber is called.
Note: You can also search for the second part of the name: Press the space
bar in the empty input field, followed by the first letter of the second part
of the name.
Note: Several phone numbers can be stored under a name in the phone
book. Office 1600/1600IP dials the number selected in the contact
entry (see "Enter phone numbers, email, and URL", Page 65).
Page 26

Office 1600IP
Dial from the phone book (contacts)
Your Office 1600/1600IP is idle.
Click Contacts in the toolbar. The contacts view is opened.
Select the phone book you want: The Public phone book in the
second tab contains all internal subscribers and abbreviated dialling
numbers in your company. The Private phone book in the third tab
contains your private contacts. The All phone book in the first tab contains the contacts from the two other phone books.
If Office 1600/1600IP is connected to an MS Exchange server, you
also have access to the contacts stored there
(see "Maintain contacts", Page 63).
EF
Click the key with the first letter of the desired name, or write the name
in the input field on the toolbar.
Click the contact you want, or use the mouse to drag the contact to
the input field in the main view (a double click opens the contact
details).
Telephony made simple
You want to place a call
Page 26
Hold the media device to your ear and click the Call key in the toolbar.
The subscriber is called.
Note: A private contact can be classed by first name or last name. This can
be defined when you enter the contact.
Page 27

Office 1600IP
Telephony made simple
You want to place a call
Page 27
Dial from an external phone book
From Office 1600/1600IP, you can directly open a phone book on the Internet. The
URL address of this phone book is entered in the settings
(see "Make general settings", Page 14).
Your Office 1600/1600IP is idle.
Click Contacts in the toolbar. The contacts view is opened.
Click Search Web in the toolbar. The Internet phone book is opened
in a browser application.
Copy the number that is found, and use it in the Office 1600/1600IP
input field.
If necessary, edit the number so that it either corresponds to international format (+4112345678) or starts with the exchange access prefix
(0012345678).
Remove all other characters such as slashes, asterisks, brackets, and
so on (hyphens and spaces are permitted).
Hold the media device to your ear and click the Call key in the toolbar.
The subscriber is called.
Page 28

Office 1600IP
Telephony made simple
You want to place a call
Dial with a number key
If you have stored your most important numbers on number keys (see
"Use number keys", Page 45), you can dial these with just a mouse click.
Your Office 1600/1600IP is idle.
Click Groups in the toolbar. The group view is opened.
Click the group tab that contains the number key you want.
Double click the desired number key.
The subscriber is called.
Dial from the journal
Your Office 1600/1600IP is idle.
Click Journal in the toolbar. The journal view is opened.
Page 28
Select the entry containing the call party you want.
Hold the media device to your ear and click the Call key in the toolbar.
The subscriber is called.
Note: Double click the journal entry to call the subscriber you want directly.
Page 29

Office 1600IP
Telephony made simple
You want to place a call
Page 29
Call a subscriber again
Your Office 1600/1600IP is idle.
Click the Redial key and select the subscriber you want from the list
that appears. The call number is transferred to the input field. You can
then edit the number if required.
Hold the media device to your ear and click the Call key.
The subscriber is called.
Note: The redial list lists the subscribers that are entered in the journal. If a
journal entry is deleted, the subscriber concerned is also removed from
the redial list.
Respond to unanswered calls
You come to your workstation and want to respond to the calls made to you during
your absence. Unanswered calls are logged in the journal. You can easily see from
the way in which the Journal pushbutton is displayed in the main view whether
there are entries for unanswered calls.
Journal 4
Journal 2
Journal
Journal pushbutton Unanswered calls and messages
The pushbutton text is bold
and is followed by a number
(e.g. 4).
The pushbutton text is not bold
and is followed by a number
(e.g. 2).
The pushbutton text is not
bold, and is not followed by a
number.
There are four entries for unread
and unanswered calls / messages in
the journal.
There are two entries, which have
already been read, for unanswered
calls / messages in the journal.
There are no entries for unread and
unanswered calls / messages in the
journal.
Page 30

Office 1600IP
Proceed as follows to respond to the unanswered calls:
Your Office 1600/1600IP is idle.
Click Journal in the toolbar.
Select the entry for an unanswered call. This is indicated by a symbol
and a bold font.
Hold the media device to your ear and click the Call key in the toolbar.
The subscriber is called. If the call party answers your call, the entry
is no longer bold once you have terminated the call, and the number
of unanswered calls indicated on the Journal pushbutton on the toolbar of the main view is reduced by one.
Telephony made simple
You want to place a call
Page 30
Page 31

Office 1600IP
Telephony made simple
During the call
Page 31
During the call
Set the call volume (Office 1600IP only)
Your call party’s voice is too loud or too quiet. You want to adjust the volume of the
voice reproduction temporarily for this call.
You are taking the call.
Click several times on the relevant Volume key, until the volume is at
the level you require.
Microphone on/off (Office 1600IP only)
For a moment, you do not want your called party to hear what you are discussing
with somebody else.
You are taking the call.
Click the Mute key to turn the microphone off. The call party can no
longer hear you.
Click the Mute key once more to turn the microphone on again.
Page 32

Office 1600IP
Open listening mode (Office 1600IP only)
You want to listen to your call party on your speakers.
You are taking the call.
Click the Open Listening key, to turn on open listening mode.
Click the key again to turn off open listening mode.
Telephony made simple
During the call
Page 32
Page 33

Office 1600IP
Telephony made simple
Learn about the journal
Page 33
Learn about the journal
All incoming and outgoing calls and text messages are entered as events in the
journal. The entry contains useful information, including the type of event, when it
took place, who was involved, and how long it lasted. By double clicking on an entry,
you can trigger a context-sensitive action.
Note: Office 1600: The journal entries are independent of the call lists of the
coupled Office terminal.
Understand journal entries
The symbol in the first column of an entry indicates the type of entry.
Meaning Double click entry
Call received and answered Call party called
Call received but not answered Call party called
Outgoing call was answered Call party called
Outgoing call was not answered
or destination subscriber was
busy
Call received and deflected to
mailbox
Text message sent Text message displayed
Text message received and read Text message displayed
Text message received and not
yet read
Call party called
Mailbox called
Text message displayed
Page 34

Office 1600IP
Telephony made simple
Learn about the journal
Page 34
Unanswered calls are indicated by a bold font.
The Name column contains the name of the call party - if it is known.
The Number contains the call number or email address if the entry relates to a text
message sent as an email.
The Date/Time column contains the date and time at which the event took place.
The Duration column shows how long the call lasted. This field is empty for entries
relating to unanswered calls and to text messages.
The Forwarded from column indicates whether an incoming call was forwarded to
you, and if so, from which subscriber.
Sort journal entries
You can sort journal entries by a column of your choice.
The journal view is open.
Click a column header to sort the entries by this column.
Click the column header again to change the sort direction.
Save a journal entry as private contact
You can save a call number in a journal entry as a private contact.
The journal view is open.
Select the entry that you want to save.
Click Save in Contacts and edit the input fields.
Click Save and close to save the data and return to the main view.
Page 35

Office 1600IP
Telephony made simple
Learn about the journal
Page 35
Retain journal entries
The system deletes journal entries at regular intervals. If you want to ensure that
the system does not delete a particular entry, you must flag it accordingly.
The journal view is open.
Select an entry that you do not want the system to delete.
In the Archive column, click the selection field. The entry is retained
when the system deletes the other entries.
Delete journal entries manually
Journal entries are automatically deleted at regular intervals. However, you can
also delete selected entries manually before they are automatically deleted.
The journal view is open.
Select the entry that you want to delete (you can use the mouse to
select several entries by pressing the Shift or Ctrl key when selecting
the entries).
Click Delete in the toolbar. The selected entries are deleted.
Page 36

Office 1600IP
Use the phone like a professional
Page 36
Use the phone like a professional
As a telephone from the Office suite, your Office 1600/1600IP provides you with
practically the whole range of convenience functions. Thanks to the fact that
Office 1600/1600IP goes beyond the tight boundaries of the display of a conventional telephone, characteristics such as team and function keys can be displayed
more clearly and used more effectively.
Here, you learn how to best use the convenience functions with Office 1600/
1600IP.
Note: Office 1600IP: The description here may differ slightly from actual ope-
ration, depending on the media device used. For example, some handsets support the initiation and conclusion of a call by removal of the
handset from the mount. The following description assumes that this
function is not available.
Topics overview
Use convenience functions . . . . . . . . . . . . . . . . . . . . . . . . . . . . . . . . . . . . Page 37
Use functions during a call . . . . . . . . . . . . . . . . . . . . . . . . . . . . . . . . . . . . Page 39
Manage absence. . . . . . . . . . . . . . . . . . . . . . . . . . . . . . . . . . . . . . . . . . . . Page 42
Cope with special situations . . . . . . . . . . . . . . . . . . . . . . . . . . . . . . . . . . . Page 44
Use number keys . . . . . . . . . . . . . . . . . . . . . . . . . . . . . . . . . . . . . . . . . . . Page 45
Use team keys. . . . . . . . . . . . . . . . . . . . . . . . . . . . . . . . . . . . . . . . . . . . . . Page 47
Use function keys . . . . . . . . . . . . . . . . . . . . . . . . . . . . . . . . . . . . . . . . . . . Page 50
Use function codes . . . . . . . . . . . . . . . . . . . . . . . . . . . . . . . . . . . . . . . . . . Page 54
Page 37

Office 1600IP
Use convenience functions
Request a callback
You are trying to call a subscriber. However, the line is busy.
Callback
Click the Callback Foxkey.
The callback is activated.
As soon as the required subscriber has finished his or her call, your
Office 1600/1600IP places a call.
Hold the media device to your ear and click the Call key.
The subscriber is called.
Use the phone like a professional
Use convenience functions
Page 37
Note: If the required subscriber does not accept the call you can request a
callback. The subscriber then receives a continuous visual message
about your callback request.
Answer callback request
Please call
back
A subscriber asks you for a callback.
Hold the media device to your ear and click on Call key to respond to
the callback.
The subscriber is called.
Page 38

Office 1600IP
Reply or reject call waiting
You are taking the call. A subscriber wants to speak to you urgently
and makes you aware of this by indicating a call waiting. Your
Office 1600/1600IP is calling.
Click the Call key next to the subscriber in call waiting mode.
The first call is put on hold and you are connected to the subscriber
who is in call waiting mode.
- or -
Reject
If you do not want to take the call of the subscriber who is in call waiting mode, click the Reject Foxkey.
- or -
Click the Call key to exit the active call.
Click the Call key next to the subscriber in call waiting mode to take
the call.
Use the phone like a professional
Use convenience functions
Page 38
Send a call waiting signal to a subscriber
You are calling a subscriber; however, the line is busy.
Call waiting
While you are listening to the busy tone, click the Call waiting Foxkey. You are hearing the dialling tone and the subscriber receives a
signal that you want to talk to him.
If the required subscriber rejects your call or if call waiting is not possible, the connection is cut (busy tone).
Page 39

Office 1600IP
Use the phone like a professional
Use functions during a call
Use functions during a call
Enquiry calls during a call
You are taking a call and want to call another subscriber without exiting the current call.
Enter the call number or the name of the required enquiry call party in
the empty input field.
Click the Call key.
The first call is put on hold.
After receiving an enquiry, click the Call key displayed next to the
enquiry party. You are connected to the call party again
Broker between the enquiring party and the call party
Page 39
Brokering
Brokering
You have initiated an enquiry and want to switch to the first call party
without disconnecting the enquiring party.
Click the Brokering Foxkey during the call. The enquiring party is put
on hold.
Press the same Foxkey again to return the enquiring party.
Page 40

Office 1600IP
Use the phone like a professional
Use functions during a call
Transfer a call party with prior notification
You are taking a call and want to transfer your call party.
Enter the call number or the name of the required subscriber in the
empty input field, and then click the Call key. The subscriber is called
and the current call is put on hold.
Connect
Wait until the required subscriber takes the call and announce the call
to him. Click the Connect Foxkey.
Transfer a call party without prior notification
You are taking a call and want to transfer your call party.
Enter the call number or the name of the required subscriber in the
empty input field, and then click the Call key. The subscriber is called.
Connect
Wait for the first dialling tone and click the Connect Foxkey.
Page 40
Note: If the other subscriber does not accept the call it is routed back to your
Office 1600/1600IP.
Page 41

Office 1600IP
Put call party on hold
You are taking a call and want to put the connection on hold in order
to clarify something.
Park
Click the Park Foxkey.
Take back
To reconnect to the parked call party, click the Take back Foxkey.
Make a conference call
You are taking a call and have a call party on hold whom you want to
include in the current call.
Conference
Click the Conference Foxkey.
Use the phone like a professional
Use functions during a call
Page 41
To exit the conference, click a Call key.
Page 42

Office 1600IP
Use the phone like a professional
Manage absence
Page 42
Manage absence
Forward call (call forwarding)
You leave your work place. You want to forward your calls to another subscriber.
Your Office 1600/1600IP is idle.
Enter the call number or the name of the required subscriber in the
empty input field.
In the toolbar, click Forward.
- or -
In the toolbar, click the Move down key next to the forward key. A
selection list opens that provides you with previously used forwarding
destinations.
Click the desired forwarding destination.
Take back call forwarding
You have returned to your workstation and want to take back call forwarding.
Your Office 1600/1600IP is idle.
Click the Call key next to the forwarding destination.
Provide information for initiator of call forwarding
You receive a call for someone who forwarded their calls to you, and want to leave
a note for this person. You can use the message facility to send this person a
message.
Page 43

Office 1600IP
You are taking the call.
Message
Click the Message Foxkey. The message editor is opened. The subscriber who forwarded calls to you is entered as the sender address.
Enter your call log and click Send a message in the toolbar.
Use the phone like a professional
Manage absence
Page 43
Page 44

Office 1600IP
Use the phone like a professional
Cope with special situations
Page 44
Cope with special situations
Activate/deactivate DTMF mode (tone selection)
You will need DTMF dialling mode to control other devices from your phone, such
as remote enquiries to your answering machine.
You are taking a call and the system prompts you to enter characters
via the keyboard.
DTMF
Click the DTMF on Foxkey to activate dialling mode DTMF.
DTMF
Once you exit the call, the system automatically deactivates DTMF
dialling mode. If you want to deactivate this mode while you are still
taking the call, click the DTMF Foxkey again.
Deflect a call during the calling phase
Your Office 1600/1600IP is calling.
Deflect
Click the Deflect Foxkey.
Enter the call number or the name of the required subscriber in the
input field that opens, and then click OK.
Reject a call during the calling phase
Your Office 1600/1600IP is calling.
Reject
Click the Reject Foxkey if you do not want to take the call.
Page 45

Office 1600IP
Use the phone like a professional
Use number keys
Page 45
Use number keys
You want to dial frequently-used numbers directly with a mouse click.
To do this, you can define number keys and assign them to a group.
Note: Office 1600: The number keys are independent of the configurable
keys on the coupled Office terminal.
Define and assign number keys
You have opened the main view.
Click Group in the toolbar. The group view is opened.
Open a group for number keys:
1. In the menu, select Groups/New group. The name dialog is opened.
2. Enter the name (for example ”Important numbers”) and click OK. A
new group tab is added.
Note: You can also create the new number keys in an existing group tab (but
not in a workgroup tab).
Note: You can also store different key types, such as number keys and func-
tion keys, in the same group tab.
Page 46

Office 1600IP
You have opened the new group tab.
Create number keys:
1. In the menu, choose Key/New. The key dialog is opened.
2. Choose Number key and entered the desired call number under
3. In the Label field, enter the name that is to be displayed for the
4. Click OK. The number key is created.
5. Repeat these steps until you have created all the number keys.
6. Arrange the number keys manually by moving them with the mouse
Use the phone like a professional
Use number keys
Page 46
Call number. If the call number is already stored in the contacts,
you can take it from the selection list.
number key (optional).
If you leave this field empty, and the call number is not stored in the
contacts, the call number is used as the label.
If you leave this field empty, and the call number is stored in the
contacts, the name in the contact s used as the label.
or automatically using the menu Groups/Arrange key.
Note: You can drag the number keys with the mouse from the group tab on
the desktop and operate from there.
Delete number key
You have opened the group view and the group tab containing the
number keys.
Click the number key that you want to delete.
In the menu, choose Key/Delete. The number key is deleted.
Page 47

Office 1600IP
Use the phone like a professional
Use team keys
Page 47
Use team keys
You and your team partners want to be constantly available as a team. You want to
be able to call each other simply by pressing a key.
You can define a team key for each team partner and assign this key to a group.
Note: Office 1600: The team keys are independent of the team keys on the
coupled Office terminal.
Define and assign team keys
You have opened the main view.
Click Group in the toolbar. The group view is opened.
Open a group for team A:
1. In the menu, select Groups/New group. The name dialog is opened.
2. Enter the name (for example ”Team A”) and click OK. A new group
tab with the name "Team A" is added.
Note: You can also create the new team keys in an existing group tab (but not
in a workgroup tab).
Note: You can also store different key types, such as team keys and function
keys, in the same group tab.
Page 48

Office 1600IP
Use the phone like a professional
Use team keys
Page 48
You have opened the new group tab.
Create team keys:
1. In the menu, choose Key/New. The key dialog is opened.
2. Choose Team key and enter the call number or name of your team
partner under Call number. The team partner must be a subscriber
in the same system. Click OK. The team key is created.
3. Repeat these steps until you have created all the team keys.
4. Arrange the function keys manually by moving them with the
mouse or automatically using the menu Groups/Arrange key.
Note: You can drag the Team keys with the mouse from the group tab on the
desktop and operate from there.
Delete team key
You have opened the group view and the group tab of a team.
Click the team key that you want to delete.
In the menu, choose Key/Delete. The team key is deleted.
Understand team key status
The team key uses symbols to indicate the current status of your team partner:
Symbol Status
The team partner is free.
The team partner’s phone is ringing.
The team partner is taking a call.
Page 49

Office 1600IP
Use the phone like a professional
Use team keys
Page 49
If the text and frame for a team key is light grey, the key is inactive, for example
because the team partner has activated call forwarding.
Call team partner
Your Office 1600/1600IP is idle. You have opened the group view and
the group tab of a team.
You see that the team partner you want to call is free.
Double click the team key of the team partner you want to call.
The team partner is called.
Pick up call for team partner
Your Office 1600/1600IP is idle. You have opened the group view and
the group tab of a team.
You see that a team partner’s phone is ringing, and want to pick up
this call.
Double click the team key of this team partner.
The call is connected to you.
Page 50

Office 1600IP
Use the phone like a professional
Use function keys
Page 50
Use function keys
You want to access frequently-used functions with a mouse click, rather than entering them by hand.
To do this, you can create function keys, and assign a function of your choice to
them.
Note: Office 1600: The function keys are independent of the configurable
keys on the coupled Office terminal.
Define and assign function keys
You have opened the main view.
Click Group in the toolbar. The group view is opened.
Open a group for function keys:
1. In the menu, select Groups/New group. The name dialog is opened.
2. Enter the name (for example ”Functions”) and click OK. A new
group tab with the name "Functions" is added.
Note: You can also create the new function keys in an existing group tab (but
not in a workgroup tab).
Note: You can also store different key types, such as team keys and function
keys, in the same group tab.
Page 51

Office 1600IP
Use the phone like a professional
Use function keys
Page 51
You have opened the new group tab.
Create function keys:
1. In the menu, choose Key/New. The key dialog is opened.
2. Choose Function key. A selection list containing the functions is
opened.
3. Select a function from the list and define the function parameters
on the right-hand side of the dialog. Click OK. The function key is
created.
4. Repeat this steps until you have created all the function keys.
5. Arrange the function keys manually by moving them with the
mouse or automatically using the menu Groups/Arrange key.
Note: You can drag the function keys with the mouse from the group tab on
the desktop and operate from there.
Understand functions
The available functions have the following properties:
Function Property
Dials the selected call number and suppresses the display
CLIR per call
Courtesy
Remote maintenance
of your call number on the system of the person you are
calling. This service must be supported by your service
provider.
Activates/deactivates courtesy group 1 or 2. Courtesy is
the announcement text that is played when someone calls.
Permits or blocks remote maintenance on a single occasion, or always permits or blocks remote maintenance.
Page 52

Office 1600IP
Function Property
Mailbox retrieval: Calls the mailbox and automatically
enters the mailbox PIN.
Mailbox
MCID
Park
Relay
Do not disturb
User group
If your mailbox has the same PIN as your Office 1600/
1600IP, activate the option field Use Office 1600IP PIN
code. If the PINs are different, enter the PIN for your mailbox under Mailbox PIN.
Malicious Call Identification. You must request this service
from your service provider.
Puts a call on hold centrally, so that it can be picked up by
another subscriber. Across the system, only one call can
be centrally parked at a time.
Controls one of three internal relays. The relays can be
used for example to operate sun shades, heating systems
or other electrically controlled devices. If you want to know
how you can use these relays, ask your system administrator.
Diverts all your calls to a destination that was predefined in
the system configuration.
Logs out and back in to individual or all user groups. You
must be entered as a member of these user groups in the
system configuration.
Use the phone like a professional
Use function keys
Page 52
Page 53

Office 1600IP
Function Property
You can use switch groups to divert calls to different destinations on the weekend and workdays, for example. Each
Switch group
Forwarding
Deflect
switch group has three switch options. You need authorization to use switch groups. Ask your system administrator
how switch groups are used for you, and whether you are
authorized to use them.
Activates and deactivates call forwarding to another call
destination. Under Variant, choose the type of destination
or forwarding, and under Number enter the call number of
the subscriber you want to forward the calls to.
During the ring phase, this function deflects an incoming
call to the destination that you defined under Number.
The difference between this and the Foxkey function of the
same name is that, for the Foxkey function, the call number
of the target subscriber is not predefined. Therefore define
a function key if you often deflect calls to the same destination subscriber.
Use the phone like a professional
Use function keys
Page 53
Use function key
You have opened the group view and the group tab containing the
function key that you want to use.
Double click the function key for the function that you want to initiate.
Delete function key
You have opened the group view and the group tab containing the
function key that you want to delete.
Click the function key that you want to delete.
In the menu, choose Key/Delete. The function key is deleted.
Page 54

Office 1600IP
Use the phone like a professional
Use function codes
Use function codes
You can use */# procedures to activate functions not offered in the menu. You can
either type in a */# procedure directly or store it under a key. The DTMF mode has
to be deactivated before you can activate a function using a */# procedure.
Function */# procedure
<~sort>Activate / deactivate function us ing anot her phone
Activate / deactivate function using another phone
(Remote control)
<~sort>Activat e exchange access with char ge recal l
Activate exchange access with charge recall *32 <SC No.>
<~sort>Announcement
Announcement
<~sort>Announcement
• To a subscriber *7998 <SC No.>
<~sort>Announcement
• To a group *79 <GR No.>
<~sort>Announcement
• Answer to group *89
<~sort>Appointment reminder call
Appointment reminder call
<~sort>Appointment reminder call
• Activate single order *55 <hh mm>
<~sort>Appointment reminder call
• Clear single order #55
<~sort>Appointment reminder call
• Activate standing order *56 <hh mm>
<~sort>Appointment reminder call
• Clear standing order #56
<~sort>Call Forwarding on No Reply (CFNR)
Call Forwarding on No Reply (CFNR)
<~sort>Call Forwarding on No Reply (CFNR)
• Protect against *02
<~sort>Call Forwarding on No Reply (CFNR)
• Allow to own set #02
<~sort>Call Forwarding on No Reply (CFNR)
• Activate CFNR *61 <SC No.>
<~sort>Call Forwarding on No Reply (CFNR)
• Clear CFNR #61
<~sort>Call Forwarding on No Reply (CFNR)
• Activate CFNR on last configured SC *61#
<~sort>Call Forwarding on No Reply (CFNR)
• Clear CFNR on last configured SC #61
<~sort>Call Forwarding on No Reply (CFNR)
• Activate CFNR to preconfigured SC *62
<~sort>Call Forwarding on No Reply (CFNR)
• Clear CFNR to preconfigured SC #62
<~sort>Call Forwarding on No Reply (CFNR)
• Activate CFNR to pager or general bell *68
<~sort>Call Forwarding on No Reply (CFNR)
• Clear CFNR to pager or general bell #68
<~sort>Call waiting
Call waiting
<~sort>Call waiting
• activate in suffix dialling *43
<~sort>Call waiting
• Protect against *04
<~sort>Call waiting
• Allow to own set #04
<~sort>Callback
Callback
<~sort>Callback
• Delete (from executing phone) #37
*06 <SC No.> <Function>
Page 54
Page 55

Office 1600IP
Use the phone like a professional
Function */# procedure
<~sort>Callback message / message LED
Callback message / message LED
<~sort>Callback message / message LED
• Activate *38 <SC No.>
<~sort>Callback message / message LED
• Delete (from receiving phone) #38 <SC No.>
<~sort>Control Relays
Control Relays
<~sort>Control Relays
• Activate *74 <Relay No.>
<~sort>Control Relays
• Deactivate #74 <Relay No.>
<~sort>Deactivat e all active functions
Deactivate all active functions
*00
(except user group)
<~sort>Do not disturb (c all prot ection)
Do not disturb (call protection)
<~sort>Do not disturb (c all prot ection)
• Activate *26
<~sort>Do not disturb (c all prot ection)
• Deactivate #26
<~sort> F o llow me
Follow me
<~sort> F o llow me
• Activate *23 <SC No.>
<~sort> F o llow me
• Clear #23
<~sort>Forwar d calls (CFU)
Forward calls (CFU)
<~sort>Forwar d calls (CFU)
• Protect against *02
<~sort>Forwar d calls (CFU)
• Allow to own set #02
<~sort>Forwar d calls (CFU)
• Activate CFU *21 <SC No.>
<~sort>Forwar d calls (CFU)
• Clear CFU #21
<~sort>Forwar d calls (CFU)
• Activate CFU on last configured SC *21#
<~sort>Forwar d calls (CFU)
• Clear CFU on last configured SC #21
<~sort>Forwar d calls (CFU)
• Activate CFU to preconfigured SC *22
<~sort>Forwar d calls (CFU)
• Clear CFU to preconfigured SC #22
<~sort>Forwar d calls (CFU)
• Activate CFB *67 <SC No.>
<~sort>Forwar d calls (CFU)
• Clear CFB #67
<~sort>Forwar d calls (CFU)
• Activate CFB on last configured SC *67#
<~sort>Forwar d calls (CFU)
• Clear CFB on last configured SC #67
<~sort>Forwar d calls (CFU)
• Activate CFU to standard message *24 <Text No.>
<~sort>Forwar d calls (CFU)
• Clear CFU to standard message #24
<~sort>Forwar d calls (CFU)
• Activate CFU to pager or general bell *28
<~sort>Forwar d calls (CFU)
• Clear CFU to pager or general bell #28
<~sort>General bell
General bell
<~sort>General bell
• Find with coded ringing in prefix dialling *81 <SC No.>
<~sort>General bell
• Find with coded ringing in suffix dialling *81
Use function codes
Page 55
Page 56

Office 1600IP
Use the phone like a professional
Use function codes
Function */# procedure
<~sort>General bell
• Answer coded ringing *82
<~sort>Intrusion
Intrusion
<~sort>Intrusion
• activate in suffix dialling *44
<~sort>Intrusion
• Protect against *04
<~sort>Intrusion
• Allow to own set #04
<~sort>Mak e a cal l on a third-party phone
Make a call on a third-party phone
<~sort>Mak e a cal l on a third-party phone
• Business Calls #36 <SC No.> <PIN>
<~sort>Mak e a cal l on a third-party phone
• Private Calls #46 <SC No.> <PIN>
<~sort>Open door
Open door *74 <Door intercom system No.>
<~sort>Paging system
Paging system
<~sort>Paging system
• Find subscriber in prefix dialling *81 <SC No.>
<~sort>Paging system
• Find subscriber in suffix dialling *81
<~sort>Paging system
• Answer the pager *82 <SC No.>
<~sort>Park
Park
<~sort>Park
• Park subscriber in suffix dialling *76
<~sort>Park
• Connect with parked subscriber #76
<~sort>Picking Up a Call
Picking Up a Call *86 <SC No.>
<~sort>Picking up a call (Fast Take)
Picking up a call (Fast Take) *88 <SC No.>
<~sort>Private call with personal code (PIN)
Private call with personal code (PIN) #46 <SC No.> <PIN>
<~sort>Set up conference cal l
Set up conference call
<~sort>Set up conference cal l
• Preset *70 <Conf. No.>
<~sort>Set up conference cal l
• Variable *71 <SC No. 1> * to <SC No. 5> #
<~sort>Suppress your call n umber from display
Suppress your call number from display
<~sort>Suppress your call n umber from display
• CLIR per call *31 <Destination No.>
<~sort>Swit c h over switch groups 01…20
Switch over switch groups 01…20
<~sort>Swit c h over switch groups 01…20
• Switch to switch group xx in position y *85 <xx> <y>
<~sort>Swit c h over switch groups 01…20
(xx = 01..20, y = 1..3)
<~sort>Swit c h phone network manual ly – LCR (Fall back)
Switch the phone network manually – LCR (Fallback)
(after fallback the external phone number last dialled is selected
automatically)
<~sort>Text message (standar d text ) wit h / without parameter
Text message (standard text) with/ without parameter
<~sort>Text message (standar d text ) wit h / without parameter
• send to a subscriber *3598 <SC No.> <Text No.> [Param.] #
<~sort>Text message (standar d text ) wit h / without parameter
• send to a group *35 <GR No.> <Text No.> [Param.] #
<~sort>Text message (standar d text ) wit h / without parameter
• send to all *3599 <Text No.> [Param.] #
*90
Page 56
Page 57

Office 1600IP
Use the phone like a professional
Function */# procedure
<~sort>User group (UG)
User group (UG)
<~sort>User group (UG)
• Log into all user groups *4800
<~sort>User group (UG)
• Log out of all user groups #4800
<~sort>User group (UG)
• Log into a particular user group *48 <User group No.>
<~sort>User group (UG)
• Log out of a particular user group #48 <User group No.>
<~sort>Voice M ail System
Voice Mail System
<~sort>Voice M ail System
• Record greeting (x=1,2,3) *913 x #
<~sort>Voice M ail System
• Monitor greeting (x=1,2,3) *#913 x #
<~sort>Voice M ail System
• Delete greeting (x=1,2,3) #913 x #
<~sort>Voice M ail System
• Activate greeting (x=1,2,3) *933 x
<~sort>Voice M ail System
• Deactivate greeting (x=1,2,3) #933 x
<~sort>Voice M ail System
x = 1,2,3 : personal greeting 1,2,3
x = 7: global greeting
x = 8: global overflow greeting
Use function codes
Page 57
Page 58

Office 1600IP
Use text messages
Page 58
Use text messages
Office 1600/1600IP provides a user-friendly message editor, which you can use to
send text messages to internal subscribers and to send emails.
Here you learn how to send, receive, forward and edit text messages with ease.
Note: Office 1600: The text messages are processed independently of the
text messages on the coupled Office terminal.
Topics overview
Send text messages . . . . . . . . . . . . . . . . . . . . . . . . . . . . . . . . . . . . . . . . . Page 59
Receive text messages . . . . . . . . . . . . . . . . . . . . . . . . . . . . . . . . . . . . . . . Page 61
Page 59

Office 1600IP
Send text messages
Send text messages to subscribers
Your Office 1600/1600IP is idle.
Message
Click the Message Foxkey. The message editor is opened.
There are various ways of entering the recipient:
• Enter the call number in the empty input field (see "Dial with the call
number", Page 24).
• Write the name in the empty input field (see "Dial by name",
Page 25).
• Select the recipient from the phone book (see "Dial from the phone
book (contacts)", Page 26).
• Select the recipient by using a number key (see "Dial with a number
key", Page 28)
Use text messages
Send text messages
Page 59
• Select the recipient from the journal (see "Dial from the journal",
Page 28).
Enter your message and click Send a message in the toolbar.
Note: The length of a text message to a subscriber with an Office system ter-
minal with display is restricted to a maximum of 160 characters.
Page 60

Office 1600IP
Use text messages
Send text messages
Page 60
Send text messages as email
Your Office 1600/1600IP is idle.
Message
Click the Message Foxkey.
There are various ways of entering the recipient:
Write the email address directly in the empty input field, or if details on
the recipient are stored in the contacts:
• Write the name in the empty input field (see "Dial by name",
Page 25).
• Select the recipient from the phone book (see "Dial from the phone
book (contacts)", Page 26).
Enter your message and click Send a message in the toolbar.
Note: This function is only available if Office 1600/1600IP knows your perso-
nal email address (see "Enter own email address", Page 15).
Page 61

Office 1600IP
Receive text messages
Receive text messages
An internal subscriber has sent you a text message.
Depending on your basic settings, the system opens your message
window and may also generate an acoustic signal upon receipt of a
message (see "Determine view behaviour", Page 14).
Open the journal
Click the bold entry for the received message. The message is opened.
Reply to text messages
A subscriber has sent you a text message. You want to reply to the
message.
Click Reply message in the toolbar. The system automatically enters
the recipient in the input field.
Use text messages
Receive text messages
Page 61
Enter your reply and click Send a message.
Forward text messages
A subscriber has sent you a text message. You want to forward this
message to a colleague.
Click Forward message in the toolbar.
Enter the call number or the name of the required subscriber in the
empty input field.
Enter your message and click Send a message in the toolbar.
Page 62

Office 1600IP
Use text messages
Receive text messages
Page 62
Note: Text messages can also be forwarded as emails. To do this, write the
email address of the recipient in the empty input field, rather than the
subscriber’s call number or name. Prerequisite: Office 1600/1600IP
knows your personal email address (see "Enter own email address",
Page 15)
Read unread text messages
In the toolbar of the main view, the Journal pushbutton displays how many calls
were unanswered in your absence and/or how many text messages you have not
yet read.
You want to read unread text messages. Your Office 1600/1600IP is
idle.
Click Journal in the toolbar.
Select an entry for an unread text message. This is indicated by a
symbol and a bold font.
Double click the entry to display the message.
Once you have closed the message, the entry is no longer displayed
in bold font, the symbol changes, and the number of unread text messages displayed on the Journal pushbutton in the toolbar of the main
view is reduced by one.
Page 63

Office 1600IP
Maintain contacts
Page 63
Maintain contacts
Office 1600/1600IP provides you with three phone books. Each phone book is
accessed via a separate tab under Contacts. The All phone book in the first tab
contains all contacts from the other two phone books. The Public phone book in the
second tab contains all internal subscribers. These two phone books are provided
by the system, and you cannot edit them. After a new installation of Office 1600/
1600IP, the Private phone book in the third tab does not contain any contacts. It is
available for you to enter your personal contacts.
If you use an MS Exchange server in your company to manage contacts, your system administrator can set up Office 1600/1600IP so that the MS Exchange contact
directory is directly accessible via the Contacts view. This enables you to maintain
your private contacts directory via the Office 1600/1600IP private phone book, and
also to directly access the company contacts stored in MS Exchange via the public
phone book.
Here you learn how to create and maintain contacts in your phone books.
Note: Office 1600: The private contacts are independent of the private phone
book of the coupled Office terminal.
Topics overview
Create a new contact . . . . . . . . . . . . . . . . . . . . . . . . . . . . . . . . . . . . . . . . Page 64
Edit a contact. . . . . . . . . . . . . . . . . . . . . . . . . . . . . . . . . . . . . . . . . . . . . . . Page 67
External phone book . . . . . . . . . . . . . . . . . . . . . . . . . . . . . . . . . . . . . . . . . Page 68
Page 64

Office 1600IP
Maintain contacts
Create a new contact
Page 64
Create a new contact
In the private phone book you can create and maintain any number of contacts.
Create a new contact
You have opened the main view and want to include a subscriber in
your private phone book.
Click Contacts in the toolbar. The contacts view is opened. On the
Private phone book.
Then click New. The dialog for entering and maintaining contacts is
opened.
Enter personal details
The dialog for entering and maintaining contacts is open.
Enter the name:
1. Click Name.
2. Enter the first and last name in the input fields of the name dialog.
3. Click OK to close the dialog box and apply the name.
Edit the Position: and Company
Under Display:, select whether the name is to be classed by the first
or last name.
Note: First and last names cannot start with an umlaut.
Page 65

Office 1600IP
Enter the address
The dialog for entering and maintaining contacts is open.
Enter the business address:
1. Choose Business in the selection field underneath the Address
pushbutton.
2. Click Address.
3. Enter the business address in the input fields of the address dialog.
4. Click OK to close the dialog box and apply the address.
Enter the private address:
1. Choose Private in the selection field underneath the Address pushbutton.
2. Click Address.
3. Enter the private address in the input fields of the address dialog.
4. Click OK to close the dialog box and apply the address.
Maintain contacts
Create a new contact
Page 65
Enter phone numbers, email, and URL
The dialog for entering and maintaining contacts is open.
Enter the phone numbers in the four input fields Business, Private,
Fax and Mobile.
You can enter numbers in international format (+4112345678) or
national format (0012345678). You only need to enter the leading digit
for exchange access if you use national format (in the example, this
is the leading 0).
To make the number easier to read, you can use spaces and hyphens
(0-01 234 5678). Office 1600/1600IP does not understand any other
characters.
Select which of the phone numbers is to be dialled when the name is
entered by clicking the option field next to the desired phone number.
Enter the email and internet address (e.g. http://www.contact.org).
Page 66

Office 1600IP
Save a private contact
The dialog for entering and maintaining contacts is open. You have
entered all details for the contact.
Click Save and close to save the data and return to the main view.
Your new contact now appears in the All and Private phone books.
If Office 1600/1600IP is connected to an MS Exchange server, the
contact is also stored there automatically (temporally delayed).
Maintain contacts
Create a new contact
Page 66
Page 67

Office 1600IP
Edit a contact
Edit a contact
You have opened the main view and want to edit an entry in your private phone book.
Click Contacts in the toolbar. contacts view is opened.
Open the Private phone book.
EF
Delete a private contact
Click the key with the first letter of the desired name, or write the name
in the input field on the toolbar.
Double click the desired contact or choose Edit contact. The dialog
for entering and maintaining contacts is opened.
Make the required changes to the contact. For detailed information on
the input fields, see "Create a new contact", Page 64.
Click Save and close to save the data and return to the main view.
Maintain contacts
Edit a contact
Page 67
EF
You have opened the contacts view and want to delete an entry from
your private phone book.
Click the key with the first letter of the desired name, or write the name
in the input field on the toolbar.
Select the entry you want to delete, and then click Delete entry.
Page 68

Office 1600IP
Maintain contacts
External phone book
Page 68
External phone book
Dial from an external phone book
From Office 1600/1600IP you can directly open a phone book on the Intranet.
The URL address of this phone book is entered in the settings
(see "Make general settings", Page 14).
Please read "Dial from an external phone book", Page 27, to find out how to dial
from an external phone book.
Page 69

Office 1600IP
Call within the group
Page 69
Call within the group
If several people deal with customer matters on the phone, it makes sense to create
workgroups. Regardless of whether you work in a booking office, on a help desk,
for an info line or customer service centre, Office 1600/1600IP is a user-friendly
group tool.
In addition to conventional group functions such as break, wrap-up time, and group
overview (busy lamp key), Office 1600/1600IP provides members of the workgroup
with a common platform for logging calls.
With group administrator rights, you can determine the members of the workgroup
and make other group-specific changes.
Note: For the system administrator:
The group functions, together with the corresponding system configuration, largely cover the functionality of a key telephone.
Note: The group functions are not included in the standard licence of the
Office 1600/1600IP.
Topics overview
Member in a workgroup. . . . . . . . . . . . . . . . . . . . . . . . . . . . . . . . . . . . . . . Page 70
Enter phone calls. . . . . . . . . . . . . . . . . . . . . . . . . . . . . . . . . . . . . . . . . . . . Page 75
Manage workgroups . . . . . . . . . . . . . . . . . . . . . . . . . . . . . . . . . . . . . . . . . Page 77
Page 70

Office 1600IP
Call within the group
Member in a workgroup
Page 70
Member in a workgroup
Your group administrator configures which subscribers belong to a workgroup. One
subscriber can be a member of several workgroups.
Log into a workgroup
You are a member of one or more workgroups and want to log in (only logged in
members receive the calls for a particular workgroup).
Your Office 1600/1600IP is idle.
Click Log in in the Workgroup menu.
You are logged into all workgroups that you are a member of.
In the main view, the display of your own name shows which
workgroups you are logged into. To access this information, click the
left arrow key on the display.
Note: The group administrator can also log you in from his/her Office 1600/
1600IP.
Page 71

Office 1600IP
Call within the group
Member in a workgroup
Page 71
Open the group overview (busy lamp key)
All the members of a workgroup are listed in the group overview. You can also see
whether a member is active or taking a call, or whether a call is being signalled to
a member.
You are logged into your workgroups.
Your Office 1600/1600IP is idle.
Click Groups in the toolbar.
The group view is opened with one additional tab per workgroup
(workgroup tabs).
Open workgroup tab.
In the workgroup tab , all members of the group have a member key.
If a member is not logged in or is currently on a break, his/her display
is light grey and not active. The symbol for an active member key also
shows you whether a member is free or on the phone, who the call
party is, or whether a call is being signalled to him/her.
Understand call distribution
A call is offered to a member of a workgroup. If this member does not take the call
within a defined period, the call is signalled to the next member. If the call is not
taken by the last member, the system sends the call back to the first member.
Your group administrator can define whether the next call is initially signalled to the
same member, or whether it is signalled to the next member in the sequence, in
order to ensure more a even distribution of the calls.
Page 72

Office 1600IP
Call within the group
Member in a workgroup
Page 72
Answer calls
There is an incoming call in your workgroup. The call may have already been offered to some of your colleagues in the group, but their lines were busy. The call is
now offered to you.
Your Office 1600/1600IP is calling.
On your main view, you see the name of the workgroup in place your
own name.
Hold the media device to your ear and click the Call key.
The connection is established. The caller’s display shows the call
number or the name of the workgroup.
You can enter a call log now or when you hang up (see "Enter phone
calls", Page 75).
Page 73

Office 1600IP
Call within the group
Member in a workgroup
Page 73
Finish wrap up time
After each call, you have a wrap up time during which calls to the workgroup are not
signalled to you. The wrap up time starts automatically when a call is terminated,
and gives you time to carry out activities for the call you just terminated, before you
take the next call.
You have completed a phone call. The wrap up time starts automatically.
Click the Continue key to exit the wrap up time manually.
You are available again immediately to answer incoming calls.
Activate / deactivate break
You can temporarily avoid calls to your workgroups.
You are logged into your workgroups. Your Office 1600/1600IP is
idle.
Click the Break key to activate the break.
To deactivate the break, click the Break key again. Your Office 1600/
1600IP is once again ready to take incoming calls.
Note: Only you can activate and deactivate breaks in your Office 1600/
1600IP.
Page 74

Office 1600IP
Call within the group
Member in a workgroup
Dial from a workgroup
You want to call someone on behalf of the workgroup.
You are logged into your workgroups. Your Office 1600/1600IP is
idle.
Check whether the name of the workgroup you want is shown on the
display. If it is not, select the correct name by opening the selection
list with the left arrow in the display, and selecting the correct name.
Dial the call number and click the Call key.
The subscriber is called.
If the subscriber is external, the person called sees the call number or
the name of the workgroup.
If the subscriber is internal, the person called sees your personal,
internal call number or your name.
Log out of workgroup
You are logged into one or more workgroups and want to log out.
Page 74
Your Office 1600/1600IP is idle.
Click Log out in the Workgroup menu.
You are logged out of all workgroups that you are a member of.
Calls to one of the workgroups are no longer signalled on your
Office 1600/1600IP.
Note: The group administrator can also log you out from their Office 1600/
1600IP.
Page 75

Office 1600IP
Call within the group
Enter phone calls
Page 75
Enter phone calls
You can enter a call log for a call. The call logs are grouped into work tickets. You
can therefore open a work ticket on a particular subject, and enter the relevant call
log there. The work tickets are listed in the workgroup journal.
Create new ticket
You are on the phone and want to record the most important information in keywords.
Click Journal in the toolbar and select your workgroup's tab.
Click New work ticket.
The work ticket dialog is opened. It consists of three frames, one
above the other.
In the top frame, enter the name of the contact person and the subject
of the work ticket (under Subject).
In the middle frame, enter your call log (the call log you entered is displayed later in the bottom frame).
Save the call log you just entered.
Note: You can also enter the call log after you have terminated the call.
Note: The saved call log can be accessed by all members of the workgroup,
and can also be edited by them as long as a new call log is not opened
in this work ticket for another call.
Note: Your group administrator can define that a call log must always be
saved. In this mode, if you do not create a call log yourself during the
call, a call log is automatically created and saved after you terminate
the call, regardless of whether you edited this or not.
In this mode, an empty call log is also created for unanswered calls.
Page 76

Office 1600IP
Call within the group
Enter phone calls
Page 76
Add call log to existing work ticket
For each call, you can decide whether you want to open a new work ticket or
whether you want to add the new call log to an existing work ticket.
You are taking the call. Work tickets with call logs already exist for the
call number.
Click Journal in the toolbar and select your workgroup's tab.
All work tickets in the list that contain one or more call logs with the
same caller’s number are highlighted in yellow.
You can now open one of the highlighted work tickets, one of the other
listed work tickets, or a new work ticket. You open one of the highlighted work tickets:
Select one of the work tickets in the list that is highlighted in yellow,
and click Open work ticket.
The work ticket dialog and a new call log (in the middle frame) are
opened. The call logs already entered are displayed in the bottom
frame.
Enter your call log in the middle frame.
Save the call log you just entered.
Page 77

Office 1600IP
Call within the group
Manage workgroups
Page 77
Manage workgroups
In workgroup management, you can add or exclude members, determine call distribution and call duration, define the wrap up time, and make other settings,
providing you have the necessary authorization.
Create workgroup
You are the group administrator for one or more workgroups.
Click Manage workgroups... in the Workgroup menu. The dialog
for managing workgroups is opened.
Click the tab of the workgroup you want to manage.
Select the workgroup members you want from the user list (at the
right), then click the Move left key.
You can use the Move right key to exclude members from the
workgroup.
You can use the Move up and Move down key to modify the sort
sequence of the members
Make the settings described further below in line with your requirements.
Click Apply to save the settings without exiting the view or on OK to
save the settings and close the dialog.
Page 78

Office 1600IP
Call within the group
Manage workgroups
Page 78
Workgroup settings:
Setting Explanation
Name Here, you can change the name of the workgroup
A call is generally displayed according to the
sequence in the list of members.
Call distribution
With Linear, the first member on the list is always
called first
With Cyclic the next member in sequence is
always called first
Call duration
A call is signalled to a member for the time entered
here, before it is forwarded to the next member.
Wrap up time Length of the wrap up time
Activate Auto-save call log if you want a call log
Auto-save call log
to be automatically opened and saved for each
call (see also "Create new ticket", Page 75).
Monitor status and log members in/out
You want to see who is already logged into the workgroup, and if
necessary, log other members in or out.
In the Workgroup menu, click Manage workgroups, and then click
the tab for the workgroup you want to manage.
The members are listed in the left-hand frame.
If there is a checkmark next to Logged in for a member, the member
is already logged in.
At this point, you can log the member in or out yourself.
Click Apply to save the settings without exiting the view or on OK to
save the settings and close the dialog.
Page 79

Office 1600IP
Call within the group
Manage workgroups
Page 79
Delete work ticket
You can delete every work ticket, regardless of whether you added call logs yourself. Workgroup members without group administrator rights cannot delete any
work tickets.
You want to delete a work ticket.
Click Journal in the toolbar and select your workgroup's table.
Select the ticket entry you want to delete, and then click Delete jour-
nal entry.
Page 80

Office 1600IP
Page 80
Index
A
Activate / deactivate break . . . . . . . . . . . . 73
Activate exchange access
with charge recall
Add call logs
Address of Internet phone book
Answer a call
Answer callback request
Answer calls
. . . . . . . . . . . . . . . . . . . . . . .76
. . . . . . . . . . . . . . . . . . . . . . 22
. . . . . . . . . . . . . . . . . . . . . . .71
B
Brokering . . . . . . . . . . . . . . . . . . . . . . . . . 39
C
Call a subscriber again . . . . . . . . . . . . . . . 29
Call team partner
Contact functions
Create a contact
Create new ticket
Create workgroup
D
Define and assign
number keys
Deflect a call during the calling phase
Delete a contact
Delete function key
Delete number key
Delete team key
Delete work ticket
Dial by name
Dial from the external phone book
Dial from the journal
Dial from the phone book
Dial with the call number
Discrete ringing
. . . . . . . . . . . . . . . . . . . . . . 25
. . . . . . . . . . . . . . 54
. . . . . . . .15
. . . . . . . . . . . . . 37
. . . . . . . . . . . . . . . . . . . 49
. . . . . . . . . . . . . . . . . . . 63
. . . . . . . . . . . . . . . . . . . . 64
. . . . . . . . . . . . . . . . . . . 75
. . . . . . . . . . . . . . . . . . . 77
. . . . . 45, 47, 50, 58, 63
. . . 44
. . . . . . . . . . . . . . . . . . . . 67
. . . . . . . . . . . . . . . . . . 53
. . . . . . . . . . . . . . . . . . 46
. . . . . . . . . . . . . . . . . . . . 48
. . . . . . . . . . . . . . . . . . . 78
. . . . . . 27
. . . . . . . . . . . . . . . . . 28
. . . . . . . . . . . . . 26
. . . . . . . . . . . . . 24
. . . . . . . . . . . . . . . . . . . . 21
DTMF (tone selection)
. . . . . . . . . . . . . . . 44
E
End a call . . . . . . . . . . . . . . . . . . . . . . . . .22
Enquiry calls during a call
Enter email addresses
Enter own email address
Enter personal details
Enter phone numbers
Enter the address
Enter URL
. . . . . . . . . . . . . . . . . . . . . . . .65
. . . . . . . . . . . . 39
. . . . . . . . . . . . . . .65
. . . . . . . . . . . . . 15
. . . . . . . . . . . . . . . 64
. . . . . . . . . . . . . . . . 65
. . . . . . . . . . . . . . . . . . . 65
F
Finish wrap up time . . . . . . . . . . . . . . . . . 73
Forward text messages
Function keys
. . . . . . . . . . . . . . . . . . . . . . 50
. . . . . . . . . . . . . .61
L
LCR . . . . . . . . . . . . . . . . . . . . . . . . . . . . . 56
Learn about Operation keys/Foxkeys
Learn about the graphical user interface
Log in / log off members
Log into / out of workgroup
Log out of workgroup
. . . . . . . . . . . . . . 78
. . . . . . . . . . . .70
. . . . . . . . . . . . . . . .74
. . .10
. . 8
M
Make a conference call . . . . . . . . . . . . . .41
Make media settings
Media device
Microphone on/off
Monitor status
. . . . . . . . . . . . . . . . 16
. . . . . . . . . . . . . . . . . . . . . . .9
. . . . . . . . . . . . . . . . . .31
. . . . . . . . . . . . . . . . . . . . . . 78
O
Office 1600IP as a group tool . . . . . . . . . . . 6
Office 1600IP in Twin mode
Office 1600IP on a portable PC
Office 1600IP on an individual workstation
Office 1600IP on multiple workstations
Open listening mode
. . . . . . . . . . . . 6
. . . . . . . . .6
5
. . . 6
. . . . . . . . . . . . . . . . 32
Page 81

Office 1600IP
Page 81
P
Park call party . . . . . . . . . . . . . . . . . . . . . 41
Pick up call for team partner
*/# Procedures
Provide information for initiator of CFU
. . . . . . . . . . . . . . . . . . . . . 54
. . . . . . . . . . 49
. . 42
R
Receive text messages . . . . . . . . . . . . . . 61
Reject a call during the calling phase
Reject call waiting
Reply call waiting
Reply to text messages
Request a callback
. . . . . . . . . . . . . . . . . .38
. . . . . . . . . . . . . . . . . . . 38
. . . . . . . . . . . . . .61
. . . . . . . . . . . . . . . . . . 37
. . . . 44
S
Save a contact . . . . . . . . . . . . . . . . . . . . .66
Save a journal entry as contact
Save the caller's name
and call number
Select devices for ring devices
Send a call waiting signal to a subscriber
Send text messages as email
Send text messages to subscribers
Set the call volume
Set tones and melodies
. . . . . . . . . . . . 23, 24
. . . . . . . . . . . . . . . . . . 31
. . . . . . . . 34
. . . . . . . . . 16
38
. . . . . . . . . 60
. . . . . 59
. . . . . . . . . . . . . . 17
Sort journal entries
Start Office 1600IP
Suppress ringing signal
Switch the phone network manually
. . . . . . . . . . . . . . . . . . 34
. . . . . . . . . . . . . . . . . . . 7
. . . . . . . . . . . . . .21
. . . . . 56
T
Take back call forwarding . . . . . . . . . . . . 42
Team keys
Telephony functions
Text messages
Transfer with prior notification
Transfer without prior notification
. . . . . . . . . . . . . . . . . . . . . . . . 47
. . . . . . . . . . 20, 36, 69
. . . . . . . . . . . . . . . . . . . . . 58
. . . . . . . . . 40
. . . . . . . 40
U
Unanswered calls . . . . . . . . . . . . . . . . . . . 29
Understand functions
Understand journal entries
Understand team key status
Use function key
. . . . . . . . . . . . . . . . 51
. . . . . . . . . . . .33
. . . . . . . . . . 48
. . . . . . . . . . . . . . . . . . . . 53
V
Volume of the ringing signal . . . . . . . . . . . 21
Volume of voice reproduction
. . . . . . . . . . 22
 Loading...