

Page 1

AastraLink
160
Pro
Pro
AastraLink
Administrator Guide
Release 1.2
160
41-001190-02
Rev 01
Page 2

*Aastra, Aastra Telecom, and the Aastra Telecom corporate logo are registered trademarks of Aastra Technologies,
Limited. AastraLink, AastraLink Pro, AastraLink Pro 160, and AastraLink Pro, Model 160 are trademarks of Aastra Telecom
US Inc. Microsoft, Microsoft Windows, and Internet Explorer are trademarks of Microsoft Corporation. Ethernet is a
registered trademark of Xerox Corporation, Inc. UNIX is a registered trademark in the United States and other countries,
licensed exclusively through The Open Group. Asterisk is a registered trademark of Digium, Inc. Linux is a registered
trademark of Linus Torvalds. All other third-party trademarks (and registered trademarks) are the property of their
respective owners.
© 2008 Aastra Technologies, Limited. All rights reserved. Information in this document is subject to change without notice.
Aastra Technologies, Limited assumes no responsibility for any errors that may appear in this document.
Copyright 2008 Aastra Telecom. www.aastratelecom.com
All Rights Reserved.
Published in the USA
Page 3

AastraLink Pro 160 Administrator Guide
Contents
Preface
Chapter 1
Getting Started
What Does the AastraLink Pro 160 Do? .......... ... ... ... .... ... ...............................................1-2
How Do I Set Up My AastraLink Network? .....................................................................1-5.
Required Tasks ........................................................................................................1-6.
Optional Tasks ..........................................................................................................1-6.
What Does the AastraLink Web UI Allow Me To Do? .....................................................1-7.
Can I Still Use the Phone UI? .........................................................................................1-7.
AastraLink Pro 160 Emergency Call Support .................................................................1-9.
Lifeline Phone ..........................................................................................................1-9.
Emergency Call Priority ................................ ... ... .... ... ... ... .... .....................................1-9.
Emergency Call Support Important Notes ..............................................................1-10.
AastraLink Pro 160 Hardware and Software ................................................................1-11.
Hardware Requirements ........................................................................................1-11.
Software Requirements ..........................................................................................1-13.
Users and Privileges ..............................................................................................1-13.
Reference Documentation ............................................................................................1-14.
.
Chapter 2
Using the AastraLink Pro 160 Web UI
Accessing the AastraLink Web UI ..................................................................................2-2
.
Using Your Web Browser to Access the AastraLink Web UI ....................................2-2.
Using Windows Explorer to Access the AastraLink Web UI ....................................2-4.
Administrator Menu Options .....................................................................................2-6.
My Phone ...............................................................................................................2-11.
41-001190-02 Rev. 01, Rel. 1.2 iii
Page 4

AastraLink Pro 160 Administrator Guide
Users .................................. ................................ ................................. ...................2-12
User List Menu ............................ .... ... ... ... ... .... .......................................... ... ...2-12
Groups Menu ...................................................................................................2-12
Default Softkeys Menu (User Phone) ..............................................................2-12
Reference ........................................................................................................ 2-13
Configuration ................................... .................................... ................................... 2-14
System Menu ............... .............................................................................. ... ...2-14
Network Menu .................................................................................................2-14
Dial Plan Menu ................................................................................................2-14
VoIP Menu .......................................................................................................2-15
Auto-Attendant Menu .......................................................................................2-15
Maintenance .................................... ....... ...... ...... ....... ...... ....... ...... ....... ...... ....... ...... 2-16
Current Status Menu ........................................... ... ... .......................................2-16
Call Records Menu ..........................................................................................2-16
Backup & Restore Menu .................. ... ... ... .......................................................2-16
Update Menu ...................................................................................................2-17
Support Menu .................................................. ... ... ..........................................2-17
Reference ........................................................................................................ 2-17
Chapter 3
Configuring Aastra IP Phone Accounts
Accessing the Users Menu .............................................................................................3-3
Managing IP Phone Users ..............................................................................................3-4.
Adding User Accounts and Phones .......... ... ... ... .............................................. ... ... ..3-5.
Adding a User Account ... ... ... .... ... ... ... .... ... ... ... ... .... ... ... ..........................................3-10.
Editing a User Account ...........................................................................................3-15.
Reference ........................................................................................................ 3-15
Configuring a User’s Keys on the Phone or Expansion Module
in the User Account .................. ... ....................................................................3-20
Setting Softkey Permissions in the User Account
(User or Administrator Phone) .........................................................................3-25
Deleting a User Account ........................................................................................3-27
Enabling/Disabling User Accounts ...................................... ...................................3-29.
Secondary Non-Aastra SIP Phones and Softclients ..............................................3-31.
Enabling/Disabling an Extensions Directory Privacy ..............................................3-32.
.
.
.
.
.
iv 41-001190-02 Rev. 01, Rel. 1.2
Page 5

AastraLink Pro 160 Administrator Guide
Uploading User Lists ..............................................................................................3-34
Uploading User Lists if MBU 400s Connected to the AastraLink Pro ..............3-37
Configuring Groups ......................................................................................................3-38
Ring Groups and Paging Groups ...........................................................................3-38.
Dial Plan for Ring Groups ................................................................................3-39
Dial Plan for Paging Groups ............................................................................3-41
Virtual Extension Numbers (for Ring and Paging Groups) ..............................3-42
Creating Rules for Groups (Ring and Paging Groups) ....................................3-43
Distinctive Ringing (Ring Groups only) ............................................................3-45
Example of a Ring Group ................................................................................3-47
Example of a Paging Group ............................................................................3-48
Adding a Group .................. .......................................... ... .... ... ... ... ..........................3-49
Configuring Additional Features for a Paging Group .......................................3-51
Editing a Group ......................................................................................................3-52
Deleting a Group ....................................................................................................3-53.
Reference ........................................................................................................ 3-53
Default Softkeys (Users Menu) .....................................................................................3-54
Using the Default Softkeys Menu (User Phone) ....................................................3-55.
Softkey Types (User Phone) ..................................................................................3-56.
Call Settings Softkeys (User Phone) ...............................................................3-57
Application Softkeys (User Phone) ..................................................................3-60
Adding a Default Softkey (User Phone) .................................... ... .... ... ... ... ... .... ... ...3-61
Editing a Default Softkey (User Phone) .................................................................3-62.
Deleting a Default Softkey (User Phone) ...............................................................3-62.
Default Softkey Permissions (User Phone) ............................................................3-63.
Default Softkeys for Expansion Modules (Administrator or User Phone) ...............3-64.
Restoring Default Softkeys Back to Factory Settings .............................................3-65.
.
.
.
.
.
.
Chapter 4
Configuring AastraLink Pro 160 System and Network Parameters
Accessing the Configuration Menu .................................................................................4-3
.
Configuring System Settings ..........................................................................................4-4.
Specifying Regional Settings .......................................... .... ... ... ... .... ........................4-6.
Specifying the Date and Time ......................................... .......................................4-10.
Configuring the Music On Hold Option ...................................................................4-11.
41-001190-02 Rev. 01, Rel. 1.2 v
Page 6

AastraLink Pro 160 Administrator Guide
Configuring Push Button Trigger Input or Relay Output ................... ... ... ... ... ..........4-12
Configuring Visual Voicemail Settings ....................................................................4-15.
Configuring FXO Tuning Settings ..........................................................................4-17.
Configuring Network Settings .......................................................................................4-21.
Editing Local Network Settings ..............................................................................4-22.
Editing Local Service Settings ................................................................................4-26.
Configuring Remote Office Support .................................................................4-31
Editing External Services Settings ............................... ... .... ... ... ... .... ... ... ... ... .... ... ...4-34
Send Test Email ...............................................................................................4-37
Configuring Dial Plan Settings ......................................................................................4-38
Local Dial Plan .......................................................................................................4-40.
Star Codes .............................................................................................................4-41.
Specifying Dial Plan Settings ............................. .... ... ... ... .... ... ... .............................4-41.
Configuring a Dial Plan for Auto-Fax ......................................................................4-45.
Overview ................................... ....................... ...................... ....................... ... 4-45
FAX Indication Tones .......................................................................................4-45
FAX Call Re-routing .........................................................................................4-45
FXO Incoming Call Routing .............................................................................4-46
Configuring FXO Lines for Manually Forwarding Auto-Fax .............................4-47
Configuring Overhead Paging ................................................................................4-49
Configuring Paging and Intercom Options .............................................................4-50.
Dial Plan for Meet-Me Conference Bridges ............................................................4-53.
Host Capacity Limitations ................................................................................4-54
Configuring an Emergency Dial Plan .....................................................................4-54
Configuring Barred Numbers .................................................................................4-55.
Adding a Barred Number ............................. .... ... ... ... .... ... ... .............................4-56
Deleting a Barred Number ...............................................................................4-56
Configuring FXO Lines ...........................................................................................4-57
Configuring FXO Lines for Incoming Calls ......................................................4-58
Configuring FXO Lines for Shared Line Appearance (SLA) ...................................4-60
About Shared Line Appearances .....................................................................4-60
SLA and the AastraLink Pro ............................................................................4-61
SLA Key Mapping ............................................................................................4-62
Using AastraLink SLA from the SIP Phones ...................................................4-63
.
.
.
.
.
.
.
vi 41-001190-02 Rev. 01, Rel. 1.2
Page 7

AastraLink Pro 160 Administrator Guide
Configuring SLA on the AastraLink .................................................................4-63
Enabling/Disabling Individual SLA Memberships ............................................4-64
SLA Configuration Changes ............................................................................4-65
Configuring Abbreviations ......................................................................................4-67
Examples of Abbreviated Number Configurations ...........................................4-68
Configuring Abbreviated Numbers ..................................................................4-71
Editing Abbreviated Numbers ..........................................................................4-72
Deleting Abbreviated Numbers ........................................................................4-73
Configuring VoIP Settings .............................................................................................4-74
SIP Trunking ... ... ... .......................................... ... .......................................... .... ......4-76.
Incoming SIP trunk calls ..................................................................................4-77
Outgoing SIP trunk calls ..................................................................................4-77
Adding a SIP Trunk ................................................ ..........................................4-80
Deleting a SIP Trunk ........................................................................................4-83
Single and Multiple SIP Trunks ........................................................................4-84
SIP Direct Inward Dialing (DID) ..............................................................................4-86
Adding a SIP DID ............................ ... ... ... ... .... .......................................... ... ...4-87
Deleting a SIP DID ..........................................................................................4-87
AastraLink Trunking ...............................................................................................4-89
Configuration Parameters ......................... ....................... ...................... ..........4-90
Configuration Guidelines .................................................................................4-91
AastraLink Trunking Example ..........................................................................4-91
Mobility Base Units (MBUs) ......................................... ... .......................................4-97
MBU Configuration Download from the AastraLink ................................... ... ...4-99
Handset Registrations .....................................................................................4-99
Adding an MBU ............................... ... ... ... ... .... ... ... ........................................4-100
Rebooting an MBU ........................................................................................4-110
Configuring Auto-Attendant ........................................................................................4-112
How Auto-Attendant Works ..................................................................................4-113.
Settings for the Auto-Attendant .......... .... ... ... ... ... .... ... ... ... .... ... ... ...........................4-115.
Configuring Settings for the Auto-Attendant ..................................................4-116
Custom Interactive Voice Response (IVR) ...........................................................4-121
Custom IVR Configuration .............................................................................4-122
Configuring a Custom IVR .............................................................................4-123
.
.
.
.
.
.
.
41-001190-02 Rev. 01, Rel. 1.2 vii
Page 8

AastraLink Pro 160 Administrator Guide
Schedule for the Auto-Attendant ..........................................................................4-126
Holidays for the Auto-Attendant ...........................................................................4-130.
Adding a Holiday to the Auto-Attendant ............................. ... .... ... ... ... ... .... ... .4-132
Deleting a Holiday from the Auto-Attendant ..................................................4-132
Custom Recordings ..............................................................................................4-134
Chapter 5
Maintaining the AastraLink Pro 160
Accessing the Maintenance Menu ..................................................................................5-3
Viewing the Current System Status ................................................................................5-4.
Managing Call Detail Records (CDR reports) ........... .... ... ... ... .... ... ... ...............................5-5 .
About the Call Records Menu ..................................................................................5-5.
Sorting CDR Columns ..............................................................................................5-7.
Viewing Call Detail Records .....................................................................................5-9.
Downloading CDR Reports ......................................................................................5-9.
Performing AastraLink Backup and Restore Tasks ......................................................5-10.
Backup and Restore Guidelines .............................................................................5-11.
Backing Up AastraLink System Software ...............................................................5-12.
Restoring the AastraLink Configuration Database and Voicemail ..........................5-14.
Updating AastraLink System Software ............................................... .... ... ... ... ... .... ......5-15.
Automatic Updates ....... ... ... ....................................................................................5-17.
Manual Updates .....................................................................................................5-18.
Support Information ......................................................................................................5-21.
Send Email to Aastra Support with Debug Reports ...............................................5-21.
General Support ....... .... ... ... ... .......................................... .... ... ... ... .... ... ... ... ... .... ......5-24.
.
.
.
Chapter 6
AastraLink FAQs
How Does Network Addressing Work? ..........................................................................6-3
.
How Does IP Phone Auto-Configuration Work? .............................................................6-3.
What is the Difference Between the Administrator Phone and User Phones? ...............6-4.
Do I Ever Need to Re-Register IP Phones? ...................................................................6-4.
Can I Access My IP Phone Network From a Remote Office? ........................................6-4.
How Do I Assign An IP Phone To A Different User? ......................................................6-5.
What Are Softkeys and How Do They Work? .................................................................6-5.
What are Expansion Modules? ................................................................................6-7.
viii 41-001190-02 Rev. 01, Rel. 1.2
Page 9

AastraLink Pro 160 Administrator Guide
How Do I Obtain the IP Address Assigned to the AastraLink Pro 160? .........................6-9
Why Do My IP Phone Screens Look Different? ............................................................6-10.
Why Does The Web UI Occasionally Time-out? ..........................................................6-10.
How Do I Maximize System Performance? ..................................................................6-10.
Does This Guide Describe How To Operate My IP Phone? .........................................6-11.
How Does Auto-Fax Work on the AastraLink Pro 160? ...............................................6-11.
Does the AastraLink Pro Support Routing to a FAX over IP (FOIP) Device? ...............6-11.
Can I Add More PSTN Gateways to Add More Than Six FXO ports? ..........................6-12.
Can I Link Multiple AastraLink Pros Using AastraLink Trunks for
Making Toll-Free Calls? ................................................................................................6-12
Can I Create Custom Dial Plans on the AastraLink Pro? .............................................6-12.
Does My AastraLink Pro Support non-Aastra SIP Phones? ............ ... .... ... ... ... ... .... ... ...6-12.
How Many Extensions Can the AastraLink Pro Host When SIP Trunking is Used? ....6-12.
If Custom “On Hold” Music is Enabled, Does it Play for Both Parked Calls
and On-Hold Calls? ......................................................................................................6-13
Does the AastraLink Pro Support Shared Line Appearance (SLA)? ............................6-13.
How Do I Reduce the Initial Echo that Occurs at the Beginning of Each Call? ............6-14.
Can a Call Group Send a Voicemail to an Email Address? ..........................................6-14.
Does the AastraLink Pro Support Analog Telephone Adapters (ATAs)
for Adding More FXS Ports? .........................................................................................6-14
How do I Register a Generic SIP Device as a Secondary SIP Phone? .......................6-15.
.
.
.
.
Chapter 7
Troubleshooting Solutions
Monitoring the AastraLink Status LED ................... ... .......................................... .... ... ... ..7-3
.
Rebooting the AastraLink ...............................................................................................7-5.
Rebooting Using the Web UI ....................................................................................7-5.
Rebooting Using the Reset Switch (Hard Reboot) ...................................................7-6.
Restoring AastraLink Factory Default Settings ...............................................................7-7.
What Happens if I Restore Factory Default Settings? ..............................................7-7.
Using the Reset Switch to Restore Factory Default Settings ...................................7-7.
What To Do After Restoring Factory Default Settings ..............................................7-8.
Reinstalling System Software Using Recovery Mode ............................................. ... ...7-11.
Automatic Recovery Mode .............. ... .... ... ... .......................................... ... ... .... ... ...7-12.
Manual Recovery Mode .........................................................................................7-13.
Using The AastraLink Recovery Mode UI ..............................................................7-14.
41-001190-02 Rev. 01, Rel. 1.2 ix
Page 10

AastraLink Pro 160 Administrator Guide
Obtaining the IP Address of Your AastraLink Pro 160 .....................................7-14
Reprogramming the CompactFlash Card ........................................................7-17
Reprogramming the Onboard Flash ................................................................7-22
Uploading the .abf File to the CompactFlash ............................. ... ... ... ... .... ......7-25
Repairing the File System, Bad Block, and or Database ................................. 7-26
Advanced Recovery Mode Tasks (Netconsole) ..................................... ..........7-29
Using AastraLink System and Phone Log Files ...........................................................7-31
Appendix A
Remote Office Configuration of the IP Phone (Phone-Side)
Preparing To Deploy Remote User Phones ...................................................................A-2
Registering IP Phones At the Central Site ..................................................................... A-4.
Connecting To The IP Phone Network From a Remote Office ...................................... A-7.
Configuring Port Information .................................................................................A-10.
Reinstalling Aastra IP Phones at the Central Site ........ ... ... ... .... ... ... ... .... ... ... ... ... .... ... .. A-13.
Appendix B
Remote Office Configuration of the AastraLink Pro 160 (S erver-Side)
Remote Office Configuration of the
AastraLink Pro 160 ........................................................................................................ A-2
Description .............................................................................................................. A-2.
Network Diagram for Remote Phone Setup .............................. ... .... ....................... A-2.
Configuring the AastraLink Pro 160 for Remote Office Setup ................................. A-4.
1. UPnP Configuration ...................................................................................... A-4
2. Phone Configuration ..................................................................................... A-7
3. Remote Phone Installation ........................................................................... A-7
AastraLink Pro 160 Manual Remote Office Configuration Example ..................... A-10
Index
.
.
.
.
Warranty
Regulatory information
.
Software licensing and copyright
x 41-001190-02 Rev. 01, Rel. 1.2
Page 11

About This Guide
Introduction
This guide provides information about the AastraLink Pro 160, and is intended for
the system administrator who installs, configures, manages, maintains, and
troubleshoots the unit.
The AastraLink Pro 160 is a Linux-based hardware unit that hosts the Asterisk
open source Private Branch Exchange (PBX) software. You can use the
AastraLink Pro 160 in small to medium Business, and Enterprise environments.
Preface
Other Documentation
The AastraLink Pro 160 documentation set also includes:
• AastraLink Pro 160 Quick Start Administrator’s Guide - contains
AastraLink Pro 160 installation and setup instructions. Describes how to
install and register the Administrator IP phone, as well as instructions for how
to access the AastraLink Web UI.
• AastraLink Pro 160 Quick Start User’s Guide - Describes how to initially
install user IP phones on your network, and how to register user IP phones
with the AastraLink device.
• AastraLink Pro 160 IP Phone User’s Guide - Designed for an Aastra IP
phone end-user. Explains how to use the IP phone UI, or the AastraLink Web
UI, to operate your IP phone on an AastraLink IP phone network.
41-001190-02 Rev. 01, Rel. 1.2 xi
Page 12
AastraLink Pro 160 Administrator Guide
About This Guide
Chapters in This Guide
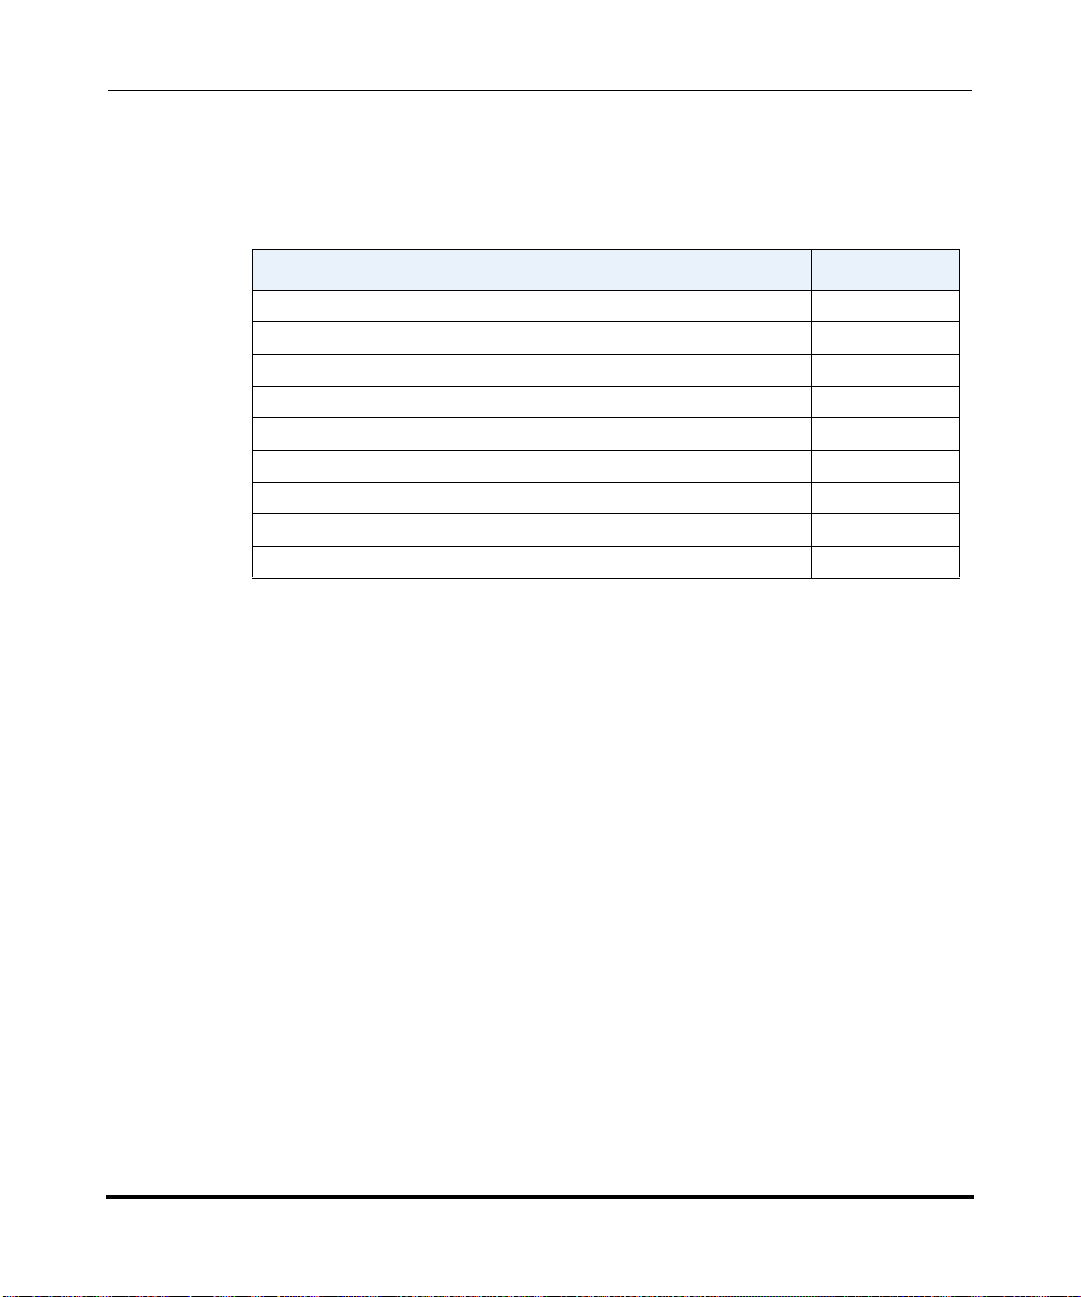
This guide contains the following chapters:
For Go to
Overview information about the AastraLink Pro 160 Chapter 1
Instructions on using the AastraLink Web UI Chapter 2
Instructions on configuring IP phone User accounts Chapter 3
Instructions on configuring network/system parameters Chapter 4
Instructions on maintaining the AastraLink Pro 160 Chapter 5
FAQs about the AastraLink Pro 160 Chapter 6
Troubleshooting solutions Chapter 7
Remote office configuration of the IP Phone (Phone-side) Appendix A
Remote office configuration of the AastraLink Pro 160 (Server-side) Appendix B
xii 41-001190-02 Rev. 01, Rel. 1.2
Page 13

Overview
Chapter 1
Getting Started
Congratulations!! You have purchased a highly functional, cost-effective,
easy-to-use AastraLink Pro 160 for use in your Enterprise network.
The AastraLink Pro 160 is Linux-based hardware that hosts the Asterisk open
source Private Branch Exchange (PBX) software. The AastraLink Pro 160 acts as
a private telephone network (or PBX) within an enterprise. Users of the
AastraLink Pro 160 can direct dial internal extensions via the Voice over IP
(VoIP) network. They can also share a number of outside lines for making
telephone calls external to the AastraLink Pro 160.
The AastraLink Pro 160 is easy to install and operate, and provides a
comprehensive set of security features you would expect from a state-of-the-art
PBX.
The AastraLink Pro 160 is compatible with these Aastra IP phones and expansion
modules:
• 675xi Series SIP IP Phones: 6730i, 6731i, 6751i, 6753i, 6755i,
6757i, 6757i CT
• 9143i, 9480i, 9480i CT SIP IP Phones
• MBU 400 and DECT 420d handset
• Expansion Modules: 536M and 560M
41-001190-02 Rev. 01, Rel. 1.2 1-1
Page 14

AastraLink Pro 160 Administrator Guide
What Does the AastraLink Pro 160 Do?
What Does the AastraLink Pro 160 Do?
The AastraLink Pro 160 provides full PBX functionality, including:
• Local SIP extensions, remote SIP users, SIP trunking
• Flexible voicemail with visual voicemail menus
• Operator console
• Custom announcements
— Auto-attendant (AA) with day/night/holiday scheduling with
customizable Open and Closed Greetings, Main Menu prompts, Key
Announcements, and Language Greetings (English, French, Spanish).
• Interactive Voice Response (IVR) with directory number and name dialing,
and ability to disable the dial-by-name feature
• Shared Line Appearance (SLA) support that can be used with Redial,
speeddial, 3-way conference, and call transfer.
• 3-way conference calling phone feature
• Meet-me conference bridge feature
• Busy lamp field monitoring (BLF)
• Flexible call forwarding (CFB, CFNA, CFA)
• Find-me, Follow-me (FMFM)
• Call Park (displays number on phone’s LCD as well as announcing number)
• Ring Groups and Paging Groups - Ring Groups have overflow feature and
group member email notifications of new group voicemails.
• Remote call pickup
• Barred numbers
• Abbreviated Numbers and Shortcut Dialing
• Custom speed-dial
• User-configurable ring tones and Administrator-configurable distinctive ring
1-2 41-001190-02 Rev. 01, Rel. 1.2
Page 15

Getting Started
What Does the AastraLink Pro 160 Do?
• Up to 6 Foreign Exchange Office (FXO) ports for connection to analogue
public telephone lines (PSTN). Each FXO is equipped with on-hook CallerID
detection and full G.168 echo cancellation. Also provides far-end FXO
disconnect supervision.
• Auto-Fax using Auto-Attendant or manually using call forwarding on
FXO lines (up to 6)
• Universal Plug-and-Play (UPnP) integration for easy setup of gateway/router
and local network discovery from Microsoft Windows PCs.
Additional AastraLink Pro 160 features/functionality includes:
• Generates call detail records (CDRs) for external billing applications.
• Stores calling line ID (CLID) and calling name ID (CNID) in the missed calls
and callers list.
• Network multiple AastraLink Pro 160 platforms across a LAN/WAN
(identified by an IP address, public Internet name, or domain name service
(DNS)).
• Local dialing plan and ability to define user dialing restrictions.
• Provides multiple simultaneous SIP trunk support for incoming SIP trunks.
• Offers “music on hold” feature that supports playing analog from an external
input source, or digital from an uploaded .wav file.
• Overhead paging port for connection to an amplifier.
• Administrator can customize softkey list available on User’s or
Administrator’s phones.
• Administrator can disable a User’s phone from appearing on the AastraLink
Pro network without deleting or changing the configuration of that phone.
• Administrator can prevent an Administrator’s or User’s phone from appearing
in the Corporate Directory.
• Dedicated Foreign Exchange Station (FXS) port for connection to a FAX
machine.
• Dedicated FXS port for connection to an emergency analog phone in case of
power failure.
• Input/output (I/O) port for relay output (activated by dialing an internal
directory number (DIRN)).
41-001190-02 Rev. 01, Rel. 1.2 1-3
Page 16

AastraLink Pro 160 Administrator Guide
What Does the AastraLink Pro 160 Do?
• Input connection that can trigger an event notification on the AastraLink Pro
160. A triggered event can be sent as an email, Extensible Markup Lang uage
(XML) message sent to the phone UI, or as a recorded prompt for voice
notification.
• System-wide SIP paging to all registered phones
• Easy configuration using an administrator Web interface (Web UI).
• Easy addition of multiple phones from a pre-defined User list (.csv file) via a
bulk-update mechanism
• Support of inbound Direct Inward Dialing (DID) for SIP trunks (allows
bypass of IVR menus)
• Email notification to Administrator when a remote user attempts access to the
AastraLink Pro 160.
• Administrator can backup/restore the AastraLink Pro 160 platform using a
Backup file (.abf file).
• Administrator can reboot multiple phones via the Web UI.
• Display of AastraLink Pro 160 status from Web UI during boot/reboot.
• Administrator can email AastraLink status and system config/debug
information to Aastra Support.
1-4 41-001190-02 Rev. 01, Rel. 1.2
Page 17
How Do I Set Up My AastraLink Network?
CF
CF
How Do I Set Up My AastraLink Network?
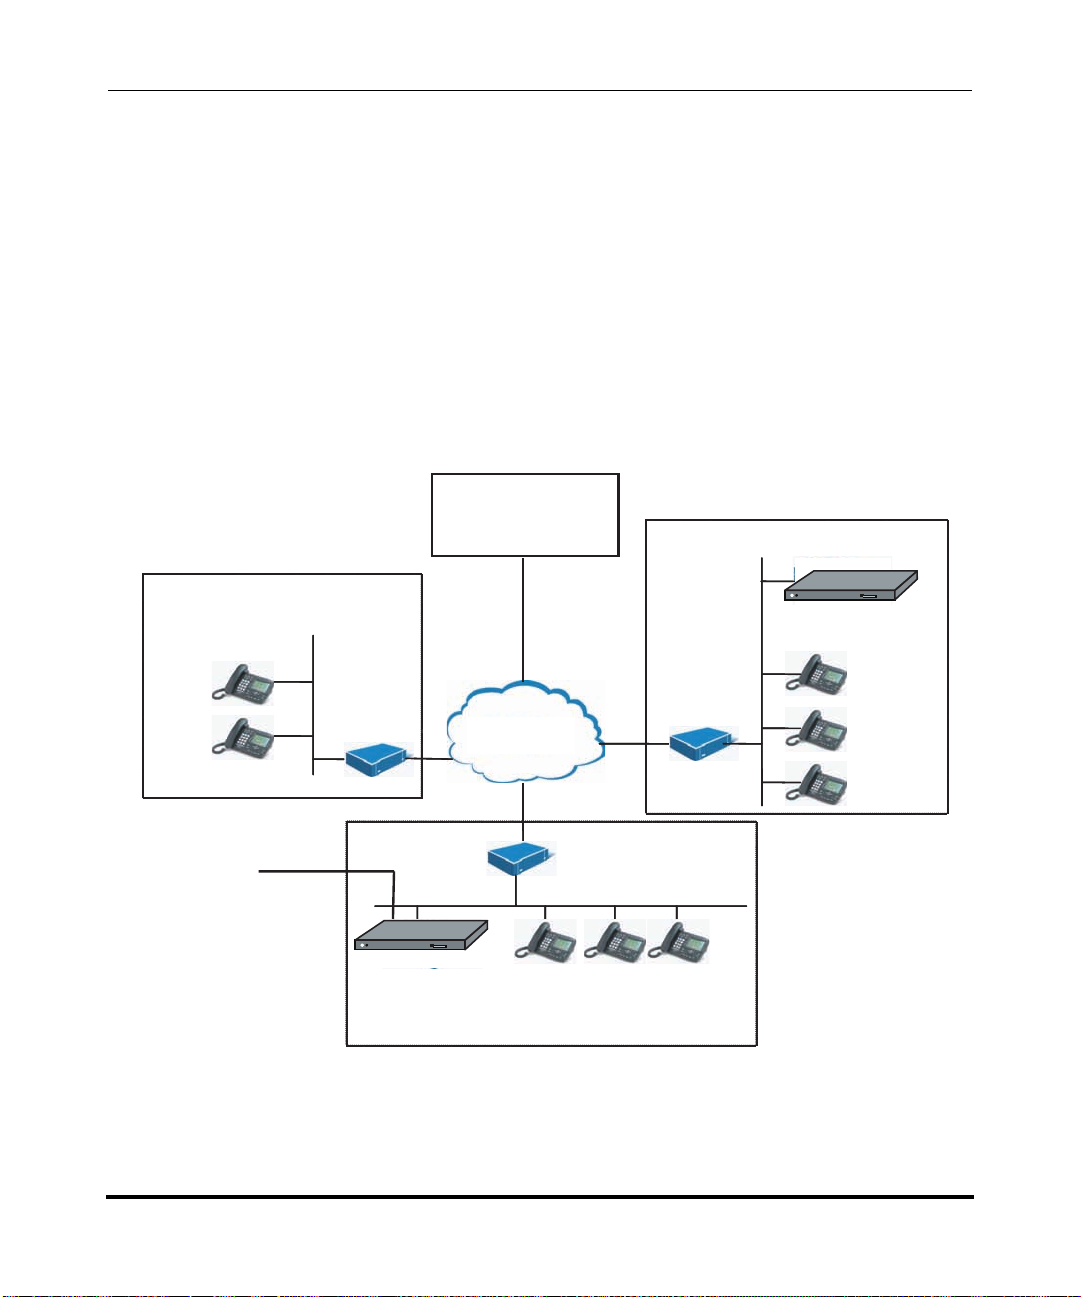
This section describes what you need to do to set up your AastraLink network. It
describes required tasks, as well as optional tasks.
The figure below shows a typical AastraLink Pro 160 network. An AastraLink
network is comprised of an AastraLink Pro 160, and the Aastra IP phones that are
registered with it.
SIP Service
Getting Started
Small Home Office
Router
Public
Telephone
Network
AastraLink Pro 160
Provider
Internet
Internet
Internet
CFCF
AastraLink Pro 160
CFCF
Router
Office 2
Router
LAN
Office 1
Figure 1-1. Sample AastraLink Pro 160 Network
41-001190-02 Rev. 01, Rel. 1.2 1-5
Page 18

AastraLink Pro 160 Administrator Guide
How Do I Set Up My AastraLink Network?
Required Tasks
Setting up your AastraLink network is a three-step process as described below.
Once you complete these three steps, the AastraLink Pro 160 and the Aastra IP
phones on your network are fully operational, handling calls and processing data.
Step Action Refer To
1 Connect the AastraLink Pro 160 to your network (Administrator
task.)
2 Install and register an administrator IP phone with the AastraLink
Pro 160 device. (Administrator task.)
• The first phone you register on a newly installed AastraLink
Pro 160 is automatically configured as the Administrator
phone, and is assigned as the Operator.
3 As administrator, you can configure and manage the phones and
the AastraLink Pro 160 device on your network (including
reassigning User/Admin/Operator privileges).
4 Install and register user IP phones with the AastraLink Pro 160
device. (Administrator or User task.)
• Enter the name/password for the user during IP phone
initialization.
• The AastraLInk automatically assigns the next free extension
to the new phone.
Optional Tasks
To customize your AastraLink network use the instructions described in this
AastraLink Pro 160 Administrator Guide to:
• (Administrator’s Phone) Configure call settings and view/delete call lists,
view/delete voicemails, define additional softkeys, add directory contacts,
modify user accounts, configure voicemail, or change your Administrator
password.
• (User Phones) View/add User phones, reboot User phones, upload
pre-specified User list (from .csv file), specify user groups, define additional
softkeys on User phones in your network.
• View and configure AastraLink system settings, network settings, dial plan
settings, VoIP settings, and/or Auto-Attendant settings.
Quick Start Administrator’s Guide
Quick Start Administrator’s Guide
See “Users and Privileges” on
page 1-13
QuickStart User’s Guide
• Perform maintenance, backup, and upgrade procedures.
• Register remote user phones.
1-6 41-001190-02 Rev. 01, Rel. 1.2
Page 19

Getting Started
What Does the AastraLink Web UI Allow Me To Do?
What Does the AastraLink Web UI Allow Me To
Do?
As administrator, you can use the AastraLink Pro 160 Web UI to:
• Configure and manage your own phone (make calls, handle calls, and enable
features).
• Configure and manage the IP phones on the AastraLink network (define user
accounts, configure default softkeys, manage phone directories, etc.).
• Configure, manage, and maintain the AastraLink Pro 160 device.
As an IP phone user, you can use the AastraLink Pro 160 Web UI to:
• Manage and configure your phone only.
Can I Still Use the Phone UI?
All administrative functions are done using the AastraLink Pro 160 Web UI.
However, IP phone users can use either the Web UI, or the Aastra IP phone UI, to
operate and configure their IP phones.
The following table shows the options available using the AastraLink Pro 160
Web UI and the Aastra IP phone UI.
Phone Option
Dial a number
Manage your recent calls
Manage and use your phone directory
Configure and customize Administrator phone
softkeys
Access From
Web UI
Access from
Phone UI
41-001190-02 Rev. 01, Rel. 1.2 1-7
Page 20

AastraLink Pro 160 Administrator Guide
Can I Still Use the Phone UI?
Phone Option
Enable phone features
• Do Not Disturb
• Call Forwarding
• Find Me, Follow Me
Edit your Administrator preferences
• Contact Information
• Voicemail Preference
• Change Password
Set phone preferences
• Contrast Level
• Set Audio (not available for 51i)
View phone IP Address.
View AastraLink IP Address
View phone firmware version
Set phone to factory default settings
Restart phone
Lock your phone
Configure User accounts:
• User preferences
• Ring groups
• Paging groups
• Default softkeys
• Default softkey permissions
Configure advanced phone features such as
SLA, Directory Privacy, and Secondary Lines
Disable a User’s or Administrator’s phone from
displaying in the Corporate Directory
Configure AastraLink network and system
parameters
Configure Dial plan Settings
Configure VoIP settings
Configure Auto-attendant
Perform AastraLink system upgrade, backups,
and maintenance tasks
Access From
Web UI
Access from
Phone UI
1-8 41-001190-02 Rev. 01, Rel. 1.2
Page 21

AastraLink Pro 160 Emergency Call Support
AastraLink Pro 160 Emergency Call Support
Because IP phones and data networks require power to operate, they do not
provide the fail-safe emergency calling capability of a traditional analogue phone.
The AastraLink Pro 160 supports emergency calling in two ways:
• Lifeline Phone
• Emergency Call Priority
These features are described in detail in the next sections.
Lifeline Phone
The FXO Line 1 and FXS Phone B ports are labelled ⎯♥⎯ on the rear of the
AastraLink unit. These ports provide capability for calling emergency services
(also known as E911 in North America). In the event of power failure, the
AastraLink Pro 160 hardware connects these two ports directly together, so that
you can make an emergency call on FXO Line 1 using an analogue phone
connected to the FXS Phone B port.
Getting Started
To ensure emergency call routing is available, we recommended that:
• You connect a traditional analogue phone to FXS B at all times, labelled as
the E911 Lifeline emergency phone.
• When connecting telephone lines, connect the LifeLine FXO port first.
Emergency Call Priority
When the AastraLink Pro 160 is active, and an emergency call (by default, 911 or
9911 in North America) is made from an IP phone, it is preferentially routed to
any available FXO line. If all FXO lines are in use, AastraLink Pro overrides any
existing non-emergency call in progress on the Lifeline FXO and routes the
emergency call in its place. Emergency Call Priority Override may take up to 15
seconds for the existing call to be cleared; an announcement plays during the
override operation.
You can use the Web UI to provision emergency call numbers.
41-001190-02 Rev. 01, Rel. 1.2 1-9
Page 22

AastraLink Pro 160 Administrator Guide
AastraLink Pro 160 Emergency Call Support
Emergency Call Support Important Notes
Note: The AastraLink Pro 160 guarantees only one emergency call at a time. If
multiple emergency calls are attempted, callers may receive a message
stating that all circuits are busy. A call placed from a phone connected to
FXS B receives the highest priority; it will not be terminated, even by
another 911 call. If a 911 call is made, and the only available FXO line is
already in use by a phone connected to FXS B, then the AastraLink will
attempt to place the 911 call using SIP trunking.
Warning: On remote phones connected to the AastraLink Pro 160, the following
emergency related message displays: “E911 calls are not available
from this phone.” Remote IP phone users should not make
emergency calls using the AastraLink Pro 160, because the location
information will be incorrect. E911 regulations in the United States
require street address location information be transmitted to the Public
Safety Answering Point (PSAP). This information is provided by the
telco, using the location of the analogue line connected to the
AastraLink Pro 160 Lifeline port (FXO Line 1).
1-10 41-001190-02 Rev. 01, Rel. 1.2
Page 23

AastraLink Pro 160 Hardware and Software
AastraLink Pro 160 Hardware and Software
Hardware Requirements
Hardware Minimum requirements
AastraLink Pro 160 Includes:
• One AastraLink Pro 160 unit.
• One 12V AC power adapter and cable.
• One RJ45 Ethernet cable.
• Six RJ11 phone cables.
• One 512 MB CompactFlash memory card.
• One set of rack mounting brackets with four
Phillips head screws.
• One wall mounting template, 3 plastic wall
anchors, and 3 Phillips panhead screws.
• One Quick Start Administrator’s guide.
Additional Equipment required
(but not included)
At least one Aastra IP Phone. The Aastra IP
phones and expansion modules supported in this
release include these models:
• 9143i
• 9480i, 9480i CT
• 6730i
• 6731i
• 6751i
• 6753i
• 6755i
• 6757i, 6757i CT
• MBU and DECT 420d Handsets
• 536M, 560M
Getting Started
Note: IP Phone Model 6753i supports the 536M expansion module. IP phone
Models 6755i, 6757i, and 6757i CT support the 536M and the 560M
expansion modules. Daisy-chained expansion mod ules are not recognized
by the AastraLink Pro 160. The AastraLink Pro 160 supports a maximum
of one expansion module per phone.
41-001190-02 Rev. 01, Rel. 1.2 1-11
Page 24
AastraLink Pro 160 Administrator Guide
CF
(Steady Green = booting.
Flashing Red/Green = updating firmware
Flashing Green = system ready for use)
Compact Flash Slot
12VDC 1.25A
LINE
AastraLink Pro 160 Hardware and Software
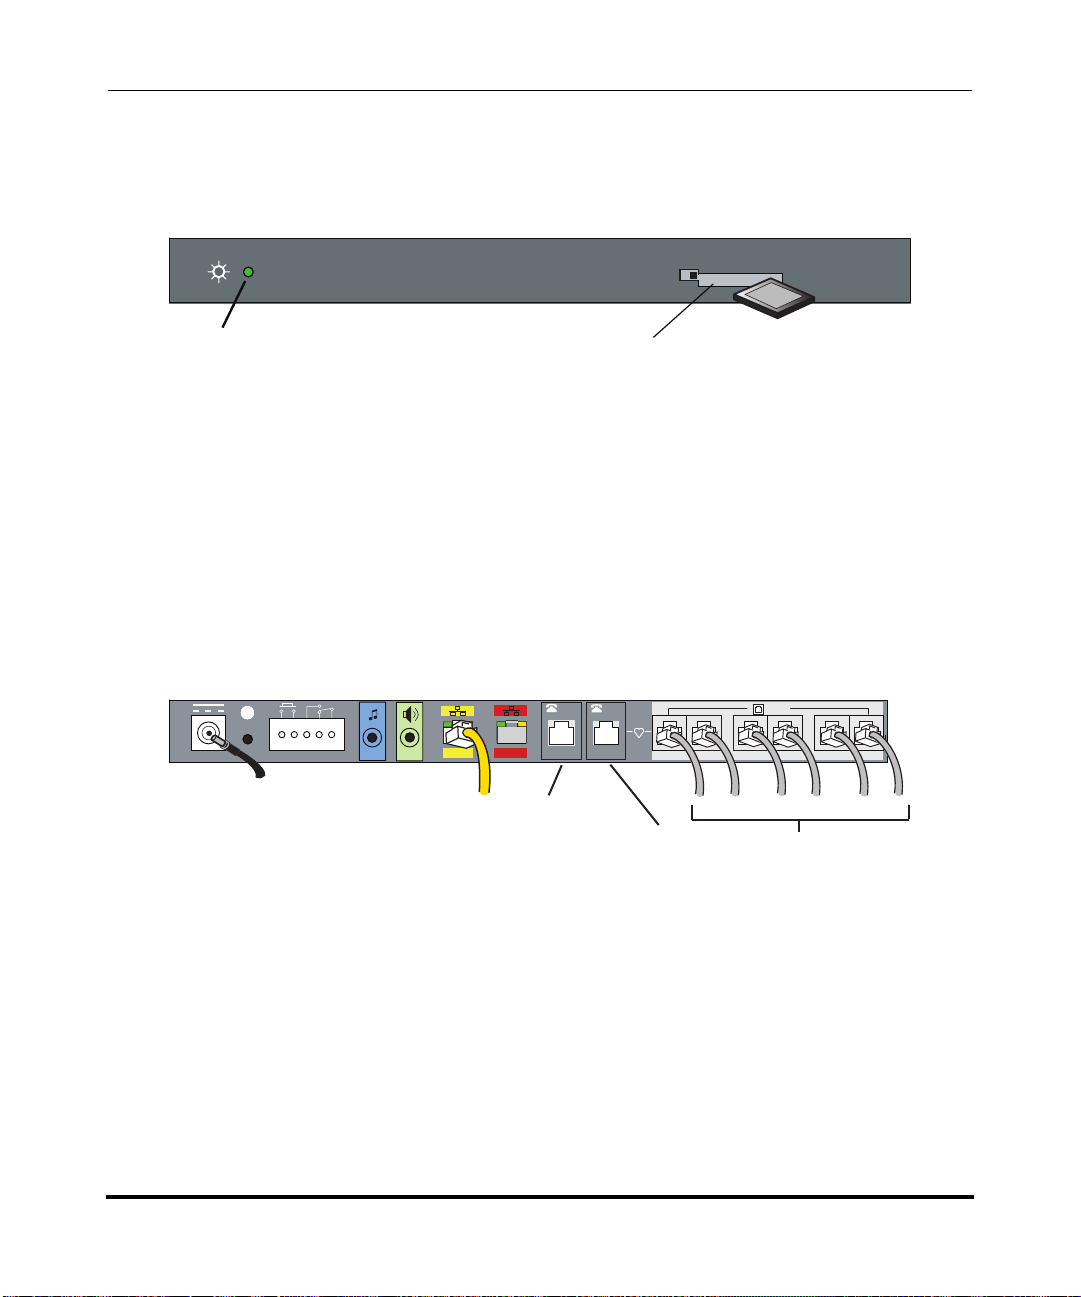
Front of AastraLink Pro 160
Front Panel
Power/Status LED
Note: See “Monitoring the AastraLink Status LED” on page 7-3 for additional
LED descriptions.
Back of AastraLink Pro 160
ompact Flash
C
(ships installed in drive)
Back Panel
/
FAX
/
FAX
TM8DC
WAN
LAN
12V Power Adapter
RJ45 Ethernet Cable
to full-duplex switch
1-12 41-001190-02 Rev. 01, Rel. 1.2
FXS-A
(default for
in/out FAX)
B
A
FXS-B Lifeline to Phone
(optional out FAX)
2
1
34
6
5
FXO Cables
Page 25

Software Requirements
The following table provides the minimum software you need to use the
AastraLink Pro 160 Web-based graphical user interface (Web UI).
Software Minimum requirements
Web browser A Web browser capable of Javascript, specifically
DHCP server (optional)*
*If DHCP is not available, ZeroConf
is used instead. Static IP may also
be provisioned after initial
configuration is completed.
FTP, TFTP or HTTP server. Required only if recovery mode is used
Getting Started
AastraLink Pro 160 Hardware and Software
Internet Explorer 6 and 7, Firefox 1.5 and 2, Opera
9, and Safari 2 and 3
DHCP server providing one IP address (for
example, 192.168.0.1/24)
Users and Privileges
The AastraLink Pro 160 supports two types of users: administrators and registered
users, as follows:
• Administrators have access privileges to all AastraLink Pro 160 management
features and functions. Administrators can manage and configure their
phones, user phones, and manage and maintain the AastraLink Pro 160
device.
• Registered users can manage and configure their phones only.
You can also specify a person from either group (administrator or user) as
“Operator.” The Operator has access to operator specific keys and the office voice
mailbox. The administrator is also the designated Operator, by default.
41-001190-02 Rev. 01, Rel. 1.2 1-13
Page 26

AastraLink Pro 160 Administrator Guide
Reference Documentation
Reference Documentation
For additional information about installing the AastraLink Pro 160, and installing
and operating the Aastra IP phones in your network, see the following guides:
• AastraLink Pro 160 Quick Start Adminstrator’s Guide
• AastraLink Pro 160 Quick Start User’s Guide
• AastraLink Pro 160 IP Phone User’s Guide
1-14 41-001190-02 Rev. 01, Rel. 1.2
Page 27
Chapter 2
Using the AastraLink Pro 160 Web UI
About this Chapter
Introduction
This chapter describes how to use to the AastraLink Web UI to configure and
manage the AastraLink Pro 160 and the Aastra IP phones on your network.
Topics
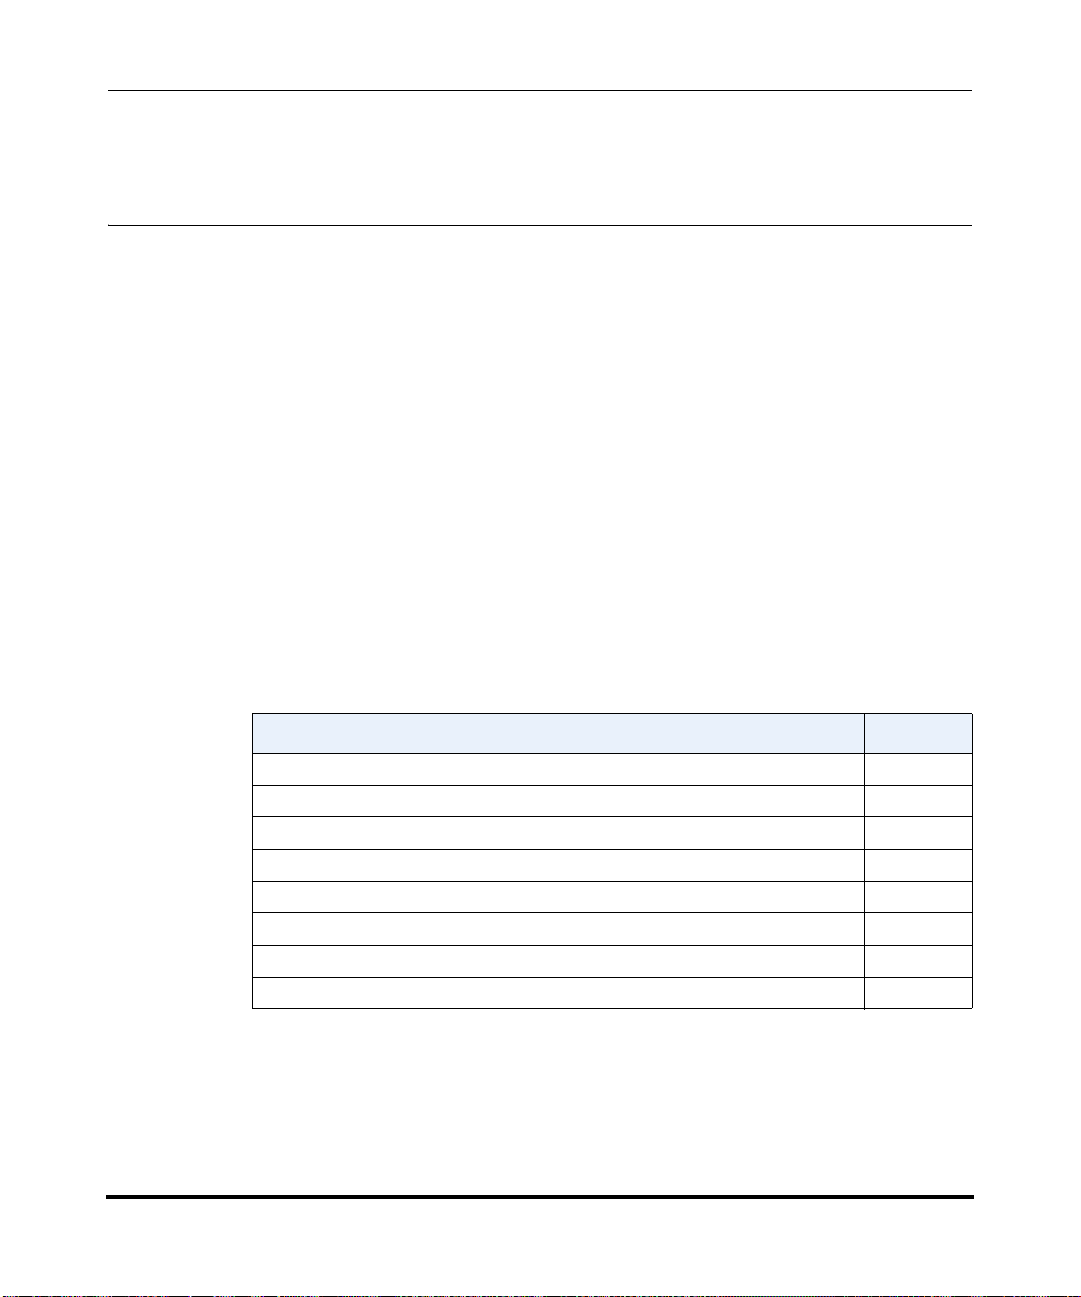
This chapter covers the following topics:
Topic Page
Accessing the AastraLink Web UI page 2-2
Using Your Web Browser to Access the AastraLink Web UI page 2-2
Using Windows Explorer to Access the AastraLink Web UI page 2-4
Administrator Menu Options page 2-6
My Phone page 2-11
Users page 2-12
Configuration page 2-14
Maintenance page 2-16
41-001190-02 Rev. 01, Rel. 1.2 2-1
Page 28
AastraLink Pro 160 Administrator Guide
Accessing the AastraLink Web UI
Accessing the AastraLink Web UI
This section describes how to use your web browser to access the AastraLink Pro
160 Web UI. You can login as an administrator, or as a user, as follows:
• Administrators have access privileges to all AastraLink Pro 160 management
features and functions.
• Users can manage and configure their phones only.
There are two ways you can access the AastraLink Web UI:
• Enter the IP address of the AastraLink Pro 160 directly into the address field
of your web browser, or
• Use Universal Plug-and-Play (UPnP) and Windows Explorer to locate the
AastraLink Pro 160 on your network.
Using Your Web Browser to Access the AastraLink Web UI
The following procedure describes how to access the AastraLink Web UI.
Step Action
1 Open your web browser and enter the IP Address or DNS hostname of the AastraLink Pro 160 in the
address field.
For example: http://10.20.50.135
Note: If you do not know the IP Address of the AastraLink, you can access it using an IP phone
connected to the device. For instructions, see How Do I Obtain the IP Address Assigned to the
AastraLink Pro 160? on page 6-9 of this guide.
The AastraLink Web UI Login Menu appears (Figure 2-1).
2 Enter your phone extension, and password, and click
The AastraLink Main Menu appears (Figure 2-3).
Note: To log out, click <logout>, located in the upper right corner of the main menu.
2-2 41-001190-02 Rev. 01, Rel. 1.2
Page 29
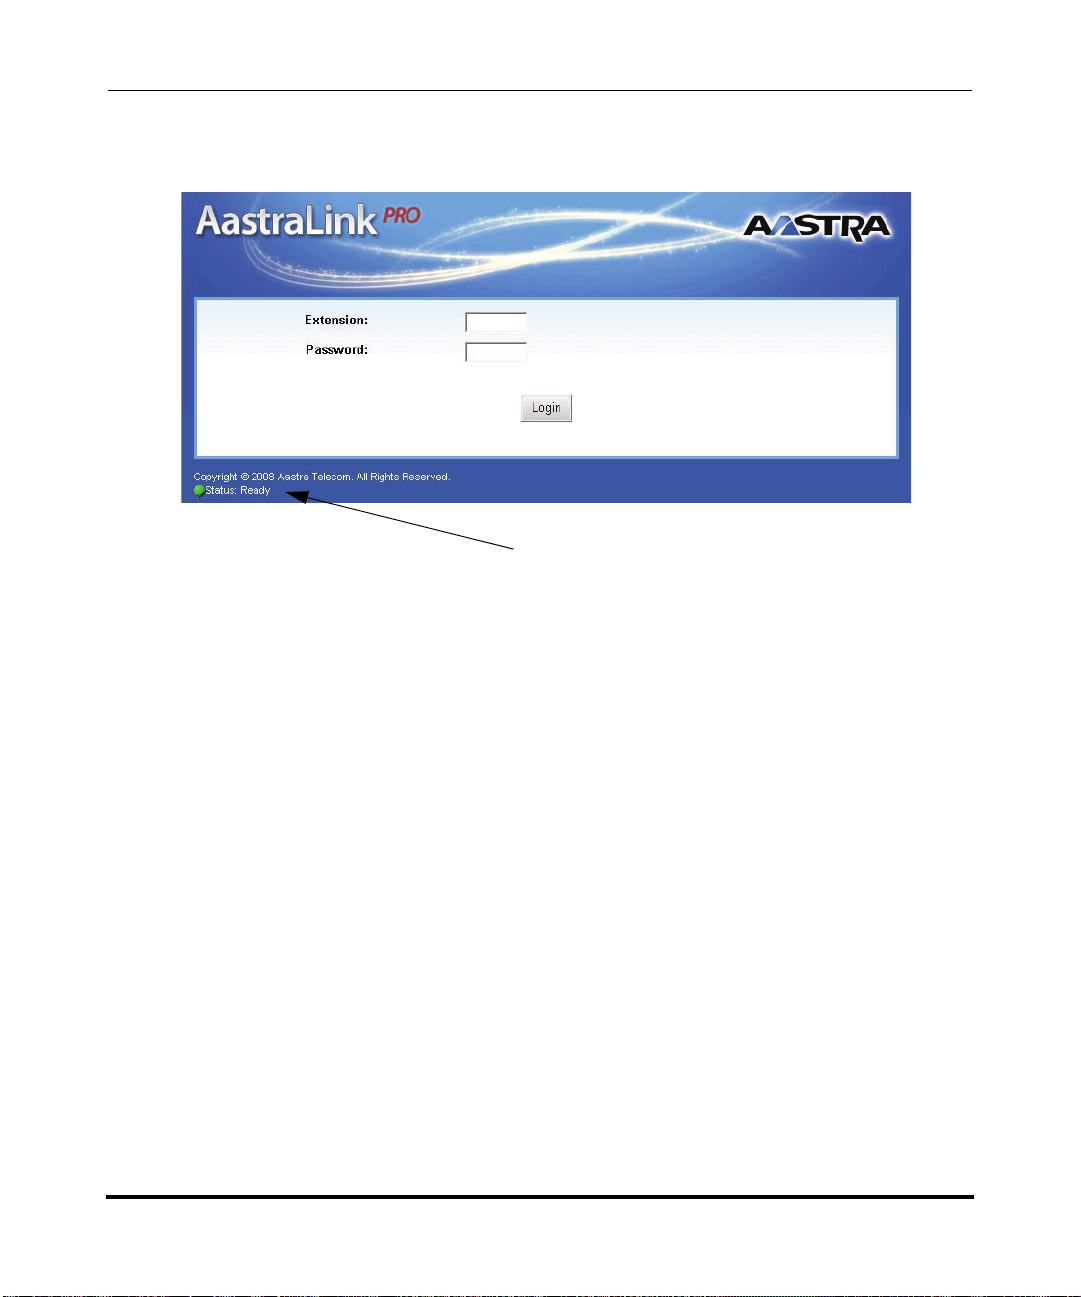
Current status of AastraLink Pro 160
Figure 2-1. AastraLink Web UI Login Menu
Using the AastraLink Pro 160 Web UI
Accessing the AastraLink Web UI
41-001190-02 Rev. 01, Rel. 1.2 2-3
Page 30
AastraLink Pro 160 Administrator Guide
Accessing the AastraLink Web UI
Using Windows Explorer to Access the AastraLink Web UI
The following procedure describes how to use Windows Explorer to access the
AastraLink Web UI.
Note: Prior to using this method to discover the AastraLink on your network, the
Windows UPnP networking component must be installed on your
computer.
Step Action
1 Click on the Start menu, then click on My Network Places.
Providing that your computer is UPnP enabled, then the AastraLink Pro 160 device icon appears in
the My Network Places window. The IP Address assigned to the AastraLink device is listed.
If there are multiple AastraLinks in your network, right-click the UPnP device icon and select
Properties. A dialogue box appears that shows the IP address, serial number and hostname (model)
of the selected device (Figure 2-2).
2 To access the AastraLink Web UI, double-click on the AastraLink device icon.
A web browser launches and the AastraLink log in menu appears (Figure 2-1).
3 Enter your phone extension, and password, and click
The AastraLink Main Menu appears (Figure 2-3).
Note: To log out of the AastraLink Web UI, click <logout>, located in the upper right corner of the
main menu.
2-4 41-001190-02 Rev. 01, Rel. 1.2
Page 31

Using the AastraLink Pro 160 Web UI
Accessing the AastraLink Web UI
Figure 2-2. My Network Places Window
41-001190-02 Rev. 01, Rel. 1.2 2-5
Page 32

AastraLink Pro 160 Administrator Guide
Accessing the AastraLink Web UI
Administrator Menu Options
When you are logged in as administrator, you can use the AastraLink Web UI to
configure your own phone, other Aastra IP phones, and the AastraLink device.
The following illustration shows the AastraLink Main Menu after an
administrator logs in.
These menus appear only if you
login as Administrator
Figure 2-3. AastraLink Administrator Main Menu
2-6 41-001190-02 Rev. 01, Rel. 1.2
Page 33

The following illustration shows the AastraLink Main Menu after a User logs in.
A User menu displays the My Phone menu and submenus only.
My Phone Menu
Using the AastraLink Pro 160 Web UI
Accessing the AastraLink Web UI
Figure 2-4. AastraLink User Main Menu
41-001190-02 Rev. 01, Rel. 1.2 2-7
Page 34

AastraLink Pro 160 Administrator Guide
Accessing the AastraLink Web UI
The Administrator Web UI is set up for easy navigation with various menus and a
color-coded 3 level structure.
The first level menus (red) are the main task/activity items (My Phone, Users,
Configuration, Maintenance). The first level menus do no change.
First level menus
The second level menus (amber) are the subsystem/category items. These menus
change according to the first level menu selected.The following illustrations show
the second level menus for the Users Menu and the Maintenance Menu.
Second level
Users Menu and Submenus
menus are different
depending on
first level
menu
selected
Maintenance Menu and Submenus
2-8 41-001190-02 Rev. 01, Rel. 1.2
Page 35

Using the AastraLink Pro 160 Web UI
Accessing the AastraLink Web UI
The third level menus (white) are tabs within the second level menus. These tabs
change according to the second level menu selected. The following illustrations
show the tabbed items on the Configuration->System Menu and the
Users->Default Softkeys Menu.
Third level
menus are tabs
that are different
depending on the
second level
menu
selected.
Configuration/System Menu Tabs
Users/Default Softkeys Menu Tabs
41-001190-02 Rev. 01, Rel. 1.2 2-9
Page 36

AastraLink Pro 160 Administrator Guide
Accessing the AastraLink Web UI
The parameters you can configure are on the final level within the menu structure.
Configurable
Parameters
My Phone/Preferences/My Profile Parameters
Configuration/System/Date and Time Parameters
The following paragraphs describe the information in the AastraLink Pro Web UI,
administrator menu structure.
2-10 41-001190-02 Rev. 01, Rel. 1.2
Page 37

My Phone
My Phone
submenus
Using the AastraLink Pro 160 Web UI
Accessing the AastraLink Web UI
The My Phone menu displays the following submenus:
•Home
• Voicemail
• Directory
• Softkeys (Administrator’s Phone)
• Preferences
Figure 2-5. My Phone Menu (Administrator)
The “My Phone” menu selections are the same as the “My Phone” menu
selections in the User’s GUI. For more information about the “My Phone”
features and options, see the AastraLink Pro 160 User Guide.
41-001190-02 Rev. 01, Rel. 1.2 2-11
Page 38

AastraLink Pro 160 Administrator Guide
Accessing the AastraLink Web UI
Users
The Users menu displays the IP phones currently registered in your AastraLink
Pro 160 network (with extensions). The list of phones includes the Operator (or
administrator) phone as well as all user phones.
From the Users menu, you can view and/or configure the following:
User List Menu
• Upload User List
• Add a phone(s)
• Delete a phone(s)
• Pre-register the phones (individually or as bulk upload) so that they enter
service automatically when connected to the network
• Reboot a phone or all phones
• Configure/edit operator and user accounts
Groups Menu
• Add/delete/edit a Ring Group(s) or Paging Group(s)
Default Softkeys Menu (User Phone)
• Configure/edit default softkey settings for all registered user phones in your
AastraLink Pro 160 network. You can also reset these softkeys to their default
values if required. The tabs that display in this menu are applicable to the
following Aastra IP Phones: 9143i, 9480i, 9480i CT, 6730i, 6731i, 6751i,
6755i, 6757i, 6757i CT. You can also configure the MBU DECT 420d
handset, and secondary, non-Aastra IP Phones.
• Specify default softkey permissions - this allows an Administrator to display
which softkeys are available for users to self-provision at the path,
“My Phone->Softkey”.
Note: Softkeys disabled by the Administrator on the “softkey permissions” page
are still configurable on a per-user basis by the Administrator, but cannot
be configured by non-privileged users.
2-12 41-001190-02 Rev. 01, Rel. 1.2
Page 39

Reference
Using the AastraLink Pro 160 Web UI
Accessing the AastraLink Web UI
For more information about the Users Menu, see Chapter 3, “Configuring Aastra
IP Phone Accounts.”
For more information about using non-Aastra IP Phones with the AastraLink Pro,
see Chapter 3, the section “Secondary Non-Aastra SIP Phones and Softclients” on
page 3-31.
41-001190-02 Rev. 01, Rel. 1.2 2-13
Page 40

AastraLink Pro 160 Administrator Guide
Accessing the AastraLink Web UI
Configuration
The Configuration menu displays the current system and network management
settings. These settings apply to the AastraLink Pro 160 device.
From the Configuration menu, you can view and/or configure the following:
System Menu
• Specify regional settings
•Set date and time
• Configure Music on Hold
• Configure the Relay Push Button
• Specify the maximum duration of a voicemail and the maximum number of
voicemail messages to store on the AastraLink Pro 160.
• Run the Auto-Tuning Wizard for the FXO lines or manually set the line
dynamic range, echo cancel, RTP-to-line power, and line-to-RTP power
parameters for FXO echo cancellation tuning.
Network Menu
• Specify local network parameters
• Specify local services
• Specify external services
Dial Plan Menu
• Specify dial plan settings (enable/disable phone registration, set SIP trunk
mode, set FXS port 'hotline' operation, where going offhook automatically
calls a preconfigured directory (or call group) number, set parked call timeout,
set an administrator password, set an overhead paging PIN, and set paging
and intercom parameters) for phones in your network
• Specify emergency numbers for phones in your network (not applicable to
remote phones)
• Specify barred numbers (blocked numbers) for phones in your network
2-14 41-001190-02 Rev. 01, Rel. 1.2
Page 41

Using the AastraLink Pro 160 Web UI
Accessing the AastraLink Web UI
• Configure individual FXO lines for which incoming calls are routed. In
addition to Default (which will send calls via the configured incoming call
route on the auto-attendant page) and SLA, you can configure a specific target
extension, a Ring Group, the Auto-Attendant, FXS phones, or the Operator.
This feature also allows you to provision FXO lines regardless of the line state
(i.e. even if there is no FXO line voltage) to enable for FXO loopback door
entry phone use.
• Specify abbreviations to use on phones in your network
VoIP Menu
• Configure SIP trunks
• Add/delete SIP direct inward dialing (DID) numbers
• Configure AastraLink trunks
• Add, Delete, or reboot MBU 400 units in your AastraLink Pro network.
Auto-Attendant Menu
• Configure Open and Closed Greetings for the interactive voice response
system (IVR) (Auto-Attendant)
• Configure a Custom Main Menu for the Auto-Attendant
• Configure a Custom Key Message for the Auto-Attendant
• Configure Language Greetings for the Auto-Attendant to use (English
(default), French, Spanish)
• Schedule open and closed hours for each day of the week
• Specify open and closed hours for specific holidays
• Configure the Interactive Voice Response (IVR) system (dial by first name,
dial by last name, upload custom menu, record custom greeting, specify keys
to use in the IVR system menus)
Reference
For more information about the Configuration Menu, see Chapter 4, “Configuring
AastraLink Pro 160 System and Network Parameters.”
41-001190-02 Rev. 01, Rel. 1.2 2-15
Page 42

AastraLink Pro 160 Administrator Guide
Accessing the AastraLink Web UI
Maintenance
The Maintenance menu displays system information and provides options for
maintaining the AastraLink Pro 160 device.
From the Maintenance menu, you can view and/or configure the following:
Current Status Menu
• View serial number of the AastraLink Pro 160
• View percentage of voicemail usage
• View status of lines 1 through 6
• View LAN/WAN status
• Reboot the entire AastraLink Pro 160 system (including all connected
phones)
• Shutdown the entire AastraLink Pro 160 system (including al connected
phones)
Call Records Menu
• V iew and sort the Call Record log
• Download the current Call Record log
• Download the entire archive of Call Record logs stored on the AastraLink Pro
160.
Backup & Restore Menu
• Backup the current AastraLink Pro 160 configuration into an “.abf” file stored
on your PC to use later if required.
• Restore a previously backed up AastraLink Pro 160 configuration from an
“.abf” file stored on your PC.
• Reboot the entire AastraLink Pro 160 system (including all connected
phones)
2-16 41-001190-02 Rev. 01, Rel. 1.2
Page 43

Using the AastraLink Pro 160 Web UI
Accessing the AastraLink Web UI
Update Menu
Automatic Updates
• Specify whether or not to you want the AastraLink Pro 160 to automatically
check and install updates as required (options are notify only, install (reboots
system when updates are found), download but don’t install).
• Specify day and time to check for updates
Manual Updates
• Allows you to manually check for updates by clicking on a “Check” link.
• Allows you to browse a server to select an update and click “Upgrade” to
upgrade the AastraLink Pro.
Support Menu
• Specify whether or not to send critical error debug information to Aastra
Support for troubleshooting purposes.
Reference
For more information about the Maintenance Menu, see Chapter 5, “Maintaining
the AastraLink Pro 160.”
41-001190-02 Rev. 01, Rel. 1.2 2-17
Page 44

AastraLink Pro 160 Administrator Guide
Accessing the AastraLink Web UI
2-18 41-001190-02 Rev. 01, Rel. 1.2
Page 45

Aastra IP Phone Accounts
About this Chapter
Introduction
This chapter describes how you use the AastraLink Web UI to configure accounts
that apply to all of the Aastra IP phones in your network. It provides instructions
for managing users, creating user groups, and specifying global default softkey
settings.
Note: You must be logged in as administrator to perform the tasks described in
this chapter.
Chapter 3
Configuring
Topics
This chapter covers the following topics:
Topic Page
Accessing the Users Menu page 3-3
Managing IP Phone Users page 3-4
Adding User Accounts and Phones page 3-5
Adding a User Account page 3-10
Editing a User Account page 3-15
Deleting a User Account page 3-27
Enabling/Disabling User Accounts page 3-29
41-001190-02 Rev. 01, Rel. 1.2 3-1
Page 46

AastraLink Pro 160 Administrator Guide
About this Chapter
Topic Page
Secondary Non-Aastra SIP Phones and Softclients page 3-31
Enabling/Disabling an Extensions Directory Privacy page 3-32
Uploading User Lists page 3-34
Configuring Groups page 3-38
Ring Groups and Paging Groups page 3-38
Adding a Group page 3-49
Editing a Group page 3-52
Deleting a Group page 3-53
Default Softkeys (Users Menu) page 3-54
Using the Default Softkeys Menu (User Phone) page 3-55
Softkey Types (User Phone) page 3-56
Adding a Default Softkey (User Phone) page 3-61
Editing a Default Softkey (User Phone) page 3-62
Deleting a Default Softkey (User Phone) page 3-62
Default Softkey Permissions (User Phone) page 3-63
Default Softkeys for Expansion Modules (Administrator or User Phone) page 3-64
Restoring Default Softkeys Back to Factory Settings page 3-65
3-2 41-001190-02 Rev. 01, Rel. 1.2
Page 47

Accessing the Users Menu
You configure Aastra IP phone accounts from the Users menu, shown below.
Configuring Aastra IP Phone Accounts
Accessing the Users Menu
Figure 3-1. Users Menu
41-001190-02 Rev. 01, Rel. 1.2 3-3
Page 48

AastraLink Pro 160 Administrator Guide
Managing IP Phone Users
Managing IP Phone Users
You manage Aastra IP phone users from the Users->User List Menu.
Click on the
extension number
link to edit a
User’s account
From this menu, you can edit user accounts, delete users from your IP phone
network, add new users and phones, upload a pre-defined User List (.csv file
which contains user and phone information), and/or remotely reboot individual or
multiple IP phones. On the User screen, you can also view information about the
user phones (MAC address, SIP DID Number, and Firmware Version).
Note: As DECT 420d handsets do not have an associated MAC address, a virtual
MBU/Handset identifier is used instead.
The AastraLink Pro 160 is designed to allow zero-management for normal
maintenance activities such as adding a new line to the system. Most customers
will prefer to allow users to register and manage their own phone; however for
customers who prefer a more traditional centralized management model, the
option is available to add, remove and change IP phone and user accounts from
the administrator Users menu.
3-4 41-001190-02 Rev. 01, Rel. 1.2
Page 49

Adding User Accounts and Phones
You can add new Users and phones to your network by clicking the
<Add Phones> button on the User List screen.
Note: Adding users manually is provided as an alternative mechanism to the more
usual method of auto-discovery and user self-registration. It is primarily
used when the Administrator prefers to disable phone registration
(Configuration->Dialplan->Settings->Phone Registration) and manually
provision new IP phone users.
The following screen displays.
Configuring Aastra IP Phone Accounts
Managing IP Phone Users
Figure 3-2. Add Users Screen
41-001190-02 Rev. 01, Rel. 1.2 3-5
Page 50

AastraLink Pro 160 Administrator Guide
Managing IP Phone Users
You can set the following Aastra IP phone user account parameters:
• User Enabled
Enables or disables user accounts from obtaining service on the AastraLink
Pro. Default is enabled. When a phone is disabled, it still retains the
configuration for the phone in the system. Disabled accounts cannot make or
receive calls, and cannot log into the Web UI. Also, the Corporate Directory
lists only enabled accounts. For more information about configuring User
Accounts, see “Enabling/Disabling User Accounts” on page 3-29.
• Secondary Enabled
Enables or disables secondary non-Aastra SIP phone and softclient user
accounts from obtaining service on the AastraLink Pro. Default is disabled.
For information on the dial plan settings for a secondary phone on the
AastraLink Pro, see “Secondary Non-Aastra SIP Phones and Softclients” on
page 3-31.
• SLA Enabled
Enables or disables the ability of this phone to participate in the Shared Line
Appearance (SLA) feature. If disabled, the phone is accessible via PBX “pool
line” dial plan only, and SLA calls do not route to this phone. Default is
enabled.
Note: SLA is not supported on the DECT 420d handsets and 6751i model phones.
For more information about SLA, see Chapter 4, “Configuring FXO Lines for
Shared Line Appearance (SLA)” on page 4-60.
• Private Extension
Enables or disables directory privacy for individual extensions. If this feature
is enabled, the User’s extension does not display in the Corporate Directory
and is not listed in the dial-by-name directory. For more information about
Private Extensions, see “Enabling/Disabling an Extensions Directory
Privacy” on page 3-32.
3-6 41-001190-02 Rev. 01, Rel. 1.2
Page 51

Configuring Aastra IP Phone Accounts
Managing IP Phone Users
• Extension
Specifies the IP phone extension for this User or Administrator. You can
specify any extension within the dial plan range you defined for your network.
By default, the first phone registered with the AastraLink Pro 160 is assigned
extension 200. When entering an extension the default valid range is 200
through 499, or 2000 through 4999, but the exact range pertains to the 'First
extension' selection made by the administrator during the initial system
configuration.
• First Name
Specifies the first name of the User or Administrator.
•Last name
Specifies the last name of the User or Administrator.
•Password
Specifies the password set up for the User or Administrator.
•Email
Specifies the email address of the User or Administrator.
• Account Type
The Account Type defines the account type (Administrator or User) and
associated privileges. An administrator can configure/use his own IP phone,
manage other IP phones/users on the network, and manage and maintain the
AastraLink Pro 160. A user can configure/use his phone only.
•Operator
Specifies if this User or Administrator is also an Operator . By default, th e first
IP phone you register with the AastraLink Pro 160 (the Administrator phone)
is also assigned Operator privileges. The IP phone acting in the role of
Operator may be moved between users, but there must always be one phone
designated as Operator.
Note: The DECT 420d handsets do not support a call-transfer softkey, and
therefore, cannot be designated as the “Operator”.
41-001190-02 Rev. 01, Rel. 1.2 3-7
Page 52

AastraLink Pro 160 Administrator Guide
Managing IP Phone Users
• Outgoing Line
Specifies which outgoing line this IP phone uses for outgoing calls. The term
“outgoing line” refers to one of the 6 FXO ports that are located on the back
of the AastraLink device.
The default is Any. Alternatively, you can specify that this phone may only
use a specific outgoing line for its calls. This is useful if different FXO lines
have different originating CLID, and is usually used in combination with the
Configuration->Dialplan->FXO Lines feature so that incoming and
outgoing calls are routed using the same FXO line.
• Phone Type
Specifies the model of this Aastra IP phone. Select the applicable phone from
the list. After saving the User information page and then redisplaying the User
information page to edit, this field becomes read-only.
• Phone Firmware Version (display only, not editable)
Displays the current phone’s (User or Administrator) firmware version
currently installed and being used on the phone.
IP Address (display only, not editable)
Displays the current IP Address assigned to this phone (User or
Administrator) used when the phone last registered to the AastraLink.
• MAC Address (not applicable when adding/editing a 420d handset)
Specifies the MAC Address assigned to this IP phone. When adding or editing
a phone in the AastraLink network, you must enter the applicable MAC
address of the phone in this field. Not used for 420d handsets. Re fer to the
next bullet “Mobility Base Unit” for more information.
• Mobility Base Unit (applicable to the MBU 420d handsets only)
Specifies the 420d handset and MBU number for which you want to apply the
current phone information. This drop-down list shows the available handsets
(max 8 per MBU) for all currently provisioned MBU-400 units, and is used
instead the of MAC address field for 420d phone model.
3-8 41-001190-02 Rev. 01, Rel. 1.2
Page 53

Configuring Aastra IP Phone Accounts
Managing IP Phone Users
• SIP DID Number
Specifies the SIP Direct Inward Dialing (DID) number to this IP phone. A
DID number is an individual telephone number assigned to this phone that
allows an outside caller to dial directly from incoming SIP trunk calls to the
users extension, without having to route via the Operator or IVR menu
system.
41-001190-02 Rev. 01, Rel. 1.2 3-9
Page 54

AastraLink Pro 160 Administrator Guide
Managing IP Phone Users
Adding a User Account
Use the following procedure to add a user account and phone to your network.
AastraLink Web UI
Step Action
1Select Users->User List
2 Click <Add Phones>. The following screen displays.
3-10 41-001190-02 Rev. 01, Rel. 1.2
Page 55

Configuring Aastra IP Phone Accounts
Managing IP Phone Users
AastraLink Web UI
Step Action
3The User Enabled field is enabled by default. If you want this User’s phone to register in the
AastraLink Pro network, leave this field enabled.
If you disable this field, the phone will still retain its configuration in the system. However, the phone
does not register on the network. Disabled accounts cannot make or receive calls, and cannot log
into the Web UI. Also, the Corporate Directory lists only enabled accounts.
For more information about enabling/disabling User Accounts, see “Enabling/Disabling User
Accounts” on page 3-29.
4The Secondary Enabled field is disabled by default.
If you are adding a non-Aastra phone or a softclient user account, enable this field by placing a check
mark in the Secondary Enabled check box.
Skip this step if the phone you are adding is an Aastra IP Phone and keep this field disabled.
For more information about adding secondary phones to your AastraLinnk Pro network, se e
“Secondary Non-Aastra SIP Phones and Softclients” on page 3-31.
5The SLA Enabled field is enabled by default.
Shared Line Appearance (SLA) is configured on a per FXO basis on the AastraLink Pro. If this field is
enabled, you must enable an FXO line as SLA at the location Configuration->Dial Plan->FXO
Lines. If disabled, the phone is accessible via PBX “pool line” dial plan only, and SLA calls do not
route to this phone. Default is enabled. SLA key mapping (L1, L2, etc.) varies by phone model.
Note: SLA is not supported on the DECT 420d handsets and 6751i model phones.
For more information about configuring SLA on the AastraLink Pro, see Chapter 4, “Configuring FXO
Lines for Shared Line Appearance (SLA)” on page 4-60.
41-001190-02 Rev. 01, Rel. 1.2 3-11
Page 56

AastraLink Pro 160 Administrator Guide
Managing IP Phone Users
AastraLink Web UI
Step Action
6The Private Extension field is disabled by default.
This field enables or disables directory privacy for individual extensions. If this feature is enabled, the
User’s extension does not display in the Corporate Directory and is not listed in the dial-by-name
directory.
If you do not want the current extension to display in the Corporate Directory, place a check mark.
For more information about enabling/disabling private extensions, see “Enabling/Disabling an
Extensions Directory Privacy” on page 3-32.
7 In the Extension field, enter an extension to assign to the new user.
Y ou can specify any extension within the dial plan range you defined for your network. By default, the
first phone registered with the AastraLink Pro 160 is assigned extension 200. When entering an
extension the default valid range is 200 through 499, or 2000 through 4999, but the exact range
pertains to the 'First extension' selection made by the administrator during the initial system
configuration
8 In the First Name field, enter the first name of the new User or Administrator.
9 In the Last Name field, enter the last name of the new User or Administrator.
10 In the Password field, enter the password to assign to this new User’s or Administrator’s phone.
11 In the Email field, enter the email address of this new User or Administrator.
12 In the Account Type field, select whether the user and user’s phone is an Administrator or User.
13 If this user is also the Operator, click on the “Operator” check box.
The first IP phone registered with the AastraLink Pro 160 is registered as both an administrator, and
Operator, by default.
Note: The DECT 420d handsets do not support a call-transfer softkey, and therefore, cannot be
designated as the “Operator”.
3-12 41-001190-02 Rev. 01, Rel. 1.2
Page 57

Configuring Aastra IP Phone Accounts
Managing IP Phone Users
AastraLink Web UI
Step Action
14 If required, specify a line (line 1 - line 6) for this extension to use for all outgoing calls in the
“Outgoing Line” field. Valid values are Line 1 through Line 6. The default is Any line.
This field specifies which outgoing line this IP phone uses for outgoing calls. The term “outgoing line”
refers to one of the 6 FXO ports that are located on the back of the AastraLink device. Alternatively,
you can specify that this phone may only use a specific outgoing line for its calls. This is useful if
different FXO lines have different originating CLID, and is usually used in combination with the
Configuration->Dialplan->FXO Lines feature so that incoming and outgoing calls are routed using
the same FXO line.
15 In the Phone Type field, select the phone type for this user. Valid values are:
• Aastra9143i
• Aastra9480i
• Aastra9480i CT
• Aastra6730i
• Aastra6731i
• Aastra6751i
• Aastra6753i
• Aastra6755i
• Aastra6757i
• Aastra6757i CT
• Aastra420d
Default is Aastra9143i.
Note: Before selecting the value, Aastra420d, you must add an MBU unit(s) to the AastraLink Pro
using the Web UI at the location, Configuration->VoIP->Mobility Base Units. Once an MBU is
registered, the administrator can provision extensions for individual handsets on this “Add Phone”
page, and then select the "Aastra420d" phone type.
16 (Not applicable to the 420d handse) In the MAC Address field, enter the MAC address of the phone
for this user. You can find the MAC address of the phone on a label on th e bottom of the phone.
This field specifies the MAC Address assigned to this IP phone. When adding or editing a phone in
the AastraLink network, you must enter the applicable MAC address of the phone in this field.
Note: If you select a value of “Aastra420d” in step 15, this MAC Address field is grayed-out. This
field does not apply to an MBU 420d handset.
41-001190-02 Rev. 01, Rel. 1.2 3-13
Page 58

AastraLink Pro 160 Administrator Guide
Managing IP Phone Users
AastraLink Web UI
Step Action
17 (For MBU units only) If you selected a value of “Aastra420d” for the Phone Type in step 15, in the
Mobility Base Unit field, select the 420d handset for which you want to apply this user information.
This field specifies the 420d handset and MBU number for which you want to apply the current phone
information. This drop-down list shows the available handsets (max 8 per MBU) for all currently
provisioned MBU-400 units, and is used instead the of MAC address field for 420d phone model.
For more information about adding MBUs to your AastraLink network, see Chapter 4, “Mobility Base
Units (MBUs)” on page 4-97.
18 In the SIP DID Number field, enter the SIP DID number for this user’s phone. The DID number is the
number that an outside caller can dial to reach this phone directly without having to go through the
company’s PBX. The DID is a direct dialed number to this phone.
19 Click <Save> to save your changes.
3-14 41-001190-02 Rev. 01, Rel. 1.2
Page 59

Editing a User Account
An administrator can edit registered phones to change the identity of the user
account associated with the phone. (For example, the Administrator can edit the
extension, users name, password, etc.). The following illustration shows a User
account that an Administrator can edit.
Configuring Aastra IP Phone Accounts
Managing IP Phone Users
Figure 3-3. Edit Users Screen
Reference
Refer to the description of each field in the above illustration on page 3-6.
41-001190-02 Rev. 01, Rel. 1.2 3-15
Page 60

AastraLink Pro 160 Administrator Guide
Managing IP Phone Users
Use the following procedure to edit a user account.
3-16 41-001190-02 Rev. 01, Rel. 1.2
Page 61

AastraLink Web UI
Step Action
1Select Users->User List
Configuring Aastra IP Phone Accounts
Managing IP Phone Users
41-001190-02 Rev. 01, Rel. 1.2 3-17
Page 62

AastraLink Pro 160 Administrator Guide
Managing IP Phone Users
AastraLink Web UI
Step Action
2 Click on the extension for the user account you want to edit.
The user account appears. You can edit personal information from this menu, specify the user type
(administrator or user), and view the phone model, IP address and MAC address assigned to this
phone.
Note: You can also set specific key types (depending on the User’s phone model) for the phone, and
specify which key types display for a User to select from. The administrator is not restricted by the
softkey subset defined in the “Default Softkey Permissions” and the target user account “Softkey
Permissions”. Administrators can therefore, assign specific softkeys to a user, which the user
themselves is not permitted to modify.
For more information about setting key types on the phone, see “Configuring a User’s Keys on the
Phone or Expansion Module in the User Account” on page 3-20. For more information about setting
softkey permissions on a User’s phone, see “Setting Softkey Permissions in the User Account (User
or Administrator Phone)” on page 3-25.
3-18 41-001190-02 Rev. 01, Rel. 1.2
Page 63

Configuring Aastra IP Phone Accounts
Managing IP Phone Users
AastraLink Web UI
Step Action
3 Edit the user account parameters as required (User Enabled, Secondary Enabled, SLA Enabled
Private Extension, Extension, First Name, Last Name, Password, Email).
For information on configuring these specific fields, refer to the procedure, “Adding a User Account”
on page 3-10.
4 Specify whether or not this user is an administrator in the “Account Type” field.
5 If this user is also the Operator, click on the “Operator” check box.
The first IP phone registered with the AastraLink Pro 160 is registered as both an administrator, and
Operator, by default.
6 If you wish, specify a line (line 1 - line 6) for this extension to use for all outgoing calls in the
“Outgoing Line” field.
The default is Any line.
7 Modify the MAC Address if required.
8 Modify or delete the SIP DID Number if required. The DID number is the number that an outside
caller can dial to reach this phone directly without having to go through the company’s PBX. The DID
is a direct dialed number to this phone.
9 Click <Save> to save your changes.
41-001190-02 Rev. 01, Rel. 1.2 3-19
Page 64

AastraLink Pro 160 Administrator Guide
Managing IP Phone Users
Configuring a User’s Keys on the Phone or Expansion Module in the User Account
An Administrator can assign key types to the the softkeys or programmable keys
(dependant on the User’s phone model), and/or expansion modules keys on their
IP Phone. If applicable to their phone, the softkeys, programmble keys, or
expansion module tab displays when editing a User’s account.
A softkey/programmable
key tab displays
dependant on the
User’s phone model.
An expansion module tab
displays if an expansion
module is attached to the
User’s phone.
3-20 41-001190-02 Rev. 01, Rel. 1.2
Page 65

Configuring Aastra IP Phone Accounts
Managing IP Phone Users
The applicable key page displays after selecting the softkey/programmable key/
expansion module key tab. The following example shows a 6755i phone’s softkey
key page.
The default keys that display are dependant on the User’s phone model. You can
also change the default softkeys at the location Users->Default Softkeys. For
more information about changing the default softkeys on a phone, see “Default
Softkeys (Users Menu)” on page 3-54.
The Administrator can override a phones current softkey settings and reset it to
the Default Softkeys template by clicking <Reset to Defaults>.
If applicable to the User’s phone model or expansion module, a <Print Label>
key displays for you to print a label to insert next to the physical key on the phone
after configuring the key.
41-001190-02 Rev. 01, Rel. 1.2 3-21
Page 66

AastraLink Pro 160 Administrator Guide
Managing IP Phone Users
You can assign key types to the keys on the User’s phone by clicking on each key
field. The following prompt displays.
This page allows you to specify a key type for the key. The key types in the list
may vary depending on the User’s model phone. For more information about keys
types on the User’s phone, see “Softkey Types (User Phone)” on page 3-56.
The list of key types can be customized by the Administrator if required. To
customize the list of key types on the User’s phone, see “Setting Softkey
Permissions in the User Account (User or Administrator Phone)” on page 3-25.
3-22 41-001190-02 Rev. 01, Rel. 1.2
Page 67

Configuring Aastra IP Phone Accounts
Managing IP Phone Users
Use the following procedure to add, edit, or delete a key type on a User’s phone.
Adding a Key Type
(User or Administrator Phone)
Use the following procedure to add/define a new key type for a User’s phone.
AastraLink Web UI
Step Action
1Select Users->User List-><select a user>.
2 Click on the Softkeys, Top Sof tkeys, Programmable Keys, or Expansion M odule tab. Th e tab that
displays is dependant on the User’s phone model you are editing.
3 Click on an <empty> softkey.
4Select the “Softkey Type” from the pull-down menu, then click <Save>.
Notes:
1. The key types that display in the list are dependant on the User’s phone model.
2. If you are configuring a Speeddial or BLF softkey, you must also assign a label/value to the
softkey. See “Softkey Types (User Phone)” on page 3-56 for more information.
Editing a Key Type
(User or Administrator Phone)
Use the following procedure to edit an existing key type for a User’s phone.
AastraLink Web UI
Step Action
1Select Users->User List-><select a user>.
2 Click on the Softkeys, Top Sof tkeys, Programmable Keys, or Expansion M odule tab. Th e tab that
displays is dependant on the User’s phone model you are editing.
3 Click on the softkey you want to edit.
41-001190-02 Rev. 01, Rel. 1.2 3-23
Page 68

AastraLink Pro 160 Administrator Guide
Managing IP Phone Users
AastraLink Web UI
Step Action
4 Select a different “Softkey Type” from the pull-down menu.
5 Click <Save> to save your changes.
Notes:
1.The key types that display in the list are dependant on the User’s phone model.
2.If you are configuring a Speeddial or BLF softkey , you must also assign a label/value to the softkey.
See “Softkey Types (User Phone)” on page3-56 for more information.
Deleting a Key Type (User or Administrator Phone)
Use the following procedure to delete a key type from a User’s phone.
AastraLink Web UI
Step Action
1Select Users->User List-><select a user>.
2 Click on the Softkeys, Top Sof tkeys, Programmable Keys, or Expansion M odule tab. Th e tab that
displays is dependant on the User’s phone model you are editing.
3 Click on the softkey you want to delete.
4 In the Softkey Type field, select “empty” from the pull-down menu, and click <Save>.
The key type is removed from the User’s phone.
3-24 41-001190-02 Rev. 01, Rel. 1.2
Page 69

Configuring Aastra IP Phone Accounts
Setting Softkey Permissions in the User Account
(User or Administrator Phone)
An Administrator can specify the key types that are available to a User or
Administrator to select from when that User is configuring keys on their phone.
When an Administrator specifies these softkey permissions, only the softkeys
enabled on the Softkey Permission page will display on the User’s phone for the
user to select from when configuring softkeys.
Use the following procedure to set softkey permissions for an Administrator or
User.
AastraLink Web UI
Step Action
1Select Users->User List-><select a user>->Softkey Permissions.
Managing IP Phone Users
41-001190-02 Rev. 01, Rel. 1.2 3-25
Page 70

AastraLink Pro 160 Administrator Guide
Managing IP Phone Users
AastraLink Web UI
Step Action
2 The available softkeys on an Administrator’s or User’s phone display in the Softkey Permissions
page. All softkeys are enabled by default. T o disable a softkey, click on a box to uncheck it.
Available softkeys are dependant on the Model of the Administrator’s or User’s phone.
If you disable a softkey, that softkey does not display in the Administrator’s or User’s softkey list.
3 Click <Save> to save your changes.
3-26 41-001190-02 Rev. 01, Rel. 1.2
Page 71

Deleting a User Account
An administrator can delete a user account associated with a registered phone.
When you delete a User account, all associated information is deleted from the
AastraLink Pro. (For example, the extension, first name, last name, password,
etc.).
Configuring Aastra IP Phone Accounts
Managing IP Phone Users
Figure 3-4. Delete Users Screen
41-001190-02 Rev. 01, Rel. 1.2 3-27
Page 72

AastraLink Pro 160 Administrator Guide
Managing IP Phone Users
Use the following procedure to delete a user account.
AastraLink Web UI
Step Action
1Select Users->User List
2 Click on the extension for the user account or accounts you want to edit.
Note: You can select an individual user account or multiple user accounts.
Click here to
select all
user accounts
3 Click <Delete>.
4 When prompted, click <Yes> to confirm your action.
The user account(s) you deleted no longer appear in the User List.
5 Click <Save> to save your changes.
3-28 41-001190-02 Rev. 01, Rel. 1.2
Page 73

Enabling/Disabling User Accounts
An Administrator can enable or disable user accounts from obtaining service on
the AastraLink Pro. When the account is disabled, it still retains the configuration
for the phone in the system. Disabled accounts cannot make or receive calls, and
cannot log into the Web UI. Also, the Corporate Directory lists only enabled
accounts.
Note: The currently logged in Administrator can disable User accounts and other
Administrator accounts. The logged-in Administrator cannot disable his
own account nor the Operator account.
You can disable user accounts using the Web UI at the location,
Users->User List-><select an existing user or click Add Phone>->General.
Use the following procedure to enable/disable a User account.
AastraLink Web UI
Step Action
Configuring Aastra IP Phone Accounts
Managing IP Phone Users
1Select Users->User List-><select an existing user or click Add Phone>->General.
2The “User Enabled” field is enabled by default. To disable this field, click the check box to remove
the check mark from the box.
Enable user by
placing a check mark
in the box
Disable user by
removing check mark
from the box
3 Click <Save> to save your changes.
41-001190-02 Rev. 01, Rel. 1.2 3-29
Page 74

AastraLink Pro 160 Administrator Guide
Managing IP Phone Users
AastraLink Web UI
Step Action
When you disable this field for a User, “Disabled” displays in the User List page in the “Account
Flags” column.
“Disabled” displays
for the applicable
User in the
User List
In the above example, the User “Bob Jones”, extensio n 201 is diabled, and does not display in the
Corporate directory as shown below. The Corporate Directory is located at
My Phone->Directory->Corporate.
User Bob Jones,
ext. 201 does not
display in the
Corporate Directory
3-30 41-001190-02 Rev. 01, Rel. 1.2
Page 75

Configuring Aastra IP Phone Accounts
Secondary Non-Aastra SIP Phones and Softclients
The AastraLink Pro 160 supports non-Aastra SIP terminal and softclient generic
accounts. These phones are not directly able to be dialed, but ring in parallel with
the primary Aastra phone for which they are associated.
Outgoing calls may be placed from the generic SIP device, and calls su pport
direct signaling; therefore enhanced capabilities such as video softclients may be
used between each generic SIP device.
The account registration information is 61 + primary extension (e.g. 61200) and
the password for registration is the users voicemail password/Web UI login.The
dialplan line prefix for the secondary phone displays as "61" at the location
Configuration->Dialplan->Settings as shown in the following illustration.
Managing IP Phone Users
Secondary Line
Prefix
Note: Secondary phones are intended to be used in conjunction with a primary
Aastra SIP desk phone. Therefore, a secondary phone is disabled if the
primary SIP phone has not recently registered to the AastraLink. Also, if
any of the primary phone account information is changed, the generic
account is disabled until the Aastra phone re-registers with Asterisk (this
can be instantaneous or require some time if the Aastra phone requires a
reboot).
To add a secondary SIP phone to the AastraLink Pro network, see “Adding User
Accounts and Phones” on page 3-5.
41-001190-02 Rev. 01, Rel. 1.2 3-31
Page 76

AastraLink Pro 160 Administrator Guide
Managing IP Phone Users
Enabling/Disabling an Extensions Directory Privacy
An Administrator can enable or disable individual extensions (User and
Administrator extensions) from displaying in a Corporate Directory . If this feature
is enabled, the User’s extension does not display in the Corporate Directory and is
not listed in the dial-by-name directory. By default, the Private Extension feature
is disabled.
You enable or disable private extensions at the location
Users->User List-><select an existing user or click Add Phone>->General.
Use the following procedure to configure a private extension.
AastraLink Web UI
Step Action
1Select Users->User List-><select an existing user or click Add Phone>->General.
2The “Private Extension” field is disabled by default. To enable this field, click the check box to place
a check mark in the box.
Private Extension
Parameter
3 Click <Save> to save your changes.
3-32 41-001190-02 Rev. 01, Rel. 1.2
Page 77

Configuring Aastra IP Phone Accounts
Managing IP Phone Users
AastraLink Web UI
Step Action
When you enable the private extension feature for a User or Administrator, “(private)” displays in the
User List page in the “Account Type” column.
“(Private)” displays
for the applicable
extension in the
User List
In the above example, extension 201 is enabled as “private extension” and does not display in the
Corporate directory as shown below. The Corporate Directory is located at
My Phone->Directory->Corporate.
Extension 201 does not
display in the Corporate
Directory
41-001190-02 Rev. 01, Rel. 1.2 3-33
Page 78

AastraLink Pro 160 Administrator Guide
Managing IP Phone Users
Uploading User Lists
The AastraLink Pro allows you to upload user lists from a file stored on a server.
This allows you to create several users at once by uploading a .CSV file. The
format of the file needs to be:
Extension, FirstName, Last Name. Password, MAC, Phone Type
Each item in the file must be separated by a comma.
Each MAC address must be in colon-separated format (for example,
54:43:4F:6E:11:B3).
Applicable phone types include:
• Aastra6730i • Aastra6757i CT
• Aastra6731i • Aastra9143i
• Aastra6751i • Aastra9480i
• Aastra6753i • Aastra9480i CT
• Aastra6755i • Aastra420d
• Aastra6757i
The following is an example of a .CSV file that you can upload to the AastraLink
Pro 160:
200,James,Test,12345,00:08:5D:03:CF:60,Aastra9480i
201,James,MBU1,12345,02:08:7B:01:03:D5,Aastra420d
Note: The AastraLink Pro does not support secondary (non-Aastra) IP Phones as
phone types when uploading User Lists.
3-34 41-001190-02 Rev. 01, Rel. 1.2
Page 79

Use the following procedure to upload a user list to the AastraLink Pro.
AastraLink Web UI
Step Action
1Select Users->User List.
Configuring Aastra IP Phone Accounts
Managing IP Phone Users
41-001190-02 Rev. 01, Rel. 1.2 3-35
Page 80

AastraLink Pro 160 Administrator Guide
Managing IP Phone Users
AastraLink Web UI
Step Action
2 Click <Upload User List>. The following prompt displays.
3 Enter the name of the “.csv” file that contains the User List information, or click <Browse> to
navigate to the location where the “.csv” file is stored.
Note: The file must be in the format: Extension, First Name, Last Name, Password, MAC, Phone
Type.
4 Click <Upload File> to upload the User List information to the AastraLink Pro.
3-36 41-001190-02 Rev. 01, Rel. 1.2
Page 81

Configuring Aastra IP Phone Accounts
Managing IP Phone Users
Uploading User Lists if MBU 400s Connected to the AastraLink Pro
If you have an MBU 400 connected to the AastraLink Pro, the 420d handsets are
DECT devices, and therefore, do not have real MAC addresses. The AastraLink
displays the MAC addresses for 420d handsets as follows:
02:08:7B:XX:YY:ZZ
where
02 - is used for the first octet to indicate that the MAC address is locally
administered*
XX - becomes the hex representation of the MBU that the handset is registered to
YY - becomes the hex representation of the handset ID
ZZ - is the real value (final octet of the owning MBU)
*Note: A Locally Administered address is an IEEE 802.3 EUI-64 MAC which
has the second least-significant bit of the most significant byte set to 1.
For this purpose, 02 is used in the MBU/420d virtual MAC address, to
ensure that it never conflicts with a real Universally Administered
Ethernet MAC address (i.e. another manufacturer etc). See the following
illustration for more detail.
41-001190-02 Rev. 01, Rel. 1.2 3-37
Page 82

AastraLink Pro 160 Administrator Guide
Configuring Groups
Configuring Groups
Ring Groups and Paging Groups
The AastraLink Pro allows you to configure the following group types:
• Ring Group - All members that belong to a specific Ring Group can receive
the same incoming calls.
• Paging Group - All members that belong to a specific Paging Group can
receive the same incoming page.
AastraLink Pro supports the ability for the Administrator to choose a subset of IP
phone extensions or FXS extension which operate together as a group. Groups
may be associated with unique configuration for incoming call routing, and have
their own voicemail and 'virtual extension' number, which is entirely separate
from the extension number of the users IP phone.
Each IP phone may be a member of zero or more groups, and can overlap between
multiple separate groups - for example, groups may have different membership
lists, with or without any users common between two specific groups. The only
provisioning restriction is that each group must have at least one IP phone as a
member at all times.You can use your keypad on the phone to dial a specific
group.
For Paging Groups, a single phone can be a member of up to 4 paging groups
only, plus a system-wide “all active phones” group (660).
The following applies to the multiple paging group feature:
• Supports up to 9 paging groups total per AastraLink.
• Phones currently in a call have no barge-in (system-wide option)
• Intercom warning tone on/off for paging groups (system-wide option)
• Icom key can be used as a Paging key (system-wide option).
• Softkey can be used as a Paging key (per-user option)
• The Phone UI displays an Intercom/Paging screen if the phone has been
configured for a Paging Group.
3-38 41-001190-02 Rev. 01, Rel. 1.2
Page 83

Configuring Aastra IP Phone Accounts
Configuring Groups
Notes:
1. By default, incoming intercom calls are enabled for all IP phone models. If
required, an Administrator can enable outgoing intercom calls on all model
phones (except 51i).
2. The Icom hard key is applicable to the 480i and 480i CT only; all other
model phones (except 51i) can be configured with an Icom softkey.
3. Remote office phones cannot receive paging calls.
• Paging group security - An optional Password allows the administrator to
establish an access PIN code that users are required to enter before sending a
call to a Paging group.
The default 660 all-phones have a permanently enabled password. This group
is the VoIP equivalent of the Overhead Paging port, (see Chapter 4,
“Configuring Overhead Paging” on page 4-49) and shares the password
configured for that feature.
Note: If the incoming "Barge-in" setting is disabled, or the incoming
"Auto-Answer" is disabled on the phone, the page does not go to the
speakerphone.
Dial Plan for Ring Groups
AastraLink Pro 160 dialplan provides access to Ring Groups using the "65"
prefix.
When configuring Ring Groups using the WebUI, AastraLink automatically
prepends the “65” digits to the groups’s extension, to create a virtual extension
number. For example, creating a Ring Group 300 will automatically prefix 65 so
that the dial plan entry becomes 65300.
For more information about dial plans and for a table of dial plan numbers, see
Chapter 4, Table 4-1 “AastraLink Pro 160 Dialplan” on page 4-40).
Note: All phones, including DECT handsets (420d) and FXS phones are
supported for Ring Groups.
41-001190-02 Rev. 01, Rel. 1.2 3-39
Page 84

AastraLink Pro 160 Administrator Guide
Configuring Groups
Ring group call-forwarding rules
For ring groups, the AastraLink Pro call-routing provides single-level forwarding
with fall-back routing.
If an incoming call route is set to a ring group, calls are first directed to the
ring-group. If no member of the group answers, after the configured 'Rings before
Transfer' time has elapsed, the call falls-back to the alternative route specified in
the "Transfer to" parameter.
Call forwarding is not performed across multiple hops; therefore calls do not take
the route specified in the destination of individual members of the facility.
Similarly, calls to a ring group cannot be transferred to another ring group; only
direct-dial extensions can receive call transfers from a ring group.
For example:
IF THEN
• Extension 200 is listed as a member of group 651.
• Extension 200 has call-forward set to extension
201 AND extension 200 is a member of group 651.
• Extension 200 has call-forward set to extension
201 AND neither extension is a member of group
651.
• “Transfer to” for group 651 is configured as
auto-attendant.
• Incoming calls will route to group 651, and
extension 200 will ring.
• The call-forward of 200 to 201 is not u sed as
that is a local setting for the users phone, not
the ring group.
• Direct-dial calls to 200 will call-forward to 201.
• Incoming calls to group 651 are set to route to
the Auto-attendant if there is no answer from
any Ring Group member.
3-40 41-001190-02 Rev. 01, Rel. 1.2
Page 85

Configuring Aastra IP Phone Accounts
Configuring Groups
Dial Plan for Paging Groups
AastraLink Pro 160 dialplan provides access to Paging Groups using the "66"
prefix.
When configuring Paging Groups using the WebUI, AastraLink automatically
prepends the "66" digits to the groups’s extension, to create a virtual extension
number. For example, creating a Paging Group 1 1 1 will automatically prefix 66 so
that the dial plan entry becomes 66111.
For more information about dial plans and for a table of dial plan numbers, see
Chapter 4, Table 4-1 “AastraLink Pro 160 Dialplan” on page 4-40
Note: DECT handsets (420d) and FXS phones are not supported for Paging
Groups.
41-001190-02 Rev. 01, Rel. 1.2 3-41
Page 86

AastraLink Pro 160 Administrator Guide
Configuring Groups
Virtual Extension Numbers (for Ring and Paging Groups)
Groups use virtual extension numbers which may have any leng th of numeric
digits from 1 to 20. Although most customers may choose to use 1 or 2 digit
numbers for group virtual extensions to keep their dial plan reasonable for callers,
longer digit strings can be useful for 'name dialling'. To dial a Group’s virtual
extension, it is necessary to dial the 65 (Ring Group) or 66 (Paging Group) before
the virtual extension number.
For example, if a Ring Group’s virtual extension is 10, the group can be reached
by dialling 6510 from a SIP phone, the IVR, etc. An example for a name dialling
could be '65+PIZZA' with the corresponding virtual extension of 'PIZZA' being
74992.
In the illustration below, a Ring Group and Paging Group were created.
Ring Group with
extension 300
(65 + 300)
Paging Group with
extension 111
(66 + 111)
For more information about the AastraLink Pro 160 dial plans, see Chapter 4, the
section, “Configuring Dial Plan Settings” on page 4-38.
3-42 41-001190-02 Rev. 01, Rel. 1.2
Page 87

Configuring Aastra IP Phone Accounts
Configuring Groups
Creating Rules for Groups (Ring and Paging Groups)
When you create a Group, you configure group-forwarding rules for the Group
that determines what happens when an incoming call goes unanswered. The
following table describes the parameters you can set to configure these
group-forwarding rules.
Parameter Description
Name Specifies the name of the Group. V alid values are:
• Ring Group
• Paging Group
Extension Specifies the extension for the Group.
Note: For more information about assigning
extension numbers, see the section, “Virtual
Extension Numbers (for Ring and Paging Groups)”
on page 42.
Password (optional) Specifies the PIN access to a Paging
Group, or the password for voicemail on a Ring
Group.
Voicemail Notification
(Not applicable to Paging
Groups)
Specifies whether or not an email is sent to the Ring
Group to notify of a voicemail that was left by the
incoming caller. Valid values are:
• Off (default)
•Email
• Email with Audio-Attachment
Note: Ring groups do not have individual email
addresses. When email is configured as the
notification method, the message is sent to the email
addresses in the "My Preferences" of all members of
that ring group (if configured).
41-001190-02 Rev. 01, Rel. 1.2 3-43
Page 88

AastraLink Pro 160 Administrator Guide
Configuring Groups
Parameter Description
Distinctive Ring
(Not applicable to Paging
Groups)
Rings Before Transfer
(Not applicable to Paging
Groups)
Transfer to
(Not applicable to Paging
Groups)
Specifies a distinctive ring for all of the member’s
phones in the Ring Group. Valid values are:
• None (default - Tone 1)
• Pattern 1 (Tone 2)
• Pattern 2 (Tone 3)
• Pattern 3 (Tone 4)
• Pattern 4 (Tone 5)
Note: Distinctive ring tones apply to SIP extensions
only. Any 420d or SIP phones in a Ring Group
receive standard ring tone.
For more information about ring tone patterns, see
the section, “Distinctive Ringing (Ring Groups only)”
on page 3-45.
Specifies the number of rings on the Ring Group’s
phones before transferring the incoming call.
Valid values are 1 through 6. Default is 1.
Note: Transfer of the call is based on the setting of
the “Transfer to” parameter.
Specifies where the incoming call is transferred to if
there is no answer or if there is a busy signal on the
Ring Group’s phones. Valid values are:
• None (default)
• Extension
•Voicemail
• Auto-Attendant
Note: If you choose extension, you must specify the
extension at the “Transfer Number” parameter.
Transfer Number
(Not applicable to Paging
Groups)
Group Membership Specifies the members of the Ring Group or Paging
3-44 41-001190-02 Rev. 01, Rel. 1.2
Specifies the phone number or extension to transfer
unanswered incoming calls to. Valid values are the
registered phones with their extensions in your
AastraLink Pro 160 network.
Group with their extensions. Only the members
selected become part of the Ring Group or Paging
Group you define. Default is NO MEMBERS.
Page 89

Configuring Aastra IP Phone Accounts
Configuring Groups
Distinctive Ringing (Ring Groups only)
In IP Telephony, different ringing patterns have different frequencies and
cadences. Ring cadence is the ringing pattern heard by the called party, before
they pick up the call. The IP phones use the following Bellcore-specified tones by
default:
Ring Tone Pattern
Call Criteria Bellcore Tones
internal calls Bellcore-dr2
external calls Bellcore-dr3
calls with contact list Bellcore-dr4
calls with specific time frames Bellcore-dr5
Note: Distinctive ring tones apply to SIP extensions only. Any 420d or SIP
phones in a Ring Group receive standard ring tone.
41-001190-02 Rev. 01, Rel. 1.2 3-45
Page 90

AastraLink Pro 160 Administrator Guide
Configuring Groups
The following table identifies the different Bellcore ring tone patterns and
cadences.
Bellcore Tone
(Standard) 1 Ringing
Bellcore-dr2 2 Ringing
Bellcore-dr3 3 Ringing
Bellcore-dr4 4 Ringing
Bellcore-dr5 5 Ringing 450 500 550
Pattern
ID Pattern Cadence
Silent
Silent
Ringing
Silent
Silent
Ringing
Silent
Ringing
Silent
Silent
Ringing
Silent
Ringing
Silent
2s On
4s Off
Long
Long
Long
Short
Short
Long
Short
Long
Short
Minimum
Duration
(ms)
1800
3600
630
315
630
3475
315
145
315
145
630
2975
200
145
800
145
200
2975
Nominal
Duration
(ms)
2000
4000
800
400
800
4000
400
200
400
200
800
4000
300
200
1000
200
300
4000
Maximum
Duration
2200
4400
1025
525
1025
4400
525
525
525
525
1025
4400
525
525
1100
525
525
4400
(ms)
3-46 41-001190-02 Rev. 01, Rel. 1.2
Page 91

Configuring Aastra IP Phone Accounts
Configuring Groups
Example of a Ring Group
The following illustration shows an example of a configured Ring Group.
In the illustration above, a Ring Group named “Support” is defined with three
members:
Extension 200, John Smith
Extension 201, Bob Jones
Extension 202, Dan Whyte
The Ring Group’s “Extension” is 5200; “Voicemail Notification” is set for Email;
“Distinctive Ring” is set for Pattern 3; “Ring Before Transfer” is set to 2; and
“Transfer to” is set to Voicemail.
41-001190-02 Rev. 01, Rel. 1.2 3-47
Page 92

AastraLink Pro 160 Administrator Guide
Configuring Groups
So in the above configuration, when a call comes into the Support Ring Group at
extension 5200, the phones at extension 200, 201, and 202 ring for at least 2 rings
with a specific ring pattern identified for Support. If the incoming call is not
answered within 2 rings, the call is transferred to voicemail so the caller can leave
a message. An email notification of the voicemail is also sent to all three members
email addresses (defined at the location My Phone->Preferences).
Example of a Paging Group
The following illustration shows an example of a configured Paging Group.
3-48 41-001190-02 Rev. 01, Rel. 1.2
Page 93

In the illustration above, a Paging Group named “Marketing” is defined with two
members:
Extension 201, Bob Jones
Extension 202, Dan Whyte
The Paging Group’s “Extension” is 111. A password is also configured for the
Paging Group. So in order for the members of the group to answer a page on their
phone, they must enter the password pin number using their phone’s keypad.
Adding a Group
Use the following procedure to add a new Group.
AastraLink Web UI
Step Action
Configuring Aastra IP Phone Accounts
Configuring Groups
For Ring Groups and Paging Groups
1Select Users->Groups
2 Click <Add Group>
3 In the “Type” field, select the type of group you want to add. Groups types are:
• Ring Group
• Paging Group
4 Specify a name for the group in the “Name” field.
For example: Sales
5 Specify a group extension for the group in the “Extension” field. Valid values are from 1 to 20
alphanumeric characters. For example:
300
or
74992
Note: For more information about assigning extension numbers, se e the section, “Virtual Extension
Numbers (for Ring and Paging Groups)” on page 42.
41-001190-02 Rev. 01, Rel. 1.2 3-49
Page 94

AastraLink Pro 160 Administrator Guide
Configuring Groups
AastraLink Web UI
Step Action
6 (optional) Specify a password for the group in the “Password” field.
For Ring Groups only
7 Select the method you want to use to be notified that a voicemail has been recorded for the user
group, in the “Voicemail Notification” field. Valid values are:
• Off (default - disables voicemail notification)
•Email
• Email with Audio Attach men t
Note: Since Ring Groups use virtual extensions, these extensions do not have an email address. If
the “Voicemail Notification” parameter is enabled, voicemail notifications are sent to the individual
email address for each member of the Ring Group (configured at the location
My Phone->Preferences).
8 Select the distinctive ring pattern you want to apply to this Ring Group, in the “Distinctive Ring”
field. Valid values are:
• None (default - Tone 1)
• Pattern 1 (Tone 2)
• Pattern 2 (Tone 3)
• Pattern 3 (Tone 4)
• Pattern 4 (Tone 5)
Note: For more information about ring tone patterns, see the section, “Distinctive Ringing (Ring
Groups only)” on page 3-45.
9 Set the number of times the phone rings before being transferred in the “Rings Before Transfer”
field.
10 Specify the destination where incoming calls should be transferred in the “Transfer To” field. Valid
values are:
• None (default)
• Extension
• Voicemail
• Auto-Attendant
3-50 41-001190-02 Rev. 01, Rel. 1.2
Page 95

Configuring Aastra IP Phone Accounts
Configuring Groups
AastraLink Web UI
Step Action
11 If you set the “Transfer To” field to Extension, then specify the extension to which incoming calls
should be transferred in the “Transfer Number” field.
For example: 200 (John Smith).
For Ring Groups and Paging Groups
12 In the “Group Membership” field, do one of the following actions:
• To add individual users to the group, click on the user name, then click to move the user
from the Available list to the Members list.
• To add multiple users to the group, press and hold the <Ctrl> key, select the users, then click
to move the user from the Available list to the Members list.
• To add all users to the group, click <Add All>.
13 Click <Save> to save your changes.
Configuring Additional Features for a Paging Group
If you’ve added a Paging Group to the AastraLink Pro, you can enable/disable t he
following Paging and Intercom dial plan options via the Web UI at the location
Configuration->Dial Plan->Settings:
• Allow Barge In
• Play Warning Tone
• Microphone Mute
•Auto-Answer
• Paging Mode for Icom Key
For more information about setting these parameters, see Chapter 4, the section,
“Configuring Paging and Intercom Options” on page 4-50.
41-001190-02 Rev. 01, Rel. 1.2 3-51
Page 96

AastraLink Pro 160 Administrator Guide
Configuring Groups
Editing a Group
Use the following procedure to edit a Group that you have previously configured.
AastraLink Web UI
Step Action
1Select Users->Groups
2 Click on the extension for the Group (Ring Group or Paging Group) that you want to edit.
3 Edit the Group parameters as necessary. To add or delete user group members, do one of the
following actions:
• To add individual users to the group, click on the user name, then click to move the user
from the Available list to the Members list.
• To delete individual users from the group, click o n the user name, then click to remove the
user from the Members list.
• To add all users to the group, click Add All
4 Click <Save> to save your changes
3-52 41-001190-02 Rev. 01, Rel. 1.2
Page 97

Configuring Aastra IP Phone Accounts
Configuring Groups
Deleting a Group
Use the following procedure to delete a Group.
AastraLink Web UI
Step Action
1Select Users->Groups
2 Click on the checkbox(s) for the group (Ring Group or Paging Group) that you want to delete.
3 Click <Delete Selected Groups>
4 When prompted, click <Yes> to confirm your action.
The group you deleted no longer appears on the group list.
Reference
For information about using the the XML Paging feature on the phone, see your
AastraLink Pro 160 Users Guide.
41-001190-02 Rev. 01, Rel. 1.2 3-53
Page 98

AastraLink Pro 160 Administrator Guide
Default Softkeys (Users Menu)
Default Softkeys (Users Menu)
You configure softkey default settings from the Users->Default Softkeys menu.
“Empty” softkeys are not yet configured
Shows which model Aastra IP phone(s)
you are currently configuring
Figure 3-5. Default Softkeys Menu
3-54 41-001190-02 Rev. 01, Rel. 1.2
Page 99

Using the Default Softkeys Menu (User Phone)
Softkeys function exactly like the hard keys on your phone, except they are
programmable. When you press a softkey on your IP phone, an action takes place.
For example, when you press the DND softkey, you enable Do Not Disturb on
your phone.
As administrator, you have the option to change the default softkey settings for
configurable softkeys for each User’s phone. (those that have been assigned a
softkey type, or are empty). You can also determine which softkeys appear in the
softkey list and available to the U s er. That is, you can use the AastraLink Web UI
to:
• Add new softkeys
• Delete softkeys
• Edit a softkey so it performs a different function (for example, change a Park
Call softkey to a Speeddial softkey).
• Customize a User’s softkey option list
Configuring Aastra IP Phone Accounts
Default Softkeys (Users Menu)
Default softkey accounts that the administrator defines are applied only to the
model phone you are configuring.
The Default Softkeys menu lists all Aastra phone’s models that may be connected
to your AastraLink network, and the default softkeys currently configured for
each phone model. If you click on the tab for a specific phone, the menu changes
to show the current softkey configuration for that model phone.
For some model phones, certain softkeys are reserved and cannot be edited. For
example, on the Aastra IP Phone Model 9143i, the first four softkeys are
pre-programmed as follows: Options, Directory, Save, Delete. These softkeys
cannot be edited or deleted by the administrator, or by the user.
Default softkey accounts that the administrator defines are applied to any new
Aastra IP phones of that particular model that you add to your network. That is,
when you initially start up and register an IP phone with the AastraLink Pro 160,
the default softkeys you specify from this menu are programmed automatically on
the IP phone. Later, users have the option to change the default settings, add
additional softkeys or delete softkeys from their own IP phones.
41-001190-02 Rev. 01, Rel. 1.2 3-55
Page 100

AastraLink Pro 160 Administrator Guide
Default Softkeys (Users Menu)
Note: If a user has defined a custom softkey list for an IP phone, then the custom
softkey list is maintained. Any changes made by the administrator to
default softkey settings do not apply to the User’s IP phone.
Softkey Types (User Phone)
Depending on the phone model you are configuring, there are several different
types of softkeys available for you to configure for the IP phones on your
network. Each softkey type performs a different function.
On the AastraLink Web UI, you can configure softkeys for the administrator
phone and the user phones. Softkeys are organized by type into the following
categories:
• Call Settings Softkeys - used to specify how inbound/outbound calls are
handled. For example, Do Not Disturb, or Call Forwarding.
• Applications Softkeys - used to access applications (Voicemail) or phone
menus (the Service menu).
Call Settings
Applications
3-56 41-001190-02 Rev. 01, Rel. 1.2
 Loading...