

Page 1

Aastra 142d
at the Communications Systems
Aastra 800 and OpenCom 100
User Guide
Page 2

Welcome to Aastra
Thank you for choosing this Aastra product. Our product meets the strictest
requirements with regard to quality and design.
The following operating instructions will assist you in using your Aastra 142d
DECT telephone and answer most of the questions that may arise.
If you should require any further technical support or information about other
Aastra products, please first contact the person responsible for your system or get
in touch with your local retailer.
You can also find information about this phone and other products on our website
at http://www.aastra.de or http://www.aastra.com.
We hope you enjoy using your Aastra 142d DECT telephone.
Aastra 800 and OpenCom 100
This user guide applies to the Aastra 800 and OpenCom 100 communications
systems.
The OpenCom 100 product family comprises the OpenCom 130, OpenCom 131,
OpenCom 150, OpenCom 510 and OpenCom X320 communications systems.
If individual features differ on the systems, a reference is made in this user guide.
Page 3

Contents
Using the Aastra 142d Telephone . . . . . . . . . . . . . . . . . . . . . . . . . . . . . . . . . . . . . . . . 1
Appropriate Use . . . . . . . . . . . . . . . . . . . . . . . . . . . . . . . . . . . . . . . . . . . . . . . . . . . . . . . . . . . . 1
Power Supply / Power Failure / Batteries. . . . . . . . . . . . . . . . . . . . . . . . . . . . . . . . . . 2
Safety Information . . . . . . . . . . . . . . . . . . . . . . . . . . . . . . . . . . . . . . . . . . . . . . . . . . . . . . 2
Communications Regulation Information . . . . . . . . . . . . . . . . . . . . . . . . . . . . . . . . . . . . 3
FCC Notices (U.S. Only) . . . . . . . . . . . . . . . . . . . . . . . . . . . . . . . . . . . . . . . . . . . . . . . . . . 3
Health and Safety Information . . . . . . . . . . . . . . . . . . . . . . . . . . . . . . . . . . . . . . . . . . . 4
Industry Canada (Canada only) . . . . . . . . . . . . . . . . . . . . . . . . . . . . . . . . . . . . . . . . . . 4
Overview and Basic Information. . . . . . . . . . . . . . . . . . . . . . . . . . . . . . . . . . . . . . . . . . . . . 5
Authorisation is Required . . . . . . . . . . . . . . . . . . . . . . . . . . . . . . . . . . . . . . . . . . . . . . . . 5
Further Documentation . . . . . . . . . . . . . . . . . . . . . . . . . . . . . . . . . . . . . . . . . . . . . . . . . 5
DECT and GAP . . . . . . . . . . . . . . . . . . . . . . . . . . . . . . . . . . . . . . . . . . . . . . . . . . . . . . . . . .5
MEM Card. . . . . . . . . . . . . . . . . . . . . . . . . . . . . . . . . . . . . . . . . . . . . . . . . . . . . . . . . . . . . . .6
The Headset Socket . . . . . . . . . . . . . . . . . . . . . . . . . . . . . . . . . . . . . . . . . . . . . . . . . . . . . 6
Installation. . . . . . . . . . . . . . . . . . . . . . . . . . . . . . . . . . . . . . . . . . . . . . . . . . . . . . . . . . . . . 7
Unpacking and Setting Up Telephone . . . . . . . . . . . . . . . . . . . . . . . . . . . . . . . . . . . . . . . 7
Scope of Delivery. . . . . . . . . . . . . . . . . . . . . . . . . . . . . . . . . . . . . . . . . . . . . . . . . . . . . . . .7
Setting Up Charging Station . . . . . . . . . . . . . . . . . . . . . . . . . . . . . . . . . . . . . . . . . . . . . 7
Activating Charging Station . . . . . . . . . . . . . . . . . . . . . . . . . . . . . . . . . . . . . . . . . . . . . . . . .8
Activating Mobile Unit . . . . . . . . . . . . . . . . . . . . . . . . . . . . . . . . . . . . . . . . . . . . . . . . . . . . . .9
Important Battery Information . . . . . . . . . . . . . . . . . . . . . . . . . . . . . . . . . . . . . . . . . . . 9
Charging and Discharging . . . . . . . . . . . . . . . . . . . . . . . . . . . . . . . . . . . . . . . . . . . . . . . 9
Commissioning . . . . . . . . . . . . . . . . . . . . . . . . . . . . . . . . . . . . . . . . . . . . . . . . . . . . . . . . . 9
Charging and Usage Times . . . . . . . . . . . . . . . . . . . . . . . . . . . . . . . . . . . . . . . . . . . . .10
Inserting/Removing Batteries . . . . . . . . . . . . . . . . . . . . . . . . . . . . . . . . . . . . . . . . . . .10
Charge Display . . . . . . . . . . . . . . . . . . . . . . . . . . . . . . . . . . . . . . . . . . . . . . . . . . . . . . . . .11
Charge Warning. . . . . . . . . . . . . . . . . . . . . . . . . . . . . . . . . . . . . . . . . . . . . . . . . . . . . . . .12
Aastra 142d with MEM Card . . . . . . . . . . . . . . . . . . . . . . . . . . . . . . . . . . . . . . . . . . . . . . . .12
General Information . . . . . . . . . . . . . . . . . . . . . . . . . . . . . . . . . . . . . . . . . . . . . . . . . . . .12
Operation with/without MEM Card. . . . . . . . . . . . . . . . . . . . . . . . . . . . . . . . . . . . . .12
Inserting MEM Card . . . . . . . . . . . . . . . . . . . . . . . . . . . . . . . . . . . . . . . . . . . . . . . . . . . .13
Removing MEM Card . . . . . . . . . . . . . . . . . . . . . . . . . . . . . . . . . . . . . . . . . . . . . . . . . . .14
Subscribing Mobile Unit . . . . . . . . . . . . . . . . . . . . . . . . . . . . . . . . . . . . . . . . . . . . . . . . . . .14
The “Subscriptions” Menu . . . . . . . . . . . . . . . . . . . . . . . . . . . . . . . . . . . . . . . . . . . . . .15
Creating New Subscription . . . . . . . . . . . . . . . . . . . . . . . . . . . . . . . . . . . . . . . . . . . . .17
Attaching/Removing Belt Clip . . . . . . . . . . . . . . . . . . . . . . . . . . . . . . . . . . . . . . . . . . . . . .19
i
Page 4

Functions. . . . . . . . . . . . . . . . . . . . . . . . . . . . . . . . . . . . . . . . . . . . . . . . . . . . . . . . . . . . . .20
Operational Controls on the Mobile Unit . . . . . . . . . . . . . . . . . . . . . . . . . . . . . . . . . . . 20
Display Elements and Symbols . . . . . . . . . . . . . . . . . . . . . . . . . . . . . . . . . . . . . . . . . . . . . 21
The Display . . . . . . . . . . . . . . . . . . . . . . . . . . . . . . . . . . . . . . . . . . . . . . . . . . . . . . . . . . . .21
Symbols Shown on the Display . . . . . . . . . . . . . . . . . . . . . . . . . . . . . . . . . . . . . . . . . 21
Text Lines. . . . . . . . . . . . . . . . . . . . . . . . . . . . . . . . . . . . . . . . . . . . . . . . . . . . . . . . . . . . . . 22
Softkey Line . . . . . . . . . . . . . . . . . . . . . . . . . . . . . . . . . . . . . . . . . . . . . . . . . . . . . . . . . . . 22
Illumination. . . . . . . . . . . . . . . . . . . . . . . . . . . . . . . . . . . . . . . . . . . . . . . . . . . . . . . . . . . . 22
Softkeys and Other Keys . . . . . . . . . . . . . . . . . . . . . . . . . . . . . . . . . . . . . . . . . . . . . . . . . . .23
Softkey: Arrow Keys . . . . . . . . . . . . . . . . . . . . . . . . . . . . . . . . . . . . . . . . . . . . . . . . . . . . 23
Softkey: OK . . . . . . . . . . . . . . . . . . . . . . . . . . . . . . . . . . . . . . . . . . . . . . . . . . . . . . . . . . . .23
Softkey: Esc . . . . . . . . . . . . . . . . . . . . . . . . . . . . . . . . . . . . . . . . . . . . . . . . . . . . . . . . . . . . 24
Softkey: Redial . . . . . . . . . . . . . . . . . . . . . . . . . . . . . . . . . . . . . . . . . . . . . . . . . . . . . . . . .24
Softkey: Menu . . . . . . . . . . . . . . . . . . . . . . . . . . . . . . . . . . . . . . . . . . . . . . . . . . . . . . . . .24
Call Key . . . . . . . . . . . . . . . . . . . . . . . . . . . . . . . . . . . . . . . . . . . . . . . . . . . . . . . . . . . . . . . . 24
Speaker/Handsfree Key. . . . . . . . . . . . . . . . . . . . . . . . . . . . . . . . . . . . . . . . . . . . . . . . . 24
Info Key. . . . . . . . . . . . . . . . . . . . . . . . . . . . . . . . . . . . . . . . . . . . . . . . . . . . . . . . . . . . . . . . 24
C Key (Delete Key). . . . . . . . . . . . . . . . . . . . . . . . . . . . . . . . . . . . . . . . . . . . . . . . . . . . . . 25
R Key (Signal Key) / Emergency Call Key . . . . . . . . . . . . . . . . . . . . . . . . . . . . . . . . . 25
Hash Key. . . . . . . . . . . . . . . . . . . . . . . . . . . . . . . . . . . . . . . . . . . . . . . . . . . . . . . . . . . . . . . 26
Star Key. . . . . . . . . . . . . . . . . . . . . . . . . . . . . . . . . . . . . . . . . . . . . . . . . . . . . . . . . . . . . . . . 26
Number Keys . . . . . . . . . . . . . . . . . . . . . . . . . . . . . . . . . . . . . . . . . . . . . . . . . . . . . . . . . . 26
Locking Your Telephone Interface . . . . . . . . . . . . . . . . . . . . . . . . . . . . . . . . . . . . . . . . . . 26
The Editor . . . . . . . . . . . . . . . . . . . . . . . . . . . . . . . . . . . . . . . . . . . . . . . . . . . . . . . . . . . . . . . . . 27
Menu Navigation. . . . . . . . . . . . . . . . . . . . . . . . . . . . . . . . . . . . . . . . . . . . . . . . . . . . . . . . . . 28
The Main Menu . . . . . . . . . . . . . . . . . . . . . . . . . . . . . . . . . . . . . . . . . . . . . . . . . . . . . . . . 28
Menus Hide Automatically . . . . . . . . . . . . . . . . . . . . . . . . . . . . . . . . . . . . . . . . . . . . . 29
Basic Functions . . . . . . . . . . . . . . . . . . . . . . . . . . . . . . . . . . . . . . . . . . . . . . . . . . . . . . . .30
Device Functions . . . . . . . . . . . . . . . . . . . . . . . . . . . . . . . . . . . . . . . . . . . . . . . . . . . . . . . . . . 30
Switching Device On/Off . . . . . . . . . . . . . . . . . . . . . . . . . . . . . . . . . . . . . . . . . . . . . . . 30
Key Lock . . . . . . . . . . . . . . . . . . . . . . . . . . . . . . . . . . . . . . . . . . . . . . . . . . . . . . . . . . . . . . . 31
Telephone Lock . . . . . . . . . . . . . . . . . . . . . . . . . . . . . . . . . . . . . . . . . . . . . . . . . . . . . . . . 31
Speaker/Handsfree Use . . . . . . . . . . . . . . . . . . . . . . . . . . . . . . . . . . . . . . . . . . . . . . . . 31
Adjusting Volume During a Call. . . . . . . . . . . . . . . . . . . . . . . . . . . . . . . . . . . . . . . . . 32
Setting Volume for Incoming Calls . . . . . . . . . . . . . . . . . . . . . . . . . . . . . . . . . . . . . . 32
Switching off Ringer. . . . . . . . . . . . . . . . . . . . . . . . . . . . . . . . . . . . . . . . . . . . . . . . . . . . 32
Muting Mobile Unit . . . . . . . . . . . . . . . . . . . . . . . . . . . . . . . . . . . . . . . . . . . . . . . . . . . . 33
Changing Display Contrast . . . . . . . . . . . . . . . . . . . . . . . . . . . . . . . . . . . . . . . . . . . . . 33
Time/Alarm . . . . . . . . . . . . . . . . . . . . . . . . . . . . . . . . . . . . . . . . . . . . . . . . . . . . . . . . . . . .33
Message Display . . . . . . . . . . . . . . . . . . . . . . . . . . . . . . . . . . . . . . . . . . . . . . . . . . . . . . . 33
Emergency Call Key (SOS Number). . . . . . . . . . . . . . . . . . . . . . . . . . . . . . . . . . . . . . 33
ii
Page 5

Connections. . . . . . . . . . . . . . . . . . . . . . . . . . . . . . . . . . . . . . . . . . . . . . . . . . . . . . . . . . . . . . .34
Internal and External Call Numbers . . . . . . . . . . . . . . . . . . . . . . . . . . . . . . . . . . . . .34
Multiple Trunk Keys . . . . . . . . . . . . . . . . . . . . . . . . . . . . . . . . . . . . . . . . . . . . . . . . . . . .34
Multiple Connections. . . . . . . . . . . . . . . . . . . . . . . . . . . . . . . . . . . . . . . . . . . . . . . . . . .34
DTMF Postdial/VF Signalling . . . . . . . . . . . . . . . . . . . . . . . . . . . . . . . . . . . . . . . . . . . .34
Charge Display (Charges) . . . . . . . . . . . . . . . . . . . . . . . . . . . . . . . . . . . . . . . . . . . . . . .35
Transmission of Call Numbers. . . . . . . . . . . . . . . . . . . . . . . . . . . . . . . . . . . . . . . . . . .35
Blocked/Unblocked Call Numbers. . . . . . . . . . . . . . . . . . . . . . . . . . . . . . . . . . . . . . .36
Keypad Dialling . . . . . . . . . . . . . . . . . . . . . . . . . . . . . . . . . . . . . . . . . . . . . . . . . . . . . . . .36
Least Cost Routing (LCR). . . . . . . . . . . . . . . . . . . . . . . . . . . . . . . . . . . . . . . . . . . . . . . .36
Calls in the Call-Waiting Queue . . . . . . . . . . . . . . . . . . . . . . . . . . . . . . . . . . . . . . . . .37
Calls with Booking Numbers . . . . . . . . . . . . . . . . . . . . . . . . . . . . . . . . . . . . . . . . . . . .37
Forwarding Calls . . . . . . . . . . . . . . . . . . . . . . . . . . . . . . . . . . . . . . . . . . . . . . . . . . . . . . .38
Menus. . . . . . . . . . . . . . . . . . . . . . . . . . . . . . . . . . . . . . . . . . . . . . . . . . . . . . . . . . . . . . . . . . . . .40
Menu Before and During a Call. . . . . . . . . . . . . . . . . . . . . . . . . . . . . . . . . . . . . . . . . .40
Menu when Idle . . . . . . . . . . . . . . . . . . . . . . . . . . . . . . . . . . . . . . . . . . . . . . . . . . . . . . . .40
Telephoning. . . . . . . . . . . . . . . . . . . . . . . . . . . . . . . . . . . . . . . . . . . . . . . . . . . . . . . . . . . 42
External/Internal Calling . . . . . . . . . . . . . . . . . . . . . . . . . . . . . . . . . . . . . . . . . . . . . . . . . . .42
External Seizure and Entry of Call Numbers. . . . . . . . . . . . . . . . . . . . . . . . . . . . . .42
Dialling Directly . . . . . . . . . . . . . . . . . . . . . . . . . . . . . . . . . . . . . . . . . . . . . . . . . . . . . . . .43
Pre-dialling . . . . . . . . . . . . . . . . . . . . . . . . . . . . . . . . . . . . . . . . . . . . . . . . . . . . . . . . . . . .43
Redial. . . . . . . . . . . . . . . . . . . . . . . . . . . . . . . . . . . . . . . . . . . . . . . . . . . . . . . . . . . . . . . . . .43
Calling from the Caller Lists . . . . . . . . . . . . . . . . . . . . . . . . . . . . . . . . . . . . . . . . . . . . .45
Using Routes to Make Calls . . . . . . . . . . . . . . . . . . . . . . . . . . . . . . . . . . . . . . . . . . . . .45
Menu during Conversation . . . . . . . . . . . . . . . . . . . . . . . . . . . . . . . . . . . . . . . . . . . . .46
Menu if Subscriber Busy . . . . . . . . . . . . . . . . . . . . . . . . . . . . . . . . . . . . . . . . . . . . . . . .47
Menu during the Call . . . . . . . . . . . . . . . . . . . . . . . . . . . . . . . . . . . . . . . . . . . . . . . . . . .48
Ending a Call . . . . . . . . . . . . . . . . . . . . . . . . . . . . . . . . . . . . . . . . . . . . . . . . . . . . . . . . . . . . . .48
Accepting Calls . . . . . . . . . . . . . . . . . . . . . . . . . . . . . . . . . . . . . . . . . . . . . . . . . . . . . . . . . . . .49
Optical Call Display. . . . . . . . . . . . . . . . . . . . . . . . . . . . . . . . . . . . . . . . . . . . . . . . . . . . .49
Temporarily Switching off Call Signalling . . . . . . . . . . . . . . . . . . . . . . . . . . . . . . . .49
Normal Call . . . . . . . . . . . . . . . . . . . . . . . . . . . . . . . . . . . . . . . . . . . . . . . . . . . . . . . . . . . .49
VIP Calls. . . . . . . . . . . . . . . . . . . . . . . . . . . . . . . . . . . . . . . . . . . . . . . . . . . . . . . . . . . . . . . .50
Calls during a Conversation . . . . . . . . . . . . . . . . . . . . . . . . . . . . . . . . . . . . . . . . . . . . .50
Incoming Call Menu . . . . . . . . . . . . . . . . . . . . . . . . . . . . . . . . . . . . . . . . . . . . . . . . . . . .50
Call Waiting Menu. . . . . . . . . . . . . . . . . . . . . . . . . . . . . . . . . . . . . . . . . . . . . . . . . . . . . .51
Enquiry, Toggling, Transfer and Conference. . . . . . . . . . . . . . . . . . . . . . . . . . . . . . . . .52
Enquiry/Toggle via the R (Signal) Key. . . . . . . . . . . . . . . . . . . . . . . . . . . . . . . . . . . .52
Transferring an Internal/External Call to an Internal Subscriber . . . . . . . . . . .52
Transferring an External Call to an External Subscriber . . . . . . . . . . . . . . . . . . .53
Menu when Subscriber on Hold. . . . . . . . . . . . . . . . . . . . . . . . . . . . . . . . . . . . . . . . .54
iii
Page 6

Three-Party Conference . . . . . . . . . . . . . . . . . . . . . . . . . . . . . . . . . . . . . . . . . . . . . . . . 55
Menu During the Conference . . . . . . . . . . . . . . . . . . . . . . . . . . . . . . . . . . . . . . . . . . . 56
Special Calls/Conversations . . . . . . . . . . . . . . . . . . . . . . . . . . . . . . . . . . . . . . . . . . . . . . . . 57
Callback . . . . . . . . . . . . . . . . . . . . . . . . . . . . . . . . . . . . . . . . . . . . . . . . . . . . . . . . . . . . . . . 57
Accepting an Appointment Call . . . . . . . . . . . . . . . . . . . . . . . . . . . . . . . . . . . . . . . . 57
Baby Call. . . . . . . . . . . . . . . . . . . . . . . . . . . . . . . . . . . . . . . . . . . . . . . . . . . . . . . . . . . . . . . 58
Parking Calls . . . . . . . . . . . . . . . . . . . . . . . . . . . . . . . . . . . . . . . . . . . . . . . . . . . . . . . . . . . 58
Announcements (with and without Intercom). . . . . . . . . . . . . . . . . . . . . . . . . . . 59
Doorbell, Door Opener . . . . . . . . . . . . . . . . . . . . . . . . . . . . . . . . . . . . . . . . . . . . . . . . . 61
Entrance Intercom Calls . . . . . . . . . . . . . . . . . . . . . . . . . . . . . . . . . . . . . . . . . . . . . . . . 62
Voicebox Queries . . . . . . . . . . . . . . . . . . . . . . . . . . . . . . . . . . . . . . . . . . . . . . . . . . . . . .63
Phone Book. . . . . . . . . . . . . . . . . . . . . . . . . . . . . . . . . . . . . . . . . . . . . . . . . . . . . . . . . . . .64
Communications System Phone Books . . . . . . . . . . . . . . . . . . . . . . . . . . . . . . . . . . . . . 64
Calling from the Communications System Phone Book . . . . . . . . . . . . . . . . . . 64
Speed-Dialling . . . . . . . . . . . . . . . . . . . . . . . . . . . . . . . . . . . . . . . . . . . . . . . . . . . . . . . . . 65
Add Phone Numbers from Lists or during a Call . . . . . . . . . . . . . . . . . . . . . . . . . 66
The Local Phone Book of Your Aastra 142d . . . . . . . . . . . . . . . . . . . . . . . . . . . . . . . . . 68
Calling from the Local Phone Book of Your Aastra 142d. . . . . . . . . . . . . . . . . . 68
Editing Local Phone Book Entries of Your Aastra 142d . . . . . . . . . . . . . . . . . . . 68
Features and Menus . . . . . . . . . . . . . . . . . . . . . . . . . . . . . . . . . . . . . . . . . . . . . . . . . . . .70
How to Set Features . . . . . . . . . . . . . . . . . . . . . . . . . . . . . . . . . . . . . . . . . . . . . . . . . . . . . . .70
“Main” Menu . . . . . . . . . . . . . . . . . . . . . . . . . . . . . . . . . . . . . . . . . . . . . . . . . . . . . . . . . . . . . . 70
“Calls” Menu . . . . . . . . . . . . . . . . . . . . . . . . . . . . . . . . . . . . . . . . . . . . . . . . . . . . . . . . . . . 72
“Call forwarding” Menu. . . . . . . . . . . . . . . . . . . . . . . . . . . . . . . . . . . . . . . . . . . . . . . . . 74
“Messages” Menu . . . . . . . . . . . . . . . . . . . . . . . . . . . . . . . . . . . . . . . . . . . . . . . . . . . . . . 76
“Phone Settings” Menu. . . . . . . . . . . . . . . . . . . . . . . . . . . . . . . . . . . . . . . . . . . . . . . . . 78
“Protection” Menu . . . . . . . . . . . . . . . . . . . . . . . . . . . . . . . . . . . . . . . . . . . . . . . . . . . . . 84
“Connections” Menu . . . . . . . . . . . . . . . . . . . . . . . . . . . . . . . . . . . . . . . . . . . . . . . . . . . 86
“Phone book” Menu. . . . . . . . . . . . . . . . . . . . . . . . . . . . . . . . . . . . . . . . . . . . . . . . . . . . 88
“Applications” Menu . . . . . . . . . . . . . . . . . . . . . . . . . . . . . . . . . . . . . . . . . . . . . . . . . . .90
“Central settings” Menu . . . . . . . . . . . . . . . . . . . . . . . . . . . . . . . . . . . . . . . . . . . . . . . . 90
Information Menus . . . . . . . . . . . . . . . . . . . . . . . . . . . . . . . . . . . . . . . . . . . . . . . . . . . . . . . .91
“Info” Menu. . . . . . . . . . . . . . . . . . . . . . . . . . . . . . . . . . . . . . . . . . . . . . . . . . . . . . . . . . . . 91
“Active features” Menu . . . . . . . . . . . . . . . . . . . . . . . . . . . . . . . . . . . . . . . . . . . . . . . . . 92
Installing USB Drivers . . . . . . . . . . . . . . . . . . . . . . . . . . . . . . . . . . . . . . . . . . . . . . . . . .93
Updating Software . . . . . . . . . . . . . . . . . . . . . . . . . . . . . . . . . . . . . . . . . . . . . . . . . . . . . . . .94
PC Tool for Managing the Phone Book . . . . . . . . . . . . . . . . . . . . . . . . . . . . . . . . . . . . . 95
iv
Page 7

Appendix . . . . . . . . . . . . . . . . . . . . . . . . . . . . . . . . . . . . . . . . . . . . . . . . . . . . . . . . . . . . . 96
Important Information on Battery Use . . . . . . . . . . . . . . . . . . . . . . . . . . . . . . . . . . . . . .96
Care and Maintenance . . . . . . . . . . . . . . . . . . . . . . . . . . . . . . . . . . . . . . . . . . . . . . . . . . . . .97
Environmental Properties and Disposal . . . . . . . . . . . . . . . . . . . . . . . . . . . . . . . . . . . . .98
Notes on Disposal . . . . . . . . . . . . . . . . . . . . . . . . . . . . . . . . . . . . . . . . . . . . . . . . . . . . . .98
Declaration of Conformity. . . . . . . . . . . . . . . . . . . . . . . . . . . . . . . . . . . . . . . . . . . . . . . . . .99
Limited Warranty . . . . . . . . . . . . . . . . . . . . . . . . . . . . . . . . . . . . . . . . . . . . . . . . . . . . . . . . . .99
Exclusions. . . . . . . . . . . . . . . . . . . . . . . . . . . . . . . . . . . . . . . . . . . . . . . . . . . . . . . . . . . . . .99
Warranty Repair Services . . . . . . . . . . . . . . . . . . . . . . . . . . . . . . . . . . . . . . . . . . . . . 100
After Warranty Service. . . . . . . . . . . . . . . . . . . . . . . . . . . . . . . . . . . . . . . . . . . . . . . . 100
Technical Data . . . . . . . . . . . . . . . . . . . . . . . . . . . . . . . . . . . . . . . . . . . . . . . . . . . . . . . . . . 101
Menu Tree. . . . . . . . . . . . . . . . . . . . . . . . . . . . . . . . . . . . . . . . . . . . . . . . . . . . . . . . . . . . . . . 103
Index . . . . . . . . . . . . . . . . . . . . . . . . . . . . . . . . . . . . . . . . . . . . . . . . . . . . . . . . . . . . . . . .104
v
Page 8

vi
Page 9

Using the Aastra 142d Telephone
Using the Aastra 142d Telephone
The Aastra 142d is a cordless telephone for operation on the OpenCom 100 /
Aastra 800 communications system. You can also operate your mobile unit on
other communications systems and thus use the same mobile unit at different
locations. Operation on communications systems by other manufacturers is still
possible when they comply with the GAP standard.
The newly designed menus offer you easy handling of your telephone and speedy
access to the wide variety of functions and features of your system.
Features and programme functions can be configured directly on the telephone
and just as conveniently using the Configurator of the OpenCom 100 / Aastra 800
communications system.
Make yourself acquainted with your telephone's capabilities. You will get to know
many new functions which make communication and organization easier for you.
Appropriate Use
This product can be operated on a DECT-GAP-compatible communications system
in all EU member countries. The telephone complies with radio-specific Europeanharmonised DECT standards.
The CE mark on the product confirms conformity with the technical regulations
regarding user safety and electromagnetic compatibility, valid as of the issue date
of the corresponding Declaration of Conformity according to European Directive
99/5/EC. The Declaration of Conformity can be viewed on the Aastra internet
homepage.
This device remains approved for use in North America (USA and Canada). Please
refer to the safety information under Communications Regulation Information
starting on page 3.
Please use the other included documentation on parts of your communications
system.
As is the case with any cordless telephone, this mobile unit uses radio signals
which do not guarantee a connection under all circumstances. This is why you
should never completely rely on cordless telephones for essential communication
(e.g. for medical emergencies).
1
Page 10

Using the Aastra 142d Telephone
Power Supply / Power Failure / Batteries
This product requires a 100V to 240V alternating current power supply for operating the charging station. When you wish to disconnect the charging station from
the power supply, pull the power supply unit plug out of the mains socket.
If there is a power outage, all memory data (programme and user data) are saved
on the mobile unit without alteration.
Please refer to page 96 for important information on battery use.
Safety Information
The charging station may only be set up and operated within a closed building.
Place the charging station on an anti-slip mat.
Do not set up the charging station and mobile unit near:
■ water, moisture or damp places
■ heat sources, direct sunlight or unventilated places
■ devices which generate powerful magnetic fields
■ places where the device can be covered up or liquid can get in
■ dusty places and places subject to vibrations, shocks or extreme temperature
fluctuations.
Please be sure to note the following when setting up, connecting and operating
the telephone:
■ Position the connecting cable where it will not cause an accident!
■ Be sure to only connect the connecting cable into appropriate sockets.
■ Connect only approved accessories.
■ Use the supplied AC adapter (ID No.: 23-001071-00) only.
■ Do not use any power supply that is visibly damaged (ruptures, housing
cracks).
■ Research has demonstrated that in certain cases medical devices can be
affected by portable telephones (DECT) that are switched on. This is why when
within medical institutions you should be sure to comply with the regulations
of the respective institution when using portable telephones.
■ Do not hold the telephone in the hands-free mode next to your ear as the
volume can be very high.
2
Page 11

Using the Aastra 142d Telephone
WARNING! Never
– open the charging station or the mobile device (aside
from the battery compartment lid)!
– touch the plug contacts with sharp, metal objects!
– carry the charger by the connecting cable!
■ Only use a slightly damp or an anti-static cloth to clean your telephone. Never
use a dry cloth. Never use cleansing agents.
■ Do not use your telephone in areas at risk of explosion.
■ Set up and keep mobile device and accessories outside the reach of children.
Note for Persons Wearing Hearing Aids
Persons wearing hearing aids should keep in mind that when using the mobile
device at sufficient volume, the resulting radio signal interference produces an
unpleasant humming noise.
Communications Regulation Information
FCC Notices (U.S. Only)
This device complies with part 15 of the FCC Rules. Operation is subject to the following two conditions:
(1) This device may not cause harmful interference, and (2) this device must accept
any interference received, including interference that may cause undesired operation.
Modifications not expressly approved by this company could void the user’s
authority to operate the equipment.
NOTE: This equipment has been tested and found to comply with the limits for a
Class B digital device, pursuant to Part 15 of the FCC Rules. These limits are
designed to provide reasonable protection against harmful interference in a residential installation. This equipment generates, uses and can radiate radio frequency energy and, if not installed and used in accordance with the instructions,
may cause harmful interference to radio communications. However, there is no
guarantee that interference will not occur in a particular installation. If this
equipment does cause harmful interference to radio or television reception, which
can be determined by turning the equipment off and on, the user is encouraged
to try to correct the interference by one or more of the following measures:
3
Page 12

Using the Aastra 142d Telephone
■ Reorient or relocate the receiving antenna.
■ Increase the separation between the equipment and receiver.
■ Connect the equipment into an outlet on a circuit different from that to which
the receiver is connected.
■ Consult the dealer or an experienced radio/TV technician for help.
Health and Safety Information
Exposure to Radio Frequency (RF) Signals:
The wireless phone is a radio transmitter and receiver. It is designed and manufactured not to exceed the emission limits for exposure to radio frequency (RF)
energy set by the Federal Communications Commission (FCC) of the U.S. Government. These limits are part of comprehensive guidelines and establish permitted levels of RF energy for the general population. The guidelines are based on
the safety standards previously set by both U.S. and international standards
bodies. These standards include a substantial safety margin designed to assure the
safety of all persons, regardless of age and health.
This device and its antenna must not be co-located or operating in conjunction
with any other antenna or transmitter.
This EUT has been shown to be capable of compliance for localized specific
absorption rate (SAR) for uncontrolled environment/general population exposure
limits specified in ANSI/IEEE Std. C95.1-1992 and had been tested in accordance
with the measurement procedures specified in FCC/OET Bulletin 65 Supplement C
(2001) and IEEE 1528-2003.
Industry Canada (Canada only)
Operation of this device is subject to the following two conditions: (1) this device
may not cause interference, and (2) this device must accept any interference,
including interference that may cause undesired operation of the device.
Privacy of communications may not be ensured when using this telephone.
Exposure to Radio Frequency (RF) Signals:
The wireless phone is a radio transmitter and receiver. It is designed and manufactured not to exceed the emission limits for exposure to radio frequency (RF)
energy set by the Federal Communications Commission (FCC) of the U.S. Government. These limits are part of comprehensive guidelines and establish permitted levels of RF energy for the general population. These guidelines are based
on the safety standards previously set by international standard bodies. These
standards include a substantial safety margin designed to assure the safety of all
persons, regardless of age and health.
4
Page 13

Using the Aastra 142d Telephone
This device and its antenna must not be co-located or operating in conjunction
with any other antenna or transmitter.
This device has been shown to be capable of compliance for localized specific
absorption rate (SAR) for uncontrolled environment / general public exposure
limits specific in ANSI/IEEE C95.1-1992 and had been tested in accordance with the
measurement procedures specified in IEEE 1528-2003.
Overview and Basic Information
Authorisation is Required
Most of the features mentioned in this manual can only be used when you have
the corresponding user authorisation. Your system administrator configures
authorisations when configuring the communications system.
Contact the system administrator when you have questions on specific features or
are not able to use a feature satisfactorily.
Further Documentation
Please use the other included documentation on parts of your communications
system. This documentation is on the OpenCom 100 product CD (on the USB stick
that comes with an Aastra 800).
The Glossary
This user guide describes all the basic functions of your telephone. Should you
require further information on the system's features, please refer to the glossary
provided with your communications system.
DECT and GAP
A digital radio connection is established between the mobile unit and the base
station (Radio Fixed Part, RFP) in accordance with the DECT standard (DECT =
Digital Enhanced Cordless Telecommunications). The digital channel ensures the
best voice quality without static or background noise. The Generic Access Profile
(GAP) is used for signalling between the communications system and the mobile
unit.
The Generic Access Profile (GAP) and the DECT standard define procedures
according to which digital cordless telephones can establish connections. The
GAP standard applies independent of manufacturer, meaning that communications systems and mobile units of various manufacturers can be combined. The
5
Page 14

Using the Aastra 142d Telephone
basic functions (telephoning, accepting calls) are always available in these combinations; other functions (e.g. displaying the call number on the display, displaying
connection charges) which your OpenCom 100 / Aastra 800 communications
system provides along with your mobile unit, may not be available with other
manufacturers’ communications systems. Please consult the corresponding manufacturer’s user guide or contact your system administrator.
Information on Transmission Quality
■ Due to digital transmission within the frequency range used – even within
range depending on the structural environment – dead spots can result. In this
case, transmission quality can be lessened by increased and brief transmission
gaps. A slight movement outside the dead spot will re-establish the usual
transmission quality. When a caller goes out of range, the connection is
disconnected.
■ In order to avoid radio-related interference with other electronic devices, we
recommend as great a distance as possible (minimum of 1 m) between the
charger or mobile unit and other devices (e.g. radios, loudspeakers, etc).
MEM Card
The Aastra 142d is equipped with a memory card (MEM card). The MEM card stores
the check-in data of the device, the user name, the display language, a local
directory and the device identification (IPEI = International Portable Equipment
Identity). This means that when switching devices by inserting the MEM card into
another device, this data is available on the other device and calls can be made
immediately (without checking in again).
The MEM card is inserted into the battery compartment below the battery. For
safety reasons, the device has an additional battery compartment lock. If the
MEM card is enclosed separately, you have to insert it in the battery compartment
below the battery. Please refer to the chapter Aastra 142d with MEM Card starting
on page 12 for information on how to insert the MEM card into the Aastra 142d.
The Headset Socket
The mobile unit has a 2.5 mm socket for connecting a headset. The Aastra headset
accessory only must be used in order to comply with the electrical values.
6
Page 15

Installation
Installation
There are several steps involved when commissioning for the first time, described
in the following sections. These steps comprise these key words:
1. Unpacking telephone, checking scope of delivery and setting up charging
station
– described under Unpacking and Setting Up Telephone starting on page 7.
2. Open telephone, insert MEM card (optional), insert batteries and charge
batteries – described under Activating Mobile Unit starting on page 9 and
Aastra 142d with MEM Card starting on page 12.
3. Switch on telephone and subscribe it on a communications system or on a GAP
base station – described under Subscribing Mobile Unit starting on page 14.
Please read the following sections first before beginning with first-time commissioning.
Unpacking and Setting Up Telephone
Scope of Delivery
The packaging contains:
■ Aastra 142d mobile unit
■ charging station
■ AC adapter (ID No.: 23-001071-00)
■ three batteries
■ MEM card (please refer to Aastra 142d with MEM Card starting on page 12 also)
■ belt clip
■ short user guide
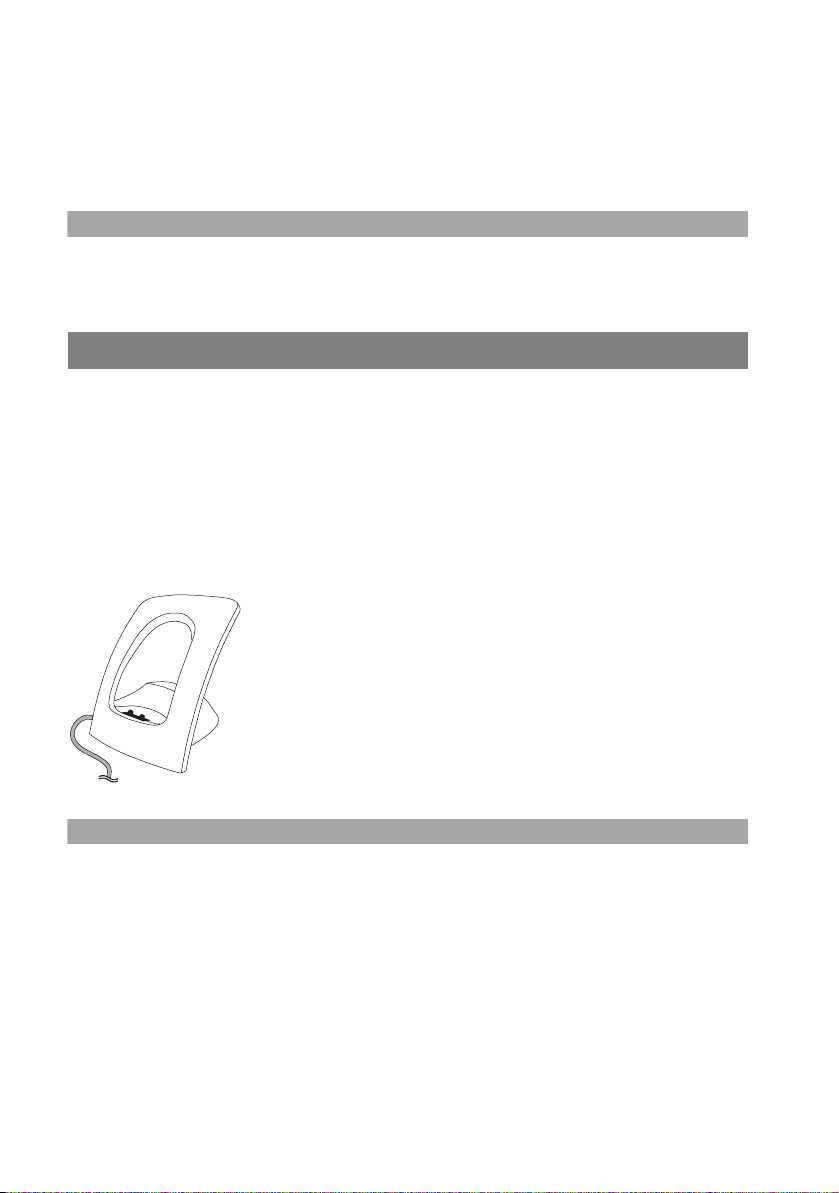
Setting Up Charging Station
Your telephone is made for normal usage conditions. Today’s furniture is coated
with a sheer myriad of lacquers and plastics and treated with various lacquer care
products. It is possible that some of these materials contain components which
can attack and deteriorate the plastic feet of the charging station. The device feet
altered by these foreign substances may leave undesirable marks on furniture
surfaces.
7
Page 16
Installation
For understandable reasons, the manufacturer cannot assume liability for these
types of damage. This is why you should use an anti-slip mat under your charging
station – particularly with furniture that is new or has been freshened up with
lacquer care products.
Note
Please make sure you do not set up the charging station in the space where
doors or windows open: Damage Risk!
Activating Charging Station
Safety precaution
Only use the AC adapter with the ID No.: 23-001071-00 type designation as
intended for the charging station!
The power supply unit is suitable for 100V to 240V alternating current (50 - 60 Hz).
It comes with 4 interchangeable adapters so it can be used practically anywhere
worldwide. As needed, put the connector onto the power supply used in your
country.
Position the switch on the power supply at OPEN and slide
the connector in place upwards and off. Stick the desired
new connector into the power supply and push it downwards until it clicks into place.
Insert the power cable into the socket on the charging
station and then the AC adapter into a mains socket.
Power Supply
Note
If the AC adapter is not connected or there is a power failure your charging
station is not operable. A mobile unit on the charging station which is not
connected to the mains socket remains switched on and discharges during the
stand-by time.
8
Page 17

Installation
Activating Mobile Unit
Important Battery Information
Use batteries only as intended. Never use a battery that is damaged or used.
Heat or cold reduce the battery performance and life span. A mobile unit with hot
or cold batteries may be temporarily inoperable even though they are fully
charged.
Dispose of used batteries in accordance with local government requirements. Be
sure to recycle them!
Never throw batteries into a fire.
Charging and Discharging
A battery can be charged and discharged hundreds of times but is used up at
some point. If the operation time (i.e. calling and stand-by time) becomes significantly shorter than normal, it is time to replace the batteries.
In order to attain long operation times, batteries should be discharged from time
to time by removing the mobile unit from the charging station and leaving it
switched on until it switches itself off. Only use this method for discharging batteries.
Extreme temperatures affect the charging capacity of the battery.
Commissioning
Load the battery ca. 5 to 6 hours before using the mobile unit for the first time.
This precautionary measure helps extend the battery life span. Maximum battery
performance is achieved only after three to five charge and discharge cycles. Place
the mobile unit regularly onto the charger to charge the battery optimally.
Observe the correct polarity when replacing the batteries (see page 10).
Note
It is strictly mandatory to use only those battery types approved by the
manufacturer. If other battery types are used, the manufacturer assumes no
liability for any defective functioning or damages occurring.
The batteries have to be charged first for your mobile unit to be operational. Now
you can subscribe the mobile unit (see Subscribing Mobile Unit starting on
page 14). Then you can use your mobile unit to make a call.
9
Page 18

Installation
Charging and Usage Times
■ Charging time: (fully discharged batteries) to full capacity in 5 to 6 hours
■ Talk T i me:
up to 18 hours (fully charged) for North America
up to 15 hours (fully charged) for other countries
■ Stand-by Time:
up to 125 hours (fully charged) for North America
up to 140 hours (fully charged) for other countries
Note
Batteries whose charge level is unknown take ca. 14 hours to fully charge.
Poor radio connections (large distance from system radio station) reduce the
stand-by and talk time of the mobile unit. High speaker or ringer signal volume,
frequently activated key and display lighting as well as activated vibration alarm
are also features decisive in reducing stand-by and talk times.
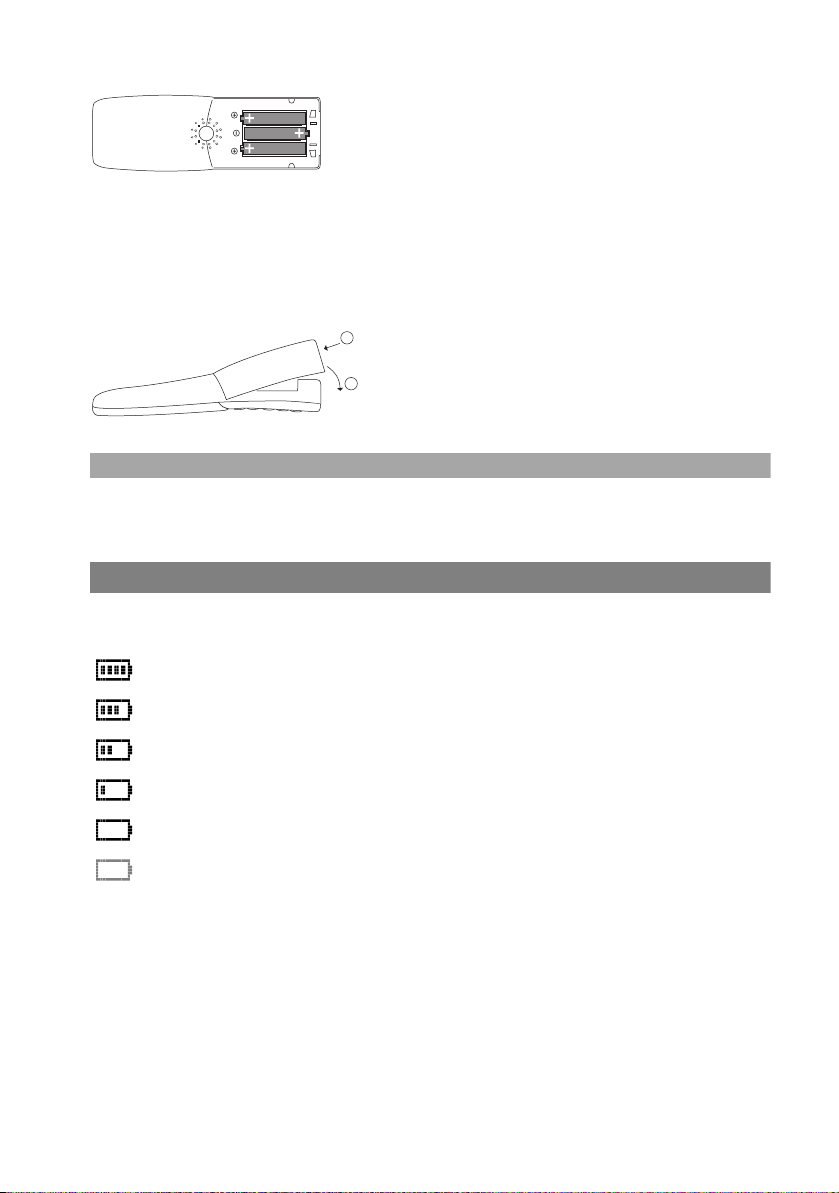
Inserting/Removing Batteries
There is a battery compartment on the lower side of the mobile unit for the three
included AAA batteries. The appendix contains important information on battery
use (see page 96).
Proceed as follows to insert and remove the battery pack:
Opening the battery compartment
To unlock the battery compartment cover, use a pointed object (e.g. a ballpoint
pen) and push it into the hole at the bottom of the handset (1). Lift away the cover
at the same time as illustrated (2).
2
1
Inserting the three batteries (note polarity)
Observe the correct polarity of the batteries. The + - marking in the battery compartment must be aligned with the + - marking on the batteries. Batteries can be
inserted without force. If batteries are inserted with incorrect polarity, this may
damage the device.
10
Page 19
Installation
Closing the battery compartment
After inserting the MEM card (please refer to page 12), position the battery compartment cover slightly diagonally as shown (1) and flip it downwards (2) until it
has clearly clicked into place.
1
2
Note
Switch off the mobile unit before removing the batteries as there may be a loss of
data otherwise.
Charge Display
The charging status of the battery is shown on the display. The following means:
81 - 100% charged
61 - 80% charged
41 - 60% charged
21 - 40% charged
0 - 20% charged
(Frame flashes) Battery nearly discharged,
warning tone issued
Your handset has a “battery management system” that must determine the limits
of the battery charging status before it can display an accurate charge level.
When the battery has been replaced, the charge level is not correctly displayed until a whole charge and discharge cycle has been completed.
11
Page 20

Installation
Charge Warning
When the battery capacity is nearly exhausted, the battery symbol will flash in the
display and you hear a 3-beep acoustic warning signal every minute. If you are
making a call at the time, you have 5 minutes to complete the call before the
mobile unit shuts itself off. If you are not making a call and the handset is not in the
charging station, “Battery empty” appears on the display. You can no longer make
a telephone call now.
NiMH batteries only, never use common batteries / primary cells (see
page 96).
Note
You can replace your mobile unit back onto the charging station after each call.
The charging process is controlled electronically so that batteries at whatever
charge level are optimally and carefully charged. Avoid removing the batteries for
no particular reason from the mobile unit as this impairs the optimal charging
process. The capacity of the batteries used can be improved when after more
lengthy usage periods the batteries are fully discharged and then fully recharged
(see also page 9).
Aastra 142d with MEM Card
General Information
The Aastra 142d can be equipped with a memory card (MEM card). The MEM card
stores the local directory, the display language, the user name and the check-in
data as well as the device identification (IPEI = International Portable Equipment
Identity). This means that when switching devices by inserting the MEM card into
another device, this data is available on the other device and calls can be made
immediately (without checking in again).
Operation with/without MEM Card
The Aastra 142d when commissioning for the first time, without a MEM card, is
also fully operational (without the above mentioned advantages). However, if you
have inserted a MEM card (which also already adopted the telephone’s data), then
removing it causes the Aastra 142d to become non-functional until a programmed
MEM card is inserted.
Programmed MEM card means: a MEM card that has been inserted in another
device or a MEM card that has been especially prepared by the service department
(e.g. as replacement).
12
Page 21
Installation
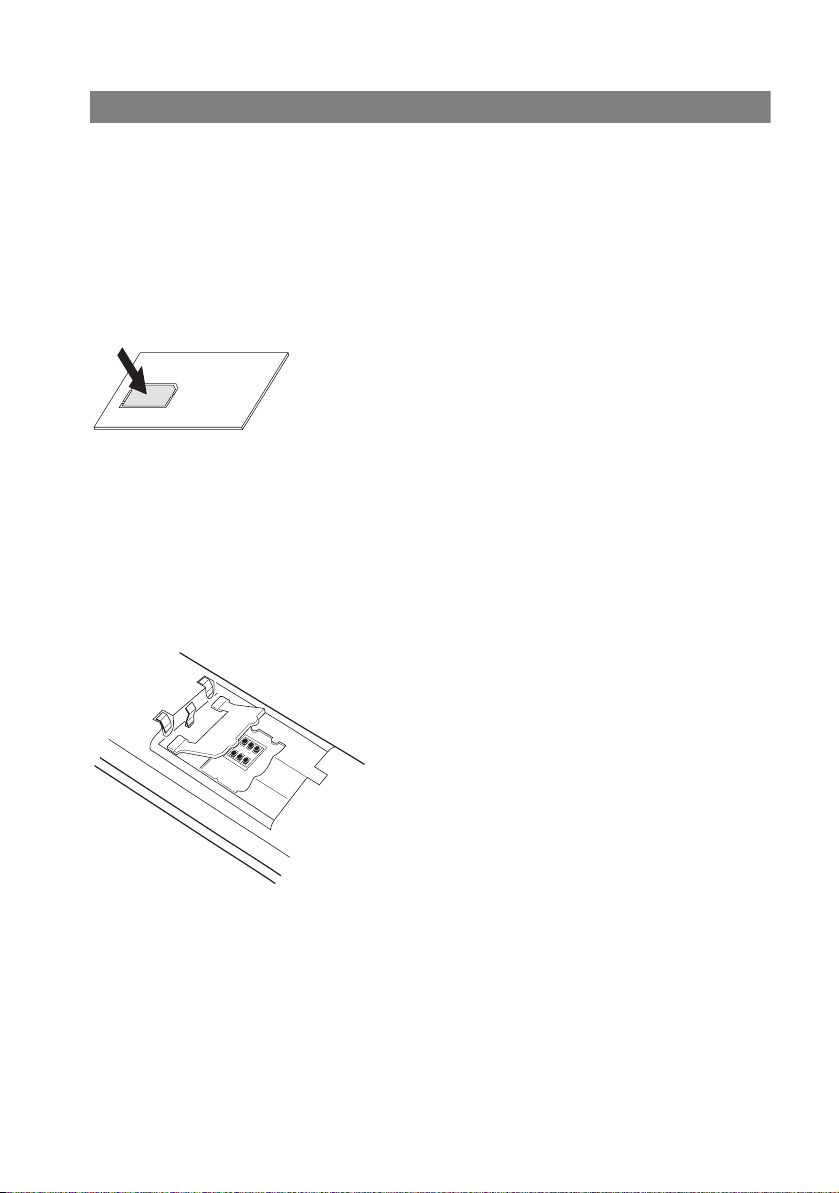
Inserting MEM Card
Safety precaution!
The MEM card must be handled with a great deal of care. The contacts must be
free of dust, moisture, grease, etc. Do not store the MEM card in warm areas (e.g.
direct sunlight). Do not bend the MEM card; the contacts can be broken.
The MEM card is inserted into the battery compartment below the battery.
1. Using your finger, first remove the small MEM card from the larger frame.
2. Open the battery compartment (see page 10) and remove the batteries (if
these have already been inserted).
3. Slide the MEM card cover in the battery compartment in the arrow direction
(OPEN). Gently pivot the cover upwards.
Note: Never touch the shiny gold contacts now visible! Static discharge
can cause the device to become defective.
4. Slide the MEM card (with the contacts facing downwards) under the half-moon
holders (a) in the MEM card compartment. Ensure that the bevelled edge of the
MEM card is to the bottom left while doing so.
5. Press the MEM card down until it audibly locks into place.
13
Page 22

Installation
a
2
1
b
6. Close the MEM card compartment with the cover. Slide the cover notches into
the case until the cover is completely covering the MEM card.
7. Insert the batteries and close the battery compartment (see page 10).
Removing MEM Card
It is only necessary to remove the MEM card if you pass the mobile unit on to
someone or if you need the MEM card for a new mobile unit.
After having removed the batteries (see page 10):
1. Slide the MEM card cover in the battery compartment in the arrow direction
(OPEN). Gently pivot the cover upwards.
2. Use a pointed object to push onto the release (b), see diagram on page 14.
3. Take the MEM card out.
Subscribing Mobile Unit
Your mobile unit can be operated on a maximum of 10 different communications
systems. To do so, it has to be subscribed to each system, i.e. subscribed and
checked in.
The subscription procedure is usually done when commissioning the device. This
is usually done by your system administrator for you when operated on the
OpenCom 100 / Aastra 800 communications system. Subscribing is done via the
following steps:
1. Switch on the mobile unit. To do so, press the
When commissioning for the first time, the Language menu appears. Use
the
F arrow keys to select the desired display language. Confirm with the D
key or with the
14
OK
softkey.
C key.
Page 23

Installation
2. When commissioning for the first time, the Subscriptions menu automatically
appears on the display with the No Subscription notification. Press the
New
softkey to start subscription (please refer to page 17).
If you do not wish to immediately start checking in, after a few seconds No
system appears on the mobile unit on the idle display. In this case, call the
“Subscription” menu on the mobile unit to create a new subscription entry
(please refer to page 15).
3. Subscription if the mobile unit is already subscribed to one or more
communications systems: select a subscription entry to be used for checking in
(see Managing existing subscription starting on page 80).
After completion of this process, the mobile unit is ready for operation.
The following applies to other manufacturers’ communications systems:
Subscribe your mobile unit with the communications system as described in the
manufacturer manual.
If you wish to subscribe your mobile unit to another communications system,
please consult the corresponding documentation. If you wish to subscribe the
mobile unit to another GAP-compatible system, the system, however, is refusing to
do so, please activate the “GAP only” feature in the “Phone settings > System >
Subscriptions” menu (see page 81). GAP-protocol compliant features only are
available with this setting. When operating a system terminal on the
OpenCom 100 / Aastra 800 communications system, this feature must not be activated!
The “Subscriptions” Menu
The content of the Subscriptions menu and the position of this menu entry
depend on the current subscription state. Access to the Subscriptions menu
differs and depends on whether
■ the mobile unit has no subscription yet, such that the device cannot be
checked in either (see page 15),
■ or the mobile unit is already checked in on a communications system (see
page 16).
No Subscription
When doing first-time commissioning or if all subscriptions have been deleted,
start the subscription to a communications system with the following steps:
15
Page 24

Installation
Menu
Press softkey.
F Use the arrow keys to select the System menu entry.
OK
OK
New
Mobile unit is already checked in to the communications system
During normal operation, the mobile unit menus are adapted to the communications system. To manage a subscription or start a new subscription, use the following steps:
Menu
Press softkey. The Subscriptions menu entry is now selected in the
System menu.
Press softkey. The Subscriptions menu opens. No Subscriptions
appears on the display.
Press softkey to begin subscription. The procedure is identical to
the one described in the Start Subscription section on page 17.
Press softkey (long key press)
F Use the arrow keys to select the Phone settings menu entry.
OK
Press softkey
F Use the arrow keys to select the System menu entry.
OK
Press softkey. The Subscriptions menu entry is now selected in the
System menu.
OK
Press softkey. A list of the names of the communications systems
where the mobile unit is already subscribed is displayed in the Sub-
scriptions menu. In addition, the Auto.Search menu entry is
available.
F Use the arrow keys to select one of the entries.
Option
OK
16
Press softkey. The New menu entry is now selected in the
Subscriptions menu.
Press softkey to begin the new subscription. The procedure is
identical to the one described in the Start Subscription section on
page 17.
Page 25

Installation
Note
You may select an existing subscription entry and change its settings in the
Subscriptions menu. Please refer to the Managing existing subscription starting
on page 80 section for information.
Creating New Subscription
The subscription of the mobile unit to a communications system is necessary for
the mobile unit to check in to the communications system. A further requirement
is that the communications system can establish a radio connection to the mobile
unit (PP = Portable Part) via one or more connected radio stations (RFP = Radio
Fixed Part).
When you wish to subscribe the mobile unit, you must configure a new DECT
configuration entry in the communications system. The IPEI (International
Portable Equipment Identity) of the mobile unit is required for this configuration
entry. The IPEI is displayed on the mobile unit at the beginning of subscription (see
the following “Start Subscription” section).
Start Subscription
You hav e selected the New menu entry in the Subscriptions menu (please refer to
the sections No Subscription on page 15 and Mobile unit is already checked in to
the communications system on page 16).
Now conduct the subscription with the following steps:
The mobile unit IPEI appears. Read the IPEI and enter it into the
communications system Configurator. Enter the desired authentication code (AC = Authentication Code) into the Configurator as
well.
OK
Press softkey to continue.
Z Enter PARK: now enter the PARK of the communications system.
The PARK (Portable Access Right Key) identifies the communications system. You can view this number in the communications
system Configurator.
If there are no other communications systems within radio range
and you have activated simplified registration on the communications system, you can continue without entering a PARK.
OK
Press softkey to confirm and continue.
17
Page 26

Installation
Z Enter Auth.Code: now enter the maximum 8-digit code that you
entered into the communications system Configurator.
OK
The mobile unit begins checking in and displays Searching for a DECT System.
This procedure should be completed very quickly. If the entries are not correct or
the radio connection is inadequate, a progress bar appears on the mobile unit. In
this case, cancel the procedure using the
with corrected entries.
Note
When you prefix authentication code entry with the star key, the mobile unit will
be checked in as a GAP device.
Tip: The length and quality of the authentication code used
After checking in successfully, you can enter name and number for the new subscription entry. Confirm with the
Note
If you wish to subscribe the mobile unit to a GAP base station for instance, the
process is often started with a simplified procedure. In many cases, press a key on
the GAP base station to open a subscription time frame. During the time frame,
start the simplified subscription and confirm all requirements on the mobile unit
with the
Press softkey to confirm and continue.
depends on your security requirements. Please keep in mind
that the memory required for the authentication code
increases 4 bits per additional digit.
Ok
softkey.
OK
softkey.
Esc
softkey and repeat the subscription
18
Page 27
Installation
Attaching/Removing Belt Clip
1. Slide the adapter clip over the back of the mobile unit
until the clip snaps into place in the side openings.
Pull the clip slightly apart to remove it.
2. Attaching belt clip: press – as shown – the upper end
of the belt clip together, slide it over the belt, and let
go of the end of the clip.
3. Securing mobile unit: slide your mobile unit with the
adapter ring into the belt clip until it clicks into place.
4. Removing mobile unit: press the release and pull the
mobile unit upwards out of the belt clip.
1
2
3
4
2
19
Page 28
Functions
Functions
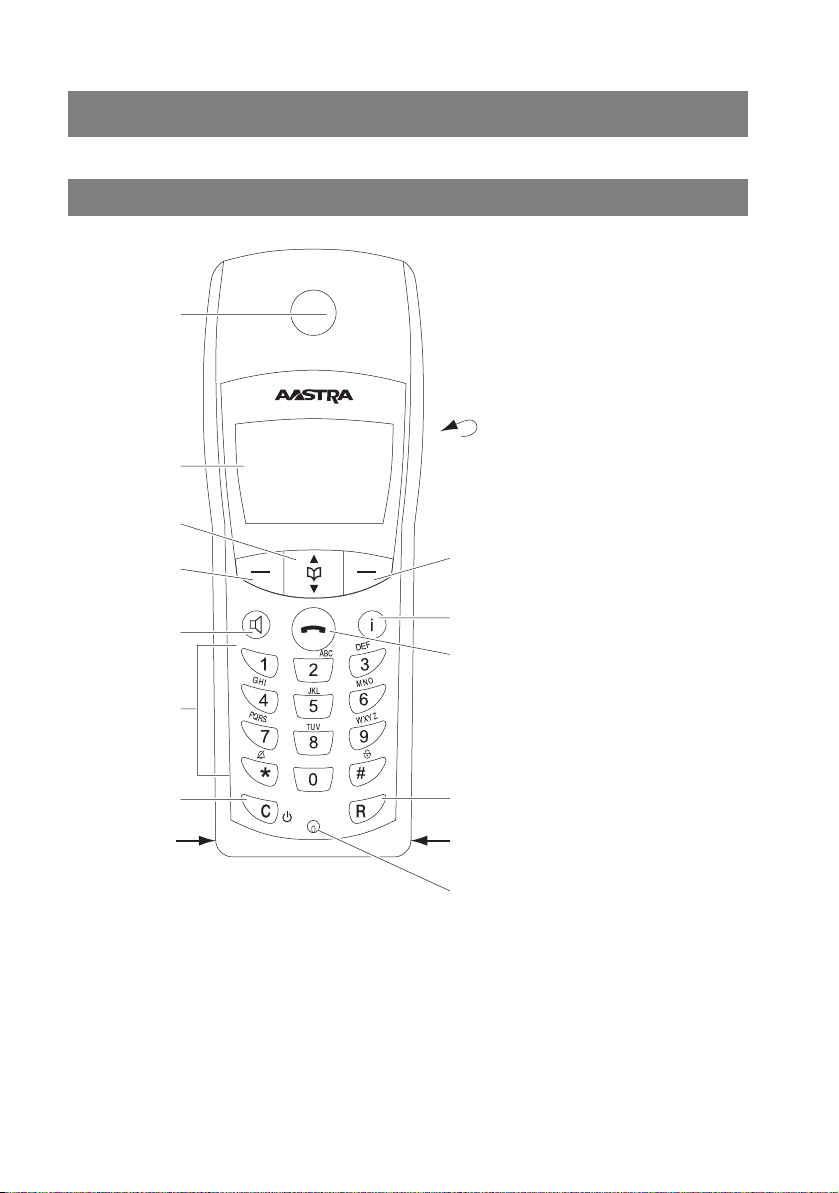
Operational Controls on the Mobile Unit
Receiver
on the back:
Display
Arrow keys
Softkey
Loudspeaker
Softkey
Speaker/
Handsfree Key
Keypad
C key (Delete key)
SOS
Headset socket USB port
Operational Controls on the Aastra 142d
20
Info key
Receiver key
R key (Signal key)
Emergency call key
Mikrofon
Page 29
Functions
Display Elements and Symbols
The Display
¢
œ
OpenCom 100
125
Smith
25.10.08
10:00
Menu ¤¬
Display on the Aastra 142d
1 symbol line (see page 21)
2 symbol lines (see page 22)
3 symbol lines (see page 22)
Symbols Shown on the Display
Quality of the radio connection (four bars: reliable radio connection; only
one bar: unreliable radio connection)
1
2
3
Connection status (call key was pressed)
Connection status (speaker/handsfree is activated)
Microphone is switched off and can be switched on
Microphone is switched on and can be switched off
Ringer switched off
Charging status of batteries (see Charge Display starting on page 11)
Keypad lock is switched on and can be switched off
Redial list
You have received messages (short messages, e-mail).
You have received a voicebox message. This requires a voicemail system
to be connected to your communications system. The symbol is only
visible if there is no active connection to the communications system.
21
Page 30
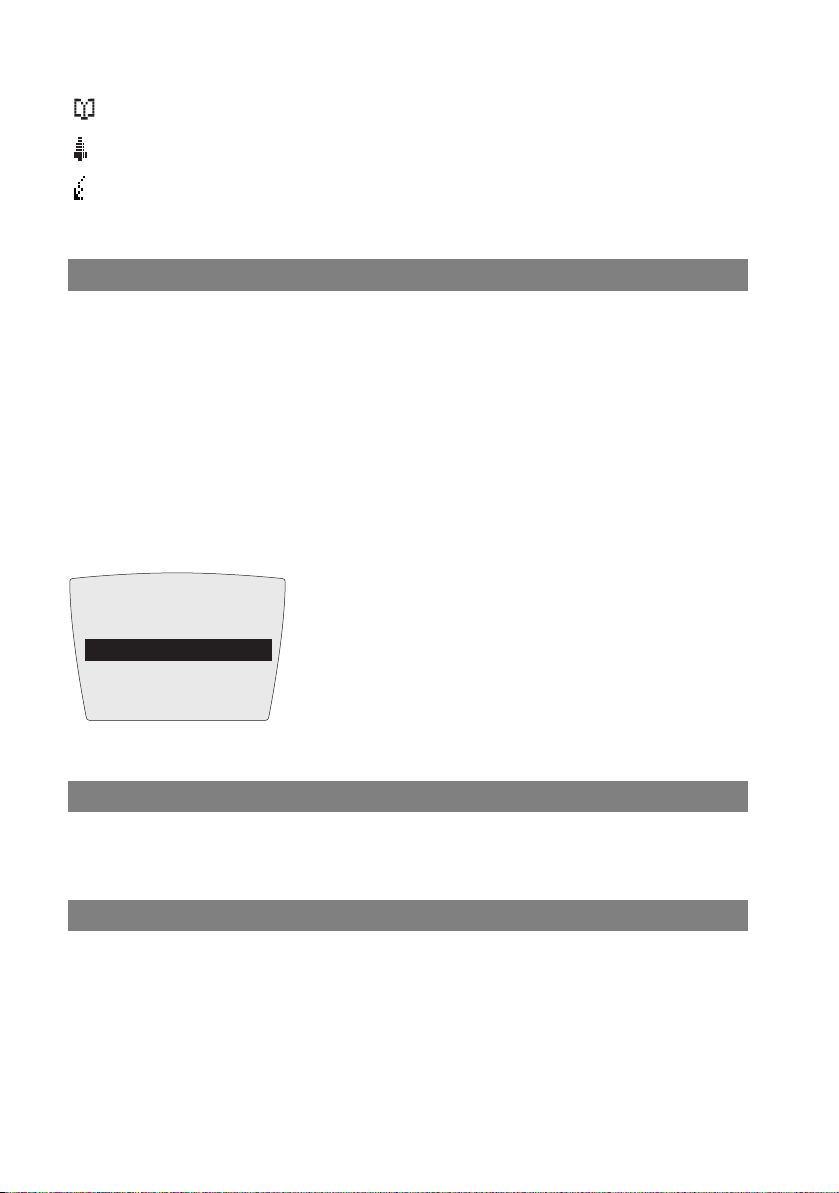
Functions
Telephone book (see page 64)
You have programmed and activated a local alarm (see page 78).
You have activated a feature that impairs your reachability: Call diversion
immediately, Call protect.
Text Lines
The three middle lines of the five-line display shows information on the current
connection state or menu lists and texts.
In the idle state you see the name of the communications system, the internal call
number of the mobile unit, the programmed user name and the current time. A
programmed alarm is still shown. In the call state, you see the call number or the
name of the caller/called subscriber on the display.
Pick-lists (e.g. phone book) and the menu for the features are displayed in three
line extracts on the display. Use the arrow keys to scroll up or down. A selectable
entry appears with a dark background.
OpenCom 100
Calls
Call forwarding
Messages
OK Esc
‘
Text Lines on the Aastra 142d
Softkey Line
The texts and symbols in this line refer to the keys underneath. The contents of the
line change according to the operating status.
Illumination
The display is automatically illuminated when calls are received or when you press
a key. The illumination is automatically switched off again ten seconds after the
last key was pressed.
22
Page 31

Functions
Softkeys and Other Keys
The three keys below the display as well as the arrow keys are called softkeys. The
functions assigned to the keys are shown in the lowest line of the display. The key
function automatically changes depending on the respective operation state of
the mobile unit.
Softkey: Arrow Keys
Above the arrow keys you will see symbols that identify the individual functions of
the arrow keys:
The up arrow key allows you to select telephone numbers from the
phone book of your communications system.
The down arrow key allows you to select telephone numbers from
the local phone book of your communications system.
When you are entering call numbers or texts, you can make
changes by moving a cursor. The arrow keys allow you to move the
cursor to the beginning or end of the entry.
If a pick-list (e.g. phone book or menu) is displayed, you can use the
arrow keys to scroll to the desired entry.
If a continuous text is shown (e.g. a message), you can scroll up and
down through the text with the arrow keys.
During a call you can change the volume of the receiver/headset or
of the loudspeaker using the arrow keys.
Softkey: OK
Use the OK softkey to confirm the selected function.
If a function only has one quick-switch option, it is operated by this key. On the
display, active settings (ON) are indicated by a “ ” next to the relevant item;
inactive settings (OFF) are indicated by a “–” or this space in a line is empty.
23
Page 32

Functions
Softkey: Esc
Press the
You will then see the selection from the previous menu branch or the current idle
or call display. When you navigate within the menu and press and hold the
softkey the menu closes and the telephone returns to the idle state once again.
Esc
softkey briefly to exit the section of the menu currently displayed.
Esc
Softkey: Redial
¤
Allows you to select a call number from the redial list.
Softkey: Menu
A long key press of the
This menu is where you can make all desired phone settings. The individual menus
are explained in the chapter “Main” Menu starting on page 70.
A short key press to the
plays a menu with only relevant operations, i.e. ones that can currently be executed.
Menu
softkey in the idle state: the main menu is displayed.
Menu
softkey: depending on the mobile unit state, dis-
Call Key
A The call key has the same function as “lifting the receiver” or “replacing the
receiver” on a conventional telephone.
Speaker/Handsfree Key
L Activates the speaker/handsfree mode. When speaker/handsfree is activated,
this key is lit. This key flashes when there is a call. You can accept the call using the
loudspeaker key and conduct the call in the handsfree mode.
Info Key
B Use the Info key to access the various lists (e.g. caller list) as well as view and
change currently activated features (e.g. call protect, call diversion).
If there are new calls, e-mails, short messages or voicebox messages the Info key
flashes. When a short message or e-mail is received, the symbol appears; when
a voicebox message is received, the symbol.
Note
In order to be able use the Info key, your OpenCom 100 communications system
must be using a software version of at least 5.22.
24
Page 33

Functions
C Key (Delete Key)
C The C key (also Delete key) has several functions. It depends on the current
state of the telephone, e.g. idle state, on a call, in the edit mode etc. and there is a
distinction between a short or long key press. The following functions are
available:
… if the device is switched off:
short or long key press: device is switched on
… when idle:
long key press: the device is switched off
… during an incoming call:
long key press: the device is switched off
…during the call:
long key press: the device is switched off
… when editing:
■ short key press: deletes a single character to the left of the cursor
■ long key press: deletes (after a short notification tone) the entire entry
… when in the lists (e.g. call or redial list):
■ short key press: deletes the selected entry
■ long key press: deletes (after a short notification tone) the entire list
… when in menus:
■ short key press: goes back one menu level
■ long key press: ends the menu
R Key (Signal Key) / Emergency Call Key
Short key press of the R key during a call: an enquiry is initiated.
Long key press when idle: the previously configured emergency call number (SOS)
is dialled. You can enter the emergency call number in the “Telephone Option>
Emergency call” menu (see page 82).
25
Page 34

Functions
Hash Key
Long key press of the # key when idle: switches the keypad lock on. An active
keypad lock is displayed with the symbol in the softkey line. To unlock the
keypad, press the softkey under this symbol and then the
# key.
Star Key
Long key press of the * key when idle: switches the buzzer/ringer on and off.
Short key press while entering text (e.g. name for phone book entry): switch back
and forth between upper and lower case.
Number Keys
The 0 to 9 number keys are for entering call numbers, names and vanity call
numbers. For information on entering text using the number keys, please refer to
the chapter The Editor starting on page 27.
Long key press in call state: opens the local phone book and you can search for a
call number, see Editing Local Phone Book Entries of Your Aastra 142d starting on
page 68.
Locking Your Telephone Interface
The system administrator can lock your telephone interface via a setting for your
user group. All keys of your telephone no longer function aside from a few exceptions (e.g. the call key and the number keys).
■ You can still make calls with your telephone but no system functions can be
configured.
■ The redial function, the communications system telephone books, the Info
menu and the state-dependent menus cannot be activated. (These menus are
opened by a short press on the
chapter.) The personal phone book of the mobile unit is, however, available
because the lock only affects communications systems functions.
■ If the system administrator has authorised you to do so, you can set the time
group of the communications system (please refer to “Central settings” Menu
starting on page 90 also). If your user group authorisation changes according
to the time group, then it is possible that your telephone’s interface lock will be
cancelled due to a change in time group.
Please contact your system administrator if you have questions regarding your
authorisations.
26
Menu
softkey, they are described in the
Page 35

Functions
The Editor
Using the editor, you can enter or change call numbers and names within lists (e.g.
in the phone book). The maximum length when entering characters (call
numbers) is 32 characters and when entering letters (names) 16 characters.
In input lines for entering text, the numeric keyboard automatically switches to
entry of letters. The following characters can be entered using multiple key press
of number keys:
Key Upper-case letter Lower-case letter
1
2
3
4
5
6
7
8
9
0
*
#
■ When entering text, use the arrow keys to move text input position to the
! ? 1 - + * / = & ( ) % ¿ ¡ ! ? 1 - + * / = & ( ) % ¿ ¡
A B C 2 Ä Å À Á Ã Æ Ç a b c 2 ä å à á ã æ ç
D E F 3 È É Ê Ë d e f 3 è é ê ë
G H I 4 Ì Í Î Ï g h i 4 ì í î ï
J K L 5 j k l 5
M N O 6 Ñ Ö Ò Ó Ô Õ Ø m n o 6 ñ ö ò ó ô õ ø
P Q R S 7 ß p q r s 7 ß
T U V 8 Ü Ù Ú Û t u v 8 ü ù ú û
W X Y Z 9 w x y z 9
space , . 0 : ; _ ” ‘ ˆ ˜ space , . 0 : ; _ ” ‘ ˆ ˜
Switching upper/lower case Switching upper/lower case
# @ $ £ ¥ § < > { | } [ \ ] # @ $ £ ¥ § < > { | } [ \ ]
beginning or end of the entry.
■ Entries are always made at the cursor position.
■ Input position moves automatically forward if you make no entry for a short
time or when you enter a new character.
27
Page 36

Functions
■ When entering text, the first letter is automatically upper case and then
automatically switched to lower case. After you enter a space, the next letter is
upper case.
■ When entering text you can switch upper and lower case by pressing a number
key longer. The upper/lower case remains in effect until the next long key
press. You can also press the
upper and lower case.
■ A short press of the C-Key C deletes single numbers/characters (left of the
cursor position), a long key press to delete the entire entry.
*star key to switch back and forth between
■ The
Esc
softkey cancels the input procedure.
Menu Navigation
The Main Menu
Menu
When idle, press the
The main menu opens (see also page 70).
OpenCom 100
Calls
Call forwarding
Messages
OK Esc
‘
Menu
softkey long.
F Select an entry via the arrow keys.
OK
OK
/
Esc
Press the OK softkey to call a menu entry. Make the desired settings
and entries, then:
■ use the OK softkey to confirm a selected function or entry (see
also page 23)
and/or
■ press the
Scrolling
Use the
arrow key with the first menu entry selected, you go to the last menu entry. When
28
F arrow keys to scroll through menu entries. When you press the up
Esc
softkey to go back a menu level (see also page 24).
Page 37

Functions
you press the down arrow key with the last menu entry selected, you go to the
first menu entry.
Switching Function
Some functions only offer two settings – ON or OFF. You can tell the function is
active (ON) due to . If the function is deactivated, “-” appears in this display line.
Type
Repeat
Play once
OK Esc
Number or Arrow Key Configuration
In the “Ringer settings> Volume” menu, for example, you can use the number
keypad or the
the
OK
‘
Farrow keys to set the desired volume (e.g. level 4). After pressing
softkey the setting is applied.
Volume Settings
Earpiece: 4
]]]]
||||
OK Esc
‘
Menus Hide Automatically
Menus hide automatically under the following conditions:
■ In the idle or call state when you receive a call.
■ In the call state when you make entries that require calling up a new call-
dependent menu (e.g. the
■ When pressing a softkey that calls up other menus than the one displayed.
R key was pressed for an enquiry call).
■ If you are in a system menu (e.g. communications system phone book) and a
caller tries to reach you, the caller hears the busy tone.
■ Any open menu closes automatically after 60 seconds if you do not make any
further entries. Exception: Playing back a voicebox message which is longer
than 1 minute. Unsaved changes are lost.
Any saved entries made in menus remain saved when you exit the menu.
29
Page 38

Basic Functions
Basic Functions
Device Functions
Switching Device On/Off
You can switch off your mobile unit to make your battery charge last longer. If your
mobile unit is switched off, no ringer or info tones are emitted (for example, for an
appointment call).
Switching off mobile unit
C Press the C key – long key press
Switching on mobile unit
C Press the C key – long key press or place the mobile unit on the charging
station
The display now looks like this (e.g.):
œ
OpenCom 100
Smith
25.10.08
Menu ¤¬
125
10:00
The communications system is called “OpenCom 100” and the (internal) call
number of the mobile unit is “125”. This information refers to the mobile unit of
the communications system. The mobile unit is named “Peters”. You can change
this information in the “Telephone Option > User Name” menu (see page 81).
The current date and time settings are usually provided by the system when
checking in.
Note
When No Subscription appears on the display the mobile unit has to be checked
in; please refer to Subscribing Mobile Unit starting on page 14.
30
Page 39

Basic Functions
Key Lock
Activate the key lock before carrying a mobile unit in your pocket. This prevents a
call number from being dialled accidentally. When you receive a call, the keylock is
deactivated for the duration of the call. Use the
Activating keylock
A call key to accept the call.
# When idle, press the hash key – long key press
When the key lock is activated the display shows: Key Lock
Deactivating keylock
Press the softkey and then the
Telephone Lock
Via the “Phone settings > Security > Lock Handset” menu (see page 84) you can
switch the telephone lock for the mobile unit on or off after entering your user PIN.
Outgoing calls are no longer possible. You may still accept incoming calls. The
emergency call key (
When the key lock is activated the display shows PIN Lock. Deactivate the telephone lock by pressing the softkey and entering your PIN (see page 84).
R key) programmed with a call number can still be used.
# hash key.
Speaker/Handsfree Use
Press the L loudspeaker key before or during a call to allow multiple persons to
participate in the call. Repeat the process to switch it off. For optimal quality, make
sure the mobile unit is upright such that neither the speaker nor the microphone
are covered up.
The
L key flashes when there is an incoming call. When speaker/handsfree is acti-
vated, this key is lit.
Note
When placing the mobile unit into the charging station during a call, handsfree is
automatically activated.
31
Page 40

Basic Functions
Adjusting Volume During a Call
During a call you have 8 levels to adjust the volume of the receiver/headset or the
loudspeaker. The setting is shown on the display.
To change the receiver or headset volume, press the
loudspeaker volume, switch the loudspeaker on first and then press the
keys.
Set volume via the
once raises or lowers the volume by one level.
Note
When the device is idle once again, it reverts to the default setting. You can
change this information in the “Phone settings” menu (see page 80).
F arrow keys or the number keys. Pressing the F arrow keys
F arrow keys; to change the
F arrow
Setting Volume for Incoming Calls
When you receive a call (and have not accepted it yet), you can temporarily change
the ringer volume. Use the
call, it reverts to the default setting (see page 80).
F arrow keys to do so. After you accept and end the
Switching off Ringer
If you wish to be sure you are not disturbed (e.g. during a meeting) you can switch
off the ringer. Incoming calls are then signalled noiselessly via the built-in
vibration signal generator (if activated) instead of the ringer. When the acoustical
ringer is activated, the symbol appears on the display.
Switching off Ringer
* When idle, press the star key – long key press
Switching on ringer
* When idle, press the star key – long key press
Alternatively you can switch the ringer on/off via the “Phone settings > Ringer
Settings > Device > Buzzer” menu (see page 79).
32
Page 41

Basic Functions
Muting Mobile Unit
If you do not want the caller to hear, e.g. what you are discussing with someone
else in the room, you can temporarily mute your mobile unit.
Muting
Press the softkey. The person you are speaking with on the telephone can no
longer hear you.
Cancel muting
When you wish to talk to the caller again, press the softkey once again. The
caller on the telephone can hear you again.
Changing Display Contrast
To adjust the display to current lighting/brightness conditions, you can change
the contrast. You can enter the emergency call number in the “Phone settings >
Telephone Option > Disp. contrast” menu (see page 83).
Time/Alarm
When idle the display shows the current communications system time. The time is
automatically updated after an external call. After commissioning or after
changing the battery it may take a moment until the current time is transmitted
from the OpenCom 100 / Aastra 800.
If you have set an alarm (see page 78) the symbol appears on the display.
Message Display
The B info key flashes when you have messages. When a short message or e-mail
is received, the symbol appears on the display; when a voicebox message is
received, the symbol.
To query these messages, press the
on how to proceed, please consult the chapter “Info” Menu starting on page 91.
B info key briefly when idle. For information
Emergency Call Key (SOS Number)
An emergency call is triggered by a long key press of the R emergency call key.
You can configure the emergency call number in the “Telephone Option> Emergency call” menu (see page 82). Dialling is immediately executed – i.e. no other
key presses necessary.
33
Page 42

Basic Functions
Connections
Internal and External Call Numbers
Internal and external call numbers for reaching you are assigned during configuration of the OpenCom 100 / Aastra 800 communications system.
Multiple Trunk Keys
Multiple trunk keys can be configured on your telephone (3 max. OpenCom 100 /
Aastra 800 communications system). Each of these keys has a separate internal call
number which – depending on the system configuration – can also be assigned to
a separate external call number. Ask your system administrator about the configuration applicable to you.
When you have multiple trunk keys configured on your telephone, you can dial a
call number directly via one of these keys (for direct dialling and pre-dialling
please refer to the External/Internal Calling starting on page 42). The first trunk key
is designated the preference key if you do not make a selection.
When making a call from the redial list or from the caller lists, the respective trunk
key is automatically seized from which the original call was made.
Multiple Connections
Your device can handle two connections simultaneously, i.e. you can speak with
two callers at the same time, and switch back and forth between these connections (toggle) or conduct a three-party conference. Any further callers will hear a
busy signal.
When the system administrator has configured a call queue, any further calls are
given a place in the queue (please refer to the Calls in the Call-Waiting Queue
starting on page 37 section).
DTMF Postdial/VF Signalling
Depending on the system configuration, your telephone is automatically set to
VF signalling during a call. Use VF signalling, e.g. to query a voice message or
voicebox. Please contact your system administrator if you have questions
regarding this function.
34
Page 43

Basic Functions
Charge Display (Charges)
If your network operator transmits charge information – even for external calls you
dial yourself – you will see the charge amount for the call during and after the call.
Transmission of Call Numbers
There are various ISDN services which either allow or prevent transmission of call
numbers between users.
“CLIP” feature
CLIP is an abbreviation which stands for “Calling Line Identification Presentation”.
The call number of the caller is displayed (if transmitted). If the call number has
also been entered into the directory of the OpenCom 100 / Aastra 800, the name is
displayed.
“CLIP no screening” feature
“CLIP no screening” offers transmission of an arbitrary call number for outgoing
connections instead of transmitting the actual call number of the caller. This
means that instead of your call number being displayed, e.g. a service call number
is displayed to the user you called. The “CLIP no screening” feature must be
ordered from the network operator and authorised for use by the system administrator during system configuration. When you receive an external call where the
caller is displaying a different call number than the one actually technically being
transmitted, a “?” appears next to the call number on the display. If the call number
indicated on the display is saved to a phone book entry, the name is displayed as
usual along with a question mark.
“CNIP” feature
CNIP is an abbreviation which stands for “Calling Name Identification Presentation”. In addition to the call number of a caller, the name provided by the caller is
transmitted and displayed. This requires that the network operator transmits this
information with the connection. If the call number of the caller is also entered
into the OpenCom 100 / Aastra 800 directory, this – local – entry is given priority
on the display.
“CLIR” feature
CLIP is an abbreviation which stands for “Calling Line Identification Restriction”.
Before dialling a call number, you can determine from case to case whether the
transmission of your call number is to be suppressed to the person you are calling.
Select the “Suppress number” function to do so (seeMenu when Idle starting on
page 40).
35
Page 44

Basic Functions
Blocked/Unblocked Call Numbers
Your telephone can be blocked for all or for certain external call numbers. Emergency call numbers (110/112 in Germany) can be placed on a special list – no
matter what your external authorisation – and can thus be dialled at any time. Ask
your system administrator about it.
Keypad Dialling
Some European network operators require the keypad protocol in order to be able
to set features. Depending on the system configuration, your telephone is automatically set to keypad dialling during a call. If not – before dialling – you have to
switch your device and enter the codes stipulated by the network operator. These
are then directly forwarded to the exchange and evaluated there. You usually
receive an announcement in response. Please contact your system administrator if
you have questions regarding this function.
A*12
Now your telephone has been switched to the keypad protocol. Now you can
enter the keypad codes.
Note
This setting is deleted once again when the call is completed!
Least Cost Routing (LCR)
For every outgoing external connection, your system automatically makes a connection – via LCR – to a network operator defined by the system administrator. If
you do not use this preferred connection and for a single call would like to select a
network operator yourself (call by call), switch LCR off before making the call
(please refer to the “LCR off” menu entry in the Menu when Idle starting on
page 40 section). This is only necessary if LCR has been configured for you on the
OpenCom 100 / Aastra 800. For more information, consult your system administrator.
Note
The baby call and external call forwarding are not automatically conducted via
preferred connections. This is where you can prefix the codes of the desired
network operator when entering the call number, when you wish to use a
different network operator than the standard one.
36
Page 45

Basic Functions
Calls in the Call-Waiting Queue
The system administrator can additionally configure and activate a Call-waiting
queue for your telephone in the OpenCom 100 / Aastra 800. While you are making
a call, new calls are registered in this queue, the caller first hears an announcement
(if your system administrator has configured an announcement) and then the ring
tone. The number of calls that can be registered in your queue is defined by the
system administrator, e.g. 5 calls. Once this number is reached, any additional
callers hear a busy signal. The calls in the queue are transferred in accordance with
their priority (baby calls, door calls, VIP calls, other internal and external calls), calls
with the same priority are transferred in the order made.
Calls that are in the queue for too long a time are removed. The caller then hears a
busy signal also. The time interval until an external call is cleared from the queue is
defined by the network operator. This is usually 2 minutes in Germany and in other
European countries usually 3 minutes.
Your telephone can have a call-waiting queue even if it belongs to a subscriber
group. A call-waiting queue simultaneously affects call forwarding.
Note
If call-waiting protection is activated on your telephone, every time a new call
comes in you will hear the call-waiting tone and see on your display whether the
call is external or internal. If call-waiting protection is activated and you end the
call, the next waiting call will be signalled.
For more information please refer to the “Call Queue” chapter in the
“OpenCom 100 Mounting and Commissioning” (or “Aastra 800 Installing and
Commissioning” user guide).
Calls with Booking Numbers
By means of a booking number you can record the call data of a connection to an
external subscriber and save them in the OpenCom 100 / Aastra 800 for further
evaluation. Booking numbers are useful, e.g. for calculating costs per client (fees
and times) in an office. Incoming calls can also be associated with a booking
number.
Notes on booking numbers
■ The system administrator defines the length of the entered booking number
during system configuration.
37
Page 46

Basic Functions
■ Entering a booking number during a call is possible only if the system
administrator has activated this function for your user group (please refer to
Menu during Conversation starting on page 46 also).
■ For external connections established by you it is relevant how system
administrator has configured the route you are using for the connection. One
thing the system administrator defines during configuration is whether a
booking number is entered via the menu during a call. He/she can, however,
also specify that booking numbers must be entered via code procedure. In that
case the booking number must be entered before the call is initiated and the
connection is established. It is entered after the routing code and before the
actual destination call number.
■ The calls made with a booking number can be evaluated with the OpenCount
Web application of the OpenCom 100 / Aastra 800 communications system.
Forwarding Calls
Types of forwarding
You can forward internal or external calls intended for yourself to another internal
call number or – provided that you have the necessary user group authorisation –
to another external call number. Calls can be forwarded either immediately, after a
specified period of time or if the terminal is busy. You can configure more than one
call forwarding mode at the same time (Immediately, After delay or Busy). You
can, e.g. configure call forwarding Immediately for external calls to one call
number, and call forwarding After delay for internal calls to a different call
number. During configuration, the system administrator defines an interval in
seconds for After Delay call forwarding. You can replace this default with your
own individual value when programming After delay call forwarding. If more
than one forwarding mode has been activated, Immediately call forwarding is
always given priority.
Call forwarding to a voicebox
When OpenVoice, the integrated Voice-Mail-System, is installed on the communi-
cations system, you can also forward calls to your voicebox call number.
Selective Call Forwarding
Furthermore, the system administrator can programme call forwarding where the
call number of the caller is evaluated (“SCF: Selective Call Forwarding”). Potentially
this could be the reason why specific calls do not reach you. Please contact your
system administrator if you have questions regarding this function.
38
Page 47

Basic Functions
Least Cost Routing
Least Cost Routing (LCR) can be evaluated with call forwarding to external
numbers – provided your system administrator has configured LCR and its application in the OpenCom 100 / Aastra 800 correspondingly. Ask your administrator
for the configuration applicable to you.
Hunt group call numbers
During system configuration, the system administrator can configure call forwarding destinations for hunt group call numbers. These destinations are called
when all users of a hunt group are busy and/or when a call is not accepted by any
member of the hunt group within a certain time interval. You cannot view or
change this call forwarding on your device.
In addition, the system administrator can determine whether you can forward
incoming calls to the hunt group call number or not. If the system administrator
does not permit call forwarding for your hunt group call number, any call forwarding that you have programmed on your device is not carried out upon a hunt
group call.
Call forwarding chains
The system administrator can configure the system such that multiple call forwarding instances can be linked one to another to form a chain. A simple example:
user A forwards to user B, who then forwards to user C. A call for user A is then
directly signalled to user C.
A setting in your user group regulates which call number appears on your device
when a call which has been forwarded multiple times is signalled on your device:
you will see either the call number of the last user who programmed the last call
forwarding in the chain, or the call number of the first user in the chain. The
number displayed is also saved to the caller list for missed calls on your device.
The system prevents call forwarding chains from forming a loop, e.g. when the call
forwarding destination refers back to the call forwarding source. When the system
detects a call forwarding loop, no further call forwarding is carried out. This can
mean that – despite call forwarding being programmed – calls are nonetheless
signalled on your device.
A loop is also detected during call deflection. If you receive a call via a call forwarding chain and wish to deflect it to a destination call number which is already
in the call forwarding chain, a negative acknowledgement tone is heard and the
call signalling on your device will continue.
Contact your system administrator if call forwarding is not functioning as
expected on your device. The system administrator is able to analyse call forwarding chains and eliminate any possible conflicts.
39
Page 48

Basic Functions
Menus
Menu Before and During a Call
When the handset is in the idle or call state, state-dependent menus are displayed
when you briefly press the
which you can activate.
Examples:
1. Another telephone in your pick-up group rings and you want to accept the call.
Press the
You will be connected with the caller.
2. Or a subscriber is busy and you want to be called back. When you hear the busy
signal, press the
The state-dependent menus are individually described at the end of the following
chapters.
Menu
softkey briefly, select Pick-up and confirm your choice with OK.
Menu when Idle
Note
Menu items marked with an * are only displayed if the corresponding user
authorisation has been set for your user group in the OpenCom 100 / Aastra 800
Configurator. Please contact your system administrator if you have any
questions.
Menu
softkey. Frequently used features are shown
Menu
softkey and confirm Callback with Ok.
When idle, press the
pressed the
Un Park: Consecutively “unparks” one or more connections which you have
Pick-up:* You accept the call for another telephone in your pick-up group.
Pick-up select:* You accept a call for any other internal caller. Enter the call
40
A call key) and then dial…
previously parked, for instance to make enquiries or to forward calls (see
also Menu during Conversation starting on page 46).
number of the other telephone. If the other telephone is already in the call
state (e.g. an answering machine is making an announcement), you pick up
the call. The subscriber for whom you picked up the call must belong to a
user group for which “Call removal” authorisation is activated, otherwise
“Pick-up select” is not possible.
Menu
softkey briefly (also possible if you have already
Page 49

Basic Functions
Note: If the called subscriber is a member of a user group for which pick-up
protection is active, “Pick-up” and “Pick-up select” are not possible.
Take: You wish to take a current call from one terminal over to your DECT
telephone and continue the call on the DECT telephone. To do so, your
DECT telephone and the other terminal must have the same internal call
number.
Announcement:* After entering the call number, you can initiate an
announcement to another system terminal (or to a group of system
terminals).
Intercom:* After entering the device ID, you can initiate an announcement to a
single system terminal. The microphone of the terminal called will be
switched on and the person you are calling can immediately answer your
announcement. The “Intercom” function cannot be used for
announcements to a group of terminals.
Charges: Here you see the amount charged for the last call and the total charges
for your device.
Door opener:* You activate the door opener.
Notes: Make a note of a call number and a name or dial a notated call number.
Suppress number:* Your call number is not transmitted to the person you call
next.
Transmit number:* Your call number is transmitted to the person you call next
LCR off:* You switch off LCR (Least Cost Routing) for the next call.
VIP call:* Your next internal call is executed as a VIP call. Even when the internal
subscriber called (with system terminal only) has activated call waiting
protection, call protection or call forwarding, your call is signalled
acoustically.
Main menu: The Main menu is called, see “Main” Menu starting on page 70.
41
Page 50

Telephoning
Tel ep ho ni ng
External/Internal Calling
External Seizure and Entry of Call Numbers
If you hear the external dialling tone after pressing the A call key, your telephone
is set to spontaneous external line seizure. If you hear the internal dialling tone
after pressing the
The external line seizure applicable for you is configured by your system administrator upon user group configuration.
If your telephone is set to manual external line seizure, an internal line is seized
initially. You can dial an internal call number immediately. You have to use the
external line prefix to dial external call numbers (default: “0”). The system administrator defines this code for all users in the OpenCom 100 / Aastra 800 and informs
you of the applicable value.
If your telephone is set to spontaneous external line seizure, an external line is
seized initially. You can dial an external call number immediately. To reach internal
users – before entering the internal call number – press the
A call key, your telephone is set to manual external line seizure.
** star key twice.
If you dial a call number for an enquiry or when you programme call number destinations, you have to enter these call numbers in accordance with the external line
seizure applicable to you.
Example
You wish to programme call forwarding.
■ You enter a n external call number directly with spontaneous line seizure; with
manual line seizure, enter the prefix code for the external line (default: “0”).
Exception: The destination of “Divert MSN” is always entered without a prefix
code.
■ Enter an internal call number directly with manual line seizure; with
spontaneous line seizure, press the
42
** star key twice beforehand.
Page 51

Telephoning
Dialling Directly
AZ Press the call key and enter the internal or external call number (if
necessary with prefixed code for external line seizure, please refer
to page 42 also).
If there are several trunk keys configured on your telephone you
can assign them specifically (please refer to page 34):
A Press call key longer.
F Use the arrow keys to select the trunk key desired.
Z Enter internal or external call number.
Pre-dialling
ZA Enter entire call number and then press call key.
If there are several trunk keys configured on your telephone you
can assign them specifically (please refer to page 34):
Z Enter internal or external call number.
A Press call key longer.
F Use the arrow keys to select the trunk key desired.
Correcting pre-dialling entry:
C short key press: deletes single characters
C long key press: deletes entire entry
Redial
The call numbers you last dialled are saved in the redial list (the last entry is first on
the list). If the call number is also entered into the communications system phone
book, the name appears as well.
43
Page 52

Telephoning
Dialling a call number
¤
Press softkey (when device is idle).
F Use the arrow keys to select an entry.
A Press call key The call number is dialled.
Note
If there are multiple trunk keys configured on your telephone (please refer to the
chapter Multiple Trunk Keys starting on page 34 also), when you redial, the trunk
key is automatically seized with which you originally dialled the call number.
Additional options:
After you have selected an entry from the redial list, you can instead of dialling –
execute the following operations:
OK
Press softkey.
F Use the arrow keys to select a menu entry:
Dial: press
Delete: you delete the entry from the list.
Phone book: you can add the entry to the communications system
OK
. The call number is dialled.
phone book (New entry) or add an existing entry (Add).
Please refer to: Add Phone Numbers from Lists or during a
Call starting on page 66.
Delete all: after a confirmation query, this deletes the entire redial
list.
Note
If your internal call number (e.g. “30”) is configured on multiple terminals, you can
view and edit the redial list for the call number 30 on each of these terminals. If
you delete, e.g. the redial list on a terminal, it is then deleted on the other
terminals as well.
44
Page 53

Telephoning
Calling from the Caller Lists
Your mobile unit saves the call numbers to the caller list of the users that either did
not reach you (missed calls) or callers that you most recently spoke with (accepted
calls). This requires that the call number was transmitted during the call, please
refer to Transmission of Call Numbers starting on page 35 also. A missed call is
deleted from the list when a caller reaches you on a subsequent call. If a caller is
saved in your phone book, the name is displayed.
If a caller has called multiple times, that caller’s calls are listed as one entry. If a
caller suppresses display of his/her call number, the call is also saved on the caller
list. Multiple calls from an unknown call number are listed as one entry.
If your system administrator has set up a voicebox for you, the caller list also lists
the messages callers have left on your voicebox.
Dialling Call Number from Caller List
B Press Info key briefly when idle.
F Select Missed calls or Voicebox mess. menu entry.
(You open the list of accepted calls via the “Calls” menu, please refer
to page 73.)
OK
Use the F arrow keys to press the softkey and select an entry.
A Press call key. The call number is dialled. When you have selected a
voicebox message, your voicebox is called and you can query the
message there.
Note
If there are multiple trunk keys configured on your telephone (please refer to the
chapter Multiple Trunk Keys starting on page 34 also), when you receive a call
from the caller list, the trunk key is automatically seized with which you originally
received the call number.
Using Routes to Make Calls
The OpenCom 100 / Aastra 800 establishes calls to a desired subscriber either
automatically or via specific routes. Your system administrator configures these
routes in the OpenCom 100 / Aastra 800 and specifies how each route is seized. In
order to manually seize a specific route for a desired call, dial the routing code
before dialling the (internal or external) call number. By making specific calls via
routes, you can e.g. contact subscribers in the branches of a large company
45
Page 54

Telephoning
network. It is also possible to use a manually-entered routing code to record your
call-charge data for external private and business calls separately.
AZ enter routing code, dial call number
For enquiry:
G RZ enter routing code, dial call number
Your system administrator can provide you information on current routes and your
codes.
Menu during Conversation
Note
Menu items marked with an * are only displayed if the corresponding user
authorisation has been set for your user group in the OpenCom 100 / Aastra 800
Configurator. Please contact your system administrator if you have any
questions.
You are making a call. Press the
Handsfree on or Handsfree off: you switch handsfree on or off.
Disconnect: you disconnect the connection. The current call is ended and you can
dial once again.
Phone book: you can add the call number of the person you are speaking with
into the phone book of the OpenCom 100 / Aastra 800 (New entry) or add
it to an existing entry (Add). Please refer to: Add Phone Numbers from Lists
or during a Call starting on page 66.
Park call:* you can “park” the caller for some time. Please refer to the chapter
Parking Calls starting on page 58 for further information.
Booking number:* The current call (to an external caller) can be designated with
a booking number. Enter the booking number (8 digits max.) under No.
and confirm with the
Booking Numbers starting on page 37 for further information.
Pick-up:* You accept the call for another telephone in your pick-up group. Your
first call is put on hold. “Pick-up” is not available if there are two
connections running already.
Pick-up select:* You accept a call for any other internal caller. Enter the call
number of the other telephone. If the other telephone is already in the call
46
Menu
softkey briefly and then dial…
OK
softkey. Please refer to the chapter Calls with
Page 55

Telephoning
state (e.g. an answering machine is making an announcement), you pick up
the call. “Pick-up select” is not available if there are two connections
running already. The subscriber for whom you picked up the call must
belong to a user group for which “Call removal” authorisation is activated,
otherwise “Pick-up select” is not possible.
Note: If the called subscriber is a member of a user group for which pick-up
protection is active, “Pick-up” and “Pick-up select” are not possible.
Take: You wish to take a current call from one terminal over to your DECT
telephone and continue the call on the DECT telephone. To do so, your
DECT telephone and the other terminal must have the same internal call
number. Your first call is put on hold.
Intercept:* The call numbers of “malicious callers” can be saved in the exchange of
the network operator (if this service has been ordered). The function is also
possible if the caller has already hung up!
Door opener:* You activate the door opener.
Menu if Subscriber Busy
Note
Menu items marked with an * are only displayed if the corresponding user
authorisation has been set for your user group in the OpenCom 100 / Aastra 800
Configurator. Please contact your system administrator if you have any
questions.
You have dialled a call number and the subscriber is busy. Press the
briefly and then dial…
Disconnect: You disconnect the call and can make another call.
Callback: You leave your callback request with the busy subscriber (please refer to
the Callback starting on page 57 section also).
Pick-up select:* You pick up a call for any other telephone. Enter the call number
of the other telephone. If the other telephone is already in the call state (e.g.
an answering machine is making an announcement), you pick up the call.
The subscriber for whom you picked up the call must belong to a user
group for which “Call removal” authorisation is activated, otherwise “Pickup select” is not possible.
Note: If the called subscriber is a member of a user group for which pick-up
protection is active, “Pick-up select” is not possible.
Menu
softkey
47
Page 56

Telephoning
VIP call:* Even when the internal subscriber called (with system terminal only) has
activated call waiting protection, call protection or call forwarding, your call
is signalled acoustically.
Door opener:* You activate the door opener.
Menu during the Call
You have dialled a number. Your call is signalled to the subscriber called. The subscriber called has not yet accepted the call. Press the
dial…
Disconnect: You disconnect the call and can make another call.
Door opener: You activate the door opener. (this menu entry is only available to
you with the appropriate user authorisation).
Menu
softkey briefly and then
Ending a Call
End a Call as Follows
A Press call key briefly or
Menu
press softkey briefly.
F Use the arrow keys to select the Disconnect menu entry.
OK
If the subscriber you are speaking to ends the call, the busy signal for your telephone is switched off after a few seconds and you can be reached again. This also
applies when you are connected via headset. The time interval until the busy
signal is switched off is configured by the system administrator. All other connections are ended after 20 seconds when the receiver is not replaced.
48
Press softkey to confirm.
Page 57

Telephoning
Accepting Calls
Optical Call Display
When there is an incoming call, the ¢ receiver symbol flashes on the display and
the display illumination is switched on.
Temporarily Switching off Call Signalling
While a call is being signalled on your telephone via ringer and/or vibrator, you can
switch off signalling temporarily. Press the
the call as described on page 49.
Silence
softkey. You can still accept
Normal Call
When you are called, the caller’s call number is displayed (if transmitted). If this call
number is also recorded in your phone book, you will see the person’s name
instead.
A Press call key
or – when “Auto answer” is activated (see page 83) – remove the
mobile unit from the charging station.
Call for a virtual call number (Tele Secretary)
Call numbers not assigned to any telephone or user (virtual call numbers) can be
configured on the OpenCom 100 / Aastra 800. The system administrator can divert
a virtual call number to another internal call number, e.g. the call number of your
telephone. This kind of diverted call is signalled on your telephone just like a
normal call.
External calls from unknown call number
When you receive an external call where the caller is displaying a different call
number than the one actually technically being transmitted (CLIP no screening), a
“?” appears next to the call number on the display. If the call number indicated on
the display is saved to a phone book entry, the name is displayed as usual along
with a question mark.
49
Page 58

Telephoning
VIP Calls
VIP calls from authorised users are signalled to you even when call protection, call
waiting protection are activated or call forwarding is programmed. You hear the
melody (please refer to the “Melody” section also on page 79) and see the entry
VIP call along with the caller’s call number on the display.
Accept the call just like a normal call (see page 49).
Calls during a Conversation
While you are making a call, any incoming calls are signalled acoustically as well as
visually on the display (“Call Waiting”). Call waiting protection must be deactivated
for this to happen (see page 85).
G You are making a call, hear the call waiting tone and see the text
“Call waiting” as well as the name or call number of the subscriber
waiting on the display.
A Press the call key to end the current call. The call waiting call is now
signalled to you just like a normal call.
or
R Press softkey briefly to accept the call waiting call. Your first call is
placed on hold. You are speaking with the call waiting caller.
For further information, please refer to the chapter Enquiry, Toggling, Transfer and Conference starting on page 52.
Incoming Call Menu
You receive an incoming call, the telephone is in the idle state. Press the
softkey briefly and then dial…
Reject call: Reject the call by pressing the
signal.
Deflect call: You do not accept the call yourself, rather deflect it to another
subscriber. Enter the call number of this subscriber under To: and then
press the
group has the authorisation to deflect to internal and/or external
destinations.
Door opener: You activate the door opener. (this menu entry is only available to
you with the appropriate user authorisation).
50
OK
softkey. You can only use the “Deflect call” function if your user
OK
softkey. The caller hears the busy
Menu
Page 59

Telephoning
Call Waiting Menu
Note
Menu items marked with an * are only displayed if the corresponding user
authorisation has been set for your user group in the OpenCom 100 / Aastra 800
Configurator. Please contact your system administrator if you have any
questions.
You are making a call and receive a call. Press the
dial…
Hands-free on or Hands-free off: You switch the handsfree mode on or off.
Disconnect: You disconnect the current call and accept the call-waiting call.
Phone book: you can add the call number of the person you are speaking with
into the phone book of the OpenCom 100 / Aastra 800 (New entry) or add
it to an existing entry (Add). Please refer to: Add Phone Numbers from Lists
or during a Call starting on page 66.
Park call:* You park the first call. Then press the
telephone to accept calls. The call-waiting call will then be signalled like a
normal call. Press the
waiting subscriber. After you have finished this call you can “unpark” the
parked call by briefly pressing the
Parking Calls starting on page 58 for further information on this function.
Reject: Reject the call-waiting call by pressing the
busy signal.
Accept: Accept the call by pressing the
subscriber is held in enquiry. You can now toggle back and forth between
the two callers (please refer to the chapter Enquiry, Toggling, Transfer
and Conference starting on page 52 also).
Deflect:* You do not accept the call yourself, rather deflect it to another
subscriber. Enter the call number of this subscriber under To: and then
press the
group has the authorisation to deflect to internal and/or external
destinations.
OK
softkey. You can only use the “Deflect” function if your user
A call key and you are connected with the call-
Menu
OK
Menu
softkey briefly and then
A call key to enable your
softkey. Please refer to the chapter
OK
softkey. The caller hears the
softkey. The connection to the original
Door opener:* You activate the door opener.
51
Page 60

Telephoning
Enquiry, Toggling, Transfer and Conference
Enquiry/Toggle via the R (Signal) Key
During a call you can consult another subscriber.
G You are making a call.
Initiate enquiry:
R Press R key briefly. Your first call is placed on hold.
Z Enter internal or external call number. Note the type of line seizure
(see page 42).
G You are speaking with the subscriber called.
For toggling (switching back and forth between callers):
R Press R key briefly.
Ending toggling/enquiry:
Menu
Press softkey briefly.
F use the arrow keys to select the menu entry Select Disconnect. The
current call is ended.
R Press R key briefly. You are speaking with the waiting subscriber
once again.
Transferring an Internal/External Call to an Internal Subscriber
You have dialled an internal enquiry call (see page 52).
The subscriber called via enquiry answers:
G Announce the call transfer.
A Press call key briefly.
The subscriber called via enquiry does not answer:
A Press call key briefly. The other subscriber is called.
52
Page 61

Telephoning
If the called subscriber accepts the call, he/she will be connected to the waiting
call. If the call is not accepted within a certain time interval (the communications
system is 45 seconds by default, the system administrator can change this value),
you get an automatic recall. After pressing the
the original subscriber once again.
If the system administrator has configured the Music on hold upon transfer on
calling feature in the Configurator, the caller on hold hears “Music on Hold” while
his/her call is signalled to the other internal subscriber. This setting also determines whether, when calling back, the caller hears “Music on Hold” or a ringing
tone or busy signal.
The subscriber called via enquiry is busy:
A call key you are connected with
Menu
Press softkey briefly.
F Use the arrow keys to select and confirm the Disconnect menu
entry.
OK
Press softkey to confirm.
Z Enter another internal call number to transfer the call.
or
R Press R key briefly. You are speaking with the waiting subscriber
once again.
Transferring an External Call to an External Subscriber
External calls can only be transferred to an external subscriber via the caller on
hold menu (see page 54).
Menu
Press softkey briefly.
F Use the arrow keys to select the Transfer menu entry.
OK
Depending on your communications system’s settings, the external calls will be
switched together on your communications system or on the exchange of your
network operator.
Press softkey to confirm transfer.
53
Page 62

Telephoning
Note
When you call an external party and then transfer this person to another external
party, you will bear the costs for the call between the two external callers. You
have no way of influencing how long the transferred call will last. The connection
is established via the OpenCom 100 / Aastra 800 and occupies two call channels
(ISDN user channels).
Menu when Subscriber on Hold
Note
Menu items marked with an * are only displayed if the corresponding user
authorisation has been set for your user group in the OpenCom 100 / Aastra 800
Configurator. Please contact your system administrator if you have any
questions.
You have put a call on hold and are making an enquiry call. Press the
briefly and then dial…
Hands-free on or Hands-free off: You switch hands-free on or off.
Disconnect: You disconnect the current connection. You can now either enter a
new call number for another enquiry. Or you press the
are once again connected with the caller on hold.
Phone book: you can add the call number of the person you are speaking with
into the phone book of the OpenCom 100 / Aastra 800 (New entry) or add
it to an existing entry (Add). Please refer to: Add Phone Numbers from Lists
or during a Call starting on page 66.
Park call: * You can “park” the current caller. Please refer to the chapter Parking
Calls starting on page 58 for further information on this function.
Booking number:* The current call (to an external caller) can be designated with
a booking number. Enter the booking number (8 digits max.) under No.
and confirm with the
Booking Numbers starting on page 37 for further information on this
function.
Call Diversion (diversion): You put your current caller on hold (called via enquiry)
and then call another subscriber with whom you wish to connect your
current caller. Enter the call number of the subscriber you wish to transfer,
announce the call to that caller and press the
been transferred. After transfer, you are reconnected with the caller you
originally put on hold.
OK
softkey. Please refer to the chapter Calls with
A call key. The call has now
R key briefly and
Menu
softkey
54
Page 63

Telephoning
Transfer:* You connect the subscriber on hold with the current caller you are
speaking with.
Conference:* You initiate a 3-party conference.
Toggle: You toggle between the current subscriber and the subscriber you last
spoke with.
Door opener:* You activate the door opener.
Three-Party Conference
If your user group has the corresponding authorisation configured, you can
conduct a telephone conference (maximum of 3 subscribers). Conference participants can be internal or external callers. Three-party conferences cannot be connected.
Initiate and end conference
Initiate conference:
R briefly Establish enquiry connection (see page 52).
G When the subscriber answers, announce the conference.
Menu
Press softkey briefly.
F Use the arrow keys to select the Conference menu entry.
The conference is initiated.
Ending conference:
A Press call key briefly.
or
Menu
Press softkey briefly.
F Use the arrow keys to select the End conference menu entry.
Disconnecting Conference Participants
During a conference, you can once again speak to conference participants separately or exclude individuals.
Menu
Press softkey briefly.
55
Page 64

Telephoning
F Use the arrow keys to select the Disconnect menu entry (e.g. Dis-
connect 034565483 for the subscriber with the call number
“034565483”) and confirm with the
connected from the conference and you continue the call with the
other subscriber.
or:
OK
softkey. The subscriber is dis-
Select the Toggle menu entry and confirm with the
connections to both callers are held and you can toggle between
them both using the
R key.
Ok
softkey. The
Menu During the Conference
Note
Menu items marked with an * are only displayed if the corresponding user
authorisation has been set for your user group in the OpenCom 100 / Aastra 800
Configurator. Please contact your system administrator if you have any
questions.
You are in a three-way conference. Press the
Hands-free on or Hands-free off: You switch hands-free on or off.
Disconnect (e.g. Disconnect 034565483): You disconnect the caller with the call
number 034565483 from the conference (in this example, an external
caller) and continue the call with the other caller.
Phone book: you can add the call number of the person you are speaking with
into the phone book of the OpenCom 100 / Aastra 800 (New entry) or add
it to an existing entry (Add). Please refer to: Add Phone Numbers from Lists
or during a Call starting on page 66.
Park call:* You “park” the caller to whom you had established an enquiry
connection before you initiated the conference (please refer to Parking
Calls starting on page 58 also). The conference is thus ended.
Menu
softkey briefly and then dial…
Booking number:* When you call an external subscriber and have included the
person in the conference, you can assign a booking number to the call data
of this connection. Enter the booking number (8 digits max.) under No. and
confirm with the
starting on page 37 chapter for further information on this function.
Transfer:* You switch yourself out of the conference. The other subscribers remain
connected.
56
OK
softkey. Please refer to the Calls with Booking Numbers
Page 65

Telephoning
End conference: You end the conference.
Toggle: You end the conference and can now toggle back and forth between the
participants.
Door opener:* You activate the door opener.
Special Calls/Conversations
Callback
If you call another subscriber of your OpenCom 100 / Aastra 800 communications
system and the line is busy, you can initiate automatic callback. Your user group
must have authorisation for this feature to be able to use it.
Initiate callback
Menu
Press softkey briefly.
F Use the arrow keys to select the Callback menu entry.
OK
Answering a callback
A callback is carried out when the other subscriber is free.
Press softkey to confirm.
When your telephone rings,
A press call key.
The other subscriber is now called.
Accepting an Appointment Call
You can save two appointments on your mobile unit (please refer to page 77).
When the appointment time occurs, your mobile unit rings for a period of one
minute with volume increasing. The appointment number appears on the display.
An appointment can be repeated once or repeatedly.
57
Page 66

Telephoning
Accepting an Appointment Call
A Press call key. The reason for the programmed appointment
appears.
OK
If you are on a call at the time of the appointment call, you will hear a special tone
and the display indicates the appointment number. After you finish the call, a
short message informs you that the appointment expired.
Note
You can also programme an alarm on your mobile unit (see page 78). An alarm is
signalled once at the programmed time and in contrast to the appointment call,
is programmed without indicating a reason.
Press softkey to confirm the appointment call.
Baby Call
The “Baby call” function dials a previously programmed internal or external call
number after a specific time interval after pressing the
page 85). The default time interval on the communications system is 5 seconds.
The system administrator can change this value. If you begin dialling a call number
within the specified time interval, the baby call is cancelled.
Carrying out a baby call
A call key (please refer to
A Press call key.
Note
You can also programme an emergency call number on your mobile unit (see
page 82). In contrast to the baby call, an emergency call is triggered with the
key and executed immediately (please refer to page 33 also).
Parking Calls
While calling, you can “park” (one or more) callers for some time and meanwhile
conduct other telephone calls or also hang up and carry out other operations.
Parked calls are recorded on a list. You can remove calls from the list in any order
such that a call is specifically “unparked” once again. The caller hears music on
hold – if music on hold has been configured – until the call is “unparked”. If the
caller is not “unparked” after some time, a callback is automatically made to your
58
R
Page 67

Telephoning
mobile unit as soon as your device is free again. The caller is then automatically
“unparked”. If you are, however, still on another call, the caller hears the busy
signal and is thus “unparked”. The authorisation for parking connections and the
time interval until which callback takes place, is configured by the system administrator upon system configuration.
Park call
G You are making a call.
Menu
Press softkey briefly.
F Use the arrow keys to select the Park call menu entry and confirm
Unpark call
Menu
with the
spot (0-9, * or #). Confirm with the
Press softkey briefly when idle.
Ok
softkey. The system offers the next available parking
Ok
softkey.
F Use the arrow keys to select the Unpark call menu entry and
confirm with the
list offered. Confirm with the
OK
softkey. Select the parked call desired from the
Ok
softkey.
G You will be connected with the parked caller.
Announcements (with and without Intercom)
Announcements can be set up on single or multiple system terminals. The
“Announcement” function is available in two versions.
■ Announcement with intercom: The microphone of the system terminal called
will be switched on (handsfree operation) and the person you are calling can
immediately answer your announcement. An announcement with intercom
can only be conducted to a single system terminal (not a group of terminals).
■ Announcement without intercom: The called subscriber hears a special
information tone followed by your announcement. You can also make an
announcement to a group of system terminals (e.g. to a hunt group number on
which calls are signalled simultaneously). All subscribers called hear the
announcement at the same time in this case. The person initiating the
announcement hears a signal tone on his/her telephone when the
(announcement) connection has been established to all called subscribers. If
one of these subscribers replies to the announcement, the announcement call
to the other system terminals is terminated.
59
Page 68

Telephoning
The system administrator has to extend the corresponding authorisation for your
user group for you to be able to use the function. If a subscriber being called has
activated announcement protection or intercom protection, announcements to
that subscriber’s call number will not be carried out.
Making an announcement without intercom
Menu
Press softkey briefly.
F Use the arrow keys to select the Announcement menu entry.
Z To: enter the call number (of a single terminal or of a group of
terminals).
OK
Making an announcement with intercom
Menu
Press softkey to confirm. State your announcement.
Press softkey briefly.
F Use the arrow keys to select the Intercom menu entry.
Z Device-ID: Enter device ID of the terminal. Your system adminis-
trator can provide you with the device ID.
OK
Responding to an announcement (Announcement without Intercom)
If you receive an announcement yourself, you will hear a special information tone.
The notification text Announcement and the caller’s name appear on the display.
Press softkey to confirm. State your announcement.
A Press the call key to answer the announcement.
alternatively:
Menu
Press softkey briefly.
F Use the arrow keys to select the Accept menu entry and confirm
with the
or:
Select the Reject menu entry and confirm with the
announcement initiator then hears the busy signal.
60
Ok
softkey.
OK
softkey. The
Page 69

Telephoning
Responding to an announcement (Announcement without Intercom)
Your telephone switches to the handsfree mode when it receives the
announcement. You can speak with the caller immediately.
When you have activated announcement protection (see page 84) and/or
intercom protection (see page 85) on your mobile device, announcements to your
call number will not be carried out.
Doorbell, Door Opener
A doorbell appears on the display (Door call). If there is an entry in the phone
book for the call number, the doorbell name appears.
Opening door while idle
A Press call key
or
Menu
press softkey briefly.
F Use the arrow keys to select the Door opener menu entry and
confirm with the
Opening door during call
OK
softkey.
G If the doorbell signal is triggered during a call, you hear the call-
waiting tone.
Menu
Press softkey briefly.
F Use the arrow keys to select the Door opener menu entry and
confirm with the
Note
The Door opener menu entry is not dependent on an entrance intercom call. The
door opener function controls a relay contact in your system which can also be
connected to other devices. For more information, consult your system
administrator.
OK
softkey.
61
Page 70

Telephoning
Entrance Intercom Calls
Calling the entrance intercom
If your OpenCom 100 communications system is connected to an entrance
intercom, you can speak with a visitor at the entrance intercom with the following
code procedure.
A*101
for enquiry:
GR*101
If you are operating a “DoorLine” entrance intercom, use the following code
procedure:
A*102
for enquiry:
GR*102
Calling door when idle
Press the
A call key. You speak with the visitor.
Door call during call
If the doorbell signal is triggered during a call, you hear the call-waiting tone.
Proceed as described under Opening door during call starting on page 61.
Door call forwarding
You can forward calls signalled from the doorbell to another (internal or external)
call number (a so-called “pharmacy line”). This is done via the Call forwarding
menu (see page 74).
Call duration
All door calls are automatically terminated after a specific time interval has expired
(default is 60 seconds). This ensures that forwarded door calls do not unintentionally lead to continuous calls (e.g. to a voicebox). Your system administrator can
configure the time interval in the OpenCom 100 from 30 to 300 seconds and will
be able to tell you the current value.
62
Page 71

Telephoning
Voicebox Queries
OpenVoice is the integrated voicebox system for the OpenCom 100 / Aastra 800
communications system. This programme enables callers to leave messages for
you even for those occasions when you are not reachable.
If the system administrator has configured a voicebox for you, the
flashes when there are new voicebox messages for you. The symbol will also
appear on the display. To query the voicebox:
B Info key
B Press info key briefly.
or
1 Long key press of number key 1.
F Use the arrow keys to select the Voice Message menu entry and
confirm with the
appears.
OK
softkey. A list of voicebox messages received
F Use the arrow keys to select one of the entries displayed and
confirm with the
edit it (please refer to the “Voiceboxmess.” section as of page 73).
Additional options
It is possible to programme call forwarding to the voicebox (please refer to “Call
forwarding” Menu starting on page 74).
You can also query your voicebox messages by directly calling the (call number of
your) voicebox. You can also use the Voicebox menu entry in the Applications
menu (see page 90).
OK
softkey. You can now listen to the message and
For detailed information, please refer to the user guide for the additional programme OpenVoice.
63
Page 72

Phone Book
Phone Book
Communications System Phone Books
Up to 2,000 entries can be saved in the phone book of your OpenCom 100 /
Aastra 800 communications system. This number includes the centrally administered phone book (available to all users), the personal entries of all subscribers,
and – provided you are using the multicompany variant of the OpenCom 100 /
Aastra 800 – the entries in the companies’ phone books.
The number of entries you can save in your personal phone book is determined by
your system administrator when configuring the OpenCom 100 / Aastra 800. Your
personal entries are automatically sorted into the comprehensive register, but can
only be viewed on your telephone by you yourself. However, the system administrator or a person with the corresponding authorisation can completely delete
your phone book.
Note
The OpenCom 100 / Aastra 800 phone books can also be edited from the system
Web console, provided you have the authorisation to do so from the system
administrator. Contact your system administrator for information on your
authorisations.
Please refer to the chapter “Phone book” Menu starting on page 88 for information on editing communications system phone books.
Calling from the Communications System Phone Book
Search the Phone book menu for entries saved to the communications system
phone books.
F Press up arrow key briefly when idle. The Directory menu and the
Name: menu entry appear.
Z Enter letter/name you are searching for (see The Editor starting on
page 27).
64
Page 73

Phone Book
OK
Press softkey.
You see the phone book list beginning with the characters entered.
If you do not enter any characters and press
with the first entry.
OK
, the list will begin
F Use the arrow keys to select the desired name.
OK
Press softkey.
If there is more than one call number under this name (e.g. an office
number and a mobile number), the list contains correspondingly
designated entries (Office, Mobile and Private).
F Use the arrow keys to select the desired call number.
A Press call key – the call number is dialled.
optional:
When there are multiple trunk keys configured on your telephone
OK
(please refer to page 34), use the
desired trunk key and then press the
or
Press softkey.
A selection menu appears where you can dial this call number (Dial
menu entry) or view information on this phone book entry (Info
menu entry).
F arrow keys to select the
A call key.
Speed-Dialling
All central phone book entries can also be dialled via two-digit or 3-digit speeddialling numbers once they have been configured. The 2-digit speed-dialling
numbers are in the range 00…99, the 3-digit are in the range 000…999. Ask your
system administrator how many digits are valid.
Dialling a speed-dialling destination
A*7Z(speed-dialling destination)
alternatively:
A*7*Z(speed-dialling destination) #
65
Page 74

Phone Book
Note
Once you have opened the phone book, you can also press the
instead of entering a name and enter the speed-dialling number to find the
associated phone book entry.
* star key
Add Phone Numbers from Lists or during a Call
You can add phone numbers saved in your caller list or your redial list to a phone
book (see “Calls” Menu starting on page 72 and Redial starting on page 43). You
can also add a call number to the phone book while making a call.
Select the Phone book menu entry.
New entry: You add the call number to a phone book (see page 66).
Add: You add the call number to an existing phone book entry (see page 67).
Adding call number as new phone book entry
F and
F and
F and
Z and
Z and
F and
OK
Select the New entry menu entry in the Phone book menu,
confirm with the
OK
Select phone book desired: Personal, Company or Central,
confirm with
OK
Determine call number: No. office, No. mobile, No. private,
confirm with
OK
Enter Name and First name (see The Editor starting on page 27),
confirm respectively with the
OK
Confirm or change the displayed call number, e.g. No. office,
confirm with
You can assign a speed-dialling number to the call numbers of the
entry in the central phone book. You automatically have the next
available speed-dialling number (Abbrev. no.) offered to you. If you
wish to assign them, press the
dialling number with the
dialling number if needed) and then press
OK
Display your own call number, confirm withOK softkey:
Transmit number: When calling (from the phone book) your call
number is displayed to the subscriber called.
Suppress number: Your call number is suppressed.
OK
OK
softkey.
OK
softkey.
OK
softkey.
softkey.
OK
softkey.
OK
softkey. If not, delete the speed-
C key (enter another unused speed-
Ok
.
66
Page 75

Phone Book
Z and
F and
Adding call number to a phone book entry
You can add the entry to your personal phone book. If your system administrator
has authorised you (or the user group you are part of) accordingly, you can also
edit the central phone book and your company’s phone book.
F and
F and
OK
If necessary – as done in the two previous steps – enter additional
call numbers (No. mobile and No. private), confirm respectively
with
OK
softkey.
OK
Dial default number (Default office, Default mobile or Default
private), confirm with
The default call number is dialled automatically if no other call
number is selected before establishing a connection.
OK
Select the New entry menu entry in the Phone book menu,
confirm with the
OK
Select phone book desired: Personal, Company or Central,
confirm with
OK
OK
softkey.
softkey.
OK
softkey. The phone book entry is saved.
Z Enter letter/name you are searching for (see The Editor starting on
page 27).
OK
Press softkey.
You see the phone book list beginning with the characters entered.
If you do not enter any characters and press
with the first entry.
OK
, the list will begin
F and
F and
Note
If you wish to edit phone book entries (e.g. to change names and call numbers),
use the “Phone book” menu (see “Phone book” Menu starting on page 88).
OK
Use arrow keys to select the name desired, confirm withOK softkey.
OK
Select the call number that the list entry is to be saved under:
No. office, No. mobile, No. private, confirm with
OK
softkey.
67
Page 76

Phone Book
The Local Phone Book of Your Aastra 142d
In addition to the phone book of your OpenCom 100 / Aastra 800 communications
system, your Aastra 142d also has a local phone book. You can save additional personal entries in this phone book. When using a MEM card (see Aastra 142d with
MEM Card starting on page 12), these are saved on the card.
Calling from the Local Phone Book of Your Aastra 142d
F Press down arrow key briefly when idle. Select the Search menu
entry.
Z Enter letter/name you are searching for (see The Editor starting on
page 27).
F Use the arrow keys to select the desired name.
A Press call key. The call number is dialled.
Editing Local Phone Book Entries of Your Aastra 142d
F Press down arrow key briefly when idle. Select the Search menu
entry and if necessary
Z enter letter/name you are searching for (see The Editor starting on
page 27).
F Use the arrow keys to select the desired entry.
Options
Local phone book menu
New: You create a new entry. Enter the call number first and then the name. Use
Edit: You edit a selected entry. Use
Add To: The entry is added to pre-dialling. This is where you can edit the entry, e.g.
Quick call: Selected phone book entries can be assigned speed-dialling (1…9).
68
Press softkey. The local phone book menu appears (see following
section).
to save.
OK
to save.
to add additional digits when re-dialling an extension.
The programmed speed dial is displayed to the right of the phone book
OK
Page 77

Phone Book
entry. When the mobile unit is idle, the local phone book entry can be
displayed as pre-dialling by pressing and holding the speed-dialling
number (1...9 key) and then dialled with the
Delete: You delete a selected entry (after a confirmation query).
A call key.
69
Page 78

Features and Menus
Features and Menus
How to Set Features
There are different ways to set the features of your telephone and of the system:
Using Menus
Use the mobile unit menus to conveniently make settings on the desired features
(please refer to Menu Navigation starting on page 28 also).
Some menu entries are only shown on your telephone when you belong to a user
group authorised to use the corresponding feature. Contact the system administrator when you have questions on specific features or are not able to use a feature
satisfactorily.
Using code number procedures
Many features can also be configured by entering code numbers. Code numbers
are entered via the
series of numbers (
Code number input is especially intended for analogue terminals on your system.
Code numbers can also be used on your mobile unit. They are described in the
short user guide “Code-number Procedures” (this is supplied with the system). A
current online overview on the Codes entry is available anytime in the System
Info menu of the OpenCom 100 / Aastra 800 communications system Web
console.
* and # keys respectively and in combination with a specific
0 to 9 keys).
“Main” Menu
This menu contains all available features. Some of the menu items can be found in
other state-dependent menus as well. For example, received e-mails are available
in the Main menu under Messages and also available via the
which affect your telephone’s reachability (e.g. call protection activated) are
located in the Main menu and also in the Active Features menu which you can
access via long key press of the
Press the
briefly and select the Main menu menu entry. This displays the primary menu
groups…
Calls: This contains the most important features relevant to a call.
70
Menu
softkey longer or, if the telephone is idle, press the
B Info key.
B Info key. Features
Menu
softkey
Page 79

Features and Menus
Call forwarding: This menu group contains all types of call forwarding that you
can program on your telephone. Please note the explanations in the
chapter Forwarding Calls starting on page 38 also.
Messages: This menu group provides information about short messages and
emails that you have received and sent. Furthermore, you can programme
appointment calls and activate prepared notification texts.
Phone settings: In this menu group you can configure your telephone to meet
your personal requirements (e. g. volume, ringer settings, key lock and
display language).
Protection: Among other things, you can activate the call protection, the
telephone lock or the user PIN.
Connections: This menu group provides you with all the features that can affect a
call. Depending on the particular state, these features are also displayed in
the menus that you can access during a call.
Phone book: You can edit the communications system phone books in this menu
group.
Applications: This menu group contains all functions offered by your system
telephone in conjunction with additional programmes of your
communications system. If your system administrator has set up, e.g. a
voicebox with the OpenVoice addition programme for you, this is where
you can access and configure your voicebox.
Central settings: This is where you can configure central settings for the
communications system. This is an optional menu item, it is only available if
your system administrator has configured the appropriate authorisation for
your user group.
71
Page 80

Features and Menus
“Calls” Menu
Select Call lists and then select...
Missed calls: Here you can see the call numbers of callers who most
recently have tried to reach you. The name is displayed instead of
the call number if the caller is in the system phone book. This also
applies to calls transferred or forwarded to you from other internal
subscribers.
– The symbol indicates forwarded calls.
– A call when busy is indicated by the symbol.
– When you receive an external call where the caller is displaying a
different call number than the one actually technically being
transmitted, a “?” appears next to the call number on the display.
– If the call number indicated on the display is saved to a phone
book entry, the name is displayed as usual along with a question
mark.
– Door calls are shown either with the call number, or with the
name of the doorbell – depending on the type of door intercom
in use.
– If a caller suppresses display of his/her call number via CLIR, the
call is also saved on the call list. Multiple calls from an unknown
call number are listed as one entry. The system administrator can,
however, during system configuration, determine that any calls
with unknown call numbers will not be included on your call list.
72
The authorisations of your user group determine which calls are
recorded on your call list. Your system administrator can specify that
internal calls, external calls, calls when busy, and calls from the door
be included on your call list.
Select an entry. You can call back the caller directly by pressing
the
A call key. Alternatively, press the
of the following options:
Dial: Call the caller back.
Delete: The entry is deleted. (an entry is automatically deleted when
you have called the caller back)
Phone book: You add the entry to one of the phone books (please
refer to Add Phone Numbers from Lists or during a Call
starting on page 66).
Info: This displays the call number or name of the caller, time of the
last call and the number of calls.
OK
softkey and then select one
Page 81

Features and Menus
Delete all: You delete all entries from the call list.
Note: If your internal call number (e.g. “30”) is configured on
multiple terminals, you can view and edit the list of calls for the call
number 30 on each of these terminals. If you delete the call list from
one terminal, it will be deleted from all others as well.
Accepted calls: You see the call numbers or the names of the callers with
whom you last spoke. You can edit this list in the same way as the
missed calls list (see page 72).
Voicebox mess. (voicebox messages): A list of voicebox messages received
appears. Each message is identified by the caller’s call number or (if
saved in the phone book) by the caller’s name. Messages that have
not yet been played back are marked with a “+”; messages that have
been played back are marked by a “-”. The most recently received
messages are at the top of the list.
Select a message, press the
following options.
Play: Listen to the message the caller recorded. You can also use the
number keys to control message playback: 4 (rewind), 5
(pause) and 6 (fast forward).
Dial: Call the caller back.
OK
softkey and then select one of the
Delete: The message will be deleted.
Phone book: You can add the caller’s call number to one of the
phone books (please refer to Add Phone Numbers from Lists
or during a Call starting on page 66).
Forward: Forward the message to another voicebox with or without
a comment. Enter the call number of the other voicebox
under To:; use the
Mark as new: If the message is addressed to another person and
you accidentally have listened to it, you can use this option to
reset the message to “new” status.
Info: To view the call number or name of the caller, as well as the
duration, date and time of the message.
Delete all: You delete all messages stored in your voicebox.
Note: The options for editing a voicebox message are only executed
if a voicebox has been activated (in the Configurator of the
OpenCom 100 / Aastra 800, OpenVoice: Voiceboxes menu).
* star key to end a spoken comment.
73
Page 82

Features and Menus
Charges: Here you see the amount charged for the last call and the total charges
for your device. If there are multiple trunk keys configured on your
telephone, you can view the individual charges for each of these keys. To do
so, select the desired key (e.g. L1: [internal call number]) and then press
the
Ok
softkey.
Remote charges: You can view the charges of other OpenCom 100 / Aastra 800
users. To do so, your user group has to have “Costs” authorisation granted
by your system administrator. Enter the internal call number of the other
user. You can also select a call number from the phone book.
Hunt group: If your telephone belongs to one or more hunt group(s), you can use
this menu entry to switch hunt group signalling for your telephone on or
off. When there are multiple trunk keys configured on your telephone and
assigned to hunt group call numbers, you can switch the hunt group
signalling for each of these keys on or off. To do so, select the desired key
(e.g. L1: [internal call number]) and then press the
HG no.: [internal call number]: The pick-list of hunt group call numbers
appears. Activated hunt group calls have a “+” prefixing the hunt
group call number; deactivated ones have a “-”. You can switch
signalling of hunt group calls to your telephone for the call number
dialled using the On/Off options. Use the All menu entry to switch
signalling of all hunt group calls on or off for your telephone or for
the trunk key selected (On/Off).
Ok
softkey.
Note: If you are the last reachable member of the hunt group and
you log out then any further callers will hear a busy signal.
“Call forwarding” Menu
Select one of the following menu entries in the Call forwarding menu…
Call diversion: Programming call diversions for your own telephone. If there are
multiple trunk keys configured on your telephone, you can programme call
diversions for each of these keys. To do so, select the desired key (e.g. L1:
[internal call number]) and then press the
forwarding type: Immediately, After Delay or Busy. Then enter the call
forwarding Dest (destination) (for information on entering the call number
please refer to the chapter External Seizure and Entry of Call Numbers
starting on page 42 also). Time: When programming call forwarding after
delay, you enter the time in seconds after which a call is to be forwarded
(10 … 120 seconds). If you do not enter a value, the default time interval
provided by the system administrator at system configuration is used
(default: 20 seconds). Then you select whether only internal calls, only
external calls or all calls are to be forwarded to the destination. Activate the
74
Ok
softkey. Select the desired
Page 83

Features and Menus
call forwarding with the On option. Active call forwarding is indicated by a
“+” sign. This is followed by the call forwarding destination.
Note: All calls for the call numbers of your device are forwarded (exception:
hunt group call numbers). If a number is in use on more than one
telephone, then calls made to any of the other telephones will be
forwarded as well.
Divert MSN (MSN call forwarding): Use the “Divert MSN” (MSN = Multiple
Subscriber Number) to forward incoming external calls per MSN to
external destinations. Several MSNs can be grouped together (this is
configured by the system administrator) and forwarded to a common
destination number.
A list of the configured MSNs and MSN groups is displayed. Select an entry.
Select the desired forwarding type: Immediately, Busy, or After delay.
Then enter the external destination and activate call forwarding. Active call
forwarding is indicated by a “+” sign. This is followed by the call forwarding
destination. A “?” preceding the entry, (e.g. ? MSN Group 1), means that call
forwarding is active for only some MSNs or that there are different call
forwarding types activated for this group.
Note: For the “Divert MSN” type of call forwarding, the (external)
destination number is always entered without the area code. If “Divert
MSN” is executed in the exchange (= external call forwarding; configured
by the system administrator), it can take a few seconds after configuration
for call forwarding to be activated in the exchange.
Divert door (door call forwarding): This is where you can programme “Divert call
immediately” for door calls. If several doorbells are configured on the
communications system, first select the doorbell whose calls are to be
diverted. The number of doorbells available and with which names they are
listed in the menu, depends on the type of entrance intercom. Consult your
system administrator if you have questions concerning the configuration of
the doorbells. Then enter the call forwarding Dest (destination) (for
information on entering the call number please refer to the chapter
External Seizure and Entry of Call Numbers starting on page 42 also).
Activate the call forwarding with the On option. Active call forwarding is
indicated by a “+” sign. This is followed by the call forwarding destination.
Remote divert (call diversion for): You can also configure call forwarding for other
OpenCom 100 / Aastra 800 users. Programming call forwarding for a virtual
call number is also possible (please refer to Call for a virtual call number
(Tele Secretary) on page 49 also). In order to do so, “Call forwarding for
other user” authorisation is required, otherwise this menu item will not be
displayed. Also, you can configure call forwarding only for those users
75
Page 84

Features and Menus
whose terminal has not been blocked for this type of access (these users
themselves have authorisation to “Prevent call forwarding by other user”).
Enter the internal phone number you wish to forward. The next steps are
identical with programming call forwarding (see page 74).
Follow me: This type of call forwarding diverts calls from another terminal
(source) to your telephone. The PIN of the source terminal is required for
this function. If the “follow me” function is active, all call numbers of the
other device are forwarded immediately to your telephone (exception:
calls for hunt group call numbers).
Enter the Source, the internal call number from which calls are to be
forwarded. Enter the PIN (user PIN) of the source. Activate the call
forwarding with the On option. You can switch “Follow me” call forwarding
off again on your own telephone or on the other terminal via the Off
option. You can also switch off “Divert call immediately” on the other
terminal.
“Messages” Menu
Short messages: You can exchange short messages with other communications
system users with a system terminal.
76
Received mail: A list of message senders is displayed. Use the
keys to select a message, press the
the following options.
Show: The text of the short message is displayed. Use the
keys to scroll through the text and view date and time the
message was received at the end.
Delete: You delete the message.
Forward: You can edit the message and then forward it to another
user. Press the
number of the user to whom you would like to forward the
message. You can also select a call number from the phone
book. Confirm input/selection of the call number with the
softkey.
Delete all: You delete all short messages received.
Outgoing mail: A list of messages you have sent is displayed. In the same
way as described in the previous section, you can forward or display
these messages.
OK
softkey to forward it. Enter the internal call
OK
softkey and then select one of
F arrow
F arrow
OK
Page 85

Features and Menus
New message: You can send a message to another user. First enter the text
(max. 160 characters) and then press the
internal call number of the user to whom you would like to forward
the message. You can also select a call number from the phone book.
Confirm input/selection of the call number with the
Short messages can also be sent with the OpenCTI 50 Web
application. Please refer to the OpenCom 100 / Aastra 800
communications system online help for information.
OK
softkey. Enter the
OK
softkey.
E-Mail: A list of senders of received e-mails is displayed. Use the
select a message, press the
options.
Show: The subject line of the e-mail is displayed. Use the
scroll and view date and time the e-mail was received.
Delete: You delete the e-mail notification.
Delete all: You delete all e-mail notifications received.
Note: The actual e-mails are not deleted. You can access and edit these at
your desktop PC with your e-mail programme.
Appointments: The status of the two messages is displayed. Use the
keys to select an appointment, to programme it and then press the
softkey. Enter the time the appointment call is to be carried out under
Time. Select Reason to enter the reason for the appointment. Select the
type of repetition: Single, Date (enter the specific date in the dd.mm.yy
format), Mo - Fr, Sa - Su or Every day. On activates the appointment call
and Off deactivates it.
Presence: You can inform other communications system users regarding your
presence status, e.g. you are currently not in the office or on holiday. The
text appears on the display of the caller of an internal call provided that the
caller’s telephone is a system terminal. There are pre-defined message texts
available for this. Select the desired text. If no message is to be displayed,
select the text Available. Furthermore, you can write your own message
text (23 characters maximum length). Select the Text: menu entry, enter
the text and press the
Presence list. You can overwrite this text anytime.
OK
softkey and then select one of the following
OK
softkey. The text is now saved and selected in the
F arrow keys to
F arrow keys to
F arrow
OK
Note: The settings of the Presence menu entry are saved on the
communications system and remain after a re-start as well.
Messages can also be entered and selected with the OpenCTI 50 Web
application. Please refer to the OpenCom 100 / Aastra 800 communications
system online help for information.
77
Page 86

Features and Menus
Received fax: This menu entry is displayed on the OpenCom X320
communications system if the system administrator has configured the fax
function. You see the sender list of received faxes. Use the
select an entry, press the
options.
Delete: The fax is deleted.
Info: Information on the fax is displayed: date/time received, sender and fax
memory size.
Delete all: All received faxes are deleted after a confirmation query.
A fax is saved as an image file on the communications system. Use the
OpenCTI 50 Web application to view and save the fax. Please refer to the
OpenCom 100 / Aastra 800 communications system online help for
information.
OK
softkey and then select one of the following
F arrow keys to
“Phone Settings” Menu
Key lock: You can protect your telephone keypad from unauthorised access. An
active keypad lock is displayed with the symbol in the softkey line. To
unlock the keypad, press the softkey under this symbol and then the
key. Alternatively you can hold down the
activate the keypad lock when idle.
# key for ca. 2 seconds to
#
Alarm: You can enter a time ranging from 00:00 to 23:59 at which the telephone
issues a signal. The alarm lasts ca. 1 minute and can be switched off by
pressing any key. After each signalling of an alarm, you must activate any
subsequent alarm once again.
Alarm active: This setting activates (
symbol appears on the display indicated an alarm is activated.
Set: When the 24 hour time format is set, enter the alarm time between
00:00 and 23:59. The time can be selected between 00:00 and 11:59
for the 12 hour format. Enter “am” with key 2 (a on display), “pm”
with key 7 (p on display). You can configure the signalling melody as
described below. The alarm signalling lasts ca. 1 minute and can be
switched off by pressing any number key. After each signalling of an
alarm, you must activate any subsequent alarm once again.
Date/Time: If the date and/or time is transmitted by the system, this menu
entry cannot be changed. If the system where the mobile unit is
currently checked into does not transmit date and time you can
enter the current date/time. For 12-hour format: After entering the
time use the number 2 to switch to “am” or number 7 to “pm”. You
78
“
) or deactivates the alarm. The
Page 87

Features and Menus
can set the date and time display format in the “Telephone Option”
menu (see page 83).
Melody: Select one of 10 melodies for signalling the alarm. To do so, press
one of the number keys or select the melody with the arrow keys.
You can also change this melody under “Ringer settings> Melody”
(see the following section).
Ringer Settings: This menu is for setting ringer volume and signalling for your
telephone.
Melody: Different call types can be signalled using different melodies.
There are 60 different melodies available respectively. Select the call
type:
Internal = internal calls
External = external calls. If there are multiple trunk keys configured
on your telephone, you can configure a separate melody for
each of these keys. To do so, select the desired key (e.g. L1:
[internal call number]) and then press the
Ok
softkey.
Unknown Number = call from unknown call number
VIP = VIP calls
Emergency Call = emergency call received
Alarm = please refer to page 78 also
Messages = call when message received
Enter a number (1...9 or for two-digit entry, 10...60, pressing the
numbers quickly one after another) or change the number displayed
with the arrow keys.
Type: This setting determines how selected melodies are signalled.
Repeat: The melody is played (repeatedly) as long as the call is
signalled.
Play once: The melody selected is played just once when there is a
call.
Device: You can select the combination of signal generators with which the
call will be signalled.
Buzzer: Activates or deactivates the acoustic ringer tone. If you
deactivate the signal generator then this is shown in the
display with the symbol.
79
Page 88

Features and Menus
Vibrator: Activates or deactivates the vibration signal generator.
Note: If you switch off all signal generators, a call is only signalled
optically on the display with the symbol.
Headset: Signals the call on the headset if this is connected to the
mobile unit.
Volume Settings: Select the buzzer volume signalling (1 … 8) via entering
a number or with the arrow keys.
Volume Settings: Select the volume at which you wish to hear the person calling
you (via Earpiece, Hands-free and Headset). Enter a number (1 … 8) or
select the volume with the arrow keys. In addition, you can also set the
volume for the Buzzer here.
System: This menu offers you settings for subscribing and checking in the mobile
unit on a communications system. Please note the information in the
chapter Subscribing Mobile Unit starting on page 14 also.
Note: The System menu entry is possibly displayed in the main menu
directly. This is the case when the mobile unit is not yet checked in or if the
mobile unit, for example, is simply checked into a GAP base station.
Subscriptions: Use this menu to subscribe the handset to one or more
communications systems and administer the subscription records
necessary for checking in. Please refer to the The “Subscriptions”
Menu on page 15 section for further information.
80
IPEI: The international mobile unit code is displayed (IPEI = International
Portable Equipment Identity).
Version Number: The software and hardware version number of the
mobile unit are displayed. Depending on the software version, you
can also view the internal memory usage and memory usage of an
inserted MEM card.
Managing existing subscription
The following menu entries are available when there is at least one existing
subscription entry.
Navigate to the System > Subscriptions menu entry. Select the desired
subscription entry or select the menu entry Auto.Search (Automatic
Search). Confirm with the
Options
softkey.
New: Begin a new subscription with this menu entry. For details, please
refer to Creating New Subscription starting on page 17.
Page 89

Features and Menus
Select:
– when you select Auto. Search: If you have subscribed the mobile
unit to multiple communications systems, the mobile unit (when
idle) will automatically select and check itself in to one of the
reachable and subscribed communications systems. Your mobile
unit will thus be automatically checked in to another
communications system as soon as you are out of range of the
current communications system.
– when selecting an existing subscription entry: Selecting this
menu entry selects a specific communications system. Even if
there are also other existing subscription entries, only the
manually selected entry is used for checking in.
Edit (only when selecting a subscription entry): You can change the name
and call number display of the subscription selected (usually the
internal/local call number of the mobile unit). This information is
displayed in the idle state when the mobile unit is checked into a
communications system and no priority status information is
displayed.
Note: Entering an internal call number for the mobile unit is
irrelevant on the OpenCom 100 / Aastra 800 as the internal call
numbers are managed by the communications system.
GAP only (only when selecting a subscription entry): Activate or deactivate
this mode with the
OK
softkey.
– Not activated (recommended): The mobile unit uses extended
system telephony functions. Use this mode for operation on a
communications system.
– Activated: The mobile unit acts like a standard GAP telephone.
Use this mode when the GAP base station subscription is not
successful.
Delete (only when selecting a subscription entry): This menu entry deletes
the subscription entry on the mobile unit. The mobile unit can only
be operated on this communications system again after resubscription.
Telephone Option: This menu contains device settings for the mobile unit.
Language: Select one of the languages listed for the display.
User Name: Enter a name for your mobile unit. This appears when idle. Your
system administrator may already have entered a name. For
information on text entry refer to page 27.
81
Page 90

Features and Menus
Attention Tones: You can configure tones that the mobile unit uses to
notify you of various “events”.
Key Click: Each key press is confirmed.
Coverage Warn (coverage warning): Notification tone every 10 sec.
when you are at the edge of the RFP coverage area and there
is a risk the connection will be interrupted.
Battery Alarm: Notification tone every 30 seconds when battery
charge capacity gets too low. There are ca. 5 minutes
remaining before the connection is disconnected.
Confirm Tones: Tone when procedure successfully completed.
End of Menu: Tone indicating end of a list/of a menu.
Emergency Call: The emergency call number is the call number dialled
upon a long key press of the emergency call key (
entry is not offered when the emergency call number is
administered by the system.
SOS number: Before entering the emergency call number, press the
R key. This ensures that the emergency call numbers can
also be dialled during a call. You can enter any internal or
external call number. When you programme an external call
number for the SOS destination you may have to – depending
on the system configuration – prefix the call number with the
code for external line seizure.
R key). This menu
82
SOS beep: Configure whether an emergency call is also signalled
with a loud beep on your mobile unit (so that the device/
person that triggered the emergency call can be located).
Hands-free: You can configure whether your mobile unit switches
to the handsfree mode during an emergency call. This means
that the person receiving the emergency call can listen and
speak throughout the room.
Melody: If your mobile unit is one receiving emergency calls, you
can configure the melody signalling the emergency call.
Select a melody via the arrow keys. You can also change this
melody under “Ringer settings> Melody” (see page 79).
Loud Environm. (loud environment): It may be useful to activate this
function in a loud environment. The mobile unit then tries to
enhance voice transmission.
Page 91

Features and Menus
Auto Answer: If this function is activated the mobile unit automatically
answers a call after the first ring (useful when using a headset). Note:
If you are not using the headset, then please deactivate this function
as a caller may listen in unnoticed otherwise.
Silent Charging: As long as the mobile unit is in the charging station no
calls are signalled. This applies to both acoustical signalling as well as
optical signalling or to the vibration signal generator.
Charger Answer (Automatic Answer): If this feature is activated, the mobile
unit automatically answers a call when it is removed from the
charging station (this means the
pressed). When the mobile unit is replaced into the charging station,
the call is switched to the handsfree mode.
Auto.Quick Hook (Automatic speed dialling): If this feature is activated, a
local phone book entry designated for speed dialling is dialled
immediately (see page 68). Dialling additional single digits after
dialling has taken place is not possible. If it is deactivated, the
corresponding call number goes to pre-dialling first and digits can
be added.
Auto.Key Lock (Automatic Key Lock): If this feature is activated, the key
lock is automatically activated 60 seconds after the last key press
when the device is idle.
A call key does not have to be
Charging LED: After removing the mobile unit from the charging station
the display illumination goes on. Switch this function off if you wish
to save energy.
Disp.Contrast: Select the level of display contrast by entering a number
(1 … 8) or with the arrow keys.
Date/Time: You can select the time and date format customary in your
country here. If the time is not transmitted by the communications
system, you can set it in the “Phone Settings” menu (see page 78).
Date Format: Select the date format dd.mm.yy (e.g. 31.12.08) or
mm/dd/yy (e.g. 12/31/08).
Time Format: Select the 24 hour or 12 hour (am/pm) format.
Call time: If this feature is activated the call duration appears on the
display during a call.
Display Time: You can switch display of the current time on/off.
Reset: Use the following menu entries to reset settings:
83
Page 92

Features and Menus
Handset: After a confirmation query, the mobile unit is reset to the
factory settings. This means that all settings/entries are
deleted, excepting system subscriptions and the PIN.
Telephone Option: This resets the settings in the “Telephone
Option” menu only.
Telephone Book: Only your local phone book is deleted.
Note: When resetting the mobile unit and the telephone options
any saved emergency call number is also deleted.
Security: This menu entry allows you to prevent unauthorised use of your
telephone keypad. To do so, you require a PIN (Personal Identification
Number). The default is “0000” (4 digits of 0 (zero)).
Lock Handset: Confirm with the
PIN Lock appears on the display. Outgoing calls are no longer
possible. You may still accept incoming calls. The emergency call key
(
R key) programmed with a call number can still be used.
Change PIN: You can change your PIN (4-digit) here. Enter your current
device PIN (default: “0000”) and then the new PIN twice. You require
the PIN for access to the “Security” menu entry described here where
you can lock the telephone keypad.
OK
softkey, the mobile unit is now locked.
“Protection” Menu
Call protect.: Switches call signalling for all call numbers of your device On/Off
(exception: VIP calls are still signalled). You can activate call protection for
internal calls only, for external only or for all calls. When call protection is
activated, a caller hears either a ringing tone or a busy signal (the system
administrator configures this when configuring user groups). If there are
multiple trunk keys configured on your telephone, you can switch call
protection on/off for each of these keys. To do so, select the desired key
(e.g. L1: [internal call number]) and then press the
Note: Call protection is only in effect on the terminal where it was
activated. If the internal call number of the terminal is available multiple
times (i.e. on other terminals as well), call protection is not automatically
activated on them.
Ok
softkey.
Announc. prot. (announcement protection): Switching the announcement
protection On or switching it Off. When announcement protection is
activated, no announcements can be made to your telephone (please refer
to page 59 also).
84
Page 93

Features and Menus
If there are multiple trunk keys configured on your telephone, you can
switch announcement protection on/off for each of these keys. To do so,
select the desired key (e.g. L1: [internal call number]) and then press the
Ok
softkey.
Telephone lock: If you wish to temporarily allow another person to use your
telephone, you can activate the telephone lock. Then your telephone is
given the authorisations for the “Guests” user group. This user group is
configured by the system administrator and facilitates locking various
menu entries and list accesses on your device so that unauthorised persons
cannot read or change them. Dialling rights may also be restricted. Please
contact your system administrator for information on the altered range of
functions when the telephone lock is on. Telephone lock access is user-PIN
protected (default “0000”). After entering the PIN, activate / deactivate the
function with the On or Off option.
Baby call: Enter the destination call number and activate or deactivate the baby
call (please refer to the chapter Baby Call starting on page 58 also).
Change PIN: Enter the current user PIN (6-digits max.) and then the new PIN twice.
You require this PIN for accessing the telephone lock (see page 85). If you
have misplaced your PIN, please contact your system administrator.
Availability: All active features that hinder your availability are cleared (i.e. call
protection, call-waiting protection, call forwarding).
Call wait. Prot: During a telephone conversation and are thus busy, authorised
internal subscribers can signal call waiting to you to gain your attention. If
you would like to prevent this, activate call waiting protection; the caller
hears a busy signal. If there are multiple trunk keys configured on your
telephone, you can switch call waiting protection on/off for each of these
keys. To do so, select the desired key (e.g. L1: [internal call number]) and
then press the
Ok
softkey.
Note: Call waiting protection is only in effect on the terminal where it was
activated. If the internal call number of the terminal is available multiple
times (i.e. on other terminals as well), call protection is not automatically
activated on them.
Intercom prot. (Intercom protection): Activate (On) or deactivate (Off) intercom
protection. When intercom protection is activated, no intercom
announcements can be made to your telephone (please refer to page 59
also).
85
Page 94

Features and Menus
“Connections” Menu
The following features are executed if the current connection state of your telephone permits. These features are also available in the state-dependent menus.
Select one of the following menu entries in the Connections menu…
Select Call pick-up then…
Pick-up: You pick up the call intended for another telephone in your pick-
up group.
If the called subscriber belongs to a user group with pick-up
protection activated, you cannot pick up calls for that person’s call
number.
Pick-up select: After entering the call number, you pick up the call for any
other telephone.
If the called subscriber belongs to a user group with pick-up
protection activated, you cannot pick up calls for that person’s call
number.
Note: If the other telephone is already in the call state (e.g. an
answering machine is making an announcement), you can pick up
the call with “Pickup select.”. The subscriber for whom you picked up
the call must belong to a user group for which “Call removal”
authorisation is activated, otherwise “Pick-up select” is not possible.
Take: You wish to take a current call from one terminal over to your DECT
Select Dial then…
Announcement: You direct an announcement to other system terminals
Intercom: This function is for directing an announcement to a single
86
telephone and continue the call on the DECT telephone. To do so,
your DECT telephone and the other terminal must have the same
internal call number.
(please refer to page 59). Enter the call number under To:.
Announcements can also be directed to call numbers where
multiple subscribers can be reached (e.g. a hunt group call number).
Note: If a called subscriber has announcement protection on (see
page 84), this feature is not executed.
system terminal and the microphone is switched on on the system
terminal called (please refer to page 59). The subscriber called can
answer you immediately without having to press a key. Enter the
Page 95

Features and Menus
device ID of the terminal in Device-ID. For information on the device
IDs available, contact your system administrator.
Note: If a called subscriber has call waiting protection on (see
page 85), this feature is not executed.
VIP call: Your next internal call is executed as a VIP call. Enter the call
number under To:. Even when the internal subscriber called (with
system terminal only) has activated call waiting protection, call
protection or call forwarding, your call is now signalled acoustically.
Door opener: You activate the door opener.
Phone book: You open the OpenCom 100 / Aastra 800 phone book and
can call one of the subscribers listed there (please refer to the
chapter Calling from the Communications System Phone Book
starting on page 64 also).
Switch auth. (Switch authorisation): You switch another terminal into a user
group defined by the system administrator. When the user group is
changed, this involves different authorisations, e.g. the authorisation for
international dialling. This switch only applies to the next call conducted on
this terminal. Please consult your system administrator regarding changed
authorisations when switching user groups.
Number: Enter the internal call number of the terminal whose
authorisation you wish to switch. Use On/Off to activate/deactivate
the switch.
Phone book: You can find and select the desired call number in the
communications system phone book (see page 64). Use On/Off to
activate/deactivate the switch.
Note: If the terminal to be switched is making a call, the
authorisation switch takes place when the call is finished. If the next
call is not begun within 60 seconds, the authorisation switch expires
automatically. At the end of the call, you receive – if configured this
way – a brief message on your telephone regarding call duration and
relevant charges incurred.
PIN dialling: For the next call, you switch your telephone into one of the user
groups defined by the system administrator. Switching the user group
means different authorisations (e.g. international dialling authorisation)
and other features are possibly available (e.g. for charging and recording
connection data of private calls). Please contact your system administrator
for information on system configuration and the designated application
area for PIN dialling.
87
Page 96

Features and Menus
First you enter your internal call number under Number and then your user
PIN under PIN. Then you can dial the desired call number.
Note: PIN dialling can be done from any terminal which belongs to a user
group with this authorisation activated. The call numbers dialled using PIN
dialling are not saved in any redial list, neither on the terminal used, nor on
one’s own terminal.
Lists: When there are multiple call numbers (trunk keys) configured for your
telephone, you can define which number(s) are to be recorded in the caller
lists (missed calls and accepted calls) and the redial list. Select the desired
call number. Use On/Off to activate/deactivate the lists for this call number.
“Phone book” Menu
Notes on phone books
You can edit communications system phone books in this menu. You can add,
edit and delete entries in your personal phone book. If your system administrator
has authorised your user group accordingly, you can also edit the central phone
book and your company’s phone book. An entry in the company phone book can
be used by all employees in your company. For information on company phone
books, please refer to the “Mounting and Commissioning” manual (for the
Aastra 800: “Installing and Commissioning”) in the “Multi-Company Variant”
chapter and in the online help of the OpenCom 100 / Aastra 800 communications
system.
You can enter multiple call numbers per entry (per name) (office, mobile and personal) and designate one of these numbers as the default number. The default
call number is dialled automatically if no other call number is selected before
establishing a connection.
You can also assign a speed-dialling number (Abbrev. no.) to the call numbers of
the entry in the central phone book. To do so, the system offers you the next
respectively available speed-dialling number.
Select one of the following menu entries in the Phone book menu…
Creating New Phone Book Entry
F and
F and
88
Ok
Select the New entry menu entry in the Phone book menu,
confirm with the
OK
Select desired phone book: Personal, Company or Central,
confirm with
OK
OK
softkey.
softkey.
Page 97

Features and Menus
Z and
Z and
F and
Z and
F and
OK
Enter Name and First name (see The Editor starting on page 27),
confirm with
OK
Enter call number No. office, confirm with OK softkey.
You can assign a speed-dialling number to the call numbers of the
entry in the central phone book. You automatically have the next
available speed-dialling number (Abbrev. no.) offered to you. If you
wish to assign them, press the
dialling number with the
dialling number if needed) and then press
OK
Display your own call number, confirm withOK softkey:
Transmit number: When calling (from the phone book) your call
Suppress number: Your call number is suppressed.
OK
As necessary – just like in the two previous steps – enter additional
call numbers (No. mobile and No. Private), confirm with
OK
softkey respectively.
OK
Dialling default number (Default office, Default mobile or Default
private), confirm with
The default call number is dialled automatically if no other call
number is selected before establishing a connection.
OK
softkey respectively.
OK
softkey. If not, delete the speed-
C key (enter another unused speed-
Ok
.
number is displayed to the subscriber called.
OK
softkey. The phone book entry is saved.
Note
If you do not activate the “Suppress number” function for a call number saved in
the telephone book, you can suppress the display of your call number from call to
call – i.e. before you dial the destination call number.
Edit phone book entry
F and
F and
OK
Select the Edit menu entry in the Phone book menu, confirm with
the
OK
softkey.
OK
Select desired phone book: Personal, Company or Central,
confirm with
OK
softkey.
Z Enter letter/name you are searching for (see The Editor starting on
page 27).
F and
OK
Use arrow keys to select the entry desired, confirm withOK softkey.
89
Page 98

Features and Menus
F Select Delete or Edit menu entry. To change the phone book entry,
simply overwrite the existing information. The procedure is identical to the one described in the section Creating New Phone Book
Entry starting on page 88.
“Applications” Menu
This menu is only shown if the system administrator has set up additional programme packages for your communications system and you have the user authorisation to use these programmes.
Voicebox: This menu is only offered to you if the OpenVoice additional
programme is installed and your system administrator has configured a
voicebox for you. Select...
Voicebox mess. (voicebox messages): You see the list of received voicebox
messages and can listen to them and edit them (please refer to
“Voicebox messages” starting on page 73).
Call voicebox: You call your voicebox. The next steps are voice-controlled.
For detailed information, please refer to the user guide for the additional
programme OpenVoice.
Server menu: Your communications system can also be extended via additional
third-party programmes. It is possible to use individual functions of these
programmes with your system telephone. The menu entry Server menu
will be offered to you in this case. For further information, please consult
the respective programme documentation.
“Central settings” Menu
In this menu you can define rules and settings for the time management of your
system.
The Time control menu entry is available if the user group of your telephone has
been granted “Time Control” authorisation by the system administrator. The Date
/ Time menu entry is available if the user group of your telephone has been
granted “Configurator - Expert” authorisation by the system administrator. If you
do not have any of these authorisations this menu will not be displayed on your
telephone.
Select Central settings, then select…
Time control: On the OpenCom 100 / Aastra 800 communications system
several time groups can be configured. Depending on the activated
time group, incoming calls are signalled on different terminals.
90
Page 99

Features and Menus
Switching back and forth between these time groups can be done
manually or automatically – according to a schedule configured by
the system administrator.
Select the Automatic entry to activate automatic time control. The
configured time groups then switch automatically according to the
schedule configured by the system administrator. This setting
remains active until one of the existing time groups is set manually.
The system administrator can configure up to 10 time groups. The
time groups are either numbered (default setting) or they have been
given a name by the system administrator. You can manually select a
specific time group; the automatic time control is then deactivated.
Note: Any “MSN” call diversion always remains in effect – regardless
of the currently active time group.
Date / Time: The date and time are taken over from the exchange on the
first external outgoing call. If this information is not transmitted by
your network operator, you can set the date and time here yourself.
Information Menus
Use the B info key to access other menus with information on received, calls, messages, etc. as well as current settings of your telephone.
When the phone lock is activated (see page 85) access to the information menu is
blocked.
Note
In order to be able use the Info key, an OpenCom 100 communications system
must be using a software version of at least 5.22.
“Info” Menu
This menu is for quickly locating received or saved messages. The same menu
entries are also in the main menu. If there are new entries on the info list, the Info
key flashes. The menu entries described as follows only appear when corresponding messages (calls, notifications) are there.
When idle, press the
Missed calls: Information on missed calls (please refer to the section “Call Lists” on
page 72)
B Info key briefly. You see one or more entries...
91
Page 100

Features and Menus
Voicebox mess.: Information on voicebox messages (please refer to the section
“Voicebox Messages” on page 73)
Short messages: Information on short messages received (please refer to the
section “Short Messages” on page 76)
E-mail: List of received e-mails (please refer to the section “E-mail” on page 77)
Appointment: Displays active appointment (please refer to the section
“Appointments” on page 77)
Received Fax (only on OpenCom X320 communications system): Displays
received faxes (please refer to the section “Received Faxes” on page 78)
Charges: Here you see the amount charged for the last call and the total charges
for your telephone. If there are multiple trunk keys configured on your
telephone, you can view the individual charges for each of these keys. To do
so, select the desired key (e.g. L1: [internal call number]) and then press
the
Ok
softkey.
Active features: Displays active features which restrict reachability (see next
chapter on page page 92)
“Active features” Menu
This menu provides an overview of active features which impair your reachability.
The same menu entries are also in the main menu. You can deactivate features
here. The features are then removed from this menu.
When idle, press the
menu (see page 91). You see one or more entries...
Call protect.: Call protection is activated; see the section “Call Protection” on
page 84
Call diversion: Call diversion is activated; see the section “Call Diversion” on
page 74
Hunt group: Your telephone is assigned at least one hunt group call number;
please refer to the section “Hunt Group” on page 74
Time control: Time control is configured on the system and can be activated from
the telephone; please refer to the section “Time Control” on page 90.
92
B Info key longer or select Active features in the “Info”
 Loading...