

Page 1

Aastra Phone 142
User Manual
Page 2

Welcome to Aastra
Table of Contents
Thank you for choosing this Aastra telephone. It’s a high-quality product with a superior design.
The following instructions will guide you in using your Aastra Phone 142 and provide answers to all
your most important questions. If you should require any further technical support or information
about other Aastra products, please first contact the person responsible for your system or get in
touch with your local retailer.
You can also find information about this phone and other products on our website.
We hope you enjoy using your Aastra Phone 142
Using Your Telephone ...............................................................................................................1
Important Safety Information ……………………………………………………………1
Proper use / Declaration of Conformity …………………………………………………1
Power Supply / Power Failure / Rechargeable Batteries……………………………………1
Safety Precautions ……………………………………………………………………1
Overview and Basic Information …………………………………………………………3
General Information ……………………………………………………………………3
DECT and GAP …………………………………………………………………………3
Memory Card …………………………………………………………………………3
Headset Connector ……………………………………………………………………4
Overview...................................................................................................................................5
The Keys on the Handset …………………………………………………………………6
Installation ...............................................................................................................................7
Unpacking and Installing Your Telephone …………………………………………………7
Unpacking Your Telephone ……………………………………………………………7
Setting up the Charger Cradle …………………………………………………………7
Commissioning the Charger Cradle ………………………………………………………8
Commissioning the Handset ………………………………………………………………9
Important Information about the Batteries ………………………………………………9
Charging and Discharging………………………………………………………………9
Initial Setup and Operation ……………………………………………………………9
Charging and Operating Times…………………………………………………………10
Inserting the Batteries …………………………………………………………………10
Inserting the Memory Card ……………………………………………………………11
Removing the Memory Card …………………………………………………………11
Charge Display ………………………………………………………………………12
Charge Warning ………………………………………………………………………12
Registering Your Handset ………………………………………………………………13
Mounting and Removing the Belt Clip ……………………………………………………13
Display Arrangement, Softkeys, and Other Keys ....................................................................14
Display Arrangement ……………………………………………………………………14
Text Lines ……………………………………………………………………………15
Softkey Line …………………………………………………………………………15
Illumination …………………………………………………………………………15
Softkeys and Other Keys …………………………………………………………………16
Softkey: Arrow Keys …………………………………………………………………16
Softkey: OK …………………………………………………………………………16
Softkey: Esc …………………………………………………………………………16
Softkey: Redialing ……………………………………………………………………17
Hook key ……………………………………………………………………………17
Handsfree Key ………………………………………………………………………17
Info Key ……………………………………………………………………………17
C-Key ………………………………………………………………………………17
R-key ………………………………………………………………………………18
i
Page 3

Table of ContentsTable of Contents
Hash Key # …………………………………………………………………………18
Star Key * ……………………………………………………………………………18
Number Keys …………………………………………………………………………18
Softkey: Menu ………………………………………………………………………19
Automatic Menu Closure…………………………………………………………………20
Menu Control ..........................................................................................................................21
Example: Main Menu ……………………………………………………………………21
Example: Telephone Book / Editor ………………………………………………………23
The Editor ………………………………………………………………………………24
Entering Names / Phone Numbers ……………………………………………………24
Basic Functions........................................................................................................................25
Switching the Handset On / Off …………………………………………………………25
Key Lock ………………………………………………………………………………26
Activating the Key Lock ………………………………………………………………26
Deactivating the Key Lock ……………………………………………………………26
Switching the Handsfree Function On/Off …………………………………………………26
Adjusting the Earpiece Volume during a Call ………………………………………………27
Switching the Ringer Off …………………………………………………………………27
Backlight ………………………………………………………………………………27
Adjusting the Display Contrast……………………………………………………………27
Emergency Number (SOS) ………………………………………………………………28
Quick Call ………………………………………………………………………………28
Muting the Handset ……………………………………………………………………28
Message-waiting Indication / Notification Texts……………………………………………28
Making Calls............................................................................................................................29
Dialing Phone Numbers …………………………………………………………………29
Dialing Phone Numbers Directly ………………………………………………………29
Making Calls Using the Predialing Feature ………………………………………………30
Making Calls Using the Quick Call Feature …………………………………………………31
Making Emergency Calls …………………………………………………………………31
Making Calls from the Redial List …………………………………………………………32
Making Calls from the Telephone Book ……………………………………………………33
Making Calls from the Caller List …………………………………………………………34
Answering Calls …………………………………………………………………………35
Options during a Call ……………………………………………………………………36
Answering a Call during a Conversation (Call Waiting) ……………………………………37
Making Another Call during a Conversation ………………………………………………38
(Enquiry Call) ……………………………………………………………………………38
Making an Enquiry Call ………………………………………………………………38
Toggling during the Enquiry Call ………………………………………………………39
Transferring a Call ………………………………………………………………………39
Blind Transfer …………………………………………………………………………39
Consultative Transfer …………………………………………………………………40
Editing Lists ............................................................................................................................41
Telephone Book: Adding a New Entry ……………………………………………………41
Telephone Book: Editing an Entry…………………………………………………………42
Telephone Book: Creating a Quick Call Entry ………………………………………………43
Editing the Redial List ……………………………………………………………………44
Editing the Caller List ……………………………………………………………………45
Info Key ................................................................................................................................46
Voice Box / Caller List ……………………………………………………………………46
Checking Your Voice Box ………………………………………………………………46
Checking Your Caller List ………………………………………………………………46
Customizing Your Telephone...................................................................................................47
Menu: Alarm ……………………………………………………………………………47
Menu: Ringer Settings……………………………………………………………………48
Menu: Volume …………………………………………………………………………50
Menu: Caller Filter ………………………………………………………………………51
Menu: System …………………………………………………………………………52
Menu: [System name] ……………………………………………………………………53
Menu: Telephone Options ………………………………………………………………54
Appendix.................................................................................................................................57
Default Settings …………………………………………………………………………57
Important Information about the Batteries ………………………………………………58
Care and Maintenance …………………………………………………………………60
Environmental Characteristics and Disposal ………………………………………………60
Notes on disposal ……………………………………………………………………60
Technical Data …………………………………………………………………………62
Menu Structure …………………………………………………………………………63
Index of Key Words………………………………………………………………………64
iiiii
Page 4

Table of Contents
Using Your Telephone
Important Safety Information
Proper use / Declaration of Conformity
Use in accordance with intended purpose / declaration of conformity.
In all EU member states this product may be operated on a communication system that supports the
specifications for an Open Mobility Management (OMM) system.
The phone complies with the radio-specific, European-wide harmonised standards for DECT.
The CE mark on the product certifies its conformity with the technical guidelines for user safety and
electromagnetic compatibility, valid from the date of issue of the relevant Declaration of Conformity
pursuant to European Directive 99/5/EC. The Declaration of Conformity can be viewed on the Aastra
homepage.
Please also use the other documentation supplied along with the individual parts of your phone system.
Like any cordless phone this mobile phone uses radio signals which do not always guarantee that a
connection can be established under any circumstances. As a general rule you should therefore
never rely exclusively on cordless phones for essential communication needs (e.g. medical emergencies).
Power Supply / Power Failure / Rechargeable Batteries
The main voltage of the adapter must match the local mains voltage (230 V AC) in order to operate
the charger cradle. You can only cut the power to the charger cradle off by removing the adapter
from the mains socket.
In the event of a power outage, the contents of the memory (program and user data) will be saved
without any changes being made.
Please refer to the important notes on using the rechargeable batteries mentioned in the Appendix
on page 58
Safety Precautions
The charger cradle must only be installed and operated indoors.
Place the charger cradle on a nonslip surface.
Do not place the charger cradle or the handset in the proximity of:
• Water, moisture or damp areas, for example bathrooms.
• Sources of heat, direct sunlight or unventilated areas.
• Devices that generate strong magnetic fields, electrical appliances, fluorescent lamps, computers,
radios, televisions, fax machines or telephones.
iv
1
Page 5

Using Your Telephone
Using Your Telephone
Overview and Basic Information
• Areas where the equipment can be covered, its ventilation impaired or liquid can get inside.
• Areas where there is excessive dust and areas subject to vibration, shock or extreme temperature
fluctuations.
Please note the following when setting up, connecting, and using your telephone:
• Lay the cables where they cannot be walked on or tripped over, causing injury.
• Connect the cables to the appropriate sockets only.
• Only connect authorized accessories.
• Only use the plug-in adapter supplied (ID No.: 4512132 Continental Europe / 4513788 for UK).
• Scientific research has shown that in certain cases, medical equipment can be influenced by operational DECT telephones. You should therefore adhere to any regulations applicable in medical
institutions regarding the operation of cordless telephones.
• Never
- open the charger cradle or handset yourself (except for the battery compartment cover)
- touch the contacts with sharp or metallic objects
- carry the charger cradle by its connector cables.
• Only use a slightly damp cloth to clean your telephone.
• Do not operate your telephone in areas where there is any risk of an explosion.
Keep the handset and accessories out of reach of small children.
Note for the users of hearing aids
Before using the handset, users of hearing aids should note that such aids can receive radio signals,
which, if powerful enough, may cause an unpleasant hum.
General Information
The Aastra Phone 142 is a telecommunications device that you can operate on a communications
system specified as compatible with an OpenMobilityManagement system (OMM).
The newly designed menus enable easy handling and fast access to the many functions and features provided by your system.
Make yourself familiar with your telephone equipment. You’ll discover many new functions that
make communication and organization easier.
DECT and GAP
Your handset uses a digital radio connection in accordance with the Digital Enhanced Cordless Telephone (DECT) standard for the connection to the base station. This digital channel guarantees the
highest voice quality possible without static or background noise.
The Generic Access Profile (GAP) and the DECT standard define methods according to which digital
cordless telephones can establish connections. As the GAP standard is not manufacturer-specific, it’s
possible to combine base stations and handsets from different manufacturers with one another.
Basic functions (i.e., making and receiving calls) are always possible when using these combinations.
Other functions (e.g., the display of phone numbers or connection states) may not be available if you
use other manufacturers’ devices, however. For more information, please refer to the user guide
provided by the other manufacturer or ask your system administrator.
Memory Card
The Aastra Phone 142 is equipped with a memory card. This stores your phone's local settings
(including a local telephone book with up to 100 entries) and its identification number (IPEI). This
means that if you exchange phones with someone else, you simply take your memory card out of
your own phone and plug it into the other one. You will then have all the data you need in the new
phone and can make calls right away without having to register it on the base station again.
The memory card is inserted in a slot in the battery compartment underneath the batteries. For
security purposes, your phone is fitted with an additional battery compartment lock.
In some models, the memory card has already been inserted in the factory. If the memory card has
been supplied separately, you will have to insert it in its slot yourself. This is located in the battery
compartment underneath the batteries. For instructions on how to insert the memory card in the
Aastra Phone 142, please refer to the section entitled "Installation" below.
32
Page 6
Using Your Telephone
Headset Connector
Your phone is equipped with a 2.5 mm jack for connecting a headset. In order to maintain electrical
compatibility, it is important that you only connect the headset supplied as an accessory by Aastra.
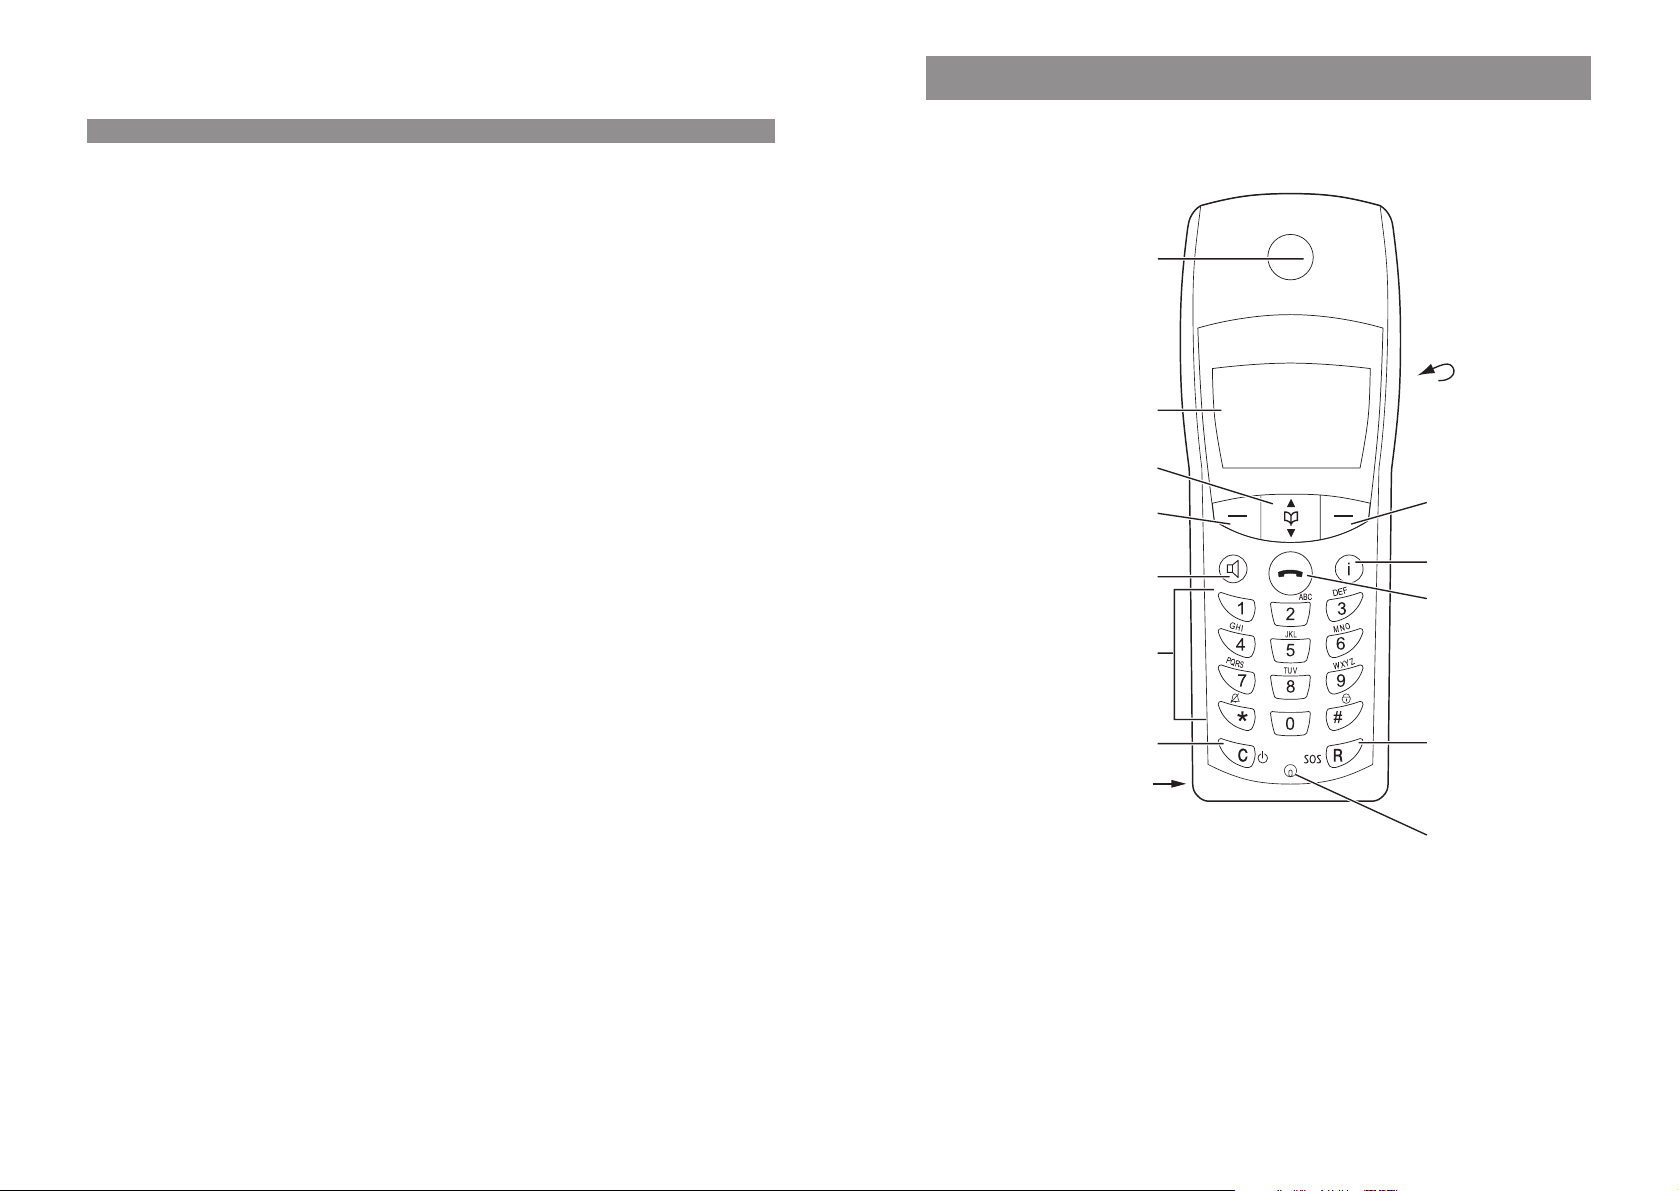
Overview
Handset:
Earpiece
Display
Arrow keys
Softkey
Handsfree key
Dialling keypad
Cancel / Delete key
Power on/off
Connector for Headset
Rear:
Loudspeaker
Softkey
Info key
Hook key
R-key
Emergency call key
Anschluss für PC
Microphone
54
Page 7

Overview
The Keys on the Handset
DE
Softkeys - the function allocated to each key is shown in the display. The key
function changes automatically according to the respective operating state of
the handset. If a function only permits you to switch between two options,
these are allocated to the left and right softkeys. If more than two options are
available, then the softkey will appear.
When your phone is in the idle state, the arrow key opens the telephone
F
book. In this case, the arrow key has no function.
When a menu or list is displayed, the arrow keys move the cursor to the desired
entry.
R-key: this is used to make enquiry calls.
r
Handsfree key: switches the built-in loudspeaker on (key is lit) and off.
H
Info key:
B
Press this key briefly while your phone is in the idle state to open the info menu
(caller list, redialing, telephone book, voice box).
The key flashes when there are new messages (missed calls/messages in your
voice box).
The C-key is used to delete erroneous input when you are making an entry. A
C
long press on this key in the idle state switches your handset on/off.
Hook key: pressing this key corresponds to going off hook (i.e., picking up the
A
handset) or on hook (replacing it again) when using a conventional telephone.
Options
Installation
Unpacking and Installing Your Telephone
Unpacking Your Telephone
The package contains:
• Aastra Phone 142 handset
• Charger cradle
• 230 V plug-in adapter with a connector cable (3 m)
• Three rechargeable batteries
• Memory card (either already inserted or separate, depending on the model)
• Belt clip
• Brief user guide
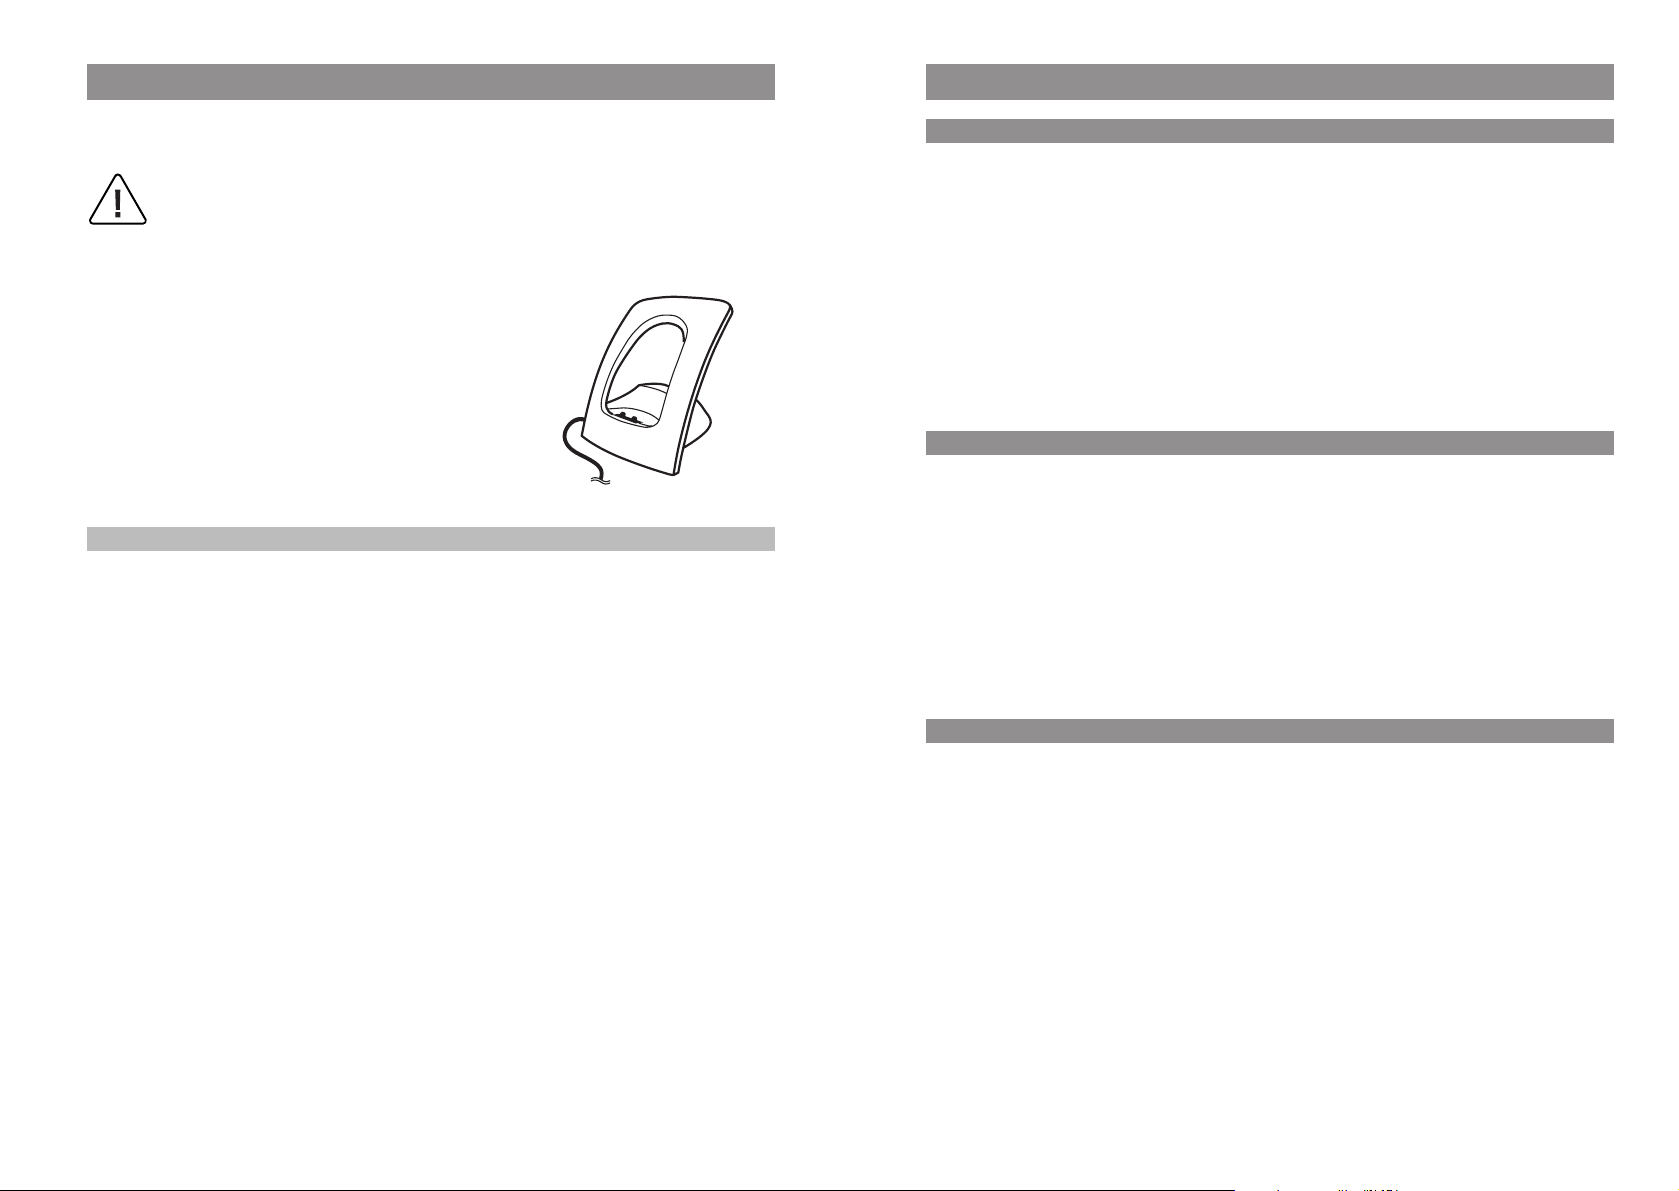
Setting up the Charger Cradle
Your telephone was designed for normal operating conditions. These days, furniture is coated with a
large range of different paints and synthetics, and then treated with various polishes. It is possible
that some of these substances may contain components which damage the rubber feet on the
charger cradle. In this situation, the feet may leave unsightly marks on the surface of furniture.
The manufacturer cannot accept any liability for damage of this nature. For this reason you should
place your charger cradle on a nonslip base, especially in the case of new or polished furniture.
0
…
Number keys: these keys are used to enter phone numbers or names directly.
9
Keys "1" – "9": a long press on the desired key activates the quick call numbers
"1" – "9".
Key "0": a long press on this key when you are entering a phone number inserts
a pause.
The hash key enables you to enter the hash icon.
#
A long press in the idle state switches the key lock on/off.
The star key enables you to enter the star icon.
*
A long press in the idle state switches the ringer on/off.
All of the keys are illuminated.
Note
• Please note the following:
The 230 V mains socket must be within range of the connector cable supplied (3 m).
• Do not locate the charger cradle where it could be damaged when a door or window is opened.
76
Page 8
Installation
Installation
Commissioning the Charger Cradle
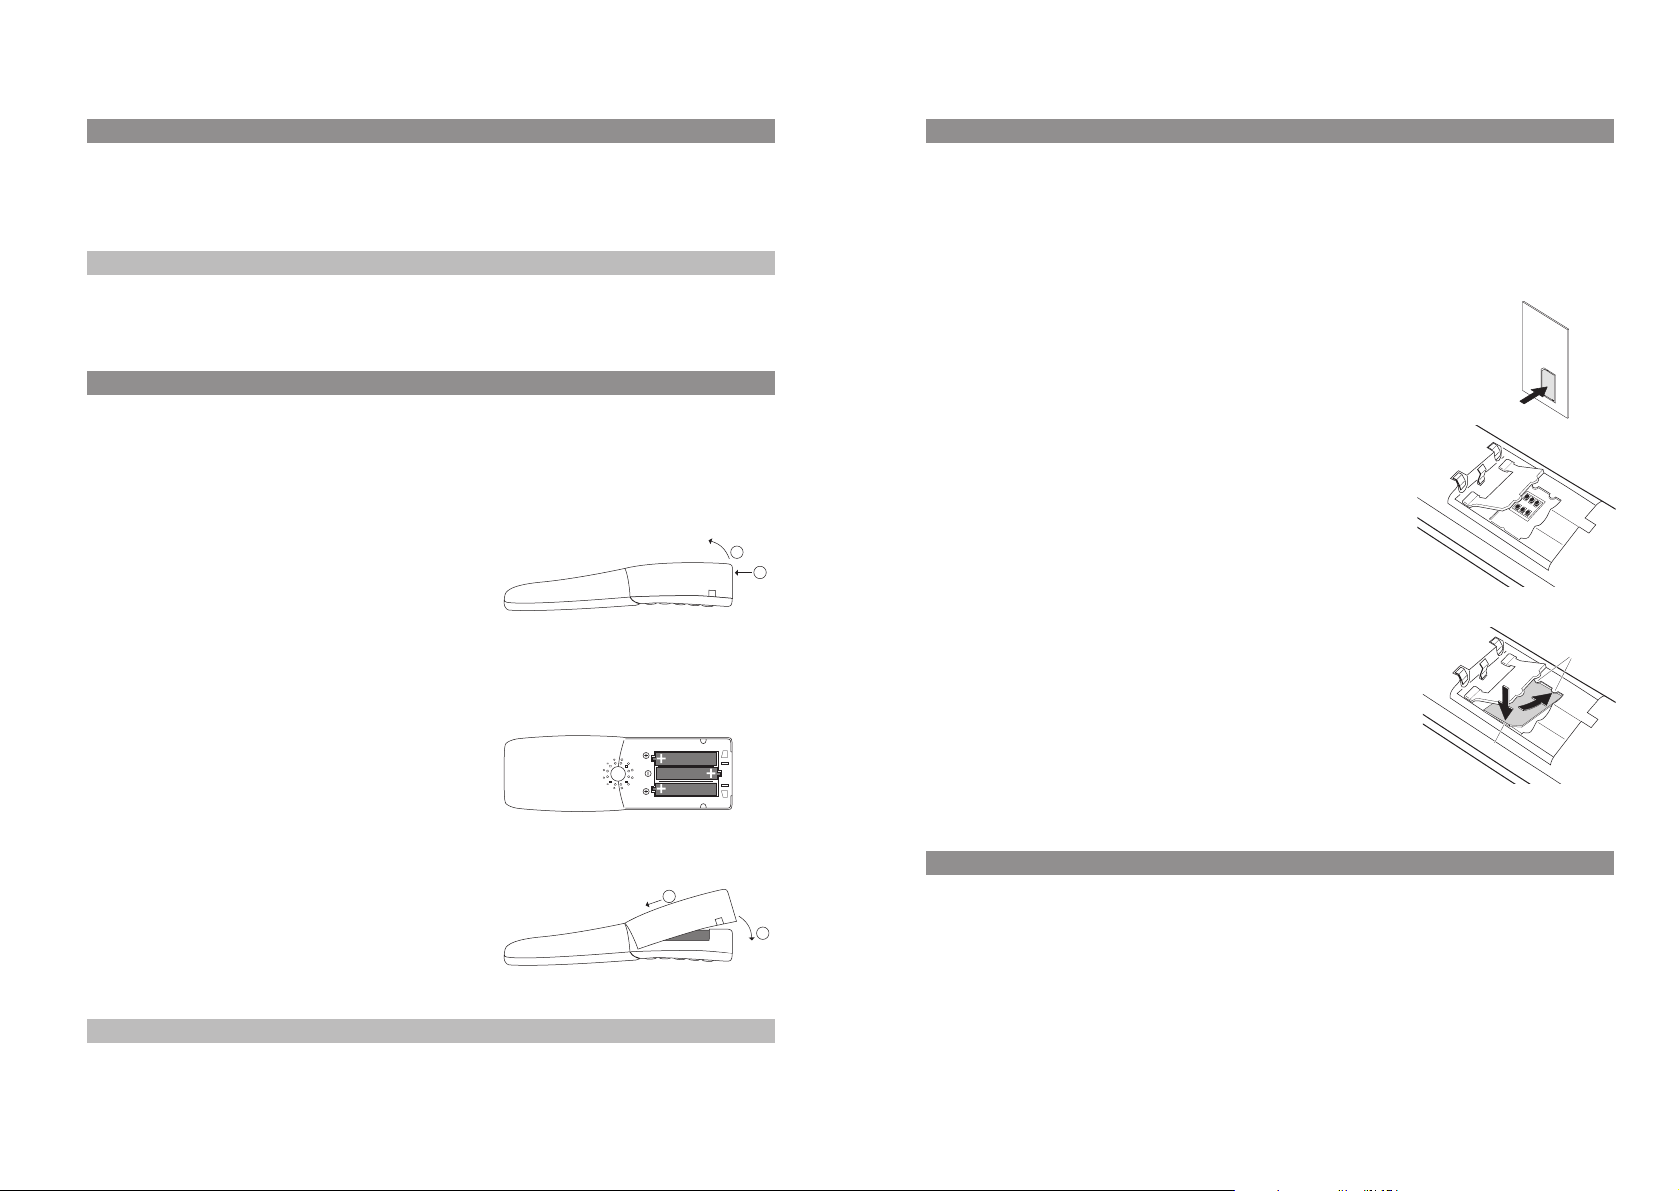
In order to start operating your telephone, you must first plug in the charger cradle's power cable.
Safety Precautions
Use only the plug-in adapter supplied for use with the charger cradle.
Its ID no. is 4512132 Continental Europe / 4513788 for UK.
Connect the cable on the plug-in adapter to the terminal on
the bottom of the charger cradle, and then plug the adapter
into the mains socket.
Plug-in adapter
Note
Your charger cradle will not work if the adapter is not plugged in or the power fails.
If there is no power to the charger cradle and the handset is placed in the cradle, the handset will
remain switched on and will gradually discharge itself while on standby.
Commissioning the Handset
Important Information about the Batteries
Never use the batteries for any purpose other than that for which they were intended. Never use a
battery which is damaged or worn out.
Heat or cold reduces the performance and service life of the batteries. A handset with hot or cold
batteries may be temporarily out of order even if the batteries are fully charged.
Used batteries should be disposed of in accordance with local authority regulations. Please hand
them in for recycling if possible.
Do not throw batteries in a fire.
Charging and Discharging
The batteries can be charged and discharged hundreds of times, but sooner or later they will be
worn out. If the operating time (i.e., talk and standby time) is significantly shorter than usual, then
it is time to replace the batteries.
To maintain the highest operating time possible, the batteries should be discharged now and again
by not placing the handset in the charger cradle but leaving it switched on until it discharges itself.
Only use this method to discharge the batteries.
Extreme temperatures influence the charging capability of the batteries.
Initial Setup and Operation
Charge the batteries approximately six to seven hours before using the handset for the first time.
This protective measure will extend the service life of the batteries.
The maximum capacity is only attained after three to five charging and discharging cycles.
Place the handset regularly in the charger cradle, thus ensuring optimum charging of the batteries.
When replacing the batteries, please pay attention to the correct polarity. It is essential to make sure
that only battery types approved by the manufacturer are used.
The manufacturer does not accept any liability for malfunctions or damage caused by using normal
batteries or other types of rechargeable batteries.
Your handset is only operational after the batteries have been charged. You can then use the handset to make and receive calls.
98
Page 9
Installation
Installation
Charging and Operating Times
Charging time: (empty batteries) to full capacity in approx. six to seven hours.
Talk time: approx. 14 hours (with fully charged batteries).
Standby time: up to 140 hours (with fully charged batteries).
Note
If the battery charge is unknown, they will be fully charged in approx. 14 hours.
Inserting the Batteries
The battery compartment is on the back of the handset. It takes the three type AAA batteries that
are supplied.
Please refer to the important information about the batteries mentioned in the Appendix (page 58).
Opening the Battery Compartment
Insert a suitable, sharp item (the top of a ballpoint pen, for
example) into the hole at the bottom of the handset (1).
2
Simultaneously lift the battery compartment cover upward
as shown (2).
Inserting the Batteries (Observe the Polarity)
Take care to observe correct polarity: the + - markings of the batteries must correspond with the +
- markings in the battery compartment.
It does not require any force to insert the batteries. If you
try to insert them with incorrect polarity, you may damage
your phone.
Inserting the Memory Card
If a memory card was not in your handset when you first unpacked the phone, then you will have to
insert it in its slot in the battery compartment yourself.
Important note on safety
Take great care handling the memory card. The contacts should be free of dust, grease, moisture,
etc. Do not store your card in a place where it will get hot (e.g., through direct exposure to sunlight). Avoid bending the memory card, as the contacts may get damaged as a result.
• First of all, press the memory card out of the frame holding it
using your finger.
• Then push the memory card cover in the battery compartment in
the direction of the arrow (OPEN). Tilt the cover upward slightly.
Make sure you never touch the gold contacts that are now visible,
as static discharge could lead to the device becoming defective.
1
• Press the memory card under the two semicircular protuberances
(a) in the memory card slot. Make sure the contacts are face down
as you do so and that the notched edge of the card is at the bottom left.
• Press the memory card down until it snaps audibly into place.
• Close the memory card slot using the cover (to do this, push the
2
b
a
1
lugs into the housing until the cover lies in a flat position on top of
the memory card).
Closing the Battery Compartment Cover
When you have inserted the memory card (see next page)
and the batteries, replace the cover by placing it on the
compartment at a slight angle (1) and pressing it down
until it clicks into place (2).
Note
Switch the handset off before you remove the batteries, as otherwise data may be lost.
Removing the Memory Card
1
2
You only need to take out the memory card if you wish to give the handset to someone else or need
the memory card for a new handset.
• After removing the batteries: Push the memory card cover in the battery compartment in the
direction of the arrow (OPEN). Tilt the cover upward slightly.
• Using a pointed object, press on point (b) to release the card, as shown in the diagram.
• Now you can lift out the memory card.
1110
Page 10

Installation
Installation
Registering Your Handset
Charge Display
The charge status of the batteries is indicated on the display:
batteries are 81 - 100% charged
ƒ
batteries are 61 - 80% charged
„
batteries are 41 - 60% charged
√
batteries are 21 - 40% charged
…
batteries are 0 - 20% charged
†
(frame flashes) batteries are almost empty; a warning has been given.
†
Your handset has a battery management system which has to ascertain the limits of the battery
charge status first before it can output the correct status to the display.
When you insert the batteries for the first time, the charge status will not be displayed correctly
until they have been completely discharged and then completely recharged.
When the handset is placed in the charger cradle, the flashing or lit segments indicate the charging
process or charge status respectively.
Charge Warning
When the batteries' capacity is almost exhausted, the battery icon in the display will flash, and an
acoustic warning is given in the form of three short “beep” signals every minute. If you are making a
call, you have approximately five minutes' talk time left before the handset switches itself off.
Use only rechargeable NiMH batteries. Never use normal, nonrechargeable batteries or fuel cells (see
page 58).
Note
Your handset can be operated on up to ten different communications systems. To do so, it has to be
registered to each system.
Your system administrator will register the handset for operation on a communications system with
OpenMobilityManager.
If you want to register your handset on any other communications system, please refer to the relevant documentation. If you want to register the handset on a base station complying with the GAP
standard, please activate the “GAP only” feature in the “System > Subscriptions” menu (see page
52). In this setting, only GAP-compatible features are available. When the handset is operated on a
communications system with OpenMobilityManager (OMM), this feature must not be activated.
Mounting and Removing the Belt Clip
➀ Push the adapter ring over the back of the handset until it
snaps into the openings on the side. To remove the
adapter, pull the two sides slightly apart.
➁ Mounting the belt clip: Press the upper parts of the belt
clip together as shown, push it over the belt, then release
the end of the clip again.
➂ Fastening the handset: Using the adapter ring, push your
handset into the belt clip until it snaps audibly into place.
22
3
4
You can replace your handset in the charger cradle after every call if you wish. The charging process
is electronically regulated so that the batteries are always optimally recharged, whatever their
charge level at the time. Do not remove the batteries from the handset unless there is a good reason
for doing so. Removing the batteries interrupts the optimized recharging process.
The capacity of the batteries can be increased by discharging them
they have been in use for a long period and then
fully recharging them again.
completely in the handset when
➃ Removing your handset: Press the release button and pull
the handset upwards and out of the belt clip.
1312
Page 11

Display Arrangement, Softkeys, and Other Keys
Display Arrangement, Softkeys, and Other Keys
Display Arrangement
‹ œ ¢ Œ ƒ
OMMSIP 5050
pp5050
19.10.06 ª16:27
¤¬Menu
Radio link quality (four bars – good link; only one bar – weak link).
œ
Connection state (hook key pressed down).
¢
Connection state (handsfree mode activated).
»
Microphone is muted.
‡
Messages in the voice box.
≥
Ringer is deactivated.
‹
Battery charge status (see page 12).
ƒ
Icon line
System name with internal phone number
Programmed user name
Date / time / alarm
Softkey line
Te xt Lines
The three lines in the center of the five-line display contain information on the current connection
state, or lists and menu texts. In the idle state you will see the name of the system along with the
internal phone number, your programmed user name, the current time, any alarms that you have
programmed, and call forwarding if you have activated it.
You use the arrow keys to scroll up or down through lists (like the telephone book, for example)
and the features menu. A selectable entry is shown inversely with a dark background.
Ringer Settings
Melody
Type
Device
OK ‘ Esc
Softkey Line
The texts and icons on the softkey line refer to the keys below. The contents of the line change according to the operating state.
Illumination
You have programmed and activated a local alarm time (see page 47).
ª
You have activated the key lock.
º
You have activated call forwarding.
Œ
¤ Open redial list.
¿
Caller Filter switched on.
The display is automatically illuminated whenever there is an incoming call or a key is pressed. The
display illumination is automatically switched off after ten seconds if no key is pressed.
1514
Page 12

Display Arrangement, Softkeys, and Other Keys
Softkeys and Other Keys
Display Arrangement, Softkeys, and Other Keys
The two keys below the display and the arrow keys are called the softkeys. The functions allocated
to these keys are shown in the bottom line of the display. The key function changes automatically
according to the respective operating state of the handset.
Softkey: Arrow Keys
Symbols are displayed above the arrow keys which identify the current functionality of the arrow
keys:
Arrow key up: Currently has no function and is reserved for future applications.
Arrow key down: Opens the telephone book.
Whenever you enter phone numbers or texts, you can make changes by moving the posi-
tion of the cursors. The arrow keys move the cursor to the beginning or the end of the entry.
When a list (telephone book or menu, for example) is displayed, you use the arrow keys to
move the cursor to the desired entry.
Earpiece /Hands free / Headset:
You use the arrow keys to set the desired volume.
Volume Settings
Earpiece: 4
ÿÿÿÿ
||||
Softkey: Redialing
This enables you to select a phone number from the redial list.
Hook key
Depending on the current state of the phone — for example in the idle state, during a conversation, or in editing mode — pressing the hook key executes the following functions:
... in the idle state:
you seize a line.
... during an incoming call:
you answer the call.
... during a conversation:
you end the conversation by disconnecting the call.
... if a list is displayed — for example the call or redial list — or if you have entered some digits:
the phone number is dialed.
Handsfree Key
You use this key to activate the handsfree function (speakerphone).
When the handsfree function is activated, this key is illuminated.
OK ‘ Esc
Softkey: OK
You use to confirm the selected function. If a function only permits you to switch between
two options, the OK key causes this to take place. In the display, active settings (ON) are indicated
by a "
either a "—" in front of the respective word or this space is left blank.
You press the softkey briefly to quit the respective menu section which is displayed. The display then shows the selection of the previous menu branch or the current idle / connection display.
OK
✓" in front of the respective word. In the case of settings that are not active (OFF), there is
Softkey: Esc
Esc
Info Key
You use this key to open various lists, for example the caller or redial lists. If there are new entries in
the caller list or new messages in your voice box*, then the info key flashes.
* To do this, you register your voice box access number in the “Telephone Options > Voice Box No.”
menu. You can obtain the number from your system administrator. If no voice box access number
has been registered, the icon will appear in the display.
C-Key
The C-key (cancel key) has several functions. These depend on the current state of the telephone,
i.e., whether it is in the idle state, the call state, the edit mode, and so on. In addition, the functions
also depend on whether the keypress is a
implemented:
≥
long or short one. The following functions have been
1716
Page 13

Display Arrangement, Softkeys, and Other Keys
Display Arrangement, Softkeys, and Other Keys
... when your handset is switched off:
short
or long press: switches the handset on.
... in the idle state:
short
press: opens the caller list.
long press: switches the handset off.
... during an incoming call:
long
press: switches the handset off.
... during a conversation:
long
press: switches the handset off.
... while you are making entries in a list:
short
press: deletes the character to the left of the cursor.
long press: deletes the entire line.
... if a list is displayed, for example the caller or redial list:
short press: deletes the selected entry (after a security query).
R-key
A short press during a conversation initiates an enquiry call.
long press in the idle state dials a previously stored SOS number. You can program this emer-
A
gency number in the “Telephone Options > Emergency Call” menu.
When you input text, you use the arrow keys to move the cursor to the beginning or the end of the
entry. The
For further information, please refer to the section entitled “The Editor” on page 24.
Softkey: Menu
A long press in the idle state/connection state opens the OpenMobilityManager (OMM) service
menu. This contains all the available OMM functions, depending on the current state.
short press in the idle state opens the handset menu.
A
short press in the connection state displays the menu items available, depending on the current
A
state — for example “Microphone off” or “Telephone Book” — so that you can open the telephone
book.
-key deletes one letter or digit at a time. The softkey aborts the procedure.
C
Esc
Hash Key #
A long press in the idle state activates the key lock.
Press the softkey and the
Star Key *
A long press in the idle state switches the ringer on or off.
short press while you are making entries in a list (typing names into the telephone book, for
A
example): shifts from upper-case to lower-case letters, or vice versa.
Number Keys
You use the number keys to input phone numbers, names, and vanity phone numbers.
¿
key to deactivate the key lock again.
#
1918
Page 14

Display Arrangement, Softkeys, and Other Keys
Automatic Menu Closure
Menus are automatically closed under the following conditions:
• When you receive a call while your phone is in the idle or connection state.
• In the connection state, when you perform input that requires a new, connection-dependent
menu (for example, when you press the R-key
tion entitled “Making Calls”).
• When you press a softkey that opens a menu other than the one currently being displayed.
Input that you have already saved in menus remains saved when you quit them.
to make an enquiry call; please see the sec-
r
Menu Control
Example: Main Menu
Press the softkey to open the main menu.
The following items are available:
- Key Lock
- Alarm
- Ringer Settings
- Volume Settings
- Caller Filter
- System
- [System name] (the communications system menu/switching functions: Only appears when you
- Telephone Options
Menu
Menu
Key Lock
Alarm
Ringer Settings
OK ‘ Esc
are logged into such a system)
Use the arrow keys to highlight an entry. Press to open a submenu. For further descriptions,
please refer to the section entitled “Customizing Your Telephone”.
Menu
Key Lock
You select the submenu item (Key Lock, Alarm, etc.) in exactly
the same way. Please refer to the menu structure on page 63.
OK
Alarm
Ringer Settings
OK ‘ Esc
Ringer Settings
Melody
Type
Confirm your selection by pressing .
Use the arrow keys to select one of the submenu items
Melody, Type, Device and Volume Settings, e.g.,
OK
press .
OK
Type, and
Device
OK ‘ Esc
2120
Page 15

Menu Control
Menu Control
Example: Telephone Book / Editor
Type
Repeat
Use the arrow keys to select Play once, for example, and press
OK
. Your setting will be activated.
Play once “
OK ‘ Esc
Toggling function
Some functions permit only two options - ON or OFF. Active (ON) functions are indicated by a ✓ , for
example .
If the function is not active, the icon
Using the number keys or the arrow keys to edit settings
In the “Ringer Settings > Volume Settings” menu, for example, you can set the desired volume (e.g.,
level 4) using either the number keys or the arrow keys. Your setting will be activated when you
press .
Alarm
OK
softkey to toggle between settings.
OK
✓
— appears, for example . You always use the
Alarm
–
This example describes how to create a new entry in the telephone book. For information on further
telephone book options, please refer to page page 41ff.
Use the arrow key to open the telephone book.
Telephone Book
Empty
New Esc
Enter Number:
12349876_
OK {} Esc
Enter Name:
Adm_
OK {} Esc
New
Press . The phone number input opens.
Enter “12349876_”, for example. You can correct your input by
using the arrow keys to move the cursor to a digit, which will
then flash. Press the C-key to delete the digit to the left of the
flashing character. You can then insert new digits at this point.
When you have completed your input, press to move to
name input.
Enter the name. You enter letters by pressing the corresponding key briefly a number of times. The available characters will
be displayed in the upper line. The input position moves on
automatically if you do not enter any characters for a few seconds or if you enter a new character. You correct your input in
the same way as with phone number entries.
The initial letter of every word is automatically upper case. You
can toggle between upper and lower case (Display e.g.,
A –> a) by pressing the star key or by pressing and holding
down the respective number/letter key.
OK
2322
Page 16

Menu Control
The Editor
Entering Names / Phone Numbers
You can use the editor to enter new names or numbers in lists, or edit them (e.g., in the telephone
book).
The maximum length a phone number can have is 32 digits, and the maximum length of names is
16 characters.
Key Upper-case letter Lower-case letter
1? ! 1 - + * / = & ( ) % ¿ ¡ ? ! 1 - + * / = & ( ) % ¿ ¡
2A B C 2 Ä Å À Á Ã Æ Ç a b c 2 ä å à á ã æ ç
3D E F 3 È É Ê Ë d e f 3 è é ê
4G H I 4 Í Ì Î Ï g h i 4 í ì î ï
5 JKL5 j k l 5
6M N O 6 Ñ Ö Ò Ó Ô Õ Ø m n o 6 ñ ö ò ó ô õ ø
7P Q R S 7 ß p q r s 7 ß
8T U V 8 Ü Ù Ú Û t u v 8 ü ù ú û
9WXYZ 9 w x y z 9
0 Space , . 0 : ; _ ” ‘ ˆ ˜ Space , . 0 : ; _ ” ‘ ˆ ˜
✳ Toggle upper/lower case Toggle upper/lower case
## @ € $ £ ¥ § < > { | } [ \ ] # @ € $ £ ¥ § < > { | } [ \ ]
Basic Functions
Switching the Handset On / Off
Once the batteries have been charged for the first time, your handset is automatically switched on
and is ready for operation. You can switch the handset off so that your batteries will stay charged for
longer.
Switching the handset off
Press and hold down the C key.
C
Note
Your handset cannot receive calls or signal programmed alarms while it is switched off.
Switching the handset on
Press and hold down the C key
C
or
place the handset in the charger cradle.
You will see the following in the display, for example:
œ ƒ
OMMSIP 5050
pp5050
19.10.06 16:27
¤¬Menu
The name of the communications system is “OMMSIP” and the
handset has the internal phone number “5050”. The handset
receives this information from the communications system.
The name of the handset is “pp5050”. You can edit this name
in the “Telephone Options > User Name” menu.
The current date and time settings are usually supplied by the system when the phone is registered.
If this is not the case, you will be able to enter the current date and time manually. In case of time
settings in the 12h time format, please note the changeover between “am” and “pm” with key 2, 7
respectively. If you make no input for approximately a minute or press , then the display
changes to the idle state.
The date and time are then not displayed. In this state, entries to the caller list are also registered
without the date or the time. You can enter the date and time settings later in the “Alarm” or
“Date / Time“ menu.
Note
If you see in the display, the handset needs to be registered. Please contact
your system administrator.
Please register!
Esc
2524
Page 17

Basic Functions
Basic Functions
Key Lock
Activate the key lock before putting your handset in a bag or your pocket to prevent a call from
being made accidentally.
If you receive a call, the key lock is deactivated for the duration of the call. You answer the call by
pressing the hook key.
Activating the Key Lock
Menu
Press .
E
Key Lock
F
You’ll see in the display.
Alternatively you can activate the key lock as follows:
In the idle state, press and hold down the hash key #.
Deactivating the Key Lock
Key Lock
OK
.
Adjusting the Earpiece Volume during a Call
Let’s say you’re making a call using the earpiece, the loudspeaker, or a headset.
You use the arrow keys or the number keys to adjust the volume.
A single press increases or decreases the volume by one level, e.g.,
Volume:3
In addition, the bar indicator shows the selected volume level.
You can also press the corresponding key a number of times to adjust the volume to one of eight
levels. The minimum and maximum values are indicated by means of an special tone.
The adjusted settings are only valid for the current call. You edit the basic settings for the earpiece in
a menu (see page 50).
.
]]]]]
|||
Switching the Ringer Off
If you don't want to be disturbed — e.g., because you’re in a meeting — you can switch the ringer
off (in which case you will see in the display).
You perform this setting by pressing the star key
Buzzer Off
To switch the ringer on again, press and hold down the star key
appears in the display.
‹
and holding it down until you hear a tone and
*
again.
*
Key Lock
Press the softkey .
To Unlock
Press #
Press the hash key
appears in the display to remind you that you have activated the lock.
¿
to deactivate the lock.
#
Switching the Handsfree Function On/Off
To switch the loudspeaker on or off, press the handsfree keyHin the idle state (i.e., when the
handset is ready to make call) or during a call.
Alternatively, you can switch the ringer off by deactivating the “Buzzer” item in the “Volume Settings > Device” menu. You’ll then see in the display.
‹
Backlight
The backlight is activated every time you press a key, and it remains on for approximately eight seconds.
Adjusting the Display Contrast
You can change the display contrast in order to adjust it to local lighting conditions. You perform the
settings in the “Telephone Options” menu (see page 55).
2726
Page 18

Basic Functions
Emergency Number (SOS)
In order to be able to make an emergency call with just a single long press of the R key
must first store this emergency number using the “Telephone Options > Emergency Call” menu
item.
You make the emergency or SOS call to the programmed phone number by pressing and holding
down the R key
handset goes into handsfree mode.
. The call is dialed right away, so you don't have to press any more keys. The
r
r
, you
Quick Call
If you have defined an entry in the telephone book as a quick call entry (see page 43), you can press
and hold down the corresponding key to show the phone number in the display. You dial the number by pressing the hook key.
Muting the Handset
If you don't want the other party taking part in your call to hear something that is said — e.g., if you
need to speak with another person in the room — then you can temporarily mute your handset.
You are making a call:
Mic.‡
Press . You’ll see in the display for a few seconds.
D
Now the other person involved in the call can’t hear you anymore.
When you want to speak with the other party again, press the left softkey again. You’ll see
Mic. on
in the display for a few seconds. The other party can now hear you again.
Mic. off
Making Calls
Dialing Phone Numbers
Dialing Phone Numbers Directly
Press the hook key.
A
Enter the phone number and press #; the phone number will be dialed right away.
t
... or
Menu
Press .
E
Select one of the following menu items and confirm it by pressing .
F
Caller List
Redial
Telephone Book
To end your call:
Press the hook key.
A
Select a phone number from the caller list and initiate dialing
with / .
Select a phone number from the redial list and initiate dialing
with / .
Select a phone number from the telephone book and initiate
dialing with / .
OK
DialOptions
DialOptions
DialOptions
Message-waiting Indication / Notification Texts
If the handset caller list contains a missed call or there are messages in your voice box, the info key
will flash and the following notification text will appear:
B
and / or .
The message “Voice Box” only appears in conjunction with the flashing info key Bif your voice box
access number has been registered in the “Telephone Options > Voice Box No.” menu. If this is not
the case, then only the icon will flash. Contact your system administrator for assistance if necessary.
You can retrieve your messages by means of the info key
Voice BoxMissed Calls
≥
(see page 46).
B
Tip
You can also open the redial list by pressing the left softkey .
¤
2928
Page 19

Making Calls
Making Calls Using the Predialing Feature
You can use predialing to correct your input before dialing the number or to chain phone numbers
from different lists.
Enter the phone number while the handset is in the idle state. If necessary, correct any errors
t
you’ve made with the arrow keys (cursor) and the C key by deleting them and entering the
right input.
Making Calls
Making Calls Using the Quick Call Feature
Press and hold down the number key “1” – “9” on which the quick call entry is saved until the
t
number appears in the display.
Press the hook key to dial the number.
A
For information on creating a quick call entry, please see page 43.
Note
Press the hook key to dial the number.
A
... or
chain the phone number you previously entered to another one:
Please note: In predialing, if the input cursor is positioned behind the phone number, the
number to be chained will be suffixed to that phone number. If the input cursor is at any
other point, the number to be chained will be prefixed to the phone number.
Menu
Press .
E
Select one of the following menu items and confirm it by pressing .
F
Caller List
Redial
Telephone Book
Press the hook key to dial the number.
A
Select a phone number from the caller list and copy it to predialing with / / .
Select a phone number from the redial list and copy it to predialing with / / .
Select a phone number from the telephone book and copy it to
predialing with / / .
OK
If you activate the “Auto Quick Hook” feature in the “Telephone Options” menu, the quick call number will be dialed immediately without being copied to predialing. It’s not possible to postdial numbers when a quick dial entry has been dialed.
Making Emergency Calls
Press and hold down the R key.
r
The stored phone number will be dialed directly.
The handset switches to handsfree mode.
Press the hook key to end the call.
OKPredialOptions
OKPredialOptions
OKPredialOptions
A
3130
Page 20

Making Calls
Making Calls
Making Calls from the Redial List
The redial list contains the last ten phone numbers you dialed (max. 32 digits long). Every number
you subsequently dial overwrites the oldest number in the list.
You can view the phone numbers in the redial list, together with the corresponding details (the time
of the call, for example), delete them, and copy them to predialing, to the telephone book, or to the
caller filter.
¤
Press while the handset is in the idle state.
D
Select the desired phone number.
F
Press the hook key to dial the number immediately
A
… or
Options
Press .
D
Add To
Select , and confirm this by pressing .
F
Predial
Select , and confirm this by pressing . The phone number will be
F
copied to predialing.
For further list editing options, please see page 41ff.
Note
You can still open the redial list when you have already pressed the hook key and can hear the dial
tone.
OK
OK
Making Calls from the Telephone Book
The telephone book can contain up to 100 entries, which are automatically sorted into alphabetical
order.
Press the arrow key while the handset is in the idle state and select the name you want
F
or
search for the name by entering the initial letter (if necessary, press the number key several
t
times in quick succession).
Press the hook key to dial the number immediately
A
… or
Options
Press .
D
Add To
Select , and confirm this by pressing .
F
Predial
Select , and confirm this by pressing . The phone number will be
F
copied to predialing.
For further telephone book editing options as well as information on how to create new
entries, please see page 41ff.
Note
You can still open the telephone book if you have already pressed the hook key and can hear the dial
tone.
OK
OK
F
3332
Page 21

Making Calls
Making Calls
Making Calls from the Caller List
Press the info keyBto open a list with the following items for selection: voice box, caller list,
redial list and telephone book. The voice box entry only appears if your voice box access number has
been registered in the “Telephone Options > Voice Box No.” menu.
The procedures for making calls from the telephone book and the redial list are described above.
When one of these lists is open, you can call the phone numbers displayed there, either directly or
using predialing.
You can view the phone numbers in the caller list, together with the corresponding details (the time
of the call, for example), delete them, and copy them to predialing, to the telephone book, or to the
caller filter.
Press the info key while the handset is in the idle state.
B
Caller List
Select , and confirm this by pressing .
F
Select the desired phone number.
F
Press the hook key to dial the number immediately.
A
… or
Options
Press .
D
Add To
Select , and confirm this by pressing .
F
Predial
Select , and confirm this by pressing . The phone number will be
F
copied to predialing.
OK
OK
OK
Answering Calls
Calls are signaled on the handset both acoustically and on the display, which is then illuminated.
You’ll see the caller's phone number in the display. In addition, you’ll see the caller's name in the
upper text line.
œ ¢ ƒ
5051
pp5051
Silence ‘ Menu
The phone number will not be displayed if the caller is calling anonymously, i.e., if the caller has suppressed phone number transmission, or if for any reason the phone number is not transmitted.
While the call is being signaled you can…
… use the softkey to suppress signaling for this call. You can still answer the call by
D
pressing the hook key until the caller goes on-hook again.
... or:
Press .
E
Select one of the following menu items, and confirm this by pressing .
F
Silence
Silence
Menu
OK
The ringer will be switched off.
For further list editing options, please see page 41ff.
Reject
Press the hook key to answer the call.
A
Note
If you have already pressed the left softkey with , its function changes to .
The call will be rejected (the caller hears the busy tone).
RejectSilence
3534
Page 22

Making Calls
Making Calls
Options during a Call
If required, you can select a phone number from one of the available lists and postdial it during the
current call by pressing (DTMF postdialing).
If required, press briefly.
E
Select one of the following menu items, and confirm this by pressing .
F
Telephone Book
Redial
Caller List
Microphone off
Press the hook key to end the call.
A
Note
Further options during a call such as toggling or call transfer are described below.
OK
Menu
OK
Open the telephone book.
Open the redial list.
Open the caller list.
Mute the microphone.
Answering a Call during a Conversation (Call Waiting)
You hear the call-waiting tone and see the call in your display.
œ ¢ ƒ
Call from
pp5052
5052
Mic.‡ ‘ Menu
You see the caller's name and phone number.
Press the R key to answer the call. The first call is then held.
r
... or:
Press Info Key to open the service menu.
B
w: pp5052
Select , and confirm this by pressing .
F
The waiting caller is accepted and the existing call is held. "w:" stands for “waiting”, and
“pp5052” in this example is the name of the waiting caller.The first call is held.
When you want to end the call with the second caller and return to your held call:
OK
Press the hook key. The service menu then opens automatically.
A
h: pp5050
Select , and confirm this by pressing .
F
"h:" stands for "hold" and "pp5050" in this example is the name of the first caller.
Note
You can also end the first call and then answer the waiting call. To do this, press the hook key
The service menu opens automatically. Select , and press .
w: pp5052
OK
OK
A
.
3736
Page 23

Making Calls
Making Another Call during a Conversation
Making Calls
(Enquiry Call)
Making an Enquiry Call
You are making a call.
Press the R key. The first call will be held.
r
Enter a phone number using the number keys, then press #(or wait four seconds).
t
or
Menu
Press
phone book as described on page32ff.
... or:
Press Info key to open the service menu. The first call will be held.
B
Select , and confirm this by pressing .
F
Select one of the following menu items and confirm this by pressing .
F
edit number
No by phone bk
To end the enquiry call and return to the held call:
Press the hook key. The service menu opens automatically.
A
Select , and confirm this by pressing .
F
"h:" stands for "hold", and "pp5050" in this example is the name of the first party.
briefly and select a phone number from the caller list, the redial list, or the tele-
new call
h: pp5050
Use this to enter the number by means of the number keys, and then
OK
press .
Opens the telephone book. You can then dial a phone number that has
been stored there (see page 33)
OK
OK
OK
Toggling during the Enquiry Call
If the enquiry call can be established, you can use the R key rto speak alternately with the other
two parties (this is known as “toggling”).
... or:
Press Info Key to open the service menu.
B
h: xxx
Select , and confirm this by pressing .
F
The currently held call will be activated and the active call held.
OK
Transferring a Call
Blind Transfer
You are making a call and want to transfer it to another party without consulting with that party
beforehand:
Press Info Key to open the service menu.
B
call transfer
Select , and confirm this by pressing .
F
Select one of the following menu items and confirm this by pressing .
F
edit number
No by phone bk
Start
Select , and confirm this by pressing .
F
Your handset returns to the idle state.
Use this to enter the number by means of the number keys, and then
OK
press .
Opens the telephone book. You can then dial a phone number that has
been stored there (see page 33)
OK
OK
OK
Note
If you are entering a phone number and don't press any key for four seconds, the number that has
been entered up to that point will be dialed. Further inputs are normaly invalid.
3938
Page 24

Making Calls
Editing Lists
Consultative Transfer
You are making an enquiry call and your handset is in the toggle state (see above):
Press Info Key to open the service menu.
B
call transfer
Select , and confirm this by pressing .
F
Your handset returns to the idle state.
If the desired party is busy or cannot be contacted:
Press the R key to return to the first call.
r
Note
If you initiate the calls and you then connect the two other parties by means of the
call transfer
call. Under certain circumstances the call charges may be billed to you.
menu item, please note that you have no further control over the duration of the
OK
Telephone Book: Adding a New Entry
The telephone book can contain up to 100 entries. Phone numbers can be up to 32 digits long and
names up to 16 characters.
When there are no entries in the telephone book:
Press the arrow key while your handset is in the idle state.
F
New
Press .
D
Enter the phone number and press (for information on how to make corrections, please
t
refer to page 24). Always enter the phone number together with the area code, as otherwise
the name cannot be displayed when a call comes in from this number.
Enter the person’s name and press . The entry will be stored.
t
If there are some entries in the telephone book already:
Press the arrow key while your handset is in the idle state.
F
Options
Press .
D
New
Select , and confirm this by pressing .
F
Enter the phone number and press (for information on how to make corrections, please
t
refer to page 24). Always enter the phone number together with the area code, as otherwise
the name cannot be displayed when a call comes in from this number.
Enter the person’s name and press . The entry will be stored.
t
OK
OK
OK
OK
OK
Note
You can also open the telephone book by pressing the info key
B
.
4140
Page 25

Editing Lists
Editing Lists
Telephone Book: Editing an Entry
Press the arrow key while your handset is in the idle state, and scroll to the entry For
F
search for the name by entering the initial letter
times in quick succession).
Options
Press .
D
Select one of the following menu items and confirm this by pressing .
F
Edit
Add To
Quick Call
Delete
Note
You can find further information on the editor on page 24ff.
You can delete all of the telephone book entries by means of the "Reset" menu item (see page 56).
You can edit the number and the name.
Copies the phone number to predialing or to the caller filter (see page
51).
You can assign a quick call number to the entry (see page 43).
After a security check, the entry concerned will be deleted.
(if necessary, press the number key several
t
OK
Telephone Book: Creating a Quick Call Entry
You can define important telephone book entries as quick call entries and dial these numbers by
pressing just a single key. You can create up to nine quick call entries (corresponding to the number
keys "1" to "9").
Those telephone book entries defined as quick call destinations are identified by the corresponding
quick call code number placed behind the name.
To dial a number, press the key you have allocated to that number and hold it down for a second or
two while the handset is in the idle state. The number you wish to call will then be copied to predialing (see page 30). If you activate the "Auto.Quick Hook" feature in the "Telephone Options" menu,
the quick call number will be dialed immediately without being copied to predialing.
Press the arrow key while your handset is in the idle state and scroll to the desired entry,
F
D
F
If you store additional quick call numbers, those that have already been allocated are marked with a
– sign. Quick call codes that have already been allocated can be overwritten. You delete quick call
entries by deleting the code displayed with the C key. Confirm the deletion by pressing .
Brown, Tom
e.g. .
Options
Press .
Quick Call
Select , and confirm this by pressing .
You will see, for example, in the display:
Enter a quick call code, and confirm this by pressing .
>123456789<
OK
OK
OK
4342
Page 26

Editing Lists
Editing Lists
Editing the Redial List
Press the ¤ softkey while your handset is in the idle state, and then select the desired entry,
D
D
F
Note
You can also open the redial list by pressing the info key
43567890
e.g., .
Options
Press .
Select one of the following menu items and confirm this by pressing .
Add To
Details
Delete
Delete All
Copies the phone number to predialing, to the telephone book, or to
the caller filter (see page 51).
The entry details (the called party's name/number and the date/time
of the call) are displayed. You can use the arrow keys to view the
details of the other entries in the redial list.
After a security check, this deletes the selected phone number.
After a security check, this deletes the entire list.
.
B
OK
Editing the Caller List
Press the info key while the handset is in the idle state.
B
Select , and confirm this by pressing .
F
Select the desired entry, e.g., .
F
Accepted calls are marked with a
calls with a
Press .
D
Select one of the following menu items and confirm this by pressing .
F
Add To
Details
Delete
Delete All
Œ.
Options
43567890
✔, missed calls with a ➜ , filtered calls with a ¿ and rejected
Copies the phone number to predialing, to the telephone book, or to
the caller filter (see page 51).
The entry details (the caller's name/number and the date/time of the
call) are displayed. You can use the arrow keys to view the details of
the other entries in the redial list. The top line in the display contains
the following information for every entry: "Missed Call", "Filtered Call",
"Rejected Call" or "Accepted Call".
After a security check, this deletes the selected phone number.
After a security check, this deletes the entire list.
OKCaller List
OK
4544
Page 27

Info Key
Customizing Your Telephone
Voice Box / Caller List
Press the info key briefly while your handset is in the idle state. The following options will then be
available: voice box, caller list, redial, and telephone book.
The info key
Display icon Text in the idle display Meaning
flashes Voice Box There are new messages in your voice box
≥
Note
If "Voice Box" does not appear and only the
your voice box access number in the "Telephone Options > Voice Box No.“ menu.
Checking Your Voice Box
Press the info key.
B
Confirm by pressing .
D
The rest of the procedure is voice-controlled.
flashes to signal voicemail and missed calls.
B
Missed Calls There are new entries in your caller list.
≥ icon flashes, it means that you still have to register
Voice Box
OK
Menu: Alarm
Menu
Press .
E
Select , and confirm this by pressing .
F
Select one of the following menu items and confirm this by pressing .
F
OK
Alarm active
Set
Date / Time
Press to activate
alarm appears in the display as
At a given 24h time format, enter the time between 00:00 and 23:59.
At the12h time format the time can be entered between 00:00 and
11:59. The “am” or “pm” selection can be done by pressing the key 2
(indication a) or key 7 (indication p). You can select a melody for the
alarm as described below. The signal lasts approximately 60 seconds
and can be switched off by pressing any number key. Whenever an
alarm has been signaled, you have to activate any new alarm again.
Complete your input by pressing .
If the current date and time is supplied by the system this menu
option will not be shown. Enter the current date/time. In case of time
settings in the 12h time format, the changeover between “am” and
“pm” can be done with key 2 or 7. Complete your input by pressing
.
OK
Please note: Settings for date, time and time format can also be done
in the menu “Telephone Option”.
✔ or deactivate — the alarm. An activated
OKAlarm
.
ª
OK
OK
Checking Your Caller List
Press the info key.
B
Select , and confirm this by pressing .
F
The caller list will be displayed. Accepted calls are marked with
For other possibilities, please see page 45.
OKCaller List
✔ and missed calls with a ➜.
Melody
Use the arrow keys to select a melody for the alarm, and complete
your input by pressing .
OK
4746
Page 28

Menu: Ringer Settings
Customizing Your TelephoneCustomizing Your Telephone
Menu
Press .
E
Select , and confirm this by pressing .
F
Select one of the following menu items and confirm this by pressing .
F
Melody
You can specify different melodies to identify different types of incom-
OKRinger Settings
ing calls. However, transmission of the call type depends on the communications system on which you are operating your handset. For further information, please contact your system administrator.
…
Internal
…
External
…
Unknown Number
…
VIP
…
…
Alarm
Emergency call
(see also page 47)
Use the arrow keys to select an entry and press .
Select a melody, and confirm this by pressing .
Type
You can specify whether the melody that signals an incoming call is to
be repeated (the normal setting) or played only once.
Select one of the variants, and confirm this by pressing .
OK
OK
OK
OK
Device
Volume Settings
You can specify whether an incoming call is to be indicated by the
ringer (”buzzer”), the vibrator, or the headset.
Select an entry and activate or deactivate the device by
pressing .
…
Buzzer
…
Vibrator
…
Headset
Press to accept the setting.
OK
✓
✓
✓
Esc
✓
–
Use the arrow keys or the number keys "1" to "8" to set the desired
ring volume, then press .
OK
…
…
Repeat
Play once
✓
The active setting is marked with .
Esc
Press to accept the setting.
✓
4948
Page 29

Customizing Your Telephone
Customizing Your Telephone
Menu: Volume
Menu
Press .
E
Select , and confirm this by pressing .
F
Select one of the following menu items and confirm this by pressing .
F
Earpiece
Hands-free
Headset
Buzzer
Use the arrow keys or the number keys "1" to "8" to set the desired volume level for the earpiece, then press .
Use the arrow keys or the number keys "1" to "8" to set the desired volume level for the loudspeaker (speakerphone), then press .
Use the arrow keys or the number keys "1" to "8" to set the desired volume level for the headset, then press .
Use the arrow keys or the number keys "1" to "8" to set the desired volume for the buzzer and press (see also page 49).
OKVolume Settings
OK
OK
OK
OK
OK
Menu: Caller Filter
You can use the caller filter to block or accept incoming calls from certain phone numbers. The
phone numbers in question have to be stored in the caller filter's list of numbers (see below). You
can copy phone numbers to the caller filter list from the telephone book, the redial list, or the caller
list (see the section entitled "Editing Lists" on page 41ff). An entry can consist of up to 32 digits for
the number and 16 characters for the name. Up to ten entries can be stored in the caller filter.
The active Caller Filter is displayed with the symbol .
Menu
Press .
E
Select , and confirm this by pressing .
F
Select one of the following menu items and confirm this by pressing .
F
Accept list
Block List
Filter off
The active setting is marked with .
List of numbers
Only calls from phone numbers in this list will be accepted.
Calls from phone numbers in this list will be rejected.
✓
✓
This is the list in which you enter the phone numbers you want to filter. For information on creating entries, please refer to the section
entitled "Editing Lists" on page 41ff.
¿
OKCaller Filter
OK
Esc
Press to accept the setting.
5150
Page 30

Customizing Your Telephone
Customizing Your Telephone
Menu: System
Your handset can be operated on up to ten DECT systems. Before you can make a call via a system,
however, your handset has to be registered on the respective system. A system password or registration code may be necessary for the registration process. If this is the case, please contact your system administrator for assistance.
If the handset has not been registered, will appear in the display.
Menu
Press .
E
Select , and confirm this by pressing .
F
Select one of the following menu items and confirm this by pressing .
F
Subscriptions
Confirm this by pressing .
The list of systems on which your handset is registered will be displayed. The current system is marked with .
You can select one of the available entries and press .
… Select this option if you want to register
… Pick this option to register your handset on
… Select this option to edit the name of the
… If you operate your handset on a GAP base
… Select this option to deregister your hand-
Auto.Search
… If you have registered your handset on several sys-
tems and this function is active, your handset will automatically log
into the system with the most powerful radio signal. You can activate
✓
No System
OKSystem
OK
OK
✓
Options
New
your handset on a new system. For information on how to do
this, please contact the administrator of the system in question.
Select
the current (marked) system.
Edit
system. This only affects the name shown in the display when
your handset is in the idle state.
GAP only –
station, please activate this feature. You activate or deacti-
–
vate it by pressing .
IMPORTANT: to enable operation on a system with OMM, this
OK
✓
feature must be deactivated.
Delete
set from the current (marked) system. If you do this, you will only
be able to operate the handset on that system again when you
have registered it again.
✓
or deactivate this function by pressing .
–
OK
Menu: [System name]
This accesses the communications system menu. This menu is only available when the handset has
been logged into a system. NB The entries and features that are actually available may differ from
those described in this user guide as they are dependent on specific conditions. If necessary, contact
your system administrator.
Press and hold .
E
or
Press , select , and confirm this by pressing .
Select one of the following menu items and confirm this by pressing .
F
new call
call forwarding
Lines
local menu
Menu
OK[System name]Menu
OK
Confirm one of the following menu items by pressing .
edit number
… Use the number keys to enter the phone
number, and then press .
No by phone bk
… Opens the telephone book. You can then dial
OK
OK
a phone number stored there (see page 33)
Confirm one of the following menu items by pressing .
Off
… This is the type of call forwarding.Press
OK
and select one of the available options: ""off","immediately",
"busy", "no answer", or "busy no answer". Confirm your choice by
No
OK
OK
pressing .
… Press and select whether you want to
copy a phone number from the telephone book or enter a phone
number using the number keys. This procedure is described in
"New call" above.
0 [sec]
… Press and specify the duration of the
OK
delay until the incoming call is forwarded. Select one of the available delays (0 - 32 seconds), and confirm your choice by pressing
OK
.
save!
… Press to save your settings. Call forward-
OK
ing has now been configured.
This menu item currently has no function. Quit it by pressing .
This accesses the local menu (corresponds to pressing ).
OK
Esc
Menu
IPEI
Version Number
This displays the handset's IPEI number.
This displays the handset's software and hardware versions.
5352
Page 31

Customizing Your Telephone
Menu: Telephone Options
Customizing Your Telephone
You’ll find all the individual settings for your handset in this menu.
Menu
Press .
E
Select , and confirm this by pressing .
F
Select one of the following menu items and confirm this by pressing .
F
Language
Select one of the available languages for your display, and confirm this
by pressing . The following languages are available:
OK
OKTelephone Option
- Deutsch - English - Français
- Español - Italiano - Nederlands
- Svenska - Dansk - Norsk
- Portugues - Suomi - Cesky
- Slovensky.
The selected language then applies to all of the handset's local menus.
Under certain circumstances, the language setting of the communications system may differ from the setting for the handset. This will
affect the texts displayed in the [System name] menu (see page 53).
User Name
Enter a name for your handset. This is the name that is displayed when
your handset is in the idle state. Your system administrator may have
allocated a name to it already. For information on entering characters,
please refer to page 24.
Attention tones
These are the short, acoustic signals that your handset emits to draw
your attention to specific events. You can press to activate
or deactivate them.
Key Click ✓
… If this is activated, every keypress will be
–
acoustically confirmed.
Coverage warn ✓
… If this is activated, an attention tone will be
emitted once every ten seconds if you approach the limits of the
radio reception area and are in danger of losing contact.
Battery alarm ✓
… If this is activated, an attention tone will be
emitted once every 30 seconds when the battery charge gets too
low. You have approximately three more minutes before being
disconnected.
Confirm tones ✓
… If this is activated, a tone will be emitted to
confirm that a procedure has been carried out successfully.
End of Menu ✓
… If this is activated, a tone will be emitted
when the end of a list has been reached.
OK
OK
Emergency Call
Enter the emergency phone number that is to be dialed automatically
when you press and hold down the R key
. For information on
r
entering phone numbers, see page 24.
Voice BOX No.
Enter the voice box access number (see also page 46). For information
on entering numbers, see page 24.
Auto- Answer
If this is activated, the handset will automatically answer an incoming
✓
call after the first ring (this is useful if you are using a headset along
Silent Charging
Charger Answer
with your handset). You can press to activate or deactivate
–
this feature.
If this is activated, the handset will not signal any incoming calls while
✓
in its charger cradle. You can press to activate or deactivate
–
this feature.
If this is activated, the handset will automatically answer calls when it
✓
OK
OK
✓
✓
is removed from the charger cradle. If you replace the handset into the
OK
Auto. Quick Hook
charger your call will be terminated. You can press to activate
✓
or deactivate this feature.
If this is activated, telephone book entries that have been defined as
✓
–
quick call entries will be dialed immediately, i.e., without being copied
to predialing. In this case, it’s not possible to postdial numbers when
the quick dial entry has been dialed. If the feature is deactivated, the
phone number in question is first copied to predialing, where you can
✓
Auto.key lock
add digits if required. You can press to activate or deacti-
–
vate this feature.
If this is activated, the keypad will automatically be locked 60 seconds
✓
after your last keypress. You can press to activate or deac-
–
tivate this feature.
Charging LED
If this is activated, the display backlight will switch on automatically
✓
OK
OK
✓
✓
whenever you take the handset out of the charger cradle. You can
OK
press to activate or deactivate this feature. If you
✓
–
want to keep the battery charged, you should deactivate this feature.
Disp.Contrast
Date / Time
Use the arrow keys or the number keys "1" to "8" to set the desired display contrast, and then press .
OK
If the time is not supplied by the system your settings can be made
here. Further on, you can select the time /date format which is used in
your country.
54
55
Page 32

Customizing Your Telephone
Appendix
Reset
… Select the 24h- or 12h (am/pm) time format
Time Format
… Select the date format dd.mm.yy (e.g.
Date Format
… This settings only appear, when no system
Set
After a security check the handset will be reset to its default settings
(the original settings made at the factory). This means that all settings
and entries, with the exception of the system registration, will be
deleted.
and confirm this by pressing
31.12.07) or mm/dd/yy (e.g. 12/31/07) and
confirm this by pressing
clock is available. By regarding the time
format, please enter the current time and date.
In case of time settings in the 12h time format,
“am” can be selected with key 2 (indication a)
and “pm” with key 7 (indication p).
OK
OK
.
✓
.
✓
Default Settings
-Alarm: off
- Ringer Settings:
- Melody
- internal: 1
- external: 2
- unknown number: 4
- VIP: 5
- Alarm: 7
- Emergency Call: 13
- Type: Repeat
- Device:
Buzzer, Vibrator, Headset on
- Volume Settings: Buzzer 3
- Volume Settings
- Earpiece: 3
- Hands-free: 3
- Headset: 3
- Buzzer: 3
- Caller Filter
-Filter off
- List of numbers: no entry
- System
- Subscriptions: no entry
- Telephone Option
- Language: English
- User Name: xxx
- Attention tones:
- Key Click: on
- Coverage Warn: off
- Battery alarm: on
- Confirm tones: on
- End of Menu: on
- Emergency Call: no entry
- Voice BOX No.: no entry
- Auto Answer: off
- Silent Charging: off
- Charger Answer: off
- Auto.Quick Hook: off
- Auto.key lock: off
- Charging LED: on
- Disp.Contrast: 4
- Telephone Book: no entry
- Caller List: no entry
- Redial: no entry
- Quick Call: 1 ... 9 no entry
- Date / Time: not adjusted
- Time Format: 24h
- Date Format: dd.mm.yy
5756
Page 33

Appendix
Important Information about the Batteries
Appendix
Always switch the handset off before removing the batteries, as otherwise data could be lost.
1. Use only nickel metal hydride (NiMH) rechargeable batteries. The talk times, standby times, and
charging times stated below (see the section entitled "Technical Data") only apply when batteries with a capacity of 700 mAh are used. Three size AAA NiMH rechargeable batteries are
included in the original product package.
Note
Never use nonrechargeable batteries, fuel cells, or other types of rechargeable battery. This is
dangerous, and could also lead to malfunctioning or damage to your equipment.
The manufacturer will not accept any liability in such cases.
2. Rechargeable batteries warm up during the charging process. This is normal and not dangerous.
3. Never use other manufacturers' charger cradles, as this could damage the batteries.
4. Be careful to observe the correct polarity when replacing the batteries.
5. Never put a battery in water or throw a battery into a fire.
6. Never forcibly open a battery, as this could allow battery acid to leak out and cause injury.
7. The battery charge level indicator requires a number of charge/discharge cycles to have taken
place before it can accurately reflect the charge level of new batteries.
8. New batteries only reach their full capacity after a number of charge/discharge cycles.
11. In some countries, the law requires used rechargeable batteries to be returned. Do not throw
batteries into your household waste. Dispose of used batteries in accordance with your local
regulations, and recycle them whenever you can. The batteries can contain substances such as
nickel-cadmium (NiCd), lead (Pb), cadmium (Cd), or mercury (Hg).
9. You can replace your handset in the charger cradle or the base station after every call if you
wish. The charging process is electronically regulated so that the batteries are always optimally
recharged, whatever their charge level at the time. Do not remove the batteries from the handset unless there is a good reason for doing so. Removing the batteries interrupts the optimized
recharging process.
The capacity of the batteries can be increased by discharging them completely in the handset
when they have been in use for a long period, and full recharging them again.
10. Never short-circuit a battery — this is dangerous! Avoid accidental short circuits when transporting the equipment or storing it together with bunches of keys, metal plates, or similar
objects. Avoid getting fatty substances on the batteries by keeping them properly packed when
not in the handset. Also avoid getting fatty substances on the handset contacts.
5958
Page 34

Appendix
Care and Maintenance
Appendix
Your telephone is a product that meets the highest design and manufacturing standards. It should
therefore be treated with care. Note the advice below and you will have pleasure in this product for
a long time.
Follow all the safety precautions mentioned on page 1. These precautions apply to the handset, the
charger cradle, and the rechargeable batteries (i.e., the entire telephone) as well as to the accessories.
In order to clean the telephone, first remove the charger cradle adapter plug from the mains socket.
Wipe the device with an antistatic cloth or soft, damp leather rag, then with a dry cloth.
Warning: Never spray your telephone with cleansers or solvents.
Clean the handset and charger cradle contacts with a lintless cloth.
Environmental Characteristics and Disposal
This product is environmentally friendly and can be recycled. It was manufactured in accordance
with statutory requirements and with the Manufacturers’ Guideline 2002.
It was developed with special focus on low energy consumption, long life, and ease of servicing. The
few materials used in its manufacture are environmentally friendly.
Help to extend the life of your communications device by adhering to the safety precautions, the
instructions on rechargeable batteries, and the care and maintenance instructions.
The product that you have purchased was developed in line with the current state of the art in an
environmentally friendly manner and with a view to recycling. It therefore meets the specifications
of the European directives.
The product is labelled with the symbol illustrated beneath. If you wish to dispose
of this product, this symbol obliges you to do so separately from unsorted domestic
waste. Suitable facilities have been setup for the return of waste electrical and electronic equipment. Waste equipment can be handed in at these return centres free
of charge.To find out where these return centres are located, please consult the
information provided by the department of your local authority responsible for
waste disposal.
Please note:
Electric equipment does not belong in household waste.
Deposit it free of charge at a return centre.
Notes on disposal
In order to avoid any possible effects resulting from the disposal of electrical and electronic equipment containing substances damaging to the environment and human health, the European Parliament and Council directives
• 2002/96/EC on waste electrical and electronic equipment (WEEE) and
• 2002/95/EC on the restriction of the use of certain hazardous substances in electrical and electronic
equipment (RoHS)
have been transferred into national law in all EU member states.
The primary aim of the legislation is the prevention of waste electrical and electronic equipment,
and also the recycling, material recovery and any other form of recovery of such waste in order to
reduce the quantities of waste to be disposed of and the amount of hazardous substances from electrical and electronic equipment in waste.
6160
Page 35

Appendix
Appendix
Technical Data
Standard: . . . . . . . . . . . . . . . . . . . . . . . . . . . . . DECT / GAP
No. of channels: . . . . . . . . . . . . . . . . . . . . . . . 120 duplex channels
Frequencies: . . . . . . . . . . . . . . . . . . . . . . . . . . 1880 MHz to 1900 MHz
Duplex: . . . . . . . . . . . . . . . . . . . . . . . . . . . . . . . Time-division multiplex, 10 ms frame length
Channel raster: . . . . . . . . . . . . . . . . . . . . . . . . 1728 kHz
Bit rate: . . . . . . . . . . . . . . . . . . . . . . . . . . . . . . . 1152 kbps
Modulation: . . . . . . . . . . . . . . . . . . . . . . . . . . . GFSK
Voice coding:. . . . . . . . . . . . . . . . . . . . . . . . . . 32 kpbs
Output: . . . . . . . . . . . . . . . . . . . . . . . . . . . . . . . 10 mW (average output per active channel)
Range: . . . . . . . . . . . . . . . . . . . . . . . . . . . . . . . . up to 300m outdoors, 50m indoors
Power supply charger cradle: . . . . . . . . . . . AC 230 V / 50 Hz (plug-in adapter
ID no. 4512132 Continental Europe / 451377 for UK)
Operating time handset: . . . . . . . . . . . . . . . Standby time / talk time
up to 140 hours / approx. 14 hours
Rechargeable batteries: . . . . . . . . . . . . . . . . 3 x AAA batteries, NiMH, 1.2 V / 700 mAh
Time to charge completely
discharged batteries:. . . . . . . . . . . . . . . . . . . 5 to 6 hours
Permissible ambient temperatures
for operating the handset:. . . . . . . . . . . . . . 5° C to 40°C
Permissible ambient conditions for
operating the charger cradle: . . . . . . . . . . . 5° C to 40° C; 20% to 70% relative humidity
Permissible storage temperature: . . . . . . . -10° C to +60° C
Charge cradle dimensions:. . . . . . . . . . . . . . Length / Width / Height = 121 x 107 x 70 mm
Handset dimensions:. . . . . . . . . . . . . . . . . . . Length / Width / Height = 146 x 53 x 28 mm
Charger cradle weight: . . . . . . . . . . . . . . . . . 49 g
Handset weight: . . . . . . . . . . . . . . . . . . . . . . . 104 g without batteries, 139 g with batteries
Length of adapter cable: . . . . . . . . . . . . . . . 3 m
Menu Structure
Key Lock on/off
Alarm Alarm active
Set
Date / Time
Melody
Ringer Settings Melody Internal
External
Unknown Number
VIP
Alarm
Emergency call
Type Repeat
Play once
Device Buzzer
Vibrator
Headset
Volume Settings
Volume Settings Earpiece
Hands-free
Headset
Buzzer
Caller Filter Accept list
Block List
Filter off
List of numbers
System Subscriptions
IPEI
Version Number
Systemname (depends on the system being operated/
only appears after login)
Telephone Option Language Deutsch
English
Français
Español
Italiano
Nederlands
Svenska
Dansk
Norsk
Portugues
Suomi
Cesky
Slovensky
User Name
Attention tones Key Click
Coverage Warn
Battery alarm
Confirm tones
End of Menu
Emergency Call
Voice BOX No.
Auto Answer
Silent Charging
Charger Answer
Auto. Quick Hook
Auto.key lock
Charging LED
Disp.Contrast
Date/Time
Reset
6362
Page 36

Appendix
Index of Key Words
Appendix
A
Alarm............................................................47, 48
Answering a call................................................35
Attention tones.................................................54
Auto answer ......................................................55
Auto. key lock....................................................55
Auto. quick hook...............................................55
Auto. search.......................................................52
Automatic Menu Closure ................................20
B
Backlight ............................................................27
Basic Functions .................................................25
Batterie charge level ........................................12
Belt Clip ..............................................................13
Blind Transfer ....................................................39
C
Call transfer........................................................39
Call waiting........................................................37
Caller filter..........................................................51
Caller List...............................................34, 45, 46
Care and maintenance ....................................60
Chaining phone numbers ...............................30
Charge status ....................................................12
Charge warning ................................................12
Charger Answer ................................................55
Charger Cradle.....................................................8
Charging and operating times.......................10
Charging LED.....................................................55
Commissioning the handset.............................9
Confirm tones....................................................54
Consultative transfer........................................40
Coverage warning ............................................54
D
Date / Time ...........................................25, 47, 55
DECT......................................................................3
Delivery state.....................................................57
Dialing phone numbers...................................29
Direct dialing.....................................................29
Discharged batteries........................................54
Display................................................................14
Display contrast ................................................27
Disposal..............................................................60
During a call.......................................................36
During a conversation...............................37, 38
E
Earpiece Volume...............................................27
Editing Lists .......................................................41
Editor ..................................................................24
Emergency number.............................28, 31, 55
End of menu ......................................................54
Enquiry call..................................................38, 39
Entering names / phone numbers.................24
Environmental Characteristics .......................60
G
GAP........................................................................3
GAP only.............................................................52
H
Handset name...................................................54
Handsfree function...........................................26
Headset.................................................................4
I
Important information about the batteries.58
Info key ........................................................34, 46
Initial setup and operation................................9
Inserting the batteries .....................................10
Inserting the memory card .............................11
Installation ...........................................................7
IPEI ......................................................................52
K
Key click..............................................................54
Key lock ..............................................................26
Keys on the handset...........................................6
L
Language ...........................................................54
M
Main menu (example) .....................................21
Maintenance .....................................................60
Making a call during a conversation .............38
Making Calls ......................................................29
Melodies.............................................................48
Memory Card.......................................................3
Menu...................................................................21
Menu control.....................................................21
Menu structure .................................................63
Menu: alarm ......................................................47
Menu: caller filter..............................................51
Menu: ringer settings.......................................48
Menu: system....................................................52
Menu: telephone options................................54
Menu: volume ...................................................50
Menu: [System name]......................................53
Message-waiting indication ...........................28
Microphone off ...............................................36
Muting the handset .........................................28
N
Name for your handset....................................54
Notification Texts .............................................28
O
Options during a call...........................36, 37, 38
P
Power failure .......................................................1
Power supply.......................................................1
Q
Quick dial...............................................28, 31, 43
R
Rechargeable batteries......................................1
Redial list .....................................................32, 44
Registering the handset..................................13
Registration .......................................................52
Removing the memory card...........................11
Reset ...................................................................56
Ringer .................................................................49
Ringer on/off .....................................................27
S
Safety precaution................................................1
Scope of delivery.................................................7
Setting up the charger cradle...........................7
Silent Charging .................................................55
Softkeys and other keys ..................................16
SOS......................................................................28
Subscriptions.....................................................52
Switching the handset on/off ........................25
Switching the ringer off ..................................27
System................................................................52
System name.....................................................53
T
Technical data...................................................62
Telephone book .........................................23, 33
Telephone Book / editor..................................23
Telephone book: adding a new entry...........41
Telephone options ...........................................54
Time / Date ...........................................25, 47, 55
Toggling.............................................................39
Transferring a call .............................................39
U
User.....................................................................54
Using your telephone ........................................1
V
Version Number................................................52
VIP .......................................................................48
Voice Box............................................................46
Voice box access number................................55
Volume ...............................................................27
6564
Page 37

Copyright 2007 Aastra
All Rights Reserved
Created in June 2007 • The right to technical changes is reserved.
Aastra Phone 142
 Loading...