

Page 1

VIGIL Client Software
v7.00.0000
Users Guide
March 2012 Revision
Page 2

Table of Contents
1 INTRODUCTION ..................................................................................................................................................................... 5
2 SYSTEM REQUIREMENTS .................................................................................................................................................... 6
3 FEATURES .............................................................................................................................................................................. 7
4 MAIN SCREEN ........................................................................................................................................................................ 8
4.1
I
CON TOOLBAR
4.2
I
NFORMATION BAR
4.3
C
AMERA SIDEBAR
5 SERVERS WINDOW ............................................................................................................................................................. 10
5.1
A
DD / EDIT A SERVER
5.2
DVR S
ETTINGS
DVR Recorder Tab ................................................................................................................................................................ 12
Picture Quality Tab ................................................................................................................................................................ 14
Simple Settings Tab ........................................................................................................................................................... 14
Advanced Settings Tab ...................................................................................................................................................... 14
Camera Names Tab .............................................................................................................................................................. 15
Camera Settings Tab ............................................................................................................................................................. 15
Camera Settings Sub-Tab .................................................................................................................................................. 15
Recording Mode Sub-Tab .................................................................................................................................................. 16
CODEC Settings Tab ......................................................................................................................................................... 18
Settings Tab ........................................................................................................................................................................... 20
Site Name ........................................................................................................................................................................... 20
Global Server Settings Tab ................................................................................................................................................ 20
Sequence Tab .................................................................................................................................................................... 21
Auto Logon ......................................................................................................................................................................... 21
Data Drive Settings ............................................................................................................................................................ 21
Users Tab .............................................................................................................................................................................. 22
Update Tab ............................................................................................................................................................................ 23
5.3
R
EMOTE REGISTER
.................................................................................................................................................................. 8
............................................................................................................................................................. 9
............................................................................................................................................................. 9
...................................................................................................................................................... 11
............................................................................................................................................................... 12
......................................................................................................................................................... 24
6 CAMERA SIDEBAR .............................................................................................................................................................. 25
6.1
S
ITES TAB
Cameras Treeview ................................................................................................................................................................. 25
Audio Treeview ...................................................................................................................................................................... 26
Relays Treeview .................................................................................................................................................................... 26
V-POS Treeview .................................................................................................................................................................... 26
Chat Treeview ........................................................................................................................................................................ 27
Server Alarms Treeview ........................................................................................................................................................ 27
POS/ATM Live Treeview ....................................................................................................................................................... 28
6.2
G
ROUPS TAB
7 LIVE VIEWER ........................................................................................................................................................................ 30
7.1
L
IVE VIEWER CONTROLS
7.2
L
IVE VIEWER WINDOW RIGHT CLICK MENU
7.3
F
ULL SCREEN MODE
7.4
ON S
7.5
PTZ C
7.6
R
ECORDING MODES
8 V-POS TREEVIEW CONFIGURATION ................................................................................................................................ 37
8.1
V-POS E
Add / Edit Exceptions ............................................................................................................................................................. 38
8.2
V-POS E
Exception Event Playback ..................................................................................................................................................... 42
....................................................................................................................................................................... 25
.................................................................................................................................................................. 29
.................................................................................................................................................. 30
....................................................................................................................... 31
....................................................................................................................................................... 32
CREEN DISPLAY
AMERA CONTROLS
XCEPTIONS
VENTS
(OSD) C
........................................................................................................................................................ 36
....................................................................................................................................................... 37
.............................................................................................................................................................. 40
ONFIGURATION
................................................................................................................................................ 33
3xLOGIC’s VIGIL Client - Users Guide Page 2
.................................................................................................................. 33
Doc# 12031914
Page 3

8.3
V-POS S
General Tab ........................................................................................................................................................................... 43
Database Settings Tab .......................................................................................................................................................... 44
DVR Settings Tab .................................................................................................................................................................. 45
Email Settings Tab ................................................................................................................................................................. 45
Event Settings Tab ................................................................................................................................................................ 46
DVR Site Information Tab ...................................................................................................................................................... 46
8.4
V-POS R
Report Criteria........................................................................................................................................................................ 47
Manual Query ..................................................................................................................................................................... 47
Predefined Exception Query .............................................................................................................................................. 49
Search for Transaction by Receipt ..................................................................................................................................... 49
Report Results ....................................................................................................................................................................... 49
8.5
V-POS Q
ETTINGS
EPORTS
UICK SEARCH
........................................................................................................................................................... 43
............................................................................................................................................................ 47
................................................................................................................................................... 50
9 DIGITAL VIRTUAL SWITCH ................................................................................................................................................. 51
9.1
V
IRTUAL SWITCH KEYPAD
9.2
V
IRTUAL SWITCH SCREEN
10 SEARCHING ...................................................................................................................................................................... 54
10.1 S
Search Criteria ....................................................................................................................................................................... 55
Video Search Results ............................................................................................................................................................ 55
10.2 S
Search for Line Items ............................................................................................................................................................. 56
Search for Transaction .......................................................................................................................................................... 56
10.3 C
10.4 V
Playback Controls .................................................................................................................................................................. 60
Advanced Playback Controls ................................................................................................................................................. 61
Controlling Playback Video with Digital PTZ: ........................................................................................................................ 64
Playback Right-click Menu: .................................................................................................................................................... 65
11 EXPORTING ...................................................................................................................................................................... 66
EARCHING VIDEO
EARCHING
USTOM SEARCH
IDEO PLAYBACK
Smart Search Tab .............................................................................................................................................................. 61
Zoom Tab ........................................................................................................................................................................... 62
Adjust Image Tab ............................................................................................................................................................... 62
Markers Tab ....................................................................................................................................................................... 63
Buffering Tab ...................................................................................................................................................................... 63
Audio Tab ........................................................................................................................................................................... 64
Visual Search Tab .............................................................................................................................................................. 64
POS/ATM D
............................................................................................................................................................ 58
............................................................................................................................................................ 59
................................................................................................................................................ 51
................................................................................................................................................ 52
.......................................................................................................................................................... 55
ATA
........................................................................................................................................... 56
11.1 S
11.2 V
11.3 A
11.4 E
12 SITE MAP .......................................................................................................................................................................... 70
13 SERVER ALARMS ............................................................................................................................................................ 71
13.1 P
13.2 S
13.3 S
14 SETTINGS ......................................................................................................................................................................... 74
14.1 S
Managed by VCM .................................................................................................................................................................. 74
Enable Client Login ................................................................................................................................................................ 75
14.2 L
14.3 S
14.4 A
14.5 H
TILL IMAGE EXPORTING
IDEO EXPORTING
UDIO EXPORTING
XPORT FILE BROWSER
REVIEW ALARMS
UPPRESS ALARMS
EARCH ALARMS
TARTUP TAB
IVE TAB
EARCH TAB
LARMS TAB
ARDWARE TAB
......................................................................................................................................................................... 76
........................................................................................................................................................... 67
.......................................................................................................................................................... 68
........................................................................................................................................................... 72
......................................................................................................................................................... 72
............................................................................................................................................................. 73
................................................................................................................................................................. 74
................................................................................................................................................................... 77
................................................................................................................................................................... 78
.............................................................................................................................................................. 79
................................................................................................................................................. 66
.................................................................................................................................................. 68
3xLOGIC’s VIGIL Client - Users Guide Page 3
Doc# 12031914
Page 4

14.6 D
14.7 A
14.8 C
14.9 S
14.10
14.11
Digital Virtual Switch .............................................................................................................................................................. 82
Analog Virtual Switch ............................................................................................................................................................. 83
Virtual Switch Input Mappings ............................................................................................................................................... 84
ESTINATIONS TAB
UDIO TAB
HAT TAB
ITEMAPS TAB
T
RANSCODER TAB
V
IRTUAL SWITCH TAB
.......................................................................................................................................................... 80
...................................................................................................................................................................... 80
....................................................................................................................................................................... 80
................................................................................................................................................................ 81
....................................................................................................................................................... 81
.................................................................................................................................................. 81
15 SITE MAP DESIGNER ...................................................................................................................................................... 85
15.1 S
15.2 S
16 DV PLAYER ....................................................................................................................................................................... 88
17 LANGUAGE SWITCHER .................................................................................................................................................. 90
18 CONTACT INFORMATION ............................................................................................................................................... 91
ITE MAP DESIGNER ICONS AND BUTTONS
ITE MAP / HOT SPOT PROPERTIES
................................................................................................................................. 87
....................................................................................................................... 86
3xLOGIC’s VIGIL Client - Users Guide Page 4
Doc# 12031914
Page 5

1 Introduction
VIGIL Client gives you unrivalled access to live and recorded video from any of your networked DVR’s.
Advanced playback and intelligent SmartSearch functionality lets you identify and review events of interest
quickly and easily. The result is a more accurate and efficient investigation of incidents with easy export of
evidence material. Our mapping function provides unlimited map layers and camera links for unrivaled access
to your cameras.
A unique combination of control, efficiency, and adaptability offering investigators unparalleled accessibility
and manageability to their video network. The result is faster response times, reduced investigator times, and
increased access and effectiveness of your video surveillance investments.
VIGIL Client’s advanced SmartSearch functionality includes:
• Instant playback of 1, 5 or 10 minute video increments with the click of a mouse
• The ability to define advanced search parameters, incorporating video analytics and POS/ATM data
integration for unrivalled incident investigations
• Quickly and accurately navigate through large amounts of recorded high-definition video
• Advanced playback – review recorded video using an intuitive interface and buttons. Users can play
forward and reverse, at normal or variable speed (up to 50-times)
• Bookmark and export video clips or still images in industry-standard formats including AVI or
3xLOGIC’s Authenticated Video for forensic investigations. Files are exported with our exclusive DV
Player application ensuring that recipients can easily access and view surveillance video related to your
investigation.
Advanced Control Feature - Alarm monitoring
• Can be triggered by an internal system event, as well as external third-party access control and
building management system triggers.
• VIGIL Client's Virtual Switch Functionality enables additional PC VGA monitor outputs to be used as a
Virtual Switch. This allows the user constant live view of their sites on the virtual switch monitors while
maintaining the standard VIGIL Client monitor for regular usage, i.e. live, playback, export and alarm
window usage. The Virtual Switch can be controlled using on screen virtual keyboard or using a Pelco
KBD300a.
Advanced Control Feature - POS/ATM Integration
• Instantly link surveillance footage with related transactional data for complete access of your operation.
Increase compliance requirements while reducing shrinkage and theft. Coupled with advanced
exception-based reporting functionality enables operators to be notified in the event of POS/ATM
transactions fall outside the norm – so called POS/ATM exceptions.
3xLOGIC (www.3xlogic.com) is based in Victoria, British Columbia and is the manufacturer of the VIGIL line of
digital video products which have been available under a variety of OEM names and our own VIGIL name for
over 10 years.
3xLOGIC’s VIGIL Client - Users Guide Page 5
Doc# 12031914
Page 6

2 System Requirements
Recommended
Operating System Microsoft Windows XP Professional SP3 or Windows 7 Professional or Ultimate (32 or 64 bit)
CPU Intel Core2 Duo, minimum 2.8 GHz
RAM Minimum 2 GB (4GB when running Virtual Switch)
Video Card PCI Express 1GB (2GB when running Virtual Switch)
Hard Drive SATA (Minimum 100MB required for install)
Note: VIGIL Client will only run on Windows platforms that support DirectX 7.01 or higher. Run
DxDiag.exe to view the version of DirectX that is currently installed.
3xLOGIC’s VIGIL Client - Users Guide Page 6
Doc# 12031914
Page 7

3 Features
Details
Search Retrieve a list of stored footage for specified cameras from a start date/time to an end date/time.
Quick Search Retrieve a list of all footage for the past 1 – 8 hours.
Regular Playback Scan through recorded footage using play/pause buttons.
Scroll-bar Playback
Current Frame
Video Cueing Cue video to a specified date/time or frame number.
Save Footage Save the currently displayed video footage in AVI or Authentic Video (MJPG) format.
Save Picture Save the currently displayed frame in JPG or BMP format.
Full Screen View footage or pictures at their full resolution.
Live Viewer
Modular Live and
Playback
Use a scroll-bar to locate footage by dragging to a desired location, or skim ahead or back 1 or
10 frames per click.
See the frame number, frame count, frame size (in KB) and frame time/date for the currently
displayed frame.
View many video feeds at once; see the site name, camera name and local time/date for each
live video feed; with the client/server, view feeds for multiple sites at once.
View Live and Playback feeds at the same time.
3xLOGIC’s VIGIL Client - Users Guide Page 7
Doc# 12031914
Page 8

3xLOGIC’s
4 Main Screen
is displayed
This table is a quick listing of the main toolbar buttons and their usage. Detail of each corresponding window is
program.
no longer display alarm events.
be loaded from a configured VCM Server or from Local settings.
Opens the Cameras list. You can also open this sidebar from the menu by going to
window.
can be opened
window. You can also open this window from the menu by going to
has finished loading.
window to exit
from which Site settings can
from which the
This is the Main Screen window that
when VIGIL Client
4.1 Icon Toolbar
outlined in later sections.
Exits the VIGIL Client
cause VIGIL Client to
Logs off the current user.
Opens the Servers window.
Opens the Search
Search window
Opens the Exports
Browser.
Click Yes in the Exit Confirmation
Clicking the button opens the context menu
Clicking the button opens the context menu
.
VIGIL Client. This will
View | Cameras.
Custom
View | Export File
VIGIL Client - Users Guide Page 8
Doc# 12031914
Page 9

3xLOGIC’s
Opens the Site Map
window. You can also open this window from the menu by going to
window. You can also open this window from the menu by going to
Opens the Digital Virtual Switch window.
window. You can also open this window from the menu by going to
button opens the context menu
Inc. Client
The information bar found at the very bottom of the main Client window provides you with the
CPU usage, dat
usage is under 95 percent; red indicates that it is
information screen detailing information about the system, current streams and
The Sidebar will be discussed in section 6
Client settings can be imported or
window that displays the software version.
A green CPU bar indicates that the CPU
over 95 percent, clicking on the CPU Usage will bring up an
virtual switch.
View | Site Map.
Opens the Server Alarms
Server Alarms.
Opens the Settings
Clicking the
exported.
Opens the About 3xLOGIC
4.2 Information Bar
sent to the Virtual Switch,
from which the VIGIL
e, time, and chat status.
View |
View | Settings.
last command
4.3 Camera Sidebar
Camera Sidebar.
VIGIL Client - Users Guide Page 9
Doc# 12031914
Page 10

3xLOGIC’s
5 Servers Window
erver in this context is a DVR PC running
servers more efficient than remembering IP addresses or DNS names. Server
information is stored by a description that is created by the user.
ngs, the Servers list will be populated by the VCM Server the Client connects to.
displays a list of saved servers. It also displays their current connection status and offers different buttons to
ngs and more.
e of setting up servers is to make
Managed by VCM
Connected to the server, but with non
Connects to all configured servers.
have a username and password stored in the settings, it
will prompt for the username and password.
Connects to the selected server only.
have a username and password stored in the settings, it
prompt for the username and password.
Connects to the selected server only.
automatically bypass the stored username and password
and will prompt one for this connection.
disconnect from the currently selected
window where you can add a server.
Opens a prompt confirming if you wish to remove the currently selected
window for the currently selected server allowing
window for the currently selected server. You must
be connected to the server with administrative privileges for this to be
window for the currently selected server.
A S
connecting to local and remote
Setti
VIGIL Server. The purpos
Note: If
is enabled in the
The Servers window
interact with the servers, change setti
Disconnect
Connect All
Connect
Connect
As…
Opens a prompt asking if you want to
server.
Disconnected from the server.
Connected to the server.
privileges.
will
-administrative
If a server does not
If the server does not
However, it will
Add
Remove
Edit
DVR Settings
Remote Register
Opens the Server Settings
server from the server list.
Opens the Server Settings
you to change the stored settings.
Opens the DVR Settings
available.
Opens the Registration
VIGIL Client - Users Guide Page 10
Doc# 12031914
Page 11

5.1 Add / Edit a Server
.
Click the Add or Edit (with a Server Selected) buttons from the Servers window to open the Server Settings
window.
Description
IP/DNS
Name
User Name/
Password
Use Dialup
TCP/IP
Ports
A short description or name that will be used
to identify this server.
The IP address or DNS name of the server. To
use a dialup connection, leave this setting
blank and Enable Use Dialup, select the dialup
connection to use from the drop-down menu.
The user name and password that VIGIL Client
will use to log in to the server. If these are left
blank, a prompt will be opened during
connection for the user name and password to
be input manually. Note: The default
administrator login to VIGIL Server is:
username administrator and password 123
The default user login is: username user and
password 123.
Enable to use a dialup connection to connect to
a server. Note: At least one Windows dialup
connection must be set up for this feature to
become enabled.
Open a window to change the default TCP/IP
port settings if they have been altered on the
server.
For the Client software to connect properly to the Server, the TCP/IP Ports in the
Client software must match the TCP/IP Ports on the Server.
To change the TCP/IP Ports: select a preset number from the drop-down menu;
enter in the Data Port and then click the Get Settings button; or enter the ports
manually.
Retrieves the settings from the server. Enter
Get Settings
Reset to Defaults
Check Network Status Checks the status of your network every set amount of time.
Timeouts Before Failure
the Data Port and then click the Get Settings
button to retrieve the other ports from the
server.
Click to reset the ports to their default
values.
The number of times VIGIL Client will attempt to connect to a Server before
marking the Server as offline.
3xLOGIC’s VIGIL Client - Users Guide Page 11
Doc# 12031914
Page 12
Live Overlay
Enables live overlay features from an installed capture card to be used. Select the input number
Use Live Overlay
From Card Capture
Card
Input Number Select the input number for the live overlay from the drop-down menu.
from the drop-down menu.
Note: For this feature to function properly Live Overlay must be enabled in the Settings |
Hardware section and the capture card drivers must be installed.
Poll Server Data
Poll Server Data
Enable Polling of Server Alarms and Live POS/ATM Data from the DVR Server. The frequency of
polling can also be configured.
5.2 DVR Settings
To access a remote server’s DVR settings, VIGIL Client must be connected to the server with administrative
privileges. Select a server from the list and click Connect. If the default user does not have administrative
privileges, use Connect As to login as an administrator.
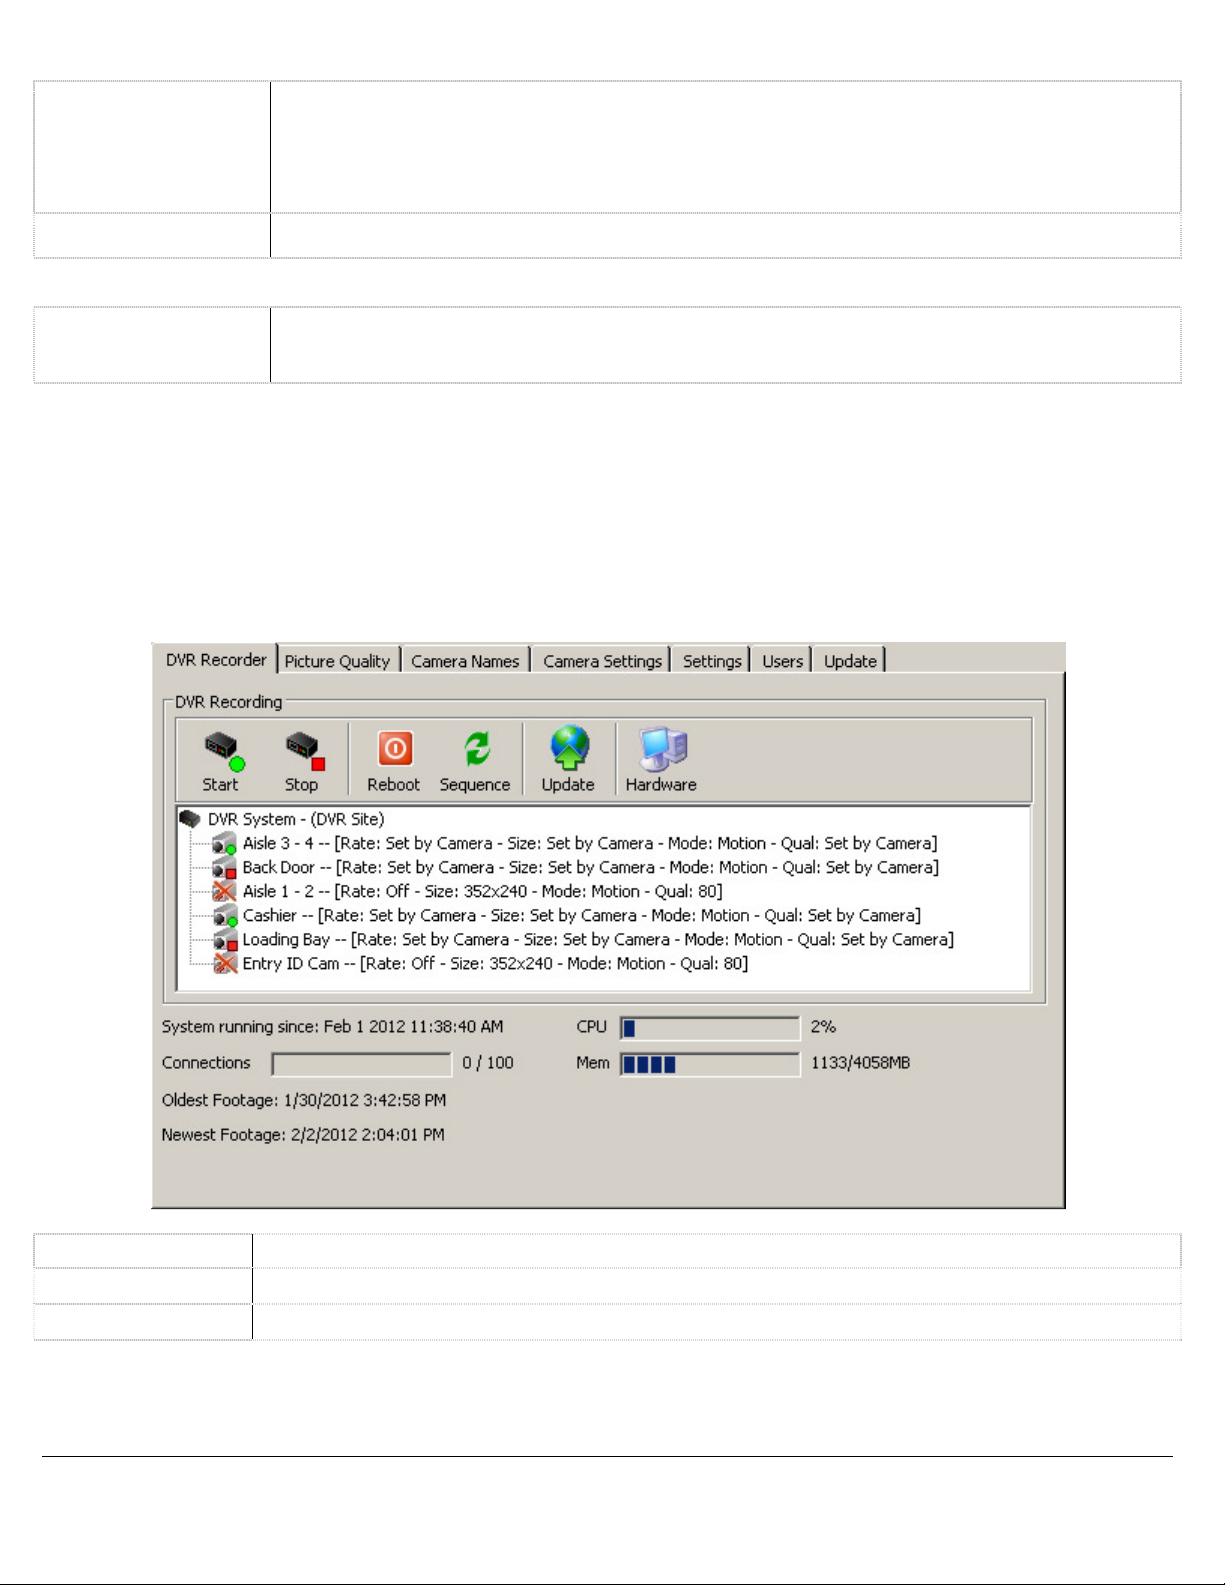
DVR Recorder Tab
From this window, cameras can be set to start or stop recording, the server can be rebooted or updated, and
basic information about the operating performance of the DVR is displayed.
Start Starts recording on the currently selected camera(s).
Stop Stops recording on the currently selected camera(s).
Reboot Restarts the server. Warning: This action will restart the server and take it temporarily offline.
3xLOGIC’s VIGIL Client - Users Guide Page 12
Doc# 12031914
Page 13

3xLOGIC’s
Sequence
window which turns on/off the camera sequencing on
connected analog monitors.
Uploads and applies an update file on the server. Select the .VGL update file and the update
Warning
Opens the Hardware Information window which provides some basic information about the Capture
VIGIL
Camera information is displayed in the main portion of the
show the status of
Along with the status icons, camera settings are also
displayed. The camera recording frame rate, the recording
resolution, recording mode and compression quality are
At the bottom of the window, DVR information such as running time, number of Client Connections, current
Oldest / Newest Footage Dates are displayed.
Shows the time when the
Shows the CPU usage on the DVR.
Shows the amount of client connections to the DVR.
The total memory usage on the DVR.
Shows the date and time of the oldest/newest footage stored on the DVR.
The sequences must be configured on the
This action will restart the server and take it temporarily offline.
recording.
Camera is currently stopped and not recording.
Opens the Sequence
Note:
Server.
Update
Hardware
window. Three status icons are used to
each camera:
listed.
process will begin.
Card installed in the
CPU and Memory usage and
System running
since
:
Server.
Camera is currently
Camera is disabled.
VIGIL Server was last rebooted.
CPU
Connections
Mem
Oldest Footage/
Newest Footage
VIGIL Client - Users Guide Page 13
Doc# 12031914
Page 14

Picture Quality Tab
The recording quality of each camera can be adjusted on this tab.
Simple Settings Tab
Adjust the camera recording quality to preset values: Low (20), Medium (40), High (60) and Super-High (80).
Advanced Settings Tab
Adjust the camera recording quality between 20 and 90. This is for fine-tuning the camera recording quality.
3xLOGIC’s VIGIL Client - Users Guide Page 14
Doc# 12031914
Page 15

Camera Names Tab
Adjusts the U and V color difference signals used in YUV color format for the video footage.
The Camera Names tab allows the ability to change the name of each camera.
To change the name of a camera, type in the new name beside the camera number and click either Apply or
OK.
Camera Settings Tab
The Camera Settings tab provides advanced configuration of camera parameters, recording mode and rates,
and recording CODECs.
Camera Select a camera to configure.
Default Camera Settings Set the currently selected camera back to default settings.
Default All Cameras Set all cameras back to default settings.
Camera Settings Sub-Tab
Brightness Adjusts the brightness of the video footage.
Sharpness Adjusts the sharpness of the video footage
Contrast Adjusts the contrast of the video footage.
Hue Adjusts the hue of the video footage.
Saturation U/
Saturation V
Noise Reduction
Note that not all cameras use a YUV color format, in which case, adjusting the Saturation U
slider will adjust the color saturation while the Saturation V slider will have no effect.
Reduces video noise on grainy video images. Warning: If this value it is set too high it may
have detrimental effects.
3xLOGIC’s VIGIL Client - Users Guide Page 15
Doc# 12031914
Page 16

Recording Mode Sub-Tab
The Recording Mode Sub Tab allows for the Recording Speed of the Camera and the Recording Mode to be
configured. There are four Recording Mode options encompassing a full range of recording possibilities. These
modes are accessible by selecting the appropriate option from the Recording Mode drop-down menu.
Opens the Recording Speed window. The recording speed can
be set individually for Constant, Motion and Alarm Recording
Mode. Use the drop-down menu to select the desired number
Set Speeds
of frames per second (fps). Note: Network cameras will often
record and play back at a slower rate than what was set in the
Recording Speed window, depending on the bandwidth and
camera.
Constant Always recording, 24 hours 7 days a week.
Motion
Records only when motion is detected. Full configuration over motion area, amount of motion, size of
motion and post motion recording time makes this a very versatile recording mode.
Post Motion Record
Trigger Blocks
Motion Sensitivity
Reset to Default Resets the motion settings back to their default values.
The length of time a camera continues to record before and after motion or
an alarm is detected.
The number of motion zones necessary to trigger the motion detector. The
recommended value is 1.
Controls the sensitivity of the motion detection. High sensitivity will detect
a large amount of motion; less sensitivity will detect a smaller amount of
motion.
Alarm Only
Records in alarm mode when any alarm is detected. The alarms can be of any type including Video
Analytics, Video Motion, Digital Input and POS/ATM alarms.
Schedule
Records based on a schedule. The easy to use graphical interface provides a full overview of a week’s
schedule in 15-minute intervals. This mode offers full control over recording times and any combination
of constant or motion controlled recording modes.
Mode drop-down menu, the Schedule window will appear. To edit an existing schedule click
the … button to open the Schedule window. To modify a schedule, click the appropriate
recording mode button (Const or Motion) and then click-and-drag across a time slot. Areas
that are blank (no color) have no recording modes defined for that time and will not record
any footage.
If Schedule is selected from the Recording
3xLOGIC’s VIGIL Client - Users Guide Page 16
Doc# 12031914
Page 17

Note: The smallest time interval that can be used is a 15 minute period.
Const Sets or changes the section to Constant recording mode; these time periods are colored green.
Motion Sets or changes section to Motion recording mode; these time periods are colored blue.
HZoom+/-
VZoom+/- Expands and contracts the schedule vertically.
Move a time
period
Copy a time
period
Change record
mode
Change the
start/end time
Importing from
another camera
Viewing start and
end times of a
section
Deleting a time
period
Expands and contracts the schedule horizontally; this allows for better precision in setting time
periods.
Click and hold the Shift key, then click-and-drag the section.
Click and hold the Ctrl key, then click-and-drag the section.
Click a section of the schedule, and then click the appropriate button (Const or Motion) to change
the recording mode for that section.
Select the section by clicking on it and then click-and-drag the right or left edge of the section.
Select the camera from the Import From Camera drop-down menu, and then click Import. This will
overwrite the current schedule.
Select the section by clicking on it. The start and end times of the section are displayed near the
bottom left corner of the Schedule window. Hover the mouse over any part of the section to display
the time.
To select a section, click on it and then click Delete.
Deleting a
schedule
Apply Schedule To
All Cameras
Click the Clear All button to delete the entire schedule.
When marked, this checkbox will apply the created schedule to all cameras that have been set to
Schedule recording mode.
3xLOGIC’s VIGIL Client - Users Guide Page 17
Doc# 12031914
Page 18

CODEC Settings Tab
The CODEC Settings tab allows advanced configuration of the recording CODEC used for storing video footage.
Normally, two video encoding CODECs are available for recording video footage: AZTECH and MPEG4, however some
models support Hardware CODECs, which have slightly different customization options.
AZTECH CODEC Settings
The AZTECH CODEC is the default CODEC for most systems. To switch the recording CODEC to AZTECH, select
the AZTECH option from the CODEC drop-down menu.
Space Saving
Mode (AZTECH)
Enabled
Sensitivity
Noise Adaptive
Detect Using
Grayscale/ Color
Use B Frame
Enables advanced compression technology to decrease the file size of recorded footage.
Note: This is a CPU intensive setting.
Adjusts the threshold used by the CODEC to identify areas of change between frames. The higher
the sensitivity, the smaller a change is encoded.
Adjusts the noise threshold used by the comparison algorithm when determining whether a block
contains a change. When this value is increased, more noise is allowed in the block without
triggering change for that block. This feature does not decrease noise in an image.
Determines whether grayscale or color will be used to detect changes. Note: Color detection is a
CPU intensive setting.
Uses bi-directional frames to decrease the file size of recorded footage. Note: This setting is
extremely CPU and Memory intensive.
MPEG4 CODEC Settings
To switch the recording CODEC to MPEG4, select the MPEG4 option from the CODEC drop-down menu.
Key-frame Rates
Motion Search
Scope
Quantization
Method
Sets the number of key-frames recorded per second. The higher the value, the greater the data
space needed for recording, but the higher the quality of the video.
Changes the size of the regions used to detect motion.
Selects the type of compression. H263 offers higher compression than MPEG4 but requires more
CPU usage.
3xLOGIC’s VIGIL Client - Users Guide Page 18
Doc# 12031914
Page 19

ME Accuracy
ME Algorithm
Motion Estimation Accuracy includes two options: Full Pixel and Half Pixel. Full Pixel checks for
motion comparing differences of full pixels. Half Pixel will check for motion using an interpolation
method that detects finer movements. Note: Half Pixel is a CPU intensive setting.
The Motion Estimation Algorithm changes the shape of the area used for motion detection and
includes two options: Full Search and Fast Search. Fast Search will save CPU time but Full Search is
more accurate.
ME Vectors
Sets the number of vectors tested for motion from 1 to 4. The greater the number, the more CPU
processing is required.
Hardware CODEC Settings
Depending on the DVR model, it may use Hardware CODEC recording, which has slightly different
customization options. For some types of cards the CODEC used can be changed on the VIGIL Server Settings
| Hardware Tab via the Hardware CODEC Dropdown box.
Variable Bit Rate
Constant Bit Rate
Restrict Maximum
Bit Rate
The default setting of Variable Bit Rate allows the encoder to change its recording bit rate
automatically as required. This option offers the best combination of file size and visual quality.
Changes a variable bit rate into a constant bit rate. A setting of Constant Bit Rate with a very high
bit rate selected will provide the maximum video quality settings, although this is at the expense of
storage space.
Sets a hard limit on the maximum quality that can be recorded. Use the slide bar to select the
desired maximum bit rate.
Recording Rate / Resolution
In the Recording Rate / Resolution Section, the cameras are grouped into Bank tabs that represent the
physical camera banks in the DVR. This allows the user to maximize the capture resolution and recording
speeds for each camera bank. When the number of FPS is changed in the Recording Rate / Resolution window,
it is applied to all recording modes.
Note: The number of banks and the cameras in each bank is determined by the capture card
installed, which cannot be configured. There are many possible layouts of banks and channels per
bank. If no capture card is installed (NVR) only the Network Camera tab will be available.
Camera Select a camera number within the current bank tab to change its settings.
Capture
Resolution
Select the desired recording resolution from the drop-down menu.
3xLOGIC’s VIGIL Client - Users Guide Page 19
Doc# 12031914
Page 20

Select the desired number of frames per second. Each bank has a set amount of FPS that can be set
Recording Speed
Network Camera
to its cameras. Values will change depending on the recording speeds for other cameras within the
same bank.
Network cameras are automatically detected and the analog feed is disabled for that camera
number. Network camera speeds are independent of other cameras and do not change the
maximum allowable FPS for cameras belonging to the same camera bank.
Settings Tab
The Settings tab provides control over some of the basic behaviour of the DVR server.
Site Name
The name of the Site where VIGIL Server is located. The site name is included when saving still images.
Global Server Settings Tab
When enabled, the DVR starts recording footage as soon as the VIGIL Server program is
Auto-Start Recorder
Network Logging Logs network activity that can be reviewed in the Network Log Analyzer.
Resolve Client Name
A/C Cameras
Watchdog
Limit Search to One
Day
Client Connections Enter the maximum number of simultaneous client connections allowed.
launched. When disabled, the user must manually start the recorder using the controls in the
Recorder Controls window.
When enabled, client IP addresses are translated into their computer names for easier
recognition.
Enable A/C Cameras to set VIGIL Server to record footage from A/C powered cameras. Disable it
to record footage from D/C powered cameras.
When enabled, the watchdog circuit on the video capture card is used to verify that VIGIL Server
is responsive. If the software becomes unresponsive, then the watchdog will reboot the DVR
When enabled, the Search window will be limited to performing searches for a single day only.
3xLOGIC’s VIGIL Client - Users Guide Page 20
Doc# 12031914
Page 21

Sequence Tab
The Sequence tab configures the camera display sequences for the analog output monitors. Only analog video
feeds can be added to a sequence. This is due to hardware limitations on the capture cards.
Monitor Number Select the analog output monitor number for the sequence.
Auto Start
Sequence
Add Add a new camera to the sequence with a specified dwell time.
Edit Modify the dwell time of the selected camera.
Delete Remove the selected camera from the sequence.
Up / Down Moves the selected camera up/down in the sequence.
When enabled, the sequence for the selected analog output monitor is started automatically when
VIGIL Server starts.
Auto Logon
When this is checked, a message prompts for a username and password. The username and password entered
will be used to log into VIGIL Server automatically when the program is launched.
Data Drive Settings
The Data Drive Settings area displays the data drive information of the DVR.
available/total space of the drive are displayed.
The path of the drive and the
The status of the data drive is indicated by its icon:
Configured drive
Currently recording on this drive
Drive warning
Drive error, contact your system administrator.
3xLOGIC’s VIGIL Client - Users Guide Page 21
Doc# 12031914
Page 22

Users Tab
The Users tab allows the configuration of users on the DVR with specific permissions. Each user belongs to a
group and each group has a set of permissions.
Users
Click the Users button to access the User configuration options.
Add a User
Edit a User
Changing a
Users Group
Click the Add button and enter a Username, Group and
Password in the Add New user window.
Select a User from the Drop-Down Menu and click the Edit
button. The user’s group or password can be changed, the
user’s name cannot.
Select a User from the Drop-Down Menu and check the box
beside the Group the User will be a member of.
Note: A User can only belong to one group.
Delete a User
Select a User from the Drop-Down Menu and click the delete
button.
Groups
Click the Groups button to access the Group configuration options.
Add a Group Click the Add button and enter a group name in the Add New Group window.
Select a group from the Drop-Down menu and enable the check box beside each permission that
Permissions
Select All / None Enable all permissions or disable all permissions.
Delete a Group Select a Group from the Drop-Down Menu and click the delete button.
the group will have. To disable permissions for the group, un-check the box beside the
permission.
3xLOGIC’s VIGIL Client - Users Guide Page 22
Doc# 12031914
Page 23

Update Tab
The Update tab controls the VIGIL Update Service on the remote server. This tool can be used to provide
software updates to the server alone or host updates for interconnected VIGIL DVR Systems.
A Primary Server provides update files
to other systems, but does not receive
Primary
Server
Secondary
Server
Client
update files from other systems and
does not automatically apply updates
locally. Update files must be manually
added to the Updates tab.
A Secondary Server acts as both a
client and a server. As a client it
receives update files from other Update
Servers and applies them locally. As a
Server, it provides update files to other
systems, both files added manually as
well as files it receives from other
systems.
A Client receives and applies updates to
local software, but does not provide
update files to other systems.
Daily
Weekly
Automatically apply
updates
Local Products to
Update
Update
Server
Address /
Port
Backup
Server
Address /
The Update Service connects to the Update Server once per day during the hour specified In This
Hour.
The Update Service connects to the Update Server once per week on the day selected from the
drop-down menu during the hour specified In This Hour.
When a new version of software is available for one of the products listed in the Local Products to
Update section, it is automatically applied. Note: When this feature is enabled, the system will
restart itself, apply the update, and restart itself again.
The products listed here will be updated when a new update is available. If a product is installed,
but not listed, it will not be updated.
Port
The DNS name or IP Address and port
for the main server the update service
will check for update files.
The DNS name or IP Address and port
of the backup server to check for
update files. The backup server will be
checked if the connection to the main
update server fails.
3xLOGIC’s VIGIL Client - Users Guide Page 23
Doc# 12031914
Page 24

5.3 Remote Register
Opens the Registration window, where you can register software components for the remote server.
To obtain registration information for VIGIL Server, record or export the Serial number listed in the
registration window. Send the following information to 3xLOGIC at support@3xlogic.com.
The serial number or serial number export file.
Your Name, Company Name and Contact Information.
Details of the modules you wish to purchase.
A representative will contact you to complete the transaction. If you receive a Registration file, use the import
feature to import the registration information. If you receive registration keys, Select the appropriate module
from the Unregistered Modules drop-down list, enter the registration key, and click Register.
3xLOGIC’s VIGIL Client - Users Guide Page 24
Doc# 12031914
Page 25

3xLOGIC’s
6 Camera Sidebar
consists of three tabs: Sites,
The standard camera organization is by
Live Viewer
The Cameras Treeview shows all configured and currently enabled cameras on the connected Server.
Double Click
Data (Live). The default view is the
ite, click the
Server site status is indicated by one of these three icons:
Site connected with administrator privileges.
Site connected without administrator privileges.
Options:
Connect to the site with the configured username and
Enter a username and password to connect to the
Reload the Information from the Site.
Double Click Display All to open all Cameras on this site in Live View
View Window.
Right Click on a Camera and choose Replay Camera to playback the last
The Camera Sidebar
Sites tab.
6.1 Sites Tab
camera can be viewed in the
Groups and POS/ATM
server site. To view cameras listed by s
by double-clicking the camera’s name.
Sites tab. A
Cameras Treeview
Site not connected.
Right-Click on a Site Name for the following
Connect
Connect As…
Refresh
Disconnect Disconnect from the Site.
password.
site.
Display All
Right Click
Windows.
Double Click on a Camera to open it in a Live
two minutes of footage.
VIGIL Client - Users Guide Page 25
Doc# 12031914
Page 26

Audio Treeview
The Audio Treeview shows all configured and currently enabled Audio channels on the connected Server.
Double Click
Current
Channel
Sensitivity
Stop Click to Stop playing the current Live Audio Channel.
Double Click on an Audio Channel to Play it Live.
Control Volume with the Windows Volume controls.
The currently selected Live Audio channel.
This slider adjusts the audio sensitivity without
affecting the sensitivity settings on the connected
server.
This level meter indicates the audio level for the
currently selected audio channel.
Relays Treeview
The Relays Treeview shows all configured Relays on the connected Server and allows for them to be quickly
toggled on or off.
The current status of the Relay is indicated by the following icons:
The Relay is Toggled On.
The Relay is Toggled Off.
Double Click the Refresh option to poll the current state of the
Refresh
Relays from the DVR Server. Client does not actively poll for
relay state as that would be prohibative on bandwidth.
V-POS Treeview
The V-POS Treeview will be available when V-POS is installed on the DVR Server. Details of each option will be
discussed in Section 8 - V-POS Treeview Configuration.
Opens the POS/ATM Exceptions window, where POS/ATM
Exceptions
Events
Settings
Reports
Exceptions can be created, edited, deleted, imported,
exported or manually run.
Opens the POS/ATM Exception Events window, where
users can view, acknowledge, or playback POS/ATM
exception alerts.
Opens the Settings window, where V-POS settings can be
configured.
Opens the Reports window, where manual or predefined
queries can be run.
Quick Search
Opens the Quick Search window, where transactions can
be searched for by receipt number, IDX line number or
Event ID number.
3xLOGIC’s VIGIL Client - Users Guide Page 26
Doc# 12031914
Page 27

Chat Treeview
VIGIL Server and Client include a chat feature to speak or write back and forth between VIGIL Clients
connected to VIGIL Servers. The Chat session is initiated by the VIGIL Client only and can be used to
communicate via voice or text chat. Double click on Chat in the Treeview to initiate a chat session with the
selected Server.
Note: For voice chat to be available and function correctly, audio settings for Chat must be
configured correctly in the VIGIL Server Settings window (see the VIGIL Server Users Guide for
more information).
Check Hands Free for VIGIL Chat to automatically detect the volume level and only send voice when
Hands Free
Talk
Voice Detection
Graphs
Send Text Sends a typed message. Type text into the textbox and click Send Text.
Sensitivity
sound reaches a specific volume. Uncheck Hands Free to use the Talk button to manually start and
stop sending voice data.
When Hands Free is unchecked, click Talk to send voice data. Unclick Talk to stop sending voice
data.
The voice detection graphs provide a visualization of voice data detected in the chat session.
Use the slide bar to adjust the chat audio sensitivity. To the left is less sensitive, to the right is
more sensitive. Note: Use the down button to expand the Controls section.
Server Alarms Treeview
Double Click on the Server Alarms Treeview item to open the Alarms window for the selected server. Server
Alarm Polling must be enabled for this option to work.
3xLOGIC’s VIGIL Client - Users Guide Page 27
Doc# 12031914
Page 28

POS/ATM Live Treeview
Double Click on the POS/ATM Live Treeview item to open the POS/ATM Data (Live) window for the selected
store.
Site
Name
Filter
The POS/ATM Data (Live) window presents Data in tabular form with these columns:
• Qty. – The quantity of the item purchased.
• Item – The item purchased.
• Amount – The price of the item purchased.
• Code – The transaction code identifies the type of transaction.
• Reg # – The cash register number.
• Cashier – The cashier currently logged into the data terminal.
• Receipt # – The receipt number of the current receipt.
• Timestamp – The time at which the Point of Sale event occurred.
• Idx – A unique identifier to quickly identify and find POS/ATM data line items.
The column headers are all able to be resized as well as moved around within the window. Simply drag and
move the column header to the desired location. The column locations can be reset by right-clicking in the
Live POS/ATM Data window and selecting Reset Column Order.
Note: Some types of data terminals do not support all of the columns that are available.
There are four options available when the POS/ATM Data (Live) window is right-clicked:
The Site Name is listed in the Title of the
window in [ ].
Enter a register number to filter from the
POS/ATM data, or leave the entry blank to
view data from all data terminals.
Copy Line Copies the selected data record to the Windows clipboard.
Opens the Select Destination window where an
export destination is selected. After making a
selection, the POS/ATM Export Settings window
Export All Records
Print All Records Prints the live POS/ATM Data to the default printer.
Reset Column Order Resets the order of the POS/ATM Data columns if they have been rearranged.
opens. Select the time periods to export or select
Export All to export all Data records. Once
complete, click OK to begin the export process.
Click Cancel to exit without exporting.
3xLOGIC’s VIGIL Client - Users Guide Page 28
Doc# 12031914
Page 29
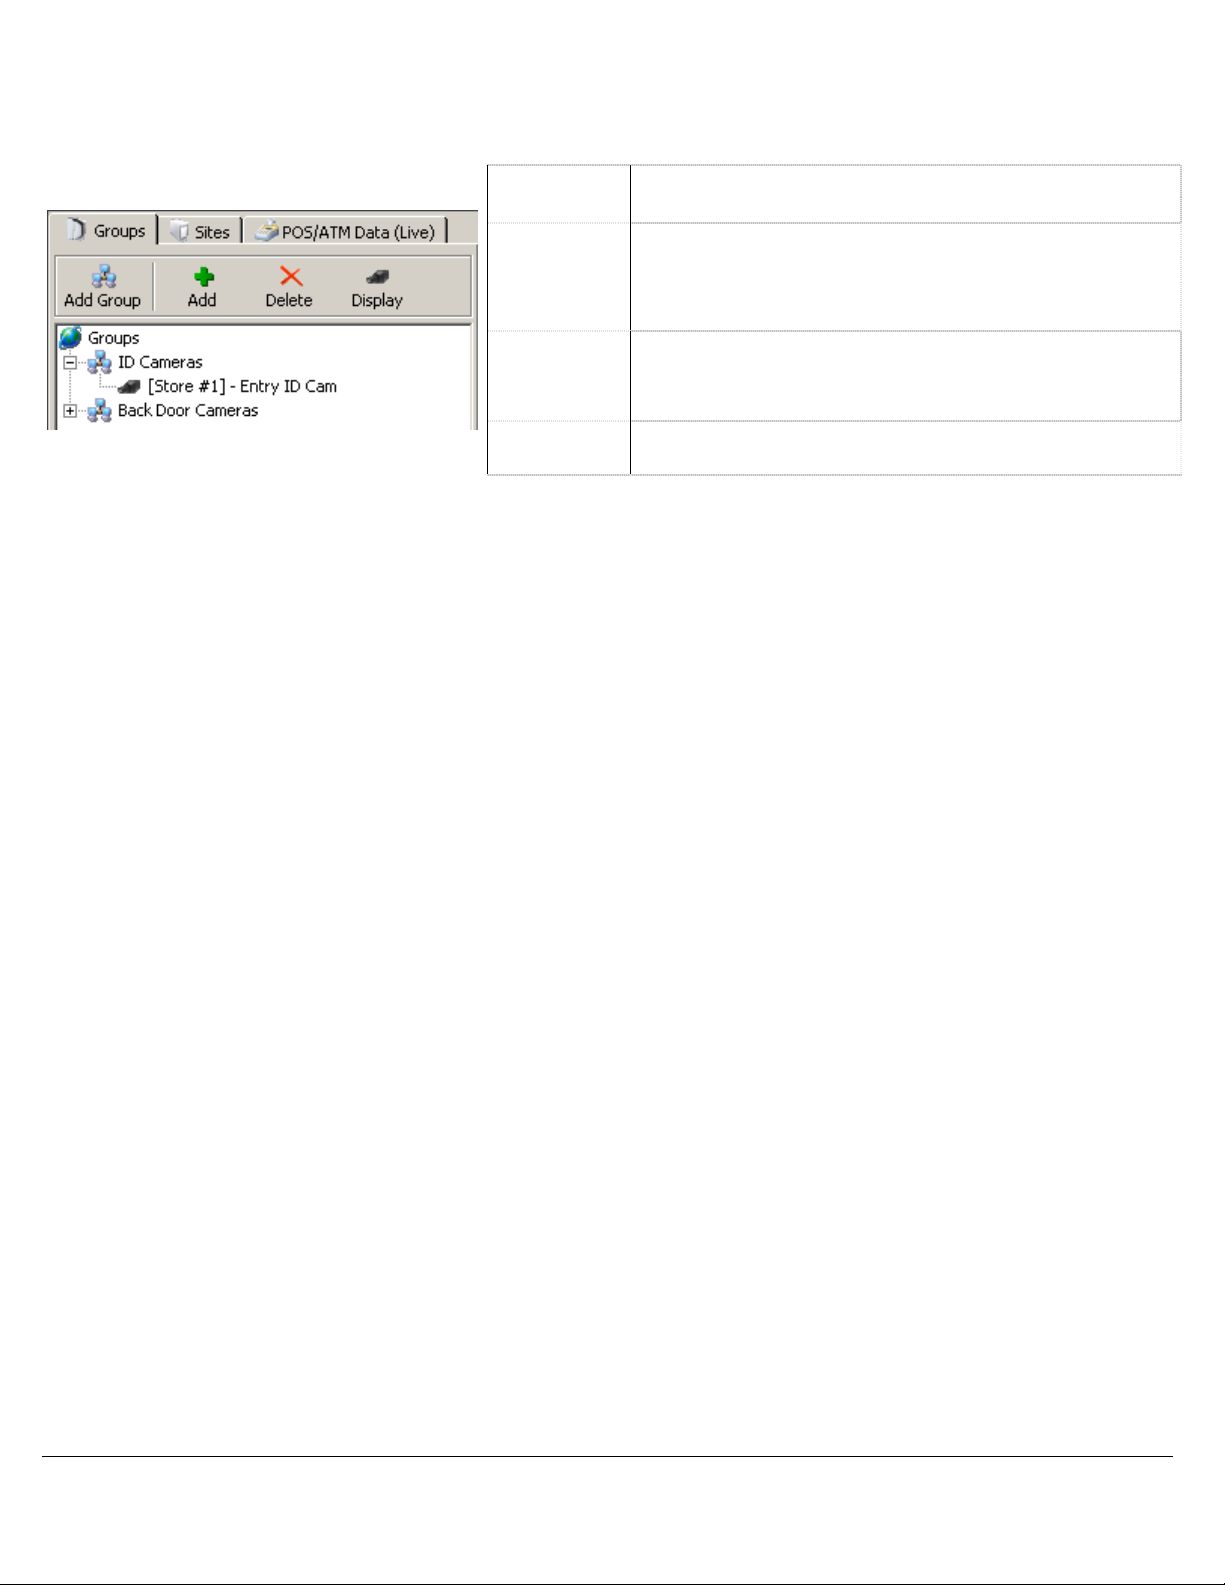
6.2 Groups Tab
Cameras are typically grouped by server site, however, custom camera groups that include cameras from any
connected server can be defined. To view custom camera groups, click the Groups tab.
Add Group
Add
Delete
To add a new group, click the Add Group button, enter a
name for the new group and click OK.
To add a camera to a group, click the Add button to open
the camera selection screen. Drag and drop the camera
onto the group name. To add all the cameras from a site,
drag and drop the site onto the group name.
To delete a group or a camera, click on the group name
or camera name to select it and then click the Delete
button. Click Yes in the confirmation box.
Display
To display all of the cameras of a group Live, select the
group and click the Display button.
3xLOGIC’s VIGIL Client - Users Guide Page 29
Doc# 12031914
Page 30
3xLOGIC’s
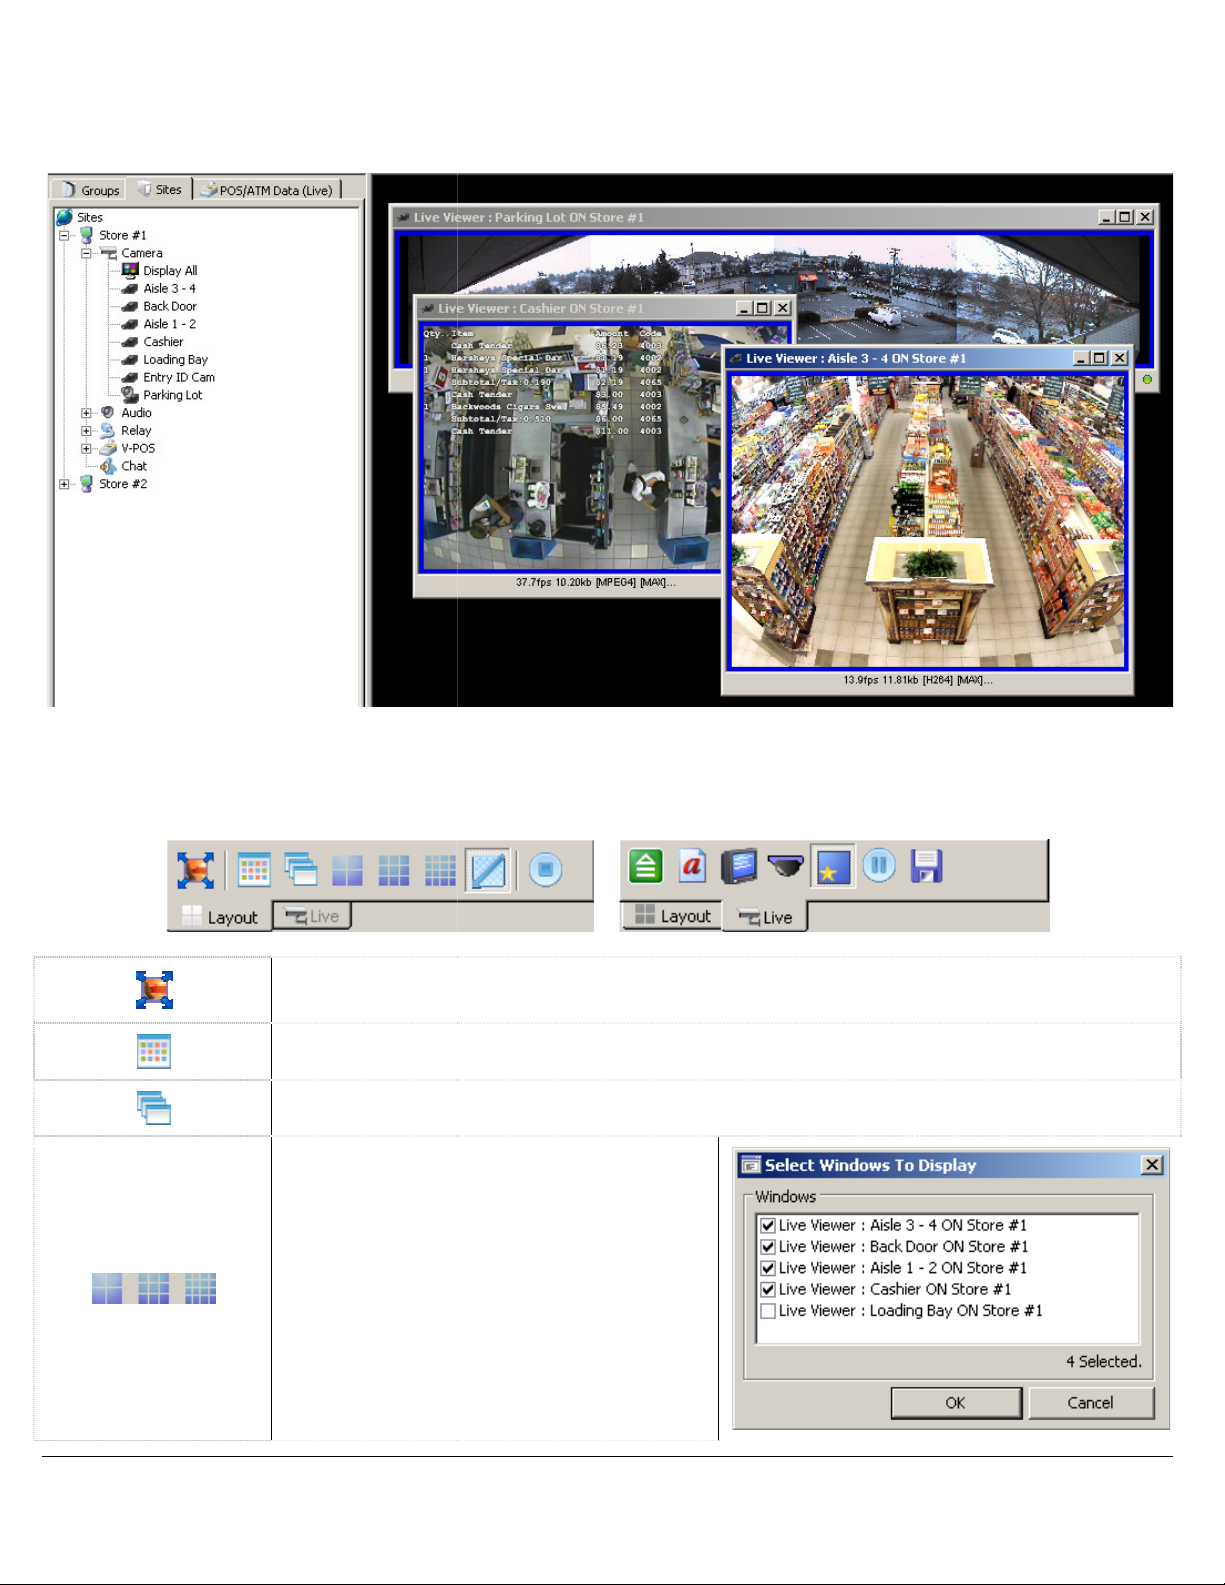
7 Live Viewer
Live Viewer Windows each display a Single Camera feed from a connected DVR Server.
Live Viewer Controls
There are two tabs at the bottom of the Cameras Sidebar that contain controls for the Live Viewer windows.
Toggles Full Screen Mode. This mode removes the UI and replaces it with a control bar at the
bottom of the screen. See Section 7.3 Full Screen Mode for details.
Fit All to Screen. This will fit all currently open windows on the screen without
Cascade Windows. This will cascade all currently open windows.
2x2, 3x3 and 4x4 Grid. Click to organize open
windows in the selected grid. If more
windows are open then can fit in the grid, the
Select Windows to Display window will
This window lists all currently open windows
7.1
overlapping.
and allows the
open.
VIGIL Client - Users Guide Page 30
Doc# 12031914
Page 31
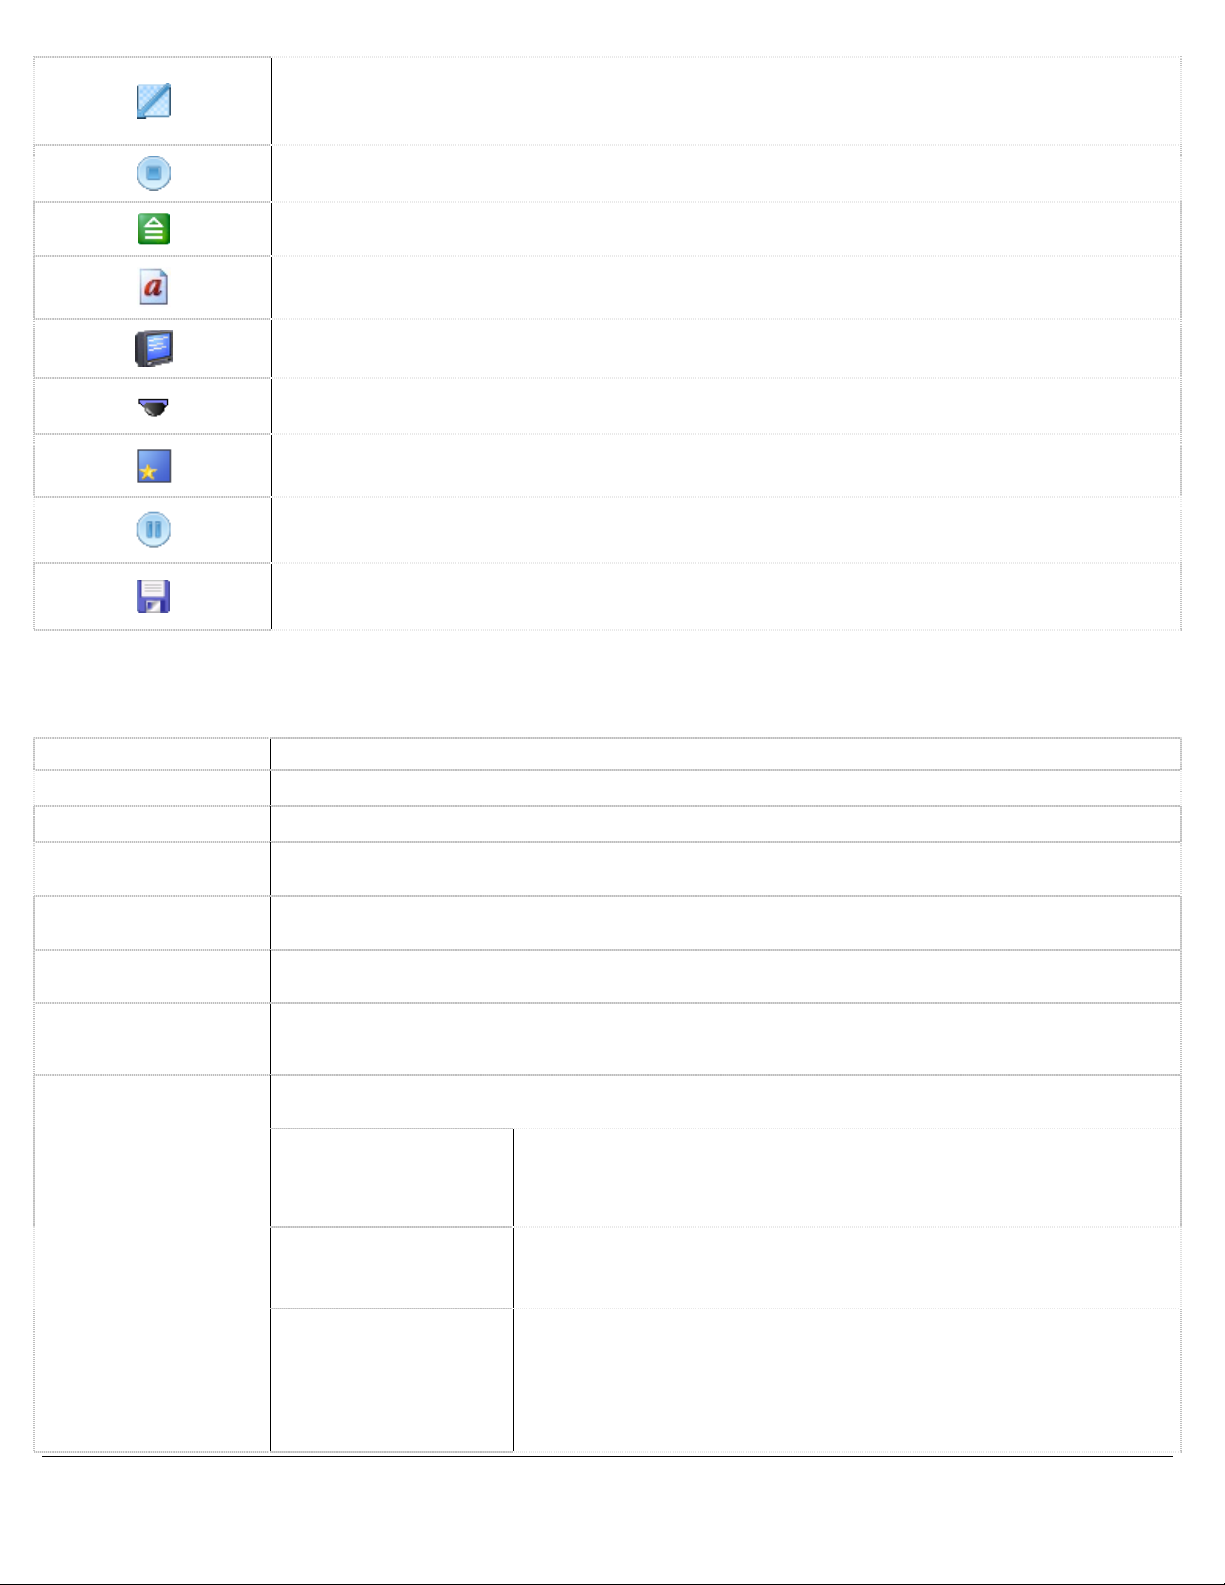
Maintain Aspect Ratio. When resizing Live Viewer windows, toggle this button to Maintain the
Aspect ratio. With this toggled off, the Live Viewer windows can be resized to any size and
shape.
Close all Live Feeds.
Increase all Live Viewer Windows to the maximum speed available for each Camera.
Hides/displays the server timestamp in the top left corner of each Live Viewer Window.
Opens the OSD Configuration window. See Section 7.4 OSD Configuration for Details.
Click to open/close the Camera Control pad. See Section 7.5 PTZ Camera Controls for Details.
Click to toggle on-screen interactive icons.
Click to Suspend / Resume all Live Feeds. This option will only suspend or resume the Live Video
feeds, the windows will remain open.
Click to save the current layout as a Group. When you display the Group from the Groups Tab,
the Cameras will open in the same positions.
7.2 Live Viewer Window Right Click Menu
Right-clicking on a Live Viewer Window provides a context menu with the following options:
Zoom Enables the zoom tool. Left-click to zoom in, right-click to zoom out.
Camera Control Opens the Camera Control Pad.
Copy Copy a still shot of the video feed to the Windows clipboard.
Stop
Quad / Panorama
View
Enable On-Screen
Display
Digital PTZ
Stops and removes the camera from the Live Viewer window. This does not affect the recording
settings.
Only available for 180 cameras. This toggles between displaying the 180 camera in Quad View
layout or Panoramic View Layout.
Enables On-Screen display of POS/ATM data. This option will only be available if the camera is
configured as a Priority camera for POS/ATM on the VIGIL Server.
Enable this feature for zoom and pan control on fixed cameras. This option is available and
enabled by default for all cameras that do not have alternative camera control setup in the VIGIL
Server camera settings.
This option is available for cameras using Panorama PTZ control type. This must be configured
on VIGIL Server to be available as an option in Client.
This option is enabled by default. This feature allows users to zoom in
Source Video Only
(Rotate Disabled)
and move cameras during playback. Click on an area of interest and
then use the mouse scroll to zoom in. Click-and-drag to move the
image after it is zoomed in.
Panorama PTZ
Source Video Only
(Rotate enabled)
360 View and Source
Video
This feature allows users to zoom in and rotate cameras during
playback. Click on an area of interest and then use the mouse scroll to
zoom in. Or, click-and-drag to rotate the image.
This feature splits the playback image into 4 quadrants. The first
quadrant shows the full image, and the second, third and fourth
quadrants show different zoomed sections of the image. To load an
area of interest in one of the zoom quadrants, click on a zoom
quadrant and then click on the first quadrant to load that section. The
zoomed sections can be clicked on directly and then rotated.
3xLOGIC’s VIGIL Client - Users Guide Page 31
Doc# 12031914
Page 32

3xLOGIC’s
Priority Audio
If a Priority Audio channel is configured for the camera on
Analytics information will be displayed on the live video feed.
Select the display speed for the camera.
Maximum, and Frame by Frame
Interfaces to the server relays.
open states respectively.
VIGIL
Retrieve recent footage from the camera for preset intervals of one, five, or ten minutes.
Search
Opens the audio talk window.
Server for this option to be available.
Toggle between Main and Sub Stream if the Camera supports a Sub Stream. If the Cam
not support a Sub Stream, the
VIGIL
Server Users Guide for more details.
In Full Screen Mode the UI is replaced with a toolbar at the bottom of the screen. The rest of the screen is
available for displaying Live Viewer windows.
mode off.
Toggle the Cameras Sidebar.
4.1 and 7.1 for descriptions of the other buttons.
Server, toggle this option to
Analytics information will be displayed on the live video feed.
Slow (1fps), Medium (5fps), Fast (10fps),
Relays can be toggled on or off, corresponding to close
Relays must first be configured on the DVR to enable this
window and begin playback of the selected camera and time interval.
Audio Talk must be configured and associated with the Camera on
Rapid
Server and will be disabled if CPU usage exceeds a defined threshold. See
VIGIL
play live audio.
Analytics Select which Video
Speed
Relays
Quick Search
Audio Talk
Sub Stream /
Rapidstream
Turbo (20fps)
option. See the
will open the
VIGIL
intensive on the
the VIGIL
7.3 Full Screen Mode
Options are:
.
Note:
Server users guide for more information.
Rapidstream option will be available.
d and
This
era does
stream is CPU
Toggle Full Screen
See Sections
VIGIL Client - Users Guide Page 32
Doc# 12031914
Page 33

7.4 On Screen Display (OSD) Configuration
Dwell Time
Number of Lines
Background Transparent
/Color
Font Color/Size/Bold Change the font color/size/boldness.
Horizontal/Vertical Offset The number of characters to offset the text from the left/top side.
Column Selection Specify which columns to display on-screen. Unchecked columns will not be displayed.
OK
The number of seconds a data record will remain on-screen.
The maximum number of records to display at a time.
Change the text background color/transparency.
When you are finished configuring the OSD, click the OK button to apply your changes
and return to the Search window.
7.5 PTZ Camera Controls
Pan/Tilt/Zoom (PTZ) cameras allow navigation to an area of interest and are controlled by the user from the
Live Viewer window. There are three major types of Pan/Tilt/Zoom (PTZ) cameras that exist: digital PTZ
cameras, IP PTZ cameras and hard-wired PTZ cameras.
Digital PTZ camera control allows users to zoom in on a fixed camera and move within the image without
controlling the physical camera itself. Digital PTZ camera control is automatically enabled for all cameras in the
live viewer that are not assigned to any other type of camera control. To disable or re-enable the control,
right-click the camera in the live viewer, and then select Digital PTZ. The live digital PTZ control works in
single-view, multi-view and full-screen mode.
IP PTZ cameras must be set up individually in the DVR settings and control the physical camera through a
network connection to the DVR.
Hard-wired PTZ cameras are also set up individually in the DVR settings and control the physical camera
through a camera input on the DVR.
3xLOGIC’s VIGIL Client - Users Guide Page 33
Doc# 12031914
Page 34

Dropdown
Selection Box
Pan-Tilt
Zoom/Focus/
Iris
This is a menu of all the PTZ cameras configured on the
DVR. Select a camera to load for control.
Shows/hides additional PTZ camera controls.
Use the mouse to click-and-drag
the blue dot in the middle of the
Pan-Tilt control in the desired
direction. The speed at which the
camera moves increases as the dot
is dragged closer to the edge of the
circle.
The alternate directional controls
are displayed when the selected
PTZ camera does not support a full
range of motion (i.e. it cannot pan
and tilt at the same time), or when
the Push-Button Controls option is
enabled.
Click-and-drag the appropriate slide bar up to increase or
down to decrease. The speed at which the camera is
adjusted increases as the bar is moved farther from the
center of the control.
Joystick
This window allows for customization of each of the joystick
buttons. Use the drop-down menus to assign actions to each
button.
To determine which button is which, go into the Windows Control
Panel and select Game Controllers, where the device will be listed.
Select it and click Properties. Click any button on the joystick and
the button number will be highlighted in the resulting window.
Presets are fixed locations that the camera can save and go to. The presets are stored
Presets
within the camera for hard-wired PTZ cameras, and in VIGIL Server for digital PTZ
cameras.
If a USB PTZ Joystick is attached, this button will be available. Once clicked,
it opens the Joystick Customization window.
To save a preset, move the camera to the desired preset location, select the preset number from
the drop-down menu and click Save. This will overwrite any presets previously saved to that
number.
To move the camera to an existing preset, select a preset from the drop-down menu and click
Goto, or click the button with the preset number on it.
3xLOGIC’s VIGIL Client - Users Guide Page 34
Doc# 12031914
Page 35

Patterns
Select a pattern from the drop-down menu and click Record. Use the other control buttons to
move the camera in the desired pattern. Once finished, click Stop. This will overwrite the existing
saved pattern. Select a pattern from the drop-down menu and click Run to begin the saved
pattern.
Tours A tour is a cycle of camera presets. Tour settings are stored within VIGIL Server.
Click Settings to open the Tour Settings window, where presets are added and set to run for a
specified number of seconds before going to the next preset.
Click Run to activate the tour. The camera will cycle through the presets in the Live Viewer
window. The tour can be ended by moving the camera or pressing Stop.
Note: Presets must be configured before a tour can be run.
Control the saved pattern of movement for the selected camera. Patterns are stored
within the camera.
Add Adds a preset to the tour.
Edit Edits a preset in the tour.
Delete Deletes a preset from the tour.
Save Saves changes made to presets.
Cancel Exits the Tour Settings window without saving any changes.
Enhancements
Enhancements can be selected via the Drop Down Box and turned on or off via the buttons.
Menu Some cameras have built-in menus that can be accessed and configured via this tool.
Settings on the camera that can be toggled on/off. These include Color, Sensitivity,
Backlight, White Balance and Auto Focus.
Displays the camera’s menu; it may take a moment to appear.
Exits the camera’s menu. You can also navigate to the Exit menu option and
click the Select button.
Camera menu navigation buttons.
Camera menu select button.
3xLOGIC’s VIGIL Client - Users Guide Page 35
Doc# 12031914
Page 36

7.6 Recording Modes
Colored borders appear around the frame of each Live Viewer Window. These are used to provide a quick
assessment of current camera recording modes and events.
Green
Blue
Red
Yellow
Uncolored Camera is currently not recording, but is enabled.
Constant recording mode and is recording.
Motion recording mode and is recording (motion detected).
Alarm recording mode and is recording (alarm triggered).
Set to a motion recording mode and is recording (motion currently
not detected and will stop after the Post Motion Record time has
elapsed).
Note: When a camera is active, a small green dot will blink at the lower right of the Live Viewer
Window. This gives feedback that a camera is still active, especially useful if the video frame rate is
less than 1 frame per second.
3xLOGIC’s VIGIL Client - Users Guide Page 36
Doc# 12031914
Page 37

8 V-POS Treeview Configuration
8.1 V-POS Exceptions
V-POS Exceptions are a powerful tool for automating the process of scanning through POS/ATM records looking
for Anomalies. Exceptions are automatically checked against the POS/ATM data and when triggered can set off
a local or email based report.
Import
Export
Sync Now This Option is not available via Client.
Import Exceptions from an .xml file. This will clear all existing Exceptions and replace them with the
Exceptions contained in the .xml file.
Export Exceptions to an .xml file. This file can be used to import exceptions onto another system, or as an
Exception Auto-Sync File.
Add
Edit
Delete Delete the selected Exception.
Run
Open the Exception Settings window
to create a new Exception.
Open the Exception Settings window
to edit the selected Exception.
Manually Run the Selected
Exception. This will open in the
Reports window.
3xLOGIC’s VIGIL Client - Users Guide Page 37
Doc# 12031914
Page 38

Add / Edit Exceptions
Exception Report Description
Enter the Description for the Exception. This will show in the Description column
in the Event window, the Predefined Exception Query drop down and the Subject
line of Emailed reports.
Enter a full or partial item name
to search for. To search for
multiple items, insert a comma
between each item. To exclude
Item
Case
Sensitive
an item, insert the test [NOT]
before the item name. If the
Load Distinct Items on Startup
setting is enabled, a list of valid
items will be available from the
drop down menu.
Enable this option to make the
item field Case Sensitive. When
enabled, only items matching the
case used in the item field will be
reported by the exception.
Example: Item will only report
back Item, not item or ITEM.
Value
Whole Dollar
Amounts
Quantity
Code
Register
Cashier Matches results in the Cashier column. Enter a Cashier Name or Number to search for.
Void Followed by No
Sale Transactions
Display in Reports
Predefined
Exceptions List
Filter Method
OR / AND
Matches results in the Amount column. By default, Any Price is selected. If you want to match a
certain value, select an operator and input a value. The available operators are; Greater Than,
Greater Than or Equal To, Equal To, Less Than or Equal To and Less Than. Example: if the
operator Greater Than or Equal To is used with the value of $20.15, any Data with a value of
20.15 and higher will be returned.
Enable this option to only include Whole dollar amounts in the Exception Report. Example:
$5.00 will show in the report, but $5.25 will not.
Matches results in the Quantity column. By default, Any Quantity is selected. If you want to
match a certain value, select an operator and input a value. The available operators are; Greater
Than, Greater Than or Equal To, Equal To, Less Than or Equal To and Less Than. Example: if the
operator Greater Than or Equal To is used with the value of 5, any Data with a Quantity of 5 and
higher will be returned.
Matches results in the Code column. You can manually type in a code to search for, or select NS
(No Sale) or VX (Void) from the drop down menu.
Matches results in the Register column. Click on the Lookup Register button to display a list of
Register to Priority Camera mappings configured on the VIGIL Server, double click a Register in
the list to auto fill the Register field. The Register field is used for matching up the Records to the
appropriate video footage.
Enable this option to configure the Exception report to search for transactions that contain a Void
followed by a No Sale.
Enable this option to have this Exception included in the Predefined Exceptions drop down menu
in the Reports window.
Logical operators that will assist in searching with multiple criteria. By default, this is the OR
operator, which will match results in any of the used Data criteria fields. Alternatively, the AND
operator will match results in all of the used Data criteria fields.
3xLOGIC’s VIGIL Client - Users Guide Page 38
Doc# 12031914
Page 39
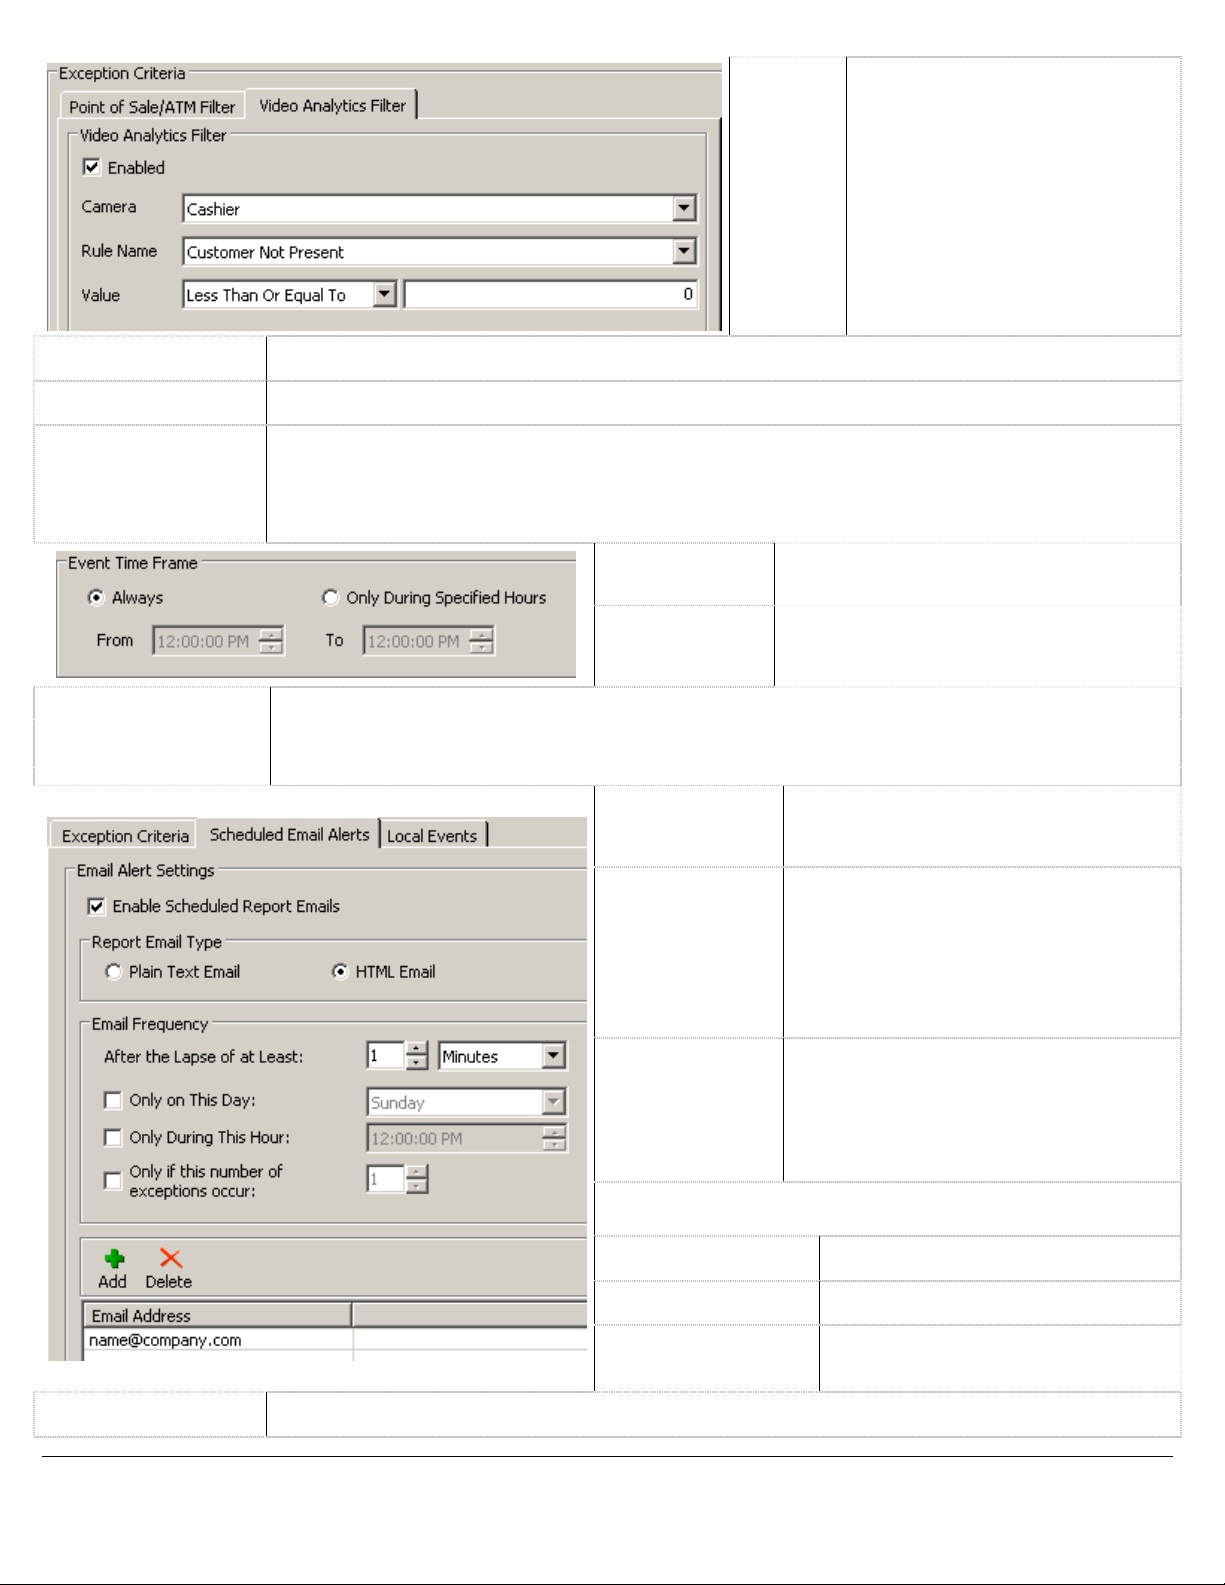
Enable this option to enable the
use of Video Analytics Rules
configured on the VIGIL Server.
Enabled
Camera Select the Camera which the Video Analytics rule is configured on.
Rule Name Select the Rule from the list of Rules configured on the selected Camera.
Select an operator and input a value. The available operators are; Greater Than, Greater Than or
Equal To, Equal To, Less Than or Equal To and Less Than. Example: When using an Occupancy
Value
Count rule on the DVR Server, use the operator Less Than or Equal To with a value of 0. If the
rule reports back that the Occupancy is 0, then it can be assumed that a customer is not present
during this transaction.
Combining Video Analytics with
Data in Exception Reports allows
for powerful Exception reporting
such as Customer Not Present
during a Refund transaction.
Always
Only During
Specified Hours
Scheduled Email Alerts send the Exception Event reports to designated Email Addresses at the
Scheduled Email
Alerts
Add / Delete Click to Add an Email Address to send events to or to Delete the currently selected Address.
specified Interval. The Email Alerts contain information about the Exception Event, a screen shot
of the associated camera, and the full transaction that contained the item that triggered the
Exception Event.
Enable
Scheduled
Report Emails
Plain Text /
HTML Email
After the Lapse
of at Least
When Email Alerts are sent can be further restricted with the
following criteria:
Only on This Day
Only During This
Hour
Only if this number
of exceptions occur
This is the default. This Exception report
will always be in effect.
Enable this option to specify a time range
for this Exception report to be in effect.
Enable this option to enable Scheduled
Report emails. By default this option is
disabled.
Choose Plain Text or HTML format
emails. Plain Text is the default. The
HTML report contains the Exception
details, a screenshot of the priority
camera, and the entire receipt containing
the transaction that triggered the
exception report.
Sends an Email alert when the specified
amount of time has elapsed since the
previous Email alert. Editing the Email
settings will reset this timer. Available
options are Minutes, Hours, Days and
Weeks.
Sends Email alerts only on the
specified day of the week.
Sends Email alerts only during the
specified hour.
Sends Email alerts only when the
specified number of Exceptions have
occurred.
3xLOGIC’s VIGIL Client - Users Guide Page 39
Doc# 12031914
Page 40

This feature is enabled by default. When enabled, each occurance of this Exception will have an
Local Events
associated record in the Events Window. If this option is disabled, the Event will not have an
associated record.
8.2 V-POS Events
All Exceptions that have the Enable Real Time Exception Events enabled (the default setting) will create an
Exception Event for each POS/ATM record that matches the criteria specified in the Exception.
Exception Events are listed in a tabular form with the Event ID, Description, Timestamp, Event Flag and Notes
columns enabled by default. Columns can be enabled or disabled in Settings. New Events are highlighted in
Red, Acknowledged Events are highlighted in Yellow. When using Event Flags, the Event ID column will
highlight Red or Yellow depending on Acknowledged status.
Acknowledge
Acknowledge All
Clear
Clear All
Show All
Filter Indicates the current Filter applied to the Event List.
Clear Filter Click to clear the current Filter.
Click to Acknowledge the currently selected Event or Events. If Allow User to Acknowledge all
Events is not enabled in the Settings, only one Event can be selected at a time.
Click to Acknowledge all Events. If Allow User to Acknowledge all Events is not enabled in the
Settings, this button will not be available.
Click to Clear the currently selected Acknowledged Event from the list. If Allow User to Clear
Acknowledged Events is not enabled in the Settings, this button will not be available.
Click to Clear all Acknowledged Events from the list. If Allow User to Clear Acknowledged Events is
not enabled in the Settings, this button will not be available.
Click to Show all Events in the list. This will show all previously cleared Events. When this option
is enabled, Clear and Clear all will not be available. Note: Events will be completely removed from
the list depending on the Local Database Size in Settings.
3xLOGIC’s VIGIL Client - Users Guide Page 40
Doc# 12031914
Page 41

Double click on an Exception Event in the list to open the Playback window. Right Click on an Exception Event
to view the following options:
Acknowledge
Acknowledge All
Clear
Clear All
Show All
Playback Open the Playback window for this Exception Event.
Acknowledge the currently selected Event or Events. If Allow User to Acknowledge all Events is not
enabled in the Settings, only one Event can be selected at a time.
Acknowledge all Events. If Allow User to Acknowledge all Events is not enabled in the Settings,
this button will not be available.
Clear the currently selected Acknowledged Event from the list. If Allow User to Clear
Acknowledged Events is not enabled in the Settings, this option will not be available.
Clear all Acknowledged Events from the list. If Allow User to Clear Acknowledged Events is not
enabled in the Settings, this option will not be available.
Show all Events in the list. This will show all previously cleared Events. When this option is
enabled, Clear and Clear all will not be available. Note: Events will be completely removed from
the list depending on the Local Database Size in Settings.
Show Thumbnail
Search for
Transaction
Add / Edit Notes
Set Event Flag
Apply As Filter
Clear Filter Clear the currently applied filter. If no filter is applied, this option will not be available.
Open a window with a Thumbnail of the Priority Camera at the time the Exception Event was
triggered.
Opens the Report Window to the Search for Transaction tab and search for the Receipt Number of
the Exception Event.
Open the Add / Edit Notes window. In this window you can Add new notes, edit existing notes or
clear the notes.
This option will open a cascade menu with the option to add a custom event flag, or clear the
existing flag.
This option will apply the field that was right clicked on as a filter. This option can be done multiple
times to apply a complex filter based on multiple criteria.
3xLOGIC’s VIGIL Client - Users Guide Page 41
Doc# 12031914
Page 42

Exception Event Playback
Double click on an entry in the Exception Events window, or right click and choose Playback to open the
Playback window. Exception Event Playback will have a V-POS Tab available in the Advanced Features Section
of the Playback Window.
Camera
Email
V-POS Data
Event ...
V-POS Exception Events can require views from multiple cameras. Select a camera from the drop
down list to open another playback window queued up to the same time frame as the Exception Event.
A Still Image of the Selected Camera can be Emailed as a POS/ATM Report. This report is the same as
the Printed Exception Report which includes still image of the current frame, in the print options
window; check Include Notes to print the Event Flag and Notes with the Still Image, check Include
Data to print the receipt data with the Still Image. This can be emailed as a Bitmap, JPEG or no image
included POS/ATM Report.
Open the V-POS Data window.
This window will show the reciept
with the item that triggered the
Exception Event. The Line item
that triggered the Exception will
be highlighted in red text.
View / Enter Notes that have been entered for this Exception Event. These notes
Notes
Event Flag
Acknowledge
are stored on the V-POS Server and can be viewed and edited by any connected
client.
Select an Event Flag from the Drop down. These Event Flags are configured on
the V-POS Server and can be used by any connected client.
Click to Acknowledge the Exception Event. 'Only acknowledge events on
playback' must be enabled in V-POS Settings for this option to be available.
Click to Save the Notes and Event Flag. If 'Close playback window when save
Save
event flag or notes' is enabled in V-POS Settings, this will also close the playback
window.
3xLOGIC’s VIGIL Client - Users Guide Page 42
Doc# 12031914
Page 43
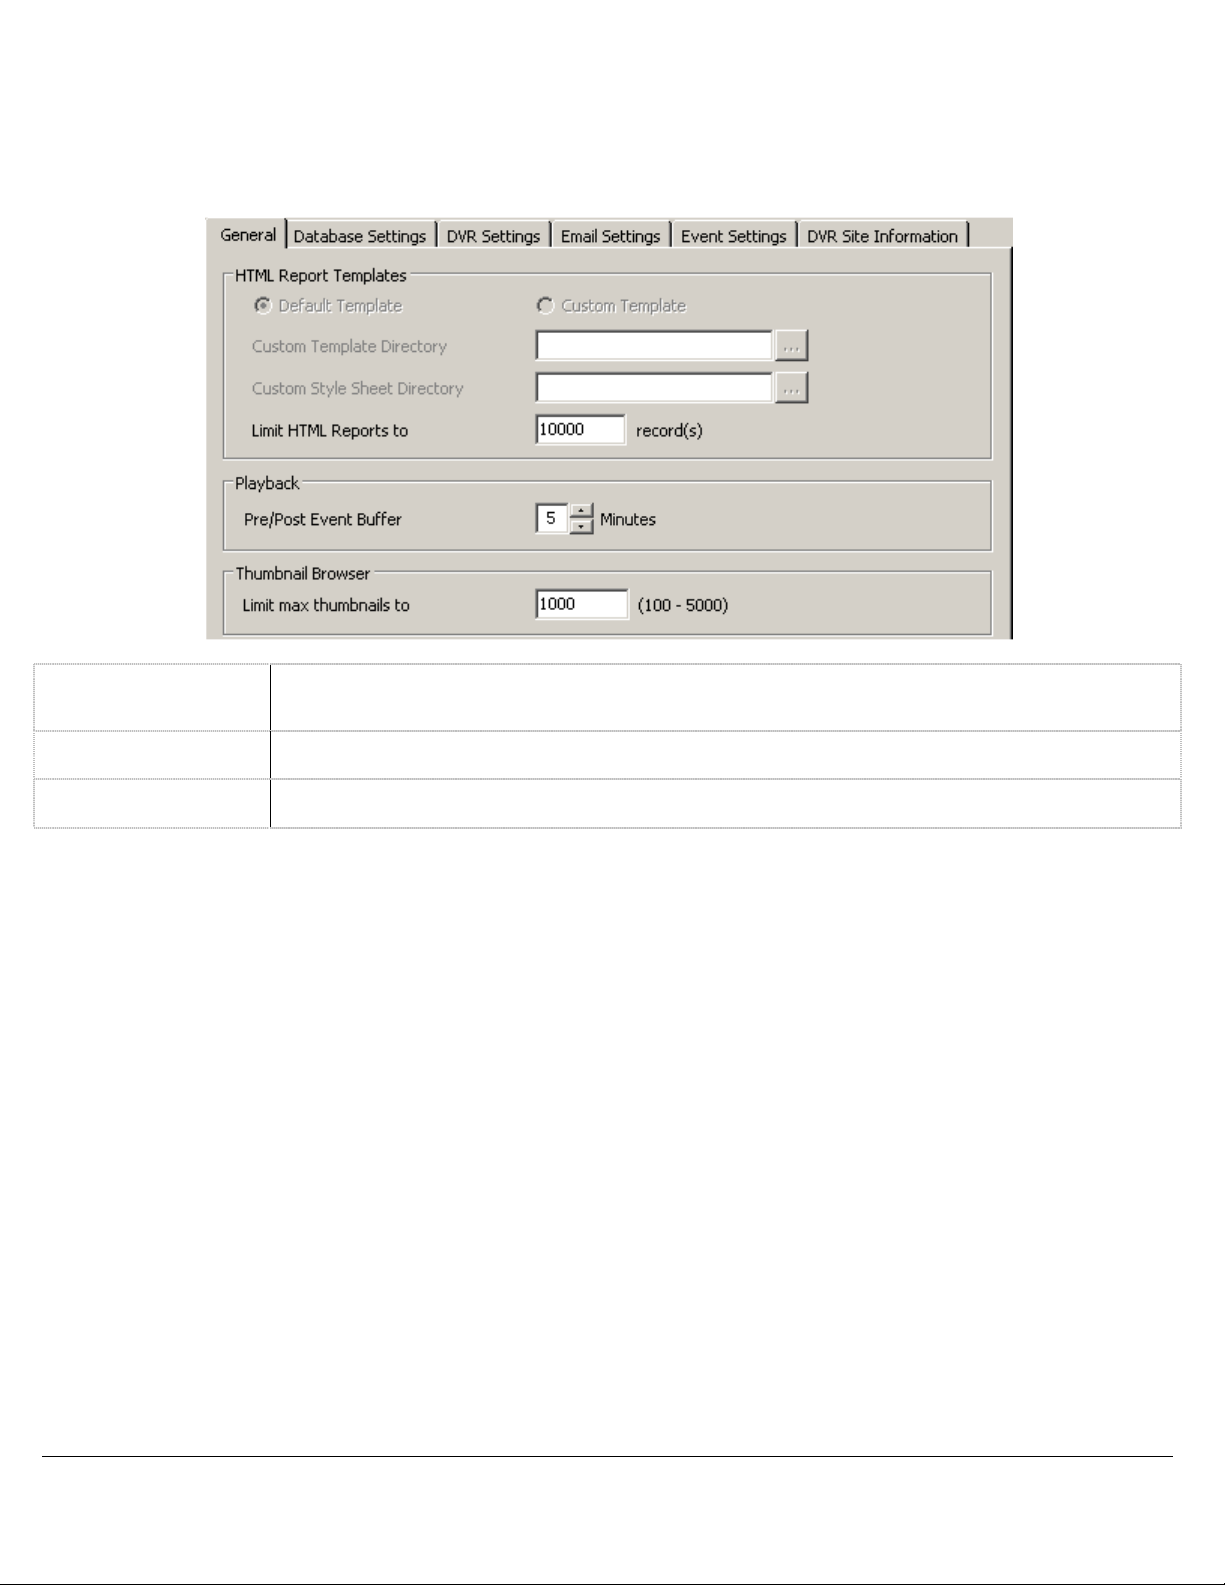
8.3 V-POS Settings
The Settings window is where V-POS is configured. Some options are not available for configuration from
VIGIL Client.
General Tab
Limit HTML Reports
to X Records
Pre/Post Event
Buffer
Limit max
thumbnails to
Enter the maximum number of records to load into a report. Note: Although possible,
exceeding 10,000 records will seriously affect system response times when trying to load a
report.
When you Playback an Exception Event, this setting determines how much footage to display pre
and post the record that triggered the Exception Event.
Enter the maximum number of Thumbnails to be displayed in the Thumbnail Browser window.
3xLOGIC’s VIGIL Client - Users Guide Page 43
Doc# 12031914
Page 44

Database Settings Tab
Database Server
Location
SQL Server Port
Number
POS/ATM Data
Replication Interval
Load Distinct Items
on Startup
Local Database Size
Enter the IP Address, DNS name or Network name of the VIGIL DVR Server. Although it is
possible to run V-POS on a different system from the DVR Server, V-POS is designed to work
with a single DVR Server and is recommended to be run on the same system.
Enter the port number of the SQL Database. The default SQL port number is 1433, we
recommend changing the port number from default to port 2025.
Configure the time in Minutes between database replications from the DVR Server database to
the V-POS database.
When enabled, V-POS will search for unique item descriptions from the database on startup. This
list of items will be available from the Item drop down menu in the Exceptions and Reports
forms. Note: Using this feature when there are a large number of distinct item descriptions can
cause system performance issues when starting V-POS.
Limit by Number of
records
Limit by number of
days
Match server days of
storage
Limit the size of the V-POS replicated Database by number of records.
Limit the size of the V-POS replicated Database by number of days.
Limit the size of the V-POS replicated Database by matching the days
of footage on the DVR Server. This is the recommended setting.
3xLOGIC’s VIGIL Client - Users Guide Page 44
Doc# 12031914
Page 45

DVR Settings Tab
DVR server location
same as database
DVR Server
Port Enter the Data Port for the DVR Server. The default port is 22801.
Check this to indicate that the DVR Server is located on the same system as the V-POS replicated
database. This is the recommended installation configuration.
If the DVR Server is not located on the same system as the V-POS replicated database, enter the
IP Address, DNS name or Network name of the DVR Server.
User Name /
Password
Test Connection Click this button to test the settings for the DVR Server connection.
Enter a username and password that exists on the DVR Server with sufficient permissions to view
live and playback footage.
Email Settings Tab
SMTP Server
Location
Port
From
Requires SSL
Requires
Authentication
The IP address or DNS name of
the Mail Server.
The port number on the Mail
Server. The default mail port
is 25.
The Name and Email Address
displayed in the outgoing
emails.
Check if the SMTP Server
requires SSL Security.
If the Mail Server requires
authentication, check this box.
User Name /
Password
Attachment
Images Quality
3xLOGIC’s VIGIL Client - Users Guide Page 45
Doc# 12031914
The User Name and Password
for the Mail Server
authentication.
Select whether to send
attached images at Reduced
(CIF) or Full Resolution.
Page 46

Event Settings Tab
Custom Flags can be created to mark Exception Events in the Event Window.
Opens the Add / Edit Event Flag window. On that window you can Enter
a Name for the Flag and select a custom color for the flag.
Allow User to
Acknowledge all Events
Popup Event Screen
Allow flag and notes
modification in event
window
Close playback window
when save event flag or
notes
Only acknowledge
events on playback
Allow User to Clear
Acknowledged Events
Acknowledge events
older than xx day(s)
Add / Edit
Delete Click to Delete the selected Flag.
Enable this option to allow access to the Acknowledge All button on the Events window, as
well as be able to select multiple Events and Acknowledge them with the Acknowledge
button.
This option is not available in Client as the Exception Event screen is only updated when it is
opened.
Enable this option to add the ability to Add/Edit Notes and set the Event Flag when right click
on an Event in the Event Window. When disabled, you will only be able to Add /Edit notes
and Set the Event Flag from the Event Playback window.
When this option is enabled, the Event Playback window will close when you click the Save
button.
When this option is enabled, the option to Acknowledge the Exception Event will only be
available footage has been played. The Exception Event can then be acknowledged from the
Acknowledge button on the Playback Window.
Enable this option to enable the Clear and Clear all buttons in the Exception Events window.
Note: Cleared Events are not removed from the database, and can be seen by clicking the
Show All button.
Enable this options and set a number of days. This will automatically acknowledge any
Exception Events older than the specified number of days.
DVR Site Information Tab
The DVR Site Information tab is where Contact Information for the DVR Server site can be specified. This
information will be included with HTML based reports, enable the check box to also include this information
with Text based reports.
3xLOGIC’s VIGIL Client - Users Guide Page 46
Doc# 12031914
Page 47

8.4 V-POS Reports
Manual Reporting can be configured using the same criteria as are available for Pre-Defined Exception Events.
Manual Reports are presented in easy to read HTML reports that can be Printed, Emailed or Exported.
Report Criteria
Manual Reports can be created using 3 different methods; a Manual Query, Running a Pre-Defined Exception
Event as a Manual Query or Searching for a Specific Transaction.
From / To
Click the Report Criteria Title bar to Hide / Show the Report Criteria Window.
Specify the start date/time and end date/time for the Manual Report. If there is no POS/ATM Data
during the specified time frame the following message will appear:
Note: If there is a large volume of data, Generating a Manual Report of a large time span can
cause the report to take a long time to be generated.
Quick Search Select a pre-defined time interval from the drop down menu.
Newest Records
First
Back to Last
Query
Generate Report Click this button to Generate the HTML Report using the configured criteria.
Reset Click this button to Reset the search criteria to default values.
This option is enabled by default, uncheck to display oldest records first.
Click this button to toggle between the two most recent queries.
Manual Query
Note: Any search criteria left blank will not be used for the Manual Report.
3xLOGIC’s VIGIL Client - Users Guide Page 47
Doc# 12031914
Page 48

Search for Line Items
Enter a full or partial item name to search for. To search for multiple items, insert a comma
Item
Case Sensitive
Value
Quantity
Code
Cashier Matches results in the Cashier column. Enter a Cashier Name or Number to search for.
Register
Filter Method
OR / AND
Whole Dollar
Amounts
Void Followed by
No Sale
Transactions
between each item. To exclude an item, insert the test [NOT] before the item name. If the Load
Distinct Items on Startup setting is enabled, a list of valid items will be available from the drop
down menu.
Enable this option to make the item field Case Sensitive. When enabled, only items matching the
case used in the item field will be reported. Example: Item will only report back Item, not item or
ITEM.
Matches results in the Amount column. By default, Any Price is selected. If you want to match a
certain value, select an operator and input a value. The available operators are; Greater Than,
Greater Than or Equal To, Equal To, Less Than or Equal To and Less Than. Example: if the
operator Greater Than or Equal To is used with the value of $20.15, any POS/ATM data with a
value of 20.15 and higher will be returned.
Matches results in the Quantity column. By default, Any Quantity is selected. If you want to match
a certain value, select an operator and input a value. The available operators are; Greater Than,
Greater Than or Equal To, Equal To, Less Than or Equal To and Less Than. Example: if the
operator Greater Than or Equal To is used with the value of 5, any POS/ATM data with a Quantity
of 5 and higher will be returned.
Matches results in the Code column. You can manually type in a code to search for, or select NS
(No Sale) or VX (Void) from the drop down menu.
Matches results in the Register column. Click on the Lookup Register button to display a list of
Register to Priority Camera mappings configured on the VIGIL Server, double click a Register in the
list to auto fill the Register field. The Register field is used for matching up the POS/ATM records to
the appropriate video footage.
Logical operators that will assist in searching with multiple criteria. By default, this is the OR
operator, which will match results in any of the used POS/ATM data criteria fields. Alternatively,
the AND operator will match results in all of the used POS/ATM data criteria fields.
Enable this option to only include Whole dollar amounts in the HTML Report. Example: $5.00 will
show in the report, but $5.25 will not.
Enable this option to configure the HTML report to search for transactions that contain a Void
followed by a No Sale.
Video Analytics Filter
Enable this option to enable the use of Video Analytics Rules configured on the VIGIL Server.
Enabled
Camera Select the Camera which the Video Analytics rule is configured on.
Rule Name Select the Rule from the list of Rules configured on the selected Camera.
Value
Combining Video Analytics with POS/ATM Data in HTML Reports allows for powerful reporting such
as Customer Not Present during a Refund transaction.
Select an operator and input a value. The available operators are; Greater Than, Greater Than or
Equal To, Equal To, Less Than or Equal To and Less Than. Example: When using an Occupancy
Count rule on the DVR Server, use the operator Less Than or Equal To with a value of 0. If the rule
reports back that the Occupancy is 0, then it can be assumed that a customer is not present during
this transaction.
3xLOGIC’s VIGIL Client - Users Guide Page 48
Doc# 12031914
Page 49

Predefined Exception Query
Click the Drop Down to select a Predefined Exception Event to use to generate an HTML Report. Only
Exceptions with Display in Reports Predefined Exceptions List will be available in this drop down.
Search for Transaction by Receipt
Receipt #
IDX
Type in text that will match results in Receipt # column. This Report will only contain the specified
Receipt.
Type in text that will match results in the IDX column. An IDX# is assigned to each line item in the
POS/ATM Database. If the IDX refers to a line item with a receipt number, the Report will contain
the receipt.
Report Results
The report is presented in an HTML table with each column corresponding to the data fields from the POS/ATM
data. Up to fifty results are presented per page of the report. Depending on the number of results returned by
the query, many pages may exist. Pages can be navigated using the controls in the bottom left.
3xLOGIC’s VIGIL Client - Users Guide Page 49
Doc# 12031914
Page 50

Receipt # Click on a Receipt # Link to filter the report on that receipt number.
IDX
Thumbnail
Browser
Email Page
Export Report Click this button to Export the entire report as either a .txt or .html file.
Click on an IDX Link to open a playback window. The time frame for the playback window is
determined by the Pre/Post Event Buffer setting.
Use this control to navigate through the report pages.
Click this button to open the Thumbnail Browser. The Thumbnail browser displays a thumbnail for
each individual time stamp in the Report. Note: This can take a while to display depending on
Camera Resolutions and Internet / Network speeds.
Click this button to Email the current report page to a list of recipients. An SMTP Server must be
configured in settings.
Print Page
Click this button to Print the current report page. The printed page will appear as displayed in the
Report Results window.
8.5 V-POS Quick Search
Event ID Type in an Event ID. This will open an Exception Event Playback Window for the specified Event.
Receipt # Type in a Receipt #. This will open a Playback window for the specified Receipt.
IDX
Type in an IDX number. An IDX# is assigned to each line item in the POS/ATM Database. This will
open a Playback window for the specified IDX.
3xLOGIC’s VIGIL Client - Users Guide Page 50
Doc# 12031914
Page 51

9 Digital Virtual Switch
The Digital Virtual Switch feature allows users to configure additional PC monitors to display up to 16
simultaneous live camera feeds per PC monitor. Users are able to access and control all cameras from DVR
sites, whether they are analog, network, or PTZ cameras, all without the need for a KBD300 keyboard.
9.1 Virtual Switch Keypad
The virtual switch keypad allows users to add and remove cameras from a digital virtual switch, change the
virtual switch layout, and control PTZ cameras in the virtual switch. Note: The digital virtual switch feature
must be setup in the VIGIL Client settings before the keypad is available for use.
Monitor /
Camera /
Input
MON
Prev / Next
Preset
Relay
CAM
The currently selected monitor, camera, and input
number will display here as the user configures the
virtual switch.
Each camera spot on the virtual switch is a monitor.
There are 16 virtual switch monitors per PC monitor. To
select a virtual switch monitor, enter the monitor
number and then press the MON button.
Switches the currently selected camera to the
previous/next camera on the virtual switch map.
To go to a camera preset, first select the monitor, and
then press the preset number followed by the Preset
button.
Press this button to trigger an output relay from a DIO
device such as an Adam6060. The VIGIL Client system
must be setup specifically to use this feature. Please
contact your vendor for more information.
To add a camera to the virtual switch, select the virtual
switch monitor number and then press the virtual
switch input number followed by the CAM button.
3xLOGIC’s VIGIL Client - Users Guide Page 51
Doc# 12031914
Page 52

9.2 Virtual Switch Screen
The virtual switch screen is displayed on secondary monitors with the main monitor reserved for controlling the
system without interrupting view of the virtual switch display. Cameras may be added and removed using the
keyboard number pad and controlled on-screen using the mouse, or the virtual switch keypad.
Under each camera is a control bar containing the virtual switch monitor number, the virtual switch input
number, the camera name and the DVR site. The control bar can be clicked on to set focus on that monitor
(highlighted in red), or double clicked on to set that monitor to Full Screen Mode / Open in Live Viewer Window
on Main Screen (configurable in Settings).
3xLOGIC’s VIGIL Client - Users Guide Page 52
Doc# 12031914
Page 53

Right-clicking on a monitor in the virtual switch provides a context menu with the following options:
Copy Copy a still shot of the video feed to the Windows clipboard.
Enable On-Screen
Display
Digital PTZ
Enables On-Screen display of POS/ATM data. This option will only be available if the camera is
configured as a Priority camera for POS/ATM on the VIGIL Server.
Enable this feature for zoom and pan control on fixed cameras. This option is available and
enabled by default for all cameras that do not have alternative camera control setup in the VIGIL
Server camera settings.
Priority Audio
Analytics Select which Video Analytics information will be displayed on the live video feed.
Speed
Relays
Quick Search
Audio Talk
Sub Stream /
Rapidstream
If a Priority Audio channel is configured for the camera on VIGIL Server, toggle this option to
play live audio.
Select the display speed for the camera. Options are: Slow (1fps), Medium (5fps), Fast (10fps),
Turbo (20fps) Maximum, and Frame by Frame.
Interfaces to the server relays. Relays can be toggled on or off, corresponding to closed and
open states respectively. Note: Relays must first be configured on the DVR to enable this option.
See the VIGIL Server users guide for more information.
Retrieve recent footage from the camera for preset intervals of one, five, or ten minutes. This
will open the Search window and begin playback of the selected camera and time interval.
Opens the audio talk window. Audio Talk must be configured and associated with the Camera on
VIGIL Server for this option to be available.
Toggle between Main and Sub Stream if the Camera supports a Sub Stream. If the Camera does
not support a Sub Stream, the Rapidstream option will be available. Rapidstream is CPU
intensive on the VIGIL Server and will be disabled if CPU usage exceeds a defined threshold. See
the VIGIL Server Users Guide for more details.
3xLOGIC’s VIGIL Client - Users Guide Page 53
Doc# 12031914
Page 54

10 Searching
VIGIL Client offers a robust set of tools for searching and playing video footage and data. To open the Search
window, either click Search on the main VIGIL Client icon toolbar, or select Search | Search Footage and Data
from the main menu.
Each of the Search window sections can be minimized by clicking the double arrows in the title bar. When
a section is already minimized, it can be restored using the double arrows.
3xLOGIC’s VIGIL Client - Users Guide Page 54
Doc# 12031914
Page 55

10.1 Searching Video
Search Performs a search based on the current criteria.
Reset
POS/ATM Data
Resets all search criteria and POS/ATM data filters to their default values. The From/To time defaults
to the past hour from when Reset is clicked.
If POS/ATM Data is configured on the VIGIL Server, this button will open the POS/ATM Data Filter
and Data Search Results sections. Click the POS/ATM Data Filter section title bar to specify the
POS/ATM data search criteria.
Search Criteria
When first opened, the Search window defaults to a search of all cameras, recording in all modes, from the last
hour. Click the Search button to retrieve all footage meeting the specified criteria.
You can specify the start date/time and end date/time of your search. By default, VIGIL Server
From/To
Servers Select the connected server you wish to perform the search on.
Cameras Select the cameras you wish to perform the search on.
allows you to search across multiple days. This can be changed to default to One Day in the DVR
Settings on the Server.
This drop-down menu includes preset search intervals in hourly increments from 1 hour up to 8
hours. Additionally, selections for 15 and 30 minutes can be added by checking Quick Retrieve Short
Presets
Mode
Intervals in the Settings | Search Tab. When a selection is made, the From/To times are adjusted
accordingly. Selecting Custom Search opens the Custom Search window where searches that are
performed frequently can be created or run.
Making a selection from this drop-down menu will restrict the returned footage to only the selected
type: All Modes, Constant, Motion, All Alarms, Digital Input Alarms, Motion Alarms, POS/ATM Alarms
or Video Analytics Alarms.
Video Search Results
After completing a search, the results are displayed in the Video Search Results pane as seen below. To view
the resulting video footage, click on the desired result to open Playback window.
Note: Depending on the recording configuration of your cameras, there may be no saved footage or
data matching your search criteria.
3xLOGIC’s VIGIL Client - Users Guide Page 55
Doc# 12031914
Page 56

10.2 Searching POS/ATM Data
In addition to searching Video Footage, if the server has also been configured to record POS/ATM Data, you
can search that data in VIGIL Client. Click the POS/ATM Data button to open the POS/ATM Data Filter
section, then click the POS/ATM Data Filter title bar to open the POS/ATM Data search criteria section.
Search for Line Items
Use the Search for Line Items section to find specific POS/ATM Data within the date and time indicated in the
Search Criteria section. When searching for line items, normal search criteria are also included (i.e. From and
To date/times, selected cameras).
Item
Code Type in text to search by Code.
Register Type in a number to search by Register Number.
Quantity Type in a number to search by Quantity.
Value
Cashier Type in text to search by cashier number or name.
Or/And
Type in text to search by Item. Use the drop-down menu to select a recently searched item,
remembers last 10 searched for items.
Matches results in the Amount column. By default, Any Price is selected. If you want to match a
certain value, select an operator and input a value. The >= means “more than or equal to” the
value that you input. For example, if the operator >= is used with the value of $20.15, any
POS/ATM data with the value of 20.15 and higher will be returned. The <= operator means “less
than or equal to”, while the = operator simply means an exact value.
Logical operators that will assist in searching with multiple criteria. By default, this is the OR
operator, which will match results in any of the used POS/ATM Data criteria fields. Alternatively, the
AND operator will match results in all of the used POS/ATM Data criteria fields.
Search for Transaction
This type of search looks for a unique line item or receipt number and disregards the other criteria.
Receipt Number
Type in text that will match results in Receipt # column. The search results will include 10 seconds
before the start of the receipt and 10 seconds after the end of the receipt.
Type in text that will match results in IDX column. If the IDX contains a receipt number, the
POS/ATM data returned will be that receipt number and all IDX values corresponding to it within
IDX
one hour. If there is no receipt number for the searched IDX value, the returned results will be
based on the timestamp of that IDX. The search results will be +/- 10 seconds from the timestamp
of the IDX.
3xLOGIC’s VIGIL Client - Users Guide Page 56
Doc# 12031914
Page 57

After completing a POS/ATM Data search, a POS/ATM Data Search window will be opened.
Note: POS/ATM Data can also be displayed on the Video Playback Window in an OSD Format.
The POS/ATM Data Search window presents
POS/ATM Data in tabular form with these
columns:
Qty
Item
Amount The price of the item purchased.
Code
Reg #
Cashier
Receipt #
Timestamp
IDX A unique identifier to quickly identify and find POS/ATM data line items.
The cash register number.
The cashier currently logged in to the data terminal.
The receipt number of the current receipt.
The time at which the Point of Sale event occurred.
The quantity of the item purchased.
The item purchased.
The transaction type code associated
with the transaction.
There are six options available when a line in the POS/ATM Data Search tab is right-clicked:
Copy Line Copies the selected data record to the Windows clipboard.
Opens the Select Destination window where an
export destination is selected. After making a
selection, the POS/ATM Export Settings window
Export All Records
Print All Records Prints the live POS/ATM Data to the default printer.
Search for
Transaction by
Receipt
Search for
Transaction by IDX
Reset Column Order Resets the order of the POS/ATM Data columns if they have been rearranged.
opens. Select the time periods to export or select
Export All to export all Data records. Once
complete, click OK to begin the export process.
Click Cancel to exit without exporting.
Narrow the Search results to display only the results that match the receipt number of the record
that was right clicked on.
Narrow the Search results to display on the results that match the receipt number that the IDX of
the record right clicked on is a member of.
3xLOGIC’s VIGIL Client - Users Guide Page 57
Doc# 12031914
Page 58
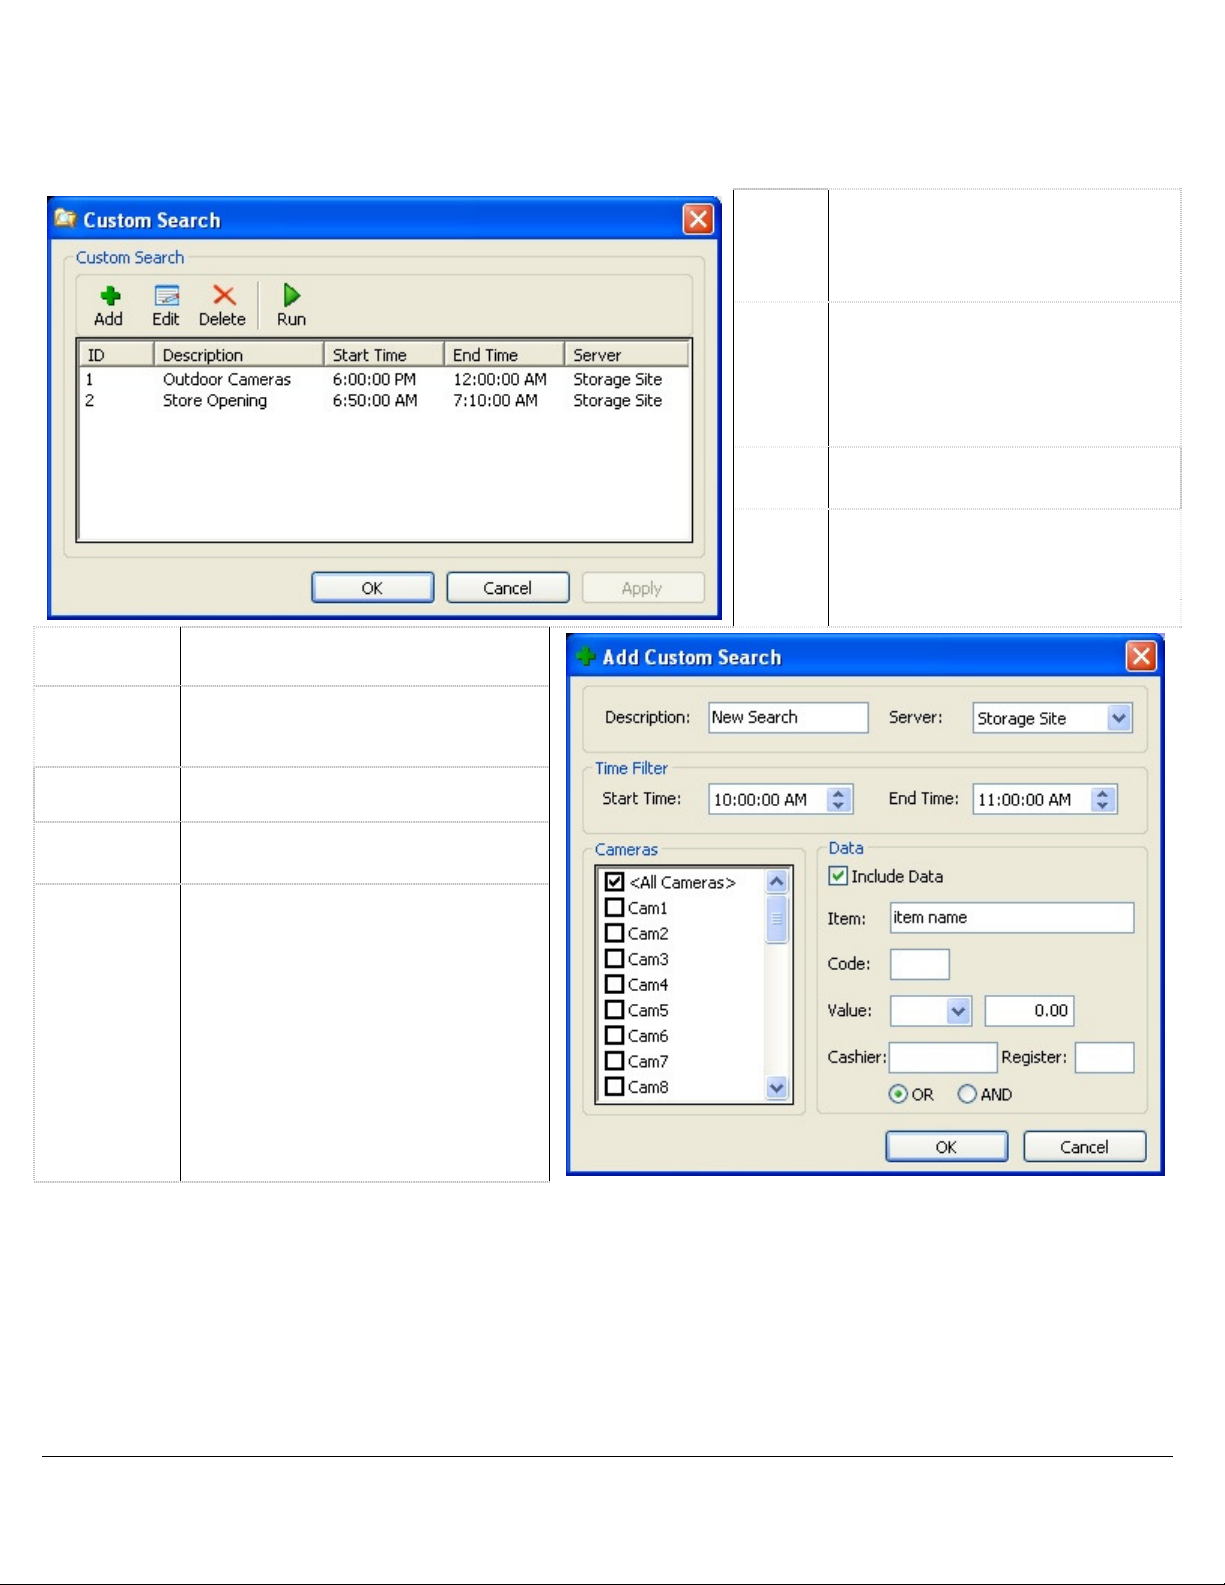
10.3 Custom Search
A Custom Search that includes specified search criteria can be created and saved. The Custom Search window
can be accessed from the Presets | Custom Search drop-down menu. It can also be opened from the toolbar
menu (Search | Custom Search). When selected, the Custom Search window will appear.
Opens the Add Custom Search
Add
Edit
window. Once a Custom Search has
been added, click Apply to save the
search.
Opens the Edit Custom Search
window for the selected search.
Select an entry and click Edit. Once
a Custom Search has been edited,
click Apply to save the changes.
Deletes an existing Custom Search.
Select an entry and click Delete.
Runs an existing Custom Search.
Select an entry and click Run.
Description
Server
Time Filter
Cameras
Data
Delete
Run
The name of the search that will
appear in the Custom Search list.
Select the server the custom search
will be run on from the drop down
list.
The start time and end time to be
searched.
Select the camera(s) to search, or
select All Cameras.
Include Data – When enabled, the
Custom Search will include the
POS/ATM data criteria specified.
OR/AND - Logical operators that will
assist in searching with multiple
criteria. By default, this is the OR
operator, which will match results in
any of the POS/ATM data criteria
fields. The AND operator will only
match results that have matched
results in all of the POS/ATM data
criteria fields.
Click OK to return to the main Custom Search window. Note: You must save Custom Searches before they can be
run. To do this press the OK or Apply buttons.
3xLOGIC’s VIGIL Client - Users Guide Page 58
Doc# 12031914
Page 59
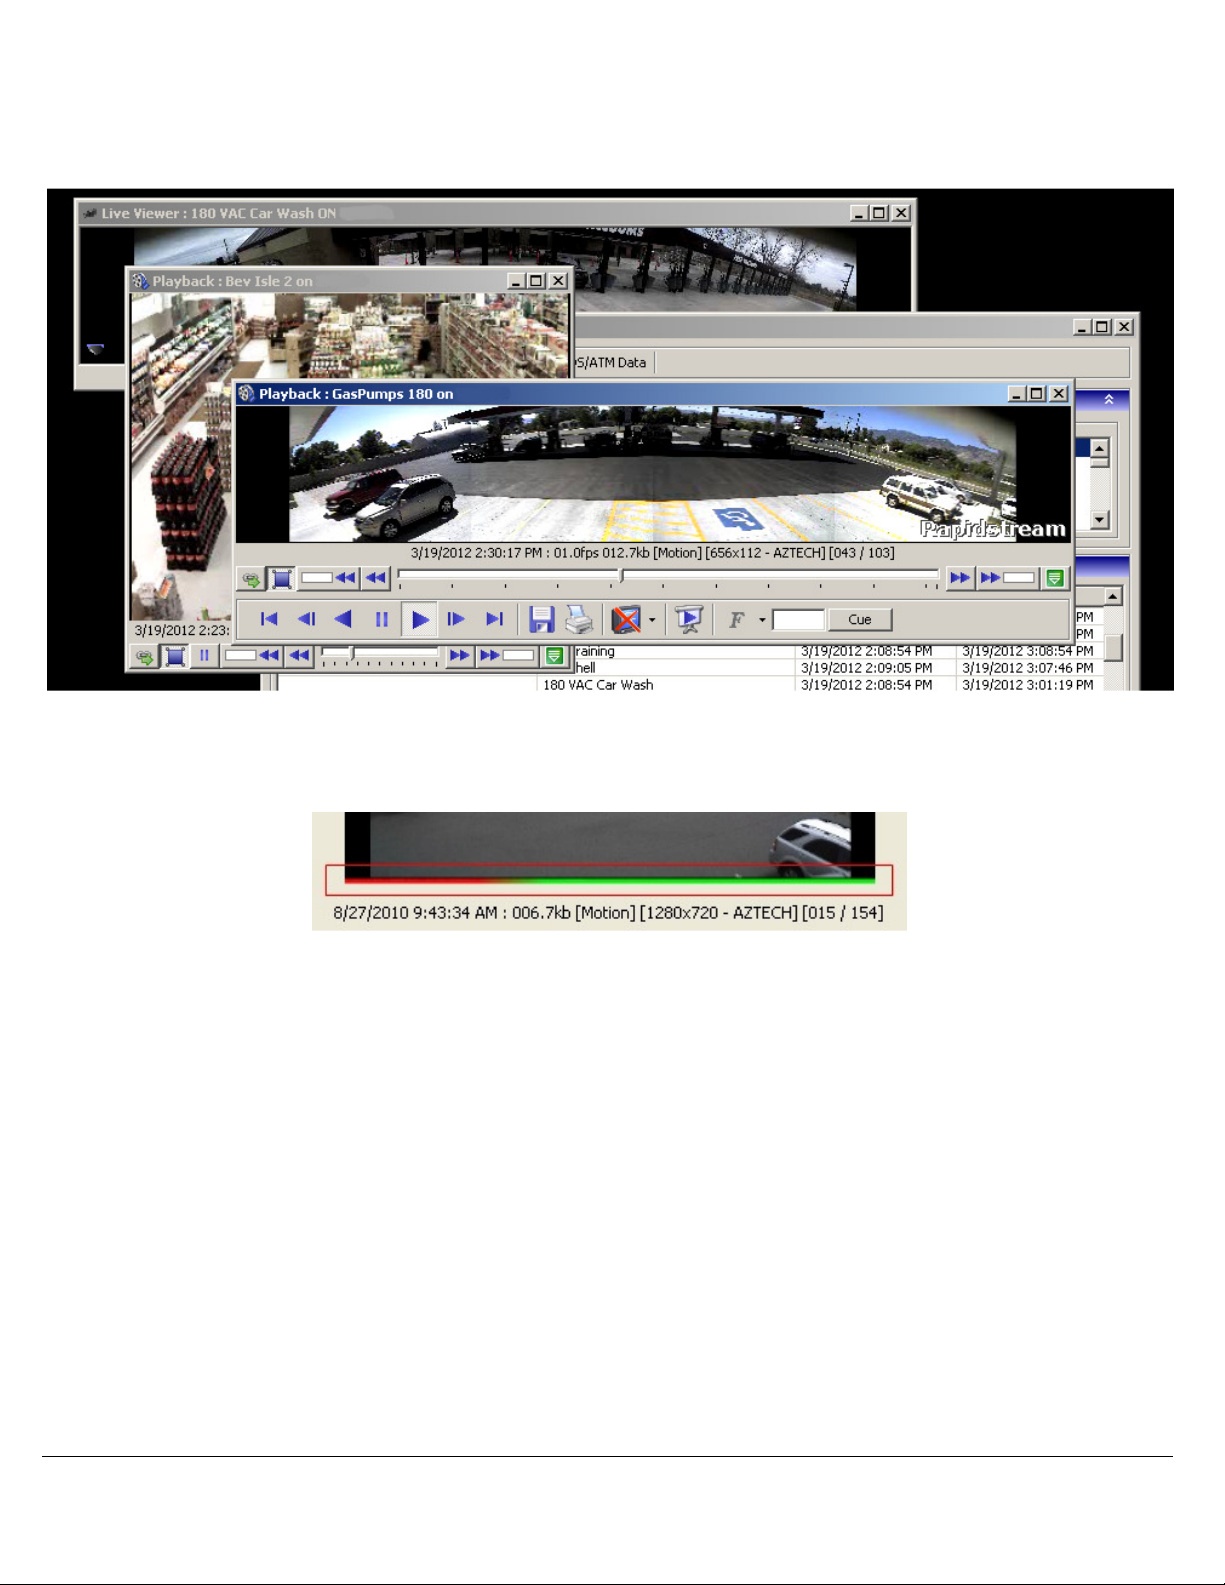
10.4 Video Playback
To play recorded video footage, double-click a camera from the Video Search Results pane. A Playback window
will open with the Video Footage Queued up. Multiple Playback and Live Windows can be open at the same
time.
Information about the camera feed is displayed below the Playback window. This information includes the
playback status, the date and time of the footage, the frame rate (if currently playing), the resolution, the
recording CODEC of the footage, the current frame number and the total number of frames.
A visible bar that displays the current cache level can be found just below the Playback window. A green bar
indicates the cache level is full and if the bar is almost all red it indicates the cache is low.
3xLOGIC’s VIGIL Client - Users Guide Page 59
Doc# 12031914
Page 60

Playback Controls
The Playback Controls section of the Playback Window will dynamically change how many buttons are
displayed based on the size of the Playback Window.
Toggle this button to Sync Playback with all Playback Windows that have this button toggled.
Whichever Playback Window is currently selected will become the Master.
Click-and-drag the Variable Speed Playback Slider to change the speed of the video playback. The
variable speed playback tool tip displays the number of times faster the variable speed playback is
than the Recorded Speed. You can also right click on the button to select the speed directly.
Click the Fast Backward or Fast Forward button to play back at Maximum speed without skipping any
frames.
Skips to the very beginning/end of the video footage.
Skips one 10th of the footage if clicked while playing the video footage. While paused or stopped,
click to play back frame by frame. The mouse scroll wheel can also be used to do this by selecting
the playback slide-bar.
Pauses the video footage.
Plays the video footage backward or forward.
Click-and-drag the slide-bar to move to a different point in the video clip.
For Exporting Still Image, Video Footage, Audio or POS/ATM Data.
Click and select Print Still Image to print the current frame, or select Print Data to print the POS/ATM
data currently displayed in the Data Search Results pane. Defaults to Print Still Image if no Data
Search Results available.
Click to toggle the Data On-Screen Display feature, where POS/ATM data is displayed with the video
footage.
Click to play in Full Screen mode. Double-click on the image to return to the standard Playback
window.
Frame de-interlacing applies only to DVR480 series DVRs running VIGIL Server version 2.03.0000
and higher, recording at resolution 704x480. When paused in the Playback window, use the Frame
Cue
De-interlacing feature to toggle between F (Full Field), AF (A Field) and BF (B Field). Click the F
button to toggle between frame types or use the drop-down arrow to select the frame type.
Toggle between Full Resolution and Rapidstream for Playback. Rapidstream is CPU intensive on the
VIGIL Server and will be disabled if CPU usage exceeds a defined threshold. See the VIGIL Server
Users Guide for more details.
Cues the playback video to a specific frame. Enter a frame number in the text box and click the Cue
Frame button.
Click to expand the Advanced Features section of the Playback Window.
3xLOGIC’s VIGIL Client - Users Guide Page 60
Doc# 12031914
Page 61

3xLOGIC’s
Advanced Playback Controls
button on a Playback Window to expand the Advanced Features Controls. If the button is not
w larger to display all buttons.
loaded v
To perform a Smart Search, you must first define or “mask” a motion detection region. To do this, click
and draw on the playback image. Any time a clear area is clicked on, the mask is expanded.
Alternatively, when a masked area is clicked on, th
perform the search. Once the search is complete, only video frames that contain motion in the masked region
If there is more than one masked region (i.e. two or more di
masks), the Smart Search will load video frames that contain motion in any one, not all, of the regions.
Performs the Smart Search. Video frames that do not contain motion in the masked regions are removed
from the loaded footage. Use the
Smart Search masks and restores the originally loaded footage.
Displays a menu where Video Analytics information can be overlaid on the playback footage.
ion detected within a user
e mask is removed. Click the
Shows/hides the smart search mask. A mask can
Show Mask
options for modifying masks:
Erases all masks on the image.
Masks the entire image.
Swaps clear and masked areas.
button must be latched on for
these options to be available.
controls the sensitivity of the motion
detection algorithm used by the Smart Search
function. To the left is less sensitive, requiring larger
change in motion; to the right is a more sensitive,
detecting smaller movement.
buttons to skip back/forward to the next Smart Search frame.
Click the
visible, drag the Playback Windo
Smart Search Tab
The Smart Search feature refines the
region.
Mask
ideo footage based on mot
-defined
Show
Smart Search button to
will be loaded for playback. Note:
Smart
Search
Reset Removes all
Show
Mask
Mask
Sensitivity
only be edited when the
latched on.
Offers some quick
Clear –
Select All –
Invert -
Note: The Show Mask
This slider
sconnected
button is
Analytics
VIGIL Client - Users Guide Page 61
Doc# 12031914
Page 62
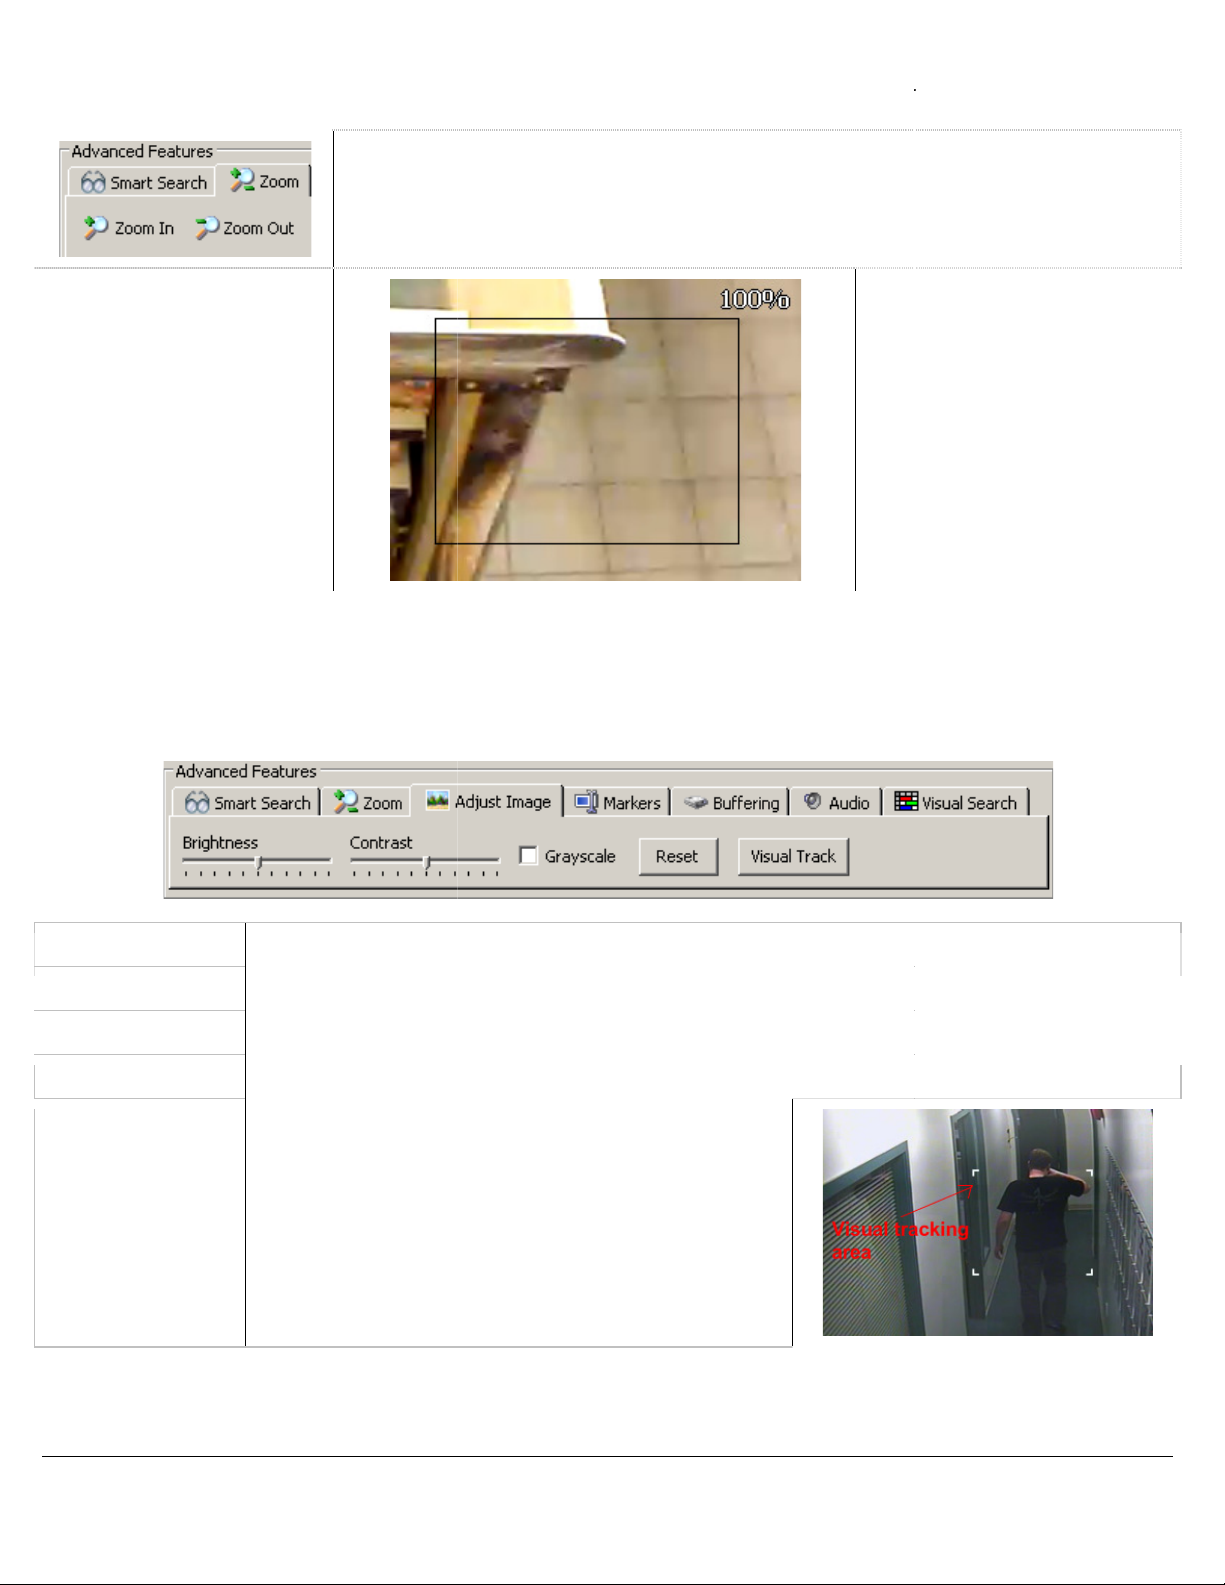
3xLOGIC’s
Zoom Tab
by selecting the
Click the Zoom In / Out buttons to zoom the playback window in and out. The Zoom will
be focused on the current center of the window.
When playback is paused, you can adjust the image by selecting the
section. The adjusted image can be exported or printed
g playback is too CPU intensive. Any adjustment made will be re
Adjusts the brightness of the current frame.
Adjusts the contrast of the current frame.
Toggles between a grayscale
Returns the image to its default values.
When enabled, the Visual Tracking feature tracks moving
objects by the placement of white corners around the
Features
The magnification factor is
displayed in the upper right
hand corner of the
window.
Adjust Image
Only a paused image can be
and color image. Only still images will export in grayscale.
Playback footage can be zoomed
When the cursor is moved
over the Playback window,
a zoom outline will be
displayed to indicate the
region that will be
magnified. Left-clicking
zooms in and right-clicking
zooms out of the image
Adjust Image Tab
Features
adjusted, adjustment of footage durin
when Playback is paused again.
Zoom tab from the Advanced
. Note:
section.
-
Playback
tab from the Advanced
-applied
Brightness
Contrast
Grayscale
Reset
Visual Track
object.
VIGIL Client - Users Guide Page 62
Doc# 12031914
Page 63
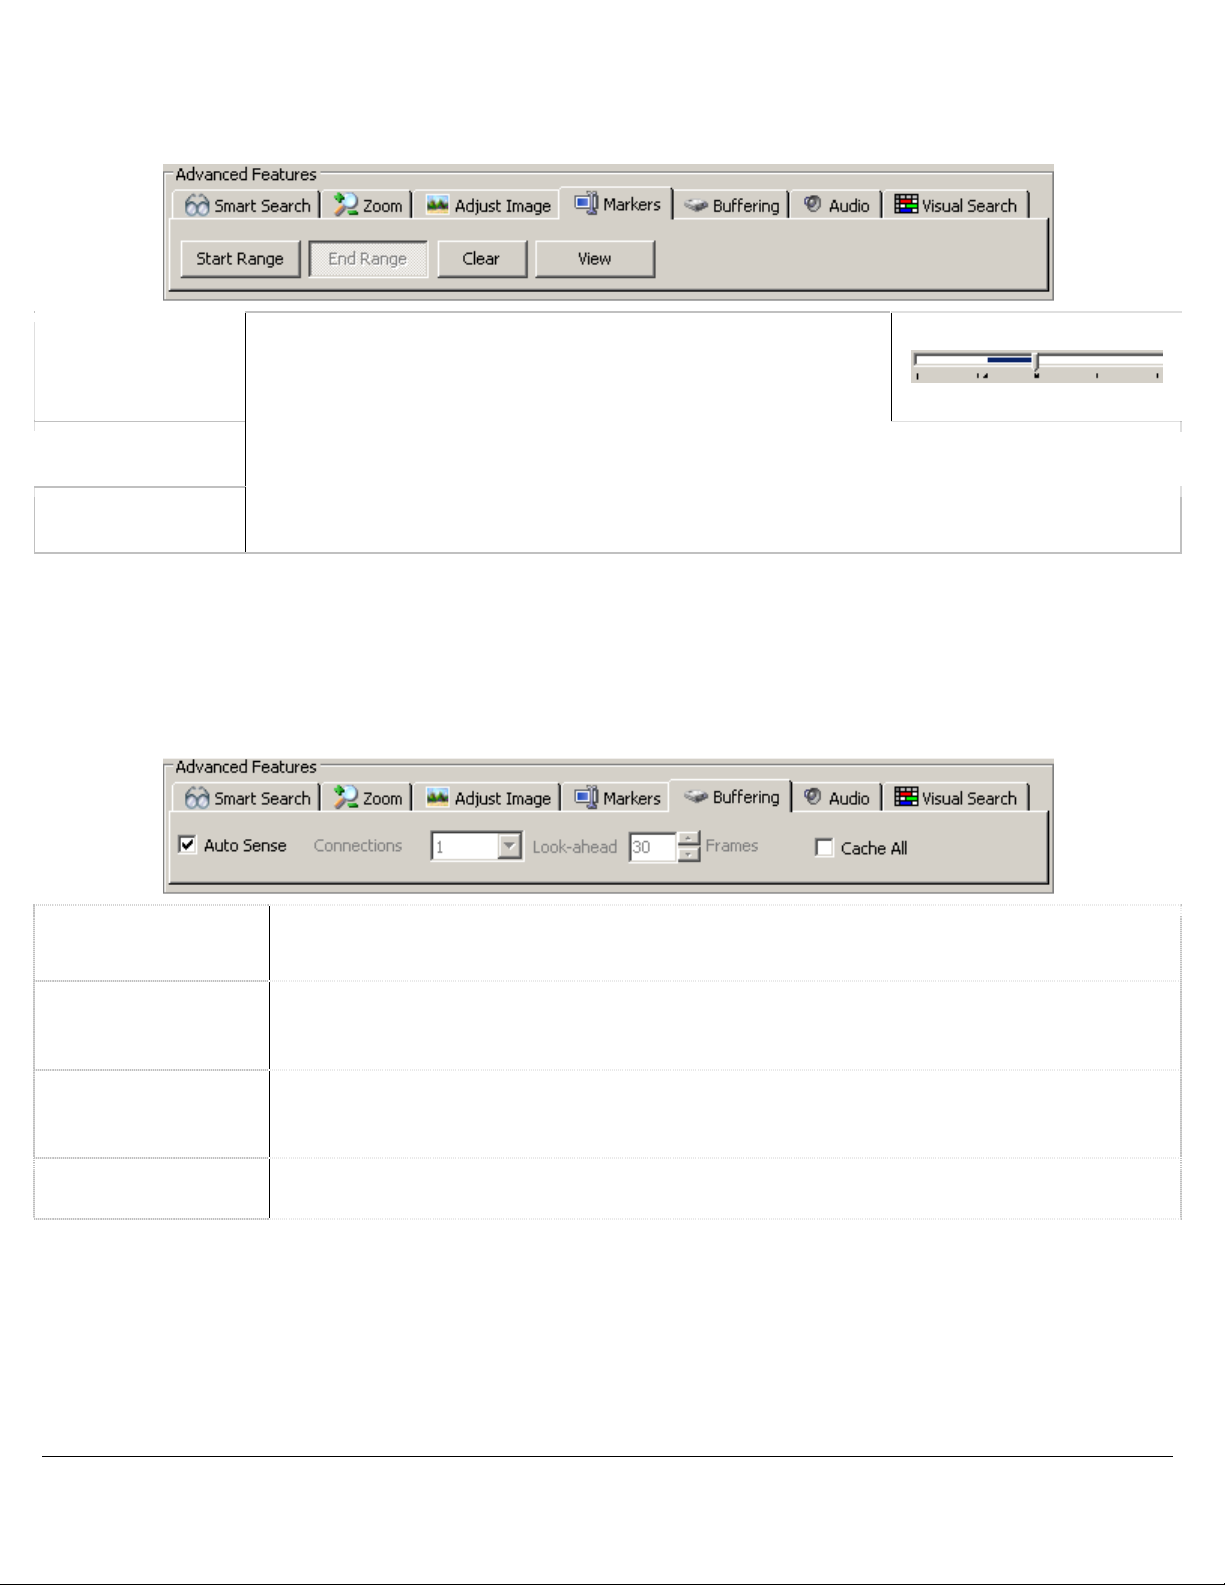
Markers Tab
During playback, if only a sub-range of the loaded footage is of interest it can quickly be selected by using
Markers. To use Markers, select the Markers tab from the Advanced Features section.
Position the footage navigation slider at the beginning of the sub-
Start / End Range
range and click the Start Range button. You will notice a small
marker appear below the starting point. Next, navigate to the end
of the sub-range and click the End Range button.
Clear
View
Removes the sub-range markers. If the sub-range is cleared when the View button is latched on,
the playback will return from the sub-range to the fully loaded footage.
Loads the sub-range for playback. The playback information will indicate that a sub-range is
currently displayed. All of the playback controls will operate on only the sub-range of footage.
Note: If a sub-range has been defined, only the sub-range will be saved when video is exported.
Buffering Tab
Depending on your Network/Internet bandwidth, it might be useful to configure the playback caching. Using
Autosense for the most part will be the most efficient. Only advanced users should attempt to adjust the
buffering settings.
Auto Sense
Buffering
Connections
This is the default value and the recommended setting. It will enable the buffering to become
dynamic and change as required.
Changes how many buffering connections will be used. Each buffering connection opens a TCP
connection to the DVR, increasing possible bandwidth; but may be limited on CPU usage, as well
as the maximum throughput to the DVR.
Look-ahead x
Frames
Cache All Cache the entire video before beginning Playback.
This is the number of frames that VIGIL Client will buffer during playback. Settings from 30 to
1800 frames are available. A higher number of Look-Ahead frames is recommended for DVRs
recording at higher frame rates.
3xLOGIC’s VIGIL Client - Users Guide Page 63
Doc# 12031914
Page 64
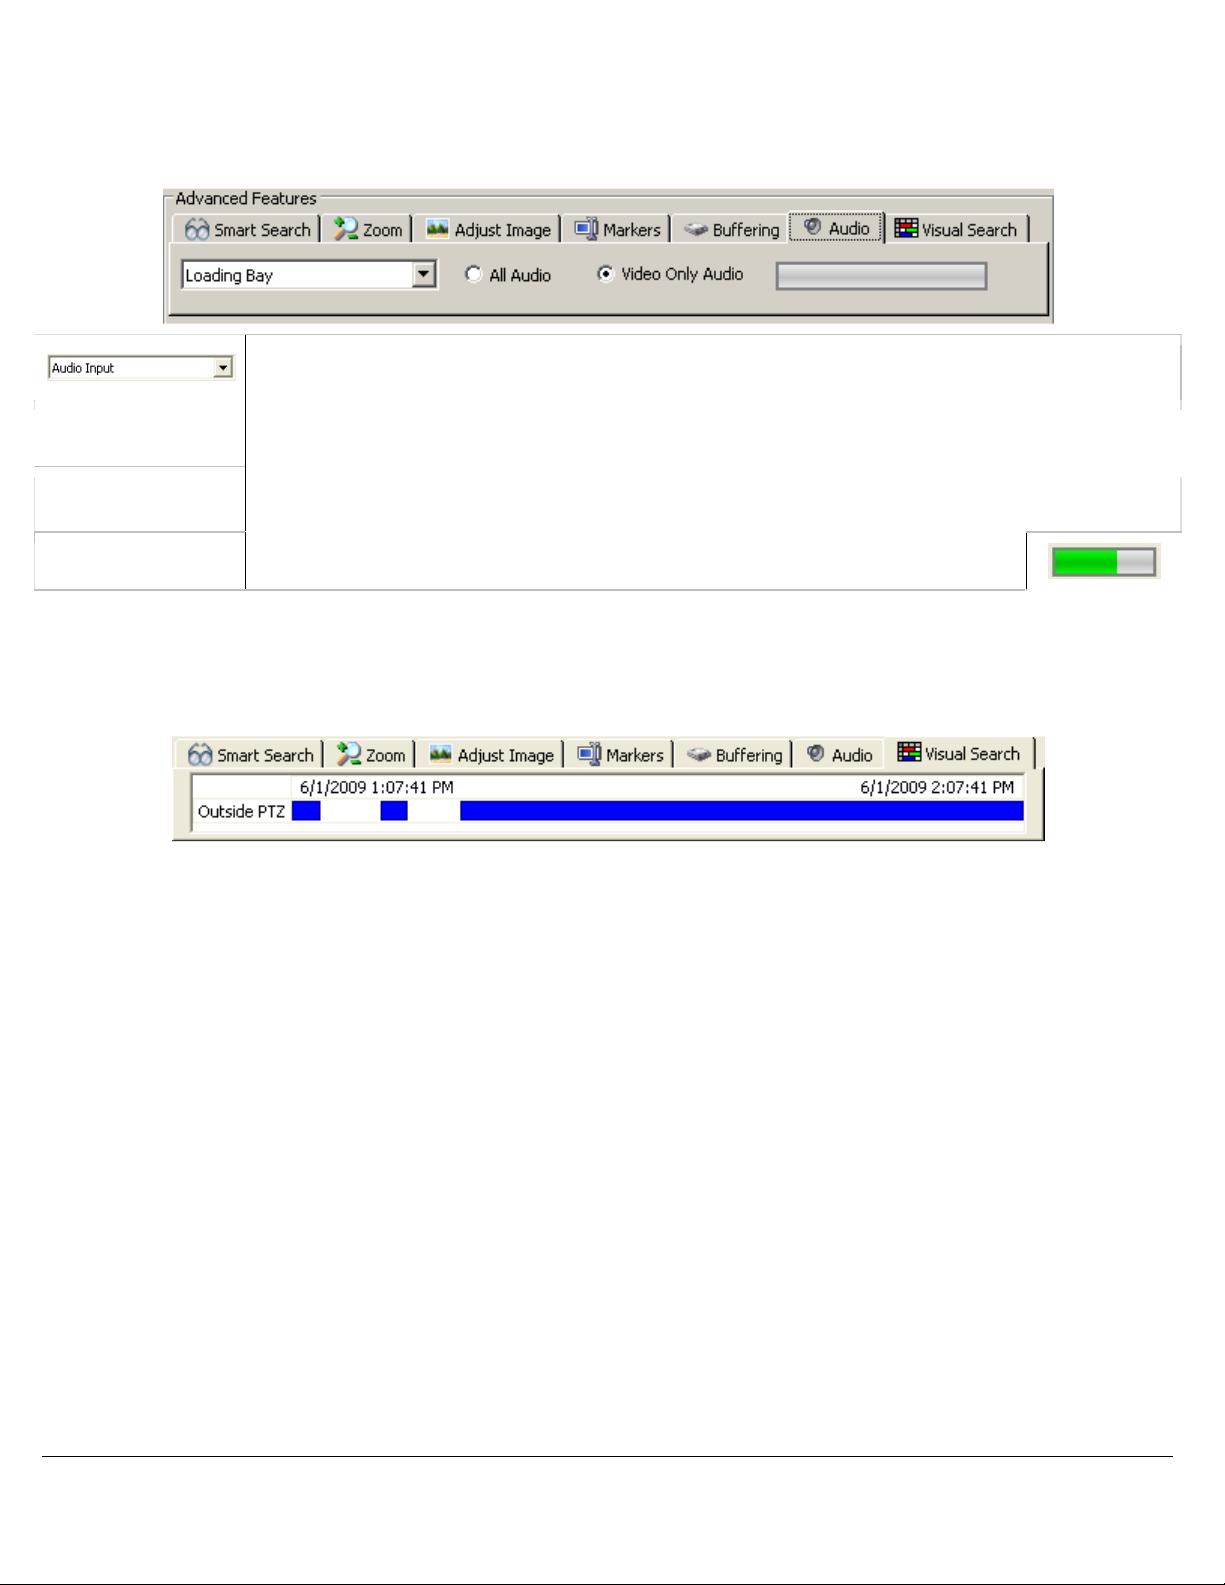
Audio Tab
If audio recording is enabled and configured in the DVR settings, the Audio tab will become available in the
Advanced Features section of the Search window. Selecting an audio channel from this tab allows you to
playback recorded audio along with video footage.
To choose which audio channel to playback, select the channel from the drop-down menu in the
Audio tab.
All Audio
Video Only Audio
Audio Level Meter This Audio Level Meter indicates the signal strength of the currently playing audio.
When selected, all audio from the specified channel is played back even when there is no
corresponding video footage for the playback time.
When selected, audio from the specified channel is played back only when there is corresponding
video footage for the playback time.
Visual Search Tab
Visual search is a graphical representation of the search results. The visual footage shows the period of time
searched with footage recorded displayed as blocks of color representing the recording mode: Green for
Constant, Blue for Motion or Red for Alarm.
When the mouse is moved within the display, a line is drawn indicating the point in time under the cursor,
which is displayed in text between the footage start and end times. Clicking within the chart will begin
playback of the camera at that time.
Controlling Playback Video with Digital PTZ:
Cameras can be controlled during playback using the digital PTZ camera control just like in a Live Viewer
Window. Because digital PTZ controls the camera through the software, it can be used for both live and
playback video. The digital PTZ controls will work for every camera that is loaded for playback regardless of
the camera control type specified in the settings.
3xLOGIC’s VIGIL Client - Users Guide Page 64
Doc# 12031914
Page 65

Playback Right-click Menu:
Remove Closes the Playback Window.
Copy
For cameras using the Panorama PTZ camera control type, the video can be manipulated in the playback window using the
following right-click menu options:
Source Video Only
(Rotate Disabled)
Source Video Only
(Rotate enabled)
360 View and
Source Video
Copies a still shot of the current image to the Windows clipboard. If the image is zoomed in, a Copy
Zoomed option will be available as well.
This option is enabled by default. This feature allows users to zoom in and move cameras during
playback. Click on an area of interest and then use the mouse scroll to zoom in. Click-and-drag to
move the image after it is zoomed in.
This feature allows users to zoom in and rotate cameras during playback. Click on an area of
interest and then use the mouse scroll to zoom in. Or, click-and-drag to rotate the image.
This feature splits the playback image into 4 quadrants. The first quadrant shows the full image,
and the second, third and fourth quadrants show different zoomed sections of the image. To load an
area of interest in one of the zoom quadrants, click on a zoom quadrant and then click on the first
quadrant to load that section. The zoomed sections can be clicked on directly and then rotated.
3xLOGIC’s VIGIL Client - Users Guide Page 65
Doc# 12031914
Page 66

11 Exporting
Video footage can be saved either as a single frame still shot or as a video file. Audio and POS/ATM data can
be saved either embedded within video footage or in a separate document. This process is referred to as
“exporting”.
Note: To export footage there must be at least one export destination configured.
Note: If Export Auditing is enabled on the DVR, required information must be entered before
selecting the destination folder for both images and video exports.
11.1 Still Image Exporting
Single frame shots can be saved in either Bitmap (BMP) or JPEG (JPG) format. BMP images retain all of the
original image detail, but are typically much larger than JPG images as a result. JPG images are compressed
and are typically indistinguishable from the original image when the JPG quality is 70 or greater.
Bitmap
JPEG
Select the destination you want to save the image to. You can select multiple
destinations by checking the corresponding boxes, as well as create subdirectories
by using the New Folder button. When Exporting a Bitmap the Quality slider will not
be visible.
Click to open the Export Menu and Select Still Image.
Saves the still image as a BMP image. Select the export destinations and enter a filename. Click Save when
finished or Cancel to exit without saving.
Saves the still image as a JPG image. Select the export destination and enter a filename. Additionally, you
may select a quality setting for the JPG image by adjusting the slider. Closer to the left side means a lower
quality, smaller sized file; further to the right means a higher quality, larger sized file. For the most part,
the default compression setting is the best choice. Click Save when finished or Cancel to exit without
saving.
Click and Select Print Still Image to Print to the Windows default printer. Note: The image will be sent to
the default Windows printer only. If one has not been configured an error message will inform you of this.
3xLOGIC’s VIGIL Client - Users Guide Page 66
Doc# 12031914
Page 67

11.2 Video Exporting
Video footage can be exported in Microsoft AVI Video format or in Authentic Video format which uses
3xLOGIC’s Motion JPEG AZTECH format. Video clips exported in Authentic Video format can be played using
the 3xLOGIC DV Player program. AVI format video clips can be played using Windows Media Player or any
other player that supports standard AVI format. The Authentic Video format is recommended when exporting
video clips as evidence since the authenticity of the clip can be verified using DV Player. VIGIL Client allows
video exports to include the VIGIL DV player installation kit file to ensure that playback software is available
for Authentic Video exports.
AVI
Authentic Video
Video Export Options
Click to open the Export Menu and Select AVI Video or Authentic Video.
Saves the current video footage as an AVI video. Select the export destinations and enter a
filename.
Clicking the Advanced button will open the CODEC Settings window that allows you to set the
image size the video will be saved at. The … button will open another window where you can
select and configure the CODEC used during the encoding process.
Click OK when finished or Cancel to exit without saving.
Saves the current video footage as a MJPEG. Select the export destinations and enter a filename.
Click Save when finished or Cancel to exit without saving.
POS/ATM Data as
Text File
POS/ATM Data
Embedded in Video
Audio Data
Embedded in Video
Select the destination you wish to save the footage to. You can select multiple destinations, as well as create subdirectories
by clicking the New Folder button.
POS/ATM data is included with the export in a separate text file with the same filename as the
Video Export.
The POS/ATM data will be overlaid on the video image when the exported video file is opened
using DV Player. Note: Embedded is only available for Authentic Video Exports.
Exports any audio on the selected channel with the video file. Audio can also be exported
separately from video.
3xLOGIC’s VIGIL Client - Users Guide Page 67
Doc# 12031914
Page 68

11.3 Audio Exporting
Click the export button and select Audio as WAV File.
This will allow you to export audio in .wav format with no
accompanying video footage, Use the From and To date
and time boxes to select the range of the audio footage to
export, and select the audio channel to export from the
Channel drop-down menu.
Note: To export audio, an audio channel must be
configured on the VIGIL Server.
11.4 Export File Browser
The Export File Browser provides a thumbnail file browser for exported video footage and still shots. File
navigation is similar to Windows Explorer. To open the Exports window, select the Export File Browser option
from the View drop-down menu in the main VIGIL Client window.
Open a File
Open in
External
Application
Copy a File
To search for a file or folder, go to
Edit | Find, enter a file or folder
name, and click OK. Go to Edit | Find
Next to select the next file or folder
with the given name.
Find a
File or
Folder
Double-click the desired file in the File Browser or Thumbnail Browser. This will open the file using the
default program as configured in the Windows file associations. VIGIL Server includes an internal
viewer for .BMP and .JPG files.
Right-click the desired file in the File Browser or Thumbnail Browser and select Open in External
Application. This will open the file using the default program as configured in the Windows file
associations.
Right-click the desired file in the File Browser or Thumbnail Browser and select Copy item(s). This will
open the Select Destination window that allows you to save another copy of the file to an export
destination. You can also use the menu to copy a file by selecting the file and going to File | Copy
item(s). Note: To select multiple folders, hold down the Control key as you make your selection.
Note: If you would like to search for
a file or folder using only a partial
name, enter an asterisk (*) for the
part of the name that is not defined.
For example, enter *cam1* to search
for files or folders that contain “cam1”
in their name; enter cam1* to search
for names that begin with “cam1”.
Right-click the desired file in the File Browser or Thumbnail Browser and select Delete item(s). You can
Delete a File
also use the menu to delete a file by selecting the file and going to File | Delete item(s).
Note: To select multiple folders, hold down the Control key as you make your selection.
3xLOGIC’s VIGIL Client - Users Guide Page 68
Doc# 12031914
Page 69

Right-click on a folder in the File Browser and select Copy item(s). You can also use the menu to copy
Copy a Folder
Delete a Folder
a folder by selecting the folder and going to File | Copy item(s). Note: To select multiple folders, hold
down the Control key as you make your selection.
Right-click on a folder in the File Browser and select Delete item(s). You can also use the menu to
delete a folder by selecting the folder and going to File | Delete item(s). Only empty folders can be
deleted. Note: To select multiple folders, hold down the Control key as you make your selection.
Note: For export folders to show in the browser, at least one export destination must be configured
in Settings | Destinations tab.
3xLOGIC’s VIGIL Client - Users Guide Page 69
Doc# 12031914
Page 70

12 Site Map
The Site Map utility provides a graphical interface to a site’s cameras by displaying their location on a map. For
more information on creating and using site maps, please refer to the Site Map Designer Section.
Monitor Select an analog output monitor on the DVR that will display the camera.
Live Displays cameras in the Live Viewer window.
Toggles the playback controls:
Reset – Resets the search criteria to default (previous hour).
Play
Stretch Toggles the site map between normal and full screen.
Prev / Next Switch to the previous/next site map.
Back / Forward Moves back/forwards in the site map navigation history.
Drop-down Menu Use this drop-down menu to select from multiple site map files.
Quick Retrieve – Search from preset time intervals.
From/To - Start and end date/time interval to search.
Changes the view to the selected camera. The display depends upon which display feature is set
(Monitor, live, or playback).
Changes the display to the corresponding layout, which contains multiple cameras.
3xLOGIC’s VIGIL Client - Users Guide Page 70
Doc# 12031914
Page 71

13 Server Alarms
VIGIL Server DVRs can be configured to send alarms to VIGIL Clients. The IP address of the client computer
must be entered in the VIGIL Server settings before it is able to receive alarms. Please refer to the VIGIL
Server User’s Guide for details. When VIGIL Client receives an alarm, the Server Alarms window is displayed.
The Server Alarms window provides a listing of alarm events and allows quick playback of alarm footage. To
open the Server Alarms window, select Alarms from the menu of the main window toolbar.
Note: The Server Alarms window will automatically appear as a response to an alarm event if you
have Automatically Display Inbound Alarms From Server enabled in the Alarms tab of the settings
window.
Note: The TCP/IP port used by VIGIL Client to receive Server Alarms is 22830.
The Server Alarms window displays a list of alarms received by VIGIL Server DVRs.
Alarms are listed in a tabular form with the site name and IP Address, type of alarm, camera number, alarm
number, and the start and end date/time of the alarm. New alarms that have not yet been acknowledged are
shown in red. Acknowledged alarms are displayed in yellow.
Search Alarms Search for cleared alarms.
Acknowledge Acknowledges the selected alarm and changes its highlighted color to yellow.
Acknowledge All Acknowledges all visible alarms and changes their highlighted color to yellow.
Clear Clears the selected alarm from the Alarms window.
Clear All Clears all alarms from the Alarms window.
Suppress
Live Loads live video footage of the camera that corresponds to the selected alarm in the Live Viewer.
Playback
Opens the Suppressed Alarm window where alarms can be suppressed so that no new notifications
from the suppressed alarm will display until the alarm suppression expires or is deleted.
Plays back the video footage for the selected alarm. The playback footage will begin at the alarm
Start Time and end at the alarm End Time.
3xLOGIC’s VIGIL Client - Users Guide Page 71
Doc# 12031914
Page 72

In the alarm right-click menu all of the above features are available as well as the Export Image feature. Once
an alarm thumbnail has been opened the Export Image feature will become available. When selected, the
Select Destination window displays where the user can choose an export destination to save a copy of the
thumbnail image.
13.1 Preview Alarms
Click on the thumbnail icon in the Preview column to show a thumbnail snapshot image of the alarm event.
Click on the expanded thumbnail to minimize it.
To view an alarm thumbnail, the server from which the alarm was received must be connected.
Click on the disconnected icon to automatically connect to the server.
The greyscale thumbnail icon represents a thumbnail that has not yet been viewed. Click on the
icon to view the thumbnail.
The colour thumbnail icon represents a thumbnail that has been viewed, but has been minimized.
Click on the icon to open the thumbnail.
The greyscale thumbnail icon with a yellow exclamation point represents a thumbnail display
attempt where no thumbnail was currently available. For example, if the minute of video footage
was still in process of being written on the DVR system. Click on the thumbnail again after a
moment to retry the thumbnail display request.
The alarm thumbnail snapshot displays the first frame of the alarm footage.
13.2 Suppress Alarms
While an alarm is suppressed, no new notifications from the suppressed alarm will display until the alarm
suppression expires or is deleted. While the alarm is suppressed, the Suppressed Alarms title bar flashes as a
reminder that there are suppressed alarms.
Right-click on an alarm received from a VIGIL Server system and select
Suppress to open the Suppressed Alarm configuration window. Click the
Suppressed Alarms title bar to expand or collapse the Suppressed
Alarms window. In this window, suppressed alarms can be added,
edited, or deleted.
3xLOGIC’s VIGIL Client - Users Guide Page 72
Doc# 12031914
Page 73
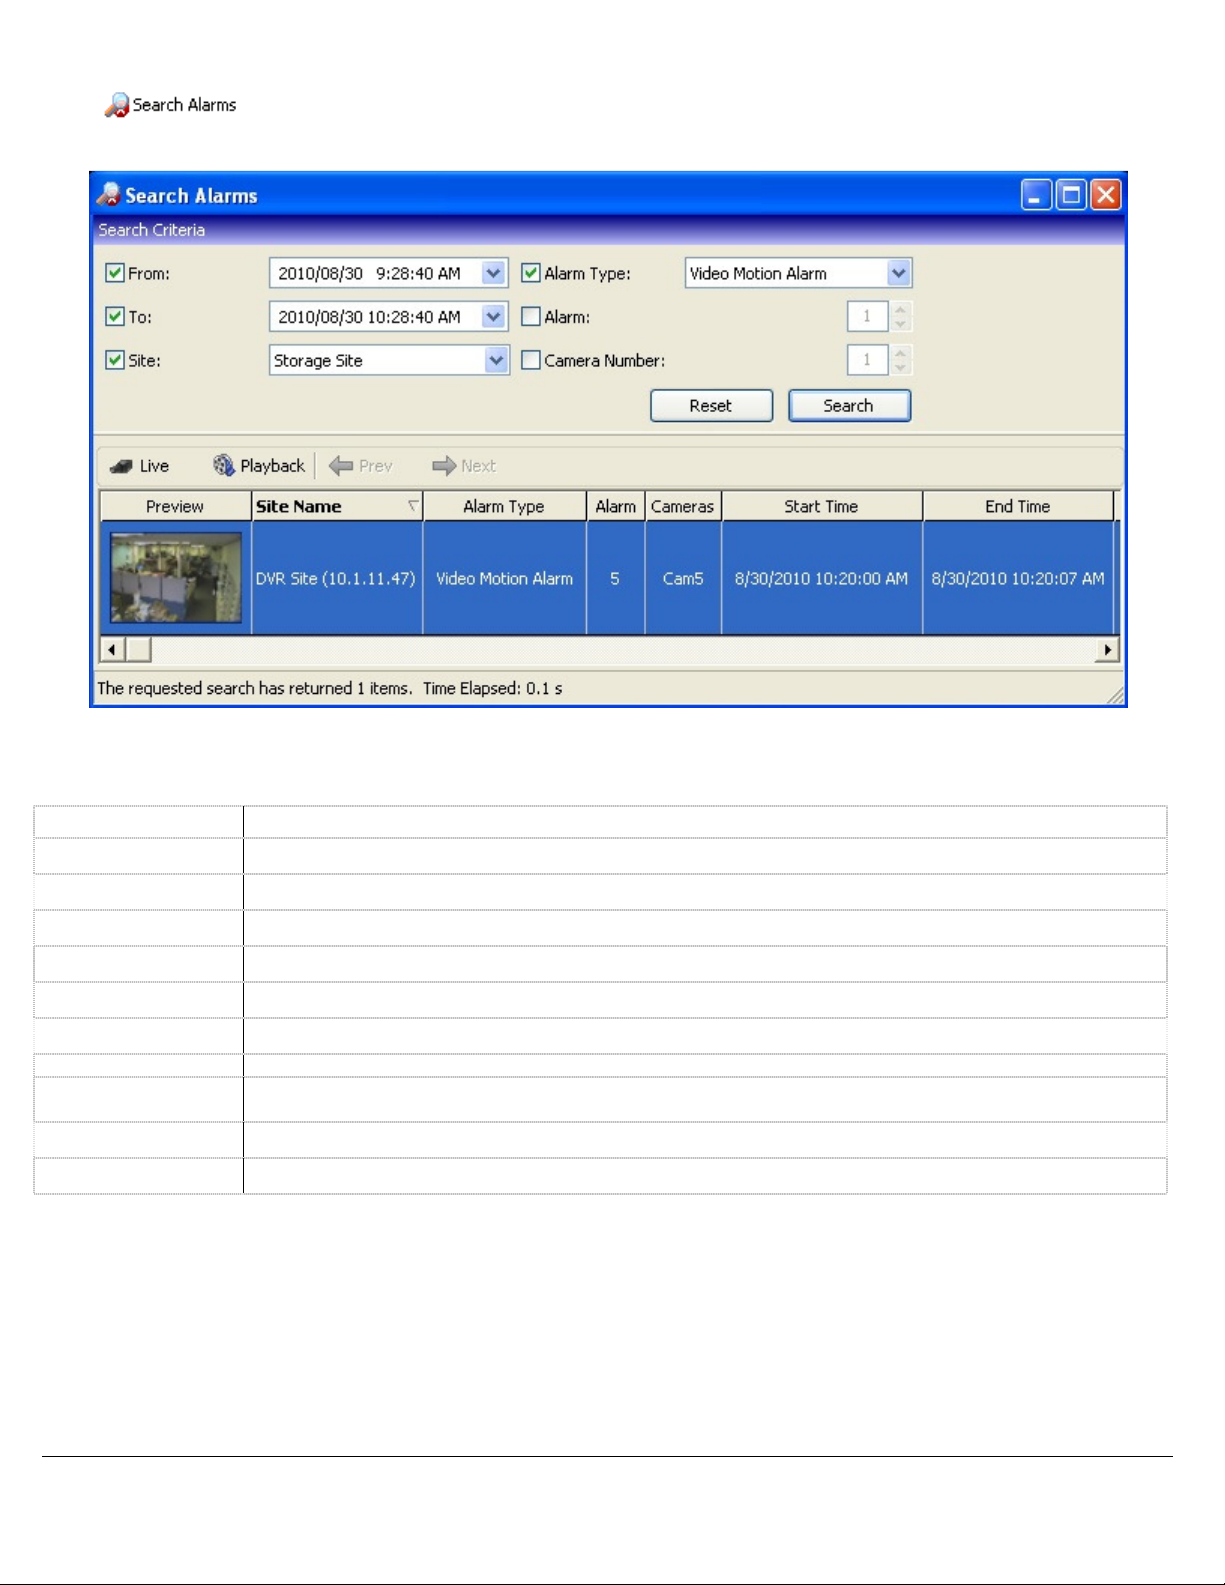
13.3 Search Alarms
Click to open the Search Alarms window where a variety of criteria can be used to search for an
alarm event.
Click Search to search for all alarm events on the system. The results can be narrowed down with the
following options.
From/To Check the From and/or To box and enter the time range to search for alarm events.
Site Select the Site to search alarms from.
Alarm Type Check this box and select an alarm type to search for from the drop-down menu.
Alarm Check this box and enter an alarm number to search for.
Camera Number Check this box and enter a camera number to search for.
Reset Resets the search criteria to default.
Search Searches for alarm events that match the search criteria.
Live Loads the live video feed of the camera that corresponds to the selected alarm in the Live Viewer.
Playback
Prev Navigates to the previous page
Next Navigates to the next page
Plays back the video footage for the selected alarm. The playback footage will begin at the alarm
Start Time and end at the alarm End Time.
3xLOGIC’s VIGIL Client - Users Guide Page 73
Doc# 12031914
Page 74
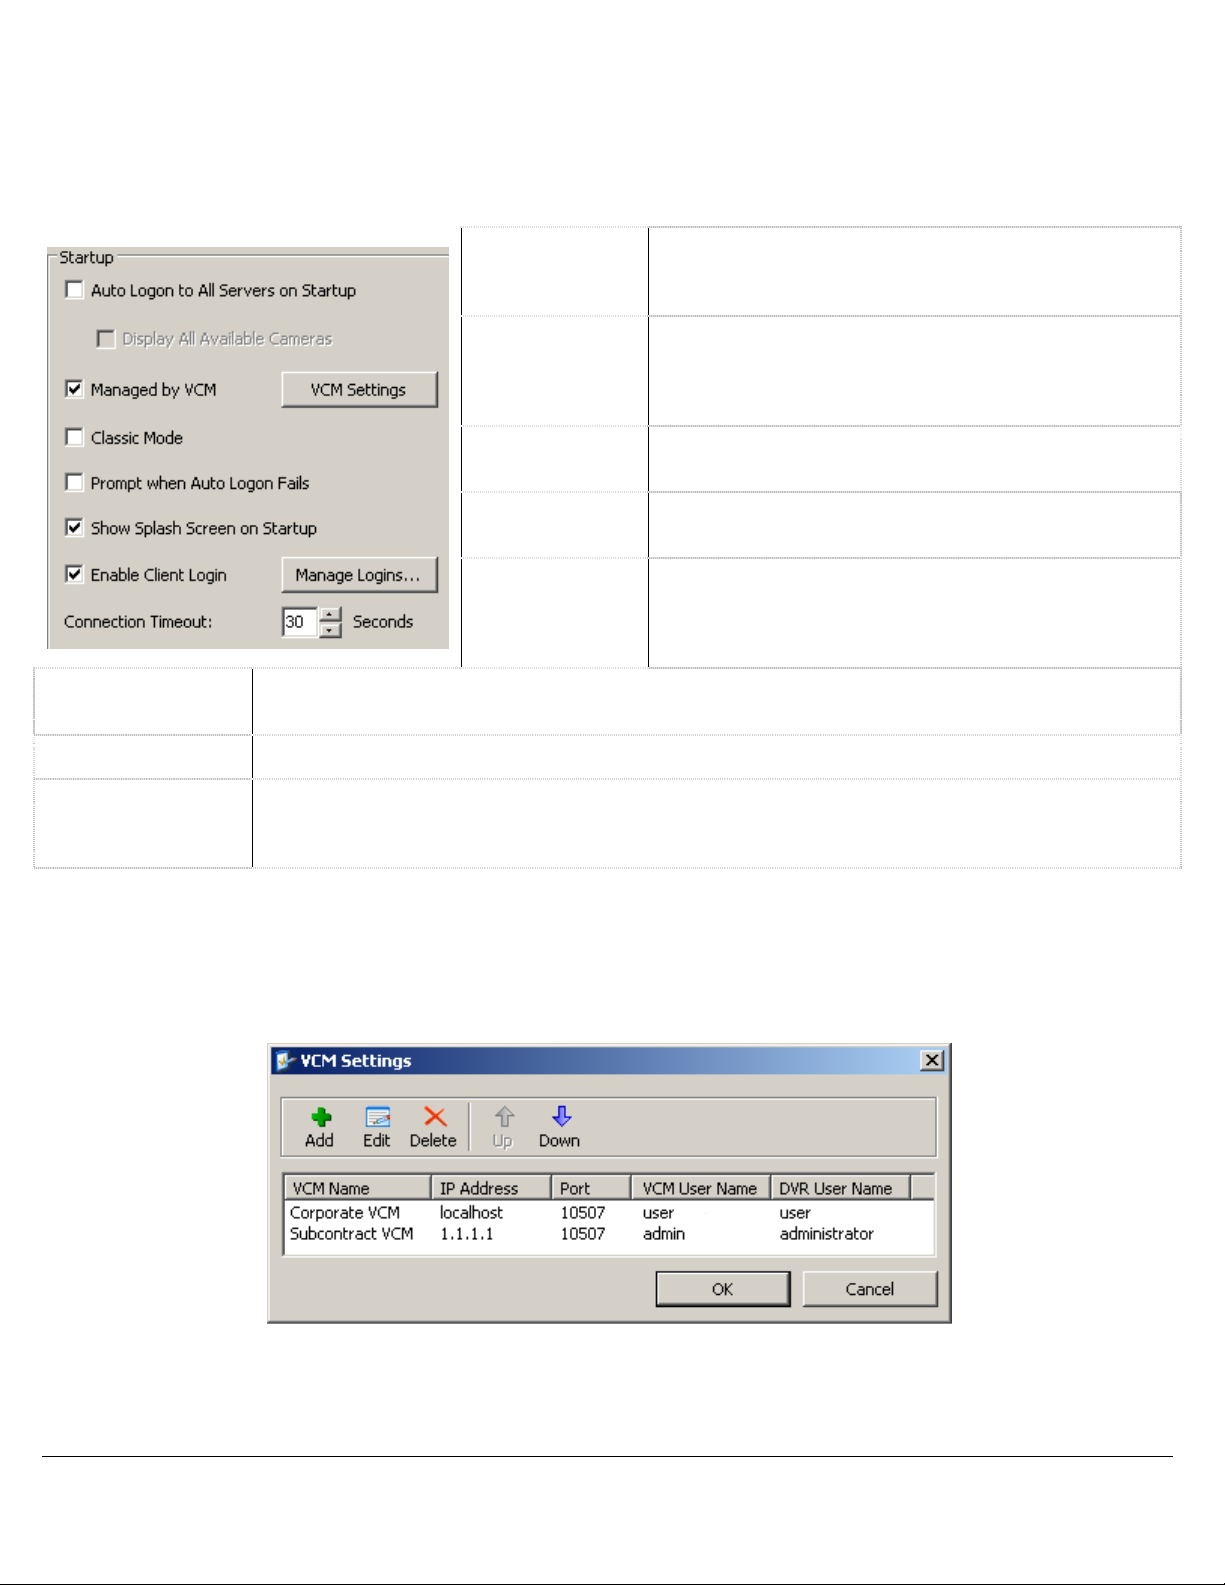
14 Settings
14.1 Startup Tab
The Startup tab controls the behaviour of VIGIL Client when it first opens.
Auto Logon to
All Servers on
Startup
Display All
Available
Cameras
Managed by
VCM
Classic Mode
Prompt when
Auto Logon
Fails
Show Splash
Screen on Startup
Enable Client Login When enabled, a username and password will be required to log on to VIGIL Client.
Connection
Timeout
When enabled, the VIGIL Client splash screen is automatically displayed when the program is
launched.
Enter the number of seconds to attempt a network connection before the attempt is stopped. This
setting applies to all connections except for a footage search, which has an individual setting in the
Search tab.
When enabled, VIGIL Client automatically connects to
all servers when the program is launched.
When enabled, VIGIL Client will launch up to 36
available cameras in the Classic Live Viewer. This
feature requires Auto Logon to All Servers on Startup to
be enabled.
When enabled, VIGIL Client will retrieve its Site list
from a VIGIL VCM Server.
When enabled, VIGIL Client will function in Version 6
Mode for the Live Viewer and Playback.
When enabled, if VIGIL Client cannot connect to a Site
due to incorrect account credentials, it will prompt so
that the user can enter the correct username and
password.
Managed by VCM
VIGIL Client can be configured to pull it's list of Servers from a VCM Server. This allows the Servers list to be
always up to date with all servers the user has access to without having to constantly update the Servers list
locally on the Client. Enable the Check Box and Click the VCM Settings button to open the VCM Settings
Window.
3xLOGIC’s VIGIL Client - Users Guide Page 74
Doc# 12031914
Page 75
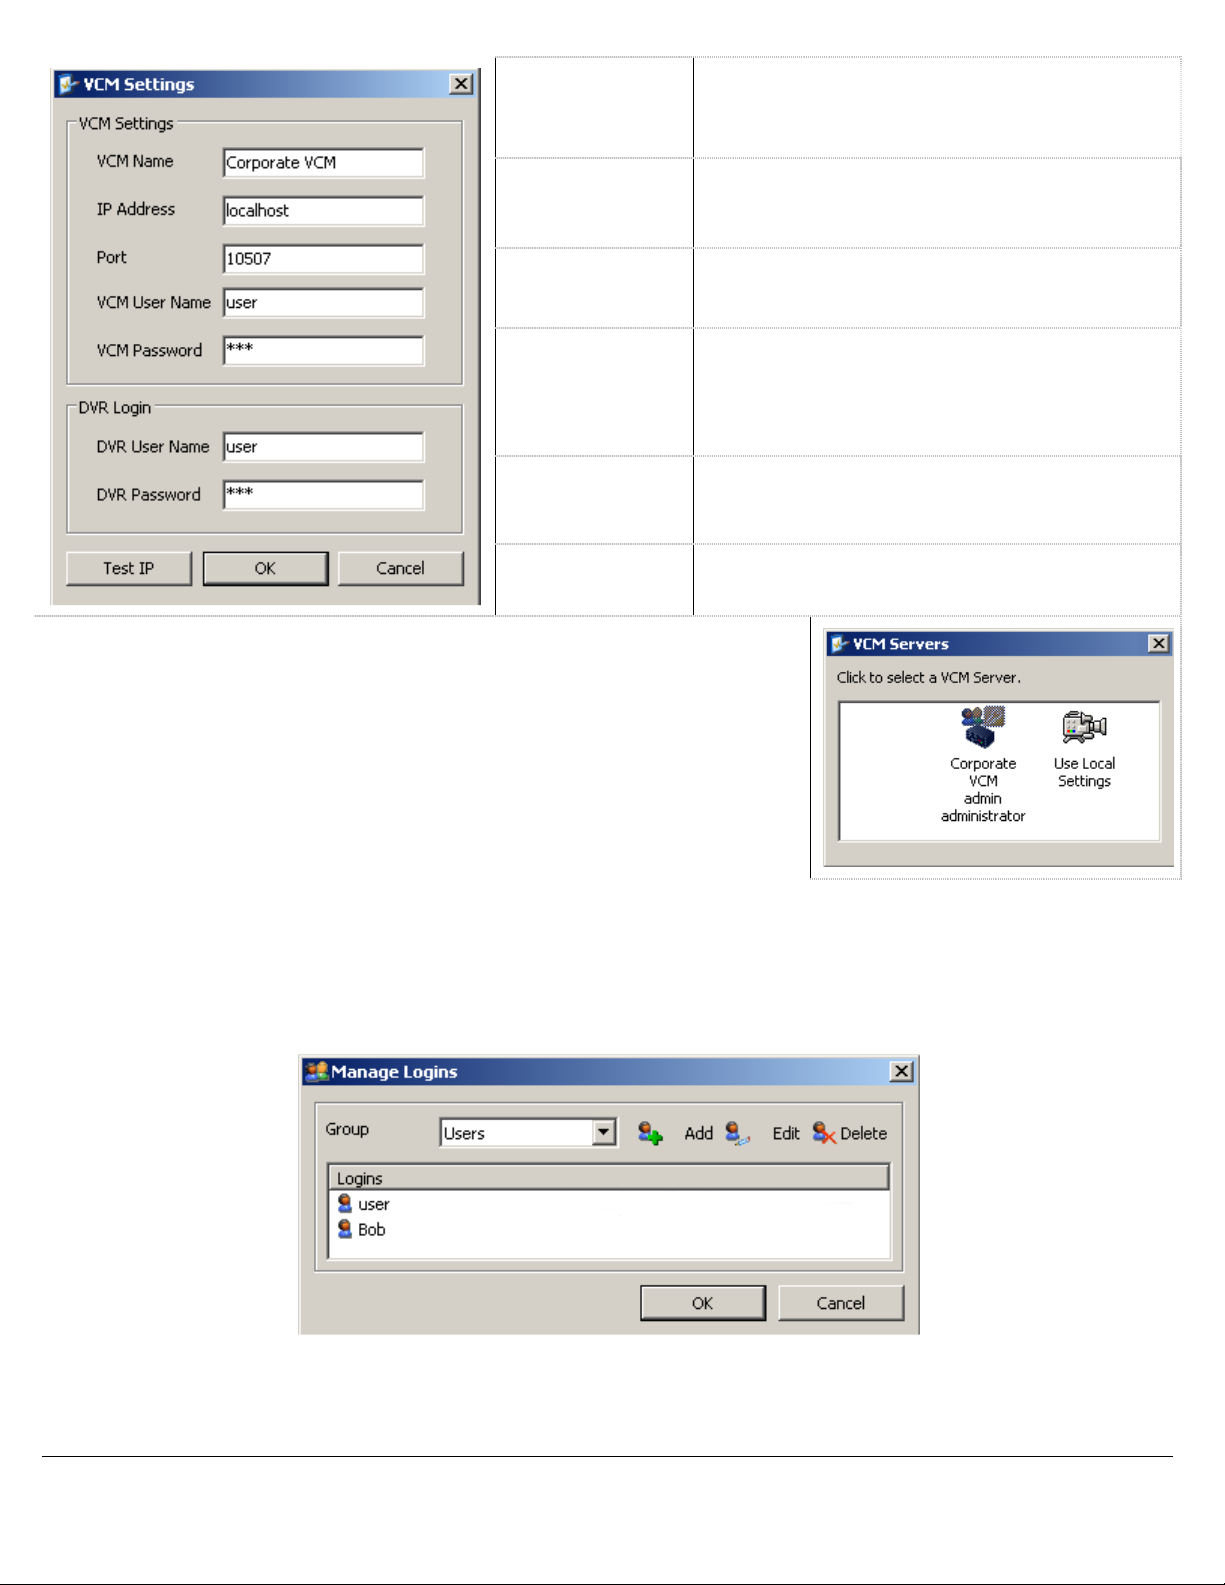
VCM Name
Enter a Descriptive Name for the VCM Server, this
name will show in the Connection window when
Client is launched.
IP Address
Port
VCM User Name
/ Password
DVR User Name
/ Password
Test IP
When VIGIL Client starts, the user will be prompted to select a VCM Server to
connect to and retrieve the DVR List or choose Local Settings to load the DVR list
that was locally configured on the VIGIL Client.
Enter the IP Address for the system the VCM
Server Service is running on.
Enter the Port for the VCM Server Service. The
default is 10507.
Enter a Valid Username and Password that exist on
the VCM Server. The list of DVR Servers provided
by the VCM Server will be based on the
permissions of the VCM User.
Enter a Valid Username and Password that exist on
the DVR Servers. The DVR access will be based on
the permissions of the DVR User.
Click to test that the IP and Port information is
correctly configured.
Enable Client Login
VIGIL Client by default users No Authentication which allows any user full access to the Client Software. When
the Enable Client Login option is checked, VIGIL Client supports two levels of User Authentication;
Administrative Users who have full access and Users who have no access to the Settings window or to DVR
Settings. Click the Manage Logins button to open the Manage Logins window.
3xLOGIC’s VIGIL Client - Users Guide Page 75
Doc# 12031914
Page 76

14.2 Live Tab
The Live tab controls how the Live Viewer windows function.
Frame by Frame
Transfer Motion
Block
Adjust Speed
Automatically
Use Sub Stream If
Available
Use Rapidstream if
Supported by DVR
Automatic Select
Main Stream In
Single Layout
Default Live Speed
Pre Buffer For
Network Cameras
Pre Buffer For Other
Cameras
Enables faster decoding of streams from MPEG4 cameras.
Note: This setting may have an adverse effect on non-MPEG4 cameras.
Enables the transfer of motion block information for use with the SDK.
Note: Enabling this feature is not recommended.
Automatically adjusts the live video speed for each camera according the number of Live Viewer
windows open and the CPU usage percentage to maintain the optimum level of video
performance.
When enabled, if a camera has the sub stream available, the Live Viewer will open the sub
stream instead of the main stream by default.
If Allow Rapidstream in Client is enabled on the VIGIL Server, enable this option for the Live
Viewer to open the Rapidstream instead of the main stream by default.
When enabled, if a camera has the sub stream being displayed in a multi layout, when the
camera is switched to a single layout, the main stream will be displayed. This affects both the
Classic Mode Live Viewer and the virtual switch display.
Choose Slow (1fps), Medium (5fps), Fast (10fps), Turbo (20fps) or Maximum as the default live
video speed. A lower live speed will use less CPU.
Enter the number of milliseconds to use as a pre buffer for live network cameras. This setting is
useful if there is latency in the live viewer due to a slow network connection.
Enter the number of milliseconds to use as a pre buffer for live analog cameras. This setting is
useful if there is latency in the live viewer due to a slow network connection.
Show Site and
Camera Name
Maximize
Replace
Cameras
Enable On-
Screen Display
on Start
When enabled, the DVR site and camera name will display in full
screen live mode. This option is for the Classic Mode Live
Viewer.
When enabled, the Classic Mode Live Viewer window will
automatically open maximized.
When enabled, choosing the Display All option when right-click
on a Site, will replace cameras in the Live Viewer, if not enabled,
the cameras will only display enough to fill the live viewer. This
option is for the Classic Mode Live Viewer.
When enabled, POS/ATM OSD will automatically display when a
camera that is set as a POS/ATM Priority camera is displayed in
the Live Viewer.
3xLOGIC’s VIGIL Client - Users Guide Page 76
Doc# 12031914
Page 77
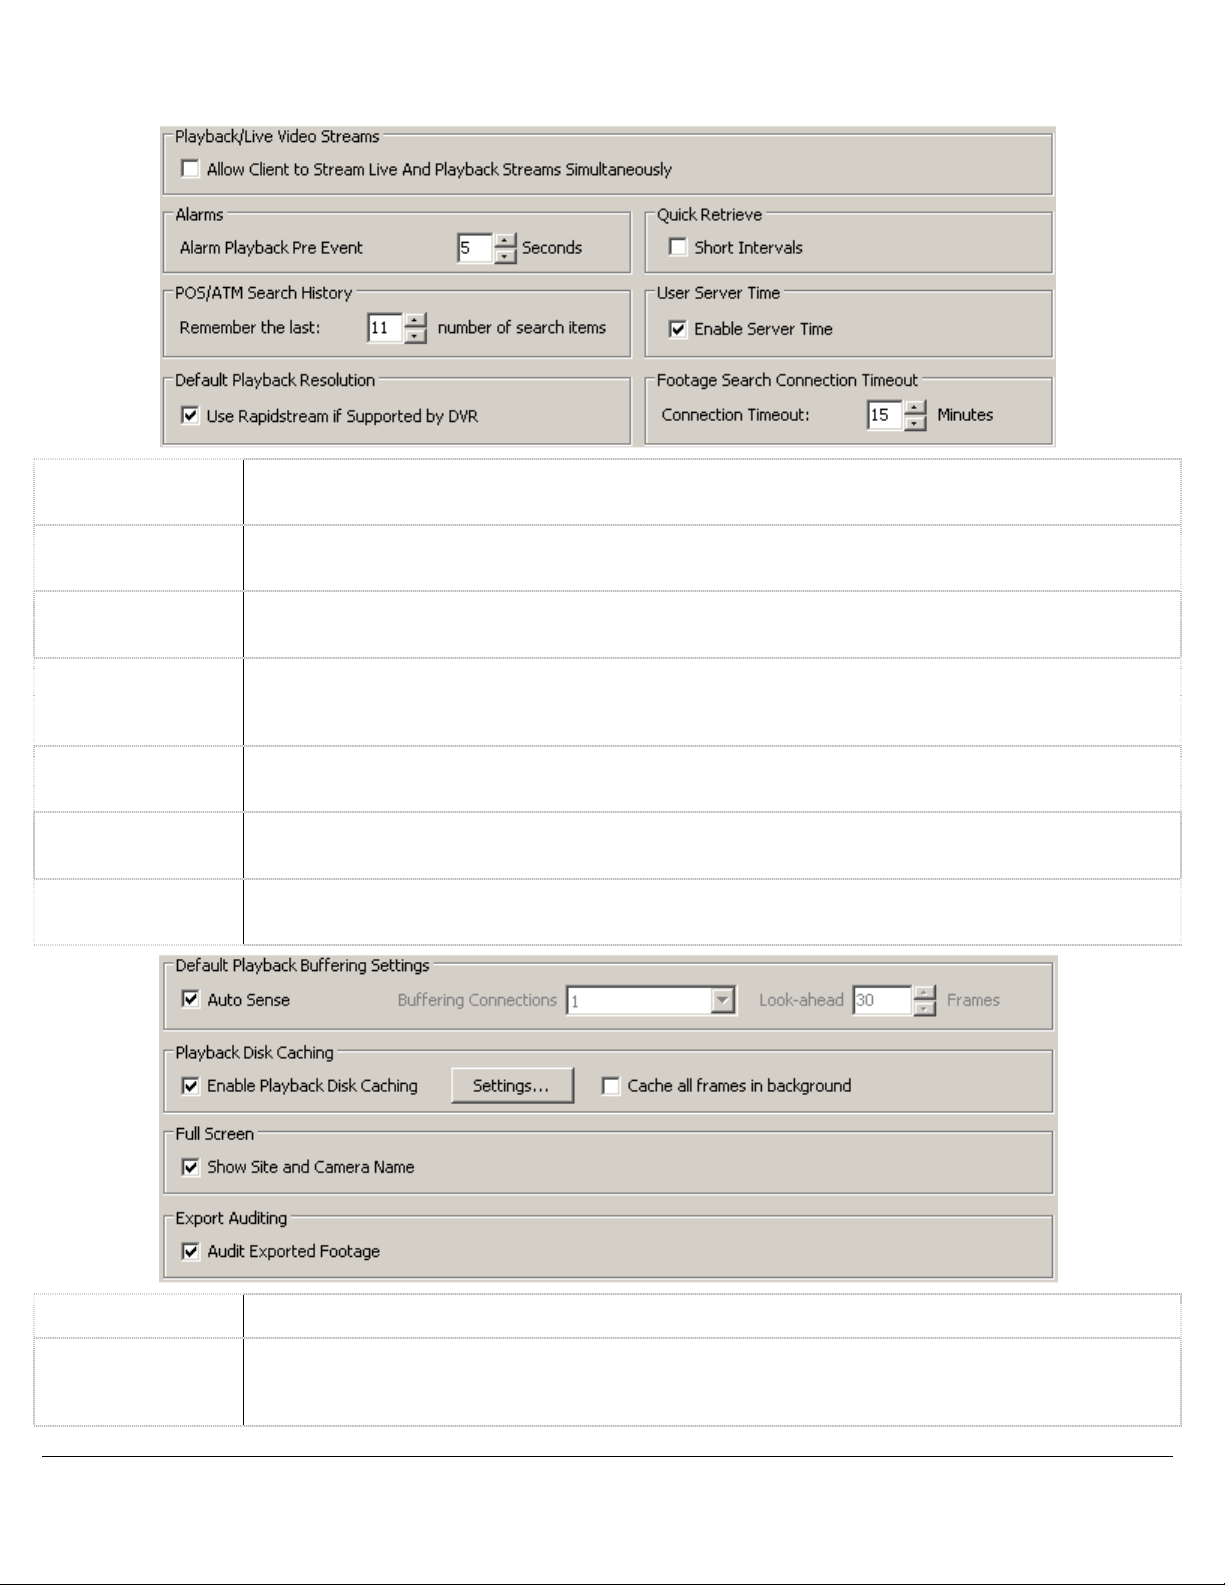
14.3 Search Tab
The Search tab controls how searching of Video Footage and POS/ATM data functions.
Stream
Simultaneously
Alarm Playback
Pre Event
Short Intervals
Remember Last X
Search Items
Enable Server
Time
Use Rapidstream
Connection
Timeout
Enables VIGIL Client to stream live footage and playback recorded video footage simultaneously. To
conserve server resources, leave this option disabled.
Set the amount of time to playback prior to an Alarm when playing Alarm footage in the Server
Alarms window.
When enabled, the Quick Retrieve drop-down menu in the Search window displays short intervals of
15 and 30 minutes in addition to the selection of an hour, 2 hours, 4 hours, and 8 hours.
In the POS/ATM Data Filter section within the Search window, previously searched items are listed
in the Items drop-down menu. Use the arrows to select how many search items will be
remembered.
When the Server and Client are in different time zones, enable this option to use the Servers time in
the From / To section of the Search Window.
If Allow Rapidstream in Client is enabled on the VIGIL Server, enable this option for the Playback
Window to open the Rapidstream instead of the Main Stream by default.
Select the amount of minutes to wait for video search results from the server before displaying a
Connection Timeout message.
Auto Sense This is the default value. It will enable the cache to become dynamic and change as required.
Buffering
Connections
Changes how many buffering threads will be used. Each buffering thread opens a TCP connection to
the DVR, increasing possible bandwidth, but may be limited on CPU usage, as well as the maximum
throughput to the DVR.
3xLOGIC’s VIGIL Client - Users Guide Page 77
Doc# 12031914
Page 78
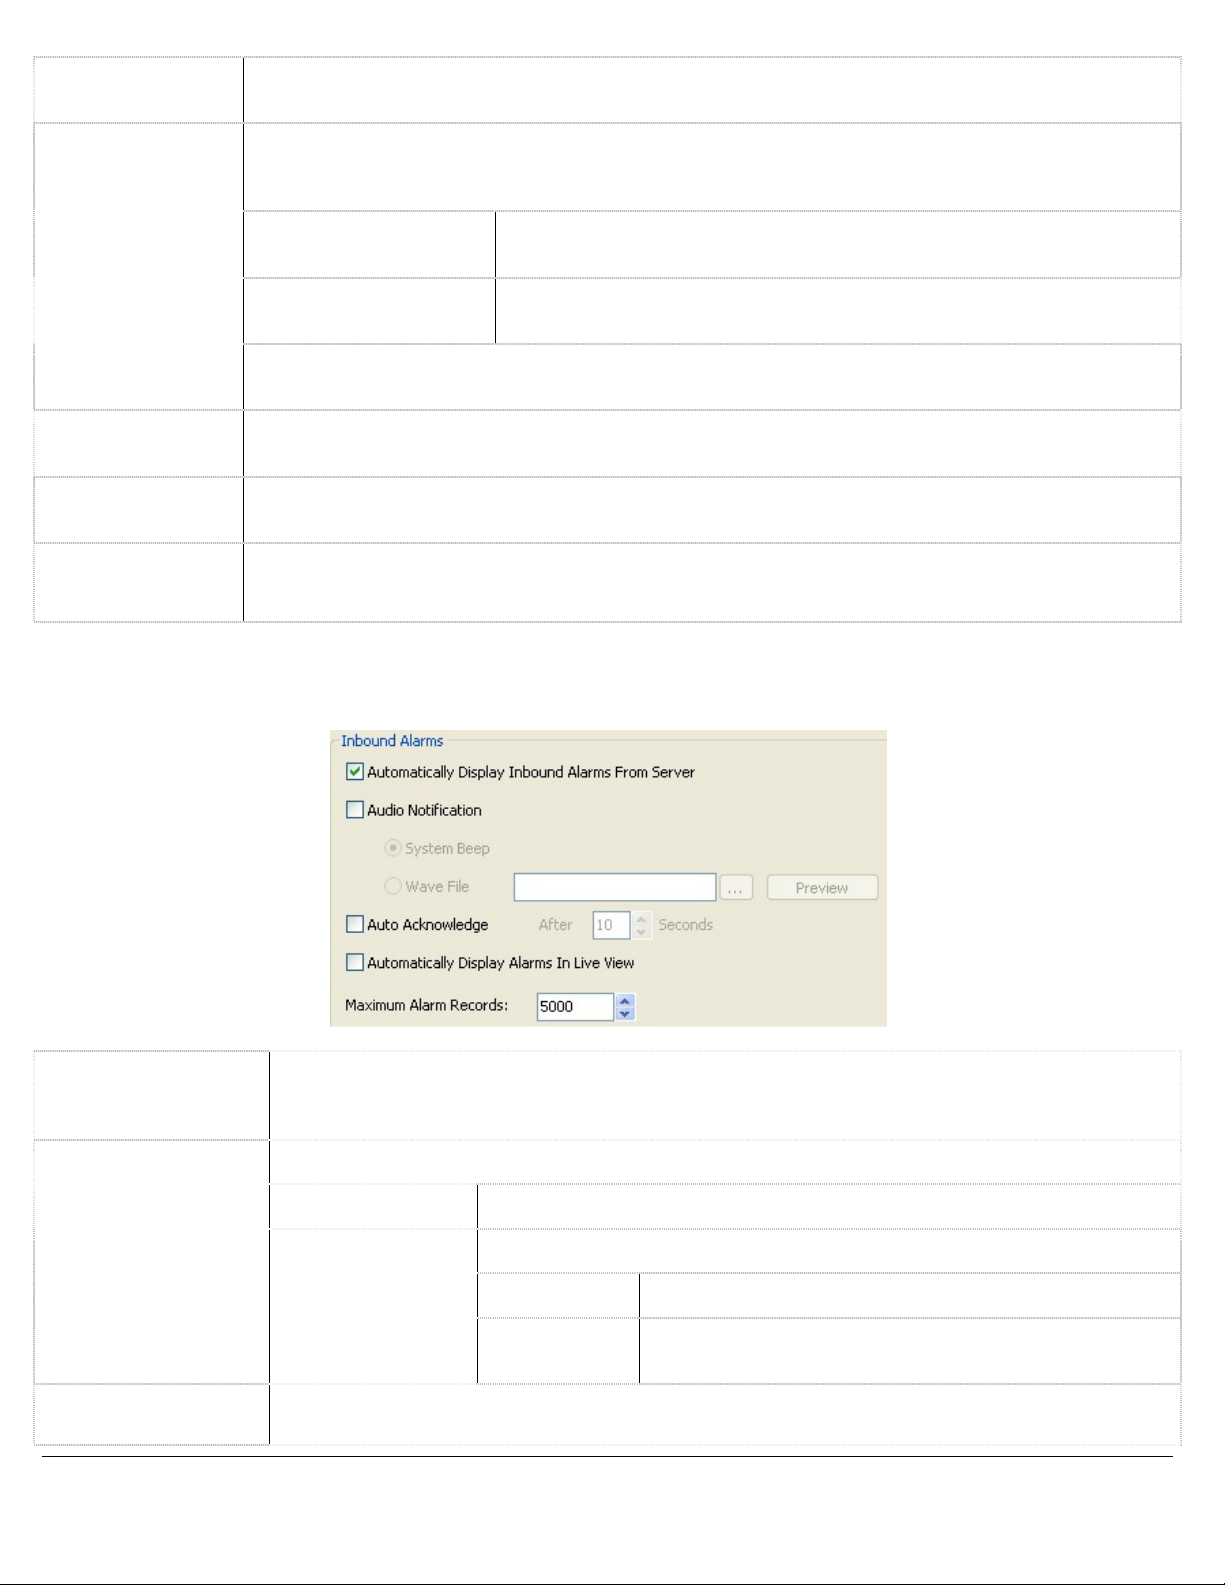
Look Ahead
This is the size of the buffer, in number of frames. Settings from 30 to 1800 frames are available. It
is recommended that a higher cache size is used for a higher frame rate.
When searching footage, this feature stores the footage in the configured cache location. If the
footage already exists in the cache, the cached footage is displayed instead of retrieving the footage
again from the server.
The location where the cached files will be stored. VIGIL Client deletes
Cache files automatically when the cache is full.
The maximum amount of hard drive space that will be used by VIGIL
Client Playback Disk Caching. The default cache size is 528 Mb.
Enable Playback
Disk Caching
Cache all Frames
in Background
Show Site and
Camera Name
Audit Exported
Footage
Cache Location
Max Cache Size
Note: If the cache is located on the same drive as the operating system, ensure there is enough
available disk space for the operating system and other programs to function properly.
When video playback is paused, all frames in the video will be cached instead of the default 1
minute cache.
Displays the site and camera name for each camera when in Full Screen mode.
When enabled, every export will be logged to the file %SYSTEMDRIVE%\VigilClientExports.log.
14.4 Alarms Tab
The Alarms tab controls the notification settings for alarms received from connected servers.
Auto Display
Inbound Alarms
From Server
Audio Notification
Auto Acknowledge Automatically acknowledge alarm notifications after the specified number of seconds.
When enabled, the Alarms window will automatically pop up when inbound alarms from VIGIL
Server are received.
Instructs the system to beep or play a Wave file when an incoming alarm is displayed.
System Beep A system beep is played.
Uses an audio WAV file instead of a system beep.
Wave File
... Browse to the WAV file that will be played.
Preview
Plays the selected WAV file. Changes into a Stop button
after WAV file begins playing; click to stop.
3xLOGIC’s VIGIL Client - Users Guide Page 78
Doc# 12031914
Page 79

Automatically
Display Alarms In
Live View
Maximum Alarm
Records
When enabled, the live camera feed corresponding to an alarm event will automatically be
displayed in the Live Viewer window. If the live view layout is full, the camera feed will replace
another that does not currently have an alarm event. If the site is not connected, it will reconnect
and display the live camera feed.
Set the maximum number of alarms to display in the Server Alarms window. When the number
of alarms to display in the Server Alarms window is reached, oldest alarms will be removed from
the window as new alarms are received. The range for this setting is 500 - 100,000; setting this
number too high can cause performance issues on systems.
14.5 Hardware Tab
The Hardware tab contains settings specific to the video rendering hardware installed on the client system.
Enables the ability to view live overlay (hardware rendering) from
Use Live
Overlay From
Capture Card
the video capture card if the VIGIL Client PC has a video capture
card that supports it. Select the video capture card type from the
drop-down menu. For more information, please contact
support@3xlogic.com.
Use Direct
Draw
Monitor CPU Usage Enable or disable the CPU Usage bar at the bottom of the main window.
COM Ports
Keyboard
Settings
Opens the Virtual Switch Input Mappings window where you can add, edit, delete, auto map, or
Virtual Switch Input
Mappings
print virtual switch input mappings. This feature allows you to view the mapped cameras using
the VIGIL Client Virtual Switch control pad or a KBD300 by entering the monitor number and
virtual switch input number.
Enables the ability to use Direct Draw if the VIGIL Client PC
supports it. The Direct Draw program will produce a better quality
picture with faster rendering.
Opens the COM Port Settings window, where COM Port settings
can be configured. Select the desired COM Port from the dropdown menu and adjust the Baud Rate, Data Bits, Stop Bits and
Parity to match that of the connected hardware.
Allows you to add, edit, or remove a special camera control
keyboard, such as the Pelco KBD300A.
3xLOGIC’s VIGIL Client - Users Guide Page 79
Doc# 12031914
Page 80

14.6 Destinations Tab
Video Still/Motion Export Destinations are used to store exported video footage. You must set up destinations
here before you can save video footage or still images.
When an export destination is added or edited, the Media Control window is displayed.
Destination
Name
Destination
Path
The name for the export destination.
The path for the export destination. Click ... to
browse to the destination.
This setting affects how the destination appears
in the export list.
Include DV Player
Include AutoRun
Files
Default
Destination
Type
Saves the Digital Video (DV) Player to the same destination each time an export is done. This
setting is normally used for CD-R or DVD-R media type destinations.
Due to some Anti Virus applications detecting all Auto Run files as a potential threat, disable this
option to not include the AutoRun files with the export. If the AutoRun files are included, the DV
Player install will run when the DVD is inserted to a system that does not already have DV Player
installed.
On
Default
Off
Silent
Send
The destination checkbox will be
selected.
The destination checkbox will not be
selected.
All exports will also be sent to this
destination without notifying the
user.
Note: Deleting a destination will not delete the Windows folder or the files contained in that
destination.
14.7 Audio Tab
The Audio tab controls the buffering of audio streams.
Pre Buffer
The number of milliseconds to buffer when streaming
live audio. Use the arrows to change the pre buffer.
14.8 Chat Tab
The Chat tab controls the audio buffering for the chat utility.
Pre Buffer
3xLOGIC’s VIGIL Client - Users Guide Page 80
Doc# 12031914
The number of milliseconds to buffer when listening
to audio chat. Use the arrows to modify the pre
buffer.
Page 81
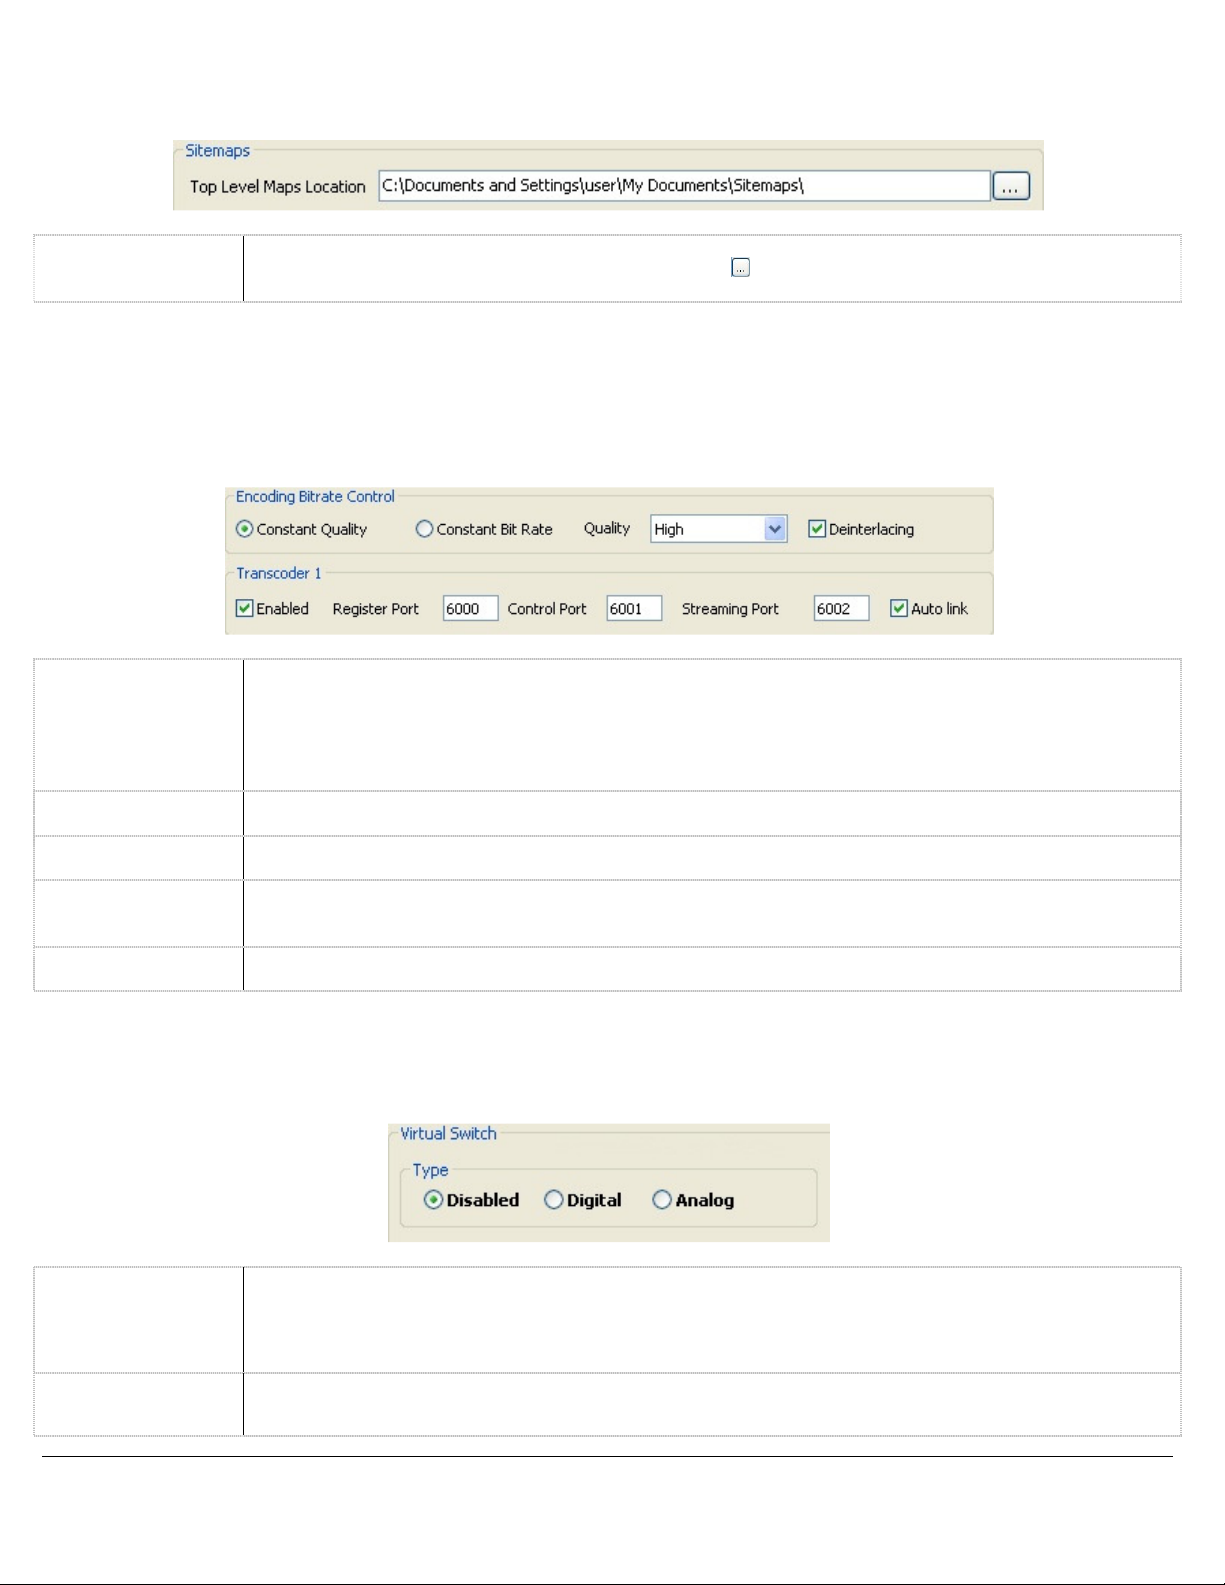
14.9 Sitemaps Tab
The Sitemaps tab instructs VIGIL Client where to locate sitemap files.
Top Level Maps
Location
Enter the path to the top level sitemaps or click the button to browse to the location.
14.10 Transcoder Tab
The Transcoder tab allows configuration of up to four video transcoders to recode video and display it on an
analog monitor. For more information, please contact 3xLOGIC.
Selects the type of encoding. Constant Quality will ensure the quality of the encoding never falls
Constant
Quality/Bitrate
Deinterlacing Addresses interlacing issues that may occur on high resolution video feeds.
below a certain threshold (Low, Medium, High and Super-High) but at the expense of playback
performance (reduced frame rates and skipping/jumpiness). Selecting Constant Bitrate will ensure a
constant Bitrate is sent, at the expense of image quality. For high frame rate/high motion video
feeds, it will help the playback performance, improving video smoothness.
Enabled Enables the corresponding transcoder.
Register, Control,
Streaming Ports
Auto Link When enabled, establishes an automatic connection with the transcoder.
Changes the ports to use to connect to the transcoder. Refer to the documentation of the video
transcoder to correctly set these ports.
14.11 Virtual Switch Tab
The Virtual Switch tab allows configuration of up to eight digital (PC) or analog monitor outputs.
The digital virtual switch feature allows users to configure additional PC monitors to display up to 16
Digital
Analog
simultaneous live camera feeds per PC monitor. Users are able to access and control all cameras
from DVR sites, whether they are analog, network, or PTZ cameras, all without the need for a
KBD300 keyboard.
The analog virtual switch allows live viewing or playback of one camera per analog monitor
connected to the VIGIL Client system.
3xLOGIC’s VIGIL Client - Users Guide Page 81
Doc# 12031914
Page 82

Digital Virtual Switch
Show Timestamp Displays the video time on the monitor output screen.
Show Record
Status
Stretch Image to
Fit Window
Priority Audio
Double Click .....
Displays coloured camera borders that indicated the recording mode on the monitor output screen.
Blue for motion, yellow for dwell time, green for constant, and red for alarm.
Stretches the camera image to fit the virtual switch monitors (i.e. camera spots).
Enable this to automatically play the Priority Audio channel associated with a Video stream when it
is added to or switched to on the monitor.
When enabled, Double Click on a Monitor on the Virtual Switch and it will open in a Live Viewer
window on the Main Monitor. When disabled, Double Click on a Monitor on the Virtual Switch and it
will change to Single Monitor Layout, Double Click again to return to previous layout.
Monitor Settings
Enabled Enables the corresponding monitor output.
Use Hardware
Acceleration
When enabled, the monitor will use hardware acceleration, if applicable.
3xLOGIC’s VIGIL Client - Users Guide Page 82
Doc# 12031914
Page 83

Analog Virtual Switch
Note: Analog Monitor Output is not supported on Microsoft Windows 7 or Microsoft Windows Vista
operating systems.
Video Standard
Choose to use NTSC or PAL as your monitor output video standard. NTSC is the analog television system used
in Canada and the United States (among some other countries).
Configure OSD
Show Camera
Name
Show Site Name Displays the Site Name on the monitor output screen.
Show Timestamp Displays the video time on the monitor output screen.
Show Monitor
Number
Small / Large
Font
Horizontal/
Vertical Offset
Displays the camera name on the monitor output screen.
Displays the Monitor Number on the monitor output screen.
Select Small or Large Font text to be displayed on the screen of the monitor output.
Offsets the text displayed on the monitor output screen according to the specified offset placement.
A lower offset number will offset the text less than a higher offset number. This feature may be
desirable if the text is obstructing an area of interest on the video footage.
Monitor Settings
Enabled Enables the corresponding monitor output.
Auto Link
When enabled, the video footage for a camera selected in the Live Viewer or Playback window is
automatically displayed on the enabled monitor output(s).
3xLOGIC’s VIGIL Client - Users Guide Page 83
Doc# 12031914
Page 84

Virtual Switch Input Mappings
Opens the Virtual Switch Input Mappings window where you can add, edit, delete, auto map, or print virtual switch input
mappings. This feature allows you to view the mapped cameras using the VIGIL Client Virtual Switch control pad or a
KBD300 by entering the monitor number and virtual switch input number.
Opens the Edit Virtual Switch Input Mapping window
Add / Edit
Delete Deletes the selected destination.
Auto Map
Print Prints the virtual switch input mappings to the default printer.
where you can add/edit a virtual switch input mapping by
specifying the input number, server name, and camera
number.
Automatically maps virtual switch inputs for all detected servers.
Note: If you click Auto Map when there are existing virtual switch input mappings, you will be
prompted if you would like to overwrite the mappings. Click Yes to overwrite the existing mappings,
or click No to add new mappings to existing ones.
Digital Virtual Switch Setup
To setup the digital virtual switch feature:
1. Expand your local desktop to another monitor in the Window Display Properties.
2. Open VIGIL Client and go to the Settings window.
3. Go to the Virtual Switch tab and select Digital as the type
4. Any monitors available for the virtual switch are enabled by checking the Enabled box under the
monitor number. If setting up the digital virtual switch, Monitor 1 here is monitor #2 in the Windows
Display Properties, Monitor 2 is #3 in the Windows Display Properties, and so on.
5. Click the Virtual Switch Input Mappings button and add cameras that will be accessible to the virtual
switch > click OK.
6. Click OK to the main settings form.
3xLOGIC’s VIGIL Client - Users Guide Page 84
Doc# 12031914
Page 85

15 Site Map Designer
The Site Map Designer is a utility that allows the user to configure graphical displays of the site with associated
cameras.
To open the Site Map Designer, from the Start Menu: Programs | VIGIL | Site Map Designer.
Creating a New Site Map
1. Before beginning a new site map, create an image (JPG or BMP) file. This file will be used as a
background picture for the site map.
2. Click the Image button on the toolbar or select File | Load Background Image from the menu.
Opening an Existing Site Map
1. Click the Open button on the toolbar or select File | Open from the menu.
Saving a Site Map
1. To save a site map, click the Save button from the toolbar or select File | Save As… from menu. Site
map files are normally stored in the C:\Program Files\VIGIL\Client directory.
3xLOGIC’s VIGIL Client - Users Guide Page 85
Doc# 12031914
Page 86

15.1 Site Map Designer Icons and Buttons
Hot Spot
With this icon selected, drag a box on the site map to define a new hot spot. To delete a hot spot,
select the hot spot you wish to remove and click the Delete key.
Fixed Camera
Dome (PTZ) Camera
Multi-Camera Grid
Map Link
Directional
Relays
Select an existing hot spot on the sitemap and then click the icon or drag a box with the icon
selected to place a fixed camera on the site map. When setting up these cameras, specify the
appropriate remote host and camera number in the control settings.
Select an existing hot spot on the sitemap and then click the icon or drag a box with the icon
selected to place a pan/tilt/zoom camera on the site map. When setting up these cameras,
specify the appropriate remote host and camera number in the control settings.
Select an existing hot spot on the sitemap and then click the icon or drag a box with the icon
selected to place an icon to link to 4, 9, or 16 camera grid on the server Live screen. When
setting up these cameras, specify the appropriate remote host and set the camera number to 0 in
the control settings.
Select an existing hot spot on the sitemap and then click the icon or drag a box with the icon
selected to place a map link icon.
Select an existing hot spot on the sitemap and then click the icon or drag a box with the icon
selected to place a directional icon on the site map. For example, can be used to provide
directional links to adjacent maps.
Select an existing hot spot on the sitemap and then click the icon or drag a box with the icon
selected to place a relay on the site map. It provides a toggle for relays on the site map. It is also
polled every 5 seconds for its current state.
Alignment
Color
Select a hot spot and then use a combination of the horizontal and vertical alignments to move
the icon into any position within the hot spot.
Use these buttons to change the default colors of the hot spot borders for each state (normal,
mouse over, mouse click).
Note: These changes affect all hot spots on the site map.
Click the Preview button to view the site map in runtime mode.
3xLOGIC’s VIGIL Client - Users Guide Page 86
Doc# 12031914
Page 87

15.2 Site Map / Hot Spot Properties
Note: Click the Tab key or select a different input box after each setting has been made to make
sure the changes occur.
Sitemap Properties
Description A brief description of the site map.
Top Level Map Top Level Maps are listed as a home map in Gatekeeper.
Hotspot Properties
Default Select Default for a PTZ or a fixed camera hotspot.
Live Only
Hot Spot Types
Link Select Link for a hotspot that links to another map.
Relay Select Relay to trigger an output relay from a DIO device configured on the DVR.
Caption The text that is displayed when the mouse is moved over the camera.
Tag
Top / Left / Width /
Height
Matrix Input For Live Only cameras; the Matrix Input number of the camera.
Link Map For link hot spots, the location of the site map where the link leads to.
Use the Tag section to make any notes about this camera. This information is not displayed in the
site map.
Size and position of the hot spot in pixels.
Select Live Only for camera hotspots that link to a camera that is connected to the
Matrix Switch but not to a VIGIL Server DVR.
Remote Host
IP/DNS Name The IP Address or DNS Name of the VIGIL Server DVR.
Port The data port of the VIGIL Server DVR.
Dialup Enable this option if the connection to the VIGIL Server DVR is a dialup connection.
Dialup Entry For dialup connections only; the dialup entry of the dialup connection.
Camera Number The DVR camera number of the selected camera.
Preset
For controllable cameras, enter a preset number for the camera to go to this preset when the
hotspot is clicked. Presets will only function when the Site Map Monitor button is latched on.
Relay
Relay The number of the relay switch that will be toggled when the hotspot is clicked.
3xLOGIC’s VIGIL Client - Users Guide Page 87
Doc# 12031914
Page 88

16 DV Player
VIGIL Client allows video exports to include the VIGIL DV Player to ensure playback software is available for
Authentic Video (MJPG) exports.
A number of controls have been provided to make navigation and advanced features more accessible:
Click and hold down the Fast Backward or Fast Forward button to playback as quickly as possible
without skipping any frames.
Skips to the very beginning/end of the video footage.
If clicked while playing the footage, skips one 10th of the footage.
While paused or stopped, click to playback frame by frame.
Stops / Plays the video footage.
Click-and-drag the pointer on the slider bar to advance or rewind
the video footage. The mouse scroll wheel can also be used to do
this.
During playback, if only a sub-range of the loaded footage is of interest, it can quickly be selected
by using markers.
Click to authenticate the video to ensure that it has not been tampered with. If the video has been
tampered with, a red X and an error message will be displayed.
Note: The authentication feature on the DV Player will only detect errors for video frames that have
been tampered with since the export. If the video was altered before the export, authentication
errors will not be found.
3xLOGIC’s VIGIL Client - Users Guide Page 88
Doc# 12031914
Page 89

If Video Analytics information has been embedded in the Video File, what information is displayed
Cue Cues the video to a specific frame, enter a frame number and click the Cue button.
can be selected.
Save a still image in BMP or JPG format, export video in AVI, Authentic Video (MJPG) or VIGIL
Server File Stream format, or Audio only.
Select Print Still Image to print the current frame or select Print Data to print the currently
displayed data.
Rotate the video 90 degrees in the indicated direction.
To zoom in, move the cursor over the video. A zoom outline will be displayed to indicate the region
that will be magnified. Left-click to zoom in on the image or right-click to zoom out.
Switch to Full Screen playback. Double click or press Esc to return to windowed mode.
3xLOGIC’s VIGIL Client - Users Guide Page 89
Doc# 12031914
Page 90
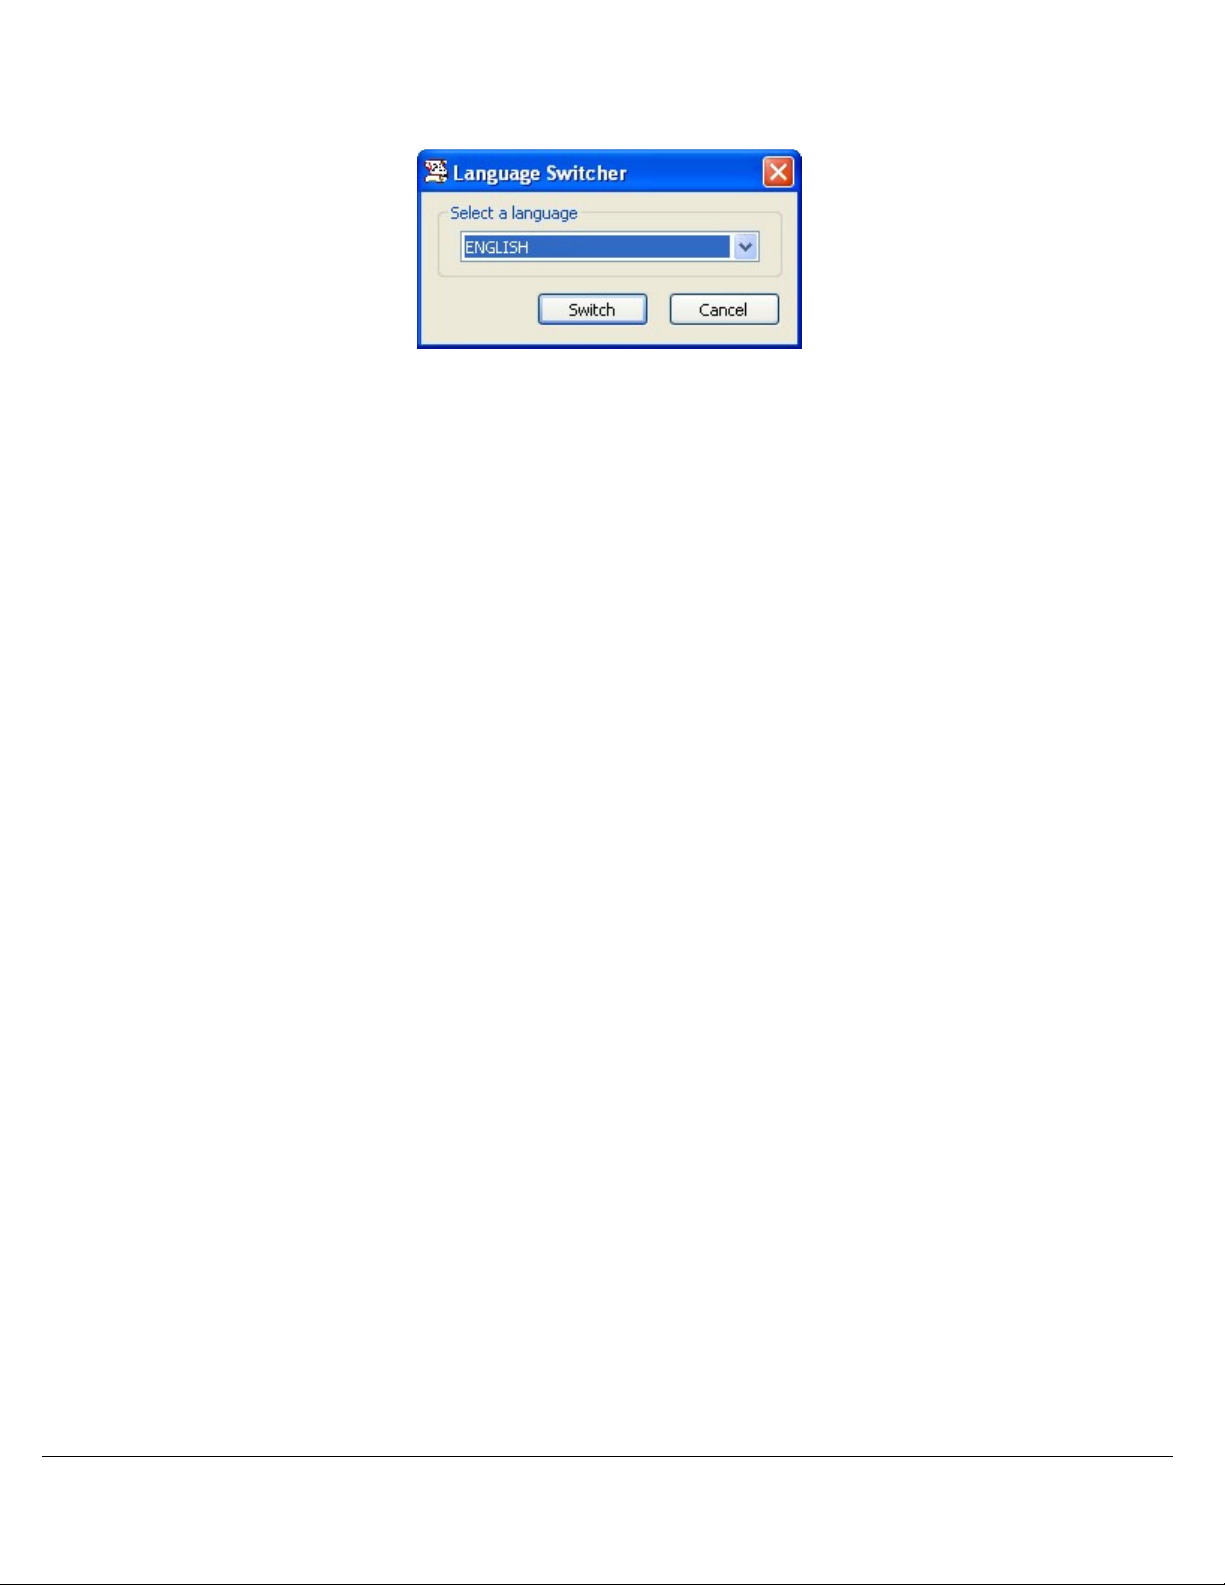
17 Language Switcher
VIGIL Client can be run in English, French, Spanish and Hebrew. The Language Switcher can be run from the
Windows Start menu, select Programs | VIGIL | Language Switcher. Select the desired language from the
drop-down menu, click switch. A prompt will show informing that a system reboot is required to complete the
language change. Click Yes to reboot immediately, Click No to have the update applied the next time the
system is restarted. Note: The prompt will display in the language that is being switched to.
3xLOGIC’s VIGIL Client - Users Guide Page 90
Doc# 12031914
Page 91

18 Contact Information
3xLOGIC has offices in Victoria BC, Canada and in Westminster Colorado, USA. Please visit our 3xLOGIC web
site at www.3xlogic.com. Please contact us by e-mail at support@3xlogic.com (technical support), or using the
following contact information:
3xLOGIC Technical Support:
Toll Free: (877) 3XLOGIC
(877) 395-6442
Email: support@3xlogic.com
Website: www.3xlogic.com
3xLOGIC Corporate Headquarters
16-6782 Veyaness Road
Victoria, BC V8M 2C2
Canada
3xLOGIC USA Main Office
6510 West 91st Avenue
Westminster, CO 80031
USA
3xLOGIC’s VIGIL Client - Users Guide Page 91
Doc# 12031914
 Loading...