

Page 1
Page 2
VIGIL Copyright ©2014 3xLOGIC, Inc. All rights reserved.
3xLOGIC Inc.
6510 West 91st Avenue
Westminster, CO 80031
USA
Disclaimer
Information in this document is subject to change without notice and does not represent a commitment on the part of 3xLOGIC Inc. The software and/or databases described in this document are furnished under a license agreement or nondisclosure agreement. They may be used or copied only in accordance with the
terms of the agreement. It is against the law to copy the software on any medium except as specifically allowed in the license or nondisclosure agreement. The
purchaser may make one copy of the software for backup purposes. No part of this manual and/or databases may be reproduced or transmitted in any form or by
any means, electronic or mechanical, including (but not limited to) photocopying, recording, or information storage and retrieval systems, for any purpose other
than the purchaser's personal use, without the express written permission of 3xLOGIC Inc.
3xLOGIC, VIGIL and AZTECH are trademarks of 3xLOGIC, Inc.
Other tradema rks and trade names may be used in this document to refer to either the entities claiming the marks and names or their products. 3xLOGIC Inc. disclaim any proprietary interest in trademarks and trade names other than their own.
©2014 3xLOGIC Inc. | View Lite Smart Device Application - User Guide
Page 3

Table of Contents
1 Introduction 1
2 Using View Lite with an Apple iOS Device 2
2.1 Installing 3xLOGIC's View Lite on your Device 3
2.2 View Lite Main Screen 4
2.3 Adding VIGIL Servers/3xCLOUD Accounts to View Lite 5
VIGIL Server 5
3xCLOUD: 5
2.4 Viewing Live Video with View Lite on your iOS Device 6
Server-Specific Toolbar: 7
2.4.1 Viewing Live Video in Full Screen 8
2.4.2 Using PTZ With Live Video (iOS) 9
2.5 Saving and Loading Views on View Lite 10
2.6 Using Layouts on View Lite 11
2.7 Searching and Viewing Playback on View Lite 12
2.7.1 Searching for Playback 12
2.7.2 Viewing Playback on 3xLOGIC View Lite 13
2.7.3 Playback Options 14
2.8 Searching and Viewing POS Data 15
2.9 View Lite Settings 16
3 Using View Lite with an Android OS Device 17
3.1 Install View Lite 18
3.2 View Lite Main Screen 19
3.3 Adding VIGIL Servers/3XClouds to View Lite 20
Adding a VIGIL Server 20
Adding a 3XCloud 21
3.4 Viewing Live Video 22
Server Specific Toolbar 23
Camera Tools: 23
3.4.1 Using Relays in Live View 24
3.4.2 Viewing Live Video In Full Screen Mode 25
3.5 Saving and Loading Views 26
3.6 Using Layouts 28
3.7 Searching and Viewing Playback 29
Searching Playback 29
Viewing Playback 30
©2014 3xLOGIC Inc. | View Lite Smart Device Application - User Guide -ii-
Page 4

3.8 Searching POS Data 32
3.9 View Lite Settings 33
4 Contact Information 34
©2014 3xLOGIC Inc. | View Lite Smart Device Application - User Guide
Page 5
1 Introduction
With the exponential growth of wireless and mobile capability, the potential for instant and direct access to your security network
via a mobile device has become reality. Welcome to 3xLOGIC's View Lite Smart Device application, a new solution to your mobile
video surveillance and management needs.
With 3xLOGIC's View Lite you can use your Apple iOS or Android OS device to view live streams of all cameras connected to your
3xLOGIC VIGIL Server(s). View Lite is designed to connect and view both IP and analog cameras from a configured VIGIL Server. With
a simple drag-and-drop interface, saved views and several different layout options, you can easily view up to 48 live cameras on
your mobile device.
To compliment this core functionality, features such as VIGIL Connect, still image exports, full PTZ control (on applicable cameras),
relays(DIOs), POS Search and full playback capability give View Lite a powerful feature set that far exceeds standard mobile video
management offerings.
©2014 3xLOGIC Inc. | View Lite Smart Device Application - User Guide -1-
Page 6
2 Using View Lite with an Apple iOS Device
The following section will outline the installation and basic usage of 3xLOGIC View Lite on your Apple iPhone or iPad device. 3xLOGIC View Lite is compatible with iPhone 3GS, iPhone 4(4s), iPhone 5 (5s, 5c), iPod touch (3rd, 4th, 5th generation) and iPad(1,2,3,
Air, Mini.) Requires iOS 5.0 or later.
Note:The screenshots throughout this manual were taken with an iPhone 4s and iPhone 5 running iOS 7. Please note the iPad/
iPad mini and iPhone application are the same application, with only larger or smallers viewing areas depending on the device
being used. All interface components pictured in this manual will be located in the same area, relative to your device size.
©2014 3xLOGIC Inc. | View Lite Smart Device Application - User Guide
Page 7
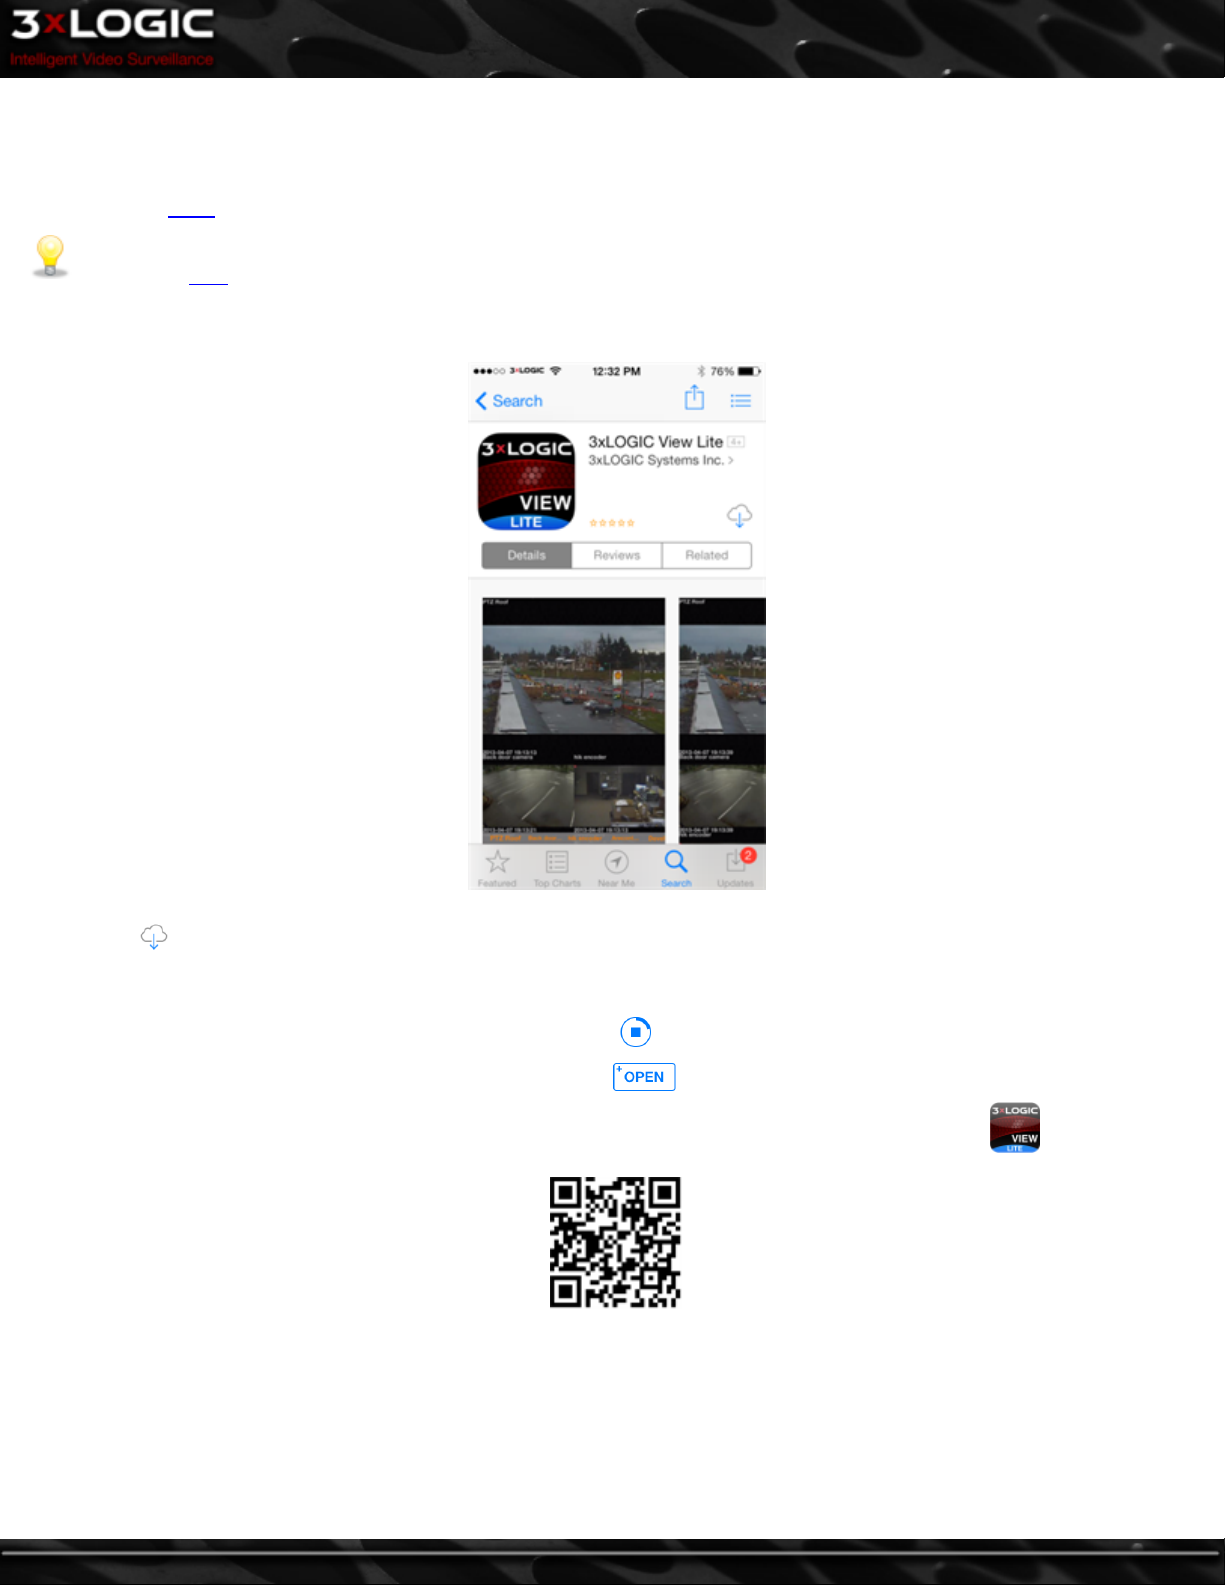
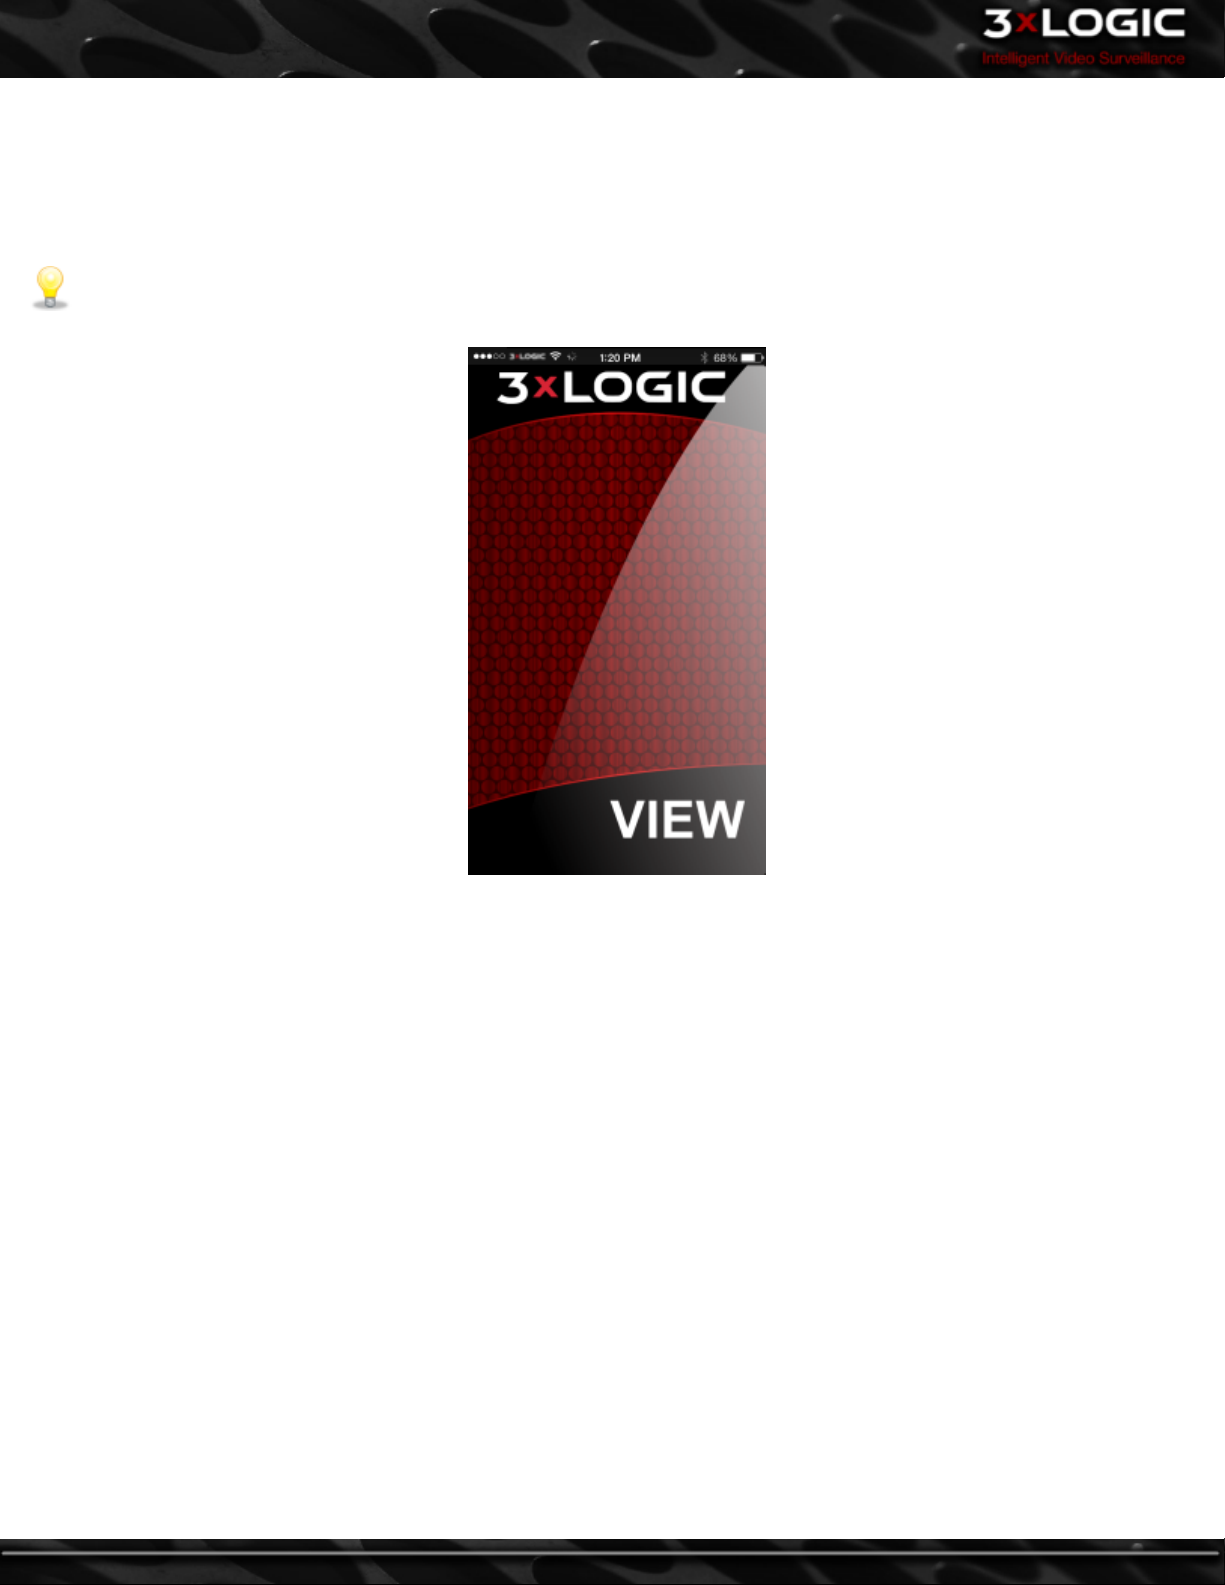
2.1 Installing 3xLOGIC's View Lite on your Device
To install 3xLOGIC's View Lite app directly from your Apple device, navigate to the 3xLOGIC View Lite page by using the below QR
code or tapping here.
Note:The above link and QR code will only function properly on an appropriate Apple device or a PC with iTunes installed.
Please click here to visit the 3xLOGIC View Lite App page on PCs without iTunes installed
Alternatively, you may search for the app through the iTunes App Store directly from your apple device. You will be presented with
the below screen(or similar, depending on your Apple device generation.)
l
Click to begin the download. You will be prompted for your AppleID login credentials. If you have recently installed other
software off of the iTunes App Store you will not be prompted for your Apple ID credentials. Login to begin the download and
installation.
l
Download and installation progress will be indicated by the icon.
l
When installation completes, this symbol will turn into the button.
l
Click this to open 3xLOGIC View Lite, or return to your home screen and open the app by clicking the icon.
©2014 3xLOGIC Inc. | View Lite Smart Device Application - User Guide -3-
Page 8
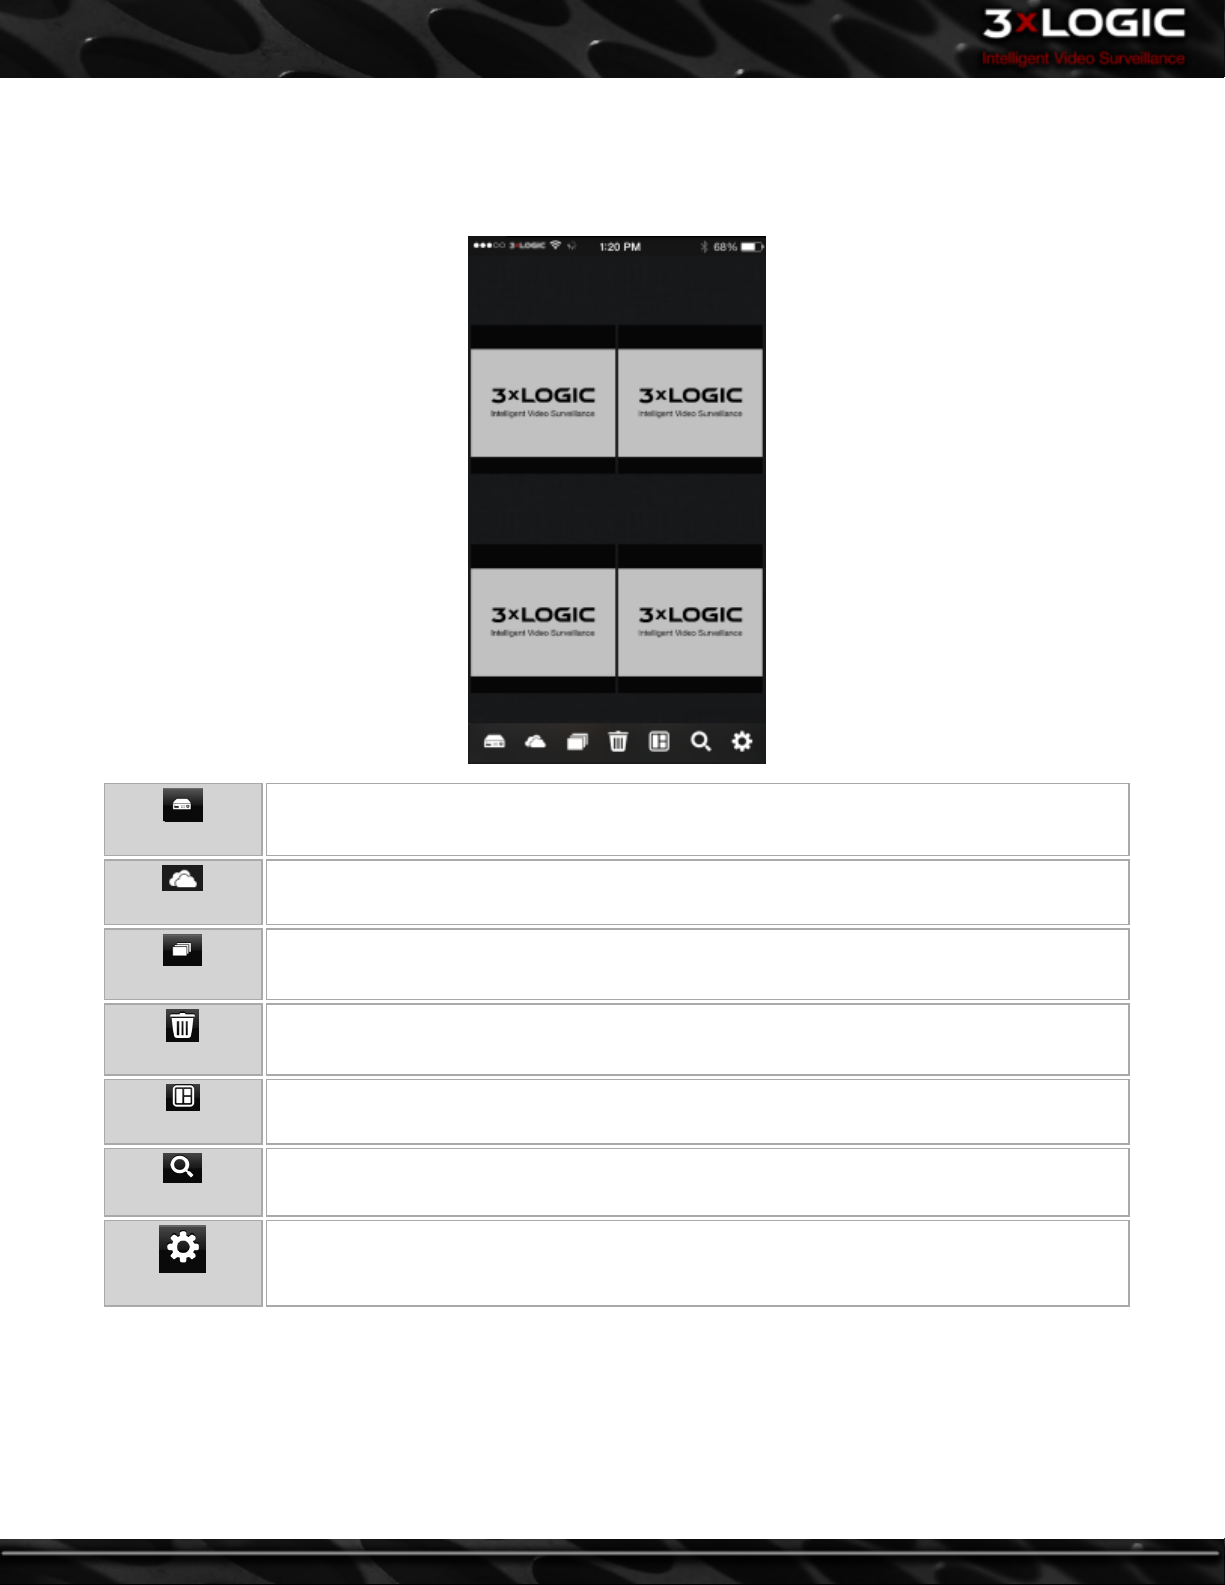
2.2 View Lite Main Screen
After saving a VIGIL Server, or when logging into the program after having already configured your Server lists, you will be pr sented
with the 3xLOGIC Lite View Main Screen(pictured below.) When running 3xLOGIC View Lite for the first time, the main screen will
appear with no active camera feeds. The number of blank windows is dependent on your device's screen size.
Servers
3xCloud
Views
Clear Layout
Select Layout
Search Playback
Settings
This button will open a list of configured VIGIL Servers. Select a Server to access its cameras,
which can be dragged into the current layout for live viewing.
This button will open a list of configured 3xCloud accounts. If no accounts have been created,
this button will allow you to Add a 3xCloud account.
This button will take you to the Views screen which contains a collection of saved views.
This button will clear the current layout of all cameras and windows. You will be asked to confirm this action.
Select pre-configured layout options for your 3xLOGIC View Lite main screen.
This button will bring you to the Playback Search screen.
Selecting this button will bring you to the 3xLOGIC View Lite Settings page.
©2014 3xLOGIC Inc. | View Lite Smart Device Application - User Guide
Page 9
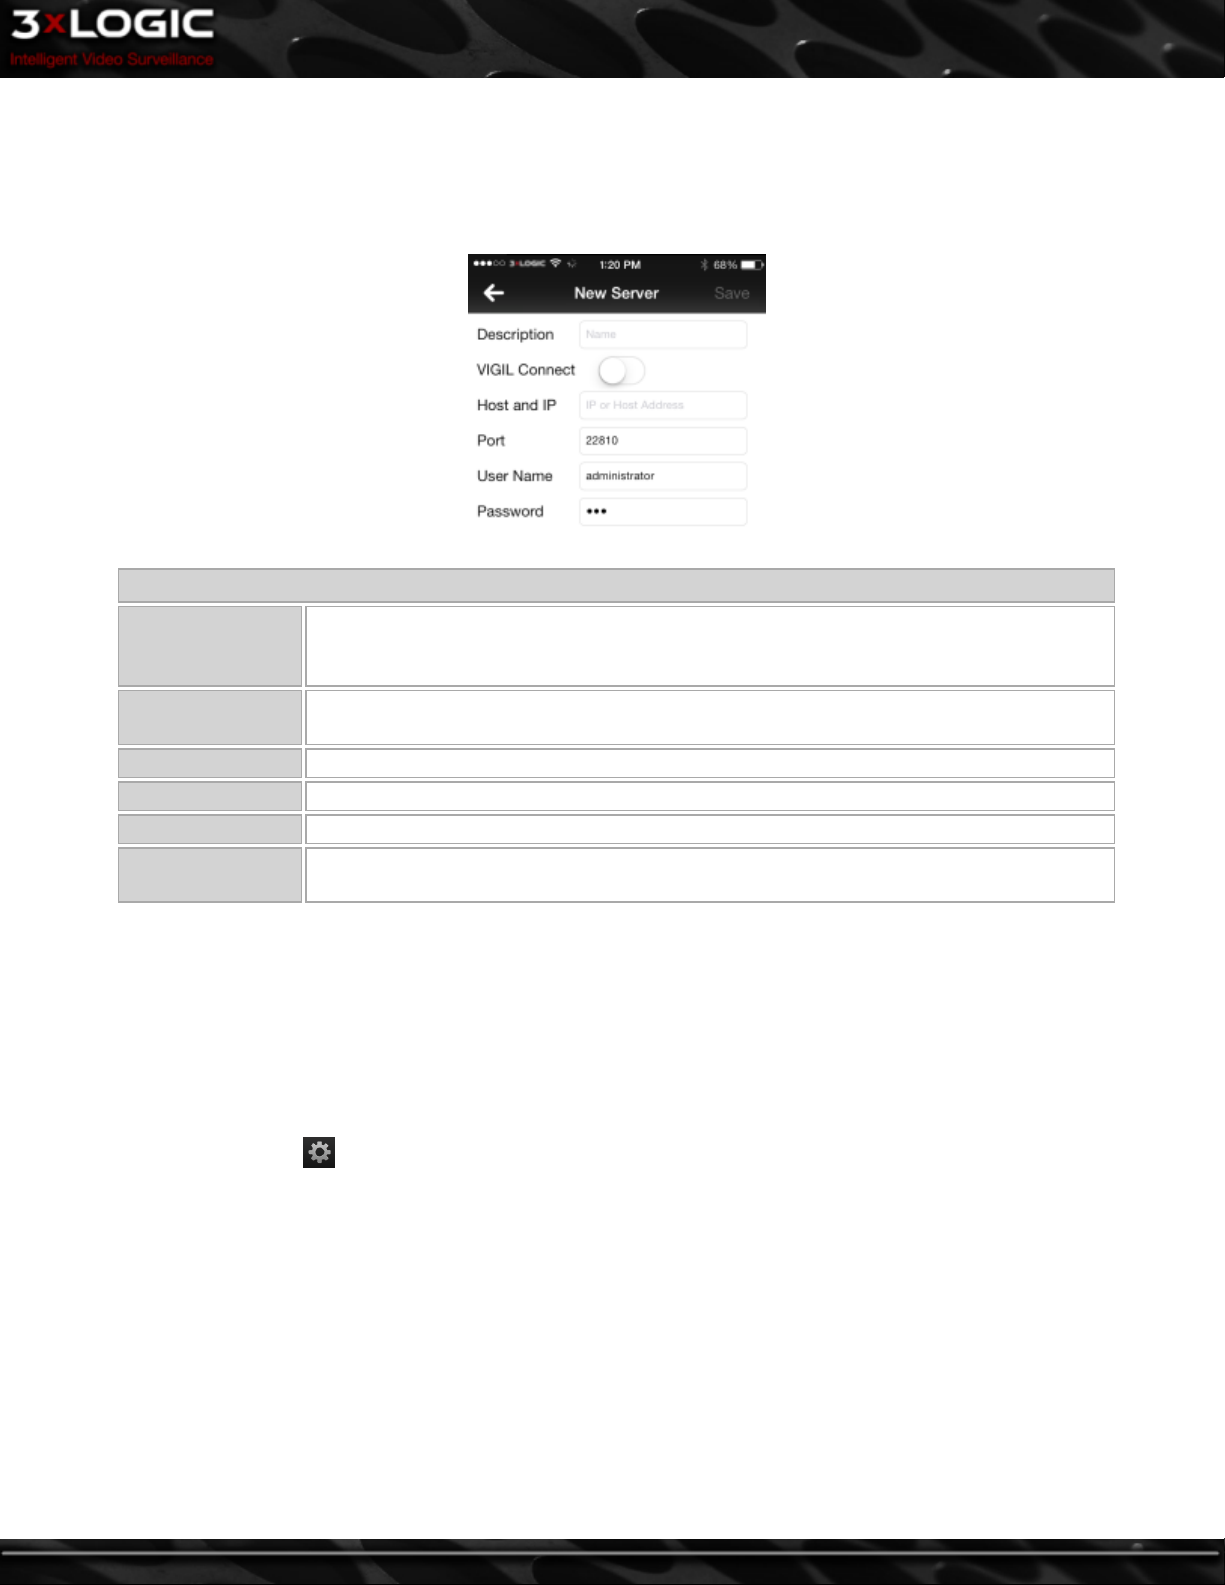
2.3 Adding VIGIL Servers/3xCLOUD Accounts to View Lite
VIGIL Server
The first time you run 3xLOGIC's View Lite app, you will be met with the New Server screen (pictured below.) This runs when no
active Servers have been added to 3xLOGIC View Lite.
New VIGIL Server
Enter the Description of the Server you wish to save. This will be used throughout 3xLO-
Description
VIGIL Connect
Host and IP Enter the IP address of the Server you are attempting to save.
Port Enter the Port number of the Server you are attempting to save.
User Name Enter a valid User Name for the Server you are attempting to save.
Password
GIC View Lite to refer to the Server currently being saved to View Lite. The example
above uses the description "Test Box."
Enable VIGIL Connect by setting this option to On. Set to Off to disable VIGIL Connect.
The example above has VIGIL Connect disabled.
Enter a valid Password for the user account you entered in the preceding User Name
field.
l After filling in the appropriate fields, select Save in the upper-right hand corner of the New Server screen.
l After a successful attempt you will be notified with a prompt stating "Server Settings are Successfully Saved."
3xCLOUD:
3xCLOUD is a video management solution offered by 3xLOGIC. It consists of a list of VIGIL Servers added by a user, and a browserbased Client used to view streams from these servers using any number of devices(PC, Tablet, Smartphone).
To add a 3xCLOUD account to View Lite:
l
Select the Options icon ( ) from the View Lite main page.
l Select 3xCLOUD from the options menu.
l Click 3xCLOUD Login to configure your Cloud account for use with View Lite.
l If you wish to create a new 3xCLOUD account, select 3xCLOUD Register . This will generate the sign-out form.
l Fill in the appropriate fields, and submit the form.
l Follow the instructions in the confirmation e-mail to create your 3xCLOUD account.
©2014 3xLOGIC Inc. | View Lite Smart Device Application - User Guide -5-
Page 10
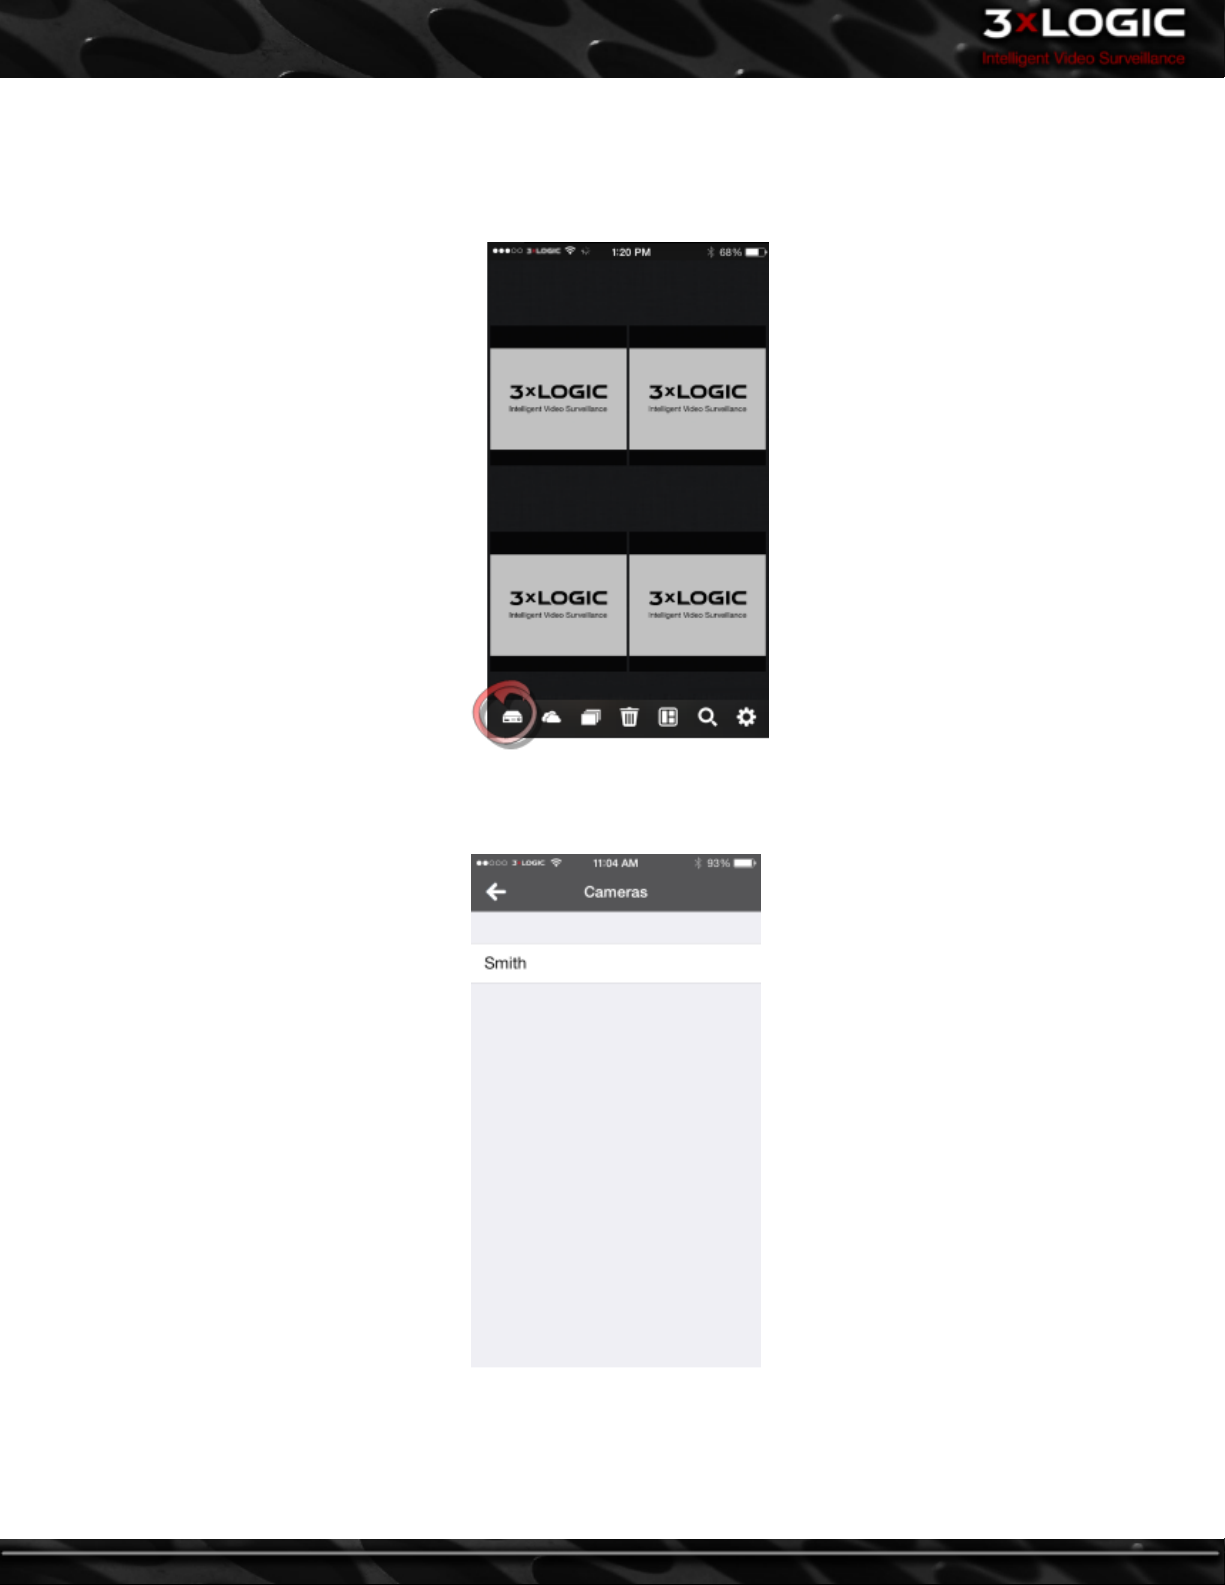
2.4 Viewing Live Video with View Lite on your iOS Device
To view live streams from the cameras currently active on your VIGIL Server:
l Select the Servers button from the 3xLOGIC View Lite main screen(circled in red, below-left.)
l After selecting the Servers button, you will be presented with the Servers screen(pictured below) This screen features a list
of eligible VIGIL Servers containing up to 32 cameras each.
l Select the appropriate VIGIL Server (The example above features a VIGIL Servers, named "Smith." After selecting a VIGIL
Server, you will be brought back to the main screen.
©2014 3xLOGIC Inc. | View Lite Smart Device Application - User Guide
Page 11
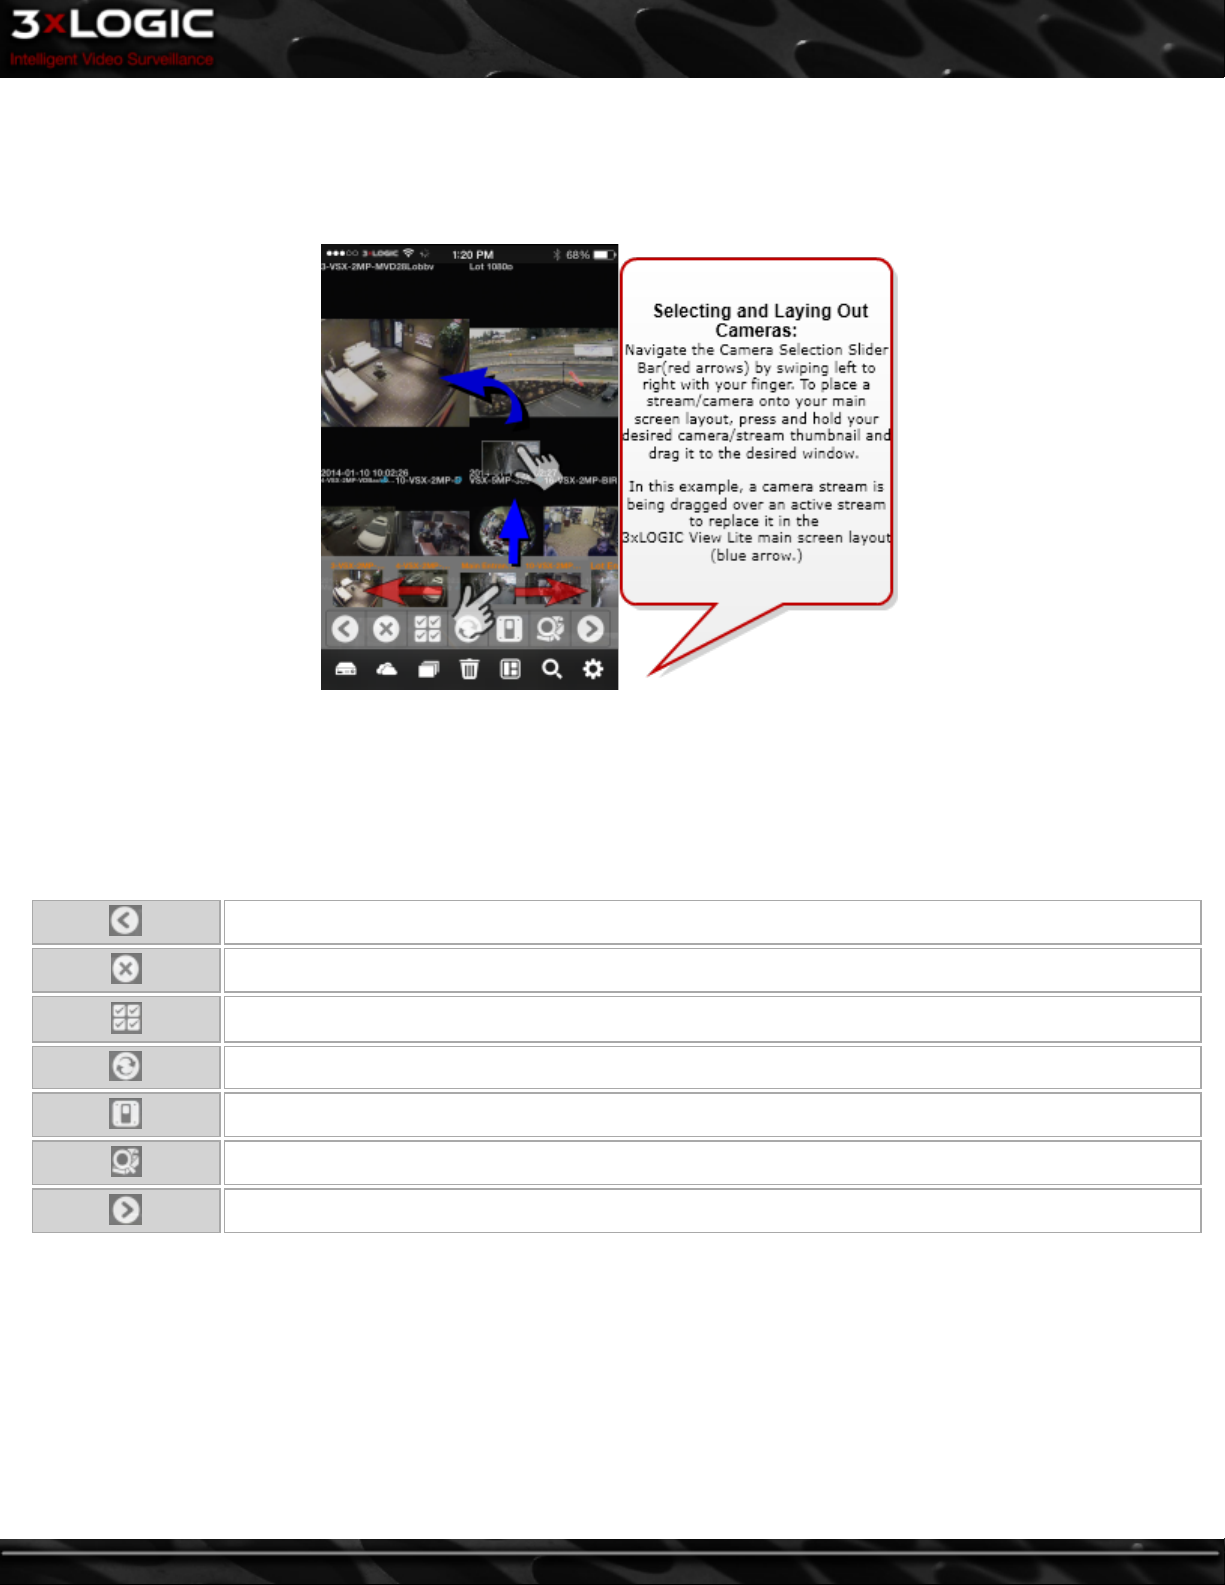
A camera selection slider bar(red arrows, below) featuring available camera streams will be visible along the bottom of the main
screen, above the button toolbar.
l To navigate available cameras streams, swipe your finger along the camera selection slider bar, left or right as pictured
below.
l To select a camera/stream for viewing on the main screen, simply drag the camera thumbnail image from the camera selec-
tion slider bar to an open window on your main screen. This will place the camera in the available window.
The above example has had ten camera streams slotted on the 3xLOGIC View Lite main screen.
Server-Specific Toolbar:
After selecting a VIGIL Server, the main page will load a Server-Specific toolbar along with the Server's camera list.
Move camera list left (if swiping is unavailable on your device)
Clear current layout
Display all cameras
Refresh Server
Generate a list of available DIO (relays) on the selected VIGIL Server
Open the POS Search window.
Move camera list right (if swiping is unavailable on your device)
©2014 3xLOGIC Inc. | View Lite Smart Device Application - User Guide -7-
Page 12
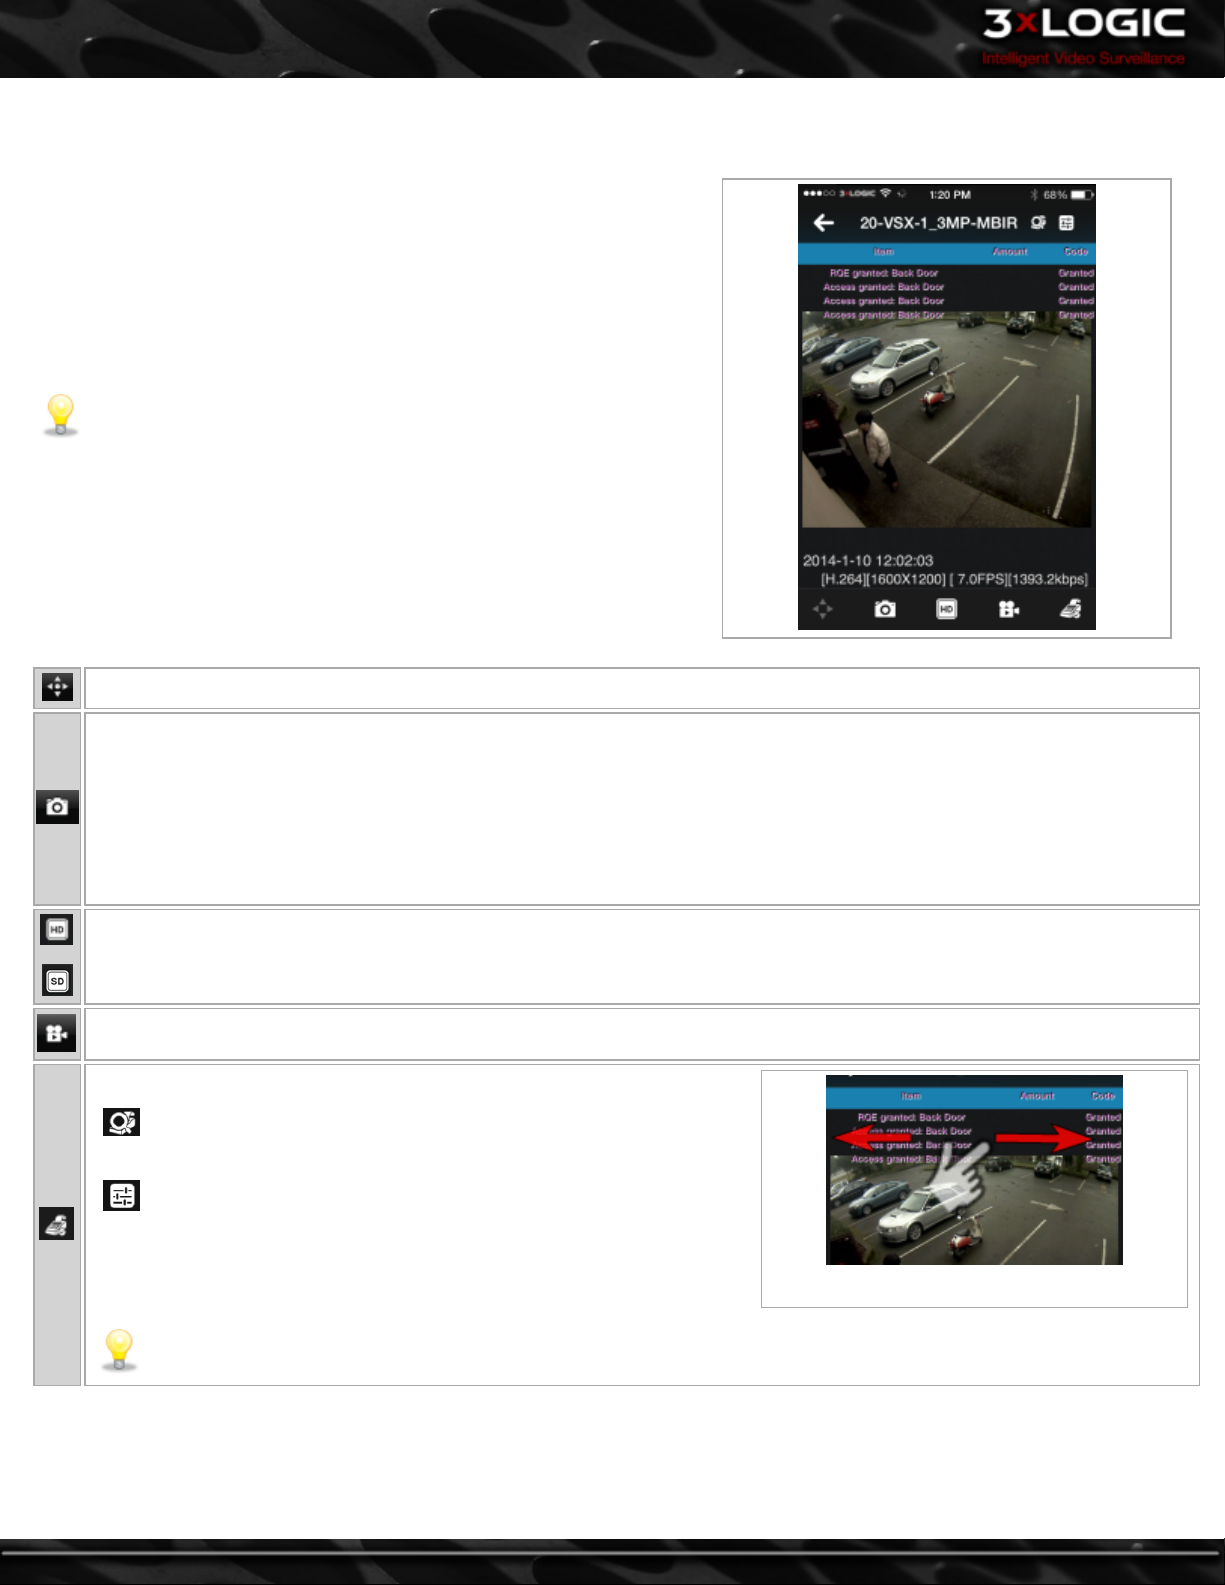
2.4.1 Viewing Live Video in Full Screen
To bring a stream from your main screen layout into full screen mode:
l Tap the desired stream.
l A full screen window will launch(pictured below.) Stream infor-
mation is available under the camera frame when in full screen
mode. Stream information includes compression type, FPS, current
bandwidth usage as well as date and time.
Note:Tilt your device sideways to enlarge the stream further. Full
screen size is dependent on device screen size. Dimensions and resolution will increase and decrease depending on device screen
size.
Access Camera PTZ Controls(if available.)
Take a snapshot. You will be presented with a menu featuring the following options after tapping the Snapshot button
Clear- Clear Camera window(this will bring you back to the main screen and will remove the current camera from the
stream window.
Save Image - Save image to your device's camera roll.
Send Image- E-mail the image to a recipient(s) of your choice.
Cancel - Exit the Snapshot menu.
Switch between Mainstream(High Quality) and Substream(Low Quality) video. If iOS does not support the selected camera's
substream, 3xLOGIC's RapidStream technology will be used.
Access the Playback search function for this camera. See "Searching for Playback" on page 12
Toggles POS On-Screen Display
- Located in the upper-right corner next to the camera name. Opens
the POS Search. See "Searching and Viewing POS Data" on page 15
-Located in the upper-right corner next to the camera name. Opens
the OSD Settings window. A user may adjust OSD Dwell Time, Number of
Lines, Font Size and Font Colour, Toggle Column Headers and adjust Column Visibility and Width from this window.
Swipe left to right to view all OSD columns.
Note:The OSD, POS Search and OSD Settings buttons will only appear on POS-enabled cameras.
©2014 3xLOGIC Inc. | View Lite Smart Device Application - User Guide
Page 13

2.4.2 Using PTZ With Live Video (iOS)
3xLOGIC View Lite has the ability to access a camera's PTZ controls when a capable camera is in full screen mode.
To access PTZ:
l
Tap the button(PTZ Controls) in the lower left-hand corner of the screen when in live full screen mode. The PTZ controls
will appear as pictured below.
l Use the directional controls to move the camera in the corresponding direction. The + and - controls at the center of the PTZ
control panel are used to operate zoom.
l To access PTZ Presets, tap the Presets button(circled in red, above-left.)This button will only generate when the PTZ controls
are open. Tapping it will cause the PTZ control keypad to convert to a number list(above-right.)
l Select a number and the camera will move to the preset location assigned to that number.
l When you have achieved your desired camera position, via manual PTZ control or a PTZ preset, tap outside of the PTZ or Pre-
set control pad to leave PTZ mode.
l Tap the full-screen stream to return to the 3xLOGIC View Lite main screen and your full camera layout.
©2014 3xLOGIC Inc. | View Lite Smart Device Application - User Guide -9-
Page 14

2.5 Saving and Loading Views on View Lite
To save your current view(your current layout including assigned cameras):
l Navigate to the Views screen by clicking the Views button(circled in red, below-left.)
l After navigating to the Views screen, you may save your current view by selecting Save Current View(circled in red, above.)
l You will be asked to give the view a name. Enter your desired name and select OK to save the view.
The Saved Views screen lists the name of the view and the number of cameras present on that view. To load and use a view you have
previously saved:
l Click on the view label(circled in black, above). You will be brought back to the 3xLOGIC View Lite main screen which will
now be using the selected view.
©2014 3xLOGIC Inc. | View Lite Smart Device Application - User Guide
Page 15

2.6 Using Layouts on View Lite
To select predefined layouts in 3xLOGIC View Lite:
l Tap the Layouts button in the button toolbar to open the Layout Selection Slider Bar.
l Swipe left-to-right to navigate the Layout Selection Slider Bar(red arrows) and tap a layout to select it. The main screen will
automatically configure the window layout to the chosen specifications.
The below example is using the 8+2 layout(four more slots are available which are hidden beneath the Layout Selection Slider bar.)
©2014 3xLOGIC Inc. | View Lite Smart Device Application - User Guide -11-
Page 16

2.7 Searching and Viewing Playback on View Lite
While 3xLOGIC View Lite grants you the ability to view your live camera streams from anywhere, it also has the ability to search and
pull playback footage from any of the active streams that have been set to record by your VIGIL Server.
2.7.1 Searching for Playback
To view playback:
l Navigate to the Playback screen by clicking the Playback icon in the button toolbar(circled in red, below-left) on the 3xLOGIC
View Lite Mainscreen.
After clicking the Playback button, you will be presented
with a list of available cameras(pictured left), compiled
from active streams on the 3xLOGIC View Lite main screen
l Select the camera stream from which you would like
to pull footage and tap it. This will bring you to the
Select Date Range screen.
l By default you will have the option to select a Quick
time interval; 1, 3, 5, 10 or 15 minutes of playback
from the selected camera.
To select a more comprehensive date range:
l Tap the Advanced button(bottom left of the Select Date Range window.) You will be presented with the Advanced Date Range
Selection screen(pictured below.)
l If you wish to choose one of the preset ranges, tap one to be taken to the Playback screen.
l If you have chosen to configure an advanced date range, click Submit to view the resulting footage on the Playback screen.
©2014 3xLOGIC Inc. | View Lite Smart Device Application - User Guide
Page 17

2.7.2 Viewing Playback on 3xLOGIC View Lite
After selecting a camera to retrieve playback footage from and choosing a date range, you will be brought to the Playback screen
with your footage queued and ready for playback(See below example.) As an option, a small live window containing a timestamp(circled in red, below,)from the camera you are currently viewing will open so you may monitor live footage from the chosen camera
while viewing playback.
Indicates the current status of the video as well as playback speed(1x in
the above example.)
Time and Current/Total frame count for active playback footage.
Brings queued playback to the first frame of the footage.
Set the currently queued playback footage back 10 frames.
Rewind the footage frame-by-frame.
Pause/ Play the currently queued footage.
Fast-Forward the footage frame-by-frame.
Set the currently queued playback footage forward 10 frames.
Brings the queued playback to the final frame of the footage.
©2014 3xLOGIC Inc. | View Lite Smart Device Application - User Guide -13-
Page 18

2.7.3 Playback Options
To bring up the Playback Options Menu:
l
Select the Options button( ) from the playback screen.
Reset Time
Hide/Show
Live
Snapshot Select this option to bring up the Snapshot menu.
Reset the Date/Time Range of the currently queued playback footage.
Select this to hide or show the mini Live footage window.
©2014 3xLOGIC Inc. | View Lite Smart Device Application - User Guide
Page 19

2.8 Searching and Viewing POS Data
To search for POS data:
l
Tap the button (POS Search) from the Server Specific toolbar(to search an entire Server for POS data) or from a individual
POS-enabled camera's playback window(to search for POS data only from the selected camera.)This will load the POS Search
window(pictured below-left.)
l Fill in your POS Search criteria (criteria is identical to POS Search criteria within VIGIL Server and Client.)
l
Click the button (Search) to begin querying results. A POS results page will generate(pictured below-right.)
l Click an entry in the POS results to be taken to playback footage surrounding the desired POS item.
©2014 3xLOGIC Inc. | View Lite Smart Device Application - User Guide -15-
Page 20

2.9 View Lite Settings
To access the 3xLOGIC View Lite Settings screen:
l Select the Settings button (circled in red, below) from the View Lite Main Screen.
VIGIL Servers
3xCLOUD
Auto
Disconnect
Help Opens the 3xLOGIC View Lite manual.
Contact Opens the 3xLOGIC Contact page.
Options
Version Lists the 3xLOGIC View Lite version number.
Lists all VIGIL Servers presently configured on 3xLOGIC View Lite. Also provides the ability to add VIGIL
Servers
Lists all configured 3xCLOUD accounts. This section also gives the option to login to a 3xCLOUD, effectively
configuring it for use with View Lite. Also, a user can select to register a 3xCLOUD account.
Allows the user to set Auto Disconnect times for both 3G/LTE and WiFi networks to prevent overage charges
and regulate battery usage.
Opens the Options page.
Clear Layout After Closing App - Switching this feature to On will wipe all cameras from the main screen
layout whenever the app is closed.
Show or Hide Live on Playback - - Switching this feature to On will permanently display the mini-live
stream window while viewing playback.
Auto Disconnect from Network- - Set the amount of time View Lite will idle before disconnecting from the
network. Separate times can be set for 3g/4g/LTE and WiFi.
Display Image Quality- - Set the default image quality
©2014 3xLOGIC Inc. | View Lite Smart Device Application - User Guide
Page 21

3 Using View Lite with an Android OS Device
The following section outlines the installation and basic usage of 3xLOGIC View Lite on your Google Android device. 3xLOGIC View
Lite is compatible with Android devices running Android OS 2.3(Gingerbread) or later.
Note:The example screen-shots throughout this manual were taken with an Acer Iconia Android Tablet. The tablet has a
larger viewing area than many devices which support Android OS. All interface components pictured in this guide will be
located in the same area, relative to your device size.
©2014 3xLOGIC Inc. | View Lite Smart Device Application - User Guide -17-
Page 22

3.1 Install View Lite
To download and install 3xLOGIC View Lite on your Android device:
l Scan the below QR code or click here.
l You will be met with the Google Play Store 3xLOGIC View Lite screen.
l
Click the button to begin the installation process.
l Installation progress is displayed at the top of the page(pictured below.)
l
After installation, select the button from your device's main screen or app screen to open the application.
©2014 3xLOGIC Inc. | View Lite Smart Device Application - User Guide -18-
Page 23

3.2 View Lite Main Screen
After saving a VIGIL Server, or when logging into the program after having already configured your Server lists, you will be presented
with the 3xLOGIC Lite View Main Screen(pictured below.) When running 3xLOGIC View Lite for the first time, the main screen will
appear with no active camera feeds. The number of blank windows is dependent on your default device screen size.
This button will open a list of configured VIGIL
Servers. Select a Server to access its cameras,
which can be dragged into the current layout for
Servers
VIGIL
Cloud
live viewing.If only one Server has been configured, its cameras will automatically be displayed.
This button will open the Cloud server list. If only a
single Cloud has been configured, its list of Servers
will automatically be displayed. If two Clouds are
configured, the user will be given the option to
Switch between Clouds. If three or more Clouds are
configured, the User will be presented with a list
of available Clouds.
View Lite will remember the active cloud causing
the current Cloud's server list to generate whenever the VIGIL Cloud button is tapped.
Views
Clear
Current
Layout
Layouts
Settings
This button will take you to the Views screen
which contains a collection of saved views.
This button will clear the current layout of all cameras and windows. You will be asked to confirm
this action.
Select pre-configured layout options for your 3xLOGIC View Lite main screen.
Selecting this button will load the 3xLOGIC View
Lite Settings menu.
©2014 3xLOGIC Inc. | View Lite Smart Device Application - User Guide
Page 24

3.3 Adding VIGIL Servers/3XClouds to View Lite
Adding a VIGIL Server
To add a Server to VIGIL View Lite:
l
Tap the button on the View Lite main screen to open the Settings window.
l Select VIGIL Servers.
l Tap Add VIGIL Server. You will be met with the window pictured below.
New VIGIL Server
Enter the Description of the Server you wish to save. This will be used throughout 3xLO-
Description
VIGIL Connect
Host or IP Enter the IP address of the Server you are attempting to save.
Port Enter the Port number of the Server you are attempting to save.
User Name Enter a valid User Name for the Server you are attempting to save.
Password
l Click Save after filling in the appropriate information. Your VIGIL Server is now ready to use with View Lite.
GIC View Lite to refer to the Server currently being saved to View Lite. The example
above uses the description "Test Box."
Enable VIGIL Connect by setting this option to On. Set to Off to disable VIGIL Connect.
The example above has VIGIL Connect disabled.
Enter a valid Password for the user account you entered in the preceding User Name
field.
©2014 3xLOGIC Inc. | View Lite Smart Device Application - User Guide -20-
Page 25

Adding a 3XCloud
3xCloud is a video management solution offered by 3xLOGIC. It consists of a list of VIGIL Servers added by a user, and a mobile
browser-based Client used to view streams from these servers using any number of devices(PC, Tablet, Smartphone).
To add a Cloud to View Lite:
l
Tap the Settings button( ) on the View Lite main screen to open the Settings window.
l Select 3XCloud.
l Tap Add 3xCloud. You will be met with the window pictured below.
l Fill in the appropriate information and tap OK to add the Cloud to View Lite.
When more than one Cloud is configured in View Lite, users will be given the option to switch between Clouds (2 Clouds) or will be
presented with a list of Clouds(3 or more) to choose from when selecting a Cloud from the View Lite mainscreen.
From the 3xCloud Settings window, you can also choose to create a 3xCloud account:
l Click Create 3xCloud Account. This will generate the below registration form.
l Fill in the appropriate fields and agree to 3xLOGIC's Terms and Conditions.
l Tap Sign Up to proceed. You will receive a confirmation e-mail. Please follow the instructions in the e-mail to finalize
account creation.
©2014 3xLOGIC Inc. | View Lite Smart Device Application - User Guide
Page 26
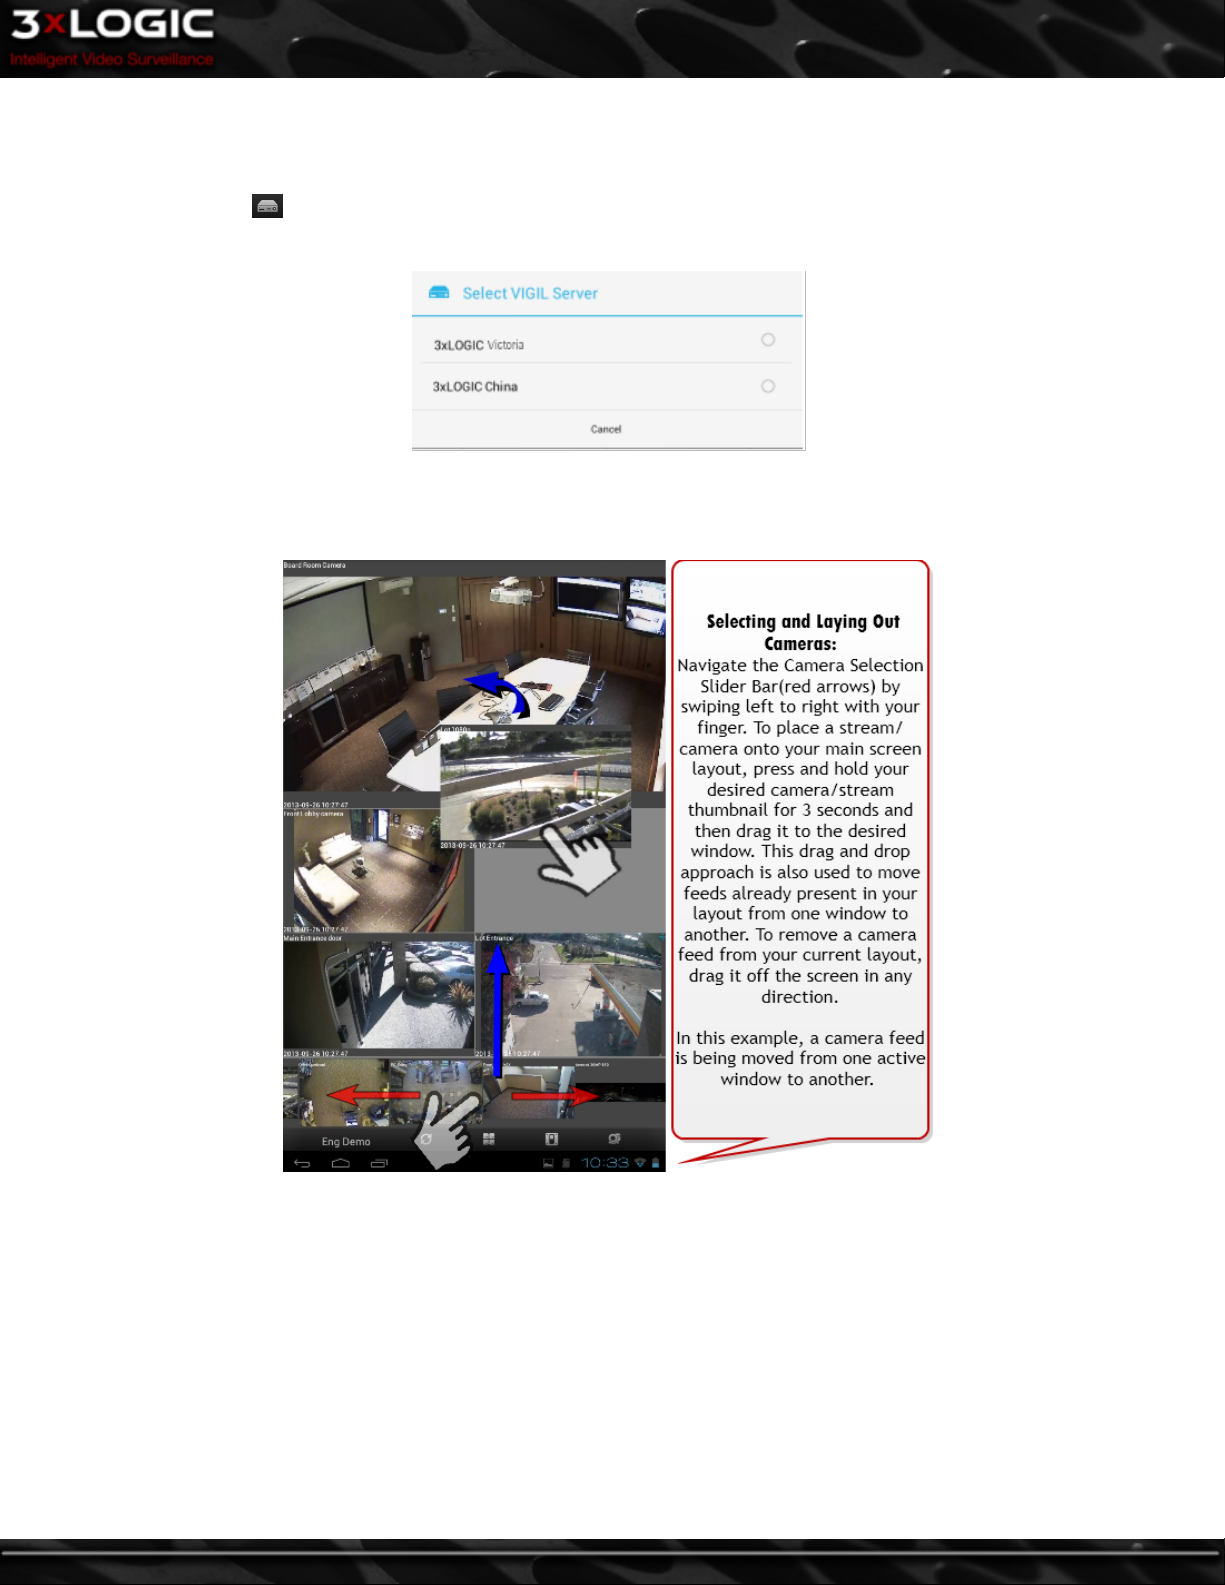
3.4 Viewing Live Video
To view live streams from the cameras currently active on your VIGIL Server:
l
Select the Servers( ) button from the 3xLOGIC View Lite main screen. This will bring up a list of available Servers(pictured
below), or the camera selection slider bar if only a single Server has been configured.
l If multiple Server have been configured, select one to bring up the camera selection slider bar.
l To navigate available cameras, swipe your finger along the camera selection slider bar, left or right as pictured below.
To select a camera stream for viewing on the main screen:
l Tap and hold the thumbnail for 3 seconds.
l Drag the image from the camera selection slider bar to a window on your main screen. This will place the camera in the avail-
able window or replace the currently active feed in that window.
To eliminate a camera feed from the current layout:
l Drag the window off the screen in any direction.
©2014 3xLOGIC Inc. | View Lite Smart Device Application - User Guide -22-
Page 27

Server Specific Toolbar
When a Server is selected, a server-specific toolbar will also generate.
Display all cameras from the currently active VIGIL Server
Display All
Refresh all streams and Relays.
Refresh
Open the POS Search window. This POS Search will pertain to all
POS=enabled cameras on the chosen Server. See "Searching POS
POS Data
Clear
Data" on page 32 on POS Search.
Eliminate the camera selection slider bar and the Server specific
toolbar and return you to the main screen while maintaining your
current layout
Camera Tools:
To access camera tools for a specific camera from the View Lite main screen:
l Tap and hold the desired camera without moving the camera frame until the checkmark(pictured below)appears. This will gen-
erate a tools menu(circled in red, below)for the currently selected camera.
Capture a still image
E-mail a still image. Android will let the user decide which email application to use(i.e Gmail)
Clear the current selection
Load playback. For more information on searching and viewing playback, See "Searching and Viewing Playback" on page 29
Select this button to exit the camera tools menu.
More camera-specific tools can be accessed in full-screen mode. See "Viewing Live Video in Full Screen" on page 8
©2014 3xLOGIC Inc. | View Lite Smart Device Application - User Guide
Page 28

3.4.1 Using Relays in Live View
To open a list of available relays:
l
Tap the button (Relays) on the Server-specific toolbar (pictured below.) On Servers with no relays configured, the Relays
button will not appear.
To activate a relay:
l Slide the switch from Off to On.
Note:When changes are made to a DIO/Relay from a VIGIL Server or VIGIL Client, the View Lite Refresh button( ) must be
tapped in the Server-specific toolbar for the changes to take affect in View Lite. Alternatively, the application may be
restarted on your Android device to achieve the same affect.
©2014 3xLOGIC Inc. | View Lite Smart Device Application - User Guide -24-
Page 29

3.4.2 Viewing Live Video In Full Screen Mode
To bring a stream from your main screen layout into full screen mode:
l Tap the desired stream. A full screen window will generate, as seen in the example below-left. Stream information is avail-
able in the top left corner of the camera frame when in full screen mode. Stream information includes camera name, resolution,and current bandwidth usage. Date and time are available in the bottom right hand corner of the frame.
A camera toolbar will also be present at the bottom of the frame(circled in red, below.)
Note:Not all functions listed below will be available for every camera. A function will only appear if it is supported by the
selected camera.
Opens the Tools Menu.
Note:This icon may vary depending on what tool is cur-
rently selected. Select the button on the far left of the toolbar to open the tools menu.
Toggle On-Screen Display(OSD) of POS data.
Adjust On-Screen Display settings
Capture a still image
E-mail a still image. Android will let the user decide which email
application to use(i.e Gmail)
Clear the current selection
Change image quality.Use the slider bar to adjust image quality
which varies from 1, the lowest quality, to 90, the highest quality.
Note:This settings effects all active camera streams in
View Lite. If you are experiencing poor app performance,
consider lowering image quality.
Load playback. For more information on searching and viewing
playback, See "Searching and Viewing Playback" on page 29
Toggle eagle-eye view on or off. Eagle eye is a full-screen preview that opens when using digital zoom (pictured below).
Camera Controls/Image Tools:
After tapping the tools icon, the user will be met with the Camera Control/Image Tools pop-up menu pictured below.
©2014 3xLOGIC Inc. | View Lite Smart Device Application - User Guide
Page 30

Enables Digital PTZ mode.
l Tap and hold to drag the image around the screen.
l Pinch together or spread apart two fingers on the screen to zoom in and out of the
picture.
Digital
PTZ
Pan/Tilt
Zoom
Focus
Bright-
ness
When Zoomed, a small window featuring the full camera frame will appear in the top
right corner of the screen to aid users in navigating the image.
Note:Digital PTZ mode does not utilize any hardwired PTZ components and only alters the image while main-
taining original resolution. Hard-wired PTZ controls are only available on applicable cameras.
Access hardwired Pan and Tilt mode. Drag your finger onto any of the four quadrants of the frame to move the camera.
A blue line will appear to indicate direction. The longer a user makes the line, the faster the camera will pan and tilt.
Hardwired PTZ camera's are indicated both in full screen and from the main screen by a symbol in the top right
corner of their window frame.
Access hardwired zoom mode. Pinch together or spread apart two fingers on the screen to zoom in and out of the picture.
Access Focus mode. Pinch together or spread apart two fingers on the screen to adjust the cameras focus.
Access Brightness setting. Pinch together or spread apart two fingers on the screen to adjust image brightness.
Access Preset list(pictured below.) Choose a preset number from the list to move the camera to the chosen preset position.
Presets
Save the camera's current position to a preset number. Tap the number in the list to save the current potion to that pre-
Save Pre-
sets
set number.
3.5 Saving and Loading Views
To save your current view(your current layout including assigned cameras):
©2014 3xLOGIC Inc. | View Lite Smart Device Application - User Guide -26-
Page 31
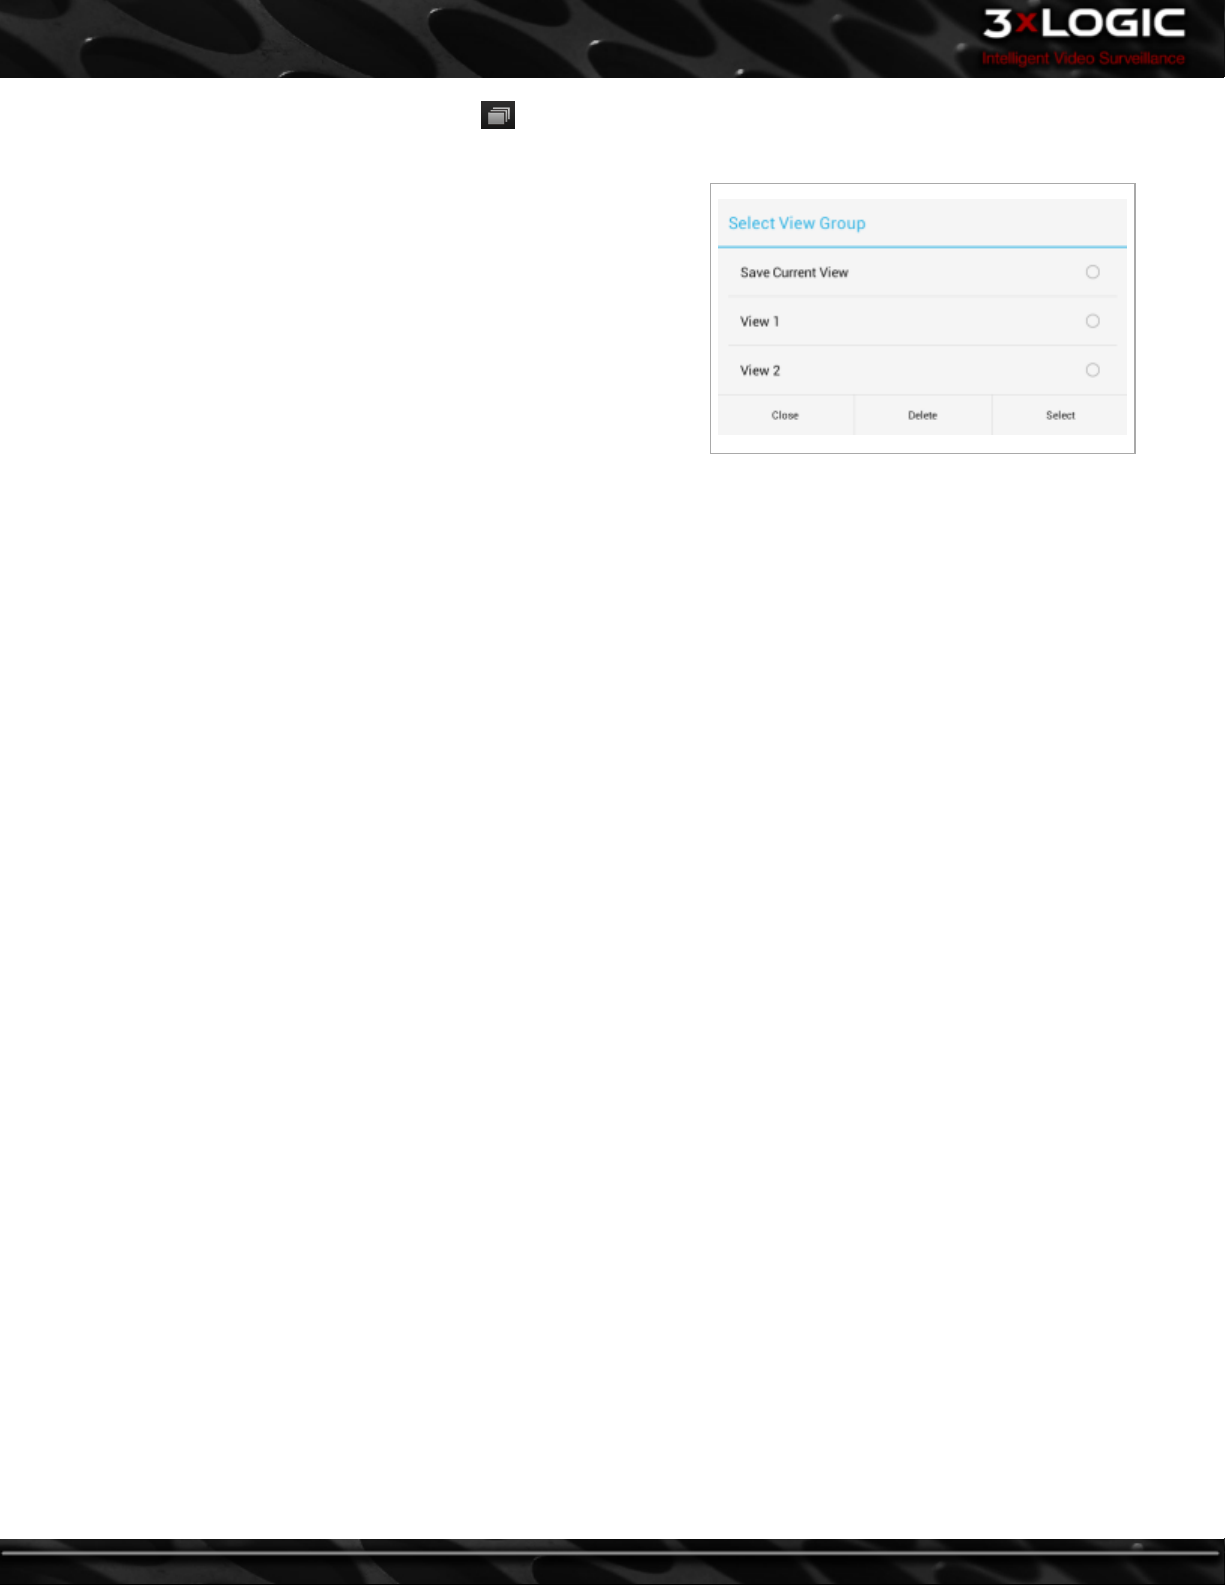
l
Navigate to the Views screen by tapping the button (Views) on the View Lite main screen. You will be met with the below
window.
To save a view:
l Tap Save Current View.
l Enter a View Group Name
l Tap 'OK'. Your View will now be available in the list of Saved View
Groups.
To load a view:
l Tap the desired View in the Saved View Group list.
l Tap Select. The selected view will load on the View Lite Main
Screen.
©2014 3xLOGIC Inc. | View Lite Smart Device Application - User Guide
Page 32

3.6 Using Layouts
To use a pre-configured layout:
l
Tap the button(Layouts) on the View Lite main
screen. This will load the layout slider bar(right.)
To navigate the layout slider:
l Sweep your finger left or right.
l Tap a layout to select it. The chosen layout will now
appear on the main screen. If a VIGIL Server is currently selected, View Lite will automatically fill the
layout windows according to camera number order.
A user may also select the Any option from the layout slider
bar:
The Any option, located on the far-right of the layout slider
bar, will present you with the screen pictured right. This
mode allows the user to customize the amount of cameras to
be used for the current layout by dragging their finger across
the grid and selecting and appropriate amount of windows.
- Resize a window frame
- Undo any changes to individual frame size
- Use layout
- Discard layout and return to main screen
©2014 3xLOGIC Inc. | View Lite Smart Device Application - User Guide -28-
Page 33

3.7 Searching and Viewing Playback
Searching Playback
To search playback on a specific camera:
l Open a Camera Tools menu by pressing and holding a camera stream on the View Lite main screen until the checkmark
appears .
l
Tap the button(Playback) to open the playback search window. The playback button can also be accessed from a camera
stream's full-screen view.
After selecting the Playback button, You will be met with the Select Playback Period window(pictured right.)
By default you will have the option to select a Quick time interval; 1, 3, 5, 10 or 15 minutes of playback from the selected camera.
For a more comprehensive search, a date and time range may be manually set.
To set a date and time range:
l Select the Fromoption and configure the appropriate date and time.
l Repeat the process for the To option to allot the appropriate time interval for the playback footage you wish to pull.
l Select OK to continue.
Note: The POS Option will only appear when playback is being searched on a POS-enabled camera. The POS Search will pertain
only to the active camera. SSee "Searching POS Data" on page 32 for instructions on using the POS Search interface.
©2014 3xLOGIC Inc. | View Lite Smart Device Application - User Guide
Page 34

Viewing Playback
After retrieving the requested playback footage, you will be presented with the playback screen(pictured below.)
Indicates the current status of the video as well as playback speed(1x in the above example.)
Time and Current/Total frame count for active playback footage.
Brings queued playback to the first frame of the footage.
Set the currently queued playback footage back 10 frames.
Rewind the footage frame-by-frame.
Pause/ Play the currently queued footage.
Fast-Forward the footage frame-by-frame.
Set the currently queued playback footage forward 10 frames.
Brings the queued playback to the final frame of the footage.
Toggle the Live Preview box on or off. This feature enables a user to view a small window featuring the
live stream of the camera currently being used for playback
Toggles the Playback Tools menu. Playback Tools are explained below.
Save and email the current still. The Android device will allow the user to choose the email application
(i.e Gmail) of their choice.
Saves the current still image to the Android device's gallery. This option is located at the top-center of
the playback window.
©2014 3xLOGIC Inc. | View Lite Smart Device Application - User Guide -30-
Page 35

Toggle On-Screen Display(OSD) of POS data.
Adjust On-Screen Display settings
Adjust image quality by using the slider bar to set a value between 1(lowest) and 90(highest).
Toggle eagle-eye view on or off. Eagle eye is a full-screen preview window that opens when using digital zoom (pictured below). Enable this feature to keep aware of your zoomed location in relation to the
full image.
©2014 3xLOGIC Inc. | View Lite Smart Device Application - User Guide
Page 36

3.8 Searching POS Data
To search a Server for POS data:
l
Tap the ( POS Search) button in the Server specific toolbar. This will load the Select POS Period window(pictured below)
followed by a separate POS/ATM Search window.
The POS Search will query all applicable cameras on the Server during the timeframe chosen on the Select POS Period window.
Note:To perform a camera-specific POS search, select the Playback button from a POS-enabled camera's tools menu and tap
the POS button after filling in your playback search criteria.
l Fill in the appropriate search criteria in both windows and click OK to begin. Below is a sample of the POS Search result page.
l Use the arrow buttons at the bottom of the screen to quickly navigate results that span multiple pages.
l
The button will generate a list of numbers. Select a number to jump to the correpsonding POS Search results page.
l
Tap a POS item in the results table and tap the (Playback) button to pull footage surrounding the selected POS entry.
©2014 3xLOGIC Inc. | View Lite Smart Device Application - User Guide -32-
Page 37

3.9 View Lite Settings
To open the View Lite Settings menu(pictured below):
l
Tap the button(Settings) on the View Lite main screen.
VIGIL Servers
3xCLOUD
Mail Address
Auto Disconnect
Others
Help
Add VIGIL Servers to View Lite
Add a 3xCLOUD account to View Lite or create a 3xCLOUD
Account.
Configure the e-mail address that still images will be distributed from.
Configure Auto-Disconnect settings. This is a battery-saving
feature intended to prevent overconsumption of battery life
when using 3G/LTE connections.
Presents a list of miscellaneous options:
Clear Layout After Closing App - Clears main screen layout when app is closed.
Show/Hide Live on Playback - Enables/disables a small
Live View window while in playback mode.
Full Screen -Enables/Disables full-screen capability.
Do Not Save Settings When Closing App -When enabled,
settings will return to default whenever the app is closed.
Load the 3xLOGIC View Lite User's Guide
Contact
Version #
Generates a list of department contacts at 3xLOGIC
Lists View Lite version number.
©2014 3xLOGIC Inc. | View Lite Smart Device Application - User Guide
Page 38

4 Contact Information
3xLOGIC has offices in Victoria BC, Canada and in Westminster, Colorado, USA. Please visit our 3xLOGIC web site at www.3xl-
ogic.com. Please contact us by e-mail at support@3xlogic.com (technical support), or using the following contact information:
3xLOGIC Technical Support:
Toll Free:(877) 3XLOGIC
(877) 395-6442
Email:support@3xlogic.com
Website:www.3xlogic.com
3xLOGIC USA Main Office:
6510 West 91st Avenue
Westminster, CO 80031
USA
©2014 3xLOGIC Inc. | View Lite Smart Device Application - User Guide -34-
 Loading...