

Page 1
Page 2

VIGIL Copyright ©2014 3xLOGIC, Inc. All rights reserved.
3xLOGIC Inc.
6510 West 91st Avenue
Westminster, CO 80031
USA
Disclaimer
Information in this document is subject to change without notice and does not represent a commitment on the part of 3xLOGIC Inc. The software and/or databases described in this document are furnished under a license agreement or nondisclosure agreement. They may be used or copied only in accordance with the
terms of the agreement. It is against the law to copy the software on any medium except a s specifically allowed in the license or nondisclosure agreement. The
purchaser may make one copy of the software for backup purposes. No part of this manual and/or databases may be reproduced or transmitted in any form or by
any means, electronic or mechanical, including (but not limited to) photocopying, recording, or informa tion storage and retrieval systems, for any purpose other
than the purchaser's personal use, without the express written permission of 3xLOGIC Inc.
3xLOGIC, VIGIL a nd AZTECH are trademarks of 3xLOGIC, Inc.
Other trademarks and trade names ma y be used in this document to refer to either the entities claiming the marks and names or their products. 3xLOGIC Inc. disclaim any proprietary interest in trademarks and trade names other than their own.
-i-
©2014 3xLOGIC Inc. | 3xCLOUD Web Client - User Guide
Page 3
Table of Contents
1 Introduction 1
2 Creating a 3xCLOUD Company Account 2
3 Logging in to 3xCLOUD 3
4 3xCLOUD Main Screen 4
5 Settings 6
5.1 Servers Tab 7
5.1.1 Adding a Server to Your 3xCLOUD Account 8
By Serial No./ Alias (Figure 5.1.1 A) 8
By IPAddress and Port (Figure 5.1.1 B) 8
5.1.2 Editing a Server 9
Servers Configured Using Serial No./ Alias (Figure 5.1.2 A) 9
Server Configured using IP Address and Port (Figure 5.1.2 B) 9
5.2 Options Tab 10
5.3 Views Tab 11
5.4 Users Tab 12
5.4.1 Creating a User 13
5.5 OSD (On-Screen Display) Tab 14
6 3xCLOUD Sidebar 15
7 View Live Video in 3xCLOUD 16
7.1 Viewing Live Video/ Live View Edge Controls 17
7.2 Using PTZ Controls in the Live Viewer 18
8 Playback in 3xCLOUD 19
8.1 Searching for Playback Footage 19
8.2 View Playback Footage/ Playback Video Edge Controls 19
8.3 Exporting Playback Footage 21
DropBox 21
Media Server/ Cloud Footage Storage 21
9 POS Search 23
9.1 POS Reports 24
9.2 POS Playback 25
©2014 3xLOGIC Inc. | 3xCLOUD Web Client - User Guide -ii-
Page 4
10 Version Control 26
11 Contact Information 27
-iii-
©2014 3xLOGIC Inc. | 3xCLOUD Web Client - User Guide
Page 5
1 Introduction
Imagine watching live footage, searching playback and exporting surveillance video from any of your networked cameras while
catching your favorite hockey or football team's latest game. Picture the ability to control a PTZ camera at the warehouse from the
comfort of your couch. Envision running precise Point-Of-Sale queries against your store's cash register footage all while making
dinner in your own kitchen, with access only to a smartphone with Internet connection. These scenarios are no longer out-of-reach.
Welcome to the endless potential of cloud computing technology. Welcome to 3xCLOUD™.
3xCLOUD™, 3xLOGIC’s web-based VMS Client, can be accessed via any common web-browser, on any number of web-capable devices
including Windows or Linux PC, Mac, smartphones and tablets. 3xCLOUD™ offers simplistic operation and an easy-to-navigate interface that offers many of the core features existing in 3xLOGIC’s VIGIL desktop software, on-the-go.
With 3xCLOUD™, you’ll always be able to see what your cameras are seeing while you’re out with friends, tied up in a meeting or
stuck on the train. Live video(and more) at your fingertips, 24/7. 3xLOGIC is proud to stand at the forefront of this wave of cloudbased technology sweeping through the surveillance video management sector and has engineered the most robust, efficient webbased Client available.
Welcome. 3xLOGIC hopes you enjoy your time in the cloud.
©2014 3xLOGIC Inc. | 3xCLOUD Web Client - User Guide -1-
Page 6
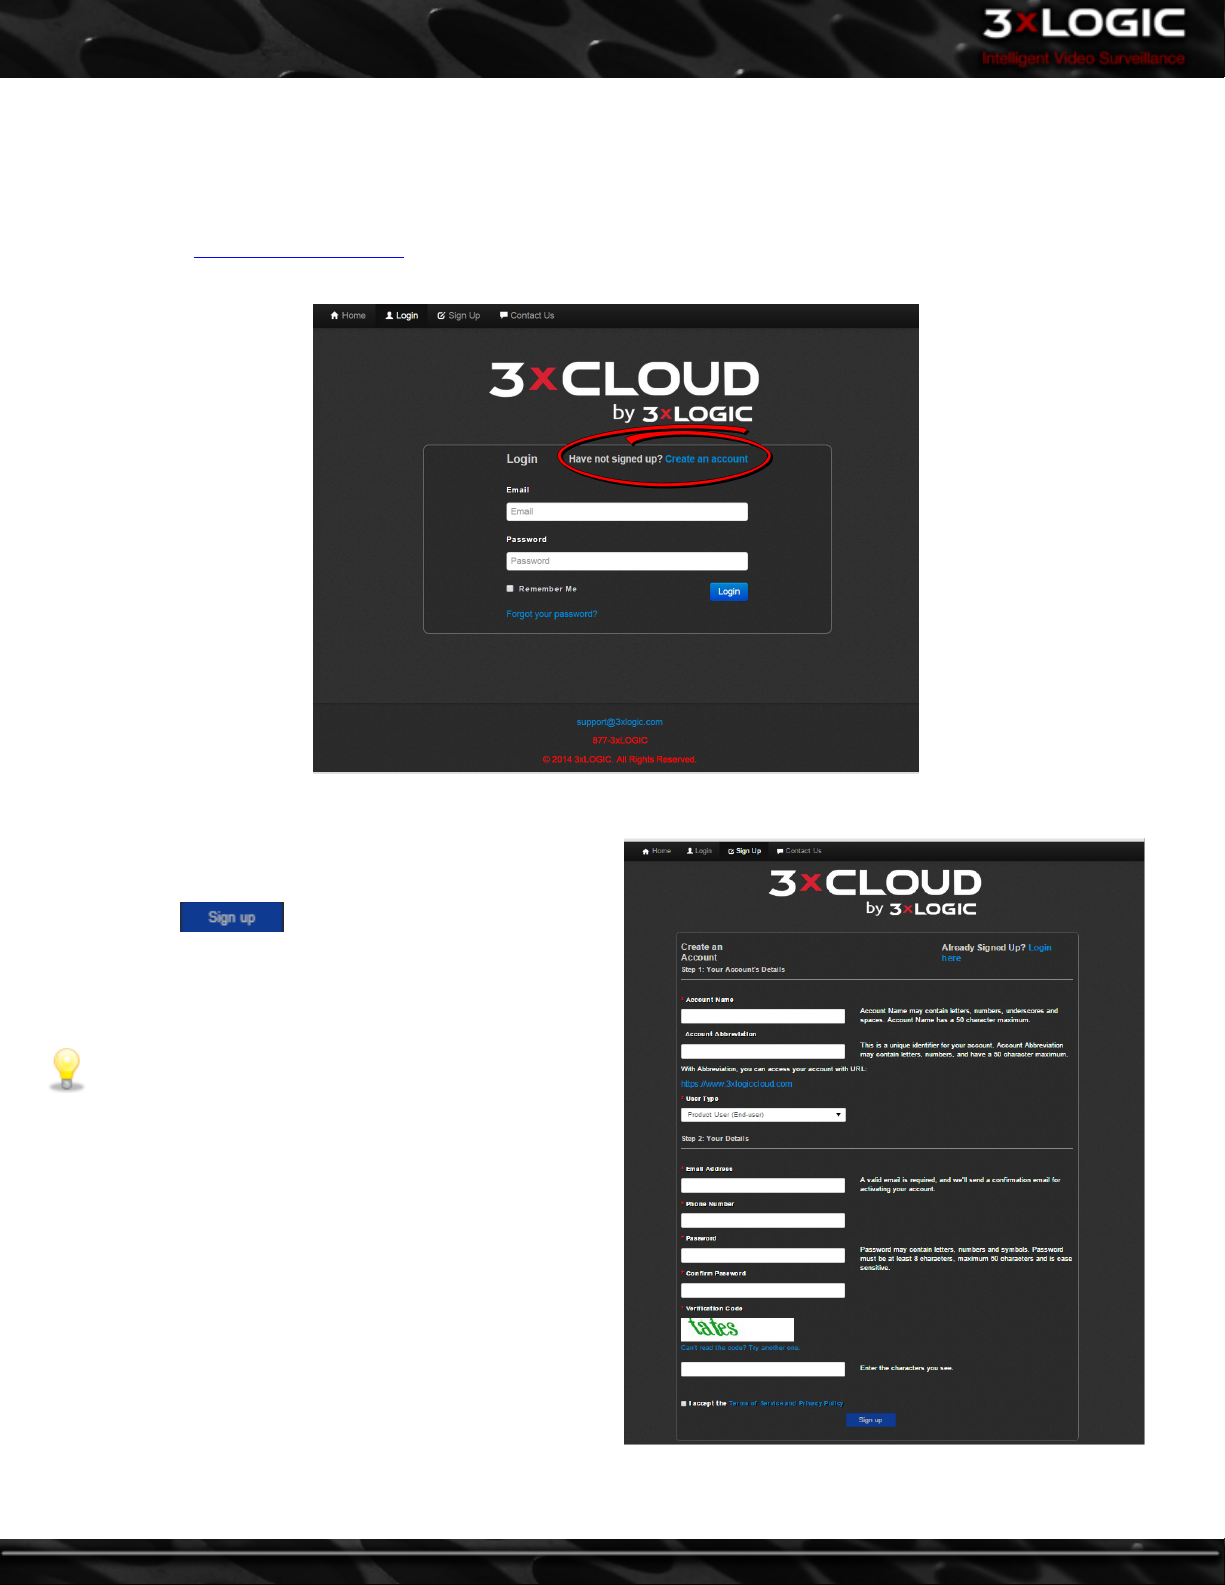
2 Creating a 3xCLOUD Company Account
First time users of 3xCLOUD will be required to create a company account. This will create both the company account as well as an
administrative-level user who will create and manage all other users for the company account. To create an account:
l Navigate to www.3xlogiccloud.com
l Select Create an Account(circled in red, below.)
This will launch the account setup page (pictured right):
l Fill in the required fields.
l
Click the button to submit the form.
You will receive a verification e-mail in the provided e-mail account’s inbox. Follow the instructions in the e-mail to finalize account creation.
Note: Be sure to keep record of your User Name
and Password. These credentials will be required
for login.
-2-
©2014 3xLOGIC Inc. | 3xCLOUD Web Client - User Guide
Page 7
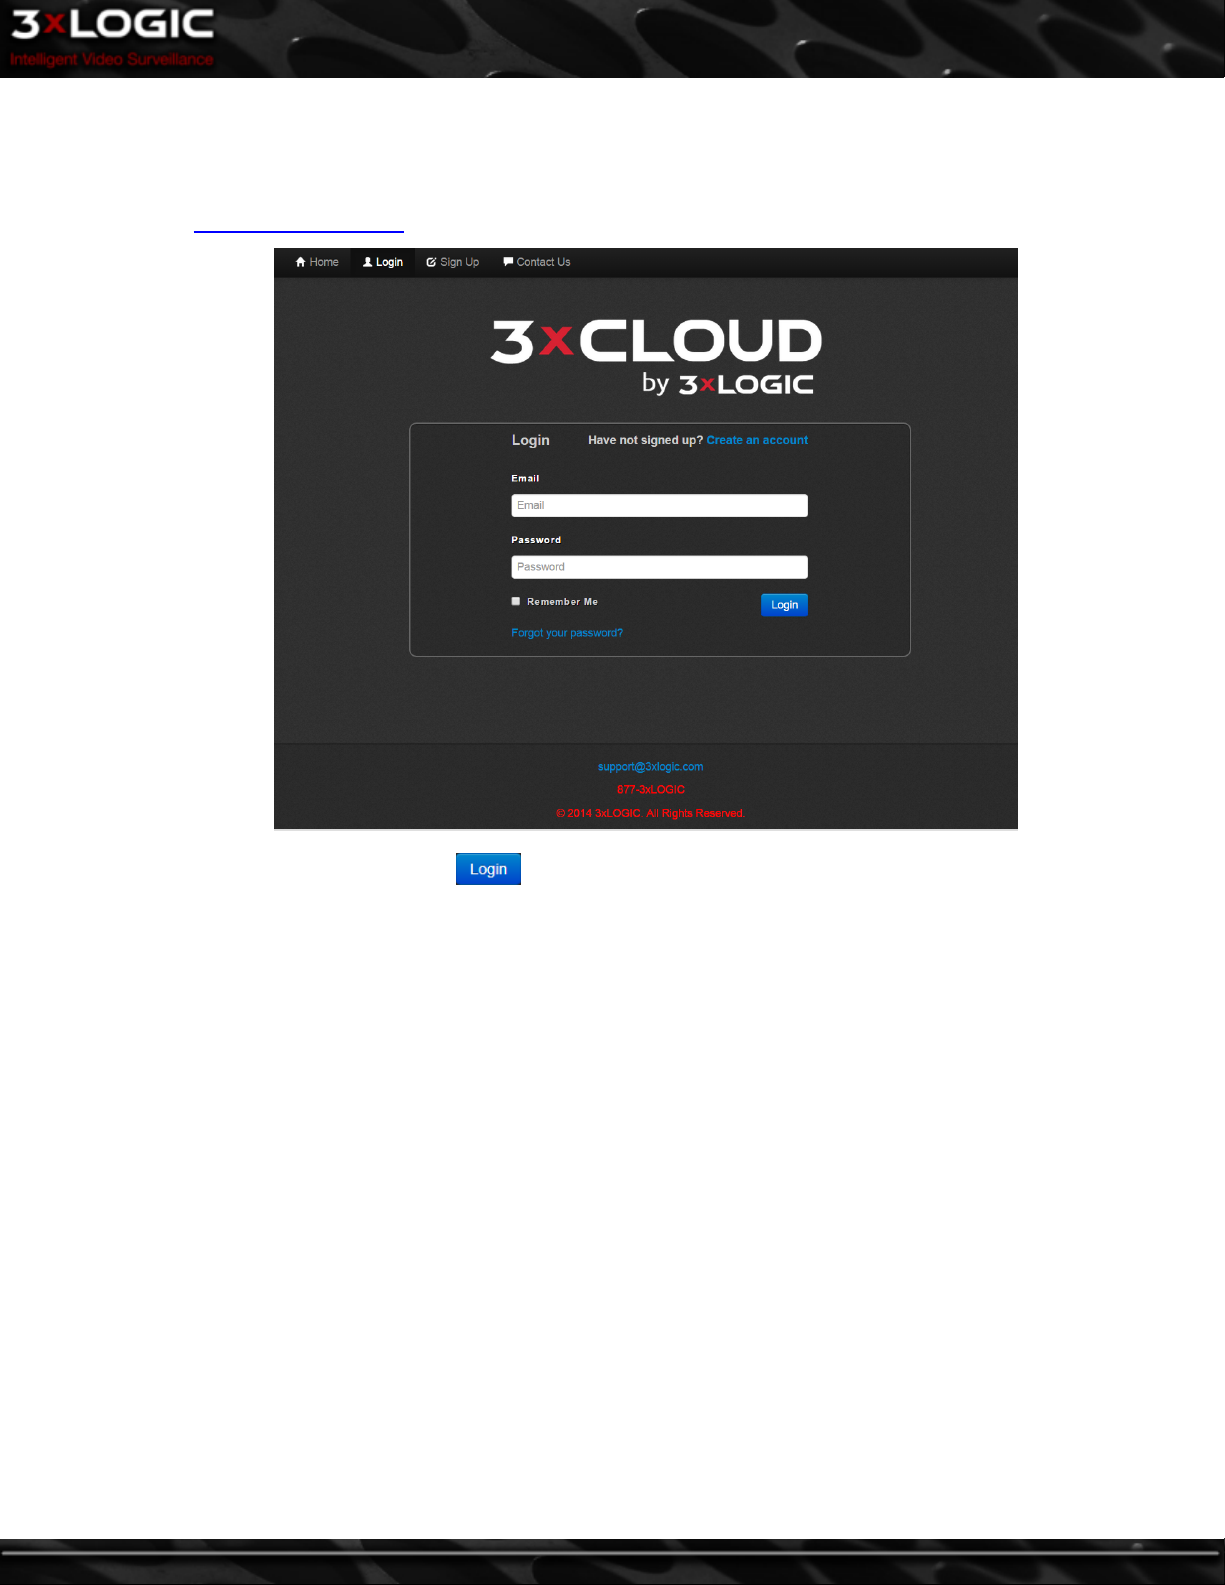
3 Logging in to 3xCLOUD
To login in to your 3xCLOUD after creating an account:
1. Navigate to www.3xlogiccloud.com.
2.
Enter your login credentials and click the button to continue.
©2014 3xLOGIC Inc. | 3xCLOUD Web Client - User Guide -3-
Page 8
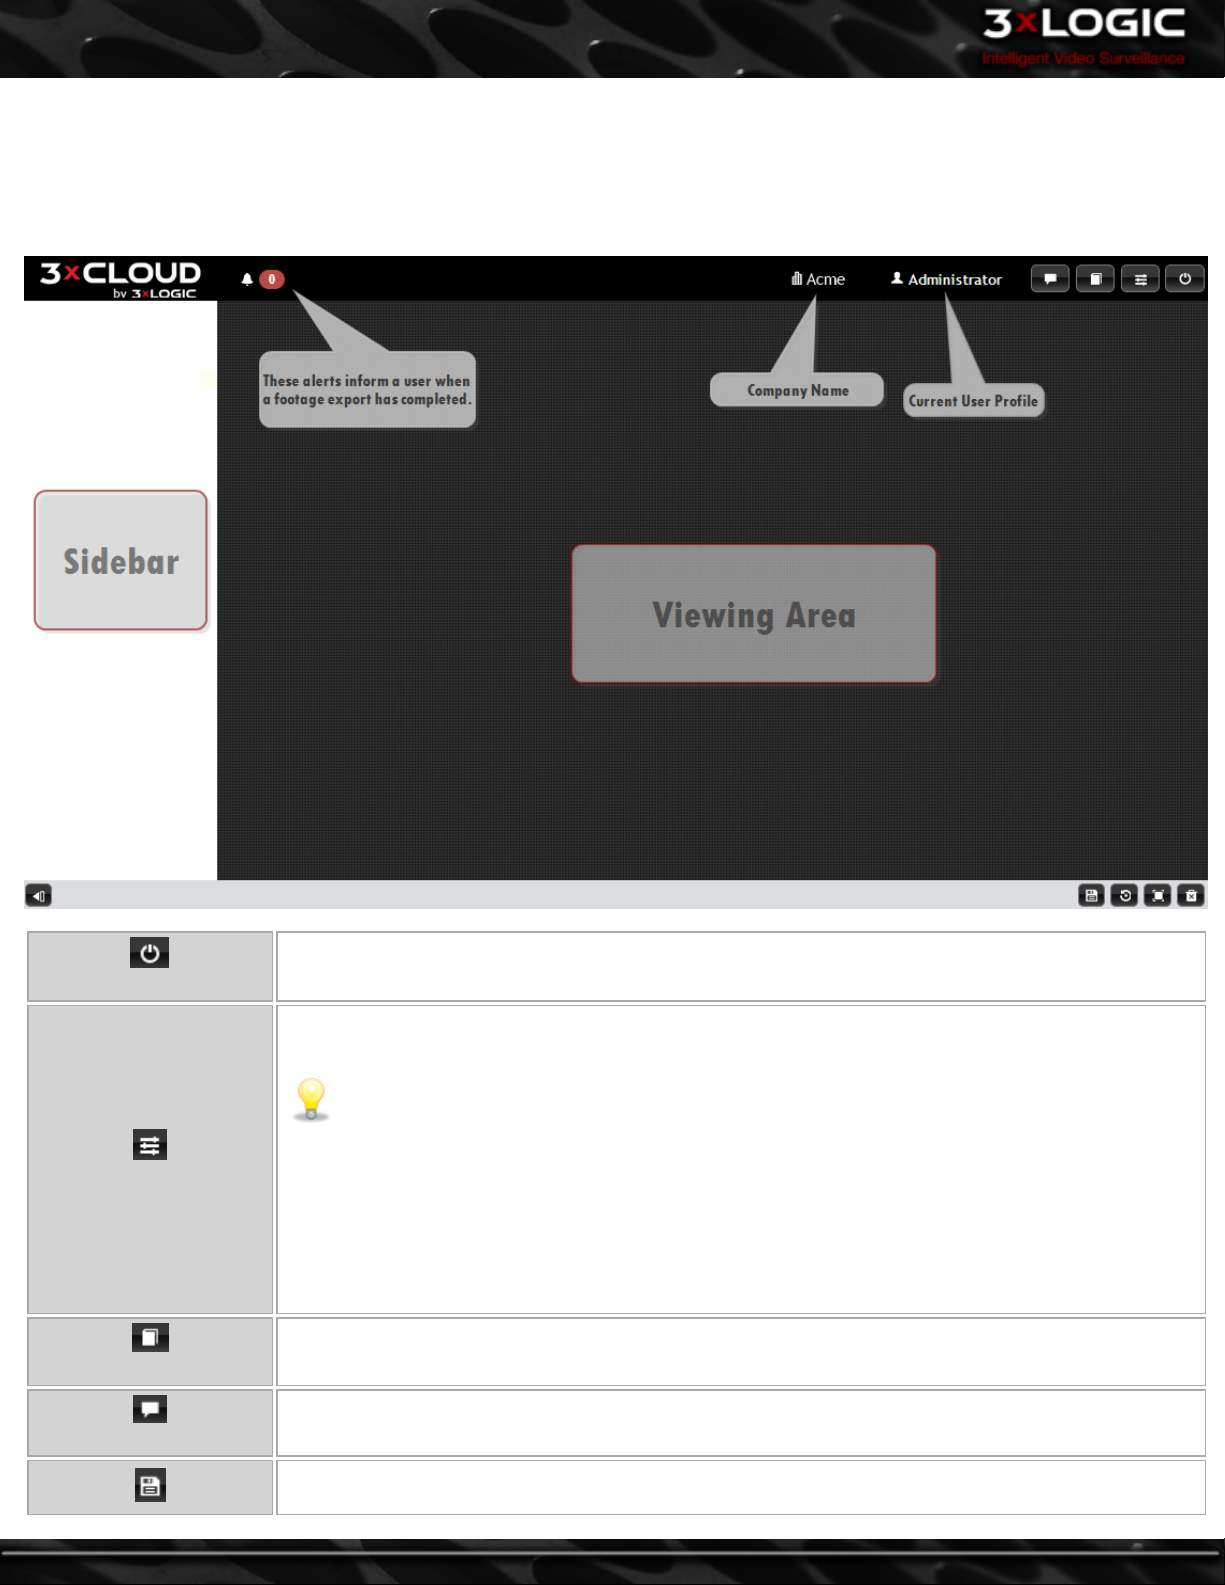
4 3xCLOUD Main Screen
When logging into your 3xCLOUD account for the first time, the interface will be empty. The 3xCLOUD interface is broken into two
main sections; The Sidebar and the Viewing Area. The information bar at the top features a Contact Us link. It also lists the Current
User Profile and their associated Company Name.
Logout
Settings
User Guide
Contact Us
Logout of the current 3xCLOUD account.
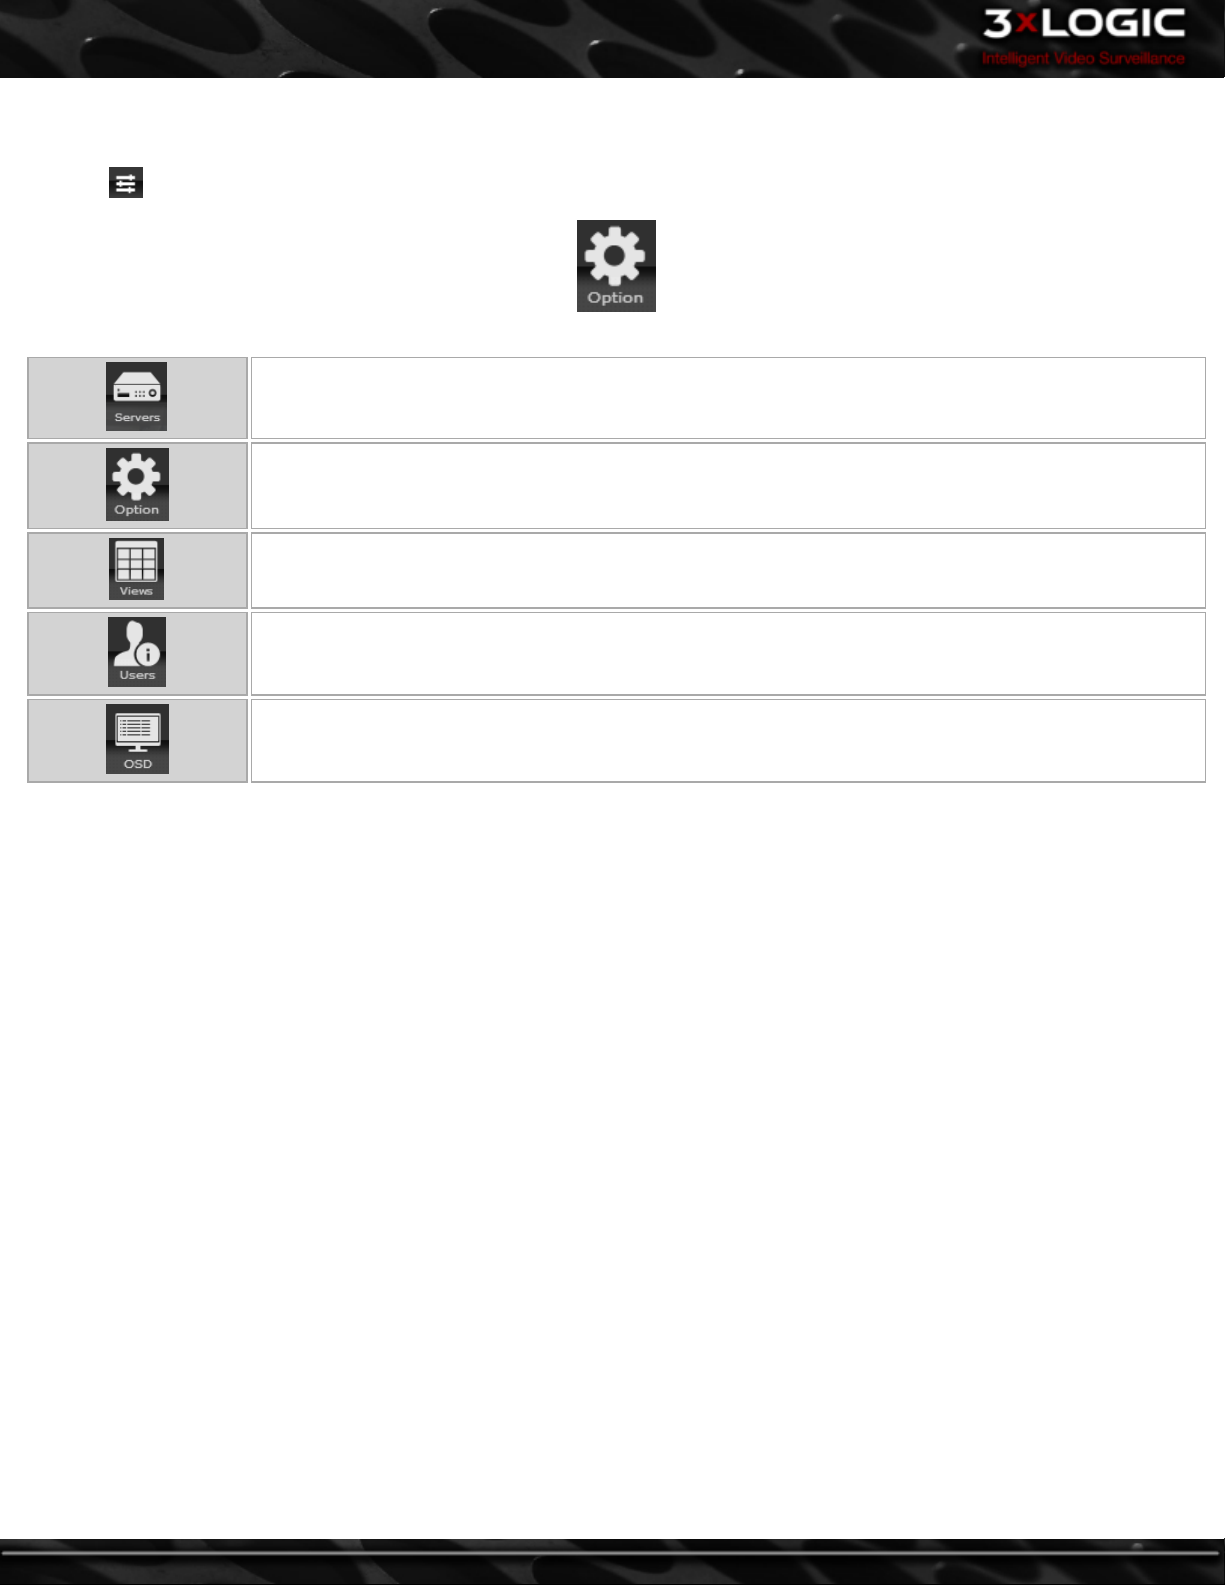
Open the Settings menu(pictured below). A user can manage settings via several different control
tabs.
Note:Configuration options marked with an asterisk (*) are only available to administrator-level
users.
l VIGIL Servers – Add*, Edit*, Delete* and Refresh VIGIL Servers.
l Options – Edit the Aspect Ratio, Resolution, and Video Quality settings.
l Views – Select and Delete Saved views.
l User Profiles – Add*, Edit, and Delete* user profiles.
l OSD (On-Screen Display) Settings – Edit OSD Display Settings such as Dwell Time, Column
Width, Columns to Display and more.
Opens the 3xCLOUD User Guide web help interface.
Opens a contact form. Fill in the fields with the appropriate information and click the Send button to
send an e-mail to the 3xLOGIC support team.
Save the current layout. Saved views can be accessed from th eview Tab on the Setting menu. See
"Views Tab" on page 11 for more info on loading saved views.
-4-
©2014 3xLOGIC Inc. | 3xCLOUD Web Client - User Guide
Page 9
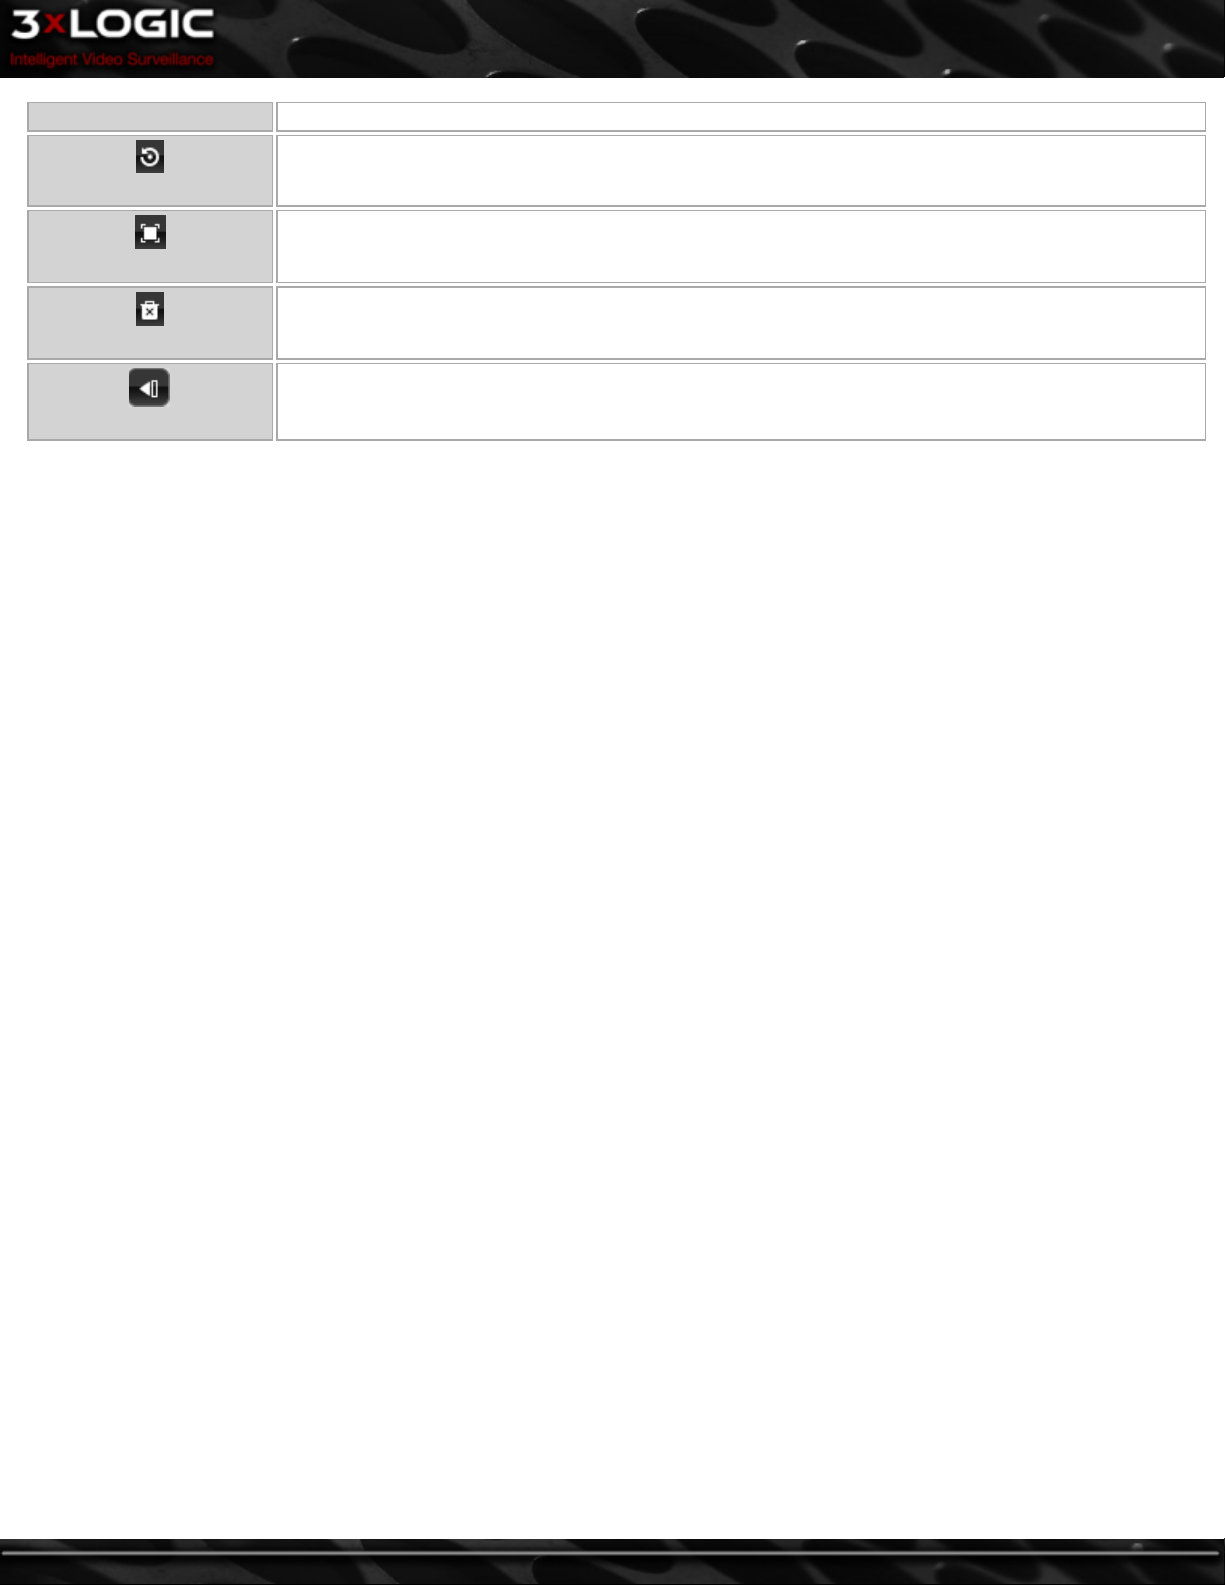
Save Current Layout
Reset the view to the last saved settings.
Reset View
Put the 3xCLOUD live viewer interface into full-screen mode.
Full Screen
Close all open camera streams in the viewing area.
Close All
Minimize/hide the sidebar.
Minimize Sidebar
A VIGIL Server must be configured to display camera streams in the viewing area.
©2014 3xLOGIC Inc. | 3xCLOUD Web Client - User Guide -5-
Page 10
5 Settings
Click the button to open the Settings menu(pictured below.)
Configuration options marked with an asterisk (*) in the below table are available only to administrative-level users.
From the Servers tab user may Add*, Edit*, Delete* and Refresh VIGIL Servers.
From the Options tab a user may select 3xCLOUD's Aspect Ratio setting.
From the Views tab a user may Edit/Rename or Delete saved views.
From the Users tab a user may Add*, Edit, and Delete* user profiles.
From the OSD Tab a user may edit OSD Display Settings such as Dwell Time, Column Width, Columns to
Display and more.
Details of each tab listed above are outlined in the proceeding sections of this chapter.
-6-
©2014 3xLOGIC Inc. | 3xCLOUD Web Client - User Guide
Page 11

5.1 Servers Tab
Click the Servers button on the Settings menu to open the Servers tab(pictured below.)
All Server's currently configured on the Cloud will be visible in the tab. Examples in the above image include, 3xLOGIC USA Demo,
Eng Demo and Home Demo.
Add and configure a VIGIL Server to your 3xCLOUD Account.
Edit Server details of a configured VIGIL Server.
Edit Server
Delete an existing VIGIL Server.
This will load a dialogue asking if you would like to delete the server in question. Click OK to delete or
Delete Server
Refresh Server
Cancel to return to the Server tab.
Refresh a Server. Refreshing a Server will initiate any settings changes that have been performed on the
Server itself (Add Camera, Disable Camera, Add/Remove Digital Inputs/Outputs, etc.)
Note: Only Administrative level accounts can Add, Edit or Delete a VIGIL Server.
©2014 3xLOGIC Inc. | 3xCLOUD Web Client - User Guide -7-
Page 12

5.1.1 Adding a Server to Your 3xCLOUD Account
Click the button to begin adding a VIGIL Server to your 3xCLOUD account.
This will generate a server configuration form(pictured below).
Figure 5.1.1 A
Figure 5.1.1 B
By Serial No./ Alias (Figure 5.1.1 A)
To add a Server using a VIGIL Connect Alias or serial number, select the By Serial No./Alias tab .
Fill in all the fields with your desired VIGIL Server's information and click Add to add the Server to your 3xCLOUD account.
By IPAddress and Port (Figure 5.1.1 B)
To add a Server using its IP address and the standard VIGIL port range, select the By IP Address and Port tab.
Fill in all fields with your desired VIGIL Server's information and click Add to add the Server to your 3xCLOUD account.
-8-
©2014 3xLOGIC Inc. | 3xCLOUD Web Client - User Guide
Page 13

5.1.2 Editing a Server
To Edit a VIGIL Server's details, click the button located next to your desired Server.
This will open the Edit Server Form (pictured below.)
Figure 5.1.2 A
Figure 5.1.2 B
Servers Configured Using Serial No./ Alias (Figure 5.1.2 A)
If the VIGIL Server you are editing was configured using a VIGIL Connect alias or serial number, the Edit Server Form will appear as is
pictured in Figure 5.1.2 A, above.
Server Configured using IP Address and Port (Figure 5.1.2 B)
If the VIGIL Server you are editing was configured using an IP Address and standard VIGIL port ranges, the Edit Server Form will
appear as is pictured in Figure 5.1.2 B, above.
©2014 3xLOGIC Inc. | 3xCLOUD Web Client - User Guide -9-
Page 14

5.2 Options Tab
Click the Options button on the Settings menu to open the Options tab(pictured below.)
From the Options tab, a user can adjust the Aspect Ratio.
Resolution
Resolution Choose a resolution. Options include QCIG, CIF, 2CIF, 4CIF VGA, Fullsize, AutoSize.
Quality
Select the level of Video Quality. Options include High, Medium, Low.
Quality
Note:Thissetting will only be used on cameras which do not have Automatic Video Quality mode
( ) in use.
Aspect Ratio
Fit The Fit setting resizes video images in respect to the browser window size.
Keep
The Keep setting will shrink or enlarge the video frames around the image as the browser window is
resized, keeping the original image aspect ratio intact.
-10-
©2014 3xLOGIC Inc. | 3xCLOUD Web Client - User Guide
Page 15
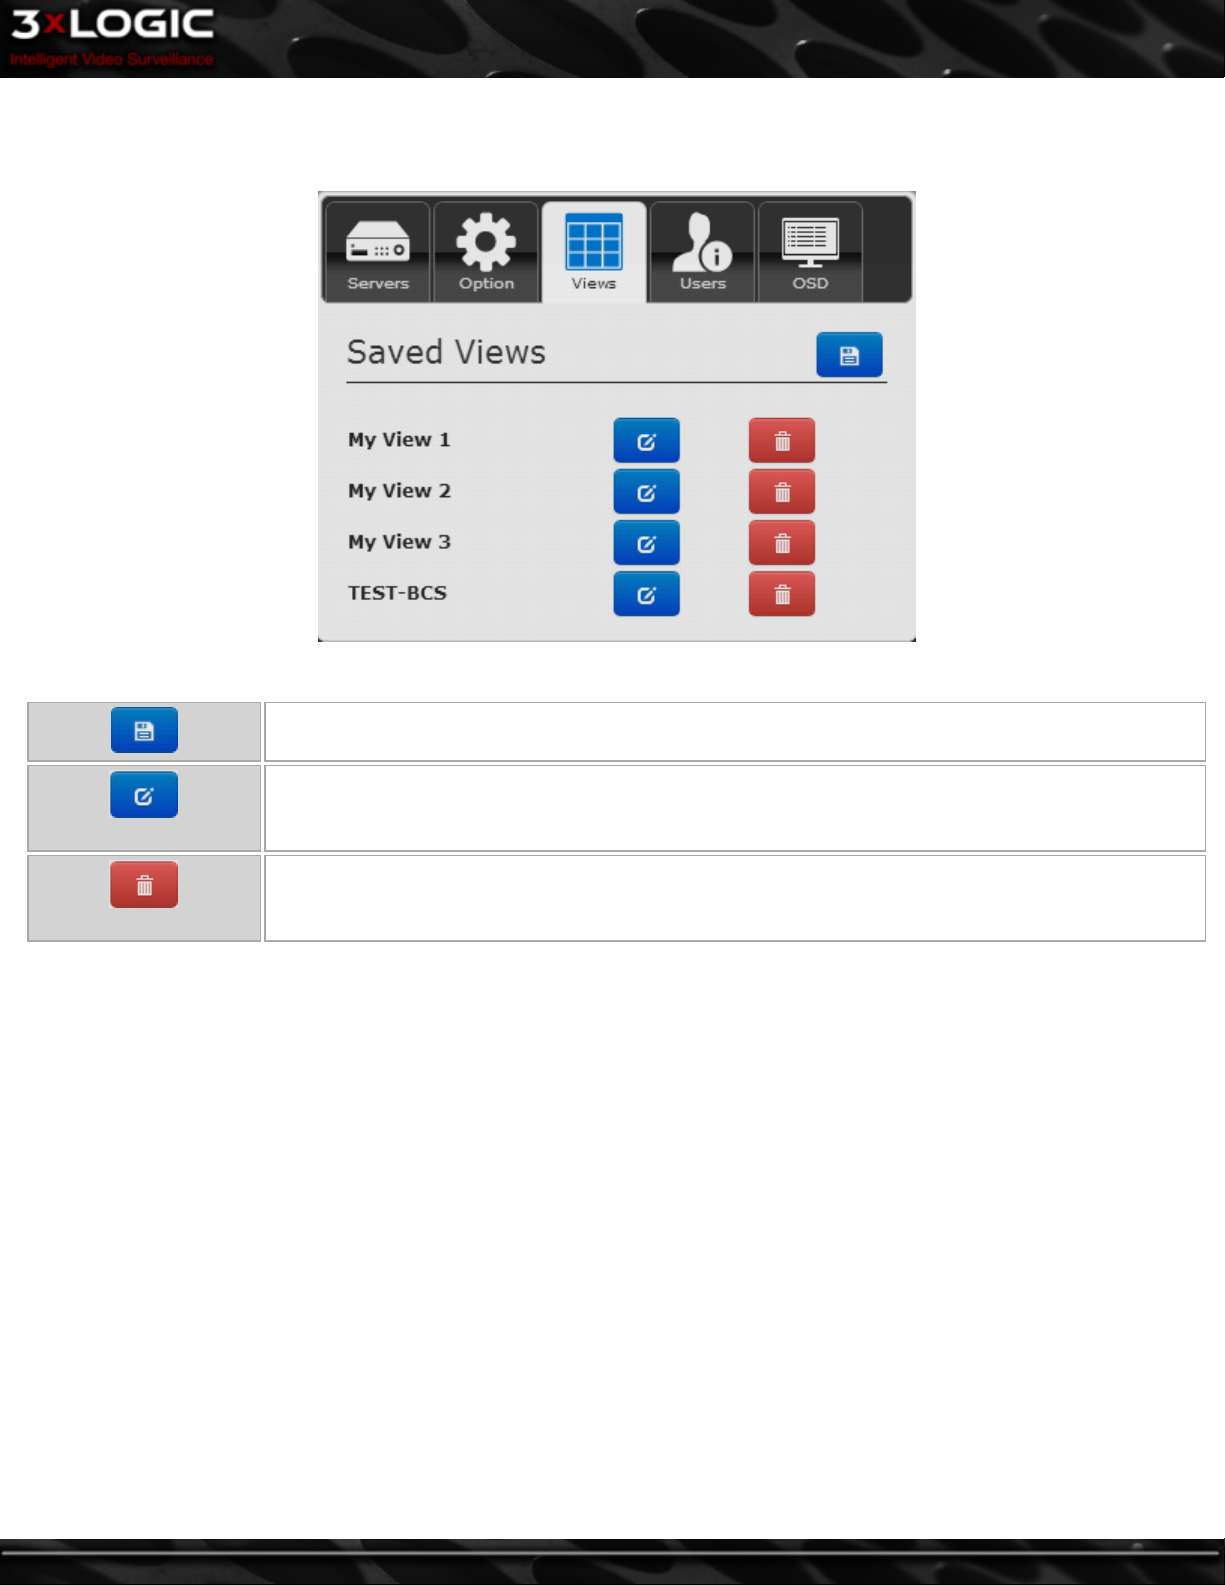
5.3 Views Tab
Click the Views button on the Settings menu to open the Views tab(pictured below.)
Under the Saved Views header, there will be a list of all views which have been saved on the active 3xCLOUD account.
Edit View
Delete View
Save the current live view. You will be prompted to name the Saved View. Click OK after choosing a
name to save the view.
Edit a View's name.
This will also load the selected view for a preview.
Delete an existing saved View.You will be asked to confirm. Select OK to permanently delete the view
or Cancel to return to the Views Tab.
©2014 3xLOGIC Inc. | 3xCLOUD Web Client - User Guide -11-
Page 16

5.4 Users Tab
Click the Users button on the Settings menu to open the Users tab(pictured below.)
Create a user.
User accounts are grouped into three separate tiers(Agent, Admin, Member.) For more info on user creation and the tiered user system, please See "Creating a User " on page 13.
Edit a user's details. A user's User Name, Phone Number and E- Mail Address may be edited. Admin-
Edit User
Delete User
istrative-level accounts(Agent, Admin) can also edit a User's User Group.
Delete an existing user profile.You will be asked to confirm. Select OK to permanently delete the user
profile or Cancel to return to the Views Tab.
Note:Only Administrative-level (Agent, Admin) users can Add and Delete users.
Agent-level accounts(The user who signed up for and created the 3xCLOUD company account) can assign a user to a User Group
(Admin or Member) based on the desired permissions for that user account. Agent-level users can also Add, Edit and Delete Server's
and Users. Only one agent-level user exists per 3xCLOUD company account.
Admin-level accounts can Add, Edit and Delete Servers and Add, Edit and Delete Member-level users.
Member-level accounts can only view Servers(and their cameras) that have been previously configured by Admins/Agents. Memberlevel users have no administrative-level permissions. Member-level users cannot Add, Edit or Delete Servers nor can they Add, Edit or
Delete other users.
-12-
©2014 3xLOGIC Inc. | 3xCLOUD Web Client - User Guide
Page 17

5.4.1 Creating a User
Click the button on the Users tab to create a user.
This will load the Create a User form (pictured below.)
Assign the user to a User Group(Member for basic access, Admin for advanced permissions/access). Fill in all the fields and click
Create to add the user profile to your 3xCLOUD company account. The user will receive a verification in their e-mail inbox. After
verifying, the user may login using their email address and password.
Note: Only Administrative-level (Agent, Admin) users can Add and Delete users.
©2014 3xLOGIC Inc. | 3xCLOUD Web Client - User Guide -13-
Page 18

5.5 OSD (On-Screen Display) Tab
Click the OSDbutton on the Settings menu to open the OSD tab(pictured below.)
The OSD Configurations window allows you to configure the look of your POS (Point-of-Sale) On-Screen Display.
Text Options
Dwell Time The amount of time a POS entry will remain on-screen
Number of Lines Number of OSD entry lines (if set to 8, the max number of POS entries displayed at once will be 8.)
Item Column Width Adjust the width of the OSD columns.
Font Size Adjust the OSD font size.
Horizontal Offset Adjust the horizontal position of the OSD.
Vertical Offset Adjust the vertical position of the OSD.
Show Column Headers Toggle OSD column headers on/off.
Header Font Color Choose the color of the OSD Column header font.
Entry Font Color Choose the color of the OSD POS entry font.
Show Column
Check off a box to include that column in the OSD.
Select Default to reset the current settings to the Default configuration.
Click Update to save OSD settings changes. Click reset to return the OSD settings to the last saved default settings.
-14-
©2014 3xLOGIC Inc. | 3xCLOUD Web Client - User Guide
Page 19

6 3xCLOUD Sidebar
The 3xCLOUD Client Sidebar will list all configured Servers, as well as all components belonging to those Servers.
VIGIL Server's names will appear along with the icon. Click a Server to
extend a list of available components/functions:
- Refresh - Refresh the selected VIGIL Server.
- Camera List - List the VIGIL Server's networked cameras.
- POS - Opens the POS Search.
- Digital Outputs - Opens a list of digital inputs currently con-
figured on the Server.
- Digital Inputs - Opens a list of digital outputs currently con-
figured on the Server.
A list of your saved views can also be accessed by clicking the icon.
©2014 3xLOGIC Inc. | 3xCLOUD Web Client - User Guide -15-
Page 20

7 View Live Video in 3xCLOUD
After successfully adding a VIGIL Server to your account, you are ready to begin viewing footage from its networked cameras as pictured below. Configured Servers will appear in the left side-bar. Click on a Server (1)to reveal its available components.
Click Camera (2) to open a list of the VIGIL Server's available cameras . Drag a camera name into the viewing area or double-click a
camera name to add the camera feed to viewing area.
Double-click Display All to automatically load all available camera feeds into the Live Viewer.
To view a video feed in full-screen mode, simply double click the desired frame.
-16-
©2014 3xLOGIC Inc. | 3xCLOUD Web Client - User Guide
Page 21

7.1 Viewing Live Video/ Live View Edge Controls
Cursor over a live camera feed to reveal its edge controls(pictured below.) Available controls will depend on the camera, its hardware and its VIGIL Server configuration.
Frame Resizers
Take Stillshot
Toggle PTZ Controls
Search Playback
Adjust Video Quality
Mode
Toggle OSD
Enlarge or shrink the feed's frame.
Take a stillshot of the current frame. The stillshot will be automatically downloaded to your browsers
downloads folder.
Toggle on-screen PTZ controls for PTZ-capable cameras.
Opens the Playback Search window.
Swich Video Quality Modes.
Click the button to use the mode defined in the Settings-Option Tab.
Click the button to automatically select quality based on available network resources.
Toggle the POS OSD (on-screen display) on or off.
Close the window frame.
Close Window Frame
©2014 3xLOGIC Inc. | 3xCLOUD Web Client - User Guide -17-
Page 22

7.2 Using PTZ Controls in the Live Viewer
To access a PTZ-capable camera's PTZ controls, cursor over the camera's frame, and select the button. The PTZ control panel
will appear as a transparent overlay over the camera feed(pictured below)
Pan and Tilt Controls
PTZ Preset Controls
Click a directional arrow to pan or tilt the camera in that direction. Single-clicks will move the camera a single point while clicking and holding will move the camera across several points.
Click this button to open the PTZ Preset window(pictured below.)
Select a number and click Save to save the current camera position to the chosen preset number.
Select a number and click Goto to move the camera to the PTZ position currently saved to the
chosen number.
-18-
©2014 3xLOGIC Inc. | 3xCLOUD Web Client - User Guide
Page 23

8 Playback in 3xCLOUD
8.1 Searching for Playback Footage
To search for playback from a camera feed, cursor over the camera
feed frame and click the button.
This will generate the below Playback Search window(pictured,
right.)
Select a pre-configured timeframe(5, 15, 30, or 60 minutes) or select
Advanced to input a custom timeframe.
The chosen camera feed frame will now convert to a playback window featuring the footage timeframe you have chosen.
8.2 View Playback Footage/ Playback Video Edge Controls
Play/Pause the current playback footage.
Play / Pause
Use the slider to adjust playback speed, from 1x to 50x.
Playback Speed
Return to Live View
Swich Video Quality Modes.
©2014 3xLOGIC Inc. | 3xCLOUD Web Client - User Guide -19-
Page 24

Adjust Video Quality Mode
Export Footage
Still Frame
Mark Footage
Click the button to use the mode defined in the Settings-Option Tab.
Click the button to automatically select quality based on available network resources.
Export the currently marked footage to your DropBox or Media Server/Cloud Footage Account.
You will be notified when the footage export is complete by the alert icon ( )in the top lefthand corner of the 3xCLOUD interface, next to the "3xCLOUD by 3xLOGIC" logo.
Please see Section 8.3 Exporting Playback Footage for more information regarding exporting footage. .
E-mail or download a still shot of the current frame.
Open a preview box of the Live Footage currently being received from camera
Creates slideable markers to mark footage for export. Footage within the light pink timeline will
be exported(pictured below.)
-20-
©2014 3xLOGIC Inc. | 3xCLOUD Web Client - User Guide
Page 25

8.3 Exporting Playback Footage
To export marked footage or entire playback clips, select the Export button ( )from the bottom of the Playback window. Two
Export options(DropBox, Media Server)will load in the Save to Cloud window(pictured below-right). Due to the nature of browserbased services, both have limitations.
DropBox
The Dropbox option requires that a DropBox be installed
on the current system's desktop. Please visit https://www.dropbox.com/ for more info regarding Dropbox.
The DropBox feature will only be available for footage
which is 15 minutes or less in duration. This is due to size
restrictions on standard DropBox accounts. This option
will not be visible on any Playback clips which are 15 minutes or longer.
Note:Please note that uploading footage to Drop-
Box is time intensive(several hours for some applications) and varies depending on network speeds
and available Server bandwidth. Please allow a sufficient time for the export to complete. You will
be notified when the footage export is complete
by the alert icon ( )in the top left-hand
corner of the 3xCLOUD interface, next to the
"3xCLOUD by 3xLOGIC" logo.
Media Server/ Cloud Footage Storage
Note:This option is a pay service and is only available
upon request. Please contact your 3xLOGIC representative to request this feature.
The Media Server/ Cloud Footage Storage option can be used for
larger video files. Also, stored footage can be accessed directly
via the 3xCLOUD interface.
Enter a Video Name, Resolution, FPS and Video Quality for the
export and click Save to begin the Export process.
Note:Please note that uploading footage to the Cloud can
be time intensive and varies depending on network speeds
and available Server bandwidth. Please allow sufficient
time for the export to complete. You will be notified
when the footage export is complete by the alert icon (
)in the top left-hand corner of the 3xCLOUD inter-
face, next to the "3xCLOUD by 3xLOGIC" logo.
Upon completion, footage stored in the Cloud Media Server can be quickly accessed from the 3xCLOUD sidebar:
©2014 3xLOGIC Inc. | 3xCLOUD Web Client - User Guide -21-
Page 26

1. Click the Cloud Footage treeview option on an applicable Server. This will open the list of footage stored on the Cloud.
2. Click the thumbnail from the desired clip to view playback.
-22-
©2014 3xLOGIC Inc. | 3xCLOUD Web Client - User Guide
Page 27

9 POS Search
To perform a POS data search, click the POS icon in the sidebar(1). After the POS menu extends, click POS/ATM Search(2).
This will generate the POS Search window(pictured below.)
Manually set a timeframe using the From and To fields, or select a Quick Time interval(5, 10, 30 mins: 1,2, 5 hrs)
Choose an operator(AND, OR), fill in and check off the desired search criteria and click search to generate your results.
©2014 3xLOGIC Inc. | 3xCLOUD Web Client - User Guide -23-
Page 28

9.1 POS Reports
After a successfully POS Search query, a user will be presented with a 3xCLOUD POS report(example pictured below.)
To take a record of the report, 3xCLOUD offers the option to export the current report page via e-mail or by downloading the entire
report locally via your browser.
To e-mail the current report page, click the E-mail Current Page button. You will be prompted to enter a subject line and any body
text to include. Click Send when you have finished. The report page will be e-mailed to the e-mail account associated with your
3xCLOUD user profile.
To download directly, click the Export Report button. The report will be downloaded as text file to your browsers download directory.
-24-
©2014 3xLOGIC Inc. | 3xCLOUD Web Client - User Guide
Page 29

9.2 POS Playback
To open playback footage that corresponds with an item in your POS search results, click the highlighted Idx number (circled in red)
in the POS report.
A playback window will open featuring a minute of footage which corresponds with the selected POS report entry. When pulling playback from a POS report, the playback window differs slightly from the regular 3xCLOUD playback window.
1. The POS transaction receipt will be included in a moveable window which can be minimized.
2. The POS Search and POS Search Results windows will be automatically minimized and can be retrieved by clicking their bot-
tom bar placeholders.
©2014 3xLOGIC Inc. | 3xCLOUD Web Client - User Guide -25-
Page 30

10 Version Control
Version Number/ Date Notes
1.0.0 / Feb 27th, 2014 -Initial Release
1.0.1/ Mar 4th, 2014
1.0.2/ Aug 30th, 2014 -Added Export Alert indicator and User info icons in top bar, updated screens accordingly.
1.0.3/ Dec 2nd, 2014
-Added changes to main page.
-Added changes to OSD Settings form.
-Made revisions in Sections 5, 6, 7, 8 and 9(including subsections). Added new tiered sser system information to Section 5.4. Added Live Preview toggle button to Section 8.2 as well as Video Quality mode
button to sections 7.1 and 8.2. Added new options to Section 5.2. Replaced screens as required by
aforementioned revisions.
-26-
©2014 3xLOGIC Inc. | 3xCLOUD Web Client - User Guide
Page 31

11 Contact Information
3xLOGIC has offices in Victoria BC, Canada and in Westminster, Colorado, USA. Please visit our 3xLOGIC web site at www.3xl-
ogic.com. Please contact us by e-mail at support@3xlogic.com (technical support), or using the following contact information:
3xLOGIC Technical Support:
Toll Free:(877) 3XLOGIC
(877) 395-6442
Email:support@3xlogic.com
Website:www.3xlogic.com
3xLOGIC USA Main Office:
300-10225 Westmoor Drive
Westminster, CO 80021
United States (303) 430-1969
©2014 3xLOGIC Inc. | 3xCLOUD Web Client - User Guide -27-
 Loading...