

Page 1
9700
Overhead Projector
Operating Instructions
Rétroprojecteur
Manuel Opérateur
Tageslichtprojektor
Bedienungsanleitung
Retroproyector
Manual del operador
Lavagna Luminosa
Manuale d’Uso
Overhead Prosjektør
Bruksanvisning
Overheadprojector
Handleiding
Retroprojector
Manual do usuário
Page 2

Thank You
ENGLISH
Thank you for choosing 3M overhead projection equipment. This product has been produced in accordance with 3M’s
highest quality and safety standards to ensure a smooth and troublefree use in the years to come. Your purchase of
this product proves that you appreciate this.
For optimum performance we kindly ask you to follow these operating instructions carefully. We hope you will enjoy
using this high performance product in your meeting, training and presentation sessions.
FRANÇAIS
Nous vous remercions de votre décision d’avoir choisi un retroprojecteur 3M. Ce produit offre toutes les garanties de
qualité et sécurité.
Veuillez observer soigneusement manuel d’opération suivant pour que vous puissiez utiliser l’appareil de façon
optimale. Nous espérons que ce produit à haute performance vous fera donnera satisfaction.
DEUTSCH
Vielen Dank, daβ Sie sich für einen 3M Tageslichtprojektor entschieden haben. Dieses Produkt erfüllt die höchsten
Ansprüche an Qualität und Sicherheit und gewährleistet eine problemlose und störungsfreie Bedienung für viele
Jahre.
Bitte beachten Sie die folgende Bedienungsanleitung sorgfältig, damit Sie das Gerät optimal einsetzen können. Wir
hoffen, daβ Sie bei der Arbeit mit diesem 3M Tageslichtprojektor viel Freude haben werden und wünschen Ihnen
viele erfolgreiche Präsentationen.
ESPAÑOL
Gracias por escoger este equipo de retroproyección 3M. Este producto ha sido construído según los estándares más
altos de calidad y seguridad 3M, para así asegurar su funcionaniemto libre de problemas durante los siguientes años.
Con la compra de este producto Ud. ha demostrado que aprecia esto. Para un rendimiento óptimo le recomendamos
seguir las instrucciones detalladas en el manual del operador. Esperamos que disfrute al usar este producto de alto
rendimiento en sus reuniónes, cursillos y demostraciones.
ITALIANO
Vi ringraziamo di aver scelto una lavagna luminosa della 3M. Questo apparecchio è stato prodotto in conformità alle
norme di qualità e sicurezza per assicurarvi negli anni futuri l’utilizzo senza difficoltà o problemi. Con l’acquisto di tale
prodotto avete mostrato di apprezzare la qualità.
Per un rendimento ottimale Vi preghiamo di leggere accuratamente le seguenti istruzioni.
Speriamo che l’utilizzo di un prodotto di un così elevato rendimento sia di Vostro gradimento durante le Vostro
riunioni di conferenza, di addestramento e di presentazione.
NORSK
Vi takker for at du har bestemt deg for en overhead prosjektor fra 3M. Dette produktet oppfyller de høyeste krav til
kvalitet og sikkerhet og garanterer problemløs og feilfri betjening i mange âr.
Vennligst følg vedlagte bruksveiledning omhyggelig, slik at du kan utnytte apparatet optimalt. Vi vil gjerne at du har
mye glede av dette kvalitetsproduktet.
NEDERLANDS
Wij danken u voor de aanschaf van 3M overheadprojectie-apparatuur. Dit produkt is vervaardigd conform de
strengste kwaliteits-en veiligheidsnormen van 3M, zodat u gedurende vele jaren verzekerd bent van een soepel en
storingvrij gebruik. Uw keuze voor 3M geeft aan dat u dit op prijs stelt.
Voor optimale prestaties verzoeken wij u de instructies in deze gebruiksaanwijzing zorgvuldig op te volgen. Wij hopen
dat dit kwaliteitsprodukt u uitstekend van dienst zal zijn tijdens vergaderingen, trainingen en presentaties.
PORTUGUÊS
Agradecemos a escolha dum retroprojector 3M. Este produto foi concebido segundo os mais altos padrões de
qualidade e segurança 3M. A fim de lhe assegurar um funcionamento sem problemas durante os próximos anos.
Para obter um melhor rendimento do aparelho recomendamos a leitura deste manual. Esperamos que este produto
de elevado rendimento seja do seu agrado e lhe proporcione prazer nas suas reuniõnes, cursos e demonstrações.
1
Page 3
Projector to screen distance
Projector to screen distance - Liste de distances projecteur/écran de projection Entfernungstabelle Projektor/Projektionswand - Escala de distancia
proyector/superficie de proyección - Tabella delle distanze proiettore/schermo di
proiezione - Avstandstabell eyskastor/projeksjonregg - Afstandstabell
projector/projectieviak - Tabela de diståncias projector/pantalha de projecão
9700 EVD
F = 342 mm
9700 EVD
F = 342 mm
F = 342 mm
9700 EVD
F = 292 mm
x=21.3 cm
(8.4I)
x=24.1 cm
(9.5I)
x=26.4 cm
(10.4I)
x=21.3 cm
(8.4I)
x=24.1 cm
(9.5I)
x=26.4 cm
(10.4I)
127 cm
x
127 cm
50I x 50I 60I x 60I 70I x 70I 84I x 84I 96I x 96I
187 cm
(74I)
x
50I
239 cm
(94I)
215 cm
(85I)
199 cm
(78I)
203 cm
(80I)
183 cm
(72I)
170 cm
(67I)
152 cm
x
152 cm
217 cm
(86I)
x
60I
279 cm
(110I)
251 cm
(99I)
232 cm
(91I)
238 cm
(94I)
214 cm
(84I)
198 cm
(78I)
177 cm
x
177 cm
248 cm
(98I)
x
320 cm
(126I)
287 cm
(113I)
265 cm
(104I)
273 cm
(107I)
244 cm
(96I)
226 cm
(89I)
70I
213 cm
x
213 cm
291 cm
(114I)
x
84I
377 cm
(148I)
338 cm
(133I)
311 cm
(122I)
321 cm
(126I)
288 cm
(113I)
266 cm
(104I)
243 cm
x
243 cm
327 cm
(129I)
x
96I
426 cm
(168I)
381 cm
(150I)
351 cm
(138I)
363 cm
(143I)
324 cm
(128I)
299 cm
(118I)
2
Page 4

GB
IMPORTANT SAFEGUARDS
When using your overhead projection equipment,
basic safety precautions should always be
followed, including the following:
1. Read and understand all instructions
before using. Pay particular attention to
areas where this symbol
!
is shown.
2. Close supervision is necessary when any
appliance is used by or near children. Do not
leave appliance unattended while in use.
!
3. Care must be taken as burns can occur from
touching hot parts.
4. Do not operate appliance with a damaged
cord or if the appliance has been dropped or
damaged until it has been examined by a
qualified serviceman.
!
5. Position the cord so that it will not be tripped
over, pulled, or contact hot surfaces.
6. If an extension cord is necessary, a cord with
a current rating at least equal to that of the
appliance should be used. Cords rated for
less amperage than the appliance may
overheat.
7. Always unplug appliance from electrical outlet
before cleaning and servicing and when not in
use. Never yank cord to pull plug from outlet.
Grasp plug and pull to disconnect.
!
8. Let appliance cool completely before putting
away or when replacing lamp.
9. To reduce the risk of electric shock, do not
immerse this appliance in water or other
liquids.
10. To reduce the risk of electric shock, do not
disassemble this appliance, but take it to a
qualified technician when service or repair
work is required. Incorrect reassembling can
cause electric shock when the appliance is
used subsequently.
11. The use of an accessory attachment not
recommended by the manufacturer may
cause a risk of fire, electric shock, or injury to
persons.
12. Do not overload accessory circuit.
13. Connect this appliance to a grounded outlet.
14. Disconnect this unit from its source of supply
before replacing the projection lamp.
!
15. This unit is equipped with optical lenses and
should not be exposed to direct sunlight.
16. Keep ventilation openings free of any
obstructions.
17. This unit is connected by a special cable that,
if it is damaged, has to be replaced by the
same type of cable. This cable can be
ordered from your local 3M dealer and has to
be installed by a qualified serviceman.
SAVE THESE INSTRUCTIONS
The information contained in this manual will help
you operate and maintain your overhead
projector.
3M 9700 Operator’s Guide
3
Page 5
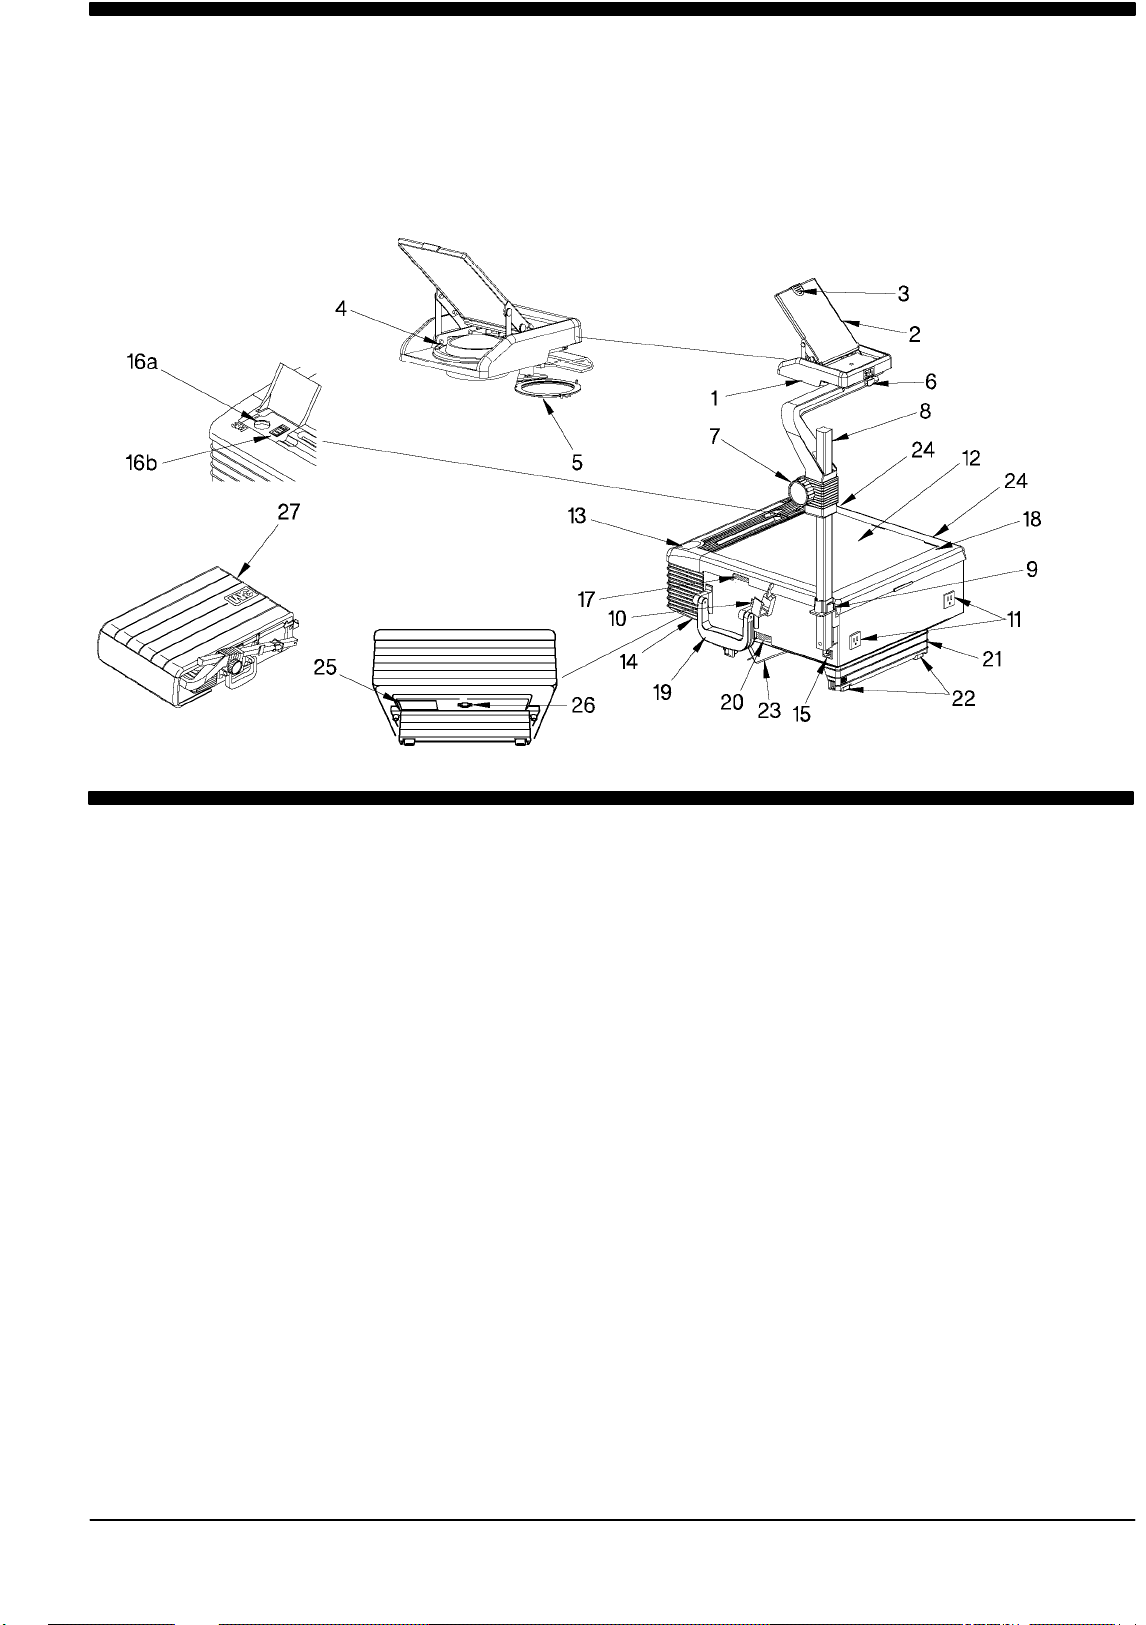
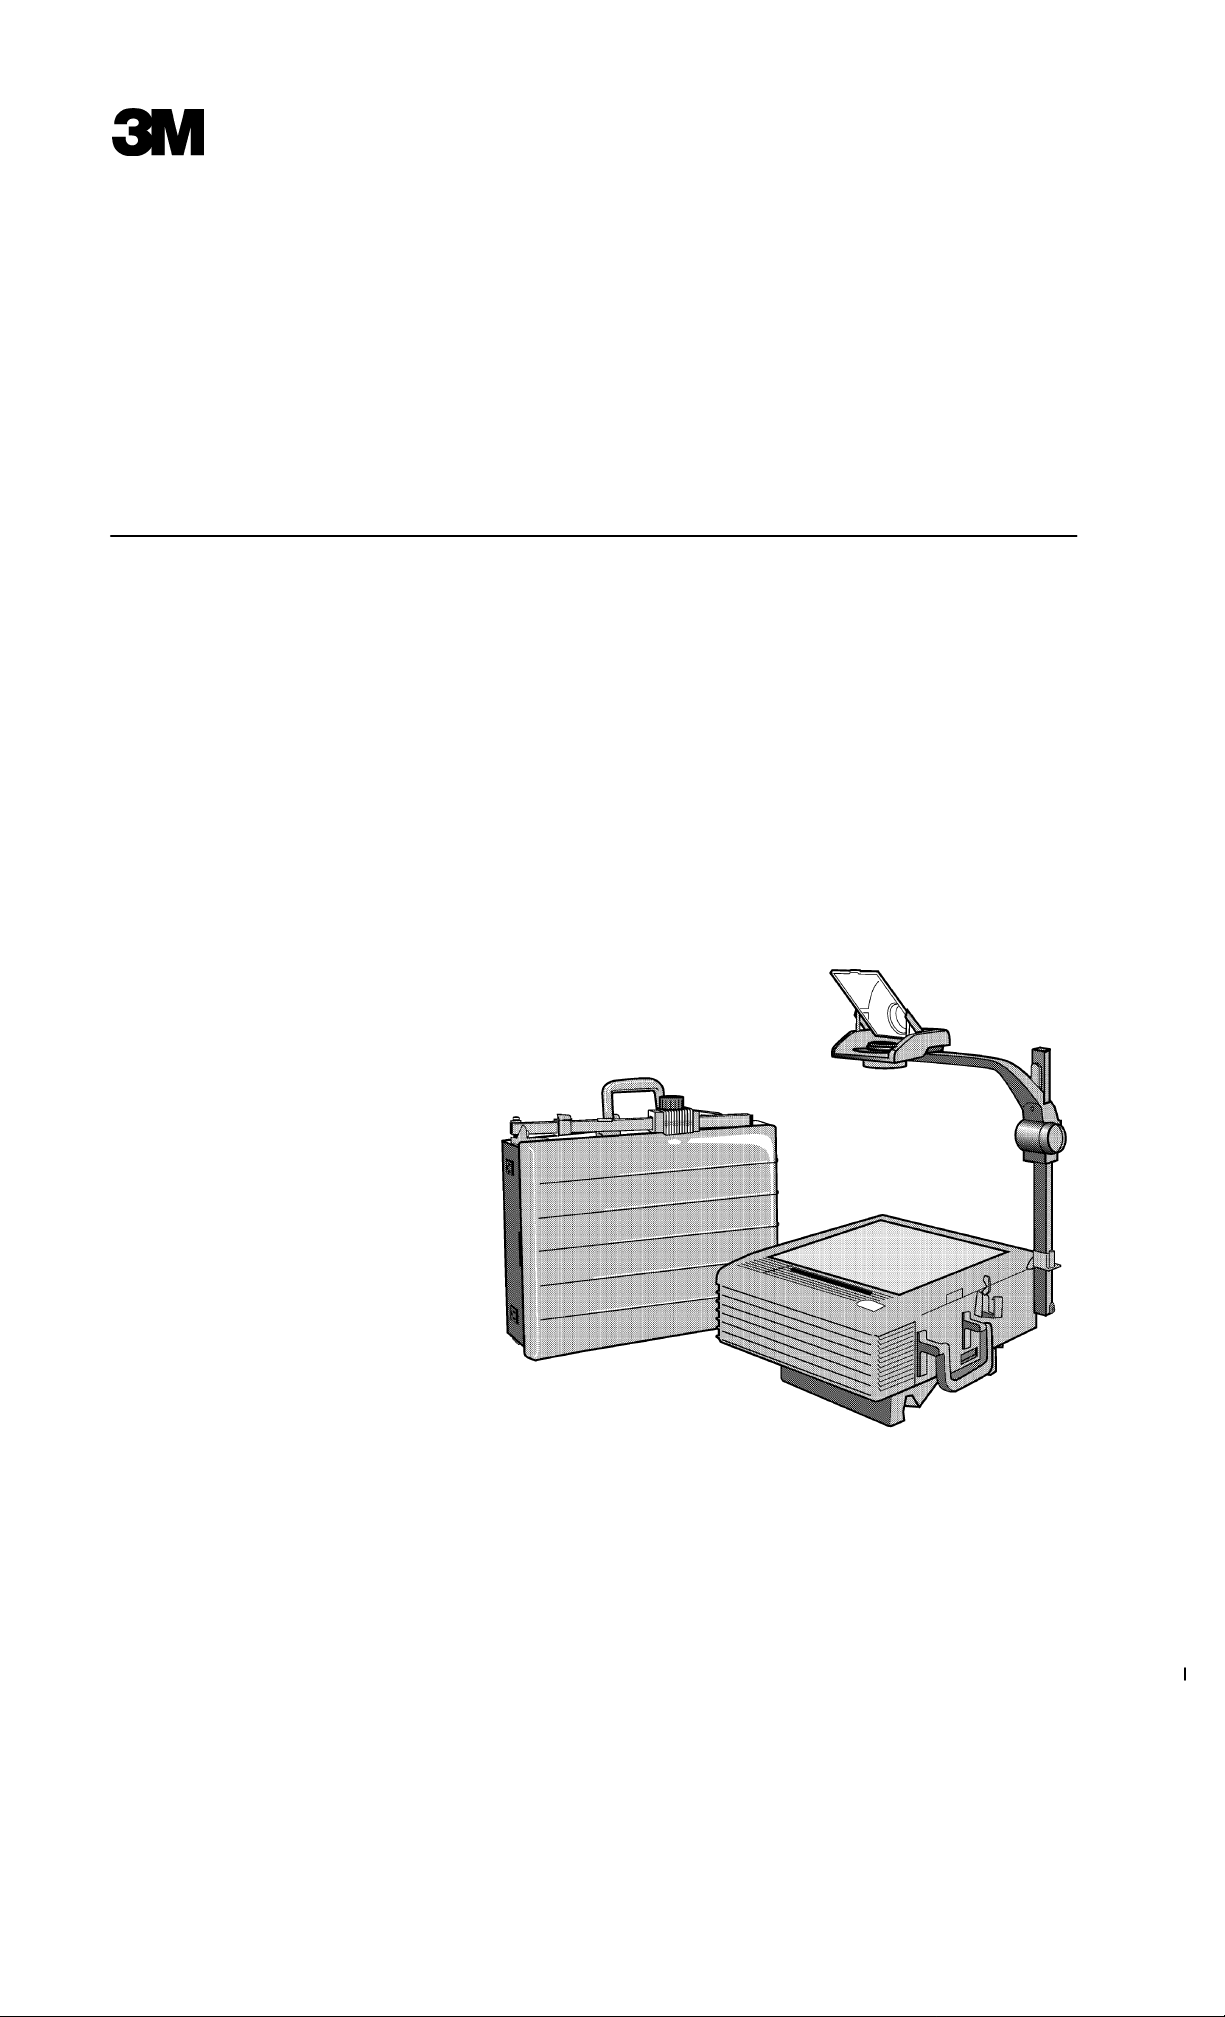
Product Description and Machine Characteristics
The 3MtOverhead Projector 9700 is designed to be
safe, efficient, portable, and easy to use. It features an
open head, triplet lens, high output lamp, lamp
changer, lamp brightness control, external colour tuning
adjustment, unswitched power outlets for accessories,
and lamp interrupt switches to prevent damage.
To
transport the 9700 projector
folding
the body and lift by the carrying handle.
Refer to the illustration below to identify the external
machine characteristics for the 9700.
legs, rotate the head, slip the hard travel cover over
, lower the post, retract the
Part Identification List
1. Open Projection Head
2. Projection Mirror
3. Mirror Lift Tab
4. Triplet Lens
5. Flip-In Magnifier (Optional Accessory)
6. Head Release Button
7. Focus Knob
8. Folding Post
9. Post Latch
10. Post Cradle
11. Accessory Outlets (design varies by country)
12. Stage Glass
13. On/Off Power Switch
14. Attached Power Cord (120 VAC only)
15. Detachable Power Cord Connector (if equipped)
16. Control Panel Door (with lamp interrupt switch)
a. Lamp Changer Dial
b. High/Low Lamp Brightness Switch
17. Stage Cover Release Latch (with interlock)
18. Stage Cover
19. Folding Carrying Handle
20. Folding Leg Release Latch (left, right sides)
21. Folding Legs
22. Vibration Isolation Feet
23. Folding Mirror Pan (with lamp interrupt switch)
24. Travel Feet
25. Machine Identification Plate
26. Colour Tuning Adjustment
27. Hard Travel Cover
3M 9700 Operator’s Guide
4
Page 6

Set Up Projector
1. Set projector down on table. To remove travel
cover, lift up at back and slide cover off.
2. Hold projector above table top. Lift up on both leg
release latches to unfold legs and mirror pan.
Fold Down Projector
3. Set projector down on table. Lamp will not
illuminate unless folding legs and mirror pan are
completely down.
4. If equipped with Flip-In Magnifier, rotate focus
knob to raise lens away from projector body.
5. Release post cradle latch and lift post to upright
position. Post will lock into place.
6. Push head release button and rotate head 90_ until
it locks into place.
7. Grasp mirror lift tab and raise projection mirror.
1. Unplug power cord from electrical outlet.
2. Lower projection mirror to closed position.
3. Push head release button and rotate head 90_ until
it locks into position.
4. Release post latch and lower post until it stops and
locks in the post cradle.
5. Rotate focus knob counterclockwise to lower head
until it stops.
6. Lift projector by carrying handle and set down on
travel feet.
7. Push on leg tab to fold and lock each leg into
projector body.
8. Slide travel cover over projector body. Push down
on back edge of cover to lock in place.
9. Coil power cord and insert into front space of travel
cover.
3M 9700 Operator’s Guide
5
Page 7

Operating The Projector
!
Do not illuminate the lamp with the projection mirror
in the down position.
To Operate Projector:
1. Position projector in front of projection screen. The
distance from the screen controls the size of the
projected image.
2. Plug in detachable power cord (if equipped) into
connector on side of projector. Plug in power cord
(all projectors) into electrical outlet.
3. Push power switch “On” to illuminate lamp.
Important
Lamp will not illuminate unless folding legs
and mirror pan are completely down.
4. Rotate projector (1) until projected light beam is
perpendicular (90_) to the screen surface. The
height at the left and right sides of the projected
image should be equal.
5. Adjust angle of projection mirror (2) to raise or
lower the image on the screen.
6. For best results, tilt projection screen (3) toward
projector until the width of the projected image is
equal at both the top and bottom.
7. Place LCD projection panel or film transparency on
stage glass (4).
8. Set “High/Low” lamp setting to desired position.
See “High/Low Lamp Setting” below.
9. Rotate focus knob (5) for clearest image.
!
Caution
Lamp Changer
If the primary lamp burns out, rotate Lamp Changer
dial to select the second lamp.
9700–27C
1. Open control panel door (1).
2. Lamp interrupt switch (2) cuts power to lamp.
3. Rotate lamp changer dial (3) to select alternate
lamp. Turn dial fully until it stops.
4. Close control panel door to illuminate lamp.
The glass and metal frame on the flip-in magnifier
lens get warm to the touch during use. Always
grasp the insulated tab to rotate the lens.
10. If your projector has the optional magnifier lens
rotate the lens to enlarge the LCD projection panel
image size. Adjust focus knob (5) for sharpest
image.
High/Low Lamp Setting
Activate the High/Low switch to select High (brightest)
or Low (normal) lamp illumination. See diagram to
left.
1. Open control panel door (1).
2. Lamp interrupt switch (2) cuts power to lamp.
3. Press High/Low switch (4) to set desired
brightness.
a.
b.
4. Close control panel door to illuminate lamp.
= Brightest image, shorter lamp life
= Normal image, longer lamp life
Lamp will not illuminate unless Control Panel door is completely closed.
3M 9700 Operator’s Guide
Important
6
Page 8

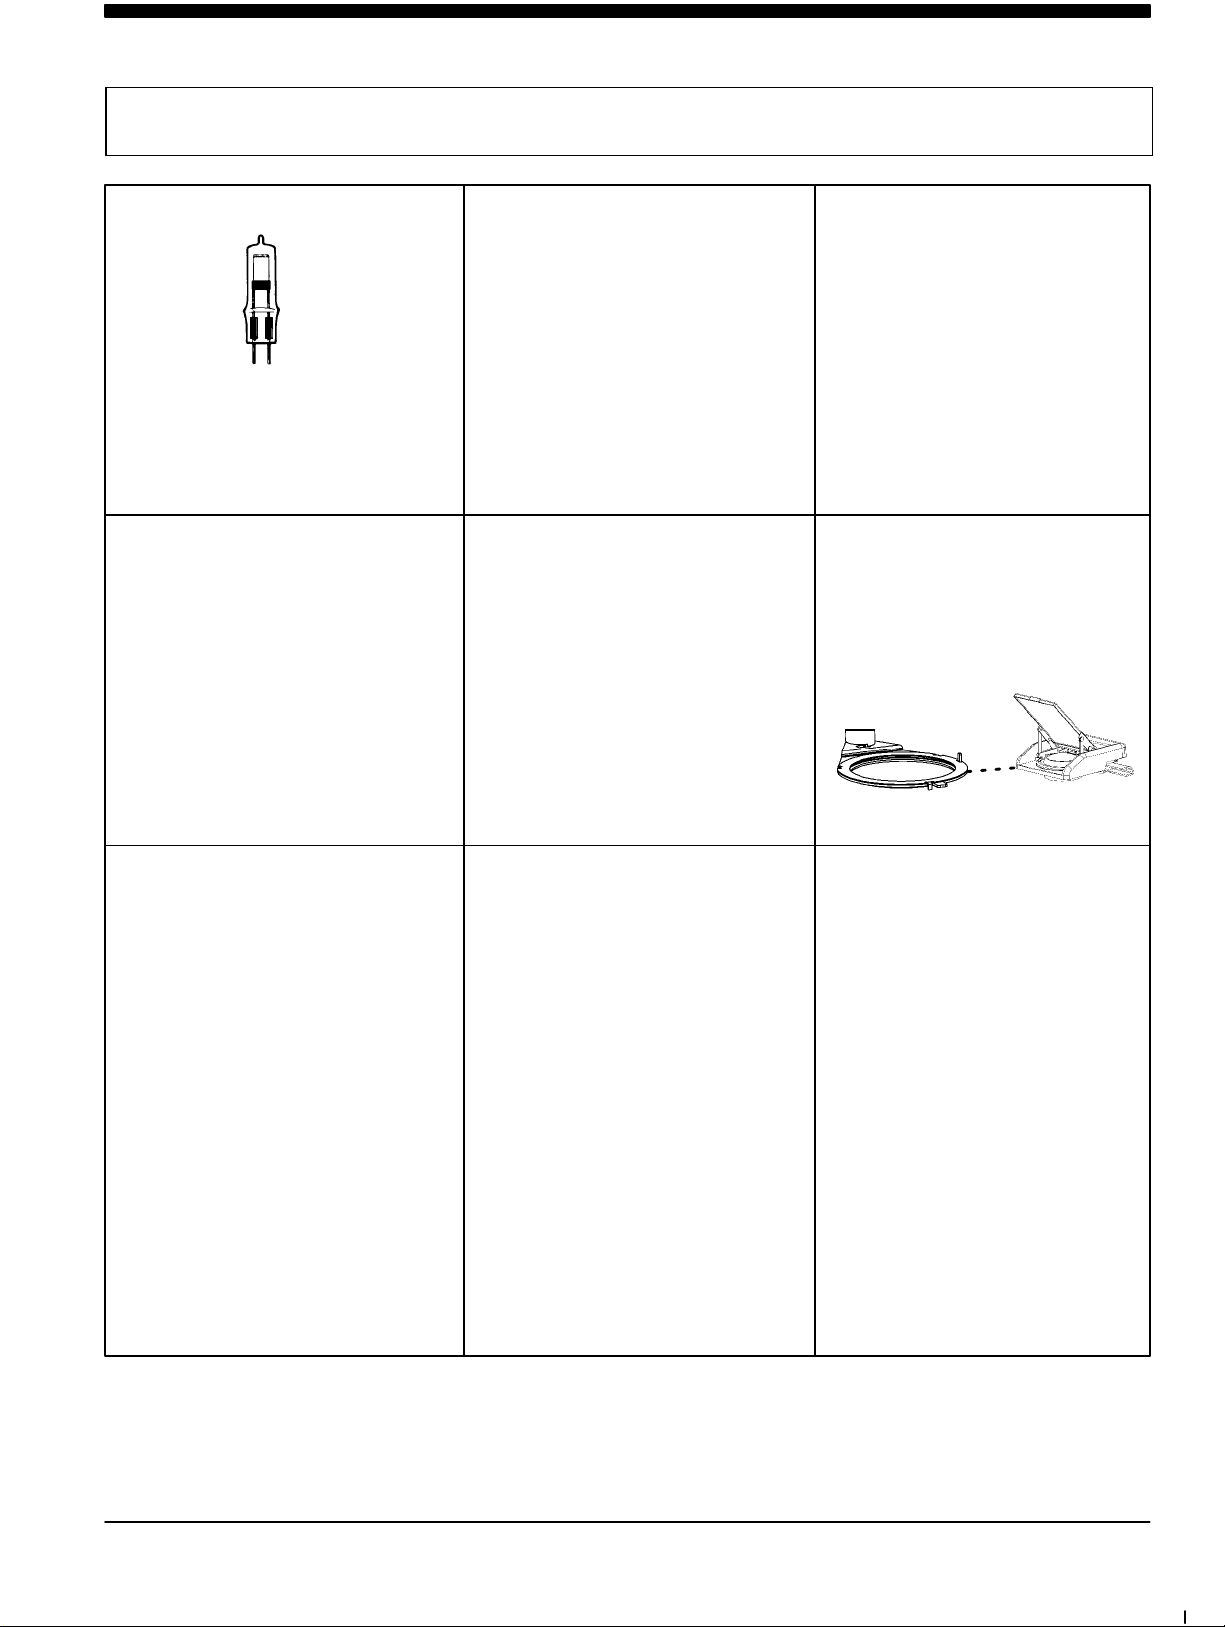
Lamp Replacement
Use the proper lamp type for your projector.
FXL 410W 82V
EVD 400W 36V
1. Push power switch to “Off” and unplug projector.
2. Release cover latch and lift up stage cover.
!
Lamp and adjacent metal parts are hot. Allow lamp
to cool before replacing.
3. After lamp has cooled, remove and discard.
a. FXL Lamps: Pull back on lamp ejection lever
to release. Pull lamp out.
b. EVD Lamps: Lift retaining bracket to open
condenser lens frame. Pull lamp out.
EVDFXL
4. Push new lamp fully and squarely into socket.
For EVD lamp, do not touch bulb glass with
fingers. Close condenser lens frame and secure
with bracket.
5. Close stage cover and plug in power cord.
Color Tuning
Rotate the colour tuning dial to eliminate the
yellow/orange to brown or blue corners projected on the
screen.
1. Rotate dial to the left to remove blue corners.
2. Rotate dial to the right to remove yellow corners.
AC Electrical Outlets
There are two unswitched AC power outlets, for
powering accessories, connected to a 5 amp circuit
breaker.
!
Caution
Do not overload outlets with accessories that
exceed a total of 5 amps.
To Reset the Circuit Breaker:
1. Unplug accessories and lift stage cover to access
circuit breaker
2. Push down on circuit breaker lever to reset.
.
3M 9700 Operator’s Guide
7
Page 9

Cleaning
For best performance, keep your projector free of
excess dust and surface dirt.
Daily Cleaning
Use a soft cloth to remove dust from the stage and
projector base areas.
Stage Glass and Lenses
Use 3M Overhead Cleaner 676 to remove surface dirt
from the stage glass and projector lens.
!
Caution
Cleaning the underside of the stage glass or
Fresnel lens is not recommended. Improper cleaning
or disassembly may damage the optics. Contact your
3M Dealer or Service Center for assistance.
Projection Mirror
Use a soft brush to remove surface dirt from the
projection mirror.
!
Caution
The projection mirror is a front-surface mirror and
must not be wiped clean.
3M 9700 Operator’s Guide
8
Page 10

Troubleshooting
Problem Probable Causes Solution
Lamp does not illuminate but fan motor
runs.
Neither lamp nor fan comes on. a. Projector not plugged in
Fan motor does not run but lamp
illuminates.
Lamp and fan both work but utility
outlets do not have power.
After replacing a burned out lamp, the
new lamp fails.
Short lamp life: Lamps seem to fail
before expected life span.
Projected image is wider at the top than
bottom (Vertical Keystoning).
Projected image higher on one side
(Horizontal Keystoning).
Projected image is dim. a. Dirty stage glass, lenses, mirrors
Projected image does not have uniform
brightness.
Yellow/orange to brown or blue colours
appear in corners of image.
Colour, focus or image problem. a. Optics out of alignment a. Call for service.
c. Control Panel door open
d. Lamp changer dial not engaged
e. Mirror Pan obstructed, not fully
deployed
f. Lamp not seated properly
g. Lamp burned out
b. Stage cover not completely closed
c. No power at wall outlet
a. Fan blade/motor is obstructed
b. Fan motor is burned out
a. Outlets overloaded, circuit breaker
tripped
a. Defective lamp was installed
b. Possible electrical problem
a. Defective lamps
b. High line voltage
a. Screen not aligned at 90_ angle to
projected light beam
a. Projector not aligned at 90_ angle to
screen
b. ENX lamp incorrectly installed in
FXL projector
c. EVD Lamps only: condenser lens
bracket not closed
a. Lamp alignment a. Properly seat lamp in socket and/or
a. Lamp not at best location for
projector to screen distance
a. Close control panel door.
b. Fully rotate lamp changer dial.
c. Remove all obstructions from under
mirror pan.
d. Seat lamp squarely in socket.
e. Replace lamp.
a. Plug projector into outlet.
b. Close stage cover to engage safety
interlock.
c. Verify outlet has power.
a. Call for service.
b. Call for service.
a. Unplug accessories and reset circuit
breaker. Accessories must not
exceed 5 amps total.
a. Replace lamp again.
b. If new lamp fails immediately, you
may have an electrical problem. Call
for service.
a. Document actual lamp life, then
contact Lamp Supplier or 3M Service
Information.
a. Tilt projection screen toward
projector until image width is equal
at top and bottom.
a. Rotate projector until image height is
equal on both sides.
a. Remove surface dirt.
b. Replace incorrect lamp type with
FXL lamp.
c. Close condenser lens bracket.
fully rotate lamp changer into
position 1 or 2.
a. Rotate colour tuning dial.
3M 9700 Operator’s Guide
9
Page 11

Service Information
Service Information - Service Information - Service - Información de Servicio Servizio assistenza - Service - 3M Service - Serviço informativo
English: Contact your supplier or 3M sales office where you purchased your unit.
Français: Contactez votre distribution ou le bureau de vente 3M où vous avez acheté votre appareil.
Deutsch: Wenden Sie sich bitte an lhren 3M Händler oder den technischen Kundendienst der 3M, wenn Sie
Serviceinformationen benötigen. Die zentrale Service-Nr. der 3M Deutschland GmbH lautet: Tel.
0130/114969, Fax 02131/143417.
Español: Póngase en contacto con su proveedor o con la oficina de ventas 3M, en la que compró su aparato.
Italiano: Contattare il Vostro fornitore oppure 3M visual informa, Tel. 02-75452630.
Norsk: Henvend deg til forhandleren eller til 3M-salgskontoret hvor du har kjøpt apparatet.
Nederlands: Neem contact op met uw leverancier of de 3M vestiging waar u uw apparaat hebt gekocht.
Português: Contacte o serviço de vendas da 3M ou o fornecedor onde adquiriu o seu aparelho.
COUNTRY COMPANY NAME ADDRESS LOCATION
Austria 3M Östereich Ges.m.b.H. Brunner Fieldstraße 63 A-2380 Perchtoldsdorf
Belgium 3M Belgium N.V./S.A. Hermeslaan 7 B-1231 Diegem
Denmark 3M Denmark Fabriksparken 15 DK-2600 Glostrup
Finland Suomen 3M OY PL 26 Sinimaentie 6 02630 Espoo 63
France 3M France Boulevard de l’Oise F-95006 Cergy
Germany 3M Deutschland GmbH Hammfelddamm 6 D-41453 Neuss
Greece 3M Hellas Ltd. Gr 15125 Maroussi Gr-10210 Athens
Ireland 3M Ireland 7th Floor, 3M House –
Adelphi Centre,
Dun Laoghaire
Italy 3M Italia SpA –
Sistemi Visual
Netherlands 3M Nederland BV Industrieweg 24 NL-2382 NW Zoeterwoude
Norway 3M Norge A/S Hvamveien 6 N-2013 Skjetten
Portugal Minnesota (3M)
de Portugal, Lda.
Spain 3M España, S.A. Apartado 25
Sweden 3M Svenska AB Bollstanacsvægen 3, Rotebro SE-19189 Sollentuna
Switzerland 3M (Schweiz) AG Eggstraße 93
Turkey 3M Ticaret A.S. Buyukere Cad. Ucyol Mevkii
United Kingdom 3M UK 3M House PO Box 1
Via S. Bovio 3
Loc. San Felice
Rua Conde de Redondo, 98 P-1199 Lisboa Codex
Normanin Is
Merkezi No: 414–416
Berkshire RG 1211 JU
Co. Dublin
20090 Segrate MI
Madrid 28027
CH-8803 Rüschlikon
Maslak 80670 Istanbul
Bracknell
10
Page 12

Safety Points to Note
SAFETY POINTS TO NOTE:
–
Use an alternating current only
U.K. only! How to connect the flex to a plug:
IMPORT
Please read the instructions given below before connecting the flex to a plug.
If in doubt, please consult a qualified electrician. As the colours of the wires in the
mains lead of this appliance may not correspond with the coloured markings identifying
the terminals in your plug, proceed as follows:
The wire which is coloured green and yellow must be connected to the terminal which is marked
with the letter E, or the symbol
The wire which is marked brown must be connected to the terminal which is marked
with the letter L or coloured red.
The wire which is coloured blue must be connected to the terminal which is marked
with the letter N or coloured black.
Replacement fuses of 10 amp should be used which have A.S.T
Attention:
The plug, if severed from the mains lead, must be destroyed, as a plug with bared flexible cord is
hazardous if engaged in a live socket outlet.
ANT –
The wires in the mains lead are coloured in accordance with the following code:
Green and Y
Blue Neutral
Brown Live
ellow Earth
. Check that the supply voltage is the same as that stated on the rating plate of the appliance.
, or coloured green or green and yellow
.A. and B.S. 1362 approval.
.
Green and
Yellow
E
N
L
Blue Brown
WARNING!
THIS APPLIANCE
MUST BE
EARTHED!
English: The 9700 AHLS, AHLU and AHLZ projectors fulfill CE (EN60335-1 / EN60335-2-56 / EN55014).
Français: Les rétroprojecteurs 9700 AHLS, AHLU et AHLZ sont conformes aux normes CE (EN60335-1 /
EN60335-2-56 / EN55014).
Deutsch: Der Tageslichtprojektor 9700 AHLS, AHLU und AHLZ erfüllt CE (EN60335-1 / EN60335-2-56 /
EN55014).
Español: Los retroproyectores 9700 AHLS, AHLU y AHLZ cumplen con las normas CE (EN60335-1 /
EN60335-2-56 / EN55014).
Italiano: I proiettori 9700 AHLS, AHLU e AHLZ sono conformi alle norme CE (EN60335-1 / EN60335-2-56 /
EN55014).
Norsk: Prosjektøren av typen 9700 AHLS, AHLU, og AHLZ oppfyller CE (EN60335-1 / EN60335-2-56 /
EN55014).
Nederlands: De 9700 AHLS, AHLU en AHLZ projectoren zijn conform CE (EN60335-1 / EN60335-2-56 / EN55014).
Português: Os retroprojectors de modelo 9700 AHLS, AHLV e AHLV cumpren as normas CE (EN60335-1 /
EN60335-2-56 / EN55014).
11
Page 13
Accessories
Accessories - Accessoires - Zubehör - Accesorios - Accessorio - Tilbehør - Accessories Accessórios
-Lamp
-Lampe
-Lampe
-Bombilla
-Lampada
-Lampe
-Lamp
-Lâmpada
EVD – 9700
-
Flip frames, 100 pcs
-
Pochettes cadre
-Flip-FrameTM Präsentationshüllen
-
Flip-Frame, 100 unidades
-T
elai scattanti
-Rammer
-
Flip frames (per 100)
-
Flip-Frame, 100 unidades
, 100 stk.
-
Overhead Cleaner
-
Nettoyant pour rétroprojecteur
-Overhead-Reiniger
-
Limpiador de retroproyectores
-
Kit di pulizia
-
Overhead rens
-
Overhead Reiniger
-
Produto de limpeza para retroprojectores
70-0705-6877-2DY-0210-0010-3 EVD
-T
ransparency Film
-
Film transparent
-Präsentations-Folien
-
Marcos de plástico para transparencias
-
Lucidi da proiezione
-T
ransparent film
-Diapositief
-Transparências
-
Dust Cover
-
Protection anti-poussière
-Staubschutzhaube
-
Protección anti-polvo
-
Protezione dalla polvere
-Støvdeksel
-Stofkap
-
Protecção anti-pó
78-6969-7216-1
-
Flip-In Magnifier
-
Loupe coulissante
-
Einklappbares V
-
Lente de aumento insertable
-
Lente di ingrandimento inseribile
-
Skyv inn forstørrer
-
Inklapbaar vergrootglas
-
Lente de aumento encaixável
ergrößerungsglas
HA 5792
RS 71
10
-TA
200 Cart Standard XX-0034-1
-T
A 300 Cart Deluxe XX-0034-1
-
Chariot standard
T
A 200 XX-0034-1
-
Chariot version de luxe
T
A 300 XX-0034-1
-T
A 200 Präsentationswagen
(Standardausführung) XX-0034-1
-T
A 300 Präsentationswagen
(Luxusausführung) XX-0034-1
-
Carro estándar T
-
Carro de lujo T
-T
A 200 Carrello standard XX-0034-1
-T
A 300 Carrello deluxe XX-0034-1
-T
A 200 Rullebord Standard XX-0034-1
-T
A 300 Deluxe Rullebord XX-0034-1
-T
A 200 standard projectietafel (rollend)
XX-0034-1165-7
-T
A 300 luxe projectietafel (rollend)
XX-0034-1164-0
-T
A 200 Carro standard XX-0034-1
-T
A 300 Carro deluxe XX-0034-1
165-7
164-0
A 200 XX-0034-1
A 300 XX-0034-1
165-7
164-0
165-7
164-0
165-7
164-0
164-0
165-7
164-0
165-7
165-7
164-0
78-6969-8054-5
HA 5706
12
3M Series 9700 Operator’s Guide
Page 14

Visual Systems Division
6801 RiverPlace Boulevard
Austin, Texas 78726-9000
Printed inU.S.A.
E3M 6/96 78-6970-6359-8 Rev.C
 Loading...