

WALL DISPLAY WITH IDEABOARD -- HARDWARE
78-6970-9117-7
(PAGE 1 OF 2)
QUICK START GUIDE
WALL DISPLAY WITH IDEABOARD QUICK START GUIDE
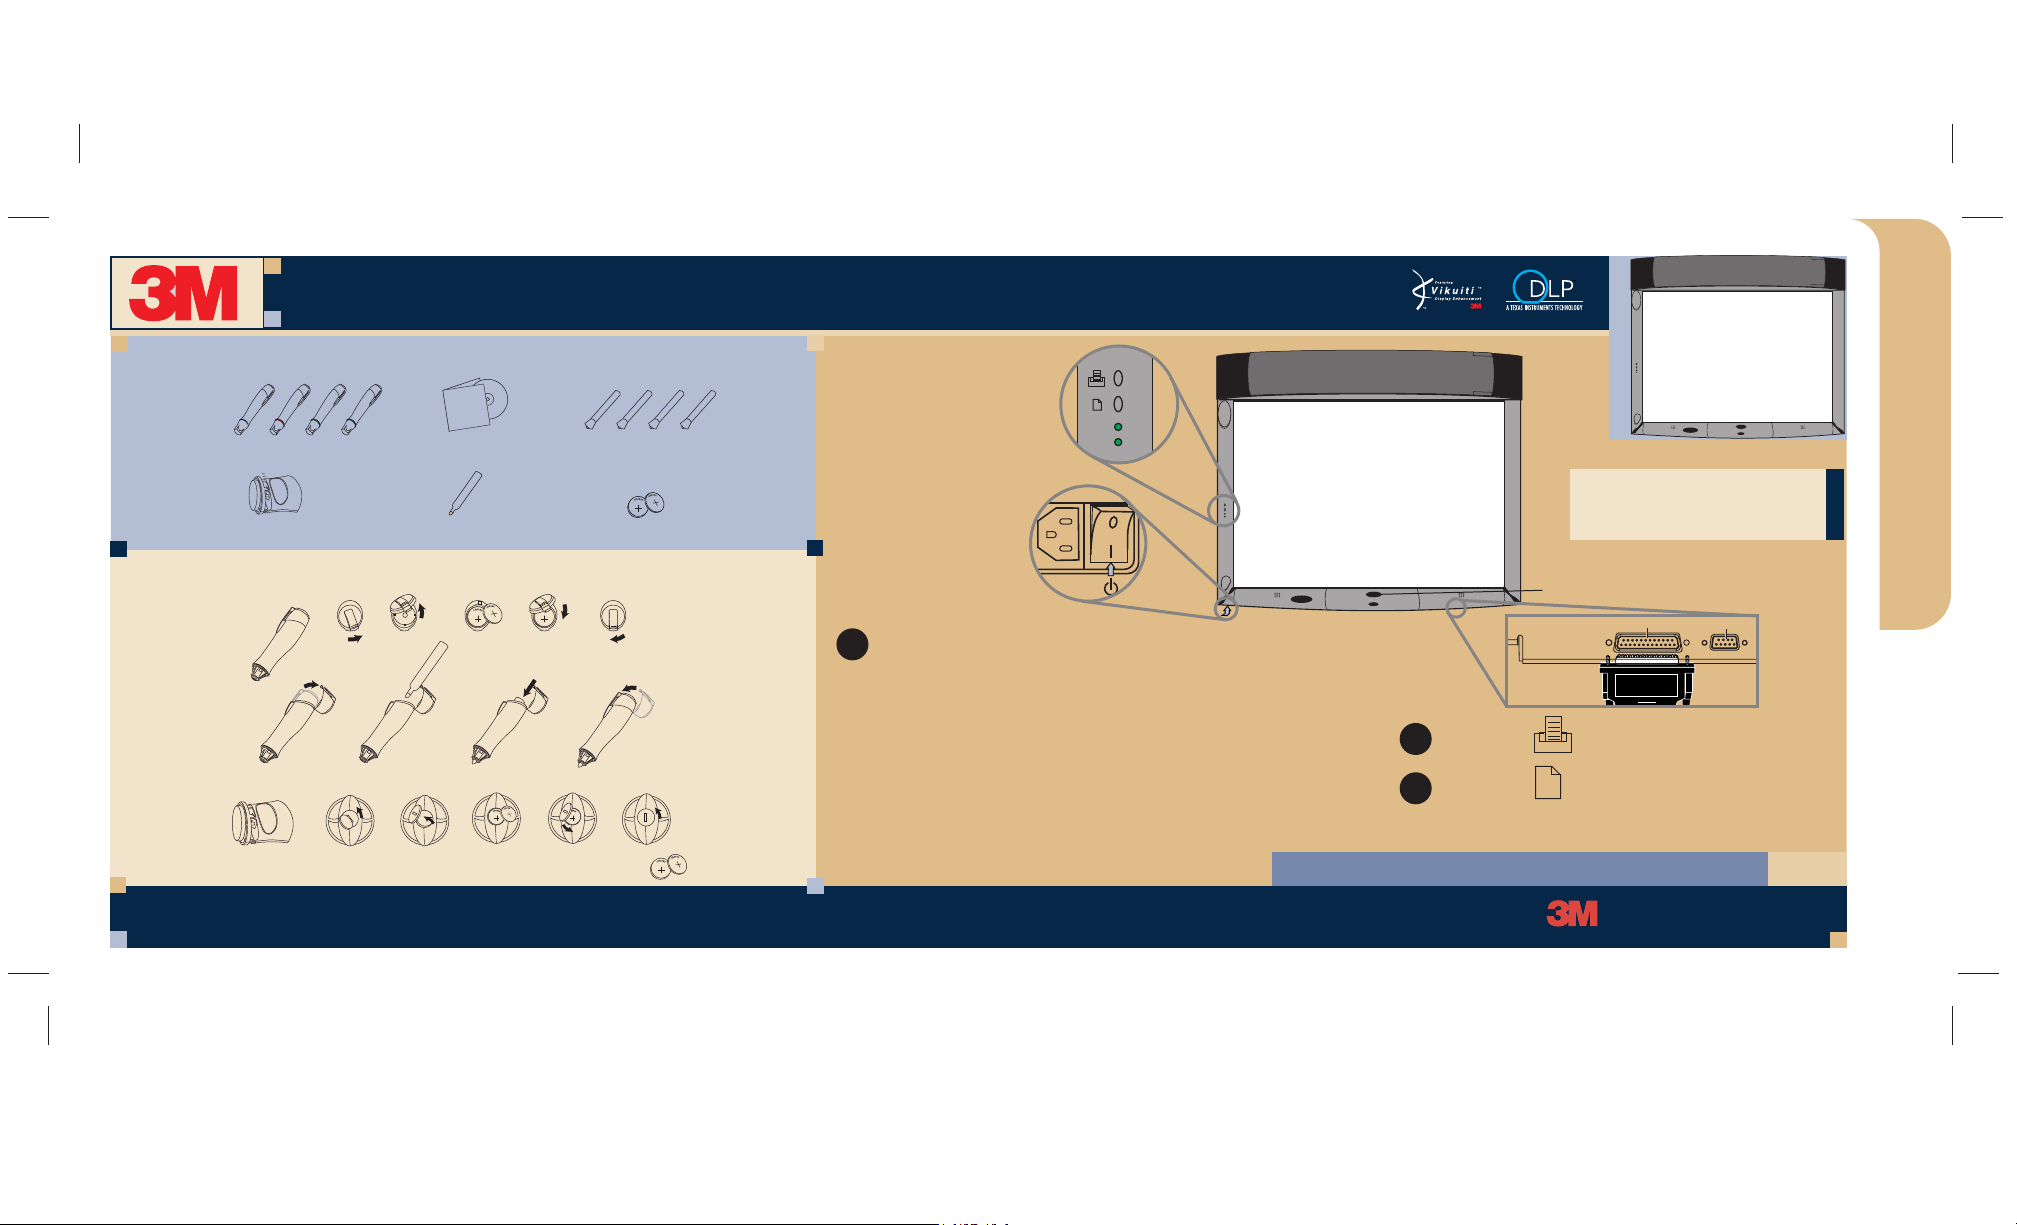
STANDARD IDEABOARD KIT
Digital Marker Sleeves
Digital Eraser
Software CD
Digital Mouse Stylus
MARKER AND BATTERY ASSEMBLY
Replacement Batteries: Lithium Ion CR2032 (2 per marker/eraser)
Dry-Erase Markers
Batteries (10)
COPYBOARD
Make sure the Wall Display is plugged in and that the
1
Master Power Switch is on.
• The On/Off Button does not need to be turned on.
• Use the digital markers to write on the board.
Use the digital eraser to erase any markings.
• A computer is not needed.
• A printer will need to be plugged into the
Printer port for the direct print option.
For Technical Support
1-800-328-1371
On/Off Button
(This row for Digital
Whiteboard option only)
Press the top button to print.
2
Press the bottom button to clear the
3
Printer
buffer and begin a new page.
www.3M.com/walldisplay
IDEABOARD
Computer
“Wherever there’s a great meeting, you’ll find 3M.”
™
Innovation
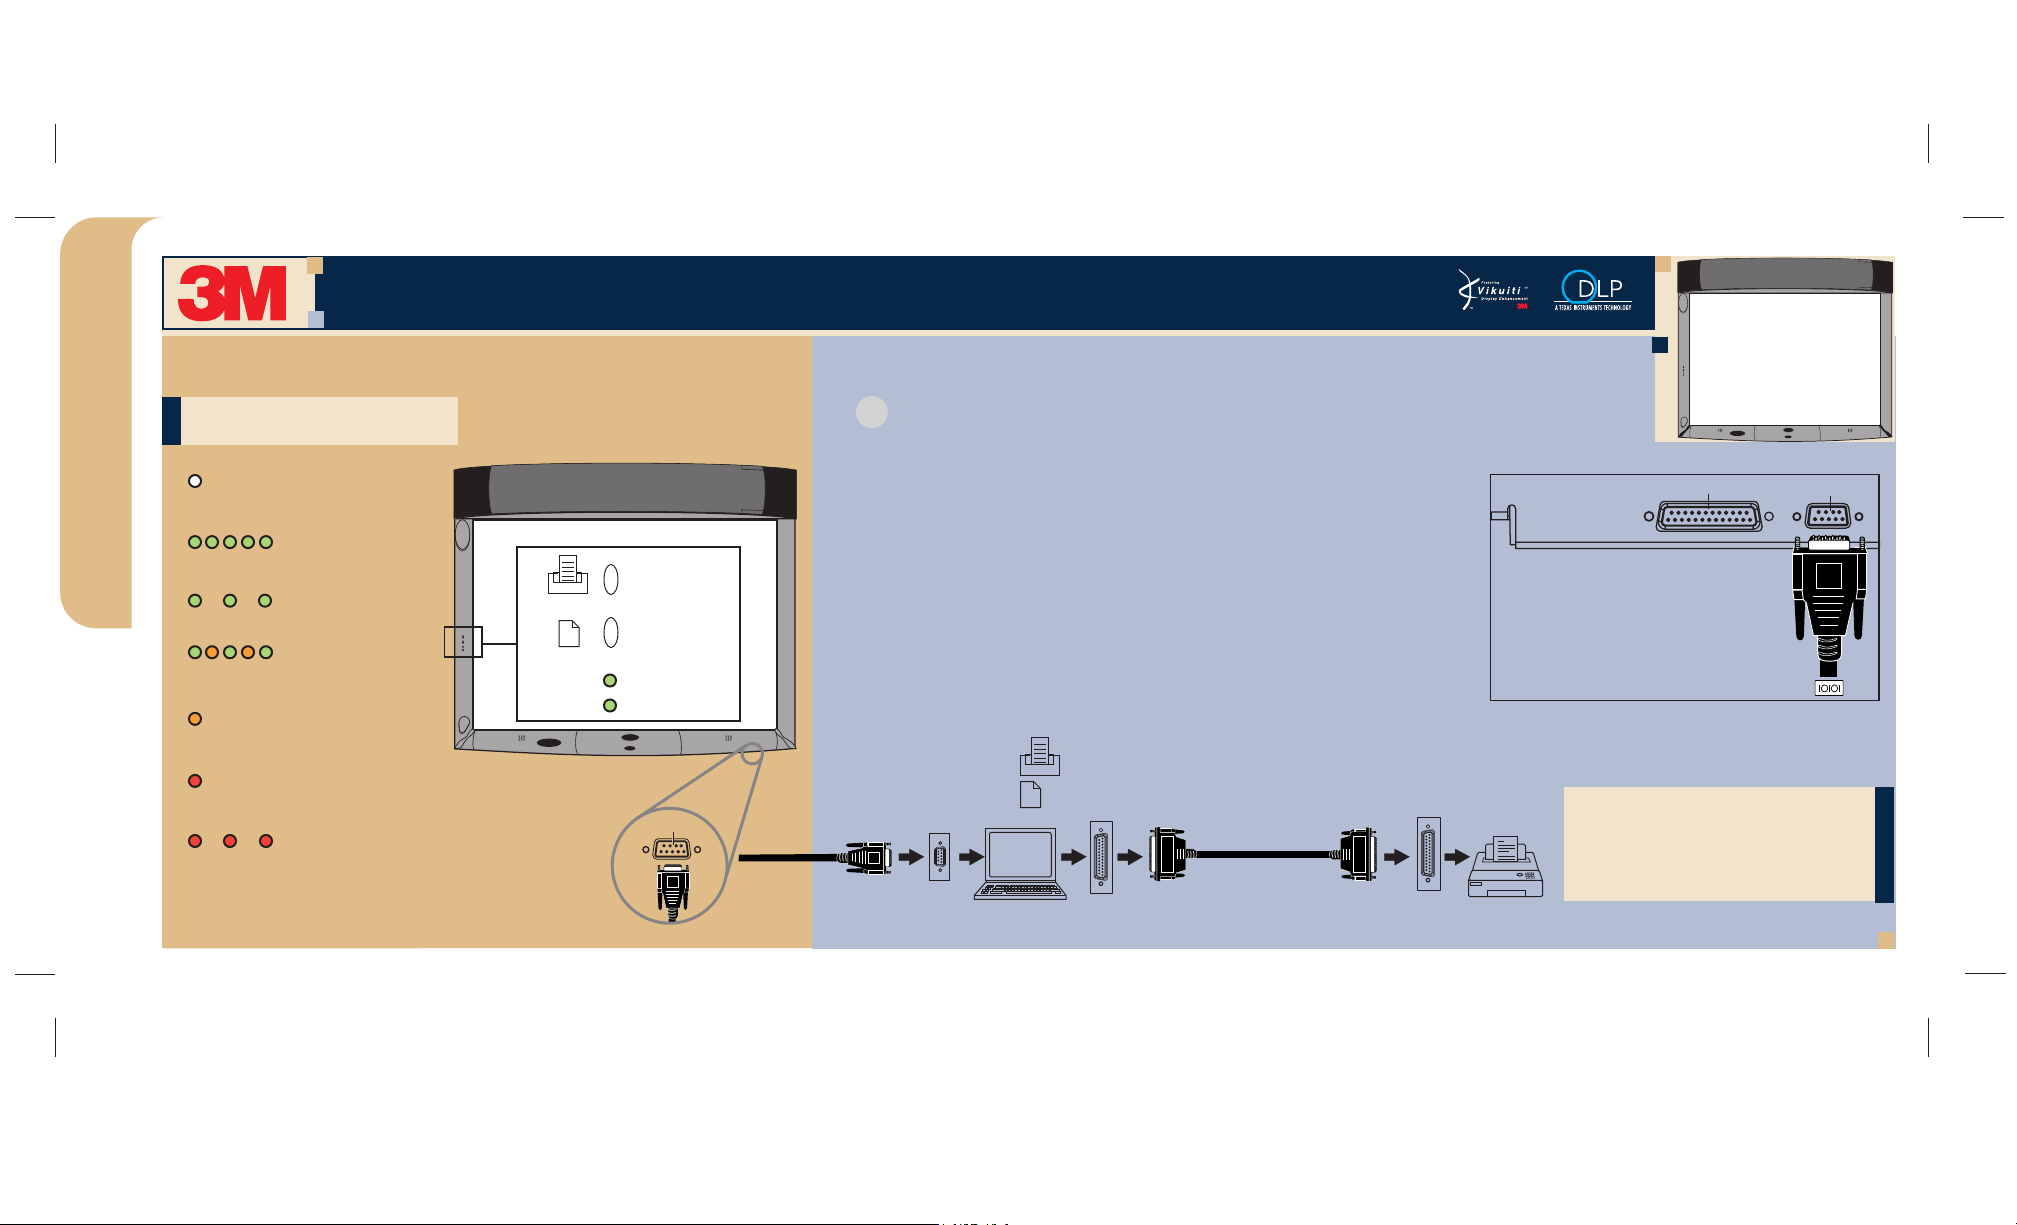
TOP LIGHT Legend
TOP LIGHT Legend
NO DATA IN MEMORY
(No light)
IDEABOARD
QUICK START GUIDE
BOARD IS RECEIVING DATA
(Quickly blinking green)
MEMORY CONTAINS DATA
(Slowly blinking green)
DATA IS PRINTING
(Blinking with alternating
green and amber)
COMMUNICATING WITH A PC
(Solid amber)
CONNECTION ERROR
(Solid red)
PRINTING ERROR
(Slowly blinking red)
WALL DISPLAY WITH IDEABOARD -- HARDWARE
WALL DISPLAY WITH IDEABOARD QUICK START GUIDE
DIGITAL WHITEBOARD
Make sure the Wall Display is plugged in and that the Master Power Switch is on.
1
Computer must be connected to system. A standard serial cable must be used to
connect the computer’s serial port to the Wall Display’s “Computer” port.
• When the power is turned on, the bottom LED light on the
side bezel will be green.
This means that the power is on for the Digital Whiteboard.
PRINTER
button
NEW PAGE
button
TOP LIGHT
BOTTOM LIGHT
Computer
• Activate the video port on your PC to display images.
• Install the eBeam Software on your PC.
• Start the eBeam Software by double-clicking the eBeam icon
on your PC.
• Use the digital markers to write on the board. Use the digital
eraser to erase any markings.
• Press the top button to print through your computer.
• Press the bottom button to clear the buffer and begin a new page.
(PAGE 2 OF 2)
Printer
(This row for Digital
Whiteboard option only)
Note: For more information on
how to use eBeam Software,
please consult the Wall Display
Operator’s Guide.
Computer
© 2001 3M IPC 78-6970-9117-7

WALL DISPLAY WITH IDEABOARD -- SOFTWARE
78-6970-8516-1
WALL DISPLAY WITH IDEABOARD SOFTWARE QUICK START GUIDE
(PAGE 1 OF 2)
IDEABOARD SOFTWARE
QUICK START GUIDE
INSTALLING AND CALIBRATING IDEABOARD SOFTWARE
Insert the eBeam CD into the CD-ROM drive on your computer. The eBeam
1
installer should start up automatically. If it does not, browse to your CD-ROM
drive and choose setup.exe. Follow all onscreen directions. It is not
necessary to restart your computer.
Make sure that no other software has the specified COM port open. For example,
2
a portable organizer may be using this port. In that case you must exit out of all
software that is using this port. You can do this by finding the icons of that software
on the task bar of your computer and selecting Exit.
Both eBeam Software and eBeam Mouse are installed and icons placed on your
3
desktop. Double-click an icon to start.
When first using either application, you must calibrate the system. In eBeam
4
Software, choose eBeam Hardware > Calibrate eBeam Hardware from
the Tools menu. In eBeam Mouse, choose eBeam Mouse > Calibrate from
the Windows taskbar eBeam menu.
For Technical Support: 1-800-328-1371
“Wherever there’s a great meeting, you’ll find 3M.”
™
GETTING STARTED WITH IDEABOARD SOFTWARE
Menus
Application Toolbar
Active Page
Thumbnail View
Participants View
Drawing Toolbar
Play Controls
The main components of the software include:
Menus
Active Page
Thumbnail View
Participants View
For detailed descriptions of these components and help, refer to the Help menu in the application.
Allow access to all software features and functions.
Receives images from the whiteboard. The active page will always be the most
recently created page in the meeting.
Displays thumbails of all pages in the meeting.
Displays the login names of all users connected to a meeting, as well as allows
users to “chat” with each other using eBeam’s instant messaging system.
www.3M.com/walldisplay
Innovation

eBeam Mouse allows you to use a stylus as a virtual mouse to control applications on the
Wall Display. At this time, eBeam Mouse works only on Windows-based systems.
Using the stylus as a virtual mouse, you can operate your computer directly from the
whiteboard. You can open, work in, and close applications, draw freehand in painting and
drawing applications, or you can operate the eBeam Software directly from the whiteboard.
QUICK START GUIDE
IDEABOARD SOFTWARE
You are now ready to use eBeam Mouse. For more detailed instructions on the different features of
eBeam Mouse, choose eBeam Mouse > Help from the Windows taskbar icon.
© 2002 3M IPC 78-6970-8516-1 Rev. B
WALL DISPLAY WITH IDEABOARD -- SOFTWARE
WALL DISPLAY WITH IDEABOARD SOFTWARE QUICK START GUIDE
Make sure the cables are connected properly to the Wall Display with eBeam
1
Software installed.
Open any marker sleeve, and slip the stylus into the sleeve in place of a dry-erase marker.
2
Double-click the eBeam Mouse icon on your desktop or select Switch To: eBeam Mouse
3
from the Windows taskbar.
NOTE: The same COM port can be used with the eBeam Software and eBeam Mouse,
but only one application can receive whiteboard input at one time. You can switch
between eBeam Mouse and eBeam Software by using the eBeam icon on the Windows
taskbar. To switch to eBeam Mouse, choose Switch To: eBeam Mouse from the
taskbar menu. To switch back to eBeam Software, choose Switch To: eBeam Software.
Choose eBeam Mouse > Calibrate from the eBeam icon menu on the Windows taskbar
4
and follow the projected instructions.
TOOLBARSGETTING STARTED WITH eBEAM MOUSE
APPLICATION TOOLBAR
New
Duplicate
Delete
Print
Full Screen
Share Meeting
Join Meeting
DRAWING TOOLBAR PLAY CONTROLS TOOLBAR
Marker
Highlighter
Eraser
Zoom
Text
Selector
Play Controls
Saves the active page and opens a new page.
Copies the selected page and makes that page the active page.
Deletes the selected page.
Prints the selected page.
Maximizes the eBeam software window on the screen.
Allows you to share the current meeting over the local intranet or the Internet.
Allows you to log on to an eBeam meeting broadcasting over the local
intranet or the Internet. NOTE: During a broadcast meeting, the page tools are
available only at the host computer.
Allows you to write freehand on the active page in one of four solid colors.
Allows you to write freehand on the active page in one of four transparent inks.
Erases both marker strokes drawn on the whiteboard and annotation marks
made within the software.
Enlarges the view of the displayed page.
Allows you to add text annotations to the displayed page.
Allows you to draw a selection rectangle in the displayed page. You can copy
and paste the selected area into another application.
Replay the meeting, one line stroke at a time, either for the current page or
for all pages in the meeting.
(PAGE 2 OF 2)
 Loading...