

Page 1
IP Conferencing Module
Installation Guide
3Com® Networked Telephony Systems
NBX® System Release 6.0
http://www.3com.com/
Part Number 900-0368-01 Rev AB
Published November 2007
Page 2

3Com Corporation
350 Campus Drive
Marlborough, MA
01752-3064
Copyright © 2007, 3Com Corporation. All rights reserved. No part of this documentation may be
reproduced in any form or by any means or used to make any derivative work (such as translation,
transformation, or adaptation) without written permission from 3Com Corporation.
3Com Corporation reserves the right to revise this documentation and to make changes in content from
time to time without obligation on the part of 3Com Corporation to provide notification of such revision
or change.
3Com Corporation provides this documentation without warranty of any kind, either implied or
expressed, including, but not limited to, the implied warranties of merchantability and fitness for a
particular purpose. 3Com may make improvements or changes in the product(s) and/or the program(s)
described in this documentation at any time.
UNITED STATES GOVERNMENT LEGENDS:
If you are a United States government agency, then this documentation and the software described herein
are provided to you subject to the following:
United States Government Legend: All technical data and computer software is commercial in nature
and developed solely at private expense. Software is delivered as Commercial Computer Software as
defined in DFARS 252.227-7014 (June 1995) or as a commercial item as defined in FAR
such is provided with only such rights as are provided in 3Com’s standard commercial license for the
Software. Technical data is provided with limited rights only as provided in DFAR 252.227-7015 (Nov
1995) or FAR
portion of any legend provided on any licensed program or documentation contained in, or delivered to
you in conjunction with guide.
Unless otherwise indicated, 3Com registered trademarks are registered in the United States and may or
may not be registered in other countries.
3Com and the 3Com logo are registered trademarks of 3Com Corporation. NBX is a registered trademark
of 3Com Corporation.
Other brand and product names may be registered trademarks or trademarks of their respective holders.
52.227-14 (June 1987), whichever is applicable. You agree not to remove or deface any
2.101(a) and as
Page 3

CONTENTS
ABOUT THIS GUIDE
Conventions 5
Notices 5
Text 6
Related Documentation 6
Comments 6
1 PRE-INSTALLATION
Configuration Overview 9
Post-installation Setup 10
Gathering Site Information 10
Using DNS 11
Single Server 11
Worksheet 11
2 INSTALLATION SCRIPTS
Overview of Components 15
Initial Installation - Services Installed 16
Initial Installation - Configuration Guidelines 17
Single Server Initial Installation 18
Sample setup Script (All-in-one server) 18
Post Installation Configuration 34
Set up Routes 34
Add Trusted SIP Interfaces 35
Configuring the IP Conferencing Module 36
Test E-Mail Notification Setup 39
Upgrade Installation 40
Sample install-upgrade Script 40
Sample vcx-switchversion Script 43
Managing the Activation Keys 44
Page 4

3 OBTAINING SUPPORT FOR YOUR PRODUCT
Register Your Product 47
Purchase Value-Added Services 47
Troubleshoot Online 48
Access Software Downloads 48
Telephone Technical Support and Repair 48
Contact Us 49
INDEX
Page 5
ABOUT THIS GUIDE
This section contains an overview of this guide, lists guide conventions,
related documentation, and product compatibility.
This guide describes how to answer the questions in the installation
scripts, which run when you first start a 3Com
Server. By providing the correct answers to the script questions, you
configure the system for initial operation.
This guide is intended for equipment installers who have a thorough
understanding of telecommunications, VoIP technology, Linux operating
systems, databases, networks, and system administrator privileges.
Release Notes are issued with some products. If the information in the
release notes differs from the information in this guide, follow the
instructions in the release notes.
Conventions This section describes notice, text, and figure conventions.
Notices Tab le 1 lists notice icons.
Ta bl e 1 Notice Icon Descriptions
Icon Notice Type Description
Information note Information that describes important features or
instructions
®
IP Conferencing Module
Caution Information that alerts you to potential loss of
data or potential damage to an application,
system, or device
Warning
Information that alerts you to potential personal
injury
Page 6

6 ABOUT THIS GUIDE
Te xt Ta bl e 2 lists text conventions.
Ta bl e 2 Text Convention Descriptions
Convention Description
Screen displays This typeface represents information as it appears on the
screen.
Commands The word “command” means that you must enter the
command exactly as shown and then press Return or
Enter. Commands appear in bold. Example:
To remove the IP address, enter the following
command:
SETDefault !0 -IP NETaddr = 0.0.0.0
Words in italics Italics are used to:
■ Emphasize a point.
■ Denote a new term at the place where it is defined in
the text.
■ Identify menu names, menu commands, and software
button names. Examples:
From the Help menu, select Contents.
Click OK.
Related Documentation
These 3Com documents contain additional information about the
products in this release that are a part of or support the 3Com
Convergence Applications Suite.
The following documents are a part of the IP Conferencing Module:
■ IP Conferencing Module Installation Guide
■ IP Conferencing Module User Guide
■ IP Conferencing Module Administration Guide
Comments Send e-mail comments about this guide or about any Voice product
documentation to:
VOICE_Techcomm_comments@3com.com
Include the following information with your comments:
■ Document title
■ Document part number (found on the front page)
Page 7

■ Page number
■ Your name and organization (optional)
Example:
Comments 7
IP Conferencing Module Installation Guide
System Release 6.0
Part Number 900-0368-01
Page 25
Please address all questions regarding 3Com software to your authorized
3Com representative.
Page 8

8 ABOUT THIS GUIDE
Page 9

1
PRE-INSTALLATION
This chapter provides pre-installation guidelines for the 3Com IP
Conferencing Module, which is an optional component of the 3Com NBX
Networked Telephony System.
The NBX system does not support presence. References to the “presence
server” and “presence database” in this document are applicable to other
products in the 3Com Convergence Applications Suite.
■ Configuration Overview
■ Gathering Site Information
■ Worksheet
Configuration Overview
All of the software components of the 3Com IP Conferencing Module
must be installed on a single hardware server. Multiple server installations
are not supported.
The hardware server that hosts the 3Com IP Conferencing Module
software must run the 3Com VCX
3Com price list for details.
Components installed on the single server:
■ conference server/conference attendant server
■ NBX user database
■ conferencing database (master)
■ web console server
™
Linux operating system. Consult the
Page 10
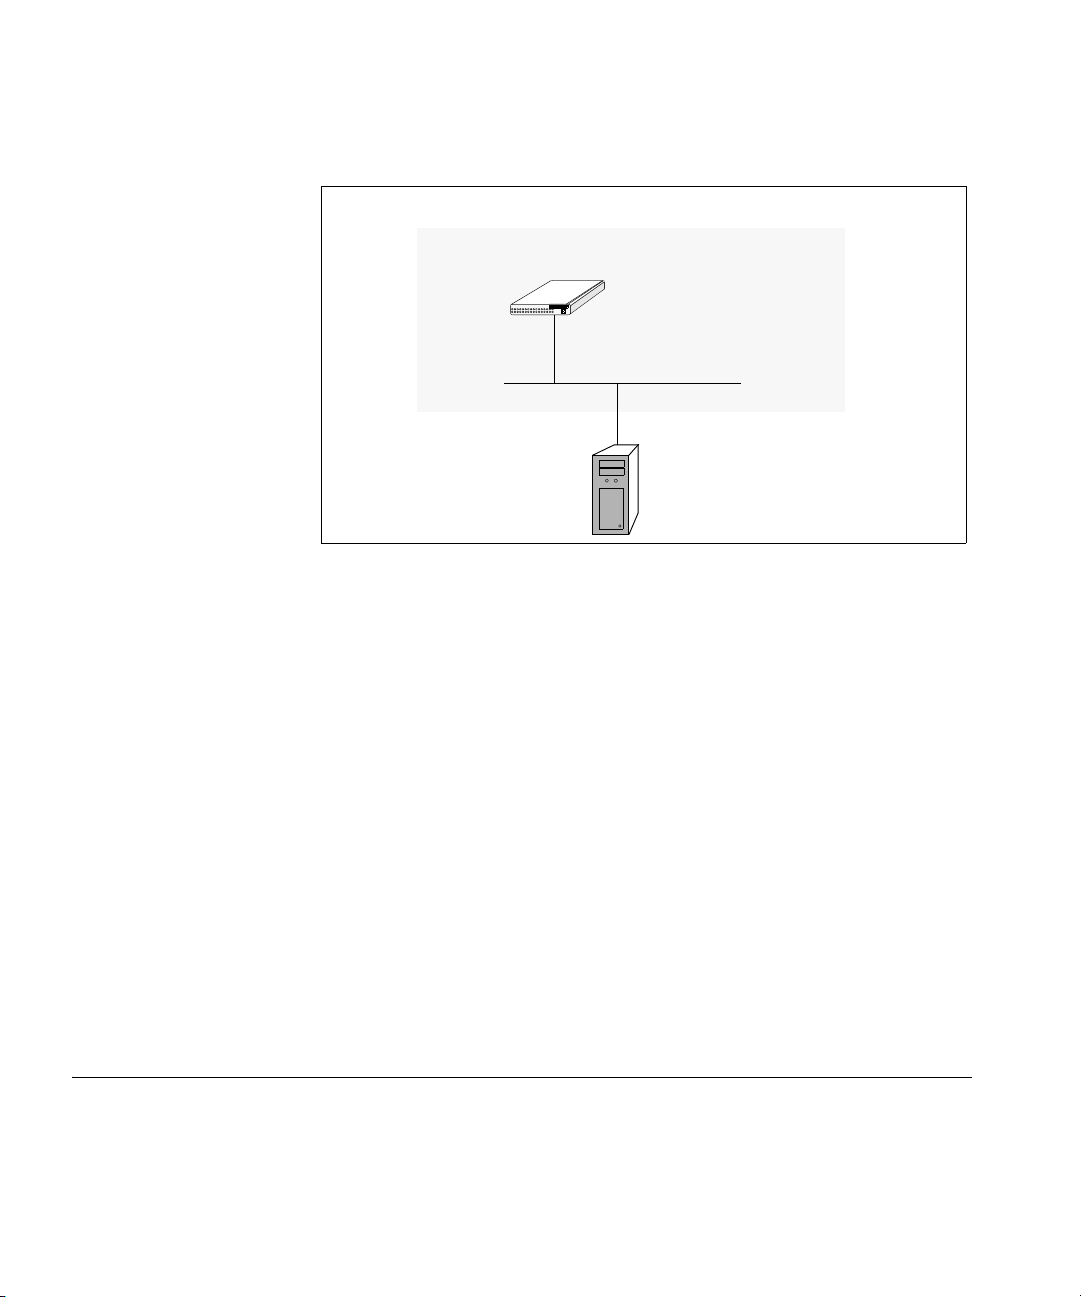
10 CHAPTER 1: PRE-INSTALLATION
Conference server pool
Conference server
Presence server
Master database
User database
Web server
NBX server
Figure 1 Network diagram - single server
Post-installation
Gathering Site Information
After you run the installation script, you need to configure the following:
Setup
Setting up a Route to the Conference Servers
You must configure the NBX dial plan with a route to your conference
server. If your implementation has only one server, then a route to a
single endpoint is required.
Setting up a Route to the Conference Attendant Servers
As with the conference server, it is necessary to configure a route for the
conference attendant server. The NBX dial plan is used for this purpose.
Test E-Mail Notification Setup
You must test the e-mail setup by logging in to the system and sending
an e-mail message using Send-only Simple Mail Transfer Protocol (sSMTP).
If you fail to receive the test e-mail message, you can check for errors in
/opt/logs/vcx-linux/maillog.
The 3Com NBX servers communicate with each other using IP addresses.
These addresses must be dedicated (static) and must be compatible with
your network design.
Page 11

Worksheet 11
One or more 3Com IP Conferencing Module servers may be added to a
system.
Using DNS 3Com recommends that you configure your DNS servers so that they
know the IP addresses of all NBX servers and gateways. If you prefer to
not use DNS, you can edit the /etc/hosts files on the IP Conferencing
Module and all of the NBX servers.
3Com does not support NIS or WINS as domain name resolution methods
for NBX products.
Single Server You require the following:
■ You must dedicate one IP address to the 3Com IP Conferencing
Module.
■ You must assign a host name to the 3Com IP Conferencing Module.
■ You must know the IP address of the network gateway.
■ You must know the IP addresses of the primary and secondary DNS
servers.
■ You must know the IP addresses of the primary and secondary NTP
servers.
Worksheet To make it easier to configure your system, you may want to have the
necessary information in front of you before you begin to install any
server.
Ta bl e 3 Network Configuration Parameters
Configuration Parameter Value
3Com IP Conferencing Module IP address (eth0)
3Com IP Conferencing Module host name
Subnetwork mask
Gateway IP address
Primary DNS server IP address
Secondary DNS server IP address
DNS search path
Primary NTP server IP address
Secondary NTP server IP address
Page 12

12 CHAPTER 1: PRE-INSTALLATION
Table 3 Network Configuration Parameters (continued)
Continent
Country
Time Zone
Ta bl e 4 System Configuration Parameters
Configuration Parameter Value
Services:
1. Presence and Conference - all in one
2. Conferencing server
3. Conferencing and database server
4. Data server for presence and conferencing
5. Presence server (with database)
Page 13

Ta bl e 5 E-Mail Notification Parameters
Configuration Parameter Value
Mailhub (computer that handles mail)
Hostname of your computer
Mail name of your system
System user e-mail address
Ta bl e 6 Database Configuration Parameters
Configuration Parameter Value
Database:
1. Local Master: this server will have the master db
2. Local Slave: this server will have the slave db
3. Remote database: db is on another server
Worksheet 13
Ta bl e 7 Initial Configuration Parameters
Configuration Parameter Value
Fully qualified hostname of the installation
Administrator’s e-mail address
Activation key(s)
Minimum value for numeric conference
names
Maximum value for numeric conference
names
Prefix for Ad Hoc conference names
Prefix for Group Call names
IP address of the primary dialout proxy
IP address of the secondary dialout proxy
Digit Map for DTMF dialout
NBX server Site ID (enter on master only)
NBX Server IP address (primary server: eth0)
Username for NBX database synchronization
Password for NBX database synchronization
Page 14

14 CHAPTER 1: PRE-INSTALLATION
Page 15

2
INSTALLATION SCRIPTS
This chapter describes the initial configuration of each 3Com IP
Conferencing Module server in a NBX system. All software components
run on each server.
The installation scripts are run on command. Each time a script prompts
you for a response, you can accept the default (preconfigured) value by
pressing the Return or Enter key, or you can manually enter a different
value.
If necessary, you can re-run the scripts and enter new values.
Verify that all the procedures outlined in Chapter 1, “Pre-Installation”
have been completed before continuing with this chapter.
The NBX system does not support presence. References to the “presence
server” and “presence database” in this document are applicable to other
products in the 3Com Convergence Applications Suite.
Overview of Components
This chapter contains information on the following:
■ Overview of Components
■ Initial Installation - Services Installed
■ Initial Installation - Configuration Guidelines
■ Single Server Initial Installation
■ Post Installation Configuration
■ Upgrade Installation
■ Managing the Activation Keys
This section provides a general description of the various components of
the IP Conferencing Module.
Page 16

16 CHAPTER 2: INSTALLATION SCRIPTS
■ Web Provisioning Server — Allows for the creation of conferences and
maintenance of the server.
■ Conference Server — Allows users to join conferences that support
any or all of audio, video, and desktop sharing communication modes.
■ Conference Attendant — Allows users to join conferences by dialing a
single access number independent of conference ID. The attendant
prompts the user for the conference ID and, if required, the
conference passcode.
■ Presence Server (optional) — Collects and distributes the online status
information of users.
■ Conference Server Database — Database of IP Conferencing Module
activity. On systems with two or more servers, a single database pair
(master and slave) is supported.
■ NBX user database — Database of NBX system users.
The NBX system does not support presence.
Initial Installation Services Installed
When you perform an initial software installation (a “fresh” install), you
must run the setup script for each hardware server in your conference
server pool. The script provisions the following services on the hardware
server:
Network Configuration — For the initial installation, you are prompted
to enter general networking settings.
System Configuration — The script prompts you to select the
configuration that matches the services you have purchased. Select one
of the following:
■ Presence and Conference (All-in-one): Installs all components,
including the conference server, conference attendant server, web
server, NBX user database, and conference database.
■ Conferencing server: Installs the conference server and conference
attendant server.
■ Conferencing and database server: Installs the conference server,
conference attendant server, and conference database.
■ Data server for presence and conferencing: Installs the conference
database.
Page 17

Initial Installation - Configuration Guidelines 17
■ Presence server (with database): Presence server, web server, NBX user
database, and conference database.
E-Mail (sSMTP) Configuration — This portion of the script configures
the Send-only Simple Mail Transfer Protocol (sSMTP) that enables the
system to send e-mail notifications when conferences are created or
modified, or when users add contacts to their buddy lists.
Database Configuration — Select a database configuration for this
server. Select “Local Master” if the server is going to host the master
database (All-in-one server, or primary server in a distributed system).
IP Conferencing Module Configuration — Contains parameters for
the NBX system software components, including the IP Conferencing
Module. Activation keys are entered in this portion of the script.
Initial Installation Configuration
Guidelines
Follow these general guidelines when you perform an initial software
installation.
Single Server Configuration
General installation steps:
1 On the single server, run the setup script:
a When prompted to select the services the system will provide, select 1
(presence and conference - all in one).
b When prompted to select a database configuration, select 1 (Local
Master: this server will have the master database).
c When prompted to start the 3Com IP Conferencing Services, enter Y.
2 Complete the post-installation configuration (see Post Installation
Configuration).
The setup script is divided into five sections:
■ network configuration
■ system configuration
■ e-mail configuration
■ database configuration
■ initial configuration.
Page 18

18 CHAPTER 2: INSTALLATION SCRIPTS
These sections run automatically after the command “setup” is entered.
Single Server Initial Installation
Sample setup Script
The section contains a sample script of the setup script for the single
server (all-in-one) configuration).
The following options are selected in this sample script:
(All-in-one server)
■ All-in-one system configuration (installs the conference server,
conference attendant server, web server, NBX user database, and
conference & presence database)
■ Master database configuration.
The setup script displays the current settings and then asks you if you
want to accept or update them. Sample answers are provided in bold
type along with explanations of those answers. Explanations are in italics.
To run the setup script:
1 Log in to the server as root.
2 Enter a password (default is pvadmin).
3 Press Enter (or Return).
-bash-2.05b# setup
Enter setup at the command prompt.
---------------------------------------------------------------------------
---------- Welcome to the VCX Linux Network Configuration Wizard ----------
--------------------------------------------------------------------------This wizard sets up networking and related services.
Start of Network Configuration
Configure networking now? [yes] :
Press the Enter or Return key to accept yes as the suggested answer.
--------- Configuring Dynamic Host Configuration Protocol (DHCP) ----------
VCX servers can use DHCP for automated configuration, but this requires
that the DHCP server is configured to provide the proper options. Unless
you know that your environment is set up in this way, you should say 'no'
here and configure static network parameters.
Use DHCP on eth0 to configure network parameters? [no] :
Page 19

Single Server Initial Installation 19
---------- Configuring Hostname ---------Enter system hostname [localhost] : conf01.yourcompany.com
---------- Configuring IP Interface 'eth0' ---------Enter IP Address [192.168.1.100 ] : 10.20.30.60
Enter Network Subnet Mask [255.255.255.0 ] : 255.255.255.0
Enter Default Gateway Address [10.20.30.254 ] : 10.20.30.254
---------- Configuring IP Interface 'eth1' ---------Interface State : disabled
Note that ‘eth1’ is not used for the 3Com IP Conferencing Module.
---------- Configuring DNS Servers ---------Enter DNS servers one at a time.
When done, enter 0.0.0.0 to stop.
Primary DNS Server [192.168.1.1] : 10.25.10.31
Secondary DNS Server [192.168.1.2] : 10.26.10.31
Tertiary DNS Server [0.0.0.0] : 0.0.0.0
---------- Configuring DNS Search Path ---------Press Enter to leave the current path unchanged, or specify
a new search path, with spaces separating each entry.
DNS Search Path []: yourcompany.com
---------- Configuring Network Time Protocol ---------Enter NTP servers one at a time.
When done, enter 0.0.0.0 to stop.
Primary NTP Server [192.168.1.253] : 10.35.10.51
Secondary NTP Server [192.168.1.252] : 10.36.10.51
Additional NTP Server : 10.1.0.3
-------------------------- Configuring Time Zone --------------------------
Please select a geographic location from the following list:
1. Africa
2. Americas
3. Antarctica
4. Arctic Ocean
5. Asia
6. Atlantic Ocean
7. Australia
8. Europe
Page 20

20 CHAPTER 2: INSTALLATION SCRIPTS
9. Indian Ocean
10. Pacific Ocean
Enter continent [2] :
Press the Enter or Return key to accept 2 as the suggested answer.
Please select a country from the following list:
1. Antigua & Barbuda 18. Ecuador 35. Panama
2. Anguilla 19. Grenada 36. Peru
3. Netherlands Antilles 20. French Guiana 37. St Pierre & Miquelon
4. Argentina 21. Greenland 38. Puerto Rico
5. Aruba 22. Guadeloupe 39. Paraguay
6. Barbados 23. Guatemala 40. Suriname
7. Bolivia 24. Guyana 41. El Salvador
8. Brazil 25. Honduras 42. Turks & Caicos Is
9. Bahamas 26. Haiti 43. Trinidad & Tobago
10. Belize 27. Jamaica 44. United States
11. Canada 28. St Kitts & Nevis 45. Uruguay
12. Chile 29. Cayman Islands 46. St Vincent
13. Colombia 30. St Lucia 47. Venezuela
14. Costa Rica 31. Martinique 48. Virgin Islands (UK)
15. Cuba 32. Montserrat 49. Virgin Islands (US)
16. Dominica 33. Mexico
17. Dominican Republic 34. Nicaragua
Enter country [44] :
Press the Enter or Return key to accept 44 as the suggested answer.
Please select a time zone from the following list:
1. Alaska Time
2. Alaska Time - Alaska panhandle
3. Alaska Time - Alaska panhandle neck
4. Alaska Time - west Alaska
5. Aleutian Islands
6. Central Time
7. Central Time - Michigan - Wisconsin border
8. Central Time - North Dakota - Oliver County
9. Eastern Standard Time - Indiana - Crawford County
10. Eastern Standard Time - Indiana - Starke County
11. Eastern Standard Time - Indiana - Switzerland County
12. Eastern Standard Time - Indiana - most locations
13. Eastern Time
14. Eastern Time - Kentucky - Louisville area
15. Eastern Time - Kentucky - Wayne County
16. Eastern Time - Michigan - most locations
17. Hawaii
18. Mountain Standard Time - Arizona
Page 21

Single Server Initial Installation 21
19. Mountain Time
20. Mountain Time - Navajo
21. Mountain Time - south Idaho & east Oregon
22. Pacific Time
Enter zone [13] :
Selected Time Zone: America/New_York
-------------------------- CONFIGURATION SUMMARY -------------------------DHCP state: disabled
Hostname: conf01.yourcompany.com
IP Interfaces: Device IP Address Network Mask Default Gateway
eth0 10.20.30.60 255.255.0.0 10.20.30.254
eth1 (interface is disabled)
DNS Servers: 10.25.10.31
10.26.10.31
Search Domains:yourcompany.com
NTP Servers: 10.35.10.51
10.36.10.51
10.1.0.3
Time Zone: America/New_York
---------------------------------------------------------------------------
Is all of the above information correct? [yes] :
---------------------------------------------------------------------------
--------------------------------------------------------------------------Please wait while the wizard completes.
Saving configuration...Done.
End of Network Configuration
The network configuration is complete. If necessary, you can re-run this
portion of the script by entering vcx-config-network -wizard.
Start of System Configuration
After successful completion of the network configuration, the script will
prompt you to select a set of services.
----------------------- Select System Configuration -----------------------
Page 22

22 CHAPTER 2: INSTALLATION SCRIPTS
Individual systems may provide various services in a VCX installation.You
must select the appropriate set of services which this system is to
provide. Be certain that the selection corresponds to the functionality
you have purchased.
Which services will this system provide?
1. Presence and Conference - all in one
2. Conferencing server
3. Conferencing and database server
4. Data server for presence and conferencing
5. Presence server (with database)
Enter your choice (1-5) : 1
Select “1” to install the following components:
- conference server
- conference attendant server
- presence server
- web server
- NBX user database
- conference & presence database.
You have chosen to configure this system to provide:
Presence and Conference - all in one
Note that in order for these services to work, you must have purchased an
appropriate license and installed the corresponding license activation key
on this system.
*** WARNING *** Once you confirm your selection, you cannot change it.
Are you absolutely certain that you wish to configure this system as an
'Presence and Conference - all in one' server?If you answer 'no' here you
can choose an alternative configuration.
Confirm selection? [no] : y
Confirm your selection by typing “y.”
Selection confirmed.
Page 23

Single Server Initial Installation 23
*** Assembling VCX.2.9.3 using 'VSBOM.xml' ***
*** Processing components ***
*** Executing assembly commands ***
*** Assembly complete ***
The VCX assembly has been created. Preparing system for use:
Performing early startup tasks: [ OK ]
Starting VCX-Firewall: [ OK ]
Starting httpd:
Removing unneeded application components from the system.
This may take several minutes. Please wait while the operation completes.
Determining which packages are not used by any VCX version:
oem.7.0.1 : [keep; used in 2.9.3]
presconf.2.5.3 : [keep; used in 2.9.3]
presconf-conf.2.5.3 : [keep; used in 2.9.3]
presconf-presence.2.5.3 : [keep; used in 2.9.3]
presconf-vcxdb.2.5.3 : [keep; used in 2.9.3]
presconf-web.2.5.3 : [keep; used in 2.9.3]
vcx-firewall.1.5.5 : [keep; used in 2.9.3]
mysql.3.23.58 : [keep; used in 2.9.3]
No extra packages were found.
End of System Configuration
The system configuration is complete. If necessary, you can re-run this
portion of the script by entering vcx-setconfigtype.
Start of E-mail (sSMTP) Configuration
After successful completion of the system configuration, the script will
prompt you to set up the e-mail notification utility. The utility sends
e-mails when conferences are created and modified, and when users
attempt to add contacts to their buddy lists. E-mail notification works
Page 24

24 CHAPTER 2: INSTALLATION SCRIPTS
once users have added their e-mail addresses to the 3Com IP
Conferencing Module.
Configuration for sSMTP
(1) mailhub
This is the computer responsible for handling your outgoing mail. It could be the
SMTP server of your ISP, or a departmental mailhub. Use the fully-qualified domain
name (foo.bar.baz) of the mailhub; if it uses an unusual SMTP port number, use the
colon syntax
foo.bar.baz:2525
Otherwise sSMTP will use the standard SMTP port number (25).
(Note that sSMTP can support a user-dependent mailhub with the 'reverse aliases'
feature, for which see the man page.)
Please enter your mailhub []: mail.yourcompany.com
Enter the fully qualified domain name of the computer handling outgoing
mail.
(2) FromLineOverride
This specifies how sSMTP handles the From: line of outgoing mail. If
FromLineOverride=YES, sSMTP will leave the From: line alone if it already exists.
If FromLineOverride has any other value, or there is no From: line, sSMTP creates
the From: line using your username (or the -f command-line option), and the value of
the rewriteDomain option (step (4), below). If you use a mail user agent (MUA; e.g.
mutt, pine) I recommend using YES and having the MUA set the From: line.
(Exception: the 'reverse aliases' feature can be used to set up a particular From:
address for each user, in which case don't use FromLineOverride=YES. See the man
page.)
FromLineOverride? [YES]:
Specify how sSMTP handles the From: line of outgoing mail.
(3) hostname
sSMTP uses the hostname of your computer to identify itself to the mailhub, and in
the Received: headers of the outgoing mail. This has relatively little effect on how
the mail is handled. Use the fully-qualified domain name (FQDN) of your
computer(foo.bar.baz). If it doesn't have a FQDN, use some name for your box.
Hostname of your box [conf01.yourcompany.com]:
Enter the host name of your computer handling outgoing mail.
(4) rewriteDomain
Please enter the mail name of your system.
sSMTP uses this value to add a domain to unqualified e-mail addresses(addresses
without an @-sign).
Page 25

Single Server Initial Installation 25
You probably want to use the domain from your own e-mail address.You probably want
to set up your MUA to handle unqualified addresses itself, in which case sSMTP will
never have to use this.
Mail name [conf01.yourcompany.com]:yourcompany.com
Enter the mail name of your system.
(5) root
Last and least: if sSMTP finds an unqualified e-mail address among the recipients,
and it corresponds to a username on your local machine with a userid less than 1000,
then the e-mail is sent to this value instead. The idea is that mail sent to 'root'
should probably go to 'postmaster' instead.
If you set up your MUA to do its own handling of unqualified
addresses, this is irrelevant. Use the default value of 'postmaster' or your own
e-mail address if you're paranoid.
System users receive mail at [postmaster]:postmaster
Enter the system user e-mail address.
Note: check with your e-mail administrator for the proper system user
e-mail address.
Wrote configuration file /etc/ssmtp/ssmtp.conf
Starting mysqld daemon with databases from /opt/3comdata/mysql
Tcl is already installed
Tcl version is 8.3
Please report any installation problem to
"3Com Support" <support@3com.com>
End of E-mail (sSMTP) Configuration
The e-mail configuration is complete. If necessary, you can re-run this
portion of the script by entering usr/sbin/smtp-configure.
Start of Database Configuration
After successful completion of the e-mail configuration, the script will
prompt you to select a database configuration.
There are different ways to install and access the database.
1 Local Master: this server will have the master database.
2 Local Slave: this server will have a slave database.
Page 26

26 CHAPTER 2: INSTALLATION SCRIPTS
3 Remote database: database is on another server.
Please choose one of the above options: 1
Select “1” to specify that this server will initially host the master database
(All-in-one server, or primary server in a distributed system).
Available applications: sipconf,sipvxml,gui,vcxdb,sippeng,
End of Database Configuration
The database configuration is complete. If necessary, you can re-run this
portion of the script by entering presconf-setup.
Start of IP Conferencing Module Configuration
After successful completion of the database configuration, the script will
prompt you to select an initial configuration.
Enter the fully qualified hostname for this installation.
[host.yourcompany.com]:
Enter the fully qualified hostname of the machine you are installing on.
Assuming the userid of the administrator who will manage the
applications for your domain is root
Enter the administrator's email address. [sipadmin@yourcompany.com]:
Assuming default value as sipadmin@yourcompany.com
Enter the administrator’s e-mail address. The default is derived from the
hostname defined in the network configuration (above).
If the system is configured to send e-mail notification of conference
events to users, the e-mails will appear to be sent from the administrator
(sipadmin@yourcompany.com). Note that some mail agents may require
this to be a valid e-mail address.
Host Identifier (hostid) of this machine is: 75896dc20fa90922ddbb2b81
Please send an email to vcxconf@3com.com to receive an activation key to activate
this product.
Please enter the software activation keys one by one; end with an empty line:
Page 27

Single Server Initial Installation 27
Send the host ID to 3Com, which will use it to generate your activation
keys. Once 3Com has returned the activation keys to you, you can paste
them into the install session when prompted.
The activation keys are validated as they are entered. If validation is
successful, the keys will be stored in a license file and the installation
session will continue. If validation is unsuccessful, the installation session
will be aborted.
Enter key:
sipconf:-:+:2006-11-11:2006-11-11:300-300-1-1-1:124b4835f1a6e9a172f4ba6596fe1f85
key ok for sipconf
Enter key: sipvxml:-:+:2006-11-11:2006-11-11:50-50:b4acb4c5415c8005d0b8bd737f8a1d5b
key ok for sipvxml
Enter key: sippeng:-:+:2006-11-11:2006-11-11:-:dcdb0531a90ffbf027786aa0a4732a98
key ok for sippeng
Enter key:
License file name: /opt/3com/components/presconf.2.5.3/presconf_licenses
Validating the license for sipconf application ...
The license key
sipconf:-:+:2006-11-11:2006-11-11:300-300-1-1-1:124b4835f1a6e9a172f4ba6596fe1f85 is
valid
Validating the license for sipvxml application ...
The license key
sipvxml:-:+:2006-11-11:2006-11-11:50-50:b4acb4c5415c8005d0b8bd737f8a1d5b is valid
Validating the license for sippeng application ...
The license key
sippeng:-:+:2006-11-11:2006-11-11:-:dcdb0531a90ffbf027786aa0a4732a98 is valid
MySQL is needed for your application.
mysql is found at /opt/3com/VCX/bin/mysql
Assuming mysql is already installed
Enter the mysql user name for accessing the master database.[root]:
Assuming default value as root
Enter the host name on which the master database is running. [localhost]:
Assuming default value as localhost
Enter the mysql password for user root at localhost. [NULL]:
Assuming default value as NULL
The SIP conferencing server will be running at conf01.yourcompany.com:5060
Page 28

28 CHAPTER 2: INSTALLATION SCRIPTS
The Conference Attendant Server will be running at conf01.yourcompany.com:5092
The range of the numeric conference names must be specified
Enter the minimum value for numeric conference names. [8000]:
Enter the minimum value for numeric conference names. Default is 8000.
Enter the maximum value for numeric conference names. Note that
it must have the same number of digits as the minimum value. :
Enter the maximum value for numeric conference names.
For conference server, the prefix of ad hoc conference can be specified
Enter the prefix for ad hoc conference. [2join]:
Enter the prefix for ad hoc conferences.
Enter the prefix for group call conferences. [777]:
Value entered by user is: 777
Enter the prefix for group calls.
Enter the IP address of the primary dialout proxy:
Value entered by user is: 10.1.15.5
Enter the IP address of the primary NBX system used for DTMF dialout
during conferences.
Enter the IP address of the secondary dialout proxy:
Assuming default value as
Enter the IP address of the secondary NBX system used for DTMF dialout
during conferences.
Enter the digitmap for DTMF dialout.[[1-7]XX|9XXXXXXXXXX|91XXXXXXXXX|9011.XT]:
Assuming default value as [1-7]XX|9XXXXXXXXXX|91XXXXXXXXX|9011.XT
Enter the digit map used to define the dial plan for DTMF dialout.
Several lines of text appear before the next prompt.
-- Creating cinema_db.conf
-- Changing permissions of all the files in /opt/3com/components/presconf.2.2.2.190
to 755.
-- Trying to load fbsql.so...
-- fbsql is loaded...
-- Opening the database sql://root:NULL@localhost/mysql
Page 29

Single Server Initial Installation 29
-- Changing permissions for conf01.yourcompany.com
-- Changing permissions for localhost
-- Changing permissions for conf01.yourcompany.com
-- Changing permissions for conf01.yourcompany.com
-- Changing permissions for conf01.yourcompany.com
-- Flushing privleges
-- Calling createdb
*** Checking table vxml_users ***
Creating table vxml_users
*** Checking table put ***
Creating table put
*** Checking table aliases ***
Creating table aliases
*** Checking table about ***
Creating table about
*** Checking table requestlog ***
Creating table requestlog
*** Checking table gwclass ***
Creating table gwclass
*** Checking table debug_config ***
Creating table debug_config
*** Checking table personnote ***
Creating table personnote
*** Checking table confatt_record ***
Creating table confatt_record
*** Checking table dialplan ***
Creating table dialplan
*** Checking table radius_config ***
Creating table radius_config
Cannot select database sip: Error 1049 (Unknown database 'sip')
*** Checking table display ***
Creating table display
*** Checking table domain ***
Creating table domain
*** Checking table sipd_log ***
Creating table sipd_log
*** Checking table conferences ***
Creating table conferences
*** Checking table eventattendee ***
Creating table eventattendee
*** Checking table user_config ***
Creating table user_config
*** Checking table cinema ***
Creating table cinema
*** Checking table address ***
Creating table address
Page 30

30 CHAPTER 2: INSTALLATION SCRIPTS
*** Checking table confinstances ***
Creating table confinstances
*** Checking table person ***
Creating table person
*** Checking table conf_log ***
Creating table conf_log
*** Checking table agendaitem ***
Creating table agendaitem
*** Checking table Rooms ***
Creating table Rooms
*** Checking table resource ***
Creating table resource
*** Checking table conffiles ***
Creating table conffiles
*** Checking table event ***
Creating table event
*** Checking table acl ***
Creating table acl
*** Checking table license ***
Creating table license
*** Checking table vote ***
Creating table vote
*** Checking table presence_conf ***
Creating table presence_conf
*** Checking table eventresource ***
Creating table eventresource
*** Checking table speed_dial ***
Creating table speed_dial
*** Checking table vcxdb_conf ***
Creating table vcxdb_conf
*** Checking table RoomACL ***
Creating table RoomACL
*** Checking table Cards ***
Creating table Cards
*** Checking table groupmember ***
Creating table groupmember
*** Checking table subscription ***
Creating table subscription
*** Checking table messageboard ***
Creating table messageboard
*** Checking table confsrv_config ***
Creating table confsrv_config
*** Checking table ua_capabilities ***
Creating table ua_capabilities
*** Checking table trusted_host ***
Creating table trusted_host
Page 31

Single Server Initial Installation 31
*** Checking table vmail ***
Creating table vmail
*** Checking table tariff ***
Creating table tariff
*** Checking table RoomPrefs ***
Creating table RoomPrefs
*** Checking table contacts ***
Creating table contacts
*** Checking table ConfigData ***
Creating table ConfigData
*** Checking table confservers ***
Creating table confservers
*** Checking table eventcategory ***
Creating table eventcategory
*** Checking table user_presence ***
Creating table user_presence
*** Checking table location_tuples ***
Creating table location_tuples
*** Checking table Credentials ***
Creating table Credentials
*** Checking table mail_account ***
Creating table mail_account
*** Checking table eventgroup ***
Creating table eventgroup
*** Checking table eventgroup_notify ***
Creating table eventgroup_notify
*** Checking table gateway_map ***
Creating table gateway_map
*** Checking table confusers ***
Creating table confusers
*** Checking table thirdparty ***
Creating table thirdparty
*** Checking table election ***
Creating table election
*** Checking table persongroup ***
Creating table persongroup
*** Checking table sipd_config ***
Creating table sipd_config
*** Checking table ssl_config ***
Creating table ssl_config
-- createdb is complete
-- *IMPORTANT*: Adding administrator root@yourcompany.com with password root
-- Database is successfully initialized.
MYSQL host is localhost
MYSQL user is root
Page 32

32 CHAPTER 2: INSTALLATION SCRIPTS
Enter the IP address of the VCX Data Server: 10.20.30.40
Enter the IP address of the NBX data server that contains the global
directory of users to be downloaded to this IP Conferencing Module.
Enter the username for VCX DB Sync: vcx
Enter the username for NBX database synchronization.
Enter the password for VCX DB Sync: vcx
Enter the password for NBX database synchronization. The password
does not echo on the screen.
Do users on this VCX have their home presence server on this installation (y/n)?[y]:
Assuming the default value as y
Enter no [n] if the NBX data server containing the global directory of users
(see above) is not a local NBX for this installation.
# 10.20.30.40 SSH-1.99-OpenSSH_3.6.1p2
# 10.20.30.40 SSH-1.99-OpenSSH_3.6.1p2
OK
now testing if we can connect to the 10.20.30.40
vcx
updating the configuration database entries
3Com IP Conferencing Module applications will be automatically restarted when
system reboots
-- Installing SIP Conferencing servers ...
-- Changing permissions of all the files in /opt/3com/components/presconf.2.5.3.
-- Changing owner and permissions of
/opt/3com/components/presconf.2.5.3/sipconf/sipconf.
restarting httpd...
Creating a directory client_config to hold the soft client
autoconfiguration files...
Directory created successfully at
/opt/3com/components/presconf.2.5.3/client_config
Any files that you store in this directory are accessible via
http://master.yourcompany.com/3c3/<CONFIGFILENAME>.xml
If you have not already entered the license string during installation
you must do so from the web interface before trying to run any
application in 3Com software.
Page 33

Single Server Initial Installation 33
You may start, stop and monitor the 3Com IP Conferencing Module applications using
the following command(s):
> service <application> start|stop|status|restart
Else, you may do so using the web interface.
Your installation is complete.
To add new user or to change your profile visit appropriate
URL corresponding to /opt/3com/components/presconf.2.5.3/gui.
Once again, Please report any installation problem to
"3Com Support" <support@3com.com>
****************************************************
* Output, from this install session, was saved to:
* /opt/3com/components/presconf.2.5.3/install_log.Dec_07_2005
****************************************************
Would you like to start the 3Com IP Conferencing Module services now?
(N/Y) [N]: y
Select “Y” to complete the installation and start the 3Com IP
Conferencing Module services. Select “N” (the default) to complete the
installation but not start the services.
Validating configuration file
Configuration file is valid for this release.
Applying configuration to all unconfigured components
Configuring VCX components:
Configuring vcx-firewall-firstboot: [ OK ]
Configured VCX components: 1 configured.
Component configuration succeeded.
Stopping VCX-Firewall: [ OK ]
Starting VCX-Firewall: [ OK ]
Starting VCX Services:
Starting vcx/mysql: [ OK ]
Starting vcx/confbridge: [ OK ]
Starting vcx/sipconf: [ OK ]
Page 34

34 CHAPTER 2: INSTALLATION SCRIPTS
Starting vcx/sippeng: [ OK ]
Starting vcx/vcxdb: [ OK ]
Started VCX Services: 5 started.
-bash-2.05b#
End of IP Conferencing Module Configuration
Following successful completion of the script, the 3Com IP Conferencing
Module services will be installed. Start the services using a script
command, shell command, or web interface selection (as noted above).
Post Installation Configuration
Set up Routes You must program the NBX dial plan with routes to the conference server
Before the 3Com IP Conferencing Module can be used, the system must
be configured to work with it. The following items must be set up:
■ Create Routes to the:
■ Conference Server
■ Conference Attendant
■ Add Trusted SIP Interfaces
■ Configure the IP Conferencing Module
■ Test the E-mail Notification Setup.
and the conference attendant server.
For information on how to program the NBX dial plan, see the 3Com NBX
Administrator’s Guide.
To create routes to the conference server/conference attendant server:
1 Using a browser, log in to the NBX system as admin (default password is
besgroup).
2 Program the digit sequence for conferences. For example, to program the
range 8000 to 8999, enter:
Command ID Entry Digit Min Max Class Priority Route
TableEntry Create 1 32 8 4 4 Internal 0 8
Page 35

Post Installation Configuration 35
Different conference types may require different routes. For example, if
users dial the prefix 76 to call Ad Hoc conferences and 74 to call other
conferences, then one route is required for dial pattern 76 and another is
required for dial pattern 74.
3 Program the Conference Attendant extension number. For example, to
program extension 7501, enter:
Command ID Entry Digit Min Max Class Priority Route
TableEntry Create 1 33 7501 4 4 Internal 0 8
4 Program a route for conferences. For example:
Command Route Description
DestinationRoute Create 8 Conferences
5 Program a destination route entry for the NBX extension of the 3Com IP
Conferencing Module. For example:
Command Route Entry DestinationExtension
DestinationRouteEntry Create 8 1 7500
Add Trusted SIP
Interfaces
Trusted SIP Interfaces may be SIP gateways, other NBX systems, 3Com
VCX telephone systems, Call Processors, or other trusted interfaces. Each
interface you add and how you configure it affects your device licensing.
Each audio path trusted end point requires one system device license.
You do not add telephones as trusted interfaces. For information about
how to add 3Com telephones and generic SIP telephones to the NBX SIP
mode system, see the NBX Administrator’s Guide.
To add or modify a trusted SIP interface:
1 See the NBX Administrator’s Guide for more information about the
details in these steps.
2 Log in to the NBX NetSet utility using the administrator login ID and
password.
3 Click SIP Applications > Trusted SIP Interfaces.
4 Click Add to add a new trusted interface or click an extension from the
list to modify that trusted interface.
5 See the online Help for detailed information about each field.
Page 36

36 CHAPTER 2: INSTALLATION SCRIPTS
Configuring the IP
Conferencing Module
The IP Conferencing Module supports two types of Meet-Me
conferences:
■ Public — Public conferences are dial-in conferences in which a caller
can dial a conference extension and connect directly to the
conference.
■ Restricted — Restricted conferences are secure conferences. Callers
must authenticate themselves before the system allows them to join a
conference. The system connects a caller to the IP Conferencing
Module Attendant, which requires the caller to provide a Conference
ID and a password.
Use the NBX NetSet utility to configure IP Conference Server and
Conference Attendant settings:
■ 3Com Conferencing servers use different UDP ports for Restricted and
Public conferences. Therefore, you must configure these ports
separately in the NBX NetSet utility.
■ You must configure a dedicated conference extension to enable callers
to connect to the IP Conferencing Module Attendant.
■ Each conference you add is a trusted SIP interface, which the system
includes in the Trusted SIP Interfaces list.
■ You must edit your dial plan to complete the 3Com IP Conferencing
Module configuration.
To configure IP Conference Server:
1 See the NBX Administrator’s Guide for more information about the
details in these steps.
2 Log in to the NBX NetSet utility using the administrator login ID and
password.
3 Click SIP Applications > 3Com IP Conferencing Module.
4 Type the extension that the system uses for IP Conferencing. This
extension must be an unused extension on the system in the range of
external extensions, which is defined as 6000-7999 by default in a 4-digit
dial plan. You must use a different extension from the one you use to
configure the Conference Attendant settings.
5 Type a description for the IP Conferencing Module.
6 Type the IP address for the IP Conferencing Module.
Page 37

Post Installation Configuration 37
7 Type a port number. A SIP endpoint is identified by the IP and port
combination.
Port 5060 is set as the default during installation and typically does not
need to be changed.
8 Type the maximum number of simultaneous sessions. Each session
requires one system device license. See the NBX Administrator’s Guide for
more information.
9 Click OK or Apply to save your changes.
When you click Apply, the system adds a trusted endpoint. Click SIP
Applications > Trusted SIP Interfaces to verify.
10 Configure the dial plan.
You must add an extension list to the dial plan to support routing of
extensions to the conference server or edit the extension list, if one has
already been created.
To configure the settings of the Conference Attendant for restricted
conferences:
1 See the NBX Administrator’s Guide for more information about the
details in these steps.
2 Log in to the NBX NetSet utility using the administrator login ID and
password.
3 Click SIP Applications > 3Com IP Conferencing Module, and then click the
Conference Attendant Settings tab.
4 Type the extension that the system uses for IP Conferencing. This
extension must be an unused extension on the system in the range of
external extensions, which is defined as 6000-7999 by default in a 4-digit
dial plan. You must use a different extension from the one you used to
configure the IP Conference Server settings.
5 Type a description for the IP Conferencing Module.
6 Type the IP address for the IP Conferencing Module.
7 Type a port number. A SIP endpoint is identified by the IP and port
combination.
Port 5092 is the port number defined in the IP Conferencing server for
running the Conference Attendant.
Page 38

38 CHAPTER 2: INSTALLATION SCRIPTS
/ Route Description
/ ----- ----------DestinationRoute Create 900 Conference
/ Route Entry DestinationExtension
/ ----- ----- -------------------DestinationRouteEntry Create 9 1 *0900
/ Extension List *0900 holds the internal extension of 3Com IP Conferencing Module
/ ID Entry Digits Min Max Class PrioRoute
/ --- ----- ------ --- --- ----- --------Table Entry Create 1 6 900 3 3 internal0900
8 Type the maximum number of simultaneous sessions. Each session
requires one system device license.
9 Click OK or Apply to save your changes.
When you click Apply, the system adds a trusted endpoint. Click SIP
Applications > Trusted SIP Interfaces to verify.
10 Configure the dial plan. You must add an extension list to the dial plan to
support routing of extensions to the conference server or edit the
extension list if one has already been created.
Dial Plan and 3Com IP Conferencing Module Configuration
You must configure the dial plan to complete the 3Com IP Conferencing
Module configuration. The following procedure describes the process.
1 See the NBX Administrator’s Guide for more information about the
details in these steps.
2 Add an extension list to the dial plan to support routing of extensions to
the 3Com IP Conferencing Module.
For example, you can define the 3Com IP Conferencing Module
extension list as follows:
3 Create a route entry in the dial plan for the dialed-in digits the telephone
user of the 3Com IP Conferencing Module enters.
For example, using the extension list created in Step 1, the entry below
shows a dial-in that begins with 900.
Page 39

Post Installation Configuration 39
/ ID Entry Digits Min Max Class PrioRoute
/ --- ----- ------ --- --- ----- --------Table Entry Create 1 7 7 3 3 internal0900
Therefore, if the caller dials 900, the system receives the extension of the
3Com IP Conferencing Module and the port number for the private
conference from the dial plan. The system can route the call to the 3Com
IP Conferencing Module.
3Com Public IP Conferencing Module Configuration
You must configure the dial plan to complete the 3Com Public IP
Conferencing Module configuration. The dial plan uses the private
conference dial plan if it is configured; otherwise, you need to configure
the dial plan for Public conference.
The only change required is in the dial plan prefix entry table because in a
Public conference, you need to define a range of extensions rather than a
single extension.
For example, using the above configuration and taking the case that the
extensions range from 700-799, the table entry can be as follows:
If the caller dials 700, the system receives the extension of 3Com IP
Conferencing Module and the port number for the Public conference
from the dial plan. The system can route the call to the 3Com IP
Conferencing Module.
Te st E-Mail
Notification
Setup
Run the following test to ensure that the e-mail setup works correctly.
1 Log in to the server as root.
2 At the prompt, enter:
/usr/sbin/sendmail user@domain.com
From: sender@domain.com
To: user@domain.com
Subject: test e-mail
[blank line]
test1
test1
test1
3 Ctrl-D
Page 40

40 CHAPTER 2: INSTALLATION SCRIPTS
Be aware that most Mail Transfer Agents (MTAs) require valid To: and
From: addresses.
If the user fails to receive the e-mail message, check for errors in
/opt/logs/vcx-linux/maillog. After resolving the problem, run
the E-Mail setup again.
Upgrade Installation
Software upgrades are completed by running two scripts: install-upgrade
and vcx-switchversion. The install-upgrade script upgrades the VCX Linux
operating system to the latest version (if necessary) and installs the
software packages. The vcx-switchversion script provisions the system
with the software packages.
It is possible to upgrade from Apps 2.0 to Apps 3.0 provided that the
server is designated as either an all-in-one or primary server.
Sample
To run the install-upgrade script:
install-upgrade Script
1 Untar the software files and add them to a directory on the server.
2 Log in to the server as root.
3 Enter a password (default is pvadmin).
4 Go to the directory where the software files are located.
5 Press Enter (or Return).
-bash-2.05b# ./install-upgrade
Enter ./install-upgrade at the command prompt.
Start of install-upgrade Script
---------------------------------------------------------------------------
-------------------------- VCX Upgrade Installer --------------------------
---------------------------------------------------------------------------
------------------------- Pre-Installation Checks -------------------------
Checking that required files are present...
Checking which packages are needed...
3ComInstall-1.1-1.noarch.rpm : already present
vcx-firewall-1.5.5-1.noarch.rpm : needed
mysql-3.23.58-1.i386.rpm : already present
Page 41

Upgrade Installation 41
presconf-2.5.13-1.i386.rpm : needed
presconf-conf-2.5.13-1.i386.rpm : needed
presconf-presence-2.5.13-1.i386.rpm : needed
presconf-vcxdb-2.5.13-1.i386.rpm : needed
presconf-web-2.5.13-1.i386.rpm : needed
oem-a-7.0.1-2.i386.rpm : needed
Checking for available disk space...
Determining required space: ....... Done.
Required space : 33581 K
Available space : 59679580 K
There is sufficient disk space.
----------------------------- OS Installation ----------------------------OS file to install : vcx-linux-4.4.0-111505.000
Target OS partition : 'A', device /dev/sda2
Replacing version : 3.2.4
Continue with OS installation? [yes] :
Installing partition image on /dev/sda2.
partimage: status: initializing the operation
partimage: status: reading partition informations
partimage: status: copying used data blocks
partimage: status: commiting buffer cache to disk.
/dev/sda2: 39554/251392 files (0.1% non-contiguous), 117820/502023 blocks
resize2fs 1.32 (09-Nov-2002)
The filesystem on /dev/sda2 is now 526128 blocks long.
tune2fs 1.32 (09-Nov-2002)
Setting maximal mount count to -1
Setting interval between check 15552000 seconds
Updating fstab files.
Configuring GRUB boot loader...Done.
Transferring configuration data.
Checking kernel configuration:
...Selecting standard kernel
Done.
Copying configuration files:
hosts
passwd
group
resolv.conf
ntp.conf
modules.conf
Page 42

42 CHAPTER 2: INSTALLATION SCRIPTS
sysconfig/network
sysconfig/hwconf
sysconfig/network-scripts/ifcfg-eth0
sysconfig/network-scripts/ifcfg-eth1
.vcx-config-network
ssmtp/revaliases
ssmtp/ssmtp.conf
ssh/ssh_config
ssh/sshd_config
ssh/ssh_host_key
ssh/ssh_host_key.pub
ssh/ssh_host_dsa_key
ssh/ssh_host_dsa_key.pub
ssh/ssh_host_rsa_key
ssh/ssh_host_rsa_key.pub
httpd/conf/ssl.key/server.key
httpd/conf/ssl.crt/server.crt
Done.
Copying user specific SSH files:
/root/.ssh
Done.
Setting console speed to 9600: Done.
Configuring timezone: Done.
Transferring cron entries:
Done.
Migrating CUPS configuration: Done.
Updating /usr/sbin/vcx-switchversion: Done.
Updating /usr/sbin/vcx-showmachineid: Done.
Updating /usr/sbin/vcx-licensequery: Done.
Updating /usr/sbin/vcx-licenseinstall: Done.
Updating /usr/sbin/vcx-updatecfg: Done.
Updating /usr/sbin/vcx-createcfg: Done.
Configuration transfer completed successfully.
-------------------------- Package Installation ---------------------------
Installing 7 packages...
vcx-firewall-1.5.5-1.noarch.rpm : OK
presconf-2.5.13-1.i386.rpm : OK
presconf-conf-2.5.13-1.i386.rpm : OK
presconf-presence-2.5.13-1.i386.rpm : OK
presconf-vcxdb-2.5.13-1.i386.rpm : OK
presconf-web-2.5.13-1.i386.rpm : OK
oem-a-7.0.1-2.i386.rpm : OK
7 packages installed.
----------------------------- Final Assembly ------------------------------
Installing assembly package...
Page 43

Upgrade Installation 43
vcx-assembly-APPS-2.9.13-1.i386.rpm : OK
Assembly package installed.
------------------- Installation Completed Successfully -------------------
------------------- VCX version 2.9.13 is now available -------------------
End of install-upgrade Script
Record the version number that appears at the end of the install-upgrade
script. You will need it to run the next script (the system provisioning
script).
Sample
vcx-switchversion
Script
Run the switchversion script after completing the install-upgrade script
for a software upgrade. This script provisions the system with the latest
software application packages.
The vcx-switchversion script takes the system out of service for several
minutes. Accordingly, run the script during a period of low system activity.
To run the switchversion script:
1 Log in to the server as root.
2 Enter a password (default is pvadmin).
3 Go to the directory where the software files are located.
4 Press Enter (or Return).
-bash-2.05b# vcx-switchversion 2.9.3
Enter vcx-switchversion <version-number> at the command prompt.
For <version-number>, enter the VCX version number that appeared at
the end of the install-upgrade script.
Start of vcx-switchversion Script
-bash-2.05b# vcx-switchversion 2.9.13
Checking if VCX can switch to VCX.2.9.13
ls: /opt/3com/VCX.2.9.13/scripts/upgrade/C??*: No such file or directory
Checking os versions: YES
Switching VCX to VCX.2.9.13:
...setting up
...checking if this is a VCX 5.X upgrade: no
...checking if existing configuration file is valid for new version.
...copying existing configuration file.
Page 44

44 CHAPTER 2: INSTALLATION SCRIPTS
...selecting operating system partition
The currently active OS is 'B', OS version 3.3.1
Selecting OS installation 'A', OS version 4.4.0
Configuring GRUB boot loader...Done.
Version switch complete. Rebooting to start new version.
Broadcast message from root (pts/0) (Tue Dec 20 11:21:43 2005):
The system is going down for reboot NOW!
End of vcx-switchversion Script
If upgrading from release 2.0 to release 3.0, you will be required to add
new activation keys (license keys).
Managing the Activation Keys
If you have purchased new applications, or need to increase the number
of users on your system, then you may need to upgrade your activation
keys (license keys). Each system has a unique system host ID that is used
in the generation of activation keys.
Before upgrading the activation keys, first ensure that the VCX Linux
operating system and the 3Com IP Conferencing Module software is
installed. Then do the following:
1 Using a browser, log in to the 3Com IP Conferencing Module as root.
2 Select Admin > System Config from the menu bar.
3 From quick links, select Licensing Information.
The License Information screen appears, listing the system’s activation
keys and host ID.
Figure 2 License Information
4 To delete an activation key, press .
5 To add an activation key:
Page 45

Managing the Activation Keys 45
a Send the host ID (located at the bottom of the screen) to 3Com.
b When 3Com returns the new activation key, paste it into the license
string box and press Add.
You can also determine the system host ID with a Linux command:
1 Log in to the server as root.
2 At the prompt, enter cd /opt/3com/VCX/presconf/tools/license
3 Enter ./hostid
The Host ID is displayed. For example: 3157ecf668ffcb7dc7f00e4c
Please note that the ./hostid command you enter in the license directory
is not the same as the hostid command normally used with Linux
(/usr/bin/hostid).
Page 46

46 CHAPTER 2: INSTALLATION SCRIPTS
Page 47

3
OBTAINING SUPPORT FOR YOUR PRODUCT
Register Your Product
Purchase Value-Added Services
Warranty and other service benefits start from the date of purchase, so it
is important to register your product quickly to ensure you get full use of
the warranty and other service benefits available to you.
Warranty and other service benefits are enabled through product
registration. Register your product at
3Com eSupport services are based on accounts that you create or have
authorization to access. First time users must apply for a user name and
password that provides access to a number of eSupport features
including Product Registration, Repair Services, and Service Request. If
you have trouble registering your product, please contact 3Com Global
Services for assistance.
To enhance response times or extend warranty benefits, contact 3Com or
your authorized 3Com reseller. Value-added services like 3Com Express
and Guardian
upgrades, onsite assistance or advance hardware replacement.
Experienced engineers are available to manage your installation with
minimal disruption to your network. Expert assessment and
implementation services are offered to fill resource gaps and ensure the
success of your networking projects. More information on 3Com
maintenance and Professional Services is available at
http://www.3com.com/
SM
can include 24x7 telephone technical support, software
http://eSupport.3com.com/.
SM
Contact your authorized 3Com reseller or 3Com for a complete list of the
value-added services available in your area.
Page 48

48 APPENDIX 3: OBTAINING SUPPORT FOR YOUR PRODUCT
Troubleshoot Online
Access Software Downloads
You will find support tools posted on the 3Com web site at
http://www.3com.com/
3Com Knowledgebase helps you troubleshoot 3Com products. This
query-based interactive tool is located at
http://knowledgebase.3com.com and contains thousands of technical
solutions written by 3Com support engineers.
Software Updates are the bug fix / maintenance releases for the version
of software initially purchased with the product. In order to access these
Software Updates you must first register your product on the 3Com web
http://eSupport.3com.com/
site at
First time users will need to apply for a user name and password. A link to
software downloads can be found at
under the Product Support heading at
http://eSupport.3com.com/, or
http://www.3com.com/
Software Upgrades are the software releases that follow the software
version included with your original product. In order to access upgrades
and related documentation you must first purchase a service contract
from 3Com or your reseller.
Telephone Technical Support and Repair
To enable telephone support and other service benefits, you must first
register your product at
http://eSupport.3com.com/
Warranty and other service benefits start from the date of purchase, so it
is important to register your product quickly to ensure you get full use of
the warranty and other service benefits available to you.
When you contact 3Com for assistance, please have the following
information ready:
■ Product model name, part number, and serial number
■ Proof of purchase, if you have not pre-registered your product
■ A list of system hardware and software, including revision level
■ Diagnostic error messages
■ Details about recent configuration changes, if applicable
Page 49

Contact Us 49
To send a product directly to 3Com for repair, you must first obtain a
return authorization number (RMA). Products sent to 3Com, without
authorization numbers clearly marked on the outside of the package, will
be returned to the sender unopened, at the sender’s expense. If your
product is registered and under warranty, you can obtain an RMA
number online at
http://eSupport.3com.com/. First time users will
need to apply for a user name and password.
Contact Us 3Com offers telephone, e-mail and internet access to technical support
and repair services. To access these services for your region, use the
appropriate telephone number, URL or e-mail address from the list below.
Telephone numbers are correct at the time of publication. Find a current
directory of contact information posted on the 3Com web site at
http://csoweb4.3com.com/contactus/
Country Telephone Number Country Telephone Number
Asia, Pacific Rim Telephone Technical Support and Repair
Australia
Hong Kong
India
Indonesia
Japan
Malaysia
New Zealand
Pakistan
You can also obtain support in this region using the following e-mail: apr_technical_support@3com.com
Or request a repair authorization number (RMA) by fax using this number: + 65 543 6348
Europe, Middle East, and Africa Telephone Technical Support and Repair
From anywhere in these
regions, call:
From the following countries, you may use the numbers shown:
1 800 678 515
800 933 486
+61 2 9424 5179 or
000800 650 1111
001 803 61009
00531 616 439 or
03 3507 5984
1800 801 777
0800 446 398
+61 2 9937 5083
+44 (0)1442 435529
Philippines
P. R . o f C hi n a
Singapore
S. Korea
Ta iw a n
Thailand
1235 61 266 2602 or
1800 1 888 9469
800 810 3033
800 6161 463
080 333 3308
00801 611 261
001 800 611 2000
Page 50

50 APPENDIX 3: OBTAINING SUPPORT FOR YOUR PRODUCT
Country Telephone Number Country Telephone Number
Austria
Belgium
Denmark
Finland
France
Germany
Hungary
Ireland
Israel
Italy
You can also obtain support in this region using the following URL:
http://emea.3com.com/support/email.html
Latin America Telephone Technical Support and Repair
Antigua
Argentina
Aruba
Bahamas
Barbados
Belize
Bermuda
Bonaire
Brazil
Cayman
Chile
Colombia
Costa Rica
Curacao
Ecuador
Dominican Republic
You can also obtain support in this region using the following:
Spanish speakers, enter the URL:
http://lat.3com.com/lat/support/form.html
Portuguese speakers, enter the URL:
http://lat.3com.com/br/support/form.html
English speakers in Latin America should send e-mail to:
lat_support_anc@3com.com
01 7956 7124
070 700 770
7010 7289
01080 2783
0825 809 622
01805 404 747
06800 12813
1407 3387
1800 945 3794
199 161346
1 800 988 2112
0 810 444 3COM
1 800 998 2112
1 800 998 2112
1 800 998 2112
52 5 201 0010
1 800 998 2112
1 800 998 2112
0800 13 3COM
1 800 998 2112
AT&T +800 998 2112
AT&T +800 998 2112
AT&T +800 998 2112
1 800 998 2112
AT&T +800 998 2112
AT&T +800 998 2112
Luxembourg
Netherlands
Norway
Poland
Portugal
South Africa
Spain
Sweden
Switzerland
U.K.
Guatemala
Haiti
Honduras
Jamaica
Martinique
Mexico
Nicaragua
Panama
Paraguay
Peru
Puerto Rico
Salvador
Trinidad and Tobago
Uruguay
Venezuela
Virgin Islands
342 0808128
0900 777 7737
815 33 047
00800 441 1357
707 200 123
0800 995 014
9 021 60455
07711 14453
08488 50112
0870 909 3266
AT&T +800 998 2112
57 1 657 0888
AT&T +800 998 2112
1 800 998 2112
571 657 0888
01 800 849CARE
AT&T +800 998 2112
AT&T +800 998 2112
54 11 4894 1888
AT&T +800 998 2112
1 800 998 2112
AT&T +800 998 2112
1 800 998 2112
AT&T +800 998 2112
AT&T +800 998 2112
57 1 657 0888
US and Canada Telephone Technical Support and Repair
1 800 876 3266
Page 51

INDEX
A
activation key, managing 44
C
conference attendant 16
conference server 16
conference server database 16
conferences
public 36
restricted 36
configuration, post installation 34
D
database configuration 17
Domain Name System (DNS) 11
E
e-mail configuration 17
G
gathering site information
requirements 10
worksheet 11
general installation guidelines 17
H
Host ID 44
network configuration 16
system configuration 16
single server installation 18
installing, server components 15
install-upgrade script, overview 40
interactive voice response system 16
IP Conferencing Module configuration 17
L
license key, managing 44
N
network configuration 16
O
overview
system components 15
P
post installation configuration
add trusted SIP interfaces 35
configure IP Conferencing Module 36
overview 34
set up conference attendant server routes 34
set up conference server routes 34
test e-mail setup 39
preparing for installation 10
presence server 16
presence server database 16
I
initial installation
guidelines 17
IP conferencing module overview 17
overview 16
post installation configuration 34
services
database configuration 17
e-mail configuration 17
S
scripts
install-upgrade 40
vcx-switchversion 43
Session Initiation Protocol (SIP)
public conferences 36
restricted conferences 36
single server installation
database configuration 25
e-mail configuration 23
IP Conferencing Module configuration 26
Page 52

52 INDEX
network configuration 18
setup script (all-in-one) 18
system configuration 21
SIP (Session Initiation Protocol)
public conferences 36
restricted conferences 36
site information, gathering 10
system components
conference attendant 16
conference server 16
conference server database 16
overview 15
presence server 16
presence server database 16
VCX database 16
web provisioning server 16
system configuration 16
U
upgrade installation
install-upgrade script 40
overview 40
vcx-switchversion script 43
V
VCX database 16
vcx-switchversion script, overview 43
W
web provisioning server 16
 Loading...