

Page 1

TokenLink
®
Velocity
™
Token Ring LAN
PC Card User Guide
A member of the 3Com TokenLink family of
network interface cards
http://www.3com.com/
Part No. 09-0536-002
Published June 1997
Page 2

3Com Corporation
Copyright © 3Com Corporation, 1997. All rights reserved. No part of this documentation may be
reproduced in any form or by any means or used to make any derivative work (such as translation,
transformation, or adaptation) without permission from 3Com Corporation.
3Com Corporation reserves the right to revise this documentation and to make changes in content
from time to time without obligation on the part of 3Com Corporation to provide notification of
such revision or change.
3Com Corporation provides this documentation without warranty of any kind, either implied or
expressed, including, but not limited to, the implied warranties of merchantability and fitness for a
particular purpose. 3Com may make improvements or changes in the product(s) and/or the
program(s) described in this documentation at any time.
UNITED STATES GOVERNMENT LEGENDS:
If you are a United States government agency, then this documentation and the software described
herein are provided to you subject to the following restricted rights:
For units of the Department of Defense:
Restricted Rights Legend: Use, duplication, or disclosure by the Government is subject to restrictions
as set forth in subparagraph (c) (1) (ii) for Restricted Rights in Technical Data and Computer Software
Clause at 48 C.F.R. 52.227-7013. 3Com Corporation, 5400 Bayfront Plaza, Santa Clara, California
95052-8145.
For civilian agencies:
Restricted Rights Legend: Use, reproduction, or disclosure is subject to restrictions set forth in
subparagraph (a) through (d) of the Commercial Computer Software – Restricted Rights Clause at
48 C.F.R. 52.227-19 and the limitations set forth in 3Com Corporation’s standard commercial
agreement for the software. Unpublished rights reserved under the copyright laws of the United States.
If there is any software on removable media described in this documentation, it is furnished under a
license agreement included with the product as a separate document, in the hard copy
documentation, or on the removable media in a directory file named LICENSE.TXT. If you are unable
to locate a copy, please contact 3Com and a copy will be provided to you.
Unless otherwise indicated, 3Com registered trademarks are registered in the United States and may
or may not be registered in other countries.
3Com, TokenDisk and TokenLink are registered trademarks of 3Com Corporation. Velocity and
NetAge are trademarks of 3Com Corporation. 3ComFacts is a service mark of 3Com Corporation.
Artisoft and LANtastic are registeed trademarks of Artisoft, Inc. Banyan and VINES are registered
trademarks of Banyan Systems Incorporated. CompuServe is a registered trademark of CompuServe, Inc.
DEC and PATHWORKS are registered trademarks of Digital Equipment Corporation. Intel is a registered
trademark of Intel Corporation. AIX, IBM, NetView, and OS/2 are registered trademarks of International
Business Machines Corporation. Microsoft, Windows, and Windows NT are registered trademarks of
Microsoft Corporation. Novell and NetWare are registered trademarks of Novell, Inc.
Other brand and product names may be registered trademarks or trademarks of their respective holders.
5400 Bayfront Plaza
■
Santa Clara, California
■
95052-8145
■
ii
Page 3

C
ONTENTS
A
BOUT
T
How to Use This Guide 1
Conventions 2
HIS
G
UIDE
1
I
NTRODUCTION
Product Features 1-1
Overview of Point Enablers, Socket Services, Card Services,
and Super Client Drivers 1-2
Point Enablers 1-4
Socket Services 1-5
Card Services 1-5
Super Client Drivers 1-7
Card Services Enabler 1-7
Card and Socket Services Versus Point Enablers 1-7
Autoset Mode 1-8
2
I
NSTALLING
Kit Contents 2-1
Installation Tips 2-1
Installing the 3C389 PC Card 2-1
Removing the 3C389 PC Card 2-5
3
I
NSTALLING
Windows 95 Installation 3-2
Windows 95 OSR 2 Installation 3-4
Windows for Workgroups/NDIS 2 Installation 3-4
Using Memory Management 3-6
Windows NT 3.51 Installation 3-6
Windows NT 4.0 Installation 3-8
Novell NetWare Client 32 for Windows 95 Installation 3-9
THE
THE
T
OKEN
N
ETWORK
L
INK
V
D
ELOCITY
RIVERS
PC C
ARD
iii
Page 4

OS/2 NDIS 2 Device Driver Using LAN Adapter Protocol Support
(LAPS) 3-9
DOS Client 16 for Novell NetWare 4.01 and
Above Installation 3-11
Using Memory Management 3-12
OS/2 NDIS 2 Device Driver Using Multiprotocol Transport Service
(MPTS) 3-12
IBM LAN Support Program/Native Installation 3-14
Using Memory Management 3-15
4
LANAID
LANAID 4-1
Net Address 4-2
IBM LAN Client 4-2
Installing LANAID 4-3
Using LANAID to Install IBM LAN Client 4-4
Using LANAID to Configure the 3C389 PC Card 4-7
Running LANAID From the Command Line 4-8
5
T
ROUBLESHOOTING
Error Codes 5-3
OS/2 NDIS Error Codes 5-3
DXMCSMOD Error Codes 5-6
Troubleshooting Windows 95 (NDIS 3) 5-7
Troubleshooting Windows NT (NDIS 3) 5-8
Running the Diagnostics Program 5-8
Test Options 5-9
Diagnostics Error Codes and Suggested Actions 5-10
Open Errors 5-11
Open Error Codes 5-11
Transmit Error Codes 5-16
AND
IBM LAN C
Initialization Error Codes 5-10
Phases 5-12
Errors 5-12
Suggested Actions in Response to Open Errors 5-12
LIENT
iv
Page 5

A
U
SING
A
M
EMORY
Memory Managers with Point Enabler A-1
Memory Managers with Card and Socket Services A-2
Expanded Memory Specification A-4
B
S
YSTEM
S
OFT
C
H
OT
-P
LUGGABILITY
Windows 95 (NDIS 3) C-2
DOS ODI Hot-Pluggability and Suspend/Resume C-3
DOS NDIS Hot-Pluggability C-3
OS/2 NDIS Hot-Pluggability and Suspend/Resume C-4
C
ARD
M
AND
AND
ANAGER
S
OCKET
S
USPEND
S
ERVICES
/R
ESUME
S
PECIFICS
D
T
ECHNICAL
Online Technical Services D-1
World Wide Web Site D-1
3Com Bulletin Board Service D-2
3ComFacts Automated Fax Service D-2
3ComForum on CompuServe Online Service D-3
Support from Your Network Supplier D-4
Support from 3Com D-4
Returning Products for Repair D-6
I
NDEX
3C
OM
FCC C
VCCI C
S
UPPORT
Access by Analog Modem D-2
Access by Digital Modem D-2
C
ORPORATION
LASS
B C
LASS
2 S
L
IMITED
ERTIFICATION
TATEMENT
W
ARRANTY
S
TATEMENT
3C
OM
E
ND
U
SER
S
OFTWARE
L
ICENSE
A
GREEMENT
v
Page 6

F
IGURES
1-1 PC Card Software Interfaces 1-3
2-1 Attaching the Cable to the 3C389 PC Card 2-2
2-2 Inserting the 3C389 PC Card 2-3
2-3 Modular UTP Cable for the 3C389 PC Card 2-4
2-4 RJ-45 to STP Connector 2-4
vii
Page 7

T
ABLES
Notice Icons 2
Text Conventions 2
4-1 Clients and Protocol Descriptions 4-5
1
2
5-1 DOS ODI Error Codes 5-4
5-2 DXMCSMOD Error Codes, Explanation, and Action 5-6
5-3 Phase Nibble Explanations 5-12
5-4 Error Condition Nibble Explanations 5-12
5-5 Actions for Open Errors 5-13
5-6 Recommended Actions Key 5-16
ix
Page 8

L
IFETIME
ARRANTY
W
3Com’s EtherLink
TokenLink Velocity
FDDILink
Lifetime Limited Warranty. For further details,
please see 3Com’s Limited Warranty statement
in this guide.
To ensure the very best 3Com service and
support, take the time to complete the product
registration card.
™
L
IMITED
®
, Fast EtherLink, TokenLink
™
, ATMLink
network interface cards have a
™
PCI, and
®
,
Page 9

Customers in the countries or regions shown below should send the
completed registration card to the appropriate address. Customers in
other non-U.S. locations should send the registration card to the U.S.
address on the front of the card.
■
Asia
3Com Asia Ltd., Marketing Department
Room 2506-07, 25/F.
Citibank Tower
Citibank Plaza, Central
Hong Kong
■
Australia, New Zealand
3Com Australia, Marketing Department
99 Walker Street
Level 7
North Sydney
New South Wales 2060
Australia
■
Belgium, Netherlands, Luxembourg
3Com Benelux B.V.,
Marketing Department
Nevelgaarde 8-9
3436 ZZ
Nieuwegein
Netherlands
■
France, Israel
3Com France, Marketing Department
Immeuble McKinley
BP 965
1, Avenue de l’Atlantique
91976 Les Ulis Courtaboeuf Cedex
France
■
Japan
3Com Japan, Marketing Department
Shinjuku Sumitomo Building 23F
2-6-1 Nishi Shinjuku, Shinjuku-ku
Tokyo 163-02
Japan
■
Sweden, Finland, Norway,
Denmark
3Com Nordic, Marketing Department
Torshamsgatan 39
Box 1110
164 22 KISTA
Sweden
■
United Kingdom, Eire
3Com UK Ltd., Marketing Department
Pacific House
Third Avenue
Globe Park Marlow-on-Thames
Buckinghamshire, SL7 1YL
England
■
Germany, Austria, Switzerland
3Com GmbH, Marketing Department
Gustav-Heinemann-Ring 123
D-81739 Muenchen
Munich
West Germany
■
Italy, Greece, Spain, Portugal,
Malta
3Com Mediterraneo Srl,
Marketing Department
Via Michelangelo Buonarroti, 1
20093 Cologno Monzese MI
Italy
Page 10

ABOUT THIS GUIDE
This guide describes how to install and configure the
3Com 3C389 TokenLink Velocity PC Card, and is
intended for the token ring network administrator,
operator, or hardware installer. A knowledge of token
ring networks and microcomputer hardware configuration
procedures is required.
If the information in the README.TXT file or the Release
Notes differs from the information in this guide, follow
the information in the README.TXT file first, the Release
Notes second, and the user guide third. The README.TXT
files are on the software diskettes; the printed Release
Notes are placed in the product box or inserted in the
user guide when the product is packed.
How to Use This Guide
This table shows where to find specific information in this
guide.
If you are looking for... Turn to...
Features of the 3C389 TokenLink Velocity PC Card Chapter 1
Installing the 3C389 TokenLink Velocity PC Card Chapter 2
Installing the network device drivers for a specific operating system Chapter 3
Using LANAID for network device driver configuration Chapter 4
Troubleshooting and error codes Chapter 5
Using the diagnostic utility Chapter 5
Using a Memory Manager Appendix A
Specifics about SystemSoft Card and Socket Services Appendix B
Hot-Pluggability and Suspend/Resume Appendix C
Contacting 3Com technical support Appendix D
Page 11
2 ABOUT THIS GUIDE
Conventions
Table 1 and Table 2 list conventions that are used
throughout this guide.
Table 1 Notice Icons
Icon Notice Type Alerts you to...
Information note Important features or instructions
Caution Risk of personal safety, system damage, or loss
Warning Risk of severe personal injury
Table 2 Text Conventions
Convention Description
Commands The word “command” means you must enter the
Screen displays This typeface represents information as it appears on
Words in italicized
type
of data
command exactly as shown in text and press the Return
or Enter key. Example:
To remove the IP address, enter the following
command:
SETDefault !0 -IP NETaddr = 0.0.0.0
This guide always gives the full form of a command in
uppercase and lowercase letters. However, you can
abbreviate commands by entering only the uppercase
letters and the appropriate value. Commands are not
case-sensitive.
the screen.
Italics emphasize a point or denote new terms at the
place where they are defined in the text.
Page 12

INTRODUCTION
1
The 3Com TokenLink Velocity PC Card (referred to as the
3C389 PC Card) is a network interface card (NIC) that
provides an interface between PCs and token ring
networks. The 3C389 PC Card is designed to operate in
PCs with PC Card slots that comply with the standards of
the Personal Computer Memory Card International
Association (PCMCIA) Release 2.1, Type II slots.
Product Features
■ Fully compatible and up to 90% faster than the
3Com TokenLink III PC Card.
■ Remote Program Load (RPL) capability.
■ Full-duplex ready.
■ Supports the Desktop Management Interface (DMI).
■ Easy to install—variable interrupt levels and I/O
address choices.
■ Choice of Plug and Play automated configuration or
software configurable, with included graphical or
command line tool, for fast and easy installation.
■ RJ-45 cable and shielded twisted pair (STP) media
access adapter for easy connection to either
unshielded twisted pair (UTP) or STP cabling.
■ Hot-Pluggability—conserves power and memory
resources without removing the PC Card.
■ Compliance with PCMCIA and IEEE 802.5 standards,
Revision 2.
■ Support for a variety of network operating systems
and network applications.
■ Auto Ring Speed option that automatically detects the
data rate of the ring.
Page 13

1-2 CHAPTER 1: INTRODUCTION
See the README.TXT files on the TokenDisk diskettes for
information on 3C389 PC Card features not documented
in the user guide.
Overview of Point Enablers, Socket Services,
Card Services, and Super Client Drivers
Computers that support PC Cards have one or more PC
Card slots, known as A, B, C... or 1, 2, 3....
Communication between the LAN device driver and the
PC Card is enabled by a software layer which may include
one or more of the following programs:
■ Point Enablers
■ Card Services
■ Socket Services
■ Super Client Drivers
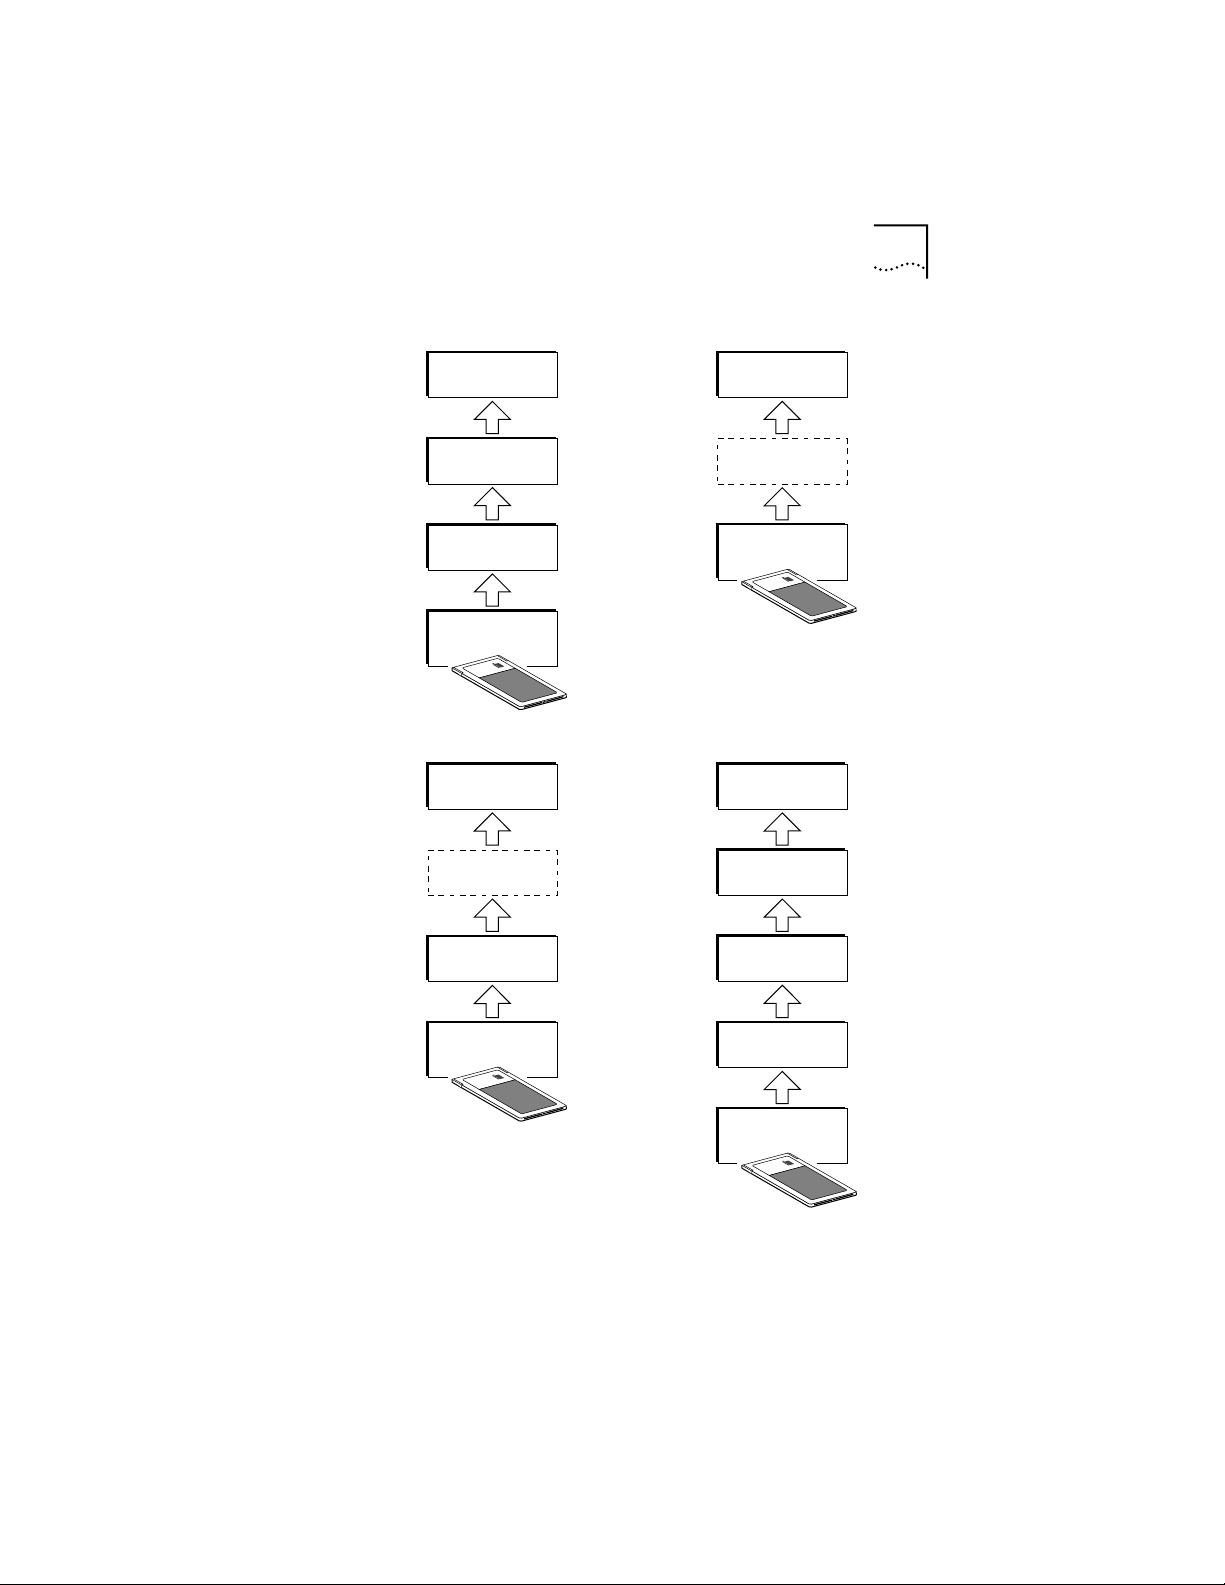
Figure 1-1 shows how these programs operate relative to
each other. A dotted line means that the program has
fulfilled a temporary function and is no longer operating
or resident in memory.
Page 14
Overview of Point Enablers, Socket Services, Card Services,
and Super Client Drivers
1-3
PCMCIA 2.1
LAN device
driver
Card
services
Socket
services
Socket
controller
Socket services
enabled
LAN device
driver
Socket services
enabler
Point enabled
LAN device
driver
Point
enabler
Socket
controller
Card services
enabled
LAN device
driver
Card services
enabler
Socket
services
Socket
controller
Figure 1-1 PC Card Software Interfaces
Card
services
Socket
services
Socket
controller
Page 15

1-4 CHAPTER 1: INTRODUCTION
Point Enablers
Windows NT currently uses a point enabler called
PCMCIA.SYS, which currently ships with Windows NT.
OS/2 requires Card Services.
Point enablers are small programs that provide an
interface directly to the PC Card controller; therefore,
they must be written to support a particular type of
controller. For the 3C389 PC Card, there are point
enablers for the Intel chip (most PCs) and for the chip
installed in the Toshiba 3300SL.
In the DOS environment only, you have the option of
using these point enablers instead of Card and Socket
Services.
Two point enablers are supplied for this PC Card:
■ POINTTR.EXE—For PCs with Intel PCMCIA controllers,
including the IBM ThinkPad, Toshiba 4500 and later,
and many other makes.
■ TOSHTR.EXE–For the Toshiba T3300SL.
When using the point enabler, it is vitally important that
you make certain that the system resources used by the
PC Card are different from and do not conflict with the
system resources and any other PC Cards installed in
your PC.
Advantages
Enablers consume no memory—they remove themselves
after configuring the PC Card.
Disadvantages
You must specify the slot number; the point enabler will
enable only that slot. Therefore, the PC Card must always
be in a specific slot.
In some PCs, the slot may not be switched off when the
PC is in suspend mode, so the PC Card will continue to
consume power.
Page 16

When configuring two or more PC Cards, you must
allocate memory and interrupt resources manually.
Socket Services
This is a BIOS-type interface that provides a way to gain
access to the PC Card sockets (slots) of a PC. It identifies
how many sockets your PC has and detects the insertion or
removal of a PC Card while the PC is switched on. It has
an interface to Card Services. Socket Services is part of the
PCMCIA Specification.
The Socket Services device driver is usually provided by
the manufacturer of the PC, because the driver must
understand the PC's BIOS and PCMCIA controller.
The Socket Services interface enabler shipped on
TokenDisk diskette #2 is TOKENRNG.EXE. It will not work
with Socket Services 2.0 or higher.
The file TOKENRNG.EXE is an MSDOS Socket Services 1.01
interface enabler. It uses the Socket Services that is
included in some PCs to configure the socket and PC Card.
It is used on machines with DATABOOK PC Card controllers
that support the Socket Services 1.01 interface and not
Card Services.
Socket Services
1-5
Card Services
This is a software management interface that allows
system resources (such as memory, interrupts, slots, and
I/O ports) to be allocated automatically when Socket
Services has detected that a PC Card has been inserted.
Client drivers call Card Services to allocate and de-allocate
system resources. When Socket Services detects an
insertion or removal of a PC Card, it sends notification to
Card Services. Card Services then notifies its registered
client drivers, such as IBMTOKCS.OS2, that they should
allocate or de-allocate resources.
Page 17

1-6 CHAPTER 1: INTRODUCTION
If the installation program detects Card and Socket
Services in your PC, it will default to Autoset mode.
Autoset mode allows your LAN driver to negotiate with
Card Services for memory space and interrupts. This helps
to prevent conflicts with other PC Cards that are
installed in your PC; however, you will not know exactly
what memory addresses and interrupts have been given
to you.
Card Services requires Socket Services. The Card Services
interface is usually provided with the operating system.
Advantages
■ Ability to insert and remove PC Cards without PC
reconfiguration and without damaging the electrical
contacts.
■ Automatic allocation of system resources.
■ When used with your token ring software in Autoset
mode, automatic configuration of your PC Card
occurs.
Disadvantage
■ Stay-resident program that uses system memory. The
amount varies according to the type of PC Card
support and the drivers used.
The file CS20TOK.EXE is a DOS Card Services 2.00
interface enabler shipped on TokenDisk diskette #2. It uses
the Card Services interface to configure the socket and
the PC Card. It is used when the token ring device driver is
not a Card Services client driver and a Card Services
environment is desired. It works with DOS Card Services
2.00 and higher.
Page 18

Super Client Drivers
Many notebook PC vendors are providing customers with
super client drivers that can enable many different PC
Cards. PC-DOS 6.1 includes one called PCMSCD.EXE, for
example.
They are best used for modems and other PC Cards that
do not have a Card Services client driver of their own. If
you use a super client driver, try to disable support for the
PC Card and use the 3Com client driver. 3Com drivers
have been written to take advantage of Card Services.
Look at the documentation for your super client driver to
find out whether you can disable token ring support.
Card Services Enabler
If you want to use a token ring device driver that does
not have built-in Card Services support on a system that
uses Card Services, CS20TOK.EXE is supplied. This
program is a Card Services Enabler that uses Card and
Socket Services to configure the 3C389 PC Card. As with
other enablers, you must specify the resources desired
for the PC Card, and they must agree with the settings of
the token ring device driver for the system to work
correctly.
Super Client Drivers
1-7
Card and Socket Services Versus Point Enablers
In principle, Card and Socket Services is the better
method of connection because it allows you to insert or
remove PC Cards from any slot as you want, even while
the PC is switched on (hot-swapping) and it automatically
allocates resources like memory, I/O ports, interrupt levels,
and slots.
Point Enablers, two of which are provided with the
PC Card, are popular because they remove themselves
from memory after having been loaded—as opposed to
the 30-40 KB needed for Card and Socket Services.
Page 19

1-8 CHAPTER 1: INTRODUCTION
For point enablers, you have to specify the slot in which a
particular PC Card will be used and you have to specify
memory locations, interrupt levels, and other parameters.
This is not difficult unless you use several PC Cards at
different times, in which case you need to make certain
that what you specify does not conflict with any other PC
Cards installed in your PC.
Autoset Mode
Card and Socket Services turns out to be most helpful
when you have a number of PC Cards installed in your
PC. If the installation program detects Card and Socket
Services in your PC, it will default to Autoset mode.
Autoset mode allows your LAN driver to negotiate with
Card and Socket Services for memory space and
interrupts every time you switch on your PC. This helps to
prevent conflicts with other PC Cards that are installed in
your PC; however, you will not know exactly what
memory addresses and interrupts you are using.
Page 20
INSTALLING THE
2
Kit Contents
In addition to this manual, your kit contains the following
items:
■ 3Com 3C389 TokenLink Velocity PC Card
■ Token ring PC Card RJ-45 cable
■ Five TokenDisk diskettes
■ An shielded twisted pair (STP) connector for
connection to STP network wiring
The 3C389 PC Card cable can be purchased separately.
If you want additional cables, contact your 3Com
marketing representative or your place of purchase.
Installation Tips
If you plan to use Card and Socket Services software,
Version 2.0 or higher, install it and reboot your PC. The
software may be provided with your PC or operating
system. See Chapter 1 for a description of these services.
TOKENLINK VELOCITY
PC CARD
The README.TXT file on TokenDisk diskette #2 contains
more information to help you configure and customize
the 3C389 PC Card.
Installing the 3C389 PC Card
The procedures in this section explain how to physically
install the 3C389 PC Card. The installation procedure is
summarized by the following sequence:
■ Attach the RJ-45 cable to the 3C389 PC Card.
■ Insert the 3C389 PC Card into the PC.
■ Plug the cable into the appropriate network port.
Page 21
2-2 CHAPTER 2: INSTALLING THE TOKENLINK VELOCITY PC CARD
If you are using Card and Socket Services, you may be
able to use hot-pluggability features with your 3C389
PC Card. See Appendix C, “Hot-Pluggability and
Suspend/Resume” for more information
1 Turn off the power to the PC.
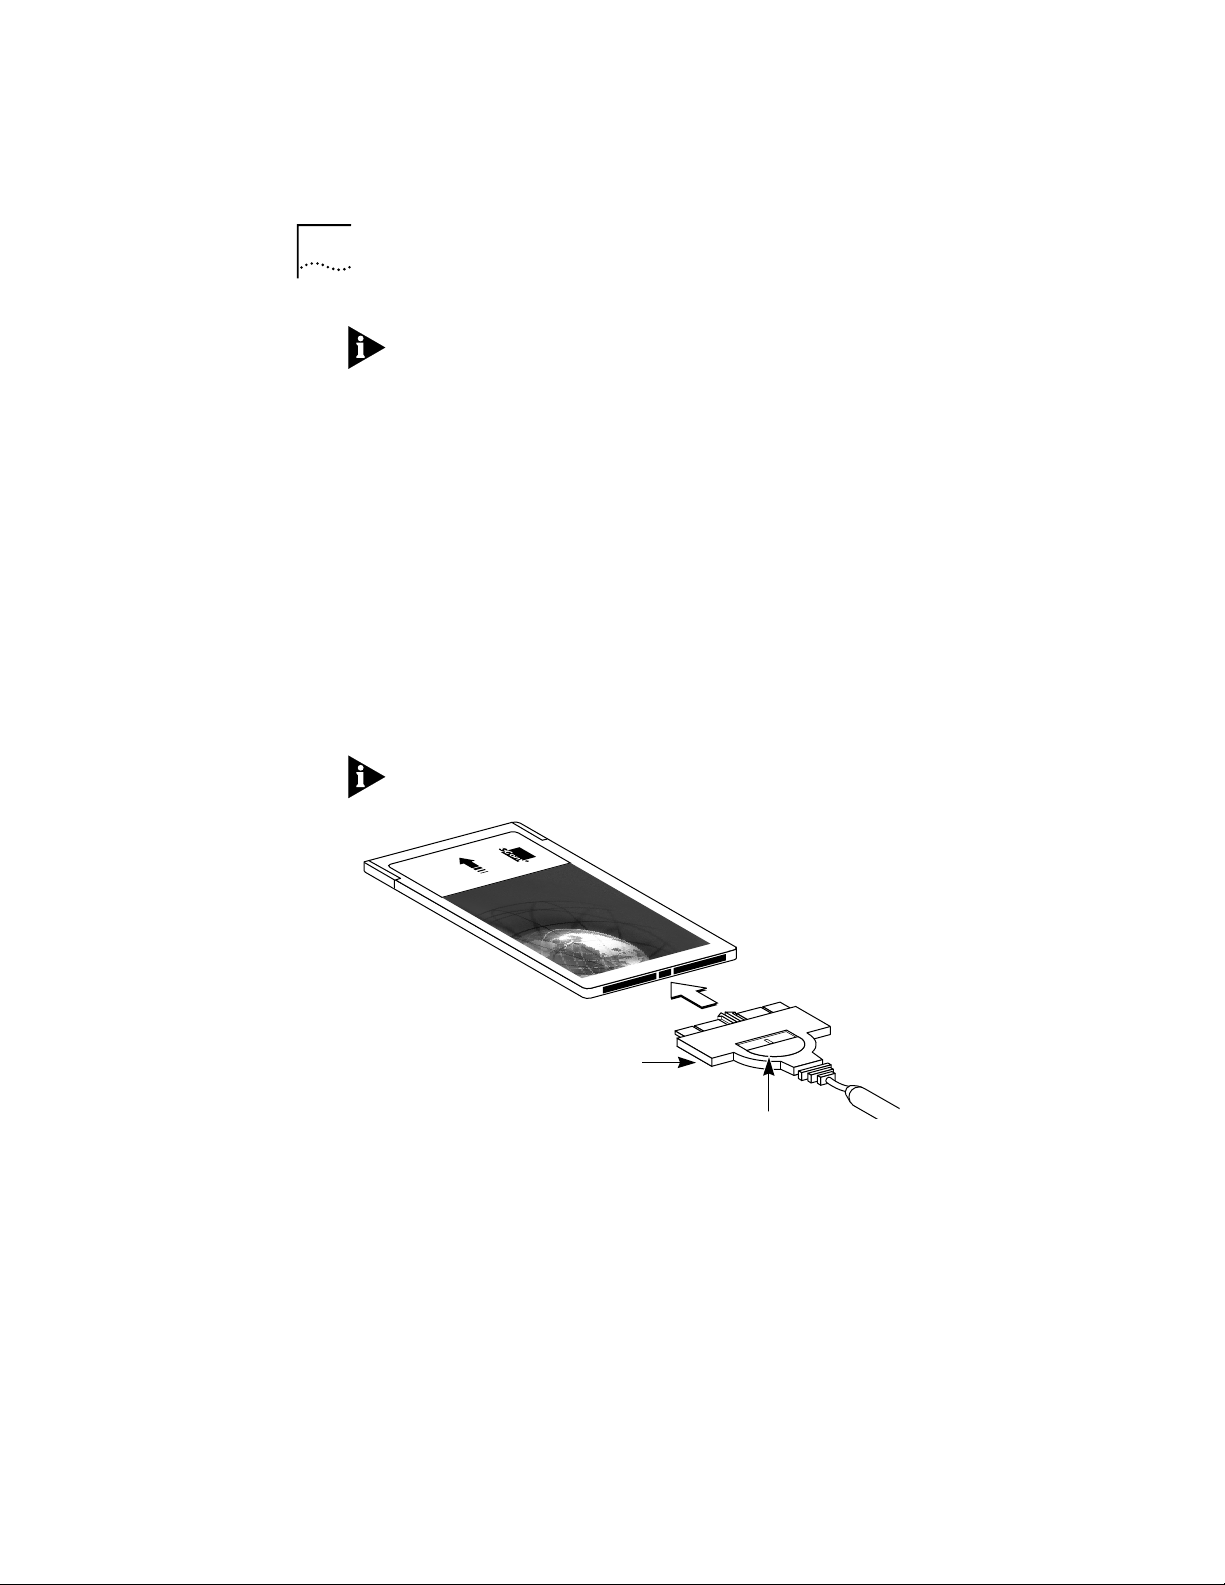
2 Attach the cable to the 3C389 PC Card (Figure 2-1).
Retract the latch by sliding the half-circle latching button
on the connector backwards toward the cable. The cable
cannot be connected or disconnected unless the latch is
retracted.
With the part number facing down, attach the cable
connector to the 3C389 PC Card.
The connector can attach to the 3C389 PC Card in only
one way. If the connector does not seem to fit, turn it
over and gently try again.
The cable for the 3Com 3C689 TokenLink III PC Card is not
compatible with the 3C389 PC Card.
INSERT
THIS SIDE UP
3C389
PC card
TokenLink
16/4 PC Card
Part number
(on bottom)
®
Velocity
™
Latching button
Figure 2-1 Attaching the Cable to the 3C389 PC Card
Page 22
Installing the 3C389 PC Card 2-3
16/4 PC Card
TokenLink
®
Velocity
™
INSERT
THIS SIDE UP
3C389
3 Lock the cable connector to the 3C389 PC Card.
Slide the latching button toward the 3C389 PC Card.
You can leave the latching button retracted, so that if the
cable is yanked, the connector will disconnect from the
PC Card, possibly saving your PC from being pulled off a
table.
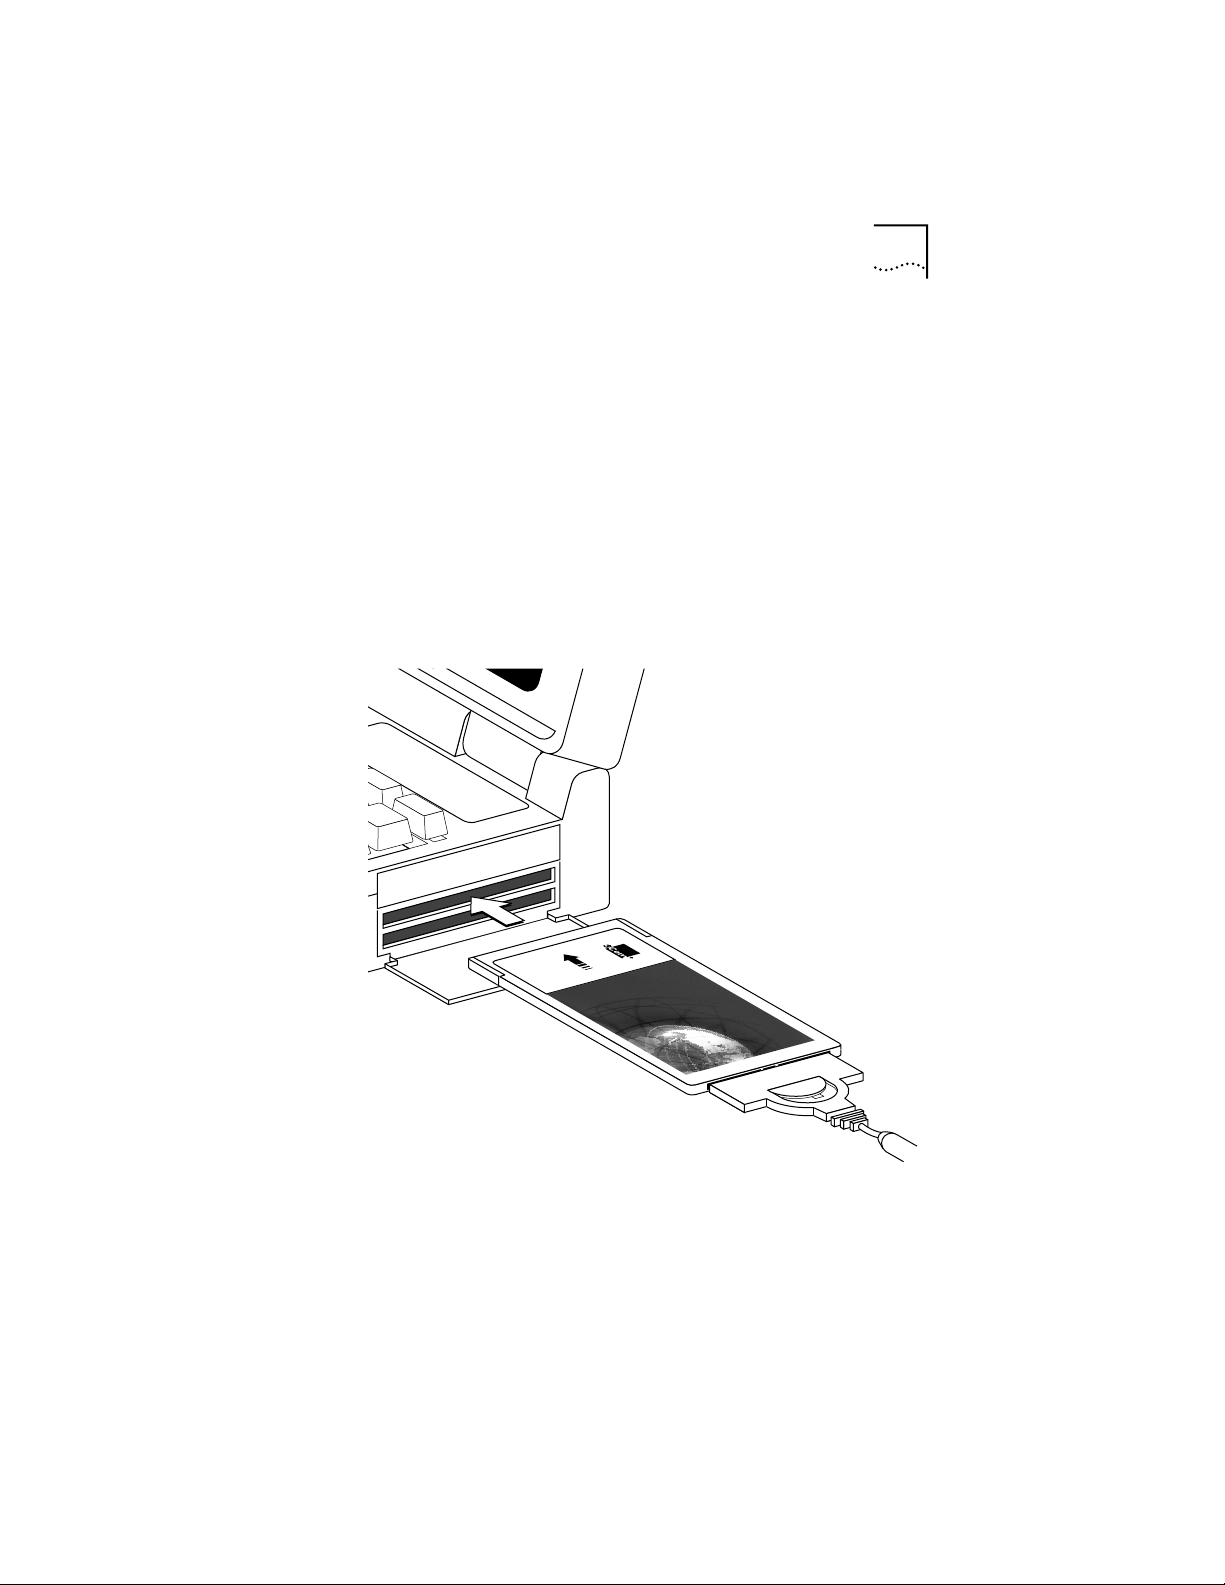
4 Insert the 3C389 PC Card in the slot (Figure 2-2).
If you are using a point enabler, note which slot
you use.
The 3C389 PC Card can go in only one way. If you feel
resistance before the 3C389 PC Card is fully inserted,
remove the 3C389 PC Card, turn it over, and reinsert it.
Figure 2-2 Inserting the 3C389 PC Card
Page 23
2-4 CHAPTER 2: INSTALLING THE TOKENLINK VELOCITY PC CARD
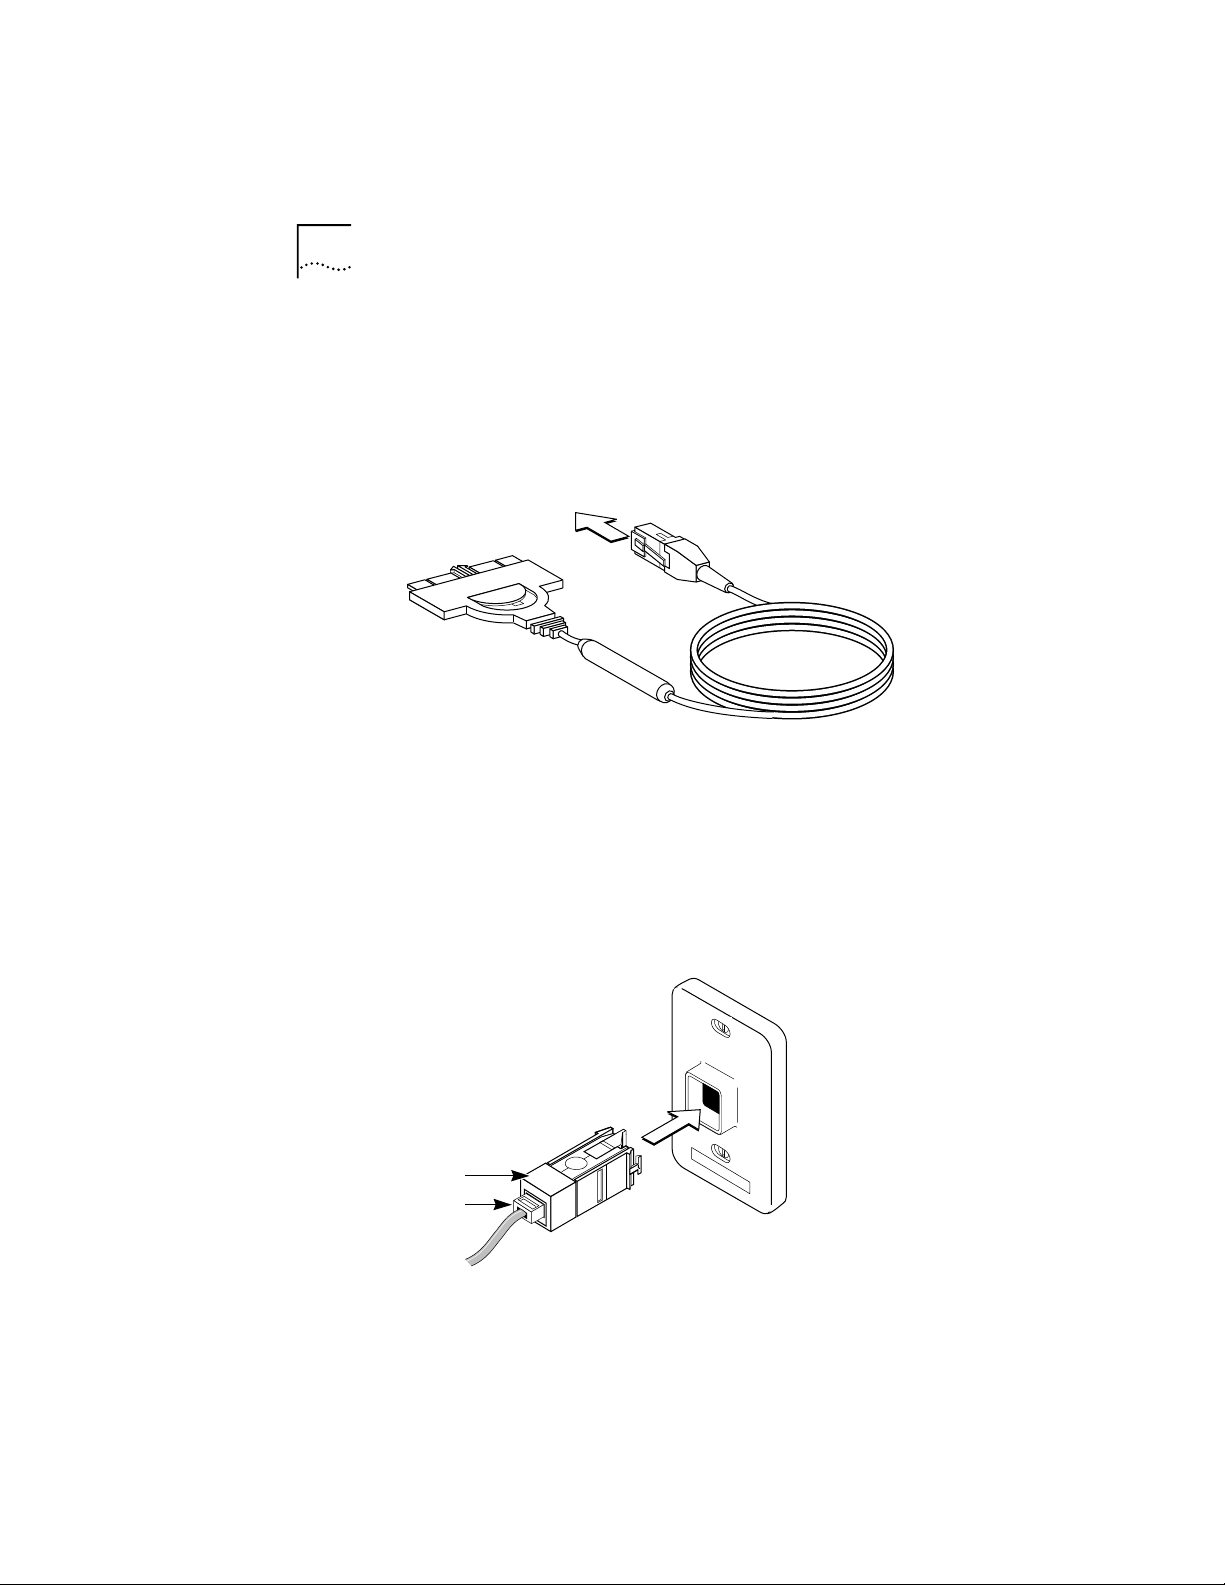
5 Connect the PC Card cable to the network port.
■ If your network uses unshielded twisted pair (UTP)
cabling, attach the RJ-45 (8-pin modular) connector
on the 3C389 PC Card cable (P/N 38H7044) to the
RJ-45 network port (Figure 2-3).
To RJ-45
network port
RJ-45 connector
Credit card
adapter cable
Figure 2-3 Modular UTP Cable for the 3C389 PC Card
■ If your network uses shielded twisted pair (STP)
cabling, attach the RJ-45 connector on the 3C389
PC Card cable (P/N 38H7044) to the RJ-45 end of the
STP connector (P/N 73G8315). Attach the STP
connector to the STP network port (Figure 2-4).
The STP connector has been specifically designed to
work with the 3C389 PC Card.
network port
Code
number
RJ-45
Figure 2-4 RJ-45 to STP Connector
100
STP
Data connector
Page 24
Verify that you are using the correct STP connector. The
correct STP connector is labeled with the number 100.
6 Turn on the power to the PC.
Proceed to Chapter 3 for instructions on how to install
the network drivers.
Removing the 3C389 PC Card
Removing the cable from the 3C389 PC Card makes the
operating system behave as if the PC Card has been
physically removed from the slot. See Appendix C for
more information.
Follow these steps to remove the 3C389 PC Card:
1 Switch off the power to the PC.
2 With the cable still attached to the 3C389 PC Card,
remove the 3C389 PC Card from the PC.
3 To detach the cable from the 3C389 PC Card, retract
the latching button (the half-circle in the center of
the connector) by sliding it backwards away from
the 3C389 PC Card.
4 Disconnect the cable connector from the 3C389
PC Card.
Removing the 3C389 PC Card 2-5
Page 25
INSTALLING THE NETWORK
3
DRIVERS
This chapter describes how to install network LAN drivers
other than IBM LAN Client. After installation, some
network drivers must be configured using LANAID, an
installation and diagnostic utility described in Chapter 5.
If you are installing the IBM LAN Client go directly to
Chapter 5.
Consult the following lists to determine if LANAID is
required to configure your network driver:
LANAID is not required to configure the following
drivers:
■ Windows 95
■ Windows NT 3.51
■ Windows NT 4.0
■ OS/2 NDIS 2 device driver using LAPS
■ OS/2 NDIS 2 device driver using MPTS
■ OS/2 NDIS 2 device driver using other installation
programs
■ Warp Connect
■ Warp Server
■ Novell NetWare Client 32 for Windows 95
LANAID is required to configure the following
drivers:
■ IBM LAN Support Program/Native
■ IBM LAN Client
■ DOS Client 16 for Novell NetWare lower than 3.12
■ DOS Client 16 for Novell NetWare 3.12 and 4.0
Page 26

3-2 CHAPTER 3: INSTALLING THE NETWORK DRIVERS
■ DOS Client 16 for Novell NetWare 4.01 and higher
■ OS/2 NetWare Client
■ Artisoft LANtastic 6.0, 7.0
■ Banyan VINES 6.X
■ Microsoft LAN Manager/NDIS
■ Windows for Workgroups\NDIS 2
■ Other DOS NDIS environments
The installation procedures for the following drivers are
found in the README.TXT file shipped on TokenDisk
diskette #1:
■ Microsoft LAN Manager, NDIS
■ ARTISOFT LANtastic Versions 6.0 and 7.0
■ Banyan VINES, NDIS
■ DOS Client-16 for Novell NetWare lower than 3.12
■ DOS Client-16 for Novell NetWare 3.12 and 4.0
■ OS/2 NetWare Client
■ OS/2 NDIS 2 Device Driver Using Other Installation
Programs
The most recent 3Com drivers are available from the
3Com World Wide Web site (www.3com.com) or the
3Com Bulletin Board Service. See Appendix D for
information on how to connect with 3Com online
services.
Windows 95 Installation
You will need your Windows 95 diskettes or CD-ROM
during installation, unless you have copied the .CAB files
to your hard disk.
TokenDisk diskette #2 contains the device driver for
Windows 95. It is recommended that you use the
Windows 95 3C389 PC Card support software.
Page 27

Windows 95 Installation 3-3
There are two versions of Windows 95: the original
version shipped in August 1995 and the OEM Sales
Release 2 (OSR 2). The driver installation instructions are
slightly different in the two versions.
1 Determine if you have OSR 2.
Click Start, Settings, Control Panel, and System.
If the system version number is 4.00.950 B, you are using
OSR 2. If it is 4.00.950 A or just 4.00.950, you are using
the original version of Windows 95.
If you are running OSR 2, use the instructions in
“Windows 95 OSR 2 Installation” later in this chapter.
Otherwise, perform the following instructions.
2 If you have not already inserted the 3C389 PC Card,
insert it now with the cable attached.
The PC does not detect the 3C389 PC Card if the cable is
detached.
If PCMCIA support has been started on your machine,
the system will prompt you for a diskette.
If PCMCIA support has not been started on your
machine, do the following sub steps.
a Click Start, Settings, and Control Panel.
b Click PC Card (PCMCIA) to start PCMCIA support, and
follow the instructions given.
3 Insert TokenDisk diskette #2 into the appropriate
floppy drive and press [Enter].
4 Type a:\win95 [Enter]
5 Set the displayed parameters.
The system will list acceptable default values.
6 Follow the instructions to copy the files.
Windows 95 PC Card software installation is now
complete.
Page 28

3-4 CHAPTER 3: INSTALLING THE NETWORK DRIVERS
Windows 95 OSR 2 Installation
1 If you have not already inserted the 3C389 PC Card,
insert it now with cable attached.
The PC does not detect the 3C389 PC Card if the cable is
detached.
If PCMCIA support has been started on your machine,
the system will prompt you for a diskette.
If PCMCIA support has not been started on your
machine, complete the following sub steps.
a Click Start, Settings, and Control Panel.
b Click PC Card (PCMCIA) to start PCMCIA support, and
follow the instructions given.
2 When the Update Device Driver Wizard appears,
insert TokenDisk diskette #2 and click Next to search
the diskette for the driver.
3 If the driver is not found on the diskette, click Other
Locations and type:
a:\win95
4 When the driver is found, click Finish.
5 Set the parameters.
The system will list acceptable default values.
6 Follow the displayed instructions to copy the files.
Windows OSR 2 PC Card software installation is now
complete.
Windows for Workgroups/NDIS 2 Installation
If you are installing the 3C389 PC Card in a PC that
already has Windows for Workgroups installed, refer to
the Microsoft Windows for Workgroups User's Guide for
instructions on how to install and configure a third-party
device driver.
Page 29

Windows for Workgroups/NDIS 2 Installation 3-5
If you are running Windows for Workgroups Version 3.11,
perform the following procedure:
1 At the Network Setup window, select Networks,
then Install Microsoft Windows Network.
2 Change any other items for your environment, and
click OK and Continue.
3 When prompted to install a new PC Card, select
Unlisted or Updated Network Adapter.
4 When prompted to insert a diskette that contains
the network driver, insert TokenDisk diskette #2
and click OK.
5 Follow the instructions as they appear on the
window to install the device driver.
6 Accept the defaults for Interrupt, MMIO, and SRAM.
You will be given a chance to update these later, if
necessary.
7 Exit the Windows for Workgroups setup.
8 Exit to the DOS prompt. Do not reboot your PC at
this time.
9 Configure the 3C389 PC Card using LANAID.
See Chapter 5 for information on how to use LANAID.
10 If LANAID is not already installed, install it as
described in Chapter 4 in the section “Installing
LANAID.”
11 After LANAID is installed, continue with Chapter 4
“Using LANAID to Configure the 3C389 PC Card.”
When you get to the panel that asks for the existing
network operating system, select Microsoft windows for
workgroups.
Page 30

3-6 CHAPTER 3: INSTALLING THE NETWORK DRIVERS
Using Memory Management
■ If you are using Card and Socket Services, the
program will default to Autoset mode, which allows
the LAN driver to negotiate with Card and Socket
Services for available resources. LANAID will allow you
to select values for resources to be used by your
3C389 PC Card such as Interrupt, memory, and I/O
Base Address.
■ If you are not using Card and Socket Services in
Autoset mode, you must ensure that the values that
you select for Interrupt, MMIO, and SRAM do not
conflict with those for other PC Cards and resources
installed in your PC (such as video, sound, COM port).
■ If you are using EMM386, in most cases the memory
exclusions will be automatically handled by LANAID.
If you are using a memory manager, you must
exclude the memory ranges being used by your
3C389 PC Card (8-KB default).
The Microsoft Windows for Workgroups PC Card
software installation is now complete.
Windows NT 3.51 Installation
The NDIS 3.0 device driver for Windows NT 3.51 or
higher requires that Service Pack 2 or higher be installed
with your Windows NT system. It will function only in a
PC with an Intel 82365SL or compatible socket
controller. Windows NT does not support the Databook
socket controllers at this time. Check your PC user guide
to determine which controller is in your PC.
Make sure that the 3C389 PC Card with cable attached is
inserted before installing Windows NT.
1 On the Windows NT desktop, open the program
group Main.
2 In the Main Window, double-click the Control Panel
icon.
Page 31

Windows NT 3.51 Installation 3-7
3 In the Control Panel Window, double-click the
Network icon.
4 Click Add Adapter.
5 Select <Other> – Requires disk from manufacturer
from the bottom of the Network Adapter Card drop
down list and click Continue.
The Insert Disk dialog box appears.
6 Insert TokenDisk diskette #2 into the floppy drive.
7 Type a:\nt and click OK.
The Select OEM Option dialog box appears.
8 Select 3C389 TokenLink Velocity PC Card and click OK.
The 3C389 PC Card driver and its associated files will be
copied from the diskette to the hard drive.
9 In the 3Com TokenLink Velocity PC Card dialog box,
click Configure.
10 Choose either Enhanced Mode or Compatibility Mode
and click OK.
Enhanced Mode uses less memory for the hardware
operation of the 3C389 PC Card. Compatibility Mode
allows the configuration to be used by earlier token ring
PC Cards such as the 3C689 PC Card.
The system lists acceptable defaults.
11 Set the displayed parameters and click OK.
Make sure the Ring Speed parameter is set to the correct
value.
12 Click Save to accept the configuration.
13 Click OK.
14 Restart the PC.
If this is a first time installation, Windows NT prompts you
to enter additional NOS configuration information, such
as client addresses and server names.
15 Restart the PC.
Windows NT 3.51 PC Card software installation is now
complete.
Page 32

3-8 CHAPTER 3: INSTALLING THE NETWORK DRIVERS
Windows NT 4.0 Installation
1 Insert TokenDisk diskette #2 into the floppy drive.
2 Right-click the Network Neighborhood icon.
3 Select Properties.
4 Click the Adapters tab.
5 Click Add.
The PC will generate a list of available NICs.
6 Click Have Disk.
The Insert Disk window appears.
7 Type a:\nt and click OK.
The Select OEM Option dialog box appears.
8 Select 3C389 TokenLink Velocity PC Card and click
OK.
The 3C389 PC Card driver and its associated files will be
copied from the diskette to the system.
9 In the 3Com TokenLink Velocity PC Card dialog box,
click Configure.
10 Choose either Enhanced Mode or Compatibility
Mode and click OK.
Enhanced Mode uses less memory for the hardware
operation of the 3C389 PC Card. Compatibility Mode
allows the configuration to be used by earlier token ring
PC Cards such as the 3C689 PC Card.
11 Set the displayed parameters and click OK.
Make sure the Ring Speed parameter is set to the correct
value.
12 Click Save to accept the configuration.
13 Click OK.
14 Restart the PC.
Windows NT 4.0 PC Card software installation is now
complete.
Page 33

Novell NetWare Client 32 for Windows 95 Installation 3-9
Novell NetWare Client 32 for Windows 95 Installation
1 Click Remove PC Cards from the Network Control
Panel for any PC Cards that are no longer in the
system or that you are removing.
2 In a DOS window, change to the \windows\inf
subdirectory.
3 Delete the TOKENCS.INF file.
4 Copy the new .INF file for your driver from the
TokenDisk diskette #2 \novell\netware directory
into the \windows\inf directory.
5 Complete the Client 32 installation.
6 Reboot the machine to effect the changes and load
the new driver.
Novell NetWare Client 32 for Windows 95 installation is
now complete.
OS/2 NDIS 2 Device Driver Using LAN Adapter
Protocol Support (LAPS)
If your OS/2 network operating system has not yet been
installed on your PC, install it now and follow its
instructions for installing device drivers. If an OS/2 network
operating system has previously been installed, follow the
instructions here for using LAPS to install device drivers.
1 Insert TokenDisk diskette #2 into the floppy drive.
2 Enter laps at the OS/2 prompt.
LAPS is usually located in the \ibmcom subdirectory on
the boot drive.
3 Click Install.
You will be prompted for the source of the .NIF file.
4 Type:
a: [Enter]
5 Click OK when the Installation Complete message
appears.
You will return to the main menu.
Page 34

3-10 CHAPTER 3: INSTALLING THE NETWORK DRIVERS
6 Click Configure in the main menu.
The Select a Configuration Option menu appears.
7 Make sure that Configure LAN Transport is
highlighted then click Continue.
The Configuration Workstation panel appears.
8 From the Network Adapters group box, select
3Com TokenLink Velocity PC Card, then click Add.
You can edit parameter settings for this NIC. Select this
NIC in the Current Configuration box and select Edit.
9 In the Protocols list box, select the protocols used by
your network application and click ADD.
If you are not sure which ones to use, select IBM
IEEE 802.2 and IBM OS/2 NetBIOS protocol drivers or ask
your network administrator.
The protocol drivers you have selected will appear under
the NIC driver name in the Current Configuration list box.
You can edit parameter settings for the protocols.
Highlight a protocol and select Edit.
10 Click OK when you have completed your selections
for the NIC.
You will now return to the main menu.
11 Click Exit for the changes to take effect.
12 Click Exit on the IBM logo panel.
You will see messages regarding updates to the
CONFIG.SYS file.
13 Make sure that the correct drive and directory for
the CONFIG.SYS file are specified, and click
Continue.
14 Exit the program.
15 Select OK when asked if you want CONFIG.SYS,
STARTUP.CMD, and PROTOCOL.INI updated.
16 Select Exit on the Exiting LAPS window.
17 Shut down and restart your PC for all changes to
take effect.
Page 35

DOS Client 16 for Novell NetWare 4.01 and Above Installation 3-11
OS/2 NDIS 2 device driver using LAPS installation is
complete when the following conditions exist:
■ The device driver files load successfully and there are
no error messages.
■ You are able to log on and communicate with the
network.
If you experience problems, go to Chapter 5,
“Troubleshooting.”
DOS Client 16 for Novell NetWare 4.01 and
Above Installation
1 Insert the Novell 4.01 Diskette into the floppy disk
drive.
2 Type:
install [Enter]
Follow the steps on the panels as they appear.
3 Record the client directory name in order to do a
client installation.
The default directory name is C:\NWCLIENT.
4 At the Insert the driver disk window, insert
TokenDisk diskette #2 and type:
a:\novell\dos [Enter]
5 Select Other drivers.
6 Choose 3Com TokenLink Velocity PC Card.
7 At the Settings for 3Com TokenLink Velocity PC Card
window, press [Esc].
8 At step 5, press [Enter] to finish installing NetWare.
9 Press Enter to exit the installation tool.
10 Configure the 3C389 PC Card.
11 If LANAID is not already installed, install it as
described in Chapter 4 in the section “Installing
LANAID.”
Page 36

3-12 CHAPTER 3: INSTALLING THE NETWORK DRIVERS
12 After LANAID is installed, continue with Chapter 4
“Using LANAID to Configure the 3C389 PC Card.”
When you get to the panel that asks for the existing
network operating system, select Novell NetWare 16-Bit
Client.
Using Memory Management
■ If you are using Card and Socket Services, the
program will default to Autoset mode, which allows
the LAN driver to negotiate with Card and Socket
Services for available resources. LANAID will allow you
to select values for resources to be used by your
3C389 PC Card such as Interrupt, memory, and I/O
Base Address.
■ If you are not using Card and Socket Services in
Autoset mode, you must ensure that the values that
you select for Interrupt, MMIO, and SRAM do not
conflict with those for other PC Cards and resources
installed in your PC (such as video, sound, COM port).
■ If you are using EMM386, in most cases the memory
exclusions will be automatically handled by LANAID.
If you are using a memory manager, you must
exclude the memory ranges being used by your
3C389 PC Card (8 KB default).
The DOS Client-16 for Novell NetWare 4.01 and
Higher installation is now complete.
OS/2 NDIS 2 Device Driver Using Multiprotocol
Transport Service (MPTS)
If your OS/2 network operating system has not yet been
installed on your PC, install it now and follow its
instructions for installing device drivers. If an OS/2
network operating system has previously been installed,
follow the instructions here for using MPTS to install
device drivers.
1 Start MPTS by performing either of the following
actions:
■ From the OS/2 desktop, double-click the MPTS icon.
Page 37

OS/2 NDIS 2 Device Driver Using Multiprotocol Transport Service (MPTS) 3-13
■ From an OS/2 window, go into the IBMCOM
subdirectory and enter mpts at the OS/2 prompt.
2 Click OK on the MPTS logo panel.
3 Click Install.
You will be prompted for the source of the .NIF file.
4 Insert TokenDisk diskette #2 in the floppy drive.
5 Click OK when the Installation Complete message
appears.
You will return to the main menu.
6 Click Configure in the MPTS dialog box.
7 On the Configure panel, make sure that LAN
adapters and protocols is preselected and then click
Configure at the bottom of the panel.
8 In the Configuration panel, in the Network Adapters
group box, select 3Com TokenLink Velocity PC Card
and click ADD.
You can edit parameter settings for the 3C389 PC Card.
Highlight this NIC in the Current Configuration list box
and click Edit. When you have finished with the
parameter settings, click OK.
9 In the Protocols list box, select the protocols used by
your network application and click ADD.
If you are not sure which ones to use, select IBM
IEEE 802.2 and IBM OS/2 NetBIOS protocol drivers or ask
your network administrator.
The protocol drivers you have selected will appear under
the NIC driver name in the Current Configuration list box.
You can edit parameter settings for the protocols.
Highlight a protocol and select Edit.
10 Click OK when you have finished selecting and
editing protocols in the Configuration panel.
11 Click Close on the Configure panel.
12 Click Exit in the MPTS dialog box.
13 Click Exit on the Update CONFIG.SYS panel to
update the CONFIG.SYS file.
Page 38

3-14 CHAPTER 3: INSTALLING THE NETWORK DRIVERS
14 Click OK when you get the message that the
CONFIG.SYS has been successfully updated.
15 Click Exit on the Exiting MPTS panel.
16 Shut down OS/2 and restart your PC to let the
changes take effect.
OS/2 NDIS 2 device driver using MPTS installation is
complete when the following conditions exist:
■ The device driver files load successfully and there are
no error messages.
■ You are able to log on and communicate with the
network.
If you experience problems, go to Chapter 5,
“Troubleshooting.”
IBM LAN Support Program/Native Installation
The LAN Support Program/Native (LSP Native) installs the
LAN support driver DXMCSMOD.EXE. It does not support
the NDIS environment and should not be used for the
installation of NDIS drivers.
Perform the following installation steps for the 3C389
PC Card when using DOS and LSP Native:
1 Insert TokenDisk diskette #2 into the floppy drive
and type:
a:\lspnativ\dxmaid [Enter]
The default configuration will install both the 3C389
PC Card driver for Native mode (DXMCSMOD.SYS) and
the NetBIOS interface (DXMT0MOD.SYS). DXMCSMOD is
a card-services-aware version of DXMC0MOD, the native
token ring driver that comes with the LAN Support
Program (LSP). A Card Services enabler is no longer
necessary to use LSP. DXMCSMOD.SYS supports Card
Services 2.1 and utilizes a parameter initialization file
called LSP.INI to read in configuration options. The LSP.INI
file is similar to the PROTOCOL.INI file that is used in the
NDIS environment.
Page 39

Using Memory Management 3-15
2 Make a note of the name of the directory (default is
LSP) where the LSP is installed. You will have to
specify this name when LANAID asks for the
directory containing your LSP.INI file during step 2.
Also, if you are using a locally administered address,
edit the LSP.INI file and add:
netaddress=yyyyyyyyyyyy
where yyyyyyyyyyyy is the 12-digit hexadecimal
address.
3 Configure the 3C389 PC Card using the LANAID
program (See Chapter 4).
4 If LANAID is not already installed, go to the section
“Installing LANAID” in Chapter 4.
5 After LANAID is installed, continue with Chapter 4
“Using LANAID to Configure the 3C389 PC Card.”
When you get to the panel that asks for the existing
network operating system, select IBM LSP/Native.
Using Memory Management
■ If you are using Card and Socket Services, the
program will default to Autoset mode, which allows
the LAN driver to negotiate with Card and Socket
Services for available resources. LANAID will allow you
to select values for resources to be used by your
3C389 PC Card such as Interrupt, memory, and I/O
Base Address.
■ If you are not using Card and Socket Services in
Autoset mode, you must ensure that the values that
you select for Interrupt, MMIO, and SRAM do not
conflict with those for other PC Cards and resources
installed in your PC (such as video, sound, COM port).
■ If you are using EMM386, in most cases the memory
exclusions will be automatically handled by LANAID. If
you are using a memory manager, you must exclude the
memory ranges being used by your 3C389 PC Card
(8 KB default).
IBM LAN Support Program/Native Installation is complete.
Page 40

LANAID AND
4
LANAID
IBM LAN CLIENT
After you have installed the 3C389 PC Card and the
network drivers, you must configure the 3C389 PC Card
software to operate with your PC and network operating
system. You will need the manuals that were shipped
with your network operating system.
LANAID is a software tool shipped on the 3C389 PC Card
TokenDisk diskettes. Use LANAID to configure the 3C389
PC Card to work with any of the following network device
drivers:
LANAID requires that Card Services or an Intel socket
controller that is compatible with the point enabler be
installed.
■ IBM LAN Support Program/Native
■ IBM LAN Client
■ DOS Client 16 for Novell NetWare lower than 3.12
■ DOS Client 16 for Novell NetWare 3.12 and 4.0
■ DOS Client 16 for Novell NetWare 4.01 and higher
■ OS/2 Novell NetWare Client
■ Artisoft LANtastic 6.0, 7.0
■ Banyan VINES 6.X
■ Microsoft LAN Manager/NDIS
■ Windows for Workgroups\NDIS 2
■ Other DOS NDIS environments
LANAID can also install the IBM LAN Client. For all other
environments, you will use your network operating system
to change parameters in the 3C389 PC Card configuration.
Page 41

4-2 CHAPTER 4: LANAID AND IBM LAN CLIENT
Net Address
LANAID identifies the 3C389 PC Card to be configured by
its universally administered address, which was assigned
at the factory. The universally administered address (also
known as the net address or MAC address) of the
3C389 PC Card is shown on the back of the card.
Ensure that the address shown by LANAID is the same as
the address on the 3C389 PC Card. It may be necessary
to remove one or more PC Cards to allow LANAID to find
the 3C389 PC Card to be configured.
IBM LAN Client
IBM LAN Client has the following features:
■ As little as 2 KB conventional memory required.
■ Protocol NetWare Loadable Modules (NLMs): these
are dynamically loadable and unloadable modules
that operate in 32-bit protect mode and implement
the various protocol functions. Supported protocols
include 802.2, IPX/SPX, TCP/IP, and NetBIOS.
■ New Novell NetWare Client-32 for DOS/Windows
■ 32-bit, protect-mode client
■ Automatically reconnects an entire network
environment, including open files
■ Enhanced cache (large, configurable network
cache)
■ Enhanced native installation and configuration
utilities.
■ Provides backwards compatibility for existing
DOS 802.2 and NetBIOS applications.
■ Uses NET.CFG file, consistent with other products.
■ Concurrent multiple frame types and protocols.
■ Winsock 1.1 support for TCP/IP.
DOS conventional memory consumption does not
increase when you combine multiple protocols. The DOS
LAN Services (DLS) Client can require significant amounts
of DOS memory.
Page 42

Installing LANAID 4-3
IBM LAN Client provides support using one PC Card
specific LAN device driver instead of two different kinds
of drivers for your clients and servers. You select the
appropriate device drivers and protocol stacks for your
PC. The correct modules are automatically loaded based
on the options you select.
IBM LAN Client provides support for the following
protocols and clients:
■ For DOS 5.0 or higher:
NetWare Client-32 (IPX**/SPX)
IEEE 802.2
NetBIOS
DOS LAN Services
■ For Windows 3.1:
NetWare Client-32 (IPX/SPX)
IEEE 802.2
NetBIOS
TCP/IP
DOS LAN Services
■ For Windows for Workgroups 3.11:
NetWare Client-32 (IPX/SPX)
IEEE 802.2
NetBIOS
TCP/IP
DOS LAN Services
Installing LANAID
The LANAID graphical user interface operates under DOS
or in a full-screen DOS session of OS/2. (A DOS window
of OS/2 will not work correctly.) You need at least 1.5 MB
of free, extended memory and 300 KB of conventional
memory to run the program.
You can get help on each LANAID panel by selecting the
Help button at the bottom of the panel. You can get
context-sensitive help by placing your mouse pointer on
any part of the panel and pressing [F1].
Page 43

4-4 CHAPTER 4: LANAID AND IBM LAN CLIENT
Complete the following procedure to install LANAID on
your hard disk:
1 At the DOS prompt, insert TokenDisk diskette #1 in
the drive and type:
a:install [Enter]
2 Change the drive, path, and directory for the
LANAID files, or press [Enter] to accept the default
values.
The LANAID program may display a prompt requesting
permission to modify the CONFIG.SYS and
AUTOEXEC.BAT files. The LANAID program launches
automatically after the files are and copied to the target
directory.
Using LANAID to Install IBM LAN Client
LANAID must be run from DOS or full screen DOS in an
OS/2 session.
1 Launch LANAID.
2 Click Network Software.
The Select Disk Drive window appears.
3 Enter the letter of the hard disk on which you want
to install IBM LAN CLient and click Continue.
The Network Operating System Choices window appears.
4 Select Install IBM LAN Client and click Continue.
The IBM LAN Client Installation window appears.
5 Select the appropriate operating system from the
drop down list box.
6 Select Express Install or Custom Install.
If you chose Custom Install go to step 7.
If you chose Express Install go to step 9.
When you choose Express Install, NetWare Client-32 and
frame type 802.2 are loaded as well as IBM LAN Client
using the default protocols provided for your 3C389 PC
Card type and operating system.
Page 44

Installing LANAID 4-5
7 Select one or more of the clients and protocols and
click Continue.
The IBM LAN Client Configuration window appears.
Table 4-1 Clients and Protocol Descriptions
Client or Protocol Description
NETWARE CLIENT 32
(IPX/SPX)
DOS LAN SERVICES
(DLS)
NetBIOS When you select NetBIOS, device driver parameters
IEEE 802.2 Choose 802.2 when you are using the IEEE 802.2
TCP/IP This option is available under Windows or Windows for
NetWare Client 32 is Novell’s version of client software.
You cannot select both NetWare Client and DOS LAN
Services
DLS is the DOS client software for IBM LAN and Warp
servers. When you select DLS, you must provide the
following information:
User Name
Machine ID
Domain Name
When you select DLS, NetBIOS is automatically
selected as well. You cannot select both DLS and
NetWare Client
cannot be set in LANAID. You can find up-to-date
information about the NetBIOS device driver
parameters in LNCLIENT.TXT in the \LNCLIENT
subdirectory.
protocol on your LAN. When you select 802.2, driver
parameters cannot be set in LANAID.
Workgroups only. Choose TCP/IP when you are using
the TCP/IP protocol on your network.
When you select TCP/IP, you are required to select a
local IP address and default gateway. The local subnet
mask is set to 255.255.240.0 by default.
8 Enter the parameters for Install Options, Network
Options and if appropriate, for TCP/IP or NetWare
Client 32.
On the IBM LAN Client Configuration window, there are
two or more folder tabs. The Install Options and NetWork
Options folders always appear. The TCP/IP and NetWare
Client 32 folders appear only when they are selected for
in the IBM LAN Client IBM Installation window. Make
sure that you enter all requested information.
Page 45

4-6 CHAPTER 4: LANAID AND IBM LAN CLIENT
9 Click Install.
You will be prompted to insert diskettes. The options that
you have selected will be installed automatically.
The Installation Log and IBM LAN Client Installation
Complete windows appear.
10 Click OK and click Close.
The View Adapter Configuration window appears.
On the View Adapter Configuration panel, there are two
folder tabs: Configurable and Hardware. The
Configurable folder shows all the parameters that you
can set along with their current values. Parameters that
are in conflict with other settings are noted. The
Hardware folder shows parameters of the PC that you
cannot set, but that might be useful to know.
11 Click Suggest to have LANAID suggest
non-conflicting values.
12 Click Change to select from the allowable values
yourself.
13 Click Store to save the settings.
You will be prompted to insert diskettes, and the values
that you have chosen are configured automatically.
14 Click Done to complete the installation.
The LANAID main menu reappears.
15 Click Exit to return to DOS.
16 Reboot your PC.
This completes the LANAID IBM LAN Client installation
procedure.
Page 46

Installing LANAID 4-7
Using LANAID to Configure the 3C389 PC Card
This section explains how to run LANAID to configure
the 3C389 PC Card for operation with a device driver.
See Chapter 3, “Installing the Network Drivers,” for
information on installing device drivers.
If you are using Card and Socket Services, LANAID will
default to Autoset mode, which allows the LAN driver to
negotiate with Card and Socket Services for available
resources. If you do not use Autoset mode, LANAID will
allow you to select values for resources to be used by
your 3C389 PC Card such as Interrupt and I/O Address.
1 From the LANAID main panel, select Network
Software.
2 In the Network Operating System Choices window,
select Identify Existing Network Operating System
and click Continue.
The Network Operating System Selection window appears.
LANAID identifies a network operating system and the
directory in which the network operating system is
installed. Either confirm the displayed choice or select
another operating system and type in the path to the
network configuration file.
3 Click Continue.
The View Adapter Configuration window appears.
There are two folder tabs: Configurable and Hardware.
The Configurable folder shows all the parameters you can
set along with their current values. Parameters that are
in conflict with other settings are noted. The Hardware
folder shows parameters of the PC system that you
cannot set, but that might be useful.
4 Click Suggest to have LANAID suggest
non-conflicting values.
If you are not using Card and Socket Services in Autoset
mode, you must ensure that the values that you select for
Interrupt and I/O address do not conflict with those for
other PC Cards installed in your PC.
Page 47

4-8 CHAPTER 4: LANAID AND IBM LAN CLIENT
5 Click Change to select from the allowable values
yourself.
6 Click Store.
You are prompted to insert diskettes at the correct time,
and the values that you have chosen are configured
automatically.
7 Click Done.
The LANAID main window reappears.
8 Click Exit to return to DOS.
9 Reboot your PC.
See the section “Running the Diagnostics Program” in
Chapter 5 to use the diagnostics utility.
Running LANAID From the Command Line
If you want to do automated installations of LAN Client,
run the LANAIDC.EXE program from the DOS command
line. Enter lanaidc /h for help. See the README.TXT file
on TokenDisk diskette #1 for more information on
running LANAID from the command line.
Page 48

5
TROUBLESHOOTING
Check this list of possible error conditions if problems
occur:
■ Make sure that the 3C389 PC Card is correctly
installed. See Chapter 3 for details.
■ When you are using EMM386.EXE or another memory
manager.
When EMM386.EXE and the LAN device driver are
using the same memory, contention occurs and the
3C389 PC Card will not function correctly. If you are
using Card Services, check to be sure that the memory
that Card Services controls is excluded by the
memory manager. If you are using a point enabler, be
sure that the memory that you use is excluded by the
memory manager. As a quick test, you may want to
comment out EMM386.EXE in your CONFIG.SYS,
reboot, and try the 3C389 PC Card again.
If the 3C389 PC Card functions, you will have to edit
the EMM386.EXE command to exclude some memory.
The 3C389 PC Card uses 8 KB of memory in two
separate areas. These memory areas may be
consecutive. See Appendix A, “Using a Memory
Manager” for more information.
■ If are using Card Services.
During reboot, you hear four alternating tones which
indicates that Card Services was unable to give you
one or more resources (I/O ports, interrupt level, and
memory locations) that your program requested.
Page 49

5-2 CHAPTER 5: TROUBLESHOOTING
The items in the following paragraph are performed by
the installation program.
If you are using the NDIS driver (IBMTOKCS.DOS),
edit the PROTOCOL.INI file and see whether you have
specified a particular value for the interrupt level or
memory locations. This would be indicated by the
keywords INTERRUPT=X, MMIO=0xXXXX, or
RAM=0xXXXX. If you are using the ODI driver
(TOKENCS.COM), edit the NET.CFG file and see
whether you have specified a particular value for the
interrupt level or memory locations. This would be
indicated by the keywords INT X, MEM #1 XXXXX, or
MEM #2 XXXXX.
These keywords specify a particular value for these
parameters. If you find one or more of these
keywords, comment them out by placing a semicolon
in front of the keyword. Save the file and reboot your
PC. If all three are commented out or are not in
PROTOCOL.INI or NET.CFG, the driver is in Autoset
mode and lets Card Services determine what values
are used by the driver. If you reboot and still receive
the alternating beep alarm, there is a problem with
Card Services. Check your level of Card Services and
ensure that it is the latest available.
■ If you are using a point enabler
When you use a point enabler, it is essential that the
I/O ports, interrupt, memory areas, and slot number
that are chosen by the enabler agree with what the
LAN device driver is expecting. Problems occur when
the enabler has set up certain resources and the LAN
device driver is expecting others. Typically, the LAN
driver will not initialize. Look at the default values for
the interrupt, whether the 3C389 PC Card is a primary
or secondary 3C389 PC Card (this affects the I/O
ports), and where the MMIO memory and the SRAM
memory are located. Be sure that the enabler settings
and the settings of the LAN driver coincide. By the use
of parameters on the command line of the enabler
and the parameters for the LAN device driver (in
PROTOCOL.INI, NET.CFG, or LSP.INI), you should be
able to configure your 3C389 PC Card to function.
Page 50

■ If you believe that you have a hardware problem with
the 3C389 PC Card, run the 3C389 PC Card
diagnostics.
See “Running the Diagnostics Program” later in this
chapter.
■ Check “Error Codes” if your PC displays an error
code.
Error Codes
The following sections provide messages that can be
received from the NDIS driver function. The messages are
logged to a file. The NDIS driver signals you with an
alternating beep when a Card Services call fails.
OS/2 NDIS Error Codes
If a Card Services call fails, and you are running OS/2, a
problem is occurring during configuration of the 3C389
PC Card and you must review the LANTRAN.LOG file in
your \IBMCOM subdirectory to determine what is wrong.
Depending on the error, you may see one or more of the
error codes listed in Table 5-1 and Table 5-2.
Error Codes 5-3
OS/2 message information can be displayed with the
OS/2 help facility. Enter help <error code> where
<error code> is the error code from the LANTRAN.LOG
DOS ODI Error Codes
Page 51

5-4 CHAPTER 5: TROUBLESHOOTING
Table 5-1 DOS ODI Error Codes
Error Code Explanation and Action
TOKENCS-DOS-50 PC Card cannot be found or the cable is not attached.
3C389 PC Card has not been inserted in the PCMCIA
socket.
Insert your 3C389 PC Card in the socket and try again.
TOKENCS-DOS-204 The shared RAM is on incorrect boundary.
Change the Shared RAM base address and place it on
a 16-KB boundary (C0000, C4000, C8000, CC000,
D0000, D4000, D8000, DC000).
TOKENCS-DOS-205 The 3C389 PC Card did not reset during initialization.
During initialization, no interrupt occurred.
This can happen if you are using an enabler and it is
setting an interrupt level that is different from the
interrupt level TOKENCS.COM is using. Check to make
sure that both interrupts are the same.
TOKENCS-DOS-206 An interrupt failed to occur during initialization.
During initialization, no interrupt occurred.
This can happen if you are using an enabler and it is
setting an interrupt level that is different from the
interrupt level TOKENCS.COM is using. Check to make
sure that both interrupts are the same.
TOKENCS-DOS-226 The ROM and shared RAM address ranges overlap.
The ROM and RAM memory areas are overlapping.
Check the settings in NET.CFG for MEM #1 and
MEM #2. MEM #1 determines the ROM (MMIO) base
address. MEM #2 determines the Shared RAM base
address. If you are using an enabler, check where it is
placing the ROM (MMIO) and the RAM address. ROM
is 8 KB in size. RAM is usually 16 KB in size.
TOKENCS-DOS-228 The MAX FRAME SIZE in NET.CFG file is too large
TOKENCS-DOS-229 The MAX FRAME SIZE in NET.CFG file is too small
(continued)
(Max=17960).
The maximum frame size has been exceeded.
Change the maximum frame size to a valid value.
(Min=632).
The maximum frame size is too small.
Increase the maximum frame size to a valid value.
Page 52

Error Codes 5-5
Table 5-1 DOS ODI Error Codes (continued)
Error Code Explanation and Action
TOKENCS-DOS-230 The MAX FRAME SIZE in NET.CFG file is not a multiple
TOKENCS-DOS-231 The MAX FRAME SIZE in NET.CFG is too big for this
TOKENCS-DOS-233 Card Services could not be found.
TOKENCS-DOS-235 A Card Services error has occurred.
TOKENCS-DOS-246 The DATA RATE specified in NET.CFG must be either 4 or
(no message) Please insert a 3C389 PC Card or press [ESC] to avoid
of 8.
The maximum frame size has been set to a value that
is not valid.
Change the MAX FRAME SIZE to a multiple of 8.
3C389 PC Card.
The maximum value at this speed for this 3C389
PC Card is xx.
Change the MAX FRAME SIZE to a valid value.
TOKENCS.COM could not find Card Services.
Check your CONFIG.SYS and ensure that Card
Services is loading. If Card Services support is not
wanted, take the PCMCIA keyword out of NET.CFG.
You have heard an alternating tone and this message
is posted to the panel. This indicates that Card Services
was unable to provide the resources requested.
Check your NET.CFG parameters INT, MEM #1,
MEM #2. If they are not in NET.CFG, Card Services
has a problem. If they are specified in NET.CFG,
comment (REM) them out and try again.
16 Mbps.
You have specified an incorrect ring speed. It must be
either 4 or 16 Mbps. The DATA RATE keyword is used
to set the speed.
loading the driver.
This message occurs when you have not inserted a
3C389 PC Card in the machine and have started
TOKENCS.COM.
Insert a 3C389 PC Card at this time or press [ESC] to
leave.
Page 53

5-6 CHAPTER 5: TROUBLESHOOTING
DXMCSMOD Error Codes
Table 5-2 DXMCSMOD Error Codes, Explanation, and Action
Error Code Explanation and Action
DXMCS 18I The 3C389 PC Card is ready to attach to the ring. It is
DXMCS 19I Changing the ring speed configuration to xx Mbps.
DXMCS 20I Ring speed will REMAIN at xx Mbps.
DXMCS 21E An error occurred during configuration.
DXMCS 22I No Card Services present.
DXMCS 23I An error occurred when accessing the LSP.INI file.
DXMCS 24E An error occurred when the program was accessing
configured for the displayed ring speed in Mbps. Enter Y if
this is correct. If you would like to change the configured ring
speed, enter C to change.
The PC Card permits you to select the ring speed it will use.
You can respond to the question or prevent the question
from being asked by removing the PROMPT keyword in
LSP.INI.
This message is displayed in response to the user input from
message DXMCS 18I.
No action indicated.
This message is displayed in response to the user input from
message DXMCS 18I.
No action indicated.
An error prevented DXMCSMOD from configuring the PC
Card using the parameters entered in LSP.INI.
Verify that the parameters entered in LSP.INI do not conflict
with other settings in the computer. The possible conflicts are
memory and interrupt settings.
DXMCSMOD cannot locate Card Services.
Ensure that the Card Services drivers have been loaded before
DXMCSMOD loads.
The LSP.INI file could not be read. The file may either be
corrupted or not be present in the same directory as
DXMCSMOD.
Verify that theLSP.INI file exists. Reinstall DXMCSMOD
using the installation aid.
PARSEINI.COM.
The PARSEINI.COM file could not be read. The file may
either be corrupted or not be present in the same directory
as DXMCSMOD.
Check that the PARSEINI.COM file exists in the same
directory as DXMCSMOD.
Page 54

Troubleshooting Windows 95 (NDIS 3)
Windows 95 sometimes has trouble selecting available
resources for the 3C389 PC Card, causing the 3C389
PC Card not to function. If you find that your
3C389 PC Card is not functioning, follow this procedure.
1 Click Start.
2 Go to the Settings menu selection and click Control
Panel.
3 Click System.
4 Click the Device Manager tab.
5 Check the 3C389 PC Card network adapters icon for
for indications of a resource conflict.
The resource conflict indicator is an exclamation point
inside a yellow or red circle that appears on top of the
network adapter icon.
6 If you see a conflict indicator, double click the 3C389
PC Card networks adapters icon.
The properties dialog for the 3C389 PC Card appears.
7 Click the Resources tab of the dialog box.
There are three resources that must be correct before the
3Com TokenLink Velocity PC Card will function correctly:
the Interrupt Request (IRQ), Memory Range, and
Input/Output (I/O) range. The interrupt request value
should be a value between 3 and 15 that does not
conflict with any other devices. The memory range is
often set incorrectly by Windows 95. It is recommended
that the memory range be set in the 000D0000 to
000DC000 in a non-conflicting memory region. The
memory range 000C0000 to 000CFFFF is often used for
video caches and Windows 95 does not always exclude
memory regions that are already in use. Acceptable values
for the input/output range include any four consecutive
values beginning at 0300.
Error Codes 5-7
8 If EMM386.EXE is in your CONFIG.SYS, comment
it out.
Page 55

5-8 CHAPTER 5: TROUBLESHOOTING
Troubleshooting Windows NT (NDIS 3)
Windows NT 3.51 and 4.0 use a point enabler called
PCMCIA.SYS that is supplied with Windows NT.
PCMCIA.SYS configures the Intel compatible socket
controller with settings gleaned from the registry entry for
the PC Card. Windows NT will indicate resource conflicts
only after an attempt is made to configure a device. As
when using a DOS enabler, you must manually choose
your PC Card resources. By looking at the event viewer in
the administrative tools, you might find that there is an
I/O, IRQ, or memory conflict. A program called WINMSD
is included with Windows NT which allows you to see the
resources of your machine and determine if there are
any conflicts. Make a note of your configured resources
and compare them to the settings indicated by WINMSD.
Make corrections to your configuration as needed. This is
done by the following procedure:
1 Right-click Network Neighborhood.
2 Select Properties.
3 Select the Adapter tab.
4 Select 3Com TokenLink Velocity PC Card and click
Properties.
You can now change your configuration as needed.
Running the Diagnostics Program
Use the diagnostics program on TokenDisk diskette #1 to
test the hardware components of the 3C389 PC Card.
The diagnostics program performs a series of tests and
displays the results of each one by showing success or
failure. An error during any test will end the test in
progress and display an error message and error code.
See the following tables for a description of error codes
and recommended actions.
Page 56

The testing process might run as long as three minutes
and can be exited at any time by pressing [Enter] or by
removing the diskette and pressing [Esc]. Pressing [Esc]
will cause the computer to reboot. Pressing [Enter] will
end the test in progress and allow the user to select
another test option.
1 Boot the PC with TokenDisk diskette #1.
TokenDisk diskette #1 is a PC DOS system diskette.
2 At the DOS Menu, select 2, 3Com TokenLink Velocity
PC Card Extended Diagnostics.
3 Follow the instructions as they appear.
You will be prompted to select a test option. See “Test
Options” for descriptions.
Test Options
There are two test options: the wrap test and the
on-ring test.
Running the Diagnostics Program 5-9
The wrap test ensures that the PC Card and cable
hardware are functioning properly. For this test, connect
the NIC and cable to the network to perform a wrap test
through the hub or concentrator, or insert a wrap plug
(no wrap plug is required if you have a shielded twisted
pair cable connection) to help isolate a failure to the
NIC, the cable, or the wiring to the hub or concentrator.
The on-ring test verifies communication between the NIC
and the LAN. This test requires that the NIC is connected
to a network with other NICs, so the ring speed of the
network can be automatically sensed. If the NIC under
test is the only one on the network, the on-ring test will
fail. Continue testing the NIC using the wrap test, or
connect the NIC to a network that has at least one other
station connected and open.
Page 57

5-10 CHAPTER 5: TROUBLESHOOTING
Diagnostics Error Codes and Suggested Actions
Initialization Error Codes
Failure during PC Card initialization usually indicates a
hardware error on the PC Card. Reboot your PC using the
diagnostic diskette (TokenDisk diskette #1 is a bootable
diskette), and run the diagnostic program again. If the
3C389 PC Card continues to fail, replace the card and
cable.
One of the following codes will be shown to indicate the
results of the initialization test. The error codes are
displayed in hexadecimal format and represent the
BRING_UP_CODE set by the 3C389 PC Card.
0000 Initialization success
0020 Diagnostics could not be executed
0022 ROM diagnostics failed
0024 Shared RAM diagnostics failed
0026 Processor instruction test failed
0028 Processor interrupt test failed
002A Shared RAM interface register diagnostics failed
002C Protocol-handler diagnostics failed
0040 PC Card’s programmable timer for the
computer failed (set by the microcode)
0042 Cannot write to shared RAM (set by microcode)
0044 Reading from shared RAM read-only area
caused an incorrect error indication (interrupt)
0046 Writing into shared RAM read-only area did not
cause an error indication (interrupt)
0048 Initialization timed out
Page 58

Open Errors
Running the Diagnostics Program 5-11
Failure during the adapter open test might indicate that
the PC Card is not properly configured to run on the
network it is trying to open onto or that the PC Card is
not properly configured for the system. The open test
provides a return code and an open error code. If the
return code is 07, then see “Open Error Codes” in this
chapter for a more accurate description of the failure and
suggested actions. If the return code is a value other than
00 or 07, record the error and contact your network
administrator.
00 Open completed successfully
01 Incorrect command code
03 PC Card open, should be closed
05 Required parameters not provided
07 Command cancelled, unrecoverable failure
(see open error codes to isolate problem)
30 Inadequate receive buffers
32 Incorrect MAC address
33 Incorrect PC Card receive buffer length
34 Incorrect PC Card transmit buffer length
Open Error Codes
If the open test provides a return code of 07, there will
be a corresponding error code. The open errors are
returned in 2 bytes. The high-order byte is always 0 and
the low-order byte contains the following information:
■ The phase of testing in which the error was
encountered is in the high-order nibble (half-byte) of
the low-order byte.
■ The error condition is in the low order nibble of the
low-order byte.
Page 59

5-12 CHAPTER 5: TROUBLESHOOTING
Phases
Table 5-3 Phase Nibble Explanations
Value Meaning
1n Lobe media test
2n Physical insertion
3n Address verification
4n Roll call poll (neighbor notification)
5n Request parameters
Errors
Table 5-4 Error Condition Nibble Explanations
Value Meaning
n1 Function failure
n2 Signal loss
n3 Reserved
n4 Frequency error (see note)
n5 Time-out
n6 Ring failure
n7 Ring beaconing
n8 Duplicate node address
n9 Parameter request--retry count exceeded
nA Remove received
nB IMPL force received
nC Duplicate modifier
nD No monitor detected
nE Monitor contention failed for RPL
Suggested Actions in Response to Open Errors
When the following phase-error combination values are
presented, they are the result of certain specific
occurrences. Explanation of the occurrences follows with
recommended actions listed. Table 5-6 lists the
recommended actions for both the application program
and the computer operator.
Page 60

Running the Diagnostics Program 5-13
Table 5-5 Actions for Open Errors
Error Code Explanation Action
11 Lobe Media, Function Failure: The testing of the
lobe between the PC Card and the access unit has
1, 3, and
5
been unsuccessful because the lobe has a bit-error
rate that is too high, or the PC Card cannot receive
successfully.
24 Physical Insertion, Frequency Error: The PC Card has
2
detected that the ring is operating at a speed other
than the speed at which it was inserting.
26 Physical Insertion, Ring Failure: The PC Card, acting
1 and 2a
as an active monitor, was unable to complete the
ring purge function successfully. This indicates that
an error condition has occurred since the successful
completion of monitor contention (claim token),
when this PC Card became the active monitor.
27 Physical Insertion, Ring Beaconing: The PC Card has
detected one of the following conditions:
■ The PC Card tried to insert on a ring that was
1, 2, and
2b
operating at a different data rate.
■ A monitor contention (claim token) failure
occurred.
■ The PC Card received a beacon MAC frame from
thering.
2A Physical Insertion, Remove Received: The PC Card has
2a and 4
received a remove ring station MAC frame,
indicating that a network management function has
directed this PC Card to get off the ring.
2D Physical Insertion, No Monitor Detected: RPL station
1 and 2a
is the first station attempting to insert onto the ring.
2E Physical Insertion, Monitor Contention Failed for
2
RPL: Physical insertion failure of RPL station.
32 Address Verification, Signal Loss: The PC Card has
1 and 2a
detected a 250-ms signal loss (receiver cannot
recognize signal), indicating that an error condition
has occurred since the PC Card successfully
completed the ring signal recognition phase of the
open operation.
35 Address Verification, Time Out: The insertion timer
1 and 2a
expired before this function was completed,
indicating that the ring may be congested,
experiencing a high bit error rate, or losing an
abnormally high number of tokens or frames, thus
preventing successful Address Verification MAC
frame transmissions.
(continued)
Page 61

5-14 CHAPTER 5: TROUBLESHOOTING
Table 5-5 Actions for Open Errors (continued)
Error Code Explanation Action
36 Address Verification, Ring Failure: The PC Card,
acting as an active monitor, was unable to complete
the ring purge function successfully. This indicates
that an error condition has occurred since the
successful completion of monitor contention (claim
token), when this PC Card became the active
monitor.
37 Address Verification, Ring Beaconing: The PC Card
has either detected a monitor greaster than or equal
to contention (claim token) failure or received a
beacon greater than or equal to MAC frame from
the ring.
38 Address Verification, Duplicate Node Address: The PC
Card has detected that another station on the ring
has a PC Card address that is the same as the PC
card address being tested.
3A Address Verification, Remove Received: The PC Card
has received a remove ring station MAC frame,
indicating that a network management function has
directed this specific address to get off the ring.
42 Ring Poll, Signal Loss: The PC Card has detected a
250-ms signal loss (receiver cannot recognize signal)
indicating that an error condition has occurred since
the PC Card successfully completed the ring signal
recognition phase of the open operation.
45 Ring Poll, Time Out: The insertion timer expired
before this function was completed, indicating that
the ring can be congested, experiencing a high
bit-error rate, or losing an abnormally high number
of tokens or frames. This prevents the PC Card’s
successful reception of either the ring poll request
or response MAC frame, or transmission of the
required ring poll response MAC frame.
46 Ring Poll, Ring Failure: The PC Card, acting as an
active monitor, was unable to complete the ring
purge function successfully. This indicates that an
error condition has occurred since the successful
completion of monitor contention (claim token),
when this PC Card became the active monitor.
(continued)
1 and 2a
1 and 2b
4
2a and 4
1 and 2a
1 and 2a
1 and 2a
Page 62

Running the Diagnostics Program 5-15
Table 5-5 Actions for Open Errors (continued)
Error Code Explanation Action
47 Ring Poll, Ring Beaconing: The PC Card has either
detected a monitor contention (claim token) failure
or received a beacon MAC frame from the ring.
4A Ring Poll, Remove Received: The PC Card has
received a remove ring station MAC frame,
indicating that a network management function has
directed this PC Card to get off the ring.
55 Request Parameters, Time Out: The insertion timer
expired before this function was completed,
indicating that the ring can be congested,
experiencing a high bit-error rate, or losing an
abnormally high number of tokens or frames. This
prevents successful transmission of the request
parameter MAC frame or reception of either the set
parameter 1 or set parameter 2 MAC frame
(required response to the PC Card’s request).
56 Request Parameters, Ring Failure: The PC Card,
acting as an active monitor, was unable to complete
the ring purge function successfully. This indicates
that an error condition has occurred since the
successful completion of monitor contention (when
this PC Card became the active monitor).
57 Request Parameters, Ring Beaconing: The PC Card
has received a beacon MAC frame from the ring.
59 Request Parameters, Parameter Request - Retry
Count Exceeded: The PC Card has detected that the
ring parameter server is present on the ring but that
the required response (set parameter 1 or set
parameter 2 MAC frame) was not received in the
allotted time. This indicates that the ring can be
congested, experiencing a high bit-error rate, or
losing an abnormally high number of tokens or
frames.
5A Request Parameters, Remove Received: The PC Card
has received a remove ring station MAC frame,
indicating that a network management function has
directed this PC Card to get off the ring.
1 and 2b
2a and 4
1 and 2a
1 and 2a
1 and 2b
1 and 2a
2a and 4
Page 63

5-16 CHAPTER 5: TROUBLESHOOTING
Table 5-6 Recommended Actions Key
Number Description
1 After delaying at least 30 seconds, retry the open two
2 After delaying at least 30 seconds, check the PC Card
2a If this error persists, direct the computer operator to
2b If this error persists, direct the computer operator to
3 Direct the computer operator to contact the network
4 Direct the computer operator to contact the network
5 If this error persists, problem determination of the
times, inserting the same delay between each try.
configuration (especially the PC Card data rate) and
retry the open.
contact the network administrator for assistance and
provide Open Error information.
contact the network administrator for assistance.
administrator for assistance and provide Open Error
information.
administrator for assistance and provide Node Address
information, and try attaching to the ring after 6
minutes.
PC Card or lobe is necessary. Contact your network
administrator for problem determination assistance.
Transmit Error Codes
If you experience time-out errors during the on-ring test,
try running the wrap test in the diagnostics. If the wrap
test is completed successfully, but the on-ring test fails, it
might indicate problems on the Token-Ring network that
the NIC is opening onto during the on-ring test.
For any other errors, ensure that the NIC and cabling are
properly connected, and retry the test. If the NIC
continues to fail, record the error and contact your
network administrator.
Page 64

Running the Diagnostics Program 5-17
01 Unrecognized command code
08 Unauthorized access priority
22 Error on frame transmission, examine
STRIPPED_FS
23 Error on frame transmit or strip process
24 Unauthorized MAC frame
25 Maximum commands exceeded
26 Correlator not acceptable
27 Link not transmitting I frames, status changed
from link open
28 Transmit frame length not acceptable
29 Link retransmission in process, buffers free
40 Station ID not acceptable
41 Protocol error, link not in acceptable state for
command
Page 65

USING A MEMORY
A
MANAGER
If your PC comes with a memory manager preinstalled, or
if you would like to use one, you must configure your PC
so that the memory manager does not use the same
memory as your 3C389 PC Card. If you have more than
one 3C389 PC Card, you must reserve the memory
needed for all of them. One 3C389 PC Card cannot use
the same memory ranges as another.
To determine whether or not your PC has a memory
manager, edit your CONFIG.SYS file and look for the
memory manager driver name. For example, when using
EMM386, look for:
DEVICE=C:\DOS\EMM386.EXE ......
You must also consider your PC Card environment (Point
Enabler or Card and Socket Services) as described in the
sections that follow. For more information on your
memory manager and your configuration files, refer to
your PC’s operating system manual.
Memory Managers with Point Enabler
To prevent duplicate use of a memory location, the
memory range used by your 3C389 PC Card must be
excluded from the memory manager. To do this, you
must edit your CONFIG.SYS file. In certain environments,
LANAID will add the exclude statement automatically.
If you are using enhanced mode, 8 KB of memory must
be excluded. If you are using compatibility mode, 24 KB
of memory must be excluded.
Page 66

A-2 APPENDIX A: USING A MEMORY MANAGER
For the point enabler, the required exclusions are shown
in the following example (using EMM386, this is done
using the X= parameter):
For enhanced mode:
DEVICE=C:\POINTTR.EXE SA RS=4 MMIO=D000
IRQ=9 SRAM=D000,4 WS=0
.
.
DEVICE=C:\DOS\HIMEM.SYS
.
.
DEVICE=C:\DOS\EMM386.EXE 1024 RAM
X=D000-D1FF
For compatibility mode:
DEVICE=C:\POINTTR.EXE SA RS=4 MMIO=D000
IRQ=9 SRAM=D800,16 WS=0
.
.
DEVICE=C:\DOS\HIMEM.SYS
.
.
DEVICE=C:\DOS\EMM386.EXE 1024 RAM
X=D000-D1FF X=D800-DBFF
Notice that the EMM386 line excludes the ranges that
the POINTTR.EXE enabler uses.
Memory Managers with Card and Socket Services
To prevent duplicate use of a memory location, the
memory range used by your 3C389 PC Card must be
excluded from the memory manager. To do this, you must
edit your CONFIG.SYS file. In certain environments, the
installation program will add the exclude statement
automatically.
If you are in enhanced mode, 8 KB of the MMIO range
must be excluded.
If you are in compatibility mode, 8 KB of the MMIO
range (MMIO base address default of D000) and 16 KB
of the shared RAM (SRAM) range (SRAM base address
default of D800) must be excluded.
Page 67

Memory Managers with Card and Socket Services A-3
In addition, Card Services needs at least 4 KB excluded
for its use. Remember, if you are using more than one
3C389 PC Card, the memory locations for the other
3C389 PC Cards must also be excluded.
Card Services and memory managers typically do not talk
to each other. You must tell them what areas can be
used. For example, with IBM Card Services the /MA
option is used to tell Card Services what memory range
it can use for 3C389 PC Cards. It also uses some of this
area for itself. That same /MA range must be excluded
from the memory manager line. This will prohibit the
memory manager from also using that same space.
For IBM card services, the /MA is used to specify the
range of memory the 3C389 PC Cards and Card Services
use. The parameter is added to the Resource Map Utility
line in your CONFIG.SYS. For example:
■ Using IBM Card Services:
On a PC using memory range C0000-CFFFF
DEVICE=C:\DOS\EMM386.EXE NOEMS X=C000-CFFF
.
.
DEVICE=C:\DOS\DICRMU02.SYS /MA=C000-CFFF
The Resource Map Utility driver name may be slightly
different for the various PCs. Consult your notebook
user guide.
■ Using Phoenix Card Services with the /ADDR option:
For some versions of Phoenix Card Services, the /ADDR
parameter is used to specify the 4-KB memory range
used by Card Services. The memory range chosen for
the 3C389 PC Cards must not conflict with this range.
The /ADDR parameter is placed on the Phoenix device
driver line in the CONFIG.SYS file. Consult your
notebook user guide for the version you have and
whether the /ADDR option is needed.
The /ADDR parameter needs only the starting address of
the Card Services memory area.
Page 68

A-4 APPENDIX A: USING A MEMORY MANAGER
On a PC using memory range D0000-DFFFF
DEVICE=C:\DOS\EMM386.EXE NOEMS X=D000-DFFF
.
.
DEVICE=C:\PCMPLUS\PCMCS.EXE /WAIT=12
/ADDR=D0 /IRQ=9
IBM Card Services
■ The memory range used by 3C389 PC Cards must fall
within the range specified by /MA.
■ The memory range used by Card Services itself (4 KB)
must be included in the /MA range.
■ All of the /MA range must be excluded from your
memory manager line.
Phoenix Card Services
■ The memory used by Card Services starting at the
/ADDR address and the memory used by the 3C389
PC Card should be excluded from the memory
manager line.
■ If the /ADDR line is not used, the driver will use the
first available address on a 4-KB boundary for Card
Services. The memory manager line must exclude this
area and the 3C389 PC Card memory area.
Expanded Memory Specification
Expanded memory specification (EMS) requires 64 KB
(one page frame) of contiguous memory which may
cause you to move your 3C389 PC Card memory range.
With EMM386 you set the page frame base address
using the FRAME= option on the memory manager line in
the CONFIG.SYS. If the FRAME= option is not used,
EMM386 will find the first 64-KB block of contiguous
memory. For example:
Using a point enabler with the 3C389 PC Card at
D0000-DBFFF, the C0000-CFFFF range is free for the EMS
Page 69

Expanded Memory Specification A-5
page. A sample enhanced mode memory manager line
in your CONFIG.SYS is:
DEVICE=C:\DOS\EMM386.EXE RAM 1024 X=D000-D1FF
FRAME=C000
The token ring 3C389 PC Card uses D0000-D1FFF for
8-KB MMIO. The FRAME= parameter sets the base
address of the EMS page frame (the page frame uses
C0000-CFFFF). So, no 3C389 PC Cards should be set to
use memory in the range C0000-CFFFF.
Using a point enabler with the 3C389 PC Card at
D0000-DBFFF, the C0000-CFFFF range is free for the EMS
page. A sample compatibility mode memory manager line
in your CONFIG.SYS is:
DEVICE=C:\DOS\EMM386.EXE RAM 1024 X=D000-D1FF
X=D800-DBFF FRAME=C000
The token ring 3C389 PC Card uses D0000-D1FFF for
8-KB MMIO and D8000-DBFFF for 16-KB SRAM. The
FRAME= parameter sets the base address of the EMS
page frame (the page frame uses C0000-CFFFF). So, no
3C389 PC Cards should be set to use memory in the
range C0000-CFFFF.
Using IBM Card Services, you can set the /MA option
such that a 64 KB block is free for the EMS page frame.
A sample memory manager line in your CONFIG.SYS is:
DEVICE=C:\DOS\EMM386.EXE RAM 1024 X=D000-DBFF
FRAME=C000
.
.
DEVICE=C:\DICRMU01.SYS /MA=D000-DBFF
Because of the /MA option, IBM Card Services will use
memory in the range D0000-DBFFF only. The FRAME=
parameter sets the base address of the EMS page frame
(the page frame uses C0000-CFFFF). So, no 3C389 PC
Cards should be set to use memory in the range
C0000-CFFFF.
Page 70

SYSTEMSOFT CARD AND
B
1 After installing and configuring the card using
2 Run PCCARD.BAT, click Utility and then Resource
3 Click Open and the appropriate memory range for
4 Click Edit and then Change.
5 Change the memory range to comply with the
6 Click OK.
7 Click the appropriate I/O and IRQ ranges for the
8 Click Save and remove any cards from their slots
9 Click OK, Done, File, and then Exit.
10 This procedure will modify the CSALLOC.INI file.
11 The CARDID.INI file may also need to be edited
SOCKET SERVICES SPECIFICS
Complete the following procedure to install the
3C389 PC Card on Compaq PCs using SystemSoft Card
and Socket Services with DOS or Windows 3.1:
LANAID, go to the CPQDOS directory, or the
directory containing SystemSoft C&SS and the file
PC-CARD.EXE.
Allocation.
the card.
range of the card and then click Include.
When performing step 5, it may be necessary to change
the exclude range specified in the EMM386 driver
setting in the CONFIG.SYS file.
card and include their ranges as well by repeating
the previous three steps.
when prompted to do so.
manually to comply with the card’s settings.
Page 71

HOT-PLUGGABILITY AND
C
SUSPEND/RESUME
The Windows 95 (NDIS 3), DOS NDIS, DOS ODI, and OS/2
NDIS drivers support hot-pluggability and the
suspend/resume capability. Hot-pluggability allows you to
attach or detach the 3C389 PC Card cable from the
PC Card while the PC is running. This has the same effect
on the operating system as physically removing the PC Card
from the slot; it conserves system resources such as battery
power and memory. When the cable is reattached, the
operating system behaves as if the PC Card was reinserted
into the slot.
Hot-swapping allows you to physically remove or insert the
3C389 PC Card from an operating PC. The environments
that support hot-plugging also support hot-swapping.
If you follow these guidelines, no damage will occur to
either your 3C389 PC Card, PC, or software when
hot-plugging.
To use the hot-plugging features of this card, you must:
■ Use Card and Socket Services.
CAUTION: If you are using a point enabler, do not
attempt to unplug your card while the machine is
powered on. You might damage both your card and the
machine in this case.
■ Use the Windows 95, DOS ODI environment, DOS
NDIS environment, OS/2 ODI environment, or OS/2
NDIS environment.
CAUTION: At the present time the DOS Native
environment and Microsoft Windows NT do not support
hot-pluggability and hot-swapping. Removing your card
while in these environments might result in a system
failure or the inability to access your LAN applications.
Page 72

C-2 APPENDIX C: HOT-PLUGGABILITY AND SUSPEND/RESUME
■ Avoid hot-plugging a card when in a Windows for
Workgroups environment.
Your card does not have to be present when NET
START is run. If you plan to access your network in
your Windows session, insert your card before
starting Windows. If you plan to pull out your card,
shut down Windows before doing so. It is suggested
that you include your Network Address in the
protocol.ini file if you execute NET START without a
card present. This ensures that the system has your
card’s address even if the card is not present.
The following sections describe, in more detail, the exact
procedure to follow for each of the supported
hot-plugging environments.
Windows 95 (NDIS 3)
Windows 95 has built-in support for hot-swapping and
suspend/resume. Windows 95 recognizes the 3C389 PC
Card when it is inserted into a PCMCIA slot (or the cable
is attached to an already inserted 3C389 PC Card) and
loads the correct driver and configured protocol stack for
the 3C389 PC Card.
If you plan to disconnect from your network, complete
the following procedure:
1 Click the 3C389 PC Card icon on the status bar.
A message box appears with a message to stop the
3C389 PC Card.
2 Click Stop.
When the “Safe to remove message” appears, you can
either detach the cable or physically remove your 3C389
PC Card.
Page 73

DOS ODI Hot-Pluggability and Suspend/Resume C-3
DOS ODI Hot-Pluggability and Suspend/Resume
It is recommended that you use the NetWare Event
Service Layer program (NESL.COM) for hot-plugging to
work in this environment. Without this support, you
should use the following procedure.
Complete the following procedure to remove the 3C389
PC Card or to go into a suspend mode:
1 Unload all the drivers.
Remove them in the reverse order they were installed. by
typing the following commands at the DOS prompt:
netx u (“or” vlm u)
ipxodi u
tokencs u
lsl u
2 Remove the card from your machine.
Once the card is removed, you can enter and exit
suspend mode as often as you like before reinstalling the
card. It is best to reinstall the card while the machine is
not in suspend mode.
After reinserting the card or resuming, you can restart
your network software by typing the following
commands at the DOS prompt:
lsl
tokencs
ipxodi
netx
DOS NDIS Hot-Pluggability
You can insert and remove your card before and after
using Windows for Workgroups. You cannot hot-plug the
card while using Windows for Workgroups. Insert the
card before starting the software. Remove the card only
after exiting the Windows for Workgroups environment.
Page 74

C-4 APPENDIX C: HOT-PLUGGABILITY AND SUSPEND/RESUME
OS/2 NDIS Hot-Pluggability and Suspend/Resume
You can remove the card or go into suspend mode at any
time as long as you are not running any applications that
use shared resources. After you reinsert the card or
resume, you should have all of your LAN shared resources
connected. If you use CM/2 to connect to the host, you
will have to log on again.
One scenario that does not work is suspending and then
removing the card. The card will not be recognized when
it is reinserted. If you want to do something like this,
you must first remove the card and then suspend. You
can then resume later and reinsert the card later.
Page 75

TECHNICAL SUPPORT
D
3Com provides easy access to technical support
information through a variety of services. This appendix
describes these services.
Information contained in this appendix is correct at time
of publication. For the very latest, we recommend that
you access 3Com Corporation’s World Wide Web site as
described below.
Online Technical Services
3Com offers worldwide product support 24 hours a day,
7 days a week, through the following online systems:
■ World Wide Web site
■ 3Com Bulletin Board Service (3ComBBS)
■ 3ComFacts
■ 3ComForum on CompuServe online service
SM
automated fax service
World Wide Web Site
Access the latest networking information on 3Com
Corporation’s World Wide Web site by entering our URL
into your Internet browser:
http://www.3Com.com/
This service features the latest information about 3Com
solutions and technologies, customer service and support,
news about the company, NetAge
®
Magazine, and more.
Page 76

D-2 APPENDIX D: TECHNICAL SUPPORT
3Com Bulletin Board Service
3ComBBS contains patches, software, and drivers for all
3Com products, as well as technical articles. This service is
available through analog modem or digital modem
(ISDN) 24 hours a day, 7 days a week.
Access by Analog Modem
To reach the service by modem, set your modem to 8
data bits, no parity, and 1 stop bit. Call the telephone
number nearest you:
Country Data Rate Telephone Number
Australia up to 14400 bps 61 2 9955 2073
Brazil up to 14400 bps 55 11 547 9666
France up to 14400 bps 33 1 6986 6954
Germany up to 28800 bps 4989 62732 188
Hong Kong up to 14400 bps 852 2537 5608
Italy (fee required) up to 14400 bps 39 2 27300680
Japan up to 14400 bps 81 3 3345 7266
Mexico up to 28800 bps 52 5 520 7853
P. R. of China up to 14400 bps 86 10 684 92351
Singapore up to 14400 bps 65 534 5693
Taiwan up to 14400 bps 886 2 377 5840
U.K. up to 28800 bps 44 1442 438278
U.S.A. up to 28800 bps 1 408 980 8204
Access by Digital Modem
ISDN users can dial in to 3ComBBS using a digital modem
for fast access up to 56 Kbps. To access 3ComBBS using
ISDN, use the following number:
408 654 2703
3ComFacts Automated Fax Service
3Com Corporation’s interactive fax service, 3ComFacts,
provides data sheets, technical articles, diagrams, and
Page 77

Online Technical Services D-3
troubleshooting instructions on 3Com products 24 hours
a day, 7 days a week.
Call 3ComFacts using your Touch-Tone telephone using
one of these international access numbers:
Country Telephone Number
Hong Kong 852 2537 5610
U.K. 44 1442 438279
U.S.A. 1 408 727 7021
Local access numbers are available within the following
countries:
Telephone
Country
Australia 1800 678 515 Netherlands 06 0228049
Belgium 0800 71279 New Zealand 0800 446 398
Denmark 800 17319 Norway 800 11062
Finland 98 001 4444 Portugal 0505 442 607
France 05 90 81 58 Russia (Moscow only) 956 0815
Germany 0130 81 80 63 Singapore 800 6161 463
Hong Kong 800 933 486 Spain 900 964 445
Italy 1678 99085 Sweden 020 792954
Malaysia 1800 801 777 U.K. 0800 626403
Number
Country
Telephone
Number
3ComForum on CompuServe Online Service
3ComForum is a CompuServe-based service containing
patches, software, drivers, and technical articles about all
3Com products, as well as a messaging section for peer
support. To use 3ComForum, you need a CompuServe
account.
To use 3ComForum:
1 Log on to CompuServe.
2 Type go threecom
3 Press [Return] to see the 3ComForum main menu.
Page 78

D-4 APPENDIX D: TECHNICAL SUPPORT
Support from Your Network Supplier
If additional assistance is required, contact your network
supplier. Many suppliers are authorized 3Com service
partners who are qualified to provide a variety of services,
including network planning, installation, hardware
maintenance, application training, and support services.
When you contact your network supplier for assistance,
have the following information ready:
■ Diagnostic error messages
■ A list of system hardware and software, including
revision levels
■ Details about recent configuration changes, if
applicable
If you are unable to contact your network supplier, see
the following section on how to contact 3Com.
Support from 3Com
If you are unable to receive support from your network
supplier, technical support contracts are available from
3Com.
Contact your local 3Com sales office to find your
authorized service provider using one of these numbers:
Regional Sales Office Telephone Number
3Com Corporation
P.O. Box 58145
5400 Bayfront Plaza
Santa Clara, California
95052-8145
U.S.A.
800 NET 3Com or 1 408 764 5000
408 764 5001 (fax)
Page 79

Support from 3Com D-5
Regional Sales Office Telephone Number
3Com Asia Limited
Australia
China
Hong Kong
India
Indonesia
Japan
Korea
Malaysia
New Zealand
Phillippines
Singapore
Taiwan
Thailand
3Com Benelux B.V.
Belgium
Netherlands
3Com Canada
Calgary
Montreal
Ottawa
Toronto
Vancouver
3Com European HQ 49 89 627320
3Com France 33 1 69 86 68 00
3Com GmbH
Austria
Czech Republic/Slovak
Republic
Germany
(Central European HQ)
Hungary
Poland
Switzerland
3Com Ireland 353 1 820 7077
3Com Latin America
U.S. Headquarters
Northern Latin America
Argentina
Brazil
Chile
Colombia
Mexico
Peru
Venezuela
61 2 9937 5000 (Sydney)
61 3 9866 8022 (Melbourne)
8610 68492568 (Beijing)
86 21 63740220 Ext 6115 (Shanghai)
852 2501 1111
91 11 644 3974
6221 572 2088
81 6 536 3303 (Osaka)
81 3 3345 7251 (Tokyo)
822 2 319 4711
60 3 732 7910
64 9 366 9138
632 892 4476
65 538 9368
886 2 377 5850
662 231 8151 4
32 2 725 0202
31 30 6029700
403 265 3266
514 683 3266
613 566 7055
416 498 3266
604 434 3266
43 1 513 4323
420 2 21845 800
49 30 34 98790 (Berlin)
49 89 627320 (Munich)
36 1 250 83 41
48 22 6451351
41 31 996 14 14
408 326 2093
305 261 3266 (Miami, Florida)
541 312 3266
55 11 546 0869
562 633 9242
571 629 4110
52 5 520 7841/7847
51 1 221 5399
58 2 953 8122
(continued)
Page 80

D-6 APPENDIX D: TECHNICAL SUPPORT
Regional Sales Office Telephone Number
3Com Mediterraneo
Italy
Spain
3Com Middle East 971 4 349049
3Com Nordic AB
Denmark
Finland
Norway
Sweden
3Com Russia 007 095 258 09 40
3Com Southern Africa 27 11 807 4397
3Com UK Ltd. 44 131 220 8228 (Edinburgh)
Returning Products for Repair
Before you send a product directly to 3Com for repair,
you must first obtain a Return Materials Authorization
(RMA) number. Products sent to 3Com without RMA
numbers will be returned to the sender unopened, at the
sender’s expense.
39 2 253011 (Milan)
39 6 5279941 (Rome)
34 1 383 17 00
45 39 27 85 00
358 0 435 420 67
47 22 18 40 03
46 8 632 56 00
44 161 873 7717 (Manchester)
44 162 889 7000 (Marlow)
To obtain an RMA number, call or fax:
Country Telephone Number Fax Number
U.S.A. and Canada 1 800 876 3266,
Latin America 1 408 326 2927 408 764 7120
Europe, South Africa,
and Middle East
Outside Europe,
U.S.A., and Canada
option 2
44 1442 438125 44 1442 435822
1 408 326 2926 1 408 764 7120
408 764 7120
Page 81

INDEX
Numbers
3Com Bulletin Board Service
(3ComBBS) D-2
3Com sales offices D-4
3Com URL D-1
3ComFacts D-2
3ComForum D-3
A
adapter open test 5-11
autoset mode 1-6, 1-8
B
bulletin board service D-2
C
card services
advantages 1-6
description 1-5
enabler 1-7
hot plugging 2-2
if using 2-1
Compaq PCs
installing 3C389 PC Card B-1
CompuServe D-3
connector 2-4
conventions
notice icons, About This Guide 2
text, About This Guide 2
D
diagnostics program 5-8
DOS Client 16 for Novell NetWare
4.01 and above 3-11
DOS NDIS
hot plugging C-3
DOS ODI
hot plugging C-3
suspend/resume C-3
drivers
installation 3-1
E
error codes 5-3
diagnostic 5-10
DXMCSMOD 5-6
initialization 5-10
OS/2 NDIS 5-3
transmit 5-16
F
fax service. See 3ComFacts
H
hot plugging 2-2, C-1
DOS NDIS C-3
DOS ODI C-3
OS/2 NDIS C-4
Windows 95 (NDIS 3) C-2
hot swapping C-1
I
IBM LAN Support Program/Native
Installation 3-14
installation
inserting PC Card 2-1
removing PC Card 2-5
tips 2-1
K
kit contents 2-1
Page 82

2 INDEX
L
LANAID
configuring 3C389 PC Card 4-7
description 4-1
drivers that don’t require LANAID
for configuration 3-1
drivers that require LANAID for
configuration 3-1
installing 4-3
LAN Client
installing 4-4
running from the command
line 4-8
LAPS (LAN Protocol Support) 3-9
M
memory managers A-1
with Card and Socket
Services A-2
with Point Enabler A-1
Multiprotocol Transport Service
(MPTS) 3-12
N
network supplier support D-4
Novell NetWare Client 32 for Windows
95 installation 3-9
O
online technical services D-1
on-ring test 5-9
open error codes 5-11
open errors 5-11
suggested actions 5-12
OS/2 NDIS
hot plugging C-4
suspend/resume C-4
OS/2 NDIS 2 Device Driver Using LAN
Adapter Protocol Support
(LAPS) 3-9
OS/2 NDIS 2 Device Driver Using
Multiprotocol Transport Service
(MPTS) 3-12
P
point enablers 1-2, 1-4
versus Card and Socket
Services 1-7
R
returning products for repair D-6
S
shielded twisted pair 2-4
socket services 1-2, B-1
description 1-5
if using 2-1
versus point enablers 1-7
STP 2-4
super client drivers 1-2, 1-7
suspend/resume
DOS ODI C-3
OS/2 NDIS C-4
SystemSoft Card B-1
T
technical support
3Com URL D-1
bulletin board service D-2
fax service D-2
network suppliers D-4
product repair D-6
using CompuServe D-3
troubleshooting
card services 5-1
point enabler 5-2
Windows 95 5-7
Windows NT 5-8
U
unshielded twisted-pair cabling 2-4
URL D-1
UTP 2-4
W
Windows 95
(NDIS 3) hot swapping C-2
installation 3-2
OSR 2 installation 3-4
troubleshooting 5-7
Windows NT
3.51 installation 3-6
4.0 installation 3-8
troubleshooting 5-8
World Wide Web (WWW) D-1
wrap test 5-9
Page 83

3Com Corporation LIMITED WARRANTY
HARDWARE
3Com warrants its hardware products to be free from defects in workmanship and materials, under
normal use and service, for the following lengths of time from the date of purchase from 3Com or
its Authorized Reseller:
Network NICs Lifetime
Other hardware products (unless otherwise specified in the warranty statement above) 1 year
Spare parts and spares kits 90 days
If a product does not operate as warranted above during the applicable warranty period, 3Com
shall, at its option and expense, repair the defective product or part, deliver to Customer an
equivalent product or part to replace the defective item, or refund to Customer the purchase price
paid for the defective product. All products that are replaced will become the property of 3Com.
Replacement products may be new or reconditioned. Any replaced or repaired product or part has a
ninety (90) day warranty or the remainder of the initial warranty period, whichever is longer.
3Com shall not be responsible for any software, firmware, information, or memory data of
Customer contained in, stored on, or integrated with any products returned to 3Com for repair,
whether under warranty or not.
SOFTWARE
3Com warrants that the software programs licensed from it will perform in substantial conformance
to the program specifications therefor for a period of ninety (90) days from the date of purchase
from 3Com or its Authorized Reseller. 3Com warrants the media containing software against failure
during the warranty period. No updates are provided. The sole obligation of 3Com with respect to
this express warranty shall be (at the discretion of 3Com) to refund the purchase price paid by
Customer for any defective software products, or to replace any defective media with software
which substantially conforms to applicable 3Com published specifications. Customer assumes
responsibility for the selection of the appropriate applications program and associated reference
materials. 3Com makes no warranty or representation that its software products will work in
combination with any hardware or applications software products provided by third parties, that the
operation of the software products will be uninterrupted or error free, or that all defects in the
software products will be corrected. For any third-party products listed in the 3Com software
product documentation or specifications as being compatible, 3Com will make reasonable efforts to
provide compatibility, except where the noncompatibility is caused by a “bug” or defect in the third
party’s product.
STANDARD WARRANTY SERVICE
Standard warranty service for hardware products may be obtained by delivering the defective
product, accompanied by a copy of the dated proof of purchase, to the 3Com Corporate Service
Center or to an Authorized 3Com Service Center during the applicable warranty period. Standard
warranty service for software products may be obtained by telephoning the 3Com Corporate Service
Center or an Authorized 3Com Service Center, within the warranty period. Products returned to the
3Com Corporate Service Center must be preauthorized by 3Com with a Return Material
Authorization (RMA) number marked on the outside of the package, and sent prepaid, insured, and
packaged appropriately for safe shipment. The repaired or replaced item will be shipped to
Customer, at the expense of 3Com, not later than thirty (30) days after receipt of the defective
product by 3Com.
WARRANTIES EXCLUSIVE
IF A 3COM PRODUCT DOES NOT OPERATE AS WARRANTED ABOVE, CUSTOMER’S SOLE REMEDY
FOR BREACH OF THAT WARRANTY SHALL BE REPAIR, REPLACEMENT, OR REFUND OF THE PURCHASE
PRICE PAID, AT THE OPTION OF 3COM. TO THE FULL EXTENT ALLOWED BY LAW, THE FOREGOING
WARRANTIES AND REMEDIES ARE EXCLUSIVE AND ARE IN LIEU OF ALL OTHER WARRANTIES, TERMS,
OR CONDITIONS, EXPRESS OR IMPLIED, EITHER IN FACT OR BY OPERATION OF LAW, STATUTORY OR
OTHERWISE, INCLUDING WARRANTIES, TERMS, OR CONDITIONS OF MERCHANTABILITY, FITNESS
FOR A PARTICULAR PURPOSE, AND SATISFACTORY QUALITY. 3COM NEITHER ASSUMES NOR
AUTHORIZES ANY OTHER PERSON TO ASSUME FOR IT ANY OTHER LIABILITY IN CONNECTION WITH
THE SALE, INSTALLATION, MAINTENANCE, OR USE OF ITS PRODUCTS.
Page 84

3COM SHALL NOT BE LIABLE UNDER THIS WARRANTY IF ITS TESTING AND EXAMINATION
DISCLOSE THAT THE ALLEGED DEFECT IN THE PRODUCT DOES NOT EXIST OR WAS CAUSED BY
CUSTOMER’S OR ANY THIRD PERSON’S MISUSE, NEGLECT, IMPROPER INSTALLATION OR TESTING,
UNAUTHORIZED ATTEMPTS TO REPAIR OR MODIFY, OR ANY OTHER CAUSE BEYOND THE RANGE
OF THE INTENDED USE, OR BY ACCIDENT, FIRE, LIGHTNING, OR OTHER HAZARD.
LIMITATION OF LIABILITY
TO THE FULL EXTENT ALLOWED BY LAW, 3COM ALSO EXCLUDES FOR ITSELF AND ITS SUPPLIERS
ANY LIABILITY, WHETHER BASED IN CONTRACT OR TORT (INCLUDING NEGLIGENCE), FOR
INCIDENTAL, CONSEQUENTIAL, INDIRECT, SPECIAL, OR PUNITIVE DAMAGES OF ANY KIND, OR FOR
LOSS OF REVENUE OR PROFITS, LOSS OF BUSINESS, LOSS OF INFORMATION OR DATA, OR OTHER
FINANCIAL LOSS ARISING OUT OF OR IN CONNECTION WITH THE SALE, INSTALLATION,
MAINTENANCE, USE, PERFORMANCE, FAILURE, OR INTERRUPTION OF ITS PRODUCTS, EVEN IF
3COM OR ITS AUTHORIZED RESELLER HAS BEEN ADVISED OF THE POSSIBILITY OF SUCH DAMAGES,
AND LIMITS ITS LIABILITY TO REPAIR, REPLACEMENT, OR REFUND OF THE PURCHASE PRICE PAID,
AT THE OPTION OF 3COM. THIS DISCLAIMER OF LIABILITY FOR DAMAGES WILL NOT BE AFFECTED
IF ANY REMEDY PROVIDED HEREIN SHALL FAIL OF ITS ESSENTIAL PURPOSE.
Some countries, states, or provinces do not allow the exclusion or limitation of implied warranties or
the limitation of incidental or consequential damages for certain products supplied to consumers or the
limitation for personal injury, so the above limitations and exclusions may be limited in their application
to you. This warranty gives you specific legal rights which may vary depending on local law.
GOVERNING LAW
This Limited Warranty shall be governed by the laws of the state of California.
FCC CLASS B CERTIFICATION STATEMENT
3Com Corporation
Model No: 3C389
FCC ID: AN085H3636
Made in U.S.A.
This device complies with Part 15 of the FCC Rules. Operation is subject to the following two
conditions:
1 This device may not cause harmful interference, and
2 This device must accept any interference received, including interference that may cause
undesired operation.
WARNING: This equipment has been tested and found to comply with the limits for a Class B
digital device, pursuant to Part 15 of the FCC Rules, and the Canadian Department of
Communications Equipment Standards entitled, “Digital Apparatus,” ICES-003.These limits are
designed to provide reasonable protection against harmful interference in a residential installation.
This equipment generates, uses and can radiate radio frequency energy and, if not installed and
used in accordance with the instructions, may cause harmful interference to radio communications.
However, there is no guarantee that interference will not occur in a particular installation. If this
equipment does cause harmful interference to radio or television reception, which can be
determined by turning the equipment off and on, the user is encouraged to try to correct the
interference by one or more of the following measures:
■ Reorient or relocate the receiving antenna.
■ Increase the separation between the equipment and receiver.
■ Connect the equipment into an outlet on a circuit different from the one which the receiver is
connected to.
■ Consult the dealer or an experienced radio/TV technician for help.
Page 85

The user may find the following booklet prepared by the Federal Communications Commission
helpful:
The Interference Handbook
This booklet is available from the U.S. Government Printing Office, Washington, D.C. 20402. Stock
No. 004-000-00345-4.
NOTE: In order to maintain compliance with the limits of a Class B digital device, 3Com requires
that you use quality interface cables when connecting to this device. Changes or modifications not
expressly approved by 3Com could void the user’s authority to operate this equipment. Refer to the
manual for specifications on cabling types.
VCCI CLASS 2 STATEMENT
This equipment is in the Class 2 category (Information Technology Equipment to be used in a
residential area or an adjacent area thereto) and conforms to the standards set by the Voluntary
Control Council For Interference by Information Technology Equipment aimed at preventing radio
interference in such residential area.
When used near a radio or TV receiver, it may become the cause of radio interference. Read the
instructions for correct handling.
4/18/97
3COM END USER SOFTWARE LICENSE AGREEMENT
IMPORTANT: Read Before Using This Product
YOU SHOULD CAREFULLY READ THE FOLLOWING TERMS AND CONDITIONS BEFORE USING
THIS PRODUCT. IT CONTAINS SOFTWARE, THE USE OF WHICH IS LICENSED BY 3COM
CORPORATION ("3COM") TO ITS CUSTOMERS FOR THEIR USE ONLY AS SET FORTH BELOW.
IF YOU DO NOT AGREE TO THE TERMS AND CONDITIONS OF THIS AGREEMENT, DO NOT
USE THE SOFTWARE. USING ANY PART OF THE SOFTWARE INDICATES THAT YOU ACCEPT
THESE TERMS.
LICENSE: 3Com grants you a nonexclusive license to use the accompanying software program(s)
(the "Software") subject to the terms and restrictions set forth in this License Agreement. You are
not permitted to lease, rent, distribute or sublicense the Software or to use the Software in a
time-sharing arrangement or in any other unauthorized manner. Further, no license is granted to
you in the human readable code of the Software (source code). Except as provided below, this
License Agreement does not grant you any rights to patents, copyrights, trade secrets, trademarks,
or any other rights in respect to the Software.
The Software is licensed to be used on any workstation or any network server owned by or leased
to you, provided that the Software is used only in connection with a 3Com adapter. You may
reproduce and provide one (1) copy of the Software and supporting documentation for each such
workstation or network server on which the Software is used as permitted hereunder. Otherwise,
the Software and supporting documentation may be copied only as essential for backup or archive
purposes in support of your use of the Software as permitted hereunder. You must reproduce and
include all copyright notices and any other proprietary rights notices appearing on the Software and
the supporting documentation on any copies that you make.
NO ASSIGNMENT; NO REVERSE ENGINEERING: You may not transfer or assign the Software
and/or this License Agreement to another party without the prior written consent of 3Com. If such
consent is given and you transfer or assign the Software and/or this License Agreement, then you
must at the same time either transfer any copies of the Software as well as the supporting
documentation to the same party or destroy any such materials not transferred. Except as set forth
above, you may not transfer or assign the Software or your rights under this License Agreement.
Page 86

Modification, reverse engineering, reverse compiling, or disassembly of the Software is expressly
prohibited. However, if you are a European Community ("EC") resident, information necessary to
achieve interoperability of the Software with other programs within the meaning of the EC Directive
on the Legal Protection of Computer Programs is available to you from 3Com upon written request.
EXPORT RESTRICTIONS: You agree that you will not export or re-export the Software or
accompanying documentation (or any copies thereof) or any products utilizing the Software or such
documentation in violation of any applicable laws or regulations of the United States or the country
in which you obtained them.
TRADE SECRETS; TITLE: You acknowledge and agree that the structure, sequence and organization
of the Software are the valuable trade secrets of 3Com and its suppliers. You agree to hold such
trade secrets in confidence. You further acknowledge and agree that ownership of, and title to, the
Software and all subsequent copies thereof regardless of the form or media are held by 3Com and
its suppliers.
UNITED STATES GOVERNMENT LEGEND:
The Software is commercial in nature and developed solely at private expense. The Software is
delivered as “Commercial Computer Software” as defined in DFARS 252.227-7014 (June 1995) or
as a commercial item as defined in FAR 2.101(a) and as such is provided with only such rights as are
provided in this License Agreement, which is 3Com’s standard commercial license for the Software.
Technical data is provided with limited rights only as provided in DFAR 252.227-7015 (Nov. 1995) or
FAR 52.227-14 (June 1987), whichever is applicable.
TERM AND TERMINATION: This license will expire fifty (50) years from the date that you first use
the Software, if it is not earlier terminated. You may terminate it at any time by destroying the
Software and documentation together with all copies and merged portions in any form. It will also
terminate immediately if you fail to comply with any term or condition of this License Agreement.
Upon such termination you agree to destroy the Software and documentation, together with all
copies and merged portions in any form.
GOVERNING LAW: This License Agreement shall be governed by the laws of the State of California
as such laws are applied to agreements entered into and to be performed entirely within California
between California residents and by the laws of the United States. You agree that the United
Nations Convention on Contracts for the International Sale of Goods (1980) is hereby excluded in its
entirety from application to this License Agreement.
LIMITED WARRANTY; LIMITATION OF LIABILITY: All warranties and limitations of liability
applicable to the Software are as stated on the Limited Warranty Card or in the product manual
accompanying the Software. Such warranties and limitations of liability are incorporated herein in
their entirety by this reference.
SEVERABILITY: In the event any provision of this License Agreement is found to be invalid, illegal or
unenforceable, the validity, legality and enforceability of any of the remaining provisions shall not in
any way be affected or impaired and a valid, legal and enforceable provision of similar intent and
economic impact shall be substituted therefor.
ENTIRE AGREEMENT: This License Agreement sets forth the entire understanding and agreement
between you and 3Com, supersedes all prior agreements, whether written or oral, with respect to
the Software, and may be amended only in a writing signed by both parties.
3Com is a registered trademark of 3Com Corporation.
3Com Corporation, 5400 Bayfront Plaza, P.O. Box 58145, Santa Clara, CA 95052-8145,
(408) 764-5000
 Loading...