


COMMANDOS-STRIKE FORCE

™
GETTING STARTED ...................... 2
DEFAULT CONTROLS .................... 3
MENU CONTROLS ........................ 3
GAMEPLAY CONTROLS ................ 4
MAIN MENU .................................. 5
Settings ........................................ 5
Profiles .......................................... 5
Campaign Menu ............................ 6
COMMANDOS CAMPAIGN .......... 6
Briefing ........................................ 6
COMMANDOS TEAM .................... 7
IN-GAME DISPLAY ........................ 8
TACTICAL MAP .............................. 9
PAUSE MENU ................................ 9
SAVING GAME DATA .................... 9
TACTICS/TIPS ................................ 9
General Hints .............................. 10
Stealth ........................................ 10
Action .......................................... 11
STEALTH KILL TECHNIQUES .... 12
WEAPON USE .............................. 13
EXPLOSIVES ................................ 13
EQUIPMENT ................................ 14
THE ENEMY .................................. 14
General Behavior ........................ 14
Alarm Status .............................. 15
ENEMY PERSONNEL .................. 15
ONLINE PLAY ................................ 17
Network Configuration ................ 17
Online System Requirements ........ 17
Creating an Account .................... 17
Using the USB Headset .............. 18
MULTIPLAYER MODE .................... 18
Multiplayer Menu ...................... 18
Creating Profiles .......................... 18
Creating and Joining Matches ...... 19
Normal Search Menu .................. 19
Create Match .............................. 19
MULTIPLAYER GAME SETUP .... 20
MULTIPLAYER GAME MODES .. 20
Deathmatch ................................ 20
Team Deathmatch ...................... 20
Sabotage .................................... 21
PLAYING THE GAME
IN SPANISH OR FRENCH
............ 21
TROUBLESHOOTING .................. 22
CREDITS ........................................ 23
CONTENTS
WARNING: READ BEFORE USING YOUR PLAYSTATION®2 COMPUTER
ENTERTAINMENT SYSTEM.
A very small percentage of individuals may experience epileptic seizures when exposed
to certain light patterns or flashing lights. Exposure to certain patterns or backgrounds
on a television screen or while playing video games, including games played on the
PlayStation 2 console, may induce an epileptic seizure in these individuals. Certain
conditions may induce previously undetected epileptic symptoms even in persons who
have no history of prior seizures or epilepsy. If you, or anyone in your family, has
an epileptic condition, consult your physician prior to playing. If you experience any
of the following symptoms while playing a video game — dizziness, altered vision,
eye or muscle twitches, loss of awareness, disorientation, any involuntary movement,
or convulsions — IMMEDIATELY discontinue use and consult your physician before
resuming play.
WARNING TO OWNERS OF PROJECTION TELEVISIONS:
Do not connect your PlayStation 2 console to a projection TV without first consulting
the user manual for your projection TV, unless it is of the LCD type. Otherwise, it may
permanently damage your TV screen.
USE OF UNAUTHORIZED PRODUCT:
The use of software or peripherals not authorized by Sony Computer Entertainment
America may damage your console and/or invalidate your warranty.
Only official or licensed peripherals should be used in the controller
ports or memory card slots.
HANDLING YOUR PLAYSTATION 2 FORMAT DISC:
• This disc is intended for use only with PlayStation 2 consoles
with the NTSC U/C designation.
• Do not bend it, crush it or submerge it in liquids.
• Do not leave it in direct sunlight or near a radiator
or other source of heat.
• Be sure to take an occasional rest break
during extended play.
• Keep this disc clean. Always hold the disc
by the edges and keep it in its protective
case when not in use. Clean the disc
with a lint-free, soft, dry cloth, wiping
in straight lines from center to outer
edge. Never use solvents
or abrasive cleaners.
~ 2 ~ ~ 3 ~
GETTING STARTED DEFAULT CONTROLS
Set up your PlayStation®2 computer entertainment system according to the instructions
in its Instruction Manual. Make sure the
MAIN POWER switch (located on the back
of the console) is turned
ON. Press the RESET button. When the power indicator lights
up, press the
OPEN button and the disc tray will open. Place the COMMANDOS
STRIKE FORCE
™
disc on the disc tray with the label side facing up. Press the OPEN
button again and the disc tray will close. Attach game controllers and other peripherals,
as appropriate. Follow on-screen instructions and refer to this manual for information
on using the software.
MEMORY CARD (8MB)(for PlayStation®2)
To save game settings and progress, insert a memory card (8MB)(for PlayStation®2)
into MEMORY CARD slot 1 before powering on the system. At least 450KB of free space
on the memory card is required to save game data.
This game supports saving and loading of game data in MEMORY CARD slot 1 only.
You can load saved game data from the same memory card or from any memory card
containing previously saved
COMMANDOS STRIKE FORCE
™
games.
Connect the DUALSHOCK
®
2 analog controller to controller port 1 before starting play.
When the vibration function is
On, the controller will vibrate in response to game
events. You can reconfigure the controls and toggle the vibration function
On/Off
in Options mode (page 5).
Note: All controls used in this manual are the default controls.
MENU CONTROLS
❑
Use the directional buttons to view and cycle through the game options.
❑
Press the x button to select an option, change a current option, confirm
any changes made or progress to the next screen.
❑
Press the t button in a submenu to return to the previous screen.
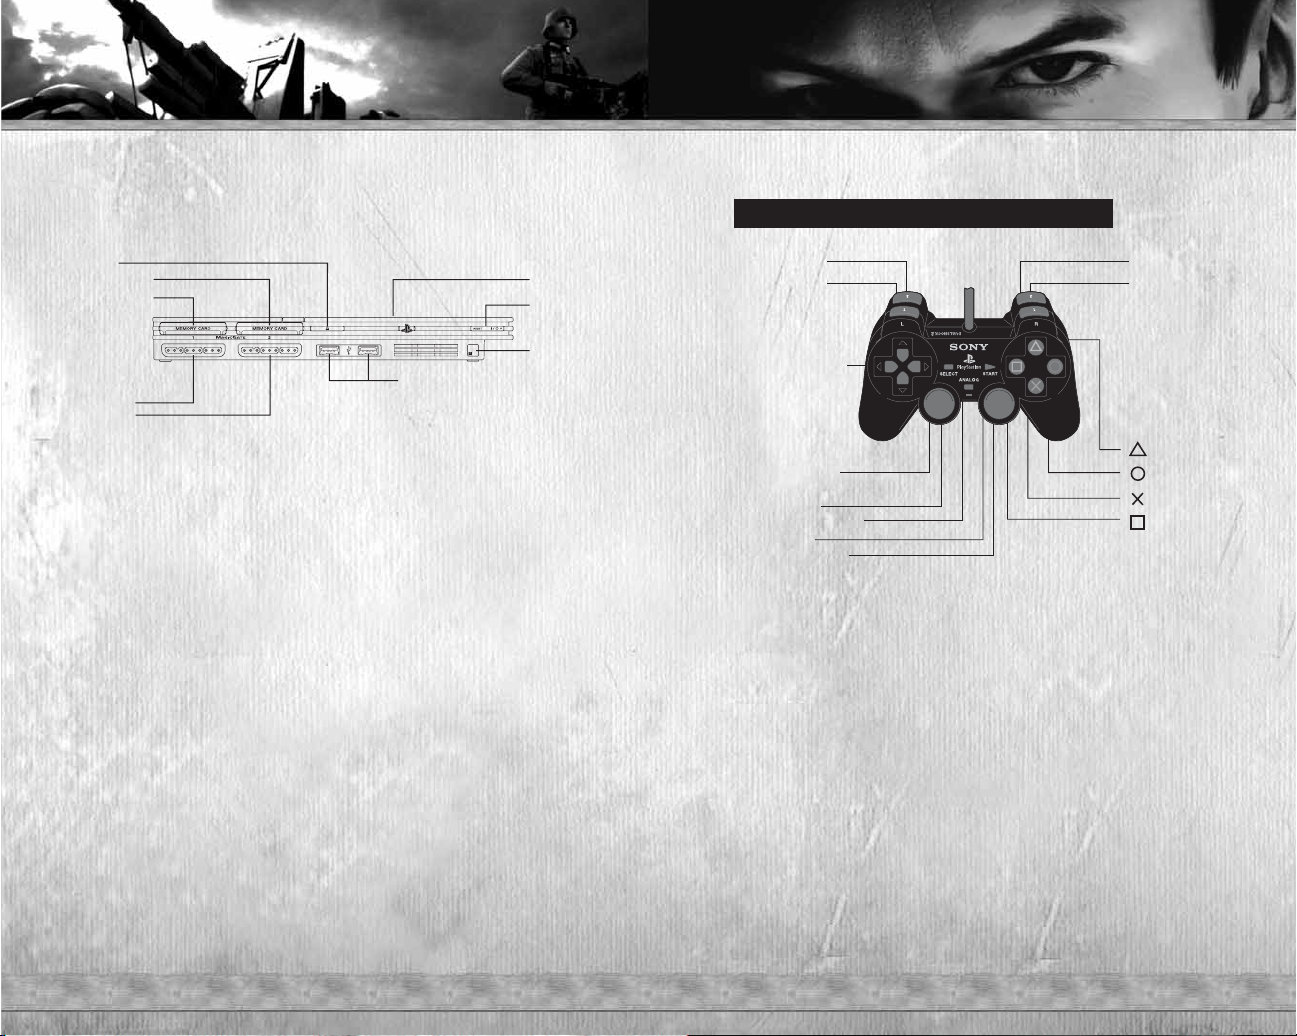
open button
on/standby/
reset button
IR receiver
USB connectors
disc cover
controller port 1
controller port 2
memory card slot 1
memory card slot 2
button
button
button
button
directional
buttons
left analog stick
(L3 button
when pushed down)
SELECT button
ANALOG mode button
START button
right analog stick
(R3 button
when pushed down)
L2 button
L1 button
R2 button
R1 button
DUALSHOCK®2 ANALOG CONTROLLER CONFIGURATIONS

~ 4 ~ ~ 5 ~
GAMEPLAY CONTROLS
BUTTON
left analog stick
. button
f button
right analog stick
directional buttons
1
directional buttons
2
directional buttons
4
directional buttons
3
t button
s button
c button
x button
l button
, button
r button
d button
q button
w button
ACTION
Move character
Jump
View
Aim/Binoculars
Select item
Select weapon
Mission objectives/
locations
External view
Cycle Commando (Single
Player)/Talk (Multiplayer)
Reload
Use medikit
Action
Sprint
Change position
Fire
Secondary action
Info screen
Pause
DESCRIPTION
Forward/Backward/Strafe
movements.
———
Available on some weapons.
Activates zoom on the sniper’s
rifle. Press the f button when not
equipped with a sighted weapon
to activate the binoculars.
Camera view control.
Cycle through items. On the
tactical map, cycle through mission
objective components.
Cycle through weapons. On the
tactical map, cycle through mission
objective components.
Show objectives and their
locations on the tactical map.
Access 3rd person camera view
(used with the right analog stick).
Also, show objectives and their
locations on the tactical map.
Change character (Single Player
only)/Activate talk function for
USB headset (Multiplayer only).
———
———
Focus the target on a specific
object to perform an action.
———
Toggle Crouch/Stand up.
Fire your selected weapon.
Use selected item.
Tactical map and information.
In Pause mode, save a game, load
another game or adjust controls.
MAIN MENU
Start by checking and adjusting your
settings
(below). Use the menu controls
(page 3) to make selections. Then return
to the Main Menu and choose between
Commandos Campaign (Single Player
game) or
BattleGround Online
(Multiplayer game). If you select
Commandos Campaign you will be
asked to set up your game profile.
SETTINGS
CONTROLS
Default
Select the default
game controls or
control variations.
VIDEO
Screen Position
Adjust screen
position.
Noise Toggle visual
noise filter.
SOUND
Music Volume
Adjust the music volume.
SFX Volume Adjust the sound effects volume.
Output Select Mono, Stereo, Surround or Headphones.
GAME
Auto Aim
Toggle On/Off.
Subtitles Toggle On/Off.
Invert Axis Toggle Inverted/Normal.
Turn Sens Adjust Turn sensitivity.
Pitch Sens Adjust Pitch sensitivity.
Vibration Toggle the controller’s vibration On/Off.
Voice Chat Toggle Muted/On (Multiplayer only).
PROFILES
Before you begin playing, you must create a new profile. Select New
and input your profile name using the virtual keyboard. Use the directional
buttons to highlight a letter, press the
x button to select that letter,
and select
Done upon completion.
~ 6 ~ ~ 7 ~
CAMPAIGN MENU
Play Mission Start a mission by selecting
a mission and then choosing
your difficulty level.
Load Game Load a saved mission.
Extras View bonus COMMANDOS
STRIKE FORCE
™
material.
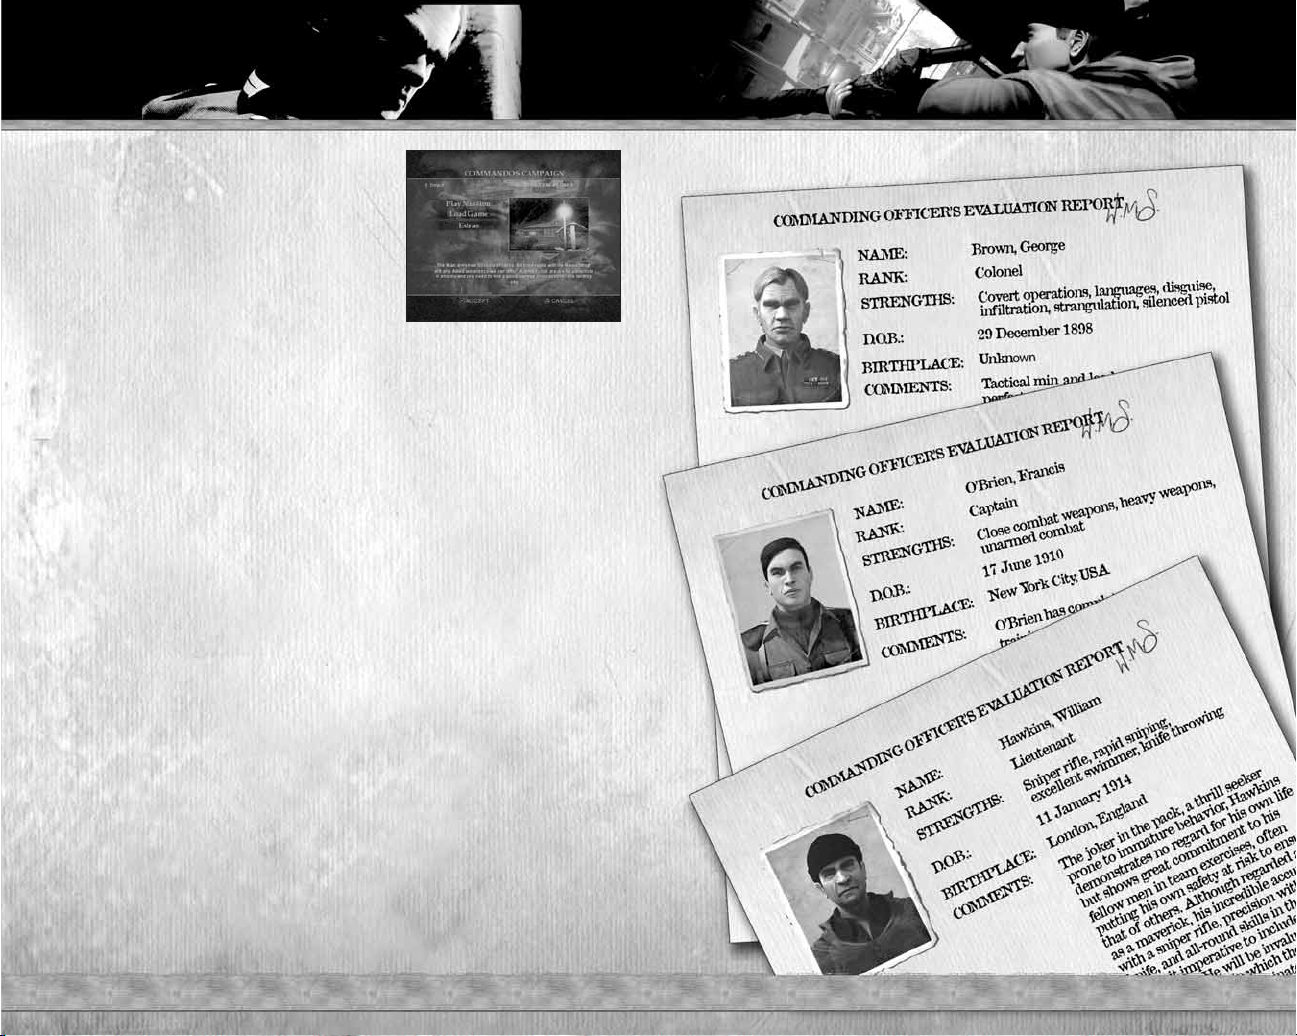
COMMANDOS CAMPAIGN
BRIEFING
A number of unorthodox military operations have been detailed to respond to the Nazi
threat that has cast a dark menacing cloud over Europe. The formation of the first
Commandos regiments has been sanctioned to defeat this seemingly invincible Nazi
army. The Commandos raison d’être is deploying smaller groups of Special Forces
to infiltrate, gather intelligence, engage in sabotage and harass the enemy deep behind
their lines.
You control a Commandos strike force unit. Your incursions will take you into France,
Norway and Russia with three elite Commando corps members — Colonel George
Brown (Spy), Captain Francis O’Brien (Green Beret) and Lieutenant William Hawkins
(Sniper) — at your disposal. You have a full arsenal of weapons, and each of your men
possesses a series of special actions and skills. You must switch between these
Commandos to adapt to all stealth and combat situations.
The missions that lie ahead will challenge you and your unit to the limit. You must:
❑
Assault and defend strategic positions.
❑
Sabotage enemy installations.
❑
Support allied troops in their own operations.
Good luck!
COMMANDOS TEAM
 Loading...