


READ AND SAVE THESE INSTRUCTIONS
EVAPORATIVE
HUMIDIFIER
OWNER’S
CARE
&
USE
MANUAL
MODELS:
821 000, WHITEDIGITAL CONTROL
•Automatic Humidistat
•Refill light with Automatic Shutoff
•2-Speed Fan with Quiet Setting for Nighttime Use
•Easy to clean, removable power pack
C
French and Spanish Instructions included.
Se incluyen instrucciones En Español y Francés.
Directives en Français et en espagnol compris
SAVE THE ENVIRONMENT
RECYCLE APPROPRIATE MATERIALS Patents: 5,037,583; 5,110,511; 5,133,904 Other Patents Pending
To order parts and accessories call 1-800-547-3888
1B5864110 4/09
IMPORTANT SAFEGUARDS
READ BEFORE USING YOUR HUMIDIFIER
1.This appliance has a polarized plug (one blade is wider than the other). To reduce the risk of electric shock, this plug is intended to fit into a polarized 120-volt AC, 15 amp outlet, and only one way. If the plug does not fit fully in the outlet, reverse the plug. If it still does not fit, contact a qualified electrician. Do not attempt to defeat this safety feature. If an extension cord must be used, it should also accept the wide blade plug and meet this electrical rating.
2.Do not place the cord under rugs, near loose drapes, in traffic areas, nor near heat sources or combustible materials.
3.Do not use the humidifier if the cord is damaged.
4.Always unplug the power cord before filling, cleaning, servicing, or when the unit is not in use.
5.This humidifier is ETL listed with Essick Air brand evaporative wicks in place.
6.It is very important that cleaning solutions such as bleach, anti-bacteria treatment or descaler, which could be used to clean the cabinet, are not sprayed or applied to the chassis assembly. These solutions can cause serious electrical malfunction of the humidifier.
INTRODUCTION
Your Essick Air evaporative humidifier adds invisible moisture to your home by moving dry inlet air through a saturated wick. As air moves through the wick, the water evaporates into the air, leaving behind any white dust, minerals, or dissolved and suspended solids. Because the water is evaporated, there is just clean and invisible moist air.
As the evaporative wick traps accumulated minerals from the water, its ability to absorb and evaporate water decreases. We recommend changing the wick at the beginning of every season. In hard water areas, more frequent replacement may be necessary to maintain your humidifier’s efficiency.
Use only Essick Air brand replacement wicks and chemicals. To order parts, wicks and chemicals call 1-800-547-3888. The 800 Series humidifiers use Essick Air wick # 1043. Only the Essick Air evaporative wick guarantees the certified output of your humidifier. Use of wicks other than Essick Air brand will void your warranty as well as the certification of output and may reduce the output of your humidifier.
2
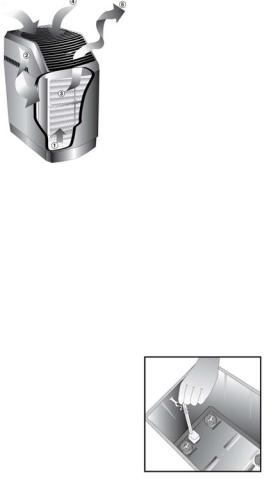
HOW YOUR HUMIDIFIER WORKS
Dry air is drawn into the humidifier though the back and moisturized as it passes through the evaporative wick. It is then fanned out into the room.
CAUTION: Do NOT position the unit directly in front of a hot air duct or radiator. Do NOT place on soft carpet.
LEGEND:
1.Water reservoir
2.Chassis/power pack (motor/fan assembly)
3.Evaporative wick
4.Dry air intake
5.Moist air output
ASSEMBLY, CONTROLS & OPERATION
1.Unpack humidifier from carton.
2.Remove all packaging materials. Check to see that you have all of the following items removed from the boxes accessory kit and cabinet before discarding the packaging:
♦ Evaporative wick ♦ Caster kit
♦ Lift rod assembly with Styrofoam float
CASTERS
3.Turn the emptied cabinet upside down. Insert each caster stem into the four caster holes on each corner of the humidifier bottom. The casters should fit snugly and be inserted until the stem shoulder reaches the cabinet surface.
4.Turn the cabinet right side up.
EVAPORATIVE WICK
5.Replace the float assembly and attached lift rod into the boxed area on the bottom of the inside of the cabinet. Slip lift rod into retainer ring and twist to secure. The lift rod should be able to freely move up and down about 3/8”. The retainer ring should be located between the two ribs on the lift rod.
6.Place the wick assembly back into the guides
provided in the bottom of the cabinet and the ribs along the sides.
7.Place the chassis unit onto the cabinet ensuring that the chassis seats correctly into the front and back grooved edges.
IMPORTANT FILLING INFORMATION
8.Before filling the humidifier with water, be certain that the speed control switch is turned off and the humidifier is unplugged. Fill the water reservoir with water to the level indicated on the wick frame assembly and “Fill to Here” decal on the cabinet side wall. Do not overfill. When first filled, the reservoir capacity is 6 gallons.
3

9.This unit has one reservoir, which when emptied, triggers the respective refill indication and automatically shuts off the motor. The motor will start again automatically when the reservoir is refilled.
10.When the reservoir is being filled for the first time, the dry wick absorbs water, requiring more water on the first fill up than subsequent fillings.
NOTE: We recommend using Essick Air Bacteriostat Treatment when you refill the water reservoir to eliminate bacterial growth. Add bacteriostat according to the instructions on the bottle.
OPERATION
1.Plug cord into wall receptacle. Your humidifier is now ready for use. The humidifier should be placed at least FOUR inches away from any walls and away from heat registers. Unrestricted airflow into the unit will result in the best efficiency and performance.
2.The 800 Series 2-speed fan control allows you to use the low setting for the quietest operation or a high setting for maximum output.
3.This model has an automatic humidistat that cycles the humidifier on and off as required to maintain the selected setting.
4.The digital controller has a display that provides
information on the status of the unit. Press the power |
Display Panel: Humidity Display, Refill Indication |
and Fan Indication |
|
button and select fan speed – F1 for low speed and |
|
F2 for high speed. At initial startup the relative |
|
humidity of the room will be displayed. Each |
Fan Speed |
successive push of the Humidity Control Button will |
Button |
increase the setting |
Control |
|
Humidity |
in 5% increments. At 65% set point, |
Button |
the unit will operate continuously. |
Power |
A flashing “F” indicates the reservoir is empty. |
Button |
|
Check Filter Indicator
The ability of any humidifier to efficiently supply humidity output relies heavily on the condition of the filter. As the filter loads with impurities it gradually loses its wicking capability. When this happens, moisture output is reduced and the humidifier has to work longer to satisfy the selected setting. This humidifier has a check filter reminder timed to appear after 720 hours of operation. When the Check Filter (CF) message is displayed, disconnect the power cord and check the condition of the filter. If a build-up of deposits or severe discoloration is evident replace the filter to restore maximum efficiency. The CF message is reset when the humidifier is plugged back in.
4
CARE AND MAINTENANCE
Cleaning your humidifier regularly helps eliminate odors and bacterial and fungal growth. Ordinary household bleach is a good disinfectant and can be used to wipe out the humidifier base and bottle/reservoir after cleaning. We recommend cleaning your humidifier at least once every two weeks to maintain optimum environmental conditions for your home.
We also recommend using Essick Air Bacteriostat Treatment each time you refill your humidifier to eliminate bacterial growth. Add bacteriostat according to the instructions on the bottle. Please call 1-800-547-3888 to order Bacteriostat Treatment reference part number 1970.
1)Turn off unit completely counterclockwise and unplug from outlet.
2)Lift out the power pack.
3)Roll or carry the base to cleaning basin. Lift wick from the base allowing the water to drain. Remove float assembly. Rinse wick under fresh water only. Do not use soap, detergent, or any other cleaners on the wick. Leave in sink to drain.
REMOVING SCALE
4)Empty any residual water from the reservoir. Fill reservoir ½ full of water and add 8 oz. (1 cup) of white vinegar. Let stand 20 minutes. Then pour out the solution.
5)Dampen a soft cloth with white vinegar and wipe out reservoir to remove scale. Rinse the reservoir thoroughly with fresh water to remove scale and cleaning solution before disinfecting.
DISINFECTING UNIT
6)Fill the reservoir ½ full with water and add 1 teaspoon of bleach. Wet all surfaces on cabinet. Let solution stay for 20 minutes, then rinse with water until bleach smell is gone. Dry with clean cloth. The outside of the unit may be wiped down with a soft cloth dampened with fresh water.
7)Refill unit and re-assemble per ASSEMBLY instructions.
SUMMER STORAGE
1)Clean unit as outlined in Care & Maintenance section.
2)Discard used wick and any water in the reservoir or bottle and allow to dry thoroughly before storage. Do not store with water inside reservoir or bottle.
3)Do not store unit in an attic or other high-temperature area.
4)Install new filter at beginning of season.
5

ESSICK AIR PRODUCTS
HUMIDIFIER WARRANTY POLICY
EFFECTIVE APRIL 1, 2008
SALES RECEIPT REQUIRED AS PROOF OF PURCHASE
FOR ALL WARRANTY CLAIMS.
This product is warranted against defects in workmanship and materials for one year from the date of sale except for motors, which are warranted for two years. This warranty does not apply to filters or wicks which are customer replaceable parts.
This warranty applies only to the original purchaser of the product when it is purchased from a reputable retailer/dealer.
This warranty does not apply to damage from accident, misuse, alterations, unauthorized repairs, unauthorized use, mishandling, unreasonable use, abuse, including failure to perform reasonable maintenance, normal wear and tear, nor where the connected voltage is more than 5% above the nameplate voltage, nor to the equipment or products being improperly installed or wired or maintained in violation of this Owner’s Manual.
Alterations include the substitution of name brand components including, but not limited to wicks and bacteria treatment.
THIS PRODUCT IS NOT INTENDED FOR COMMERCIAL USE. THIS IS THE SOLE AND EXCLUSIVE WARRANTY GIVEN BY MANUFACTURER WITH RESPECT TO THE PRODUCTS AND, TO THE MAXIMUM EXTENT PERMITTED BY LAW, IS IN LIEU OF AND EXCLUDES ALL OTHER WARRANTIES AND CONDITIONS, EXPRESS OR IMPLIED, ARISING BY OPERATION OF LAW OR OTHERWISE. INCLUDING WITHOUT LIMITATION, MERCHANTABILITY AND/OR FITNESS FOR A PARTICULAR PURPOSE.
No employee, agent, dealer or other person is authorized to give any warranties or conditions on behalf of the manufacturer. The customer shall be responsible for all costs incurred in the removal or reinstallation and shipping of the product for repairs.
Within the limitations of this warranty, purchaser with inoperative units should contact customer service @ 800-547-3888 for paperwork and instructions on the return of the unit for repair. A copy of the sales receipt is required before authorization to return a unit for repair is approved. The manufacturer will repair or replace the product, at its discretion, with return freight paid by the manufacturer. It is agreed that such repair or replacement is the exclusive remedy available from the manufacturer and that TO THE MAXIMUM EXTENT PERMITTED BY LAW, THE MANUFACTURER IS NOT RESPONSIBLE FOR DAMAGES OF ANY KIND, INCLUDING INCIDENTAL AND CONSEQUENTIAL DAMAGE OR LOSS OF PROFITS OR REVENUES.
This warranty will be null & void if purchaser attempts to repair or replace any parts which are mechanical or electrical.
The warranty gives the customer specific legal rights, and the customer may also have other rights which vary from province to province, or state to state.
6
 Loading...