American Standard 0680 PETAL, 0660 LOFT, 0670 MORNING User Manual

™ Installation |
ABOVE COUNTER SINK |
||
Instructions |
FOR USE WITH: 0660 |
LOFT |
|
0670 |
MORNING |
||
|
|||
|
0680 |
PETAL |
|
Introduction: Thank you for selecting our products...products which have been the benchmarks of fine quality for years. To help insure that the installation process will proceed smoothly, please read these instructions carefully before you begin. Also, review the recommended tools and materials list; carefully unpack and examine your new plumbing fixture.
OBSERVE LOCAL PLUMBING AND BUILDING CODES |
730687-100 |
Recommended Tools
& Materials
Hacksaw |
Phillips Screwdriver |
Tubing Cutter |
Pipe Wrench |
Basin Wrench |
Regular Screwdriver |
Channel Lock Pliers |
Putty Knife |
Plumbers' Putty or Caulking |
Adjustable Wrench |
Drill |
Tape Measure |
1A |
|
2 |
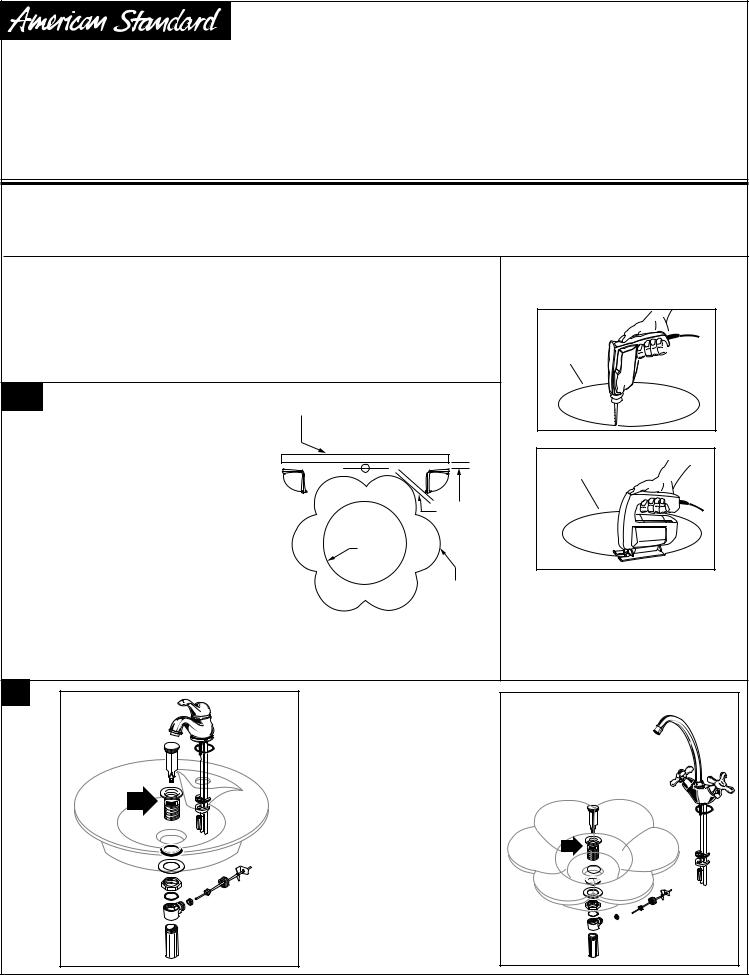
Using the template provided, locate the position of the sink. Provide proper clearance under the countertop for the fauce t supply lines, drain assembly and the structural parts of the cabinet.
NOTE: If replacing an existing sink be certain to shut off water supply before removing old sink.
1B
BACKSPLASH
Wall-mount faucet installations:
Insure sufficient spout overhang into the sink. See manufacturer's installation instructions and roughingin notes for minimum spout lengths.
Countertop faucet installations: |
1" (25mm) |
|
|
MIN. |
|
Using the template as a guide, locate the |
|
|
faucet hole on the countertop. Allow 1" |
CUT-OUT |
|
minimum clearance between: |
LINE |
|
• the sink and faucet spout |
OUTSIDE |
|
• the sink and end of faucet handles |
EDGE OF |
|
SINK |
||
• the backsplash and faucet spout and handles |
||
|
||
Use the faucet installation instructions for |
|
|
required clearances. |
|
Drill a clearance hole inside the perimeter line of the template.
Perimeter of template
Perimeter of template
Cut opening around the perimeter of the template.
NOTE: For Wallmount or Countertop faucets, drill faucet holes according to manufacturer's instructions.
3
A
Mount the faucet and drain assembly (not included) on the sink following the manufacturer's instructions. Be certain to apply a bead of sealing putty on the underside of the drain (Part "A") in order to ensure a watertight seal between the sink and drain. Remove excess putty after installing drain on sink.
A
© American Standard Inc. 2004
 Loading...