

Page 1

NBG318S Series
Super G Wireless HomePlug AV Router
Quick Start Guide
Version 3.60
11/2007
Edition 2
DEFAULT LOGIN
IP Address http://192.168.1.1
Password 1234
CONTENTS
ENGLISH 2
DEUTSCH 14
ESPAÑOL 28
FRANÇAIS 42
ITALIANO 56
SVENSKA 70
Copyright © 2007. All rights reserved.
Page 2

ENGLISH
ENGLISH
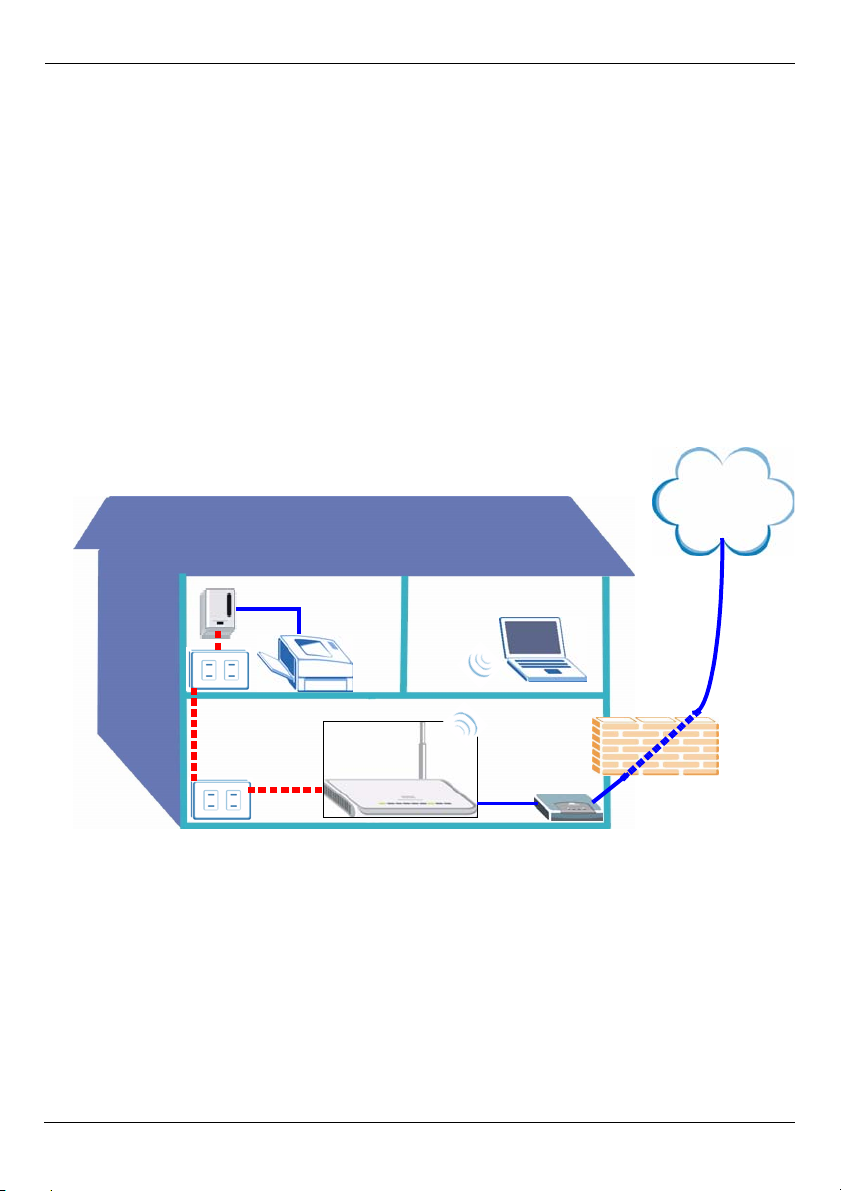
Overview
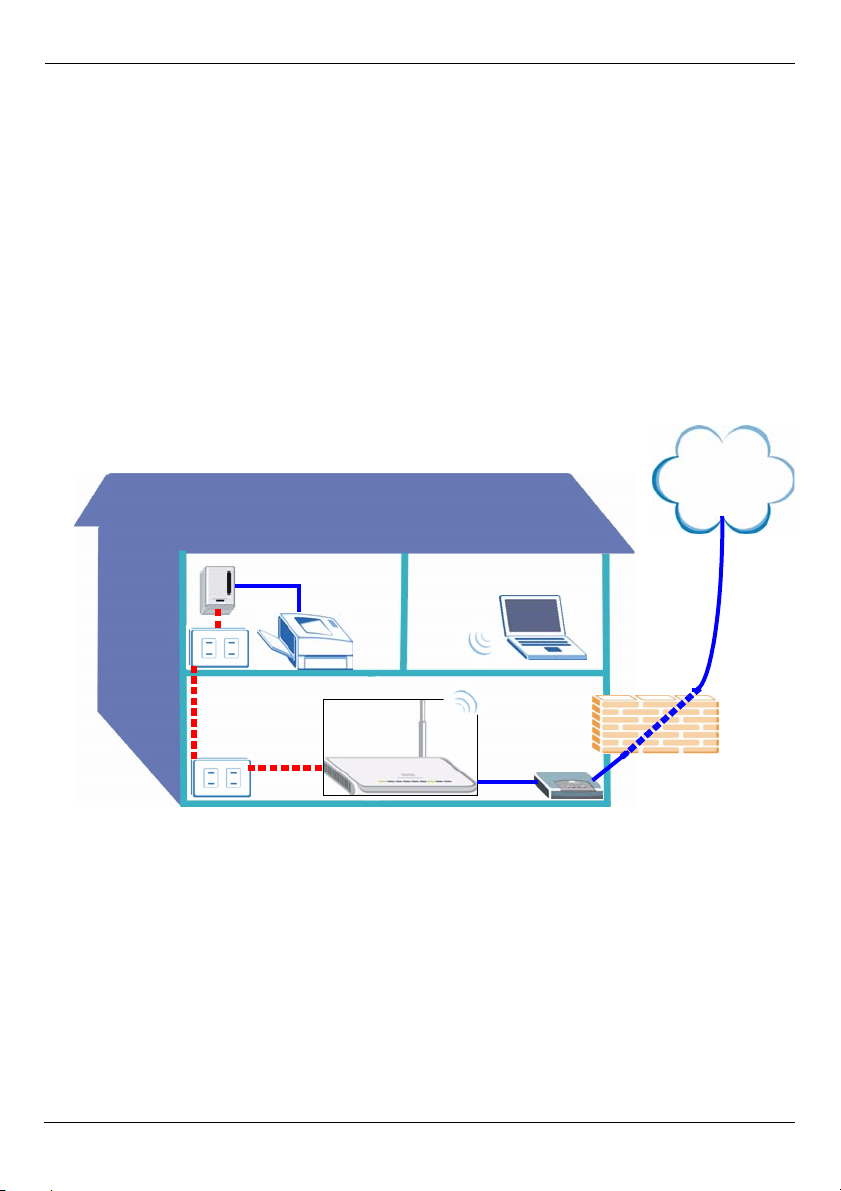
The NBG318S lets you:
• Set up a high speed wireless network compatible with IEEE 802.1b/g standards, other
Super G enabled products and a wide range of encryption standards (A).
• Use Wi-Fi Protected Setup (WPS) to set up a secure wireless network at the press of a button.
• Set up a powerline network on your standard home electrical wiring with other HomePlug
AV compatible products (B).
• Use the push-button ENCRYPT feature to set up your HomePlug AV network.
• Set up a wired and wireless network with a firewall and content filtering (C).
Internet
A
B
This Quick Start Guide shows you how to:
1 Set Up Your Hardware, p3
2 Connect to the NBG318S from Your Computer, p4
3 Set Up Wireless and Internet Access with the Wizard, p5
4 Set Up a Wireless Network, p11
5 Set Up a HomePlug AV Network with ENCRYPT, p12
See the User’s Guide on the included CD for details on all of the NBG318S’s features. If a
screen does not pop-up when you insert the included CD, use Windows Explorer (My
Computer) to go to the CD-ROM (commonly drive D) and browse for the User’s Guide.
2
C
Page 3

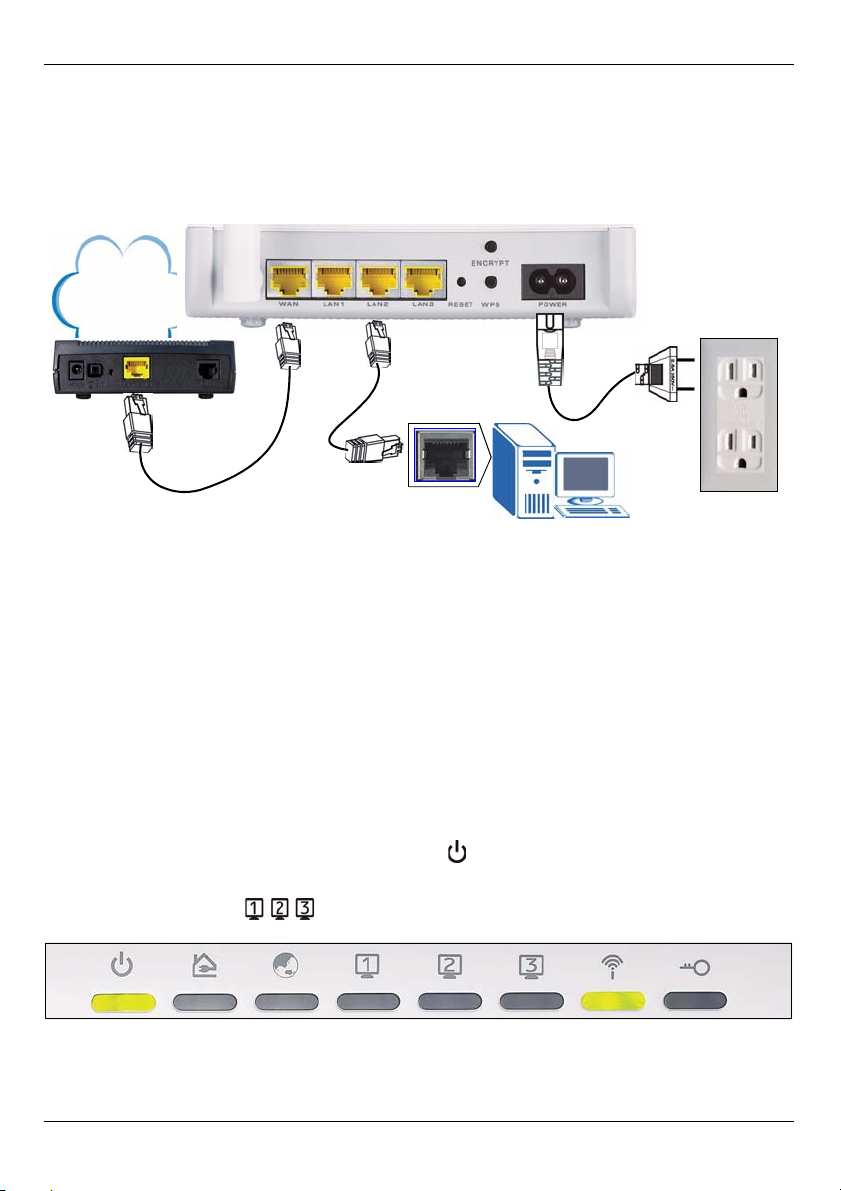
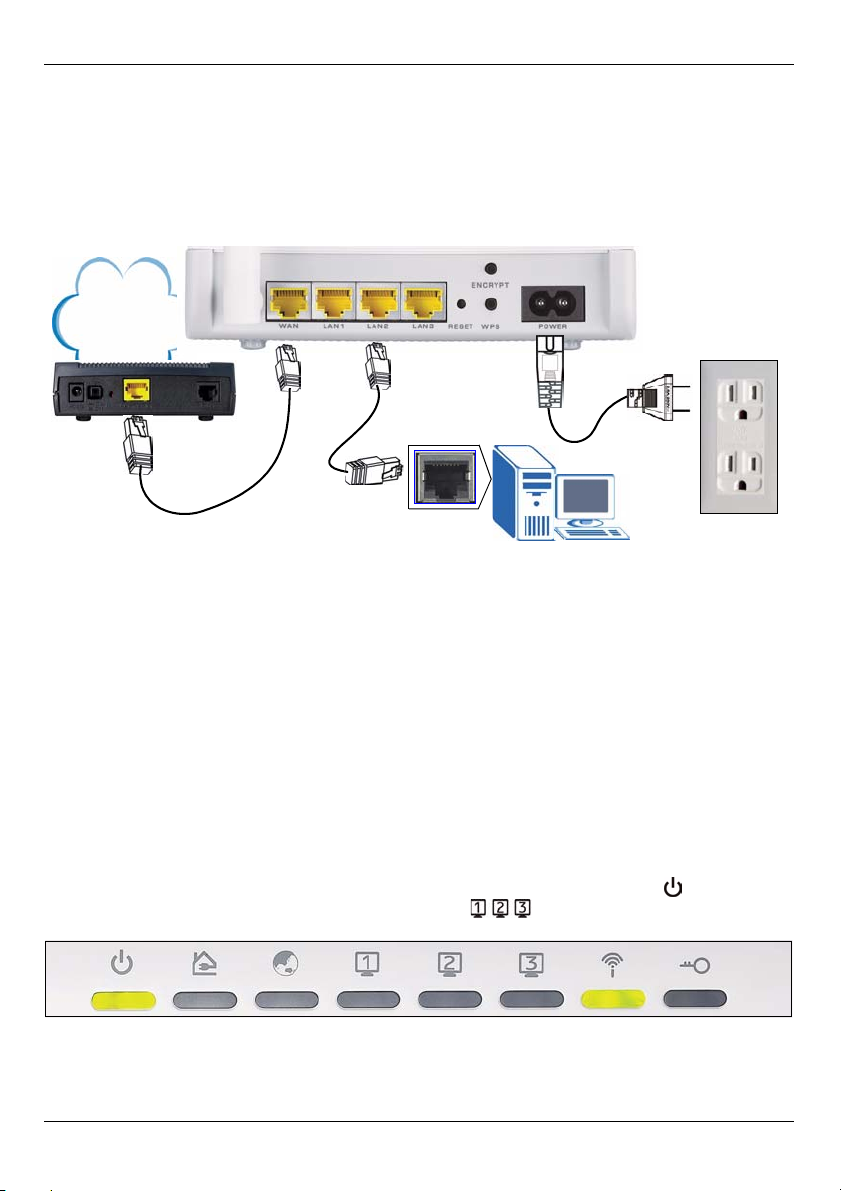
1 Set Up Your Hardware
ENGLISH
Internet
2
3
1
Do the following to make hardware connections for initial setup.
1 WAN: Connect the WAN port on your NBG318S to the Ethernet port on the device with
which you are accessing the Internet (for example, a router or modem) using an
Ethernet cable.
2LAN: Connect the Ethernet port on your computer to a LAN port on the NBG318S using
the Ethernet cable from the package.
3POWER: Use the power cord from the package to connect the POWER socket to an
appropriate power source. This is also your HomePlug AV connection.
The LEDs (lights)
Look at the lights. When you connect the power, the power ( ) light blinks and stays on
once the device is ready. The LAN ( ) lights turn on if the LAN connections are
properly made.
VCheck your connections if the power () or LAN () light does not turn
on. If this doesn’t help, disconnect the NBG318S from its power source, wait
for a few seconds and turn it back on.
3
Page 4

ENGLISH
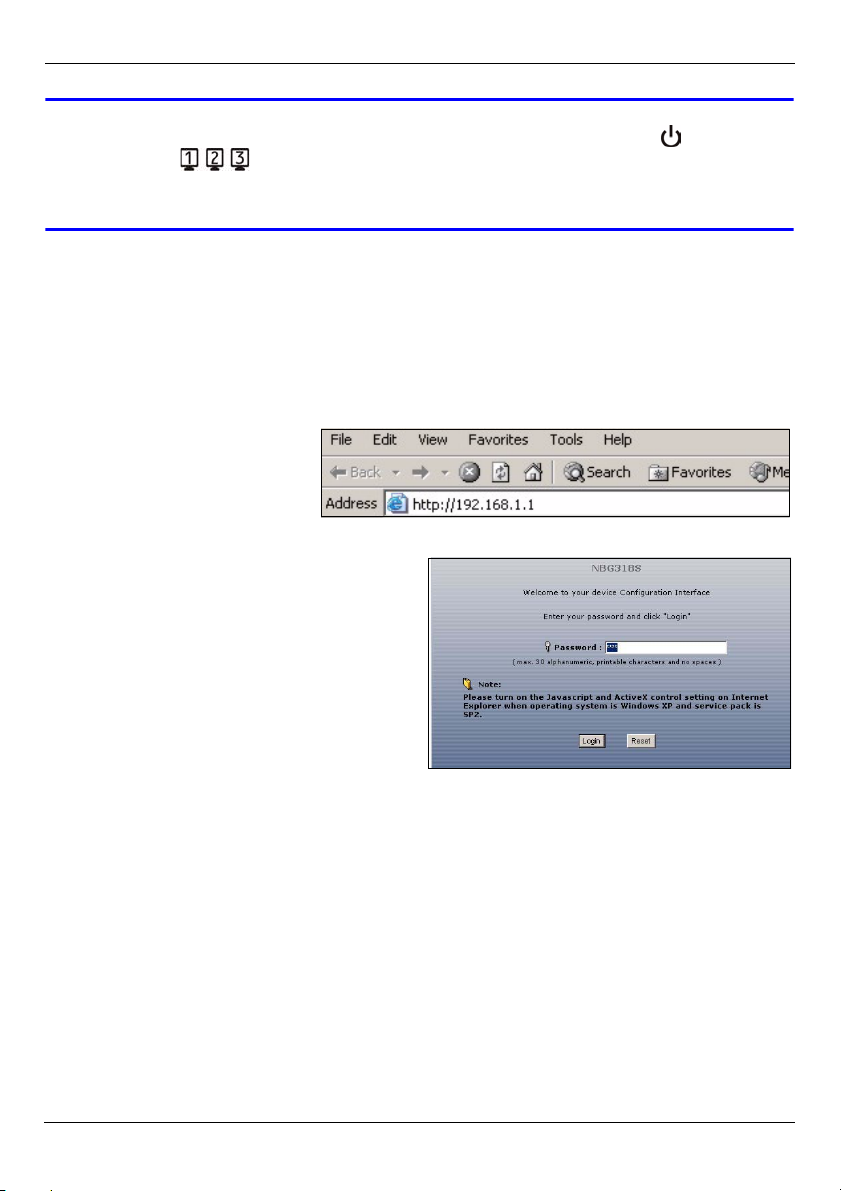
2 Connect to the NBG318S from Your Computer
You need to access the NBG318S from your computer so you can use the Wizard. The
Wizard helps you configure wireless and Internet access settings.
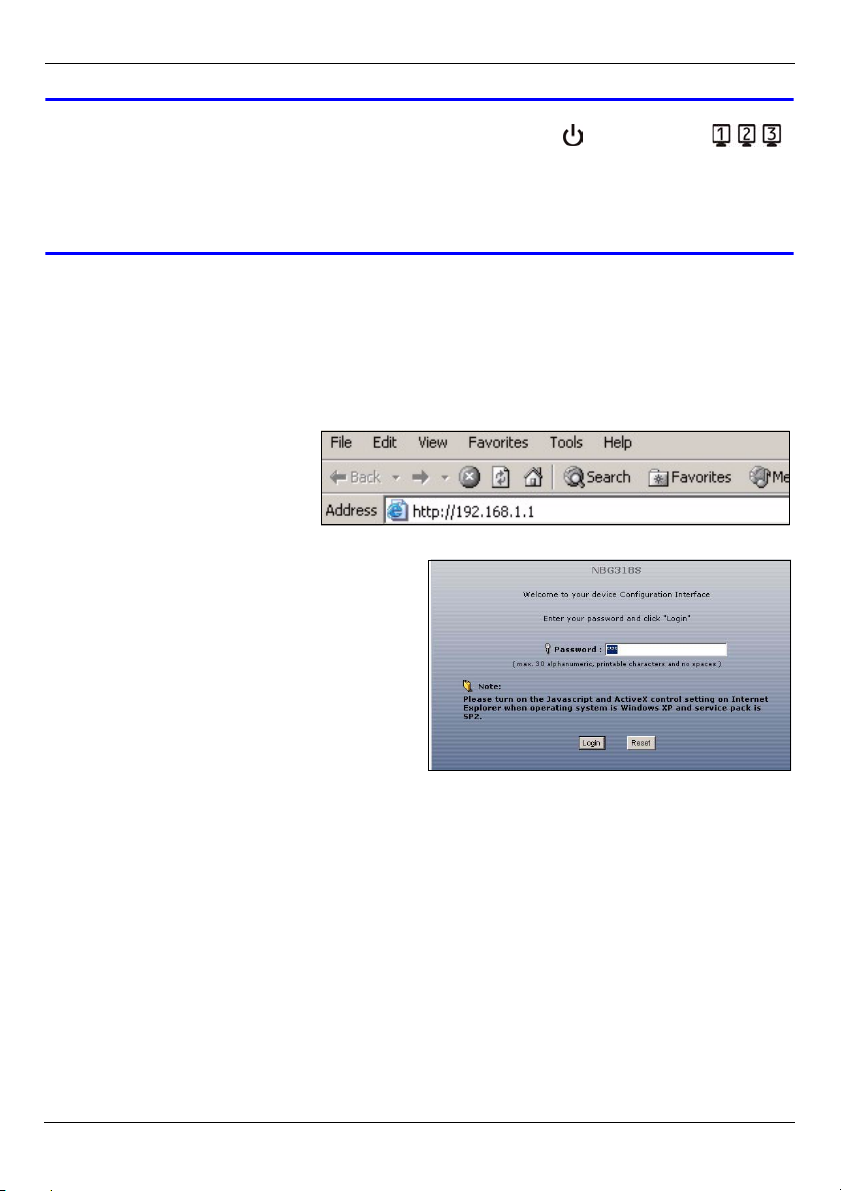
1 Launch an Internet browser
such as Internet Explorer.
Enter http://192.168.1.1 as
shown.
2 The Password window displays. Enter
the password (1234 is the default) and
click Login.
• If the login screen does not display, make sure your computer is set to receive an IP
address dynamically. If that doesn’t help, check your web browser’s security settings (see
the appendix in the User’s Guide for information on both suggestions).
3 Change the password and click Apply.
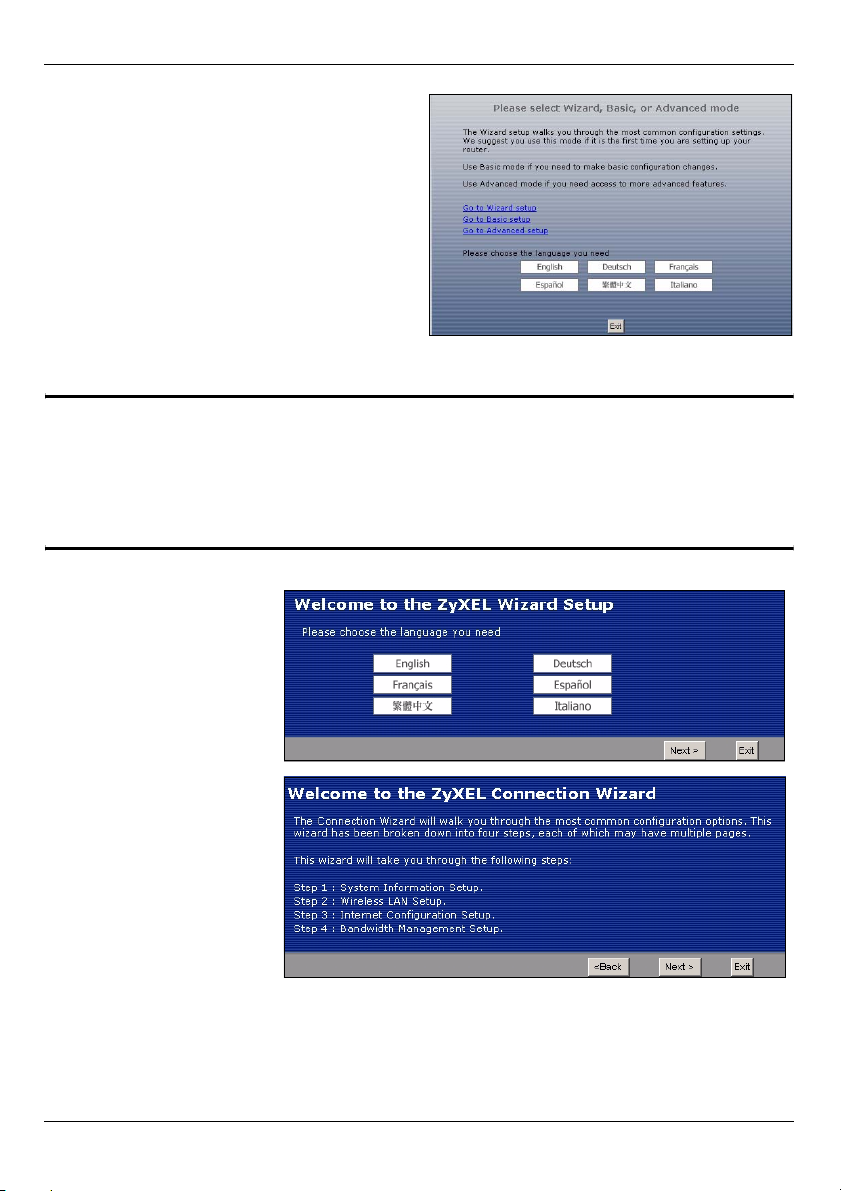
4 Select your language if you need to
change it. Click Go to Wizard setup to
set up your NBG318S for the first time.
4
Page 5

ENGLISH
3 Set Up Wireless and Internet Access with the Wizard
" When using the Wizard enter the Internet access information exactly as
given to you by your ISP in each wizard screen. Click Next to continue or
click Back to return to the previous screen. Current screen information will
be lost if you click Back.
1 Choose your language
if you haven’t done so
before. Click Next.
2 Click Next to proceed
with the Connection
Wizard.
3 This screen is optional.
You can just click Next.
5
Page 6

ENGLISH
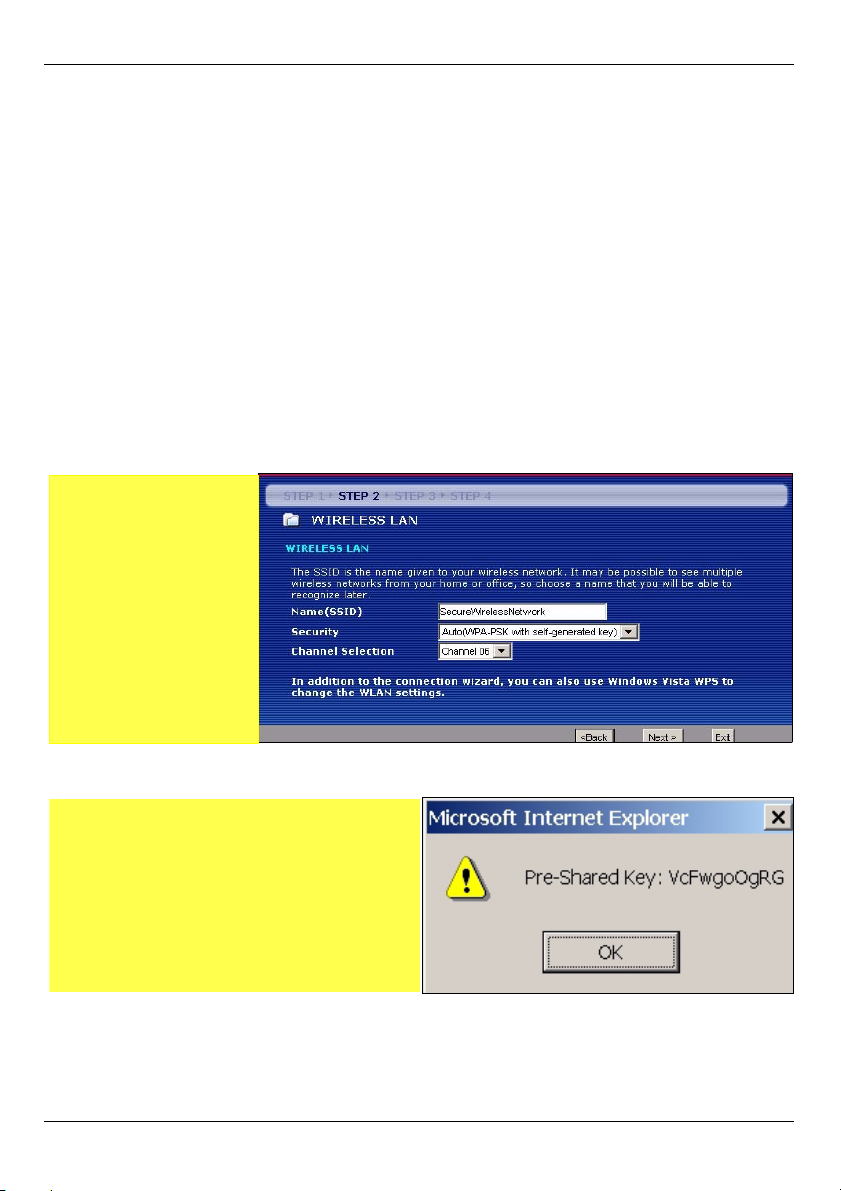
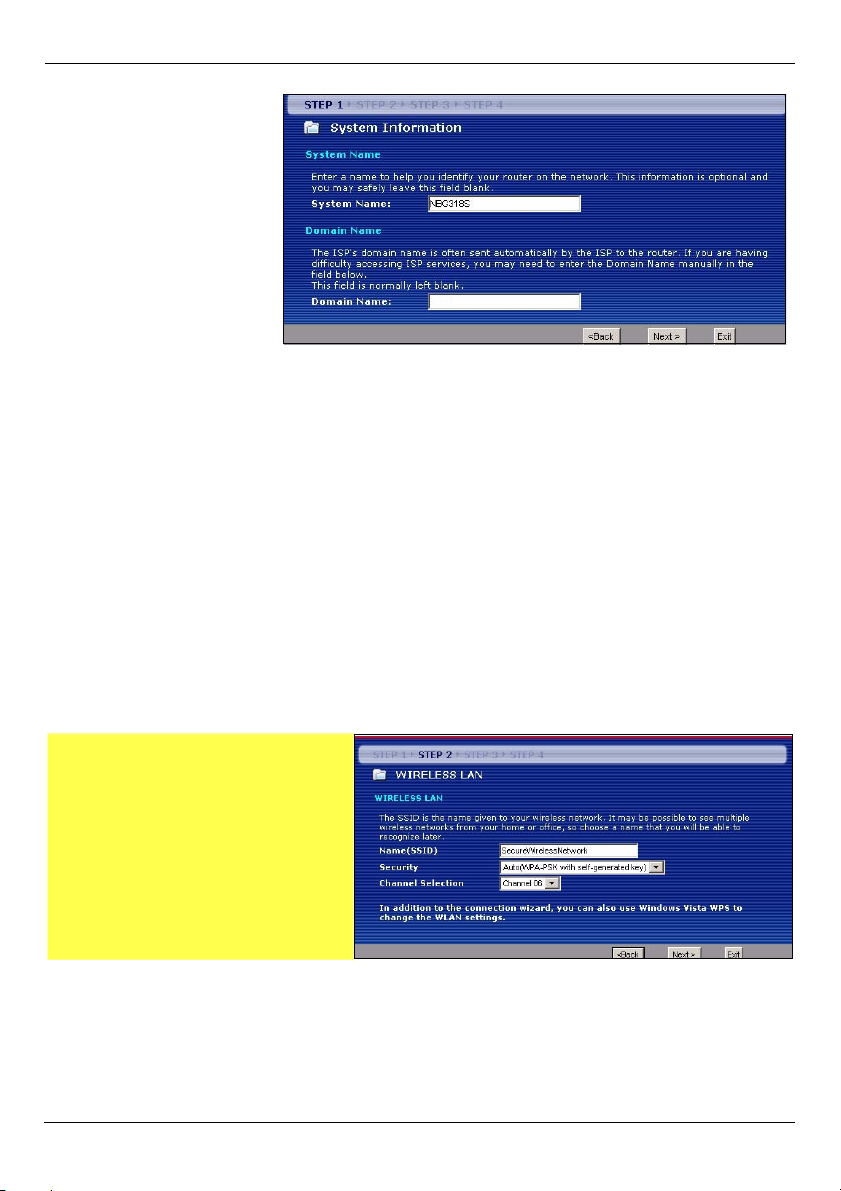
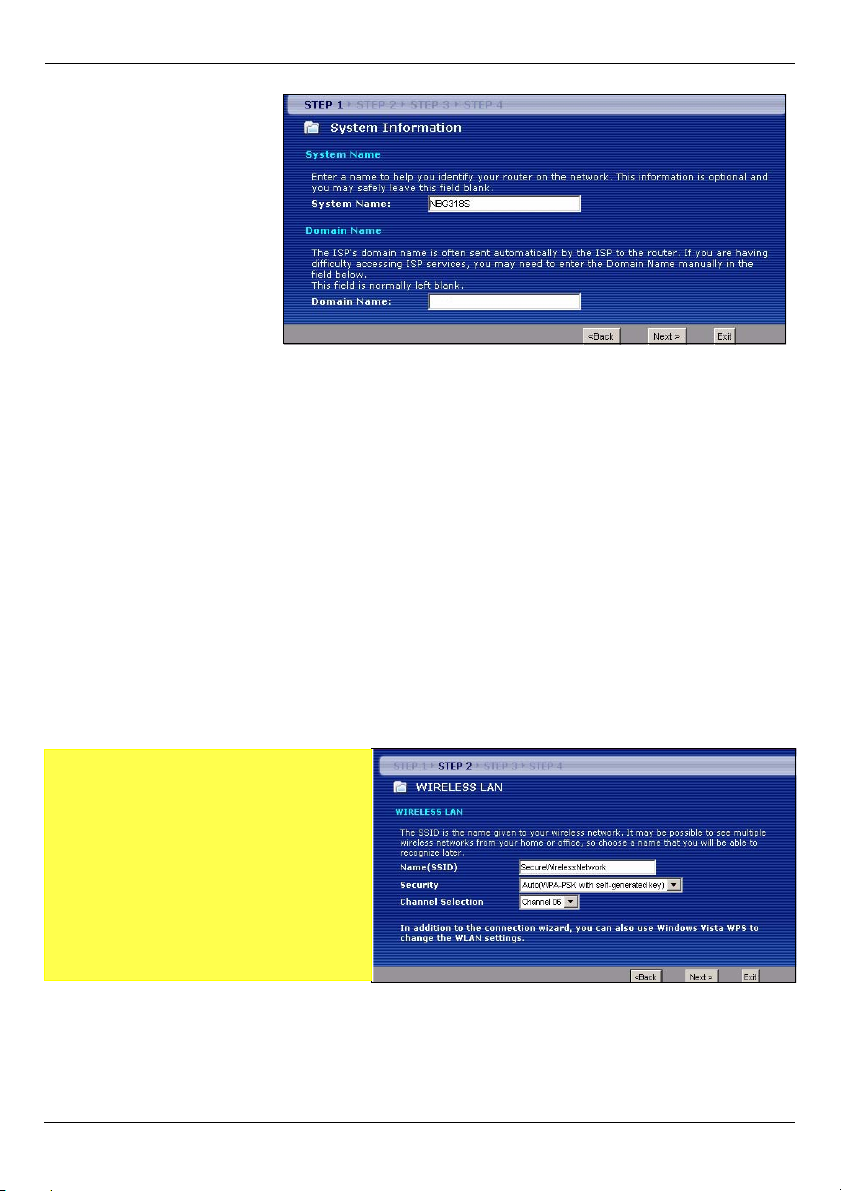
Wireless Network Settings
Configure the wireless network settings on your NBG318S by following these steps.
1 Name(SSID): Enter a descriptive name for your wireless network.
2 Security: The easiest way to set security is to select Auto. This uses the WPA-PSK
security standard, which provides a high level of security. If you have other wireless
devices you want to add to your network and they are not compatible with WPA-PSK, you
may have to choose another kind of security. See your User’s Guide for information on
other kinds of security.
3 Channel Selection: Select a wireless channel if you are worried about interference from
other APs. The NBG318S and wireless devices in your network must use the same
channel.
Write down the Name
(SSID), Security and
Channel Selection for
later use as the
NBG318S and other
devices on your
wireless network must
use the same settings.
Click Next.
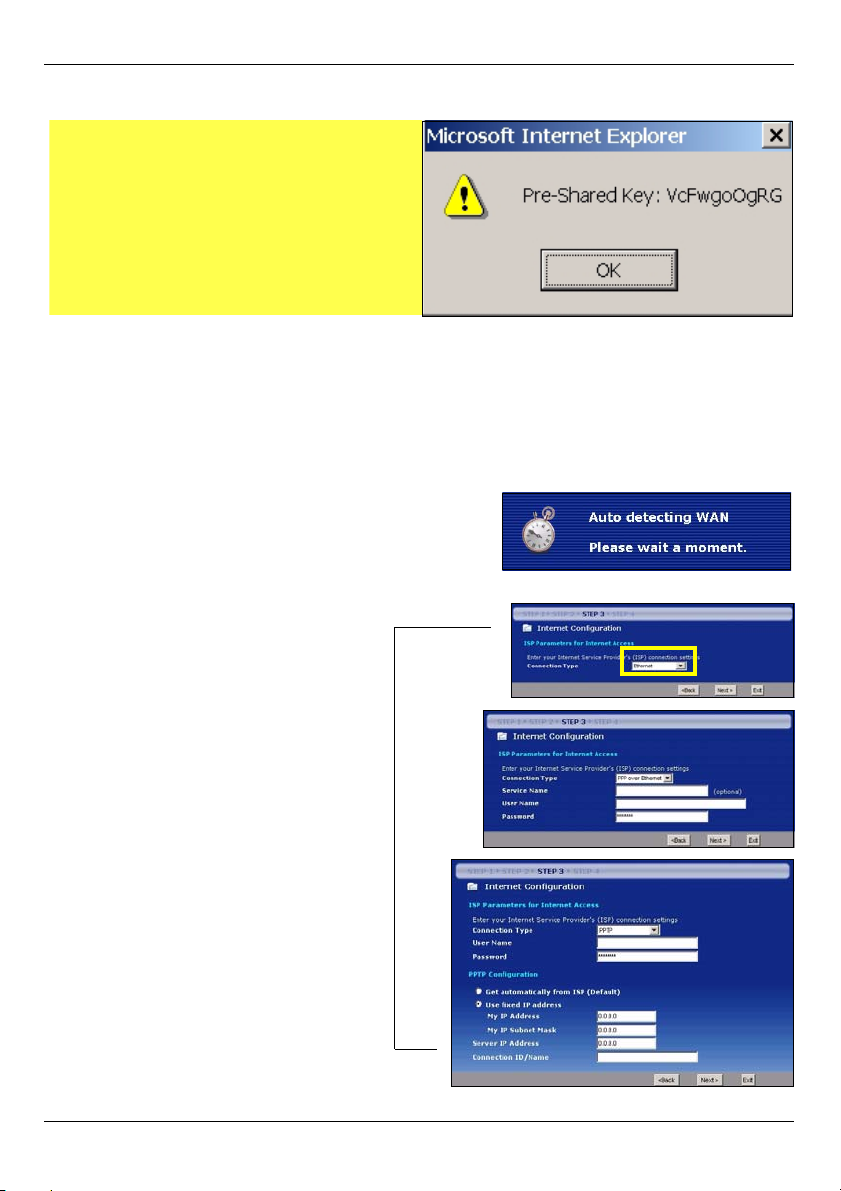
4 If you have chosen Auto, a popup appears.
Write down the Pre-Shared Key. Click
OK.
6
Page 7
ENGLISH
Internet Access Setup
Set up your NBG318S for Internet access by following these steps.
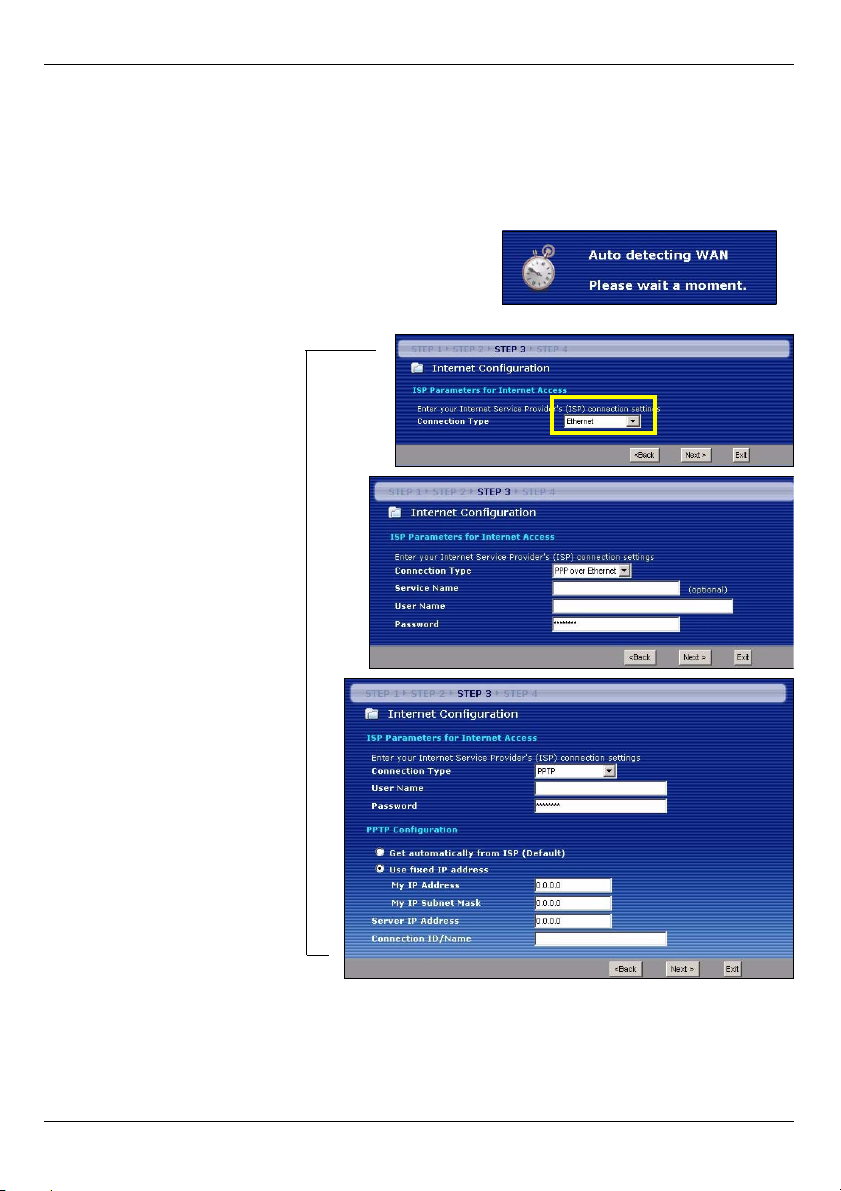
3.1 Choose a Connection Type.
1 You may need to wait several minutes while the
wizard attempts to detect what kind of connection
you have with your Internet Service Provider
(ISP).
2 If the wizard detects
your connection type,
one of the following
three screens appears.
Otherwise, you can
select your connection
type from the dropdown box (A).
3 If your ISP gave you
Internet access
settings, type them in
the screen that appears
in your Wizard.
Otherwise leave the
default settings and
click Next to go to the
next section.
• Check with your ISP if
you do not know what
connection type to use,
or what settings to configure.
A
7
Page 8
ENGLISH
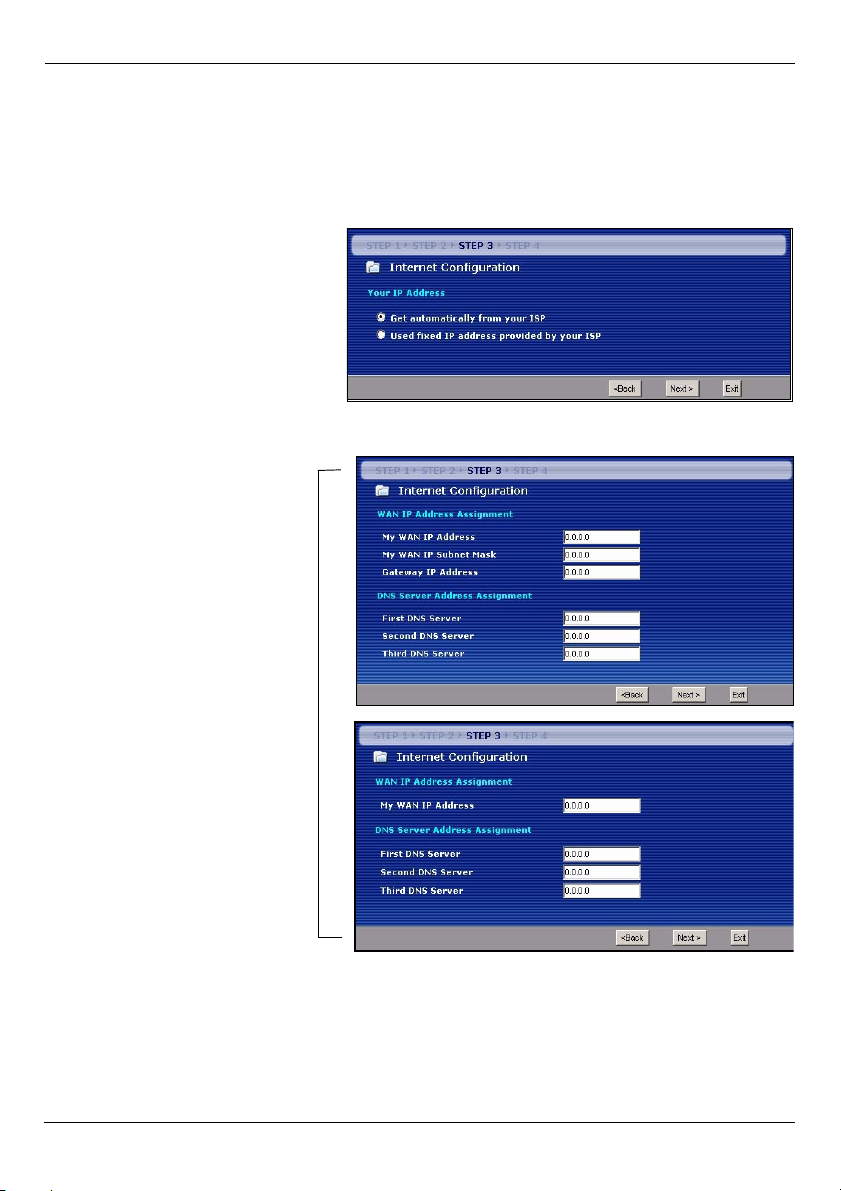
3.2 Set Your WAN IP Address
Your IP address is like a street address, it lets you send messages to other devices and
receive them. Configure your IP address settings here so you can communicate with other
devices on your WAN.
1 If your ISP did not assign you a
fixed IP address, select Get
automatically from your ISP
and click Next to go to section
3.3. Otherwise, if your ISP gave
you a fixed IP address, select
Use fixed IP address
provided by your ISP. Click
Next.
2 One of two possible
screens appears
depending on your
connection type.
3 In the screen that
appears type the WAN IP
address, and, depending
on the screen, the WAN
IP subnet mask and the
gateway IP address
given by your ISP.
4 If you are given DNS
server settings, type
them in the screen that
appears. Otherwise
leave the default settings
and click Next.
8
Page 9
ENGLISH
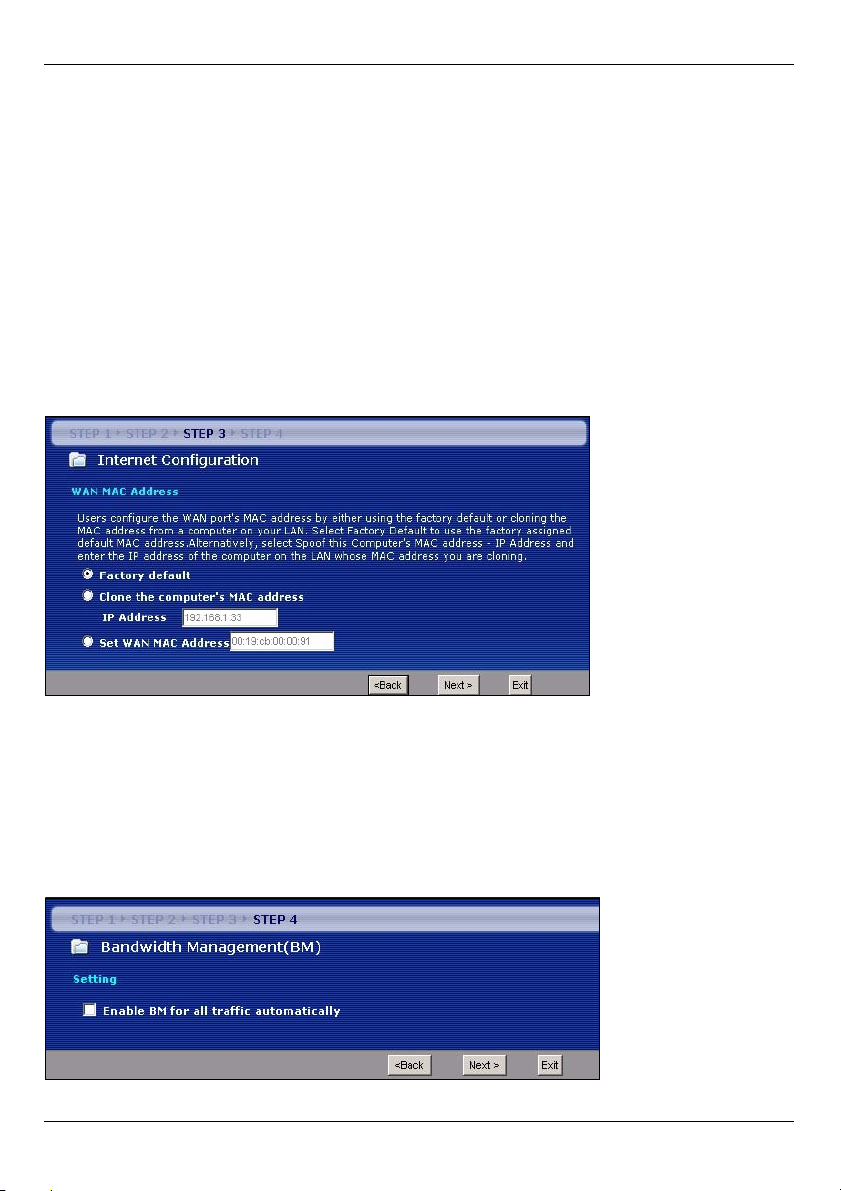
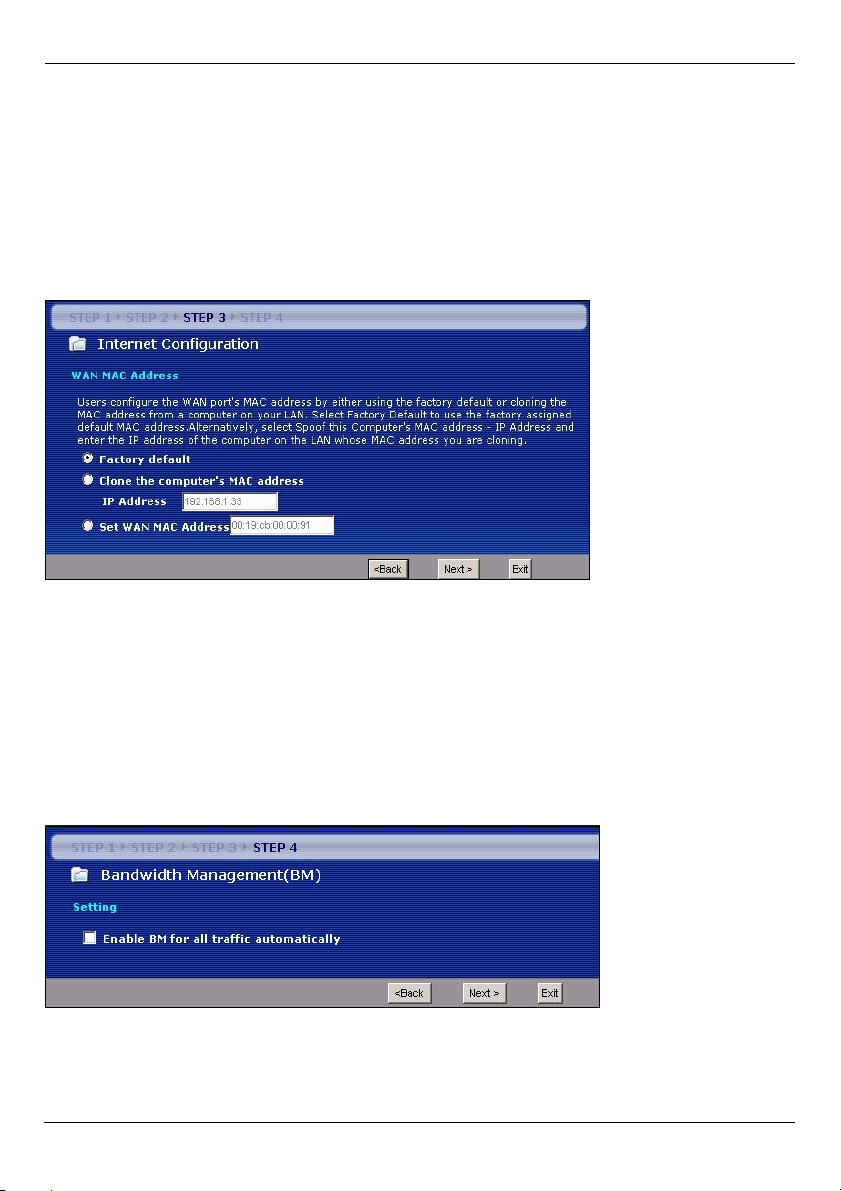
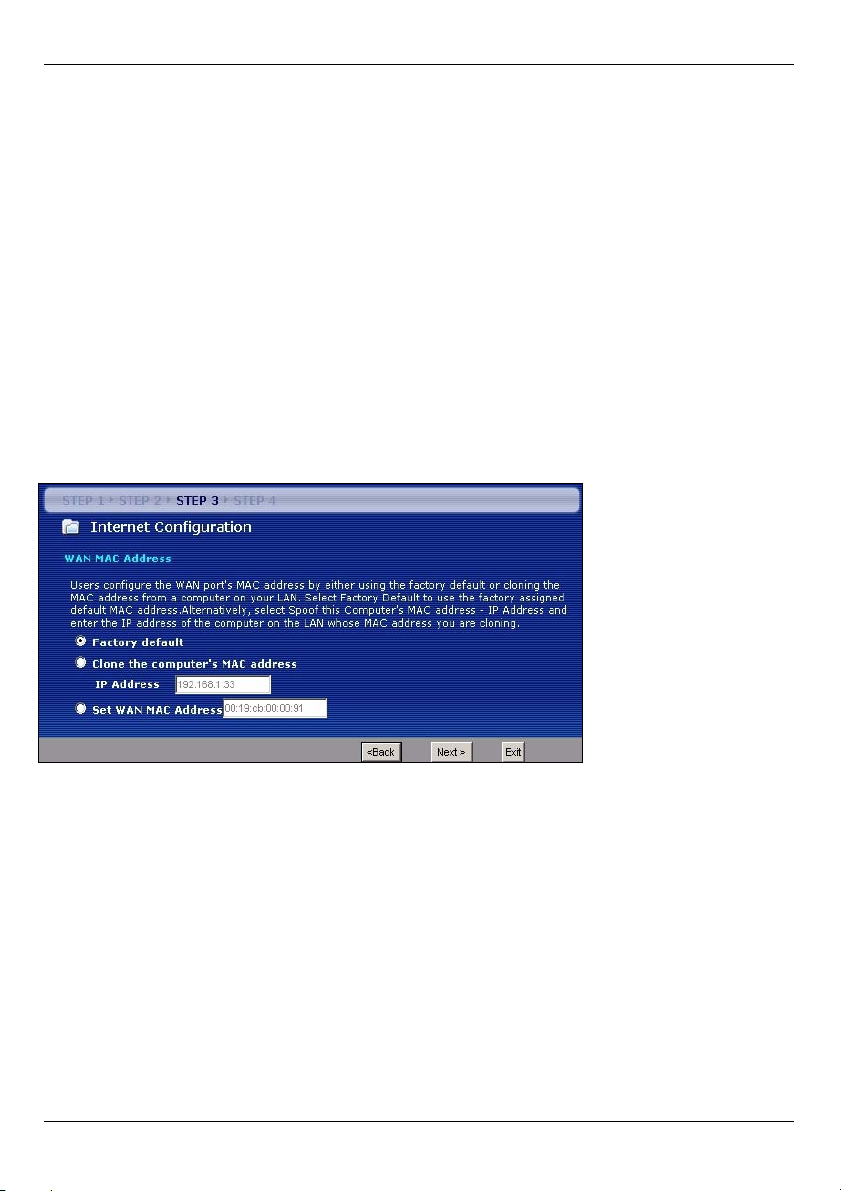
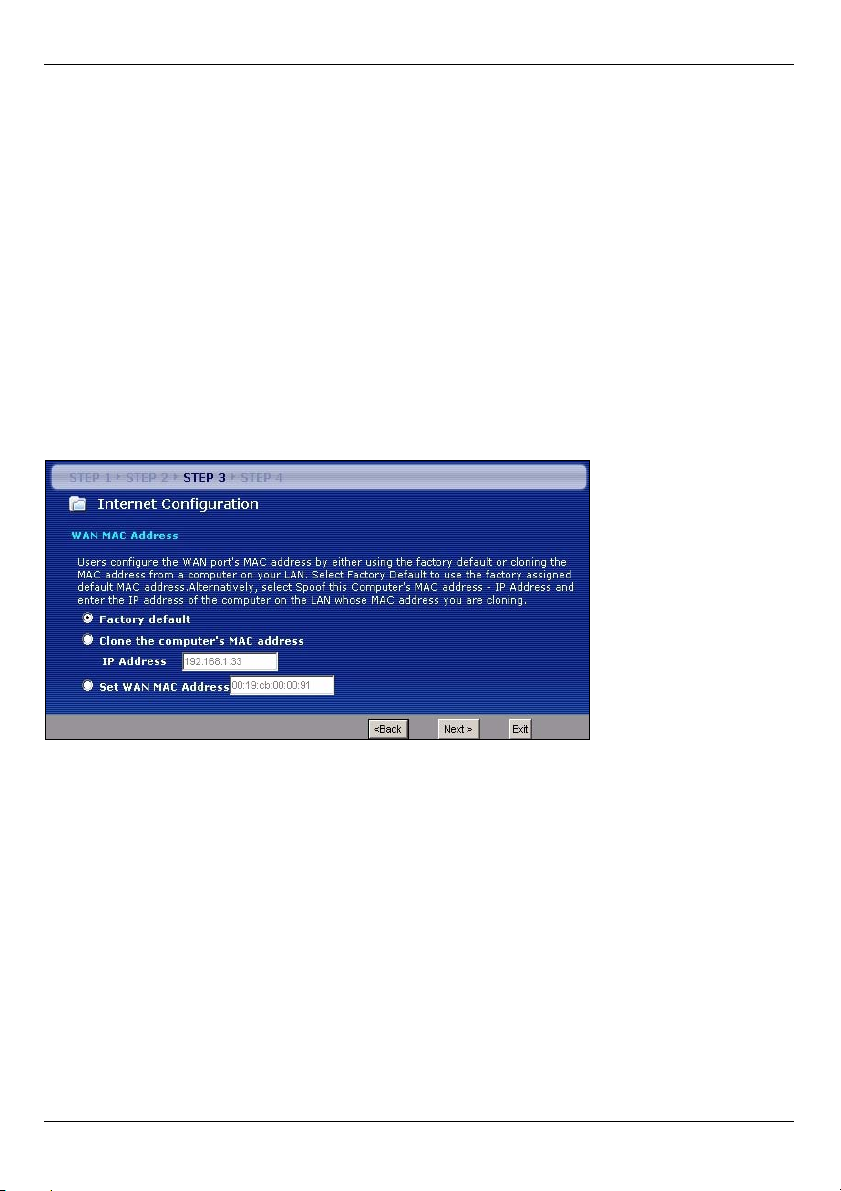
3.3 Set the WAN MAC Address
Your MAC address is like an ID number which uniquely identifies your NBG318S. Some
ISPs require MAC address authentication.
You can set how your MAC address appears to your ISP by selecting one of the following
options in the screen.
•Select Factory Default to use the factory-assigned, default MAC address.
•Select Clone the Computer’s MAC Address to copy the MAC address from a computer
on your LAN. Type the IP address of the computer with the MAC address you are copying.
It is advisable to copy the MAC address from a computer on your LAN even if your ISP
does not presently require MAC address authentication.
•Select Set WAN MAC Address and enter the MAC address you want to.
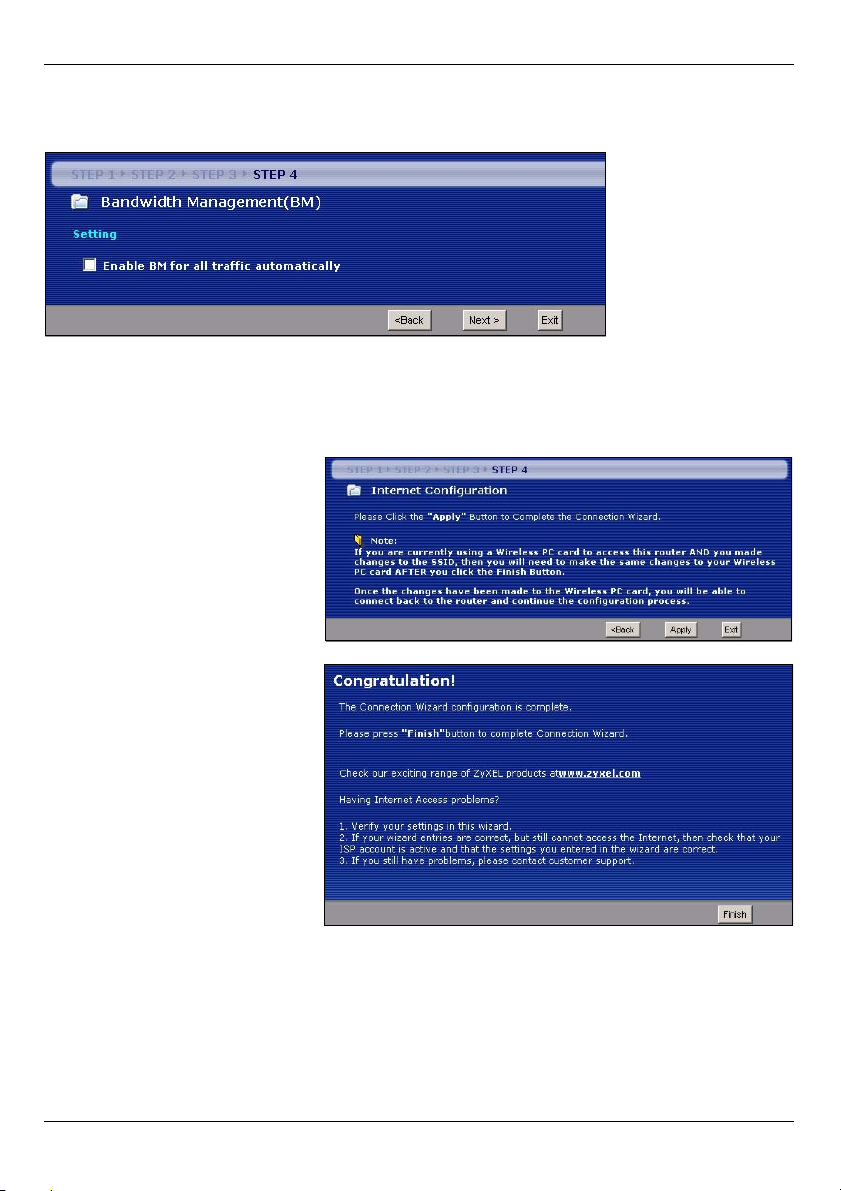
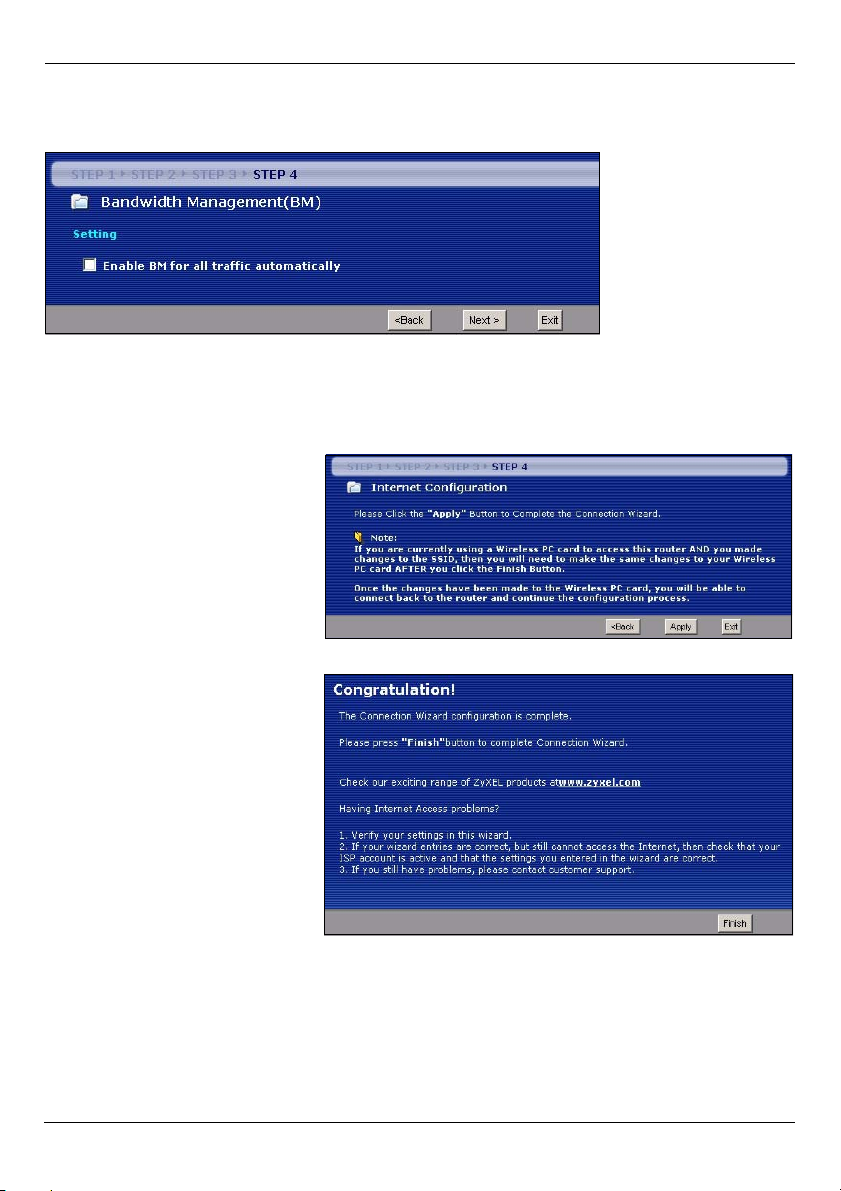
3.4 Set Up Bandwidth Management
Bandwidth Management gives different priority settings to network traffic depending on
how important the traffic is. For example, video requires a high priority while e-mail has a
low priority.
Select Enable BM for all traffic automatically to have the NBG318S apply bandwidth
management to traffic routed by the NBG318S. Click Next.
9
Page 10
ENGLISH
3.5 Apply Wizard Settings
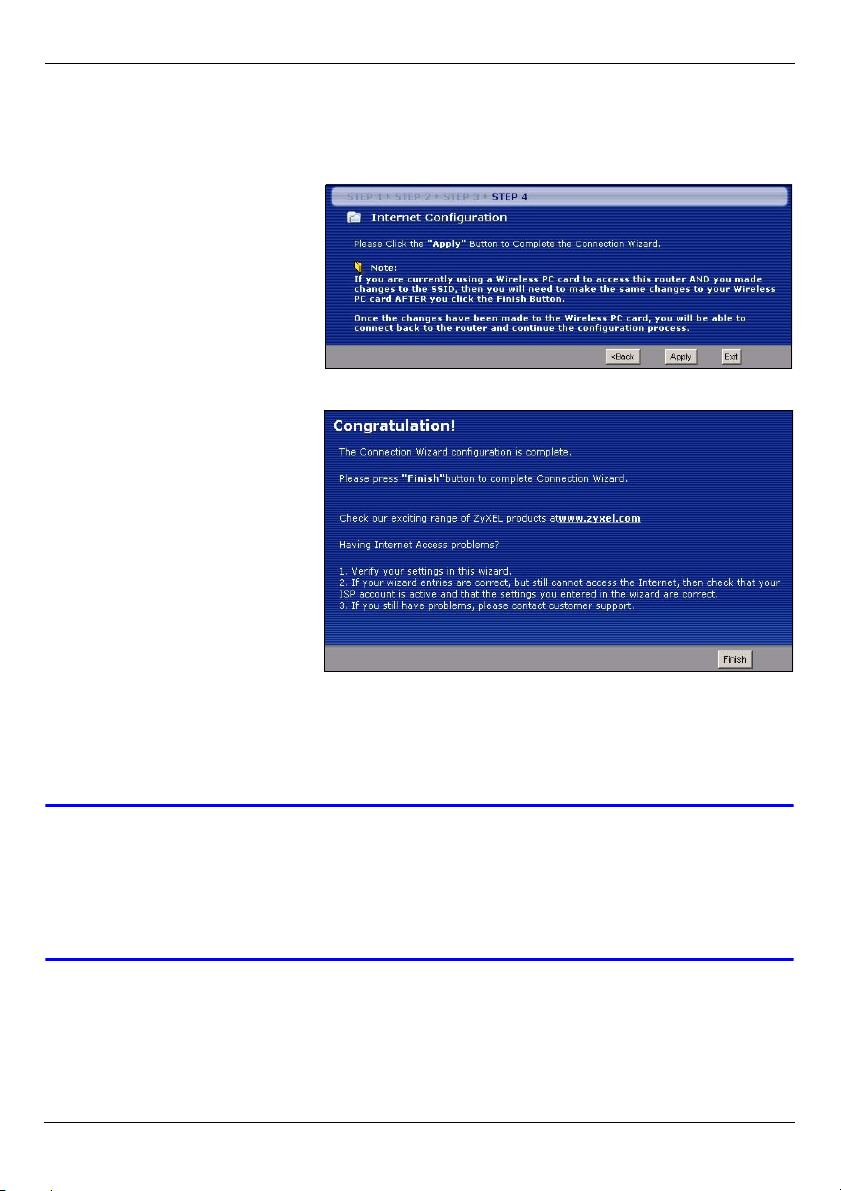
Follow these steps to complete the Wizard.
1 Click Apply to save your
changes.
2 Click Finish to complete the
wizard setup.
• If you have any Internet
access problems, follow the
on-screen instructions.
3 Congratulations. Open a web browser, such as Internet Explorer, to visit your favorite
website.
V If you cannot access the Internet when your computer is connected to one
of the NBG318S’s LAN ports, check your connections. Then turn the
NBG318S off, wait for a few seconds then turn it back on. If that does not
work, log in to the web configurator again and check you have typed all
information correctly. See the User’s Guide for more suggestions.
10
Page 11
ENGLISH
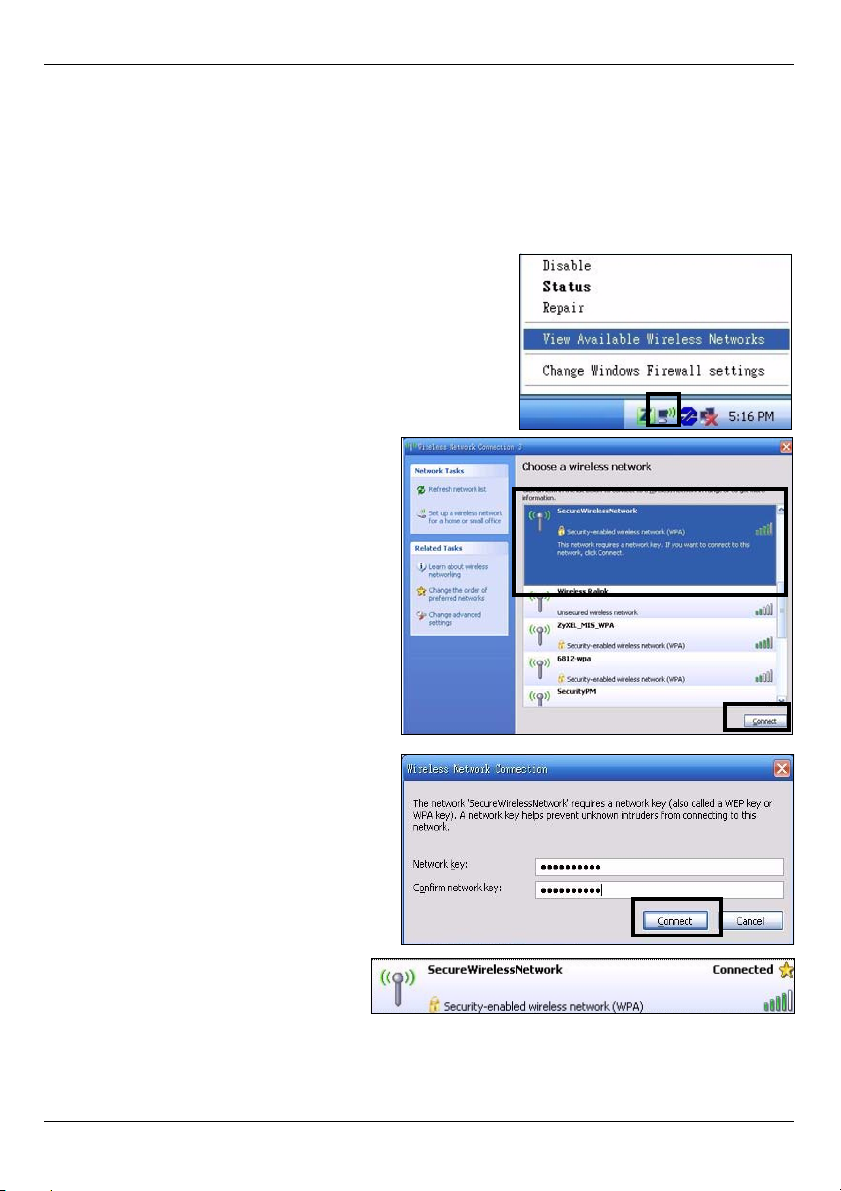
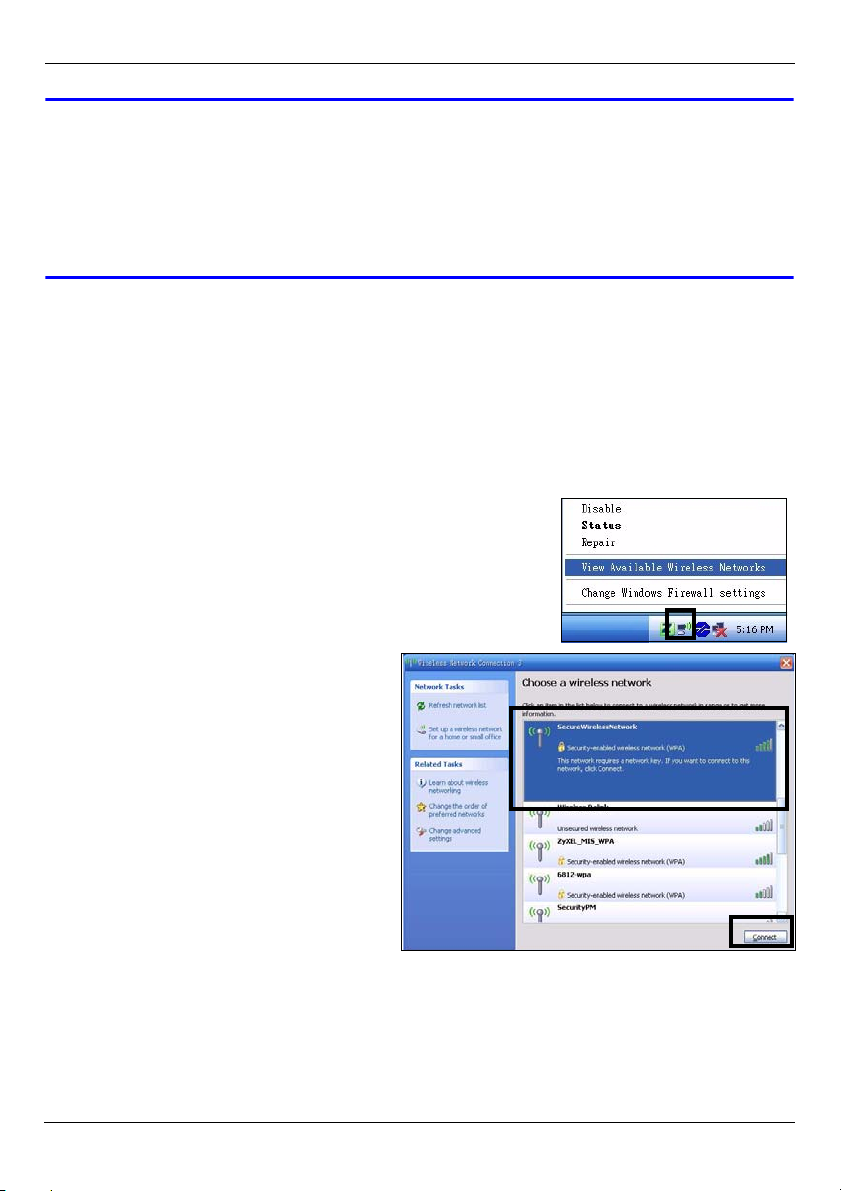
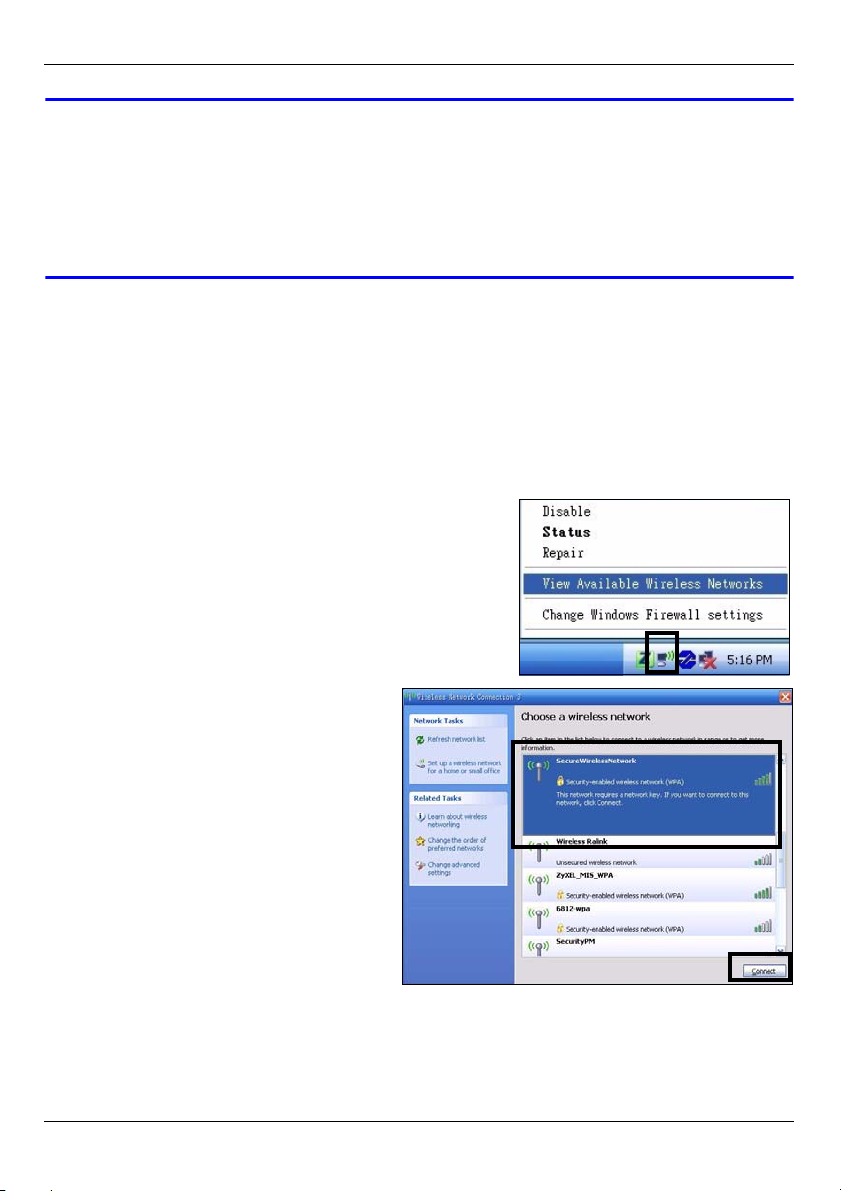
4 Set Up a Wireless Network
You can now connect wirelessly to your NBG318S from your computer and access the
Internet. You will need the Network Name (SSID) and also the Pre-Shared Key if you set
up security in the previous section. The connection procedure is shown here using
Windows XP as an example.
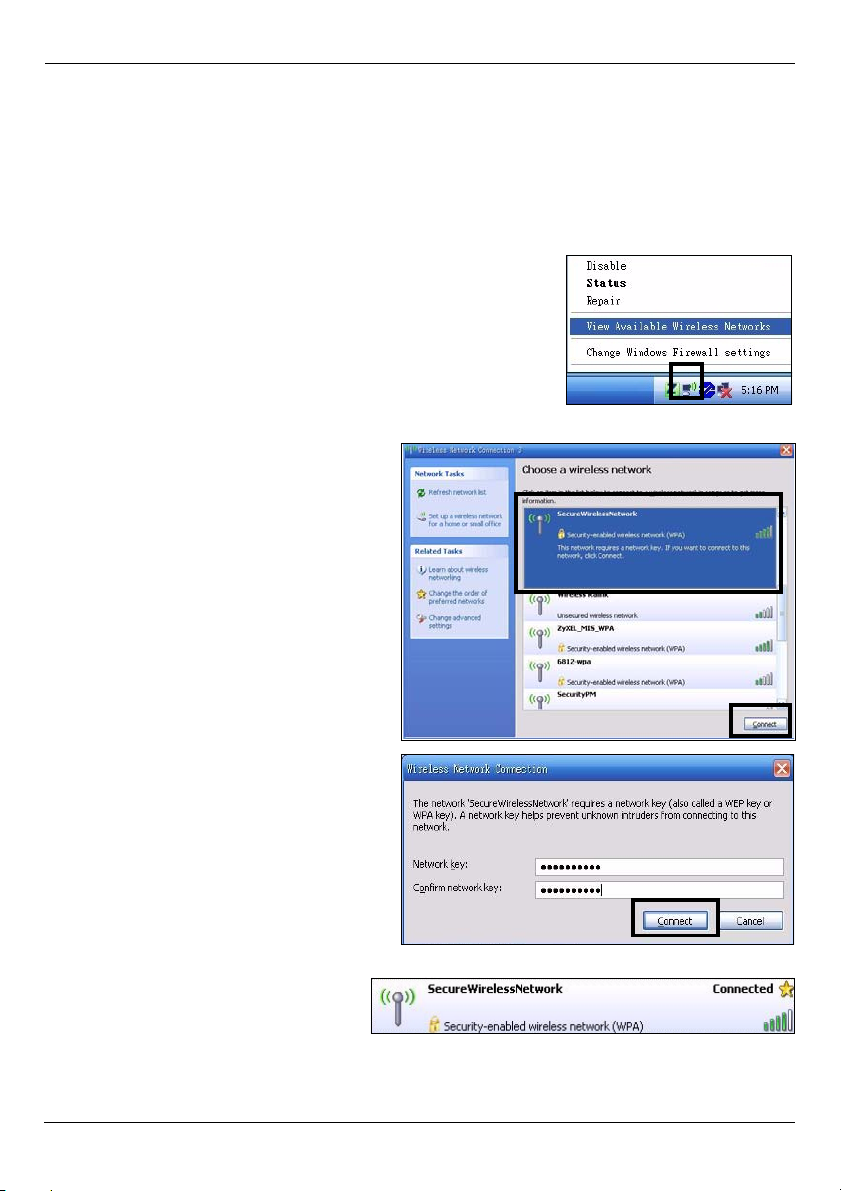
1 Right-click the wireless adapter icon which appears
in the bottom right of your computer monitor. Click
View Available Wireless Networks.
2 Select the SSID name you gave the
NBG318S and click Connect (A).
.
3 If you have set up wireless security,
you are prompted to enter a
password. Enter the Pre-Shared Key
you set up in the previous section and
click Connect (B).
You may have to wait several minutes
while your computer connects to the
wireless network.
4 You should now be securely
connected wirelessly to the
NBG318S.
A
B
11
Page 12
ENGLISH
V If you cannot connect wirelessly to the NBG318S, check you have selected
the correct SSID and entered the correct security Key. If that does not
work, ensure your network adapter is enabled by clicking on the wireless
adapter icon and clicking Enable. See the User’s Guide for more
suggestions.
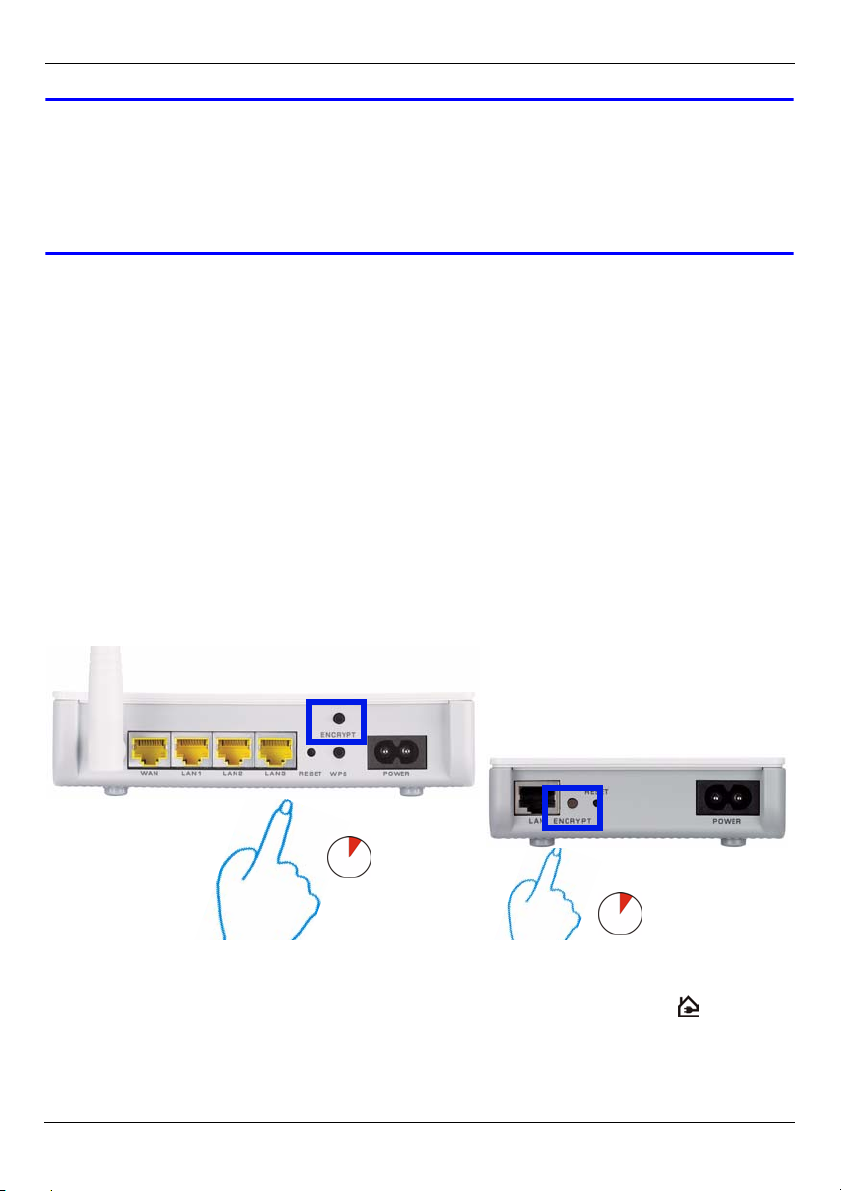
5 Set Up a HomePlug AV Network with ENCRYPT
Use the ENCRYPT button to set up a secure connection between your NBG318S and
another HomePlug AV product with an ENCRYPT button (The PLA-400 v2 is shown below as
an example). Connect each powerline device one at a time.
1 Place the products close to each other, so you have time to set up each one. After you
press ENCRYPT on the first device, you have 120 seconds to press ENCRYPT on the
second one.
• You can disconnect them from the computer or modem (or other networking product) if you
need to, but the devices need to be plugged into power outlets.
2 Press the ENCRYPT button at the rear of both of your devices for more than 10
seconds. This sets up a random network name.
3 Press the ENCRYPT button at the rear of your device for 1~2 seconds.
1...2
1...2
4 Repeat step 3 in this section for the other device you wish to connect. This must be
done within 120 seconds of pressing the ENCRYPT button on the first device.
5 Wait for roughly one minute while your devices connect. The HomePlug ( ) lights on
both devices light up when the connection is successful.
12
Page 13

ENGLISH
V If the HomePlug ( ) lights on both powerline devices do not light up, the
powerline devices are not connected. Repeat steps 3 and 4 in this section.
If that doesn’t work, use the PLA-4xx Series Configuration Utility. See the
User’s Guide for more information.
6 To add more devices to your network, repeat steps 2, 3 and 4 in this section using a
device connected to your powerline network and the device you want to add to the
network.
7 If you disconnected your computer or modem (or any other networking product
connected to your NBG318S) in step 1 of this section, you can now reconnect them.
See section 1 for information on reconnecting them.
This sets up a home network between the two HomePlug AV adapters (or more) and any
products you have connected to your devices, such as your home computer or network
modem. If you have correctly set up an Internet connection, you can now use your
computer to access the Internet.
.
Procedure to View a Product’s Certification(s)
1 Go to www.zyxel.com.
2 Select your product from the drop-down list box on the
ZyXEL home page to go to that product's page.
3 Select the certification you wish to view from this page.
13
Page 14
DEUTSCH
DEUTSCH
Übersicht
Mit dem NBG318S können Sie:
• ein drahtloses Hochgeschwindigkeitsnetzwerk einrichten, das mit den Standards IEEE
802.1b/g, mit anderen Super G-fähigen Produkten und einer großen Zahl von Verschlüsselungsstandards kompatibel ist (A);
• mit WPS (Wi-Fi Protected Setup; Wi-Fi-geschütztes Setup) mit nur einem Tastendruck ein
sicheres Drahtlosnetzwerk aufbauen;
• mit anderen HomePlug AV-kompatiblen Geräten in Ihrem normalen Hausstromnetz ein
Powerline-Netzwerk aufbauen (B);
• Ihr HomePlug AV-Netzwerk mit der Tastenfunktion ENCRYPT errichten.
• ein kabelgebundenes oder ein drahtloses Netzwerk mit einer Firewall und Inhaltsfilter einrichten (C).
Internet
A
B
In dieser Kurzanleitung werden die folgenden Schritte beschrieben:
1 Einrichten der Hardware, p15
2 Herstellen der Verbindung über den Computer, p16
3 Einrichten der Drahtlosverbindung und des Internetzugriffs mit dem Assistenten, p18
4 Anschließen der Drahtlosgeräte, p24
5 Einrichten eines HomePlug AV Netzwerks mit ENCRYPT, p25
Eine Beschreibung aller Funktionen des NBG318S finden Sie im Benutzerhandbuch, das
auf der CD enthalten ist. Legen Sie die CD in das CD-ROM-Laufwerk ein. Wenn die CD
14
C
Page 15
DEUTSCH
nach dem Einlegen nicht gestartet wird, rufen Sie mit Windows Explorer (Arbeitsplatz) die
CD-ROM auf (normalerweise Laufwerk D), und browsen Sie dort die Datei des
Benutzerhandbuchs.
1 Einrichten der Hardware
3
Internet
2
1
Bei der Erstinstallation müssen die folgenden Hardwareverbindungen hergestellt werden.
1WAN: Schließen Sie ein Ethernet-Kabel an den WAN-Port des NBG318S und an den
Ethernet-Port des Geräts an, mit dem Sie auf das Internet zugreifen (z. B. ein Router
oder Modem).
2LAN: Schließen Sie ein Ethernet-Kabel an den Ethernet-Port des Computers und an
einen LAN-Port des NBG318S an.
3 Anschließen an das Stromnetz: Schließen Sie das mitgelieferte Netzkabel an den
POWER-Anschluss (Netzanschluss) und an eine geeignete Stromquelle. Diese
Verbindung ist gleichzeitig die Powerline-Verbindung.
Die LED-Anzeigen
Das Gerät verfügt über LED-Anzeigen. Wenn Sie das Gerät an das Stromnetz
anschließen, beginnt die LED-Anzeige POWER ( ) zu blinken. Wenn es bereit ist, hört sie
auf zu blinken und leuchtet stetig.
Die LED-Anzeigen LAN ( ) beginnen zu leuchten, wenn die entsprechenden LANVerbindungen bestehen beginnen zu, wenn die entsprechenden Verbindungen bestehen..
15
Page 16
DEUTSCH
V Prüfen Sie die Anschlüsse, wenn die Betriebsanzeige-LED ( ) oder LAN-
LED ( ) nicht leuchtet. Leuchtet sie auch dann nicht, trennen Sie den
NBG318S von seiner Stromquelle, und schalten Sie ihn einige Sekunden
später wieder an.
2 Herstellen der Verbindung über den Computer
Sie können den Assistenten verwenden, wenn Sie mit dem Computer auf den NBG318S
zugreifen. Mit dem Assistenten können Sie die Drahtloseinstellungen und die
Internetzugriffseinstellungen konfigurieren.
1 Starten Sie einen Internet-
Browser, z. B. Internet
Explorer. Geben Sie wie
unten dargestellt “http://
192.168.1.1” ein.
2 Das Fenster Password (Kennwort)
erscheint. Geben Sie das Kennwort ein
("1234" ist das Standardkennwort), und
klicken Sie auf Login (Anmelden).
• Wenn das Anmeldefenster nicht angezeigt wird, prüfen Sie die IP-Adresseinstellungen des
Computers. Wenn das Problem dadurch nicht behoben ist, prüfen Sie die Sicherheitseinstellungen Ihres Internetbrowsers (ausführliche Informationen finden Sie im Anhang des
Benutzerhandbuchs)
.
16
Page 17

3 Ändern Sie das Kennwort und klicken Sie
auf Apply (Übernehmen).
4 Wählen Sie aus dem Listenfeld Ihre
Sprache aus. Klicken Sie auf Apply
(Übernehmen). Klicken Sie auf Go to
Wizard setup (Zum
Einrichtungsassistenten).
DEUTSCH
17
Page 18

DEUTSCH
3 Einrichten der Drahtlosverbindung und des
Internetzugriffs mit dem Assistenten
" Geben Sie die Daten für den Internetzugriff so ein, wie Sie sie von Ihrem
Internetdienstanbieter erhalten haben. Klicken Sie zum Fortfahren auf Next
(Weiter) oder auf Back (Zurück), um zum vorhergehenden Fenster
zurückzukehren. Wenn Sie auf Back (Zurück) klicken, gehen alle aktuell
auf dem Bildschirm vorhandenen Daten verloren.
1 Wählen Sie Ihre
Sprache aus. Klicken
Sie auf Next (Weiter).
2 Klicken Sie auf Next
(Weiter) und fahren Sie
mit dem Connection
Wizard
(Verbindungsassistent)
fort.
3 Dieses Fenster ist
optional. Sie können
einfach auf Next
(Weiter) klicken.
18
Page 19
DEUTSCH
Drahtlosnetzwerkeinstellungen
Führen Sie die folgenden Schritte aus, um die Drahtlosnetzwerkeinstellungen des NBG318S
zu konfigurieren.
1 Name (SSID) (Name (SSID): Geben Sie einen beschreibenden Namen für das
Drahtlosnetzwerk ein.
2 Security (Sicherheit): Die einfachste Möglichkeit, die Sicherheit einzustellen, ist die Option
Auto (Automatisch). Bei dieser Option wird der WPA-PSK-Standard verwendet, der
eine hohe Sicherheit bietet. Wenn Sie noch andere Drahtlosgeräte zum Netzwerk
hinzufügen möchten, die nicht mit dem Standard WPA-PSK kompatibel sind, müssen Sie
einen anderen Standard wählen. Informationen zu anderen Arten der Sicherheit finden Sie
im Benutzerhandbuch.
3 Channel Selection (Kanalauswahl): Damit es nicht zu Interferenzen mit anderen APs
kommt, können Sie einen anderen Drahtloskanal wählen. Der NBG318S und die von Ihnen
genutzten Drahtlosgeräte müssen denselben Kanal verwenden.
Notieren Sie sich den
Namen (SSID), die Art
der Sicherheit und
den Kanal, da der
NBG318S und andere
Geräte im drahtlosen
Netzwerk dieselben
Einstellungen
verwenden müssen.
Klicken Sie auf Next
(Weiter).
4 Wenn Sie die Option Auto (Automatisch) gewählt haben, erscheint eine Meldung.
Notieren Sie sich den Pre-Shared Key
(PSK-Schlüssel), der im Pop-up-Fenster
angezeigt wird. Klicken Sie auf OK.
19
Page 20

DEUTSCH
Einrichten des Internetzugriffs
Führen Sie die folgenden Schritte aus, um für den NBG318S den Internetzugriff zu
konfigurieren.
3.1 Wählen Sie einen Verbindungstyp
1 Es kann einige Minuten dauern, bis der Assistent
erkennt, welche Verbindungsart Sie bei Ihrem
Internetdienstanbieter (ISP) haben.
2 Wenn der Assistent die
Verbindungsart erkannt
hat, erscheint eines der
folgenden drei Fenster.
Anderenfalls können
Sie aus dem Dropdown-Feld (A) einen
Verbindungstyp
auswählen.
3 Geben Sie die
Konfigurationen für den
Internetzugriff, die Sie
von Ihrem ISP erhalten
haben, in das Fenster
des Assistenten ein.
Sie können auch die
Standardeinstellungen
belassen und auf Next
(Weiter) klicken, um zum
nächsten Schritt zu
gelangen.
• Informationen über die
Verbindungsart und die
Konfigurationen erhalten Sie von Ihrem ISP.
A
20
Page 21

DEUTSCH
3.2 Legen Sie Ihre WAN IP-Adresse fest
Die IP-Adresse ist wie die Angabe von Straße und Hausnummer. Mit dieser Angabe
können Nachrichten empfangen oder an andere Geräte gesendet werden. Konfigurieren
Sie hier die IP-Adresse, sodass Sie mit anderen Geräten des WAN kommunizieren
können.
1 Wählen Sie Get automatically from your ISP (Automatisch vom
Internetdienstanbieter laden), wenn Ihnen Ihr Internetdienstanbieter keine feste IPAdresse zugewiesen hat. Klicken Sie auf Next (Weiter), um zum Abschnitt 3.3 zu
gelangen. Wenn Sie von Ihrem ISP eine feste IP-Adresse erhalten haben, wählen Sie
die Option Use fixed IP address provided by your ISP (Feste IP-Adresse vom ISP
verwenden). Klicken Sie auf Next (Weiter).
2 Je nach Verbindungstyp
erscheint eines dieser
zwei Fenster.
3 Geben Sie dort die WAN
IP-Adresse und (je nach
Fenster) die WAN IPSubnetzmaske und die
Gateway-IP-Adresse ein,
die Sie von Ihrem ISP
erhalten haben.
4 Wurden Ihnen DNS-
Servereinstellungen
vorgegeben, geben Sie
diese in die
entsprechenden Felder
ein. Anderenfalls werden
die Standardeinstellungen
belassen. Klicken Sie auf
Next (Weiter).
21
Page 22

DEUTSCH
3.3 Festlegen der WAN MAC-Adresse
Die MAC-Adresse ist eine Nummer, die Ihren NBG318S eindeutig identifiziert. Einige ISP
erfordern die Authentifizierung der MAC-Adresse.
Sie können festlegen, wie die MAC-Adresse bei Ihrem ISP angezeigt wird. Wählen Sie
dazu eine der folgenden Optionen.
• Wählen Sie Factory Default (Standardwerte), um die werkseitig festgelegte StandardMAC-Adresse zu verwenden.
• Wählen Sie Clone the Computer’s MAC Address (MAC-Adresse des Computers
klonen), um die MAC-Adresse eines Computers im LAN zu klonen. Geben Sie die IPAdresse des Computers mit der MAC-Adresse ein, die geklont werden soll. Es wird empfohlen, die MAC-Adresse eines Computers im LAN zu kopieren, auch wenn Ihr Internetdienstanbieter gegenwärtig keine Authentifizierung der MAC-Adresse erfordert.
• Wählen Sie Set WAN MAC Address (WAN-MAC-Adresse einstellen), und geben Sie die
gewünschte MAC-Adresse ein.
3.4 Einrichten des Bandbreiten-Management
Mit dem Bandbreitenmanagement können Sie dem Netzwerkverkehr je nach seiner
Wichtigkeit unterschiedliche Prioritäten geben. Z. B. erfordern Videos eine hohe Priorität,
E-Mails eine niedrige.
22
Page 23
DEUTSCH
Wählen Sie Enable BM for all traffic automatically (BM für gesamten Verkehr automatisch
aktivieren), damit der NBG318S das Bandbreitenmanagement auf den vom NBG318S
geleiteten Verkehr anwendet. Klicken Sie auf Next (Weiter).
3.5 Übernehmen der Einstellungen des Assistenten
Führen Sie diese Schritte aus, um den Assistenten zu beenden.
1 Klicken Sie auf Apply
(Übernehmen), um die
Änderungen im nächsten
Fenster des Assistenten zu
speichern.
2 Klicken Sie im folgenden
Fenster auf Finish (Fertig
stellen), um den SetupAssistenten zu beenden.
• Wenn Sie Probleme mit dem
Internetzugriff haben, führen
Sie die Anweisungen auf dem
Bildschirm aus.
Herzlichen Glückwunsch. Öffnen Sie einen Internetbrowser (z. B. Internet Explorer), um
die gewünschte Website aufzurufen.
23
Page 24
DEUTSCH
V Wenn Sie keine Verbindung zum Internet herstellen können, während der
Computer an einen der LAN-Anschlüsse des NBG318S angeschlossen ist,
prüfen Sie die Anschlüsse. Schalten Sie dann den NBG318S aus und nach
einigen Sekunden wieder an. Wenn das nicht hilft, melden Sie sich erneut
beim Web-Konfigurator an, und prüfen Sie die eingegebenen Daten.
Weitere Hinweise finden Sie im Benutzerhandbuch.
4 Anschließen der Drahtlosgeräte
Sie können jetzt drahtlos die Verbindung zum NBG318S herstellen und auf das Internet
zugreifen. Sie benötigen den Netzwerknamen (SSID) und den PSK-Schlüssel, wenn Sie im
vorherigen Abschnitt einen entsprechenden Schlüssel festgelegt haben. Wie die
Verbindung hergestellt wird, wird hier am Beispiel Windows XP beschrieben.
1 Klicken Sie mit der rechten Maustaste auf das
Drahtlosadaptersymbol, das in der rechten unteren Ecke
des Computerbildschirms angezeigt wird. Klicken Sie auf
View Available Wireless Networks (Verfügbare drahtlose
Netzwerke anzeigen).
2 Wählen Sie die SSID aus, die Sie dem
NBG318S gegeben haben, und
klicken Sie auf Connect (Verbinden)
(A).
.
A
24
Page 25

DEUTSCH
3 Wenn Sie einen Sicherheitsschlüssel
festgelegt haben, müssen Sie nun ein
Kennwort eingeben. Geben sie den
Pre-Shared Key (PSK-Schlüssel) ein,
den Sie im vorhergehenden Abschnitt
eingerichtet haben, und klicken Sie
auf Connect (Verbinden) (B).
Es kann einige Minuten dauern, bis der
Computer die Verbindung zum Drahtlosnetzwerk hergestellt hat.
4 Sobald die Verbindung besteht,
wird diese oder eine ähnliche
Meldung angezeigt.
B
V Wenn Sie drahtlos keine Verbindung zum NBG318S herstellen können,
prüfen Sie, ob Sie die richtige SSID und den richtigen Schlüssel
eingegeben haben. Wenn das nicht hilft, prüfen Sie, ob der
Netzwerkadapter aktiviert ist, indem Sie auf das Netzwerkadaptersymbol
und dann auf Enable (Aktivieren) klicken. Weitere Hinweise finden Sie im
Benutzerhandbuch.
5 Einrichten eines HomePlug AV Netzwerks mit
ENCRYPT
Richten Sie mit der ENCRYPT-Taste eine sichere Verbindung zwischen Ihrem NBG318S
und einem anderen HomePlug AV-Gerät ein, das ebenfalls über eine ENCRYPT-Taste
verfügt (die Abbildung unten zeigt als Beispiel den PLA-400 v2). Schließen Sie die PowerlineGeräte nacheinander an.
1 Stellen Sie die Powerline-Geräte nahe beieinander auf, sodass Sie genügend Zeit
haben, beide einzurichten. Nachdem Sie das erste Powerline-Gerät eingerichtet
haben, haben Sie noch 120 Sekunden Zeit, um das zweite Powerline-Gerät
einzurichten.
• Die Verbindung zum Computer oder Modem (oder einem anderen Netzwerkgerät) kann
getrennt werden, aber die Powerline-Geräte müssen am Stromnetz angeschlossen
bleiben.
2 Drücken Sie länger als 10 Sekunden auf die ENCRYPT-Taste, die sich an der
Rückseite der Geräte befindet. Dadurch wird ein zufälliger Netzwerkname eingerichtet.
25
Page 26

DEUTSCH
3 Drücken Sie 1 bis 2 Sekunden lang auf die ENCRYPT-Taste, die sich an der Rückseite
des Powerline-Geräts befindet.
1...2
1...2
4 Wiederholen Sie Schritt 3 in diesem Abschnitt für das andere Powerline-Gerät, das Sie
anschließen möchten. Das muss aber innerhalb von 120 Sekunden erfolgen, nachdem
Sie auf die ENCRYPT-Taste des NBG318S gedrückt haben.
5 Es dauert etwa eine Minute, bis die Powerline-Geräte eine Verbindung hergestellt
haben. Die HomePlug-LEDs ( ) an beiden Geräten leuchtet, wenn die Verbindung
erfolgreich hergestellt wurde.
V Wenn die HomePlug-LEDs ( ) an beiden Powerline-Geräten nicht
leuchten, sind die Powerline-Geräte nicht verbunden. Wiederholen Sie die
in diesem Abschnitt beschriebenen Schritte 3 und 4. Sollte das nicht
funktionieren, verwenden Sie das Konfigurationsprogramm für die PLA4xx-Serie. Weitere Informationen finden Sie im Benutzerhandbuch auf der
beiliegenden CD.
6 Wenn Sie weitere Powerline-Geräte zum Netzwerk hinzufügen möchten, wiederholen
Sie die in diesem Abschnitt beschriebenen Schritte 2, 3 und 4. Verwenden Sie ein mit
dem HomePlug AV-Netzwerk verbundenes Powerline-Gerät und das Powerline-Gerät,
das zum Netzwerk hinzugefügt werden soll.
7 Wenn Sie Ihren Computer oder Ihr Modem (oder ein anderes Netzwerkgerät, dass mit
dem NBG318S verbunden ist) in Schritt 1 dieses Abschnitts abgetrennt haben, können
Sie diese Geräte nun wieder anschließen.
26
Page 27

DEUTSCH
Auf diese Weise können Sie mit den zwei (oder mehr) Powerline-Geräten und allen
Geräten, die Sie an die Powerline-Geräte angeschlossen haben, ein Heimnetzwerk
errichten. Wenn Sie eine Internetverbindung erfolgreich eingerichtet haben, können Sie
nun mit dem Computer auf das Internet zugreifen.
.
Schritte zum Ansehen von Produktzertifizierung(en)
1 Zu www.zyxel.com.
2 Wählen Sie auf der ZyXEL-Homepage aus der Drop-down-Liste Ihr
Produkt aus, um zur entsprechenden Produktseite zu gelangen.
3 Wählen Sie auf dieser Seite die gewünschte Zertifizierung aus.
CE-Konformität
Das Produkt entspricht den grundlegenden Anforderungen der Richtlinie
1999/5/EG (R&TTE) sowie den übrigen einschlägigen Bestimmungen des
FTEG und ist zum Betrieb in der EU und Schweiz vorgesehen. Das
Produkt ist eine Einrichtung der Klasse A. Diese Einrichtung kann im
Wohnbereich Funkstörungen verursachen; in diesem Fall kann vom
Betreiber verlangt werden, angemessene Massnahmen durchzuführen.
27
Page 28

ESPAÑOL
ESPAÑOL
Vista previa
El NBG318S le permite:
• Configure una red inalámbrica de alta velocidad compatible con los estándares IEEE
802.1b/g, otros productos con Super G y una amplia gama de estándares de cifrado (A).
• Utilice Wi-Fi Protected Setup (WPS) para configurar una red inalámbrica segura con la pulsación de un botón.
• Configure una red de línea eléctrica con el cableado de casa y otros productos compatibles con HomePlug AV (B).
• Utilice la característica ENCRYPT con la pulsación de un botón para configurar su red
HomePlug AV.
• Configure una red con cables e inalámbrica con un cortafuegos y filtrado de contenidos
(C).
Internet
A
B
Esta Guía de instalación rápida le muestra cómo:
1 Configurar su hardware, p29
2 Conectarse al NBG318S desde su ordenador, p30
3 Configuración inalámbrica y Acceso a Internet con el Asistente, p31
4 Configuración de la red inalámbrica, p38
5 Configurar una red HomePlug AV con ENCRYPT, p39
28
C
Page 29

ESPAÑOL
Consulte la Guía del usuario en el CD incluido para más detalles sobre todas las
características del NBG318S. Inserte el CD en su CD-ROM, si no se abre una pantalla,
utilice Windows Explorer (Mi PC) para ir a CD-ROM (normalmente unidad D) y buscar la
Guía del usuario.
1 Configurar su hardware
Internet
2
3
1
Realice lo siguiente para crear conexiones de hardware para la configuración inicial.
1WAN: Conecte el puerto WAN de su NBG318S al puerto Ethernet del dispositivo con el
que está accediendo a Internet (por ejemplo, un router o módem) utilizando un cable
Ethernet.
2LAN: Conecte el puerto Ethernet de su ordenador a un puerto LAN del NBG318S
utilizando el cable Ethernet del paquete.
3 Conexión de ALIMENTACIÓN: Utilice el cable de alimentacióncable de
alimentacióncable de alimentacióncable de alimentación del paquete para conectar el
zócalo POWER en una fuente de alimentación apropiada. Esto también es su conexión
de línea eléctrica.Esto también es su conexión de línea eléctrica.
Los LEDs
Mire los LEDs (luces). Cuando conecta la alimentación, el LED POWER ( ) parpadea y se
mantiene encendido una vez que el dispositivo está listo. Los LEDs LAN ( ) se
encienden si las conexiones LAN se han realizado correctamente.
29
Page 30
ESPAÑOL
VCompruebe las conexiones si la luz de alimentación ( ) o de la LAN ( )
no se enciende.Si esto no ayuda, desconecte el NBG318S de su fuente de
alimentación, espere unos segundos y vuelva a encenderlo. Si esto no ayuda,
desconecte el NBG-318S de su fuente de alimentación, espere unos
segundos y vuelva a encenderlo.
2 Conectarse al NBG318S desde su ordenador
Necesita acceder al NBG318S desde su ordenador para poder usar el Asistente. El
Asistente la ayuda a establecer la configuración inalámbrica y el acceso a Internet.
1 Abra un explorador de
Internet como Internet
Explorer. Escriba “http://
192.168.1.1” como aparece
debajo.
2 Aparecerá la pantalla Password
(Contraseña). Introduzca la contraseña
("1234"es la predeterminada) y haga clic
en Login (Acceso).
• Si la pantalla de inicio de sesión no aparece, compruebe la configuración de su dirección
IP. Si esto no funciona, compruebe la configuración de seguridad de su explorador de
Internet (consulte la Guía del usuario para más información).
30
Page 31

3 Cambie la contraseña en la pantalla
siguiente y haga clic en Apply (Aplicar).
4 Elija su idioma. Haga clic en Go to Wizard
setup (Ir al Asistente de configuración)
para configurar su NBG318S por primera
vez.
ESPAÑOL
3 Configuración inalámbrica y Acceso a Internet con el
Asistente
" Escriba la información de acceso a Internet exactamente igual que la
facilitada por su ISP en cada pantalla del asistente. Haga clic en Next
(Siguiente) para continuar o haga clic en Back (Atrás) para regresar a la
pantalla anterior. La información de la pantalla actual se perderá si hace
clic en Back (Atrás).
1 Elija su idioma. Puede
hacer clic en Next
(Siguiente).
31
Page 32

2 Haga clic en Next
(Siguiente) para
proceder con el
Connection Wizard
(Asistente para la
conexión).
3 Esta pantalla es
opcional. Puede hacer
clic en Next (Siguiente).
ESPAÑOL
Configuración de red inalámbrica
Ajuste la configuración de la red inalámbrica en su NBG318S siguiendo estos pasos.
1 Name (SSID) (Nombre (SSID)): Escriba un nombre descriptivo para su red inalámbrica.
2 Security (Seguridad): El modo más fácil para ajustar la seguridad es seleccionar Auto
(Automática). Esto utiliza el estándar de seguridad WPA-PSK, que ofrece un alto nivel
de seguridad. Si tiene otros dispositivos inalámbricos que desee agregar a su red y no son
compatibles con WPA-PSK, puede que necesite elegir otro tipo de seguridad. Consulte la
Guía del usuario para información sobre otros tipos de seguridad.
32
Page 33

ESPAÑOL
3 Channel Selection (Selección de canal): Seleccione un canal inalámbrico si está
preocupado por las interferencias de otros PA. El NBG318S y los dispositivos inalámbricos
de su red deben utilizar el mismo canal.
Escriba el Name (SSID) (Nombre
(SSID), Security (Seguridad) y
Channel Selection (Selección del
canal) para utilizarlos más tarde,
ya que el NBG318S y los otros
dispositivos de su red inalámbrica
deberán usar la misma
configuración. Haga clic en Next
(Siguiente).
4 Si ha elegido Auto, aparecerá un mensaje.
Escriba la Pre-Shared Key (Clave precompartida). Haga clic en OK.
Configuración del acceso a Internet
Configure su NBG318S para el acceso a Internet siguiendo estos pasos.
3.1 Elegir un tipo de conexión.
1 Puede que necesite esperar unos minutos
mientras el asistente intenta detectar qué tipo de
conexión tiene con su proveedor de servicios de
Internet (ISP).
33
Page 34

ESPAÑOL
2 Si el asistente detecta
su tipo de conexión,
aparecerá una de las
siguientes pantallas. De
no ser así, puede
seleccionar su tipo de
conexión en el cuadro
desplegable (A).
3 Si su ISP le ha
facilitado la
configuración de
acceso a Internet,
escríbala en la pantalla
que aparece en su
Asistente. De no ser
así, deje la
configuración
predeterminada y haga
clic en Next (Siguiente)
para ir a la sección
siguiente.
• Pregunte a su ISP si no
sabe qué tipo de conexión utilizar o qué configuración ajustar.
A
3.2 Ajustar su dirección IP WAN
Su dirección IP es como una dirección de calle, le permite enviar mensajes a otros
dispositivos y recibirlos. Ajuste la configuración de su dirección IP aquí para poder
comunicarse con otros dispositivos en su WAN.
1 Si su ISP no le ha asignado una dirección IP fija, seleccione Get automatically from
your ISP (Obtener automáticamente de su ISP) y haga clic en Next (Siguiente) para ir
a la sección 3.3. Por otro lado, si su ISP le ha facilitado una dirección IP fija, seleccione
34
Page 35

ESPAÑOL
Use fixed IP address provided by your ISP (Utilizar la dirección IP fija facilitada por
su ISP). Haga clic en Next (Siguiente).
2 Aparecerá una de dos
pantallas posibles
dependiendo de su tipo
de conexión.
3 En la pantalla que
aparece escriba la WAN
IP address (Dirección IP
WAN) y, dependiendo de
la pantalla, la WAN IP
subnet mask (Máscara
de subred IP WAN) y la
dirección IP de la puerta
de enlace facilitadas por
su ISP.
4 Si se le ha facilitado una
configuración de servidor
DNS, escríbala en los
campos. De lo contrario,
deje la configuración
predeterminada y haga
clic en Next (Siguiente).
3.3 Ajustar la dirección WAN MAC
Su dirección MAC es como un número de identificación que identifica únicamente a su
NBG318S. Algunos ISPs necesitan la autenticación de la dirección MAC.
Puede ajustar cómo aparece su dirección MAC para su ISP seleccionando una de las
opciones siguientes en la pantalla.
35
Page 36
ESPAÑOL
• Seleccione Factory Default (Predeterminado de fábrica) para utilizar la dirección MAC
predeterminada asignada de fábrica.
• Seleccione Clone the Computer’s MAC Address (Clonar la dirección MAC del ordena-
dor) para clonar la dirección MAC de un ordenador de su LAN. Escriba la dirección IP del
ordenador con la dirección MAC que está clonando. Es aconsejable que clone la dirección
MAC de un ordenador de su LAN incluso aunque su ISP no requiera actualmente autenticación de dirección MAC.
• Seleccione Set WAN MAC Address (Ajustar la dirección MAC WAN) y escriba la dirección
MAC que desee utilizar.
3.4 Configurar la administración de ancho de banda
Bandwidth Management (Administración de ancho de banda) ofrece diferentes
configuraciones de prioridad al tráfico de la red dependiendo de lo importante que sea el
tráfico. Por ejemplo, vídeo necesita una prioridad alta mientras que correo electrónico
tiene una prioridad baja.
Seleccione Enable BM for all traffic automatically (Activar BM para todo el tráfico
automáticamente) para que el NBG318S aplique la administración de ancho de banda al
tráfico enrutado por el NBG318S. Haga clic en Next (Siguiente).
36
Page 37

ESPAÑOL
3.5 Aplicar la configuración del asistente
Siga estos pasos para completar el asistente.
1 Haga clic en Apply (Aplicar)
para guardar sus cambios.
• Si tiene algún problema de
acceso a Internet, siga las
instrucciones en pantalla.
2 Enhorabuena. Abra un explorador de web, como Internet Explorer, para visitar su sitio web
favorito.
V Si no puede acceder a Internet cuando su ordenador está conectado a uno
de los puertos LAN del NBG318S, compruebe sus conexiones. Luego
apague el NBG318S, espere unos segundos y vuelva a encenderlo. Si eso
no funciona, inicie sesión en el configurador web de nuevo y compruebe si
ha escrito toda la información correctamente. Consulte la Guía del usuario
para más sugerencias.
37
Page 38
ESPAÑOL
4 Configuración de la red inalámbrica
Ahora puede conectarse a su NBG318S a través de una conexión inalámbrica y acceder a
Internet. Necesita el Network Name (Nombre de red) (SSID) y también la Security Key (Clave
de seguridad) si ha establecido la seguridad en la sección anterior. El procedimiento de
conexión se muestra aquí (usando Windows XP como ejemplo).
1 Haga clic con el botón derecho en el icono del adaptador
inalámbrico que aparece en la esquina inferior derecha de la
pantalla del ordenador. Haga clic en View Available
Wireless Networks (Ver redes inalámbricas disponibles).
2 Seleccione el nombre SSID que dio al
NBG318S y haga clic en Connect
(Conectar) (A).
3 ISi ha configurado seguridad
inalámbrica, se le pedirá que escriba
una contraseña. Escriba la Pre-Shared
Key (Clave pre-compartida)
configurada en la sección anterior y
haga clic en Connect (Conectar) (B).
Puede que tenga que esperar varios
minutos mientras el ordenador se
conecta a la red inalámbrica.
4 Si se ha conectado con éxito,
aparecerá un mensaje similar al
siguiente
A
B
38
Page 39

ESPAÑOL
V Si no puede conectarse de forma inalámbrica al NBG318S, compruebe si
ha seleccionado el SSID correcto y escrito correctamente la Key (Clave)
de seguridad correcta. Si eso no funciona, compruebe si su adaptador de
red está activado haciendo clic en el icono del adaptador inalámbrico y
haciendo clic en Enable (Activar). Consulte la Guía del usuario para más
sugerencias.
5 Configurar una red HomePlug AV con ENCRYPT
Utilice el botón ENCRYPT para configurar una conexión segura entre su NBG318S y otro
producto HomePlug AV con un botón ENCRYPT (El PLA-400 v2 aparece abajo como
ejemplo). Conecte los dispositivos de línea eléctrica de uno en uno.
1 Coloque los dispositivos cerca el uno del otro, para tener tiempo para configurar cada
uno. Tras configurar el primer dispositivo de línea eléctrica, tendrá 120 segundos para
configurar el segundo dispositivo.
• Puede desconectarlos del ordenador o módem (u otro producto de red) si lo necesita, pero
los dispositivos de línea eléctrica deben estar enchufados en las tomas de corriente.
2 Pulse el botón ENCRYPT en la parte posterior de los dos dispositivos durante más de
10 segundos. Esto configura un nombre de red al azar.
3 Pulse el botón ENCRYPT de la parte posterior de su dispositivo de línea eléctrica
durante 1-2 segundos.
1...2
1...2
4 Repita el paso 3
conectar. Esto debe hacerse dentro de 120 segundos tras haber pulsado el botón
ENCRYPT en el NBG318S.
de esta sección para el otro dispositivo de línea eléctrica que va a
39
Page 40

ESPAÑOL
5 Espere un minuto mientras sus dispositivos de línea eléctrica se conectan. El
HomePlug ( ) se enciende en ambos dispositivos cuando la conexión tiene éxito.
V Si las luces HomePlug ( ) en ambos dispositivos de línea eléctrica no se
encienden, los dispositivos de línea eléctrica no están conectados. Repita
los pasos 3 y 4 en esta sección. Si esto no funciona, utilice la Utilidad de
Configuración PLA-4xx Series. Consulte la Guía del usuario para más
información.
6 Para añadir más dispositivos de línea eléctrica a su red, repita los pasos 2, 3 y 4 en esta
sección utilizando un dispositivo de línea eléctrica conectado a su red HomePlug AV y el
dispositivo de línea eléctrica que desee añadir a la red.
7 Si desconectó su ordenador o módem (o cualquier otro producto de red conectado a su
NBG318S) en el paso 1 de esta sección, ahora puede volver a conectarlo.
Esto configura una red doméstica entre dos dispositivos de línea eléctrica (o más) y cualquier
producto que haya conectado a sus dispositivos de línea eléctrica, como su ordenador
personal o módem de red. Si ha configurado correctamente una conexión de Internet, ahora
puede usar su ordenador para acceder a Internet.
Procedimiento para ver la(s) certificación(es) del producto
1 Vaya a www.zyxel.com.
2 Seleccione su producto de la lista desplegable en la página inicial
de ZyXEL para ir a la página de ese producto.
3 Seleccione el certificado que desee visualizar en esta página.
40
Page 41

ESPAÑOL
41
Page 42
FRANÇAIS
FRANÇAIS
Présentation
Le NBG318S vous permet:
• Installer un réseau sans fil haute vitesse compatible avec les standards IEEE 802.1b/g,
d'autres produits Super G et une large gamme de standards de cryptage (A).
• Utilisez WPS (Wi-Fi Protected Setup) pour installer un réseau sans fil sécurisé à la simple
pression d'un bouton.
• Installez un réseau de courant porteur en ligne sur votre installation électrique domestique
standard avec d'autres produits (B) compatibles HomePlug AV.
• Utilisez la fonctionnalité ENCRYPT (CRYPTAGE) presse-bouton pour installer votre
réseau HomePlug AV.
• Installez un réseau câblé et sans fil avec un pare-feu et un filtrage de contenu (C).
Internet
A
B
Ce guide de mise en route rapide vous indique comment :
1 Installer votre matériel, p43
2 Connectez vous au NBG318S à partir de votre ordinateur, p44
3 Installez l'accès sans fil et Internet avec l'assistant, p45
4 Connecter des périphériques sans fil au NBG318S, p51
5 Installer un réseau HomePlug AV avec ENCRYPT, p52
42
C
Page 43

FRANÇAIS
Consultez le guide de l'utilisateur sur le CD inclus pour les détails sur toutes les
fonctionnalités du NBG318S. Insérez le CD dans votre lecteur de CD-ROM, si aucun écran
n'apparaît, utilisez Windows Explorer (Poste de travail) pour accéder au CD-ROM
(habituellement lecteur D) et recherchez le guide de l'utilisateur.
1 Installer votre matériel
Internet
2
3
1
Procédez comme suit pour effectuer les connexions matérielles pour l'installation initiale.
1 WAN : Connecter le port WAN de votre NBG318S au port Ethernet du périphérique
avec lequel vous accédez à Internet (par exemple, un routeur ou modem) à l'aide d'un
câble Ethernet.
2LAN : Connecter le port Ethernet de votre ordinateur au port LAN du NBG318S à l'aide
du câble Ethernet contenu dans l'emballage.
3 Connexion de l'ALIMENTATION: Utilisez le cordon d'alimentation inclus dans le package
pour connecter la prise POWER (ALIMENTATION) à une source d'alimentation
appropriée. C’est aussi votre connexion de courant porteur en ligne.
Les LED
Observez les LED (voyants). Quand vous connectez l’alimentation, la LED POWER ()
(ALIMENTATION) clignote et reste allumée une fois que le périphérique est prêt.
Les LED LAN ( ) s'allument si les connexions LAN sont correctement établies.
43
Page 44

FRANÇAIS
VVérifiez vos connexions si le voyant d'alimentation ( ) ou LAN ( ) ne
s'allume pas.
d’alimentation, patientez quelques secondes et rallumez-le.
2 Connectez vous au NBG318S à partir de votre
ordinateur
Vous devez accéder au NBG318S à partir de votre ordinateur afin de pouvoir utiliser
l'assistant. L'assistant vous aide à configurer les paramètres d'accès sans fil et Internet.
1 Lancez un navigateur
Internet tel qu’Internet
Explorer. Entrez “http://
192.168.1.1” comme indiqué
ci-dessous.
2 La fenêtre Password (Mot de passe)
s'affiche. Entrez le mot de passe (“1234”
est la valeur par défaut) et cliquez sur
Login (Connexion).
Si le problème persiste, débranchez le NBG318S de sa source
• Si l'écran d'ouverture de session ne s'affiche pas, vérifiez les paramètres de votre adresse
IP. Si le problème persiste, vérifiez les paramètres de sécurité de votre navigateur web
(voir le guide de l'utilisateur pour plus d'informations).
3 Changez le mot de passe dans l'écran
suivant et cliquez sur Apply (Appliquer).
44
Page 45
FRANÇAIS
4 Choisissez votre langue. Cliquez sur Go
to Wizard setup (Aller à installation de
l'assistant) pour la première installation
de votre NBG318S.
3 Installez l'accès sans fil et Internet avec l'assistant
" Saisissez les informations d'accès à Internet exactement telles qu'elles ont
été fournies par votre fournisseur d'accès à Internet (ISP) dans chaque
écran de l'assistant. Cliquez sur Next (Suivant) pour continuer ou cliquez
sur Back (Retour) pour retourner à l’écran précédent. Les informations
d'écran actuelles seront perdues si vous cliquez sur Back (Retour).
1 Choisissez votre
langue. Cliquez sur
Next (Suivant).
2 Cliquez sur Next
(Suivant) pour
continuer avec
Connection Wizard
(Assistant de
connexion).
45
Page 46
FRANÇAIS
3 Cet écran est optionnel.
Cliquez simplement sur
Next (Suivant).
Paramètres de réseau sans fil
Configurer les paramètres de réseau sans fil sur votre NBG318S en suivant ces étapes.
1 Nom (SSID): Entrez un nom descriptif pour votre réseau sans fil.
2 Sécurité : La façon la plus facile de paramétrer la sécurité est de sélectionner Auto. Cela
utilisez le standard de sécurité WPA-PSK, qui vous offre un haut niveau de sécurité. Si
vous désirez ajouter d'autres périphériques sans fil à votre réseau et qu'ils ne sont pas
compatibles avec WPA-PSK, vous devrez peut-être choisir une autre sorte de sécurité.
Consultez votre guide de l'utilisateur et les notes de publication du microprogramme pour
plus de détails. Consultez le guide de l’utilisateur pour les informations concernant les
autres types de sécurité.
3 Sélection du canal: Sélectionner un canal sans fil si vous redoutez des interférences
provenant d'autres AP. Le NBG318S et les périphériques sans fil de votre réseau doivent
utiliser le même canal.
Notez le Name (Nom) (SSID),
Security and Channel Selection
(Sécurité et sélection de canal)
pour une utilisation ultérieure étant
donné que le NBG318S et les
autres périphériques sur votre
réseau sans fil doivent utiliser les
même paramètres. Cliquez sur
Next (Suivant).
46
Page 47
FRANÇAIS
4 Si vous avez choisi Auto, une fenêtre apparaît.
Notez la Pre-Shared Key (clé
prépartagée).
Cliquez sur OK.
Installation de l'accès à Internet
Installez votre NBG318S pour pouvoir accéder à Internet en suivant ces étapes.
3.1 Choisir un type de connexion
1 Vous devrez peut-être patienter quelques minutes
pendant que l'assistant tente de détecter le type
de connexion que vous utilisez avec votre
fournisseur de service Internet (ISP).
.
2 Si l'assistant détecte votre type de
connexion, l'un des trois écrans
suivants apparaît. Vous pouvez
aussi sélectionner votre type de
connexion dans la liste déroulante
(A).
3 Si votre ISP vous a fourni les
paramètres d'accès à Internet,
tapez-les dans l'écran qui apparaît
dans votre Assistant. Autrement
laissez les paramètres par défaut
et cliquez sur Next (Suivant) pour
aller à la section suivante.
• Voyez auprès de votre ISP si vous
ne connaissez pas le type de connexion à utiliser, ou quels
paramètres configurer.
A
47
Page 48

FRANÇAIS
3.2 Définissez votre adresse IP WAN
Votre adresse IP est comme une adresse postale, elle vous permet d'envoyer des
messages à d'autres appareils et d'en recevoir. Configurez les paramètres de votre
adresse IP ici afin de pouvoir communiquer avec les autres périphériques sur votre WAN.
1 Si votre ISP ne vous a pas attribué d’adresse IP fixe, sélectionnez Get automatically
from ISP (Obtenir automatiquement de l'ISP) et cliquez sur Next (Suivant) pour aller à
la section 3.3. Autrement, si votre ISP vous a donné une adresse IP fixe, sélectionnez
Use fixed IP address provided by your ISP (Utiliser l'adresse IP fixe fournie par votre
ISP). Cliquez sur Next (Suivant).
2 Un écran parmi deux
possibles apparaît selon
votre type de connexion.
3 Dans l'écran qui apparaît
tapez l'adresse IP WAN,
et, selon l'écran, le
masque de sous-réseau
de l'IP du WAN et
l'adresse IP de la
passerelle sont données
par votre ISP.
4 Si vous avez reçu des
paramètres de serveur
DNS, tapez-les dans les
champs. Sinon laissez les
paramètres par défaut et
cliquez sur Next
(Suivant).
48
Page 49
FRANÇAIS
3.3 Définissez l'adresse MAC WAN
Votre adresse MAC est comme un numéro d'ID qui identifie de façon unique votre
NBG318S. Certains ISP nécessitent l'authentification de l'adresse MAC.
Vous pouvez définir la manière dont l'adresse MAC apparaît à votre ISP en sélectionnant
l'une des options suivantes dans l'écran.
• Sélectionnez Factory Default (Par défaut d'usine) pour utiliser l'adresse MAC par défaut
attribuée en usine.
• Sélectionnez Clone the Computer’s MAC Address (Cloner l’adresse MAC de l’ordina-
teur) pour cloner l’adresse MAC d’un ordinateur sur votre LAN. Tapez l’adresse IP de l’ordinateur avec l’adresse MAC que vous clonez. Il est conseillé de cloner l’adresse MAC d’un
ordinateur sur votre LAN même si votre ISP ne nécessite pas actuellement d’authentification d’adresse MAC.
• Sélectionnez Set WAN MAC Address (Définir l’adresse MAC du WAN) et entrez l’adresse
MAC que vous voulez utiliser.
3.4 Paramétrez la gestion de bande passante
La gestion de bande passante donne différents paramètres de priorité au trafic du réseau
selon l'importance du trafic. Par exemple, la vidéo requiert une priorité élevée alors que
l'e-mail a une faible priorité.
49
Page 50
FRANÇAIS
Sélectionnez automatiquement Enable BM for all traffic automatically (Activer BM
automatiquement pour tout le trafic) pour que le NBG318S applique la gestion de bande
passante au trafic acheminé par le NBG318S. Cliquez sur Next (Suivant).
3.5 Appliquer les paramètres de l'assistant
Suivez les étapes suivantes pour terminer l'Assistant.
1 Cliquez sur Apply (Appliquer)
pour enregistrer vos
modifications.
2 Cliquez sur Finish (Terminer)
dans l’écran ci-dessous pour
terminer l'installation par
l'assistant.
• Si vous rencontrez des
problèmes pour accéder à
Internet, suivez les instructions à l'écran.
3 Félicitations. Ouvrez un navigateur web, Internet Explorer par exemple, pour visiter
votre site web favori.
50
Page 51
FRANÇAIS
V Si vous n'arrivez pas à accéder à Internet quand votre ordinateur est
connecté à l’un des ports NBG318SLAN du , vérifiez vos connexions. Puis
éteignez le NBG318S, patientez quelques secondes et rallumez-le. Si cela
ne fonctionne pas, ouvrez à nouveau une session dans le configurateur
web et vérifiez si vous avez tapé correctement toutes les informations. Voir
le guide de l'utilisateur pour plus de suggestions.
4 Connecter des périphériques sans fil au NBG318S
Vous pouvez maintenant vous connecter à votre NBG318S via une connexion sans fil, et
accéder à Internet. Vous avez besoin du nom du réseau (SSID) ainsi que de la Clé de Sécurité
si vous avez configuré la sécurité dans la section précédente. La procédure de connexion est
indiquée ici (en utilisant Windows XP comme exemple).
1 Cliquez avec le bouton droit sur l'icône de l'adaptateur
sans fil qui apparaît en bas à droite de l'écran de votre
ordinateur. Cliquez sur View Available Wireless
Networks (Afficher les réseaux sans fils disponibles).
2 Sélectionnez le nom SSID que vous
avez donné au NBG318S et cliquez sur
Connect (Connecter) (A).
.
A
51
Page 52

FRANÇAIS
3 Si vous avez paramétré la sécurité
sans fil, vous êtes alors invité à entrer
un mot de passe. Entrez la Clé
prépartagée que vous avez paramétrée
dans la section précédente et cliquez
sur Connect (Connecter) (B).
YVous devrez peut-être attendre
quelques minutes pendant la connexion
de votre ordinateur au réseau sans fil.
4 Si vous avez réussi à vous
connecter, un message similaire à
celui qui suit s'affichera.
B
V Si vous ne pouvez pas vous connecter sans fil au NBG318S, vérifiez que
vous avez sélectionné le SSID correct et entré la clé de sécurité correcte.
Si cela ne fonctionne pas, assurez-vous que votre adaptateur réseau est
activé en cliquant sur l'icône de l'adaptateur sans fil et en cliquant sur
Enable (Activer). Voir le guide de l'utilisateur pour plus de suggestions.
5 Installer un réseau HomePlug AV avec ENCRYPT
Utilisez le bouton ENCRYPT (CRYPTER) pour installer une connexion sécurisée entre votre
NBG318S et un autre produit HomePlug AV avec un bouton ENCRYPT (CRYPTER) (Le PLA-
400 v2 est présenté ci-dessous à titre d'exemple). Connectez chaque périphérique de
courant porteur en ligne l'un après l'autre.
1 Placez les périphériques de courant porteur en ligne proches les uns des autres, afin
d'avoir le temps d'installer chacun d'eux. Après avoir installé le premier périphérique de
courant porteur en ligne, vous avez 120 secondes pour installer le second périphérique
de courant porteur en ligne.
• Vous pouvez les débrancher de l'ordinateur ou du modem (ou tout autre produit de réseau)
si nécessaire, mais les périphériques de courant porteur en ligne doivent être branchés à
des prises de courant.
2 Appuyez sur le bouton ENCRYPT (CRYPTER) situé au dos de chacun de vos
périphériques pendant au moins 10 secondes. Cela définit un nom de réseau aléatoire.
52
Page 53

FRANÇAIS
3 Appuyez sur le bouton ENCRYPT (CRYPTER) situé au dos de votre périphérique de
courant porteur en ligne pendant 1 à 2 secondes.
1...2
1...2
4 Répétez l'étape 3 dans cette section pour l'autre périphérique de courant porteur en
ligne que vous désirez connecter. Cela doit être effectué en moins de 120 secondes
après avoir appuyé sur le bouton ENCRYPT (CRYPTER) sur le NBG318S.
5 Patientez environ une minute pendant que vos périphériques de courant porteur en
ligne se connectent. Les voyants du HomePlug ( ) s'allument sur les deux
périphériques quand la connexion est établie.
V Si les voyants HomePlug ( ) sur les deux périphériques de courant
porteur en ligne ne s'allument pas, les périphériques de courant porteur en
ligne ne sont pas connectés. Répétez les étapes 3 et 4 dans cette section.
Si cela ne fonctionne pas, utilisez l'utilitaire de configuration de la série
PLA-4xx. Voir le guide de l'utilisateur pour plus d'informations.
6 Pour ajouter des périphériques de courant porteur en ligne supplémentaires à votre
réseau, répétez les étapes 2, 3 et 4 dans cette section en utilisant un périphérique de
courant porteur en ligne connecté à votre réseau HomePlug AV et le périphérique de
courant porteur en ligne que vous voulez ajouter au réseau.
7 Si vous avez déconnecté votre ordinateur ou votre modem (ou tout autre produit
réseau connecté à votre NBG318S) dans l'étape 1 de cette section, vous pouvez
maintenant les reconnecter.
53
Page 54
FRANÇAIS
Cela installe un réseau domestique entre les deux périphériques (ou plus) de courant
porteur en ligne et tous les produits que vous avez connectés à vos périphériques de
courant porteur en ligne, tels que votre ordinateur personnel ou modem réseau.Si vous
avez correctement installé une connexion Internet, vous pouvez maintenant utiliser votre
ordinateur pour accéder à Internet.
Procédure permettant d’afficher la (les) certification(s) d'un produit
1 Allez à www.zyxel.com.
2 Sélectionnez votre produit dans la liste déroulante dans la page
d'accueil du ZyXEL pour aller à la page de ce produit.
3 Sélectionnez la certification que vous désirez consulter dans cette
page.
Conformité CE
Le produit satisfait aux exigences techniques de la directive 1999/5/CE
(R&TTE) et est conçu pour être utilisé au sein de la Communauté
européenne et en Suisse. Le produit fait partie de la classe A, ce qui
signifie que son exploitation peut entraîner des bruits parasites dans les
zones d'habitation ; le cas échéant, l'exploitant peut être tenu de prendre
des mesures appropriées pour remédier au dérangement.
54
Page 55

FRANÇAIS
55
Page 56

ITALIANO
ITALIANO
Cenni generali
L'NBG318S consente di:
• Configurare una rete wireless ad alta velocità compatibile con gli standard IEEE 802.1b/g,
con altri prodotti Super G e con un'ampia gamma di standard di crittografia (A).
• Utilizzare WPS (Wi-Fi Protected Setup) per configurare una rete wireless sicura con la
semplice pressione di un pulsante.
• Configurare una rete powerline utilizzando il proprio cablaggio elettrico standard di casa
collegandosi ad alti prodotti compatibili HomePlug AV (B).
• Utilizzare la funzione ENCRYPT che con la semplice pressione di un tasto consente di
configurare una rete HomePlug AV.
• Configurare una rete cablata e wireless con un firewall e il filtraggio dei contenuti (C).
Internet
A
B
Questa Guida introduttiva spiega come:
1 Configurare l'hardware, p57
2 Connessione dell'NBG318S al computer, p58
3 Configurazione dell'accesso a Internet e wireless con la procedura guidata, p59
4 Connessione dei dispositivi Wireless all'NBG318S, p65
5 Configurazione di una rete HomePlug AV con ENCRYPT, p66
56
C
Page 57
ITALIANO
Fare riferimento alla Guida utente memorizzata sul CD fornito a corredo per i dettagli di
tutte le funzioni dell'NBG318S. Se all'inserimento del CD fornito a corredo non viene
visualizzata automaticamente una schermata, aprire il contenuto del CD (generalmente il
disco D:) con Risorse del computer e individuare la Guida utente.
1 Configurare l'hardware
Internet
3
2
1
Di seguito sono illustrati i collegamenti hardware per l'installazione iniziale.
1WAN: collegare la porta WAN dell'NBG318S alla porta Ethernet del dispositivo con cui
si accede a Internet (ad esempio un router o modem) tramite un cavo Ethernet.
2LAN: collegare la porta Ethernet del computer a una porta LAN sull'NBG318S
utilizzando il cavo Ethernet fornito nella confezione.
3 Collegamento dell'alimentazione: Utilizzare il cavo di alimentazione fornito a corredo
per collegare l'ingresso POWER a una sorgente di alimentazione appropriata. Questa
costituisce anche il collegamento della powerline. Questa costituisce anche il
collegamento della powerline. Questa costituisce anche il collegamento della
powerline. Questa costituisce anche il collegamento della powerline.
I LED (spie luminose)
Osservare i spie luminose. Quando si collega l'alimentazione, il LED POWER ( ) lampeggia e
poi resta acceso quando l'unità è pronta. I LED LAN ( ) si accendono se i collegamenti
della LAN sono stati eseguiti correttamente.
57
Page 58

ITALIANO
VSe la spia di alimentazione () o LAN () non si accende, controllare i
collegamenti. Se il problema persiste, scollegare NBG-318S
dall'alimentazione, attendere qualche secondo e poi riaccenderlo.
2 Connessione dell'NBG318S al computer
È necessario accedere all'NBG318S dal proprio computer in modo da poter utilizzare la
procedura guidata. La procedura guidata aiuta l'utente nella configurazione delle
impostazioni di accesso a Internet e wireless.
1 Aprire un browser Internet,
come ad esempio Internet
Explorer. Immettere l'indirizzo
“http://192.168.1.1” come
raffigurato sotto.
2 Viene visualizzata la finestra Password.
Immettere la password (quella predefinita è
“1234”) e scegliere Login (accedi).
• Se non viene visualizzata la schermata di accesso, controllare le impostazioni dell'indirizzo
IP. Se il problema persiste, controllare le impostazioni di sicurezza del browser (per ulteriori
informazioni vedere la Guida dell'utente).
3 Modificare la password nella schermata
seguente e fare clic su Apply (applica).
58
Page 59

ITALIANO
4 Selezionare la lingua desiderata.
Scegliere Go to Wizard setup (vai a
configurazione guidata) per configurare
NBG-318S la prima volta.
3 Configurazione dell'accesso a Internet e wireless con
la procedura guidata
" Immettere le informazioni e i parametri Internet esattamente come sono
stati forniti dal proprio ISP nelle diverse schermate della procedura guidata.
Scegliere Next (avanti) per continuare oppure Back (indietro) per tornare
alla schermata precedente. Facendo clic su Back (indietro) le informazioni
presenti nella schermata corrente vengono perse.
1 Selezionare la lingua
desiderata. Fare clic su
Next (avanti).
2 Scegliere Next (avanti)
nella schermata
successiva per
procedere con la
Connection Wizard
(connessione guidata).
59
Page 60
ITALIANO
3 Questa schermata è
opzionale. È
unicamente possibile
fare clic su Next
(avanti).
Impostazioni della rete wireless
Configurare le impostazioni della rete wireless sull'NBG318S attenendosi alle istruzioni
seguenti.
1 Name(SSID) (nome): immettere un nome descritti per la rete wireless.
2 Security (sicurezza): il modo più semplice per configurare la sicurezza è di selezionare
Auto. In questo modo viene utilizzato lo standard di protezione WPA-PSK, che offre un
elevato livello di sicurezza. Se ci sono altri dispositivi da aggiungere alla rete che non
sono compatibili con la crittografia WPA-PSK, può essere necessario scegliere un altro tipo
di sicurezza. Vedere la Guida dell'utente per informazioni sulle altre tipologie di sistemi di
sicurezza.
3 Channel Selection (seleziona canale): selezionare un canale wireless se si è preoccupati
dell'interferenza di altri AP. L'NBG318S e i dispositivi wireless della rete devono utilizzare
lo stesso canale.
Annotare le impostazioni Name
(SSID) (nome), Security (sicurezza)
e Channel Selection (selezione
canale) per poterli utilizzare in
seguito affinché l' NBG318S e gli altri
dispositivi presenti nella rete wireless
possano utilizzare le stesse
impostazioni. Scegliere Next
(avanti).
60
Page 61
ITALIANO
4 Se si è scelto Auto, appare una finestra a comparsa.
Annotare la chiave Pre-Shared Key.
Scegliere OK.
Configurazione dell'accesso a Internet
Configurare l'NBG318S per accedere a Internet con le istruzioni seguenti.
3.1 Scelta di un tipo di connessione.
1 Può essere necessario attendere qualche minuto
mentre la procedura guidata tenta di rilevare il tipo
di connessione con il provider Internet (ISP,
Internet Service Provider).
2 Se la procedura guidata rileva il
tipo di connessione, viene
visualizzata una delle
schermate seguenti. In caso
contrario è possibile
selezionare il tipo di
connessione dall'elenco a
discesa (A).
3 Se l'ISP ha fornito le
impostazioni per l'accesso a
Internet, immetterle nella
schermata visualizzata nella
procedura guidata. In caso
contrario lasciare le
impostazioni predefinite e
scegliere Next (avanti) per
passare alla sezione successiva.
• Se non si conosce il tipo di connessione da utilizzare, controllare i dati o le impostazioni da
configurare con il proprio ISP.
A
61
Page 62

ITALIANO
3.2 Impostazione dell' indirizzo IP della WAN
L'indirizzo IP è come l'indirizzo di una strada e consente di inviare messaggi ad altri
dispositivi e di riceverli. Configurare le impostazioni relative all'indirizzo IP in questa
sezione in modo da poter comunicare con altri dispositivi sulla rete geografica WAN.
1 Se l'ISP non ha assegnato un indirizzo IP statico, selezionare Get automatically from
your ISP (ottieni automaticamente dall'ISP) e scegliere Next (avanti) per passare alla
sezione 3.3. Altrimenti, se l'ISP ha fornito un indirizzo IP statico, selezionare Use fixed
IP address provided by your ISP (utilizza indirizzo IP statico fornito dall'ISP).
Scegliere Next (avanti).
2 A seconda del tipo di
connessione può
apparire una delle due
schermate seguenti.
3 Nella schermata
visualizzata digitare
l'indirizzo IP della WAN
in WAN IP address,
quindi a seconda della
schermata, immettere la
WAN IP subnet mask
(subnet mask IP della
WAN) e l'indirizzo IP del
gateway forniti dall'ISP.
4 Se sono stati fornite
impostazioni relative al
server DNS, inserirle nei
campi relativi. In caso
contrario lasciare le
impostazioni predefinite e
scegliere Next (avanti).
62
Page 63
ITALIANO
3.3 Imposta indirizzo MAC WAN
L'indirizzo MAC è come un numero identificativo che riconosce univocamente l'NBG318S.
Alcuni ISP richiedono l'autenticazione dell'indirizzo MAC.
È possibile impostare come mostrare l'indirizzo MAC al proprio ISP selezionando una delle
opzioni seguenti nella schermata.
• Selezionare Factory Default (predefinito di fabbrica) per utilizzare l'indirizzo MAC predefinito assegnato dalla fabbrica.
• Selezionare Clone the Computer’s MAC Address (clona indirizzo MAC del computer) per
clonare l'indirizzo MAC di un computer della LAN. Digitare l'indirizzo IP del computer di cui
si intende clonare l'indirizzo MAC. È consigliabile clonare l'indirizzo MAC di un computer
della LAN anche se l'ISP non richiede autenticazione dell'indirizzo MAC.
• Selezionare Set WAN MAC Address (imposta indirizzo MAC della WAN) e immettere
l'indirizzo MAC da utilizzare.
3.4 Configura gestione della banda
Bandwidth Management (gestione della banda) offre diverse impostazioni di priorità per il
traffico di rete a seconda della sua importanza. Ad esempio il video necessita di una
priorità maggiore rispetto alle e-mail.
63
Page 64

ITALIANO
Selezionare Enable BM for all traffic automatically (abilita gestione automatica della
banda per tutto il traffico) per lasciare che l' NBG318S gestisca la banda per il traffico
instradato dall'NBG318S. Scegliere Next (avanti).
3.5 Applicazione delle impostazioni della procedura guidata
Attenersi alle istruzioni seguenti per completare la procedura guidata.
1 Scegliere Apply (applica) per
salvare le modifiche nella
schermata successiva che
appare nella procedura
guidata.
2 Scegliere Finish (fine) nella
schermata sotto per
completare la configurazione
guidata.
• Se si verificano problemi con
l'accesso a Internet, seguire
le istruzioni visualizzate a
schermo.
3 Congratulazioni! Aprire il browser, quale ad esempio Internet Explorer, per visitare un
sito Web qualsiasi.
64
Page 65

ITALIANO
V Se non è possibile accedere a Internet quando il computer è connesso a
una delle porte LAN del NBG318S, controllare i collegamenti. A questo
punto spegnere il NBG318S, attendere qualche secondo e poi
riaccenderlo. Se ciò non funziona, accedere nuovamente allo strumento di
configurazione Web e controllare di aver digitato correttamente tutte le
informazioni. Vedere la Guida dell'utente per ulteriori suggerimenti.
4 Connessione dei dispositivi Wireless all'NBG318S
YÈ ora possibile connettersi all'NBG318S via connessione wireless e accedere a Internet.
Se nella sezione precedente si è configurata la sicurezza, a questo punto occorre disporre
del nome della rete (SSID) e della chiave di sicurezza Security Key. Di seguito viene
illustrata la procedura di connessione (utilizzando Windows XP come esempio).
1 Fare clic con il pulsante destro del mouse sull'icona
dell'adattatore wireless che appare in basso a destra della
schermata del computer. Scegliere View Available
Wireless Networks (visualizza reti wireless disponibili).
2 Selezionare il nome SSID fornito
all'NBG318S e scegliere Connect
(connetti) (A).
.
A
65
Page 66

ITALIANO
3 Se è stata impostata la sicurezza
wireless, viene richiesto di immettere
una password. Immettere la chiave
Pre-Shared Key impostata nella
sezione precedente e scegliere
Connect (B).
Il computer potrebbe impiegare alcuni
minuti per connettersi alla rete wireless.
4 Se la connessione avviene con
successo, viene visualizzato un
messaggio simile al seguente.
B
V Se non è possibile connettersi wireless all'NBG318S, controllare di aver
selezionato il SSID corretto e di aver immesso correttamente la chiave di
sicurezza (Key). Se anche questo non funziona, assicurarsi che la scheda
di rete sia attiva scegliendo l'icona dell'adattatore wireless e scegliendo
Attiva. Vedere la Guida dell'utente per ulteriori suggerimenti.
5 Configurazione di una rete HomePlug AV con
ENCRYPT
Utilizzare il pulsante ENCRYPT per configurare una connessione sicura tra il NBG318S e
un altro prodotto HomePlug AV dotato di un pulsante ENCRYPT (sotto è raffigurato il PLA400 v2 a titolo di esempio). Connettere i dispositivi powerline uno alla volta.
1 Posizionare i dispositivi powerline vicini tra loro, in modo da avere il tempo di
configurarli uno alla volta. Dopo aver configurato il primo dispositivo powerline, si
hanno 120 secondi a disposizione per configurare il secondo dispositivo powerline.
• Se necessario è possibile scollegarli dal computer o dal modem (o dall'altro dispositivo di
rete), ma i dispositivi powerline devono restare collegati alle prese elettriche.
2 Tenere premuto per almeno 10 secondi il pulsante ENCRYPT che si trova dietro i
dispositivi. In questo modo viene impostato un nome di rete casuale.
66
Page 67

ITALIANO
3 Tenere premuto il pulsante ENCRYPT che si trova dietro al dispositivo powerline per 1
- 2 secondi.
1...2
1...2
4 Ripetere il passo 3 di questa sezione per l'altro dispositivo powerline da collegare.
Questa operazione deve essere eseguita entro 120 secondi dalla pressione del
pulsante ENCRYPT del NBG318S.
5 Attendere circa un minuto affinché i dispositivi powerline si connettano. Le spie
HomePlug ( ) su entrambi i dispositivi si accende quando la connessione ha avuto
esito positivo.
V Se le spie HomePlug ( ) su entrambi i NBG318S non si accendono, i
NBG318S non sono connessi. Ripetere i passi 3 e 4 di questa sezione. Se
la procedura non funziona, utilizzare l'utilità di configurazione della serie
PLA-4xx. Per maggiori informazioni, vedere la Guida dell'utente.
6 Per aggiungere altri NBG318S alla rete, ripetere i passi 2, 3 e 4 di questa sezione
utilizzando un NBG318S connesso alla rete HomePlug AV e il NBG318S da
aggiungere alla rete.
7 Se si è scollegato il computer o il modem (o qualsiasi altro prodotto di rete connesso al
NBG318S) al passo 1 di questa sezione, a questo punto è possibile ricollegarlo.
La procedura consente di configurare una rete domestica tra due o più NBG318S e
qualsiasi altro dispositivo connesso ai NBG318S, quali un home computer o un modem di
rete. Se la connessione a Internet è correttamente configurata, è ora possibile utilizzare il
computer per accedere a Internet.
67
Page 68

ITALIANO
Procedura per visualizzare le certificazioni di un prodotto
1 Visitare il sito www.zyxel.com.
2 Selezionare il prodotto dall'elenco di riepilogo a discesa nella Home
Page di ZyXEL per passare alla pagina del prodotto in questione.
3 Selezionare da questa pagina la certificazione che si desidera
visualizzare.
Conformità CE
Questo prodotto soddisfa le richieste tecniche della direttiva 1999/5/EG
(R&TTE) ed è previsto per il funzionamento nella UE e in Svizzera.Il
prodotto è dispositivo della classe A. Questo dispositivo può causare nel
settore abitativo dei radiodisturbi. In questo caso può essere richiesto al
gestore di prendere opportune misure.
68
Page 69

ITALIANO
69
Page 70

SVENSKA
SVENSKA
Översikt
NBG318S låter dig:
• Konfigurera ett trådlöst nätverk med hög hastighet som är kompatibelt med IEEE 802.1b/gstandarder, andra Super G-kompatibla produkter och ett brett urval krypteringsstandarder
(A).
• Använd WPS (Wi-Fi Protected Setup ) för att konfigurera ett säkert trådlöst nätverk med en
enda knapptryckning.
• Konfigurera ett Powerline nätverk på ditt vanliga hemelnät med andra HomePlug AVkompatibla produkter (B).
• Använd tryckknappsfunktionen ENCRYPT (kryptering) för att ställa in ditt HomePlug AVnätverk.
• Konfigurera ett sladdanslutet och trådlöst nätverk med en brandvägg och innehållsfiltrering
(C).
Internet
A
B
Denna snabbstartguide visar hur du:
1 Installera maskinvara, p71
2 Ansluta till NBG318S från datorn, p72
3 Ställa in trådlös och Internet-åtkomst med guiden, p73
4 Ansluta trådlösa enheter till NBG318S, p79
5 Installera ett HomePlug AV-nätverk med ENCRYPT (kryptering), p80
70
C
Page 71

SVENSKA
Se bruksanvisningen på den medföljande CD-skivan för information om alla funktioner hos
NBG318S. Sätt in CD-skivan i CD-ROM-enheten. Om ingen skärmbild visas, använd
Windows Explorer (My Computer) (Utforskaren i Den här datorn) för att gå till CD-ROMenheten (vanligtvis enhet D) och sök efter User’s Guide.
1 Installera maskinvara
Internet
3
2
1
Gör följande för att utföra maskinvaruanslutningar för initial inställning.
1 WAN: Anslut WAN-porten på NBG318S till Ethernet-porten på den enhet du använder
för att få åtkomst till Internet (t.ex. en router eller modem) med en Ethernet-kabel.
2LAN: Anslut Ethernet-porten på datorn till en LAN-port på NBG318S med den
medföljande Ethernet-kabeln.
3 Strömanslutning: Använd strömkabeln från förpackningen för att ansluta POWER-
uttaget till en lämplig strömkälla. Detta är även din strömlinjeanslutning.
Indikatorlamporna
Titta på indikatorlamporna. När du ansluter strömmen, blinkar indikatorlampan POWER ()
och förblir tänd när enheten väl är klar. Indikatorlamporna LAN ( ) tänds och fortsätter
att lysa om LAN-anslutningarna är rätt utförda.
71
Page 72

SVENSKA
VKontrollera dina anslutningar om inte strömlampan ( ) eller lamporna LAN
( ) tänds. Om det inte hjälper, koppla bort NBG318S från dess
strömkälla, vänta några sekunder och återanslut den sedan.
2 Ansluta till NBG318S från datorn
Du måste få åtkomst till NBG318S från datorn så att du kan använda installationsguiden.
Guiden hjälper dig att konfigurera inställningarna för Internet-åtkomst och trådlöst åtkomst.
1 Öppna en Internet-
webbläsare som t.ex. Internet
Explorer. Ange http://
192.168.1.1 enligt nedan.
2 Fönstret Password (lösenord) visas. Ange
lösenord (1234 är standard) och klicka på
Login (inloggning).
• Om inloggningsskärmen inte visas, kontrollera dina IP-adressinställningar. Om det inte
fungerar, kontrollera webbläsarens säkerhetsinställningar (se bruksanvisningen för mer
information).
3 Ändra lösenord och klicka påck Apply
(verkställ).
72
Page 73
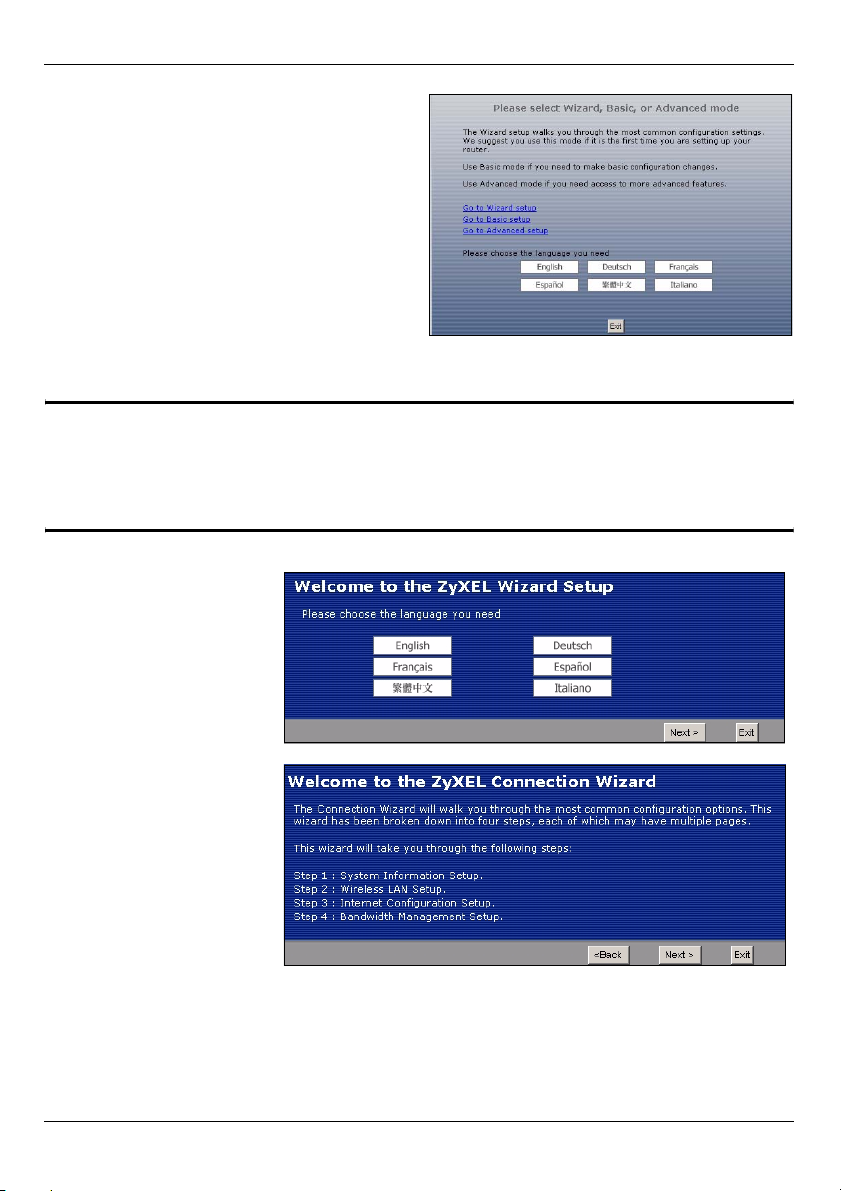
SVENSKA
4 Välj språk. Klicka på Go to Wizard setup
(gå till inställningsguiden) för att ställa in
din NBG318S för första gången.
3 Ställa in trådlös och Internet-åtkomst med guiden
" Ange dina Internet-uppkopplingsuppgifter exakt som du fått dem av din
Internet-leverantör på varje guideskärm. Klicka på Next (nästa) för att
fortsätta eller klicka på Back (bakåt) för att gå tillbaka till föregående skärm.
Aktuell skärminformation går förlorad om du klickar på Back (bakåt).
1 Välj språk. Klicka på
Next (nästa).
2 Klicka på Next (nästa)
för att fortsätta med
anslutningsguiden.
73
Page 74

SVENSKA
3 Denna skämbild är valfri.
Du kan helt enkelt klicka
på Next (nästa).
Trådlösa nätverksinställningar
Konfigurera de trådlösa nätverksinställningarna på din NBG318S genom att följa dessa
steg.
1 Name(SSID) (namn): Ange ett beskrivande namn för ditt trådlösa nätverk.
2 Security (säkerhet): Det enklaste sättet att ställa in säkerhet är att välja Auto. Detta
använder säkerhetsstandarden WPA-PSK, som ger en hög säkerhetsnivå. Om du har
fler trådlösa enheter som du vill lägga till i ditt nätverk och de inte är kompatibla med WPAPSK, måste du kanske välja en variant av säkerhet. Se bruksanvisningen för information
om andra säkerhetsvarianter.
3 Channel Selection (kanalval): Välj en trådlös kanal om du oroar dig över interferens från
andra AP. NBG318S och trådlösa enheter i ditt nätverk måste använda samma kanal.
Skriv ner Name (SSID) (namn
(SSID), Security (säkerhet)
och Channel Selection
(kanalval) för senare
användning eftersom
NBG318S och andra enheter i
ditt trådlösa nätverk måste
använda samma inställningar.
Klicka på Next (nästa).
74
Page 75

SVENSKA
4 Om du har valt Auto, visas ett popup-fönster.
Skriv ner den Pre-Shared Key (fördelad
nyckel). Klicka på OK.
Inställning av Internet-åtkomst
Ställ in NBG318S för Internet-åtkomst genom att följa dessa steg.
3.1 Välj en anslutningstyp.
1 Du måste kanske vänta flera minuter medan
guiden försöker detektera vilken typ av anslutning
du har med din Internet-leverantör (ISP).
.
2 Om guiden detekterar din
anslutningstyp, visas en av
följande tre skärmar. I annat
fall kan du välja din
anslutningstyp från
rullgardinsrutan (A)
3 Om din ISP har försett dig
med Internetåtkomstinställningar, skriv in
dem i den skärm som visas i
guiden. I annat fall låter du
standardinställningarna vara
kvar och klickar på Next
(nästa) för att gå till nästa
avsnitt.
• Kontrollera med din ISP om
du inte vet vilken
anslutningstyp som ska
användas, eller vilka
inställningar du ska
konfigurera.
A
75
Page 76
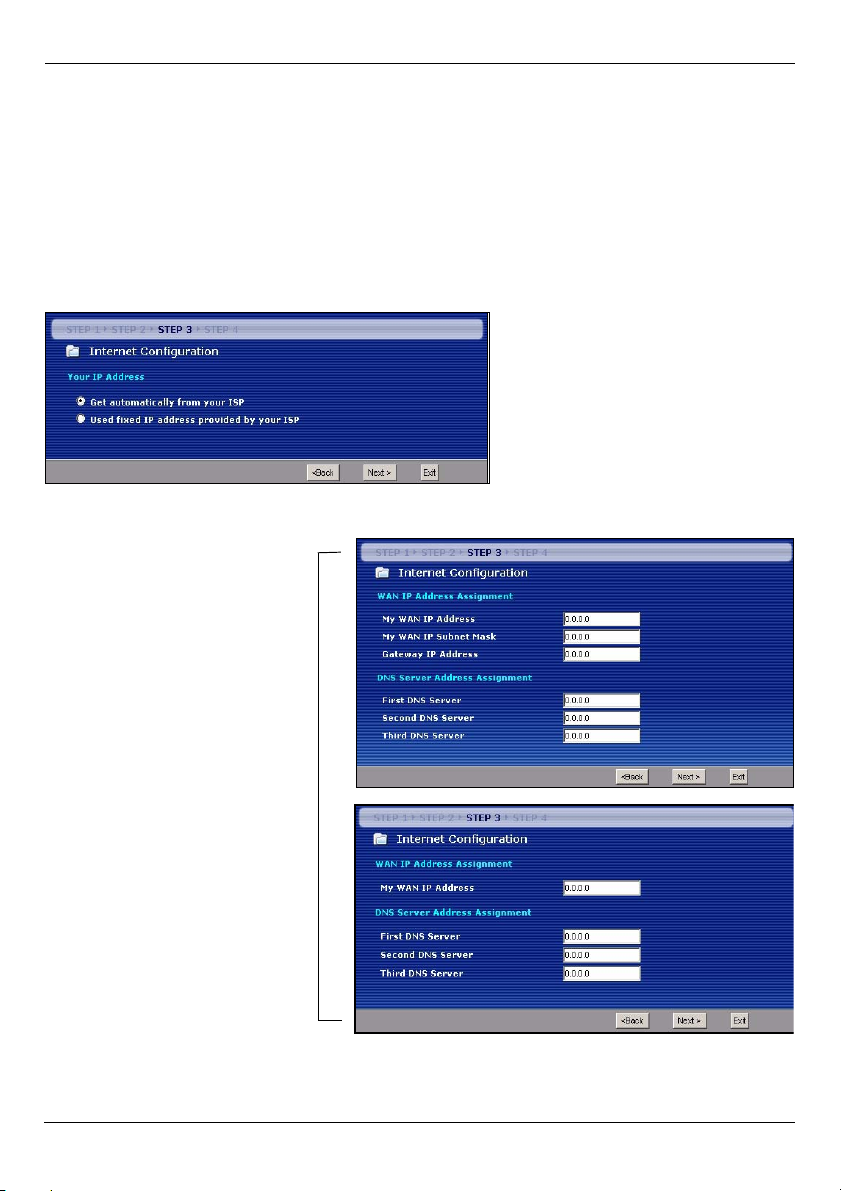
SVENSKA
3.2 Ställ in din WAN IP-adress
Din IP-adress är som en gatuadress, den låter dig skicka och hämta meddelanden till och
från andra enheter. Konfigurera dina IP-adressinställningar här så att du kan kommunicera
med andra enheter i ditt WAN.
1 Om din ISP inte har tilldelat en fast IP-adress åt dig, välj Get automatically from your
ISP (hämta automatiskt från ISP) och klicka på Next (nästa) för att gå till avsnitt 3.3. I
annat fall, om du fått en fast IP-adress från din ISP, välj Use fixed IP address
provided by your ISP (använd fast IP-adress från ISP). Klicka på Next (nästa).
2 En av två möjliga
skärmbilder visas
beroende på din
anslutningstyp.
3 På nästa skärmbild som
visas skriver du in WAN
IP-adress, WAN IPsubnetmask och den
gateway-IP-adress du
fått av din Internetleverantör.
4 Om du fått DNS-
serverinställningar, ange
dem i fälten. I annat fall,
låt
standardinställningarna
stå och klicka på Next
(nästa).
76
Page 77

SVENSKA
3.3 Ställa in WAN MAC-adress
Din MAC-adress är som ett ID-nummer som unikt identifierar din NBG318S. Vissa Internetleverantörer kräver MAC-adressautenticering.
Du kan ställa in hur din MAC-adress ska visas för din Internet-leverantör genom att välja
ett av följande alternativ på skärmen.
•Välj Factory Default (fabriksstandard) för att använda den fabrikstilldelade standard-MAC-
adressen.
•Välj Clone the Computerfs MAC Address (klona datorns MAC-adress) för att klona MAC-
adressen från en dator i ditt LAN. Skriv in datorns IP-adress med den MAC-adress du
klonar. Du rekommenderas att klona MAC-adressen från en dator i ditt LAN även om din
Internet-leverantör för närvarande inte kräver MAC-adressautenticering.
•Välj Set WAN MAC Address (ställ in WAN MAC-adress) och ange den MAC-adress du vill
använda.
3.4 Ställa in bandbreddshantering
Bandbreddshantering ger olika prioritetsinställningar till nätverkstrafik beroende på hur
viktig trafiken är. Exempelvis kräver video hög prioritet medan e-post har låg prioritet.
77
Page 78
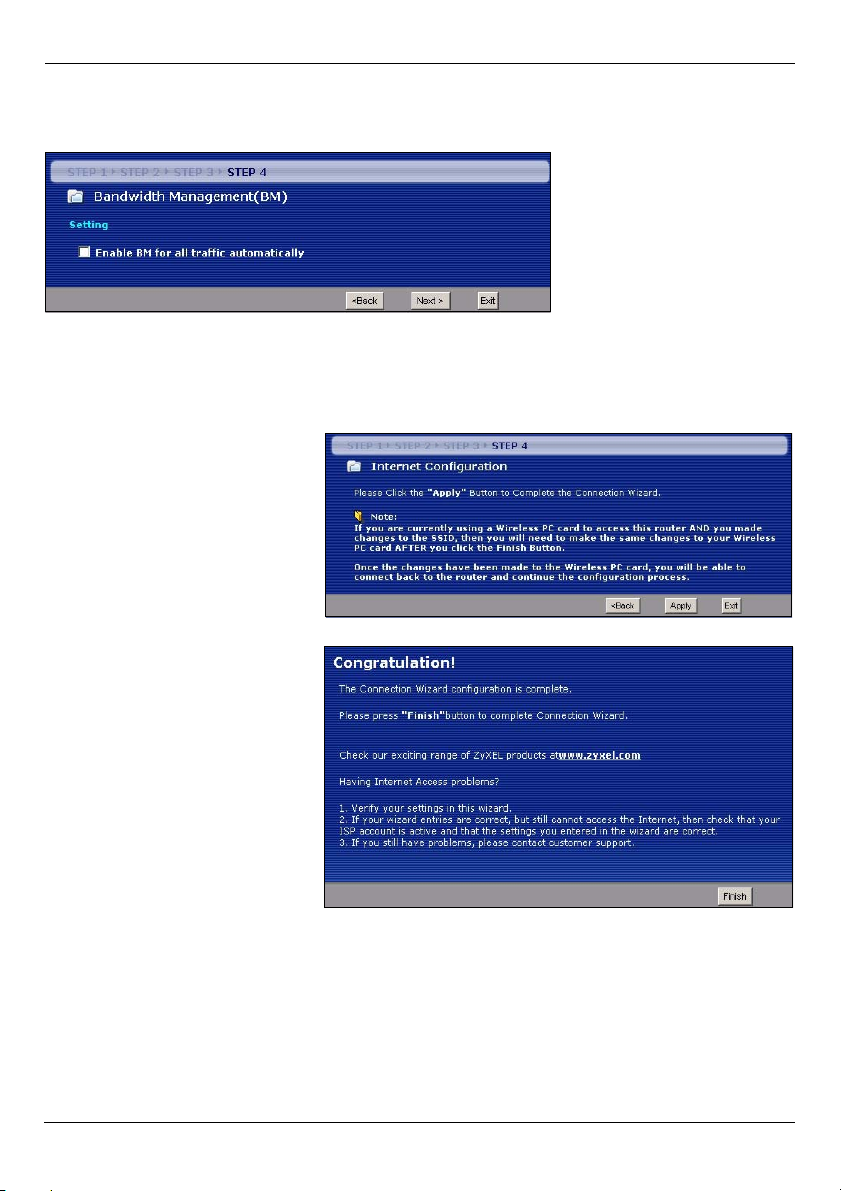
SVENSKA
Välj Enable BM for all traffic automatically (aktivera BM för all trafik automatiskt) för att
låta NBG318S tillämpa bandbreddshantering på trafik dirigerad av NBG318S. Klicka på
Next (nästa).
3.5 Tillämpa guideinställningar
Följ dessa steg för att slutföra installationsguiden.
1 Klicka på Apply (tillämpa) för
att spara dina ändringar i den
nästa skärmbild som visas i
guiden.
2 Klicka på Finish (slutför) för
att slutföra
installationsguiden.
• Om du har åtkomstproblem till
Internet, följ instruktionerna
på skärmen.
3 Grattis! Öppna en webbläsare som t.ex. Internet Explorer, för att besöka din
favoritwebbplats.
78
Page 79

SVENSKA
V Om du inte kan ansluta till Internet när din dator är ansluten till en av
NBG318S:s LAN-portar, kontrollera dina anslutningar. Stäng därefter av
NBG318S, vänta några sekunder och sätt sedan på den igen. Om inte det
fungerar, logga in till webbkonfiguratorn igen och kontrollera att du har
skrivit in all information korrekt. Se bruksanvisningen för fler förslag.
4 Ansluta trådlösa enheter till NBG318S
Nu kan du ansluta till NBG318S via en trådlös anslutning, och få åtkomst till Internet. Du
behöver Network Name (nätverksnamn) (SSID) samt Security Key (säkerhetsnyckel) om du
ställde in säkerhet i det föregående avsnittet. Anslutningsproceduren visas här (med Windows
XP som exempel).
1 Högerklicka på den trådlösa adapterikonen som visas
nere till höger på datorskärmen. Klicka på View
Available Wireless Networks (visa tillgängliga
trådlösa nätverk).
2 Välj det SSID-namn du gav NBG318S
och klicka på Connect (anslut) (A).
.
A
79
Page 80

SVENSKA
3 Om du har ställt in trådlös säkerhet,
uppmanas du att ange ett lösenord.
Ange den fördelade nyckel som du
ställde in i det föregående avsnittet, och
klicka på Connect (anslut) (B).
Du måste kanske vänta flera minuter
medan din dator ansluter till det
trådlösa nätverket.
4 Om anslutningen lyckades visas ett
meddelande som liknar det
följande.
B
V Om du inte kan ansluta trådlöst till NBG318S, kontrollera att du har valt rätt
SSID och angett rätt säkerhetsnyckel Key (säkerhetsnyckel). Om detta inte
fungerar, kontrollera att din nätverksadapter är aktiverad genom att klicka
på den trådlösa adapterikonen och klicka på Enable (aktivera). Se
bruksanvisningen för fler förslag.
5 Installera ett HomePlug AV-nätverk med ENCRYPT
(kryptering)
Använd knappen ENCRYPT för att aktivera en säker anslutning mellan din NBG318S och en
annan HomePlug AV-produkt med knappen ENCRYPT (PLA-400 v2 visas nedan som ett
exempel). Anslut en strömlinjeenhet åt gången.
1 Placera Powerline enheterna nära varandra så att du har tillräckligt med tid för att
konfigurera var och en. När du har konfigurerat den första Powerline enheten, har du
120 sekunder på dig att installera den andra Powerline enheten.
• Du kan koppla bort dem från datorn eller modemet (eller annan nätverksprodukt) vid
behov, men Powerline enheterna måste vara anslutna till eluttag.
2 Håll knappen ENCRYPT på baksidan av båda enheterna intryckt i minst 10 sekunder.
Detta ställer in ett slumpmässigt nätverksnamn.
80
Page 81

SVENSKA
3 Håll knappen ENCRYPT på baksidan av Powerline enheten intryckt i 1-2 sekunder.
Strömlampan ( ) blinkar medan Powerline enheten försöker upprätta en anslutning.
1...2
1...2
4 Upprepa steg 3 i det här avsnittet för varje Powerline enhet du vill ansluta. Detta måste
göras inom 120 sekunder efter att du har tryckt in knappen ENCRYPT på NBG318S.
5 Vänta i cirka en minut medan Powerline enheterna ansluter till varandra. Lampan
HomePlug ( ) tänds på båda enheter när anslutningen är slutförd.
V Om lamporna HomePlug ( ) inte lyser på båda Powerline enheterna, är
dom inte anslutna. Upprepa steg 3 och 4 i det här avsnittet. Om det
fortfarande inte fungerar använder du konfigurationsverktyget för PLA-4xx
Series. Se manualen för mer information.
6 Om du vill lägga till ytterligare Powerline enheter till nätverket upprepar du steg 2, 3 och
4 i det här avsnittet med en Powerline enhetet ansluten till ditt HomePlug AV-nätverk
och den Powerline enheten du vill lägga till i nätverket.
7 Om du kopplade bort datorn eller modemet (eller någon annan nätverksprodukt som
var ansluten till din NBG318S) i steg 1 av det här avsnittet kan du nu ansluta dem igen.
Det här upprättar ett hemnätverk mellan de två (eller flera) Powerline enheter och
eventuella andra produkter du har anslutit till dina Powerline enhete, t.ex. en hemdator
eller ett nätverksmodem. Om du har upprättat en fungerande Internetanslutning kan du nu
ansluta till Internet via din dator.
Mer produkthjälp finns på http://www.support.zyxel.se.
81
Page 82
SVENSKA
Procedur för att visa en produkts certifikat
1 Gå till www.zyxel.com.
2 Välj din produkt från rullgardinslistrutan på ZyXEL:s
hemsida för att gå till denna produkts sida.
3 Välj det certifikat som du vill titta på från denna sida.
82
Page 83

SVENSKA
83
 Loading...