

Page 1

ZyXEL G-270S
802.11g Wireless USB 2.0 Adapter
Quick Start Guide
Version 1.00
11/2005
English
Important Information
Federal Communications Commission (FCC) Interference Statement
The 802.11g Wireless LAN Adapter has been tested to
the FCC exposure requirements (Specific Absorption
Rate).
The equipment complies with FCC RF radiation
exposure limits set forth for an uncontrolled environment,
under 47 CFR 2.1093 paragraph (d) (2).
This Transmitter must not be co-located or operating in
conjunction with any other antenna or transmitter.
Refer to the User's Guide for general FCC statements.
Procedure to View a Product's Certification(s)
1 Go to www.zyxel.com
2 Select your product from the drop-down list box on
the ZyXEL home page to go to that product's page.
3 Select the certification you wish to view from this
page.
About Your ZyXEL G-270S
The ZyXEL G-270S is an IEEE 802.11 b/g compliant
wireless LAN USB stick that fits into any USB slot. With
the ZyXEL G-270S, you can enjoy the wireless mobility
within the coverage area. The IEEE 802.11g technology
provides greater range and offers transmission rate at up
to 54 Mbps. Your ZyXEL G-270S can transmit at up to
108 Mbps when connected to an AP or wireless router
with the Super G feature enabled. Actual speeds
attained also depend on the distance from the AP, noise,
etc.
Installation Requirements
Before installation, make sure you have a computer with
the following:
• Pentium II 300MHz or above
• A minimum of 6 MB available hard disk space
• A minimum of 32 MB RAM
• A CD-ROM drive
• A USB port (with USB1.0/1.1, the ZyXEL G-270S can
only transmit at up to 11Mbps.)
• Windows 98 Second Edition (SE), Windows ME, Windows 2000 or Windows XP
• Windows 98 SE users may need the Windows 98 SE
CD
If you install the Funk Odyssey Client software on the
computer, uninstall (remove) it.
Windows XP Users
Wireless Zero Configuration (WZC) is a wireless
configuration utility bundled with Windows XP. If you are
a Windows XP user and want to use WZC, then you can
either:
• Install the ZyXEL Utility and then disable it (by clicking
the close button in any ZyXEL Utility screen)
or
• Install the driver only. In this case, you must connect
the ZyXEL G-270S first.
ZyXEL Utility and Hardware Installation
The installation procedures are similar for all supported
Windows versions.
Install the ZyXEL Utility before you insert the ZyXEL G270S.
1 Insert the support CD into the CD-ROM drive on
your computer. The CD automatically runs.
Otherwise, locate and double-click setup.exe.
2 Select your language and click OK.
3 Click Install Utility to start installation.
4 A Welcome screen displays. Click Next.
5 Click Next to accept the default file location or click
Browse to select an alternate folder.
6 Click Finish to restart the computer.
7 Locate an available USB port on the computer.
8 Remove the protective cap to
expose the USB connector.
Insert the ZyXEL G-270S to
an available USB port on the
computer. The LED turns on
if the ZyXEL G-270S is properly inserted.
Never bend, force or twist the ZyXEL G-270S into the
port.
After you install the ZyXEL Utility and insert
the ZyXEL G-270S, an icon appears in the
system tray.
Driver Installtion for Windows XP
1 Remove the protective cap to expose the USB
connector. Insert the ZyXEL G-270S to an available
USB port on the computer. The LED turns on if the
ZyXEL G-270S is properly inserted.
2The Found New Hardware Wizard window
appears. Select Install from a list of specific
location (Advanced) and click Next.
3 Insert the included CD into your CD-ROM drive,
select Search removable media (floppy, CD-
ROM…) and then click Next.
4 A warning screen displays. Click Continue
Anyway.
5 After the driver has been installed successfully, click
Finish to complete the installation.
Refer to the User's Guide to configure the ZyXEL G270S.
Introduction to OTIST
In a wireless network, the wireless clients must have the
same SSID and security settings as the access point
(AP) or wireless router (we will refer to both as "AP"
here) in order to associate with it. Traditionally this meant
that you had to configure the settings on the AP and then
manually configure the exact same settings on each
wireless client.
OTIST (One-Touch Intelligent Security Technology)
allows you to transfer your AP's SSID and WEP or WPAPSK security settings to wireless clients that support
OTIST and are within transmission range. You can also
choose to have OTIST generate a WPA-PSK key for you
if you didn't configure one manually.
Enabling OTIST
You must enable OTIST on both the AP and wireless
client before you start transferring settings.
We use the Prestige 334WT and the G-270S screens in
this guide as an example. Screens may vary slightly for
your ZyXEL devices.
The AP and wireless client(s) MUST use the same Setup
key.
AP
You can enable OTIST using the Reset button or the
web configurator. If you use the Reset button, the default
(01234567) or previous saved (through the web
configurator) Setup key is used to encrypt the settings
that you want to transfer.
Hold in the Reset button for one or two seconds.
If you hold in the Reset button too long, the device will
reset to the factory defaults!
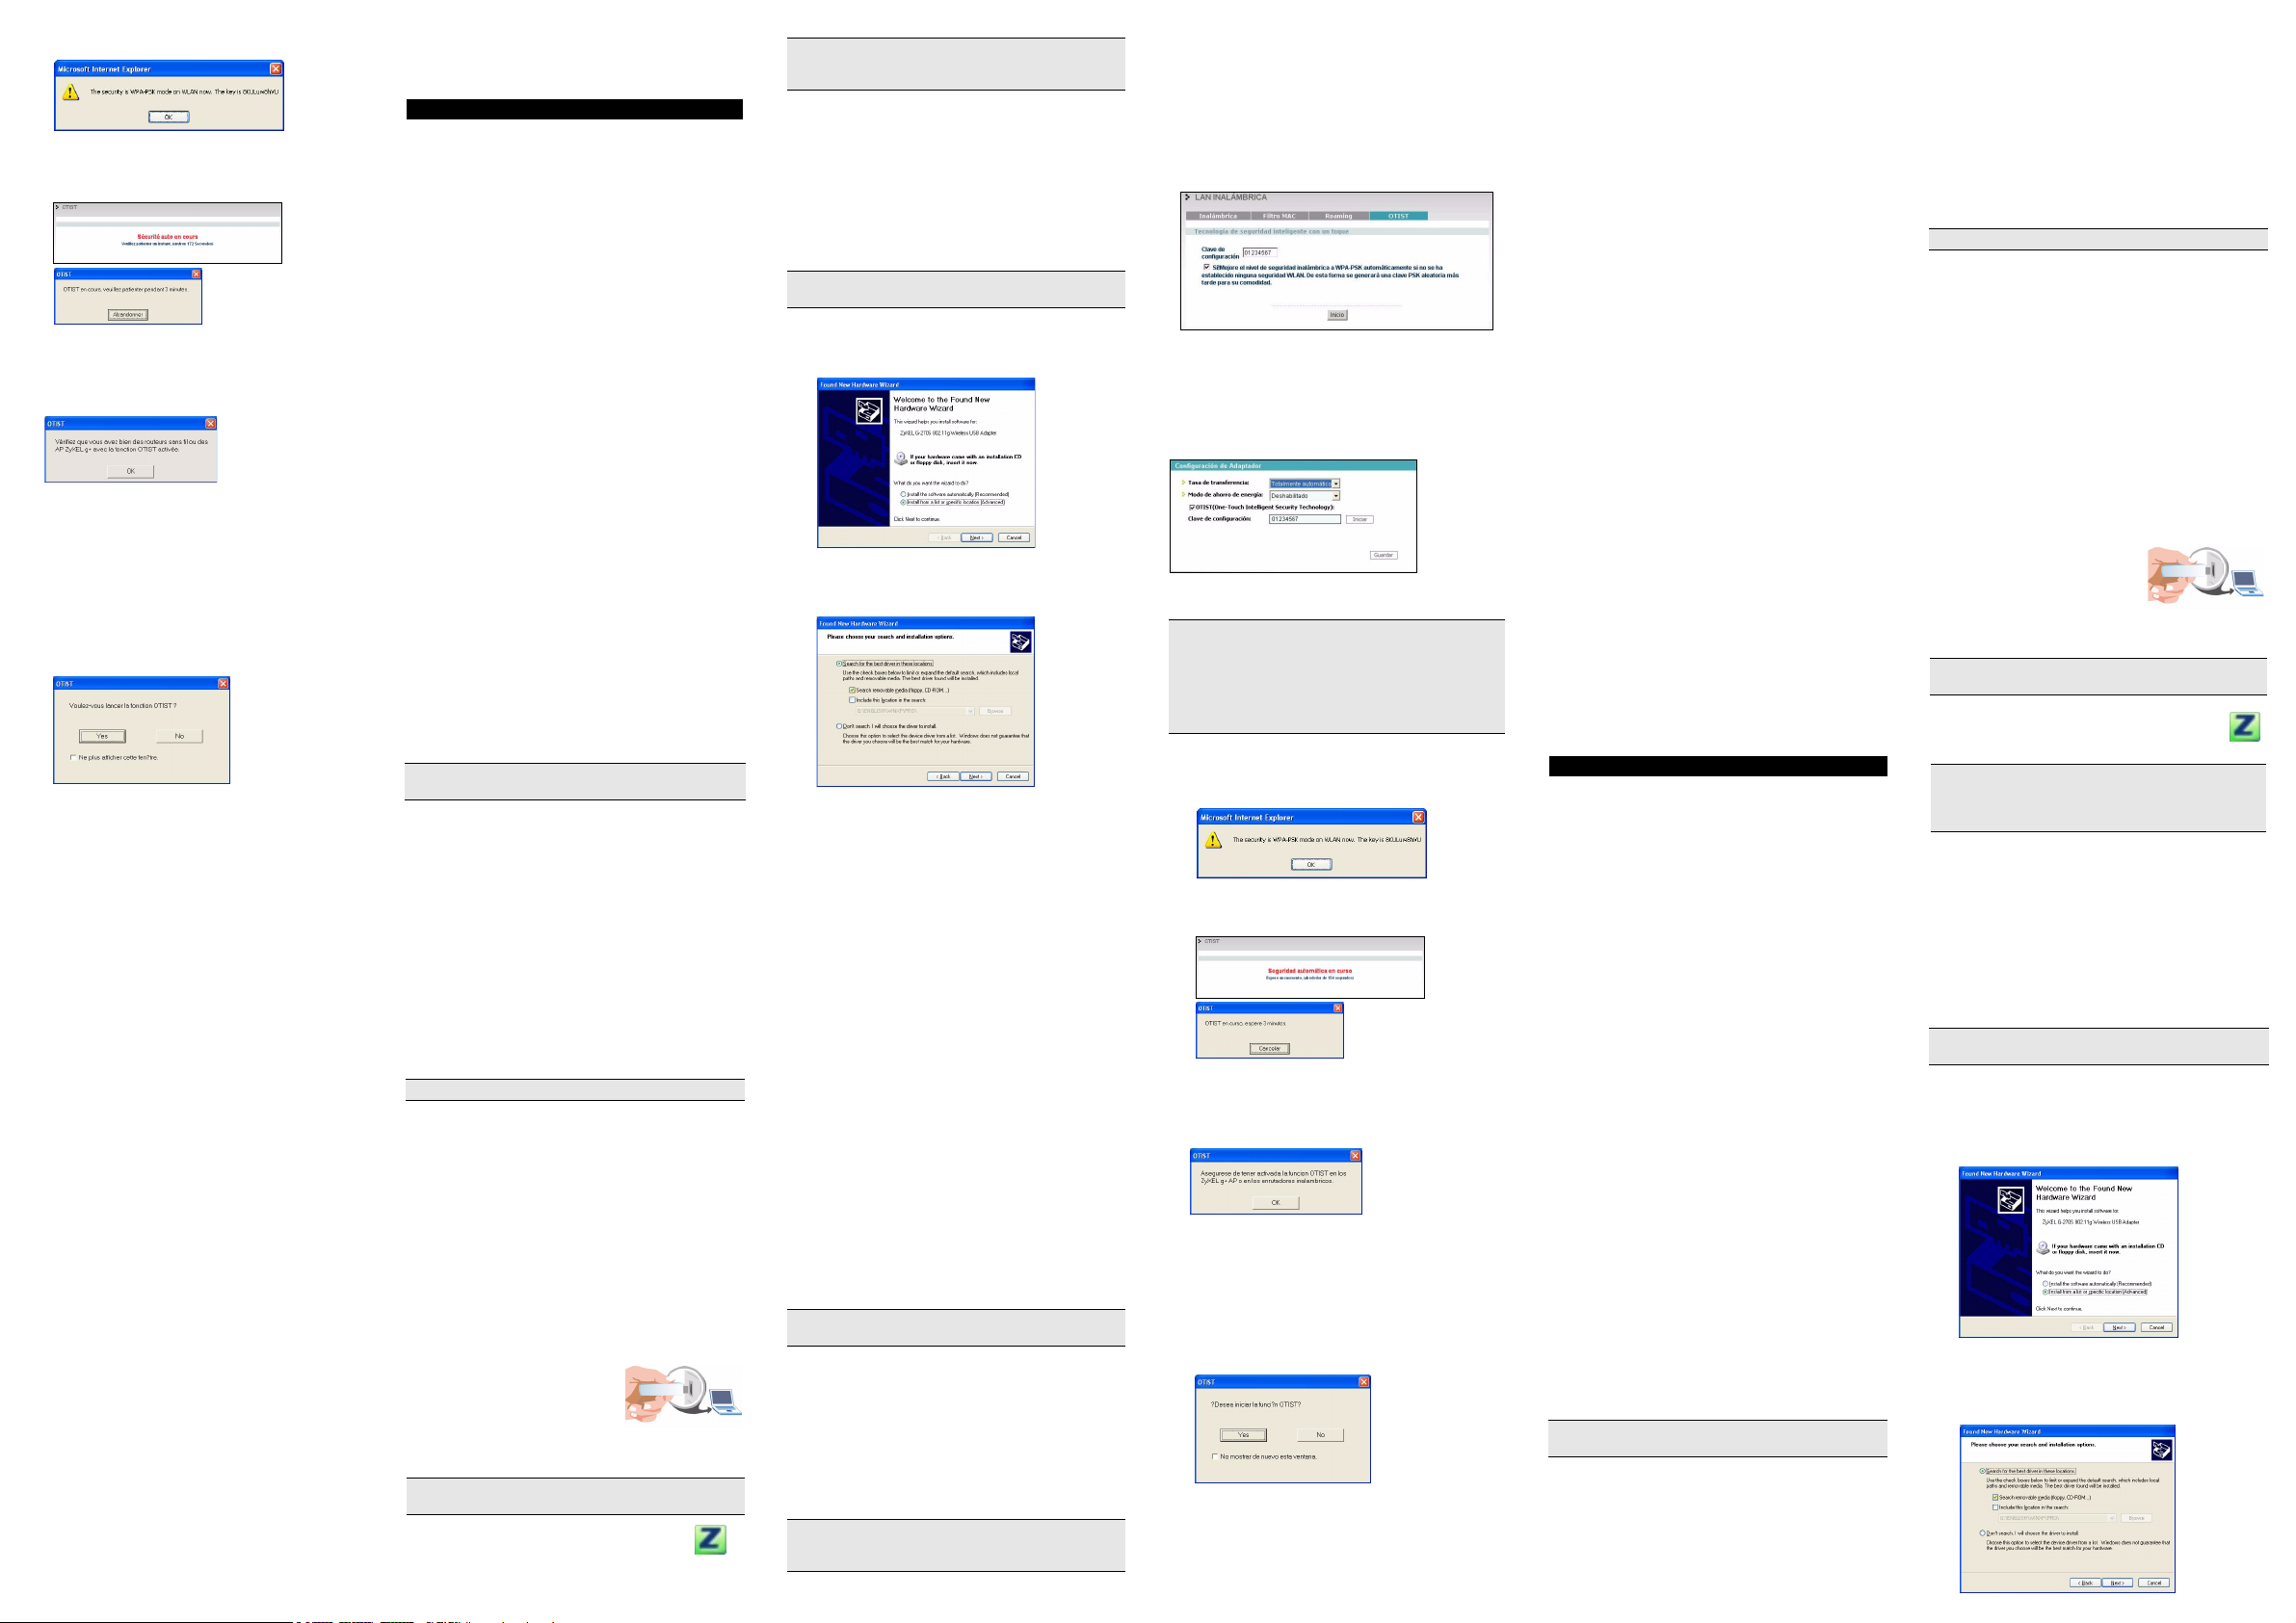
In the web configurator, go to the Wireless LAN main
screen and then select OTIST. To change the Setup key,
enter zero to eight printable characters. To have OTIST
automatically generate a WPA-PSK key, select the Yes
check box. If you manually configured a WEP key or a
WPA-PSK key and you also selected this check box,
then the key you manually configured is used.
Wireless Client
Start the ZyXEL Utility and click the Adapter tab. Select
the OTIST check box, enter the same Setup Key as
your AP's and click Save.
Starting OTIST
You must click Start in the AP OTIST web configurator
screen and in the wireless client(s) Adapter screen all
within three minutes (at the time of writing). You can start
OTIST in the wireless clients and AP in any order but
they must all be within range and have OTIST enabled.
1 In the AP, a web configurator screen pops up
showing you the security settings to transfer. After
reviewing the settings, click OK.
2 This screen appears while OTIST settings are being
transferred. It closes when the transfer is complete.
• In the wireless client, you see this screen if it can't find
an OTIST-enabled AP (with the same Setup key).
Click OK to go back to the ZyXEL Utility main screen.
• If there is more than one OTIST-enabled AP within
range, you see a screen asking you to select one AP
to get settings from.
Notes on OTIST
1 If you enabled OTIST in the wireless client, you see
this screen each time you start the ZyXEL Utility.
Click Yes for it to search for an OTIST-enabled AP.
2 If an OTIST-enabled wireless client loses its
wireless connection for more than ten seconds, it
will search for an OTIST-enabled AP for up to one
minute. (If you manually have the wireless client
search for an OTIST-enabled AP, there is no
timeout; click Cancel in the OTIST progress screen
to stop the search.)
3 When the wireless client finds an OTIST-enabled
AP, you must still click Start in the AP OTIST web
configurator screen or hold in the Reset button (for
one or two seconds) for the AP to transfer settings.
4 If you change the SSID or the keys on the AP after
using OTIST, you need to run OTIST again or enter
them manually in the wireless client(s).
5 If you configure OTIST to generate a WPA-PSK key,
this key changes each time you run OTIST.
Therefore, if a new wireless client joins your
wireless network, you need to run OTIST on the AP
and ALL the wireless clients again.
Troubleshooting
If Windows does not auto-detect the ZyXEL G-270S, do
the following:
• Make sure the ZyXEL G-270S is inserted into the
computer USB port properly and then restart your
computer. Check the LED on the ZyXEL G-270S.
• Perform a hardware scan by clicking Start, Settings,
Control Panel and double-clicking Add/Remove
Hardware. (Steps may vary depending on the version
of Windows). Follow the on-screen instructions to
search for the ZyXEL G-270S and install the driver.
• Check for possible hardware conflicts. In Windows,
click Start, Settings, Control Panel, System, Hard-
ware and then click Device Manager. Verify the sta-
tus of the ZyXEL G-270S under Network Adapter.
(Steps may vary depending on the version of Windows).
• Install the ZyXEL G-270S in another computer. If the
error persists, you may have a hardware problem. In
this case, you should contact your local vendor.
Deutsch
Vorgehensweise zum Aufrufen einer Produktzertifizierung
1 Gehen Sie zu www.zyxel.com
2 Wählen Sie Ihr Produkt aus der Auswahlliste auf der
ZyXEL Homepage aus, um die Seite des
entsprechenden Produkts aufzurufen.
3 Wählen Sie die Zertifizierung aus, die Sie von dieser
Seite aus aufrufen möchten.
Über Ihr ZyXEL G-270S
Der ZyXEL G-270S ist ein mit IEEE 802.11b/g
kompatibler drahtloser LAN-USB-Stick, der an jeden
USB-Anschluss passt. Mit dem ZyXEL G-270S können
Sie die drahtlose Mobilität innerhalb des
Abdeckungsbereichs genießen. Die IEEE 802.11gTechnologie ermöglicht einen größeren
Abdeckungsbereich und eine höhere Transferrate von
bis zu 54 Mbps. Ihr ZyXEL G-270S kann Daten mit einer
Geschwindigkeit von bis zu 108 Mbps übertragen, wenn
es mit einem AP oder Wireless-Router verbunden ist, bei
dem Super G aktiviert ist. Tatsächlich erzielte
Geschwindigkeiten hängen auch von der Entfernung
zum Zugangsknoten, Störeinflüssen usw. ab.
Installationsanforderungen
Stellen Sie bitte vor der Installation sicher, dass Ihr
Computer die folgenden Anforderungen erfüllt:
• Pentium II 300MHz oder höher
• Mindestens 6 MB freier Festplattenspeicher
• Mindestens 32 MB RAM
• CD-ROM-Laufwerk
• Ein USB-Anschluss (bei USB1.0/1.1 kann der ZyXEL
G-270S Daten nur mit einer Datenrate von bis zu
11Mbps übertragen)
• Windows 98 Second Edition, Windows ME, Windows
2000 oder Windows XP
• Benutzer von Windows 98 SE benötigen unter
Umständen die Windows 98 SE CD
Wenn Sie Funk Odyssey Client-Software auf dem
Computer installiert haben, deinstallieren (entfernen) Sie
bitte die Software.
Wenn Sie mit Windows XP arbeiten
WZC (Wireless Zero Configuration) ist ein UtilityProgramm für die Drahtloskonfiguration, das bei
Windows XP enthalten ist. Wenn Sie mit Windows XP
arbeiten und WZC verwenden möchten, können Sie
entweder
• das ZyXEL Utility-Programm installieren und dann
deaktivieren (indem Sie in einem beliebigen ZyXEL
Utility-Fenster auf die Schließen-Taste klicken)
oder
• nur den Treiber installieren. In diesem Fall muss zuerst der ZyXEL G-270S angeschlossen werden.
ZyXEL Utility- und Hardware-Installation
Der Installationsvorgang ist für alle unterstützten
Windows-Versionen ähnlich.
Bitte installieren Sie das "ZyXEL Utility" bevor Sie den
"ZyXEL-Adapter" mit Ihrem Computer verbinden.
1 Legen Sie die CD in das CD-ROM-Laufwerk Ihres
Computers ein. Die CD startet automatisch. Suchen
Sie andernfalls die Date setup.exe und klicken Sie
diese doppelt an.
2 Wählen Sie Ihre Sprache und klicken dann auf OK.
3 Klicken Sie auf Installationshilfsprogramm, um
die Installation zu starten.
4 Ein Begrüßungsbildschirm wird angezeigt. Klicken
Sie auf Weiter.
5 Klicken Sie auf Weiter, um den vorgegebenen
Zielordner zu bestätigen oder klicken Sie auf
Durchsuchen, um einen anderen Ordner
auszuwählen.
6 Klicken Sie auf Fertigstellen, um den Computer
neu zu starten.
7 Machen Sie einen freien USB-Anschluss am
Computer ausfindig.
8 Entfernen Sie die
Schutzkappe vom USB-
Stecker. Stecken Sie den
ZyXEL G-270S an den USB-
Anschluss des Computers an.
Wenn der ZyXEL G-270S richtig angeschlossen ist,
beginnt die LED zu leuchten.
Versuchen Sie unter keinen Umständen, die ZyXEL G270S durch Biegen, Drehen oder Gewaltanwendung in
den Einschub zu schieben.
Nach Installation des ZyXEL Utility und
Einschieben des ZyXEL G-270S erscheint ein
Symbol im Infobereich.
Wenn das ZyXEL Utility Symbol angezeigt wird, ist der
ZyXEL G-270S ordnungsgemäß installiert. Bitte lesen
Sie in der ZyXEL Bedienungsanleitung nach, um
Informationen über das Konfigurieren der ZyXEL G-270S
zu erhalten.
Treiberinstallation unter Windows XP
Wenn Sie den Windows XP Wireless Zero Configuration
(WZC)-Dienst zur Verwaltung des ZyXEL G-270S
verwenden möchten, folgen Sie bitte den
nachstehenden Schritten, um nur den Treiber zu
installieren.
1 Entfernen Sie die Schutzkappe vom USB-Stecker.
Stecken Sie den ZyXEL G-270S an den USB-
Anschluss des Computers an. Wenn der ZyXEL G-
270S richtig angeschlossen ist, beginnt die LED zu
leuchten. .
Der ZyXEL G-270S darf immer nur gerade, ohne
Drehen und ohne Druck in den USB-Anschluss gesteckt
werden.
2Das Hardwareupdate-Assistent-Fenster erscheint.
Wählen Sie Software von einer Liste oder
bestimmten Quelle installieren (für
fortgeschrittene Benutzer) und klicken Sie
anschließend auf Weiter.
3 Eine Warnmeldung erscheint. Klicken Sie auf
Continue Anyway (Installation fortsetzen).
4 Legen Sie die beigelegte CD in Ihr optisches
Laufwerk ein. Wählen Sie Wechselmedien
durchsuchen (Diskette, CD,...) und klicken Sie
anschließend auf Weiter.
5 Klicken Sie nach dem erfolgreichen Installieren des
Treibers auf Fertig stellen, um die Installation
abzuschließen.
Einführung von OTIST
In einem drahtlosen Netzwerk müssen die drahtlosen
Clients dieselben SSID- und Sicherheitseinstellungen
haben wie der AP (Access Point) oder der drahtlose
Router (im weiteren Textverlauf werden beide als AP
bezeichnet), damit sie sich mit ihnen in Verbindung
setzen können. Früher mussten zunächst die
Einstellungen am AP und dann genau dieselben
Einstellungen manuell an jedem drahtlosen Client
konfiguriert werden.
Mit der OTIST-Technologie (One-Touch Intelligent
Security Technology) ist es möglich, die AP SSID- und
WEP- oder WPA-PSK-Sicherheitseinstellungen zu
solchen drahtlosen Clients zu übertragen, die OTIST
unterstützen und sich innerhalb des
Übertragungsbereichs befinden. Sie können auch
festlegen, dass mit OTIST ein WPA-PSK-Schlüssel
erzeugt wird, wenn Sie keinen Schlüssel manuell
konfiguriert haben.
OTIST aktivieren
Vor dem Übertragen der Einstellungen müssen Sie
OTIST sowohl beim AP als auch beim drahtlosen Client
aktivieren.
In dieser Bedienungsanleitung verwenden wir die
Benutzeroberflächen des Prestige 334WT und G-270S
als Beispiel. Es ist möglich, dass die
Benutzeroberflächen bei Ihren ZyXEL-Geräten leicht
abweichen.
Der AP und die drahtlosen Client(s) MÜSSEN denselben
Setup Key (Schlüssel einrichten) verwenden.
AP
Sie können OTIST mit der Reset-Taste oder dem WebKonfigurator aktivieren. Wenn Sie die Reset-Taste
verwenden, können Sie den Standard-Schlüssel
einrichten (01234567) oder den zuvor gespeicherten
Schlüssel verwenden, um die Einstellungen zu
verschlüsseln, die übertragen werden sollen.
Halten Sie die Reset-Taste eine oder zwei Sekunden
lang gedrückt.
Wenn Sie jedoch zu lange auf die Reset-Taste drücken,
wird das Gerät auf die Standardeinstellungen
zurückgesetzt!
Wechseln Sie im Web-Konfigurator in das Wireless
LAN-Hauptfenster und wählen Sie OTIST. Um den
Schlüssel einrichten zu ändern, geben Sie null bis acht
druckbare Zeichen ein. Damit OTIST automatisch einen
WPA-PSK-Schlüssel erzeugt, wählen Sie die Option Yes
(Ja). Wenn Sie einen WEP- oder einen WPA-PSKSchlüssel manuell konfiguriert haben und auch diese
Option wählen, wird der Schlüssel verwendet, den Sie
manuell konfiguriert haben.
Drahtloser Client
Starten Sie das ZyXEL-Programm und klicken Sie auf
die Registerkarte Adapter. Wählen Sie die Option
OTIST, geben Sie denselben Schlüssel einrichten ein,
den auch der AP hat und klicken Sie auf Save
(Speichern).
Starten von OTIST
Klicken Sie innerhalb von drei Minuten (beim Schreiben)
im OTIST-Web-Konfigurator des AP und im Fenster
Adapter des/der drahtlosen Clients auf Start. Sie
können in den drahtlosen Clients und im AP in einer
beliebigen Reihenfolge OTIST starten, sie müssen sich
jedoch alle innerhalb der Reichweite befinden, und
OTIST muss aktiviert sein.
1 Im AP erscheint ein Web-Konfiguratorfenster, in
dem die Sicherheitseinstellungen für die
Page 2
Übertragung angezeigt werden. Überprüfen Sie die
Einstellungen und klicken Sie auf OK.
2 Dieses Fenster erscheint, während die OTIST-
Einstellungen übertragen werden. Es wird
geschlossen, sobald die Übertragung
abgeschlossen ist.
• Im drahtlosen Client erscheint dieses Fenster, wenn
er keinen AP findet, bei dem OTIST aktiviert ist (und
der denselben Schlüssel einrichten hat). Klicken Sie
auf OK, um zum Hauptfenster des ZyXEL-Programms
zurückzukehren.
• Wenn sich im Übertragungsbereich mehr als ein AP
befindet, bei dem OTIST aktiviert ist, werden Sie in
einem Fenster dazu aufgefordert, den AP auszuwählen, von dem die Einstellungen geladen werden
sollen.
Hinweise zu OTIST
1 Wenn Sie im drahtlosen Client OTIST aktiviert
haben, erscheint dieses Fenster bei jedem Start des
Programms. Klicken Sie auf Yes (Ja), damit es nach
einem AP sucht, bei dem OTIST aktiviert ist.
2 Wenn ein drahtloser Client, bei dem OTIST aktiviert
ist, die drahtlose Verbindung länger als 10
Sekunden verliert, sucht er bis zu eine Minute lang
nach einem AP, bei dem OTIST aktiviert ist. (Wenn
Sie den drahtlosen Client manuell nach einem AP
suchen lassen, bei dem OTIST aktiviert ist, schaltet
sich das Gerät nicht automatisch ab; klicken Sie im
OTIST-Fortschrittsfenster auf Cancel (Abbrechen),
um die Suche abzubrechen.)
3 Wenn der drahtlose Client einen AP findet, bei dem
OTIST aktiviert ist, müssen Sie im OTIST-Web-
Konfiguratorfenster des AP auf Start klicken, oder
auf die Reset-Taste drücken (eine oder zwei
Sekunden lang), damit der AP die Einstellungen
überträgt.
4 Wenn Sie die SSID oder den Schlüssel des AP
ändern, nachdem Sie OTIST verwendet haben,
müssen Sie OTIST noch einmal starten, oder sie bei
den drahtlosen Clients manuell eingeben.
5 Wenn Sie OTIST so konfigurieren, dass ein WPA-
PSK-Schlüssel erzeugt wird, ändert sich dieser
Schlüssel mit jedem Mal, dass OTIST durch Sie
gestartet wird. Aus diesem Grund müssen Sie,
wenn ein neuer drahtloser Client zum Netzwerk
hinzukommt, beim AP und ALLEN drahtlosen
Clients OTIST noch einmal starten.
Störungsbeseitigung
Windows entdeckt die ZyXEL G-270S nicht automatisch.
• Prüfen Sie, ob der ZyXEL G-270S richtig an den USBAnschluss des Computers angeschlossen ist und
starten Sie den Computer neu. Prüfen Sie die LED am
ZyXEL G-270S.
• Führen Sie eine Hardwaresuche durch, indem Sie auf
Einstellungen, Systemsteuerung klicken und doppelklicken Sie auf Hardware hinzufügen/entfernen.
(Die Schritte können sich je nach Windows-Version
leicht unterscheiden). Folgen Sie den Bildschirmanweisungen, um nach der ZyXEL G-270S zu suchen
und den Treiber zu installieren.
• Überprüfen Sie mögliche Hardwarekonflikte. Klicken
Sie in Windows auf Start, Einstellungen, System-
steuerung, System, Hardware und doppelklicken
Sie auf Geräte-Manager. Überprüfen Sie den Status
der ZyXEL G-270S unter Netzwerk-Adapter. (Die
Schritte können sich je nach Windows-Version leicht
unterscheiden).
• Installieren Sie die ZyXEL G-270S in einem anderen
Rechner. Besteht der Fehler weiterhin, liegt unter
Umständen ein Hardwareproblem vor. In diesem Fall
sollten Sie sich mit Ihrem örtlichen Händler in Verbindung setzen.
Español
Procedimiento para ver las certificaciones de un
producto
1 Vaya a www.zyxel.com.
2 Seleccione el producto que desea en el cuadro de
lista desplegable que se encuentra en la página
principal de ZyXEL paraobtener acceso a la página
de dicho producto.
3 Seleccione la certificación que desea ver en esta
página.
Acerca de su ZyXEL G-270S
El ZyXEL G-270S es un dispositivo USB LAN
inalámbrico compatible con IEEE 802.11b/g que encaja
en cualquier ranura USB. Con el ZyXEL G-270S, puede
disfrutar de la movilidad inalámbrica dentro del área de
cobertura. La tecnología IEEE 802.11g proporciona un
mayor rango y ofrece velocidades de transmisión de
hasta 54 Mbps. Su ZyXEL G-270S puede transmitir
hasta 108 Mbps al conectarse a un PA o router
inalámbrico con la característica Super G activada. Las
velocidades reales alcanzadas dependen de la distancia
desde el AP, ruido, etc.
Requisitos de instalación
Antes de la instalación, asegúrese de que tiene un
equipo en el que se cumplen los siguientes requisitos:
• Pentium II a 300MHz o superior
• Un mínimo de 6 MB disponibles de espacio en disco
duro
• Un mínimo de 32 MB RAM
• Una unidad CD-ROM
• Un puerto USB (con USB1.0/1.1, el ZyXEL G-270S
sólo puede transmitir hasta 11Mbps)
• Windows 98 Second Edition, Windows ME, Windows
2000 o Windows XP
• Los usuarios de Windows 98 SE podrían necesitar el
CD de Windows 98 SE
Si utiliza el software Funk Odyssey Client en el equipo,
desinstálelo (quítelo).
Usuarios de Windows XP
Wireless Zero Configuration (WZC) es una utilidad de
configuración inalámbrica incluida en Windows XP. Si es
usuario de Windows XP y desea utilizar WZC, deberá:
• Instalar la utilidad ZyXEL y deshabilitarla (haciendo
clic en el botón cerrar en cualquier pantalla de la utilidad ZyXEL)
O
• Instalar sólo el controlador. En este caso debe conectar antes el ZyXEL G-270S.
Instalación del hardware y la utilidad ZyXEL
Los procedimientos de instalación son similares para
todas las versiones admitidas de Windows.
NO inserte la ZyXEL G-270S en este punto.
1 Inserte el CD de soporte dentro de la unidad CD-
ROM de su equipo. El CD se ejecuta
automáticamente. Si no es así, ubique el archivo
setup.exe y haga clic sobre el mismo.
2 Seleccione su idioma y haga clic en OK.
3 Haga clic en Utilidad de instalación para iniciar la
instalación.
4 Aparece una pantalla de Bienvenida. Haga clic en
Siguiente.
5 Haga clic en Siguiente para aceptar la ubicación de
archivo predeterminada o haga clic en Examinar
para seleccionar una carpeta alternativa.
6 Haga clic en Ter mina r para reiniciar el equipo.
7 Localice una ranura USB disponible en el equipo.
8 Quite la tapa protectora para
descubrir el conector USB.
Inserte el ZyXEL G-270S en
un puerto USB disponible en
el ordenador. Los indicadores
LED se encienden si se ha insertado la ZyXEL G-
270S apropiadamente.
No doble, fuerce, ni retuerza la ZyXEL G-270S para que
encaje en la ranura.
Tras instalar la Utilidad ZyXEL e insertar el
ZyXEL G-270S, aparece un icono en la
bandeja del sistema.
Si aparece el icono de la Utilidad ZyXEL, la ZyXEL G270S se ha instalado convenientemente. Consulte la
Guía del usuario para configurar la ZyXEL G-270S.
Instalación del controlador para Windows XP
Si desea utilizar el servicio Configuración inalámbrica
rápida (WZC, Wireless Zero Configuration) de Windows
XP para administrar el dispositivo ZyXEL G-270S, siga
los pasos siguientes para instalar sólo el controlador.
1 Quite la tapa protectora para descubrir el conector
USB. Inserte el ZyXEL G-270S en el puerto USB del
ordenador. El LED se encenderá si el ZyXEL G270S está bien insertado.
Nunca doble, fuerce o tuerza el ZyXEL G-270S en el
interior del puerto.
2 Aparecerá la ventana Asistente para hardware
nuevo encontrado. Seleccione Instalar desde
una lista o ubicación específica (avanzado) y, a
continuación, haga clic en Siguiente.
3 Inserte el CD incluido en la unidad CD-ROM,
seleccione Buscar en medios extraíbles
(disquete, CD-ROM...) y, a continuación, haga clic
en Siguiente.
4 Aparecerá una pantalla de aviso. Haga clic en
Continuar de todos modos.
5 Cuando el controlador se haya instalado
correctametne, haga clic en Finalizar para
completar la instalación.
Introducción a OTIST
En una red inalámbrica, los clientes inalámbricos deben
tener la misma configuración de SSID y seguridad que el
punto de acceso (PA) o router inalámbrico (nos
referiremos a ambos aquí como PA) para asociarlos con
él. Tradicionalmente esto significaba que se debían
configurar los valores del PA y luego configurar
manualmente los mismos valores exactos en cada
cliente inalámbrico.
OTIST (Tecnología de seguridad inteligente con un
toque) le permite transferir su configuración de
seguridad SSID y WEP o WPA-PSK del PA a clientes
inalámbricos que soportan OTIST y que están dentro del
alcance de transmisión. También puede hacer que
OTIST genere una clave WPA-PSK si no ha configurado
una manualmente.
Activar OTIST
Debe activar OTIST tanto en el PA como en el cliente
inalámbrico antes de comenzar a transferir la
configuración.
Usamos las pantallas del Prestige 334WT y del G-270S
en esta guía como ejemplo. Las pantallas pueden variar
ligeramente según los dispositivos ZyXEL.
El PA y el/los cliente(s) inalámbrico(s) DEBEN usar la
misma Setup key (Clave de configuración).
PA
Puede activar OTIST utilizando el botón Reset
(Reiniciar) del configurador de web. Si utiliza el botón
Reset (Reiniciar), la Setup key (Clave de
configuración) predeterminada (01234567) o la
grabada anteriormente (con el configurador de web) se
utilizará para cifrar la configuración que desee transferir.
Mantenga pulsado el botón Reset (Reiniciar) durante
uno o dos segundos.
¡Si mantiene pulsado el botón Reset (Reiniciar)
demasiado tiempo, el dispositivo restaurará los valores
predeterminados de fábrica!
En el configurador de web, vaya a la pantalla principal de
Wireless LAN (LAN inalámbrica) y seleccione OTIST.
Para cambiar la Setup key (Clave de configuración),
introduzca de cero a ocho caracteres imprimibles. Para
que OTIST genere automáticamente una clave WPAPSK, seleccione la casilla de verificación Yes (Sí). Si ha
configurado manualmente una clave WEP o una clave
WPA-PSK y además ha seleccionado esta casilla de
verificación, entonces se utilizará la clave configurada
manualmente.
Cliente inalámbrico
Inicie la utilidad ZyXEL y haga clic en la ficha Adapter
(Adaptador). Seleccione la casilla de verificación
OTIST, introduzca la misma Setup Key (Clave de
configuración) que en su PA y haga clic en Save
(Guardar).
Iniciar OTIST
Debe hacer clic en Start (Iniciar) en la pantalla del
configurador de web OTIST del PA y en la pantalla
Adapter (Adaptador) del cliente(s) inalámbrico(s), todo
en tres minutos (en el momento de la escritura). Puede
iniciar OTIST en los clientes inalámbricos y el PA en
cualquier orden, pero todos deben estar dentro del
alcance y tener OTIST activado.
1 En el PA, aparecerá una pantalla del configurador
de web mostrándole la configuración de seguridad
para transferir. Tras revisar la configuración, haga
clic en OK (Aceptar).
2 Esta pantalla aparece mientras la configuración de
OTIST se está transfiriendo. Se cierra cuando la
transferencia se ha completado.
• En el cliente inalámbrico, verá esta pantalla si no
puede encontrar un PA con OTIST activado (con la
misma Setup key (Clave de configuración)). Haga
clic en OK (Aceptar) para regresar a la pantalla principal de la utilidad ZyXEL.
• Si hay más de un PA con OTIST activado dentro del
alcance, verá una pantalla pidiéndole que seleccione
un PA desde el que obtener la configuración.
Notas sobre OTIST
1 Si ha activado OTIST en el cliente inalámbrico, verá
esta pantalla cada vez que inicie la utilidad. Haga
clic en Yes (Sí) para que busque un PA con OTIST
activado.
2 Si un cliente inalámbrico con OTIST activado pierde
su conexión inalámbrica durante más de diez
segundos, buscará un PA con OTIST activado
durante un minuto. (Si tiene activada la búsqueda
manual de clientes inalámbricos para un PA con
OTIST activado, no hay límite de tiempo; haga clic
en Cancel (Cancelar) en la pantalla de progreso de
OTIST para detener la búsqueda)
3 Cuando el cliente inalámbrico encuentre un PA con
OTIST activado, deberá hacer clic en Start (Iniciar)
en la pantalla del configurador de web OTIST del PA
o mantener pulsado el botón Reset (Reiniciar)
(durante uno o dos segundos) para que el PA
transfiera la configuración.
4 Si cambia el SSID o las claves en el PA tras usar
OTIST, deberá ejecutar OTIST de nuevo o
introducirlas manualmente en el/los cliente(s)
inalámbrico(s).
5 Si configura OTIST para que genere una clave
WPA-PSK, esta clave cambiará cada vez que
ejecute OTIST. Por tanto, si un nuevo cliente
inalámbrico se une a su red inalámbrica, deberá
ejecutar OTIST en el PA y TODOS los clientes
inalámbricos de nuevo.
Solución de problemas
Windows no detecta automáticamente la ZyXEL G270S.
• Compruebe que el ZyXEL G-270S esté insertado en
el puerto USB del ordenador correctamente y reinicie
el ordenador. Compruebe el LED del ZyXEL G-270S.
• Realice una exploración de hardware haciendo clic en
Inicio, Configuración, Panel de control y haga
doble clic en Agregar/Suprimir hardware. (Los
pasos podrían variar dependiendo de la versión de
Windows). Siga las instrucciones que aparecen en
pantalla para buscar la ZyXEL G-270S e instalar el
controlador.
• Compruebe si existen posibles conflictos de hardware. En Windows, haga clic en Inicio, Configu-
ración, Panel de Control, Sistema, Hardware y, a
continuación, haga clic en Administrador de dispos-
itivos. Verifique el estado de la ZyXEL G-270S bajo
Adaptadores de red. (Los pasos podrían variar
dependiendo de la versión de Windows).
• Instale la ZyXEL G-270S en otro equipo. Si el error
persiste, es posible que tenga problemas de hardware. En este caso, debería ponerse en contacto con
su proveedor local.
Français
Procédure permettant de consulter une(les)
Certification(s) du Produit
1 Connectez vous sur www.zyxel.com.
2 Sélectionnez votre produit dans la liste déroulante
se trouvant sur la page d'accueil ZyXEL pour
accéder à la page du produit concerné.
3 Sélectionnez sur cette page la certification que vous
voulez consulter.
A propos de votre ZyXEL G-270S
Le ZyXEL G-270S est un stick USB LAN sans fil
compatible IEEE 802,11b/g s'adaptant à tout logement
USB. Avec la ZyXEL G-270S, vous pouvez profiter de la
mobilité sans fil dans la zone de couverture. La
technologie IEEE 802.11g permet une plus grande
portée et offre des vitesses de transmission pouvant
atteindre les 54 Mbps. Votre ZyXEL G-270S peut
transmettre jusqu'à 108 Mbps quand il est connecté à un
AP ou à un routeur sans fil avec la fonctionnalité Super
G activée. La vitesse réelle dépend également de la
distance de l'AP, des parasites, etc.
Configuration requise
Avant l'installation, assurez-vous que vous avez un
ordinateur avec la configuration suivante:
• Pentium II 300MHz ou plus
• Au minimum 6 Mo d'espace disponible sur le disque
dur
• An minimum 32 Mo de RAM
• Un lecteur de CD-ROM
• Un port USB (avec USB1.0/1.1, le ZyXEL G-270S
peut uniquement transmettre à un débit maximum de
11M bps )
• Windows 98 Second Edition, Windows ME, Windows
2000 ou Windows XP
• Il se peut que les utilisateurs de Windows 98 SE aient
besoin du CD Windows 98 SE
Si vous avez installè le logiciel Funk Odyssey Client sur
l'ordinateur, dèsinstallez-le (supprimez-le).
Utilisateurs de Windows XP
Configuration zéro sans fil (Wireless Zero Configuration)
(WZC) est un utilitaire de configuration sans fil fourni
avec Windows XP. Si vous êtes un utilisateur de
Windows XP et que vous voulez utiliser WZC, alors vous
pouvez :
• Installer l'utilitaire ZyXEL et ensuite le désactiver (en
cliquant sur le bouton fermer dans tout écran de l’utilitaire de ZyXEL)
ou
• installer uniquement le pilote. Dans ce cas, vous
devez d'abord connecter le ZyXEL G-270S.
Installation de l'utilitaire ZyXEL et de l'èquipement
Les procédures d'installation sont similaires pour toutes
les versions de Windows prises en charge.
NE PAS insérer la ZyXEL G-270S pour l'instant.
1 Placez le CD de soutien dans le lecteur de CD-ROM
de votre ordinateur. Le CD s'éxécute
automatiquement. Sinon, recherchez et double-
cliquez sur setup.exe.
2 Sélectionnez votre langue et cliquez sur OK.
3 Cliquez sur Installer l'utilitatire pour lancer
l'installation.
4 Un écran de bienvenue s'affiche. Cliquez sur
Suivant.
5 Cliquez sur Suivant pour accepter l'emplacement
des fichiers par défaut, sinon cliquez sur Parcourir
pour sélectionner un autre dossier.
6 Cliquez sur Ter mi ner pour redémarrer votre
ordinateur.
7 Recherchez un emplacement USB disponible sur
l'ordinateur.
8 Retirez le cache de protection
pour laissez apparaître le
connecteur USB. Insérez le
ZyXEL G-270S dans un port
USB disponible sur
l'ordinateur. Les témoins LED s'allument si la ZyXEL
G-270S est insérée correctement.
Ne jamais courber, forcer ou tordre la ZyXEL G-270S
pour la faire entrer dans l'emplacement.
Aprës que vous avez installé l'Utilitaire ZyXEL
et inséré la ZyXEL G-270S, une icône s'affiche
dans la barre systême.
Si l'icône de l'utilitaire ZyXEL s'affiche, cela signifie que
la ZyXEL G-270S a été installée correctement. Veuillez
vous reporter au Guide de l'utilisateur pour configurer la
ZyXEL G-270S.
Installation du Pilote pour Windows XP
Si vous voulez utiliser le service Wireless Zero
Configuration (WZC) de Windows XP pour gérer la
ZyXEL G-270S, veuillez suivre les étapes ci-dessous
pour installer uniquement le pilote.
1 Retirez le cache de protection pour laissez
apparaître le connecteur USB. Insérez le ZyXEL G-
270S dans un port USB sur l'ordinateur. La LED
s'allume si le ZyXEL G-270S est correctement
inséré.
Ne jamais plier, forcer ou tordre le ZyXEL G-270S dans le
port.
2 La fenêtre Assistant de Détection du Nouveau
Matèriel (Found New Hardware Wizard)
apparaótra. Sèlectionnez Installer à partir d'une
liste d'emplacements spécifiques (Avancé)
(Install from a list of specific location
(Advanced)) et cliquez sur Suivant (Next).
3 Insérez le CD livré dans votre lecteur de CD-ROM,
sélectionnez Rechercher le support amovible
(disquette, CD-ROM...) (Search removable media
(floppy, CD-ROM…)) puis cliquez sur Suivant
(Next).
Page 3

4 Un écran d'avertissement apparaît. Cliquez sur
Continuer quand-même.
5 Une fois le pilote installé avec succés, cliquez sur
Ter mi ner (Finish) pour terminer l'installation.
Présentation d'OTIST
Dans un réseau sans fil, les clients sans fil doivent avoir
les mêmes paramètres SSID et de sécurité que le point
d'accès (AP) ou le routeur sans fil (nous les nommerons
tous deux "AP" ici) afin de s'associer à celui-ci.
Traditionnellement, cela signifie que vous devez
configurer les paramètres sur l'AP et configurer
manuellement exactement les mêmes paramètres sur
chaque client sans fil.
OTIST (One-Touch Intelligent Security Technology) vous
permet de transférer les paramètres de sécurité SSID,
WEP et WPA-PSK de votre AP vers des clients sans fil
prenant en charge OTIST et se trouvant dans les limites
de la plage de transmission. Vous pouvez aussi choisir
de faire générer une clé WPA-PSK par OTIST pour vous
si vous ne voulez pas la configurer manuellement.
Activer OTIST
Vous devez activer OTIST à la fois sur l'AP et le client
avant de commencer à transférer les paramètres.
Nous utilisons les écrans du Prestige 334WT et du
ZyXEL G-270S comme exemple dans ce guide. Les
écrans peuvent légèrement varier selon vos matériels
ZyXEL.
L'AP et le(s) client(s) sans fil DOIVENT utiliser la même
Setup key (Clé de configuration).
AP
Vous pouvez activer OTIST à l'aide du bouton Reset
(Réinitialiser) ou du configurateur web. Si vous utilisez
le bouton Reset (Réinitialiser), la Setup key (Clé de
configuration) par défaut (01234567) ou celle
précédemment enregistrée (à l'aide du configurateur
web) est utilisée pour coder les paramètres que vous
voulez transférer.
Appuyez sur le bouton Reset (Réinitialiser) pendant
une à deux secondes.
Si vous appuyez trop longtemps sur le bouton Reset
(Réinitialiser), le périphérique sera réinitialisé aux
paramètres d'usine!
Dans le configurateur web, allez à l'écran principal du
Wireless LAN (LAN sans fil) et sélectionnez OTIST.
Pour changer la Setup key (Clé de configuration),
entrez zéro à huit caractères imprimables. Pour
qu'OTIST génère automatiquement une clé WPA-PSK,
cochez la case Yes (Oui). Si vous avez configuré
manuellement une clé WEP ou une clé WPA-PSK et que
vous avez aussi cochez la case, alors la clé que vous
avez configuré manuellement est utilisée.
Client sans fil
Démarrez l'utilitaire de ZyXEL et cliquez sur l'onglet
Adapter (Adaptateur). Sélectionnez la case à cocher
OTIST, entrez la même Setup Key (Clé de
configuration) que pour votre AP et cliquez sur Save
(Enregistrer).
Démarrer OTIST
Vous devez cliquer sur Start (Démarrer) dans l'écran du
configurateur web OTIST de l'AP et dans l'écran
Adapter (Adaptateur) du (des) client(s) sans fil le tout
en l'espace de trois minutes (au moment de la
rédaction). Vous pouvez démarrer OTIST dans les
clients sans fil et l'AP dans n'importe quel ordre mais ils
doivent tous se trouver à portée et avoir OTIST activé.
1 Dans l'AP, un écran de configurateur web apparaît
vous indiquant les paramètres de sécurité à
transférer. Après avoir vérifié les paramètres,
cliquez sur OK.
2 Cet écran apparaît quand les paramètres OTIST
sont en cours de transfert. Il se ferme quand le
transfert est terminé.
• Dans le client sans fil, cet écran apparaît s'il ne trouve
pas d'AP avec la fonction OTIST activée (avec la
même Setup key (Clé de configuration)). Cliquez
sur OK pour retourner à l'écran principal de l'utilitaire
du ZyXEL.
• S'il y a plus d'un AP à portée avec la fonction OTIST
activée, vous verrez apparaître un écran vous invitant
à sélectionner un AP à partir duquel obtenir les
paramètres.
Remarques sur OTIST
1 Si vous activez OTIST dans le client sans fil, vous
verrez cet écran chaque fois que vous démarrerez
l'utilitaire. Cliquez sur Yes (Oui) pour qu'il recherche
un AP avec la fonction OTIST activée.
2 Si un client sans fil avec la fonction OTIST activée
perd sa connexion sans fil pendant plus de dix
secondes, il recherchera un AP avec la fonction
OTIST activée pendant une minute au maximum.
(Si vous faites une recherche manuelle d'un AP
avec la fonction OTIST activée par le client sans fil,
il n'y a pas de délai; cliquez sur Cancel (Annuler)
dans l'écran de progression d'OTIST pour arrêter la
recherche.)
3 Quand le client sans fil trouve un AP avec la
fonction OTIST activée, vous devez cliquer sur Start
(Démarrer) dans l'écran du configurateur web
OTIST de l'AP ou maintenir le bouton Reset
(Réinitialiser) enfoncé (pendant une à deux
secondes) pour permettre à l'AP de transférer les
paramètres.
4 Si vous modifiez le SSID ou les clés sur l'AP après
avoir utilisé OTIST, vous devez exécuter à nouveau
OTIST ou les entrer manuellement dans le(s)
client(s) sans fil.
5 Si vous configurez OTIST pour générer une clé
WPA-PSK, cette clé change chaque fois que vous
exécutez OTIST. Donc, si un nouveau client se
connecte à votre réseau sans fil, vous devez à
nouveau exécuter OTIST sur l'AP et TOUS les
clients sans fil.
Dèpannage
Windows ne détecte pas la ZyXEL G-270S.
• Vérifiez que le ZyXEL G-270S est correctement
inséré dans le port USB de l'ordinateur et redémarrez
votre ordinateur. Observez la LED sur le ZyXEL G270S
• Effectuez une recherche de matériel en cliquant sur
Démarrer, Paramètres, Panneau de configuration
et double-cliquez sur Ajout/Suppression de Matériel.
(Il est possible que la procédure varie en fonction de
votre version de Windows). Suivez les instructions à
l'écran pour rechercher la ZyXEL G-270S et installer
le pilote.
• Vérifiez s'il n'y a pas de conflit de matériel. Dans Windows, cliquez sur Démarrer, Paramètres, Panneau
de configuration, Systême, Equipement, puis
cliquez sur Gestionnaire de périphériques. Vérifiez
l'ètat de la ZyXEL G-270S sous Carte réseau. (Il est
possible que la procédure varie en fonction de votre
version de Windows).
• Installez la ZyXEL G-270S dans un autre ordinateur.
Si l'erreur persiste, il se peut que vous ayez un
problême avec l'équipement. Dans ce cas, vous
devez prendre contact avec votre revendeur local.
Italiano
Procedura per visualizzare le certificazioni di un prodotto
1 Andare alla pagina www.zyxel.com
2 Nel sito ZyXEL, selezionare il proprio prodotto
dall’elenco a discesa per andare alla pagina di quel
prodotto.
3 Da questa pagina selezionare la certificazione che
si vuole vedere.
La vostra ZyXEL G-270S
ZyXEL G-270S è un dispositivo stick USB per LAN
wireless conforme allo standard IEEE 802.11b/g che si
collega a qualsiasi porta USB. La tecnologia IEEE
802.11g procura una maggiore portata ed offre velocità
di trasmissione fino a 54 Mbps. Attivando la funzionalità
Super G, il vostro ZyXEL G-270S può trasmettere dati
fino alla velocità di 108 Mbps quando connesso a un AP
o a un router wireless. Le velocità reali raggiunte,
dipendono anche dalla distanza dall'AP, dal rumore, ecc.
Requisiti per l'installazione
Prima dell'installazione verificare che il computer sia
dotato di qaunto segue:
• Pentium II a 300 MHz o superiore
• Spazio libero disponibile nel disco rigido di almeno 6
MB
• Almeno 32 MB di RAM
• Unità CD-ROM
• Una porta USB (con USB versioni 1.0/1.1, lo ZyXEL
G-270S può solo trasmettere fino alla velocità di 11
Mbps)
• Windows 98 Second Edition, Windows ME, Windows
2000 o Windows XP
• Gli utenti di Windows 98 SE potrebbero aver bisogno
del CD di Windows 98 SE
Se sul computer è installato il software Funk Odyssey
Client, disinstallarlo (rimuoverlo).
Utenti di Windows XP
Wireless Zero Configuration (WZC) è un’unità di
configurazione wireless fornita in dotazione con
Windows XP. Se si usa Windows XP e si desidera
utilizzare WZC, è possibile scegliere una delle opzioni
seguenti:
• Installare ZyXEL Utility e quindi disabilitarlo (facendo
clic sul pulsante di chiusura in una delle schermate di
ZyXEL Utility)
Oppure
• Installare solamente il driver. In questo caso, è necessario prima collegare il ZyXEL G-270S.
Installazione dell'hardware e dell'Utility ZyXEL
Le procedure di installazione sono simili per tutte le
versioni di Windows supportate.
NON inserire la ZyXEL G-270S a questo punto.
1 Inserire il CD di supporto nell'unità CD-ROM del
computer. Il CD verrà eseguito automaticamente. In
caso contrario, individuare e fare doppio clic su
setup.exe.
2 Selezionare la lingua e fare clic su OK.
3 Fare clic su Installa Utilità per avviare
l’installazione.
4 Verrà visualizzata una schermata di benvenuto.
Premere Avanti.
5 Premere Avanti per accettare la posizione
predefinita del file, oppure premere Sfoglia per
scegliere un'altra cartella.
6 Premere Fine per riavviare il computer.
7 Individuare uno slot USB libero nel computer.
8 Rimuovere la copertura
protettiva per esporre il
connettore USB. Inserire lo
ZyXEL G-270S in una porta
USB libera del computer. Se
la ZyXEL G-270S è stata inserita correttamente, i
LED si accendono.
Mai piegare, forzare o torcere la ZyXEL G-270S nello
slot ot.
Dopo l'installazione dell'Utility ZyXEL e
l'inserimento della ZyXEL G-270S, nell'area
messaggi viene visualizzata un'icona.
Se viene visualizzata l'icona dell'Utility ZyXEL, la ZyXEL
G-270S è stata installata in modo appropriato. Perla
configurazione della ZyXEL G-270S fare riferimento alla
Guida dell'utente ZyXEL.
Installazione del driver per Windows XP
Se volete usare il servizio di configurazione Wireless
Zero (WZC) di Windows XP per gestire lo ZyXEL G270S, seguite le istruzioni riportate in basso per
installare solo il driver.
1 Rimuovere la copertura protettiva per esporre il
connettore USB. Inserire lo ZyXEL G-270S nella
porta USB del computer. Se lo ZyXEL G-270S è
stato inserito correttamente si accende il LED.
Non inclinare, forzare o ruotare lo ZyXEL G-270S nella
porta.
2 Appare la finestra di procedura guidata per la
Ricerca del nuovo Hardware. Selezionare Installa
da una lista di posizioni specifiche (Avanzate) e
fare click su Avanti.
3 Inserire il CD in dotazione nell’unità CD-ROM,
selezionare Cerca supporto di memorizzazione
removibile (floppy, CD-ROM…) e poi fare click su
Avanti.
4 Viene visualizzata una schermata di avviso. Fare
clic su Continua.
5 Quando il driver sarà stato installato con successo,
fare click su Fine per completare l’installazione.
Introduzione a OTIST
In una rete wireless, i client wireless devono avere lo
stesso SSID e le stesse impostazioni di sicurezza
dell'access point (AP) o del router wireless (in questo
documento si farà riferimento a entrambi come "AP"),
questo per consentirne l'associazione. Generalmente,
ciò significa che l'utente dovrà configurare le
impostazioni sull'AP, quindi configurare manualmente le
stesse impostazioni su ciascun client wireless.
La tecnologia OTIST (One-Touch Intelligent Security
Technology) consente di trasferire le impostazioni di
sicurezza SSID e WEP o WPA-PSK dell'AP ai client
wireless che supportano OTIST e che si trovano
all'interno del campo di trasmissione. È anche possibile
lasciare che sia OTIST a generare una chiave WPA-PSK
al posto dell'utente, il quale non dovrà quindi impostarne
una manualmente.
Attivazione di OTIST
È necessario attivare OTIST sia sull'AP sia sul client
wireless prima di iniziare la trasmissione delle
impostazioni.
A titolo esemplificativo, in questo documento saranno
utilizzare le schermate relative a Prestige 334WT e a G270S. Le schermate possono variare leggermente
rispetto ai dispositivi ZyXEL in proprio possesso.
L'AP e i client wireless DEVONO utilizzare la stessa
Setup key (Impostazione chiave).
Access Point (AP)
È possibile attivare OTIST utilizzando il pulsante Reset
(Reimposta) dello strumento di configurazione Web. Se
si utilizza il pulsante Reset, per crittografare le
impostazioni che si desidera trasferire sarà utilizzata la
Setup key (Impostazione chiave) predefinita
(01234567) o precedentemente salvata (tramite lo
strumento di configurazione Web).
Tenere premuto il pulsante Reset per uno o due secondi.
Se si tiene premuto il pulsante Reset troppo a lungo, il
dispositivo viene reimpostato alla configurazione
predefinita di fabbrica!
Nello strumento di configurazione Web, aprire la
schermata principale Wireless LAN (LAN wireless) e
selezionare OTIST. Per cambiare la Setup key
(Impostazione chiave), immettere da zero a otto
caratteri stampabili. Per lasciare che sia OTIST a
generare automaticamente una chiave WPA-PSK,
selezionare la casella di controllo Yes (Sì). Se si è
configurata una chiave WEP o una chiave WPA-PSK
manualmente e si seleziona anche questa casella di
controllo, sarà utilizzata la chiave impostata
manualmente.
Client wireless
Avviare il programma di utilità di ZyXEL e fare clic sulla
scheda Adapter (Adattatore). Selezionare la casella di
controllo OTIST, immettere la stessa Setup Key
(Impostazione chiave) dell'AP e fare clic su Save
(Salva).
Avvio di OTIST
È necessario fare clic su Start (Avvio) nella schermata
OTIST dello strumento di configurazione Web dell'AP e
nella schermata Adapter dei client wireless, tutti entro 3
minuti (dall'istante della scrittura). È possibile avviare
OTIST sui client wireless e sull'AP in qualsiasi ordine,
ma è necessario che siano tutti interni al campo di
trasmissione e che abbiano OTIST attivato.
1 Nell'AP, lo strumento di configurazione Web
visualizza una schermata che mostra le
impostazioni di sicurezza da trasferire. Dopo aver
revisionato le impostazioni, fare clic su OK.
2 Nel corso del trasferimento OTIST appare la
seguente schermata. Essa si chiude quando il
trasferimento è completo.
• Sul client wireless si vedrà questa schermata se non
viene trovato un AP con la funzione OTIST attivata
(con la stessa Setup key (Impostazione chiave)).
Fare clic su OK per tornare alla schermata principale
del programma di utilità ZyXEL.
• Se vi è più di un AP con la funzione OTIST attivata
all'interno del campo, sarà visualizzata una schermata
che richiede di selezionare da quale AP scaricare le
impostazioni.
Note su OTIST
1 Se si è attivato OTIST sul client wireless, si vedrà
questa schermata ogni volta che si avvia il
programma di utilità. Fare clic su Yes (Sì) per
ricercare un AP con la funzione OTIST attiva.
2 Se un client wireless con la funzione OTIST attiva
perde la sua connessione wireless per più di 10
secondi, esso cercherà un AP con la funzione
OTIST attiva per un tempo massimo di un minuto
(se sul client wireless si attiva manualmente la
ricerca di un AP con la funzione OTIST attiva, non vi
è alcun timeout; fare clic su Cancel (Annulla) nella
schermata di visualizzazione dell'andamento OTIST
per interrompere la ricerca).
3 Quando il client wireless trova un AP con la
funzione OTIST attiva, è necessario comunque fare
clic sul pulsante Start (Avvio) nella schermata
OTIST dello strumento di configurazione Web
dell'AP oppure tenere premuto il tasto Reset
(Reimposta) per un secondo o due per consentire
all'AP di trasferire le impostazioni.
4 Se si cambia SSID o le chiavi sull'AP dopo aver
utilizzato OTIST, è necessario avviare nuovamente
OTIST oppure immettere manualmente i dati sui
client wireless.
5 Se si configura OTIST per generare una chiave
WPA-PSK, questa cambierà ogni volta che si
esegue OTIST. Pertanto, se si aggiunge un nuovo
client wireless alla rete wireless, è necessario
eseguire nuovamente OTIST sull'AP e su TUTTI i
client wireless.
Risoluzione dei problemi
Windows non rileva automaticamente la ZyXEL G-270S.
• Verificare che lo ZyXEL G-270S sia inserito correttamente nella porta USB del computer e quindi riavviare
il computer. Controllare il LED dello ZyXEL G-270S.
• Effettuare una scansione dell'hardware facendo clic
su Start, Impostazioni, Pannello di controllo e
facendo doppio clic su Aggiungi/Rimuovi hardware
(le fasi possono variare a seconda della versione di
Windows). Seguire le istruzioni fornite a schermo per
cercare la ZyXEL G-270S e installare il driver.
• Verificare la presenza di possibili conflitti hardware. In
Windows, fare clic su Start, Impostazioni, Pannello
di controllo, Sistema, Hardware, poi fare clic su
Gestione periferiche. Verificare lo stato della ZyXEL
G-270S in corrispondenza di Adattatore di rete (le
fasi possono variare a seconda della versione di Windows).
• Installare la ZyXEL G-270S in un altro computer. Se
l'errore persiste, potrebbe esserci un problema hardware. In questo caso è opportuno contattare il rivenditore locale.
Русский
Процедура просмотра сертификатов изделий
1 Зайдите на сайт www.zyxel.ru.
2 Выберите нужное изделие из раскрывающегося
списка на домашней странице корпорации
ZyXEL и перейдите на страницу, посвященную
этому изделию.
3 Выберите на этой странице нужный сертификат
для просмотра.
Адаптер ZyXEL G-270S представляет собой USBадаптер для связи с беспроводными сетями ЛВС по
стандарту IEEE 802.11g, подключаемый к USB-порту
любого типа. Благодаря ZyXEL G-270S Вы получаете
полную свободу передвижения в зоне охвата.
Технол оги я IEEE 802.11b/g обеспечивает большую
зону охвата при скорости передачи до 54 Мбит/с.
ZyXEL G-270S может передавать данные со
скоростью 108 Мбс, при подключении к точке
доступа или беспроводному маршрутизатору с
включенной функцией Super G. Фактическая
скорость также зависит от расстояния от точки
доступа, уровня шума и т.д.
Требова ния по установке
Перед установкой убедитесь, что Ваш компьютер
соответствует следующим требованиям:
• Pentium II 300 МГц или выше
• Не менее 6 Мб доступного места на жестком диске
• Не менее 32 Мб ОЗУ
• Устройство CD-ROM
•USB-порт (При подключении к порту типа USB1.0/
1.1, адаптер ZyXEL G-270S обеспечивает скорость
передачи до 11Мб/сек.)
• Windows 98 Second Edition, Windows ME, Windows
2000 или Windows XP
• Пользователям Windows 98 SE может
потребоваться установочный компакт-диск 98 SE
Если на Вашем компьютере установлено ПО Funk
Odyssey, удалите его.
Для пользователей Windows XP:
Служба Wireless Zero Configuration (WZC) - это
утилита настройки конфигурации беспроводной сети,
встроенная в систему Windows XP. Если вы
использете систему Windows XP и хотите
использовать WZC, вам требуется:
• Уст ано ви ть утилиту ZyXEL Utility, а затем
отключить ее (просто щелкнув на кнопке Close
(Закрыть) в открытом окне утилиты ZyXEL Utility),
либо
Page 4

• Уст ан о ви ть только драйвер. В этом случае вы
должны сначала подключить адаптер ZyXEL G-
270S.
Устан овк а утилиты ZyXEL и аппаратных
средств
Процедуры установки схожи для всех
поддерживаемых версий Windows.
НЕ вставляйте ZyXEL G-270S на этом этапе.
1 Вставьте поставляемый с устройством компакт-
диск в устройство для чтения компакт-дисков.
Программа, находящаяся на компакт-диске,
должна запуститься автоматически. Если этого
не произошло, найдите файл setup.exe и
дважды щелкните по нему.
2 Выберите язык и щелкните OK.
3 Щелкните Install Utility (Установить утилиту),
чтобы начать установку.
4 На экране появится окно приветствия. Щелкните
Next(Далее).
5 Щелкните Next (Далее), если Вы хотите
использовать каталог по умолчанию, или Browse
(Обзор), если Вы хотите выбрать другой каталог.
6 Щелкните Finish (Завершить) для перезагрузки
компьютера.
7 Снимите защитную крышку,
чтобы открыть USB-разъем.
Вставьте адаптер ZyXEL G270S в свободный USB-порт
компьютера. При
правильной установке ZyXEL G-270S
светодиоды должны зажечься.
При установке ZyXEL G-270S в слот не изгибайте и не
перекручивайте карту и не применяйте силу.
После инсталляции утилиты ZyXEL и
установки ZyXEL G-270S в слот на
системной панели появится значок.
Появление значка утилиты ZyXEL означает, что
установка ZyXEL G-270S проведена успешно.
Информацию о конфигурировании ZyXEL G-270S см.
в Руководстве пользователя.
Устан овк а драйвера для Windows XP
Если для управления ZyXEL G-270S Вы хотите
использовать беспроводную нулевую конфигурацию
Windows XP (WZC), проделайте указанные ниже
операции для установки только драйвера.
1 Снимите защитную крышку, чтобы открыть USB-
разъем. Вставьте адаптер ZyXEL G-270S в USBпорт компьютера. При правильном подключении
адаптера ZyXEL G-270S загорается индикатор
состояния.
Hе давите, не сгибайте и не перекручивайте адаптер
ZyXEL G-270S при подключении к разьему.
2 Появится окно Found New Hardware Wizard
(мастера настройки обнаруженного
устройства). Выберите Install from a list or
specific location (Advanced) (Установить из
списка или указать расположение (для
опытных пользователей)) и щелкните Next
(Далее).
3 Вставьте входящий в комплект компакт-диск в
дисковод для CD, выберите Search removable
media (поиск носителей - дискет, компакт-
дисков…) и щелкните Next.
4 Появится предупредительное сообщение на
экране. Нажмите "Да, продолжить".
5 После успешной установки драйвера выберите
Finish для завершения установки.
Введение в OTIST
Клиенты беспроводной сети должны иметь тот же
идентификатор SSID и те же параметры
безопасности, что и точка доступа (ТД) или
беспроводной маршрутизатор (далее оба они будут
называться "ТД"), с которыми клиенты
устанавливают связь. Раньше это означало, что Вам
приходилось конфигурировать ТД, а затем вручную
устанавливать те же самые параметры в каждом
беспроводном клиенте.
Техн ол огия OTIST (One-Touch Intelligent Security
Technology - Интеллектуальная технология
автонастройки безопасности) позволяет Вам
передавать идентификатор SSID точки доступа, а
также параметры безопасности WEP или WPA-PSK
беспроводным клиентам, которые поддерживают
OTIST и находятся в зоне действия точки доступа.
Если Вы не сконфигурировали ключ WPA-PSK
вручную, устройство, поддерживающее технологию
OTIST, может сделать это само по Вашему желанию.
Активация OTIST
Перед началом передачи параметров необходимо
активировать OTIST в точке доступа и в
беспроводном клиенте.
В качестве примеров в данном руководстве
использованы снимки с экранов Prestige 334WT и G270S. В зависимости от используемых Вами
устройств ZyXEL экраны могут немного отличаться.
Точ к а доступа и беспроводной(-ые) клиент(-ы)
ДОЛЖНЫ использовать один и тот же Установочный
ключ (Setup key).
Точка доступа
Вы может активировать OTIST с помощью кнопки
перезапуска или Web-конфигуратора. Если Вы
используете кнопку перезапуска, для шифрования
параметров будет использован Уста нов оч ны й ключ,
заданный по умолчанию (01234567), или ключ,
предварительно сохраненный через Webконфигуратор.
Уде ржи в ай т е кнопку перезапуска нажатой в течение
одной или двух секунд.
Если Вы будете удерживать кнопку перезапуска
слишком долго, устройство восстановит заводские
настройки по умолчанию!
В Web-конфигураторе перейдите к основному окну
Wireless LAN (Беспроводная ЛВС) и выберите
OTIST. Чтобы изменить Setup key (Установочный
ключ), введите от нуля до восьми печатаемых
символов. Чтобы включить автоматическую
генерацию ключа WPA-PSK key, поставьте флажок
Yes. Если Вы сконфигурировали ключ WEP или WPA-
PSK вручную и одновременно поставили этот
флажок, будет использован ключ,
сконфигурированный вручную.
Беспроводной клиент
Запустите утилиту ZyXEL и перейдите на вкладку
Adapter (Адаптер). Поставьте флажок OTIST,
введите тот же Уста н ов оч ны й ключ (Setup Key),
который использует точка доступа, и нажмите Save
(Сохранить).
Запуск OTIST
Вы должны нажать на кнопки Start в окне OTIST Webконфигуратора точки доступа и на вкладке Adapter
беспроводного(-ых) клиента(-ов) в течение трех
минут (во время записи). Запускать OTIST в
беспроводных клиентах и точке доступа можно в
любом порядке, но все они должны находиться в
зоне доступа и поддержка OTIST должна быть
включена.
1 В точке доступа появляется окно Web-
конфигуратора, показывающее Вам параметры
безопасности, которые будут переданы. После
проверки параметров щелкните OK.
2 Это окно появляется во время передачи
параметров по OTIST. Оно закрывается после
окончания передачи.
• В беспроводном клиенте Вы видите это окно, если
клиент не может найти точку доступа,
поддерживающую OTIST (с тем же Уста но во чны м
ключом). Щелкните OK, чтобы перейти обратно к
главному окну утилиты ZyXEL.
• Если в зоне доступа находятся несколько точек
доступа, поддерживающих OTIST, Вы увидите
экран, предлагающий выбрать точку доступа, от
которой будут получены параметры.
Замечания относительно OTIST
1 Если Вы включили поддержку OTIST в
беспроводном клиенте, Вы будете видеть это
окно каждый раз, когда Вы запустите утилиту.
Щелкните Yes, чтобы начать поиск точки
доступа, поддерживающей OTIST.
2 Если беспроводной клиент, поддерживающий
OTIST, теряет беспроводную связь с точкой
доступа более чем на десять секунд, он будет
искать точку доступа, поддерживающую OTIST, в
течение одной минуты. (Если Вы вручную
запускаете в беспроводном клиенте поиск точки
доступа, поддерживающей OTIST,
автоматической остановки поиска не
происходит; щелкните Cancel в окне
отображения поиска OTIST, чтобы остановить
поиск.)
3 Когда беспроводной клиент находит точку
доступа, поддерживающую OTIST, Вам
необходимо кликнуть Start в окне OTIST Webконфигуратора точки доступа или удер жив ать
нажатой кнопку перезапуска точки доступа в
течение одной или двух секунд, чтобы точка
доступа начала передавать параметры.
4 Если Вы измените идентификатор SSID или
ключи в точке доступа после их передачи по
OTIST, Вам придется повторить передачу
параметров по OTIST или ввести их вручную в
беспроводном(-ых) клиенте(-ах).
5 Если Вы выбрали генерацию ключа WPA-PSK по
OTIST, этот ключ меняется каждый раз, когда Вы
запускаете передачу по OTIST. Поэтому если к
Вашей беспроводной сети присоединяется
новый беспроводной клиент, Вам необходимо
снова запустить OTIST в точке доступа и во
ВСЕХ беспроводных клиентах.
Устранение неисправностей
Windows не определяет ZyXEL G-270S
автоматически:
• Проверьте правильность подключения адаптера
ZyXEL G-270S к USB-порту и перезапустите
компьютер. Проверьте индикатор состояния
адаптера ZyXEL G-270S.
• Выполните поиск устройств: щелкните Start
(Пуск), Settings (Настройки), Control Panel
(Панель управления) и дважды щелкните Add/
Remove Hardware (Уст ан овк а оборудования).
(Порядок действий может быть разным в
зависимости от версии Windows).
Следуйте инструкциям на экране для поиска
ZyXEL G-270S и установки драйвера.
• Проверьте возможные конфликты устройств. В
системе Windows щелкните Start (Пуск), Settings
(Настройки), Control Panel (Панель
управления), System (Система), Hardware
(Оборудование), а затем Device Manager
(Менеджер устройств). Проверьте состояние
ZyXEL G-270S в разделе Network Adapter
(Сетевые адаптеры). (Порядок действий может
быть разным в зависимости от версии Windows).
• Уст ан о ви те ZyXEL G-270S в другой компьютер.
Если проблема не исчезла, возможно, имеет место
аппаратная неисправность. В этом случае следует
связаться с продавцом.
繁體中文
低功率電波輻射性電機管理辦法
經型式認證合格之低功率射頻電機,非經許可,公司、
商號或使用者均不得擅自變更頻率、加大功率或變更原
設計之特性及功能。
低功率射頻電機之使用不得影響飛航安全及干擾合法通
信;經發現有干擾現象時,應立即停用;並改善至無干
擾時方得繼續使用。
前項合法通信,指依電信法規定作業之無線電信。低功
率射頻電機須忍受合法通信或工業、科學及醫療用電波
輻射信電機設備之干擾。
如何查閱產品的認證
1 請到 ZyXEL 網站 www.zyxel.com。
2 請在 ZyXEL 首頁的產品頁面上,透過下拉式選單選
取產品名字。
3 從這個頁面上選擇你想查閱的產品認證。
關於您的 ZyXEL G-270S 無線網卡
ZyXEL G-270S 是相容於 IEEE 802.11b/g 標準的 USB
Stick 無線網卡,只要插入 USB 插槽即可使用。除了標準
最高傳輸速率 54Mbps 之外,ZyXEL G-270S 連接至啟用
Super G 的 AP 或無線路由器時,傳輸速度最高可達 108
Mbps。實際可達之速度亦需視與 AP 之間的距離與雜訊等
因素而定。
設備安裝需求
在安裝之前,請確認您的電腦或筆記型電腦符合下列的
需求:
• CPU Pentium II 300MHz 或以上規格
• 至少 32 MB RAM(建議64 MB)
• 至少 6 MB 可用的硬碟空間
• CD-ROM 光碟機
• 一個 USB 槽
• Windows 98 Second Edition, Windows ME, Windows
2000 或 Windows XP 中任一作業系統
• Windows 98 SE的使用者可能需要Windows 98 SE光碟
如果您的電腦先前安裝過 Funk Odyssey Client 軟體,
在安裝本驅動程式前,請先卸除安裝。
Windows XP 使用者
Wireless Zero Configuration (WZC) 是 Windows XP 所
附的無線網路設定公用程式。如果您的作業系統是
Windows XP 而且想使用 WZC,則可進行下列任一動
作:
• 安裝 ZyXEL 公用程式再加以停用 ( 在任一個 ZyXEL
公用程式畫面按一下 關閉按鈕 )
或
• 只安裝驅動程式。在此情況下,您必須先連接 ZyXEL
G-270S。
ZyXEL 無線設定工具和硬體安裝
下列的安裝程序與所有 Windows 版本相似。
請勿在此時將 ZyXEL G-270S 插入電腦插槽。
1 將 CD 插入光碟機後,CD 會自動執行安裝程式。若
CD 未自動執行,請將光碟片內容開啟,執行
setup.exe。
2 選擇您要安裝的語言。
3 選擇並執行安裝使用者介面。
4 出現歡迎視窗,按下一步。
5 按下一步接受預設的安裝路徑或按瀏覽選擇其他目
錄。
6 按結束完成安裝程序,如提示請重新啟動電腦。
7 除去 ZyXEL G-270S 的保護
蓋,露出 USB 連接器。將
ZyXEL G-270S 插入電腦上可
用的 USB 埠。在 ZyXEL G270S 正確的插入之後,LED
燈就會亮起。
Windows XP 的驅動程式安裝
請勿摺疊或彎曲 ZyXEL G-270S 網卡,將之放入插槽中。
如果您想使用 Windows XP 無線網路零組態 (WZC) 服
務來管理 ZyXEL G-270S, 請只以底下的步驟安裝驅動
程式。
1 除去 ZyXEL G-270S 的保護蓋,露出 USB 連接
器。將 ZyXEL G-270S 插入電腦 USB 埠。如果
ZyXEL G-270S 插入正確,LED 指示燈會亮起。
將 ZyXEL G-270S 插入埠中時不可大力彎曲或扭轉。
2 「尋找新硬體精靈」視窗會出現。請選擇「從清單
或指定位置安裝」然後按 「下一步」。
3 將隨附的光碟置入光碟機中,選擇 「搜尋可卸除式
媒體 ( 軟碟,CD-ROM…)」然後按 「下一步」。
4 顯示警告畫面。按一下 Continue Anyway ( 繼續執行
)。
5 成功安裝完驅動程式之後,請按下 「結束」完成安
裝。
ZyXEL 無線設定工具安裝之後,右邊的圖示會
出現在電腦下方的系統列上。
假設上述圖示正常出現, 表示 ZyXEL G-270S 正確安裝
完成。參照使用手冊來設定 ZyXEL G-270S。
OTIST 簡介
在無線網路中,無線網路用戶端必須有和基地台 (AP) 或
無線路由器 ( 此處我們將此二者稱為 "AP") 相同的 SSID
及安全性設定, 以與其相連。傳統上此代表您必須設定
AP 組態,然後以相同設定值手動設定每一部無線用戶端
的組態。
OTIST (One-Touch 智慧型安全性技術 ) 讓您將 AP 的
SSID 及 WEP 或 WPA-PSK 安全性設定,轉移到支援
OTIST 且在傳輸範圍內的無線用戶端 。如果您尚未手動
設定 WPA-PSK 金鑰,還可以選擇讓 OTIST 產生 。
啟用 OTIST
在開始轉移設定前,您必先在 AP 及無線用戶端上啟用
OTIST。
本手冊中,我們使用 Prestige 334WT 及 G-270S 畫面做
為範例。畫面可能和您的 ZyXEL 裝置略有不同。
AP 及無線用戶端必須使用相同的設定金鑰。
AP
您可以使用 Reset ( 重設 ) 按鈕或網路組態設定程式啟用
OTIST。如果您使用 Reset ( 重設 ) 按鈕,會使用預設
(01234567) 或之前 ( 經由網路組態設定程式) 儲存的設
定金鑰 ,將要轉移的設定加密。
按住 Reset ( 重設 ) 按鈕一至兩秒。
如果您按住 Reset (重設) 按鈕太久,則裝置將會重設成
原廠預設值!
在網路組態設定程式中,前往 Wireless LAN ( 無線
LAN) 主畫面,然後選取 OTIST。若要變更 Setup key (
設定金鑰 ),請輸入零至八個可列印的字元。若要讓
OTIST 自動產生 WPA-PSK 金鑰,請選取 Yes ( 是的 ) 核
取方塊。如果您已手動設定 WEP 金鑰或 WPA-PSK 金
鑰,且已選取此核取方塊,則會使用手動設定金鑰。
無線用戶端
啟動 ZyXEL 公用程式,然後按一下 Adapter ( 卡片設定 )
標籤。選取 OTIST 核取方塊,輸入和您的 AP 相同的
Setup Key ( 設定金鑰 ),然後按一下 Save ( 儲存 )。
啟動 OTIST
您必須在三分鐘內 ( 此文件完成時 ),按一下 AP OTIST
網路組態設定程式畫面、以及無線用戶端 Adapter (卡
片設定 ) 畫面上的 Start ( 啟動 )。您能以任何順序啟動
無線用戶端及 AP 的 OTIST,但二者必須皆在範圍內,
且已啟用 OTIST。
1 在 AP 上會蹦現網路組態設定程式畫面,為您顯示
轉移的安全性設定。在檢視設定後,按一下 OK (
確定 )。
2 轉移 OTIST 設定時會出現此畫面。轉移完成時會關
閉畫面。
• 在無線用戶端上,您會看見找不到 ( 具相同設定金鑰 )
已啟用 OTIST 的 AP 的此畫面。按一下 OK (確定),
回到 ZyXEL 公用程式主畫面。
• 如果範圍內有超過一個以上已啟用 OTIST 的 AP,畫
面會要求您選取一個 AP 以取得設定值。
OTIST 注意事項
1 如果您已啟用無線用戶端的 OTIST,每次啟動公用
程式時都會看到此畫面。按一下 Yes ( 是 ),讓其搜
尋啟用 OTIST 的 AP。
2 如果啟用 OTIST 的無線用戶端無線連線斷線 10 秒
以上,則將會搜尋已啟用 OTIST 的 AP 至多一分
鐘。( 如果您已手動讓無線用戶端搜尋已啟用 OTIST
的 AP,則不會停止搜尋;按一下 OTIST 進行畫面
中的 Cancel ( 取消 ) 以停止搜尋。)
3 當無線用戶端找到已啟用 OTIST 的 AP 時,您仍必
須按一下 AP OTIST 網路組態設定程式畫面中的
Start ( 啟動 ),或按住 Reset ( 重設 ) 按鈕 ( 一至兩
秒 ),讓 AP 轉移設定值。
4 如果您在使用 OTIST 後變更 AP 的 SSID 或金鑰,
則必須再次執行 OTIST,或手動輸入無線用戶端。
5 如果您設定 OTIST 產生 WPA-PSK 金鑰,每次執行
OTIST 時都會變更此金鑰。因此,若有新的無線用
戶端加入您的無線網路中,則必須再次執行 AP 及所
有無線用戶端的 OTIST。
問題排除
Windows 未自動偵測到 ZyXEL G-270S。
• 確認 ZyXEL G-270S 正確插入電腦 USB 埠後再重新
啟動您的電腦。檢查 ZyXEL G-270S 的 LED 指示
燈。
• 執行新增硬體的作業, 可以按開始 , 設定 , 控制台然後
雙擊新增 / 移除硬體。( 步驟可能依 Windows 的版本
有所不同 )。依照畫面上的指示尋找 ZyXEL G-270S 並
安裝驅動程式。
• 檢查可能的硬體衝突,在 Windows 中, 按 開始, 設定,
控制台 , 系統 , 硬體然後按裝置管理員。在網路介面
卡檢查 ZyXEL G-270S 的狀態。(步驟可能依 Win-
dows 的版本有所不同 )。
• 安裝 ZyXEL G-270S 在其他台電腦,假如錯誤同樣發
生,可能就是硬體的問題。在這樣狀況下,你可以洽
詢當地的提供廠商。
 Loading...