

Page 1

ZyAIR G-2000
802.11g Wireless 4-port Router
Quick Installation Guide
Version 3.60
February 2004
Page 2

Page 3

ZyAIR G-2000 802.11g Wireless 4-port Router
Table of Contents
1 Introducing the ZyAIR ................................................................................................................. 4
2 Hardware Connections ............................................................................................................... 5
2.1 Side Panel and Connections ................................................................................................. 5
2.2 The Front Panel ..................................................................................................................... 6
3 Setting Up Your Computer’s IP Address................................................................................... 8
3.1 Windows 2000/NT/XP ........................................................................................................... 8
3.2 Checking/Updating Your Computer’s IP Address.................................................................. 9
3.3 Testing the Connection to the ZyAIR..................................................................................... 9
4 Internet Access Setup Using the Web Configurator Wizard ................................................. 10
4.1 Accessing the ZyAIR via the Web Configurator .................................................................. 10
4.2 Common Screen Command Buttons................................................................................... 12
4.3 Configuring the ZyAIR Using the Wizard............................................................................. 12
4.4 Test Your Internet Connection ............................................................................................. 15
5 Hardware Installation ................................................................................................................ 15
5.1 Attaching Antennas.............................................................................................................. 15
5.2 Hardware Mounting Installation........................................................................................... 16
6 Troubleshooting ........................................................................................................................ 19
Procedure to View a Product’s Certification(s)
1. Go to www.zyxel.com.
2. Select your product from the drop-down list box on the ZyXEL home page to go to that product's page.
3. Select the certification you wish to view from this page
3
Page 4

ZyAIR G-2000 802.11g Wireless 4-port Router
1 Introducing the ZyAIR
The ZyAIR B-G2000 is a broadband sharing gateway with a built-in wireless LAN access point and fourport switch that makes it easy for people to set up a small home/office network and share Internet access via
a broadband (cable/DSL) modem. Key features of the ZyAIR include 802.1x wireless LAN security, WPA
(Wi-Fi Protected Access), firewall, remote management and UPnP. See your User’s Guide for more details
on all ZyAIR features.
You should have an Internet account already set up and have been given most of the following information.
INTERNET ACCOUNT CHECKLIST
Your device’s WAN IP Address (if given): __________________
Encapsulation: (choose one below)
Ethernet
PPTP
PPPoE
Service Type: _______________________
Login Server IP Address: ______________
User Name: ____________ Password: ____________
User Name: ____________ Password: ____________
Your WAN IP Address: ____________ PPTP Server IP Address: ___________
Connection ID (if required): ____________
(PPPoE) Service Name: ____________
User Name: ____________ Password: ____________
4
Page 5
ZyAIR G-2000 802.11g Wireless 4-port Router
2 Hardware Connections
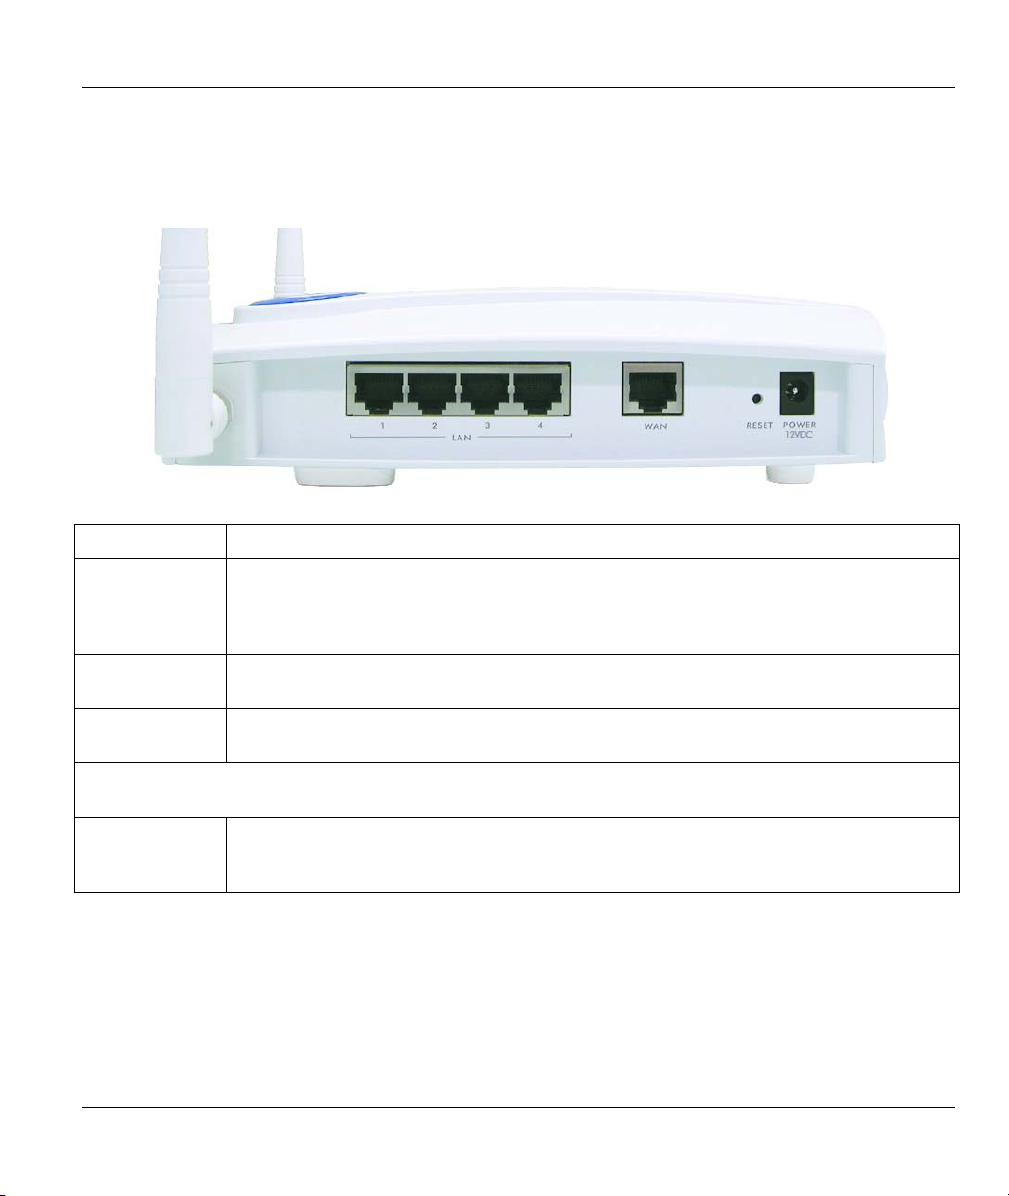
2.1 Side Panel and Connections
LABEL DESCRIPTION AND FUNCTION
1. LAN Use an Ethernet cable to connect at least one computer for initial ZyAIR configuration.
These ports are auto-negotiating (can connect at 10 or 100Mbps) and auto-crossover
(automatically adjust to the type of Ethernet cable you use (straight-through or
crossover)).
2. WAN
3. POWER
12V DC
After you’ve made the connections, connect the power cable to a power supply and look at the front panel
LEDs.
RESET You only need to use this button if you’ve forgotten the ZyAIR’s password. It returns the
Connect your cable/DSL modem to this port with the cable that came with your modem.
Connect the end of the included power adaptor (use only this adaptor) to this power
socket.
ZyAIR to the factory defaults (password is 1234, LAN IP address 192.168.1.1 etc. see
your User’s Guide for details).
5
Page 6
ZyAIR G-2000 802.11g Wireless 4-port Router
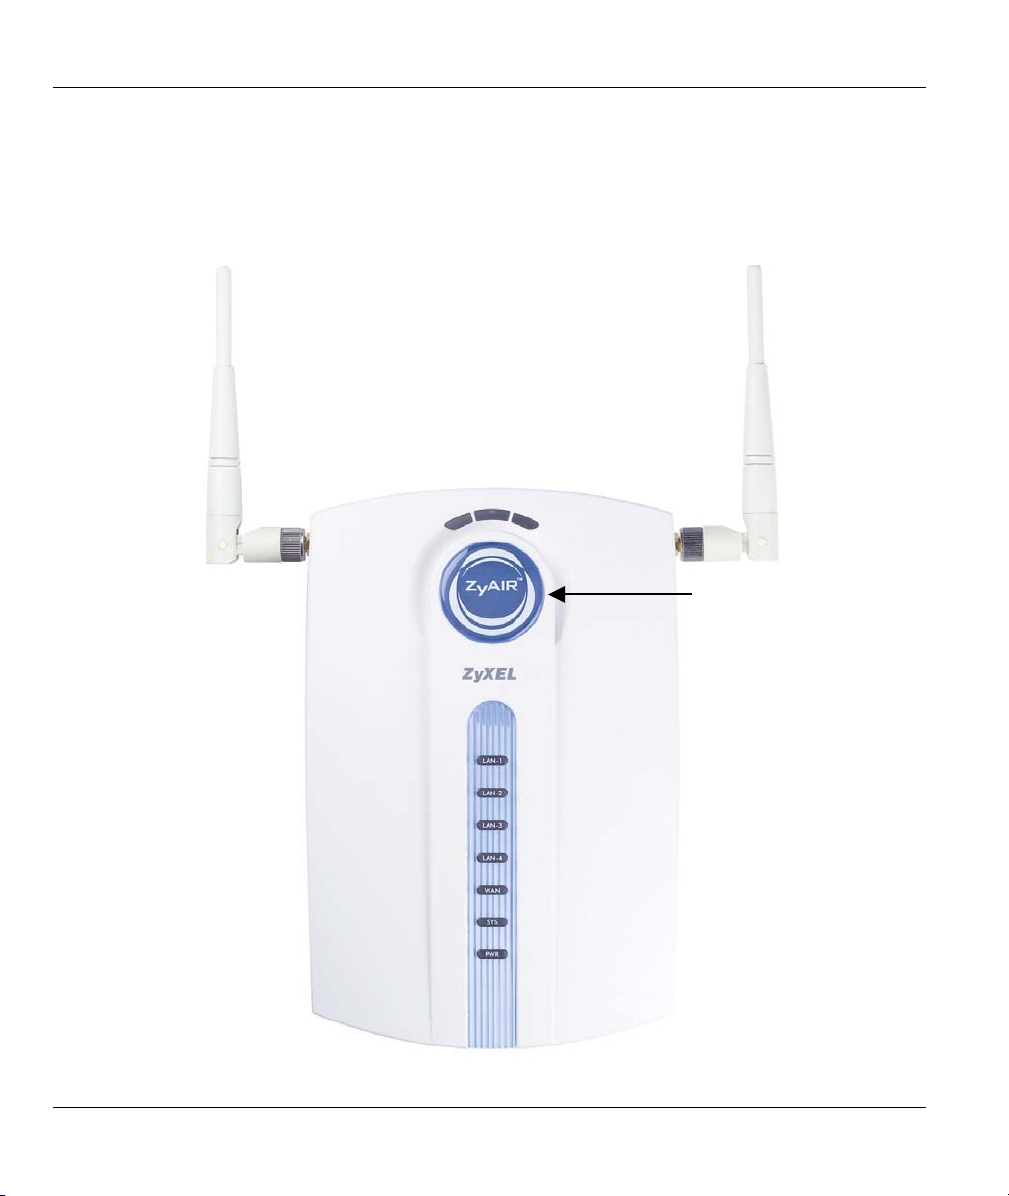
2.2 The Front Panel
The PWR LED turns steady on when the power adaptor is connected. The SYS LED blinks while
performing system testing and then turns steady on if the testing is successful. The link LED and the ZyAIR
LED turn steady on while the wireless card on the ZyAIR is working. The LAN and WAN LEDs turn on, if
they are properly connected. Refer to the User’s Guide for more detailed LED descriptions.
ZyAIR LED
6
Page 7

ZyAIR G-2000 802.11g Wireless 4-port Router
Table 1 Front Panel LED Description
LED COLOR STATUS DESCRIPTION
ZyAIR
LAN 1-4
WAN
SYS
Blue
Off The ZyAIR does not have an Ethernet connection.
Orange
Off The ZyAIR does not have a WAN connection.
Orange
Off The ZyAIR is not ready or has malfunctioned.
Green On The ZyAIR is functioning properly.
Red Blinking The ZyAIR is rebooting.
On
Blinking
(Breathing)
On The ZyAIR has a successful 10Mbps Ethernet connection. Green
Blinking The ZyAIR is sending/receiving data.
On The ZyAIR has a successful 100Mbps Ethernet connection.
Blinking The ZyAIR is sending/receiving data.
On The ZyAIR has a successful 10Mbps WAN connection. Green
Blinking The ZyAIR is sending/receiving data.
On The ZyAIR has a successful 100Mbps WAN connection.
Blinking The ZyAIR is sending/receiving data.
On The ZyAIR is receiving power. PWR Green
Off The ZyAIR is not receiving power.
The ZyAIR is ready, but is not sending/receiving data through the
wireless LAN.
The ZyAIR is sending/receiving data through the wireless LAN.
7
Page 8

ZyAIR G-2000 802.11g Wireless 4-port Router
3 Setting Up Your Computer’s IP Address
Skip this section if your computer is already set up to accept a dynamic IP
address. This is the default for most new computers.
The ZyAIR is already set up to assign your computer an IP address. Use this section to set up your
computer to receive an IP address or assign it a static IP address in the 192.168.1.2 to 192.168.1.254 range
with a subnet mask of 255.255.255.0. This is necessary to ensure that your computer can communicate with
your ZyAIR.
Your computer must have a network card and TCP/IP installed. TCP/IP should already be installed on
computers using Windows NT/2000/XP, Macintosh OS 7 and later operating systems. Refer to the Setting
Up Your Computer’s IP Address appendix in the User’s Guide for configuring the IP address in other
operating systems.
3.1 Windows 2000/NT/XP
In Windows XP, click Start, Control Panel. In Windows 2000/NT, click Start, Settings, Control
1.
Panel.
In Windows XP, click Network Connections.
2.
In Windows 2000/NT, click Network and Dial-up Connections.
Right-click Local Area Connection and then click Properties.
3.
Select Internet Protocol (TCP/IP) (under the General tab in Windows XP) and click Properties.
4.
The Internet Protocol TCP/IP Properties screen
5.
opens (the General tab in Windows XP).
-To have your computer accept a dynamic IP address,
click Obtain an IP address automatically.
-If you want a static IP address, click Use the
following IP Address and fill in the IP address (use
one between192.168.1.2 and 192.168.1.254), Subnet
mask (255.255.255.0), and Default gateway
(192.168.1.1) fields.
Click Advanced.
8
Page 9

ZyAIR G-2000 802.11g Wireless 4-port Router
Remove any previously installed gateways in the IP
6.
Settings tab and click OK to go back to the Internet
Protocol TCP/IP Properties screen.
Click Obtain DNS server address automatically if
7.
you do not know your DNS server IP address(es).
If you know your DNS server IP address(es), click Use
the following DNS server addresses, and type them
in the Preferred DNS server and Alternate DNS
server fields.
If you have previously configured DNS servers, click
Advanced and then the DNS tab to order them.
Click OK to close the Internet Protocol (TCP/IP)
8.
Properties window.
Click OK to close the Local Area Connection
9.
Properties window.
3.2 Checking/Updating Your Computer’s IP Address
In the computer, click Start, (All) Programs, Accessories and then Command Prompt.
1.
In the Command Prompt window, type "ipconfig" and then press ENTER to verify that your
2.
computer’s static IP address is in the correct subnet (in the range between 192.168.1.2 and
192.168.1.254 if using the default ZyAIR LAN IP address). Alternatively, to have the ZyAIR assign
your computer a new IP address (from the IP pool), make sure your ZyAIR is turned on, type
"ipconfig/renew" and then press ENTER.
3.3 Testing the Connection to the ZyAIR
The default IP address of the ZyAIR is 192.168.1.1.
1. Click Start, (All) Programs, Accessories and then Command Prompt.
2. In the Command Prompt window, type "ping” followed by a space and the IP address of the ZyAIR.
9
Page 10

ZyAIR G-2000 802.11g Wireless 4-port Router
3. Press ENTER and the reply messages displays.
C:\>ping 192.168.1.1
Pinging 192.168.1.1 with 32 bytes of data:
Reply from 192.168.1.1: bytes=32 time=10ms TTL=254
Reply from 192.168.1.1: bytes=32 time<10ms TTL=254
Reply from 192.168.1.1: bytes=32 time<10ms TTL=254
Reply from 192.168.1.1: bytes=32 time<10ms TTL=254
Ping statistics for 192.168.1.1:
Packets: Sent = 4, Received = 4, Lost = 0 (0% loss),
Approximate round trip times in milli-seconds:
Minimum = 0ms, Maximum = 10ms, Average = 2ms
C:\>
Your computer can now communicate with the ZyAIR using the LAN port.
4 Internet Access Setup Using the Web
Configurator Wizard
The Quick Installation Guide shows you how to use the web configurator Wizard
and introduces the ZyAIR’s key features. See your User’s Guide for configuration
details and background information on all ZyAIR features using the SMT (System
Management Terminal) and web configurator.
4.1 Accessing the ZyAIR via the Web Configurator
1. Launch your web browser. Enter “192.168.1.1” as the web site address.
Default ZyAIR IP Address
10
Page 11

ZyAIR G-2000 802.11g Wireless 4-port Router
2. The default password (“1234”) is already in the password field (in non-readable format). Click
Login to proceed to a screen asking you to change your password. Click Reset to revert to the
default password in the password field.
Default password.
3. It is highly recommended you change the default password! Enter a new password, retype it to
confirm and click Apply; alternatively click Ignore to proceed to the SYTEM screen if you do
not want to change the password now.
Change default
password.
4. You should now see the web configurator SYSTEM screen.
11
Page 12

ZyAIR G-2000 802.11g Wireless 4-port Router
Click WIZARD SETUP to help you
configure your ZyAIR for Internet access
and set up a wireless network.
Use the submenus to configure
the ZyAIR features.
Click LOGOUT at
any time to exit the
The management session automatically times out when the time period set in the
Administrator Inactivity Timer field expires (default five minutes). Simply log back
into the ZyAIR if this happens to you.
4.2 Common Screen Command Buttons
The following table shows common command buttons found on many web configurator screens.
Back
Apply
Reset
Click Back to return to the previous screen.
Click Apply to save your changes back to the ZyAIR.
Click Reset to begin configuring this screen afresh.
4.3 Configuring the ZyAIR Using the Wizard
The wizard consists of a series of screens to help you configure your ZyAIR for wireless stations to access
your wired LAN and set up Internet access. Refer to your User’s Guide for more background information.
1. Click WIZARD SETUP to display the first wizard screen. Refer to your User’s Guide for more
background information on each field.
12
Page 13

ZyAIR G-2000 802.11g Wireless 4-port Router
2. Use the second wizard screen to set up the wireless LAN.
System Name is a unique name to
identify the ZyAIR in the Ethernet
network. Enter a descriptive name.
The Domain Name entry is what is
propagated to the DHCP clients on
the LAN. If you leave this blank, the
domain name obtained by DHCP
from the ISP is used. Click Next to
continue.
ESSID is a unique name to identify
the ZyAIR in the wireless LAN. Enter
a descriptive name.
The range of radio frequencies used
by IEEE 802.11b wireless devices is
called a channel.
Select a radio channel from the
Choose Channel ID drop-down list.
WEP (Wired Equivalent Privacy) encrypts data frames before transmitting over the wireless network.
Select either 64-bit or 128-bit from the WEP Encryption drop-down list box to activate WEP encryption. Select Disable to
turn off WEP data encryption.
Select ASCII or HEX WEP key input method and then follow the on-screen instructions to set up the WEP keys.
Click Next to continue.
13
Page 14

ZyAIR G-2000 802.11g Wireless 4-port Router
The wireless stations and ZyAIR must use the same ESSID, channel ID and WEP
encryption key (if WEP is enabled) for wireless communication.
3. The third wizard screen has three variations depending on what encapsulation type you use. Use
the information in the Internet Account Checklist table and the online help to fill in the fields.
Click Next in each screen to continue.
Choose Ethernet when the WAN port is
used as a regular Ethernet. Choose from
Standard or a RoadRunner version.
You’ll need User Name, Password and
Login Server IP Address for some
Roadrunner versions.
Point-to-Point Protocol over Ethernet
(PPPoE) also functions as a dial-up
connection. Therefore you’ll also need a
username and password and possibly
the PPPoE service name.
Your ISP will give you all needed
information.
Choose PPTP if your service provider
uses a DSL terminator with PPTP login.
The ZyAIR must have a static IP address
in this case. You’ll also need a login
name, associated password, the DSL
terminator IP address and possibly a
connection ID.
Click Next to continue.
14
Page 15

ZyAIR G-2000 802.11g Wireless 4-port Router
4. Fill in the fields in the last wizard configuration screen.
WAN IP Address Assignment
Select Get automatically from ISP
to have the ZyAIR obtain an IP
address automatically from the ISP.
Select Use fixed IP address to
give the ZyAIR a fixed, unique IP
address. Enter a subnet mask
appropriate to your network and the
gateway IP address if applicable.
DNS Server Assignment
Select Get automatically from ISP
if your ISP does not give you DNS
server addresses.
If you selected the Use fixed IP
address – Primary/Secondary
DNS Server option, enter the
provided DNS addresses in these
fields.
WAN MAC Address
The WAN MAC address field allows you to configure the WAN port's MAC address by either using the factory default or
cloning the MAC address from a computer on your LAN. Select Factory Default to use the factory assigned default MAC
address. Alternatively, select Spoof this Computer's MAC address - IP Address and enter the IP address of the
computer on the LAN whose MAC address you are cloning
5. In the final screen, click Finish and change the wireless parameter settings in the wireless
stations to match those of the ZyAIR. Refer to the user’s guide for your wireless adapter.
4.4 Test Your Internet Connection
Launch your web browser and navigate to www.zyxel.com. You don’t need a dial-up program such as Dial
Up Networking. Internet access is just the beginning. Refer to the User’s Guide for more detailed
information on the complete range of ZyAIR features.
5 Hardware Installation
5.1 Attaching Antennas
Follow the steps below to connect the supplied antennas.
1. Locate the antenna connectors on the sides of your ZyAIR.
2. Screw the antennas clockwise onto the antenna connectors. The antennas should be
perpendicular to the ground and parallel to each other.
15
Page 16

ZyAIR G-2000 802.11g Wireless 4-port Router
Make sure the antennas are securely screwed onto the antenna connectors.
Figure 1 Attaching Antenna
5.2 Hardware Mounting Installation
In general, the best location for the access point is at the center of your intended wireless coverage area. For
better performance, mount the ZyAIR high up free of obstructions.
Free-standing
Place your ZyAIR on a flat, level surface (on a desk or shelf) that is strong enough to support the weight of
the ZyAIR with connection cables.
With the Desktop Holder
16
Page 17

ZyAIR G-2000 802.11g Wireless 4-port Router
The included desktop holder helps you organize the ZyAIR’s connection cables.
1. Secure the desktop holder to the back of the ZyAIR with the included screw.
2. Turn the desktop holder up to the right.
3. Refer to the Hardware Connections section. Connect the cables to the ports on the ZyAIR
through the desktop holder.
4. Turn the desktop holder down and place the unit on a flat, sturdy surface (on a desk or shelf).
Figure 2 Instructions using the Desktop Holder
Wall-mounted
Follow the steps to attach your ZyAIR to a wall.
1. Locate a high position on the wall that is free of obstructions.
2. Use screws with 6mm ~7.5mm (0.24" ~ 0.30") wide heads. Connect two screws (not included)
in the wall 80mm (3.15") apart. Do not screw the screws all the way into the wall. Leave a small
gap between the head of the screws and the wall.
17
Page 18

ZyAIR G-2000 802.11g Wireless 4-port Router
Make sure the screws are securely fixed to the wall and strong enough to hold the
weight of the ZyAIR with the connection cables.
3. Align the holes on the back of the ZyAIR with the screws on the wall. Hang the ZyAIR on the
screws.
Figure 3 Wall Mounting your ZyAIR
18
Page 19

ZyAIR G-2000 802.11g Wireless 4-port Router
or C ertifications . F or more information a bout your de vices D eclara tion of C onformity (D OC ) plea se refer to www.zy xel.c om
6 Troubleshooting
PROBLEM CORRECTIVE ACTION
The PWR and/or
SYS LED are off.
Turn the ZyAIR off and on. If the error persists, you may have a hardware problem. In
The LAN LED is
off.
The ZyAIR LED is
off.
I cannot access the
web configurator.
I cannot ping any
computer on the
LAN.
I cannot get a WAN
IP address from the
ISP.
I cannot access the
Internet.
Make sure you are using the correct power adaptor and the power adaptor is plugged
into an adequate power supply.
this case, you should contact your vendor.
Check the cable connection to the ZyAIR LAN port.
Make sure your computer’s network card is working properly.
Turn the ZyAIR off and on. If the error persists, you may have a hardware problem. In
this case, you should contact your vendor.
Make sure the IP addresses and subnet masks of the ZyAIR and the computer are in
the same IP address range. (For example, if the ZyAIR is using the default IP address
and subnet mask, check that the IP address of the computer is in the range
192.168.1.2 ~192.168.1.254 and the subnet mask is 255.255.255.0). Refer to the
Setting Up Your Computer’s IP Address section.
If you change the ZyAIR default IP address, then enter the new IP address as the
web site address.
The default password is “1234”. If you have changed the password and have now
forgotten it, you will need to reset the ZyAIR. Refer to the User’s Guide for how to use
the RESET button.
If all of the LAN LEDs are off, check the cables between the ZyAIR and your
computer or hub.
Verify that the IP address and the subnet mask of the ZyAIR and the computers are
on the same IP address range.
The WAN IP is provided after the ISP verifies the MAC address, host name or user
ID.
Find out the verification method used by your ISP and configure the corresponding
fields.
Make sure the ZyAIR is turned on and connected to the network.
Make sure you entered your username correctly. A username may be case-sensitive.
19
 Loading...