

Page 1

V660
Dual-Mode Phone
Quick Start Guide
Version 1.00
04/2007
Edition 1
Copyright © 2007. All rights reserved
Page 2
V660 Quick Start Guide
1 Overview
Your V660 provides standard cellphone functions, and adds
WiFi connectivity.
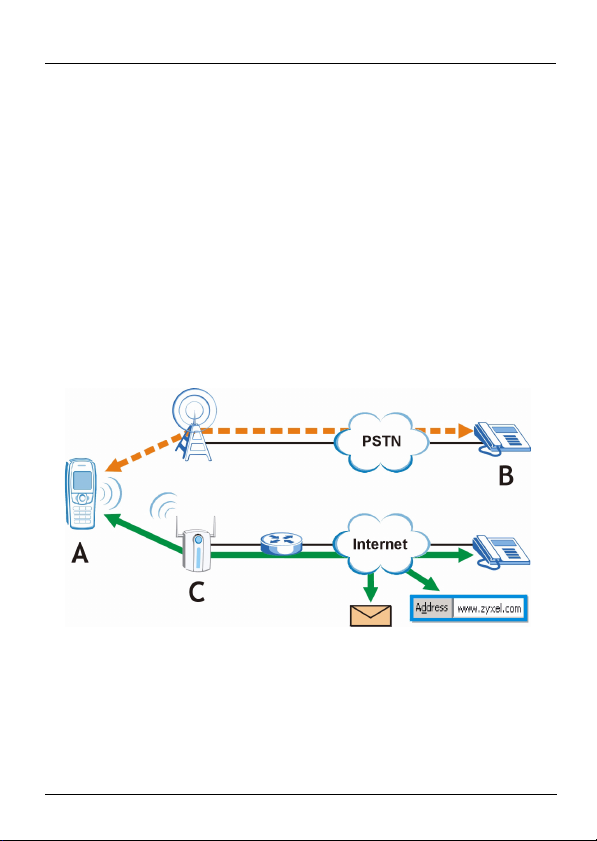
In the figure below, the dashed line shows your V660 (A)
calling a phone (B) over the regular phone network (PSTN, or
Public Switched Telephone Network).
The solid line shows the V660 connecting to a wireless
access point (C) on your computer network to send and
receive email, browse the Web, and make voice calls over the
Internet (VoIP).
This Quick Start Guide covers the following:
• Physical Features. See page 3.
• Preparing Your Phone. See page 4.
1
Page 3

V660 Quick Start Guide
• Using the LCD Screen. See page 10.
• Making Cellular Phonecalls. See page 12.
• Connecting to a Wireless Access Point. See page 13.
• Making Internet Phonecalls. See page 16.
• Using the Camera. See page 19.
• Installing a Memory Card. See page 20.
• Locking and Unlocking the Phone. See page 21.
2
Page 4
V660 Quick Start Guide
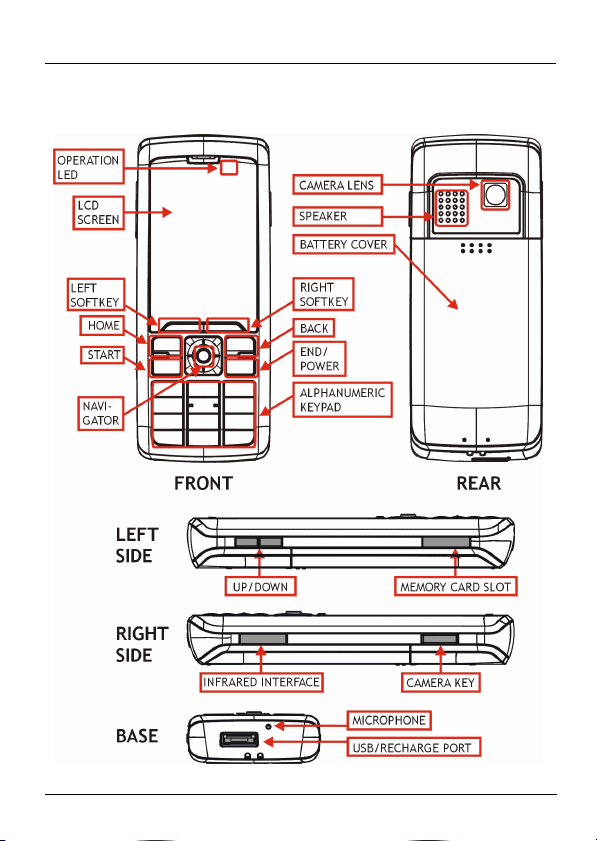
2 Physical Features
3
Page 5
V660 Quick Start Guide
The following table describes some of the keys you use in this
Quick Start Guide.
LABEL DESCRIPTION
Left and Right
Softkeys
Navigator Use this to move around the V660’s screens.
Home Press this to return to the Home page at any
Back Press this to return to the previous screen, or
Start After you enter or select a phone number,
End/Power Press this for several seconds to turn the
Alphanumeric
Keypad
The functions of these keys depend on the
screen currently displayed on the LCD. A word
displayed above a softkey indicates its current
function.
Click the navigator (press it in) to select the
highlighted function.
time (see page 10).
delete a character when entering data.
press this to start the call.
V660 on or off.
Press this once when a call is in progress to
end the call.
Use these keys to enter numbers and letters.
3 Preparing Your Phone
This section shows you how to:
4
Page 6

V660 Quick Start Guide
• Install the included battery.
• Install a SIM (Subscriber Identity Module) card.
• Charge the V660’s battery.
1 WARNING: NEVER expose the battery to
high temperatures (such as fire or
prolonged direct sunlight), short-circuit it or
open the battery’s casing. This could cause
the battery to ignite or explode.
1 WARNING: DANGER OF ELECTRICAL
SHOCK. Remove the battery or battery
cover only when the V660 is turned off and
the charger/USB cable is unplugged.
5
Page 7
V660 Quick Start Guide
3.1 Installing the Battery and a SIM Card
This section describes how to install the battery that came
with your V660, and how to install a SIM (Subscriber Identity
Module) card. A SIM card allows you to make and receive
cellphone calls with the V660. If you do not want to install a
SIM card now, you can still use the V660’s other features
once the battery is installed.
" Fully charge the battery before you first use the
V660. This may take 8 to 10 hours. When you
first charge the battery, use the included charger
and NOT the USB cable. The power supplied
from a computer’s USB port is not enough to
fully charge the battery. Use the charger instead
of the USB cable whenever possible.
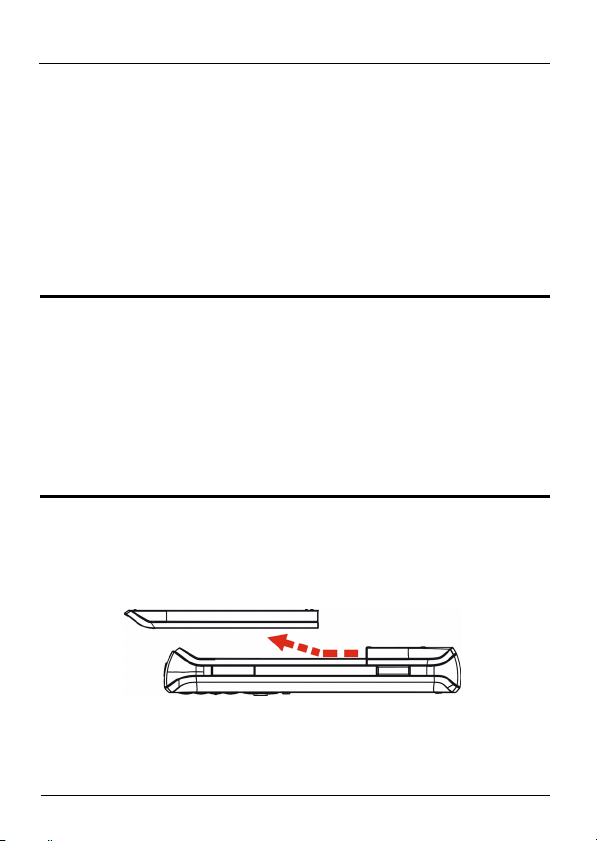
1 Remove the V660’s battery cover. Press the grooved area
at the top of the cover, slide the cover downwards
(towards the V660’s base) and lift it off.
2 Install a SIM (Subscriber Identity Module) card. If you do
not want to install a SIM card now, skip to step 3.
6
Page 8

V660 Quick Start Guide
The V660’s SIM card slot is located inside the battery
hatch. Slide the SIM card into the receptacle as shown, so
that the card’s contacts (the metal areas) are touching the
V660’s contacts.
3 Remove any packaging material from the battery. Insert
the top end of the battery into the battery hatch so that its
contacts (the metal areas) are touching the V660’s
contacts.
Ensure that the + and - symbols on the battery line up with
those on the V660.
7
Page 9

V660 Quick Start Guide
4 Press the battery’s bottom end down until it clicks into
place.
" Do not force the battery into place. If it does not
fit in the battery hatch, it is wrongly aligned.
5 Replace the battery cover.
" To remove the battery, insert a fingernail under
the small lip at the bottom of the battery, press
the battery forwards (towards the V660’s top)
and lift it out.
3.2 Charging the Battery
The V660 uses a rechargeable lithium (Li-ion) battery. Charge
the battery using the included charger or the USB cable to
connect to a computer (see your User’s Guide). Both cables
connect to the V660’s USB/Recharge port.
8
Page 10

V660 Quick Start Guide
1 WARNING: Use only the charger that came
with your V660. Using a different type of
charger might damage the V660 or its
battery.
Do the following to recharge the V660’s battery using the
included charger:
1 Insert the USB end of the charger cable into the USB/
Recharge port.
2 Connect the charger’s plug to a power socket. Turn the
power on.
3 The Operation LED comes on after a few seconds.
4 If the V660 is turned off, the LCD screen shows a battery
icon and then goes blank. If it is turned on, a icon
appears at the top of the screen.
V If the Operation LED does not come on, check
your connections and ensure the power supply
is switched on. If the problem persists, you may
have a faulty cable. Contact your vendor.
9
Page 11

V660 Quick Start Guide
4 Using the LCD Screen
Turn the V660 on by pressing the End/Power key for a few
seconds.
When you first turn the V660 on, it prompts you to enter some
basic information. Once you have done this, the Home screen
displays as shown. Go back to this screen at any time by
pressing the Home () key.
V If the screen stays dark when you try to turn on
the V660, ensure that the battery is charged.
See section 3.2 on page 8.
10
Page 12

V660 Quick Start Guide
•The Status Bar displays information about your V660. The
following table describes common status bar icons.
ICON DESCRIPTION
This shows the signal strength of the cellular phone
network connection (when a SIM card is installed).
This shows the battery level.
The battery is almost empty.
The battery is missing or faulty.
The battery is recharging.
The wireless LAN connection is up.
A VoIP account is successfully registered.
The GPRS service is available. GPRS (General
Packet Radio Service) uses the cellphone network
for Internet access.
You have a new text message.
You have a new voicemail message
There is no SIM card installed.
The installed SIM card is faulty.
• Use the Shortcut Bar to jump to the V660’s main feature
screens (Internet Explorer, Windows Media Player, the
Microsoft Network, email and messaging, etc.) Use the navi-
gator to move around the Shortcut Bar.
•The Display Area shows information related to the V660’s
current function (the Web site you are browsing, details of
the current call, etc.)
11
Page 13

V660 Quick Start Guide
•Use the Left and Right Softkeys to perform the functions
shown in the Softkey Functions section.
5 Making Cellular Phonecalls
Take the following steps to make a phonecall over the regular
GSM cellphone network.
1 If you did not already install a SIM card, do so now (see
section 3.1). Turn on the V660.
2 When the main screen displays, check that your phone
service provider’s network name and a icon display.
V If the name of your cellphone network does not
display in the Home screen, reinstall the SIM
card and check its contacts are free of dirt and
corrosion. If you still cannot see the network
name, you may be out of its coverage area.
3 Enter the number you want to call and press the Start key.
4 When you want to end the call, press the End key.
12
Page 14

V660 Quick Start Guide
V If you cannot make a cellular phonecall, ensure
that your V660 has a cellular signal (look at the
Status Bar). If the V660 has a signal but you
still cannot make a call, contact your cellular
service provider.
6 Connecting to a Wireless Access Point
When you are connected to a wireless Access Point (AP) with
Internet access, you can make VoIP calls (if you have an
active SIP account), browse the Web and send and receive
email.
Do the following to connect to an AP.
1 From the Home screen, click Start > Settings > WiFi >
Connections.
13
Page 15

V660 Quick Start Guide
2 Press New. The following screen appears.
Enter the AP’s information exactly as it was given to you. The
following table describes how to fill in the fields.
FIELD DESCRIPTION
Name Enter a name for this connection. This name
appears in the Home page when the connection is
on. You can choose any name, as this does not
affect network settings.
ESSID This is the “Network Name”. Enter the access
point’s ESSID.
Security Select the type of wireless security the access
point uses, and enter your security information in
the fields that appear.
MAC Leave this field at its default. This is the Media
Access Control address of your V660. All
networking devices have a MAC address, which
uniquely identifies them.
14
Page 16

V660 Quick Start Guide
FIELD DESCRIPTION
DHCP Select this if you were not given an IP address to
use.
When this is selected, your V660 gets its IP
address automatically. When it is not selected, you
have to enter your IP settings manually.
If you select this, leave all the following fields in this
screen blank unless you have a specific reason to
do otherwise.
IP If you were given an IP address to use, enter it
here.
If you do this, ensure DHCP is not selected.
Submask Enter the subnet mask associated with the IP
address above.
Gateway Enter the IP address of your network gateway.
Preferred/
Alternate
DNS
server
3 Click Done to return to the previous page.
Select the new profile and press Menu. Select Default to
always use this profile first.
4 Return to the Home screen (press the Home button). The
LCD screen displays WiFi: Connecting... while it searches
for the AP, then displays the wireless network’s ESSID
(network name) when it is successfully connected.
Enter the details of your Domain Name Servers
here. If you have only one DNS server address,
enter it in the Preferred DNS Server field.
15
Page 17

V660 Quick Start Guide
V If you cannot connect to a wireless LAN, check
that you entered the AP’s settings correctly. The
V660 and the AP must use exactly the same
security settings. Turn the V660 off and on.
Check that the AP is on. If the problem persists,
you may be out of the AP’s coverage area.
7 Making Internet Phonecalls
VoIP (Voice over IP) allows you to make phonecalls over the
Internet. SIP is the protocol the V660 uses to make VoIP
calls. Before you can use the V660 to make VoIP calls, you
need:
• An active account with VoIP service provider that uses SIP.
• A wireless connection between the V660 and an Access
Point (AP). See section 6 for more information.
Do the following to set up your VoIP account on the V660.
1 From the Home screen, click Start > Settings > WiFi > SIP
Phone.
16
Page 18

V660 Quick Start Guide
2 Press New. The following screen appears.
Enter your account information exactly as it was given to
you.
" If you were not given information for some of the
fields in this screen, leave them at their default
settings.
The following table describes how to fill in the fields in this
screen.
FIELD DESCRIPTION
Name Enter a name for this SIP phone account.
This name appears in the SIP Phone page.
You can choose any name.
SIP Phone
Account
User Name This is the user name for this SIP account.
Enter your account information in this
section.
17
Page 19

V660 Quick Start Guide
FIELD DESCRIPTION
Authentication
Name
Password This is the password for this SIP account.
User ID If you have an alias or secondary name for
Registrar
server
Port Enter the listening port of the SIP server.
Proxy server If you were given information on a SIP proxy
Port Enter the listening port of the SIP proxy
SIP Service
Lookup
Codec Setting Leave the fields in these sections at their
Advanced
Setting
STUN setting
This is your SIP account number. For
example, if you have a SIP account like
1234567@voip-provider.com, your SIP
account number is 1234567.
this account, enter it here. Otherwise, leave
it blank.
Enter the IP address of the SIP server for
this account. If you have more than one
server’s address, enter the registrar server’s
address.
to use, enter its details here.
server.
Select this if you want the V660 to
automatically check which calling features
your account supports.
default settings unless you have a specific
reason to do otherwise.
18
Page 20

V660 Quick Start Guide
3 When you have finished, press Apply, then press the
Home key. The V660 tries to register with the SIP server.
When the SIP account is successfully registered, a
icon displays at the top of the screen.
4 To make a VoIP call, press the # key before you dial the
number. For example, if you want to dial the phone
number 55512345 using your VoIP account instead of the
cellular network, dial “#55512345”.
V If you cannot make a VoIP call, ensure you
entered your SIP Phone settings correctly. Go
to the Home screen and check your wireless
LAN connection is working (if it is not working,
WiFi: Unavailable displays). Try using the VoIP
account from another phone, and/or try calling a
different phone number. If the problem persists,
contact your VoIP service provider.
8 Using the Camera
To use camera, press the Camera button on the side of the
V660. The viewfinder window appears.
• To take a picture, press the Camera key again, or press
Capture.
19
Page 21

V660 Quick Start Guide
• To look at the pictures stored on the V660, press Menu >
Album. Select a picture and press View.
• To delete a picture stored on the V660, press Menu >
Album. Select the picture to delete and press Menu >
Delete.
9 Installing a Memory Card
Use a T-Flash (also known as Trans-Flash or microSD)
memory card if you want to increase your V660’s storage
capacity for pictures, movies, sound clips, and so on.
You can also store data on the memory card, remove it from
the V660, and read the data on another compatible device.
• To install a memory card, locate the T-Flash port on the left
side of the V660. Lift the protective cover and insert the card
with the contacts (the metal areas) facing up.
• To remove a memory card, turn the V660 off and lift the T-
Flash port’s cover. Press the release lever (use a pencil or
other slim object if necessary) to push the card out of the
port.
" Removing the T-Flash memory card while the
V660 is turned on could damage the data on the
card. Turn the V660 off first.
20
Page 22

V660 Quick Start Guide
10 Locking and Unlocking the Phone
You can lock the V660 when you are not using it. The V660
has two kinds of lock:
1 Key Lock. This prevents accidental calls by turning off the
keypad. Anyone can unlock and use the V660.
• To turn the key lock on: go to the Home screen (see
section 4), then press and hold the Home key for a few
seconds.
• To turn the key lock off: press the Left Softkey (Unlock
displays on the LCD screen when the V660 is locked).
Then, press the asterisk ( ) key.
2 Device Lock. This not only locks the keypad but also
requires a password to unlock the phone. Only people
who know the password can use the V660.
" If you forget the Device Lock password, you
cannot use the V660. If this happens, contact
your vendor.
• To configure the device lock password: go to the Home
screen (see section 4), then press Start > Settings >
More > Security > Device Lock. If you already set up a
password, you are asked to enter it before you can
make changes.
• To turn the device lock on: go to the Home screen (see
section 4), then press and hold the Up key for a couple
21
Page 23

V660 Quick Start Guide
of seconds. The Quick List screen displays. Select
Device Lock.
" The device lock also turns on automatically if
you do not use the phone for the length of time
you set in the Device Lock settings screen.
• To turn the device lock off: press the Left Soft Key
(Unlock displays above it when the V660 is locked).
Then, enter the device lock password and press Done.
" If you have to enter a password to use your SIM
card (the SIM PIN), remember that it is different
from the device lock password.
Viewing a Product’s Certification(s)
1 Go to www.zyxel.com.
2 Select your product from the drop-down list box on
the ZyXEL home page to go to that product's page.
3 Select the certification you wish to view from this
page.
22
 Loading...