

Page 1

V630
VoIP Wi-Fi Phone
Quick Start Guide
Version 3.60
6/2008
Edition 1
Copyright © 2008. All rights reserved
CONTENTS
ENGLISH 3
DEUTSCH 19
ESPAÑOL 39
FRANÇAIS 57
ITALIANO 75
РУССКИЙ 93
简体中文 113
繁體中文 129
Page 2

V630 Quick Start Guide
2
Page 3
ENGLISH
ENGLISH
1 Overview
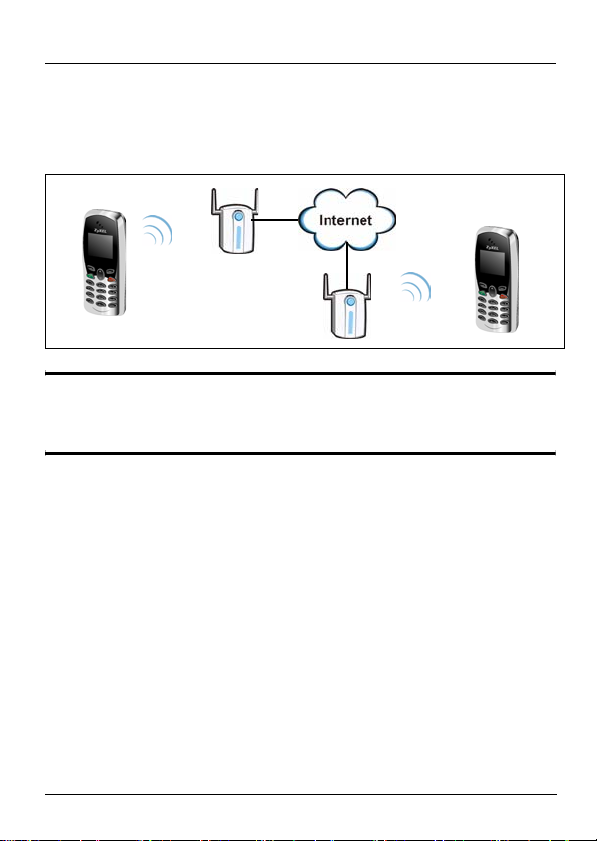
The V630 lets you use a wireless network connection to make
and receive phone calls through the Internet.
" You should have Internet access and a voice
account already set up.
This Quick Start Guide covers the following. See the User’s
Guide for more information on all features.
• Physical Features. See page 4.
• Installing and Charging the Battery. See page 5.
• The LCD Screen. See page 7.
• Initial Configuration. See page 9.
• Connect to a Wireless Network. See page 13.
• Basic Phone Operation. See page 15.
3
Page 4

ENGLISH
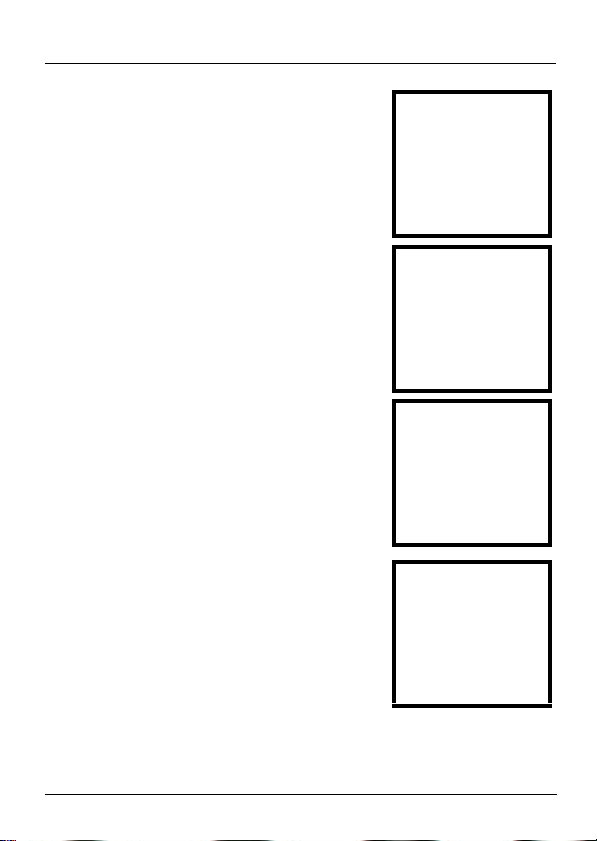
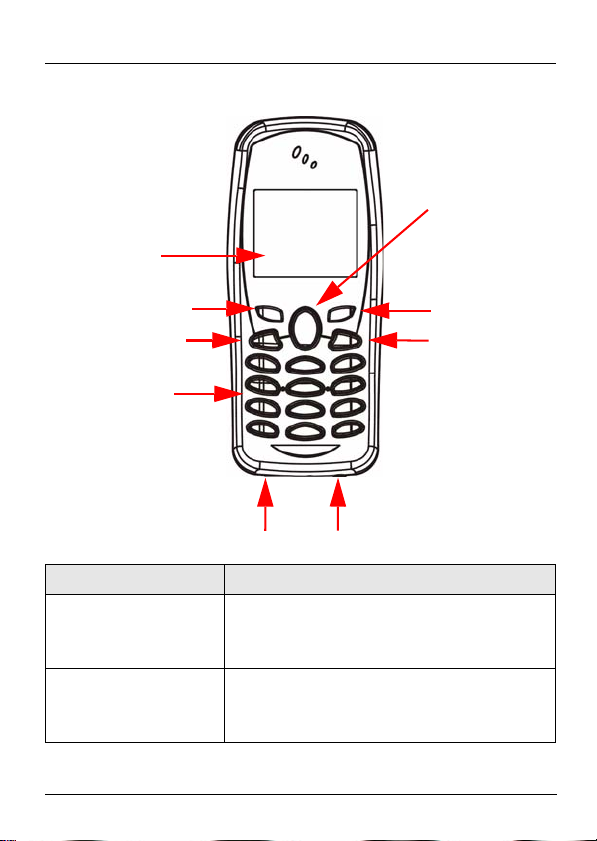
2 Physical Features
LCD screen
Up/Down key
Left key
Talk key
Alphanumeric
keypad
USB/recharge port
NAME DESCRIPTION
LCD screen Use this screen to display information and
navigate the phone’s menus.
Left key Press this to open the on-screen menus and
select options.
Right key Press this to return to the previous menu. It is
also a shortcut to the phone book.
4
Headset jack
Right key
Power/End
key
Page 5

ENGLISH
NAME DESCRIPTION
Talk key Press this to make and receive calls.
Up/Down
keys
Power/End
key
Alphanumeric
keypad
Headset jack Connect a headset (not included) to this jack.
USB/
recharge port
In the main screen, these are quick access
buttons. By default, Up opens the information
menu and Down opens the phone settings
profile setup. See the User’s Guide to change
their functions.
In the menus, these keys move the cursor.
Press this to finish or reject calls. Hold it down
for a few seconds to turn the V630 on or off.
Use these keys to enter numbers, letters and
symbols.
Connect the phone’s power adaptor here to
charge the battery.
3 Installing and Charging the Battery
• WARNING: NEVER expose the battery to high temperatures
(such as fire or prolonged direct sunlight), short-circuit it or
open the battery’s casing. This could cause the battery to
ignite or explode.
• WARNING: DANGER OF ELECTRICAL SHOCK. Remove
the battery or battery cover only when the V630 is turned off
and the charger/USB cable is unplugged.
• Charge the battery for 10 hours before you first use the
V630.
5
Page 6
ENGLISH
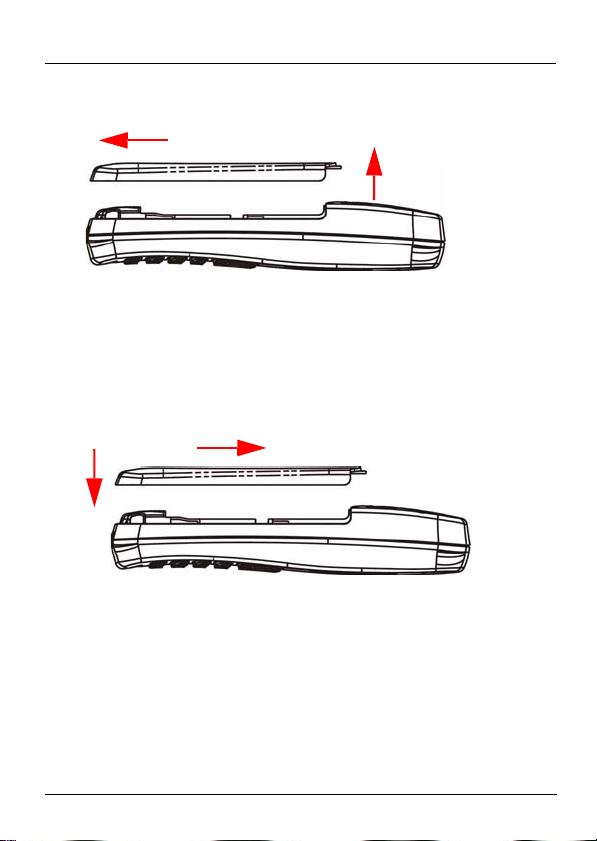
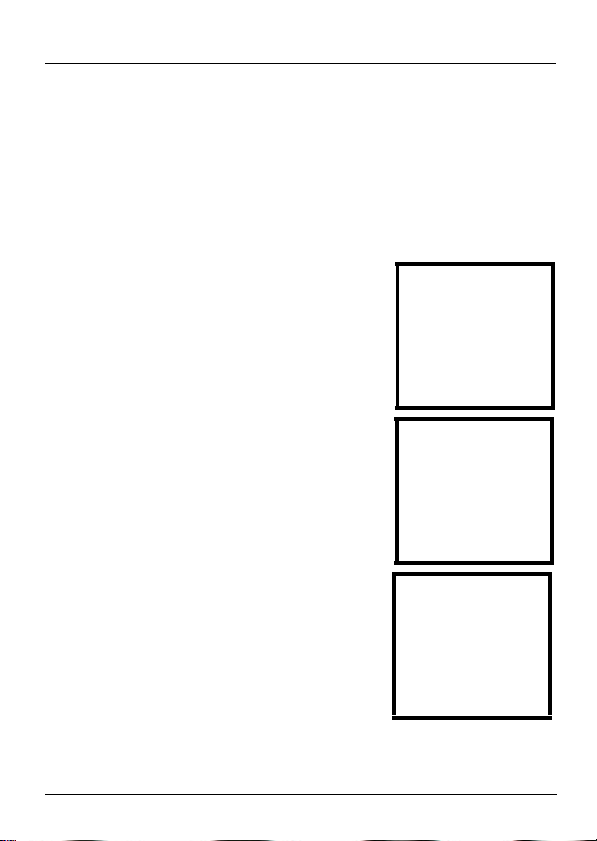
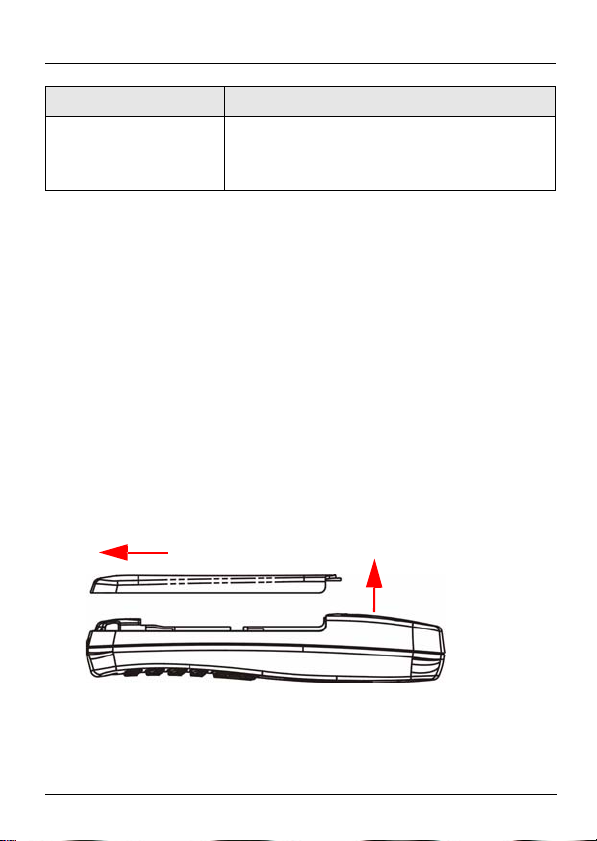
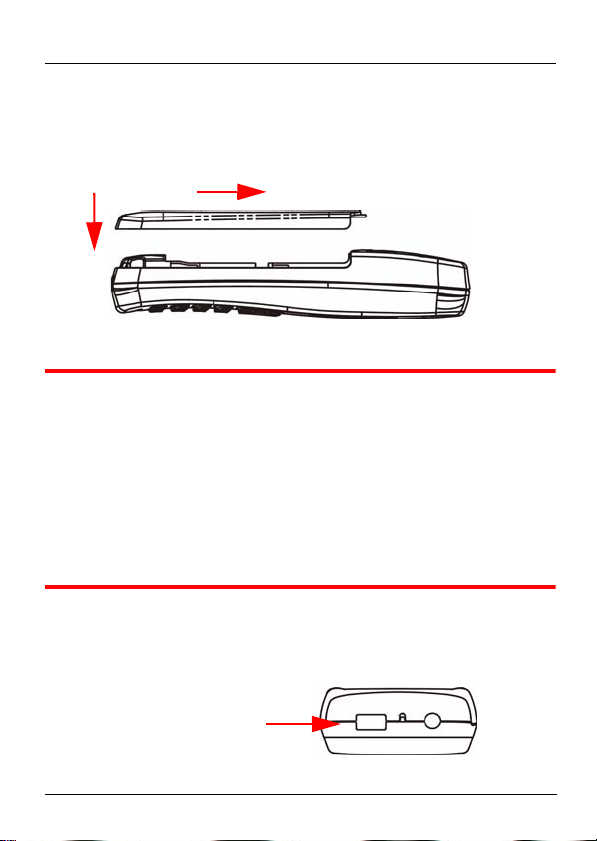
1 Press the button on the V630’s battery cover and slide the
cover towards the V630’s base and lift it off.
2 Remove any packaging from the included battery. Hold the
battery with the plastic tab facing up. Insert the battery so
the end with the contacts (the metal areas) touches the
V630’s contacts located near the base. Press the battery
down.
3 Replace the battery cover.
6
Page 7
ENGLISH
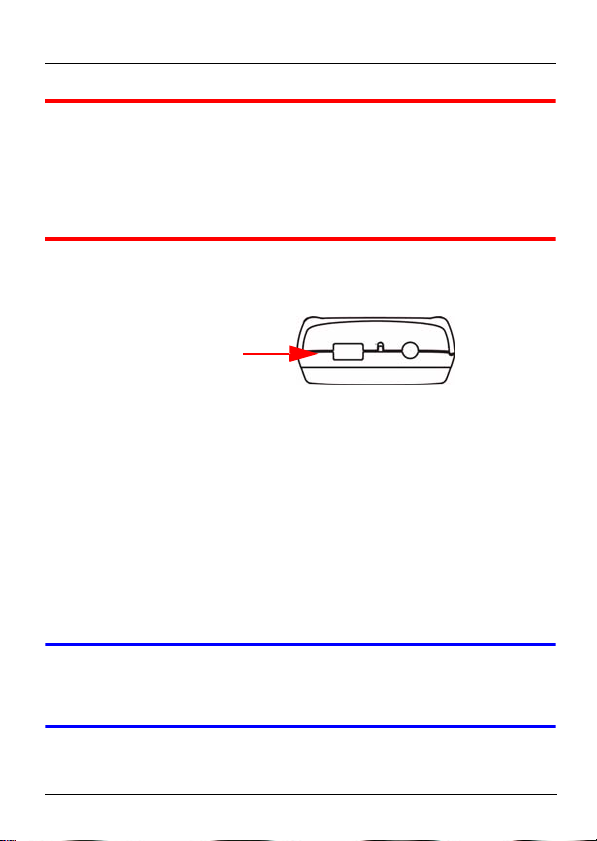
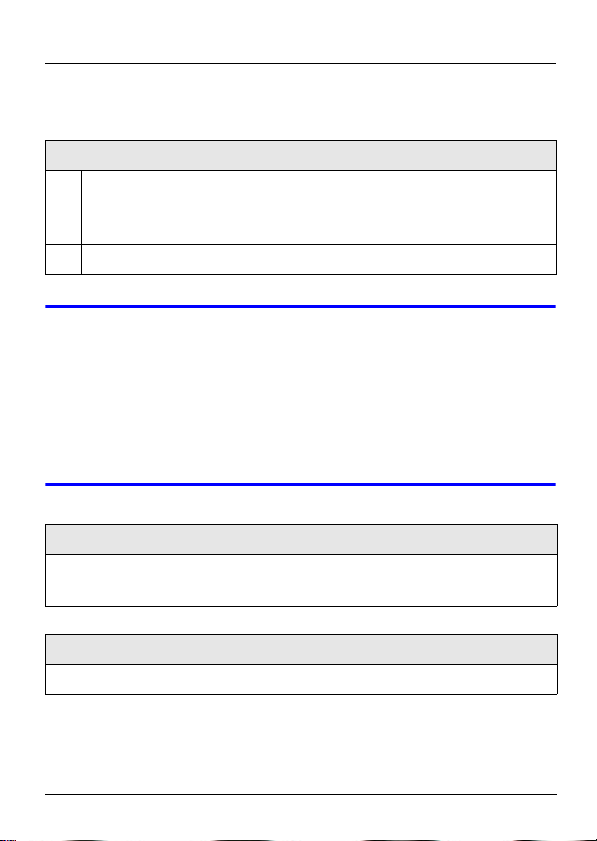
1 WARNING: Use only the included charger
or a USB cable (not included) with a
computer’s USB port. A different charger
might damage the V630 or its battery.
4 Connect the charger’s cable into the USB/Recharge port.
USB/recharge port
5 Connect the charger’s plug to a power socket. The
backlight turns on. If the V630 is turned on, the level
indicated in the battery icon’s meter cycles.
4 The LCD Screen
Press the red End/Power key for a few seconds to turn on the
V630. After the welcome display, the V630 prompts you to
enter the time and date.
V If the screen does not come on, ensure that the
battery is charged. See Section 3.
7
Page 8

ENGLISH
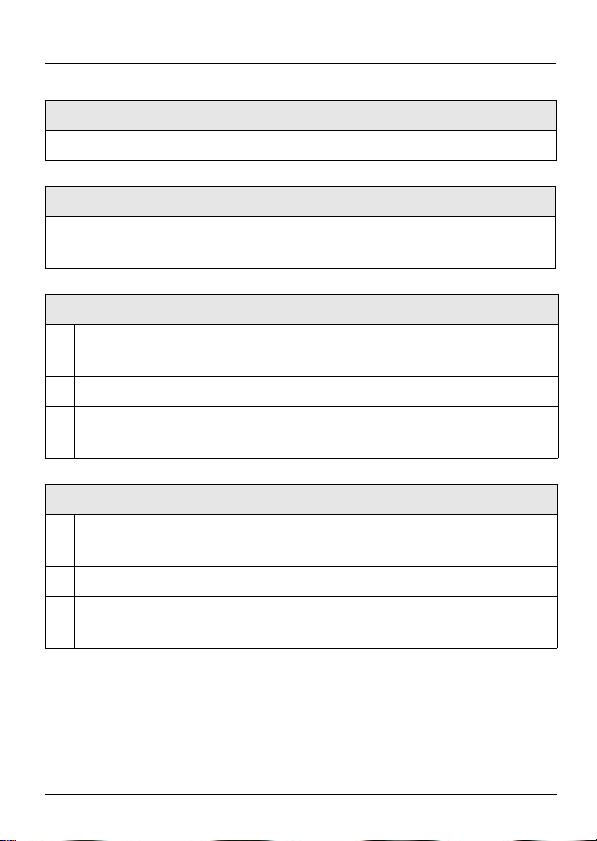
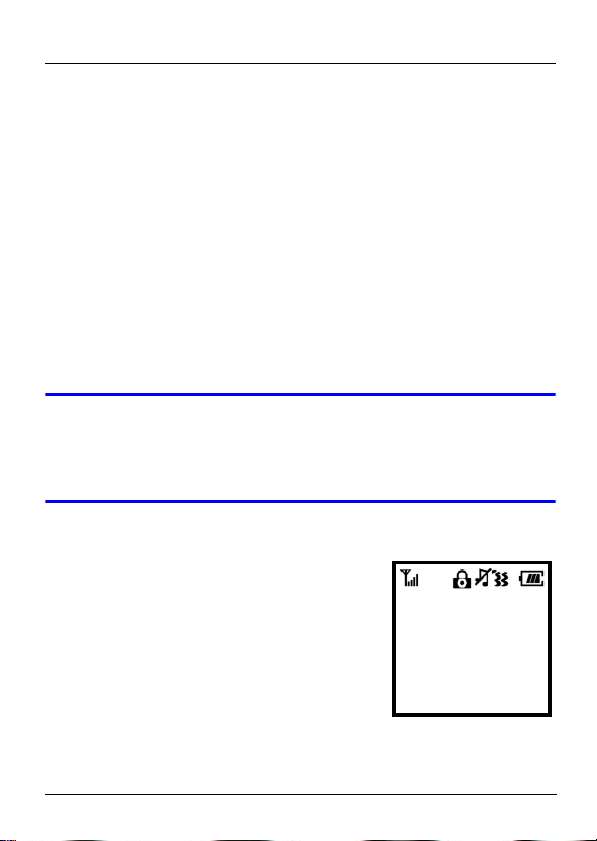
The LCD main screen displays next.
The icons at the top of the LCD screen
display status information.
No WLAN Service
2:44
10/18/2007
Menu Name
ICON DESCRIPTION
This shows the wireless LAN signal strength.
The keypad is locked. Press the Left key and * to
unlock it.
This shows whether the ring is turned on or not.
Vibrate is turned on.
This shows the remaining battery power. The
battery meter cycles during recharging.
No WLAN
Service
The status of the wireless LAN connection or SIP
server registration displays here.
Time/Date The time and date (in month/day/year format)
display in the middle of the screen.
Menu Use the Left key to perform the function shown
here. In the main screen, press the Left key to
enter the V630’s main menu.
Name Use the Right key to perform the function shown
here. In the main screen, press the Right key to
add or find a contact in the phonebook.
8
Page 9

ENGLISH
5 Initial Configuration
VoIP (Voice over IP) allows you to make phone calls over the
Internet. SIP is the protocol the V630 uses to make VoIP
calls. Before you configure the V630, you need:
• An active account with a VoIP service provider that uses SIP.
• A wireless LAN (IEEE 802.11b or IEEE 802.11g) connection.
See Section 6 for more information.
5.1 Entering Your VoIP Account
Do the following to set the V630 to use your VoIP account.
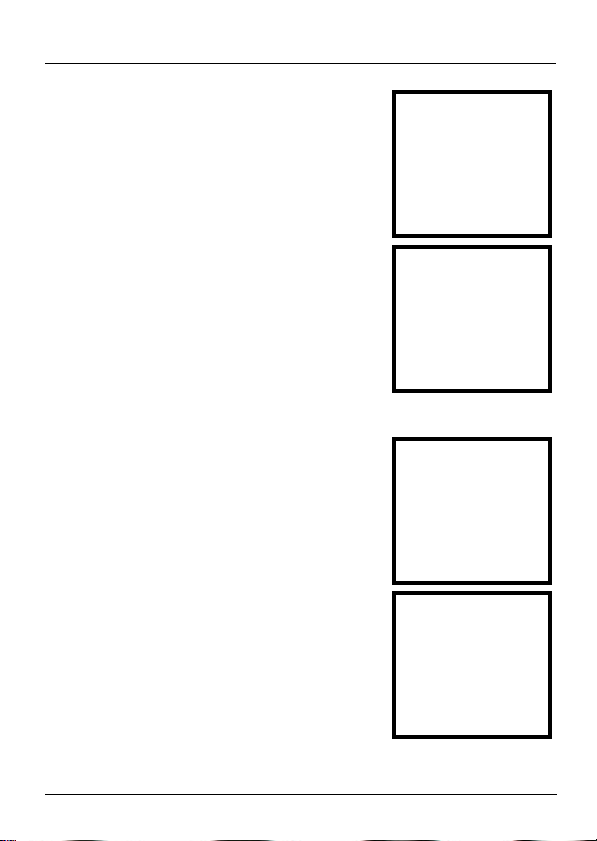
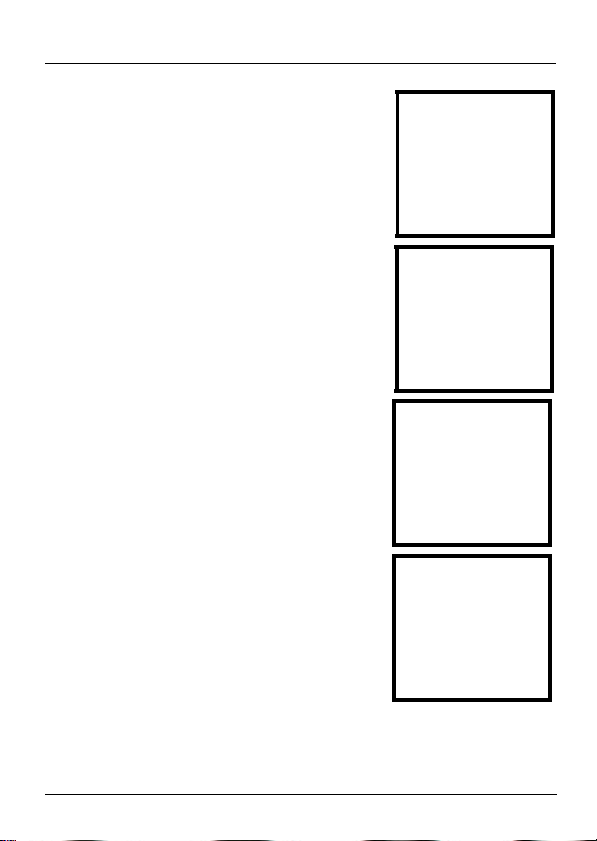
1 From the V630’s main screen, press the Left key (Menu)
to enter the menus.
2 Use the Down key to go to 4
Network and then the Left key to
select it.
3 Select 3 SIP Profiles.
--------Main Menu-------1 Call log
2 Profiles
3 Setup
4 Network
Select Back
----------Network---------1 Site Scan
2 WLAN Profiles
3 SIP Profiles
4 Ping Test
Select Back
9
Page 10
ENGLISH
4 Select 2 Add to Profile.
5 Enter a name to identify the profile
and select Done.
• You may need to press a key
several times to input the desired
character.
• Press # to use lower-case letters, upper-case letters, numbers, or symbols.
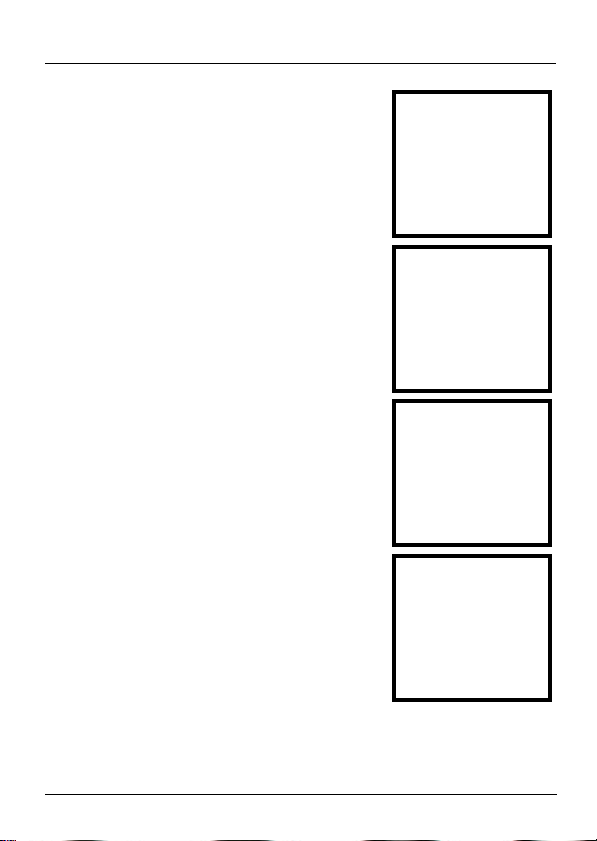
6 Select 2 Phone Number.
7 Enter your SIP account number. For
example, if you have a SIP account
like 1234567@voip-provider.com,
your SIP account number is 1234567.
-------SIP Profiles-------
1 Profiles List
2 Add to Profile
Select Back
---New Profile Name----
Done abc Clear
-------Add to Profile-----1 Display Name
2 Phone Number
3 SIP Server
4 SIP Proxy
Select Back
-----Phone Number------
1234567
10
Done Clear
Page 11

ENGLISH
8 Select 3 SIP Server.
9 Select 1 SIP Address.
10 Enter the IP address of the SIP server
for this account and select Done. If
you have more than one server’s
address, enter the registrar server’s
address.
11 If the VoIP service provider gave you
a SIP port number other than 5060,
select 2 SIP Port and go to step 12.
Otherwise, skip to step 13.
-------Add to Profile-----1 Display Name
2 Phone Number
3 SIP Server
4 SIP Proxy
Select Back
----SIP Server Setup---
1 SIP Address
2 SIP Port
Select Back
------SIP Address------
111.222.333.444
Done Clear
----SIP Server Setup---
1 SIP Server Address
2 SIP Port
11
Select Back
Page 12
ENGLISH
12 Enter the SIP port number from the
VoIP service provider and select
Done.
13 Select 4 SIP Proxy.
14 Configure your SIP account’s
username and password as the
proxy username and password. If
the VoIP service provider provided a
SIP proxy server address and/or a
port number other than 5060, enter
it.
15 Don’t modify the NAT traversal,
expire, or codec order settings
unless the VoIP service provider
provided settings for them or you
have a specific reason to do so.
Press the Power/End key to return
to the main screen.
----------SIP Port---------
5060
Done Clear
-------Add to Profile-----1 Display Name
2 Phone Number
3 SIP Server
4 SIP Proxy
Select Back
-------Proxy Setup-----1 Proxy Address
2 Proxy Port
3 Proxy Username
4 Proxy Password
Select Back
-------Add to Profile-----4 SIP Proxy
5 NAT traversal
6 Expire
7 Codec Order
Select Back
Congratulations! You have configured the VoIP settings.
Continue with Section 6 to set up the wireless connection.
12
Page 13
ENGLISH
6 Connect to a Wireless Network
Do the following to configure the V630 to connect to the
wireless network.
1 From the V630’s main screen, press the Left key (Menu)
to enter the menus.
2 Use the Down key to go to 4
Network and then the Left key to
select it.
3 Select 1 Site Scan.
4 The V630 scans and then lists the
APs in the area. Select the AP to
which you want to connect.
--------Main Menu-------1 Call log
2 Profiles
3 Setup
4 Network
Select Back
----------Network----------
1 Site Scan
2 WLAN Profiles
3 SIP Profiles
4 Ping Test
Select Back
------WLAN Scan-------
WLAN Example
RSSI: 64
Chan: 6
13
Select Back
Page 14

ENGLISH
5 The AP in this example uses
(WPA-PSK) security, enter the
-------Enter Key--------
key (password) and select Done.
• You may need to press a key
several times to input the
desired character.
• Press # to use lower-case let-
Done abc Clear
ters, upper-case letters, numbers, or symbols.
6 To use a static IP address or PPPoE,
select IP Setting and select the
appropriate option.
Otherwise, press the Power/End key
to return to the main screen.
With a single SIP account, every WLAN
------Add to Profile:----1 SSID
2 Security set..
3. IP Setting
4. SIP Binding
Select Back
profile you create uses it. If you create
multiple SIP profiles, edit a WLAN profile SIP binding settings
to set which SIP profile the WLAN profile uses.
The signal strength icon displays after the V630 connects to
the AP. Next the V630 attempts to register with the SIP
server. “ZyXEL V630” displays in the main screen after
successful SIP registration (see the User’s Guide for how to
modify the SIP profile’s display name). You can now start
making calls. See Section 7 for details.
14
Page 15
ENGLISH
7 Basic Phone Operation
MAKING A CALL
1 From the main screen, enter the number you want to call
or press the Right key to open the V630’s phone book.
See your User’s Guide for how to use the phone book.
2 Press the green Talk key to start the call.
V If you cannot call, make sure you have a
wireless LAN signal and check your VoIP
account settings. Try using a different VoIP
account, and/or try calling a different phone
number. If the problem persists, contact your
VoIP service provider.
USING THE SPEAKER PHONE
Press the Right key during a call to activate the speaker phone
feature.
RECEIVING A CALL
Press the green Talk key to answer an incoming call.
15
Page 16
ENGLISH
ENDING A CALL
Press the red Power/End key to end a call.
CALL HOLD/UNHOLD
During a call, press the Left key (Call Option) to open the call
options. Select Hold/Unhold to put the call on or off hold.
MAKING A 3-WAY CONFERENCE CALL
1 During a call, press the Left key (Call Option) to open the
call options and then select New call.
2 Enter another phone number and press the green Talk key.
3 After the third party answers, press the Left key (Call
Option) to open the call options. Select conference.
TRANSFERRING A CALL
1 During the call, press the Left key (Call Option) to open
the call options. Select Blind Transfer.
2 Dial the number to which you want to transfer the call.
3 Wait until you hear it ring. Then press the Power/End key
to finish transferring the call.
16
Page 17
ENGLISH
LOCKING AND UNLOCKING THE KEYPAD
Lock the keypad to prevent accidental calls. From the main
screen, press the Left key and * to lock or unlock the V630. You
can also have the keypad lock to turn on automatically if you do
not use the V630 for a specific length of time. See the User’s
Guide for how to do this.
PEER TO PEER CALLS (P2P)
Do the following to call directly to someone’s SIP phone
number and IP address without going through a SIP server.
1 Section 5 covered creating a SIP profile for using a SIP
server. Create a different SIP profile for P2P calls. The SIP
profile needs a phone number for the V630 (but no SIP
server settings). From the main screen, select Menu >
Network > SIP Profiles > Add to Profile.
2 You must use a static IP address. Create a WLAN profile
that uses a static IP address. From the main screen, select
Menu > Network > WLAN Profiles > Add to Profile.
Configure the IP address, subnet mask, gateway address,
and DNS server address. Use the SIP binding option to
select the SIP profile you created in the previous step. Your
phone number and (P2P) displays in the main screen.
17
Page 18
ENGLISH
PEER TO PEER CALLS (P2P)
3 In the main screen, press the Right key to open the
phonebook. In the contact list, press Option > Add. Create
a phone book entry for the callee. Enter the callee’s name
and SIP phone number. Then select the P2P mode and
enter the callee’s IP address and SIP port number (5060 is
the default). Select what group the callee should belong to
(if any). Press the Left key to start the call.
Viewing a Product’s Certification(s)
1 Go to www.zyxel.com.
2 Select your product from the drop-down list box on
the ZyXEL home page to go to that product's page.
3 Select the certification you wish to view from this
page.
18
Page 19

DEUTSCH
DEUTSCH
1 Übersicht
Das V630 ist ein WLAN Telefon mit dem sie Telefonanrufe
über das Internet tätigen und empfangen.
" Dazu benötigen Sie einen Internetzugriff und ein
gültiges Voice-Konto.
Diese Kurzanleitung ist in die folgenden Abschnitte aufgeteilt:
Weitere Informationen zu allen Funktionen finden Sie im
Benutzerhandbuch.
• Physikalische Leistungsmerkmale. Siehe Seite 20.
• Einsetzen und Aufladen des Akkus. Siehe Seite 22.
• Der LCD-Monitor. Siehe Seite 24.
• Erstkonfiguration. Siehe Seite 26.
• Anschließen an ein Drahtlosnetzwerk. Siehe Seite 30.
• Telefongrundlagen. Siehe Seite 33.
19
Page 20
DEUTSCH
2 Physikalische Leistungsmerkmale
Nach-oben/
unten-Taste
LCD-Monitor
Nach-links-Taste
Sprechen-Taste
Alphanumerisch
Tastatur
USB-/Ladeanschluss
BEZEICHNUNG BESCHREIBUNG
LCD-Monitor Auf diesem Fenster können Sie
Informationen anzeigen lassen und in
den Menüs des Telefons navigieren.
Nach-links-Taste Drücken Sie auf diese Taste, um die
Bildschirmmenüs aufzurufen und
Optionen auszuwählen.
20
Kopfhöreranschluss
Nach-rechts
-Taste
Ein/Aus/Ende
Taste
Page 21

DEUTSCH
BEZEICHNUNG BESCHREIBUNG
Nach-rechts-Taste Drücken Sie auf diese Taste, um zum
vorhergehenden Menü zurückzukehren.
Sie ist gleichzeitig eine Direkttaste für
das Telefonbuch.
Sprechen-Taste Drücken Sie auf diese Taste, um Anrufe
zu tätigen oder anzunehmen.
Nach-oben/untenTaste
Ein/Aus/Ende-Taste Drücken Sie auf diese Taste, um Anrufe
Alphanumerische
Tastatur
Kopfhöreranschluss Hier wird ein Headset (nicht im
Im Hauptfenster funktionieren diese
Tasten als Direktzugriffstasten.
Standardmäßig öffnet die Up (Nach-
oben)-Taste das InformationsmenüMenü und die Down (Nach-unten)-
Taste das Profil-Einstellmenü für die
Telefoneinstellungen. Eine
Beschreibung zum Ändern der
Tastenfunktionen finden Sie im
Benutzerhandbuch.
In den Menüs können Sie mit diesen
Tasten den Cursor verschieben.
abzuweisen oder zu beenden. Drücken
Sie einige Sekunden lang auf diese
Taste, um das V630 ein- oder
auszuschalten.
Mit diesen Tasten können Sie Zahlen,
Buchstaben und Symbole eingeben.
Lieferumfang enthalten) angeschlossen.
21
Page 22
DEUTSCH
BEZEICHNUNG BESCHREIBUNG
USB-/
Ladeanschluss
Hier wird der Netzadapter des Telefons
angeschlossen, um den Akku
aufzuladen.
3 Einsetzen und Aufladen des Akkus
• WARNUNG: Der Akku darf NIEMALS hohen Temperaturen
ausgesetzt (z. B. zu lange in starkem Sonnenlicht liegen),
kurzgeschlossen oder geöffnet werden. Dabei kann sich der
Akku entzünden oder explodieren.
• WARNUNG: STROMSCHLAGGEFAHR. Öffnen Sie das
Akkufach nur, wenn das V630 ausgeschaltet und das USB-/
Ladekabel nicht angeschlossen ist.
• Bevor Sie den V630 das erste Mal benutzen, muss der Akku
10 Stunden lang aufgeladen werden.
1 Drücken Sie auf den Akkufachriegel des V630, schieben
Sie die Abdeckung zur Basis des V630, und heben Sie sie
dann ab.
2 Entfernen Sie das gesamte Verpackungsmaterial des
enthaltenen Akkus. Halten Sie den Akku so, dass das
Kunststoffetikett nach oben zeigt. Legen Sie den Akku so
22
Page 23
DEUTSCH
ein, dass das Ende mit den Kontakten (die Metallbereiche)
die Kontakte des V630 berühren. Drücken Sie den Akku in
das Fach hinein.
3 Setzen Sie den Akkufachdeckel wieder auf.
1 WARNUNG: Verwenden Sie zum Aufladen
nur das mitgelieferte Ladegerät oder ein
USB-Kabel (nicht im Lieferumfang
enthalten), das an den USB-Anschluss
eines Computers angeschlossen ist. Mit
einem anderen Ladegerät kann das V630
oder sein Akku beschädigt werden.
4 Schließen Sie das Kabel des Ladegeräts an den
Anschluss USB/Recharge an.
USB-/Ladeanschluss
23
Page 24
DEUTSCH
5 Schließen Sie den Stecker des Ladegeräts an eine
Netzsteckdose an. Das Hintergrundlicht beginnt zu
leuchten. Wenn der V630 eingeschaltet wird, wird der
Ladestand des Akkus angezeigt.
4 Der LCD-Monitor
Drücken Sie einige Sekunden lang auf die rote End/Power
(Ein/Aus/Ende)-Taste, um den V630 einzuschalten. Nachdem
das Willkommensfenster eingeblendet wurde, werden Sie
vom V630 aufgefordert, das Datum und die Uhrzeit
einzugeben.
V Wenn das Fenster nicht angezeigt wird, stellen
Sie sicher, dass der Akku aufgeladen ist. Siehe
Abschnitt 3.
Als nächstes erscheint das
Hauptfenster auf dem LCD-Monitor. Die
Symbole am oberen Rand des LCDMonitors geben Auskunft über den
Status des Geräts.
No WLAN Service
2:44
10/18/2007
Menu Name
24
Page 25

DEUTSCH
SYMBOL BESCHREIBUNG
Hier wird die Signalstärke des Wireless-LAN
angezeigt.
Die Tastatur ist gesperrt. Drücken Sie auf die Left
(Nach-links)-Taste und die Stern-Taste (*), um sie
wieder zu entsperren.
Hier wird angezeigt, ob das Klingelsignal
eingeschaltet ist.
Vibration ist eingeschaltet.
Hier wird der Ladestand des Akkus angezeigt.
Während des Ladevorgangs zeigt die
Ladestandsanzeige wechselnde Balken.
Kein
WLAN-
Hier wird der Status der Wireless-LAN-Verbindung
die SIP-Server-Registrierung angezeigt.
Dienst
Uhrzeit/
Datum
Die Uhrzeit und das Datum (im Format Monat/Tag/
Jahr) werden in der Mitte des Bildschirms
angezeigt.
Menü Drücken Sie auf die Left (Nach-links)-Taste, um die
hier angezeigte Funktion auszuführen. Drücken Sie
im Hauptfenster auf die Left (Nach-links)-Taste, um
das Hauptmenü des V630 aufzurufen.
25
Page 26

DEUTSCH
SYMBOL BESCHREIBUNG
Bezeichn
ung
Drücken Sie auf die Right (Nach-rechts)-Taste, um
die hier angezeigte Funktion auszuführen. Drücken
Sie im Hauptfenster auf die Right (Nach-rechts)-
Taste, um einen Kontakt im Telefonbuch zu suchen
oder hinzuzufügen.
5 Erstkonfiguration
Mit VoIP (Voice over IP) können Sie über das Internet
telefonieren. SIP ist das Protokoll, mit dem der V630 VoIPAnrufe tätigt. Um den V630 zu konfigurieren, benötigen Sie:
• Ein aktives Konto bei einem VoIP-Dienstanbieter, der SIP
verwendet.
• Eine Wireless-LAN-Verbindung (IEEE 802.11b oder IEEE
802.11g). Weitere Informationen finden Sie in Abschnitt 6.
5.1 Einrichten des VoIP- Kontos
Um den V630 für das VoIP-Konto einzurichten, müssen Sie
folgendes tun:
1 Drücken Sie im Hauptfenster des V630 auf die Nach-
links-Taste, um die Menüs aufzurufen.
26
Page 27
DEUTSCH
2 Gehen Sie mit der Down (Nach-
unten)-Taste zur Option 4 Network
(Netzwerk), und wählen Sie sie mit
der Left (Nach-links)-Taste aus.
3 Wählen Sie 3 SIP Profiles (SIP-
Profile).
4 Wählen Sie 2 Add to Profile (Zu
Profilen hinzufügen).
5 Geben Sie einen Namen für das
Profil ein, und wählen Sie Done
--------Main Menu-------1 Call log
2 Profiles
3 Setup
4 Network
Select Back
----------Network---------1 Site Scan
2 WLAN Profiles
3 SIP Profiles
4 Ping Test
Select Back
-------SIP Profiles-------
1 Profiles List
2 Add to Profile
Select Back
---New Profile Name----
(Fertig).
• Um das gewünschte Zeichen
einzugeben, müssen Sie u. U.
mehrmals auf eine bestimmte
Taste drücken.
Done abc Clear
• Drücken Sie auf #, um Kleinbuchstaben, Großbuchstaben, Zahlen oder Symbole
zu verwenden.
27
Page 28
DEUTSCH
6 Wählen Sie 2 Phone Number
(Telefonnummer).
7 Geben Sie Ihre SIP-Kontonummer
ein. Wenn Ihr SIP-Konto z.B.
1234567@voip-provider.com heißt,
ist die Nummer Ihres SIP-Kontos
1234567.
8 Wählen Sie 3 SIP Server (SIP-
Server).
9 Wählen Sie 1 SIP Address (SIP-
Adresse).
-------Add to Profile-----1 Display Name
2 Phone Number
3 SIP Server
4 SIP Proxy
Select Back
-----Phone Number------
1234567
Done Clear
-------Add to Profile-----1 Display Name
2 Phone Number
3 SIP Server
4 SIP Proxy
Select Back
----SIP Server Setup---
1 SIP Address
2 SIP Port
28
Select Back
Page 29
DEUTSCH
10 Geben Sie die IP-Adresse des SIP-
Servers für dieses Konto ein, und
wählen Sie Done (Fertig). Wenn Sie
mehr als eine Serveradresse
vorliegen haben, geben Sie die
Registrator-Serveradresse ein.
11 Wenn Ihnen der VoIP-Dienstanbieter
eine SIP-Port-Nummer zur
Verfügung gestellt hat (Standard
Port ist 5060), wählen Sie 2 SIP Port
(SIP-Port), und fahren Sie weiter mit
Schritt 12. Anderenfalls gehen Sie
weiter zu Schritt 13.
12 Geben Sie die SIP-Port-Nummer des
VoIP-Dienstanbieters ein, und wählen
Sie Done (Fertig).
13 Wählen Sie 4 SIP Proxy (SIP-Proxy).
------SIP Address------
111.222.333.444
Done Clear
----SIP Server Setup---
1 SIP Server Address
2 SIP Port
Select Back
----------SIP Port---------
5060
Done Clear
-------Add to Profile-----1 Display Name
2 Phone Number
3 SIP Server
4 SIP Proxy
Select Back
29
Page 30

DEUTSCH
14 Konfigurieren Sie den
Benutzernamen und das Kennwort
des SIP-Kontos, den ProxyBenutzernamen und das
dazugehörige Kennwort. Wenn
Ihnen der VoIP-Dienstanbieter eine
SIP-Proxyserveradresse und/oder
-------Proxy Setup-----1 Proxy Address
2 Proxy Port
3 Proxy Username
4 Proxy Password
Select Back
eine andere Port-Nummer als 5060
zugewiesen hat, geben Sie diese hier ein.
15 Ändern Sie die Einstellungen bei
NAT-Traversal, Abgelaufen oder
Codec-Reihenfolge nur dann, wenn
Sie von Ihrem VoIP-Dienstanbieter
diese Einstellungen zur Verfügung
gestellt hat.
Drücken Sie auf die Power/End (Ein/
-------Add to Profile-----4 SIP Proxy
5 NAT traversal
6 Expire
7 Codec Order
Select Back
Aus/Ende)-Taste, um zum
Hauptfenster zurückzukehren.
Herzlichen Glückwunsch! Sie haben die VoIP-Einstellungen
fertig konfiguriert. Fahren Sie bei Abschnitt 6 fort, um die
Drahtlosverbindung einzurichten.
6 Anschließen an ein
Drahtlosnetzwerk
Führen Sie die folgenden Schritte aus, um den V630 mit dem
WLAN zu verbinden.
30
Page 31

DEUTSCH
1 Drücken Sie im Hauptfenster des V630 auf die Left (Nach-
links)-Taste (Menü), um die Menüs aufzurufen.
2 Gehen Sie mit der Down (Nach-
unten)-Taste zur Option 4 Network
(Netzwerk), und wählen Sie sie mit
der Left (Nach-links)-Taste aus.
3 Wählen Sie 1 Site Scan (WLAN-
Suche).
4 Der V630 durchsucht zunächst den
Bereich nach APs und listet die
gefundenen dann auf. Wählen Sie
den AP aus, zu dem die Verbindung
hergestellt werden soll.
5 In diesem Beispiel verwendet der
AP eine Sicherheitseinstellung
--------Main Menu-------1 Call log
2 Profiles
3 Setup
4 Network
Select Back
----------Network----------
1 Site Scan
2 WLAN Profiles
3 SIP Profiles
4 Ping Test
Select Back
------WLAN Scan-------
WLAN Example
RSSI: 64
Chan: 6
Select Back
-------Enter Key--------
(WPA-PSK). Geben Sie das
Kennwort ein, und drücken Sie
auf Done (Fertig).
31
Done abc Clear
Page 32

DEUTSCH
• Um das gewünschte Zeichen einzugeben, müssen Sie
u. U. mehrmals auf eine bestimmte Taste drücken.
• Drücken Sie auf #, um Kleinbuchstaben, Großbuchstaben, Zahlen oder Symbole zu verwenden.
6 Um eine statische IP-Adresse oder
PPPoE zu verwenden, wählen Sie IP
Setting (IP-Einstellung), und wählen
Sie die gewünschte Option.
Oder drücken Sie auf die Power/End
(Ein/Aus/Ende)-Taste, um zum
Hauptfenster zurückzukehren.
------Add to Profile:----1 SSID
2 Security set..
3. IP Setting
4. SIP Binding
Select Back
Jedes von Ihnen erzeugte WLAN-Profil nutzt Ihr SIP-Profil,
wenn nur nur ein SIP-Konto vorhanden ist. Wenn Sie mehrere
SIP-Profile erstellen, legen Sie mit dem WLAN-Profil der SIPBindungseinstellungen fest, welches SIP-Profil das WLANProfil verwendet.
Das Symbol für die Signalstärke wird angezeigt, nachdem
das V630 die Verbindung zum AP hergestellt hat. Als
nächstes versucht das V630, sich beim SIP-Server
anzumelden. Nach einer erfolgreichen SIP-Registrierung
erscheint auf dem Fenster "ZyXEL V630" (eine Beschreibung
zum Ändern des SIP-Profil-Anzeigenamens finden Sie im
Benutzerhandbuch). Jetzt können Sie Anrufe tätigen.
Ausführliche Informationen finden Sie in Abschnitt 7.
32
Page 33

DEUTSCH
7 Telefongrundlagen
TÄTIGEN EINES ANRUFS
1 Geben Sie im Hauptfenster die Nummer ein, die Sie
anrufen möchten, oder drücken Sie auf die Right (Nach-
rechts)-Taste, um das Telefonbuch des V630 aufzurufen.
Eine Beschreibung zum Verwenden des Telefonbuchs
finden Sie im Benutzerhandbuch.
2 Drücken Sie auf die grüne Ta lk (Sprechen)-Taste, um den
Anruf zu tätigen.
V Wenn die Telefonverbindung nicht hergestellt
wird, stellen Sie sicher, dass ein WLAN-Signal
vorhanden ist und dass die VoIPKontoeinstellungen richtig sind. Versuchen Sie
ein anderes VoIP-Konto und/oder rufen Sie eine
andere Telefonnummer an. Wenn das Problem
bestehen bleibt, wenden Sie sich an Ihren VoIPDienstanbieter.
VERWENDEN DER LAUTSPRECHFUNKTION
Drücken Sie während des Telefonierens auf die Right (Nach-
rechts)-Taste, um die Lautsprechfunktion zu aktivieren.
33
Page 34

DEUTSCH
EMPFANGEN EINES ANRUFS
Drücken Sie auf die grüne Talk (Sprechen)-Taste, um den
Anruf anzunehmen.
BEENDEN EINES GESPRÄCHS
Drücken Sie auf die rote Power/End (Ein/Aus/Ende)-Taste
Tast, um ein Gespräch zu beenden.
HALTEN/FREIGEBEN EINES ANRUFS
Drücken Sie während eines Anrufs auf die Left (Nach-links)-
Taste (Anrufoption), um die Anrufoptionen aufzurufen.
Wählen Sie Hold/Unhold (Halten/Freigeben), um den Anruf
zu halten oder freizugeben.
TÄTIGEN EINER DREIERKONFERENZ
1 Drücken Sie während eines Anrufs auf die Left (Nach-
links)-Taste (Anrufoption), um die Anrufoptionen
aufzurufen. Wählen Sie dann New call (Neuer Anruf).
2 Geben Sie eine weitere Telefonnummer ein, und drücken
Sie auf die grüne Sprechen-Taste.
3 Wenn die dritte Person abhebt, drücken Sie auf die Left
(Nach-links)--Taste (Anrufoption), um die Anrufoptionen
aufzurufen. Wählen Sie conference (Konferenz).
34
Page 35

DEUTSCH
WEITERLEITEN EINES ANRUFS
1 Drücken Sie während eines Gesprächs auf die Left (Nach-
links)-Taste (Anrufoption), um die Anrufoptionen
aufzurufen. Wählen Sie Blind Transfer (Blinde
Weiterleitung)
2 Wählen Sie die Nummer, an die ein Anruf weitergeleitet
werden soll.
3 Warten Sie, bis es klingelt. Drücken Sie dann auf die
Power/End (Ein/Aus/Ende)-Taste, um die Weiterleitung zu
beenden.
SPERREN UND ENTSPERREN DER TASTATUR
Sperren Sie die Tastatur, damit Sie nicht versehentlich Anrufe
tätigen. Drücken Sie im Hauptfenster auf die Left (Nach-links)-
Taste und auf *, um das V630 zu sperren oder zu entsperren.
Sie können auch einstellen, dass die Tastatur automatisch
gesperrt wird, wenn der V630 über einen bestimmten Zeitraum
nicht benutzt wird. Eine Anleitung dazu finden Sie im
Benutzerhandbuch.
PEER-TO-PEER-ANRUFE (P2P)
Um direkt die SIP-Telefonnummer und IP-Adresse anzurufen,
ohne über einen SIP-Server zu gehen, führen Sie die
folgenden Schritte aus.
35
Page 36

DEUTSCH
PEER-TO-PEER-ANRUFE (P2P)
1 In Abschnitt 5 wurde beschrieben, wie Sie ein SIP-Profil
zum Nutzen eines SIP-Servers erstellen. Erstellen Sie ein
anderes SIP-Profil für P2P-Anrufe. Das SIP-Profil erfordert
eine Telefonnummer für den V630 (aber keine SIPServereinstellungen). Wählen Sie im Hauptfenster Menu
(Menü) > Network (Netzwerk) > SIP Profiles (SIP-Profile)
> Add to Profile (Zu Profil hinzufügen).
2 Sie müssen eine statische IP-Adresse verwenden.
Erstellen Sie ein WLAN-Profil, das eine statische IPAdresse verwendet. Wählen Sie im Hauptfenster Menu
(Menü) > Network (Netzwerk) > SIP Profiles (SIP-Profile)
> Add to Profile (Zu Profil hinzufügen). Konfigurieren Sie
die IP-Adresse, die Subnetz-Maske, die Gateway-Adresse
und die DNS-Serveradresse. Wählen Sie mit der SIPBindungsoption das SIP-Profil aus, das Sie im
vorhergehenden Schritt erstellt haben. Ihre Telefonnummer
und (P2P) werden im Hauptfenster angezeigt.
3 Drücken Sie im Hauptfenster auf die Right (Nach-rechts)-
Taste, um das Telefonbuch zu öffnen. Drücken Sie in der
Kontakteliste auf Option > Add (Hinzufügen). Erstellen
Sie vom Anrufer einen Telefonbucheintrag. Geben Sie den
Namen und die SIP-Telefonnummer des Anrufers ein.
Wählen Sie dann den P2P-Modus, und geben Sie die IPAdresse und die SIP-Port-Nummer des Anrufers ein
(standardmäßig ist 5060 vorgegeben). Legen Sie die
Gruppe für den Anrufer fest (wenn zutreffend). Drücken Sie
auf die Left (Nach-links)-Taste, um den Anruf zu starten.
36
Page 37

DEUTSCH
Schritte zum Ansehen von Produktzertifizierung(en)
1 Zu www.zyxel.com.
2 Wählen Sie aus der Drop-down-Liste auf der ZyXEL-
Homepage Ihr Produkt aus, um zur entsprechenden
Produktseite zu gelangen.
3 Wählen Sie aus, welche Zertifizierung Sie auf dieser
Seite ansehen möchten.
37
Page 38

DEUTSCH
38
Page 39

ESPAÑOL
ESPAÑOL
1 Vista general
El V630 le permite usar una conexión de red inalámbrica para
realizar y recibir llamadas de teléfono a través de Internet.
" Debe tener acceso a Internet y una cuenta de
voz ya configurada.
Esta Guía de inicio rápido cubre lo siguiente. Consulte la
Guía del usuario para más información sobre todas las
características.
• Características físicas. Consultar página 40.
• Instalar y cargar la batería. Consultar página 41.
• La pantalla LCD. Consultar página 43.
• Configuración inicial. Consultar página 45.
• Conectar a una red inalámbrica. Consultar página 49.
• Operaciones básicas del teléfono. Consultar página 51.
39
Page 40

ESPAÑOL
2 Características físicas
Pantalla LCD
Te cl a
arriba/abajo
Tecla izquierda
Tecla llamar
Teclado
alfanumérico
Puerto USB/Carga
NOMBRE DESCRIPCIÓN
Pantalla LCD Utilice esta pantalla para mostrar información y
navegar por los menús del teléfono.
Te cl a
izquierda
Te cl a
derecha
Presiónela para abrir los menús en pantalla y
seleccionar opciones.
Presionar para regresar al menú anterior.
También es un acceso directo a la agenda.
40
Conexión de
auriculares
Tecla derecha
Te cl a
encendido/
colgar
Page 41

ESPAÑOL
NOMBRE DESCRIPCIÓN
Tecla llamar Presionar para realizar y recibir llamadas.
Tecla arriba/
abajo
Te cl a
encendido/
colgar
Teclado
alfanumérico
Conexión de
auriculares
Puerto USB/
Carga
En la pantalla principal, son botones de acceso
rápido. Por defecto, Up (Arriba) abre el menú
de información y Down (Abajo) abre la
configuración del perfil del teléfono. Consulte
la Guía del usuario para cambiar sus
funciones.
En los menús, estas teclas mueven el cursor.
Presionar para finalizar o rechazar llamadas.
Mantener presionada durante unos
segundos para encender o apagar el V630.
Utilice estas teclas para introducir números,
letras y símbolos.
Conecte unos auriculares (no incluidos) en
esta conector.
Conectar el adaptador de corriente del
teléfono aquí para cargar la batería.
3 Instalar y cargar la batería
• ADVERTENCIA: NUNCA exponga la batería a temperaturas
altas (como fuego o luz directa del sol durante mucho
tiempo), no la cortocircuite ni abra la carcasa de la batería,
podría provocar fuego o la explosión de la batería.
• ADVERTENCIA: PELIGRO DE DESCARGA ELÉCTRICA.
Quite la batería o la tapa de la batería sólo cuando el V630
esté apagado y el cable cargador/USB esté desenchufado.
41
Page 42

ESPAÑOL
• Cargue la batería durante unas 10 horas antes de utilizar el
V630 por primera vez.
1 Presione el botón de la tapa de la batería del V630 y
deslice la tapa hacia la base del V630 y levántela.
2 Quite el embalaje de la batería incluida. Sostenga la
batería con la pestaña de plástico mirando hacia arriba.
Inserte la batería para que el extremo con los contactos
(las zonas metálicas) toque los contactos del V630
situados cerca de la base. Presione la batería hacia
abajo.
3 Vuelva a colocar la tapa de la batería.
42
Page 43

ESPAÑOL
1 ADVERTENCIA: Utilice solamente el
cargador incluido o un cable USB (no
incluido) conectado a un puerto USB de
ordenador. Un cargador diferente podría
dañar el V630 o su batería.
4 Conecte el cable del cargador en el puerto USB/carga.
Puerto USB/carga
5 Conecte el enchufe del cargador en una toma de
corriente. La retroiluminación se encenderá. Si se
enciende el V630, el nivel indicado en el icono de la
batería irá mostrando el progreso.
4 La pantalla LCD
Presione la tecla End/Power (Encendio/Colgar) durante unos
segundos para encender el V630. Tras la pantalla de
bienvenida, el V630 le pedirá que introduzca la hora y la
fecha.
43
Page 44

ESPAÑOL
V Si la pantalla no se enciende, asegúrese de que
la batería está cargada. Consulte la Sección 3.
A continuación aparecerá la pantalla
principal del LCD. Los iconos de la
parte superior de la pantalla LCD
muestran la información del estado.
ICONO DESCRIPCIÓN
Esto muestra la fuerza de la señal de la LAN
inalámbrica.
El teclado está bloqueado. Presione la tecla Left
(Izquierda) y * para desbloquearlo.
Esto muestra si el timbre está activado o
desactivado.
La vibración está activada.
Esto muestra la corriente restante en la batería.
El icono de batería muestra el progreso durante
la carga.
No hay
servicio
WLAN
El estado de la conexión de LAN inalámbrica o
registro del servidor SIP aparece aquí.
No WLAN Service
2:44
10/18/2007
Menu Name
44
Page 45

ESPAÑOL
ICONO DESCRIPCIÓN
Hora/
Fecha
Menú Utilice la tecla Left (Izquierda) para ejecutar la
Nombre Utilice la tecla Right (Derecha) para realizar la
La hora y la fecha (en formato mes/día/año)
aparece en la parte central de la pantalla.
función mostrada para ese botón. En la pantalla
principal, presione la tecla Left (Izquierda) para
entrar en el menú principal del V630.
función mostrada aquí. En la pantalla principal,
presione la tecla Right (Derecha) para agregar o
buscar un contacto en la agenda.
5 Configuración inicial
La funcionalidad VoIP (Voice over IP) le permite realizar
llamadas telefónicas por Internet. SIP es el protocolo que el
V630 utiliza para realizar llamadas VoIP. Antes de configurar
el V630, necesitará:
• Una cuenta activa con un proveedor de servicios VoIP que
utilice SIP.
• Una conexión LAN inalámbrica (IEEE 802.11b o IEEE
802.11g). Consulte la Sección 6 para más información.
5.1 Entrar en su cuenta VoIP
Realice lo siguiente para que el V630 utilice su cuenta VoIP.
45
Page 46

ESPAÑOL
1 En la pantalla principal del V630, presione la tecla Left
(Izquierda) (Menú) para entrar en los menús.
2 Utilice la tecla Down (Abajo) para ir a
4 Network (4 Red) y luego utilice la
tecla Left (Izquierda) para
seleccionar.
3 Seleccione 3 SIP Profiles (3 Perfiles
SIP).
4 Seleccione 2 Add to Profile (2
Añadir a perfil).
5 Escriba un nombre para identificar al
perfil y seleccione Done (Listo).
--------Main Menu-------1 Call log
2 Profiles
3 Setup
4 Network
Select Back
----------Network---------1 Site Scan
2 WLAN Profiles
3 SIP Profiles
4 Ping Test
Select Back
-------SIP Profiles-------
1 Profiles List
2 Add to Profile
Select Back
---New Profile Name----
• Puede que necesite presionar
una tecla varias veces para
escribir el carácter deseado.
46
Done abc Clear
Page 47

ESPAÑOL
• Presione # para utilizar letras minúsculas, mayúsculas,
números o símbolos.
6 Seleccione 2 Phone Number (2
Número de teléfono).
7 Escriba su número de cuenta SIP. Por
ejemplo, si tiene una cuenta SIP como
1234567@voip-provider.com, su
número de cuenta SIP es 1234567.
8 Seleccione 3 SIP Server (3 Servidor
SIP).
9 Seleccione 1 SIP Address (1
Dirección SIP).
-------Add to Profile-----1 Display Name
2 Phone Number
3 SIP Server
4 SIP Proxy
Select Back
-----Phone Number------
1234567
Done Clear
-------Add to Profile-----1 Display Name
2 Phone Number
3 SIP Server
4 SIP Proxy
Select Back
----SIP Server Setup---
1 SIP Address
2 SIP Port
47
Select Back
Page 48

ESPAÑOL
10 Escriba la dirección IP del servidor
SIP para esta cuenta y seleccione
Done (Listo). Si tiene más de una
dirección de servidor, escriba la
dirección del servidor de registro.
11 Si el proveedor de servicios VoIP le
ha dado un número de puerto SIP
distinto a 5060, seleccione 2 SIP
Port (2 Puerto SIP) y vaya al paso
12. De lo contrario, vaya al paso 13.
12 Escriba el número del puerto SIP del
proveedor de servicios VoIP y
seleccione Done (Listo).
13 Seleccione 4 SIP Proxy (4 Proxy
SIP).
------SIP Address------
111.222.333.444
Done Clear
----SIP Server Setup---
1 SIP Server Address
2 SIP Port
Select Back
----------SIP Port---------
5060
Done Clear
-------Add to Profile-----1 Display Name
2 Phone Number
3 SIP Server
4 SIP Proxy
Select Back
48
Page 49

ESPAÑOL
14 Configure su nombre de usuario y
contraseña de la cuenta SIP como
nombre de usuario y contraseña
proxy. Si el proveedor de servicios
VoIP ha facilitado una dirección de
servidor proxy SIP y/o un número de
puerto distinto a 5060, escríbalo.
15 No modifique la configuración de
NAT traversal, Expire o Codec Order
a menos que el proveedor de
servicios VoIP haya suministrado la
configuración para ellos o si tiene
una razón específica para hacerlo.
Presione la tecla Power/End
-------Proxy Setup-----1 Proxy Address
2 Proxy Port
3 Proxy Username
4 Proxy Password
Select Back
-------Add to Profile-----4 SIP Proxy
5 NAT traversal
6 Expire
7 Codec Order
Select Back
(Encendido/Colgar) para volver a la
pantalla principal.
¡Enhorabuena! Ha finalizado la configuración VoIP. Continúe
con la sección 6 para configurar la conexión inalámbrica.
6 Conectar a una red inalámbrica
Haga lo siguiente para configurar el V630 para conectarlo a
una red inalámbrica.
1 En la pantalla principal del V630, presione la tecla Left
(Izquierda)(Menú) para entrar en los menús.
49
Page 50

ESPAÑOL
2 Utilice la tecla Down (Abajo) para ir a
4 Network y luego utilice la tecla Left
(Izquierda) para seleccionar.
3 Seleccione 1 Site Scan (1 Búsqueda
de sitios).
4 El V630 buscará y luego mostrará
los PAs en la zona. Seleccione el PA
al que desea conectarse.
5 El PA de este ejemplo utiliza
seguridad (WPA-PSK), escriba la
clave (contraseña) y seleccione
Done (Listo).
• Puede que necesite presionar
una tecla varias veces para
escribir el carácter deseado.
• Presione # para utilizar letras
minúsculas, mayúsculas, números o símbolos.
--------Main Menu-------1 Call log
2 Profiles
3 Setup
4 Network
Select Back
----------Network----------
1 Site Scan
2 WLAN Profiles
3 SIP Profiles
4 Ping Test
Select Back
------WLAN Scan-------
WLAN Example
RSSI: 64
Chan: 6
Select Back
-------Enter Key--------
Done abc Clear
50
Page 51

ESPAÑOL
6 Para utilizar una dirección IP o
PPPoE, seleccione IP Setting
(Configuración IP) y seleccione la
opción apropiada.
O bien, presione la tecla Power/End
(Encendido/Colgar) para volver a la
pantalla principal.
------Add to Profile:-----
1 SSID
2 Security set..
3. IP Setting
4. SIP Binding
Select Back
Con una única cuenta SIP, cada perfil WLAN que cree la
utilizará. Si crea varios perfiles SIP, deberá configurar una
regla de asignación SIP para establecer qué perfil SIP
utilizará el perfil WLAN.
El icono de la fuerza de la señal aparecerá después de que el
V630 se conecte al PA. A continuación, el V630 intentará
registrarse en el servidor SIP. "ZyXEL V630" aparecerá en la
pantalla principal tras un registro SIP con éxito (ver la Guía
del usuario sobre cómo modificar el nombre para mostrar del
perfil SIP). Ahora puede comenzar a realizar llamadas.
Consulte la Sección 7 para más detalles.
7 Operaciones básicas del teléfono
REALIZAR UNA LLAMADA
1 En la pantalla principal, escriba el número al que desea
llamar o presione la tecla Right (Derecha) para abrir la
agenda del V630. Consulte la Guía del usuario para saber
cómo usar la agenda.
51
Page 52

ESPAÑOL
REALIZAR UNA LLAMADA (Continuación)
2 Presione la tecla verde Talk (Llamar) para iniciar la
llamada.
V Si no puede llamar, asegúrese de que tiene una
señal LAN inalámbrica y compruebe la
configuración de la cuenta VoIP. Intente utilizar
una cuenta VoIP distinta y/o intente llamar a un
número de teléfono distinto. Si el problema
persiste, contacte con su proveedor de servicios
VoIP.
UTILIZAR EL ALTAVOZ DEL TELÉFONO
Presione la tecla Right (Derecha) durante una llamada para
activar el altavoz del teléfono.
RECIBIR UNA LLAMADA
Presione la tecla verde Talk (Llamar) para responder a una
llamada entrante.
FINALIZAR UNA LLAMADA
Presione la tecla roja Power/End (Encendido/Colgar) para
finalizar una llamada.
52
Page 53

ESPAÑOL
PONER O CONTINUAR UNA LLAMADA EN ESPERA
Durante una llamada, presione la tecla Left (Izquierda) (Call
Option (Opciones de llamada)) para abrir las opciones de
llamada. Seleccione Hold/Unhold (Poner en espera/Retomar)
para poner la llamada en espera o continuar con ella.
REALIZAR UNA LLAMADA DE CONFERENCIA A 3
1 Durante una llamada, presione la tecla Left (Izquierda)
(Call Option (Opciones de llamada)) para abrir las
opciones de llamada y luego seleccione New call (Nueva
llamada).
2 Escriba otro número de teléfono y presione la tecla Ta lk
(Llamar).
3 Cuando la tercera persona responda, presione la tecla Left
(Izquierda) (Call Option (Opciones de llamada)) para abrir
las opciones de llamada. Seleccione conference
(Conferencia).
TRANSFERIR UNA LLAMADA
1 Durante una llamada, presione la tecla Left (Izquierda)
(Call Option (Opciones de llamada)) para abrir las
opciones de llamada. Seleccione Blind Transfer
(Transferencia ciega).
2 Marque el número al que desea transferir la llamada.
53
Page 54

ESPAÑOL
TRANSFERIR UNA LLAMADA
3 Espere a escuchar el tono del timbre. Luego presione la
tecla Power/End (Encendido/Colgar) para finalizar la
transferencia de la llamada.
BLOQUEAR Y DESBLOQUEAR EL TECLADO
Bloquee el teclado para evitar llamadas accidentales. En la
pantalla principal, presione la tecla Left (Izquierda) y * para
bloquear o desbloquear el V630. También se puede activar el
bloqueo del teclado automáticamente si no utiliza el V630
durante un período determinado. Consulte la Guía del usuario
para saber cómo hacer esto.
LLAMADAS PEER TO PEER (P2P)
Haga lo siguiente para llamar directamente al número de
teléfono SIP de alguien y la dirección IP sin ir a través de un
servidor SIP.
1 La sección 5 cubre la creación de un perfil SIP para usar un
servidor SIP. Crear un perfil SIP distinto para llamadas P2P.
El perfil SIP necesita un número de teléfono para el V630
(pero no una configuración de servidor SIP). En la pantalla
principal, seleccione Menu (Menú) > Network (Red) > SIP
Profiles (Perfiles SIP) > Add to Profile (Añadir a
perfiles).
54
Page 55

ESPAÑOL
LLAMADAS PEER TO PEER (P2P)
2 Debe utilizar una dirección IP estática. Cree un perfil WLAN
que utilice una dirección IP estática. En la pantalla
principal, seleccione Menu (Menú) > Network (Red) >
WLAN Profiles (Perfiles WLAN) > Add to Profile (Añadir
a perfiles). Configure la dirección IP, máscara de subred,
dirección de puerta de enlace y dirección de servidor DNS.
Utilice la opción de asignación SIP para seleccionar el perfil
SIP creado en el paso anterior. Su número de teléfono y
(P2P) aparecerán en la pantalla principal.
3 En la pantalla principal, presione la tecla Right (Derecha)
para abrir la agenda. En la lista de contactos, presione
Option (Opciones) > Add (Añadir). Crear una entrada en
la agenda para un usuario. Escriba el nombre del usuario y
el número de teléfono SIP. Luego seleccione el modo P2P
y escribe la dirección IP del usuario y el número del puerto
SIP (5060 es el predeterminado). Seleccione el grupo al
que el usuario debería pertenecer (si lo hay). Presione la
tecla Left (Izquierda) para iniciar la llamada.
55
Page 56

ESPAÑOL
Ver los certificados de un producto
1 Vaya a www.zyxel.com.
2 Seleccione su producto de la lista desplegable en la
página inicial de ZyXEL para ir a la página de ese
producto.
3 Seleccione el certificado que desee visualizar en esta
página.
56
Page 57

FRANÇAIS
FRANÇAIS
1 Présentation
Le V630 vous permet d'utiliser une connexion à un réseau
sans fil pour effectuer et recevoir des appels téléphoniques
par Internet.
" Vous devez avoir un accès à Internet et un
compte vocal déjà activé.
Ce guide de mise en route rapide couvre ce qui suit. Voir le
Guide de l'utilisateur pour plus d'informations sur toutes les
fonctionnalités.
• Caractéristiques physiques. Voir Page 58.
• Installer et recharger la batterie. Voir Page 60.
• L'écran LCD. Voir Page 62.
• Configuration initiale. Voir Page 63.
• Connexion à un réseau sans fil. Voir Page 68.
57
Page 58

FRANÇAIS
• Utilisation de base du téléphone. Voir Page 70.
2 Caractéristiques physiques
Touche Haut/Bas
Ecran LCD
Touche Gauche
Touche Parler
Alphanumérique
pavé numérique
USB/port de rechargement
NOM DESCRIPTION
Ecran LCD Utilisez cet écran pour afficher les
informations et naviguer dans les menus du
téléphone.
Touche Gauche Appuyez ici pour ouvrir les menus d'écran et
sélectionner les options.
58
Prise casque
Touche Droite
Touche
Marche/Fin
Page 59

FRANÇAIS
NOM DESCRIPTION
Touche Droite Appuyez ici pour retourner au menu
précédent. C'est aussi un raccourci vers
l'annuaire.
Touche Parler Appuyez ici pour effectuer et recevoir des
appels.
Touches Haut/
Bas
Touche Marche/
Fin
Clavier
alphanumérique
Prise casque Connectez un casque (non fourni) à cette
USB/port de
rechargement
Dans l'écran principal, ce sont des boutons
d'accès rapide. Par défaut, Up (Haut) ouvre
le menu d'informations et Down (Bas) ouvre
le réglage du profil des paramètres du
téléphone. Voir le guide de l'utilisateur pour
modifier leurs fonctions.
Dans les menus, ces touches déplacent le
curseur.
Appuyez ici pour terminer ou rejeter des
appels. Maintenez-la enfoncée pendant
quelques secondes pour allumer ou
éteindre le V630.
Utilisez ces touches pour entrer les chiffres,
lettres et symboles.
prise.
Connectez l'adaptateur d'alimentation du
téléphone ici pour recharger la batterie.
59
Page 60

FRANÇAIS
3 Installer et recharger la batterie
• AVERTISSEMENT : NE JAMAIS exposer la batterie à de
fortes températures (comme un feu ou une exposition prolongée au soleil), court-circuiter ou ouvrir le boîtier de la batterie. Cela pourrait enflammer ou faire exploser la batterie.
• AVERTISSEMENT : DANGER D'ÉLECTROCUTION.
Retirez la batterie ou le couvercle de la batterie uniquement
quand le V630 est éteint et que le chargeur/câble USB est
débranché.
• Chargez la batterie pendant 10 heures avant la première utilisation du V630.
1 Appuyez sur le bouton sur leV630 couvercle de la batterie
du et faites coulisser le couvercle vers la base du V630 et
enlevez-le en soulevant.
2 Retirez tout emballage de la batterie fournie. Maintenez la
batterie avec la languette en plastique dirigée vers le haut.
Insérez la batterie de sorte que le côté comportant les
contacts (les zones en métal) touche les contacts du V630
situés près de la base. Appuyez sur la batterie.
60
Page 61

FRANÇAIS
3 Replacez le couvercle de la batterie.
1 AVERTISSEMENT : Utilisez uniquement le
chargeur fourni ou un câble USB (non
fourni) avec un port USB d'ordinateur. Un
chargeur différent pourrait endommager le
V630 ou sa batterie.
4 Connectez le câble du chargeur dans le port USB /
Rechargement.
USB/port de rechargement
5 Branchez la fiche du chargeur à une prise de courant. Le
rétroéclairage s'allume. Si le V630 s'allume, le niveau
indiqué dans la jauge de l'icône de batterie s'anime.
61
Page 62

FRANÇAIS
4 L'écran LCD
Appuyez sur la touche End/Power (Fin/ Marche) pendant
quelques secondes pour allumer le V630. Après le message
de bienvenue, le V630 vous invite à entrer l'heure et la date.
V Si l'écran ne s'allume pas, vérifiez que la
batterie est chargée. Voir la section 3.
L'écran principal LCD affiche suivant.
Les icônes situés au sommet de l'écran
LCD affichent les informations d'état.
ICÔNE DESCRIPTION
Cela indique la force du signal LAN sans fil.
Le clavier est verrouillé. Appuyez sur la touche
Left (Gauche) et * pour le déverrouiller.
Cela indique si la sonnerie est activée ou non.
Le vibreur est activé.
No WLAN Service
2:44
10/18/2007
Menu Name
62
Page 63

FRANÇAIS
ICÔNE DESCRIPTION
Cela indique la charge de batterie restante. La
jauge de batterie s'anime pendant le
rechargement.
Pas de
service
WLAN
Heure/
Date
Menu Utilisez la touche Left (Gauche) pour effectuer la
Nom Utilisez la touche Right (Droite) pour effectuer la
L'état de la connexion LAN sans fil ou
l'enregistrement du serveur SIP s'affiche ici.
L'heure et la date (au format mois/jour/année)
s'affiche au milieu de l'écran.
fonction indiquée ici. Dans l'écran principal,
appuyez sur la touche Left (Gauche) pour entrer
dans le menu principal du V630.
fonction indiquée ici. Dans l'écran principal,
appuyez sur la touche Right (Droite) pour ajouter
ou trouver un contact dans l'annuaire.
5 Configuration initiale
VoIP (Voice over IP) vous permet d'effectuer des appels
téléphoniques par Internet. SIP est le protocole utilisé par le
V630 pour effectuer des appels VoIP. Avant de configurer le
V630, vous avez besoin des éléments suivants :
• Un compte actif avec un fournisseur de service VoIP utilisant
SIP.
63
Page 64

FRANÇAIS
• Une connexion LAN sans fil (IEEE 802.11b ou IEEE
802.11g). Voir la section 6 pour plus d’informations.
5.1 Accéder à votre compte VoIP
Procédez comme suit pour régler le V630 afin d'utiliser votre
compte VoIP.
1 Dans l'écran principal du V630, appuyez sur la touche Left
(Gauche) (Menu) pour entrer dans les menus.
2 Utilisez la touche Down (Bas) pour
aller à 4 Network et ensuite sur la
touche Left (Gauche) pour le
sélectionner.
3 Sélectionnez 3 Profils SIP.
--------Main Menu-------1 Call log
2 Profiles
3 Setup
4 Network
Select Back
----------Network---------1 Site Scan
2 WLAN Profiles
3 SIP Profiles
4 Ping Test
Select Back
64
Page 65

FRANÇAIS
4 Sélectionnez 2 Ajouter au profil.
5 Saisissez un nom pour identifier le
profil et sélectionnez Done
(Terminé).
• Vous devrez peut-être appuyer
plusieurs fois sur une touche
pour entrer le caractère désiré.
• Appuyez sur # pour utiliser les
lettres minuscules, les lettres
majuscules, les chiffres ou les symboles.
6 Sélectionner 2 Phone Number (2
Numéro de téléphone).
7 Saisissez le numéro de votre compte
SIP. Par exemple, si vous avez un
compte SIP comme 1234567@voip-
provider.com, votre numéro de
compte SIP est 1234567.
-------SIP Profiles-------
1 Profiles List
2 Add to Profile
Select Back
---New Profile Name----
Done abc Clear
-------Add to Profile-----1 Display Name
2 Phone Number
3 SIP Server
4 SIP Proxy
Select Back
-----Phone Number------
1234567
65
Done Clear
Page 66

FRANÇAIS
8 Sélectionnez 3 SIP Server (3
Serveur SIP).
9 Sélectionnez 1 SIP Address (1
Adresse SIP).
10 Saisissez l'adresse IP du serveur SIP
pour ce compte et sélectionnez Done
(Terminé). Si vous avez plus d'une
adresse de serveur, entrez l'adresse
du serveur du registraire.
11 Si le fournisseur de service VoIP
vous a donné un numéro de port SIP
autre que 5060, sélectionnez 2 SIP
Port (2 Port SIP) et allez à l'étape
12. Autrement, sautez à l'étape 13.
-------Add to Profile-----1 Display Name
2 Phone Number
3 SIP Server
4 SIP Proxy
Select Back
----SIP Server Setup---
1 SIP Address
2 SIP Port
Select Back
------SIP Address------
111.222.333.444
Done Clear
----SIP Server Setup---
1 SIP Server Address
2 SIP Port
66
Select Back
Page 67

FRANÇAIS
12 Saisissez le numéro de port SIP dans
le fournisseur de service VoIP et
sélectionnez Done (Terminé).
13 Sélectionnez 4 SIP Proxy (4 Proxy
SIP).
14 Configurez le nom d'utilisateur et le
mot de passe de votre compte SIP
comme nom d'utilisateur et mot de
passe du proxy. Si le fournisseur de
service VoIP fournit l'adresse et/ou
le numéro de port du serveur de
proxy SIP autre que 5060, saisissezla.
15 Ne modifiez pas les paramètres de
parcours NAT, expiration, ou d'ordre
de codec à moins que le fournisseur
de service VoIP fournisse des
paramètres pour ceux-ci et que vous
ayez une raison précise de le faire.
Appuyer sur la touche Power/End
(Marche/Fin) pour retourner à
l'écran principal.
----------SIP Port---------
5060
Done Clear
-------Add to Profile-----1 Display Name
2 Phone Number
3 SIP Server
4 SIP Proxy
Select Back
-------Proxy Setup-----1 Proxy Address
2 Proxy Port
3 Proxy Username
4 Proxy Password
Select Back
-------Add to Profile-----4 SIP Proxy
5 NAT traversal
6 Expire
7 Codec Order
Select Back
67
Page 68

FRANÇAIS
Félicitations ! Vous avez configuré les paramètres VoIP.
Continuez par la Section 6 pour réinitialiser la connexion sans
fil.
6 Connexion à un réseau sans fil
Procédez comme suit pour configurer le V630 pour connecter
au réseau sans fil.
1 Dans l'écran principal du V630, appuyez sur la touche Left
(Gauche) (Menu) pour entrer dans les menus.
2 Utilisez la touche Down (Bas) pour
aller à 4 Network et ensuite sur la
touche Left (Gauche) pour le
sélectionner.
3 Sélectionnez 1 Site Scan (1
Balayage du site).
--------Main Menu-------1 Call log
2 Profiles
3 Setup
4 Network
Select Back
----------Network----------
1 Site Scan
2 WLAN Profiles
3 SIP Profiles
4 Ping Test
Select Back
68
Page 69

FRANÇAIS
4 Le V630 balaye et donne la liste des
AP dans la zone. Sélectionner l'AP
auquel vous voulez vous connecter.
5 L'AP dans cet exemple utilise la
sécurité (WPA-PSK), entrez la clé
------WLAN Scan-------
WLAN Example
RSSI: 64
Chan: 6
Select Back
-------Enter Key--------
(mot de passe) et sélectionnez
Done (Terminé).
• Vous devrez peut-être
appuyer plusieurs fois sur une
touche pour entrer le car-
Done abc Clear
actère désiré.
• Appuyez sur # pour utiliser les lettres minuscules, les
lettres majuscules, les chiffres ou les symboles.
6 Pour utiliser une adresse IP statique
ou PPPoE, sélectionnez IP Setting
(Paramètre IP) et sélectionnez
l'option appropriée.
Autrement, appuyez sur la touche
Power/End (Marche/Fin) pour
retourner à l'écran principal.
------Add to Profile:----1 SSID
2 Security set..
3. IP Setting
4. SIP Binding
Select Back
Avec un seul compte SIP, chaque profil WLAN que vous avez
créé l'utilise. Si vous créez plusieurs profils SIP, éditez les
paramètres de liaison SIP d'un profil WLAN pour définir quel
profil SIP est utilisé par le profil WLAN.
69
Page 70

FRANÇAIS
L'icône de force du signal s'affiche après que le V630 se
connecte à l'AP. Ensuite, le V630 tente de s'enregistrer avec
le serveur SIP. "ZyXEL V630" s'affiche dans l'écran principal
une fois que l'enregistrement SIP est effectué (voir le guide
de l'utilisateur pour la manière de modifier le nom de
l'affichage du profil SIP). Vous pouvez maintenant
commencer à effectuer des appels. Voir la Section 7 pour
plus de détails.
7 Utilisation de base du téléphone
EFFECTUER UN APPEL
1 Dans le menu principal, entrez le numéro que vous voulez
appeler ou appuyez sur la touche Right (Droite) pour
ouvrir l'annuaire du V630. Voir votre guide de l'utilisateur
pour savoir comment utiliser l'annuaire.
2 Appuyez sur la touche Talk (Parler) verte pour effectuer
l'appel.
70
Page 71

FRANÇAIS
V Si vous ne pouvez pas appeler, assurez-vous
que vous avez un signal LAN sans fil et vérifiez
les paramètres de votre compte VoIP. Essayez
d'utiliser un compte VoIP différent, et/ou
essayez d'appeler un numéro de téléphone
différent. Si le problème persiste, contactez
votre fournisseur de service VoIP.
UTILISER LE HAUT-PARLEUR
Appuyez avec la touche Right (Droite) pendant un appel pour
activer la fonctionnalité haut-parleur.
RECEVOIR UN APPEL
Appuyez sur la touche Tal k (Parler) pour répondre à un appel
entrant.
TERMINER UN APPEL
Appuyez sur la touche Power/End (Marche/Fin) pour
terminer un appel.
71
Page 72

FRANÇAIS
APPEL EN ATTENTE/FIN DE MISE EN ATTENTE
Pendant un appel, appuyez sur la touche Left (Gauche)
(Option d'appel) pour ouvrir les options d'appel. Sélectionnez
Hold/Unhold (En attente/Fin mise en attente) pour mettre un
appel en attente ou terminer la mise en attente.
EFFECTUER UN APPEL EN CONFÉRENCE À 3 VOIES
1 Pendant un appel, appuyez sur la touche Left (Gauche)
(Option d'appel) pour ouvrir les options d'appel, puis
sélectionnez New call (Nouvel appel).
2 Entrez un autre numéro de téléphone et appuyez sur la
touche Talk (Parler) verte.
3 Une fois que la tierce personne répond, appuyez sur la
touche Left (Gauche) (Option d'appel) pour ouvrir les
options d'appel. Sélectionnez conference (conférence).
TRANSFÉRER UN APPEL
1 Pendant l'appel, appuyez sur la touche Left (Gauche)
(Option d'appel) pour ouvrir les options d'appel.
Sélectionnez Blind Transfer (Transfert aveugle).
2 Composez le numéro auquel vous voulez transférer l'appel.
3 Attendez de l'entendre sonner. Appuyez ensuite sur la
touche Power/End (Marche/Fin) pour terminer de
transférer l'appel.
72
Page 73

FRANÇAIS
VERROUILLER ET DÉVERROUILLER LE CLAVIER
Verrouillez le clavier pour éviter tout appel accidentel. Dans
l'écran principal, appuyez sur la touche Left (Gauche) et sur *
pour verrouiller ou déverrouiller le V630. Vous pouvez aussi
faire en sorte que le clavier se verrouille automatiquement si
vous n'utilisez pas le V630 pendant une durée déterminée.
Consultez le guide de l'utilisateur pour la manière de procéder.
APPELS POSTE À POSTE (P2P)
Procédez comme suit pour appeler directement le numéro de
téléphone SIP et l'adresse IP de quelqu'un sans passer par un
serveur SIP.
1 La section 5 a couvert la création d'un profil SIP pour
utiliser un serveur SIP. Créer un profil SIP différent pour les
appels P2P. Le profil SIP nécessite un numéro de
téléphone pour le V630 (mais pas de paramètres de
serveur SIP). Dans l'écran principal, sélectionnez Menu >
Réseau > Profils SIP > Ajouter au profil.
2 Vous devez utiliser une adresse IP statique. Créez un profil
WLAN utilisant une adresse IP statique. Dans l'écran
principal, sélectionnez Menu > Réseau > Profils WLAN >
Ajouter au profil. Configurez l'adresse IP, le masque de
sous-réseau, l'adresse de passerelle, et l'adresse de
serveur DNS. Utilisez l'option de liaison SIP pour
sélectionner le profil SIP que vous avez créé dans l'étape
précédente. Votre numéro de téléphone et (P2P) s'affiche
dans l'écran principal.
73
Page 74

FRANÇAIS
APPELS POSTE À POSTE (P2P)
3 Dans l'écran principal, appuyez sur la touche Right (Droite)
pour ouvrir l'annuaire. Dans la liste de contact, appuyez sur
Option > Add (Ajouter). Créez une entrée d'annuaire pour
l'appelé. Entrez le nom et le numéro de téléphone SIP de
l'appelé. Puis, sélectionnez le mode P2P et entrez l'adresse
IP de l'appelé et le numéro de port SIP (5060 et la valeur
par défaut). Sélectionnez le groupe auquel doit appartenir
l'appelé (le cas échéant). Appuyez sur la touche Left
(Gauche) pour effectuer l'appel.
Afficher la (les) certification(s) d'un produit
1 Allez à www.zyxel.com.
2 Sélectionnez votre produit dans la liste déroulante
dans la page d'accueil du ZyXEL pour aller à la page
de ce produit.
3 Sélectionnez la certification que vous désirez
consulter dans cette page.
74
Page 75

ITALIANO
ITALIANO
1 Cenni generali
Il V630 consente di utilizzare una connessione di rete
wireless per fare e ricevere telefonate attraverso Internet.
" È necessario disporre già di un accesso a
Internet e di un account vocale configurato.
In questa Guida rapida vengono trattati gli argomenti
seguenti: Vedere la Guida dell'utente per maggiori
informazioni su tutte le funzioni.
• Caratteristiche fisiche. Vedere pagina 76.
• Installazione e ricarica della batteria. Vedere pagina 77.
• Schermo LCD. Vedere pagina 79.
• Configurazione iniziale. Vedere pagina 81.
• Connessione a una rete senza fili. Vedere pagina 86.
• Funzionamento di base del telefono. Vedere pagina 88.
75
Page 76

ITALIANO
/
2 Caratteristiche fisiche
Schermo LCD
Tast o Su / G iù
Tasti Sinistro
Tasto Parla
Alfanumerico
tastiera
Porta USB/ricarica
NOME DESCRIZIONE
Schermo LCD Nello schermo vengono visualizzate le
informazioni e le voci di menu da sfogliare.
Tasti Sinistro Premere questo tasto per aprire i menu a
schermo e selezionare le opzioni.
Tasto Destro Consente di tornare al menu precedente.
Rappresenta anche un collegamento alla
rubrica telefonica.
76
Jack auricolare
Tas t o Des t ro
Alimentazione
tasto
Page 77

ITALIANO
NOME DESCRIZIONE
Tasto Parla Consente di fare e ricevere telefonate.
Tasti Su/Giù Nella schermata principale questi
rappresentano pulsanti di accesso rapido. Per
impostazione predefinita Up (Su) apre il menu
delle informazioni, mentre Down (Giù) apre il
profilo di impostazione per configurare il
telefono. Vedere la Guida dell'utente per le
modifiche alle funzioni.
All'interno dei menu questi tasti consentono di
spostare il cursore.
Ta st o
Alimentazione
/Fine
Tastiera
alfanumerica
Jack
auricolare
Porta USB/
ricarica
Consente di terminare o rifiutare una
telefonata. Tenere premuto questo tasto per
qualche secondo per accendere/spegnere il
V630.
Utilizzare questi tasti per inserire numeri,
lettere e simboli.
Collegare un auricolare a questo connettore
(non fornito a corredo).
Collegare l'alimentatore del telefono a questo
connettore per ricaricare la batteria.
3 Installazione e ricarica della batteria
• ATTENZIONE: NON esporre la batteria a elevate tempera-
ture (ad esempio fuoco o luce diretta del sole per molto
tempo), non cortocircuitarla e non aprire l'involucro della batteria. La batteria potrebbe accendersi o esplodere.
77
Page 78

ITALIANO
• ATTENZIONE: PERICOLO DI SCOSSA ELETTRICA.
Rimuovere la batteria o il coperchio della batteria solo
quando il V630 è spento e il cavo di ricarica/USB è scollegato.
• Caricare la batteria per 10 ore prima di utilizzare per la prima
volta il V630.
1 Premere il pulsante sul coperchio della batteria del V630 e
far scorrere il coperchio verso la base del V630, quindi
tirarlo via.
2 Rimuovere tutto il materiale di imballaggio dalla batteria
fornita a corredo. Tenere la batteria con la linguetta di
plastica rivolta verso l'alto. Inserire la batteria in modo che
l'estremità contenente i contatti (le aree metalliche)
tocchino i contatti del V630 che si trovano in prossimità
della base. Spingere in giù la batteria.
3 Riposizionare il coperchio della batteria.
78
Page 79

ITALIANO
1 ATTENZIONE: utilizzare solo il caricatore
fornito a corredo o un cavo USB (non
fornito) con una porta USB di un computer.
Un caricatore differente potrebbe
danneggiare il V630 o la sua batteria.
4 Collegare il cavo del caricatore alla porta USB/ricarica.
Porta USB/ricarica
5 Collegare la spina del caricatore a una presa di corrente.
La retroilluminazione si accende. Se il V630 è acceso il
livello indicato nell'icona della batteria visualizza
ciclicamente l'indicatore.
4 Schermo LCD
Tenere premuto per qualche secondo il tasto End/Power
(Fine/Alimentazione) rosso per accedere il V630. Dopo la
visualizzazione della schermata di benvenuto, il V630
richiede di immettere l'ora e la data.
79
Page 80

ITALIANO
V Se la schermata non compare, assicurarsi che
la batteria sia carica. Vedere la sezione 3.
La schermata principale LCD visualizza
la schermata successiva. Le icone che
si trovano nella parte superiore dello
schermo LCD visualizzano le
informazioni di stato.
ICONA DESCRIZIONE
Mostra l'intensità del segnale LAN wireless.
La tastiera è bloccata. Premere il tasto Left
(Sinistra) e * per sbloccarla.
Questa icona indica se la suoneria è attivata o
disattivata.
La vibrazione è attivata.
Mostra l'energia rimanente nella batteria.
L'indicatore della batteria visualizza ciclicamente
l'indicazione di ricarica.
No WLAN Service
2:44
10/18/2007
Menu Name
80
Page 81

ITALIANO
ICONA DESCRIZIONE
Nessun
servizio
WLAN
disponibile
Ora/Data Al centro dello shermo vengono visualizzati l'ora
Menu Utilizzare il tasto Left (Sinistra) per eseguire la
Nome Utilizzare il tasto Right (Destra) per eseguire la
Qui viene mostrato lo stato della connessione
LAN wireless o la registrazione al server SIP.
e la data (in formato mese/giorno/anno).
funzione qui mostrata. Nella schermata principale
premere il tasto Left (Sinistra) per aprire il menu
principale del V630.
funzione qui mostrata. Nella schermata principale
premere il tasto Right (Destra) per aggiungere o
trovare un contatto nella rubrica.
5 Configurazione iniziale
VoIP (Voice over IP) consente di fare telefonate tramite
Internet. SIP è il protocollo utilizzato dal V630 per fare
telefonate VoIP. Prima di configurare il V630 è necessario
disporre di:
• un account attivo con un fornitore di servizi VoIP che utilizza
il protocollo SIP.
• una connessione LAN wireless (IEEE 802.11b oppure IEEE
802.11g). Vedere la sezione 6 per maggiori informazioni.
81
Page 82

ITALIANO
5.1 Inserimento dell'account VoIP
Attenersi alla procedura seguente per configurare il V630
all'uso dell'account VoIP.
1 Dalla schermata principale del V630 premere il tasto Left
(Sinistra) (Menu) per aprire i menu.
2 Utilizzare il tasto Down (Giù) per
passare a 4 Network (Rete) e quindi
premere il tasto Left (Sinistra) per
selezionare la voce.
3 Selezionare 3 SIP Profiles (3 Profili
SIP).
4 Selezionare 2 Add to Profile (2
Aggiungi a profilo) .
--------Main Menu-------1 Call log
2 Profiles
3 Setup
4 Network
Select Back
----------Network---------1 Site Scan
2 WLAN Profiles
3 SIP Profiles
4 Ping Test
Select Back
-------SIP Profiles-------
1 Profiles List
2 Add to Profile
82
Select Back
Page 83

ITALIANO
5 Immettere un nome per identificare il
profilo e selezionare Done (Fine).
• Può essere necessario premere
un tasto più volte per immettere il
carattere desiderato.
• Premere # per utilizzare le lettere
minuscole, le lettere maiuscole, i
numeri o i simboli.
6 Selezionare 2 Phone Number (2
Numero di telefono).
7 Inserire il numero dell'account SIP. Se
ad esempio il proprio account SIP è
simile a 1234567@voip-
provider.com, il numero dell'account
SIP sarà 1234567.
8 Selezionare 3 SIP Server (3 Server
SIP).
---New Profile Name----
Done abc Clear
-------Add to Profile-----1 Display Name
2 Phone Number
3 SIP Server
4 SIP Proxy
Select Back
-----Phone Number------
1234567
Done Clear
-------Add to Profile-----1 Display Name
2 Phone Number
3 SIP Server
4 SIP Proxy
Select Back
83
Page 84

ITALIANO
9 Selezionare 1 SIP Address (1
Indirizzo SIP).
10 Immettere l'indirizzo IP del server SIP
relativo all'account e selezionare
Done (Fine). Se si hanno più di un
indirizzo di server, immettere
l'indirizzo del server del Registrar.
11 Se il fornitore di servizi VoIP ha
fornito un numero di porta SIP
diverso da 5060, selezionare 2 SIP
Port (2 Porta SIP) e saltare al passo
12. In caso contrario saltare al passo
13.
12 Immettere il numero di porta SIP
specificato dal fornitore di servizi VoIP
e selezionare Done (Fine).
----SIP Server Setup---
1 SIP Address
2 SIP Port
Select Back
------SIP Address------
111.222.333.444
Done Clear
----SIP Server Setup---
1 SIP Server Address
2 SIP Port
Select Back
----------SIP Port---------
5060
84
Done Clear
Page 85

ITALIANO
13 Selezionare 4 SIP Proxy (4 Proxy
SIP).
14 Configurare il nome utente e la
password dell'account SIP nel nome
utente e nella password del proxy.
Se il fornitore di servizi VoIP ha
fornito un indirizzo di server SIP
proxy e/o un numero di porta diverso
da 5060 provvedere a immetterlo.
15 Non modificare le impostazioni di
NAT Traversal, scadenza o ordine
dei codec a meno che il fornitore di
servizi VoIP non ha fornito
impostazioni diverse oppure non vi
sia una ragione valida per farlo.
Premere il tasto Power/End
-------Add to Profile-----1 Display Name
2 Phone Number
3 SIP Server
4 SIP Proxy
Select Back
-------Proxy Setup-----1 Proxy Address
2 Proxy Port
3 Proxy Username
4 Proxy Password
Select Back
-------Add to Profile-----4 SIP Proxy
5 NAT traversal
6 Expire
7 Codec Order
Select Back
(Alimentazione/Fine) per tornare alla
schermata principale.
A questo punto le impostazioni VoIP sono quindi configurate.
Continuare dalla sezione 6 per configurare la connessione
wireless.
85
Page 86

ITALIANO
6 Connessione a una rete senza fili
Attenersi alla procedura seguente per configurare il V630 per
connettersi alla rete wireless.
1 Dalla schermata principale del V630 premere il tasto Left
(Sinistra) (Menu) per aprire i menu.
2 Utilizzare il tasto Down (Giù) per
passare a 4 Network (Rete) e quindi
premere il tasto Left (Sinistra) per
selezionare la voce.
3 Selezionare 1 Site Scan (1 Analisi
sito).
4 Il V630 analizza ed elenca gli AP
presenti nell'area. Selezionare l'AP
a cui si desidera connettersi.
--------Main Menu-------1 Call log
2 Profiles
3 Setup
4 Network
Select Back
----------Network----------
1 Site Scan
2 WLAN Profiles
3 SIP Profiles
4 Ping Test
Select Back
------WLAN Scan-------
WLAN Example
RSSI: 64
Chan: 6
86
Select Back
Page 87

ITALIANO
5 L'AP di questi esempio utilizza la
sicurezza (WPA-PSK), immettere
-------Enter Key--------
la chiave (password) e
selezionare Done (Fine).
• Può essere necessario premere un tasto più volte per
immettere il carattere desider-
Done abc Clear
ato.
• Premere # per utilizzare le lettere minuscole, le lettere
maiuscole, i numeri o i simboli.
6 Per utilizzare un indirizzo IP statico o
il PPPoE, selezionare IP Setting
(Impostazioni IP) e selezionare
l'opzione appropriata.
In caso contrario premere il tasto
Power/End (Alimentazione/Fine) per
tornare alla schermata principale.
------Add to Profile:----1 SSID
2 Security set..
3. IP Setting
4. SIP Binding
Select Back
Con un singolo account SIP qualsiasi profilo WLAN lo
utilizzerà. Se si creano più profili SIP, modificare le
impostazioni di binding (collegamento) SIP del profilo WLAN
per impostare quale profilo SIP dovrà utilizzare uno specifico
profilo WLAN.
L'icona di intensità del segnale viene visualizzata dopo che il
V630 si è connesso all'AP. Successivamente il V630 tenta di
registrarsi sul server SIP. Nella schermata principale viene
visualizzato "ZyXEL V630" dopo una registrazione SIP
87
Page 88

ITALIANO
terminata con successo (vedere la Guida utente per sapere
come modificare il nome visualizzato del profilo SIP). Ora si
può iniziare a fare telefonate. Vedere la sezione 7 per i
dettagli.
7 Funzionamento di base del telefono
FARE UNA TELEFONATA
1 Dalla schermata principale immettere il numero da
chiamare o premere il tasto Right (Destra) per aprire la
rubrica del V630. Vedere la Guida dell'utente per
informazioni su come utilizzare la rubrica del telefono.
2 Premere il tasto verde Talk (Parla) per avviare una
telefonata.
V Se non si può effettuare la telefonate verificare
che il segnale LAN wireless sia presente e
controllare le impostazioni dell'account VoIP.
Provare a utilizzare un account VoIP differente
e/o provare a chiare un altro numero di telefono.
Se il problema persiste rivolgersi al fornitore di
servizi VoIP.
88
Page 89

ITALIANO
UTILIZZO DELL'ALTOPARLANTE DEL TELEFONO
Premere il tasto Right (Destra) durante una telefonata per
attivare la funzione dell'altoparlante.
RICEVERE UNA TELEFONATA
Premere il tasto verde Tal k (Parla) per rispondere a una
telefonata in arrivo.
TERMINARE UNA TELEFONATA
Premere il tasto rosso Power/End (Alimentazione/Fine) per
terminare una telefonata.
CHIAMATA IN ATTESA
Durante una telefonata, premere il tasto Left (Sinistra)
(Opzioni telefonata) per aprire le opzioni della telefonata.
Selezionare Hold/Unhold (Trattieni/Ritorna) per mettere la
chiamata in attesa o per riprenderla.
CHIAMATA A 3
1 Durante una telefonata, premere il tasto Left (Sinistra)
(Opzioni telefonata) per aprire le opzioni della telefonata e
selezionare New call (Nuova telefonata).
2 Immettere un altro numero di telefono e premere il tasto
verde Tal k (Parla).
89
Page 90

ITALIANO
CHIAMATA A 3
3 Dopo le domande di terze parti, premere il tasto Left
(Sinistra) (Opzioni telefonata) per aprire le opzioni della
telefonata. Selezionare conference (conferenza).
TRASFERIMENTO DI CHIAMATA
1 Durante la telefonata premere il tasto Left (Sinistra)
(Opzioni telefonata) per aprire le opzioni della telefonata.
Selezionare Blind Transfer (Trasferimento).
2 Comporre il numero a cui si desidera trasferire la
telefonata.
3 Attendere lo squillo. A questo punto premere il tasto
Power/End (Alimentazione/Fine) per terminare il
trasferimento di chiamata.
BLOCCO E SBLOCCO DELLA TASTIERA
Bloccare la tastiera per evitare l'esecuzione accidentale di
telefonate. Dalla schermata principale premere il tasto Left
(Sinistra) e * per bloccare/sbloccare il V630. È inoltre possibile
fare in modo che il blocco tastiera si attivi automaticamente se
non si utilizzo il V630 per un periodo di tempo specificato. Fare
riferimento alla Guida utente per le istruzioni.
TELEFONATE P2P (PEER TO PEER)
Attenersi alla procedure seguente per chiamare direttamente il
numero SIP di qualcuno senza passare attraverso un server
SIP.
90
Page 91

ITALIANO
TELEFONATE P2P (PEER TO PEER)
1 La sezione 5 illustra la creazione di un profilo SIP per l'uso
con un server SIP. Creare un profilo SIP differente per le
chiamate P2P. Il profilo SIP necessita di un numero di
telefono per il V630 (ma di nessuna impostazione del
server SIP). Dalla schermata principale selezionare Menu >
Rete > Profili SIP > Aggiungi a profilo.
2 È necessario utilizzare un indirizzo IP statico. Creare un
profilo WLAN che utilizza un indirizzo IP statico. Dalla
schermata principale selezionare Menu > Rete > Profili
WLAN > Aggiungi a profilo. Configurare l'indirizzo IP, la
maschera di subnet, l'indirizzo del gateway e l'indirizzo del
server DNS. Utilizzare l'opzione di binding (collegamento)
SIP per selezionare il profilo SIP creato nel passo
precedente. Il numero di telefono e il (P2P) vengono
visualizzati nella schermata principale.
3 Nella schermata principale premere il tasto Right (Destra)
per aprire la rubrica. Nell'elenco dei contatti premere
Opzioni > Aggiungi. Creare una voce della rubrica per il
chiamato. Immettere il nome e il numero di telefono SIP del
chiamato. A questo punto selezionare la modalità P2P e
immettere l'indirizzo IP e il numero della porta SIP (5060 è
la porta predefinita) del chiamato. Selezionare il gruppo a
cui deve appartenere il chiamato, se richiesto. Premere il
tasto Left (Sinistra) per avviare la telefonata.
91
Page 92

ITALIANO
Visualizzazione delle certificazioni di un prodotto
1 Visitare il sito www.zyxel.com.
2 Selezionare il prodotto dall'elenco di riepilogo a
discesa nella Home Page di ZyXEL per passare alla
pagina del prodotto in questione.
3 Selezionare da questa pagina la certificazione che si
desidera visualizzare.
92
Page 93

РУССКИЙ
РУССКИЙ
1 Обзор
Телефон V630 позволяет использовать соединение по
беспроводной сети для вызовов и ответов на телефонные
звонки через Интернет.
" У вас уже должен быть настроен Интернет и
учетная запись телефонии.
Это Краткое руководство содержит приведенные ниже
разделы. Смотрите инструкцию пользователя для
получения подробной информации о всех возможностях.
• Основные элементы. Смотрите страницу 94.
• Установ к а и зарядка аккумулятора. Смотрите страницу
96.
• ЖК дисплей. Смотрите страницу 98.
• Начальная конфигурация. Смотрите страницу 99.
93
Page 94

РУССКИЙ
• Подключение к беспроводной сети. Смотрите страницу
104.
• Основные операции с телефоном. Смотрите страницу
106.
2 Основные элементы
Клавиша
вверх/вниз
ЖК дисплей
Левая клавиша
Клавиша вызова
Буквенно-цифровая
клавиатура
Правая
клавиша
Клавиша
питания/
Сброса
Порт USB/зарядки
НАЗВАНИЕ ОПИСАНИЕ
ЖК дисплей На этом дисплее отображается
информация и меню телефона.
94
Разъем наушников
Page 95

РУССКИЙ
НАЗВАНИЕ ОПИСАНИЕ
Левая
клавиша
Правая
клавиша
Клавиша
вызова
Клавиши
вверх/вниз
Клавиша
Питания/
Сброса
Буквенноцифровая
клавиатура
Разъем
наушников
Порт USB/
зарядки
Используется для открывания меню и
выбора пунктов.
Используется для возврата к предыдущему
меню. Кроме этого, является клавишей
быстрого доступа для телефонной книги.
Используется для вызова и ответа на
звонки.
На основном дисплее то кнопки быстрого
доступа. По умолчанию кнопка Up (Вверх)
открывает информационное меню, а кнопка
Down (Вниз) открывает меню настройки
профиля телефона. Порядок изменения
функций этих клавиш описан в Руководстве
по эксплуатации.
В меню эти клавиши перемещают курсор.
Используется для окончания разговора и
отклонения звонков. Для выключения V630
нажмите и удерживайте эту клавишу в
течение нескольких секунд.
Используется для ввода цифр, букв и
символов.
К этому гнезду подключаются наушники (не
входят в комплект).
К этому разъему подключается сетевой
адаптер для зарядки аккумулятора.
95
Page 96

РУССКИЙ
3 Установка и зарядка аккумулятора
• ПРЕДУПРЕЖДЕНИЕ: НИКОГДА не нагревайте
аккумулятор до высокой температуры (на огне или
длительное время на солнечном свету), не
закорачивайте его контакты и не вскрывайте корпус. Это
может привести к возгоранию или взрыву аккумулятора.
• ПРЕДУПРЕЖДЕНИЕ: ОПАСНОСТЬ ПОРАЖЕНИЯ
ЭЛЕКТРИЧЕСКИМ ТОКОМ. Вынимать аккумулятор или
снимать крышку аккумуляторного отсека можно только,
когда V630 выключен и кабель зарядного устройства/
USB вынут из разъема.
• Перед первым использованием V630 зарядите
аккумулятор в течение 10 часов.
1 Нажмите кнопку на крышке аккумуляторного отсека
V630, сдвиньте в сторону основания V630 и
поднимите.
2 Снимите с аккумулятора упаковочные материалы.
Возьмите аккумулятор, направив пластиковый выступ
вверх. Вставьте аккумулятор таким образом, чтобы
торец с контактами (металлическими полосками)
прикоснулся к контактам V630, расположенным возле
основания. Нажмите на аккумулятор.
96
Page 97

РУССКИЙ
3 Установите на место крышку аккумуляторного отсека.
1 ПРЕДУПРЕЖДЕНИЕ: Используйте для
подключения к USB порту компьютера
только входящее в комплект поставки
зарядное устройство или USB кабель
(поставляется отдельно). Зарядное
устройство другого типа может
повредить V630 или его аккумулятор.
4 Подключите кабель зарядного устройства к портуUSB/
Recharge (USB/зарядка).
Порт USB/зарядки
5 Вставьте вилку зарядного устройства в сетевую
розетку. Включится подсветка. Если V630 включен, то
97
Page 98

РУССКИЙ
уровень заряда на значке зарядки будет циклически
меняться.
4 ЖК дисплей
Нажмите клавишу End/Power (Сброс/Питание) в течение
нескольких секунд до включения V630. После появления
экрана приветствия, V630 попросит вас ввести время и
дату.
V Если экран не появляется, то проверьте
заряд аккумулятора. Смотрите раздел 3.
Вид главного ЖК экрана показан
рядом. Значки вверху ЖК дисплея
отображают информацию о статусе.
ЗНАЧОК ОПИСАНИЕ
Отображает мощность сигнала сети WLAN.
Клавиатура заблокирована. Нажмите клавишу
Left (Влево) и клавишу * для разблокировки.
No WLAN Service
2:44
10/18/2007
Menu Name
98
Page 99

РУССКИЙ
ЗНАЧОК ОПИСАНИЕ
Показывает, включен ли звуковой сигнал.
Виброзвонок включен.
Отображает оставшийся заряд батареи. При
зарядке указатель пульсирует.
No WLAN
service
Время/
Дата
Menu Для выполнения описанных здесь функций
Name Для выполнения описанных здесь функций
Здесь отображается состояние подключения к
сети WLAN или регистрация на сервере SIP.
Время и дата (в формате месяц/день/год)
отображаются в середине экрана.
используется клавиша Left (Влево). На
главном экране нажмите на клавишу Left
(Влево) для входа в главное меню V630.
используется клавиша Right (Вправо). На
главном экране нажмите на клавишу Right
(Вправо) для добавления или поиска контакта
в телефонной книге.
5 Начальная конфигурация
Технология VoIP (Голос через IP) позволяет вам
выполнять телефонные звонки через Интернет. Для
выполнения VoIP звонков V630 использует протокол SIP.
Для настройки конфигурации V630 вам необходимо:
• Активировать учетную запись у провайдера услуг VoIP,
который использует SIP.
99
Page 100

РУССКИЙ
• Установ ить соединение по сети WLAN (IEEE 802.11b или
IEEE 802.11g). Дополнительную информацию смотрите в
разделе 6.
5.1 Ввод информации о вашей учетной
записи VoIP
Чтобы настроить ваш V630 для использования учетной
записи VoIP выполните следующие действия:
1 На главном экране V630 нажмите на клавишу Left
(Влево) (Menu) (Меню) для входа в меню.
2 При помощи клавиши Down (Вниз)
перейдите к пункту 4 Network (4
Сеть), а затем нажмите на клавишу
Left (Влево), чтобы выбрать этот
пункт.
3 Выберите 3 SIP Profiles (3
Профили SIP).
--------Main Menu-------1 Call log
2 Profiles
3 Setup
4 Network
Select Back
----------Network---------1 Site Scan
2 WLAN Profiles
3 SIP Profiles
4 Ping Test
Select Back
100
 Loading...