

Page 1

V500 Series
IP Phone
Quick Start Guide
Version 1.00
8/2007
Edition 1
Copyright © 2007. All rights reserved.
Page 2

V500 Series Quick Start Guide
Overview
At the time of writing, this Quick Start Guide covers the following models:
• V500: IP Phone.
• V501: IP Phone with Power over Ethernet (PoE).
This Quick Start Guide shows you how to set up and use your V500. It includes the
following sections:
• Hardware and Connections - introduces the physical features of the V500 and shows you
how to connect it to your network.
• Initial Configuration - discusses how to set up your network configuration and SIP server
registration using the V500’s LCD screen and keypad.
• Phone Operation - covers how to use the V500’s basic telephone functions, such as making a call.
You can also configure the V500 via the web configurator using a computer connected to
the V500’s PC port. See your User’s Guide for details.
1
Page 3
V500 Series Quick Start Guide
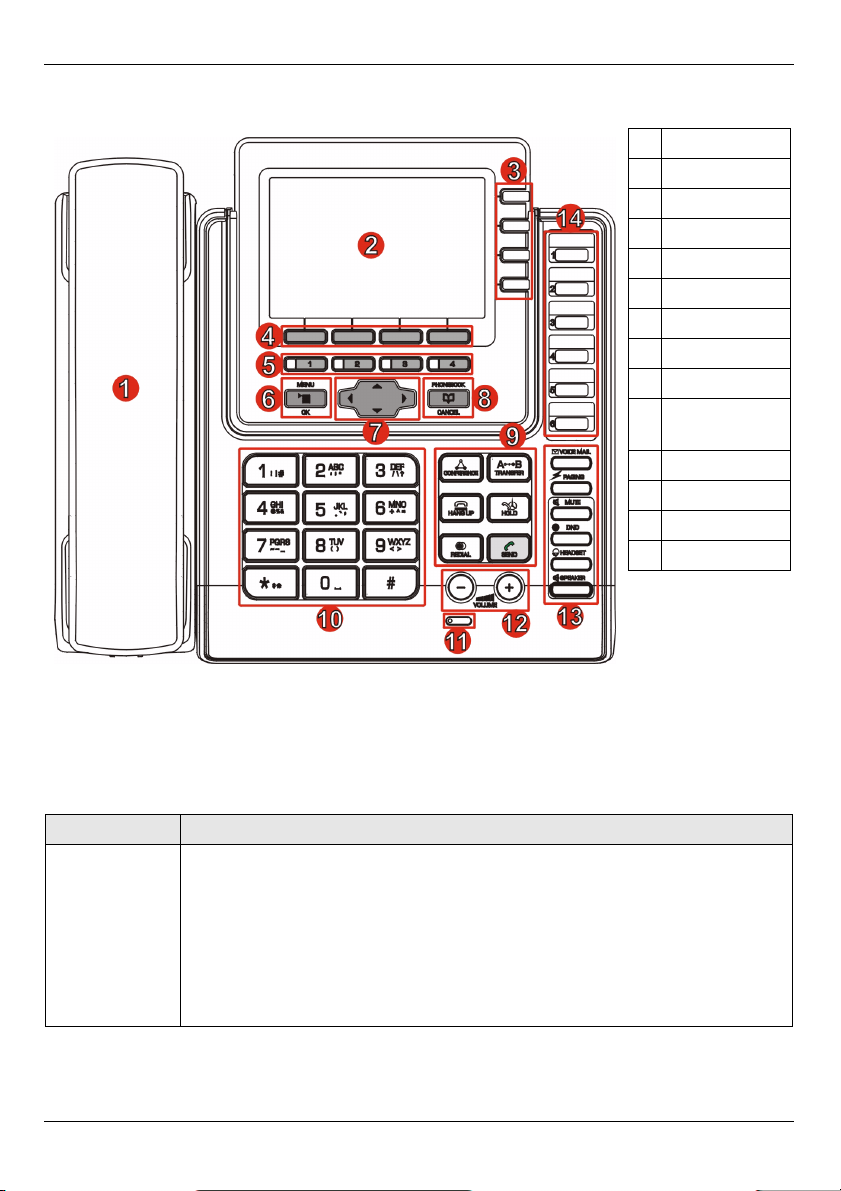
1 Hardware and Connections
1 Handset
2 LCD screen
3 Account keys
4Softkeys
5 Line keys
6 Menu
7 Navigator
8 Phonebook
9 Action keys
10 Alphanumeric
keypad
11 Microphone
12 Volume keys
13 Function keys
14 Custom keys
The following table describes some of the hardware features used for basic operations.
See the hardware chapter in your User’s Guide for full descriptions of all features.
FEATURE DESCRIPTION
Account keys Use these to select the SIP account you want to use. You can configure up
to four SIP accounts on the V500.
Note: You can select an account only when it has been
configured (use the Advanced Setting > SIP
Configuration LCD screen menus to configure an
account).
2
Page 4
V500 Series Quick Start Guide
FEATURE DESCRIPTION
Softkeys These keys’ functions depend on the screen currently displayed on the LCD
screen. A word or symbol displayed on the LCD screen above a softkey
shows its current function.
Line keys Press these to select the phone line you want to use. The V500 has four
phone lines.
Menu Press this to display the V500’s configuration menu. Press it again to exit
the menu. The menu is not accessible when a call is in progress.
Navigator Press these keys to move around the V500’s screens. Press to go up
one line in a menu, and press to go down one line. Press to move
one space to the right, and press to move one space to the left. You can
also press to make a menu selection, and press to return to the
previous menu.
Phonebook Use this to display the list of contacts stored in the V500. You can add, edit
and delete phonebook entries from this screen.
Alphanumeric
keypad
Microphone The microphone is active when the V500 is in speakerphone mode.
Volume keys Use the + key to increase the volume, and use the - key to decrease it.
Use these to enter numbers, letters and symbols. Use the # key to switch
between Number mode, Uppercase mode, Lowercase mode and Symbol
mode.
• When you use the handset, these keys control the handset’s speaking
and listening volume.
• When you use the headset, these keys control the speaking and
listening volume on the headphone ( ) and microphone ( ) ports on
the V500.
• When you use the speakerphone, these keys control the internal
speaker and microphone (Mic) volume.
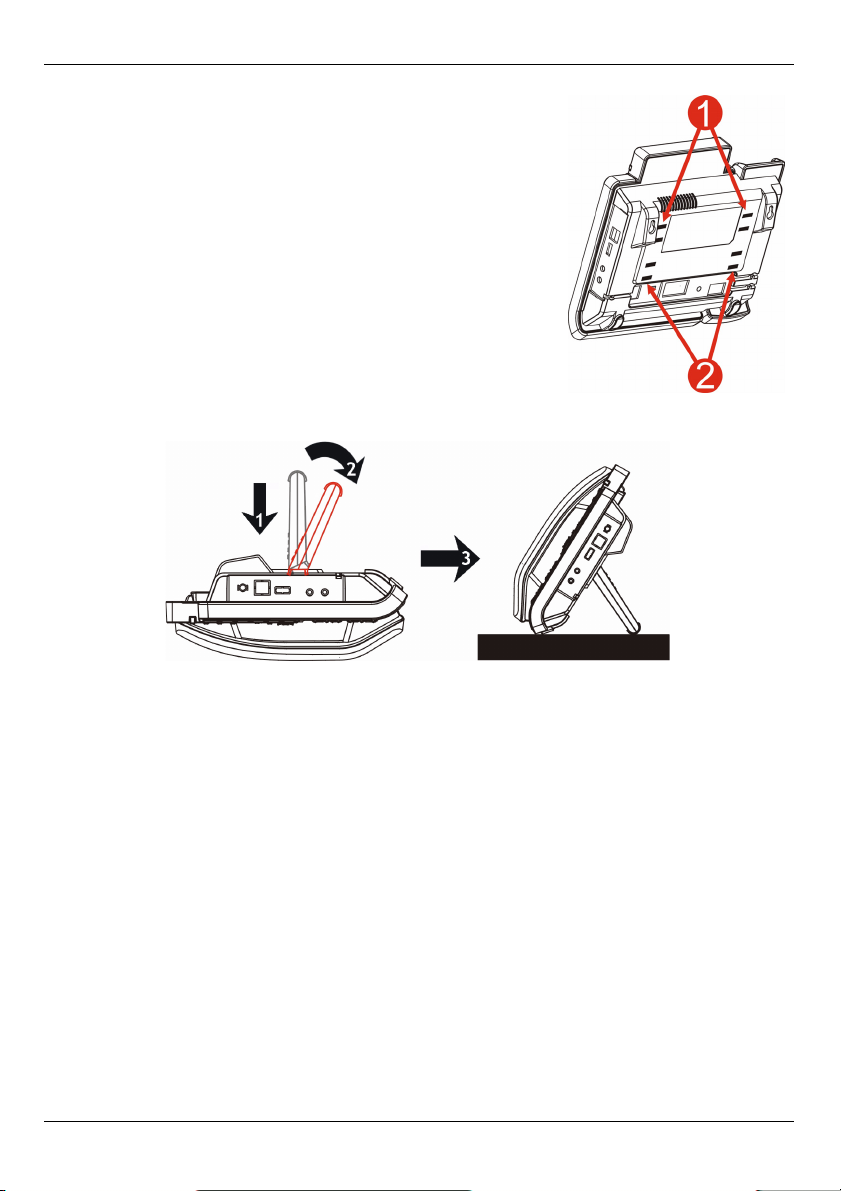
1.1 Stand Installation
Attach the included stand, unless you want to hang the V500 on a wall (see your User’s
Guide for wall-mounting instructions).
There are four ways to attach the
included stand, as shown.
3
Page 5
V500 Series Quick Start Guide
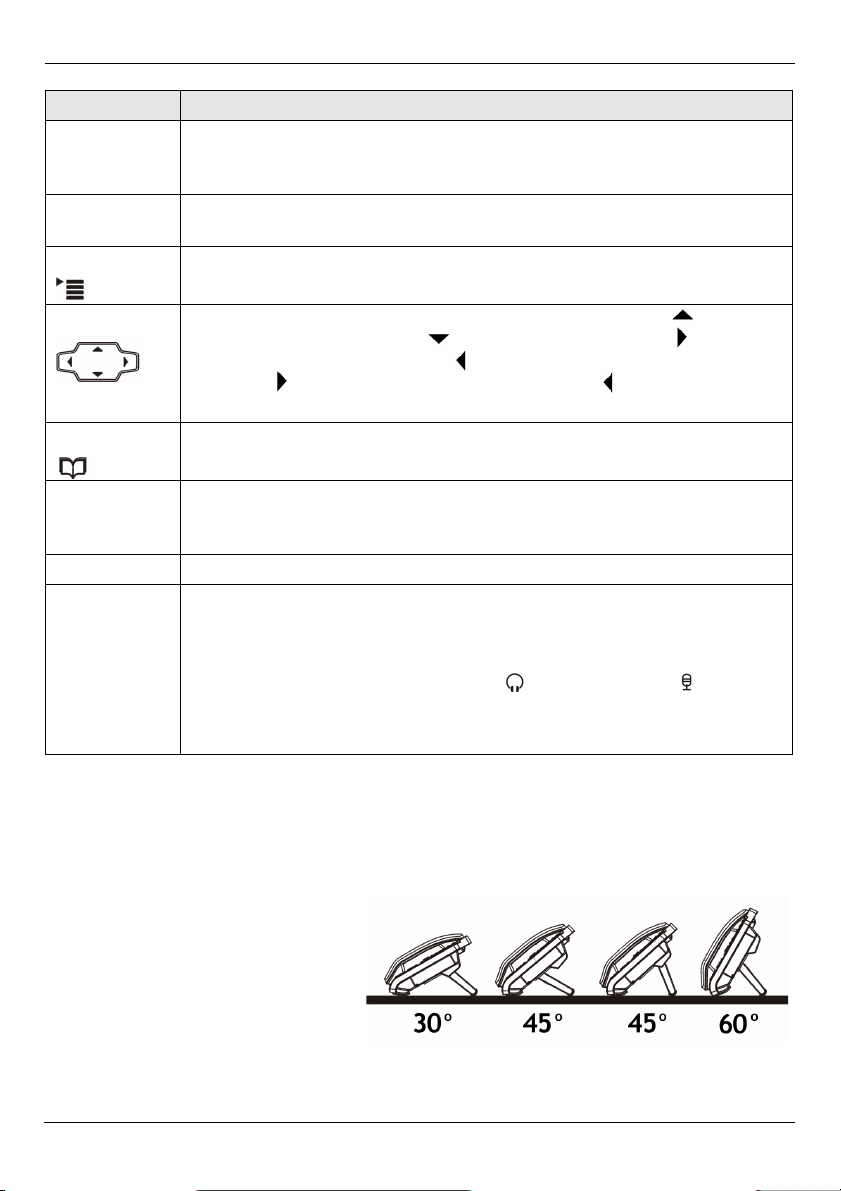
If you want to stand the V500 at its lower angle (nearer the
horizontal) use the holes marked 1 in the following figure.
Use the holes marked 2 to stand the V500 at its higher angle
(nearer the vertical).
Take the stand and connect it to the V500 as shown in the following figure.
1 Insert the two connectors on the longer side of the stand first.
2 Pivot the stand down until the other two connectors are inserted.
3 Turn the V500 the right way up. Check that the stand is securely attached.
4
Page 6

V500 Series Quick Start Guide
1.2 Rear Panel Hardware Connections
1WAN: Use an Ethernet cable to connect the V500 to your network.
V501 only: if you are using Power over Ethernet (PoE), connect the Ethernet cable
supplying power to this port. See Section 1.3 on page 6 for more information on PoE.
2PC (optional): Use an Ethernet cable to connect your computer to the PC port on the
V500 to access your network through the V500, or to configure the V500 using the web
configurator (see your User’s Guide for information on using the web configurator).
3 HANDSET: Connect the included handset cable to the HANDSET port on the V500.
Connect the other end to the handset. Hang up the receiver before you connect the
power.
4POWER: Connect the included power adaptor to the POWER socket on the V500. Plug
the power adapter into an appropriate power source.
V501 only: if you are using Power over Ethernet (PoE), you do not need to connect the
power adaptor.
5
Page 7

V500 Series Quick Start Guide
1.3 V501 Only: Power over Ethernet (Optional)
Power over Ethernet (PoE) is the ability to provide power to your V501 via an 8-pin CAT 5
Ethernet cable, eliminating the need for a nearby power source.
A PoE injector (not included) is also needed to supply the Ethernet cable with power. This
feature allows increased flexibility in the location of your V501.
In the following figure, Z is your V501, A is the CAT 5 Ethernet cable, B is the PoE injector
and C is the power cable.
2 Initial Configuration
This section describes how to use the phone’s LCD screen menus to:
• Set up Your Network Connection
and
• Set up Your Voice Account
The phone does not need to be connected to a computer to do this.
" When entering information, use the # key to cycle between Uppercase,
Lowercase, Symbol and Number modes. The current mode is displayed
on the LCD screen.
Press a key multiple times to access the different characters. For example,
in Uppercase mode press 9 four times to enter “Z”.
6
Page 8

V500 Series Quick Start Guide
2.1 Set up Your Network Connection
When you have finished your hardware
connections, look at the LCD screen. The V500
displays your Voice over Internet (VoIP) account
registration status in the tabs on the right, and time
and date details in the top section.
The V500 allows you to configure up to four VoIP
accounts (also known as SIP accounts). When a
VoIP account is not active, Unused displays. When
an account is active but not successfully
registered, No Reg displays in the tab. When an
account is active and successfully registered, the
tab displays the account name (SIP 1 in this
example).
11:45 2006-12-12
ZyXEL
SIP 1
Unused
Unused
Unused
V If the LCD screen displays nothing, recheck your hardware connections.
See section 1.2.
Follow these steps to configure your network settings.
1 Press the Menu key, and use the navigator to
select Advanced Setting. Press Select.
Menu Setting
1 System Info
2 Ring Setting
3 Volume Setting
4 Call Preference
5 Phonebook
6 Advanced Setting
7 System Restart
8 Feature Code Show
Select Back
" You can also use the alphanumeric keypad to make your selections in the
LCD screen. For example, you can press the 6 key in the Menu Setting
screen (above) to go to the Advanced Setting screen.
7
Page 9

V500 Series Quick Start Guide
2 Select Network Setting.
Choose from the following options:
• If you were given a username and password for
network access, go to section 2.1.1 on page 8.
• If you were given an IP address and subnet mask
to use, go to section 2.1.2 on page 9.
• If you were not given an IP address to use, go to
section 2.1.3 on page 10.
2.1.1 Set Up PPPoE
1 If you were given a username and password,
select PPPoE (Off) in the Advanced Setting >
Network Setting menu. Press the On softkey to
have the V500 use PPPoE.
The screen displays PPPoE (On). Press Select
to enter your information.
2 Press 1 to enter the user name for your
account.
Advanced Setting
1 Network Setting
2 SIP Configuration
3 Auto Provision (Off)
4 Programmable Feature Key
5 Display Adjusting
Select Back
Network Setting
1 PPPoE (On)
2 Static IP (Off)
3 DHCP (Off)
Select On Back
PPPoE
1 Username
2 Password
Select Back
8
Page 10

V500 Series Quick Start Guide
3 The PPPoE Username screen displays. Press
Edit and enter your user name.
Press Save when you are done, then press 2 to
enter the PPPoE Password screen. Press Edit.
4 Enter your password, then go down to Confirm
and re-enter it. Press Save when you are done.
PPPoE Username
Current:
New: User123
Number mode
Save <- Back
Edit Password
Current:
New: NewPassword
Confirm: NewPassword
Lowercase mode
Save <- Back
2.1.2 Set Up a Static IP Address
9
Page 11

V500 Series Quick Start Guide
1 If you have an IP address to use, select Static
IP (Off) in the Advanced Setting > Network
Setting menu. Press the On softkey to have the
V500 use a static IP address.
The screen displays Static IP (On). Press Select
to enter your information.
2 Use the options in this menu to enter the static
IP address, gateway and DNS information
provided by your Internet Service Provider (ISP)
or network administrator. Press Back to return
to the previous screen.
2.1.3 Get an IP Address Automatically
Network Setting
1 PPPoE (Off)
2 Static IP (On)
3 DHCP (Off)
Select Back
Static IP
1 IP Address
2 Default Gateway
3 Subnet Mask
4 1st DNS
5 2nd DNS
Select Back
" The V500 is set to get an IP address automatically by default.
1 If you have neither a username and password
nor an IP address to use, select DHCP (Off) in
the Advanced Setting > Network Setting menu.
Press the On softkey to have the V500 use
DHCP.
DHCP allows your V500 to get an IP address
automatically. Press Back to return to the
previous screen.
10
Network Setting
1 PPPoE (Off)
2 Static IP (Off)
3 DHCP (On)
Select Back
Page 12

V500 Series Quick Start Guide
2.2 Set up Your Voice Account
Follow these steps to configure your VoIP account.
1 Press the Menu key, then press 6 to enter the Advanced Setting menu.
2 Press 2 to enter the SIP Configuration menu.
3 If VoIP 1 Configuration does not display Active,
select its entry and press the Active softkey. If
the SIP account is not active, you cannot use it
to make or receive calls.
4 Press 1 to select the SIP 1 Configuration menu. You can configure up to four SIP
accounts on the V500 (see the User’s Guide for details).
Enter the information exactly as given to you by your VoIP service provider.
SIP Configuration
1 VoIP 1 Configuration (On)
2 VoIP 2 Configuration (Off)
3 VoIP 3 Configuration (Off)
4 VoIP 4 Configuration (Off)
Select Off Back
" If your VoIP service provider did not give you information to use for any of
the fields in this menu, leave them at their default settings.
The following table describes the fields in this menu.
FIELD DESCRIPTION
1 Display Name Choose a name for this SIP account. This name displays in the SIP
account’s tab on the V500’s LCD screen.
2 SIP Number This is your SIP account number. If you have a SIP account like
1234567@voip-provider.com, the SIP Number is 1234567.
3 SIP Local Port This is the port on the V500 used for SIP calls. The default is 5060.
4 SIP Server Addr This is the IP address of the server your VoIP service provider uses for
SIP calls.
5 SIP Server Port This is the port on the SIP server used for SIP calls. The default is 5060.
6 SIP Register
Server
This is the IP address of the server your VoIP service provider uses to
register the V500. If your VoIP service provider did not give you a
specific SIP register server address, enter the SIP Server address
again.
11
Page 13

V500 Series Quick Start Guide
FIELD DESCRIPTION
7 SIP Register
Port
8 SIP Service
Domain
9 SIP Auth ID This is the user name for this SIP account.
10 Auth Password This is the password for this SIP account.
11 Codec Priority Your V500 and the SIP server must use the same voice codec (coder /
12 Voicemail
Number
13 DNS SRV /
DNS
14 Call ID Use this to turn outgoing caller ID on (On) or off (Off).
15 NAT Setting Use this to configure Network Address Translation.
16 Backup SIP
Server
This is the port the SIP register server uses to register the V500. The
default is 5060.
If you have a SIP account like 1234567@voip-provider.com, the
SIP Service Domain is voip-provider.com.
decoder). Select the codecs you want the V500 to try using first, second
and third.
This is the number you enter to access your voicemail messages for this
SIP account.
Turn this on (select On) to have the V500 use the DNS servers you
configured in section 2.1.2. Turn it off (select Off) if you do not want the
V500 to use DNS. DNS SRV is off by default.
Use this to set up the SIP server(s) the V500 uses if it cannot access the
main SIP server.
5 When you are done configuring SIP 1
Configuration, press Back. The upper right
part of the LCD screen displays the SIP account
name you registered (“SIP1”, in this example).
6 See section 3 for how to test your V500’s
configuration by making a call.
11:45 2006-12-12
ZyXEL
SIP 1
Unused
Unused
Unused
V If your SIP account does not register successfully (Unused or No Reg is
still displayed in the main screen) or you cannot make a call, check your
connections and re-enter your SIP settings. Restart the V500 (turn the
power off, then back on). If this does not help, contact your network
administrator or VoIP service provider.
12
Page 14

V500 Series Quick Start Guide
3 Phone Operation
This section describes how to use your V500’s basic telephone functions.
" For more information on the V500’s telephone functions, see the hardware
chapter in your User’s Guide.
MAKING A CALL
1 Pick up the handset.
A Line key LED turns on. The LCD screen shows which SIP account you are using.
Change these, if you want, using the Line and Account keys.
2 Check that you can hear a dial tone.
3 Enter the number you want to call. If you have numbers stored in the V500’s phone
book, you can use the navigator to select from the list of entries. See your User’s
Guide for more information on using the phone book.
4 Press the yellow SEND key to start the call.
RECEIVING A CALL
When the phone rings, do one of the following:
• Pick up the handset to receive the call using the handset.
• Press the SPEAKER key to receive the call using the internal speakerphone.
• Press the HEADSET key to receive the call using an external headset.
ENDING A CALL
When you want to end a call, press the HANG UP key. Alternatively, do one of the
following:
• If you are using the handset, replace it in the cradle.
• If you are using the internal speakerphone, press the SPEAKER key.
• If you are using an external headset, press the HEADSET key.
PLACING A CALL ON HOLD
Press the HOLD key once to place a call on hold. Press it a second time to return to the call.
You can make a call on another line (press another line key) then return to the call on hold.
13
Page 15

V500 Series Quick Start Guide
USING VOICEMAIL
Once you have configured your SIP account’s voicemail number on the V500, press the
VOICEMAIL key to check your messages.
Use the Advanced Setting > SIP Configuration > SIP 1 ~ 4 Configuration > Voicemail
Number menu to set the voicemail account number. The account you check when you press
the VOICEMAIL key depends on which SIP account is currently active. See your User’s
Guide for more information.
MAKING A CONFERENCE CALL
Take the following steps to make a three-way conference call.
1 Either start a call, or receive a call. Make sure you know which line the call is using (the
corresponding Line key lights up).
2 Ensure the call is active (you can talk with the other person). Press the Conference key.
This “marks” the first call you want to mix into the conference call.
3 Press another Line key. You can either receive an incoming call, make another outgoing
call, or resume an existing call that you previously put on hold.
4 Ensure the call is active and press the Conference key again. The three-way
conference call begins. All three parties can talk with one another.
TRANSFERRING A CALL
Take the following steps to transfer an ongoing call to another phone number.
1 During the ongoing call, press the Transfer key. The next available line automatically
activates. Ensure you can hear a dial tone.
2 Dial the number to which you want to transfer the call.
3 To transfer the call, either:
• Wait until you hear the ringing tone, then put down the handset, press the Speaker
key or the Headset key (depending on which you are using) to end the call.
• Wait for the other person to answer, then end the call.
Viewing a Product’s Certification(s)
1 Go to www.zyxel.com.
2 Select your product from the drop-down list box on the ZyXEL home
page to go to that product's page.
3 Select the certification you wish to view from this page.
14
 Loading...