

Page 1

Prestige 623 Series
Dual-link ADSL Router
Quick Start Guide
Version 1.38
April 2003
Page 2
Prestige 623 Series Dual-link ADSL Router Quick Start Guide
Introducing the Prestige
The Prestige 623 series Dual-link ADSL Router is the ideal all-in-one device for small networks connecting
to the Internet via DSL. See your User’s Guide for more details on Prestige features.
You should have an Internet account already set up and have been given most of the following information
from your ISP. You don’t have to fill in all the fields.
REQUIRED INFORMATION
Your device’s WAN IP Address :__________________ Subnet Mask: ________________
Multiplexing (VC-based or LLC-based): VC LLC
DNS Server IP Address Primary: _________________ Secondary: _________________
Virtual Path Identifier (VPI): ____________
Virtual Channel Identifier (VCI): ____________
Gateway IP Address: _________________
Encapsulation:
PPPoE
PPPoA
RFC 1483
RFC 1483 (1577)
Username: ______________
Password: _______________
Hardware Connection
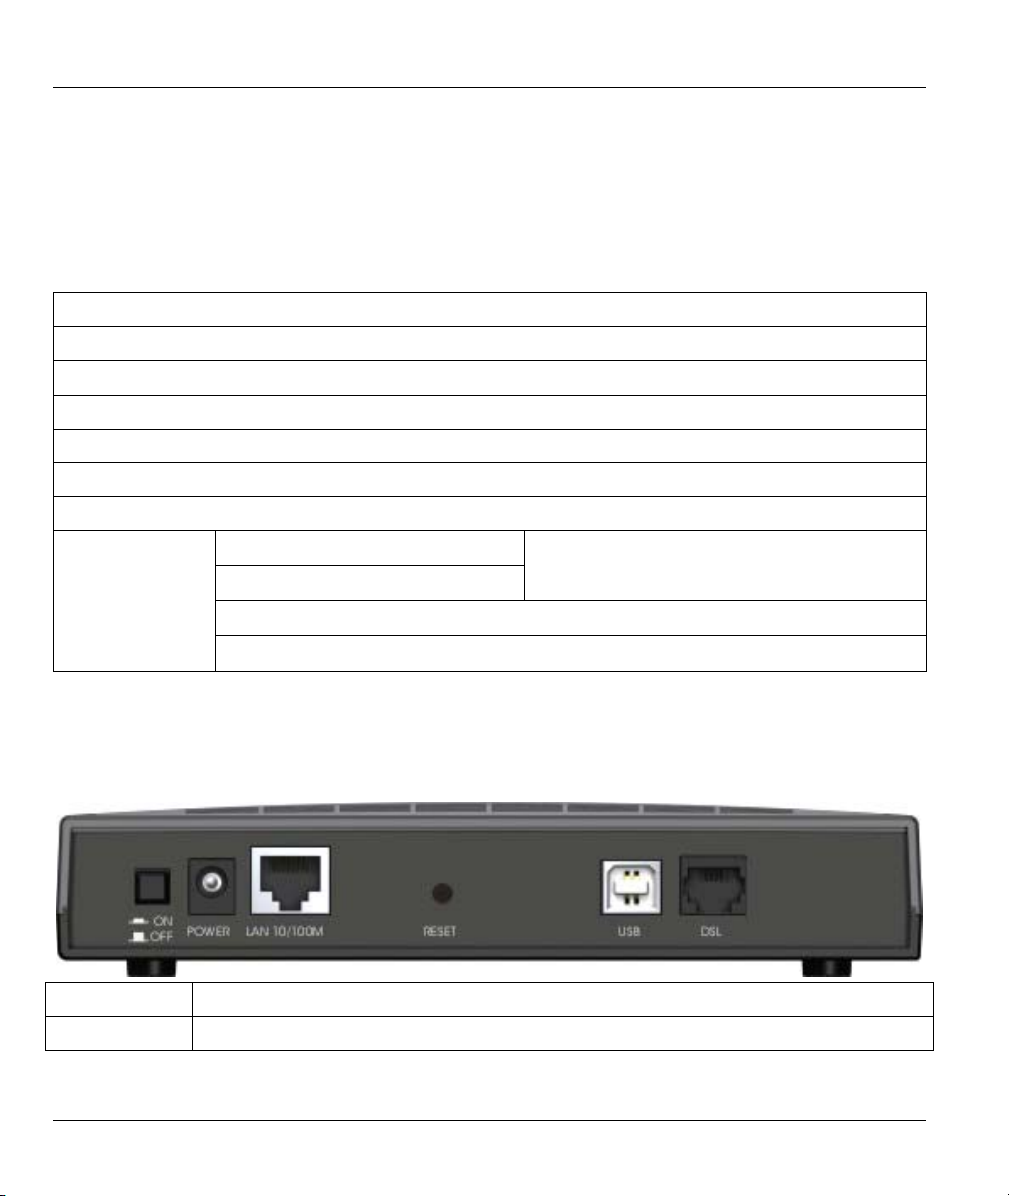
Rear Panel
PORT CONNECTION
1. DSL Connect to a telephone jack using a telephone cable.
2
Page 3
Prestige 623 Series Dual-link ADSL Router Quick Start Guide
PORT CONNECTION
2. LAN
10/100M
3. POWER Do this last. Connect to a power source using the supplied power adapter.
After you’ve made the connections, connect the power adapter to a power supply and push in the power
button to turn on the Prestige. Look at the front panel LEDs.
Proceed to install the USB driver if you want to connect the Prestige to the USB port on the computer. Refer
to the Installing USB Driver section.
USB The USB port is useful when a computer does not have a network card. Connect the USB port
RESET You only need to use this button if you’ve forgotten the Prestige’s administrative account
Connect to a computer using a crossover Ethernet cable or to a hub using a straightthrough Ethernet cable.
during the USB driver installation.
password or IP addresses. It returns the Prestige to the factory defaults (see your User’s Guide
for details).
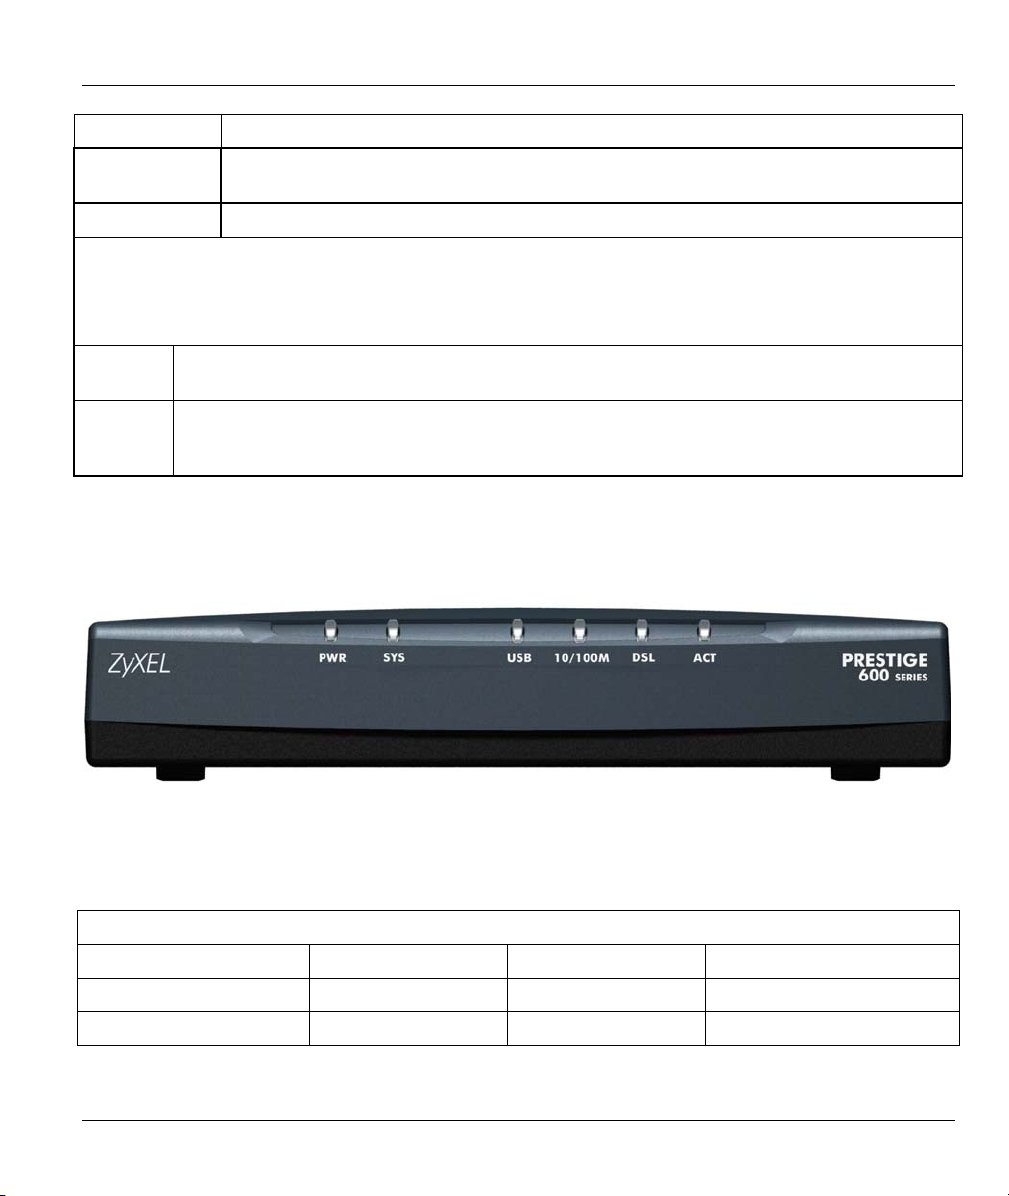
Front Panel LED
When the Prestige is turned on, the PWR LED turns on. The SYS LED turns steady on if the system selftest is successful. The appropriate LAN and/or USB LEDs turn on if they are properly connected.
Prestige Factory Defaults
This Quick Start Guide provides a default configuration that should be compatible with your home or small
office network setup. Refer to the User’s Guide for additional configuration instructions.
PRESTIGE FACTORY DEFAULTS
LAN IP Address 192.168.1.1 Default User name admin
USB IP Address 192.168.1.2 Default Password 1234
Subnet Mask 255.255.255.0 DHCP IP Pool 192.168.1.3 – 192.168.1.34
3
Page 4
Prestige 623 Series Dual-link ADSL Router Quick Start Guide
Installing the USB Driver
DO NOT connect the USB port at this point.
Installation steps and screens are similar for all Windows systems. Screen shots for Windows XP are shown
unless otherwise specified.
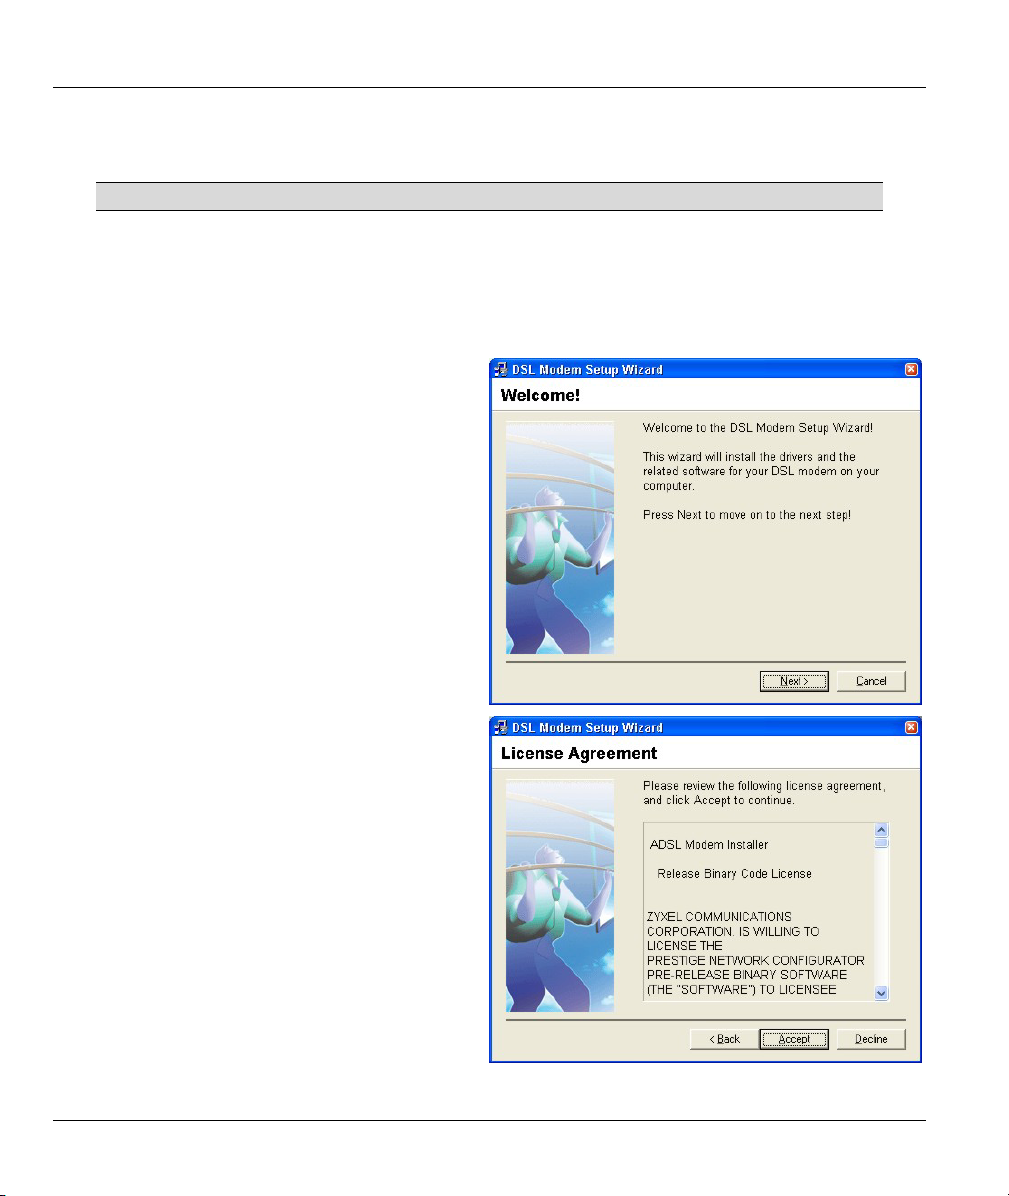
Step 1. Save your work and close all other Windows applications.
Step 2. Insert the included CD and copy the USB installation file onto the computer.
Step 3. Double-click setup.exe in the folder
where you copied the files.
A Welcome dialog box displays, click
Next.
Step 4. Click Accept to agree to the license
agreement.
4
Page 5

Prestige 623 Series Dual-link ADSL Router Quick Start Guide
Step 5. Connect the USB port to the computer
when prompted. A window displays
briefly, indicating that the system has
found a new hardware.
Step 6. For Windows 2000/XP: Click Finish to complete the driver installation.
For Windows 98/98 SE/Me: Reboot the computer when prompted.
Verifying Your USB Installation
After you have completed the USB driver installation, click
Start, (all) Programs, ZyXEL Prestige 623-43 (or ZyXEL
Prestige 623-41) and ADSL Status.
A ZyXEL P623-43 ADSL Modem (or ZyXEL P623-41 ADSL
Modem) screen displays. In the Physical Link screen, the Stat
should display Connected if a computer is connected to the
Prestige via the USB port.
This utility is for USB connection only.
5
Page 6

Prestige 623 Series Dual-link ADSL Router Quick Start Guide
Setting Up Your Computer’s IP Address
Skip this section if your computer is already set up to accept a dynamic IP
address. This is the default for most new computers.
The Prestige is already set up to assign your computer an IP address. Use this section to set up your
computer to receive an IP address or assign it a static IP address in the 192.168.1.3 to 192.168.1.254 range
with a subnet mask of 255.255.255.0. This is necessary to ensure that your computer can communicate with
your Prestige.
Your computer must have a network card and TCP/IP installed. TCP/IP should already be installed on
computers using Windows NT/2000/XP, Macintosh OS 7 and later operating systems.
Windows 2000/NT/XP
In Windows XP, click start, Control Panel. In Windows 2000/NT, click Start, Settings, Control
1.
Panel.
In Windows XP, click Network Connections.
2.
In Windows 2000/NT, click Network and Dial-up Connections.
Right-click Local Area Connection and then click Properties.
3.
Select Internet Protocol (TCP/IP) (under the General tab in Win XP) and click Properties.
4.
The Internet Protocol TCP/IP Properties
5.
screen opens (the General tab in Windows
XP).
-To have your computer accept a dynamic IP
address, click Obtain an IP address
automatically.
-If you want a static IP address, click Use the
following IP Address and fill in the IP
address (use one between192.168.1.3 and
192.168.1.254), Subnet mask
(255.255.255.0), and Default gateway
(192.168.1.1 or 192.168.1.2) fields.
Click Advanced.
6
Page 7

Prestige 623 Series Dual-link ADSL Router Quick Start Guide
6. Remove any previously installed gateways in
the IP Settings tab and click OK to go back to
the Internet Protocol TCP/IP Properties
screen.
Click Obtain DNS server address
7.
automatically if you do not know your DNS
server IP address(es).
If you know your DNS server IP address(es),
click Use the following DNS server
addresses, and type them in the Preferred
DNS server and Alternate DNS server fields.
If you have previously configured DNS
servers, click Advanced and then the DNS
tab to order them.
Click OK to close the Internet Protocol
8.
(TCP/IP) Properties window.
Click OK to close the Local Area Connection
9.
Properties window.
Refer to your User’s Guide for detailed IP address configuration for other Windows and Macintosh
computer operating systems.
Checking/Updating Your Computer’s IP Address
In the computer, click Start, (All) Programs, Accessories and then Command Prompt.
1.
In the Command Prompt window, type "ipconfig" and then press ENTER to verify that your
2.
computer’s static IP address is in the correct subnet (in the range between 192.168.1.3 and
192.168.1.254 if using the default Prestige LAN IP address). Alternatively, to have the Prestige assign
your computer a new IP address (from the IP pool), make sure your Prestige is turned on, type
"ipconfig /renew" and then press ENTER.
Testing the Connection to the Prestige
1. Click Start, (All) Programs, Accessories and then Command Prompt.
2. In the Command Prompt window, type "ping” followed by a space and the IP address of the Prestige
(192.168.1.1 is the default for the LAN port and 192.168.1.2 is the default for the USB port. You may
enter either one).
7
Page 8

Prestige 623 Series Dual-link ADSL Router Quick Start Guide
3. Press ENTER. You should see the reply messages displayed as shown. Your computer can now
communicate with the Prestige using the LAN or the USB port.
C:\>ping 192.168.1.1
Pinging 192.168.1.1 with 32 bytes of data:
Reply from 192.168.1.1: bytes=32 time=10ms TTL=254
Reply from 192.168.1.1: bytes=32 time<10ms TTL=254
Reply from 192.168.1.1: bytes=32 time<10ms TTL=254
Reply from 192.168.1.1: bytes=32 time<10ms TTL=254
Ping statistics for 192.168.1.1:
Packets: Sent = 4, Received = 4, Lost = 0 (0% loss),
Approximate round trip times in milli-seconds:
Minimum = 0ms, Maximum = 10ms, Average = 2ms
C:\>
Accessing the Prestige
Step 1. Launch your web browser. Enter either “192.168.1.1” or “192.168.1.2” as the web site address.
Web site address.
Step 2. An Enter Network Password window displays. Enter the user name (“admin” is the default),
password (“1234” is the default) and click OK.
Step 3. You should now see the System View screen as shown next. This is the first screen that displays
every time you access the web configurator.
8
Page 9

Prestige 623 Series Dual-link ADSL Router Quick Start Guide
Quick Configuration for Internet Access
Use the Quick Configuration screen to configure your system for Internet access.
In the System View screen, click Quick Configuration to display the screen as shown. Fill in the fields
with the information in the Required Information table.
9
Page 10

Prestige 623 Series Dual-link ADSL Router Quick Start Guide
Select an interface number from the ATM Interface
drop-down list menu.
From the Operation Mode drop-down list menu, select
Enabled to set the Prestige to act as an Internet
gateway for your LAN.
Select the encapsulation type your ISP uses from the
Encapsulation drop-down list menu.
Enter the correct Virtual Path Identifier (VPI) and Virtual
Channel Identifier (VCI) numbers supplied by your ISP
in the VPI and VCI fields.
Set the Bridge and IGMP fields depending on your ISP.
If given by your ISP, enter the IP address and the
subnet mask in the IP Address and Subnet Mask
fields.
From the Default Route drop-down list menu, select
Enabled to use the IP address specified above as the
default route. Otherwise select Disabled.
Enter the IP address of the default gateway (or your ISP
server) through which your Internet connection will be
routed in the Gateway IP Address field.
Enter the Internet account username and password
provided by your ISP in the Username and Password
fields. (This is not the same as the user name and
password you used to log in to web configurator.)
In the Use DNS field, select Enable if your ISP provides
you with DNS (Domain Name Service) information.
Otherwise, select Disable.
If you enable DNS, enter the IP address(es) of the DNS
server(s) provided by your ISP in the Primary DNS
Server and/or Secondary DNS Server fields.
Click Submit. Then click the Admin tab, Commit & Reboot and Commit to save your changes.
Test Your Internet Connection
Launch your web browser and navigate to www.zyxel.com. Internet access is just the beginning. Refer to
the User’s Guide for more detailed information on all Prestige features. If you cannot access the Internet,
open the web configurator again to confirm that the Internet settings you configured in the Quick
Configuration screen are correct.
10
Page 11

Prestige 623 Series Dual-link ADSL Router Quick Start Guide
Troubleshooting
PROBLEM CORRECTIVE ACTION
The PWR and/or SYS
LEDs are off.
Turn the Prestige off and on. If the error persists, you may have a hardware
The 10/100M LED is
off.
The DSL LED is off.
The USB LED is off.
I cannot access the
web configurator.
Make sure you type in the correct IP address. The default LAN IP address is
Verify that the IP address and the subnet mask of the Prestige and the computers
I cannot ping any
computer on the LAN.
I cannot get a WAN
IP address from the
ISP.
I cannot access the
Internet.
Make sure the Prestige is connected to the correct power adapter, the power
adapter is plugged into an adequate power supply and the Prestige power switch is
turned on.
problem. In this case, you should contact your vendor.
Check the cable connection to the Prestige LAN port. Make sure your computer’s
network card is working properly.
Make sure you are using the correct Ethernet cable type. Refer to the Hardware
Connection section.
Check the connection between the Prestige DSL port and the wall jack.
Check the USB connection to your computer.
The default user name is “admin” and the default password is “1234”. If you have
changed the password and have forgotten, you need to reset the Prestige. See
User’s Guide.
192.168.1.1 and the default for USB port is 192.168.1.2 (you may use either one).
If you changed the Prestige default LAN IP address then enter the new one as the
URL.
are on the same subnet.
If the 10/100M LED is off, check the cables between the Prestige and your
computer or hub.
Verify that the IP address and the subnet mask of the Prestige and the computers
are on the same subnet.
The WAN IP address is provided after the ISP verifies the MAC address, host name
or user ID.
Find out the verification method used by your ISP and configure the corresponding
fields.
Make sure the Prestige is turned on and connected to the network.
If the Prestige ’s DSL LED is off, check the cable between the Prestige and the
telephone wall jack.
Make sure you entered your user name correctly. A username may be casesensitive.
11
 Loading...