

Zte ZT303 User Manual

User’s Manual
ZT303
Thank you for purchasing ZTC touch display GSM/ GPRS mobile
phone. Please go through this manual carefully to make the best
use of your phone.
1

CONTENT
1 FOR YOUR SAFETY................................................1
2 GETTING STARTED................................................5
2.1 N
AMES OF PARTS AND INTRODUCTION
................. 5
2.1.1 Technical Parameters...............................5
2.1.2 Phone Layout.............................................6
2.1.3 Keypad Function........................................7
2.1.4 Side Key Function..................................... 8
2.1.5 Icons..........................................................10
2.2 B
ATTERY
............................................................ 11
2.2.1 Remove and Replace Battery ............... 11
2.2.2 Charge Battery......................................... 13
2.3 C
ONNECT NETWORK
.......................................... 15
2.3.1 SIM Card................................................... 15
2.3.2 Insert and Remove SIM Card................ 15
2.3.3 Insert and Remove Memory Card.........16
2.3.4 Turn Your Device On / Off ...................... 17
2.3.5 Phone Lock .............................................. 18
2.3.6 SIM Lock...................................................18
2.3.7 Connect Network.....................................19
3 QUICK START GUIDE........................................... 20
2

3.1 F
3.2 H
3.3 M
EATURES
OT KEY FUNCTION
AKE A CALL
........................................................... 20
..................................................... 25
........................................... 23
3.3.1 Make a National Call............................... 25
3.3.2 Dial Extension of the Fixed Number.....26
3.3.3 Make an International Call..................... 27
3.3.4 Dial Numbers in List..................................28
3.4 E
3.5 R
3.6 E
3.7 C
3.8 C
MERGENCY CALL
ECEIVE A CALL
ND A CALL
ALL HISTORY
ALL OPTION
................................................. 28
........................................................ 29
................................................... 29
..................................................... 29
............................................. 28
4 MENUS FUNCTION ............................................... 32
4.1 U
SING THE MENU
............................................... 32
4.1.1 Shortcut Menus.....................................32
4.1.2 Scroll, Search, and Select Funtion....... 39
4.1.3 Shortcut Selecting Function................... 39
4.1.4 Exit from Menus....................................... 40
4.2 M
4.3 M
ENUS FUNCTION STRUCTURE
ESSAGES
.......................................................... 45
.......................... 40
4.3.1 SMS...........................................................46
4.3.2 MMS .......................................................... 56
4.3.3 Voice Mail Server .................................... 66
3

4.3.4 Broadcast Message ............................. 66
4.4 S
ERVICES
............................................................ 67
4.4.1 STK* .......................................................... 67
4.4.2 WAP Browser...........................................68
4.4.3 Data Account............................................74
4.5 C
ALL HISTORY
................................................... 75
4.5.1 Missed Calls.............................................75
4.5.2 Dialed Calls .............................................. 76
4.5.3 Received Calls.........................................77
4.5.4 Delete Call Log ........................................ 77
4.5.5 Call Time................................................... 78
4.5.6 Call Cost ................................................... 78
4.5.7 SMS Counter ........................................... 79
4.5.8 GPRS Counter.........................................79
4.6 M
ULTIMEDIA
...................................................... 79
4.6.1 Camera ..................................................... 80
4.6.2 ImageViewer ............................................ 82
4.6.3 eBook ........................................................ 83
4.6.4 Photo Artist...............................................84
4.6.5 Video Recorder........................................ 86
4.6.6 Video Player.............................................89
4.6.7 Audio Player.............................................90
4.6.8 Recorder................................................... 92
4.6.9 Melody Compose .................................... 94
4

4.6.10 File Manager ............................................98
4.7 U
4.8 S
SER PROFILES
ETTINGS
.......................................................... 106
................................................ 103
4.8.1 Pen calibration....................................... 106
4.8.2 Phone Setup .......................................... 106
4.8.3 Display Characteristic........................... 110
4.8.4 Call Setup............................................... 112
4.8.5 Network Setup ....................................... 116
4.8.6 Security Setup ....................................... 118
4.8.7 Restore factory settings........................123
4.8.8 Sound Effect........................................... 123
4.9 F
UN & GAMES
.................................................. 123
4.9.1 Games..................................................... 123
4.9.2 Game Setting......................................... 126
4.9.3 Stopwatch...............................................127
4.9.4 Karaoke................................................... 127
4.9.5 Mobile QQ .............................................. 128
4.10 E
XTRA
.............................................................. 129
4.10.1 Calendar ................................................. 129
4.10.2 To do List ................................................ 132
4.10.3 Alarm ....................................................... 132
4.10.4 World Clock ............................................ 133
4.10.5 Calculator ............................................... 134
4.10.6 Incoming call show................................134
5

4.10.7 Unit Converter........................................134
4.10.8 Currency Converter............................... 135
4.10.9 Health ...................................................... 136
4.10.10 Shortcuts................................................. 137
5 INPUT SETTING...................................................137
5.1 B
5.2 K
5.3 I
RIEF
................................................................ 137
EYPAD
............................................................ 138
NPUT MODE
..................................................... 139
5.3.1 Pinyin Input............................................. 139
5.3.2 Intelligent Pinyin Input .......................... 142
5.3.3 Stroke Input............................................144
5.3.4 English Input .......................................... 148
5.3.5 Number Input ......................................... 151
5.3.6 Symbol Input .......................................... 153
5.3.7 Handwriting Input .................................. 153
6 FAQ & SOLUTION ............................................... 154
7 APPENDIX ⅠⅠⅠⅠ....................................................... 158
8 APPENDIX ⅡⅡⅡⅡ....................................................... 160
6

1 For Your Safety
Read these simple guide lines.
Not following them may be dangerous or illegal.
SWITCH ON SAFETY
Do not switch the device on when wireless phone use
is prohibited or when it may cause interference or
danger.
ROAD SAFETY COMES FIRST
Obey all local laws. Always keep your hands free to
operate the vehicle while driving. Your first
consideration while driving should be road safety.
INTERFERENCE
Do not switch the device on when wireless phone use
is prohibited or when it may cause interference or
danger.
SWITCH OFF IN HOSPITALS
Follow any restrictions. Switch the device off near
medical equipment.
SWITCH OFF IN AIRCRAFT
Follow any restrictions. Wireless devices can
1

cause interference in aircraft.
SWITCH OFF WHEN REFUELING
Don't use the device at a refueling point. Don't use near
fuel or chemicals.
SWITCH OFF NEAR BLASTING
Follow any restrictions. Don't use the device where
blasting is in progress.
QUALIFIED SERVICE
Only qualified personnel may install or repair this
product.
ENHANCEMENTS AND BATTERIES
Use only approved enhancements and batteries.
Do not connect incompatible products.
WATER-RESISTANCE
Your phone is not water-resistant. Keep it dry.
BACK-UP COPIES
Remember to make back-up copies or keep a
written record of all important information.
CONNECTING TO OTHER DEVICES
2

When connecting to any other device, read its user
guide for detailed safety instructions. Do not connect
incompatible products.
EMERGENCY CALLS
Ensure the device is switched on and in service.
Press the end key as many times as needed to clear
the display and return to the main screen. Enter the
emergency number, then press the calling key.
Give your location. Do not end the call until given
permission to do so.
About your device
The wireless devices described in this guide are
approved for use on the GSM 900 / DCS1800 networks.
Contact your service provider for more information
about networks.
When using the features in this device, obey all laws
and respect privacy and the legitimate rights of others.
Warning: To use any features in this device, other
than the alarm clock, the device must be switched on.
Do not switch the device on when wireless phone use
may cause interference or danger.
3

Network Services
To use the device you must have service from a
wireless service provider. Many of the features in this
device depend on features in the wireless network to
function. These Network Services may not be
available on all networks or you may have to make
specific arrangements with your service provider
before you can utilize them. Your service provider may
need to give you additional instructions for their use
and explain what charges will apply. Some networks
may have limitations that affect how you can use
Network Services. For instance, some networks may
not support all language-dependent characters and
services.
Your service provider may have requested that certain
features be disabled or not activated in your device. If
so, they will not appear on your device menu. Contact
your service provider for more information.
4

2 Getting Started
2.1 Names of Parts and Introduction
2.1.1 Technical Parameters
Phone
Item name ZT303
Demisnions About 47mm×97mm×13mm
Weight About 80g
Li-ion battery
Item name ZT303
Standard voltage 3.7V
Limited voltage 4.2V
Nominal Capacity 650mAh
Travel charger
Item name A01S050050C
Input 100~240Vac 50/60Hz
Output DC 5.0V, 500mA
Talk/ standby time about 120 minutes/100hours
(Note: Actual time of usage for the battery varies
according to the operation mode and the network base
station.)
5
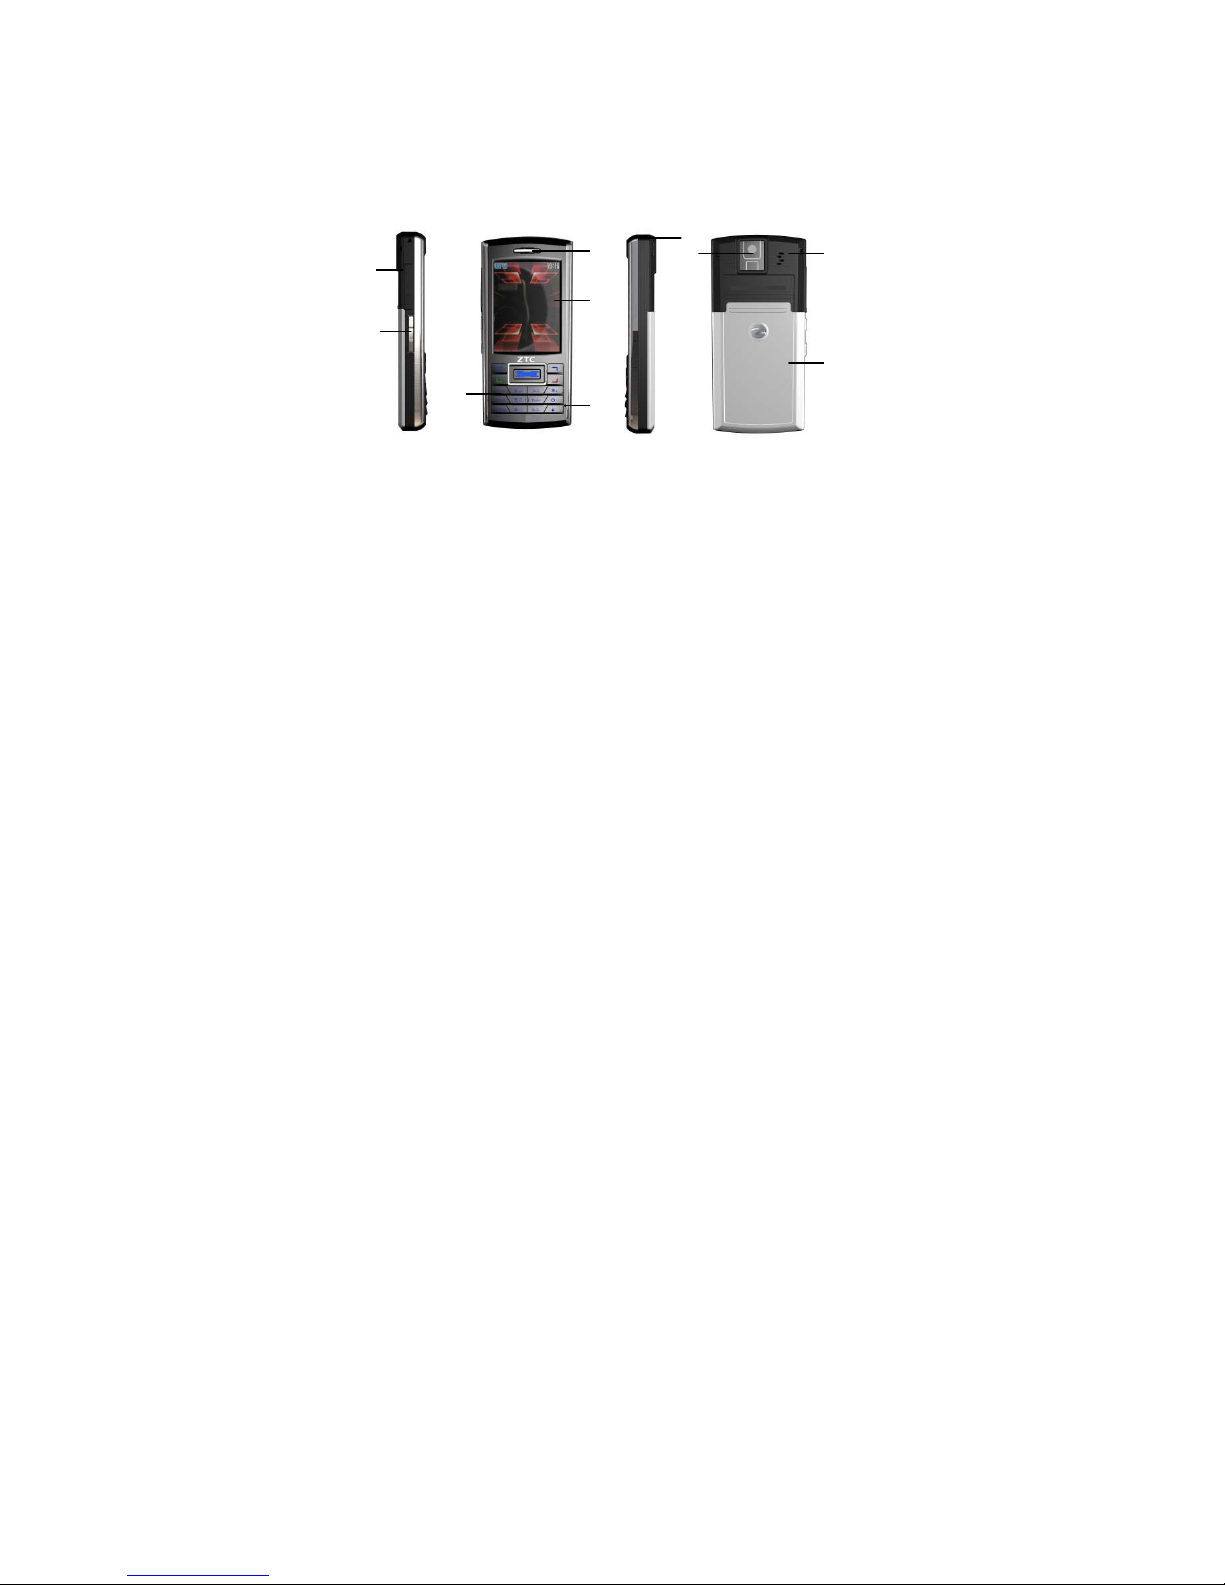
2.1.2 Phone Layout
1
2
4
5
6
7
9
1
0
3
8
1. Earphone/ charger/ datawire jack 2. Left Side Key
3. Earpiece 4. Touch display 5. Keypad
6. Microphone 7. Touch pen 8. Camera
9. Battery cover 10. Loud Speaker
6

2.1.3 Keypad Function
1. Left/ Right Key: Scroll the cursor left and right
in editing mode; in standby, press Left Key to
access messages Inbox, press Right Key to
access Tone Setup; in the camera capturing
mode, press Left/ Right Key to set EV data
amog -4——+4; in some submenu, press
Right key to open selected menu, press Left
Key to return to previous menu.
2. Up/ Down Key: scroll to browse name, phone
number, SMS, MMS etc. submenu or setting; in
editing mode, scroll the cursor up/ down; in
standby, press Up Key to access to Shortcuts,
and press Down Key to access to access
Writing Message; in the camera capturing
mode, press Up/ Down Key to adjust focus.
7

3. Left Selection Key: Carry out the operation at
the down left of display.
4. Calling Key: Dial a phone number and answer
a call; in standby, show all call lists.
5. Right Selection Key: carry out the function at
the down right of display.
6. End Key: End or reject a call; return to standby
mode; press and hold can turn the phone on/
off.
7. Number Keys: 0-9 Number Keys, enter
numbers and characters; select menus directly;
2-9 number keys, can set as speed dials
shortcut.
8. *Key: Have various functions in different
modes and menus.
9. #Key: Have various functions in different
modes and menus.
2.1.4 Side Key Function
Side Key has convenient functions.
8

1. Press Left Side Key to light the backlight
when it is off.
2. During a call, press Left Side Key to modulate
earpiece volume.
3. In standby, press Left Side Key to modulate
key tone.
4. When alarm is alerting, press Up Left Side Key
to “Stop” alarm and press Down Left Side Key
to select “Snooze” to intermit alarm
temporarily.
5. Press Left Side Key can also shift picture
backgroud frame after picture is taken by
camera (only for 176×220 picture).
6. In Audio Player mode, press Left Side Key to
modulate volume. When audio is playing in
standby as background playing mode, press
9
Left Side Key to modulate music volume while
press and hold Left Side Key can shift songs.
In Video Player, press Left Side Key can
modulate movie volume.
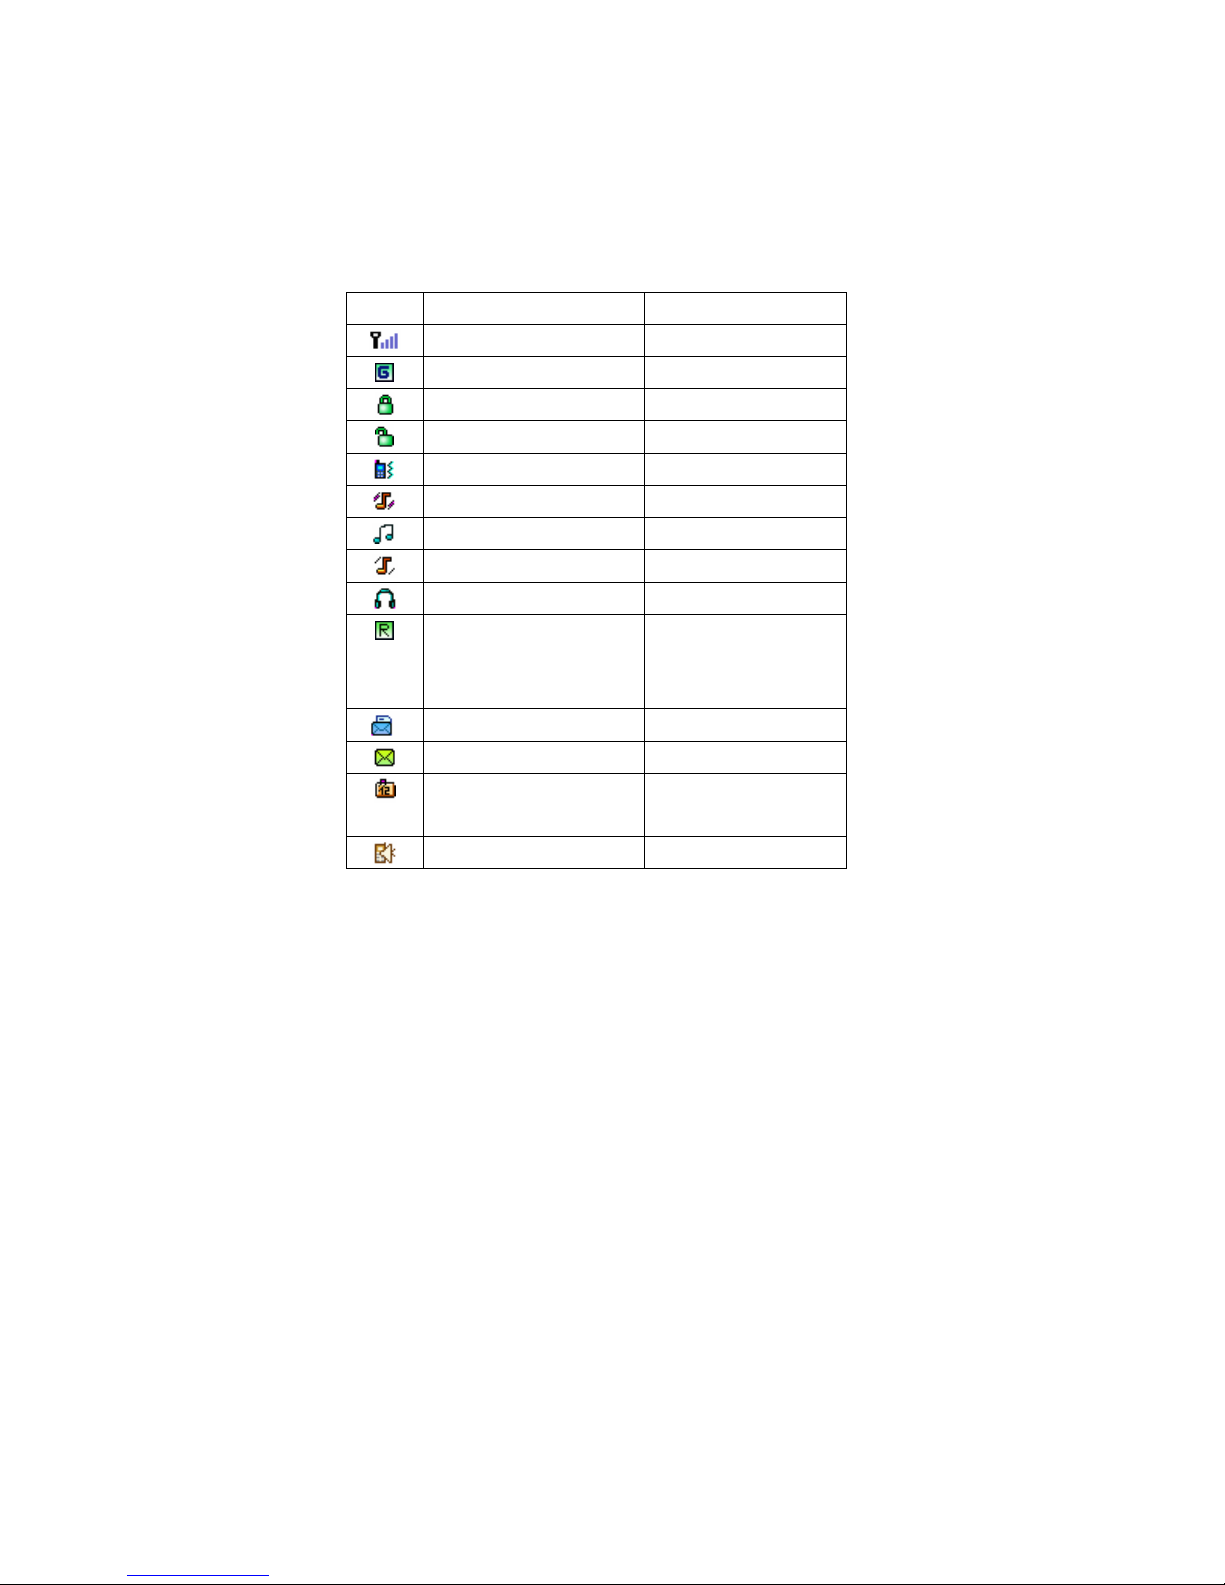
2.1.5 Icons
Icon Direction Show Position
Strength of signal Icon area
GPRS is connected Icon area
Keypad is locked Icon area
Keypad is unlocked Icon area
Vibration Only Icon area
Vibra amd Ring Icon area
Ring Icon area
Vibra Then Ring Icon area
Earphone is inserted Icon area
You are roaming
Icon area
outside your home
network.
You have new MMS Icon area
You have new SMS Icon area
You have new voice
Icon area
messages.
Call record Icon area
10

You have new WAP
Icon area
service messages.
Alarm clock is active Icon area
Divert All Voice Calls
Icon area
is active
Battery indication Icon area
You have missed call Icon area
2.2 Battery
The handset is powered by a rechargeable battery.
A new battery must be fully charged before the first
time use. A new battery will reach its nominal capacity
after fully charged and discharged for about three
times.
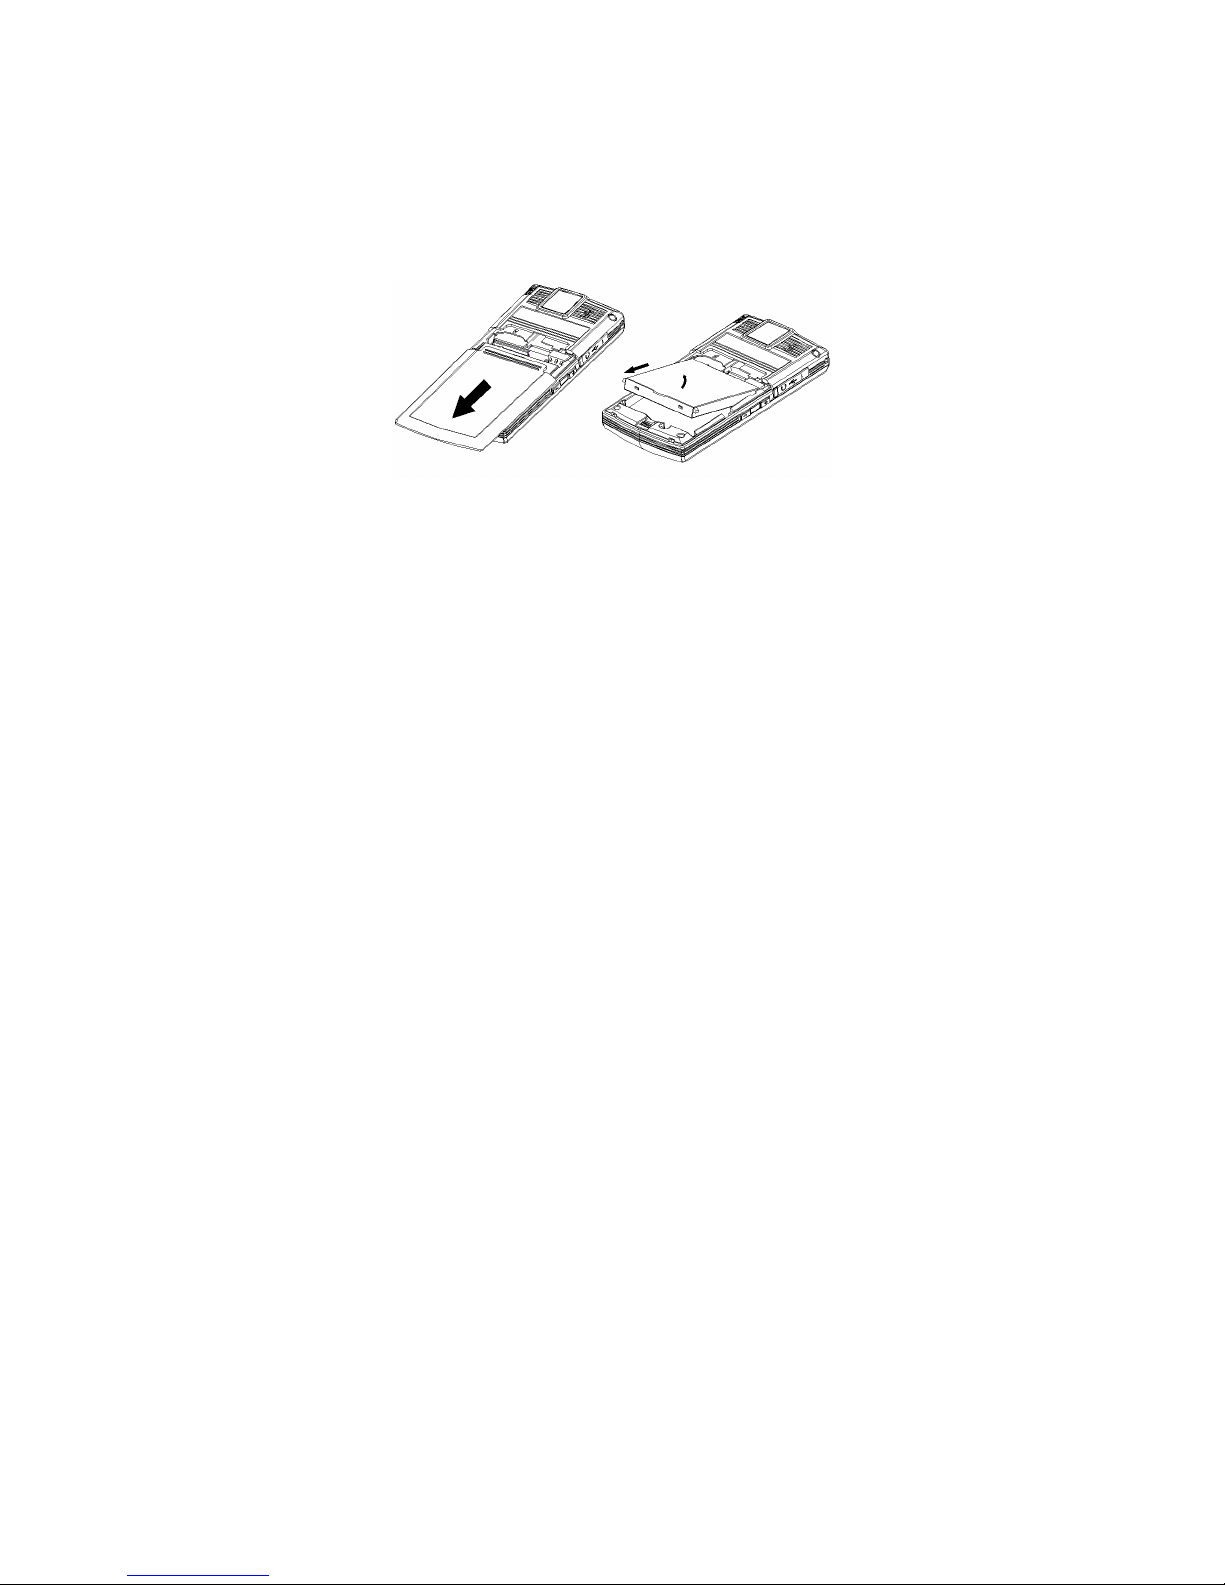
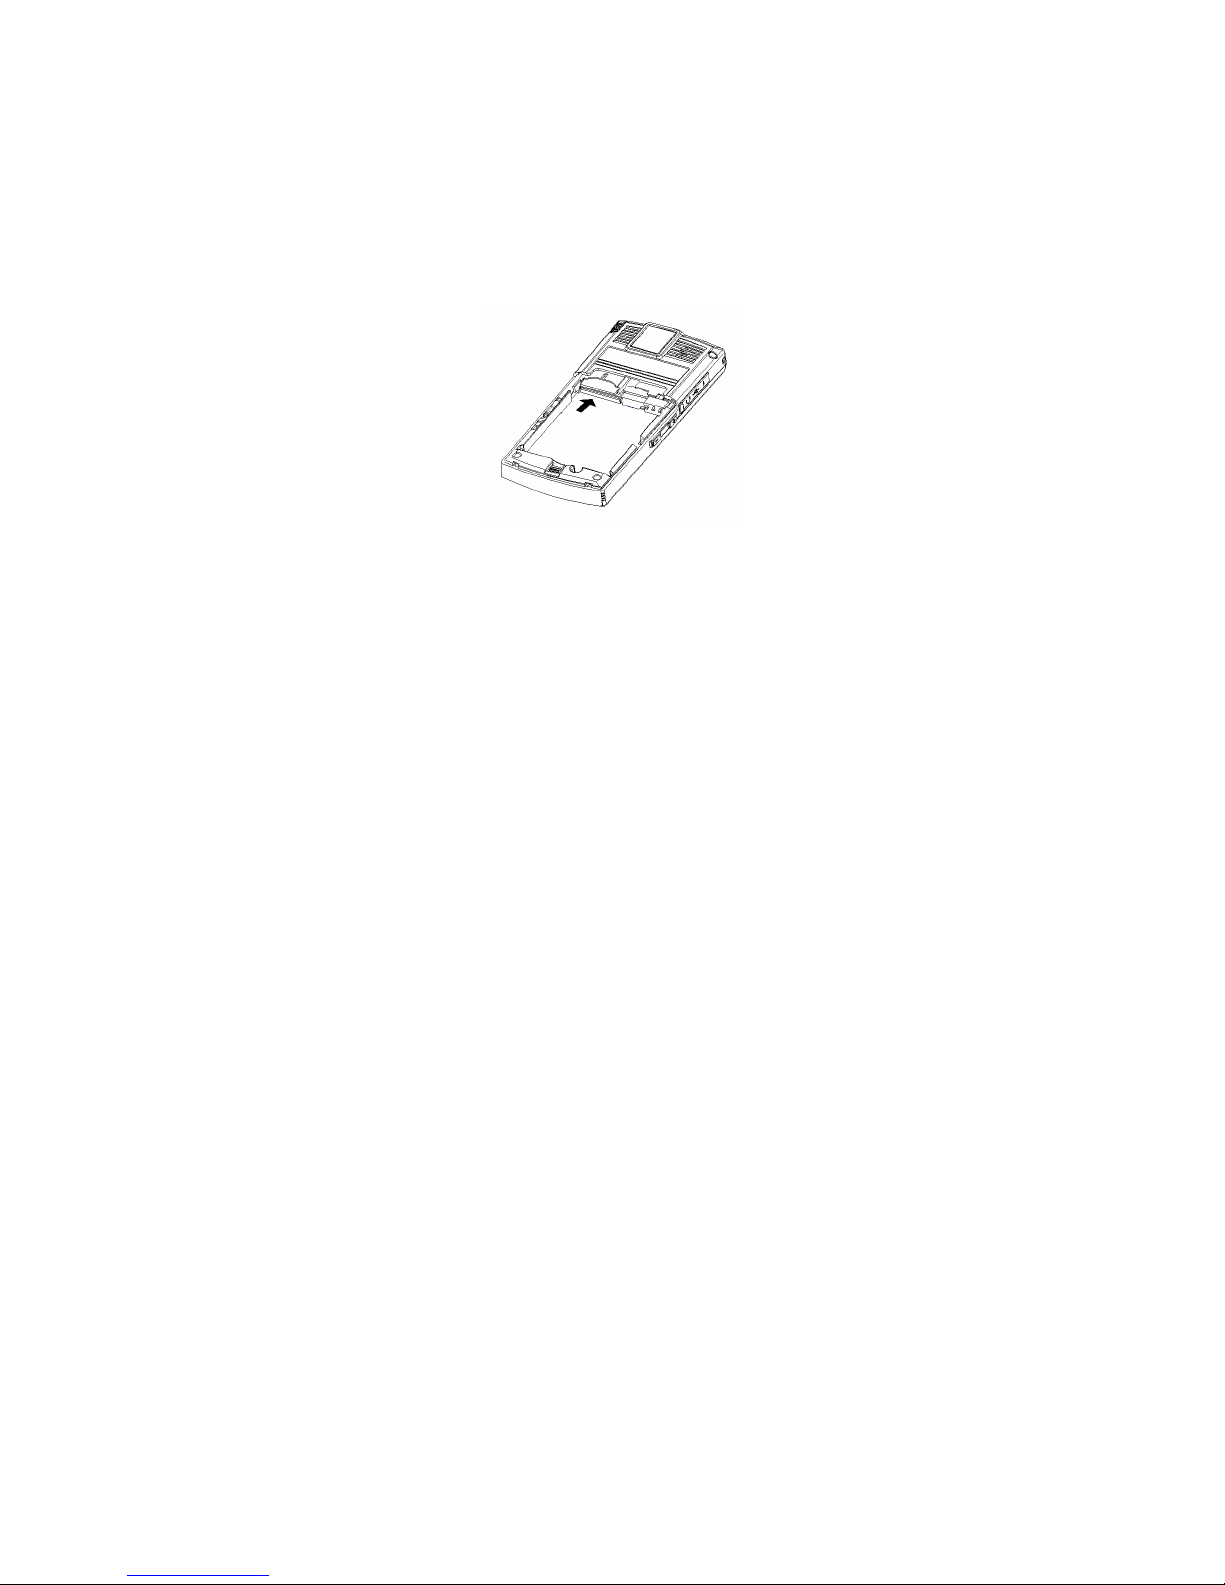
2.2.1 Remove and Replace Battery
Remove steps:
① With the back of the device facing you, slide the
battery cover toward the bottom of the device and
remove.
① After you have removed the back cover, slide the
battery, insert your finger into the finger grip and lift the
battery from its compartment.
11
Warning: Before removing the cover, always switch off
the power and disconnect the charger and any
other device. Avoid touching electronic
components while changing the covers.
Replace step:
① Insert the gold-colored contact end of the battery,
into the battery slot. Push down on the other end
of the battery to snap the battery into place.
① Slide the back cover towards the top of the
device until the back cover is securely in place.
12
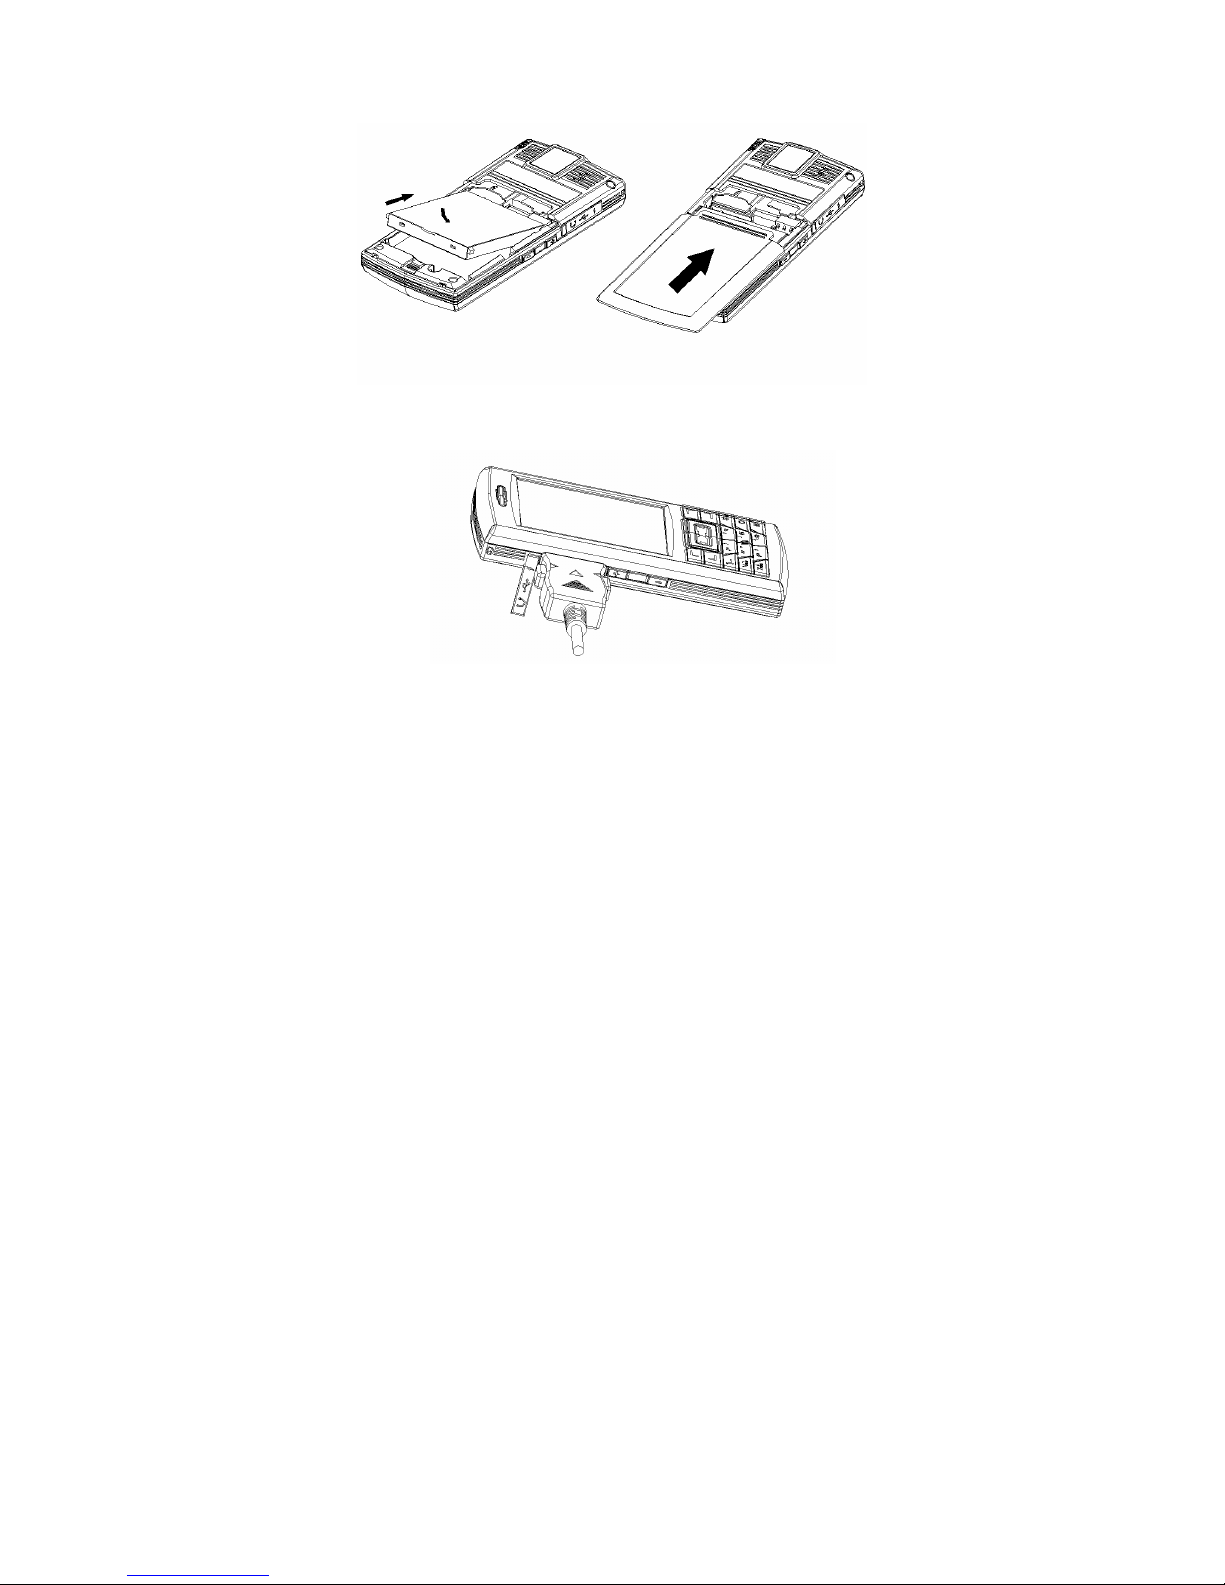
2.2.2 Charge Battery
Insert charger plug into phone charger jack.
Plug in charger.
After a few seconds, in power on mode, the
battery indicator in icon area starts to scroll from
bottom to top; in power off mode, the battery
indicator will also appear on display to show in
13

charging.
In power on mode, when the battery indicator
stops flash, the batter is completely charged.
Ordinarily, the battery needs to charge 1-2.5 hours
(12-14 hours in the first three times to reach its
nominal capacity).
Disconnect the charge after charging.
Note: Always use the original batteried and the battery
charger will maximize your battery’s performance.
New batteries or batteries that have been stored
for a long time may require a longer charge time.
Maintain the battery at or near room temperature
when charging.
Do not expose batteries to temperatures below
-10① (14①) or above 45①(113①) .
When you do not intend to use a battery for a while,
store it uncharged in a cool, dark & dry place.
Never dispose of batteries in a fire because they
may be exploded.
Always switch off the power and disconnect the
charger and any other device before removing the
covers. Avoid touching electronic components
while changing the covers.
Batteries gradually wear down and require longer
14

charging times,this is normal.If you charge your
battery regularly and notice a decrease in talk time
or an increase in charging time, then it is the time
to purchase a new battery.
2.3 Connect Network
2.3.1 SIM Card
Before use your mobile you must insert valid SIM
(subscriber identity module) card which is offered by
network operator.
With the SIM card, storing many parameters
required for communications, you can use the various
functions of the device, and save personal information,
including PIN (Personal Identification Number),
phonebook, short message and other extra system
services.
Warning: The phone must power off before remove
SIM card. Please don’t touch the metal
interface of card, and place the card far from
electricity and magnetism.
2.3.2 Insert and Remove SIM Card
The metal interface contact of SIM card is easily
15
damaged. Remove it carefully before replacing.
Switch off the phone; remove power supplier and
battery.
Insert SIM card into card slot.
When you need remove the SIM card, please
switch off the phone and remove power supplier
firstly.
2.3.3 Insert and Remove Memory Card
Power off the phone; remove power supplier and
battery.
Insert memory card inter memory card slot and
push it until it completely fixes in slot.
When you need remove the memory card, please
switch off the phone and remove power supplier
firstly.
16

2.3.4 Turn Your Device On / Off
Press and hold End Key to turn you device On/
Off.
If you turn on the phone without inserting SIM card,
the phone will indicate “Insert SIM Card”. After insert
SIM card, the phone will check automatically
whether the card can use or not.
Then the display will show following indication one
by one:
Enter Password —— If you have set Phone Lock.
Enter PIN —— If you have set SIM Lock.
Greeting Text —— If you have set Greeting
Text and actived it.
Searching —— The phone will search the
network connection.
17

2.3.5 Phone Lock
In order to protect your phone from illegal using,
your phone can set Phone Lock. When the function is
active, you must enter password to unlock phone.
Subscriber can clear the lock, in that case, you can’t
protect your phone.
Press and hold Calling Key to turn on your phone.
Enter phone lock password, press Right
Selection Key or click “Clear” to delete wrong
input; press Left Right Key or click “OK” to enter.
Note: If you forget your password, you can contact
with the retailer or local sales service center to clear up
your phone lock. The original password of phone lock
is 0000.
2.3.6 SIM Lock
In order to protect your phone from illegal using,
your SIM card apply PIN (
Number
)to lock card. When the function is active, you
Personal Identification
must enter PIN to unlock SIM card. Subscriber can
clear the lock, in that case, you can’t protect your
phone.
Press and hold Calling Key to turn on your phone.
Enter PIN, press Right Selection Key or click
“Clear” to delete wrong input; press Left
Selection Key or click “OK” to enter.
If there are continual wrong enter for three times,
18

your SIM card will be locked by network, and the
phone will inqury PUK.
Note: Your network operators will set a standard
PIN (4-8 numbers) for you, you should
change it immediately.
2.3.7 Connect Network
After SIM is unlocked, the phone will search
available network automatically. When connecting,
name of network operator will appear on display.
ZT303 supports GPRS (General Packet Radio
Service), if your network operator open GPRS service
for you and your phone locates in cover area of GPRS
network, you can surf WAP by GPRS network.
Note: If display indicates “Emergency”, means that
you have located outside the cover area of network,
but you can make emergency call according to
signal strength.
19

3 Quick Start Guide
3.1 Features
As a multimedia mobile phone, besides basic
function, ZT303 supports rich, practical and convenient
multimedia functions as follows:
Phone Book: Can search phone number
quickly; Every entry can store 4
corresponding numbers; the phone have a
storage of 500 entries, and phone number
storage of SIM card depends on card capacity;
Supports sending short message, copying
number entry to SIM or phone, and IP calls.
Supports business card style phone book and
customized caller ringtone/ video/ picture.
Call History: Your phone will save call history
automatically; supports calling the numbers in
call history list; Supports saving the numbers
to phone book; supports deleting content of
call history; supports saving and checking
GPRS data counter.
SMS: Supports saving SMS to phone and can
save 200 pieces; Support EMS and inserting
template in short massage; Supports
checking SIM and phone memory status;
20

Supports picking up numbers from current
message and saving them.
MMS: Supports MMS; can receive and send
text, picture and sound, etc. multimedia
format message.
Audio Player: Your phone supports MP3
music file and *.wav,*.amr,*.mid,*.imy etc.
format file.
Sound Recorder: Your phone supports call
recorder and other recorder. During a call, you
can press Left Selection Key to access
“Option” and select Sound Recorder
function. The recorded file will be saved in
Audio submenu as .amr or .wav format. In
other mode, you can access Multimedia to
select Sound Recorder. The recorded file
can send to User Profiles as incoming call
ringtone or send to your friends and family as
MMS.
Karaoke: The device can play the songs that
edited by karaoke software synchronously
with lyrics.
eBook: The wireless device supports TXT
format file.
Memory Card: ZT303 supports mobile
storage (this U disc). In Power Off mode,
connecting mobile phone with PC, the device
will be a U Disc and support data
transmission and storge. Connecting USB
wire with PC in Power On mode, selecting
21

“Storage Device”, the device will power off
automatically and can be used as USB;
selecting “Back”, the device will keep on
power on and be charged.
Camera: Your handset supports camera, you
can customize the camera according to your
needs, e.g., File Size Limit, EV, Effect Setting
etc.; support taking photos continually and
Night Mode functions etc.
Video Recorder: Your mobile supports video
and audio record synchronously.
Webcam: Connect mobile camera with
Internet of PC to realize video charting.( as for
detailed introduction, please refer to
“Appendix II”)
Extra: Your wireless device supports ternary
Alarm, Calculator, To Do List reminder
function etc.
Setting: Customize your mobile phone
according to different matters and
environment, including Phone Setting, Phone
Setup, Network Setup , and Security Setup
etc. under each submenu, it provides various
flexible functions for your customized option,
such as customize Time and Date,
22

Scheduled Power On / Off, Speed Dial, Call
Barring, Call Waiting etc.
Network Service: Your device supports WAP
service. Using WAP browser and roaming on
wireless network to gain more information.
Fun & Games: your wireless device provides
interesting games; you can enjoy yourself in
spare time.
Input Method: you handset support multi
input modes, it is convenient for you to input
English Letter, Numbers, Chinese Characters,
and Symbols etc.
Display: you can set customized standby
wallpaper.
3.2 Hot Key Function
Function Hot Key State
Power On End key (press
and hold)
Power OFF End key (press
and hold)
Access Main
Menu
Left Selection
Key
Show Phone Right Selection Standby Mode
Power Off
Power On
Standby Mode
23

Book List Key
Receive
Access
Up Key Standby Mode
Shortcuts
Access Write
Down Key Standby Mode
Message
Access
Left Key Standby Mode
Message
Access Tone
Right Key Standby Mode
Setup
Show Call Logs Calling Key Standby Mode
Volume Control Left Side Key Volume
modulating
mode
Convert Photos
Background
Frame
Left Side Key Camera
capaturing mode
and the picture
size set as
176×220
Input phone
Number Keys Standby Mode
number
End Call End Key During a call
Note: The Up/Down/ Left/ Right Keys function
default as factory setting, you can change it.
24
 Loading...