

Page 1

X160 CDMA 20001X
Digital Mobile Phone
User Manual
Page 2
Document History and Update Records
Versi
Date Written by Typesetted by Checked by
V1.0 05.12 Han Ke Zhang Xiang chuan
V1.1 06.6 Han Ke Zhang Xiangchuan
Remarks
First version
Added Russian
Tetris, changed
“ Phone records ”
to “Contacts”, etc
Page 3

X160
CDMA 2000 1X Digital Mobile Phone
User Manual
1
Page 4

Copyright © 2006 by ZTE Corporation
All rights reserved.
No part of this publication may be excerpted, reproduced, translated or utilized in any form
or by any means, electronic or mechanical, including photocopying and microfilm, without
the prior written permission of ZTE Corporation.
ZTE Corporation reserves the right to make modifications on print errors or update specifications
in this manual without prior notice.
Version 1 on Jan. 1, 2006
2
Page 5

Table of Contents
1 Before Use..........................................................................................9
1.1 Introduction ............................................................................................................... 9
1.2 Safety Instructions................................................................................................... 10
1.3 Safety Warnings and Precautions............................................................................ 10
1.4 Parts Definition........................................................................................................ 16
1.4.1 Keys and Appearance .................................................................................... 16
1.4.2 Key Definition ................................................................................................. 17
1.5 Battery.....................................................................................................................18
1.5.1 Installing Battery............................................................................................. 18
1.5.2 Removing the Battery..................................................................................... 19
1.5.3 Charging the Battery....................................................................................... 20
1.6 Insert and Remove R-UIM Card .............................................................................. 22
1.7 Power On / Off.......................................................................................................... 23
1.8 Interface Introduction............................................................................................... 24
2 Making and Receiving Calls ..................................................................26
2.1 Making Calls............................................................................................................ 26
3
Page 6

2.2 Receive a Call ......................................................................................................... 27
2.3 Hang up a Call......................................................................................................... 27
2.4 Menu during Conversation ...................................................................................... 27
2.5 Dial Extension Numbers.......................................................................................... 28
3 Contacts...........................................................................................29
3.1 Add a Contact.......................................................................................................... 30
3.2 Search for a Contact................................................................................................ 31
3.3 View a Contact ........................................................................................................ 33
3.4 Modify a Contact ..................................................................................................... 33
3.5 Erase a Contact....................................................................................................... 33
3.6 Move the Record between the Phone and R - UIM Card.............................................. 34
3.7 Speed Dial Number ................................................................................................. 34
3.7.1 Add a Speed Dial Number .............................................................................. 34
3.7.2 Dial a Speed Dial Number .............................................................................. 34
3.8 Check Memory Status ............................................................................................. 35
3.9 Erase All Contacts ................................................................................................... 35
4 Short Messages .................................................................................. 36
4.1 Edit Short Messages ............................................................................................... 36
4
Page 7

4.2 Inbox .......................................................................................................................37
4.2.1 View Messages .............................................................................................. 37
4.2.2 Save Phone Number from Message............................................................... 38
4.2.3 Receive New Message................................................................................... 38
4.2.4 Full Inbox........................................................................................................ 38
4.3 Outbox..................................................................................................................... 39
4.4 Delete Messages..................................................................................................... 39
4.5 Send to Multi-receivers............................................................................................ 40
4.6 Preset Messages..................................................................................................... 40
4.7 Voice Mail................................................................................................................ 41
4.8 Short Message Settings .......................................................................................... 41
5 Recent Calls ...................................................................................... 43
5.1 Recent Call Icons .................................................................................................... 43
5.2 View Recent Calls ................................................................................................... 43
5.3 Delete an Entry........................................................................................................ 44
5.4 Delete All................................................................................................................. 45
5.5 Send Message from Recent Calls ........................................................................... 45
5.6 Edit Phone Number of Recent Calls ........................................................................ 45
5.7 Dial from Recent Calls............................................................................................. 45
5
Page 8

6 Settings............................................................................................ 46
6.1 Auto Key Guard ....................................................................................................... 46
6.2 Supplementary Services.......................................................................................... 46
6.2.1 Call Waiting.................................................................................................... 46
6.2.2 Call Forward................................................................................................... 47
6.3 Sound...................................................................................................................... 48
6.4 Display .................................................................................................................... 48
6.5 Alert......................................................................................................................... 50
6.6 Call Timers .............................................................................................................. 50
6.7 Security ................................................................................................................... 51
6.8 Accessories............................................................................................................. 52
7 Extra ...............................................................................................53
7.1 Games..................................................................................................................... 53
7.1.1 BlackJack ....................................................................................................... 53
7.1.2 Video Poker.................................................................................................... 53
7.1.3 Teris................................................................................................................ 54
7.2 Stopwatch................................................................................................................ 54
7.3 Alarm.......................................................................................................................55
7.3.1 Alarm Setting .................................................................................................. 55
6
Page 9

7.3.2 Turn off the Alarm........................................................................................... 55
7.4 Scheduler ................................................................................................................ 56
7.4.1 Add New Scheduler ........................................................................................ 56
7.4.2 View the Scheduler......................................................................................... 56
7.4.3 Modify the Scheduler...................................................................................... 57
7.4.4 Delete the Scheduler...................................................................................... 58
7.4.5 Set Options..................................................................................................... 58
7.5 Calculator................................................................................................................ 59
8 Appendix .........................................................................................60
8.1 Shortcut................................................................................................................... 60
8.1.1 Speed Dial...................................................................................................... 60
8.1.2 Quick View the Contacts................................................................................. 61
8.1.3 Quick Entry into Extra..................................................................................... 61
8.1.4 Quick Entry into Messages............................................................................. 61
8.1.5 Quick Set Mute Mode..................................................................................... 61
8.1.6 Quick Set Alert Type....................................................................................... 61
8.1.7 Quick View All Recent Calls............................................................................ 61
8.1.8 Quick Lock the Keys....................................................................................... 62
8.1.9 Quick Return to Idle Mode.............................................................................. 62
7
Page 10

8.1.10 Delete the Current Input ............................................................................... 62
8.1.11 Quick Switch Input Methods ......................................................................... 62
8.1.12 Quick Input Symbols..................................................................................... 63
8.2 Input Characters...................................................................................................... 63
8.3 Failure Analysis....................................................................................................... 65
8
Page 11
Before Use 1
1 Before Use
1.1 Introduction
Thank you for choosing
To guarantee your mobile phone always in its best condition, please read this manual
carefully and keep it for future use.
ZTE declares that this product is in compliance with the essential requirements and other
relevant provisions of Directive1999/5/EC.
The pictures in this user manual are only used to demonstrate the mobile phone’s functions,
so they are maybe different from what you see on your mobile phone. Please refer to your
mobile phone if there are any differences.
X160 CDMA 2000 1X
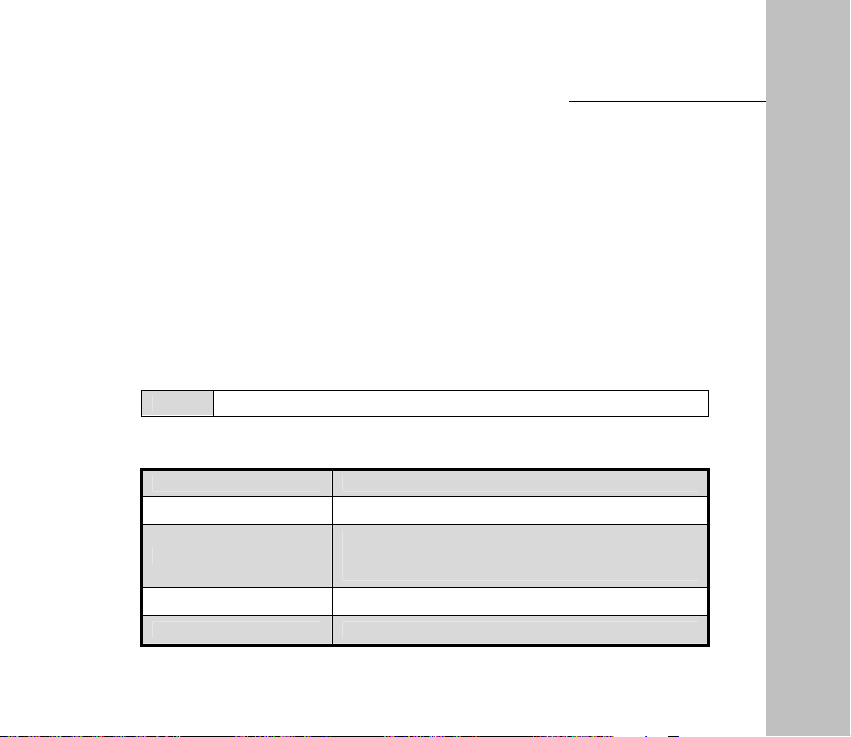
Note Digital Mobile Phone will be shortly referred to as mobile phone.
Your mobile phone offers the following functions:
Normal Call Makes common calls based on CDMA network.
Short Message Sends, receives and composes short messages.
Stores 200 entries in different groups, and each contains
Grouping Phone Book
3 phone numbers, 1 email addr, 1 street addr. and 1 web
page.
Personal Schedule Convenient and routine schedule management.
Game Different games bring you much fun and relaxation.
mobile phone of ZTE Corporation.
9
Page 12

1.2 Safety Instructions
If your mobile phone is lost or stolen, notify your network service provider immediately to
prevent others from abusing it. Meanwhile you need to provide the service provider with
your phone’s ESN, which can be found on the back of the mobile phone after the battery is
removed. Keep the ESN properly for future use.
To protect your mobile phone against abuse, take the following precautions:
–
Set a PIN code ( if your mobile phone supports R-UIM card ) and modify it at intervals.
–
Take it with you as you can.
1.3 Safety Warnings and Precautions
Precautions for using the phone
z Do not use your mobile phone near TV set, radio or office automated equipments to
avoid mutual influence.
z Use your mobile between temperature -30° C - 55° C.
z Power off your mobile phone as required such as on airplane or in hospital. As mobile
phones may affect the normal operation of electronic devices or medical apparatus,
10
Page 13

Before Use 1
you are required to follow the mobile phone usage regulations in the above cases.
z Do not use your mobile phone in the place where there is weak signal or near the
high-precision electronic devices. Radio wave interference may cause misoperation
or other problems to electronic devices, especially medical devices such as audiphone
and pacemaker, fire detector and auto-control equipments such as auto-door. For details
on the influence that your mobile phone would probably have upon pacemaker or other
medical devices, consult the manufacturer or the local distributor.
z Do not use your mobile phone in gas station. Power off your mobile phone near fuels
or chemicals.
z Occasionally, using phone in the vehicles of certain models might bring negative
effect to the internal electronic devices. In this case, do not use your mobile phone to
ensure safety.
z Keep your mobile phone away from magnetic objects such as magcards because
radio wave of your mobile phone may clear out the information stored in floppy disks,
deposit cards or credit cards.
z Protect your mobile phone against dampness. Water or other kinds of liquid entered
your mobile phone might cause overheating, creepage or failure.
z Do not disassemble or reassemble your mobile phone because this might cause
damage, creepage or circuit failure.
z Do not use your mobile phone if your antenna is damaged, otherwise it may cause
body injury.
11
Page 14

1 Before Use
z Keep traffic security in mind and follow the local corresponding rules and regulations.
z Place the phone out of the reach of small children. The phone may cause body injury
if used as a toy.
z Do not press keys with needles, pen points or other sharp objects to avoid damage or
misoperation.
z Keep tiny metal objects such as thumb pins away from the phone. The phone speaker
is magnetic and thus magnetizes those metal objects, which may hurt people or
damage the phone.
z Use the original accessories or those authenticated by ZTE. Using any unauthenticated
accessories may affect your mobile phone’s performance, hurt your phone or even
cause danger to your body and violate related national regulations about telecom
terminals.
Precautions for using the battery
z The battery life is limited, and becomes shorter and shorter if the battery is charged
frequently. If the battery fails to be charged several times, it shows the battery is worn
out and needs to be replaced.
z Do not throw the battery into household garbage but dispose it as required in specified
place.
12
Page 15

Before Use 1
z Do not throw the battery into fire, otherwise it might cause fire or explosion.
z Do not press the battery with great force, otherwise it may cause battery leakage,
overheating, explosion or fire.
z Do not disassemble or reassemble the battery, otherwise it may cause battery leakage,
overheating, explosion or fire.
z Replace the battery that gets heated, changed in color or deformed during use,
charging or storage.
z Prevent the battery against dampness, otherwise it might cause overheating, smoldering
or erosion.
z Do not expose the battery in direct sunshine, around a car or near any place where
there is high temperature, but place it in ventilated and cool places. Otherwise it might
cause leakage or overheating. This might affect the battery’s performance and shorten
its life.
z Do not keep charging the battery continuously for more than 24 hours.
Precautions for using the charger
z Use the power voltage between 100VAC and 240VAC. Using the voltage beyond the
range may cause leakage, fire or damage to the phone and charger.
z Do not short-circuit the charger, otherwise it might cause electric shock, smoldering or
13
Page 16

1 Before Use
damage.
z Do not charge in the places where there is direct sunshine, dampness, dust or
vibration, or near electric apparatus such as TV set, radio.
z Do not use the charger with damaged power cables, otherwise it might cause fire or
electric shock.
z Do not place water containers near the charger to avoid water splashing. If water or
any other kind of liquid splashes on the charger, immediately remove the charger
from the power socket to avoid overheating, fire, leaking, electric shock or failure.
z Do not disassemble or reassemble the charger, otherwise it might cause body injury,
electric shock, fire or damage.
z Do not touch any charger, power cable or power socket with wet hands to avoid
electric shock.
z Do not place heavy objects onto power cables or refit power cable; otherwise it might
cause electric shock or fire.
z Remove power plug from the socket before cleaning and maintenance.
z Clean the accumulated dusts from the power socket in time.
z Hold the charger rather than pull the power cable while removing the plug from the
socket; otherwise it might cause damage, electric shock or fire.
14
Page 17

Before Use 1
Cleaning and maintenance
z Clean the phone, battery and charger with a soft dry cloth.
z Do not clean the phone with the liquor such as alcohol, dilution agent or benzene.
z Clean the socket at intervals because a dusty socket might cause disconnection,
power failure, or even charging failure.
15
Page 18
1 Before Use
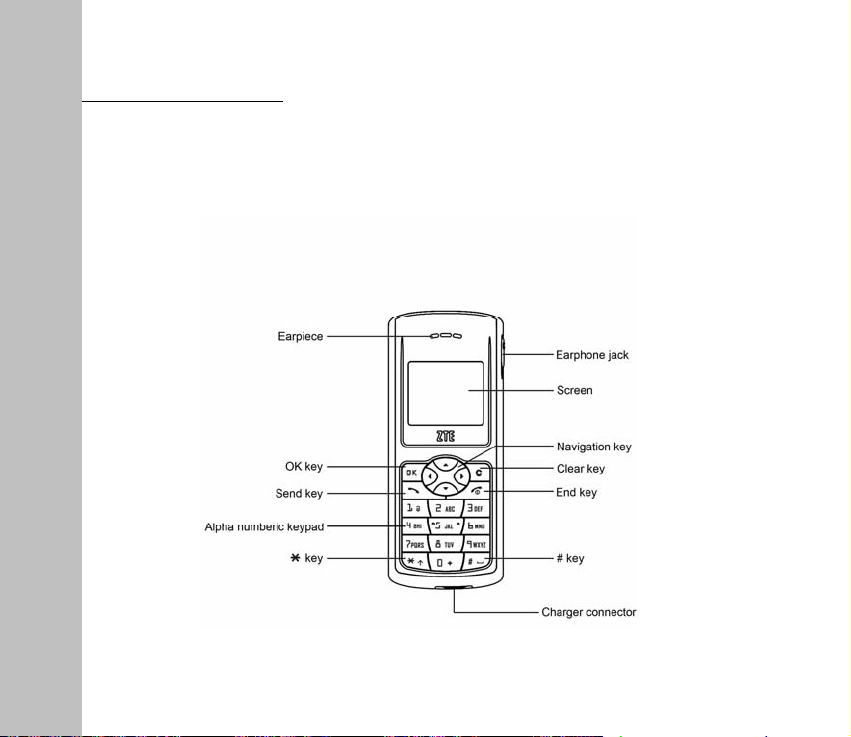
1.4 Parts Definition
1.4.1 Keys and Appearance
16
Page 19
Before Use 1
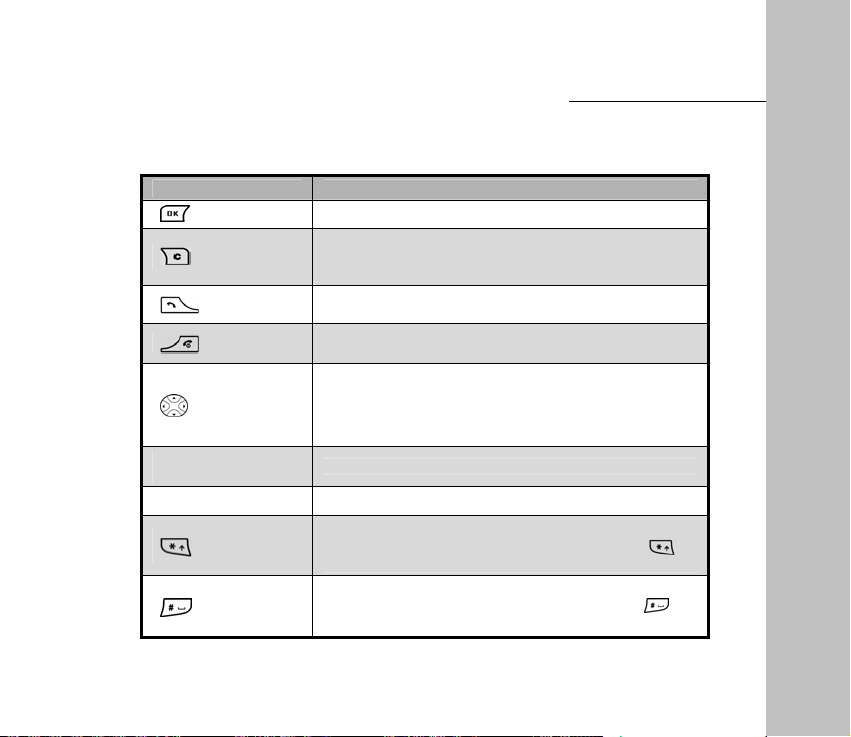
1.4.2 Key Definition
Names Descriptions
OK key
Clear key
Navigation key
0~9 Alphanumeric
keypad
" 1 " key Inputting some common symbols in abc / ABC mode.
* key
# key
Send key
End key
Entering the menu or selecting from the menu.
Under the status of text editing, clearing all the existing text
by pressing and holding it, or clearing the letter before
cursor. Under other status, returning to the previous menu.
Sending or receiving a call. In idle mode, acting as the
shortcut for call history ( all call records ).
Hanging up the phone during a conversation; returning to
idle mode; Powering on / off by pressing it and holding it.
Scrolling the menu, or moving the cursor as inputting the text.
Adjust the volume.
In idle mode, the up key is shortcut for Mute; the down key
is shortcut for SMS; the left key is shortcut for Extra and
the right key is shortcut for contacts ( all contacts ).
Inputting numbers, letters and symbols.
Entering the list of symbols in any kind of input method.
When only the numbers are allowed to input, press to
Input " * " In idle mode, press and hold * key to set alert type.
Switching the input methods as inputting the text.
When only the numbers are allowed to input, press
input " # " Locking the keyboard by pressing it and holding it.
to
17
Page 20
1 Before Use
1.5 Battery
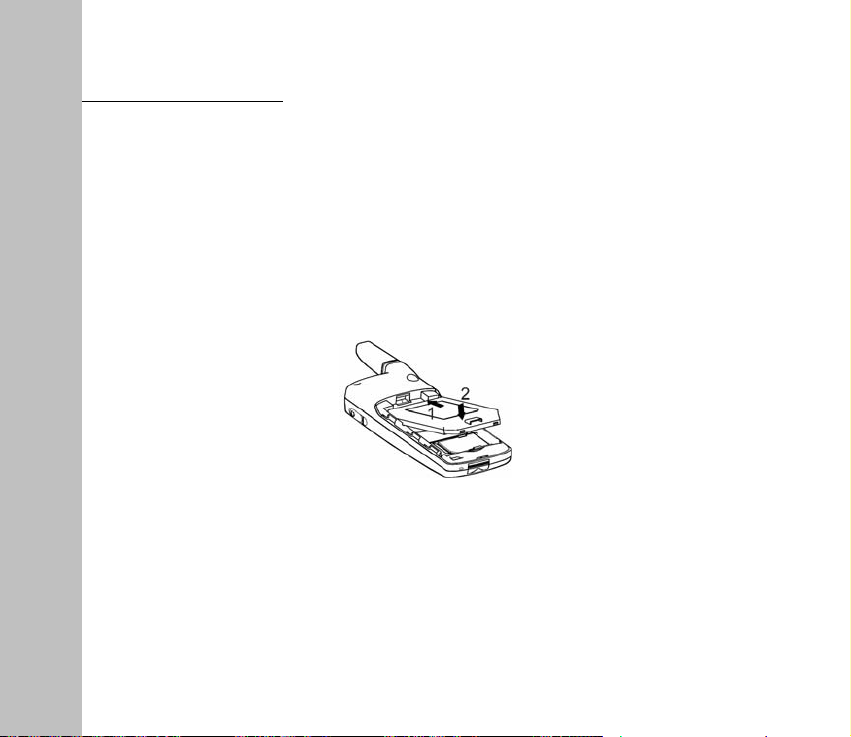
1.5.1 Installing Battery
1. Press the spring button downwards, and then push down the back cover of the battery.
When the button is unlocked and the cover can not be pushed down, take out the back cover.
2. Insert the battery into the slot and insert the top firstly.
3. Put the back cover of the battery on the phone and make sure the clasp is in the slot.
Push the back cover in the direction indicated by the arrow until it is locked.
18
Page 21
Before Use 1
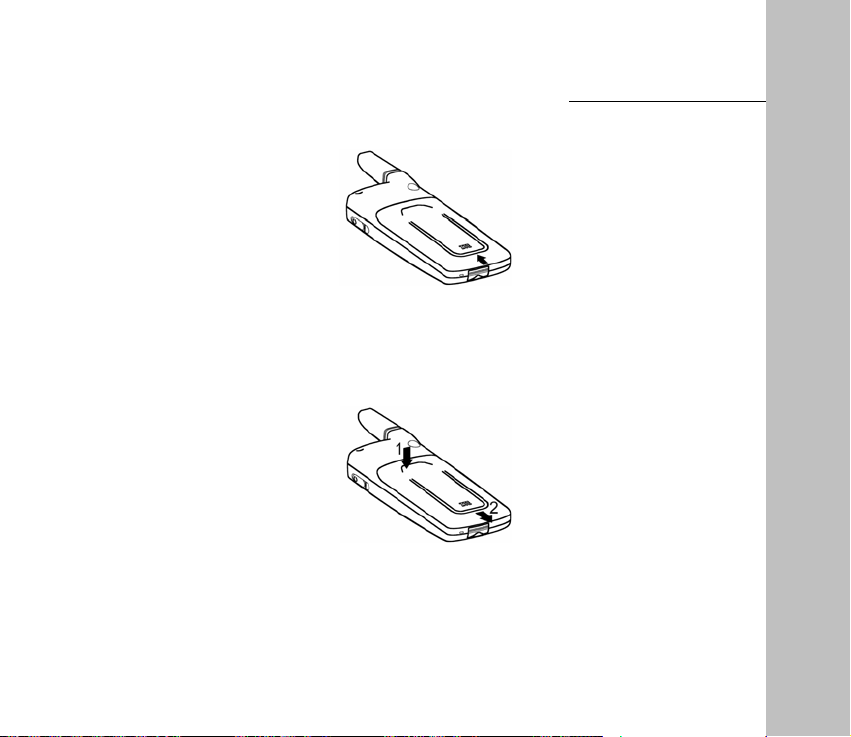
1.5.2 Removing the Battery
1. Press the spring button downwards, and then push down the back cover of the battery.
When the button is unlocked and the cover can not be pushed down, take out the back cover.
2. Pull the battery in the direction indicated by the arrow and take out the battery.
19
Page 22

1 Before Use
Note
1.5.3 Charging the Battery
The lithium battery of phone can be used directly after being taken out from the package, but
it needs to be charged firstly before use because the new battery is not fully charged.
To make the battery always in its best condition, please exhaust the capacity of the battery
and then fully recharge it for the first three times.
Power off the phone before taking out the battery.
20
Page 23

Before Use 1
1. Insert the charger plug into the bottom of the phone ( the side with arrow is upturned ), and
connect the charger to power socket.
2. When the phone is powered on, the smaller battery bar on up-right corner of the screen
keeps scrolling during charging; when the phone is powered off, the larger battery bar in
the center of the screen keeps scrolling during charging.
3. If the phone is used excessively without enough capability, the battery bar will not
immediately appear on the screen of the phone when charging starts.
4. You could charge the battery when the phone is on or off. When the phone is on, the
battery is fully charged as the battery bar on the up-right corner of the screen is full and
doesn’t flicker any longer. When the phone is off, the battery is fully charged as " Fully
charged " appears on the screen. During the charge, your phone and charger may normally
become hot.
5. Please disconnect the charger from the phone and the outlet when the charging is
21
Page 24

1 Before Use
completed.
1. Put your phone in ventilated place with normal temperature during
charging. Use the original accessories or those authenticated by ZTE.
Using any unauthenticated accessories may affect your mobile
Note
1.6 Insert and Remove R-UIM Card
Consult your network service provider whether your phone needs R-UIM card or not.
phone’s performance, hurt your phone or even cause danger to your
body and violate related national regulations about telecom terminals.
2. Charge your phone in time when it is powered off automatically or
prompts the lack of the power.
Note
If your network service provider requires R-UIM card, you need to insert a valid R-UIM card
before use. All the information about network connection is recorded in R-UIM card, together
with information saved in R-UIM card phonebook.
Note
1. Insert the R-UIM card into the socket from left to right as the picture indicates. Please put
Skip this section if your phone does not need R-UIM card.
Please make sure that the phone is powered off and disconnected
from the charger before inserting or taking out the R-UIM Card.
22
Page 25

Before Use 1
the gap of the R-UIM card toward left.
2. Power off the phone, remove the charger and battery, and then take out the R-UIM card
from the socket as the arrow’s direction.
1.7 Power On / Off
Power on
Press and hold
Your phone will check whether the R-UIM card is plugged in and usable or not after powering
on. Then the following information will appear on the screen in turn:
until the greeting picture appears.
z Input PIN: If the PIN code of R
-
UIM card is set.
23
Page 26

1 Before Use
Skip this section if your phone does not support R-UIM card. The
R-UIM card will be locked if you enter wrong PIN code three times.
Then you need PUK code to unlock the R-UIM card. The PIN code and
Note
z Search for network: Search for the available network.
Power off
Press and hold
The screen becomes black after the phone is powered off, and displays battery charging bar
during charging.
1.8 Interface Introduction
Icons on the Status Bar
PUK code may be provided together with the R-UIM card. If not,
contact your network service provider. The default PIN code is
normally 1234. Please replace it with your own PIN code as soon as
possible.
until you see the powering off animation on the screen.
Status bar
Operation bar
24
Page 27

Icons Descriptions
Network signal strength
Call in progress
Keys locked
Roaming status indication
Unread messages
Alerting by vibrator
In mute mode
Alarm is on
Current battery capacity
Before Use 1
25
Page 28

Making and Receiving Calls
2
2 Making and Receiving Calls
2.1 Making Calls
You can make a call in any of the following three ways:
1. Direct dial.
2. Dial from phone book.
3. Dial from recent calls.
Direct dial
Enter the desired telephone number in idle mode and press
Dial from phone book
1. Press
2. Press
3. Press
4. If you need to dial other number of the contact, press
▲/▼
in idle mode to access Menu Contacts .
to select Find or In Phone to search the desired contact.
▲/▼
to dial the default number of the contact.
to select the number which you want to dial, press to dial the selected number.
to dial.
to view the details,then press
Note
1. Press the right key of in idle mode to enter [
2. Refer to section "Search for a contact" in chapter "Contacts" .
26
Contacts
] .
Page 29

Dial from recent calls
1. Press
2. Press
Calls , Select the desired number.
3. Press
in idle mode to access Menu Recent Calls .
to select Missed Calls , Incoming Calls , Outgoing Calls and All Recent
▲/▼
to dial the selected number.
Making and Receiving Calls
2
Note
Press in idle mode to enter "All Recent Calls".
2.2 Receive a Call
When a call is incoming, press key to receive it; press to select Mute ; press
to reject the incoming call.
2.3 Hang up a Call
Press to hang up a call during conversation.
2.4 Menu during Conversation
1. During conversation, the other side can not hear your voice when you press
27
e/f
key to
Page 30

Making and Receiving Calls
2
select Mute and press ; Press again to return to normal conversation.
2. During conversation, press
conversation.
key to select Menu The operation will not end the
e/f
2.5 Dial Extension Numbers
1. Input the exchange number, press
Letter ‘ P ’ will be added after the exchange number.
2. Input the extension number.
3. Press
4. After the exchange number is connected, press
extension number automatically.
to dial.
key to select Pause then press key, the
e/f
key and the phone will dial the
28
Page 31

Contacts
3 Contacts
You can save names and phone numbers in the R-UIM card or in the phone. Up to 200
entries can be stored in the phone, and each entry contains 3 telephone numbers, 1 e-mail
address, 1 street address and web page. Five methods of storing number are available:
Work, Home, Mobile, Pager and Other. Each contact saved in R-UIM card corresponds to
one unique telephone number.
For easy search, contacts are divided into 2 groups: Personal Group and Business Group.
Note
Contacts Icons
Icons Descriptions Icons Descriptions
The contact can only be saved in the phone if your phone doesn’t
support R-UIM card. Please skip the related contents.
Work phone number
Mobile phone number
Email
Web Page
Records in UIM card
Home phone number
Other phone number
Address
Pager
29
3
Page 32

3 Contacts
3.1 Add a Contact
Store in the phone
1. Select Menu
2. Select the information you want to add: Phone, Email, Address, Web Page.
3. Press
4. After inputting, select Next .
5. Scroll the highlight to the information which was added just now ( such as phone ), then
press
msg , Erase , Save in R- UIM or Add to Speed Dial .
6. Scroll the highlight to Options , press
z Add to Phone: Add new information.
z Edit Name: Edit the name of contact.
z Classify Contact: Divide the information into Personal and Business.
z Erase Contact: Erase the new record.
Store in the R-UIM card
1. Select Menu
Contacts Add to Phone .
twice and select Next , input the name.
. You can continue other operations, such as Number Type , Edit , Send text
to confirm.
Contacts Add to R-UIM .
30
Page 33

Contacts
2. After inputting the phone number, press twice to select Next , then input the name.
3. After inputting, select Next .
4. Scroll the highlight to the number which was added just now and then press
can continue other operations,such as Edit , Send text msg , Save on phone or Add to
Speed Dial .
5. Scroll the highlight to Options , press
z Edit Name: Edit the name of contact.
z Erase Contact: Erase the new record.
Store in idle mode
Input the phone number in idle mode, press
R-UIM , then press
to the next operation.
to confirm.
to select To Phone , To Existing , To
e/f
, You
3
Note
Under the editing status,press to clear the inputs on the screen
one by one, or hold
to clear all the inputs on the screen.
3.2 Search for a Contact
This phone provides four methods to search a phone number: direct search, search by
name, search by number and search by group.
31
Page 34

3 Contacts
Direct Search
1. Press
2. All the contacts are listed, and use
Search by Name
1. Press
2. Input the name to be searched, and then press
3. Use
Search by Number
1. Press
2. Input the phone number to be searched, and then press
3. Use
Search by Group
1. Press
2. Use
on the idle screen to enter Menu Contacts In Phone .
▲/▼
in idle mode to enter Menu
to select the contact you want to search.
▲/▼
in idle mode to enter Menu
to select the contact you want to search.
▲/▼
in idle mode to enter Menu
to select the contact you want to search.
▲/▼
to select the name you want to search.
Contacts Find According to name .
.
Contacts Find According to number .
.
Contacts Personal / Business .
32
Page 35

3.3 View a Contact
1. Search the contact you want to view ( Refer to "Search for a contact" ).
2. Press
and press
to view the details of the contact. At this point, use
to dial the number.
to select the number,
▲/▼
3.4 Modify a Contact
1. Search the contact you want to view ( Refer to "Search for a contact" ).
2. View the contact you want to modify ( Refer to "View a contact" ).
3. Edit the contact. The operation is the same as "Add a contact".
3.5 Erase a Contact
1. Search the contact you want to view ( Refer to "Search for a contact" ).
2. View the contact you want to erase ( Refer to "View a contact" ).
3. Select Options
Erase Contact .
33
Contacts
3
Page 36

3 Contacts
3.6 Move the Record between the Phone and R- UIM Card
Move the record from phone to R- UIM card
1. View the contact you want to modify ( Refer to "View a contact" ).
2. Press
Move the record from R- UIM card to the phone
1. View the contact you want to modify. ( Refer to "View a contact" ).
2. Press
or ▼ to scroll to your desired record, press
▲
or ▼ to scroll to your desired record, press
▲
to select Save on R-UIM .
to select Save on Phone .
3.7 Speed Dial Number
There are totally 8 speed dial numbers in the phone, ranging from 2 to 9.
3.7.1 Add a Speed Dial Number
1. View the contact you want to modify ( Refer to "View a contact" ).
2. Press
or ▼ to scroll to your desired record, press
▲
3.7.2 Dial a Speed Dial Number
In idle mode, press and hold the corresponding numeric keys to dial the phone number.
34
to select Add to Speed Dial .
Page 37

Note
Press
to view the list of all the speed dials.
in idle mode to enter
Menu
3.8 Check Memory Status
In idle mode, press
to enter Menu
Contacts Memory Status .
3.9 Erase All Contacts
1. In idle mode, press
2. Select In Phone / In R-UIM or Back to cancel this step.
to enter Menu
Contacts Erase All Contacts .
35
Contacts
Contacts Speed Dial List
3
Page 38

Short Messages
4
4 Short Messages
This function enables you to send, view, reply, forward, send to multi-receivers and delete the
short messages. The received short message are stored in the inbox, and unsent or sent
short messages are stored in the outbox.
If your phone supports R-UIM card, you can move the short messages from the inbox to
R-UIM card.
Enter "Messages" :
In idle mode, select Menu to enter, and then press
enter, or in idle mode press
directly to enter the menu.
▼
to select Messages , press
▲/▼
4.1 Edit Short Messages
After editing a short message, you can send it immediately, or save it as draft.
1. Enter "Messages", select Create Message .
2. Input the text, press
and
to set Priority and Pref Msg .
f
36
to
Page 39

3. Input number of the recipient or select from Contacts.
4. Press Next
Send to multi to send it to several recipients
Send to send it immediately; select Save to save it in Outbox ; select
(
Refer to "Send to Multi" chapter ).
4.2 Inbox
Icons in the inbox
Icons Descriptions
Unread Messages
Read Messages
Emergent Messages
4.2.1 View Messages
1. Enter "Messages", select Inbox .
2. Press
3. During viewing, press
/ Forward / Next / Erase / Sender / Move to R-UIM .
to choose the desired short message and press
▲/▼
or ▼ to view the whole message; press
▲
37
Short Messages
to view.
to select Reply
e/f
4
Page 40

Short Messages
4
4.2.2 Save Phone Number from Message
1. Enter the message you want to view, press
2. Press
3. Choose Reply to reply to the sender.
4. Select To Phone to save the phone number of sender in your phone.
5. Select To Existing to save the phone number of sender in existed records.
6. Select To R-UIM to save the phone number of sender in R-UIM card.
and
to select Call to dial this phone number.
e/f
to select Sender .
e/f
4.2.3 Receive New Message
1. The system will alert upon receiving a new message. Select View to go into the inbox
directly; select Ignore to exit the menu.
2. If there are unread messages in the inbox, "
screen.
" will appear on the status bar on the idle
4.2.4 Full Inbox
1. The messages in the inbox ≥
may wish to delete some old messages." will be displayed on the screen when a new
message comes. Select OK to exit; select Erase old to enter inbox directly, and press
to delete the messages.
▲/▼
"The Message memory is approaching capacity. You
15 .
38
Page 41

Short Messages
4
2. The messages in the inbox =
delete some old messages." will be displayed on the screen and "
bar when a new message comes. Select OK to exit, select Erase old to enter inbox
directly, and press
▲/▼
. "The last text message was rejected. You may wish to
20
to delete the messages.
" flicks on the status
4.3 Outbox
Icons in outbox
Icons Descriptions
Sent Messages
Unsent Messages
In the outbox, you can view all the sent & unsent messages.
1. Enter "Messages", and select Outbox .
2. Press
3. Press
to select the desired message and then press
▲/▼
to select Erase / Send / Forward / Edit ( only the unsent message can be edited ).
e/f
to view.
4.4 Delete Messages
Enter "Messages", select Erase Messages and then Entire Inbox / Entire Outbox / Entire
R-UIM / Old Inbox .
39
Page 42

Short Messages
4
4.5 Send to Multi-receivers
1. Enter "Messages", and select Send to Multi .
2. Select Add Receiver and add 10 receiver numbers at most; You can add the phone
and
number directly or press
3. Press
Note
to confirm, select List OK to edit the message text to send.
1. You can delete or edit the phone numbers of the list.
2. You can [
Resend
to add from the Contacts.
f
] or [
] the number which is failed to send.
Abort
4.6 Preset Messages
There are some common messages stored in your phone for you to select and send directly,
or send after editing.You can also insert it as writing a message.
The operation of inserting the message is as below:
1. Enter "Messages", select Create Message .
2. Input the text and then press
3. Select Continue to input the phone number of receiver, press Continue
the message or select the phone number from Contacts and then press
and
to select Pref Msg , select the desired messages.
f
40
Send to send
to send.
Page 43

Short Messages
4
4.7 Voice Mail
Please consult your network service provider before use. If a new voice message is received,
the system will send a text message to your phone automatically. View the message and
dial the number to listen to the voice mail.
Hold
to dial the voice mail number to read the voice mail.
Note
The function requires network support.
4.8 Short Message Settings
You can set the short message functions based on your own needs.
Voice Mail Number
Note
1. Enter "Messages", select Message Settings
2. Select Yes to add the number and then press
Message Alert
Set alert mode when a new message comes. You may select Alert Once or Alert & Remind .
Consult your network service provider for the specific number.
Voice Mail Number .
.
41
Page 44

Short Messages
4
z Alert Once: Only alert once when a new message comes.
z Alert & Remind: When a new message is not acknowledged, the phone will ring per
minute to remind the user until it is acknowledged.
Note
Auto Erase
When Enable is activated and the inbox is full, the messages read earliest will be automatically
deleted when a new message comes.
The message alert can be set in [
and "vibration" can only be used as incoming call alert.
42
] of [Settings] . "Vibe+Ringer"
Sound
Page 45

Recent Calls
5 Recent Calls
Recent incoming calls, missed calls and outgoing calls are saved in Recent Calls . The
earliest call will be deleted automatically when the records are full.
5.1 Recent Call Icons
Icons Descriptions
Received Calls
Missed Calls
Dialed Calls
5.2 View Recent Calls
Two methods are available to view recent calls.
43
5
Page 46

5 Recent Calls
View from Menu
1. In idle mode, press
and press
2. Press
▲
Outgoing Calls, All Recent Calls ), press
3. Press
▲
to view the details.
Quick View
1. In idle mode, press
2. Press
▲
view the detailed information.
to enter.
or ▼ to scroll to the desired type of recent calls ( Missed Calls, Incoming Calls,
or ▼ to choose the desired record, and then press
or ▼ to scroll to your desired record, and press and Call Information to
5.3 Delete an Entry
1. Enter the call list ( see "View Recent Calls" ).
2. Press
or ▼ to scroll to the desired record, and then press
▲
to enter the main menu, press
to enter the list of All Recent Calls .
to select Recent Calls
▲/▼
enter the call list of the selected type.
and Call Information
to select Delete Entry .
44
Page 47

Recent Calls
5.4 Delete All
1. In idle mode, press
2. Select Missed Calls / Incoming Calls / Outgoing Calls / All Recent Calls to delete.
5.5 Send Message from Recent Calls
1. Enter the call list ( see section "View Recent Calls" ).
2. Press
or ▼ to scroll to the desired number and then press to select Send text
▲
msg .
5.6 Edit Phone Number of Recent Calls
1. Enter the call list
2. Press
3. After the editing, you could dial the edited number.
to scroll to the desired number and then press
▲ or ▼
5.7 Dial from Recent Calls
1. Enter the call list ( see section "View Recent Calls" ).
2. Press
or ▼ to scroll to the desired number and then press to dial.
▲
to enter Menu
see section " View Recent Calls "
(
Recent Calls
45
Delete All Calls .
).
to select Edit Number;
5
Page 48

6
Settings
6 Settings
In idle mode, press
to enter Menu, and press
to select Settings .
▲/▼
6.1 Auto Key Guard
1. Press
2. Select Off / 30 seconds / 2 minutes / 5 minutes .
Note
to enter Settings
Input 123 to unlock the keypad.
Auto Key Guard .
6.2 Supplementary Services
6.2.1 Call Waiting
When this function is activated, you can switch to the second incoming call by pressing
when you are already in a call.
46
Page 49

Settings
6
Note
1. Press
2. Select Activate / Deactivate to operate.
6.2.2 Call Forward
This function enables you to forward incoming calls to another phone number. Please
consult your network service provider to apply for this function.
1. In idle mode, press
2. Select All / Busy / No Answer / Default / Cancel All to operate.
z All: Forward incoming calls in any condition.
z Busy: Forward incoming calls when busy.
z No Answer: Forward incoming calls when no answer.
z Default: Forward incoming calls when busy or no answer.
z Cancel All: Cancel all the calls forward.
Select Activate / Deactivate / Cancel to operate.
Note
Network support required.
to enter Settings
Network support is required for this function.
Supp. Services
to enter Settings
Call Waiting .
Supp. Services
47
Call Forwarding .
Page 50

Settings
6
6.3 Sound
In idle mode, press
contents:
Vol ume
Alert Type
Ringer Type
Key Beep
Key Tone Length
SMSRinger Type
ClockRinger Type
6.4 Display
In idle mode, press
contents to enter:
to enter Settings
Press
▲/▼
press ▲/▼ to select the volume mode, use
the volume.
Enter "Alert Type", press
Vibe + Ringer or Off , press
Select the ringer type.
Enter "Key Beep", press
to save.
Enter "Key Tone Length", press
Long , press
Select the alert when a new message comes.
Select the alert of ring.
to enter Settings
Sound , then press
to select "Volume", then press
▲/▼
▲/▼
to save.
Display , then use
48
▲/▼
▲/▼/
to select Ringer , Vibration ,
to save.
to select Tones or Off , press
to select Normal or
▲/▼
▲/▼
to select the desired
to enter,
to adjust
e/f
to select the desired
Page 51

Backlighting
Select Off / 10s / 30s / 10s and in call / 30s and in call .
Banner
View and edit the banners.
Language
Select the language.
Contrast
Press
Menu Format
Select large icons or small icons of the main menu.
Time Format
Select AM / PM , or 24HR .
Screensaver
Select the type and timeout of the screensaver.
▲/▼
or
to adjust the contrast of the screen.
e/f
49
Settings
6
Page 52

Settings
6
6.5 Alert
In idle mode, press
Missed Call
Select if the alert is needed when there is a missed call.
Roaming
Select if the alert is needed when the phone is roaming.
Minute Alert
Alert is on before each minute during call or alert is turn off.
to enter Settings
Al ert :
6.6 Call Timers
In idle mode, press
Outgoing Calls
The total duration of all outgoing calls. It can be reset to zero.
Incoming Calls
The total duration of all incoming calls. It can be reset to zero.
to enter Settings
Call Timers :
50
Page 53

Settings
All Calls
The total duration of all calls. It can be reset to zero.
6.7 Security
The PIN code is needed to enter the security. Generally, the default PIN code is: "1234".
Please modify it to a private PIN Code as soon as possible.
6
Note
Phone Reset
When you select "Phone Reset", all the settings will be reset to their default value.
Note
PIN Lock
When On is set, it is necessary to input PIN code when you turn on the phone, the phone will
be unlocked after inputting the correct PIN code. Otherwise only emergency calls are permitted.
PIN Change
1. Input new PIN code.
If the phone doesn’t need R-UIM card, the password is “0000”.
Contents such as password, contacts, recent calls and alarm will not
be deleted.
51
Page 54

6
Settings
2. Press
3. Press
Note
to input the new PIN code again.
to confirm.
If the phone doesn’t need R-UIM card, there would be no “PIN LOCK”.
6.8 Accessories
Handset Ringing
When On is selected, the ring is sent out from earphone.
Handset Autoanswer
You can select 2 seconds / 5 seconds / 10 seconds or Off .
Any Key Answer
All incoming calls can be answered if any key but End key is pressed.
52
Page 55

Extra 7
7 Extra
Enter "Extra" : in idle mode, press
to enter Menu
Extra .
7.1 Games
"BlackJack", "Video Poker" and "Teris" are provided.
7.1.1 BlackJack
Enter "BlackJack", and the game instruction appears on the screen. Press OK to enter New
or select Continue to continue the last game.
z Deal: Start the new game, the banker is on the upper screen and the player is on the
lower screen.
z Bet: Select the sum of ante.
7.1.2 Video Poker
Enter "Video Poker", and the game instruction appears on the screen. Press OK to enter
New or select Continue to continue the last game.
53
Page 56

7
Extra
z Deal: Start the new game.
z Bet: Select the sum of ante.
z Payout: Display the cash sum of different kinds of cards.
7.1.3 Teris
Enter "Teris" to start a new game.
z Press
z Press
z Press
z Press
7.2 Stopwatch
This function is used for timing.
1. Enter "Extra", select Stopw atch to enter.
2. Select Start to begin to keep time.
3. Select Pause to stop keeping time.
to move the falling squares to the left / right.
e/f
to rotate the squares clockwise.
▲
to drop the squares rapidly.
▼
key to exit.
54
Page 57

Extra 7
4. Select Cont. to continue. After entering Option
7.3 Alarm
7.3.1 Alarm Setting
1. Enter "Extra", and then select Alarm to enter.
2. Press
to switch between hour and minute, then press
3. Press
7.3.2 Turn off the Alarm
1. Enter "Extra", and then select Alarm to enter.
2. Select Disable to turn off the alarm.
Note
to select Set , press alphanumeric keys or
e/f
to select the alarm mode Once / Daily / Weekdays , press
e/f
1. Set the alarm ringing in the specified time. The alarm can work only
when the phone is turned on.
2. Select [
to delay the alarm by 10 minutes, and then ring again.
to turn off the alarm when it is ringing ; select [
]
OFF
55
Clear , the timer will be set to 0.
to input the time, press
▲/▼
to confirm.
e/f
to confirm.
Snooze
]
Page 58

7
Extra
7.4 Scheduler
7.4.1 Add New Scheduler
1. Enter "Extra", and then select Scheduler
Ad d Event .
2. Input the name of new scheduler, press
3. Select Next , then press
switch between hour and minute.
4. Press
5. Press
alarm.
6. Press
7.4.2 View the Scheduler
View the scheduler per day or per month.
View Day
to select Duration , then press
e/f
to select Alarm , then press
e/f
to confirm the settings, input the contents of events and then select Next .
to set the beginning time of scheduler,press
▲/▼
to confirm.
to set the period of events.
▲/▼
to set time quantum of alarm or turn off the
▲/▼
56
e/f
to
Page 59

View the scheduler per day.
1. Enter "Extra", and select Scheduler
2. Press
to view the details.
View Month
View one day in different months.
to select the desired date, press
e/f
View Day .
to select scheduler, then press
▲/▼
Extra 7
1. Enter "Extra", and select Scheduler
2. Press
3. Press
or
to select the desired date, and then press
▲/▼
e/f
to select the date you want to view and enter it.
▲/▼
View Month .
7.4.3 Modify the Scheduler
1. Enter the desired scheduler to view ( see section "View the Scheduler" ).
2. Press
3. Modify the correlative contents in the scheduler, press
to select Edit to enter.
e/f
57
to save it.
to enter.
Page 60

7
Extra
7.4.4 Delete the Scheduler
1. Enter the desired scheduler to view ( see section "View the Scheduler" ).
2. Press
3. Select Yes to delete the scheduler.
7.4.5 Set Options
Set the default options of the scheduler. Enter "Extra", and then select Scheduler
Options :
Set Work Hours
Set working time, namely, the beginning and ending time of work in scheduler every day.
Auto Delete
Delete the record time for event after the event happened.
Default Alarm
to select Erase to enter.
e/f
58
Page 61

Set the default of alarm when you add the scheduler.
7.5 Calculator
The calculator enables you to have basic mathematical computation.
1. Enter "Extra", and select Calculator to enter.
2. Press number keys to input the desired numbers, press
Operator Symbols Notes
to input the operator symbols.
e/f
Extra 7
÷
-
=
+
x
Division Sign
Subtraction Sigh
Equal Sign, result
Plus Sign
Multiply Sign
59
Page 62

7
Extra
Note
8 Appendix
.
C
±
The definition of calculator is limited and rounding errors may occur.
Radix Point
Clear the numbers inputted and
display zero.
Change the positive and negative
value of the numbers.
8.1 Shortcut
8.1.1 Speed Dial
Speed dial refers to quickly dial out the number in "Contacts" in idle mode ( Refer to section
"Speed Dial" in chapter "Contacts" ).
60
Page 63

Operation Method
Press and hold the corresponding alphanumeric key to dial it directly.
8.1.2 Quick View the Contacts
Press f to view all contacts quickly.
8.1.3 Quick Entry into Extra
Press e to enter "Extra" quickly.
8.1.4 Quick Entry into Messages
Press
to enter "Messages" quickly.
▼
8.1.5 Quick Set Mute Mode
Press and hold ▲ to enter or exit from the mute mode.
8.1.6 Quick Set Alert Type
Press and hold
8.1.7 Quick View All Recent Calls
Press and hold to view all recent calls quickly.
to set alert type quickly in idle mode.
Extra 7
61
Page 64

Appendix
8
8.1.8 Quick Lock the Keys
Press and hold to lock the keys quickly.
Note
8.1.9 Quick Return to Idle Mode
Press ( rather than hold ) to return to the idle mode quickly.
8.1.10 Delete the Current Input
In the input state, press to delete the current inputs one by one. Press and hold
to delete all the current inputs.
8.1.11 Quick Switch Input Methods
When inputting the texts, press to switch the input methods. When only the numbers
are allowed to input, press
Input "123" to unlock.
to input "# " .
62
Page 65

Appendix
8.1.12 Quick Input Symbols
When inputting the texts, press
8.2 Input Characters
In the phone you can input English, numbers and symbols through the alphanumeric keys.
Your phone provides these input methods: letter input method, number input method,
English input method, and symbol input method. Letter input method can be divided into
Uppercase English Input method and Lowercase English Input method.
Description for input methods
Input Method Operation Methods
to enter the list of symbols.
63
8
Page 66

Appendix
8
Input uppercase /
lowercase letters
Input numbers
Input English
Input symbols
Delete character
Delete all characters
Move the cursor to
left or right.
1. Select letter input method.
2. Press the corresponding alphanumeric keys.
Each key corresponds to multiple letters. Pressing the key
once will input the first letter, pressing the key twice will
input the second letter, and so on.
1. Select number input method.
2. Press number keys to input numbers.
1. Select English input method.
2. Press the corresponding alphanumeric keys until the
desired word appeared on the screen.
3. If the word on the screen is not the one you want, you may
press
4. Select the desired word and then press
Press to enter the list of symbols directly and then
press
alphanumeric keys to input the symbols.
z Under abc / ABC input method, press "
Press
Press and hold
Press
to view other suited words.
▲/▼
to switch the screen, press the corresponding
▲/▼
" to input some
common symbols.
.
.
.
e/f
64
1
.
Page 67

Appendix
8
8.3 Failure Analysis
Symptoms Possible Causes Solutions
Power- on
Failure
Automatic
power- off
Inadequate
standby time
Network
connection
failure
Call drop during
a call
No ring for a
incoming call
Prompt to input
PUK
Inadequate battery power Charge the battery
Poor battery contact Re-install the battery
Seriously poor battery power Recharge the battery
Deceasing of battery
performance
Poor network signal Move to other places
Poor network signal Move to other places
Out of the service area
Poor network signal Move to other places
The phone is set to Silence,
or the volume for incoming call
ringtone is set to 0.
R-UIM card is locked due to
successive inputting false PIN
code for three times.
Replace the battery
Confirm whether it is in the
CDMA network service area
Enter [Settings] and set the
mode as non-mute; or check
ringtone volume.
Contact with operators.
65
Page 68

Appendix
8
If the problems cannot be solved after the above handling, you may contact your seller or network
operator, or feed back your information directly by sending emails to zte_mobile@zte.com.cn
for customer service. We will reply to you as soon as possible.
8.4 RF exposure Information
The SAR limit of USA (FCC) is 1.6 W/kg averaged over one gram of tissue. Device types
X160 (FCC ID: Q78-X160) has also been tested against this SAR limit. The highest SAR
value reported under this standard during product certification for use at the ear is 1.514
W/kg and when properly worn on the body is 0.311 W/kg. This device was tested for
typical body-worn operations with the back of the handset kept 1.5cm from the body. To
maintain compliance with FCC RF exposure requirements, use accessories that maintain
a 1.5cm separation distance between the user's body and the back of the handset. The
use of belt clips, holsters and similar accessories should not contain metallic components
in its assembly. The use of accessories that do not satisfy these requirements may not
comply with FCC RF exposure requirements, and should be avoided.
66
 Loading...