


LEGAL INFORMATION
Copyright © 2012 ZTE CORPORATION.
All rights reserved.
No part of this publication may be quoted, reproduced, translated
or used in any form or by any means, electronic or mechanical,
including photocopying and microfilm, without the prior written
permission of ZTE Corporation.
ZTE Corporation reserves the right to correct typographical errors,
misprints or update specifications in this guide without prior notice.
The Bluetooth
Inc. and any use of such trademarks by ZTE Corporation is under
license. Other trademarks and trade names are the property of their
respective owners.
The phone is manufactured under license from Dolby Laboratories.
Dolby and the double-D symbol are trademarks of Dolby Laboratories.
We offer self-service for our smart terminal device users. Please visit
ZTE official website (at www.zte.com.cn) for more information on
self-service and supported product models. Information subject to the
website.
Version No.: R1.0
Edition Time: 2012.09
®
trademark and logos are owned by the Bluetooth SIG,
What’s Inside
Getting Started ............................................................................ 9
Your Phone at a Glance ........................................................... 9
Knowing the Keys.... ............................................................ 10
Installing the SIM Card, microSD Card, and Battery ................ 1 1
Charging the Battery ............................................................ 14
Powering On/Off ................................................................. 15
Locking/Unlocking th e Screen and Keys ................................ 15
Using the Touch Screen ............................................ ............ 16
Getting to Know the Home Screen ......................................... 17
Personalizing ............................................................................. 19
Changing the System Language ............................................. 19
Setting the Date and Time ..................................................... 19
Changing Ringtone and Notification Sound ............................ 19
Adjusting Volumes ................................................... ............ 20
Applying New Wallpapers .................................................... 21
Changing Screen Brightness .................................................. 21
Protecting Your Phone with Screen Locks ............................... 22
Protecting Your Phone with Encryption .................................. 23
Knowing the Basics ................................................................... 25
Monitoring the Phone Status ................................................. 25
Managing Notifications ........................................................ 26
1
Managing Shortcu ts an d Widgets ........................................... 28
Rearranging the Favorites Tray .............................................. 29
Entering Text ........................................................ ............... 29
Editing Text ......................................................................... 32
Opening and Switching apps ................................................. 33
Connecting to Networks and De vices .......................................... 34
Connecting to Mobile Networks ............................................ 34
Connecting to Wi-Fi .................................. ........................... 35
Connecting to Bluetooth Devices ........................................... 37
Connecting to Your Computer via USB ............. ............ ......... 39
Sharing Your Mobile Data Connection.................................... 40
Connecting to Virtual Private Networks .................................. 42
Phone Calls ................................................................................ 45
Placing and Ending Calls ........................... ........................... 45
Answering or Rejecting Calls ....................................... ......... 46
Working with the Call Log .................................................... 46
Calling Y o ur Contacts ........................................................... 48
Checking Voicemail .............................................................. 49
Using Options During a Call.................................................. 49
Managing Multi-Party Calls ............................................... ... 50
Adjusting Your Call Settings ................................................. 51
People ........................................................................................ 57
Opening Your Contact List ............................... ..................... 57
Adding a New Contact .......................................................... 58
Setting Up Your Own Profile .................................. ............... 58
2
Importing, Exporting, and Sharing Contacts ............................ 58
Working with Favorite Contacts ...................................... ...... 60
Working with Groups ................................... ........................ 61
Searching for a Conta ct ........................................................ 63
Editing Contac ts .................................................................. 63
Accounts ....................................................................... ............ 64
Adding or Removing Accounts .............................................. 64
Configuring Account Sync .................................................... 65
Email ...................................................................... .................. 67
Set Up the First Email Account .............................................. 67
Checking Y our Emails ............................ .............................. 68
Responding to an Email ........................................................ 68
Writing and Sending an Email ........... .................................... 70
Adding a Signature to Your Emails ........................................ 70
Adding and Editing Email Accounts....................................... 71
Changing General Email Settings .......................................... 72
GmailTM .................................................................................. 73
Opening Yo ur Gmail Inbox ................................................... 73
Switching Accounts .............................................................. 73
Writing and Sending a Message ............................................. 74
Adding a Signature to Your Gmail Messages........................... 74
Replying to or Forwa rding a Message .................................... 75
Working with Received Attachments ...................................... 76
Searching for Messages .............. .......................................... 76
Working with Labels ........................ .................................... 77
3
4

Changing Gmail Settings ............... ............ ............ ...... ......... 78
Messages ............................................ ............ .................. ......... 79
Opening the Messages Screen ................................................ 79
Sending a Text Message ........................................................ 79
Sending a Multimedia Message ............................................. 80
Replying to a Message .......................................................... 81
Forwarding a Mes sage .......................................................... 81
Viewing Details About a Message .......................................... 81
Deleting Messages or Threads ............................................... 82
Changing Message Settings ................................................... 82
Calendar .......................................................................... ......... 83
Viewing Your Calendars and Events ....................................... 83
Creating an Event ................................................................. 85
Editing or Deleting an Event.................................................. 86
Changing Calendar Settings ........... ...... ............ ...... ............ ... 86
Google Talk .................................................... ........................... 87
Signing in to See Your Friends ............................................... 87
Adding a Friend ...................... ............................................. 88
Changing Your Online Status ................................................. 88
Chatting with Friends ........................................................... 89
Changing Google Talk Settings .............................................. 90
Google+ ................................................................ ..................... 90
Organizing Your Contacts ..................................................... 91
Getting Updates ................................................................... 91
Chatting with Contacts .......................................................... 92
Checking Photos ...................................................... ............ 92
Checking and Manag ing Your Pro file ..................................... 92
Browser ..................................................................................... 94
Opening the Browser ............................................................ 94
Working with an Opened Page ............................................... 96
Using Multiple Browser Windows ......................................... 97
Downloading Files ............................................................... 98
Using Bookmarks .......................................................... ...... 98
Changing Browser Settings ................................................... 99
Maps, Navigation, Places, and Latitude .................................... 100
Activating Location Services ............................................... 100
Getting Y our Location ............................ ............................ 101
Searching for a Locat ion ..................................................... 101
Getting Directions to Your Destination ................................. 102
Sharing Location ................................................................ 102
Google Search, Voice Search, and Voice Actions . ...................... 104
Searching with Text ............................................................ 104
Searching by Sp ea ki n g ....................................................... 105
Using Voice Actions ....................................................... .... 105
Changing Search and Voice Search Settings .......................... 105
Camera ............................................................. ...................... 106
Capturing a Photo ........................................ ...................... 106
Customize Camera Settings ................................................. 108
Recording a V ide o ...................... ........................................ 109
Customizing Camcorder Settings ......................................... 110
5
Gallery ..................................................... ............................... 1 12
Opening Gallery ................................................................. 112
Working with Albums ......................................................... 1 12
Working with Pictures...................................... ................... 113
Working with Videos .......................................................... 1 16
Playing Your Music .................................................................. 117
Creating Playlists .......................... ..................................... 118
Video Player ............... ............................................................. 120
Opening the Video Library ................................................. . 120
Playing and Control Vide os ................................................. 120
Managing Video Files ......................................................... 121
Sound Recorder ....................................................................... 122
More Apps ............................................................................... 123
Alarm .................................................................. ............. 123
Backup and Restore ............................................................ 124
Calculator .......................................................................... 124
File Manager ................................ .................. ............ ....... 124
News and Weather .............................................................. 125
Note Pad .................................................................... ....... 125
Task Manager ............................................................. ....... 126
YouTube ............................................................................ 126
Play Store ................................................................... ............. 126
Browsing and Searching for Apps ........................................ 127
Downloading and Installing Apps ........................... ...... ....... 127
6
Managing Your Downloads ................................................. 128
Settings ....................................................... ............................ 129
Wireless and Networks ....................................................... 129
Call Settings ...................................................................... 131
Device .................................................................... .......... 131
Personal ............................................................................ 133
System .............................................................................. 136
Troubleshooting ................................................................... .... 138
For Your Safety ....................................................................... 144
General Safety ................................................................... 144
Distraction ...................................... .................. ............ .... 145
Product Handling ............................................................... 146
Electrical Safety ....................................................... .......... 149
Radio Frequency Interference .............................................. 150
Explosive Environments ................................................. .... 152
Radio Frequency (RF) Energy ................................... .......... 152
FCC Compliance ............................................................... 154
CITA Requirements ............................................................ 157
7
8
k
p
Getting Started
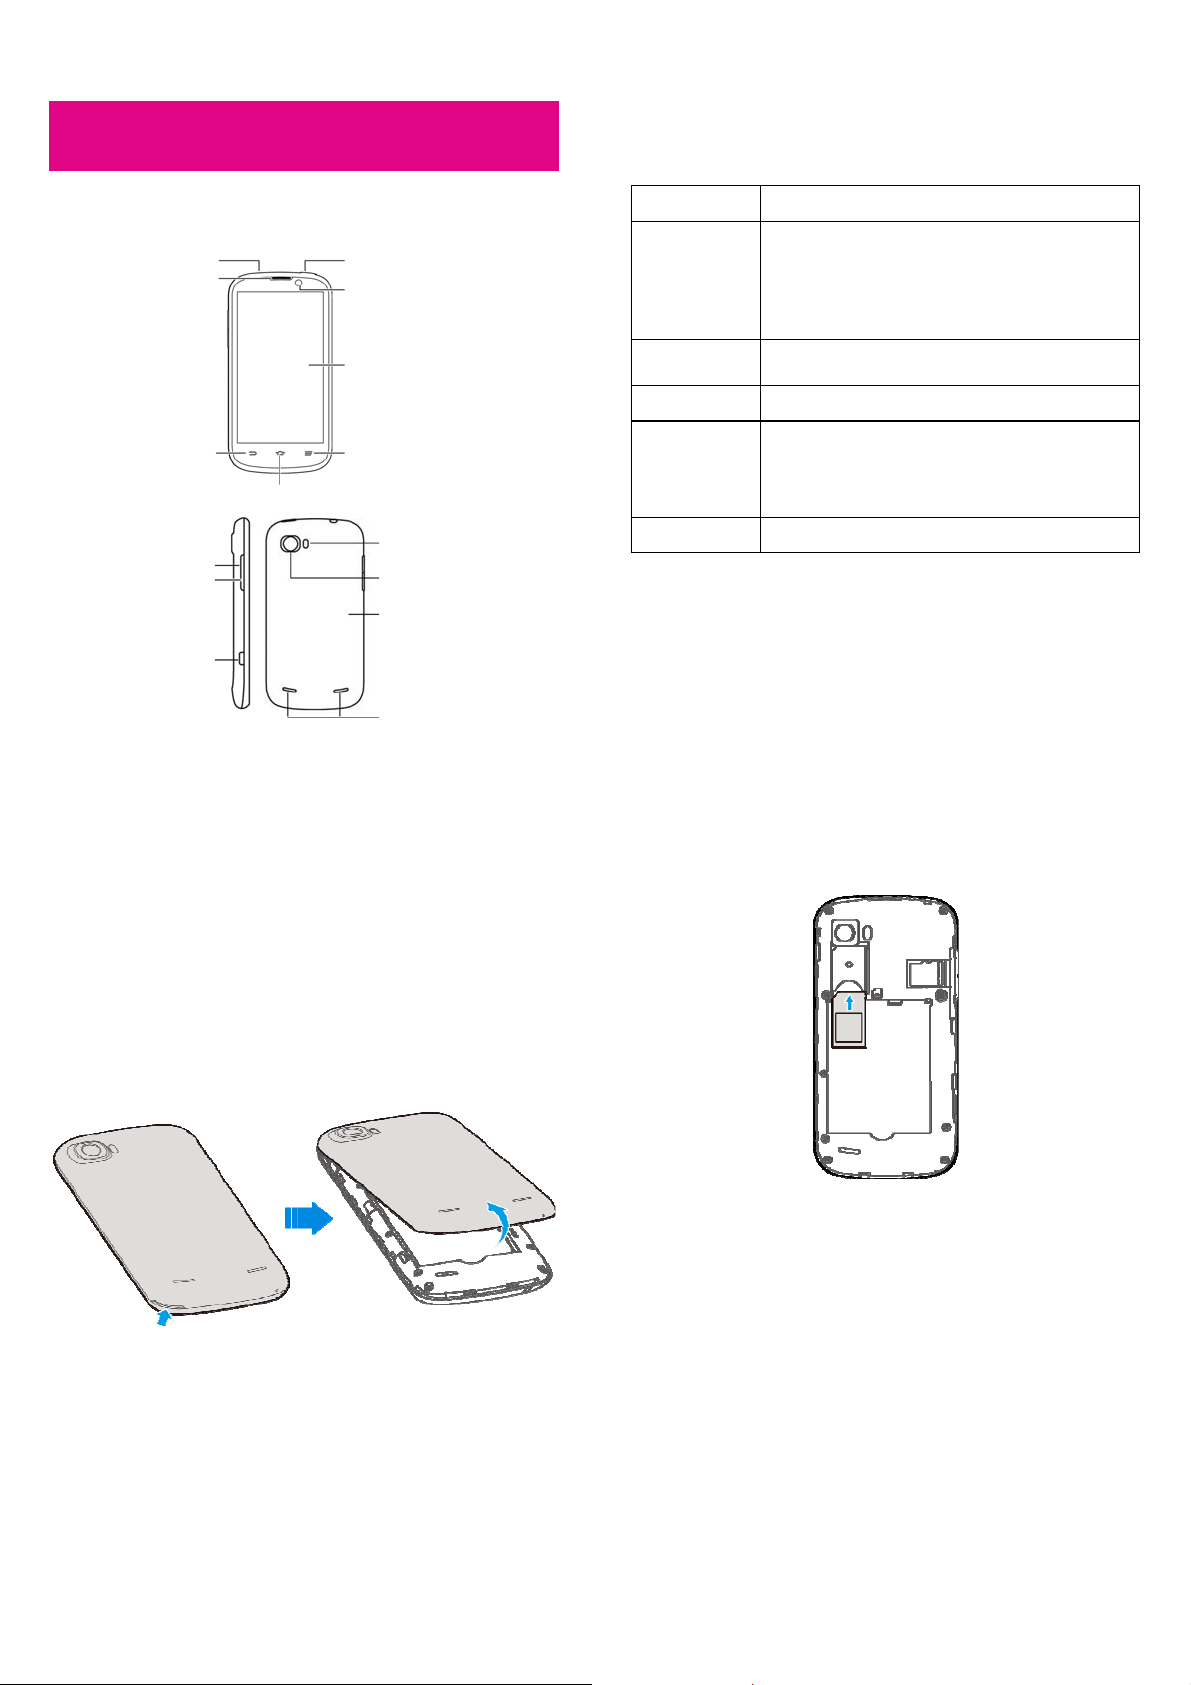
Your Phone at a Glance
Headset Jac
Earpiece
Back Key Menu Key
Volum e
Vol ume
Down
Charger/USB Jack
Power Key
Front
Touch Screen
Home Key
Flash
Camera
Back Cover
Knowing the Keys
Key Function
Power Key
Vol ume Key s
Menu Key
Home Key
Back Key
• Press and hold to turn on your phone.
• Press and hold to turn on or off Silent, Vibration
or Airplane mode, or to power off your phone.
• Press to switch your phone to Sleep mode.
• Press to wake up your phone.
Press or hold either end of the key to turn the
volume u
Touch to get the options for the current screen.
• Touch to return to the Home Screen from any
• Touch and hold to see recently used
Touch to go to the previous screen.
or down.
application or screen.
applications.
9
Speaker
Installing the SIM Card, microSD
Card, and Battery
Switch off your phone before installing or replacing the battery, SIM card
or microSD card.
1. Remove the back cover.
10
3. Hold your microSD card with the metal contacts facing down and
slide it in.
2. Hold the SIM card with the cut corner in the direction as shown
and slide it into the card holder.
11
12
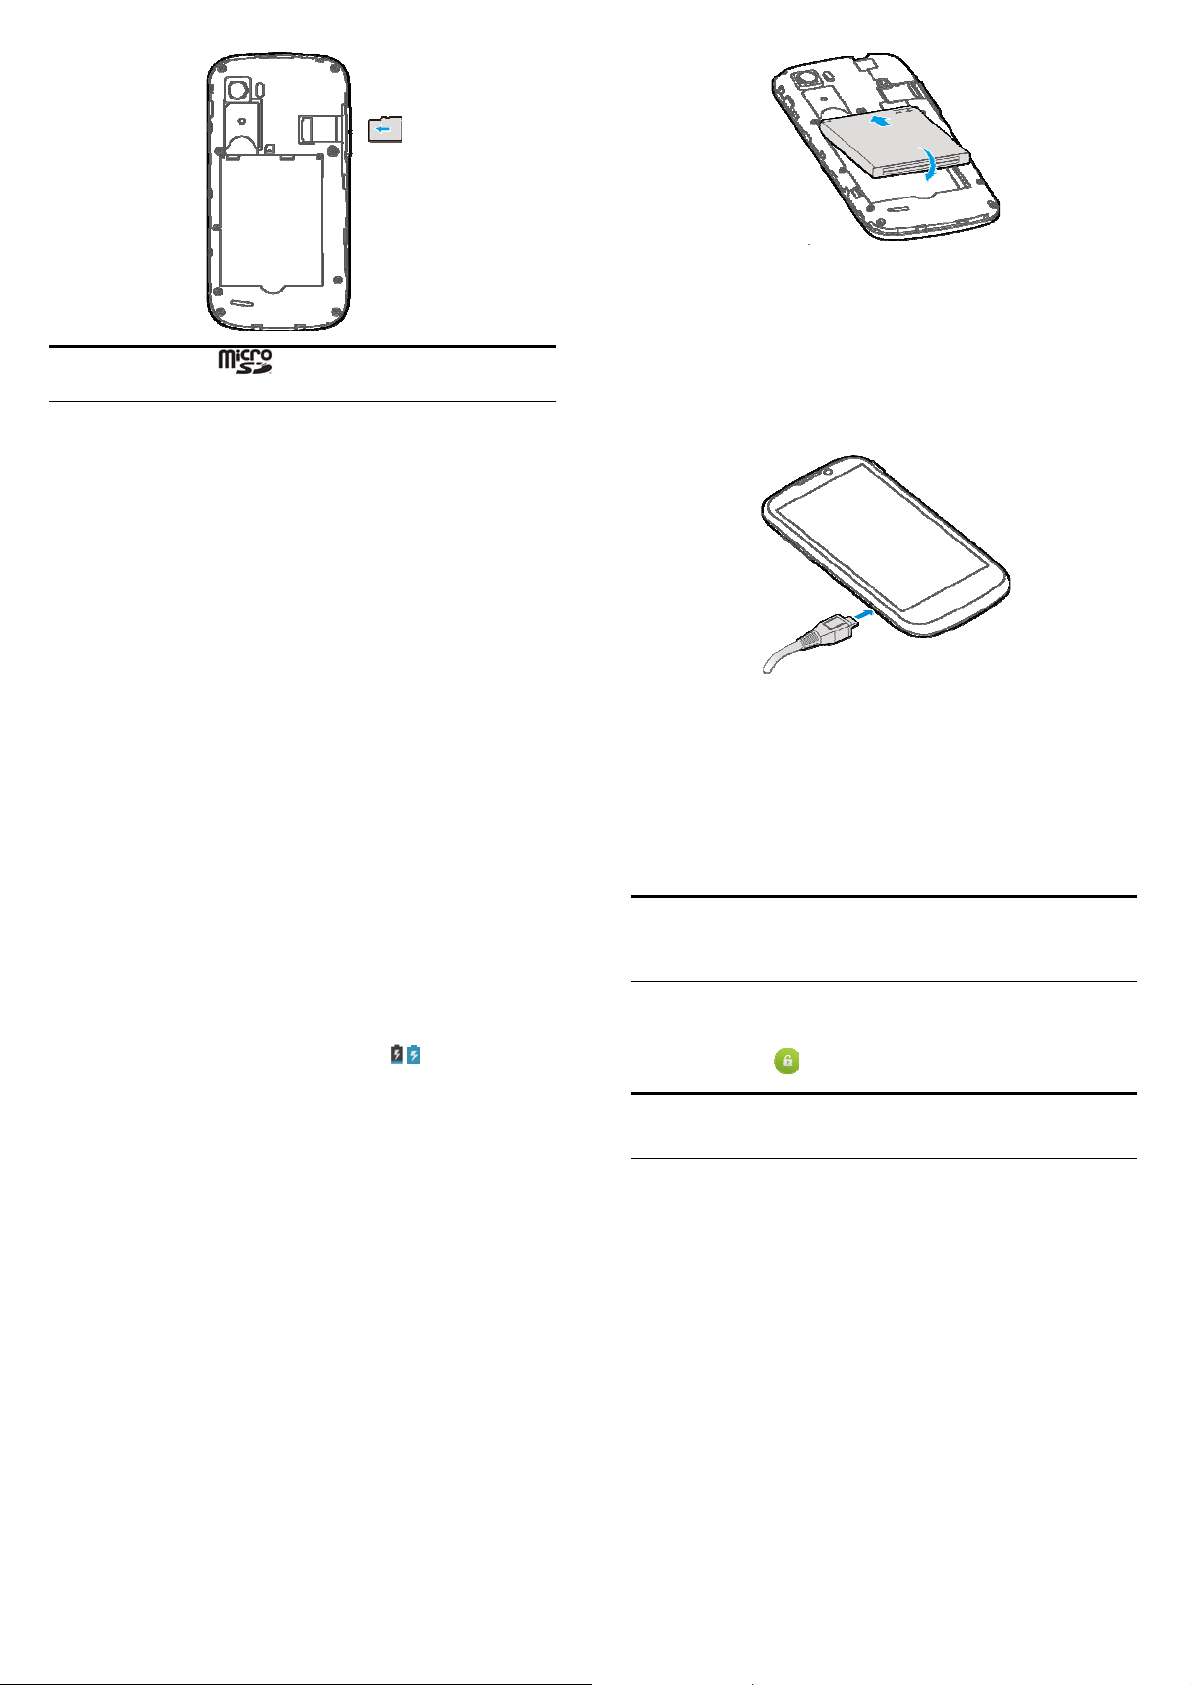
5. Press the cover gently back into place until you hear a click.
NOTE: microSD logo is a trademark of the SD Card
Association.
4. Insert the battery by aligning the gold contacts on t he bat tery
with the gold contacts in the battery compartment. Gently push
down the battery until it clicks into place.
13
Charging the Battery
When you first get your new phone, you’ll need to charge the battery.
1. Connect the adapter to the charger jack. Ensure that the adapter is
inserted with the correct ori en tat io n. Do no t forc e the co nn ec tor
into the charger jack.
14
2. Connect the charger to a standard AC wall outlet.
3. Disconnect the charger when the battery is fully charged.
How much charge have you got?
If the battery is low, there will be a pop-up message on the screen. As
you charge your phone, the screen will tell you the exact battery level
each time you wake up your phone.
If the phone is on, you’ll see this charging icon
status bar.
/ appearing on the
Powering On/Off
Make sure the SIM card is in your device and the battery is charged.
• Press and hold the Power Key to power on your phone.
• To power it off, press and hold the Power Key to open the options
menu. Touch Power off and then touch OK.
Locking/Unlocking the Screen and
Keys
Your phone allows you to quickly lock the screen and keys when not in
use, and to turn the sc reen back on and unlock it when you need it.
To lock the screen and keys:
To quickly turn the screen off and lock the keys, press the Power Key.
NOTE: To save battery power, the phone automatically turns off the
screen after a certain period of time when you le av e it idle. You wi ll
still be able to receive messages and calls while the phone screen is
off.
To unlock the screen and keys:
1. Press the Power Key to turn the screen on.
2. Long press the
NOTE: If you have set an unlock pattern, PIN or password for your
phone (see chapter Settings – Personal – Security), you’ll need to
draw the pattern or enter the PIN/password to unlock your screen.
icon to unlock t he screen and keys.
Using the Touch Screen
Your phone’s touch screen lets you control actions through a variety of
touch gestures.
• Touch
When you want to type using the onscreen keyboard, select items
onscreen such as application and settings icons, or press onscreen
buttons, simply touch them with your finger.
• Touch and Hold
To open the available options for an item (for example, a message
or link in a Web page), touch and hold the item.
• Swipe or Slide
15
16
To swipe or slide means to quickly d rag your finger vertically or
horizontally acros s the screen.
• Drag
To drag, press and hold your finger with so me pressure before yo u
start to move your finger. While dragging, do not release your
finger until you have reached the target position.
• Pinch
In some apps (such as Maps, Browser, and Gallery), you can zoom
in and out by placing two fingers on the screen at once and
pinching them together (to zoom out) or spreading them apart (to
zoom in).
• Rotate the screen
For most screens, you can automatically change the screen
orientation from portrait to landscape by turning the phone
sideways.
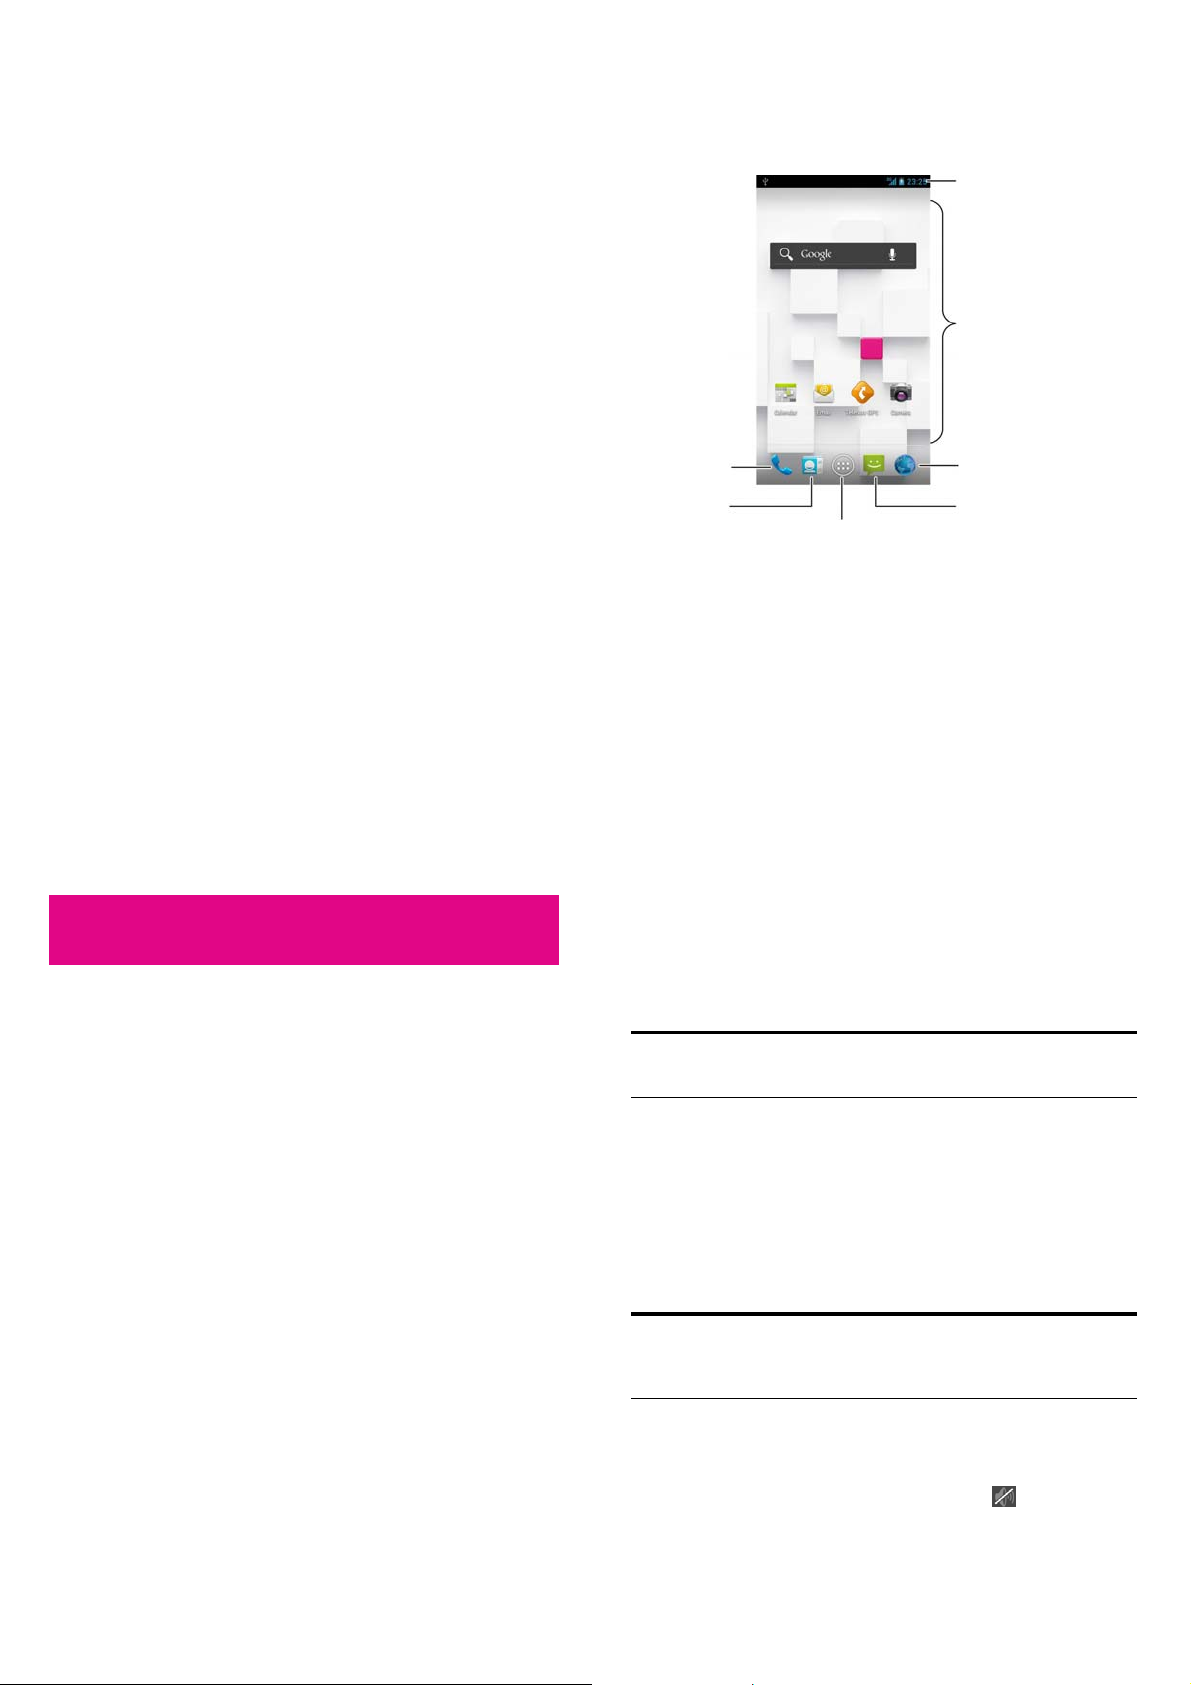
Getting to Know the Home Screen
The home screen is the starting point for your phone’s applica tions,
functions, and menus. You can customize your home screen by adding
application icons, shortcuts, folders, widgets, and more. Your home
screen extends beyond the initial screen. Swipe the screen left or right
to display additional screens.
Phone
People
Status &
Notifications
Shortcuts
& Widgets
Browser
Messages
Touc h to v iew all apps.
17
Personalizing
Changing the System Language
1. Touch the Home Key > Menu Key > System settings >
Language & input > Language.
2. Select the language you need.
Setting the Date and Time
1. Touch the Home Key > Menu Key > System settings > Date &
time.
2. Clear the Automatic date & time and Automatic time zone
check boxes if you want to set the date, time and time zone by
yourself.
3. Set the date, time, time zone, and date/time format.
Changing Ringtone and Notification
Sound
You can customize the ringtone for incoming calls and the default
notification sound quickly.
18
1. Touch the Home Key > Menu Key > System settings > Sound.
2. Touch Phone ringtone or Default notification.
3. Scroll through the ringtone list and se lect the ringtone you want to
use.
4. Touch OK.
NOTE: To adjust the ringtone for an individual caller, go to that
person's contact card in the People app, touch the Menu Key > Set
ringtone for that card.
Adjusting Volumes
1. Touch the Home Key > Menu Key > System settings > Sound >
Volumes.
2. Adjust the volume for music, video, games, and other media, the
ringtone and notification volume, and the alarm volume.
3. Touch OK to save.
TIP: You can adjust the media volume by pressing the Volume Keys
while using a media application. If no media application is active,
press the Volume Keys to adjust ringtone volume (or the earpiece
volume during a call).
To enable silent or vibration mode:
You can set the phone to silent or vibration mode by using one of the
following methods.
• Press and hold the Power Key and then touch to enable the
19
20

silent mode, touch to enable the vibration mode, or touch
to disable the silent mode.
• Press the Volume Keys down when no media application is active.
When the
vibration mode. When the
phone is in the silent mode.
• Touch the Home Key > Menu Key > System settings > Sound >
Silent mode, and touch Off, Vibrate or Mute.
icon appears in the status ba r, the phone is set to the
icon appears in the status bar, the
Applying New Wallpapers
You can set the wallpaper for the Home Screen or Lock Screen.
1. Touch the Home Key > Menu Key > Wallpaper.
2. Select a wallpaper source from Gallery, Live W allpaper s, or
Wallpapers and choose the image or animation you want to
use as the wallpaper. Some cropping may be needed for Gallery
images.
3. Touch CROP at the top of the screen (for Gallery images) or Set
wallpaper.
Changing Screen Brightness
1. Touch the Home Key > Menu Key > System settings > Display >
Brightness.
2. Tick the Automatic brightness box to make the phone adjust the
screen brightness automatically, or clear the tick box to adjust the
brightness manually.
3. Touch OK.
Protecting Your Phone with Screen
Locks
You can protect your phone by creating a screen lock. When enabled,
you need to draw a pattern or enter a numeric PIN or password to
unlock the phone’ s screen and keys.
1. Touch the Home Key > Menu Key > System settings > Security.
2. Touch Screen lock.
3. Touch Pattern, PIN or Password.
f If you touch Pattern, you’re guided to create a pattern you
must draw to unlock the screen. The first time you do this, a
short tutorial about creating an unlock pattern appears. Then
you’re prompted to draw and redraw your own pattern.
f If you touch PIN or Password, you’re prompted to set a
numeric PIN or a password you must enter to unlock your
screen.
The next time you turn on your phone or wake up the screen, you must
draw your unlock pat tern or enter your PIN or pa ssword to unlock it.
IMPORT ANT: Screen lock options are listed in the approximate order
of the strength of their security, starting with None and Long Time
Press, which provide no security. A pattern provides minimal security,
21
although it can be more convenient than the stronger options.
Protecting Your Phone with
Encryption
You can encrypt all the data on your phone: Google Accounts,
application data, music and other media, downloaded information, and
so on. If you do, you must enter a numeric PIN or password each time
you power on your phone.
WARNING! Encryption is irreversible. The only way to revert to an
unencrypted phone is to perf orm a factory data reset, which erases all
your data.
Encryption provides additional protection in case your phone is stolen,
and may be required or recommended in some organizations. Consult
your system administrator before turning it on. In many cases the PIN
or password you set for en cryption is controlled by the system
administrator.
Before turning on encryption, prepare as follows:
1. Set a lock screen PIN or password.
2. Charge the battery.
3. Plug in your phone.
4. Schedule an hour or mor e for the encryption proce s s: you mu s t not
interrupt it or you will lose some or all of your data.
When you're ready to turn on encryption:
22
5. Touch the Home Key > Menu Key > System settings >
Security > Encrypt phone.
6. Read the information about encryption carefully.
The Encrypt phone button is dimmed if your batte ry's no t charged
or your phone's not plugged in.
If you change your mind about encrypting your phone, touch the
Back Key.
WARNING! If you interrupt the encryption process, you will lose
data.
7. Touch Encrypt phone.
8. Enter your lock sc reen PIN or passwor d a nd touch Next.
9. Touch Encrypt phone again.
The encryption process starts and displays its progress. Encryption can
take an hour or more, during which time your phone may restart
several times.
When encryption is complete, you're prompted to enter your PIN or
password.
Subsequently, you must enter your PIN or password each time you
power on your phone , to decrypt it.
23
24
Managing Notifications
Knowing the Basics
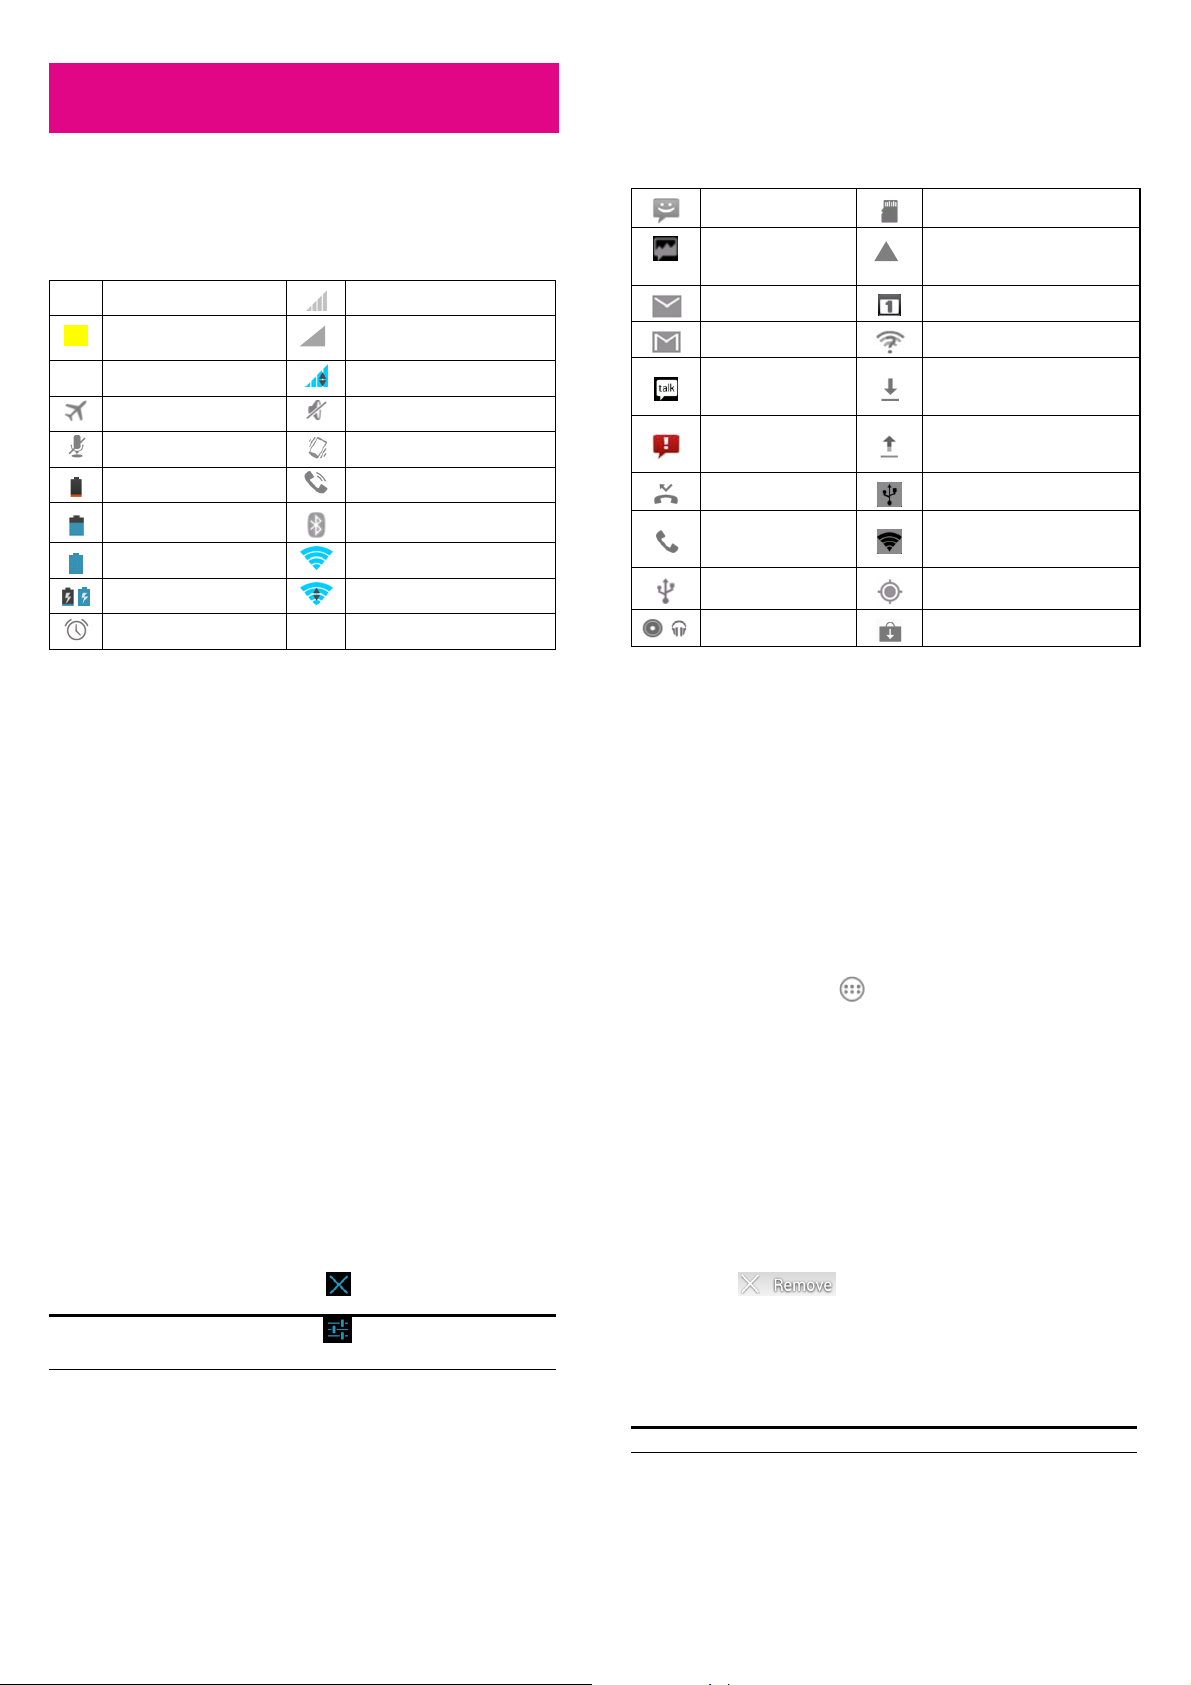
Monitoring the Phone Status
The status bar at the top of the home screen provides phone and service
status informat ion on the right side. You can monitor the phon e status
by checking the following status icons.
G
GPRS connected
2G
EDGE connected
3G
3G connected
Flight mode
Phone microphone off
Battery low
Battery partially drained
Battery full
Battery charging
/
Alarm set
Signal strength
X
No signal
Mobile data in use
Ringer off
Vibrate mode
Speaker on
Bluetooth on
Connected to a Wi-Fi network
Wi-Fi in use
Notification Icons
The status bar at the top of the home screen provides notification alerts
on the left. You can view the following notification icons.
New SMS
New MMS
New email
New Gmail message
New Google Talk
instant message
Problem with
SMS/MMS delivery
Missed call
Call in progress
USB connected
Song is playing
/
microSD card unmounted
microSD card unexpe ctedly
!
removed
Upcoming event
New Wi-Fi netwo rk detecte d
Downloading data
Sending data
USB tethering is on
Portable Wi-Fi hots pot or Wi-Fi
direct is on
GPS on
Updates available
25
Open/Close th e N o ti fication Panel
Notifications report the arrival of new messages, calendar events, and
alarms, as well as ongoing events, such as when you've configured
your phone as a Wi-Fi hotspot. You can open the notification panel
to view the details of notific atio ns.
• To open the notification panel, swipe your finger down from the
top of the screen.
• To close the notification panel, swipe your finger up from the
bottom of the screen or touch the Back Key.
Respond to or Remove a Notification
In the notification panel, you can respond to a notification or remove
the notifications.
• To respond to a notification, just touch it.
• To remove a notification, swipe it sideways.
• To remove all notifications, touch in the top right corner.
26
Managing Shortcuts and Widgets
Add Shortcuts and Widgets
1. Touch the Home Key > .
2. Touch APPS or WIDGETS to view the available apps and
widgets.
3. Touch and hold an item to add widget or shortcut to the Home
Screen.
Move Shortcuts or Widgets
1. Touch and hold a widget or shortcut on the Home Screen.
2. Drag it to the place you n eed.
Remove Shortcuts or Widgets
1. Touch and hold a widget or shortcut on the Home Screen.
2. Drag it to
to remove it.
TIP: In the notification panel, touch
list to get to the Settings menu quickly.
27
at the top of notificatio ns
Adjust Widget Size
1. Touch and hold a widget on the Home Screen and th en r elea s e it.
2. An outline appears on the widget. Drag the outline to resize the
widget.
NOTE: Not all widgets can be resized.
28

Rearranging the Favorites Tray
The Home Screen includes a customizable favorites tray visible
from all extended Home Screens. You can drag apps, shortcuts,
and other priority items in or out of the favorites tray for instant
access from Home Screen.
To remove items from the favorites tray:
Touch and hold an item in the favorites tray and drag it out of the
tray.
To add items to the favorites tray:
Touch and hold an item and drag it onto the favorites tray.
If the favorites tray is full, you need to remove an item in the tray.
Entering Text
You can enter text using the onscreen keyboard. Some apps open it
automatically. In others, you open it by touching where you want to
type. You can touch the Back Key to hide the onscreen keyboard.
Change Input Methods
1. When you use the onscreen keyboard to enter text, the icon
appears on the notification panel.
2. Open the notification panel and touc h Select input method.
3. Select an input method you need.
Android Keyboard
The Android Keyboard provides a layout similar to a desktop computer
keyboard. Turn the phone sideways and the keyboard will change from
portrait to landscape. The landscape keyboard is not supported in all
applications.
• Touch the alphabetic keys to enter letters. Touch and hold some
specific keys to enter associated accented letters or numbers. For
example, to enter È, touc h an d ho ld
letters and number 3 appear. Then slide to choose È.
• Touch
This key also changes to indicate the current case you are using :
uppercase.
to use uppercase. Double -tap to lock uppercase.
for lowercase, for uppercase, and when locked in
and the available accented
29
• Touch to delete the text before the cursor.
• Touch
top of the keyboard.
• Touch
• Touch
• Touch and hold
Android keyboard.
to select numbers and symbols. You can then touch
to find more. Also, frequently used symb ols are displayed on
to start a new line.
to use voice input.
to change the input languages or set up the
Swype Keyboard
Swype is a fast way to enter text. It lets you type a word by drawing
through letters. Swype a word, then lift your fing er.
Put your finger on the first letter of the word and draw a path from
letter to letter, lifting up after the last letter.
Start of the word
• Touch
This key also changes to indicate the current ca se you are using:
to use uppercase. Double-tap to lock uppercase.
for lowercase, for uppercase, and when locked in
End of the word
30
uppercase.
• Touch
• Touch
menu.
• Touch
• Touch
• Touch
• Touch
to change the language.
to view the tips. Touch and hold to open settings
to select numbers and symbols.
to delete the text before the cursor.
to start a new line.
to use voice input.
Touch Input Settings
Choose the touch input settings by touching the Menu Key > System
settings > Language & input from the Home Screen.
In the KEYBOARD & I N PUT M ETH O DS sec tio n, yo u can set the
default input method and choose the settings for input methods.
Editing Text
• Move the insertion point: Touch where you want to type.
The cursor blinks in the new position, and a tab appears below it.
Drag the tab to move the cursor.
• Select text: Touch and hold or double-tap within the text.
31
32
The nearest word highlights, with a tab at each end of the se lection.
Drag the tabs to change the selection.
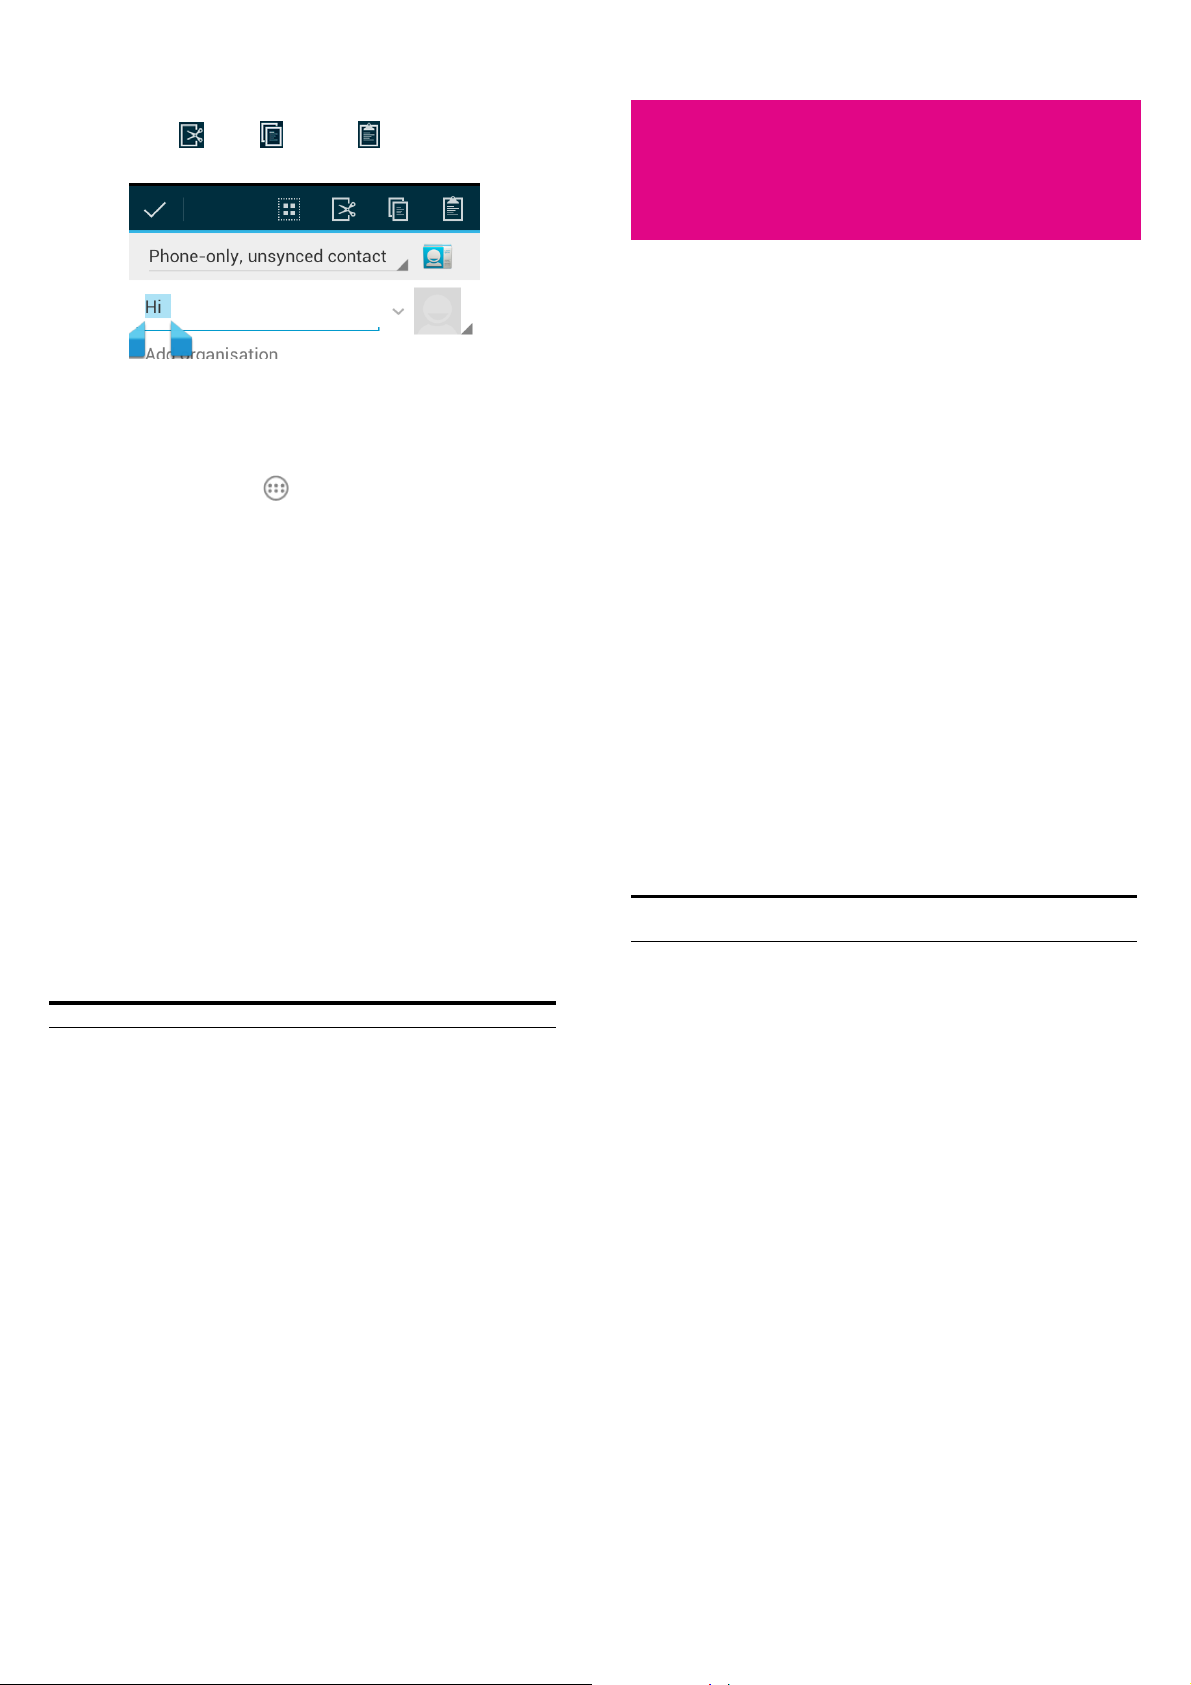
• Cut, copy, paste: Select the text you wan t to manipul ate. Then
touch the Cut
, Copy , or Paste button:
Opening and Switching apps
Open an App
1. Touch the Home Key > .
2. Slide left or right on the screen, and touch an app to open it.
Switch Between Recently Opened Apps
1. Touch and hold the Home Key.
A list of the names and thumbnails of apps you’ve used recently
opens. If you’ve been using more apps than can fit on the screen,
you can scroll the list up and down.
2. Touch a thumbnail to open that app.
You can swipe a thumbnail sideways to remove it from the list.
Connecting to Networks
and Devices
Connecting to Mobile Networks
Select Network Operator
1. Touch the Home Key > Menu Key > System settings > More >
Mobile networks > Network operators.
2. Touch Search networks to search for all available networks.
3. Touch a network in the network list to register manually.
You can also touch Select automatically to select preferred
network automatically.
Control Mobil e Data Use
To enable or disable data acce ss:
1. Touch the Home Key > Menu Key > System settings > More >
Mobile networks.
2. Tick the Data enabled check box to enable data access over the
mobile network. Clear the check box to disable data access.
33
To get data services when roaming:
1. Touch the Home Key > Menu Key > System settings > More >
Mobile networks.
2. Tick the Data roaming check box.
IMPORTANT: Data roaming may incur significant roaming charges.
Use 2G Network Only to Save Power
1. Touch the Home Key > Menu Key > System settings > More >
Mobile networks.
2. Tick the Use only 2G networks check box to save battery
power.
Connecting to Wi-Fi
Wi-Fi is a wireless networking technology that can provide Internet
access at distances of up to 100 meters, depending on the Wi-Fi router
and your surroundings.
Turn Wi-Fi On and Connect to a Wi-Fi Network
1. Touch the Home Key > Menu Key > System settings > Wi-Fi.
2. Slide the Wi-Fi switch to the ON position to turn on Wi-Fi.
The Wi-Fi networks that your phone has detected are displayed
with their names and security settings. If your phone finds a
network that you connected to previously, it connects to it.
3. Touch a network name to connect to it.
34
NOTE: If the network is secured, you're pr ompted to ente r a password
or other credentials. (Ask your network administrator for details.)
Get Notified of Open Networks
1. Touch the Home Key > Menu Key > System settings > Wi-Fi.
2. Slide the Wi-Fi switch to the ON position.
3. Touch the Menu Key > Advanced.
4. Tick the Network notification check box.
When Wi-Fi is on, you receive notifications in the Status bar when
your phone detects an open Wi-Fi network. Clear the check box to
turn off notifications .
Add a Wi-Fi Network
You can add a Wi-Fi network if the network does not broadcast its
name (SSID), or add a Wi-Fi network when you are out of range.
To connect to a secured network, you first need to get the security
details from the network's administrator.
1. Touch the Home Key > Menu Key > System settings > Wi-Fi.
2. Slide the Wi-Fi switch to the ON position.
3. Touch ADD NETWORK.
4. Enter the network SSID (name). If necessary, enter security or
other network configuration detail s.
5. Touch Save.
35
36

Forget a Wi-Fi Network
You can make your phone forget about the details of a Wi-Fi network
that you have added - for example, if you don’t want the phone to
connect to it automatically or if it is a netwo rk that you no longer use.
1. Touch the Home Key > Menu Key > System settings > Wi-Fi.
2. Slide the Wi-Fi switch to the ON position.
3. Touch the Wi-Fi network name and then touch Forget.
Connecting to Bluetooth Devices
Bluetooth® is a short-range wireless communication technology. Phones
or other devices with Bluetooth capabilities can exch ange i nf ormat ion
wirelessly within a distance of about 10 meters. The Bluetooth devices
must be paired before the communication is performed.
Turning Bluetooth On/Off
1. Touch the Home Key > Menu Key > System settings >
Bluetooth.
2. Slide the Bluetooth switch to the ON or OFF position.
When Bluetooth is on, the
Making Your Phone Visible
In order to work with other phones or device s th at have Bluetooth, you
need to make your phone ‘vi si b le ’ to t hem.
1. Touch the Home Key > Menu Key > System settings >
icon will appear in the Status bar.
Bluetooth.
2. Slide the Bluetooth switch to the ON positi on .
3. Touch your device name on the top of the screen to make your
phone visible or invisible.
NOTE: Touch the Menu Key > Visibility timeout to set the Bluetooth
visibility timeout of your phone.
Change the Device Name
When your phone is visible to other Bluetooth devices it will be seen
by its name and you can assign it any name you want – like ‘Ben’s
Phone’.
1. Touch the Home Key > Menu Key > System settings >
Bluetooth.
2. Slide the Bluetooth switch to the ON position.
3. Touch the Menu Key > Rename phone.
4. Edit the name and touch Rename.
Pair with a Bluetoo t h Device
1. Touch the Home Key > Menu Key > System settings >
Bluetooth.
2. Slide the Bluetooth switch to the ON position.
3. Touch SEARCH FOR DEVICES. Your phone scans for and
displays the IDs of all available Bluetooth devices in range.
4. Touch the device you want to pair with.
Follow the instructions to comple te the pairing. If you're prompted to
37
enter a passcode, try entering 0000 or 1234 (the most common
passcodes), or consult the documentation that came with the device.
Unpair From a Bluetooth Device
You can make your p hone forget its pairing connection with another
Bluetooth device. To connect to the device again, you may n eed to
enter or confirm a passcode again.
1. Touch the Home Key > Menu Key > System settings >
Bluetooth and make sure Bluetooth is turned on.
2. In the list of paired devices, touch the icon
Bluetooth device you want to unpair from.
3. Touch Unpair.
beside the
Connecting to Your Computer via
USB
You can connect your phone to a computer with a USB cable and
transfer music, pictures, and othe r files in both directions. Your phone
stores these files in internal storage or on a removable microSD ca rd.
If you are using USB tethering, you must turn that off befo re you can
use USB to transfer files between your phone and computer.
Connect Your Phone to a Computer via USB
1. Connect your phone to the PC with a USB cable.
2. Open the Notification pane l and touch the
icon.
38
3. Choose one of the following options:
f Media device (MTP): Transfer media files on Windows, or
using Android File Transfer on Mac.
f Camera (PTP): Transfer photos using camera software, and
transfer any files on the computers that don’t support MTP.
f Install driver: Install the driver file of your phone in your
computer.
Disconnect Your Phone from the Computer
To disconnect the phone from the computer, simply unplug the USB
cable when you’re finished.
Remove the microSD Card from Your Phone
If you need to remove the microSD card while the phone is on, you
must unmou nt it first.
1. Touch the Home Key > Menu Key > System settings >
Storage.
2. Slide down the screen and touch Unmout SD card.
3. You can now safely remove the microSD card from the phone.
Sharing Your Mobile Data
Connection
You can share your phone’s data capabilities through tethering or by
activating the mobile hotspot feature to create a portable Wi-Fi hotspot.
39
40

Share Your Mobile Data Connection via USB
You can access the Internet on your computer via the USB tethering
feature of your pbone. The feature needs data connection on a mobile
network and may result in data charges.
1. Connect your phone to your computer with a USB cable.
2. Touch the Home Key > Menu Key > System settings > More >
Tethering & portable hotspot.
3. Tick the USB tethering check box. Your computer is now sharing
your phone's data connection.
4. To stop sharing your data connection, unchec k USB tethering.
Share Your Mobile Data Connection as a Wi-Fi
Hotspot
You can share your phone’s data connection with other devices by
turning your phone into a portable Wi-Fi hotspot. This feature needs
data connection on a mobile network and may result in data charges.
NOTE: When the portable Wi-Fi hotspot feature is enabled, you
cannot use your phone’s applications to access the Internet via its
Wi-Fi connection. You still remain connected to the Internet via your
mobile data network.
1. Touch the Home Key > Menu Key > System settings > More >
Tethering & portable hotspot.
2. Slide the Wi-Fi hotspot switch to the ON position. After a
moment, the phone starts broadcasting its Wi-Fi network name
(SSID).
3. To stop sharing your data connection, slide the Wi-Fi hotspot
switch to the OFF position.
Rename or Secure Your Wi-Fi Hotspot
You can change the name of your phone's Wi-Fi network name (SSID)
and secure your portable Wi-Fi hotspot.
1. Touch the Home Key > Menu Key > System settings > More >
Tethering & portable hotspot > Configure Wi-Fi hotspot.
2. Set your name and security options as follows:
f Network SSID: Enter or edit a network SSID (name) that other
devices see when scanning for Wi-Fi networks.
f Security: Choose a security option: Open (not recommended),
WPA PSK or WPA2 PSK (other users can access your mobile
hotspot only if they enter the correct password). When you
select WPA PSK or WPA2 PSK, touch the Password field to
edit the security password.
3. Touch Save to save your settings.
Connecting to Virtual Private
Networks
Virtual private networks (VPNs) allow you to connect to the resources
inside a secured local network. VPNs are commonly deployed by
corporations, schools, and other institutions to let people access local
network resources when not on campus, or when connected to a
wireless network.
41
Depending on the type of VPN you are using, you may be required to
enter your login credentials or install security certificates before you
can connect to your VPN. You can get this information from your
network administrator.
Add a VPN
1. Touch the Home Key > Menu Key > System settings > More >
VPN.
2. Touch Add VPN network and fill in the information provided
by your network administrator.
3. Touch Save.
The VPN is added to the list on the VPN screen.
Connect to a VPN
1. Touch the Home Key > Menu Key > System settings > More >
VPN.
2. Touch the VPN that you want to connect to.
3. When prompted, enter any requested credentials, and then touch
Connect.
When you are connected, the VPN connected icon appears in the Status
bar.
42
4. Touch Save.
Delete a VPN
1. Touch the Home Key > Menu Key > System settings > More >
VPN.
2. Touch and hold the VPN that you want to delete.
3. Touch Delete network.
Modify a VPN
1. Touch the Home Key > Menu Key > System settings > More >
VPN.
2. Touch and hold the VPN that you want to modify.
3. Touch Edit network and edit the VPN settings you want.
43
44
Phone Calls
You can place calls from the Phone app, the People app, or other apps
or widgets that display contact informa tion. Wherever you see a phone
number, you can usually touch it to dial.
Answering or Rejecting Calls
When you receive a phone call, the Incoming Call screen opens,
displaying the caller ID and any a ddi tional information about the caller
that you've entered in People. You can answer or reject the call, or
reject it with a text message.
Answer a Call
Placing and Ending Calls
Place a Call by Dialing
1. Touch the Home Key > .
2. In the dialer tab
keypad. Touch
NOTE: As you enter digits, your phone searches for contacts that
match. If you see the number you want to dial, touch it to place the
call immediately without entering the rest of the number.
3. Touch the Phone icon
TIP: To make an international call, touch and hold the 0 key to enter
the plus (+) symbol. Then enter the international prefix for the
country, followed by the full phone number.
End a Call
During a call, touch on the screen.
, enter the phone number with the on-screen
to delete wrong digits.
below the keypad to dial.
45
When you receive a phone call, drag over to answer the call.
NOTE: To silence the ringer before answering the call, press t h e
Volume Keys up or down.
Reject a Call
When you receive a phone call, drag over to reject the call.
You can also drag
text message to the caller.
TIP: To edit the text response from within the Phone app, touch the
Menu Key > Settings > Quick responses.
over to reject the cal l and send a preset
Working with the Call Log
The Call log is a list of a ll the calls you've placed, received, or missed.
It is a convenient way to redial a number, return a call, or add a number
to your Contacts.
46
To open the call log, you can touch the Home Key > > .
Place a Call from the Call Log
1. Open the call log.
2. Touch a number for more information about the call, or touch
beside it to call back.
NOTE: You can touch
call log type you want to view.
on the bottom of the screen and select the
Add a Call Log Number as a Contact
1. Open the call log.
2. Touch a number to view more call information.
3. Touch
4. To add the number to an existing contact, touch a contact in the
list. To add a new contact, touch CREATE NEW CONTACT.
.
Take Other Actions on a Ca ll Log Entry
1. Open the call log.
2. Touch a number to view more call information. While vie win g
the call details, you can:
f Touch the number to ca ll it.
f Touch the Menu Key > Edit number before call to edit the
number in the dialer before c al ling it.
f Touch to send a message.
f Touch to add the number as a contact.
Delete the Call Log
1. Open the call log.
2. Touch the Menu Key > Clear call log.
3. Touch to select the call log(s) and then touch
4. Touch OK to delete the selected call log(s).
NOTE: You can also touch a number in the ca ll lo g s creen, and touch
the Menu Key > Remove from call log to delete the call log of the
number.
.
Calling Your Contacts
Call a Contact
1. Touch the Home Key > and then touch the Contact tab .
2. Flick the screen up or down to view all your contacts with phone
numbers.
TIP: You can search for a contact by touching
the screen.
3. Touch a contact or number to call it.
on the bottom of
47
48

Call a Favorite Contact
1. Touch the Home Key > and then touch the Contact tab
.
2. Frequently called contacts or numbers are listed on the top of the
screen. Touch a contact or number to call it.
Checking Voicemail
1. Touch the Home Key > .
2. Touch and hold the 1 key in the dialer.
3. Follow the voice prompts to listen to and manage your voicemail
messages.
NOTE: To set your voicemail service, touch the Menu Key > Settings
in the dialer and to uch the vo ic email settin g s you wan t t o change . F or
detailed information, pl ease co ntact your serv ice prov id er.
Using Options During a Call
During a call, you will see a number of onscreen options. Touch an
option to select it.
• Touch
• Touch
to turn on or off the speaker.
to mute or unmute your microphone.
• Touch to make another call separately from the first call, which
is put on hold.
• Touch
• Touch
• Touch
• Touch
• Touch
WARNING! Because of higher volume levels, do not place the p hone
near your ear during speakerphone use.
to switch to the dialer, for example to enter a code.
to switch to another call in progress.
to hold or unhold the current call.
to merge separate calls as a singl e con fer en ce ca ll.
to end the current call.
Managing Multi-Party Calls
When the call waiting and three-way call features are available, you
can switch between two calls or set up a conference call.
NOTE: The call waiting and three-way call features need network
support and may result in additional charges. Please contact your
service provider for more information.
Switch Between Current Calls
When you’re on a call, your phone screen in forms you that another call
is coming in and displays the caller ID.
To respond to an incoming call while you’re on a call:
Drag
over to answer the call. (This puts the first caller on
49
hold and answers the s econd call.)
To switch bet ween two call s :
Touch
on the screen.
Set Up a Conference Call
With this feature, you can talk to two people at the same time.
1. On the dialer screen, enter a number and touch
2. Once you have established the connection, touch
the second number. (This puts the first caller on hold and dials
the second number.)
3. When you’re connected to the second party, touch
If one of the people you called hangs up during your call, you and the
remaining caller stay connected. If you initiated the call and are the
first to hang up, all callers are disconnected.
To end the conference call, touch
.
.
and dial
.
Adjusting Your Call Settings
Use Fixed Dialing Numbers
Fixed Dialing Numbers (FDN) allows you to restrict outgoing calls to a
limited set of phone numbers.
1. Touch the Home Key > Menu Key > System settings > Call
settin g s > F i xed Diali n g N umbers.
50
2. The following options are available:
f Enable FDN: Input the PIN2 code to enable the FDN feature.
f Change PIN2: Change the PIN2 code for FDN access.
f FDN list: Manage the FDN list.
NOTE: The PIN2 code is provided by your carrier. Entering an
incorrect PIN2 code more times than allowed can cause the phone to
lock. Contact the service provider for assistance.
Edit Quick Response to Rejected Callers
1. Touch the Home Key > Menu Key > System settings > Call
settings > Quick responses.
2. Touch the text message to edit it.
Set V oicemail
1. Touch the Home Key > Menu Key > System settings > Call
settings.
2. Touch Voicemail service to check. Voicemail service provided
by your carrier is the default.
3. Touch Voicemail settings > Voicemail number to edit the
voicemail number if necessary.
Set TTY Mode
Your phone is a TTY compatible device. A TTY device can allow people
who have hearing or speech disabilities to communicate by telephone.
Simply connect the TTY device to the phone’s headset jack.
1. Touch the Home Key > Menu Key > System settings > Call
51
52

settings > TTY mode.
2. Select one of the following options.
f TTY Off: Users who can hear and talk can disable TTY
support.
f TTY Full: Users who cannot talk or hear may use this mode to
send and receiv e text messages through TTY device.
f TTY HCO: Users who can hear, but cannot talk, may use this
mode to listen to conversation of the other party, and respond
via text messages.
f TTY VCO: Users who can talk, but cannot hear, may use this
mode to talk through the phone and receive responses via text
messages.
Turn on/off Hearing aids
Check the Hearing aids check box to turn on hearing aid compatibility,
uncheck the check box to turn off it.
Use Wi-Fi Calling
With Wi-Fi Calling you can send and receive calls and messages over a
Wi-Fi network using your existing T-Mobile plan. Touch Home Key >
Menu Key > System settings > Call settings > Wi-Fi Calling > Help
or contact the service provider for details.
Set IP dial
Check or uncheck the IP dial check box to enable/disable IP dial
function. Touch IP dialing number to set up the IP dialing number.
Set Speed Dials
You can touch and hold the 1 ~ 9 key from the dialer to call the
corresponding speed dial number.
The number key 1 is reserved to speed dial your voicemail.
To assign a speed dial key:
1. Touch the Home Key > Menu Key > System settings > Call
settings > Speed dial.
2. Touch a speed dial key.
3. Enter a phone number or select one from the contact list.
4. Touch OK.
Bar Certain Calls
The call barring feature allows you to bar certain types of calls from
your phone.
1. Touch the Home Key > Menu Key > System settings > Call
settings > Call barring settings.
2. Set the restriction of specific types of calls from your phone.
Forward Incoming Calls
The call forwarding feature allows you to forward your incomin g cal ls
to another phone number.
1. Touch the Home Key > Menu Key > System settings > Call
settings > Call forwarding.
2. Touch an available option ( Always forward, Forward when
busy, Forward when unanswered, or Forward when
53
unreachable) to enable it.
Other Options
1. Touch the Home Key > Menu Key > System settings > Call
settings > Additional settings.
2. Touch Caller ID to choose whether your number is displayed
when someone receives your outgoing call. Or check Call waiting
to get notified of incoming calls dur ing a call.
NOTE: Please contact the service provider to check whether the caller
ID and call waiting features are available.
Internet Call Settings
To add an Internet calling account:
1. Touch the Home Key > Menu Key > System settings > Call
settings > Accounts.
2. Touch ADD ACCOUNT.
3. Follow the instructions from your Internet calling service
provider to configure the settings for your account.
4. Touch SAVE.
54
2. Touch Use Internet calling.
3. Touch the Internet calling option you want.
To configure your phone to re ceive Internet calls:
By default, your phone is configured to make Internet calls, but not to
ensure that you will receive them. But you can configure your phone to
accept Internet calls made to an Internet calling account you added to
your phone.
1. Touch the Home Key > Menu Key > System settings > Call
settings > Accounts.
2. Tick the Receive incoming calls check box. Checking this
setting will reduce your batter y life between charges.
To configure which calls use Internet calli ng :
You can configure your phone to place all calls using Internet calling
(when you’re connected to a Wi-Fi network ), jus t calls to Inter net
calling addresses, or to ask each time you place a call.
1. Touch the Home Key > Menu Key > System settings > Call
settings.
55
56

People
You can add contacts on your phone and synchronize them with the
contacts in your Google account or other accounts that support contact
syncing.
To see your contacts, touch the Home Key >
can touch the tabs on the top of the scre en to qui ckly switch to the
contact groups or frequently contacted contacts .
. From there, you
Adding a New Contact
1. Touch the Home Key > and touch the all contacts tab .
2. Touch
3. Touch the account field on the top of the screen to choose where
to save the contact.
4. Enter the contact name, phone numbers, email addresses, and
other information.
5. Touch DONE to save the contact.
to add a new contact.
Setting Up Your Own Profile
Opening Your Contact List
1. Touch the Home Key > and touch the all contacts tab
to access your contact list.
2. Scroll through the list to view all your contacts.
3. Touch a contact to view its details.
TIP: If you have many contacts stored, you'll see a slider when you
touch the right side of the screen. To go directly to a letter, touch and
hold the slider while dragging it to a letter.
57
Bluetooth, Email or Messages, etc.
Import Contacts From the SIM Card
1. Touch the Home Key > .
2. Touch the Menu Key > Import/export > Import from SIM
card.
3. Touch to select the contacts you need and then touch .
Import Contacts From the microSD Card
1. Touch the Home Key > .
2. Touch the Menu Key > Import/export > Import from storage.
3. Select to import one, multiple or all vCard files and touch OK.
4. Select the vCard file(s) and to uch OK.
Export Contacts to the SIM Card
1. Touch the Home Key > .
2. Touch the Menu Key > Import/export > Export to SIM card.
3. Touch to select the contacts you need and then touch
4. Read the promptness and then touch OK.
.
You can create your own name card in your phone.
1. Touch the Home Key >
2. Scroll to the top of the screen and touch Set up my pr ofi le.
3. Edit your profile information and touch DONE.
and touch the all contacts tab .
Importing, Exporting, and Sharing
Contacts
You can import/export contacts from/to your SIM or microSD card.
This is especially u seful when you need to transfer contacts between
different devices. You can also quickly share your contacts using
58
3. The phone will prompt you with the name of the vCard file.
Touch OK to create the file.
Share Contacts
1. Touch the Home Key > and touch the all contacts tab .
2. Touch the Menu Key > Import/export > Share visible
contacts.
3. Choose a sending method. Yo u can either send it via Bluetooth to
another device, or as an at ta c hment in an Email, a Gmail, or
messages then follow the prompt.
Working with Favorite Contacts
In the frequentl y c ontacted contacts tab, you can find your favorite
contacts and frequently contacted contacts.
Add a Contact to Favorites
You can add the contac ts used frequently to favorites, so you can find
them quickly.
Export Contacts to the microSD Card
1. Touch the Home Key > .
2. Touch the Menu Key > Import/export > Export to storage.
59
1. Touch the Home Key >
2. Touch a contact and then touch
and touch the all contacts tab .
60
next to the contact name.

Remove a Contact From Favorites
1. Touch the Home Key > and touch the frequently contacted
contacts tab
2. Touch a favorite contact and then touch
name.
.
next to the contact
Working with Groups
View Your Contact Groups
1. Touch the Home Key > and touch the contact groups tab
.
2. Scroll through the list to view the preset groups and the groups
you create.
3. Touch a group to view its members.
Add a New Group
1. Touch the Home Key > and touch the contact groups tab
.
2. Touch
3. Touch the account field on the top of the screen to choose an
account for the group.
4. Enter the group name and touch DONE.
to create a new group.
Add Members to a Group
1. Touch the Home Key > and touch the contact groups tab
.
2. Touch a group and then touch the Menu Key > Edit.
3. Touch Type person’s name, and type the name of contacts you
need to add. The corresponding person in the contacts will be
displayed.
4. Touch the contacts you need as the group members.
Delete a Group
1. Touch the Home Key > and touch the contact groups tab
.
2. Touch a group and then touch the Menu Key > Delete.
3. Touch OK to disband the group. The contacts in the group will
not be deleted.
Edit a Group
1. Touch the Home Key > and touch the contact groups tab
.
2. Touch a group and then touch the Menu Key.
3. Touch Edit to edit the group name. Touch Type person’s name
to type the name of the contacts you need to add.
61
Searching for a Contact
1. Touch the Home Key > .
2. Touch
3. Input the contact name you wa nt to search for. The contac ts
matched will be listed.
on the bottom of the screen.
Editing Contacts
Edit Contact Details
1. Touch the Home Key > .
2. Touch a contact you need to edit and then touch the Menu Key >
Edit.
3. Edit the contact and touch DONE.
Set a Ringtone for a Contact
1. Touch the Home Key > .
2. Touch a contact you want to set a ringtone for and then touch the
Menu Key > Set ringt on e.
3. Select a ringtone you like and touc h OK.
Delete a Contact
1. Touch the Home Key > .
62
2. Touch a contact you want to delete and touch the Menu Key >
Delete.
3. Touch OK to confirm.
To delete several contacts, you can:
1. Touch the Menu Key > Select item(s) in the all contacts screen.
2. Touch to select the contacts you want to rem ove and then touch
.
3. Touch OK to confirm.
Accounts
Adding or Removing Accounts
You can add multiple Google accounts and Microsoft Exchange
ActiveSync accounts. You may also add other kinds of accounts,
depending on the apps installed on your device.
Add an Account
1. From the Home Screen, touch the Menu Key > System settin gs >
Accounts & sync.
2. Touch ADD ACCOUNT.
63
64

3. Touch the type of account you want to add.
4. Follow the onscreen steps to enter the information about the
account. Most accounts require a username and password, but the
details may vary. You may also need to obtain some information
from IT support or system administrator.
5. When the account is successfully added, it is displayed in the
Accounts & sync list.
Remove an Account
Removing an account will delete it and all information associated
with it from your device, such as emails and contacts.
1. From the Home Screen, touc h the Menu Key > System
settings > Accounts & sync.
2. Touch the account.
3. Touch the Menu Key > Remove account > Remove account.
Configuring Account Sync
Configure Auto Sync Setting
1. Open the Accounts & sync settings screen.
Your accounts and sync status are displayed.
automatic sync is enabled for some or all of the accounts data,
and gray if automatic sync is disa bled.
2. Touch the ON/OFF switch to turn on or off automatic sync.
turns green if
X When automatic sync is turned on, changes you make to
information on your device or on the web are automatically
synced with ea ch other.
X When auto sync is turned off, you need to sync manually to
collect emails, updates, or other recent information.
Sync Manually
1. Open the Accounts & sync settings screen.
2. Touch the account whose data you want to sync.
3. Touch the Menu Key > Sync now.
Change an Account’s Sync Settings
1. Open the Accounts & sync settings screen.
2. Touch the account whose sync settings you want to change. The
Sync settings screen appears, showing a list of information the
account can sync.
3. Check or uncheck items as you need. Checked types of
information on the device and the web will be kept in sync when
auto-sync is turned on.
65
Email
Touch in the Home Screen and s elect Email. Use it to read and
send emails from services other than Gmail.
Set Up the First Email Account
66
servers. Please contact your mobile service provider and email
service provider for more information.
2. Set the email checking frequency, download options, account name
and other settings. Touch Next when you finish.
Your phone will show the inbox of the email account and start to
download email messages.
TIP: To add more email accounts, open Email to get the Inbox
screen. Then touch the Menu Key > Account settings and touch
ADD ACCOUNT at the top right of the screen.
Checking Your Emails
Your device can automatically check for new emails at the interval you
set when setting up the account.
You can also check new emails manually by touching
email account’s boxes .
in any of the
1. When you open Email for the first time, enter your email address
and password and then touch Next.
NOTE: Your device will connect to the Internet and verify in coming
and outgoing server settings before proceeding to the next step. If
the email service provider is not a popular one, you need to select the
type of your account and edit the settings for incomi ng and outgoing
67
Responding to an Email
You can reply to or forward a message that you receive. You can also
delete messages and manage them in other ways.
Rely to or Forward an Email
1. Open the email you want to reply to or forward from Inbox.
68

2. Do the following as you need:
To… do…
Reply to the sender,
Reply to the sender and all recipients
of the original message,
Forward the message,
3. Edit your message and touch .
touch > Reply.
touch > Reply all.
touch > Forward.
Mark an Email as Unread
You can return a read email to the unread state—for example, to
remind yourself to read it again later. You can also mark a batch of
emails as unread.
• While reading a message, touch the Menu Key > Mark as
unread.
• While in a message list (for instance , the inbox), touch the
checkboxes before the messages and then touch
.
Delete an Email
You can delete an email from its folder. You can also dele te a batch of
emails.
• While reading a message, touc h > OK.
• While in a message list (for instance , the inbox), touch the
checkboxes before the messages and then touch > OK.
Writing and Sending an Email
1. Open your email Inbox.
2. Touch
3. If you have more than one email account added on the device,
touch the sender line to select the account you want to use for
sending the message.
4. Enter a contact name or email address in the ‘To’ field. Separate
each recipient with a comma. You can also touch
recipients from your contacts.
5. Enter the em ail subject a nd compose th e email text.
6. Touch Menu Key > Attach file to add audio files, images, videos
and other types of files as attachment.
7. Touch
to open the compose screen.
to select
at the top right of the screen to send the message.
Adding a Signature to Your Emails
You can set a few lines of plain text as a signature for every outgoing
email message from an account, such as your name and contact
information.
1. Open the Email app.
2. Touch the Menu Key > Account settings and select the account
69
you want to add a signature to.
3. Touch Signature and enter the text.
4. Touch OK.
Adding and Editing Email
Accounts
Add an Email Account
After setting up your first email account (see Email – Set Up the First
Email Account), you can add more email accounts and manage them
separately.
1. Open Email to get the Inbox screen.
2. Touch the Menu Key > Account settings and touch ADD
ACCOUNT at the top right of the screen.
3. Set up the account as you set up the first one.
70
3. Make the changes you want and touch the Back Ke y.
Remove an Email Account
1. Open Email to get the Inbox screen.
2. Touch the Menu Key > Account settings and touch the account
you want to remove.
3. Touch Remove account > OK.
Changing General Email Settings
1. General settings apply to all email accounts you add.
2. Open Email to get the Inbox screen.
3. Touch the Menu Key > Account settings > General.
4. Make the changes you want and touch the Back Ke y.
Edit an Email Account
You can change a number of settings for an account, including how
often you check for email, how you’re notified of new mails, and
details about the servers the account uses to send and receive mails.
1. Open Email to get the Inbox screen.
2. Touch the Menu Key > Account settings and touch the acco unt
whose settings you want to change.
71
72

GmailTM
After signing in to your Google account on the device, you can send
and retrieve Gmail messages with the Gmail app.
NOTE: This feature may not be available in a certain region or with
a certain service provider.
Opening Your Gmail Inbox
Touch in the Home Screen and s elect Gmail. The Inbox screen
appears.
If you haven’t signed in, you will be prompted to do so or create a
new account.
Touch
download new messages.
Switching Accounts
Gmail displays conversations, messages, and settings from one
Google account at a time. If you have signed in to more than one
Google account on your device, you can switch accounts and view
at the bottom right of the screen to refresh your Inbox and
information in each account.
1. From your Inbox, touch the current account at the top of the screen.
2. From the drop-down menu, touch th e account you want to see. The
account’s Inbox will open.
Writing and Sending a Message
1. Open your Gmail Inbox and switch to the account you want to use
for sending the message.
2. Touch
3. Enter a contact name or email address in the ‘To’ field. Separate
each recipient with a comma.
4. Enter the em ail subject a nd compose th e email text.
5. To attach an image, touch the Menu Key > Attach file and select a
file from the image gallery.
6. Touch
.
at the top right of the screen to send th e message.
Adding a Signature to Your Gmail
Messages
You can set a few lines of plain text as a signature for every outgoing
Gmail message. The signature you set on the device is independent of
the signature you use for Gmail on the web.
1. Open the Gmail app.
73
2. Touch the Menu Key > Settings and select the account you want
to add a signature to.
3. Touch Signature and enter the text.
4. Touch OK.
Replying to or Forwarding a
Message
1. Open the Gmail message you want to reply to or forward to another
person.
2. Do the following as you need:
To… do…
Reply to the sender,
Reply to the sender and all recipients
of the original message,
Forward the message,
touch
header.
touch in the message header
touch in the message header
in the message
> Reply all.
74
Working with Received
Attachments
When a message has an attachment, Gmail displays information
about that attachment at the top of the message.
Depending on the attachment type, the applications installed on your
device, and on your settings, you may preview, view, play, save the
attachment, or check information about the attachment.
TIP: For documents with multiple pages, touching the Preview
option will only download the pages you view, while touching View,
Play, or Save will download the entire file and cost mo re time and
data.
Searching for Messages
You can search for messages using words that appear in addresses,
subjects, labels, or contents.
NOTE: If you search while the phone doesn’t have an active
Internet connection, only messages synchronized onto your device
can be searched.
> Forward.
3. Edit your message and touch the send icon .
75
1. Open the Gmail app and touch .
2. Enter the words to search for and touch Search or the search icon
on the screen keyboa rd.
76

As you type, suggestions may appear below the search field. You
can touch a suggestion to search for it right away, or touch the
arrow next to it to add its text to the search field.
3. In the search results, touch the message you need and work with it
just as you would with any Gmail message.
Working with Labels
Message labels include both labels you create and default labels such
as Sent, Starred, and Outbox. You can organize your emails by
labeling them or adding stars to them. Labels also help you sort your
messages, just like folders.
To label or change labels:
1. Open the Gmail app and touch in the message list the checkboxes
before the messages you want to label.
2. Touch the label icon
3. Check or uncheck labels in the new screen and touch OK.
To add stars to messages:
at the bottom of th e screen.
1. Open the Gmail app and touch in the message list the checkboxes
before the messages you want to star.
2. At the bottom of the scre en, touch
To view messages by label:
1. Open the Gmail app and touch the label icon
the message list without checking any message.
2. Touch the label to view messages with that label.
TIP: You can also touch the name of your account at the top of the
screen. Then touch one of the labels listed in the RECENT section,
below account names.
.
at the bottom of
Changing Gmail Settings
Touch Menu Key > Settings in any Gmai l sc r e en to change General
settings, which apply to all Gmail accounts, or other settings that
only apply to specific accounts.
77
Messages
You can use Messages to exchange text messages (SMS) and
multimedia messages (MMS).
Opening the Messages Screen
Touch in the favorites tray on the Home Screen.
The Messages screen opens, where you can create a new message,
search for messages, or open an ongoing message thread.
• Touch to write a new text or multimedia message.
• Touch to search for message with keywords.
• Touch an existing message thread to open the conversation
you’ve had with a certain number.
Sending a Text Message
1. On the Messages screen, touch at the bottom.
2. Touch the To field, and enter the recipient’s number or, if the
recipient is stored in People as a contact, the first letters of the
recipient’s name. As matching contacts appear, you can touch a
78
suggested recipient.
3. Touch the Type message field, and enter the contents of your text
message.
4. Touch
.
Sending a Multimedia Message
1. On the Messages screen, touch at the bottom.
2. Enter the recipient and the text of the message, as you do when
sending a text message.
3. Touch the Menu Key > Add subject to add a message subject.
4. Touch the paper clip icon beside the message text box to
open a menu where you can select the kind of media file to attach
to the message.
Pictures Select a picture to add to your message.
Capture picture Take a photo and add to your message.
Videos Select a video clip to attach to your m essage.
Capture video Shoot a video clip and add to your message.
Audio Select an audio file to add to your message.
Record audio Record an audio file and add to your message.
Slideshow Edit a slideshow and add to your message.
5. Touch .
79
80

Replying to a Message
Messages you receive are appended to existing threads of the same
number. If the new message comes from a new number, a new th read
is created.
1. On the Messages screen, touch the thread that has the message
you want to reply to.
2. Type your reply in the text box at the bottom. You can touch the
attach icon if you want to reply with an MMS.
3. Touch
.
Forwarding a Message
1. On the Messages screen, touch the thread that has the message
you want to forward.
2. T ouch and hold the message.
3. Touch Forward in the menu that opens.
4. Enter a recipient for the message and edit the content if you want.
5. Touch
.
Viewing Details About a Message
1. T ouch and hold a messag e in a thread.
2. Touch View details to see information about the message.
Deleting Messages or T hreads
To delete messages in a thread:
1. On the Messages screen, touch a thread.
2. Touch the Menu Key > Select item(s).
3. Touch the messages you want to delete. The ones you touch will
have a check in the box in front of them.
4. Touch
5. Touch Delete.
To delete message threads:
1. On the Messages screen, touch and hold the th re ad you wan t to
delete.
2. If there are more threads you want to delete, touch them one by
one.
3. Touch
4. Touch Delete.
at the bottom.
at the bottom.
Changing Message Settings
Touch the Menu Key > Settings in the Messages screen to change
Messages settings.
81
Calendar
Calendar on the phone use the web-based Google Calendar service
for creating and managing events, meetings, and appointments. It also
works with the Microsoft Exchange ActiveSync calendar once yo u
sign into your Exchan ge ac co un t on th e phone.
To open Calendar, touch
Calendar.
Viewing Y our Calendars and
Events
in the Home Screen and select
82
Change Calendar Views
You can view your calendars in different forms. The app offers four
view types: Month, Week, Day, and Agenda.
To change calendar views, touch the time s hown at the top left and
select the view you prefer.
You can also change to Day view from Month view by touching any
day in the grid.
Change Calendars
1. Open the Calendar app.
2. Touch the Menu Key > Calendars to display.
3. In the new screen, touch the calendars to check t he calendars you
want to see or uncheck the calendars you’d like to hide.
Events from hidden calendars are not shown in the Calendar app.
83
TIPS:
z In Mo nth view, swipe vertically to see earlier months and
later months.
z In Week or Day view, swipe horizontally to see earlier
84

weeks/days and later weeks/days.
z When you are viewing earlier or later d ays, weeks, or mont hs,
touch
at the top to quickly switch to today.
View Event Details
In Agenda, Day, or Week view, touch an event to view its details.
In Month view, touch a day to switch to Day view. Then touch an
event to view its details.
Creating an Event
1. In any Calendar view, touch the Menu Key > New event to open
an event details screen for a new event.
You can also touch a spot in Day or Week view to highlight the
spot, and then touch the spot again to add an event to that time
spot.
2. Add details about the event.
Enter a name, location, time span, and other additional details
about the e ve nt.
NOTE: If you have more tha n o n e calendar, you can choose the
calendar to which you want to add the event by touching the current
calendar above the Event name box.
3. Touch DONE at the top of the screen to save the new event.
85
Editing or Deleting an Event
1. Find the event you want to edit or del ete .
2. Open its details screen (see Viewing Your Calendars and Events –
View Event Details in this chapter).
3. Do one of the following as you need.
To… do…
Edit the event, T ouch at the top of the screen. Touch
DONE to save your changes.
Delete the event, Touch at the top of the screen and then
touch OK.
Share the event Touch at the top of the sc reen to share
the event by MMS, Email or Bluetooth.
Changing Calendar Settings
To change Calendar settings, open a Calendar view (Day, Week,
Month, or Agenda). Then tou ch the Menu Key > Settings.
You can change General settings, which apply to all accounts, or
other settings that only apply to specific accounts.
86
Google Talk
Google Talk is Google’s instant messaging service. You can use it to
communicate in real time with other people who also use Google
Talk, on a phone, on the web, or with a desktop application.
Signing in to See Your Friends
You must sign in to your Google account before you can use Google
Talk.
Touch
launch Talk, touch the account you want to sign in with. Your friends
list is then displayed.
NOTE: You remain signed in to Google Talk after launching the
Talk app even if you switch to other apps, until you explicitly sign
out. To sign out, go back to your friends list and touch the Menu
Key > Sign out.
in the Home Screen and select Talk. The first time you
Adding a Friend
1. In the friends list, touch at the top right of the screen.
2. E nt er your friend’s address and touch DONE.
Your friend’s address in Google Talk is a Gmail or other email
address that is configured to connec t to Google Talk.
NOTE: If other people try to add you as a friend, you will receive a
notification in the status bar and the invitation appears in your
friends list. You can touch the invitation to Accept, Decline, or
Block.
Changing Your Online Status
1. Touch your own entry at the top of your friends list.
2. In the screen that opens, touch your current status to change it (or
to sign out of Talk).
3. Enter a status message or if you already have one, edit it.
In addition to the standard status settings, you can als o touch
Change to a recently-used status to select a message that
you’ve entered previously.
4. Touch the Back Key to return to your friends list.
87
88

Chatting with Friends
1. Touc h a friend in your friends list. The chat screen for th at friend
opens.
2. Enter your message and touch . You can also touch or
to initiate a video chat or voice chat if the fri end is online.
Switch Between Active Chats
If you have more than one chat going, you can switch between these
chats in one of the following ways.
• Touch the Back Key to return from one chat to the friends list.
Then touch the other friend you want to chat with .
• While you are in one cha t screen with a friend, swipe le ft or right
to switch to the chat screen with the other friend.
Use Group Chat
When you’re chatting, you can invite additional friends to join a
group chat.
1. On a chat screen, touch the Menu Key > Add to chat.
2. Touch the name of the friend to invite.
The friend you invite d and the current particip ants receive an
invitation to a group chat. Each friend who accepts the invitation
joins the group chat. In a group chat, everyone can see everyone
else’s messages. Group chats appear at the top of your friends list,
with a group chat icon.
End the Chat
While on a chat screen, touch the Menu Key > End chat.
You can also touch the Menu Key > End all chats while in the
friends list to end all active chats.
Changing Google Talk Settings
On any chat screen or the friends list, touch the Menu Key >
Settings to change Google Talk settings for your account.
Google+
Google+ is a social networking service offered by Google. The
Google+ application on your device enables you to manage your data,
chat with online contacts, organize them in different circles, and share
your selected information.
Touch
open the Google+ app, select the insta n t uplo ad and con ta ct sync
options.
in the Home Scre en and select Google+. The first time you
89
Organizing Your Contacts
1. Open the Google+ app.
2. Touch Circles.
3. Touch People > Find & invite people.
3. Touch
4. Touch an existing circle or select Create a new circle.
next to a suggested person.
Getting Updates
1. Open the Google+ app.
2. Touch Stream.
3. Swipe left or right to see information shared with you by other
users. Touch Menu Key > Choose circles to choose what groups
of information are shown.
X NEARBY shows posts shared with you by users near your
current location.
X ALL CIRCLES, ACQUATANCES, FAMILY,
FOLLOWING and FRIENDS show updates from people
you’ve added to your circles.
X WHAT’S HOT shows popular posts on Google+.
90
Chatting with Contacts
You can chat with your Google+ contacts th rough instant messaging,
similar to sending a text with the Messages app.
1. Touch Messenger in the Google+ app or touch from the Home
Screen
2. Touch
3. Touch
4. Enter the message.
5. Touch
> Messenger.
to create a new message.
to add recipients, they can be contacts or circles.
to send the message.
Checking Photos
You can see your own photo albums and those shared by other users.
Touch Photos in the Google+ app to see all available albums.
Checking and Managing Your
Profile
1. Touch Profile in the Google+ app.
2. Swipe left or right to see your posts, personal info, and photos.
91
92

X Touch the ABOUT tab to change your profile photo.
X Touch the PHOTOS tab and open a photo. You can add
comments to it, delet e it, o r se t it as your prof i le pho to.
Browser
Use Browser to view web pa ge s and search for information.
Opening the Browser
Touch in the favorites tray on the Home Screen.
Browser also opens when you touch a web link - for example, in an
email or a text message.
Open a Web Page or Search the Web
1. When you open Browser, the last web page you have viewed is
displayed. If you have not used Browser recently, your home page
opens. You can switch to another web page by doing the following.
2. Touch the address box at the top of the web page. If the address
box isn’t visible, swipe down a li ttle to show it.
3. Enter the address (URL) of a web page. Or enter terms you want to
search for. As you enter text, your web search engine makes
93
4. Touch a suggestion or touch Go on the keyboard.
If you touch a suggested page or enter an address and touch Go,
that web page opens. If you touch a suggested query, your web
search engine opens with the results.
TIP: Touch to the left of the address box if you want to stop
opening the page.
X
Set the Homepage
Your home page opens when you open a new browser window, and
when you start Browser after restarting your phone or after not using
it for a while.
1. Open the page you want to set as your home page.
2. Touch the Menu Key > Settings > Gener al > Set homepage.
3. Touch Current page or one of the following options.
Blank page Open browser windows without opening a web
page by default. This can make new Browser
windows open more quickly.
Default page Set the factory default URL as the homepa ge .
Most visited
sites
Other Type a URL as the homepage.
Every new browser window displays a list of your
most visited sites for you to choose from.
suggestions of we b pages and querie s. You can also tou ch the
microphone icon
to search by voice.
94
Working with an Opened Page
While viewing most web pages, you can do the following operation.
Scroll Swipe the screen in any direction.
Zoom out Touch the screen with two fingers and pinch them
together.
Zoom in T ouch the screen w ith two fingers and spr ead them
apart.
Go back Touch the Back Key to return to the page you’ve
viewed previously in the same window.
Go forward Touch the Menu Key > Forward.
Refresh the page Touch the Menu Key > Refresh. Or touch the
address box and then touch
Find text on the
page
Send the page URL
to friends
Follow a link T ouch a link on the web page to open it.
Save the page for
offline reading
TIPS:
Touch the Menu Key > Find on page and type
the terms you search for.
Touch the Menu Key > Share page and select
how you want to send the URL.
Touch the Menu Key > Save for offline reading.
.
Get Information About the Current Page
Touch the page icon, to the left of the address box.
95
z Some web sites may redirect you to the mobile version of
their web pages, which mostly do not suppor t scrolling or
96

zooming. If you want to view the desktop version, touch the
Menu Key and check Req u es t desktop site.
z Besides links, Browser also recognizes some phone numbers,
addresses, and similar informat ion for you to act on. Try
touching them and see what happens.
Using Multiple Browser Windows
You can open several browser windows at once and switch between
multiple web page s.
To open a new browser window:
1. Touch the tabs icon
2. Touch + at the top right of the screen. A new browser window
opens and the homepage is loaded.
To switch between windows:
1. Touch the tabs icon
2. Swipe vertically to scroll through the list of opened tabs.
3. Touch the thumbnail of the window you want to open.
TIP: Swipe a thumbnail horizontally or touch its to close the
window.
To use incognito window for privacy browsing:
1. Pages you view in incognito windows won’t appear in your
to the right of the address box.
to the right of the address box.
X
browsing history or search history. No tra ce will be left on your
device once you cl ose the window.
2. Touch the tabs icon
3. Touch the Menu Key > New incognito tab.
to the right of the address box.
Downloading Files
Touch and hold an image or a link to a file or to another webpage. In
the menu that op ens, touch Save image or Save link.
The downloaded files are saved to your memory card. Yo u can view
or open them in the Downloads app (
> Downloads).
Using Bookmarks
Save web URLs as bookmarks to open them easily in the future.
To open a bookmark, touch the Menu Key > Bookmarks in a
browser window and then touch the bookmark.
Bookmark a Web Page
1. Open the web page.
2. Touch the Menu Key > Save to bookmarks.
3. Edit the bookmark label and address if necessary, or choose a
97
different account.
Touch the name beside Add to to change the place where the
bookmark will be stored.
4. Touch OK.
Edit a Bookmark
1. Touch the Menu Key > Bookmarks.
2. Touch and hold the bookmark to edit.
3. Touch Edit bookmark.
4. Edit the label, address, account, or location of the bookmark in the
dialog that opens.
5. Touch OK.
Delete a Bookmark
1. Touch the Menu Key > Bookmarks.
2. Touch and hold the bookmark to delete.
3. Touch Delete bookmark.
4. Touch OK.
Changing Browser Settings
You can configure a number of Browser settings to customize th e
way you browse the web, incl ud i ng s eve r al that yo u can use to
control your privacy.
98
To open the Browser settings screen, touch the Menu Key >
Settings.
Maps, Navigation, Places,
and Latitude
Activating Location Services
To u se Navigation, Places, Latitude, and find your location on
Google Maps, you must have location services activated on your
device.
1. Touch the Home Key > Menu Key > System settings > Location
services.
2. Select the location options you want to use.
f Check Google’s location service to use Wi-Fi and mobile
networks to determine your approximate location.
f Check GPS satellites to use GPS sa tellites to determine your
location.
f Check Use assisted GPS to use server to assist GPS.
f Check Location & Google search to let Google use your
location to improve search results and other services.
99
100

Getting Your Location
1. Touch in the Home Screen and s elect Maps.
2. Touch
The map centers on a blue blinking dot that indicates your location.
at the top right.
Searching for a Location
1. Touch in the Home Screen and s elect Maps.
2. Touch
3. Enter the place you’re l ooking for in the search box at the top. You
can enter an address, a city, or a type of business or establishment,
for example, “museums in Shanghai.” As you enter information,
suggestions from your previous searches and from popular searches
appear in a list below the search box. You can touch a suggestion
to search for it.
TIP: You can also touch
search.
4. Touch the search icon on the keyboard. Markers with letter labels
indicating search resu l ts app e ar on th e map .
5. Touch a marker to open a balloon that contains a label with
summary information about the location.
at the bottom.
beside the search box to use voice
101
6. Touch the balloon to open a screen with more information, as we ll
as options for obtaining directions and more.
Getting Directions to Your
Destination
Maps can provide directions for travel by foot, public transportation,
or car.
1. Touch
2. Touch
3. Enter a start and end point and select the mode of transportation
(car, public transit, or walking). If you have enabled My Location,
this will appear in the s tart point field by default.
4. Touch GET DIRECTIONS. The directions to your destination are
marked on the map. Touch the left or right arrow to see the
direction step by step. You can also touch DIRECTIONS LIST to
see your route displayed in a list.
NOTE: Touch
Maps Navigation (beta) and get turn-by-turn voice directions.
in the Home Screen and select Maps.
at the bottom.
> from the Home Screen to use Google
Sharing Location
Google Latitude lets you and your friends view each other’ s
102
locations on maps and share status messages with each other.
While using Maps, touch the top left of the screen and select the Join
Latitude.
After you join in, you can always touch the top left of the screen in
Maps and select Latitude or touch
Screen to see your status as well as that of your selected friends.
In Latitude, you can do the following operations.
• Touch to re fresh friends’ status.
• Touch MAP VIEW to see friends on Maps. You can touch the
left/right arrow to switch between each friend and yourself.
• Touch to add new friends to Latitude from contacts, via
email addresses, or from suggested friends.
• Touch the Menu Key to show or hide stale friends, who have n’t
updated their location with you for a while.
• Touch the Menu Key > Location Settings to change Latitude
settings or sign out o f Latitude service.
> Latitude from the Home
Google Search, Voice
Search, and Voice
Actions
You can search for information on the web or on your device using
Google Search. You can also search the web or perform certain tasks
by speaking.
Searching with Text
1. Start the Search app in one of the following ways.
f Touch in the Home Screen and select Search.
f Touch the Google Search box at the top of the Home Screen.
2. Enter the terms you want to search for a nd touch Search or
touch a search suggestion.
, or
103
104

Searching by Speaking
1. Touch the microphone icon to the right of the search box.
2. Speak the terms you want to search for. When you’re finished
speaking, your sp eech is analyzed and the se arch is initiated.
If Google Search didn’t quite understand what you said, you are
presented with a list of similar-sounding terms. Touch the correct
term to start the search.
Using Voice Actions
1. Touch the microphone icon to the right of the search box.
2. Speak the voice action you want to use. For example, say ‘send a
text’.
Your speech is analyzed before the action is initiated.
3. Some voice actions need you to complete by speaking or typing
more information. For example, a send text window appears after
you say ‘send a text’. You need to enter the recipient and message
text by typing or speaking.
Changing Search and Voice Search
Settings
Open the Search app and touch the Menu Key > Settings to set
Searchable items.
To set Voice Search settings, touch in the Home Screen the Menu
Key > System settings > Language & input > Voice Search.
Camera
You can take photos and record videos. Photos and videos are stored
to the phone’s memory card or the phone’s internal storage. You can
copy them to your computer or access them in the Gallery app.
Capturing a Photo
1. Touch in the Home Screen and select Camera to open the
Camera app.
2. Aim the camera a t the subject and make a ny necessary adjust ment.
105
Number Function
1
Hold the circle and slide to zoom in or out.
2
Change the camera settings.
3
Switch to the camcorder or to capture panorama.
4
Capture a photo.
5
View photos and videos you have captured.
6
Switch between th e front and the back cameras.
7
Current flash mode.
3. Lightly touch the blue button .
106
Customize Camera Settings
Before taking a photo, you can touch to open the following
camera setting options.
Brightness
Flash mode
, or
White balance
, , ,
, or
Exposure
SCN
Camera settings
Set the bright ness.
Set flash mode as Auto, On or Off.
Select how the camera ad justs colors in different
kinds of light, to achieve the most natural-looking
colors for your shots. Or a l low the camera to adjust
the white balance automatically.
Adjust the exposure. To let the camera set the
exposure automatically, touch 0.
Set Scene mode as A uto, Action, Night or Sunset.
Set the store locat ion , p icture size, focus mod e,
faces detection, grid, lag snapshot, or restore default
camera settings.
107
108

Recording a Video
1. Touch in the Home Screen and select Camcorder, or switch
to the camcorder fr om the camera screen.
2. Aim the camera at the subject and make any necessary
adjustment.
Number Function
1
Hold the circle and slide to zoom in or out.
2
Change the camcorder settings.
Number Function
3
Switch to the camera or to capture panorama.
4
Record a video.
5
View photos and videos you have captured.
6
Switch between the front and the back cameras.
3. T ouch the red button to star t recording.
4. Touch
TIP: While the recording is in progress, you can touch the screen
to save the frame as a separate photo when you set video snapshot
on.
to stop recording.
Customizing Camcorder Settings
Before recording a video, you can touch to open the following
camcorder setting options.
White balance
, , ,
, or
Select how the camera adjust s co lor s in differe n t
kinds of light, to achieve the most natural-looking
colors for your videos. Or allow the camera to a djus t
the white balance automatical ly.
Time la pse
interval
Video quality
Camera settings
109
Set the time lapse interval
Adjust video quality
Set the store locat ion, video snapshot or restore
default camera settings.
110
Gallery
Opening Gallery
Touch in the Home Screen and select Gallery to view albums of
your pictures and videos.
Working with Albums
When you open Gallery, all pictures and videos on your phone are
displayed in a number of albums. In addition, if you have selected to
sync with your Picasa web albums, they are displayed as well.
To view album contents:
Touch an album to view the pictures and videos it contains.
To share albums:
1. Touch and hold an album until it is selected.
2. Touch more albums that you want to shar e.
3. Touch
share the albums.
at the top of the screen and select how you want to
111
112

To view details of an album:
1. T ouch and hold an album until it is selected.
2. Touch
To delete albums:
1. T ouch and hold an album until it is selected.
2. Touch more albums that you want to delete.
> Details.
3. Touch
To download Picasa web albums:
1. Touch the Menu Key > Make available offline.
2. Touch the Picasa web albums you want.
3. Touch Done.
> Delete.
Working with Pictures
Touch a picture in an album to view the picture in full screen.
Double-touch the picture, or pinch two fingers together or spread
them apart to zoom out or in. Slide left or right to view other pictures
in the album.
113
Number Function
Touch to return to the album, where all its contents are
1
displayed in a grid.
Thumbnails of all the pictures and videos in the album.
2
Swipe horizontally to see more; touch a thumbnail to view
it in full screen.
3
Share the picture.
Touch the Menu Key to delete the picture, browse the album
contents in a slideshow, rotate the picture, view picture file detail, set
it as contact icon or wallpaper, or edit it.
NOTE: All the opti ons may not be available for certain albums or
pictures.
114
Retouch Y our Pictures
You can edit any photos you took and some other pictures in Gallery.
The changed picture is saved in the Edited album, while the original
image is never affected.
1. Touch the Menu Key > Edit while viewing a picture in full screen
to open the Edit interface.
2. Touch the icons along the bottom of the screen to edit the picture.
Add fill light, highlight or shadows, or set to auto-fix.
Apply effects such as cross-process, posterize, lomo,
documentary, vignette, fisheye, and film grain.
Apply color effects such as warm th, sat urati on, B&W, sepia,
negative, tint, duo-tone as well as other effects including
doodling on the picture.
Crop, fix red eye, straighten, rotate, flip, or sharpen the picture.
3. To undo or redo the changes you’ve made to the picture, touch
or at the top of the screen.
4. Touch SAVE to save the new picture to the Edited album.
Share Your Pictures
1. Touch an album in the galler y a nd then touch a pict ure.
2. Touch
the screen first.
3. Select how you want to share the picture.
at the top of the screen. If the icon is invisibl e, touch
Working with Videos
Play Videos
1. Touch an album in the gallery and then touc h the thumbnail of a
video.
2. Touch
3. Touch the video to view the playback controls.
Share V i deos
1. Touch an album in the gallery and then touch and hold the
thumbnail of a video.
2. Touch
3. Select how you want to share the video.
at the center to start playing.
at the top of the screen.
115
116

playing
t
y
n
m
d
h
d
Playing Your Music
Touch in the Home Screen a n d select Music to play your digital
audio files.
1. Select Artists/Albums/Songs/Playlists to find the songs you
want to play.
2. Touch an item from the list to start playing.
NOTE: You can adjust the volume with the Volume Keys.
Informatio
(artist, albu
and title) of the
track. Touch an
hold to searc
for relate
Touch to pla
the previous
Drag or touch to
jump to any par
of the track.
Touch to view the
Now
Touch to tur n
on/off shuffle.
Touch to choose
repeating mode: repeat
off, repeat all, repeat
the current track.
Touch to play the
next track.
Touch to pause or
resume the track.
Creating Playlists
Playlists help you organize your music files:
1. Select a song in Music you want to add to a new playlist.
2. Touch and hold the song until a shortcut menu pops up.
3. Touch Add to playlist.
list.
117
4. Touch New.
5. Type the playlist name and touch Save.
Managing Playlists
1. From the Music Screen touch Playlists to see them all.
2. T ouch and hold the playlist you want to play or edit until a
shortcut menu pops up.
3. Touch Play, Delete or Rename.
Adding a Song to a Playlist
1. Open Music and find the song you need under Artists, Albums,
Songs or Playlists.
2. Touch and hold the song until a shortcut menu pops up.
3. Touch Add to playlist.
4. Select a playlist.
Setting a Song as Ringtone
1. Open Music and find the song you need under Artists, Albums,
Songs or Playlists.
2. Touch and hold the song until a shortcut menu pops up.
3. Touch Use as phone ringtone.
118
Video Player
Use the video player to play various kinds of videos.
Opening the Video Library
Touch in the Home Screen and select Video Player to view
your video library.
Touch the tabs at the top of the screen to view the available videos.
• ALL: videos on your device.
• LAST ADDED: last added videos on your device.
• CAMERA VIDEOS: videos you have recorded with the device’s
camera.
Playing and Control Videos
Touch a video in the video library to play it. Rotate the device on its
side to watch the video in landscape view.
T ouch the video to show the playback controls. You can pause and
resume the playback, or jump to any part of the video. You can also
119
120

exit the video by touching at the top left of the screen.
Managing V ideo Files
To delete videos:
1. Touch and hold a video in the video library. The video is
highlighted.
2. To remove more videos, touch them.
3. Touch
To share videos:
1. Touch and hold a video in the video library. The video is
highlighted.
2. To share more videos, touch them.
3. Touch
want to share them.
To rename a video:
1. Touch
2. Touch Rename.
3. T ype the new video name and touch OK.
To view details of a video:
1. Touch
2. Touch Details.
> Delete at the bottom left of the screen.
at the bottom right of the screen and select how you
next to the video you want to rename.
next to the video you want to view the details of.
Sound Recorder
Sound Recorder enables you to record voice memos and listen to
them whenever you like.
1. Touch
2. Touch
3. Touch
4. Touch
5. Touch Done to save the voice recording, or touch Discard to delete
the recording.
TIP: You can find your recordings in
My recordings.
in the Home Screen and select Sound Recorder.
to start recording.
to stop recording.
to play back the voice recording.
> Music > Playlists >
121
More Apps
Alarm
Set alarms or turn the device into a beds ide clock.
Setting a New Alarm
1. Touch in the Home Screen and select Alarm.
2. Touch a default alarm to configur e it, or touch Menu Key > Add
alarm at the bottom of the screen to create a new alarm.
3. Touch Turn on alarm and set up the alarm options, such as time,
repeat, and ringtone.
4. Press the Back Key to save and exit.
122
sleeps charging the device.
3. Touch the Menu Key > Bed Clock to open the bed clock screen.
Backup and Restore
Touch in the Home Screen and select Backup & restore. Y ou
can back up your user data, such as contacts and messages, and
installed applications to the memory card regularly. If the data get
lost, restore it from the memory card.
Touch the Menu Key > Help to view detailed guide.
Calculator
Using Bed Clock
Bed clock displays the current time and the next alarm.
1. Touch
2. If necessary, touch the Menu Key > Preferences > Bed Clock
Preferences in the Alarm screen to set up bed clock options.
Enable bed
clock
Bed clock nev er Keep the bed clock screen turned on when
in the Home Screen and select Alarm.
Turn on or off the bed clock function.
123
Touch in the Home Screen and select Calculator.
TIP: Swipe left or right to switch between different panels.
File Manager
Quickly access all of your images, videos, audio clips, and other
types of files on your device and the memory card.
124

Touch in the Home Screen and select File Manager. Touch the
folder name at the top of the screen to sw itch between the memory
card storage and the phone storage.
News and Weather
News & Weather offers weather forecasts and news stories about
common topics. You can also customize the news topics that are
displayed.
Touch
left or right to view weather forecasts and news headlines under
different news topics.
Touch the Menu Key to refresh news and forecast data, or to change
the settings.
in the Home Screen and select News & Weather. Swipe
Note Pad
Touch in the Home Screen and s elect Note pad to save and view
your text no tes.
Touch NEW NOTE to create a new note. Then enter your text and
touch
to save it.
share it, or change its title.
Task Manager
Touch in the Home Screen and select Task Manager to view or
stop applications.
• T ouch a task in the Tasks tab to switch to its screen, abort it, or
see its detail.
• Touch the Applications tab to manage all the apps on your
device.
• Touch the Resources tab to view the real-time system resources
information.
YouTube
Touch in the Home Screen and select YouTube.
You can watch YouTube videos or upload your own.
Play Store
Touch a note to view its entire content. You can also delete it,
125
or rent music, books, movies, apps, and download them to your
device.
Browsing and Searching for Apps
You can browse apps by category and sort them in different ways.
Touch a top-level category, such as Games and touch the app from
any subcategory.
You can also search for ap ps using an app’s name or descriptio n, or
the developer’s name. Just touch
and enter the search terms.
Downloading and Installing Apps
Touch in the Home Screen and select Play Store. You can buy
126
authorized.
Managing Your Downloads
After you’ve downlo aded and installed an app, you can rate it, view it
in a list with your other downloaded apps, and configure it to update
itself automatically, and so on.
View Your Downloaded Apps
1. On the Apps screen of Play Store, touch the Menu Key > My
Apps.
2. Your list of installed apps opens, you can touch one to rate it,
uninstall it, request a refund, an d so on.
When you find th e app you are interested in through browsin g or
searching, touch it to open its details screen, where more information
about the app is displ a yed.
1. Touch Download (free apps) or the price (paid apps) in the app
details screen.
2. If the app is not free, you need to sign in to your Google Wallet
account and select a payment method.
3. Touch Accept & download (free apps) or Accept & buy (paid
apps) to accept the permissions for the app. Your app will start
downloading immediately or once payment is successfully
127
TIP: Swipe left from the INSTALLED list to the ALL list, where
you can view all the apps you downloaded previously on the device
as well as other Android devices using the same Google account.
Uninstall an App
1. On the Apps screen of Play Store, touch the Menu Key > My
Apps.
2. In the INSTALLED list, touch an app to open its details screen.
3. Touch Uninstall > OK.
128

using mobile data, or restrict background data for individual apps.
Settings
Touch in the Home Screen and select Settings. The Settings
app contains most of the tools for customizing and configuring your
device.
Wireless and Networks
Wi-Fi
Turn on or off Wi-Fi and configure your Wi-Fi connections. See
Connecting to Networks and Devices – Connecting to Wi-Fi
Bluetooth
Turn on or off Bluetooth and configure your Bluetooth connections.
See Connecting to Networks and Devices – Connecting to Bluetooth
Devices.
Data Usage
Touch the ON/OFF switch to turn on or off mobile data.
You can check how much data has been used during the time circle
you set, set a mobile data limit and warning, see what app has been
.
Airplane Mode
In the Settings app, touch More under Wireless & networks and
check the box next to Airplane mode.
transmit voice or data are turned off.
All the device’s radios that
VPN
Set up and connect to virtual private networks. See Connecting to
Networks and Devices – Connecting to Virtual Private Networks.
Tethering and Portable Hotspot
Share your device’s mobile data connection with PCs or other devices
via USB or Wi-Fi. See Connecting to Networks and Devices –
Sharing Your Mobile Data Connection.
Mobile Networks
Control mobile data use, select mobile network and set access point
names. See Connecting to Networks and Devices – Connecting to
Mobile Networks.
129
WI-Fi Calling
Turn on or turn off the Wi-Fi Calling function. See Phone calls
–Adjusting Y our Call Settings.
Call Settings
Configure call related settings. See Phone Calls – Adjusting Your Call
Settings.
Device
Sound
Adjust volumes (see Personalizing – Adjusting Volumes), set up
ringtone and notification sound (see Personalizing – Changing
Ringtone and Notification Sound), and select system sounds.
Touch Silent mode to turn off all sounds except media and alarm, or
enable silent mode with vibration.
Display
• Brightness: Set the brightness of the display.
• Wallpaper: Select a background image for the Home Screen.
• Auto-rotate screen:
phone.
• Sleep: Set the length of time of inactivity before the screen turns
Rotate the scre en di spl ay as yo u r ota te th e
130
off.
• Font size: Set the font size of the text on the screen.
• Pulse notification light: Flash the LED light to notify you of
missed calls, new messages, and other e vents.
• Extra graphics acceleration : Extra hardware graphics
acceleration for selected applications.
Storage
Check memory information for your memory card and int ernal
storage.
Unmount SD card: Unmount the memory card from your phone so
that you can safely remove the card while the phone is on.
Erase SD card: Erase all data on the SD card.
Battery
Check how much power remains for the battery and what has been
using the battery.
Apps
See apps installed on your device and manage them.
Touch an app in the DOWNLOADED, ON SD CARD, RUNNING,
or ALL tab to see its information. You can stop the app, uninstall the
app, clear data and cache, or move the app between the internal
storage and the memor y ca rd.
131
132

NOTE: Not all applications can be moved or uninstalled.
Personal
Accounts and Sync
Manage your accounts and synchronization settings.
• Touch t he ON/OFF switch to turn on or off auto-sync.
• Touch ADD ACCOUNT to sign in or create accounts on your
device.
• Touch an account to set the sync settings for that account. You
can then touch the Menu Key > Sync now to sync all checked
items.
• Touch an account and then touch the Menu Key > Remove
account to remove the account and all information related to it
from your device.
Location Services
Activate location services to determine your location. See Maps,
Navigation, Places and Latitude – Activating Location Services.
Select Location & Google search to improve Google search results
and other services using your location information.
Security
• Screen lock: Lock the screen with slide, pattern, PIN, or
password. See Personalizing – Protecting Your Phone with
Screen Locks.
• Automatically lock: Set the delay for the screen to automati ca l ly
lock after the phone is turned to sle ep mo de .
• Vibrate on touch: Vibrate when touch the Menu Key, Home
Key and Back Key.
• Ow ner info: Set the text that you may display on the lock screen.
• Encrypt phone: Encrypt your data on the phone to protect your
privacy. See Personalizing – Protecting Your Phone With
Encryption.
• Set up SIM card lock:
X Lock SIM card: Activate or deactivate the PIN lock to
require PIN before accessing the SIM card.
X Change SIM PIN: Change the PIN used to access the SIM
card.
• Make passwords visible: Display passwords as you enter them.
• Device administrators: View or deactivate apps you have
authorized to be device administrators.
• Unknown sources: Tick the checkbox to permit installation of
apps from sources other than the Play Store.
• Trusted credentials: Display trusted CA certificates.
• Install from SD card: Install certificates from the memory card.
• Clear credentials: Delete all certificates.
133
Language and Input
• Language: Selec t a language and region for your system.
• Personal dictionary: Add new words to the device’s dictionary
or remove words from the dictionary. The words you add are used
for spelling check and word suggestion.
• KEYBOARD & INPUT METHODS: Confi g ur e text inpu t
settings. See Knowing the Basics – Entering Text – Touch Input
Settings.
• Voice Search:
X Language: Select the language you use when entering text
by speaking or searching by speaking.
X SafeSearch: You can use Google SafeSearch filtering to
block some results when you use Google search by voice.
X Block offensive words: Replace offensive words with
asterisk (*) when you use Google voice recognition to
transcribe your voice into text.
• Text-to-speech output:
X PREFERRED ENGINE: Select the speech synthesis engine
you want to use or change its settings.
X Speech rate: Select how quick you want the synthesizer to
speak.
X Listen to an example: Play a brief sample of the speech
synthesizer, using your current settings.
• Pointer speed: Select how fast the screen should scroll as you
flick the screen.
134
Backup and Reset
• Back up my data: Back up app data, Wi-Fi passwords, and other
settings to Google servers after you sign in to your Google
account.
• Backup account: Set backup account.
• Automatic restore: Restore previously backed up settings and
data when you reinstall an app.
• Factory data reset: Reset your device to factory status. All your
personal data from the phone’s internal storage will be erased.
You can also erase the data on the memory card during the
process.
• Collect Diag nostics: Collect diagnostics data for troubleshooting.
System
Date and Time
Set date, time, time zone, and how date and time are di splayed. You
can also use network-provided data.
Accessibility
Configure accessibility plug-ins on your device, such as using Large
text for the visually-impaired.
135
136

Developer Options
Developer options contains settings that are useful for developing
Android applications.
Troubleshooting
About Phone
View phone status and legal information. You can also check for
system updates.
137
If you encounter problems while using the phone, or if it performs
abnormally, you can refer to the chart below. If your particular
problem cannot be resolved using the information in the chart,
contact the dealer wher e you purc ha se d the pho ne .
Problem Possible causes Possible solution
Poor
reception
The network is busy at the
The network signal is too
weak at your current
location, for example, in a
basement or ne ar a tall
building, because wireless
transmissions cannot
effectively reach it.
current time (for example,
during peak times, there
may be too much network
traffic to handle additional
calls).
Move to a location where
the network signal can be
properly received.
Avoid using the phone at
such times, or try again
after waiting a short time.
138
You are too far away from
a base station for your
service provide r.
Echo or noise Poor network trunk quality
on the part of your service
provider.
Poor local telephone line
quality.
Unable to
select certain
features
Battery not
charged
Your service provider does
not support these features,
or you have not applied for
services that provide these
features.
The battery or batt ery
charger is damaged.
You can request a service
area map from your
service provider.
End the call and dial
again. Y ou may be
switched to a
better-quality network
trunk or phone line.
End the call and dial
again. Y ou may be
switched to a
better-quality network
trunk or phone line.
Contact your service
provider.
Contact the dealer.
The phone’s temper ature is
below 0°C or higher than
45 °C.
Poor contact between the
battery and charger.
Shortened
standby time
The battery is depleted. In
The standby time is related
to your service provider
system configuration. The
same phone used with
different service prov iders’
systems will not provide
exactly the same lengt h of
standby time.
high-temperature
environments, battery life
will be shortened.
Adjust the battery
charging environment to
avoid extremes of
temperature.
Check all connectors to
make sure all connections
have been properly made.
If you are located in an
area where signaling is
weak, temporarily power
off the phone.
Use a new battery.
139
140

If you are not able to
connect to the network, the
phone will continue to
send out signal s a s it
attempts to locate a base
station. Doing so
consumes battery power
and will consequently
shorten standby time.
Cannot switch
your phone on
(U)SIM card
error
(U)SIM card inserted
Debris on the (U)SIM card
Unable to
connect to the
network
Battery power has been
depleted.
(U)SIM card malfunction
or damage.
improperly.
contacts.
(U)SIM card invalid. Contact your service
Change your location to
one where the network is
accessible, or temporarily
turn off your phone.
Recharge the phone’s
battery.
Take the (U)SIM card to
your service provider for
testing.
Insert the (U)SIM card
properly.
Use a soft, dry cloth to
clean the (U)SIM card
contacts.
provider.
You are not within the
network’s service area.
Poor signal. Move to an open space, or
Cannot
answer
incoming
calls
You cannot
make
outgoing
calls.
You have activated the
You have activated the
Call barring feature.
You have activated the
Call barring feature.
Fixed dialing numbers.
Check the service area
with your service provider.
if you are inside a
building, move closer to a
window.
Go to Settings > Call
settings > Call barring
settings, and then select
Deactivate All.
Go to Settings > Call
settings > Call barring
settings, and then select
Deactivate All.
Go to Settings > Call
setti n g s > F ixed Dialing
Numbers and select
Disable FND.
PIN Code
blocked
Unable to
enter
information
into the phone
book
141
Yo u have entered an
incorrect PIN code three
consecutive times.
The phone book’s m emory
is already full.
Contact your service
provider. If the service
provider provides the
(U)SIM card’s PUK code,
use the PUK code to
unlock the (U)SIM card.
Delete unnecessa ry data
from the contacts.
142
For Your Safety
General Safety
Don’t make or receive
handheld calls while
driving. And never text
while driving.
Keep your phone at least
15 mm away from your ear
or body while making
calls.
Don’t use at petrol stations.
Your phone may produce a
bright or flashing light.
143
Small parts may cause a
choking.
Your phone can produce a
loud sound.
Keep away from
pacemakers and other
electronic medical
devices.
144
Don’t dispose of your
phone in fire.
Avoid contact with
anything magnetic.
Avoid extreme
temperatures.

Switch off when asked to
in hospitals and medical
facilities.
Switch off when told to in
aircrafts and airports.
Switch off when near
explosive materials or
liquids.
Don’t rely on your phone for em ergency communications.
Avoid contact with liquids.
Keep your phone dry.
Don’t take your phone
apart.
Only use approved
accessories.
Distraction
Driving
Full attention must be given to driving at all times in order to reduce
the ris k o f a n a c ci de n t . Using a phone while driving (even with a
hands free kit) can cause distraction and lead to an accident. You must
comply with local laws and regulations restricting the use of
wireless devices while driving.
Operating Machinery
Full attention must be given to operating the machinery in order to
red uc e t h e ri s k o f a n accident.
Product Handling
General Statement on Handling and Use
You alone are responsible for how you use your phone and any
consequences of its use.
You must always switch off your phone wherever the use of a phone is
prohibited. Use of your phone is subject to safety measures designed to
protect users and their environment.
• Always treat your phone and its accessories with care, and keep it
in a clean and dust-free place.
• Do not expose your phone or its accessories to open flames or lit
tobacco products.
• Do not expose your phone or its accessories to liquid, moisture or
high humidity.
• Do not drop, throw or try to bend your phone or its accessories.
• Do not use harsh chemicals, cleaning solvents, or aerosols to clean
the device or its accessories.
• Do not paint your phone or its accessories.
• Do not attempt to disassemble your phone or its accessories, on ly
authorized personnel can do so.
• Do not expose your phone or its accessories to extreme
temperatures, minimum - [5] and maximum + [ 50] degrees Cels ius.
• Please check local regulations for disposal of electronic products.
145
• Do not carry your phone in your back pocket as it could break
when you sit down.
Small Children
Do not leave your phone and its accessories within the reach of small
children or allow them to play with it.
They could hurt themselves or others, or could accidentally damage the
phone.
Your phone contains small parts with sharp edges that may cause an
injury or may become detached and create a choking hazard.
Demagnetization
To avoid the risk of demagnetization, do not allow electronic devices or
magnetic media close to your phone for a long time.
Electrostatic Discharge (ESD)
Do not touch the SIM card’s metal connector s .
146
Seizures/Blackouts
The phone can produce a bright or flashing light. A small percentage of
people may be susceptible to blackouts or seizures (even if they have
never had one before) when exposed to flashing lights or ligh t patterns
such as when playing games or watching video. If you have
experienced se izures or blackouts or have a family history of such
occurrences, please consult a physician.
Repetitive Strain Injuries
To minimize the risk of Repetitive Strain Injury (RSI) when texting or
playing games with your phone:
• Do not grip the phone too tightly.
• Press the buttons lightly.
• Use the special features which are designed to minimize the times
of pressing buttons, such as Message Templates and Predictive
Text.
• Take lots of breaks to stretch and relax.
Air Bags
Do not place a phone in the area over an air bag or in the air bag
deployment area as an airbag inflates with great force and serious
injury could result.
Store the phone safely before driving your vehicle.
147
Emergency Calls
This phone, like any wireless phone, operates using radio signals,
which cannot guarantee connection in all conditions. Therefore, you
must never rely solely on any wireless phone for emergency
communications.
148

Loud Noise
This phone is capable of producing loud noises, which may damage
your hearing. Turn down the volume before using headphones,
Bluetooth stereo headsets or other audio devices.
Phone Heating
Your phone may become warm during charging and during normal use.
Electrical Safety
Accessories
Use only approved acc essories.
Do not connect with incompatible products or accessories.
Take care not to touc h or allow me tal object s, such as coin s or
key rings, to contact or short-circuit in the battery terminals.
Connection to a Car
Seek professional advice when connecting a phone interface to the
vehicle’s electrical system.
Faulty and Damaged Products
Do not attempt to disassemble the phone or its accessory.
Only qualified personnel can service or repair the phone or its
accessory.
If your phone or its accessory has been submerged in water,
punctured, or subjected to a severe fall, do not use it until you have
taken it to be checked at an authorized service center.
Radio Frequency Interference
General S t atement on Interferen ce
Care must be taken when using the phone in close proximity to
personal medical devices, such as pacemakers and hearing aids.
Pacemakers
Pacemaker manufacturers recommend that a minimum separation of
15 cm be main tained between a mobile phone and a pacemaker to
avoid potential interference with the pacemaker. To achieve this, use
the phone on the opposite ear to your pacemaker and do not carry it in
a breast poc ket.
Hearing Aids
People with hearing aids or other cochlear i mplants may experie nce
interfering noises when using wireless devices or when one is nearby.
The level of interference will depend on the type of hearing device and
the distance from the interference source, increasing the separation
between them may reduce the interfe ren ce . You may also consult
your hearing aid manufacturer to discuss alternatives.
149
Medical Devices
Please consult your doctor and the device manufacturer to
determine if operation of your phone may interfere with the operation
of your medical devi c e .
Hospitals
Switch off your wireless device when reques ted to do so in hospi tals,
clinics o r h ealth car e facilities. These requests are designed to prevent
possible interference with sensitive medical equipment.
Aircraft
Switch off your wireless device whenever you are instructed to do so
by airport or airline staff.
Consult the airline staff about the use of wireless devices on board the
aircraft. If your device offers a ‘flight mode’, this must be enabled prior
to boarding an aircraft.
150
Explosive Environments
Petrol Stations and Explosive Atmospheres
In locations with potentially explosive atmospheres, obey all posted
signs to turn off wireless devices such as your phone or other radio
equipment.
Areas with potentially explosive atmospheres include f uelli ng areas,
below decks on boats, fuel or chemical transfer or storage facilities,
areas where the air contains chemicals or particles, such as grain, dust,
or metal powders.
Blasting Caps and Areas
Power off your mobile phone or wireless device when in a blasting
area or in areas posted power off “two-way radios” or “electronic
devices” to avoid interfering with blasting operations.
Interference in Cars
Please note that because of possible interference to electronic
equipment, some vehicle manufacturers forbid the use of mobile
phones in their vehicles unless a hands-free kit with an external
antenna is included in the installation.
151
Radio Frequency (RF) Energy
This model phone meets the government’s requirements for exposure
to radio waves.
This phone is designed and manufactured not to exceed the emission
limits for exposure to radio frequency (RF) energy set by the Federal
Communications Commission of the U.S. Government:
The exposure standard for wireless mobile phones employs a unit of
measurement known as the Specific Absorption Rate, or SAR. The
152

SAR limit set by the FCC is 1.6W/kg. *Tests for SAR are
conducted using standard operating positions accepted by the FCC
with the phone transmitting at its highest certified power level in all
tested frequency bands. Although the SAR is determined at the
highest certified power level, the actual SAR level of the phone while
operating can be well below the maximum value. This is because
the phone is designed to operate at multiple power levels so as to use
only the power requir ed to reach the network. In general, the cl oser
you are to a wireless base station, the lower the power output.
The highest SAR value for the model phone as reported to the FCC
when tested for use at the ear is 0.737 W/kg and when worn on the
body, as described in this user guide, is 1.11 W/kg (Body-worn
measurements differ among phone models, depending upon available
enhancements and FCC requirements.)
While there may be differences between the SAR levels of various
phones and at various positions, they all meet the government
requirement.
The FCC has granted an Equipment Authorization for this model
phone with all reported SAR levels evaluated as in compliance with
the FCC RF exposure guidelines. SAR information on this model
phone is on file with the FCC and can be found under the Display
Grant section of http://www.fcc.gov/oet/fccid after searching on
FCC ID: Q78- V970T
For body worn operation, this phone has been tested and meets the
FCC RF exposure guidelines for use with an accessory th at contains
no metal and the positions the handset a minimum of 1.0cm from the
body. Use of other enhancements may not ensure compliance with
FCC RF exposure guidelines. If you do no t use a body-worn
accessory and are not holding the phone at the ear, position the
handset a minimum of 1.0 cm from your body when the phone is
switched on.
FCC Compliance
This device complies with part 15 of the FCC Rules. Operation is
subject to the following two conditions: (1) This device may not cause
harmful interference, and (2) this device must accept any interference
received, including interference that may cause undesired operation.
Caution: Changes or modifications not expressly app roved by the
manufacturer could void the user’s authority to operate the equipment.
NOTE: This equipment has been tested and found to comply with th e
limits for a Class B digital device, pursuant to part 15 of the FCC Rules.
These limits are designed to provide reasonable protection against
harmful interference in a residential installation. This equipment
generates, uses and can radiate radio frequency energy and, if not
installed and used in accordance with the instructions, may cause
harmful interference to radio communications. However, there is no
guarantee that interference will not occur in a particu la r installation. If
this equipment does cause harmful interference to radio or television
reception, which can be determined by turning the equipment off and
on, the user is encouraged to try to correct the interference by one or
more of the following measures:
—Reorient or relocate the receiving antenna.
—Increase the separation between the equipment and receiver.
153
—Connect the equipment into an outlet on a circuit different from that
to which the receiver is connected.
—Consult the dealer or an experienced radio/ TV technician for help.
Hearing Aid Compatibility (HAC)
regulations for Mobile phones
In 2003, the FCC adopted rules to make digital wireless telepho nes
compatible with hearing aids and cochlear implants. Although analog
wireless phones do not usually cause interference with hearing aids or
cochlear implants, digital wireless phones sometimes do because of
electromagnetic energy emitted by the phone's antenna, backlight, or
other components. Your phone is compliant with FCC HAC regulations
(ANSI C63.19- 2007). While some wireless phones are used near some
hearing devices (hearing aids and cochlear implants), users may detect
a buzzing, humming, or whining noise. Some hearing devices are more
immune than others to this interference noise and phones also vary in
the amount of interference they generate. The wireless telephone
industry has developed a rating system for wireless phones to assist
hearing device users in finding phones that may be compatible with
their hearing de vices. Not all phones have been rated. Phones that are
rated have the rating on their box or a label located on the box. The
ratings are not guarantees. Results will vary depending on th e user's
hearing device an d h earing loss. If your he aring device happens t o be
vulnerable to interference, you may not be able to use a rated phone
successfully. Trying out the phone with your hearing device is the best
way to evaluate it for your personal needs.
154
This phone has been tested and rated for use with hearing aids for some
of the wireless technologies that it uses. Howev er, there ma y be some
newer wireless technologies used in this phone that have not been
tested yet for use with hearing aids. It is important to try the different
features of this phone thoroughly and in different locations, using your
hearing aid or coch lear implant, to determine if you hear any
interfering noise. Consult your se rvice provider or the manufacturer of
this phone for information on hearing aid compatibility. If you have
questions about return or exchange policies, consult your service
provider or phone retailer.
M-Ratings: Phones rated M3 or M4 meet FCC requirements and are
likely to generat e les s interference to hear in g devices than phones that
are not labeled. M4 is the better/higher of the two ratings.
T-Ratings: Phones rated T3 or T4 meet FCC requirements and are
likely to be more usable with a hearing device’s telecoil (“T Sw itch” or
“Telephone Switch”) than unrated phones. T4 is the better/ higher of
the two ratings. (Note that not all hearing devices have telecoils in
them.)
Your phone meets the M3/T3 level rating.
Hearing devices may also be rated. Your hearing device manufacturer
or hearing hea lt h professional may he lp you find this rating. F or more
information about FCC Hearing Aid Compatibility, please go to
http://www.fcc.gov/cgb/dro.
155
156

CITA Requirements
a) Do not disassemble or op en crush, bend or deform, puncture or
shred.
b) Do not modify or r emanufacture, attempt to insert foreign
objects into the battery, immerse or expose to water or other
liquids, expose to fire, explosion or other hazard.
c) Only use the battery for the system for which it is specified.
d) Only use the battery with a charging system that has been
qualified with the system per this sta ndard. Use of an
unqualified battery or charger may present a risk of fire,
explosion, leakage, or other hazard.
e) Do not short circuit a battery or allow metallic conductive
objects to contact battery terminals.
f) Replace the battery only with another battery that has been
qualified with the syst e m pe r th is standard, IEEE-Std-172 5-2006.
Use of an unqualifed batter y may pre sent a risk o f fre, explo sion,
leakage or other haza rd.
g) Promptly dispose of used batteries in accordance with local
regulations
h) Battery usage by children should be supervised.
i) Avoid dropping the phone or battery. If the device or battery is
dropped, especially on a hard surface, an d the user suspects
damage, take it to a service center for inspection.
j) Improper battery use may result in a fre, explosion or other
hazard.
For those host devices t hat utilize a USB port as a charging sou rce, the
host device's user manual shall include a statement that the phone shall
only be connected to CTIA cert if ie d adapters, products that bear the
USB-IF logo or products that have completed the USB-IF compliance
program.
157
158
 Loading...