

Page 1

GSM Digital Mobile Handset
ZTE R3000 User Guide
Page 2

Document Information:
Version
2012.8 yan lian.Chen
Revise
Date
Reviser
Soft
Version
Note
Argentina
BGH
Page 3

Copyright © 2012 ZTE Corporation
All rights reserved.
No part of this publication may be quoted, reproduced, translated or used in any
form or by any means, electronic or mechanical, including photocopying and
microfilm, without the prior written permission of ZTE Corporation.
The Bluetooth
®
trademark and logos are owned by the Bluetooth SIG, Inc. and
any use of such trademarks by ZTE Corporation is under licence. Other
trademarks and trade names are the property of their respective owners.
ZTE Corporation reserves the right to make modifications on print errors or
update specifications in this guide without prior notice.
Version 1.0/August 2012
Page 4

contents
LET’S GET STARTED .................................................................... 1
LOST OR STOLEN? ............................................................................. 1
GETTING TO KNOW YOUR PHONE .......................................... 9
KEY DEFINITIONS ............................................................................ 10
DESCRIPTIONS OF ICONS ON THE STATUS BAR ................................. 11
SCREEN CONTROL ........................................................................... 12
HOME SCREEN ................................................................................ 12
SWITCH TO SLEEP MODE .................................................................. 14
WAKE UP YOUR PHONE .................................................................... 14
INSERTING AND REMOVING THE SIM .............................................. 14
INSERTING AND REMOVING A MEMORY CARD .................................. 16
USING THE BATTERY ....................................................................... 17
POWER ON/OFF ............................................................................... 19
MAKING AND ANSWERING CALLS ........................................ 20
Page 5

ANSWER A CALL .............................................................................. 21
REJECT A CALL ................................................................................ 21
END A CALL..................................................................................... 21
ADJUST THE VOLUME ...................................................................... 21
TURN THE SPEAKER ON OR OFF ....................................................... 21
ADD ONE CALL ............................................................................... 22
CONTACTS ..................................................................................... 23
ADD NEW CONTACT ........................................................................ 23
DELETE A CONTACT ......................................................................... 24
DELETE CONTACTS ......................................................................... 24
EDIT CONTACT DETAILS .................................................................. 24
SEARCH CONTACTS ......................................................................... 24
SHARE A CONTACT .......................................................................... 25
MESSAGING .................................................................................. 26
SEND MESSAGES ............................................................................. 26
RECEIVE MESSAGES ........................................................................ 27
Page 6

MESSAGE THREAD .......................................................................... 27
MESSAGING SETTINGS .................................................................... 27
EMAIL ............................................................................................. 28
LOGIN TO THE EMAIL ACCOUNT ...................................................... 28
SEND EMAILS .................................................................................. 28
CHECK EMAILS ............................................................................... 29
NETWORK APPLICATIONS ....................................................... 30
GETTING CONNECTED TO THE INTERNET ......................................... 30
WLAN ........................................................................................... 31
BROWSER ....................................................................................... 32
BLUETOOTH® .................................................................................. 33
SETTINGS ....................................................................................... 35
FLIGHT MODE .................................................................................. 35
SOUND SETTINGS ............................................................................ 35
CALL SETTINGS ............................................................................... 36
DISPLAY SETTINGS .......................................................................... 37
Page 7

SECURITY SETTINGS ........................................................................ 37
DATE AND TIME SETTINGS ............................................................... 40
LANGUAGE AND INPUT METHOD ..................................................... 40
EXPERIENCING MULTIMEDIA ................................................ 42
CAMERA ......................................................................................... 42
CAMCORDER ................................................................................... 43
MUSIC ............................................................................................. 44
GALLERY ........................................................................................ 46
RECORDER ...................................................................................... 46
MORE APPLICATIONS ................................................................ 48
FILE MANAGER ............................................................................... 48
ALARM ........................................................................................... 48
CALCULATOR .................................................................................. 49
CALENDAR ...................................................................................... 49
FM RADIO ....................................................................................... 50
OTHER APPLICATIONS ..................................................................... 51
Page 8

ENTERING TEXT .......................................................................... 52
CURRENT TEXT MODE ..................................................................... 52
USING PREDICTIVE TEXT ................................................................. 52
USING THE KEYPAD ......................................................................... 53
APPENDIX ...................................................................................... 54
CARE AND MAINTENANCE ............................................................... 54
FCC REGULATIONS ......................................................................... 55
DECLARATION OF ROHS COMPLIANCE ........................................... 58
DISPOSAL OF YOUR OLD PHONE....................................................... 59
PROBLEMS AND THEIR SOLUTIONS .................................................. 60
Page 9

Let’s get started
Thanks for choosing the the R3000. It’s a GSM dual band GPRS digital mobile
phone, which we’ll simply call ‘phone’ from now on.
If you’d like your phone to live a long and fruitful life, please read this guide
carefully and keep it for future reference. You never know when you might need
it.
And don’t worry if the pictures we use to demonstrate your phone’s functions
look a little different from what you see on its screen. It’s the functions they
show that matter.
Lost or stolen?
If your phone goes missing, please tell your service provider as soon as you
know. That way other people can be barred from using it.
Obviously, it’s best to keep your phone with you at all times, and we’d strongly
advise you to set a PIN, and change it from time to time.
1
Page 10

Using your phone safely
on the road
Using a phone while driving is illegal in many countries. Please follow local
laws and drive safely at all times.
near sensitive electronics
Don’t use your phone near sensitive electronic equipment – particularly
medical devices such as pacemakers – as it could cause them to
malfunction. It can also interfere with the operation of fire detectors and
other automated equipment.
For more information about how your phone affects pacemakers or other
electronic equipment, please contact the manufacturer or your local
distributor.
Your phone may cause interference when used near TVs, radios or
automated office equipment.
while flying
Your phone can cause interference with aircraft equipment. So it’s essential
2
Page 11

you follow airline regulations. And if airline personnel ask you to switch off
your phone, or disable its wireless functions, please do as they say.
in hospital
Your phone may interfere with the normal operation of medical equipment.
Follow all hospital regulations and turn it off when you’re asked to by posted
warnings or medical staff.
at a petrol station
Don’t use your phone at petrol stations. In fact, it’s always best to switch off
whenever you’re near fuels, chemicals or explosives.
around water
Keep your phone away from water (or any other liquid). It’s not a waterproof
model.
making repairs
Never take your phone apart. Please leave that to the professionals.
3
Page 12

Unauthorised repairs could break the terms of your warranty.
broken antenna
Don’t use your phone if the antenna is damaged, as it could cause injury.
around children
Keep your mobile out of children’s reach. It should never be used as a toy
and it might not be good for their health.
original accessories
Only use the original accessories supplied with your phone or those
approved by the manufacturer. Using unapproved accessories may affect
performance, make the warranty void, break national regulations on the use
of mobile phones, or even cause injury.
near explosives
Turn off your phone in or near areas where explosive materials are used.
Always obey local laws and turn off your phone when requested.
4
Page 13

emergency calls
To make an emergency call your phone must be turned on and in an area
where there’s network coverage. Dial the national emergency number (in the
UK: 999) and press ‘send’. Explain exactly where you are and don’t hang up
until help has arrived.
working temperature
The working temperature for the phone is between 0℃ and 40℃. Please
don’t use the phone outside that temperature range as it might cause
problems.
At very high volume, prolonged listening to a mobile phone can damage your
hearing.
5
Page 14

Battery care and safety
Keep the battery in a cool, ventilated place and out of direct sunlight.
Although the battery is rechargeable, it’ll eventually start to lose its ability to
recharge. If you find that the battery won’t recharge, it’s time to replace it.
Please don’t throw old batteries into your household rubbish. You’ll find there
are special bins for batteries at refuse collection points. And some high
street electrical stores provide a battery recycling service too.
Never throw the battery into a fire – it’s highly inflammable and could
explode, hurting you or somebody else.
When you put the battery into your phone, there’s no need to use force.
Exerting too much pressure could make it leak, overheat, explode or burst
into flame.
Never take the battery apart. This may result in leakage, overheating,
explosion or fire.
If the battery becomes hot, changes colour or shape at any time (when in
use, charging or even while in storage) please stop using it immediately and
replace.
Keep the battery dry. Damp or wet conditions can cause it to overheat or
corrode.
6
Page 15

Don’t leave the battery in direct sunlight or anywhere really hot, like in a car
on a summer’s day. That could make it leak or overheat, while lowering its
performance and shortening its life.
Don’t charge the battery continuously for 24 hours. Overcharging is not good
for it.
Note:
Please avoid contact with the materials inside a damaged or leaking
battery. If they get on your skin, wash with lots of water and seek
medical assistance if required.
Charger care and safety
Only plug the charger into voltages between 110VAC and 220VAC. Using a
voltage outside that range can damage the phone/charger – and cause the
battery to leak or catch fire.
Never short-circuit the charger – this may cause electrocution, overheating
or damage.
Don’t charge the phone in direct sunlight or in an area where it’s damp, dusty,
or on a vibrating surface. And charging your phone near – or on – a TV or
7
Page 16

radio could interfere with transmission.
Don’t use the charger if the power cable is damaged. It may cause a fire or
give someone an electric shock.
Keep water well away from the charger. If the charger does get splashed by
water, or any other kind of liquid, immediately unplug it to avoid overheating,
fire or electrocution.
Don’t take the charger apart. It could cause injury, give you an electric shock
or catch fire.
Never touch any charger, electric cable or socket with wet hands.
Don’t place heavy objects on the electric cable.
If the cable is damaged, don’t try to mend it yourself – it could cause a fire or
electrocute you.
Always unplug the charger before you clean it.
When unplugging the charger, hold the plug itself, rather than pulling on the
cable. A damaged cable can cause electrocution or fire.
8
Page 17

y
y
r
y
y
y
Getting to know your phone
Earpiece
Tou c h screen
Menu ke
Back key
End ke
Delete ke
Camera key
Navigation
USB port
Power k
9
Home key
Send ke
FN ke
Space
Headset jack
Camera
Speake
Vol ume keys
Page 18

Key definitions
Menu key
Send key Press to dial or answer calls.
End key Press to end calls.
Home key Press to go back to the home screen.
Back key Press it to open the previous screen you were working in.
Camera
key
Power key Press it to turn on/off the display.
Vol ume
keys
Press to see a menu of options relevant to the current
screen or application.
Press it to open Camera.
Press and hold it to open a menu with options for Silent
mode, Flight mode, and turning off the phone
Adjust the volume.
Press and hold it to quickly adjust the ringtone volume.
10
Page 19

Descriptions of icons on the status bar
Icons Descriptions Icons Descriptions
Signal strength
Calling or call in progress
Call forwarding
You have an unread SMS
You have an unread MMS
Call alert on vibrate only
Call alert on mute
Stopwatch on
You have not inserted a SIM
card.
11
Battery charge level
You have missed calls
Call speaker
You have new voicemail
Alarm on
Call alert on vibrate and
ring
Headset connected
Bluetooth® on
Page 20

Screen control
Here’s how to control your phone using the touch screen…
- Press/tap: You can press or tap the items on the screen to select, open
applications or use the keyboard to input characters.
- Slide: You can scroll up and down the page or from left to right by sliding your
finger vertically or horizontally on the screen.
- Long press: Hold your fingertip on an item or icon to see its menu (if it has
one).
- Drag: Touch and, without lifting your finger, drag an item to move it around the
screen or into a file, etc.
Home Screen
Open and close notification panel
When a new notification appears on the notification bar, you can drag the
notification bar down to open the notification panel.
To close the notification panel, drag the tab at the bottom of the notification
panel to the top of the screen.
12
Page 21

Display area
The home screen can be extended to exceed the screen’s width in order to
provide more space for newly added shortcuts, widgets, etc.
Slide your finger across the home screen to extend it to the left or right.
Screen indicator
Small dots at the top of the screen indicate which screen you’re viewing.
Delete items on the homepage
1. In the idle mode, press the menu key until the
2. Tap the item you want to delete.
pops up.
Change wallpaper
1. On the home screen, press the menu key and then press Wallpaper.
2. Select wallpaper from System provided or Gallery.
3. Select one image and press the menu key.
4. Press OK to confirm.
13
Page 22

Switch to sleep mode
Sleep mode is a power saving mode, which also stops you using your phone by
mistake.
If your phone has been in idle mode for a while, it will automatically switch to
sleep mode.
You can also press the Power key to turn off the screen and go straight to sleep
mode.
Wake up your phone
After the phone switches to the sleep mode, the screen will be turned off and
locked. When you want to use your phone, just wake it up and unlock the
screen, like this…
1. Press the Power key to turn on the screen.
2. Drag
upward to unlock the screen.
Inserting and removing the SIM
Your phone needs SIM card to work (…To keep it simple, we’ll just call it ‘SIM’
from now on.) Your network connection data and your SIM address book are
14
Page 23

saved on the SIM. So, to avoid damaging your SIM or losing data, try not to
touch the metal surface when you’re handling it – and keep well away from any
magnetic or electric source.
Here’s what you do…
1. Switch off your phone and disconnect any external power.
2. Remove the back cover and then the battery.
3. Hold your SIM on the cut corner, and slide it – face down – into the card holder.
4. Insert the battery.
5. Replace the back cover.
15
Page 24
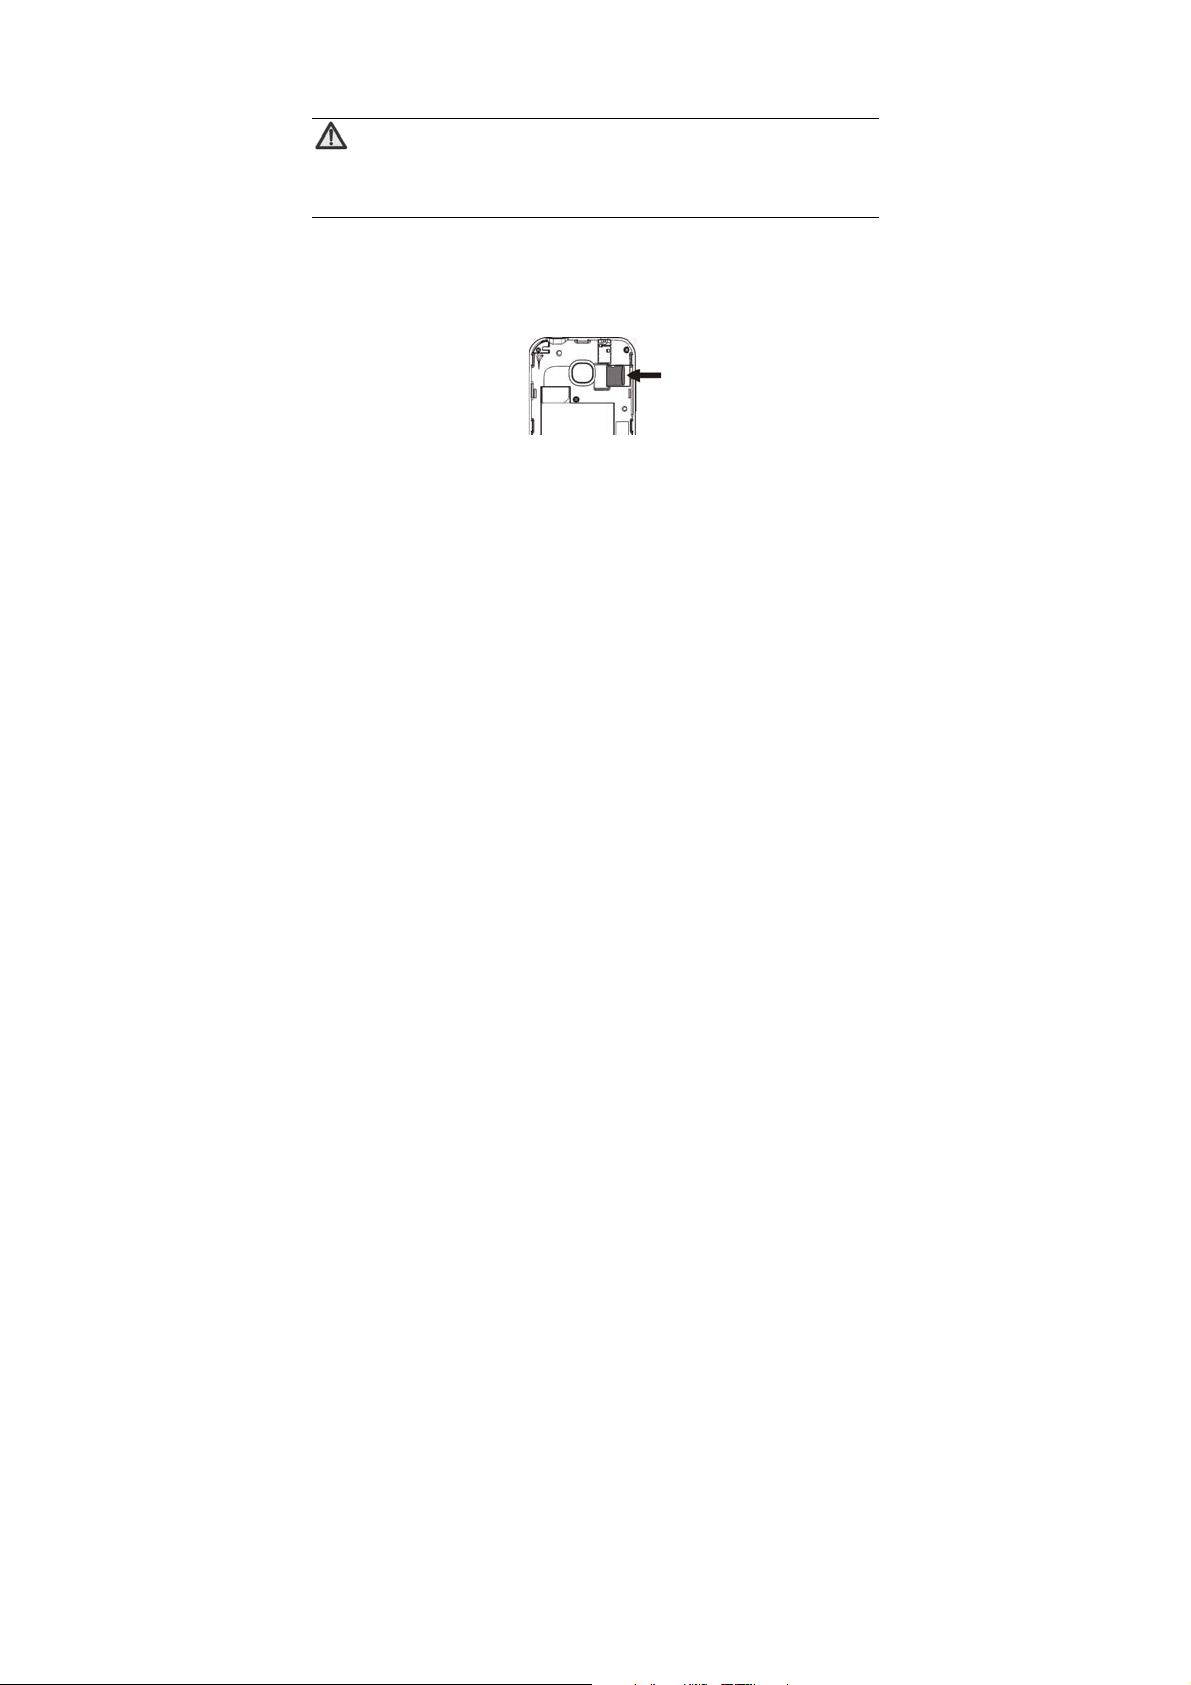
Inserting and removing a memory card
Note:
Removing or inserting a memory card when your phone is turned on
could not only damage it and your phone, but also destroy any data
1. Turn off your phone, remove the battery and disconnect any external power.
2. Slide the metal clasp back, and then open.
3. Insert the memory card into the slot.
4. Close the clasp and slide into place to secure the card.
And to remove the memory card, simply reverse those steps.
But always remember to turn your phone off and take the SIM out before
saved on the card.
16
Page 25

removing the memory card.
Using the battery
Inserting the battery
1. Open the battery cover on the
back of your phone.
2. Align the battery's contact points
with those of the phone and
gently press the battery down
into place.
3. Replace the battery cover
clicking it back into position.
17
Page 26

Removing the battery
1. Switch off your phone.
2. Open the battery cover.
3. Lift the battery up and out of your
phone.
Charging the battery
The rechargeable Li-ion battery that comes with your phone
is ready to use, but is not charged. That’s easy to do. We’ll
show you how below.
The first three times you use the battery, make sure it’s
completely drained before recharging. And then recharge it
fully. That will help ensure its optimum performance and
long life.
1. Connect the charger to your phone, and plug it into an 110V/220V socket.
2. The battery indicator in the corner of the screen will scroll up and down to
show you it’s charging. If the phone’s battery has been fully drained, the
battery indicator may not immediately appear on the screen when charging
18
Page 27

starts. And please don’t worry if the phone and charger become warm while
charging. That’s completely normal.
3. When fully charged, the battery indicator will stop scrolling up and down.
4. Disconnect the charger from your mobile, and unplug.
Power on/off
Press the power key until the power-on/off icon appears.
When you turn your phone on, it’ll automatically check the SIM and show the
following information on screen:
Input phone lock code: If you’ve set a lock code.
Input SIM PIN: If you’ve set a PIN for your SIM.
Note:
The PIN is supplied with your SIM. Please replace it with your own
PIN as soon as possible. Enter the wrong PIN three times, and your
SIM will be locked. Then you’ll need to contact your network service
provider to ask for a PUK code to unlock it.
Searching: The phone will search for an available network.
19
Page 28

Making and answering calls
Make a direct call
On the home screen, press the number keys to input the telephone number.
Then press the Send key to make the call.
Make a call from contacts
In the main menu, tap the contacts icon to display the list of contacts, select the
desired contact and press the call button beside the number to make the call.
Make the call from call log
In the main menu, tap call log and then the call button beside the number to
make the call.
Make an international call
On the home screen, press the ‘+’ key, then tap in the country code or region
code, city code and phone number.
20
Page 29

Answer a call
Your phone will ring or vibrate (depends on the current mode and settings)
when you’ve got an incoming call.
- Press the Send key to answer the call.
- If your earphones are plugged in, press the send button on the wire to answer
the call.
Reject a call
Press the End key to reject a call.
End a call
Press the End key to hang up.
Adjust the volume
In a call, you can raise or lower the volume by using the Volume keys.
Turn the speaker on or off
21
Page 30

In a call, press to turn on the speaker, and press again to turn it off.
Add one call
In a call, press
This function requires the support of the network operator.
to put the current caller on hold while you make a new call.
22
Page 31

Contacts
This is where you can view or manage your contacts.
In the main menu, tap the contacts icon to open the contacts screen for the
following options:
- Dialpad: enter a number.
- Call log: view all calls.
- Contacts: view list of contacts.
- Groups: display a group of contacts.
All of your contacts are displayed alphabetically in a scrolling list. Slide your
finger up or down to scroll quickly. A tab briefly appears on the list, which you
can drag up and down to scroll very quickly.
Add new contact
1. In contacts, press the menu key to select add.
2. Input all contact information. Slide up to move to the next field.
3. Press
icon to select a photo for the contact.
23
Page 32

4. Press the menu key > save to save your contact.
Delete a contact
1. In contacts, tap the contact you want to delete.
2. Press the menu key and then select delete.
Delete contacts
1. In contacts, press the menu key and then select delete.
2. Select the contacts you want to delete, then press menu key > delete.
Edit contact details
1. In contacts, press and hold the contact whose details you want to edit.
2. In the menu that opens, tap edit contact.
3. Edit the contact information.
Search contacts
1. In contacts, select search.
2. Input a key word for the contact you want to find. The phone will
24
Page 33

automatically list all contacts that match.
Share a contact
1. In contacts, tap the contact you want to share.
2. Tap the menu key and then share.
3. Select share with message or share with application (Bluetooth
25
®
or Email.).
Page 34

Messaging
In messaging, you can send or receive text messages and multimedia
messages.
On the home screen or in the launcher, press the messaging icon to open.
Send messages
1. In messaging, press the menu key > new msg.
2. Input the telephone number in the ‘to’ field
You can also press the
3. Press tap to compose to input text. Press the menu key to select either…
- Save: save the message.
- Insert: insert emoticon, preset message, or add an attachment to the
message.
- Subject: convert to multimedia message and add a subject for the message.
- Cc/ Bcc: copy the message to other persons.
4. Finally, press send.
button to select a phone number from contacts.
26
Page 35

Receive messages
1. In idle mode, you will be reminded about the new messages in the
notification area. Slide down to open the notification panel.
2. Tap the message.
3. Directly input text to reply to the message.
Message thread
The messages from one contact or number will be aligned chronologically in
one message thread. You can manage these threads in the messaging screen.
Press one thread on the messaging screen, then press the menu key to
select:
- Delete: delete the message.
- Copy: copy message to archive, SIM, phone, or memory card.
- Insert: insert emoticon, preset message, or add an attachment to the
message.
Messaging settings
In messaging, select the menu key and then settings for all your available
options.
27
Page 36

Email
On the home screen or in the launcher, tap the Email icon to open.
Login to the email account
1. Press the Email icon to bring up the dialogue box ‘Create account?’, and
select Create.
2. Select the account type such as Gmail, Yahoo, Hotmail, etc.
3. Input email address and password.
4. Press the Menu key and then Finish to login to the email account.
Note:
Different mail servers may have different configuration parameters when you
manually set a mail server. Please consult your mail service provider for
detailed configuration parameters.
Send emails
After the logging into an email account, your phone will automatically enter the
inbox of this email account.
28
Page 37

1. Press the Menu key, then New email.
- Press To and input the email address of the recipient.
- Ta p Input the subject if you want to enter a subject.
- Press Tap to compose to type the email.
- To input a Cc or Bcc address, tap the Menu key and then Cc/Bcc.
- You can add an emoticon, multimedia, attachment etc, by selecting Insert.
2. Press the Menu key, and then press Send.
Check emails
1. Open Email.
2. Select the mail box you want to check.
3. Press the Menu key and then select Refresh to see any new emails in the
inbox.
4. Select and press the emails you want to view.
29
Page 38

Network applications
Getting connected to the internet
Your phone’s impressive networking capabilities allow you to access the internet
or an intranet with ease.
You can use default connection settings to connect to the web via your mobile
network (GPRS/EDGE), or WLAN.
The GPRS/EDGE connection can be enabled/disabled manually.
Data connection
Different locations may have different mobile networks available. Initially, your
phone is configured to use the fastest mobile network available for data. But to
use less battery power, you can configure your phone to use only the slower 2G
network.
You can also configure your phone to access a different set of networks entirely,
or to behave in special ways when roaming.
The icons on the status bar indicate which kind of data network you’re
connected to.
30
Page 39

WLAN
Turn on/off WLAN
1. On the home screen, press Settings > Network & connectivity.
2. To turn WLAN on, drag the icon to the right. Drag the icon to the left to turn
off.
Connect to WLAN
1. On the home screen, press Settings > Network & connectivity.
2. Drag the WLAN icon to the right.
3. Press WLAN settings > Refresh. Your phone will automatically search for
WLAN networks.
4. Select the network you would like to connect to from the list.
- If you’ve selected an open network, your phone will automatically connect to it.
- If you’ve selected a security network, you need to input the security password.
31
Page 40

Browser
You can use Internet to view web pages and to search for information on the
web.
Open browser
1. On the main menu screen, tap the Internet icon.
2. Press the URL field at the top to input a web address.
3. Press the Menu key.
Select Menu key > Favorites > Bookmarks to find the bookmark you want to
open, and press Saved pages or History to open other web pages.
Browse web
After opening a web page, slide your finger around the screen to view other
parts of the page.
Settings
Go to the Internet screen, and select Menu key > Settings. From there you
can suit your browse style by choosing how page content is displayed and your
32
Page 41

preferred privacy/security settings.
Bluetooth®
Using Bluetooth® you can exchange data with other Bluetooth® devices that are
within a short distance. (Bluetooth
reception/transmission depends on obstacles and other electronic devices in
the vicinity.)
Turn Bluetooth® on/off
1. On the home screen, press Settings > Network & connectivity.
2. Select Bluetooth® and drag
Pairing Bluetooth® devices
1. In the Bluetooth® settings menu, select Paired devices. Press Menu key,
then select Search.
2. Your phone will scan and display all Bluetooth
3. Select the device you want to pair with.
4. Touch the ID of the desired device.
5. Tap Yes.
®
devices communicate via radio waves, so
to the right to turn it on.
®
devices found.
33
Page 42

Follow the instructions to complete the pairing.
Send files via Bluetooth®
1. Select a file or item, such as a contact or a media file from an appropriate
application or File manager.
2. Press the Menu key, then select Share.
3. Search for and pair with (as described above) a Bluetooth
®
-enabled device.
Change your phone’s Bluetooth® name
1. On the home screen, select Settings > Network & connectivity.
2. If the Bluetooth® function is not turned on, drag the icon to the right to
activate it.
3. To edit the name of your device, tap Bluetooth
name.
4. Return to Bluetooth
Bluetooth
®
devices can see yours.
®
settings and tick the Visibility box so that other
34
®
settings > My device
Page 43

Settings
Flight mode
In areas where the use of mobile devices is restricted, you can activate the
Flight mode to disable your phone’s ability to communicate but still use other
functions such as the calendar, music and games. You will not be able to
make/answer calls, send/receive messages or browse the internet in Flight
mode.
1. On the home screen, press Settings > Network & connectivity.
2. Drag
when Flight mode is enabled.
Tip:
On the home screen, you can press and hold the Power key, then select Flight
mode.
Sound settings
Select Settings > Sound settings and you’ll have the following options…
to the right so that all wireless connections will be turned off
35
Page 44

Silent: tick this to silence all call and notification ringtones. This
doesn’t affect the audio from music, videos and other media, or any
alarms you have set.
Vibration: choose for incoming calls and notifications.
Ring volume: set the volume for incoming calls and notifications.
Notification sound: choose the sound for new events notifications.
New message ringtone: select the ringtone you want to hear when
you receive a new message.
New Email ringtone: select the ringtone you want to hear when you
receive a new email.
Call settings
Call waiting
If you are already on a call when another one comes in, you’ll hear the call
waiting tone. The phone shows the number/name of the waiting call. Please
contact your network service provider for more information.
36
Page 45

Call forwarding
Call forwarding lets you to divert incoming calls to another phone number.
Please contact your network service provider for more information.
Call barring
Call barring allows you to bar outgoing and incoming calls as required. Please
contact your network service provider for more information.
Display settings
Select Settings > Display settings for the following options…
Wallpaper: set different wallpapers for home screen and lock screen.
Brightness: adjust the brightness of the screen.
Screen auto-lock: adjust the screen auto-lock timing.
Indicator light: Choose whether the indicator light is on or off.
Security settings
37
Page 46

SIM security
The personal identification number (PIN) for your SIM helps avoid its misuse.
You need to enter the SIM’s PIN when your new phone is first turned on.
Otherwise the phone can only make emergency calls.
For a new card, the default PIN is supplied by your network service
provider.
To enable/disable the PIN From idle mode, select Main menu >
Settings > Security settings > Phone and SIM > PIN lock.
To change the PIN code from idle mode, select Main menu >
Settings > Security settings > Phone and SIM > Change
PIN/PIN2.
Note:
If you change the PIN, please remember the new number.
PIN2 is needed for some settings. Use the same procedure as for the PIN.
Phone security
A password can protect your phone and help avoid misuse. If your phone is
password-protected, you will have to enter the correct password when the
phone is turned on.
38
Page 47

The default password is 1122.
For a new phone, the protection function is not activated by default.
You have to activate it.
To start or stop password protection from idle mode, select Main
menu > Settings > Security settings > Phone and SIM > Phone
lock.
To change your phone’s password from idle mode, select Main
menu > Settings > Security settings > Phone and SIM > Change
password. Change the password to something you can easily
remember but isn’t too obvious to others.
PUK Code
A PUK (Personal Unlocking Key) code is required to unlock your SIM. When the
SIM is locked you have to enter the correct PUK code and then enter the new
PIN. The SIM can then be used normally.
A PUK code may be supplied with a new card. Contact your service provider for
more information.
A PUK code can only be entered 10 times in a row. If you enter the wrong PUK
code more than 10 times, the SIM will be locked indefinitely.
39
Page 48

Note:
If a PUK code is supplied with the new SIM, please store it safely.
Date and time settings
On the home screen go from Main menu > Settings > Date & time settings.
Here you can set the date and time, your preferred format and city.
Language and input method
Language
To choose your preferred language, tap Main menu on the home screen and
select Settings > Language & input method > Language.
Input method settings
The input options available are Smart abc, abc, Smart es, es, and Numeric.
To select one of those, tap main menu on the home screen, and select
Settings > Language & input method > Input method settings > Preferred
input method.
40
Page 49

set T9 input method
Simply set input method T9 to on or off.
41
Page 50

Experiencing multimedia
Camera
After you’ve taken a photo with your phone, you can use it as wallpaper, share it,
or send it via MMS or email.
However, when taking photos, please respect others’ rights and abide by the
local regulations and customs.
Open the camera
In the Main menu, tap the Camera icon.
Take photos
1. Aim the camera lens at your subject, framing it on the screen, and when
you’re happy...Tap
2. To view the shot, just tap the picture in the right corner of the screen. Or
select Main menu > Gallery to view all your pictures.
to take a shot.
42
Page 51

Camera settings
From the camera screen, tap
To change the white balance, tap
to set quality, storage, resolution, etc.
until it enlarges, and rotate the icon.
To change the exposure, tap
To zoom in or out, tap +/-.
TIP: To change quickly from camera to camcorder or vice versa, use the switch
.
until it enlarges, and then rotate the icon.
Camcorder
Your phone can record video clips but, as with the camera, please respect
others’ rights and abide by the local regulations and customs.
Open the camcorder
In the camera interface, drag the
icon up to open the camcorder.
43
Page 52

Record videos
Press to start recording and to stop. After a video is recorded, you can
open the file mgr. to view it.
Camcorder settings
On the camcorder screen, tap
balance, tap
camcorder setting.
to change exposure value, and tap for a different
to change mode, tap to alter white
Music
Thanks to your phone’s music player, you can listen to music that’s been saved
to an SD card.
Open the music player
First, copy music files to a mounted SD card. On the home screen, tap the
music icon to open the music player.
44
Page 53

Listen to music
1. Select Songs / Artists / Albums / Playlists to find the music file you want
to play.
2. Tap the file to start playing.
Create playlists
In order to manage your music files easily and quickly find what you want to play,
you can create playlists. To do this…
1. Press songs.
2. Select the music file(s) you want to add to a playlist and long press on it
until the shortcut menu pops up.
3. Tap add to playlist.
4. Tap new playlist.
5. Input the name for a new playlist.
6. Press OK. In this case, the music files you selected will be automatically
added to the newly created playlist.
Manage playlists
1. In Music, press Playlists.
45
Page 54

2. Select the playlist you want to edit or play from the list and long press it until
the shortcut menu pops up. Then choose from…
- Play all: play the music in the playlist.
- Rename: change the name of the playlist. (You can only rename playlists that
you’ve created.)
- Delete: delete the playlist. (You can only delete playlists that you’ve created.)
Gallery
The gallery categorises your pictures and videos and stores these files in
folders. Tap a folder to view the pictures or videos inside.
Recorder
You can record audio files using the recorder. It’s very useful for taking notes,
etc.
Open the recorder
Before opening the recorder, please insert an SD card. Then, on the home
screen or in the launcher, tap on the recorder icon to open.
46
Page 55

Record audio files
1. Put the microphone close to your mouth and press
2. Press
Then you can tap Menu > Record list to hear what you have recorded.
to stop. The recording is saved automatically.
to start recording.
Delete recordings
1. From the recording screen, tap the Menu key and select record list.
2. Press and hold the audio file you want to delete until the shortcut menu
pops up. Select Delete.
47
Page 56

r
y
More applications
File manager
From the Main menu, tap File mgr. icon. Then you can view all files saved in
the phone or on an SD card.
Alarm
adding an Alarm
1. From idle mode, select Main menu > Alarm.
2. Press the Menu key > Add to add the alarm you require from the alarm
setup screen:
Hou
Set as required
Minute Set as required
Repetition Sunday~Saturda
Ringtone Drag the button to the right to turn on the alarm
sound.
48
Page 57

Vibrate Drag the button to the right to turn on alarm
Label Write as desired.
3. After setting the alarm, tap the Menu key and then Save.
Tips:
If the alarm time has passed, it cannot be saved.
Even if the phone is turned off, the alarm will automatically turn the phone back on
so that it can ring.
vibration.
Turning an alarm on/off
From the alarms screen, drag the button to right / left to turn the alarm on or off.
Calculator
From idle mode, simply select Main menu > Calculator, and you’re ready to
calculate.
Calendar
49
Page 58

Creating a new event
1. From idle mode, select Main menu > Calendar, then choose the event
date. Tap the Menu key and Add.
2. Type in what the event is.
3. To set the length of event, press Start and To.
4. Select the Category from personal, meeting, special day, birthday, and
others.
5. Select the Repetition.
6. Set the time of the reminder in Reminder.
7. Enter the event location and any notes.
8. Tap the Menu key to select Save.
View the event
1. From idle mode, select Main menu > Calendar.
2. Tap the Menu key for Events to view them.
FM radio
Your phone has a radio. The earphones that come with it must be plugged in
50
Page 59

first as they act as the antenna. Rotate the to find and listen to your
preferred FM channel.
Other applications
Your phone comes with many other applications such as Facebook and
Messenger. We suggest you explore the menu to see what’s available.
51
Page 60

Entering text
Current text mode
When you are in a field that allows characters to be entered, the text input mode
indicator is shown in the upper left corner of the display.
Using predictive text
Predictive text is only available in T9 mode. It is based on a built-in dictionary
and, as you type, generates an evolving list of possible words from the
combination of letters you’ve pressed so far.
1. Set the text method in T9. From the text inputting screen, tap the FN key
and then the Space key until the input method shortcut pops up. Select
Smart abc, or Smart es.
2. Press the key that corresponds to the letter you want to enter. The letters
are shown on the screen as they are entered. The list of possible words
changes as each key is pressed.
3. When the possible words are displayed, directly select the word you want
or use the Navigation key to highlight it and tap the Space key to input.
52
Page 61

Using the keypad
Here’s what you can do with the keypad....
Insert a space: press .
Delete: press
Switch input method: press FN key and then the Space key until the input
method shortcut pops up. Select the input method you want.
Switch caps lock: press
twice and all the letters you type will be capitals.
New line: press
Input letters and common symbols: there are letters and symbols on the
keys. In Smart abc / abc / Smart es / es method, press the keys to input the
letters; press the FN Key once and then press a keys to input the symbol
located on the upper part of that key; press the FN Key twice and you can
continuously input the symbols located on the upper part of the keys.
In Smart abc / Smart es method, your phone predicts the word as you enter
it, so you need input only the first few letters of the word.
Input numbers: press the numeric keys to type in the corresponding
numbers.
to delete content to the left of/before the cursor.
once to type one capital letter. Press the key
.
53
Page 62

Appendix
Care and maintenance
Your phone is a delicate device. The following advice will help you to keep it
looking good and performing well…
Use a soft dry cloth to clean your phone, battery and charger. Don’t use
liquids such as alcohol, dilution agents or benzene.
From time-to-time, clean the socket where the charger cable connects to the
phone. Dust tends to gather there. This will ensure a really good connection.
Don’t use needles, pen points or other sharp objects on the keypad or
screen.
Don’t use your phone with wet hands – it could injure you and damage the
phone.
Don’t use your phone in dusty or dirty environment.
Keep your phone away from extremes of heat – like radiators or ovens. It
may explode if it gets too hot.
If your phone gets wet and the colour of the label on it changes, the warranty
54
Page 63

will be void, even if the warranty period hasn’t expired.
If there’s anything wrong with the phone, battery, charger, or any accessory,
please send them to your nearest service centre for inspection.
FCC regulations
This mobile phone complies with part 15 of the FCC Rules. Operation is subject to
the following two conditions: (1) This device may not cause harmful interference, and
(2) this device must accept any interference received, including interference that may
cause undesired operation.
This mobile phone has been tested and found to comply with the limits for a Class B
digital device, pursuant to Part 15 of the FCC Rules. These limits are designed to
provide reasonable protection against harmful interference in a residential
installation. This equipment generates, uses and can radiated radio frequency
energy and, if not installed and used in accordance with the instructions, may cause
harmful interference to radio communications. However, there is no guarantee that
interference will not occur in a particular installation If this equipment does cause
harmful interference to radio or television reception, which can be determined by
turning the equipment off and on, the user is encouraged to try to correct the
interference by one or more of the following measures:
-Reorient or relocate the receiving antenna.
-Increase the separation between the equipment and receiver.
55
Page 64

-Connect the equipment into an outlet on a circuit different from that to which the
receiver is connected.
-Consult the dealer or an experienced radio/TV technician for help.
Changes or modifications not expressly approved by the party responsible for
compliance could void the user‘s authority to operate the equipment.
The antenna(s) used for this transmitter must not be co-located or operating in
conjunction with any other antenna or transmitter.
4RF exposure information (SAR)
This mobile phone meets the government’s requirements for exposure to radio
waves.
This phone is designed and manufactured not to exceed the emission limits for
exposure to radio frequency (RF) energy set by the Federal Communications
Commission of the U.S. Government.
The exposure standard for wireless mobile phones employs a unit of measurement
known as the Specific Absorption Rate, or SAR. The SAR limit set by the FCC is
1.6W/kg. *Tests for SAR are conducted using standard operating positions accepted
by the FCC with the phone transmitting at its highest certified power level in all tested
frequency bands. Although the SAR is determined at the highest certified power level,
the actual SAR level of the phone while operating can be well below the maximum
value. This is because the phone is designed to operate at multiple power levels so
as to use only the poser required to reach the network. In general, the closer you are
to a wireless base station antenna, the lower the power output.
56
Page 65

The highest SAR value for the model phone as reported to the FCC, described in this
user guide, is
(Body-worn measurements differ among phone models, depending upon available
accessories and FCC requirements.)
While there may be differences between the SAR levels of various phones and at
various positions, they all meet the government requirement.
The FCC has granted an Equipment Authorization for this model phone with all
reported SAR levels evaluated as in compliance with the FCC RF exposure
guidelines. SAR information on this model phone is on file with the FCC and can be
found under the Display Grant section of
on FCC ID: Q78-R3000
For body worn operation, this phone has been tested and meets the FCC RF
exposure guidelines for use with an accessory that contains no metal and the
positions the handset a minimum of 1.5 cm from the body. Use of other accessories
may not ensure compliance with FCC RF exposure guidelines. If you do no t use a
body-worn accessory and are not holding the phone at the ear, position the handset
a minimum of 1.5cm from your body when the phone is switched on.
Position 850MHz (W/Kg) 1900MHz (W/Kg)
Head 0.947 0.640
Body 0.978 0.593
http://www.fcc.gov/oet/fccid after searching
57
Page 66

This device is compliance with SAR for general population /uncontrolled exposure
limits in ANSI/IEEE C95.1-1999 and had been tested in accordance with the
measurement methods and procedures specified in OET Bulletin 65 Supplement C.
Declaration of RoHS compliance
We’re determined to reduce the impact we have on the environment and take responsibility
for the earth we live on. So this document allows us to formally declare that the N720,
manufactured by ZTE CORPORATION, fully complies with the European Parliament’s
RoHS (Restriction of Hazardous Substances) Directive 2002/95/EC, with respect to all the
following substances:
(1) Lead (Pb)
(2) Mercury (Hg)
(3) Cadmium (Cd)
(4) Hexavalent Chromium (Cr (VI))
(5) Polybrominated biphenyl (PBB)
(6) Polybrominated diphenyl ether (PBDE)
Our compliance is witnessed by written declaration from our suppliers. This confirms that
any potential trace contamination levels of the substances listed above are below the
maximum level set by EU 2002/95/EC, or are exempt due to their application.
The N720 manufactured by ZTE CORPORATION, meets all the requirements of EU
2002/95/EC.
58
Page 67

Disposal of your old phone
1. When the wheelie bin symbol is attached to a product, it means the
product is covered by the European Directive 2002/96/CE.
2. All electrical and electronic products should be disposed of
separately from normal household waste via designated collection
points provided by government or local authorities.
3. The correct disposal of electrical and electronic products will help
protect the environment and human health.
59
Page 68

Problems and their solutions
Symptoms Possible Causes Solutions
Phone won’t turn
on
Phone turns itself
off
Poor standby time
Can’t connect to
the network
Calls keep failing
Phone doesn’t
ring when
receiving
incoming calls
The battery is flat Charge the battery
Poor battery contact Reinstall the battery
Battery very low Charge the battery
Battery not holding charge Replace the battery
Weak network signal Turn off the phone
Weak network signal
Out of the service area
Weak network signal
Phone is set to ‘Mute’ or
minimum volume.
60
Move to where the signal is strong
stronger
Make sure you’re in a network
service area
Move to where the signal is strong
Enter ‘Settings’ to select a
Non-silent mode, or increase the
ring volume.
Page 69

Received prompt
asking me to input
‘PUK’
SIM locked because
wrong PIN entered three
times.
61
Contact your service provider and
ask for a PUK.
 Loading...