

Page 1

R1010 WCDMA/GSM/GPRS
Mobile Phone
User Manual
Page 2

Copyright © 2009 ZTE CORPORATION.
All rights reserved.
No part of this publication may be excerpted, reproduced, translated or utilized in any form or
by any means, electronic or mechanical, including photocopying and microfilm, without the
prior written permission of ZTE Corporation.
The manual is published by ZTE Corporation. We reserve the right to make modifications on
print errors or update specifications without prior notice.
ZTE CORPORATION Address:
ZTE Plaza, Keji Road South, Hi-tech Industrial Park, Nanshan District, Shenzhen, P. R. China
Postal Code: 518057
Website: http://www.zte.com.cn
Version No.: R1.0
Manual No.: 079584500551
Edition Time: 08.25. 2009
Page 3

3
LIMITED WARRANTY
ZTE warrants to the original purchaser that the cellular product and its enclosed accessories will be
free from defects in material and workmanship, according to the following terms and conditions:
1. WHAT THIS WARRANTY COVERS:
(1) The limited warranty for the handset remains in effect for a period of 24 months based on
the date of purchase (except for the battery, where the warranty period shall be 6 months).
(2) The limited warranty extends only to the original purchaser (end user) and is not
assignable or transferable to any subsequent purchaser/end user.
(3) During the warranty period, ZTE or officially appointed service agent will repair or
replace any defective product or parts thereof at its discretion.
(4) This limited warranty is applicable to the customer/end user that purchased the
product from an official dealer.
(5) The purchaser (end user) must retain the original purchase invoice/till slip in order to
enforce this limited warranty.
2. WHAT THIS WARRANTY DOES NOT COVER:
(1) Defects or damages resulting from the misuse of this product.
(2) Defects or damages from abnormal use, abnormal conditions, improper storage,
exposure to moisture or dampness, unauthorized modifications, unauthorized repair,
neglect, abuse, accident, alteration, improper installation, blown fuses, food or liquid
spillage, acts of God and shipping damage.
(3) The cost of delivery or transportation of the product to the dealer of officially appointed
service center will be borne by the purchaser (end user).
(4) Products received for repair by the dealer or authorized service center after the
product warranty has expired.
(5) Products that have had the serial number removed or defaced.
(6) THIS LIMITED WARRANTY IS IN LIEU OF ALL OTHER WARRANTIES, EXPRESSED
OR IMPLIED IN TERMS OF MARKETABILITY OR FITNESS FOR A PARTICULAR
USE. SPECIFICALLY THE COMPANY WILL ACCEPT NO DAMAGE CAUSED BY
OR DUE TO FAILURE OF OPERATION OR MALFUNCTION OF THE PRODUCT,
OR ARISING FROM THE USE OR INABILITY TO USE THE PRODUCT.
Page 4
4
(7) Damage resulting from the use of non-ZTE approved accessories.
(8) Scratches and damage caused by normal use.
(9) Products used outside published maximum rations.
(10) Consumables such as fuses.
(11) Products that have been subject to an unauthorized removal or deactivation of the
network operator-lock function.
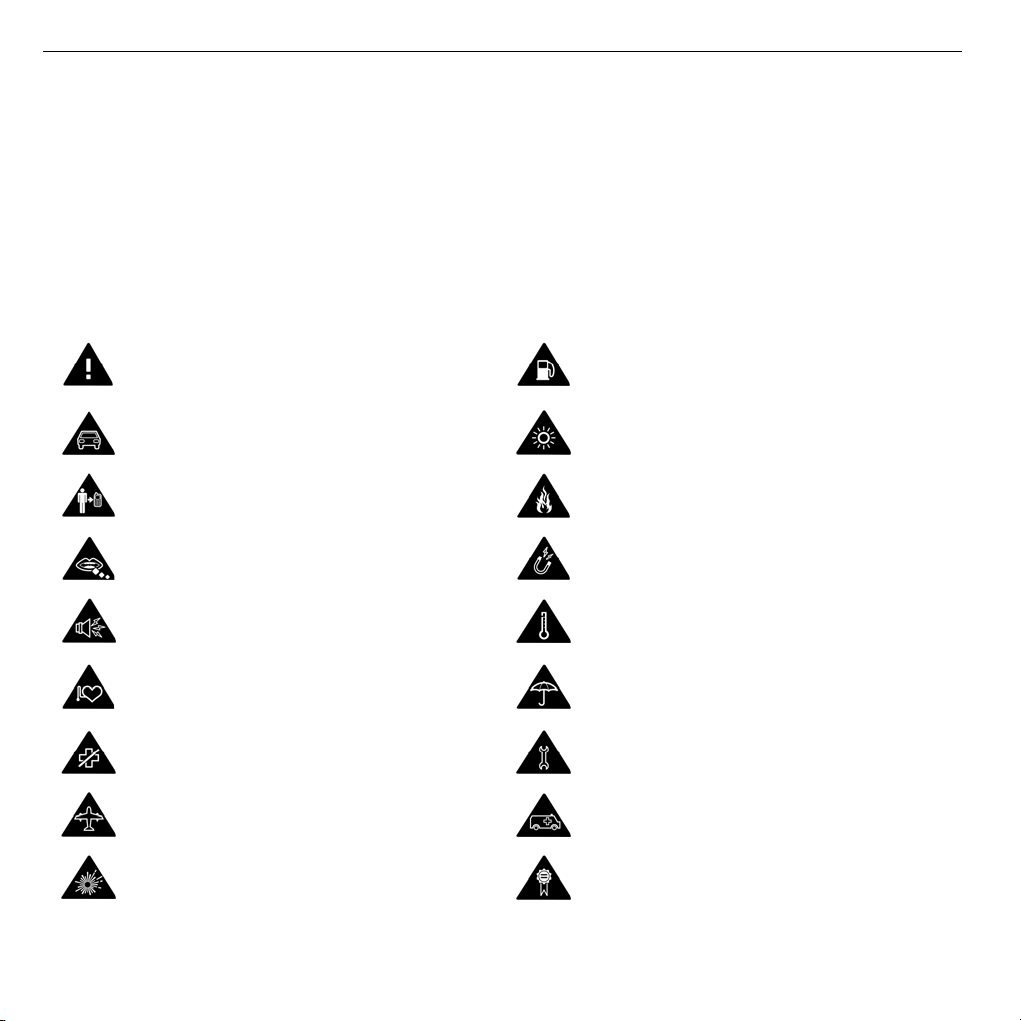
Product Safety Information
Read the Safety Information section
of this user guide on this page
Do not use hand-held while driving
For body-worn operation maintain a
separation of 15 mm
Small parts may cause a choking
hazard
This device may produce a loud
sound
Keep away from pacemakers and
other personal medical devices
Switch off when instructed in
hospitals and medical facilities
Switch off when instructed in aircrafts
and airports
Switch off in explosive environments Only use approved accessories
Do not use while re-fuelling
This device may produce a bright or
flashing light
Do not dispose of it in a fire
Avoid contact with magnetic media
Avoid Extreme Temperatures
Avoid any contact with liquid, keep it
dry
Do not attempt to disassemble
Do not rely on this device for
emergency communications
Page 5

5
RF Exposure
Health and safety information
Radio Frequency (RF) Energy
This model phone meets the government’s requirements for exposure to radio waves.
This phone is designed and manufactured not to exceed the emission limits for exposure to
radio frequency (RF) energy set by the Federal Communications Commission of the U.S.
Government:
The exposure standard for wireless mobile phones employs a unit of measurement known as
the Specific Absorption Rate, or SAR. The SAR limit set by the FCC is 1.6W/kg. *Tests for
SAR are conducted using standard operating positions accepted by the FCC with the phone
transmitting at its highest certified power level in all tested frequency bands. Although the
SAR is determined at the highest certified power level, the actual SAR level of the phone
while operating can be well below the maximum value. This is because the phone is
designed to operate at multiple power levels so as to use only the poser required to reach the
network. In general, the closer you are to a wireless base station antenna, the lower the
power output.
The highest SAR value for the model phone as reported to the FCC when tested for use at
the ear is 0.682 W/kg and when worn on the body, as described in this user guide, is 0.609
W/kg (Body-worn measurements differ among phone models, depending upon available
enhancements and FCC requirements.)
While there may be differences between the SAR levels of various phones and at various
positions, they all meet the government requirement.
The FCC has granted an Equipment Authorization for this model phone with all reported SAR
levels evaluated as in compliance with the FCC RF exposure guidelines. SAR information
on this model phone is on file with the FCC and can be found under the Display Grant section
of http://www.fcc.gov/oet/fccid after searching on
FCC ID: Q78-R1010.
For body worn operation, this phone has been tested and meets the FCC RF exposure
guidelines for use with an accessory that contains no metal and the positions the handset a
minimum of 1.5 cm from the body. Use of other enhancements may not ensure compliance
with FCC RF exposure guidelines. If you do no t use a body-worn accessory and are not
Page 6

6
holding the phone at the ear, position the handset a minimum of 1.5 cm from your body when
the phone is switched on.
This device complies with part 15 of the FCC Rules. Operation is subject to the following two
conditions: (1) This device may not cause harmful interference, and (2) this device must
accept any interference received, including interference that may cause undesired operation.
Caution: Changes or modifications not expressly approved by the manufacturer could void
the user’s authority to operate the equipment.
NOTE: This equipment has been tested and found to comply with the limits for a Class B
digital device, pursuant to part 15 of the FCC Rules. These limits are designed to provide
reasonable protection against harmful interference in a residential installation. This
equipment generates, uses and can radiate radio frequency energy and, if not installed and
used in accordance with the instructions, may cause harmful interference to radio
communications. However, there is no guarantee that interference will not occur in a
particular installation. If this equipment does cause harmful interference to radio or television
reception, which can be determined by turning the equipment off and on, the user is
encouraged to try to correct the interference by one or more of the following measures:
—Reorient or relocate the receiving antenna.
—Increase the separation between the equipment and receiver.
—Connect the equipment into an outlet on a circuit different from that to which the receiver is
connected.
—Consult the dealer or an experienced radio/ TV technician for help.
Page 7

7
Distraction
Driving
Full attention must be given to driving at all times in order to reduce the risk of an
accident. Using a phone while driving (even with a hands free kit) can cause distraction
and lead to an accident. You must comply with local laws and regulations restricting
the use of wireless devices while driving.
Operating Machinery
Full attention must be given to operating the machinery in order to reduce the risk of an
accident.
Product Handling
General Statement on Handling and Use
You alone are responsible for how you use your phone and any consequences of its
use.
You must always switch off your phone wherever the use of a phone is prohibited.
Use of your phone is subject to safety measures designed to protect users and their
environment.
• Always treat your phone and its accessories with care and keep it in a clean and
dust-free place.
• Do not expose your phone or its accessories to open flames or lit tobacco products.
• Do not expose your phone or its accessories to liquid, moisture or high humidity.
• Do not drop, throw or try to bend your phone or its accessories.
• Do not use harsh chemicals, cleaning solvents, or aerosols to clean the device or its
accessories.
• Do not paint your phone or its accessories.
Page 8

8
• Do not attempt to disassemble your phone or its accessories, only authorized personnel
must do so.
• Do not expose your phone or its accessories to extreme temperatures, minimum - [5]
and maximum + [50] degrees Celsius.
• Please check local regulations for disposal of electronic products.
• Do not carry your phone in your back pocket as it could break when you sit down.
Small Children
Do not leave your phone and its accessories within the reach of small children or allow
them to play with it.
They could hurt themselves or others, or could accidentally damage the phone.
Your phone contains small parts with sharp edges that may cause an injury or which
could become detached and create a choking hazard.
Demagnetization
To avoid the risk of demagnetization, do not allow electronic devices or magnetic media
close to your phone for a long time.
Electrostatic discharge (ESD)
Do not touch the SIM card’s metal connectors.
Page 9
9
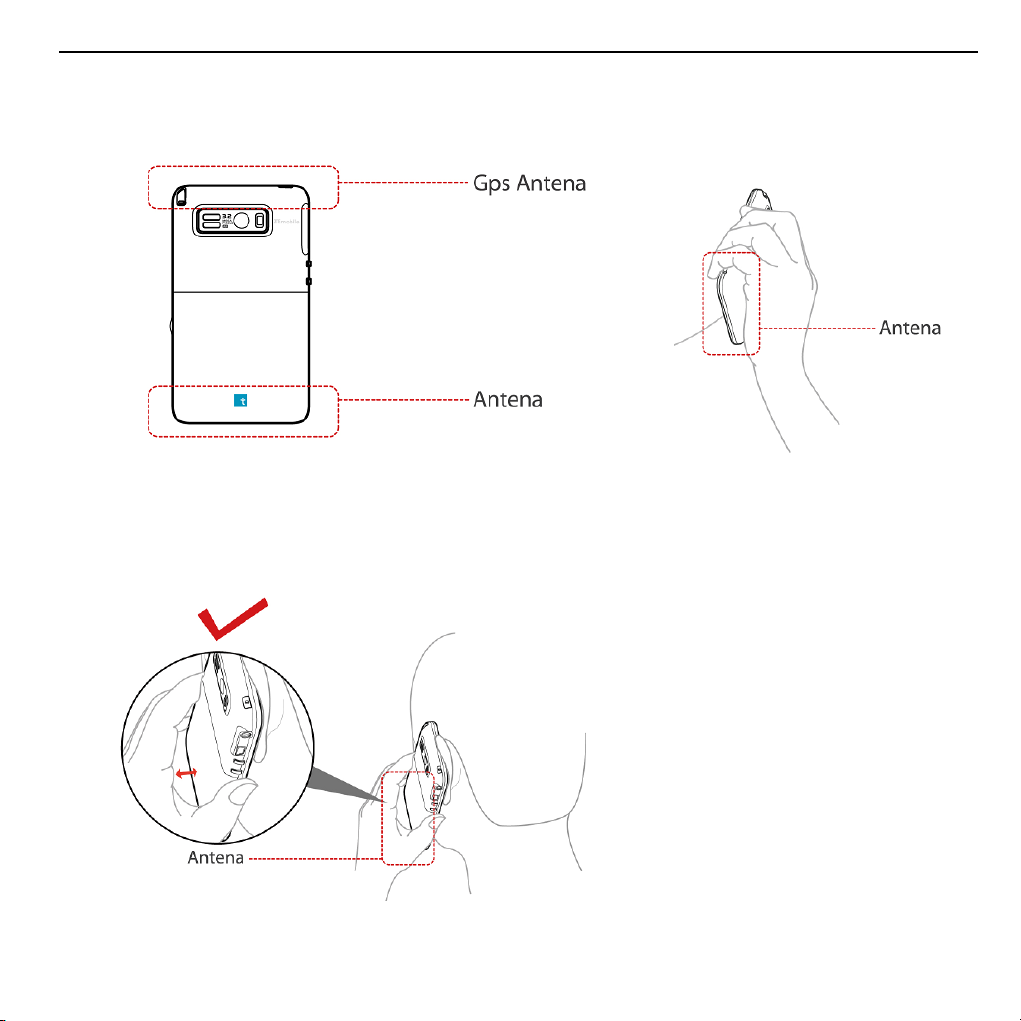
Antenna
Do not touch the antenna unnecessarily.
Normal Use Position
When placing or receiving a phone call, hold your phone to your ear, with the bottom
towards your mouth.
Page 10

10
Air Bags
Do not place a phone in the area over an air bag or in the air bag deployment area.
Store the phone safely before driving your vehicle.
Seizures/ Blackouts
The phone can produce a bright or flashing light.
Repetitive Motion Injuries
To minimize the risk of RSI when texting or playing games with your phone:
• Do not grip the phone too tightly.
• Press the buttons lightly.
• Use the special features which are designed to minimize the times of pressing buttons,
such as Message Templates and Predictive Text.
• Take lots of breaks to stretch and relax.
Emergency Calls
This phone, like any wireless phone, operates using radio signals, which cannot guarantee
connection in all conditions. Therefore, you must never rely solely on any wireless
phone for emergency communications.
Loud Noise
This phone is capable of producing loud noises which may damage your hearing. Turn
down the volume before using headphones, Bluetooth stereo headsets or other audio
devices.
Bright Light
The phone can produce a flashing light, so it can be used as a torch. However, do not
use it too close to the eyes.
Page 11

11
Phone Heating
Your phone may become warm during charging and during normal use.
Electrical Safety
Accessories
Use only approved accessories.
Do not connect with incompatible products or accessories.
Take care not to touch or allow metal objects, such as coins or key rings, to contact or
short-circuit in the battery terminals.
Connection to a Car
Seek professional advice when connecting a phone interface to the vehicle electrical
system.
Faulty and Damaged Products
Do not attempt to disassemble the phone or its accessory.
Only qualified personnel must service or repair the phone or its accessory.
If your phone or its accessory has been submerged in water, punctured, or subjected
to a severe fall, do not use it until you have taken it to be checked at an authorized
service centre.
Page 12

12
Interference
General Statement on Interface
Care must be taken when using the phone in close proximity to personal medical devices,
such as pacemakers and hearing aids.
Pacemakers
Pacemaker manufacturers recommend that a minimum separation of 15 cm be maintained
between a mobile phone and a pacemaker to avoid potential interference with the
pacemaker. To achieve this, use the phone on the opposite ear to your pacemaker and
do not carry it in a breast pocket.
Hearing Aids
People with hearing aids or other cochlear implants may experience interfering noises
when using wireless devices or when one is nearby.
The level of interference will depend on the type of hearing device and the distance
from the interference source, increasing the separation between them may reduce
the interference. You may also consult your hearing aid manufacturer to discuss
alternatives.
Medical Devices
Please consult your doctor and the device manufacturer to determine if operation of your
phone may interfere with the operation of your medical device.
Hospitals
Switch off your wireless device when requested to do so in hospitals, clinics or health
care facilities. These requests are designed to prevent possible interference with sensitive
medical equipment.
Page 13

13
Aircraft
Switch off your wireless device whenever you are instructed to do so by airport or airline
staff.
Consult the airline staff about the use of wireless devices on board the aircraft, if your
device offers a ‘flight mode’ this must be enabled prior to boarding an aircraft.
Interference in Cars
Please note that because of possible interference to electronic equipment, some vehicle
manufacturers forbid the use of mobile phones in their vehicles unless a hands-free kit
with an external antenna is included in the installation.
Explosive Environments
Petrol Stations and Explosive Atmospheres
In locations with potentially explosive atmospheres, obey all posted signs to turn off
wireless devices such as your phone or other radio equipment.
Areas with potentially explosive atmospheres include fuelling areas, below decks on
boats, fuel or chemical transfer or storage facilities, areas where the air contains
chemicals or particles, such as grain, dust, or metal powders.
Blasting Caps and Areas
Power off your mobile phone or wireless device when in a blasting area or in areas posted
power off “two-way radios” or “electronic devices” to avoid interfering with blasting
operations.
Page 14

14
About Your R1010
The mobile device R1010 described in this manual is approved for use on the
GSM850/900/1800/1900 and UMTS900/1900/2100 networks. If you need more information
about GSM and UMTS networks, please get in touch with ZTE customer care or visit www.
zte.com.cn
Your ZTE service number is +86-755-26779999.
When using the features in this device, obey all laws, respect the privacy and legitimate
rights of others, including copyrights.
Copyright protections may prevent some images, music (including ring tones), and other
content from being copied, modified, transferred, or forwarded.
Your R1010 supports the Internet connections and Bluetooth™. Like computers, your
device may be exposed to viruses, malicious messages and applications, and other harmful
content. Exercise caution and open messages, accept connectivity requests, download
content and accept installations only from trustworthy sources. To increase the security of
your device, you can consider installing appropriate antivirus software with a regular
update service and using a firewall application.
Warning: To use any features including alarm clock in this device, the R1010 must be
turned on. Do not turn the device on when your mobile device use may cause
interference or danger.
Network Services
To use the phone you must have a service agreement with your service provider. Some of
the features may require special network support and service provision. Contact your
service provider for more detailed information.
This device supports WAP 2.0 protocols (HTTP and SSL) that run on TCP/IP protocols.
Some features of this device, such as E-mail, browsing, multimedia messages and content
downloading, require network support and service provisioning for these technologies.
Page 15

15
Contents
1 Getting Started .............................................................................................. 18
1.1 Your Phone .......................................................................................................... 18
1.2 Starting Up ............................................. ............................. ............................ ..... 29
1.3 Entering and Searching Information .................................................................... 34
1.4 Functions and Features Preview ......................................................................... 39
1.5 Device Settings Preview ................................................. ............................ ......... 42
2 Using the Phone ........................................................................................... 46
2.1 Overview of Phone .............................................................................................. 46
2.2 Starting the Phone Function ................................................................................ 46
2.3 Locking/Unlocking Your Device ........................................................................... 47
2.4 Making a Call ................. ............................ ............................. ............................ . 48
2.5 Receiving a Call .................................................................................................. 51
2.6 Making a Video Call ............................................................................................ 55
2.7 Using SIM Card Services (STK) .......................................................................... 58
3 Setting Up Your Device ................................................................................ 59
3.1 Basic Settings ............ ............................ ............................. ............................ ..... 59
3.2 Customizing the Display ...................................................................................... 64
3.3 Customizing the Start Menu ................................................................................ 65
3.4 Setting Up Security ............ ........................ ............................. ............................ . 66
3.5 Setting Up E-mail ................................................................................................ 69
4 Messaging ..................................................................................................... 71
4.1 Messages .............................. .............................................................................. 71
4.2 E-mail .................................................................................................................. 75
5 Personal Information .................................................................................... 78
5.1 Contacts .............................................................................................................. 78
5.2 Calendar ........................................ ................................................. ..................... 80
5.3 Tasks ................................................................................................................... 82
5.4 Notes ................................................................................................................... 84
5.5 SIM Manager ....................................................................................................... 85
Page 16

16
6 Getting Connected ........................................................................................ 86
6.1 Connecting to the Internet .................................................................................. 86
6.2 Internet Explorer Mobile ...................................................................................... 92
6.3 Internet Sharing .................................................................................................. 96
6.4 Bluetooth ...................................... ............................................. .......................... 97
6.5 Windows Live ™ ................................................................................................. 99
6.6 Windows Live Messenger ................................................................................. 101
6.7 GPS .................................................................................................................. 102
7 Office Mobile ............................................................................................... 105
7.1 Microsoft® Office Mobile .................................................................................... 105
7.2 Microsoft
7.3 Microsoft
7.4 Microsoft
7.5 Microsoft
®
Office Word
®
Office Excel
®
Office PowerPoint
®
Office OneNote
®
Mobile ......................................................................... 105
®
Mobile ........................................................................ 108
®
Mobile ................................................................ 111
®
Mobile ................................................................... 113
8 Experiencing Multimedia ............................................................................ 114
8.1 Camera ............................................................................................................. 114
8.2 Managing Pictures and Video Files .................................................................. 116
8.3 Windows Media Player Mobile .......................................................................... 117
8.4 FM Radio .......................................................................................................... 122
8.5 Streaming Player .............................................................................................. 122
8.6 Java Applications .............................................................................................. 123
9 More Applications ....................................................................................... 126
9.1 File Explorer ...................................................................................................... 126
9.2 Task Manager ................................................................................................... 127
9.3 Add and Remove Programs Management ....................................................... 128
9.4 PDF .............................................. ............................................. ........................ 129
9.5 Calculator ............................................. ................................................. ............ 130
10 Synchronization .......................................................................................... 132
10.1 Installing ActiveSync ......................................................................................... 132
10.2 Choosing Your Synchronization Type ............................................................... 133
10.3 Setting up synchronization ................................................................................ 133
Page 17

17
10.4 Using ActiveSync tools ...................................................................................... 136
11 Specifications ............................................................................................. 138
12 Index ............................................................................................................ 139
13 Troubleshooting ......................................................................................... 141
14 Declaration of RoHS Compliance .............................................................. 142
15 Disposal of your old appliance .................................................................. 143
Page 18
1 Getting Started
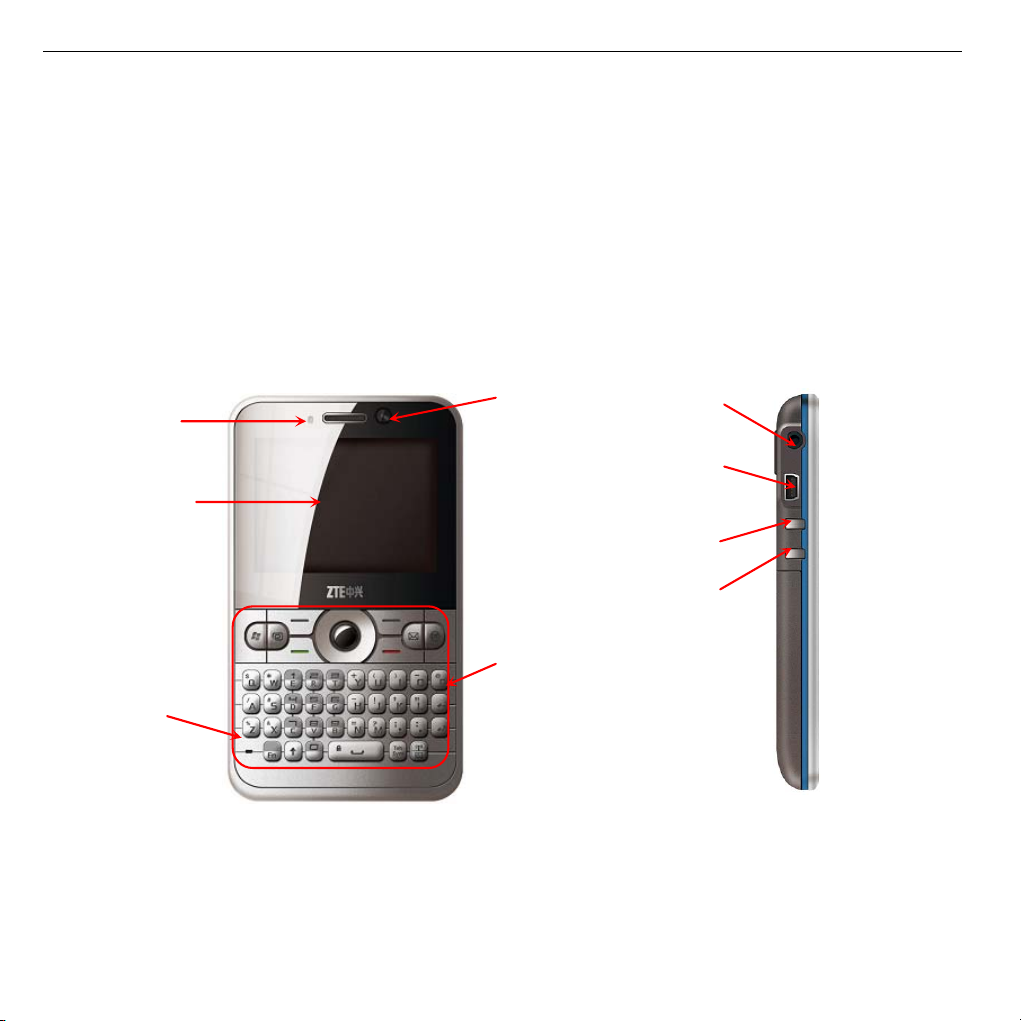
1.1 Your Phone
Front Panel Left Panel
Indicator
Light
Touch
Screen
Microphone
18
Front
Camera
QWERTY
Keyboard
Headset
Port
Charger/USB
Connection
Jack
Volume Up
Volume Down
Page 19
19
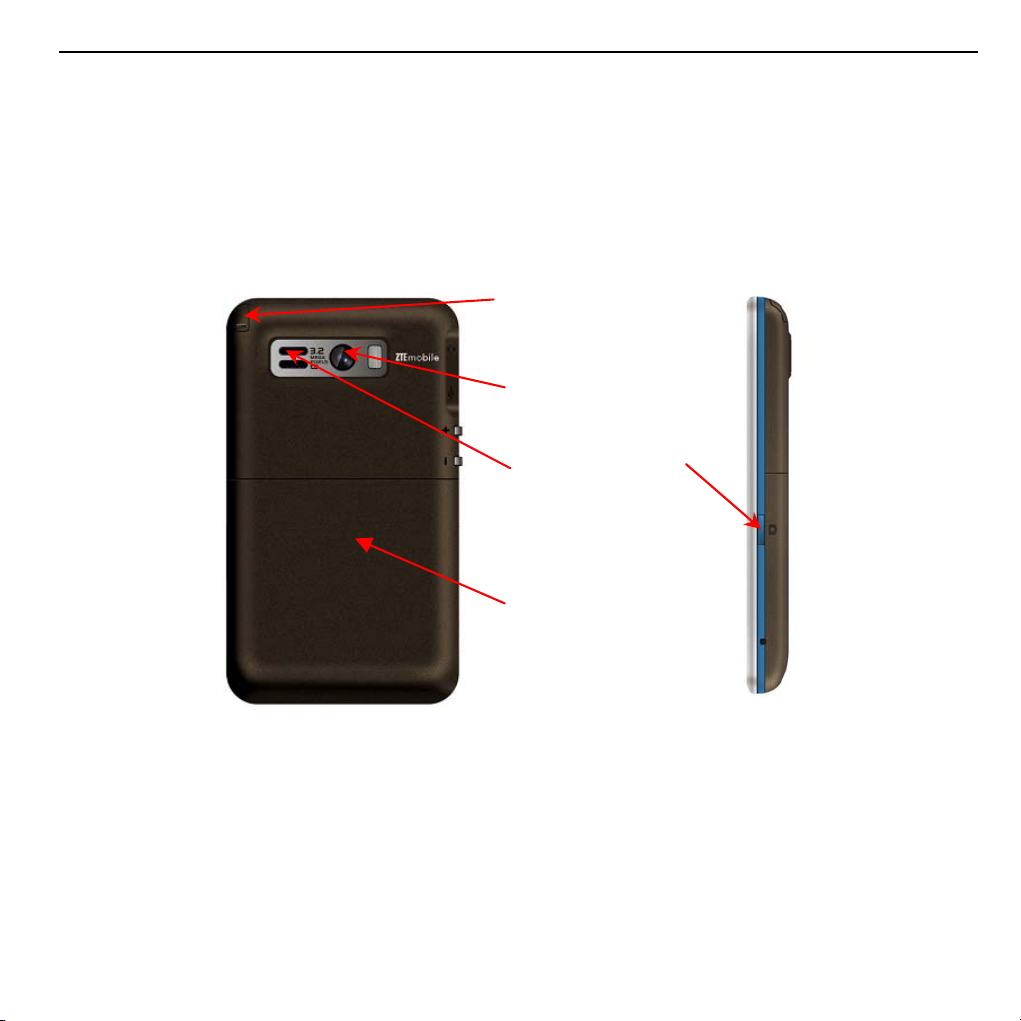
Back Panel Right Panel
Stylus
Back
Camera
Camera Key
Speaker
Battery
Cover
Top Panel
Power
Page 20
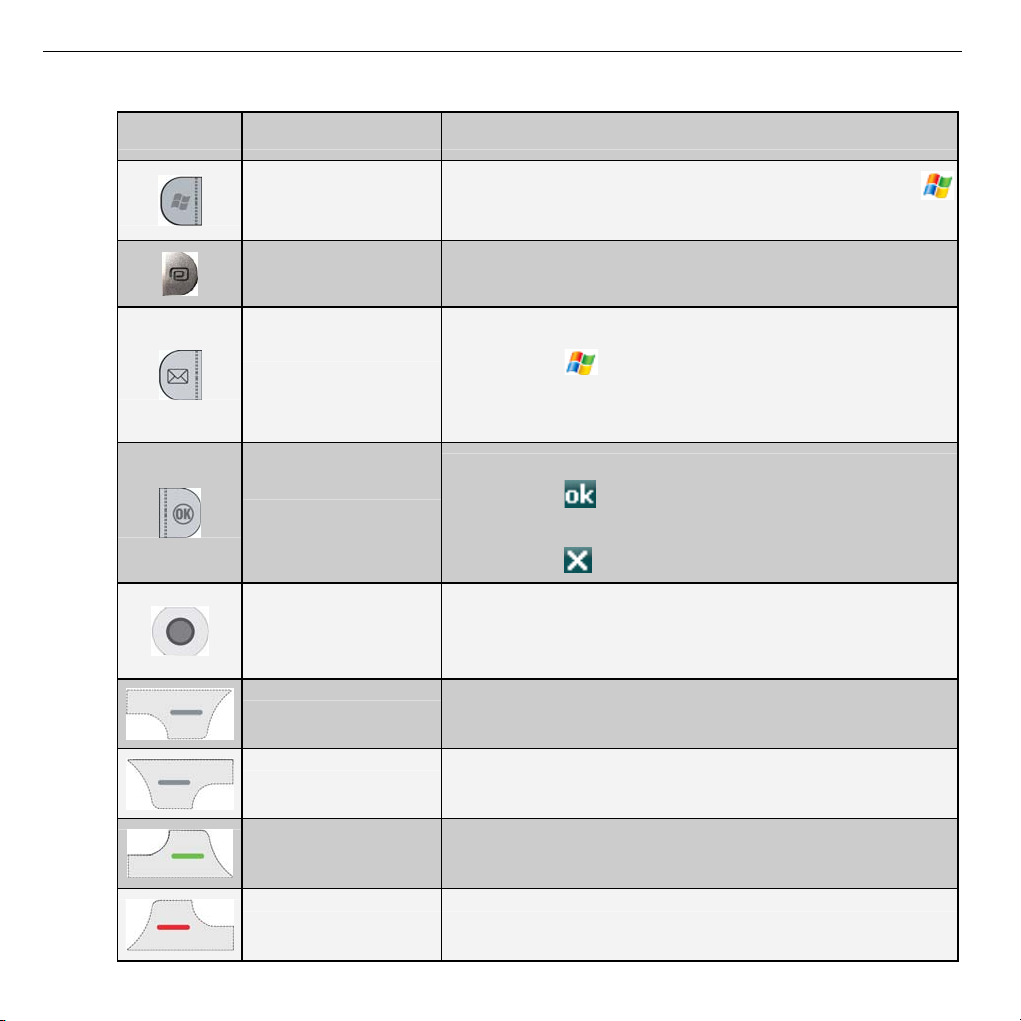
Key Definition
Key Name Function
20
Start Key
Web Key Press to go to the default home page.
Messaging Key
Press to open the Start Menu (Equal to tapping
on the touch screen).
• Press to go to the Messaging function (Equal to
tapping
>Programs>Messaging on the
screen).
Hold to open new SMS screen.
• Press to confirm your data entries (Equal to
OK Key
tapping on the touch screen).
• Press to exit the program in use (Equal to
tapping on the touch screen).
Navigation (Up/
Down/Left/Right)
Keys / Action Key
Left Soft Key
Use to scroll up, down, left, or right.
Press the center Action Key to carry out the
selection.
Press to perform the command shown in the label
above the key.
Right Soft Key
Dial Key
Press to perform the command shown in the label
above the key.
Press to dial a phone number, answer a call, switch
to another call, or put a call on hold.
End Key Press to end a call or return to Today screen.
Page 21
21
Key Name Function
→
Alphanumeric
Keys
Fn Key
Shortcut Key
Use to enter numbers, characters or symbols. See
Getting Started-Entering and Searching
Information-Key Functions.
Press to switch between the key functions (See
Getting Started-Entering and Searching
Information-Key Functions.):
• Press Fn Key once and sequentially press the
other one key to get the second function of it.
Then press the other keys to get the first
functions.
• Press Fn Key and the other one key at the same
time to get the second function of it.
• Press Fn Key twice and then press the other
keys to get the second functions of them. If you
want to get the first functions, press Fn Key
once again.
• Press to open Wireless Manager.
• Hold to open Task Manager.
This shortcut key can be assigned in >
Settings >Personal tab>Buttons.
Backspace Key Press to backspace over characters.
Enter Key Press to enter the next line when entering text.
Page 22

22
Key Name Function
Comma/
semicolon Key
Use to enter a comma or semicolon. See Getting
Started-Entering and Searching Information-Key
Functions.
Use to enter a period or colon. See Getting
Period/ colon Key
Started-Entering and Searching Information-Key
Functions.
Shift Key Hold to switch between uppercase and lowercase.
Press to open the symbols panel/enter a tab
Sym /Tab Key
symbol. See Getting Started-Entering and
Searching Information-Key Functions.
Use to enter spaces or lock the keyboard. See
Space/ Lock Key
Getting Started-Entering and Searching
Information-Key Functions.
Notes:
• In this manual "press a key" means you press a key and then release it, and "hold a
key" means you press a key and hold on for two seconds or more.
• You can use both pressing the keys on your keyboard and tapping the screen to
enter some menus. In this manual, the most convenient methods in procedures are
introduced.
For example, in the section “Customize the Today Screen”: “tap
>Settings>Today”
is the most convenient method. You can also use the following method to realize the
same function:
a) Press Start Key to open the Start menu.
b) Use your Navigation Keys to select Settings.
c) Press Action Key to open the Settings menu.
d) Use Navigation Keys to select Today.
Page 23
23
e) Press Action Key to open the Today menu.
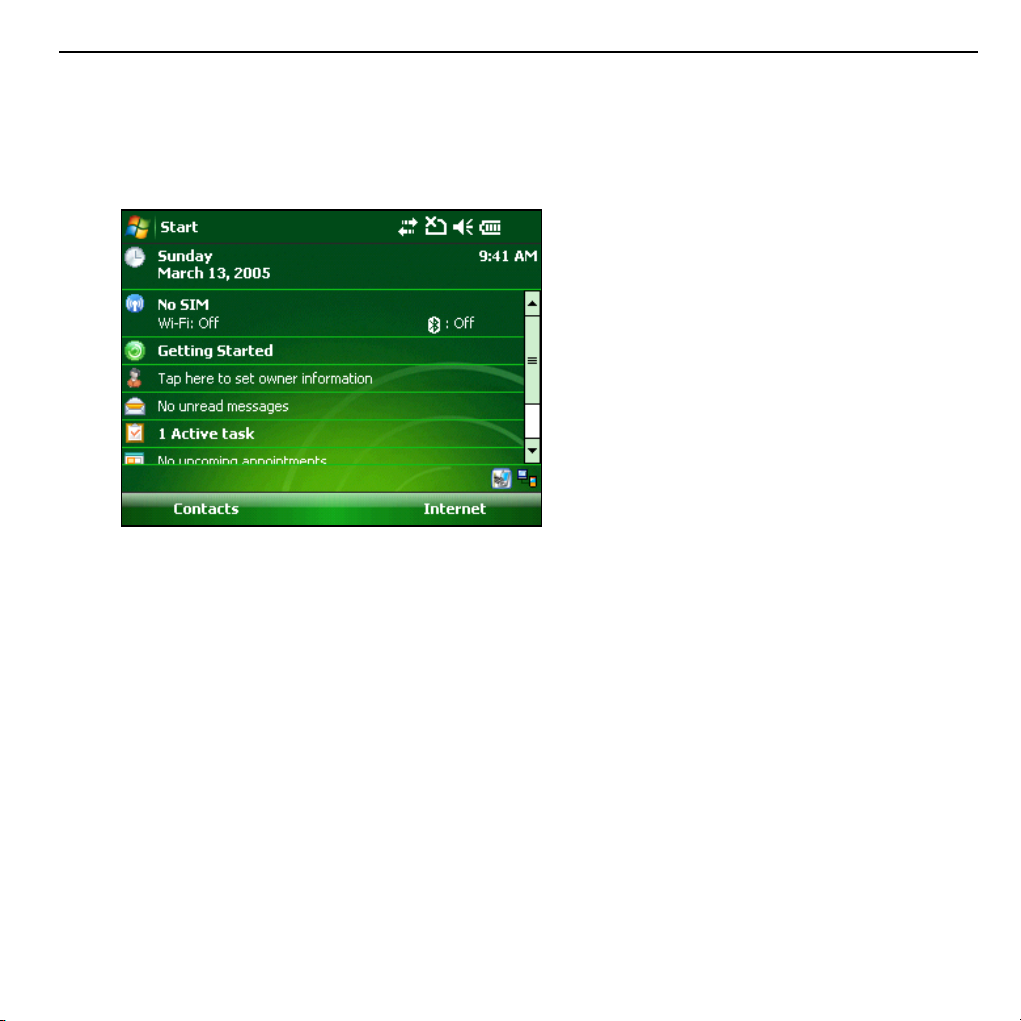
Today Screen
Today Screen Displays
The Today screen appears when you turn on the phone.
Use Navigation Keys or tap on the scroll bar to scroll down the Today screen to see
more information.
The default Today screen displays important information, such as:
• Current date and local time.
• Wireless Manager.
• Upcoming appointments.
• Number of unread messages.
• Device unlocked.
Tip: You can customize the view of Today screen. For more information, see Setting Up
Your Device – Customizing the Display- Customize the Today screen.
Page 24
24
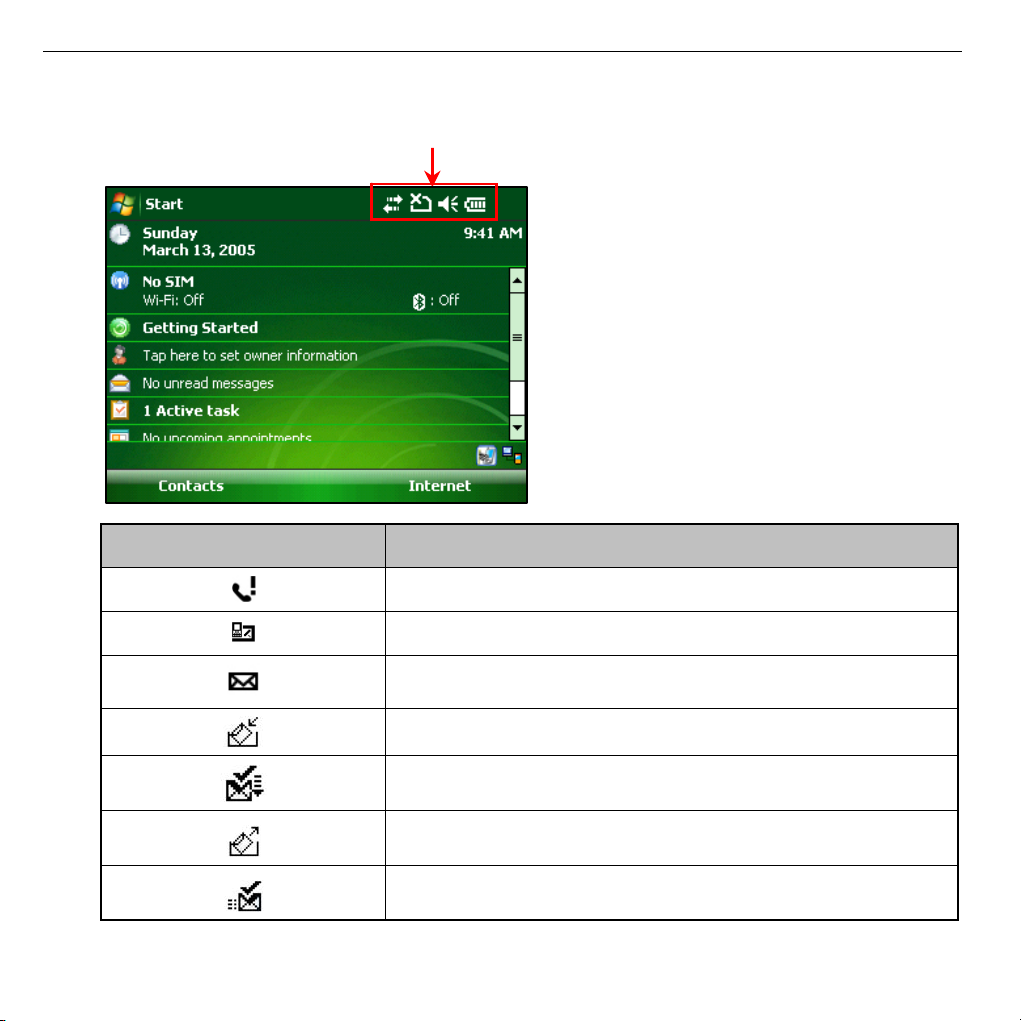
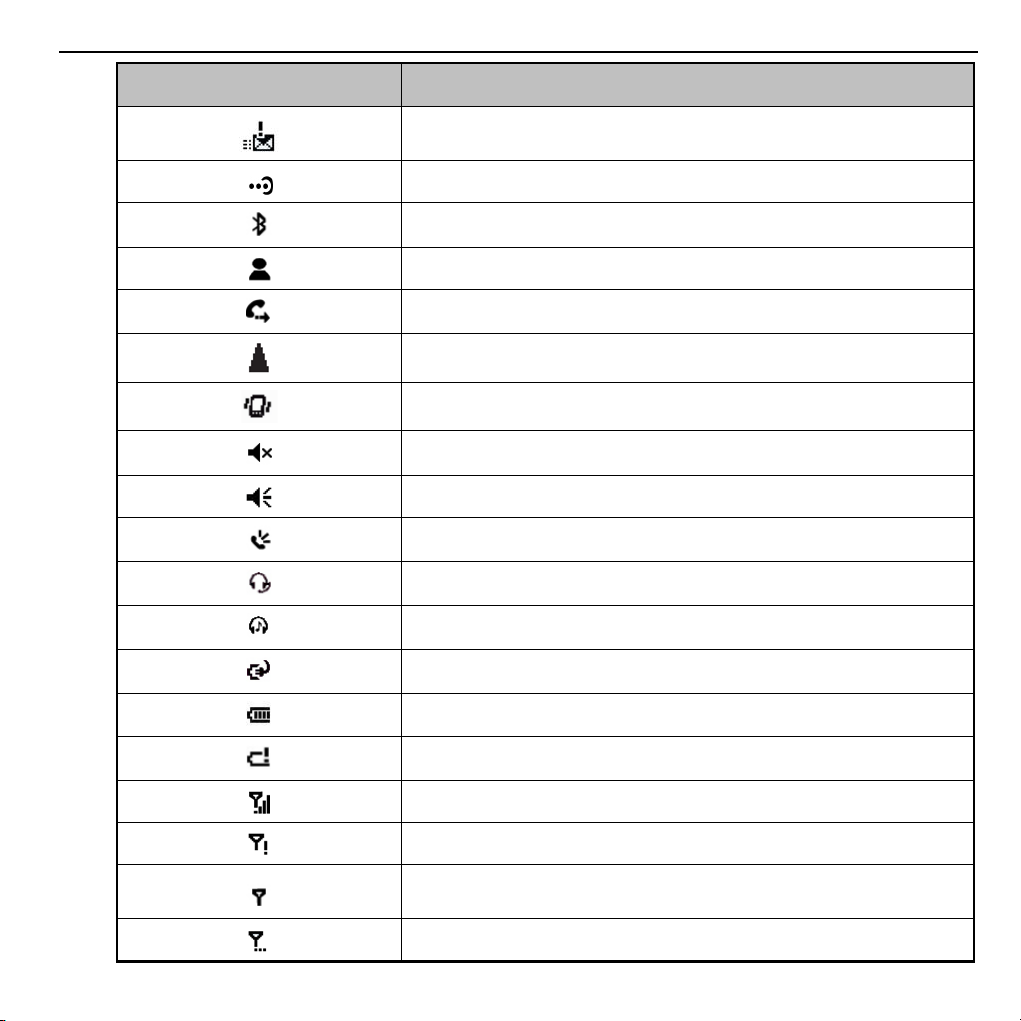
Common Status Indicators on the Title Bar of the Today Screen
Title Bar
Indicator What it means
Missed call
New message
New mail
Receiving MMS message
New MMS message received
Sending MMS message
MMS message sent
Page 25
25
TM
Indicator What it means
Cannot send MMS message
Bluetooth connection is active
Bluetooth partnership is created
New Windows Live
message
Calls are forwarded
Roaming
Vibrate mode
Sound off
Sound on
Speakerphone on
Bluetooth headset detected
Bluetooth headset playing music
Battery charging
Battery full
Battery low
Maximum signal strength
No phone service
No signal
Searching for phone service
Page 26
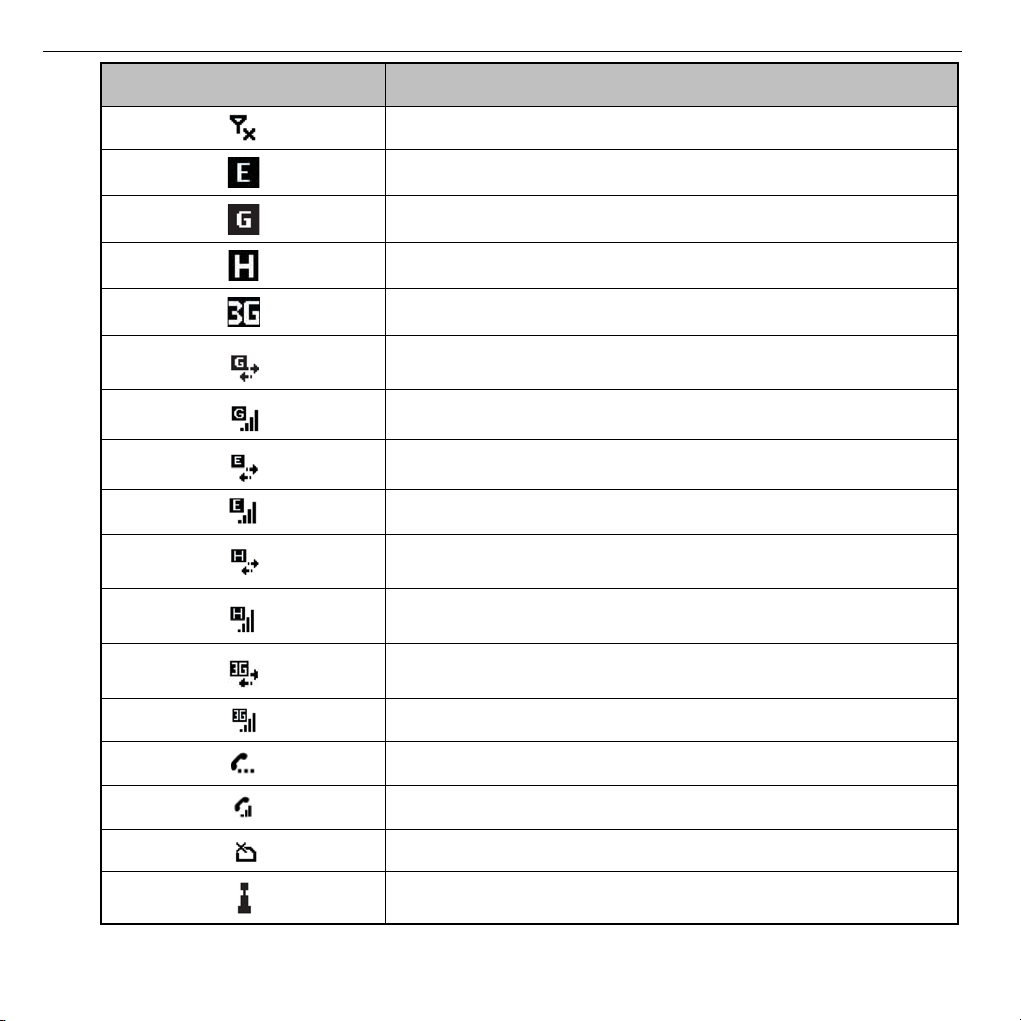
26
Indicator What it means
Phone is turned off
EDGE available
GPRS available
HSDPA available
UMTS available
GPRS connecting
GPRS in use
EDGE connecting
EDGE in use
HSDPA connecting
HSDPA in use
UMTS connecting
UMTS in use
Call on hold
Voice call in progress
No SIM card inserted
Wi-Fi is on
Page 27
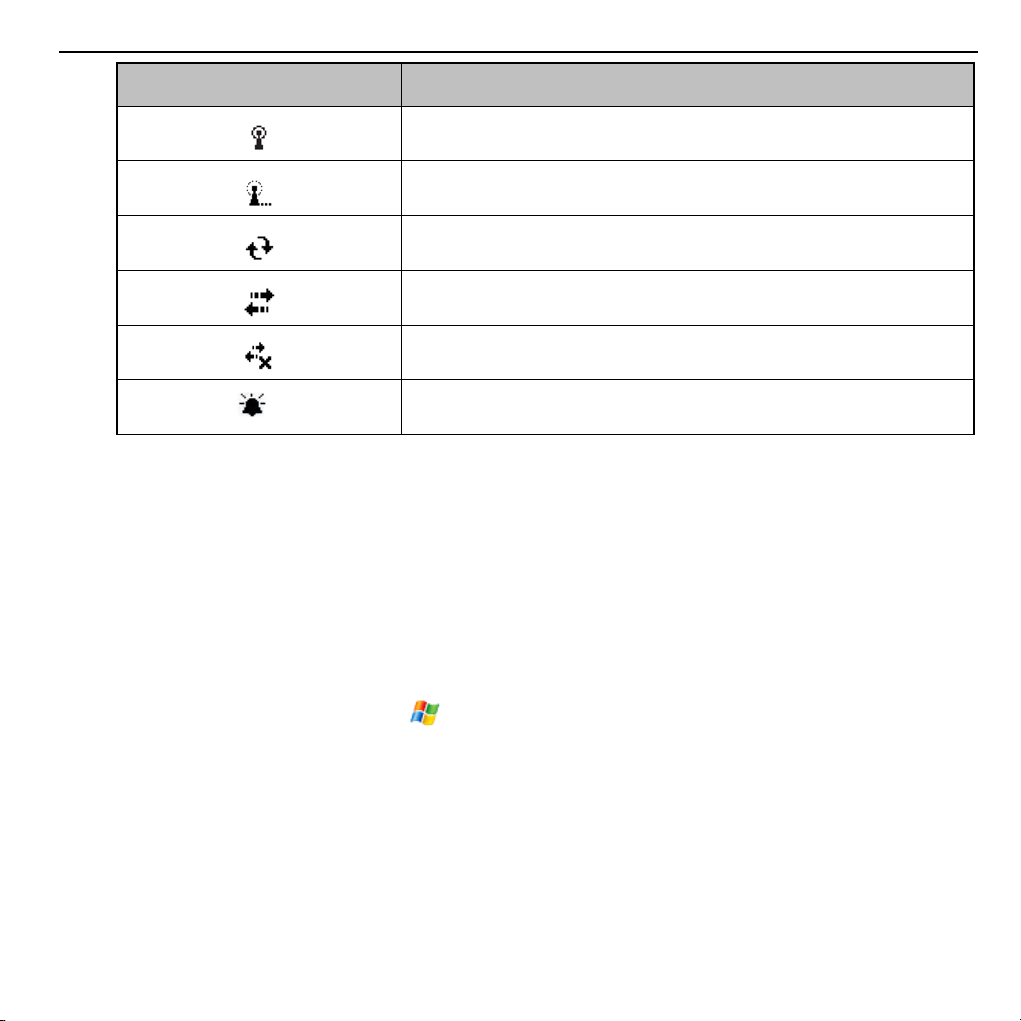
27
Indicator What it means
Wi-Fi is connected
Wi-Fi is connecting
Synchronization in progress
Connection is active
Connection is not active
Alarm
Start Menu
On the Today screen, tap Start to go to the Start menu. It shows the shortcuts for the
software bundled with the phone and the application programs installed by the user.
To run the programs:
• Tap the program you want to run.
• Use Navigation Keys to move through these application programs (see Figure
1), and press Action Key to run them.
Note: The Start menu is displayed in a normal size. If you want to change it to a
larger or smaller size, tap
slip the stylus to the left or right to adjust the text size.
> Settings>System tab>Screen>Text Size tab, then
Page 28
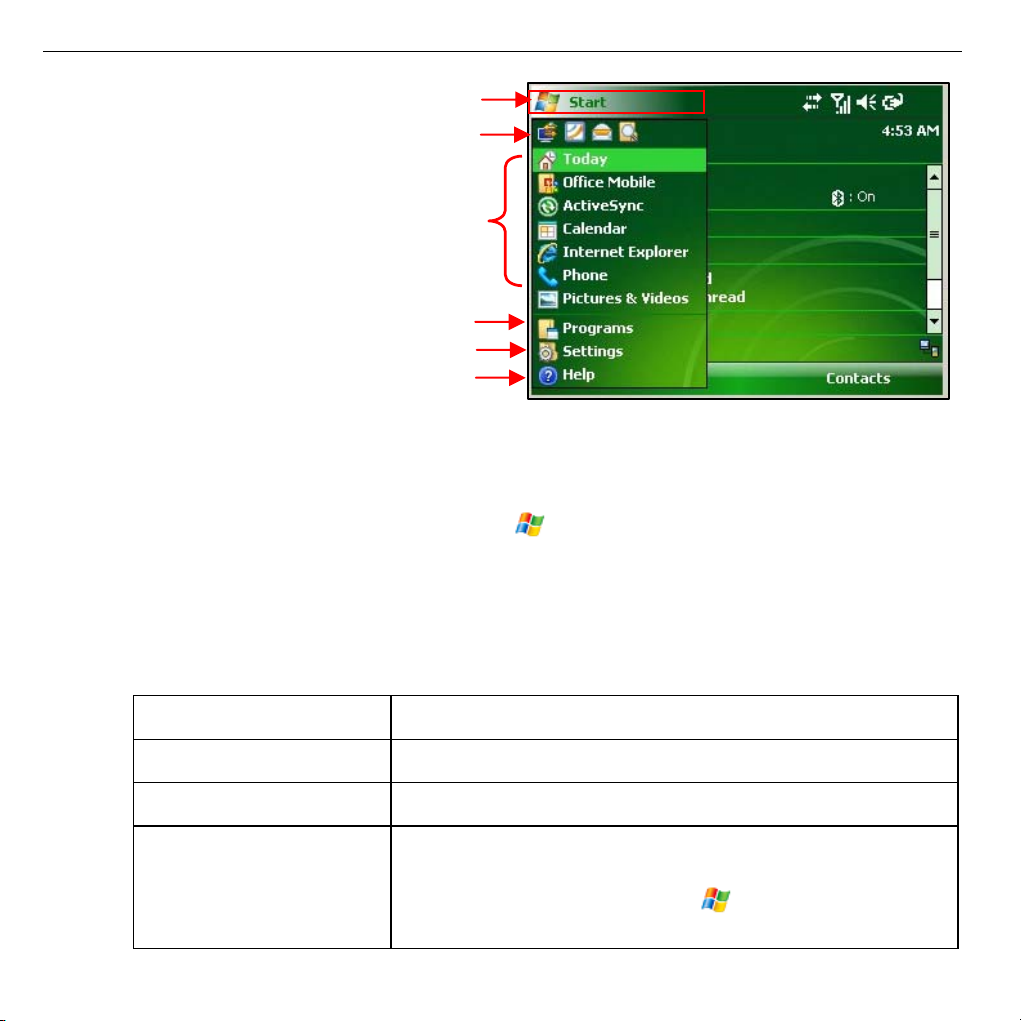
A
Open a program (The items displayed
here can be customized in Start >
Settings > Personal tab >Menus)
Open a recently-used program
Switch to the Today screen
28
ccess more programs
View and change settings
View the help information
Figure 1
To return to the Today screen
At any screen, press Start Key or tap to open the Start Menu and then select
Today to go back to the Today screen so that you can run other tasks.
Note: You can also press End Key to return to the Today screen. If you press End
Key during a call, however, the call will be ended.
Indicator Light
Detail Description
Red (normal) Charging
Green (normal) Charging completed
Green (flashing) Notifications of some events, such as missed calls, new
instant message etc.
These notifications can be set in
tab>Sounds & Notifications>Notifications tab.
> Settings>Personal
Page 29
29
1.2 Starting Up
Install the SIM/Micro SD Card and Battery
1. Hold your SIM card with the cut corner oriented as shown below and then insert it
into the card holder properly. See Figure3.
2. Hold your Micro SD card with the cut corner oriented as shown below and then insert
it into the card holder properly. See Figure 3.
3. Insert the battery by aligning the gold contacts on the battery with the gold contacts
in the battery compartment on the phone. Push down the battery until it clicks into
place. See Figure 4.
4. Replace the battery cover and press it gently until you hear a click. See Figure 5.
Figure 2
Page 30
30
Figure 3
Figure 4
Page 31
31
Figure 5
Remove the Battery and SIM/Micro SD Card
1. Make sure that your mobile phone is powered off.
2. Remove the battery cover. See Figure 2.
3. Pull the battery up and remove it from the mobile phone. See Figure 6.
4. Pull the SIM card out and remove it from the mobile phone. See Figure 3.
5. Push the Micro SD card so it clicks out.
6. Slide down gently and remove the Micro SD card from the slot. See Figure3.
Page 32

32
Figure 6
Cautions for using SIM/Micro SD card
• Do not touch the metal contacts on the card with hands or metal objects.
• Use a soft cloth to clean the card.
• Keep the card out of the reach of the children.
Charge the Battery
The new battery is not fully charged. To charge the battery, you need to:
1. Connect the adapter to the adapter slot. See Figure7.
2. Connect the charger to a standard AC wall outlet.
If battery is low, there will be a pop-up message on the screen and the indicator light will
be green and flashing.
When charging, the indicator light will be red. When charging in the power-on mode,
the icon
the battery indicator
appears on the title bar of the Today screen. When charging is completed,
appears on the title bar.
Page 33

33
Disconnect the charger when the battery is fully charged.
Figure 7
Power On/Off Your Phone
Make sure that your (U)SIM card is in your mobile phone and the battery is charged.
Hold the Power Key to power on/off the phone. The phone will automatically search for
the network after it is powered on.
When you first power on your R1010 after you purchase it or reset it to factory (see
Setting Up Your Device- Basic Settings-Reset to Factory Settings), you need to
calibrate the screen (see Setting Up Your Device- Basic Settings- Calibrate the
Screen) and select your time zone (see Setting Up Your Device- Basic Settings-Set the
time and date).
Note: You may need to enter the PIN (Personal Identification Number) code if you have
enabled the (U)SIM PIN. (See Setting Up Your Device- Setting Up Security-Secure the
(U)SIM Function-Enable the (U)SIM PIN.)
Page 34

34
1.3 Entering and Searching Information
When you enter a field that needs text or numbers, you can use the QWERTY hardware
keypad or one of the onscreen input methods to enter information.
Key functions
The Alphanumeric Keys, Comma/ semicolon Key, Period/ colon Key, Sym/ Tab
Key and Space/ Lock Key have two functions. The functions shown on the lower part
of the keys are called the first functions, and those shown on the upper part of the keys
are called the second functions.
The second
The first function
Alphanumeric Keys
• The first function: Press the keys to enter the letters shown on the lower part of the
keys.
• The second function: Press the keys to enter symbols or numbers shown on the
upper part of the keys.
Comma/ semicolon Key
• The first function: Comma Key, press to enter commas.
• The second function: Semicolon Key, press to enter semicolons.
Period/ colon Key
• The first function: Period Key, press to enter periods.
• The second function: Colon Key, press to enter colons.
Sym/Tab Key
• The first function: Sym Key, press to open the symbol panel.
• The second function: Tab Key, press to enter a tab symbol.
function
Page 35

35
Space/ Lock Key
• The first function: Press to enter a space.
• The second function: Press to lock the keyboard.
Using the QWERTY Hardware Keyboard
You can enter text, numbers, and symbols by using the QWERTY keyboard. When you
enter a field that needs text or numbers, the phone automatically selects the alphabetic
input mode. In this mode, you can:
• Use Alphanumeric Keys to enter lowercase letters.
• Press Shift Key twice, and then use the corresponding alphanumeric keys to enter
uppercase letters.
• Press Sym Key to open the symbol pad, and then select the required symbol to enter.
• Press Comma Key or Period Key to enter a comma or a period.
• Press Backspace Key to delete a single character, and hold this key to clear all
inputs.
• Press Enter Key to turn to the next line.
• Press Space Key to input a space.
• Press Fn Key to switch between the first and second functions of the keys (See
Getting Started-Your Phone-Key Definition- Fn Key).
• Press Tab Key to enter a tab symbol or jump to the next input text field.
• Press Alphanumeric Keys to enter the corresponding numbers or symbols.
• Press Semicolon Key or Colon Key to enter a semicolon or a colon.
Onscreen Input Methods
When you enter a field that needs text or numbers, the Input Panel will be available on
the bottom of the touch screen.
Ta p t he Input Selector arrow (that appears next to the Input Panel icon) to open a
menu. In this menu, you can select or customize a text input method. The corresponding
Input Panel will be displayed after selecting a text input method, and then you can use
it to enter text or numbers.
Page 36

Input Panel (Keyboard)
Input Panel icon
Input Selector arrow
36
Figure 8
Input Selector
Select to
customize the
input methods
Figure 9
Entering Text or Numbers through Touch Keyboard
With the enlarged keys and input enhancement, you can type faster and more
accurately using the touch Keyboard.
To use the touch Keyboard:
• Enter a field that needs text or numbers.
• Tap the default input panel icon to get the touch Keyboard. See Picture ①of
Figure 10.
Page 37

37
• Tap a~z to enter lowercase letters.
• Tap Sym Key to open symbols panel. From this panel, you can press Key,
Key,
Key, Key, Key or Key to search for special characters.
Note: When composing sentences, the first letter of the new sentence will be
capitalized automatically.
2
Tap 123
1
3
4
Tap CAP
Tap άű and Shift/CAP
5
Tap άű
Figure 10
• Tap CAP Key to get the uppercase touch keyboard (See Picture ③ of Figure10)
and enter uppercase letters or symbols.
• Tap CAP/Shift Key to switch between uppercase and lowercase.
• Tap the keys 0~9 to enter numbers, or
• Tap 123 Key to get the number touch keyboard (See Picture ② of Figure10) and
enter numbers or calculating symbols.
• Tap 123 Key again to return to the default keyboard screen (See Picture ①of Figure 10).
• Tap άű Key to get to the keyboard just as shown in Picture ④ of Figure10.
Page 38

38
• Tap the corresponding letters or symbols to enter them or tap CAP/Shift Keys to
get the screen shown in Picture ⑤ of Figure 10 to enter the uppercase letters.
• Tap CAP/Shift Key to switch between uppercase and lowercase.
• Tap Tab Key to enter the tab symbol.
• Tap Ctrl Key and some other keys to do some corresponding operations. For
example, you can use Ctrl and C Key to copy the text:
(1) Tap Ctrl Key.
(2) Slip your stylus to select the text that you want to copy.
(3) Tap C Key.
Searching Information
You can search for files and other items stored in My Documents folder or on an
installed storage card. You can search by file name or by words located in the item.
1. Tap
2. In the
• Enter the file name, word, or other information.
• Tap the icon and select one item that you have searched before.
3. In the Type field, you can tap the
>Programs>Search.
Search for field, you can:
icon and select a data type from the list.
4. Tap Search.
5. In the Results list, tap the item you want.
Page 39

39
1.4 Functions and Features Preview
Your R1010 has lots of functions. The following are programs that are preinstalled on your
device.
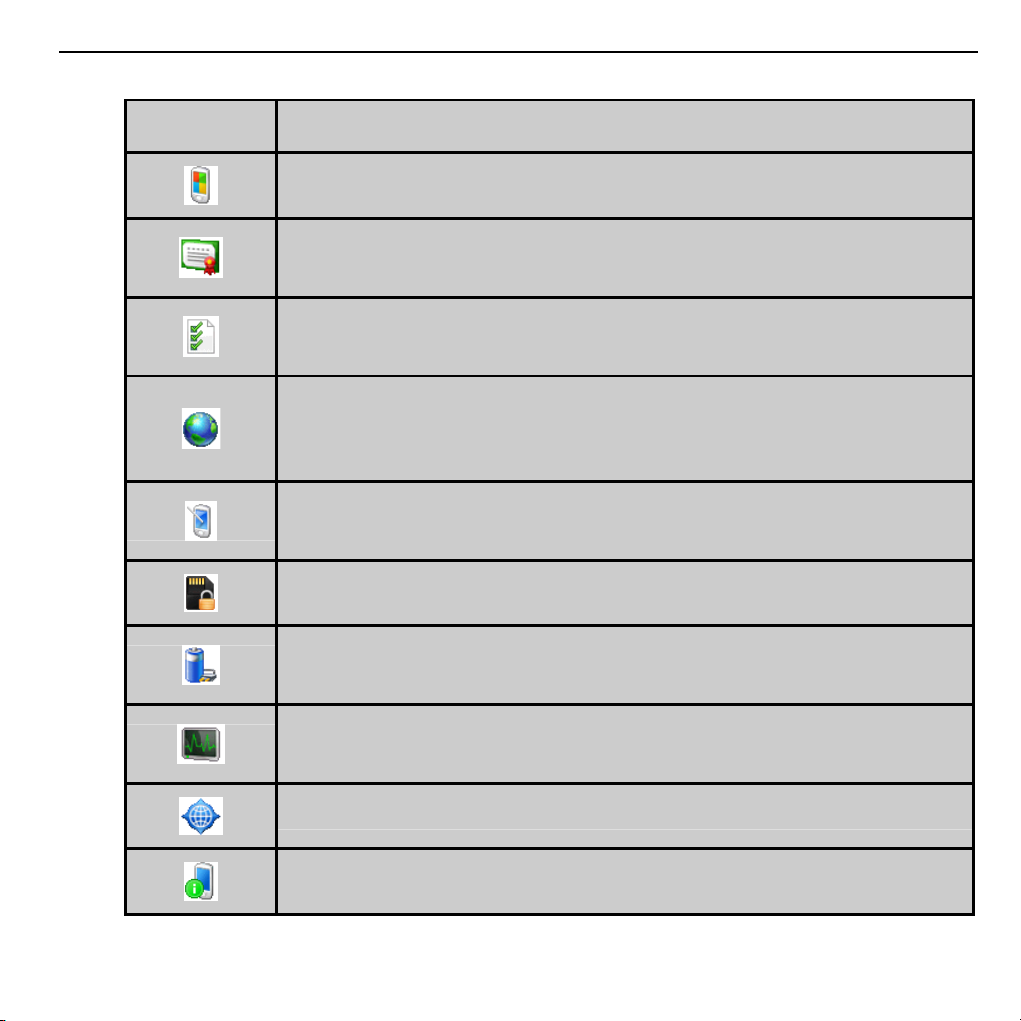
Programs in the Start Menu
Icons Description
Office
Mobile
Excel Mobile Microsoft® Office Excel® Mobile enables you to
edit and view your Excel worksheets.
OneNote Mobile Microsoft® Office OneNote® Mobile enables
you to edit and view your OneNote files.
PowerPoint Mobile Microsoft® Office PowerPoint® Mobile
enables you to view your PowerPoint presentations.
Word Mobile Microsoft® Office Word Mobile enables you to edit
and view your Word documents and text files.
ActiveSync Synchronize information between your device
and a PC.
Calendar Enables you to schedule appointments, including
meetings and other events.
Internet Explorer Enables you to browse the web and WAP
sites or download programs or files from the internet.
Phone Enables you to make and receive calls, set up speed dial
calling.
Pictures & Videos View, manage, send or beam your
pictures and videos.
Page 40

40
Programs Screen
Icons Description
Games Play the two preinstalled games: Bubble Breaker and Solitaire.
Calculator Perform the basic calculating functions, such as addition,
subtraction, multiplication, division, extraction and so on.
Camera Enables you to capture photos or shoot video clips.
Contacts Enables you to manage your friends and colleagues.
File Explorer Organize and manage your files on the device.
FM Radio Search for radio channels, listen to them, and save them on
your device.
SIMMgr Manage the contacts that are stored in your SIM card.
Task Manager View and manage all the running programs on your
device.
Getting Started Get the basic operations guide of the device: Make a call,
Set date and time, Set up E-mail, Set up a device password, Set up a
Bluetooth headset, Set background, Set ring tone, Transfer music and
Add/remove Getting Started.
JAVA Download and install JAVA applications on your device.
Messaging Enables you to send and receive SMS, MMS messages and
E-mails.
Page 41

41
Icons Description
Messenger Send and receive instant messages through the Windows
Live Messenger.
Notes Create handwriting or typed notes and voice recordings to send or
beam to other devices.
Internet Sharing Connect your PC to the internet through the data
connection of your device.
PDF View PDF (Portable Document Format) files on your device.
Search Search Notes, Help, Messaging, Tasks or other information on
your device.
Streaming Player Lets you stream live broadcasts or on-demand media
content from the Web.
Tasks View and manage your tasks on your device.
Windows Live Find information on the Web through the mobile version of
Windows Live™. You can also sign into your Windows Live account to
access your Live Mail messages and send/receive instant messages in
Live Messenger.
Windows Media Play the audio or video files on your device through
Windows Media.
Page 42

42
1.5 Device Settings Preview
You can adjust the device settings to suit the way you like. Tap > Settings>Personal/
System/Connections tab to view all the settings on your device.
Personal tab
Icons Description
2G/3G Select a network type according to your device service.
Lock Set a password of your device.
Buttons Assign a program or function to a hardware button.
Input Set the options of each input method.
Today Customize the appearance and items of the Today screen.
Menus Select the programs that appear in the Start Menu.
Owner Information Enter your personal information to your device.
Sounds & Notifications Enable the sounds for events, notifications
etc. and set the type of notifications for different events.
Phone Customize the phone settings such as the ring tone, PIN code
of your (U)SIM card, Call services, video phone settings and more.
Page 43
43
System tab
Icons Description
About View the basic information of your device.
Certificates Set the information of certificates that are installed on
your device.
Customer Feedback Send customer feedback to make Windows
Mobile software better.
Regional Settings Set the regional configuration to use, including the
format for displaying numbers, currency, date, and time on your
device.
Screen Align the screen. You can also clear type and adjust the text
size.
Encryption Encrypt files on your storage card.
Power Check the power station of your battery. You can also set the
timeout for turning of the device to conserve battery power.
Task Manager View the currently running programs information and
you can select to end them.
External GPS Set the appropriate GPS communication ports.
OEM’s information View the OEM’s information of your device.
Page 44

44
Icons Description
Memory View the storage and program memory information of your
device and storage card.
Managed Programs View the installation history of managed
programs.
Error Reporting Enable and disable the device’s error reporting
function.
Clock & Alarms Set the time and date of your device. You can also
set the alarms at specified days and times of a week.
Remove Programs Remove programs that you installed on your
device.
Connections tab
Icons Description
Reset Factory Reset your device to factory settings.
Backlight Set the backlight timeout and adjust the backlight.
Windows Update Update Windows Mobile® on your device with the
latest updates.
Bluetooth Turn Bluetooth on, set your device to be visible and search
for other Bluetooth devices.
Wireless Manager Turn on wireless services: Wi-Fi, Bluetooth or
Page 45

45
Icons Description
Phone services. You can also get quick access to the wireless service
settings.
Domain Enroll Connect your device with company resources. You
will need to enrollment password provided by your system
administrator.
Connections Set up one or more types of modem connections for
your device, such as phone dial-up, GPRS, and more, so that your
device can connect to the Internet or a private local network.
Beam Set your device to receive all incoming beams.
USB to PC Change the type of the USB connection.
Wi-Fi Configure wireless networks and the network adapters. You can
also search for networks detected.
Page 46

46
2 Using the Phone
2.1 Overview of Phone
You can use Phone to make phone calls, set up speed dials, keep track of calls, and
send messages. Your wireless service provider may also provide other useful services
such as voice mail, call barring, call forwarding, call waiting, fixed dialing and caller ID.
The integrated phone on your device can also be used to connect your device to an ISP
or work network so you can browse the web and read E-mail. You can connect to the
Internet or work network using a cellular line.
2.2 Starting the Phone Function
Disable & Enable Phone Function
When using this phone, you can control wireless functions. When the phone function is
off, you will not be able to receive calls, send/receive messages, or use GPRS to
connect to wireless mobile network. But other handset functions such as browsing
the calendar, listening to music, or playing games, can still be used.
1. Tap the
tab> Wireless Manager to open the wireless manager.
2. Tap Phone on the Wireless Manager screen.
-or-
Use Navigation Keys to select Phone and press Action Key to select On to
enable the phone function, or select Off to disable the phone function. The title bar
will display
icon on the Today screen, or select > Settings > Connections
for On or for Off.
Note: Under certain circumstances (such as on a plane), you may need to turn off the
phone function.
Open the Phone Screen
From the Phone screen, you can view the speed dial list, open call, send text message
or find a contact, and even save a new number into Contacts. There are several ways to
Page 47

47
access the Phone screen:
• Press Dial Key.
• Enter the phone number on Today screen.
• Press Start Key, select Phone and press Action Key.
• Tap >Phone.
Enter SIM PIN
Each time you power on the phone or activate the phone function, you will need to enter
the SIM card PIN provided by your network service provider if you have enabled the
PIN code (See Setting Up Your Device-Setting Up Security- Secure the (U)SIM
Function-Enable the (U)SIM PIN).
Enter the phone’s SIM PIN code and press Enter. Wait for the phone to verify the PIN code.
Warning: If you enter your PIN incorrectly for three times, the SIM card will be locked
automatically. Contact your service provider to obtain the PIN Unblocking Key (PUK)
code to unlock the SIM card.
2.3 Locking/Unlocking Your Device
Lock your device
You can lock the keypad to avoid pressing keys accidentally, and to prevent unauthorized
actions on the device while not carrying it. When the keypad is locked, you will still
receive phone call notifications and see appointments reminders.
1. Open the Today screen, if necessary.
2. Tap Device unlocked.
You can also use the keyboard to lock your device:
1. Press Fn Key once.
2. Press Space Key.
Tips:
• The lock icon will change to a closed lock .
• You can still receive calls and make emergency calls when the keypad is locked.
Page 48

48
Unlock your device
1. At the bottom of the Today screen, tap Unlock.
2. Tap Unlock again.
You can also use the keyboard to unlock your device:
1. Press Left Soft Key.
2. Press
Key.
2.4 Making a Call
Make a Call by entering a phone number
1. Enter phone numbers you want to call on the Today screen or the Phone screen.
2. If you make a mistake, press Backspace Key to erase the last digit, hold this key to
clear all digits. Your phone automatically lists the matched contacts.
3. Press Dial Key or tap Keypad >Talk to call.
4. Press End Key or tap End to end the call.
Make a Call by entering a contact name
1. Open the Phone screen (See Using the Phone – Starting the Phone Function-Open
the Phone Screen).
2. Use a text input method to enter the contact’s first or last name (See Getting
Started-Entering and Searching Information).
3. When the contact appears in the list, tap it and then tap Call or select it and press
Dial Key.
Make a Call from a hyperlink phone number
You may quickly dial a phone number from an E-mail or text message that contains a
hyperlink phone number. A hyperlink phone number is underlined in the same manner
as a web site address.
1. Tap
>Programs>Messaging, and then select Messages.
Page 49

49
2. Scroll to the message that contains the phone number you want to call.
3. Tap the message to open it.
4. Tap the
5. Verify that the phone number is correct. If necessary, add the country code or area
code.
6. Tap Call.
hyperlink phone number in the message.
Make a Call from the Contact list
1. On Today screen, tap Contacts or tap > Programs>Contacts.
2. Tap the contact you wish to call, or select it and press Dial Key.
Note: If there is more than one number for the contact, tap the number you want to
call.
Make a Call from Call History
1. Open the Phone Screen (See Using the Phone –Starting the Phone Function - Open
the Phone Screen).
2. Tap Keypad >Call History.
3. Tap the recently dialed or received contact from the list. You can scroll down the list
to see more call history.
4. Tap the number you want to call and tap Call, or select the number and press Dial
Key.
Make a conference call
You can create a phone session between yourself and two or more other parties.
1. Call the first number.
2. While you are connected to the first number, tap Hold.
3. Call the second number.
4. Tap Menu>Conference.
5. To add another party, tap Hold, dial the number, then tap Menu>Conference.
Page 50

50
Note: If you want to talk to one of the parties privately during the conference call, tap
Menu>Private. To include everyone in the call again, tap Menu>Conference.
Make Emergency Calls
On the Today screen or Phone screen, enter the emergency number for your location,
and then tap Keypad>Talk or press Dial Key. It is possible to dial emergency numbers
when the keypad is locked or the (U)SIM card is not inserted.
(U)SIM card may store other emergency numbers. Contact your service provider if you
need more information.
Make International Calls
1. On the Today screen or Phone screen, press Key to enter “+”.
2. Enter the full phone number.
3. Tap Keypad > Talk or press Dial key.
For example: +49-123-12345678 in the following format: +country code-area code-phone
number.
Make Speed Dial
Press and hold the speed key to call on the Today screen. You can set speed dial
entries/shortcuts for the frequently dialed contact numbers.
Set Speed dial
Before you create a Speed Dial entry, the number must already exist in Contacts.
1. From the Phone screen, tap Menu>Speed dial.
2. Tap Menu>New.
3. Select a contact that you want to set speed dial, or tap Menu>New Contact to add
the number you want to set speed dial to your Contacts.
4. Tap the arrow behind Location to select a number key.
5. Tap OK.
Page 51

51
Call a voice mailbox
• On the Today screen or Phone screen, Hold Key.
• Tap and hold 1 on the phone keypad.
Notes:
• If you are out of range of a phone line when voice mail arrives, you will be notified
that you have voice mail the next time that you are able to receive calls on that line.
• If you have more than one phone line, the voice mailbox that you reach will be
determined as follows:
a) If only one voice mailbox has new voice mail, you will reach that mailbox.
b) If more than one voice mail has new voice mail, you will reach line 1 first, then
line 2.
c) If you have no unread voice mail, you will reach the voice mailbox.
2.5 Receiving a Call
Answering or Ignoring a first Incoming Call
When there is an incoming call, the phone will display the information on the screen.
• To answer, press Dial Key, Left Soft Key or tap Answer.
• To ignore, tap Ignore or press End Key or Right Soft Key.
Tips:
• You can use other programs on your device during a call. To switch quickly back to
phone, press Dial Key or tap
• When someone not in your list of contacts calls you, you can create a contact during
the call or from the call history by tapping Menu>Save to Contacts.
>Phone. To end the call, Press End Key.
Answering or postponing a second call
• Press Dial Key or tap Answer to put the first call on hold and answer the second
call. Tap Swap to switch between calls.
• Tap Ignore to postpone answering the call.
Page 52
52
Put a call on hold
During a call, you can put a call on hold so that you can call another number or answer
an incoming call. If you have more than one call on the line, you can move from one call
to the other.
• Tap Hold to put a call on hold, or
• Hold Dial Key.
Forward calls
You can use Call Forwarding to forward all incoming calls to a different number.
1. Open the Phone screen (See Using the Phone-Starting the Phone Function -Open
the Phone screen).
2. Tap Menu>Options>Services tab.
3. Select Call Forwarding and tap Get Settings.
4. Select Forward all incoming phone calls and enter the phone number that is to
receive forward calls.
Page 53

53
You can also use Call forward to forward incoming calls to a different number based on
your situation:
• Select No answer to forward calls only when you cannot answer your call.
• Select Unavailable to forward calls only when your phone is turned off or you are
unreachable.
• Select Busy to forward calls when the line is busy.
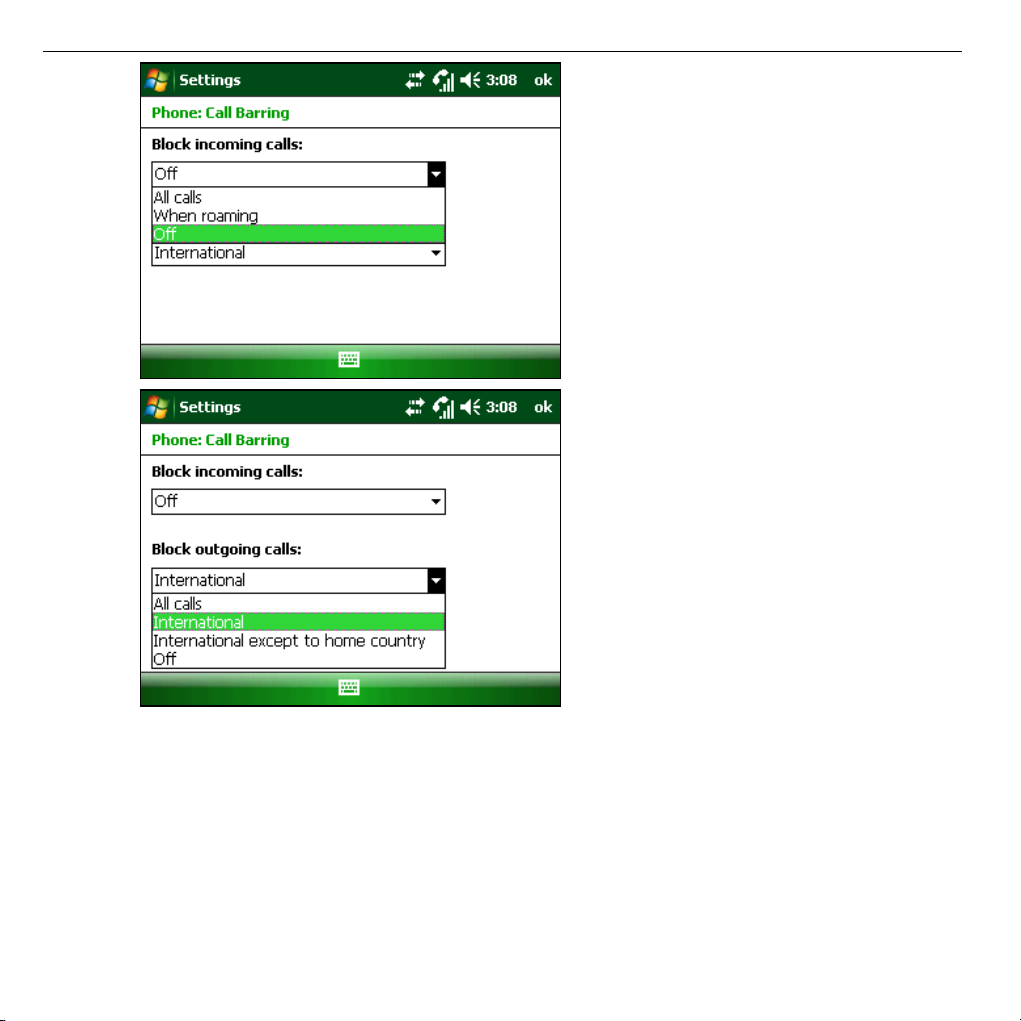
Block calls
You can use Call Barring to block certain types of incoming and/or outgoing calls.
1. Open the Phone screen (See Using the Phone-Starting the Phone Function -Open
the Phone screen).
2. Tap Menu>Options>Services tab.
3. Select Call Barring and tap Get Settings.
Page 54
54
4. Select the type of incoming and/or outgoing calls you want to block.
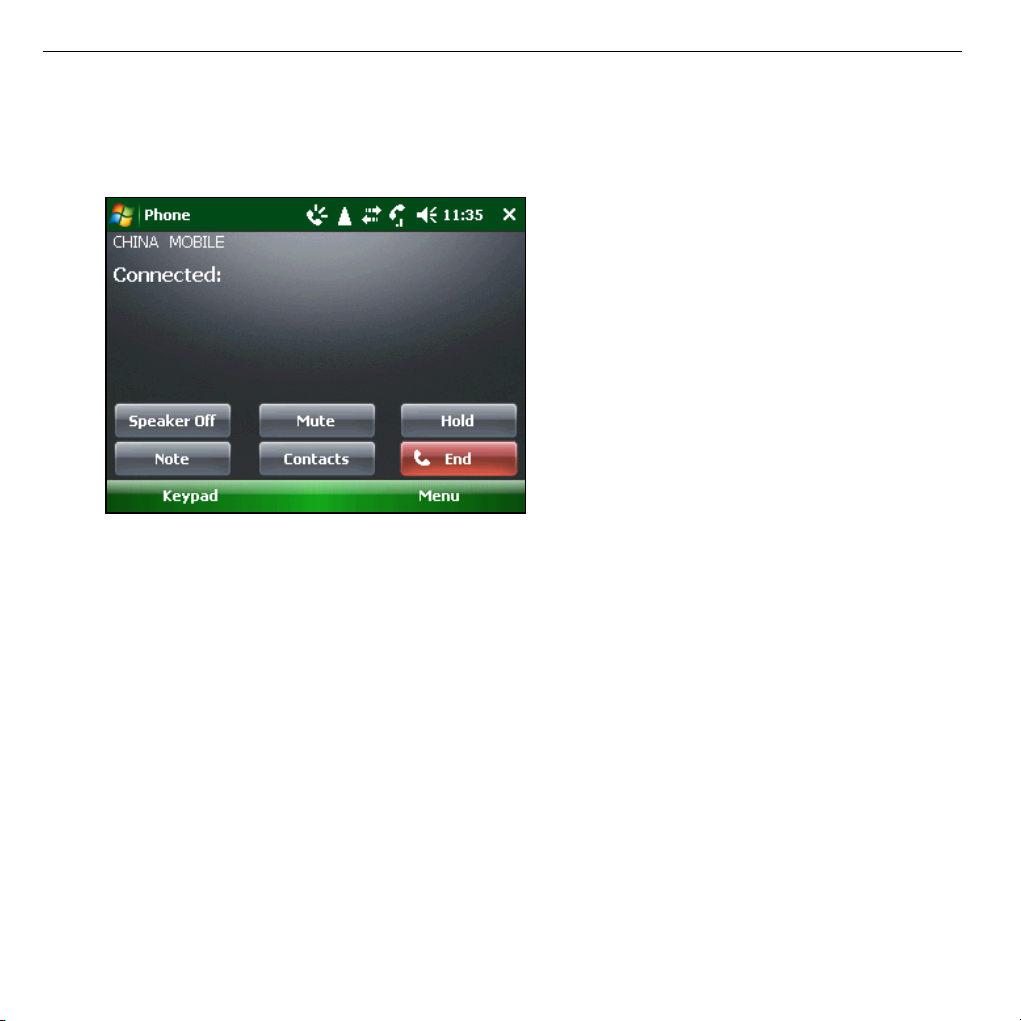
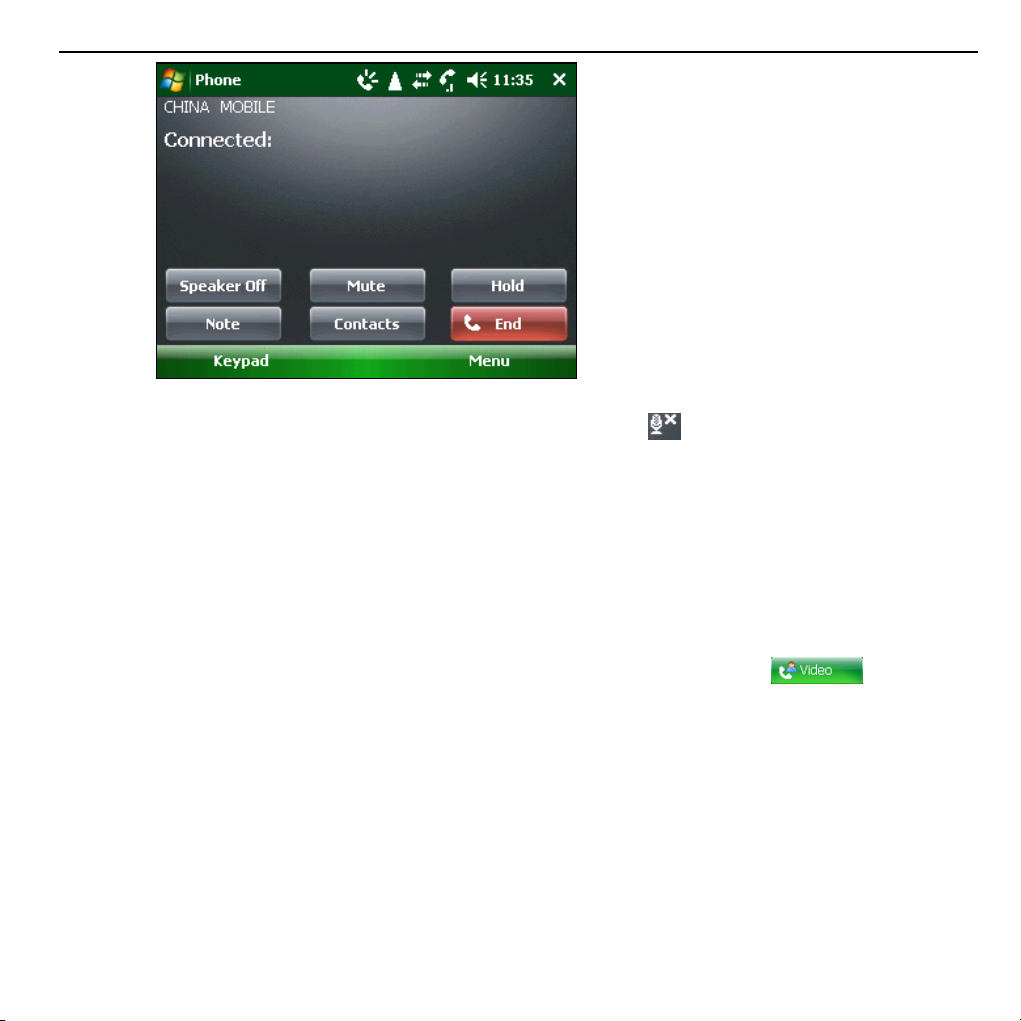
Mute a call
During a call, you can mute your microphone so that the person with whom you are
speaking cannot hear you, but you can still hear him or her.
Page 55
55
• Tap Mute to mute your call.
• When the microphone is turned off, the mute icon appears on the screen. Tap
Unmute to turn on the microphone again.
2.6 Making a Video Call
Your device allows you to make video calls when you are within a 3G network coverage
area. You need to use a (U)SIM card to make video calls.
Make a video call
On the phone keypad, tap the phone number to call, and then tap .
Page 56

56
Note: The other party’s image will appear on the screen after a connection is
established.
Change video call settings
While on a video call, you can change certain settings such as the size of the image,
brightness of the image, the camera to use, and more.
• Tap to adjust the brightness.
• Tap to adjust the color of the image.
• Tap to change the local or the far-away image as the current image.
• Tap to zoom in the current image.
Page 57

57
Set up Video call options
When you are on the video call, you can tap Menu to do the following operations:
• Mute: Mute the call.
• Open/Close camera: Open or close the camera.
• Switch the camera: Switch between the front and back camera.
• Save to Contacts: Save the current number to your Contacts.
• Create Note: Create a Note while answering the call.
• Call History: Tap to view the call history.
• Speed dial: Set speed dial of a contact number.
• Options: View and change the settings of video call.
a) Phone: View and the change the Sounds of your video call.
b) Security: View and change the security settings of your video call.
c) Services: View and change your desired Services.
d) Network:View and change your network settings.
e) Video Phone: View and change the video phone settings.
f) Others: View and change other settings.
Page 58

58
2.7 Using SIM Card Services (STK)
STK appears on the screen only if your (U)SIM card provides this function. To use the
(U)SIM card services, insert your (U)SIM card into the phone at first.
Ta p
your network service. For example, if you insert a (U)SIM card provided by ZTE, the
displayed name on the STK service will be Menu ZTE.
(U)SIM card information services rely on your networks. Please contact with your
service provider for detailed information.
>Programs >STK. The displayed name on the STK Service is provided by
Page 59

59
3 Setting Up Your Device
3.1 Basic Settings
Enter owner information
When you store your owner information on your device and display it on your screen,
you make it easier for someone to return your device to you if it is lost.
1. Tap
2. On the Identification tab, enter your personal information.
Tip: If owner information is displayed on the Today screen (Se e Setting Up Your
Device-Customizing the Displ a y-Customize the Today screen ), you can open and edit
the information directly from the Today screen. Just tap that section of screen.
Set the time and date
1. Tap >Settings>System tab> Clock & Alarms.
2. On the Time tab, select the correct time zone and set the date and time.
Tip: If Date is displayed on the Today screen (See Setting Up Your Device-Customizing
the Display-Customize the Today screen), you can open and edit the information
directly from the Today screen. Just tap that section of screen and then select Time tab
to set the time and date.
>Settings>Personal tab>Owner Information.
Note: During synchronization, the time on your device is updated with the time on your
PC.
Set alarms
1. Open Clock & Alarms by doing one of the following:
• On the Today screen, tap the date area and select Alarms tab if necessary.
• Tap >Settings>System tab> Clock & Alarms> Alarms tab.
2. Tap <Description> and enter a name for the alarm.
Page 60

60
3. Tap the day of the week for the alarm, you can select multiple days by tapping each
desired day.
4. Tap the time to open a clock and set the time for the alarm:
• To enter the time from the clock: use your stylus to drag the minute or hour hand.
• To enter the time from the box, tap hour or minute. Then either tap the up or
down arrows, or use the text input panel to enter a number.
• Tap AM or PM to change that value.
5. Tap
to specify the type of the alarm you want. You can choose a flashing light, a
single sound, a repeating sound, or vibration.
6. If you choose to play a sound, tap the list next to the Play sound check box, and tap
the sound you want.
Power Management
Change power settings
You can specify when or whether your device turns off to conserve battery power.
You can specify one setting for while the device is plugged into an external power
source and another for while it is using the battery.
For optimal conservation, specify 3 minutes or less.
1. Tap
2. Tap Advanced tab.
3. Select the check box for each condition where you want the device to turn off
automatically. Then select the time interval.
>Settings>System tab>Power.
Make the battery last longer
How long your battery last depends on battery type and how you use your device.
Try the following to help preserve battery life.
• Tap >Settings>System tab>Power. On the Advanced tab, you can specify
when your device turns off to conserve battery (See Setting Up Your Device
–Basic Settings –Power Management -Change power settings).
• Use the AC adapter to plug your device into external power wherever possible,
especially when using a modem or other peripherals.
Page 61

61
• Adjust the backlight settings (See Setting Up Your Device- Customizing the
Display - Set the backlight to dim after a time delay).
• Searching for networks consumes a lot of power. When you know you are out of
range of your Wi-Fi networks, turn Wi-Fi off (See Getting Connected – Connecting
to the Internet -Turn on/off the Wi-Fi connection).
• Turn Bluetooth off when you are not using it (See Getting Connected – Bluetooth
- Turn on/off Bluetooth).
• Make the device visible to the other devices only when you are trying to establish
a Bluetooth partnership (See Getting Connected – Bluetooth - Make your device
visible).
• Select the Receive all incoming beams setting only while you are trying to
receive beamed files. To find this setting, tap
• Lower the volume by pressing Volume Down Key (See the Left Panel of Your
>Settings>Connections>Beam.
Phone).
Change language and regional settings
Regional settings specify the style in which numbers, currency, dates, and times are
displayed.
1. Tap
2. On the Region tab, select your language and region.
The Region you select determines which options are selected by default on the other
tabs. These default options are displayed on the Region tab under the list box.
3. To change the other options from the defaults, tap the other tabs such as Number,
Currency, Time and Date to change the settings.
>Settings>System tab>Regional Settings.
Set Events Notifications
Specify the sound for an event
1. Tap >Settings>Personal tab>Sounds & Notifications.
2. On the Sounds tab, choose how you want to be notified by selecting the
appropriate check boxes.
Page 62

62
3. On the Notifications tab, in Event, tap an event name and choose how you want
to be notified by selecting the appropriate check boxes. You can choose from
several options, such as a special sound, a message, or a flashing light. If you
clear all of the options, you will still see an icon notifying you of the event.
Note: Turning off sounds and the flashing light helps conserve battery power.
Select the Network Type
The GSM and WCDMA services are supported by your device. You can set the network
type according to your phone service.
1. Tap
2. Select AUTO, WCDMA or GSM.
>Settings>Personal tab>2G/3G.
Set the ring tone
You can select a ring tone to notify you of incoming calls.
1. From the Phone screen, tap Menu>Options…>Phone tab.
2. In the Ring type list, tap the type you want.
3. In the Ring tone list, tap the sound you want to use.
Tip: To use custom, wav, mid, or wma files as ring tones, use ActiveSync on your PC or
Bluetooth to copy the file to the File Explorer/My Device / My Document folder on
your device. Then select the sound from the Ring tone list. For more information on
copying files to your device, see ActiveSync Help.
Calibrate the Screen
Calibrating the touch screen involves tapping the center of a cross with the stylus as the
cross moves around the screen. This process ensures that when you tap the screen with
your stylus, the tapped item is activated.
If your device does not accurately respond to screen taps, follow these steps to recalibrate it:
1. Tap
2. On the Alignment tab, tap Align Screen, and then follow the onscreen instructions
to complete the calibration.
> Settings > System tab > Screen.
Page 63

63
Reset to Factory Settings
1. Tap >Settings>System tab>Reset Factory.
2. Enter 1234.
3. Tap OK.
The phone will restart after reset.
Caution: After you reset your phone to factory settings, all the information and settings
you have saved on your phone will be lost.
Set up Windows Update
The first time you use this function, you need to set up how you want Windows Update
to check for and download important updates.
1. Tap
2. Tap Next.
3. Choose Automatic or Manual to check for and download important updates
automatically or manually on the Microsoft Web site, and then tap Next.
4. Tap Finish.
If you have already chosen the method to check for important updates, you can tap
Menu>Change Schedule to change.
After setting up Windows Update, it will connect to the Internet to download updates
on your device with the latest security patches or fixes.
For more information, read the description on the Windows Update screen.
>Settings>System tab>Windows Update.
Set up Error Reporting
Ta p >Settings>System tab>Error Reporting. If enabled, the phone will remind
you to send the error report to Microsoft Corporation.
For more information, read the description on the Error Reporting screen.
Page 64

64
Set up Customer Feedback
Ta p >Settings>System tab>Customer Feedback, and then tap to choose Send
Feedback or Don’t Send Feedback. If you select Send Feedback, the phone will remind
you to send a feedback to Microsoft Corporation.
For more information, read the description on the Customer Feedback screen.
3.2 Customizing the Display
Customize the Today screen
1. Tap >Settings>Personal tab>Today.
2. On the Appearance tab, select the desired theme for the background of the Today screen.
3. On the Items tab, select the items you want to appear on the Today screen. To set
the options of an item, highlight the item and tap Options. Not all items have options.
Tip: To change the order of items displayed on the Today screen, tap the item and tap
Move Up or Move Down.
Add a custom background image
You can use one of your own pictures as the background image on the Today screen.
Be aware that pictures can affect the readability of the text on the Today screen.
1. Tap
2. Select the Use this picture as the background check box and tap Browse to view
a list of your picture files.
3. In Folder, select the folder that contains the picture you want to use.
4. In Type, select the file type of the picture.
5. Tap the picture you want to use.
6. Tap OK.
>Settings> Personal tab>Today.
Tip: When you use the camera to take a picture, you can tap Menu>Set as Today
Background. When you do this, you can select the degree of transparency you want
when the picture is used as a background image.
Page 65

65
Increase or decrease the size of text on the screen
1. Tap >Settings>System tab>Screen>Text Size tab.
2. Move the slider to increase or decrease the text size.
Set the backlight
Adjust brightness of backlight
1. Tap >Settings>System tab>Backlight.
2. Tap Adjust brightness tab.
3. Move the slider to adjust the brightness.
Set the backlight to dim after a time delay
1. Tap >Settings>System tab>Backlight.
2. Tap Battery power tab or External power tab.
3. Select Turn off backlight if not used for check box, and specify the time delay.
Set the keypad led
1. Tap >Settings>System tab>Backlight.
2. Tap the Keypad led tab.
3. Select or clear the check boxes and set the time or interval.
3.3 Customizing the Start Menu
You can choose up to seven programs to always appear on the Start menu.
1. Tap
2. Select the programs you want on the Start Menu and clear the ones that you do not
want.
3. Tap OK.
>Settings>Personal tab>Menus.
Page 66

66
Note: You cannot remove the link to the Today screen that appears at the top of the
Start menu. This link is not counted as one of the seven programs that will always appear
on the Start menu.
3.4 Setting Up Security
Secure your device
You can protect your device from unauthorized use and protect your data in the
following ways:
1. Protect your device with a password, which will be required to unlock the device.
You can also set a time period after which your device will be locked automatically.
a) Tap
b) Select Prompt if device unused for check box, and in the box to the right
select how long your device must be turned off before a password is required. If
your administrator has set a minimum length of time, you can set a shorter time
interval but not a longer time.
c) In the Password type box, select the type of password you would like to use.
Enter the password and confirm it.
• Simple PIN: Indicates a number password.
• Strong alphanumeric: Indicates passwords that use uppercase and
d) On the Hint tab, enter a phrase that will help you remember your password, but
does not allow others to guess your password.
The hint will be displayed after the wrong password is entered four times.
e) Tap OK.
The next time the device is turned on, you will be prompt to enter your password.
Cautions:
>Settings>Personal tab>Lock.
lowercase letters, numbers, and symbols such as punctuation.
If your device is configured to connect to a network, use a strong password
to help protect network security.
Page 67

67
• To ensure you can make emergency calls, do not begin your password with
digits of your local emergency number.
• Each time a wrong password is entered, the time your device takes to respond
will get longer and longer, until the device appears not to be responding.
2. Encrypt files as they are placed on a storage card, so that the files can be read only
by using this device.
a) Tap
>Settings>System tab>Encryption.
b) Select Encrypt files when placed on a storage card.
Notes:
• If your organization enforces an encryption policy, you can see this setting
but cannot change it.
• Encrypted files can be read only on the device that encrypted them.
• Encrypted files are opened just like other files, provided you are using the
device that encrypted them. There is no separate step for you to take to
read these files.
Change a password
1. Tap >Settings>Personal tab>Lock.
You will be prompt to enter your current password.
2. In the Password box, enter your new password.
3. Enter the new password again in the Confirm box.
4. On the Hint tab, enter a phrase that will help you remember your new password, but
that does not allow others to guess your password.
The hint will be displayed after the wrong password is entered four times.
5. Tap OK.
Secure the (U)SIM Function
You can set the PIN password to prevent others from using the (U)SIM function. The
initial PIN code is provided by your service provider.
Page 68

68
Enable the (U)SIM PIN
After the PIN code is activated, each time you turn on the phone, you have to enter the
PIN code. Otherwise you can not use the functions of (U)SIM card. The PIN code is
required before it is modified or cancelled. If you forget the PIN code, contact your service
provider.
1. Open the Phone screen (See Using the Phone-Starting the Phone Function -Open
the Phone screen).
2. Tap Menu>Options>Security tab.
3. Select Require PIN when phone is used check box.
4. Enter the (U)SIM PIN code, and tap Enter.
Note: To cancel without enabling the (U)SIM PIN, press Cancel.
Warning: If you enter your PIN incorrectly for three times, the (U)SIM card will be locked
automatically. Contact your service provider to obtain the PUK code to unlock the
(U)SIM card.
Disable the (U)SIM PIN
You have to enter the correct PIN code to disable the use of PIN code. After it is disabled,
each time you turn on the phone, you will not be asked to enter the PIN code.
1. Open the Phone screen (See Using the Phone-Starting the Phone Function -Open
the Phone screen).
2. Tap Menu>Options>Security tab.
3. Clear Require PIN when phone is used check box.
4. Enter the (U)SIM PIN code, and tap Enter.
Change the (U)SIM PIN
When the new (U)SIM PIN is enabled, you must enter this PIN to unlock the phone.
1. Open the Phone screen (See Using the Phone-Starting the Phone Function -Open
the Phone screen).
2. Tap Menu>Options>Security tab.
Page 69

69
3. Tap Change PIN.
4. Enter old PIN, and tap Enter.
5. Enter new PIN. Make sure that the new PIN is between 4 and 8 digits in length.
6. Reenter the new PIN to confirm it and tap Enter.
Change PIN 2
1. Open the Phone screen (See Using the Phone-Starting the Phone Function -Open
the Phone screen).
2. Tap Menu>Options>Security tab.
3. Tap Change PIN 2.
4. Enter old PIN 2, and tap Enter.
5. Enter new PIN 2. Make sure that the new PIN 2 is between 4 and 8 digits in length.
6. Reenter the new PIN 2 to confirm it and tap Enter
3.5 Setting Up E-mail
Set up an E-mail account
Before you send and receive E-mail, you need to set up E-mail account that you have
with an Internet Service Provider (ISP), or an account that you access using a VPN
server connection (typically a work account).
1. Tap
2. Enter your E-mail address and password, and then tap Next.
3. Select Try to get e-mail settings automatically from the Internet check box to
download necessary E-mail server settings automatically, or you need to enter the
server setting information manually.
4. Once auto configuration has finished, tap Next.
5. Enter your name and account display name, and then tap Next.
6. In the Automatic Send/Receive list, select how often you prefer to synchronize
your E-mail, and then tap Finish.
>Programs>Messaging>Setup E-mail.
Page 70

70
Tip: For more information, see the help document on your device.
Set up E-mail to synchronize with a PC
Do all of the following steps on your PC:
1. Install Microsoft ActiveSync.
2. Connect your device to your PC by using a USB cable.
3. Click Next to start the Synchronization Setup Wizard.
4. Clear Synchronize directly with a server check box, and click Next.
5. Select E-mail and any other information types you want to synchronize with your PC,
and click Next.
6. Click Finish.
Page 71

71
4 Messaging
Messaging is where all of your E-mail, SMS, and MMS accounts are located.
When you receive a new message, you can open it from the Today screen. Simply tap
the row where the new message is located to read it. To access your message accounts,
tap
4.1 Messages
The device will alert you for the unread message(s) with the icon on the title bar.
Compose and Send a Message
Compose an SMS
>Programs > Messaging and then select the account you want to read.
Tap >Programs > Messaging > Messages to access the messages list screen,
and then select Menu > New > SMS.
1. Enter the mobile phone number of one or more recipients, separating them
with a semicolon (;).
To access phone numbers from Contacts, press Action Key or tap Menu > Add
Recipient to select a contact from the list.
2. Tap on the text entry area and enter the message contents.
• Tap Menu>My Text to add a common message to your SMS quickly.
• Tap Menu>Spell Check to check the spelling.
Tip: You can press Menu>Insert to insert picture/video, audio, vcard, vcalendar
or attachment to your message. If you do this operation, the SMS message will
change to an MMS message.
3. Tap Send to send the message.
Compose an MMS
Tap
select Menu > New > MMS.
>Programs > Messaging > Messages to access the messages list screen,
Page 72

72
1. Enter the mobile phone number of one or more recipients, separating them
with a semicolon (;).
To access phone numbers from Contacts:
a) Tap Menu > Add Recipient.
b) Select From Contacts… or From Call History.
c) Select a contact from the list.
Tip: You can also press Action Key to access phone numbers from Contacts.
2. Enter the MMS subject.
3. Tap Insert picture/video or Menu>Insert>Picture/Video… to select a photo
or video clip from your folders and insert it.
Tap
MMS message.
Tap or Menu>Capture Video to record a new video and insert it to the
MMS message.
4. Tap Insert audio or Menu>Insert>Audio to select an audio file to insert to the
MMS message.
5. Tap Insert text here or Menu>Insert>Text to enter text for your MMS message.
To insert predefined text, emoticons, favorite, contact, or calendar, select Menu >
Insert My Text/Insert Emoticon/Insert Favorite/Insert Contact/Insert Calendar.
6. Tap Menu >Remove to delete the inserted picture/video, audio or text.
7. Tap Menu >Slides to insert, delete, or organize slides.
8. Tap Menu >Template to use a template or save the current message as a template.
9. Tap Menu > Attachment>Menu to add vCard, vCalendar and File.
10. Select Menu >Options to set the background, text layout and send options of
MMS messages.
11. Tap Send to send the MMS message.
or Menu>Capture Image to capture a new photo and insert it to the
Note: You can use send options to set the delivery time, expiration, priority and
whether to get the delivery report (See Messaging- Messages-Request message
delivery notification).
Page 73

73
Cancel SMS message editing
While editing SMS messages, tap Menu > Cancel Message. On the dialogue box,
choose Yes to save the message as a draft. Choose No to discard the message.
Request message delivery notification
In SMS, before sending the message, tap Menu > Message Options, select
Request message delivery notification check box and tap OK.
In MMS, before sending the message, tap Menu > Options > Send Options,
select Delivery report check box and tap Done.
Copy messages from and to the (U)SIM card
1. Tap >Programs > Messaging > Messages to access the messages list screen.
2. Select the message you want to copy.
3. Tap Menu>Copy to SIM/Phone to copy the message to your (U)SIM card or from
your (U)SIM card.
Note: MMS messages are automatically saved in your phone and can not be copied
to your (U)SIM card.
Other Actions
Reply to a message
1. Tap >Programs >Messaging>Messages.
2. Scroll to a message you want to reply to.
3. Tap Reply or Menu>Reply>Reply.
4. Enter your message and tap Send.
Forward a message
1. Tap >Programs >Messaging>Messages.
2. Scroll to the message you want to forward.
3. Tap Menu>Reply>Forward.
Page 74

74
4. Enter your message and tap Send.
To switch messages folders
1. Tap >Programs >Messaging>Messages.
2. Tap Menu>Go to>Folders.
There are five folders in Messages:
• Deleted Items: Store deleted messages.
• Drafts: Store message drafts.
• Inbox: Store all received and sent messages.
• Outbox: Store messages that are being sent and ready to be sent.
• Sent Items: Store sent messages.
To move message
On Draft, Deleted Items, Outbox or Sent Items screen, select the message you wish
to move. Then tap Menu > Move. Select the folder to keep the message.
To delete message
Select the message, tap Menu>Delete. Then confirm in the pop out dialogue box.
Deleted messages will be moved to the Deleted Items folder.
To configure message settings
On the Messages list screen, tap Menu > Tools > Options to configure various
settings in Message.
Accounts
1. Tap the account you want to change and configure it.
2. Tap Security to choose whether to warn before navigating to a URL or file link
not on your device.
3. Tap Signatures to configure your signatures.
You can also choose whether to display account picker when opening messaging.
Page 75

Message
• When replying to e-mail, include body.
• Keep copies of sent items in Sent folder.
• Warn when deleting messages in the message list.
You can also choose the screen after you delete or move a message.
Address
You can choose a field to get e–mail addresses and add address books to check
names.
Storage
You can view the storage information of your device here.
Also, you can select a method to empty the deleted items.
4.2 E-mail
Create E-mails
Compose and send an E-mail
1. Tap >Programs > Messaging, and then select an E-mail account.
2. Tap Menu > New.
3. Enter the E-mail address of one or more recipients, separating them with a
semicolon (;).
To access E-mail addresses stored in Contacts, press Action Key or tap Menu >
Add Recipient and select a contact from the list.
4. Enter a subject and compose your E-mail. To quickly add common messages, tap
Menu > My Text and select a desired message.
5. Tap Send.
75
Tip: You can find the priority option in Menu > Message Options.
If you are working offline, E-mail messages are moved to the Outbox folder and will
be sent out the next time you connect.
Page 76

76
Add an attachment to an E-mail
1. In the message that you are composing, tap Menu > Insert and select the item
you want to attach: Picture, Voice Note, or File.
2. Select the file you want to attach, or record a voice note.
View and Reply to E-mails
The Today screen will display the E-mail item when a new E-mail message arrives. Tap
the E-mail you want. You will also be able to browse the E-mail from the Messaging.
Scroll to the E-mail to be browsed, and then press Action Key.
Download messages
The manner in which you can download messages depends on the type of your
account.
• To send and receive E-mail for an outlook E-mail account, begin synchronization
through ActiveSync.
a) Tap
b) Tap Menu>Send/Receive. The messages on your device and E-mail server
are synchronized:
New messages are downloaded to the device Inbox folder.
Messages in the device Outbox folder are sent.
Deleted messages in the server are removed from the device Inbox folder.
• To send and receive E-mail messages for an E-mail account that you have with
an ISP or that you access using a VPN server connection, download messages
through a remote E-mail server.
• Text messages are automatically received when your phone is turned on. When
your phone is turned off, messages are held by your service provider until the
next time it is turned on.
>Programs >Messaging, and tap an account.
Page 77

77
To download an attachment
In an open message with an attachment to download, select the attachment. You
can directly open the file in the associated program after you download them by
selecting the attachment again.
Reply to or forward an E-mail
1. Open the message and tap Menu > Reply > Reply, Reply All, or Forward.
2. Enter your response. To quickly add common messages, select Menu > My Text
and choose a desired message.
3. Tap Send.
Tips:
• To see more header information, scroll up.
• To always include the original message from the list view, select Menu > Tools >
Options > Message, and select When replying to e-mail, include body check
box.
Page 78

78
5 Personal Information
5.1 Contacts
You can add new contacts along with their information. Setting up communication
information for the contact will allow you to connect with the person quickly or browse
the contact's information. Contacts will be saved in the phone memory or in the (U)SIM
card. If you store the information in the (U)SIM card, you can fill the name and a number.
If you store the information in the phone memory, you can also fill out each information
field including category, E-mail, address, pictures, ring tones, etc.
You can add new contacts to Outlook and their information to the phone. Besides, you
can synchronize contacts between your device and specified remote server.
Open Contacts from Today Screen
Ta p Contacts on Today screen or tap >Programs > Contacts to open Contacts
application program.
Create a Contact
Create an Outlook Contact
1. Tap >Programs > Contacts > New > Outlook Contact.
2. Enter information for the new contact.
To easily identify the caller, you can assign a custom picture to each Outlook
contact.
To assign a picture to a contact, tap Select a picture to select the picture you
want. To remove the picture, select Menu > Remove Picture.
3. Tap OK.
If someone who is not in your list of contacts calls you, you can quickly save the
number to contacts by taping Menu>Save to Contacts.
Note: In contact’s detailed information, “m” stands for mobile number, “h” stands
for home number and “w” stands for work number.
Page 79

79
Create a SIM Contact
1. Tap >Programs > Contacts > New > SIM Contact.
2. Enter the Name and Number for the new contact.
3. Tap OK.
View and Edit Contact Information
1. Tap >Programs > Contacts.
2. Select the contact whose information you want to view or edit, and select Menu >
Edit.
3. When you finish, tap OK.
To view the Contact List with Different Sort Column
If you have entered information under Company for your Outlook contacts on your
phone, you can switch between Company mode and Name mode by selecting Menu >
View By > Company/Name. In Company view mode, you can quickly locate the contacts
who work for a specific company.
You can filter the contact list by categories. In the contact list, select Menu > Filter.
Then tap a category you have assigned to a contact. To show all contacts again, select
All Contacts.
To find a Contact
Search Contact by Name: On the Contacts list screen input the contact name to search
for a contact.
Search Contact by Phone Number: On the Today screen, input the contact’s phone
number. Contacts that have phone numbers starting with the numbers you input will be
listed.
Delete a Contact
1. Tap >Programs > Contacts.
2. Select the item you want to delete.
Page 80

80
3. Tap Menu>Delete Contact.
4. Tap Yes to confirm.
To send Contact Information
• Tap Menu > Send Contact > Beam. Select contact information to send. Select the
device. Then tap Tap to send.
Note: Make sure that both transmitter and receiver have activated the Bluetooth
function.
• Select Menu > Send Contact > Messages. Select the contact information that you
want to send. Then tap OK.
The contact information you have selected will be sent to the recipient of the message.
• Select Menu > Send as vCard. Enter the recipient in To of the MMS message, and
then tap Send.
To send MMS to Contacts
Select Menu > Send MMS (Mobile) to send an MMS to the selected contact.
If the contact information contains the E-mail address, you can send an MMS to the
E-mail address by selecting Send MMS (E-mail).
To send SMS to Contacts
1. Tap the contact you want to send an SMS to.
2. Tap Send text message.
3. Complete your message and tap Send.
5.2 Calendar
Tap > Calendar. You can use the calendar to schedule appointments, including
meetings and other events. Your appointments will be displayed on the screen as is
scheduled. You can choose to Dismiss the reminder or use Menu to set the snooze
time. On the Reminder screen, select Menu > View Item to view the details.
Page 81

81
Add New Appointments
1. Tap Menu > New Appointment.
2. Enter information about the appointment.
3. Tap OK.
The detailed appointment information includes:
• Subject: Enter the subject.
• Location: Enter the location information.
• Starts/Ends: Set the start/end date.
• All Day: Set the appointment as all day events.
• Occurs: Set the re-occurring times or frequency.
• Reminder: Set a notification time to let the phone alert you a certain period of time
before an appointment.
• Categories: Set the category information.
• Attendees: If you select Add Required Attendee… or Add Optional Attendee…,
and choose the contact as the attendee, it will send invitation to them.
• Status: Choose the appointment status.
Each appointment status is represented by a color block in the view screen. Busy as
blue, Out of Office as magenta, Tentative as light blue, Free as white.
• Sensitivity: Choose the degree of the privacy of the appointment.
• Notes tab: Enter the note information.
View and Edit Appointments
You can view your schedule in five different views: Agenda, Day, Week, Month, and
Year. To switch the Calendar View, press Left Soft key or tap Menu>View to choose
the view you want.
1. Tap the appointment to view.
2. Tap Menu > Edit, and edit the field.
3. Tap OK.
Page 82

82
Send Appointments
Select appointment tap Menu > Beam Appointment, and then select device to
exchange, and tap Beam.
You can send a calendar appointment to another phone over MMS.
1. Select an appointment, then tap Menu > Send as vCalendar.
2. Enter the recipient in To.
3. Tap Send.
Configure Calendar Options
Select Menu > Tools > Options to open the Calendar options settings screen. Select
the item to set up. Options include:
General tab:
1. Start in: Set the default view option for Calendar.
2. 1st day of week: Choose a day as the first day of the week.
3. Week view: Choose how many days to display for the weekly view.
You can also choose whether or not to show half hour slots or week numbers.
Appointments tab: You can set reminder for new items and select Show icons. You can
also choose to send meeting requests via Outlook E-mail or your own E-mail account
that you have set up.
5.3 Tasks
Select > Programs > Tasks.
Add New Tasks
1. Tap Menu > New Task.
2. Enter the task information.
3. Tap OK.
The detailed task information includes:
Page 83

83
• Subject: Enter the subject.
• Priority: Choose the priority level of the task.
• Status: Confirm whether the task is completed or not.
• Starts: Set the start date of the task.
• Due: Set the end date of the task.
• Occurs: Set the re-occurring times or frequency.
• Reminder: Set a notification time to let the phone alert you a certain period of time
before a task.
• Categories: Choose category of the task.
• Sensitivity: Choose the privacy level of the task.
• Notes tab: Enter the note information.
To view the Task List with Different Sort Column
To sort the list, select Menu > Sort By, and select a sort option.
To filter the list by category, select Menu > Filter, and select the category to be displayed.
To mark a Task as Completed
Scroll to the completed task, tap Complete. If you want to activate this task again, scroll
to it and tap Activate.
Send a Task
In the Tasks list, select the task you want to send and select Menu > Beam Task, then
select device to exchange, and tap Beam.
If the receiver supports the task format, he/she will see the task in his/her task list.
You can send a task to another phone over MMS.
1. Select a task, then tap Menu > Send as vCalendar.
2. Enter the recipient in To.
3. Tap Send.
Page 84

84
5.4 Notes
Select > Programs > Notes.
Add a New Note
1. Tap >Programs>Notes.
2. Tap New.
3. Write your text on the screen.
4. When finished, tap OK to return to the note list.
Note: If a letter crosses three ruled lines, it is treated as a drawing rather than as text.
Create a voice note
1. Tap >Programs>Notes.
2. Tap New.
3. Tap Menu>View Recording Toolbar.
To add a voice note to a note you are writing, tap and hold the microphone button
and speak into the microphone. Tap
added to the note.
• To insert the date for the voice portion of the note, tap and hold the speaker icon.
Then tap Insert Date.
• To listen to the voice portion of the note, tap the speaker icon .
Tap
to pause and tap to continue.
to stop recording. A speaker icon will be
Rename a Note
1. Tap the note in the note list to open it.
2. Tap Menu >Tools > Rename/Move.
3. Enter the new name.
4. Tap OK.
Page 85

85
Delete a Note
1. Tap to open the note you want to delete.
2. Tap Menu > Tools >Delete.
3. Tap Yes to delete the note.
Send a Note
1. Tap to open the note you want to send.
2. Tap Menu > Tools >Send.
3. Tap an E-mail account or MMS (Messages) to create an MMS or E-mail to send the
note.
Beam a Note
1. In the Notes list, tap to open the note you want to send.
2. Tap Menu > Tools >Beam.
3. Select device to exchange, and tap Beam.
5.5 SIM Manager
Ta p > Programs > SIMMgr to open the SIM manage tool. With SIM Manager, you
can manage the contacts information in your SIM card and perform actions such as
select, delete, copy to Outlook, etc.
You can tap Options > Select All to select all SIM card contacts to perform the action.
If you want to manage the contacts information in the phone memory, you can select
Options > Outlook Contacts.
Page 86

86
6 Getting Connected
6.1 Connecting to the Internet
Ways of Connecting to the Internet
Your phone’s networking capabilities allow you to access the Internet or your corporate
network at work through wire line and wireless connections.
You can use the default connection settings to connect to the Internet by: Wi-Fi, GPRS/3G,
EDGE, or Dial-up.
Notes: You can also add and set up the following connections. Please contact your
service provider for more detailed information.
• VPN: A VPN connection is used to access your corporate network by using an existing
Internet connection.
• Proxy: A Proxy connection is used to access the Internet by using an existing connection
to your corporate or WAP network.
Wi-Fi Connection
If the wireless carrier enables Wi-Fi on your device, you may be able to access the
Internet when you are away from your computer.
Set up a Wi-Fi connection
1. Tap >Settings>Connections tab>Wi-Fi.
2. Select a network you prefer to connect.
Note: If you select a secure network, you may have to enter the key that is provided by
the network administrator.
Turn on/off the Wi-Fi connection
Wi-Fi is turned off when you fist start your device. To minimize drain on the battery,
Wi-Fi is turned off automatically every time you power off the device. You must turn it on
when you want to use it.
Page 87

87
1. Tab the on the Today screen, or tap
> Settings > Connections tab> Wireless
Manager to open the wireless manager.
2. Tap Wi-Fi on the Wireless Manager screen to turn on/off the Wi-Fi connection.
GPRS/3G
Use GPRS/3G (or EDGE, if available) to connect to the Internet and to send and receive
MMS messages on your device. You will need a data plan to use your wireless service
provider’s GPRS/3G network. Check with your wireless service provider to find out about
GPRS/3G rates.GPRS/3G settings are already preconfigured on your device, and your
device is ready to use your wireless service provider’s GPRS/3G services. Do not change
the settings as this may cause services to stop working.
Add a new GPRS/3G Connection
Before you begin, get the following information from your network service provider:
• Access point name
• Your user name and password if needed.
• Server IP and the port number if the network uses a proxy server.
• Server type (HTTP, WAP, Secure WAP, Socks) if the network uses a proxy server.
1. Tap
2. Tap Select Networks.
>Settings>Connections tab >Connections > Advanced tab.
Page 88
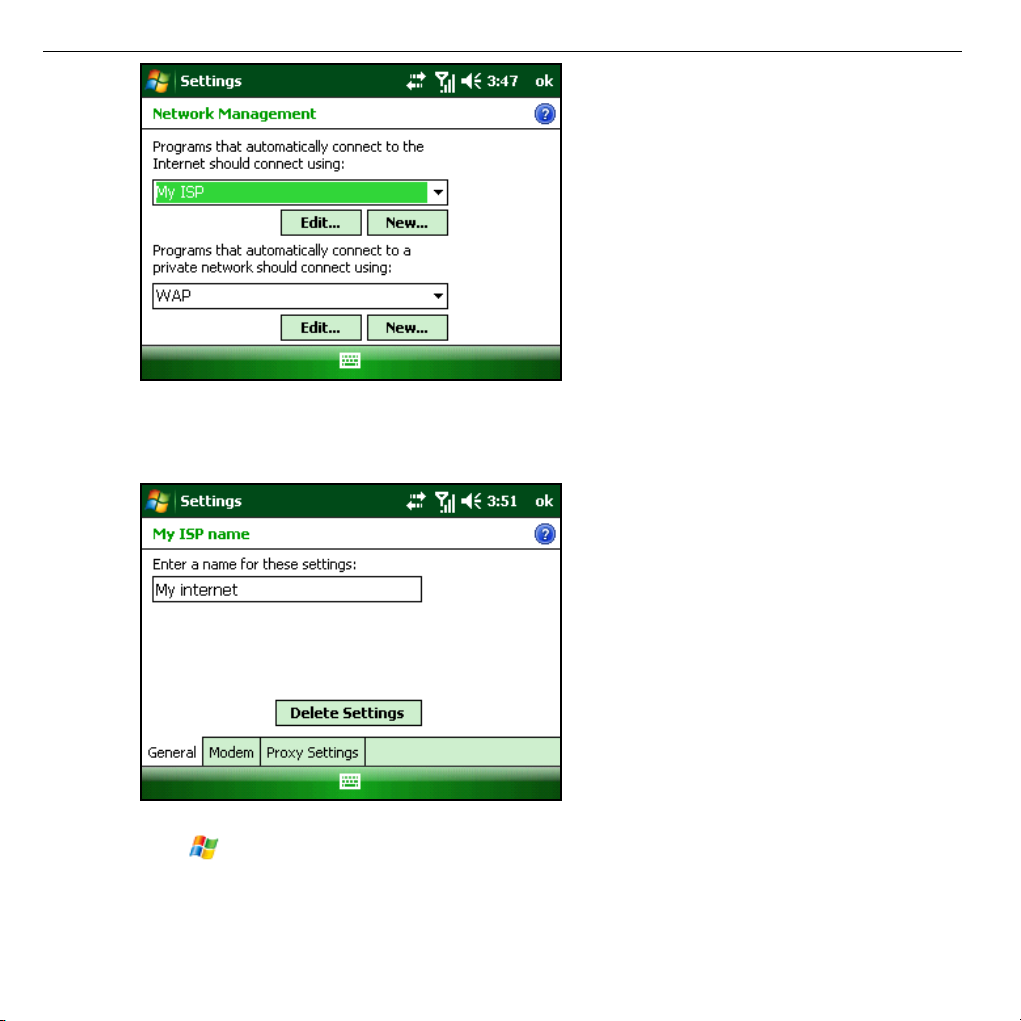
88
3. Tap New under the Program that automatically connect to the internet should
connect using.
4. Enter a name for your settings.
5. Tap ok until it is completed.
6. Tap
>Settings>Connections tab >Connections>Tasks tab.
Page 89

89
7. Tap Add a new modem connection of the settings you have created.
8. Enter a name for the connection and select Cellular Line (GPRS).
9. Tap Next.
10. Enter the Access Point Name and tap Next.
Page 90

90
11. Enter the User name and Password (If there is no User name and Password, leave
them blank).
12. Tap Finish.
If the network uses a proxy server, you need to continue:
13. Tap Set up my proxy server.
14. Sel ect This network connects to the internet and This network uses a proxy
server to connect to the internet check boxes.
Page 91

15. Tap Advanced.
91
16. Select the proxy type.
17. Enter the Server IP and the Port number.
18. Tap OK to complete.
Dial-up
You can use your phone to dial up to connect to the Internet or to your corporate network.
Page 92

92
Set up a new dial-up connection
Before you begin, get the following information from your network service provider:
Get the server phone number or access point name, your user name and password.
1. Tap
2. Under My Work Network, tap Add a new modem connection.
3. Enter a name for the connection, select Cellular Line, and tap Next.
4. Enter the number to dial and tap Next.
5. Enter your username and password provided by your network administrator, and
tap Finish.
>Settings>Connections tab>Connections.
6.2 Internet Explorer Mobile
Internet Explorer Mobile is a full-featured Internet browser, optimized for use on your
phone. You can use Internet Explorer to browse most of the Websites. Some web pages
may not be displayed properly as some specific web page technologies, such as Flash,
are not supported by the phone. Your phone will automatically create an EDGE or GPRS/3G
connection for you while browsing web pages.
Tap internet from the Today screen or tap
Explorer.
> Internet Explorer to open Internet
Browse the Web
When you use Wi-Fi, EDGE or GPRS/3G mobile network to browse web pages, the
phone will automatically make data connections.
Enter the text when the cursor is in the text field. Press Action Key to send the entered
text. Use the Navigation keys or the stylus to move around the screen. Tap on the
hyperlink, or press Action Key to link to the web page.
Open Web Pages
In Internet Explorer, you can open web pages in the following ways:
• Tap Menu >Home to open the home page.
Page 93

93
• Tap Menu > Favorites to expand Favorites list, then open a web site.
• Tap Menu > Address Bar. Enter the web address directly, and tap to open the
web page.
• Tap Menu > Tools >History to expand the History list, and then select a web site.
Browsing Options
While browsing the Web, tap Menu.
• Zoom Out: Zoom out the web page.
• Add to Favorites: Enter name, web address, and folder. Then press Add to add the
current web page to Favorites.
• Forward: Allow you to navigate one page forward from within cached web pages.
• Refresh: Reload the Web Page Contents.
• View:
Zoom Level: Adjust the zoom level.
One Column: Switch to single column view. The contents are sorted in a single
column. The column width is the same as screen width. You will rarely need to do
a horizontal scroll.
Page 94
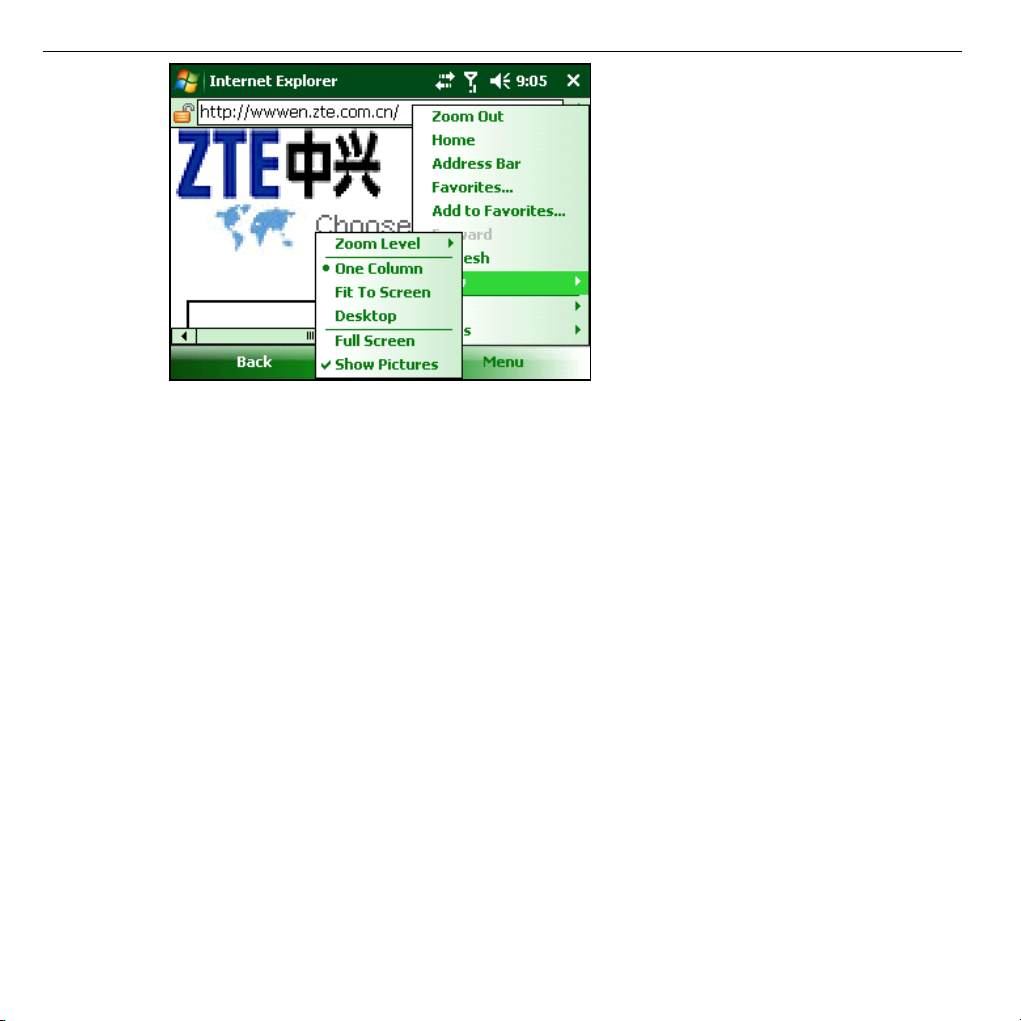
94
Fit to Screen: Switch to Fit to Screen view. It retains the same layout as the
Desktop, but the items and edited contents may shrink. However, you can still view
the majority of the page without doing a horizontal scroll.
Desktop: Switch to Desktop view. It retains the same layout and size as the
Desktop. When browsing web pages, you need to do both horizontal and vertical
scrolling of the page.
Full Screen: Switch to Full Screen view. To exit the Full Screen mode, press the
Left/Right Soft key and cancel Full Screen from the Menu.
Show Pictures: Turn off Show Pictures. To open Show Pictures, re-select it.
• Edit:
Cut: Cut the selected content.
Copy: Copy the selected content.
Paste: Paste the cut or copied content.
Select All Text: Select all the text on the current page.
Page 95

95
• Tools:
History: View the web pages you have browsed, you can select to show Page
Title or Address (URL).
Send Link: Send the current link by SMS/MMS/E-mail.
Properties: View the properties information.
Page 96

96
• Options
General: In General tab, you can set the Home page: Use Current or Use Default.
Also, you can select the Encoding among Western European, Greek (ISO), Turkish
(Windows), etc.
Memory: Tap Clear History to delete the saved links visited in the past days. Tap
the arrows to set the days you want. Tap Delete Files to delete the web content
that has been previously viewed or synchronized with the device.
Security: Tap Clear Cookies to clear the saved cookies in the device. Select a
checkbox to configure your Security settings.
Tip: To prevent Internet Explorer Mobile from accepting any cookies, clear the
Allow cookies check box.
Note: When you browse the Internet, web pages and pictures will be cached in
your phone’s memory. This will allow quick access in the future. These are
temporary files. Deleting these files can effectively increase the memory on the
phone. Cookies are files of personal information and actions recorded by the
website. Deleted cookies cannot be restored.
6.3 Internet Sharing
With Internet Sharing, you can use your phone as an external modem for another device
such as a PDA or laptop.
Note: Make sure that you have installed a (U)SIM card, and set up a GPRS or Dial-up
connection. If your phone has not been set up with a data connection yet, tap
>Programs>Internet Sharing and then select Menu > Connection Settings to
configure first. See Getting Connected – Connecting to the Internet – GPRS/3G for
setting up a GPRS connection. See Getting Connected – Connecting to the Internet –
Dial-up for setting up a phone dial-up connection.
Use the device to connect your PC to the Internet
If your device has a data connection plan, your PC can use the device to connect the Internet.
1. Make sure that your data connection is running, and that you can access the Internet
from the device.
Page 97

97
2. Connect your device to the PC using Bluetooth or a USB cable.
3. Tap
>Programs>Internet Sharing.
4. Select the PC connection type (USB or Bluetooth).
5. Select the network connection that the device should use to connect to the Internet.
6. Tap Connect. Allow approximately 30 seconds for the connection to be established.
If you are prompted to turn on Bluetooth, tap Yes.
7. If your connection type is Bluetooth, perform the following steps on the PC:
a) Click
>Control Panel>Network Connections.
b) Right-click Bluetooth Network Connections, and click View Bluetooth Network
Devices.
c) If the device is listed as a Network Access Point, click Connect. If it is not listed,
click Create a new connection and use the New Connection wizard to add the
device to the list.
Notes:
• If you select USB as the PC connection, you must first install Microsoft ActiveSync
version 4.2 or later on the PC.
• If ActiveSync on the PC is set to allow USB connections, and you use a USB cable
to connect the PC to the Internet through your device, you may see an error message
saying that ActiveSync has lost the USB connection. Dismiss this error to continue
connecting your PC to the Internet through your device.
• In order to use Bluetooth as the PC connection, Bluetooth on the device must be
turned on, the device must be visible, and you must have a Bluetooth partnership
between the device and the PC.
6.4 Bluetooth
Bluetooth is a short-range wireless communication technology. Phones with Bluetooth
capabilities can exchange information within a distance of about 10 meters without any
physical connection. The Bluetooth devices must be paired before the communication
is performed.
Page 98

98
Turn On/Off Bluetooth
1. Tap > Settings > Connections tab > Bluetooth.
2. Tap Mode tab.
3. Select or clear Turn on Bluetooth check box.
Notes:
• By default, Bluetooth is turned off. If you turn it on, then turn off your device, Bluetooth
is also turned off. When you turn on your device again, Bluetooth turns on automatically.
• You can also turn on/off Bluetooth by using Wireless Manager: Tap
>Settings>Connections tab>Wireless Manager, and then tap Bluetooth.
Make Your Device Visible
Other devices with Bluetooth capabilities can detect your device and attempt to beam
information to it, establish a partnership, or use a Bluetooth service.
1. Turn on Bluetooth. (See Getting Connected – Bluetooth - Turn on/off Bluetooth )
2. Select Make this device visible to other devices check box.
3. Tap OK.
Tip: If you no longer want your device to be visible, clear Make this device visible to
other devices check box.
Create a Bluetooth Partnership
You can create a partnership between your device and another device that has Bluetooth
capabilities. Once you do this, the two devices must have Bluetooth turned on but do
not need to be visible for you to beam information between them.
1. Make sure that the two devices are turned on, visible and within close range.
2. Tap
Your device searches for other visible Bluetooth devices and displays them in the list.
3. Tap the name of the other device, and tap Next.
4. In Passcode, if you want to use a passcode (recommended for enhanced security),
enter an alphanumeric passcode between 1 and 16 characters, and tap Next.
Otherwise, leave the passcode blank, and tap Next.
>Settings>Connections tab >Bluetooth>Devices tab>Add new device.
Page 99

99
5. Enter the same passcode on the other device.
6. Tap Done.
7. To give the partnership a more meaningful name, tap the device and change the
name of the device in Display Name.
Connect to a Bluetooth headset or other accessories
You can connect your device to Bluetooth-enabled accessories such as headset, stereo
headsets etc. You can create the connection by establishing a Bluetooth partnership
between your device and the Bluetooth accessory.
1. Turn on your device and the headset or other accessory and then position them
within several feet of one another.
2. Set the headset or the other accessory to Visible so that your device can detect it
and establish a connection. You can find instructions on how to set the accessory to
Visible in the manufacturer’s manual.
3. On your device, tap
4. Tap Devices tab, and tap Add new device to search for the headset.
5. Tap the name of the Bluetooth headset, and then tap Next.
6. Enter the passcode of the Bluetooth headset.
7. Make sure that Hands Free check box is selected.
8. Tap Finish.
Notes:
• The Bluetooth headset needs to have the Hands Free function.
• If the device has created Bluetooth partnerships with several Bluetooth headsets, it
will use the last one.
>Settings>Connections tab>Bluetooth.
6.5 Windows Live ™
Windows Live™ gives you full Internet experience on your phone. It helps you to find
information, pursue your interests, and get in touch with friends and family on the
Internet more easily. Windows Live offers the following key features:
• Live Search Bar, which lets you search for information on the Web.
Page 100

100
• Live Messenger, the next generation of MSN Messenger Mobile.
• Live Mail, the next generation of Hotmail.
• Live Search, which lets you find locations, browse maps, and check for directions.
• Live Contacts, address book for storing Live Mail, Live Messaging, and Hotmail
contacts.
Set up Windows Live
To set up Windows Live for the first time
1. Tap > Programs> Windows Live.
2. Tap Sign in to Windows Live.
3. On the next screen, select the links to read the Windows Live Term of Use and
the Microsoft Privacy Statement. After reviewing it, tap Accept.
4. Enter your Windows Live Mail or Hotmail address and password, and then tap Next.
Clear the Save password check box if you do not want the device to remember
your password.
5. Select or clear the Live Search bar and Windows Live services check boxes,
and tap Next.
6. If you want to synchronize information, make sure that the check boxes next to
Store Windows Live contacts in your mobile phone’s contact list and Sync
E-mail are selected. If you want to merge duplicate contacts, make sure that
Merge duplicate contacts check box is selected.
7. Tap Next.
8. After synchronization is completed, tap Done.
The Windows Live Interface
On the main interface of Windows Live, you will see a search bar, navigation bar, and
an area where you can view your pictures.
 Loading...