

Page 1
1
Page 2

2
Page 3

ZTE Grand™ Memo II
Quick Start Guide
1
Page 4

LEGAL INFORMATION
Copyright © 2015 ZTE CORPORATION.
All rights reserved.
No part of this publication may be quoted,
reproduced, translated or used in any form or by
any means, electronic or mechanical, including
photocopying and microlm, without the prior
written permission of ZTE Corporation.
Notice
ZTE Corporation reserves the right to make
modications on print errors or update
specications in this guide without prior notice.
We offer self-service for our smart terminal device
users. Please visit the ZTE ofcial website (at www.
ztedevice.com) for more information on self-service
and supported product models. Information on the
website takes precedence.
Disclaimer
ZTE Corporation expressly disclaims any liability
for faults and damages caused by unauthorized
modications of the software.
Images and screenshots used in this guide may
differ from the actual product. Content in this guide
may differ from the actual product or software.
2
Page 5
Trademarks
ZTE and the ZTE logos are trademarks of ZTE
Corporation.
Google and Android are trademarks of Google, Inc.
The Bluetooth® trademark and logos are owned
by the Bluetooth SIG, Inc. and any use of such
trademarks by ZTE Corporation is under license.
microSDHC logo is a trademark of SD-3C,
LLC.
Manufactured under license from Dolby
Laboratories. Dolby and the double-D symbol are
trademarks of Dolby Laboratories.
Qualcomm® Snapdragon™ processors are
products of Qualcomm Technologies, Inc.
Qualcomm and Snapdragon are trademarks of
Qualcomm Incorporated, registered in the United
States and other countries. Used with permission.
Other trademarks and trade names are the
property of their respective owners.
Version No. : R1.0
Edition Time : Nov.28, 2014
Manual No. : 079584507020
3
Page 6
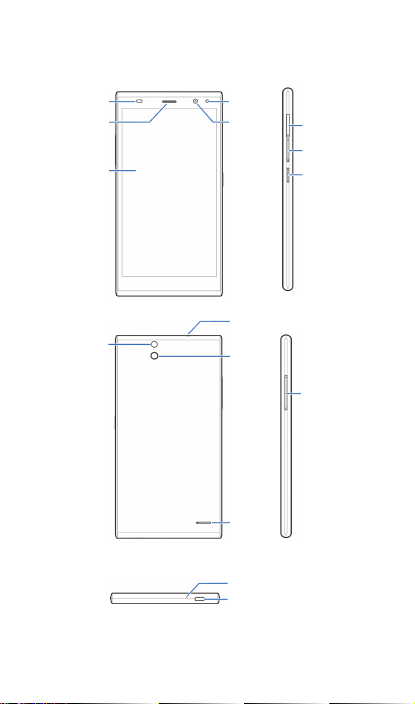
Getting to Know Your Phone
Proximity &
Light Sensor
Earpiece
Touch
Screen
Back
Camera
Indicator
Light
Front
Camera
Headset
Jack
Flash
Speaker
Microphone
Charging/ micro-USB Jack
4
microSDHC
Card Tray
micro-SIM
Card Tray
Power Key
Volume Key
Page 7
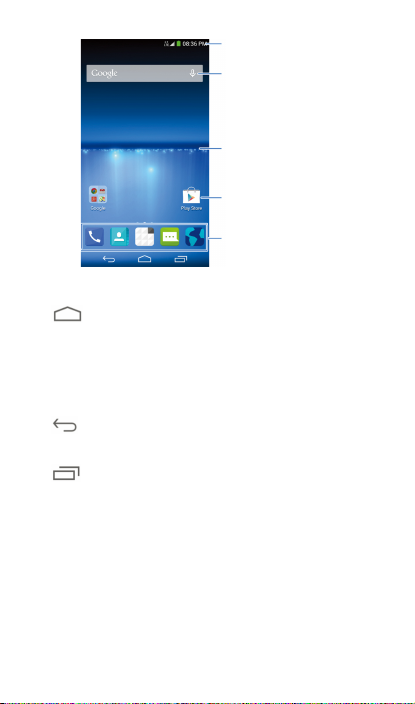
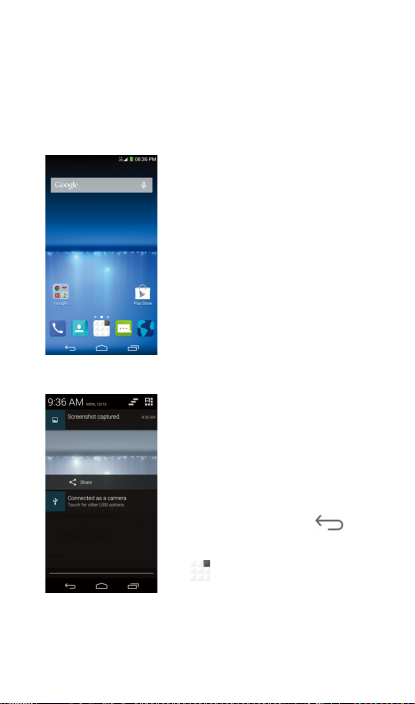
Status and notication bar
Google search
Wallpaper
Shortcut
Primary shortcuts
On-screen Keys
(Home)
• Touch to return to the home screen from any
application or screen.
• Drag to Google to open Google Search or to
go through the Internet.
(Back)
Touch to go to the previous screen.
(Recent Apps)
Touch to see recently used applications.
Setting Up Your Phone
You’ll need to set up your phone before you can
explore all its great features.
5
Page 8
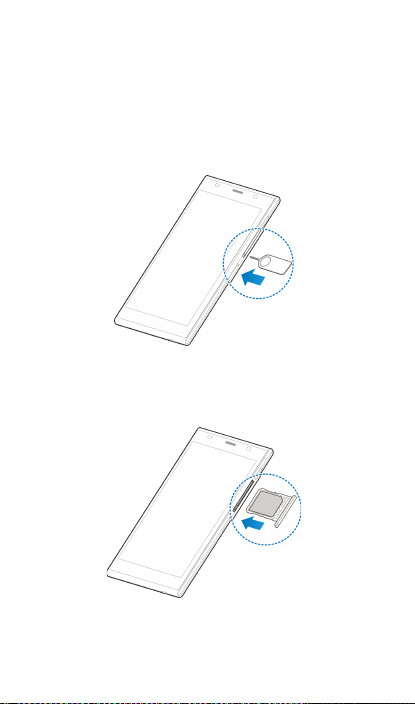
Installing the micro-SIM Card
Turn off your phone before installing or removing
the micro-SIM card.
1. Insert the tray eject tool or the end of a small
paper clip into the hole beside the micro-SIM
card tray (next to the Power Key).
Pul l out the micro-SIM card tra y a nd place the
micro-SIM card (contacts facing down) on the tray
as shown. Then carefully install the tray back.
6
Page 9
WARNING!
To avoid dama ge to the phone, do not use any
other kind of SIM card or any non-standard micro-
SI M car d cu t f ro m a S IM card. Yo ur service
provider will supply your SIM card.
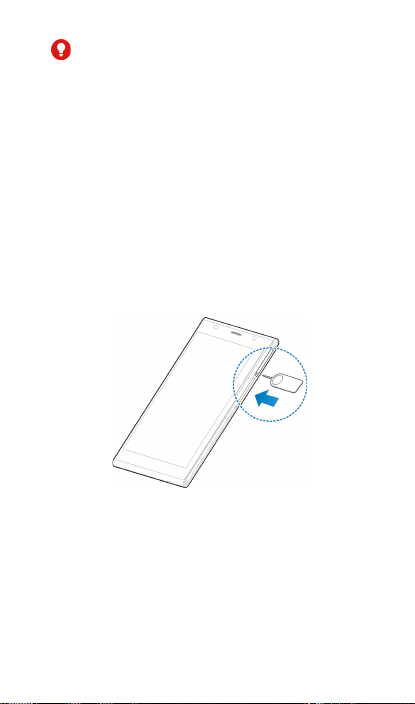
Installing the microSDHC™ Card (Not
Included)
The microSDHC card can be installed and removed
while the phone is turned on.
1. Insert the tray eject tool or the end of a small
paper clip into the hole beside the microSDHC
card tray (the upper one).
7
Page 10
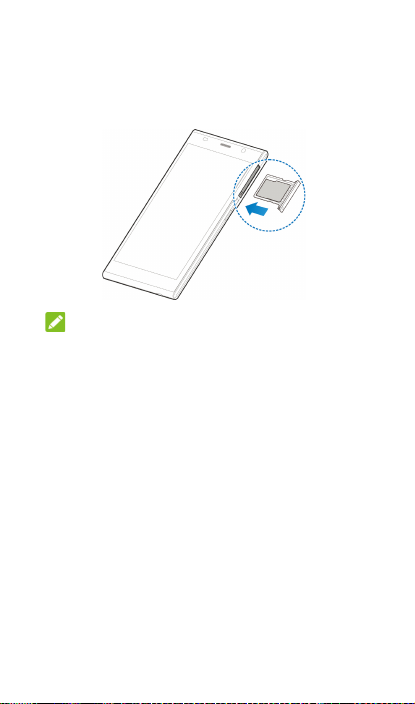
2. Pull out the microSDHC card tray and place the
microSDHC card (contacts facing down) on the
tray as shown. Then carefully install the tray
back.
NOTE:
So me applicat ion s may require a mic roS DHC
card to work normally or may store certain data
on it. Therefore, it is recommended that you keep
a microSDHC card installe d a nd not remo ve or
replace it randomly.
Charging the Battery
Your phone’s battery should have enough power
for the phone to turn on, nd a signal, and make
a few calls. You should fully charge the battery as
soon as possible.
If the battery is extremely low, you may be unable
to pow er on th e pho ne eve n whe n it is being
charged. In this case, try again after charging the
phone for at least 10 minutes.
8
Page 11

1. Co nnect the ada pter to th e c ha rgi ng jac k.
Ensure that the adapter is inserted with the
correct orientation. Do not force the connector
into the charging jack.
2. Connec t t he cha rger t o a standar d AC wall
outlet.
3. Disconnect the charger when the battery is fully
charged.
WARNING!
Use only ZTE-approved chargers and cables. The
use of unapproved accessories could damage your
phone.
CAUTION:
Do not change the built-in rechargeable battery in
your phone by yourself.
9
Page 12
Touch Screen and Navigation
Your phone features a capacitive touch screen, so
you can gently touch, quickly swipe, or pinch with
two ngers to navigate.
• Lig htly touch t he butt ons,
icons, or applications on the
screen with your ngertip.
• Touch and hold your nger
on an item to see available
options.
• Quickly flick the screen to
scroll up, down, left or right.
• Pi nch with t wo fingers or
do uble- tap the scr een t o
zoom in on a web page, a
gallery image, or a map.
• The status bar across the
top of th e sc re en ca ll s,
calendar reminders, etc.
• Touc h and fl ic k the ba r
down to see more details.
Fl ick up or to uch to
close the bar.
: Find all your
•
applications.
10
Page 13
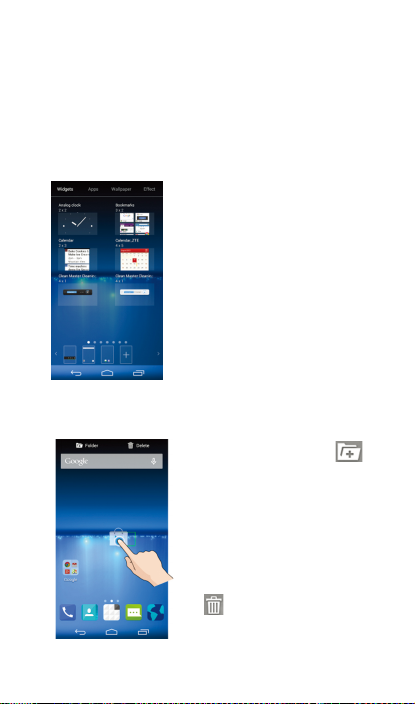
Customizing Home Screens
Add short cuts, widg ets, a nd folders or change
wallpapers and home screen transition effects to
make the phone your own.
Do one of the following, depending on the change
you want to make.
• To add a widget, shortcut,
or application shortcut,
touch and hold an empty
place on the home screen,
touch Widgets or Apps,
and then touch and hold
an item and drag it to a
home screen thumbnail at
the bottom.
• To sort shortcuts into
folders, touch and hold a
shortcut icon on the home
screen and drag it to .
• To move a widget,
shortcut, or folder on the
home screen, touch and
hold it and drag it to a new
location. To delete it, touch
and hold it and drag it to
.
11
Page 14
• To ch ang e ho me sc ree n or lo ck sc re en
wallpaper, touch and hold an empty place on
the home screen, touch Wallpaper and then
sel ect form Wallpaper for home screen or
Wallpaper for lock screen.
• To set the home screen transition effect, touch
and hold an empty place on the home screen,
touch Effect and then choose one.
• From the home screen, pinch or s pread two
ngers on the screen. Then you can touch + on
the blank screen to create new home screens;
touch x on the corner of a screen to delete it;
touch on the bottom of a screen to set it as
the main home screen; touch and hold a screen
and drag it to adjust its place.
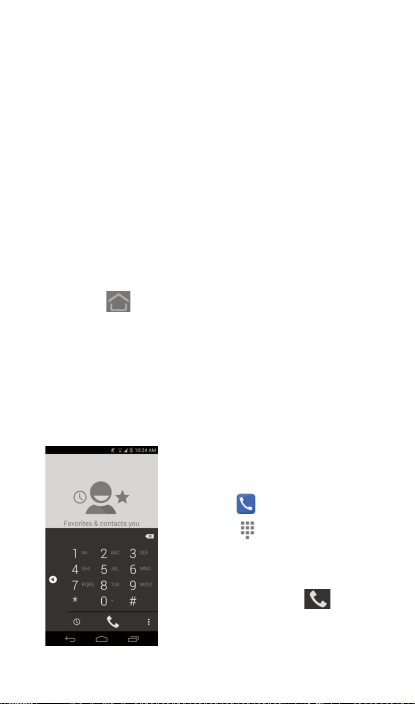
Calling and Voicemail
Call friends and family and check voicemails in just
a few simple steps.
Making a Call
1. From the home screen,
touch .
2. Touch
3. Dial the number you want
to open the
dialer.
to call and touch to
place the call.
12
Page 15
Checking Voicemail
1. From the home screen, touch .
2. Touch
3. Touch and hold the
4. Follow the voice prompts to listen to your voice
to open the dialer.
1 Key.
messages.
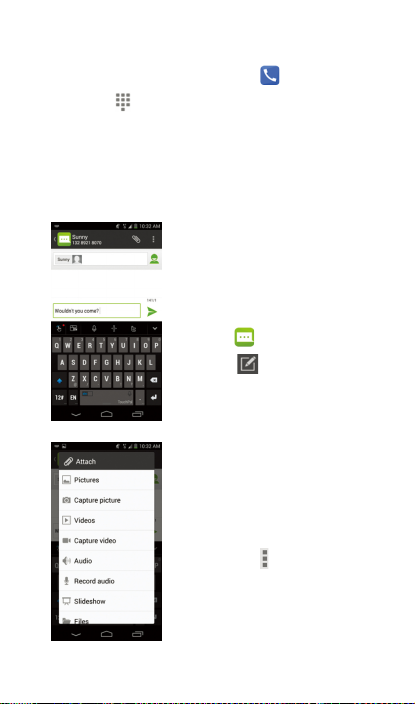
Text and Multimedia Messaging
Send messages to other mobile
phones and to email addresses
to communicate privately and
quickly.
1. From the home screen,
touch .
2. Touch
3. Enter the recipient’s number
or begin typing the contact’s
name. Touch the name
to select corresponding
number.
4. Touch the Type message
eld and type your
message.
u
.
Touch to insert Quick
Text, a smiley, or a
contact.
13
Page 16
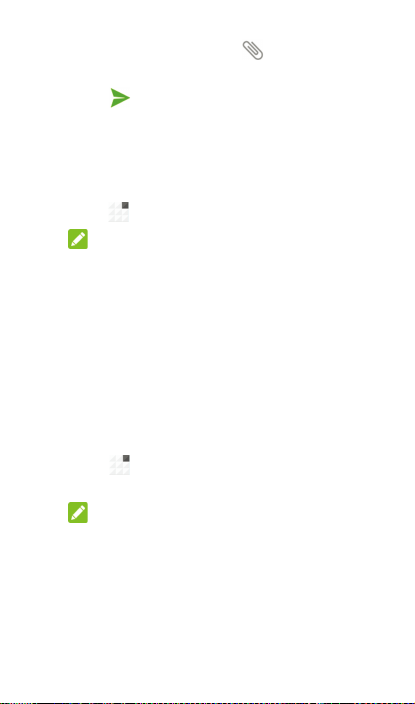
u
To send an MMS, touch and touch an
attachment type.
5. Touch
Please don’t text and drive.
to send your message.
Setting Up Email Accounts
Setting Up Gmail
1. Touch in the home screen and select Gmail.
NOTE:
If another Gmail account is already set up,
touch the Menu Key > Settings > ADD
ACCOUNT.
2. Touch Exist ing t o sign in to you r exist ing
Goo gl e Ac co un t. If yo u ha ve no Go ogl e
Accounts, touch New to create one.
3. Follow the instructions on the screen to set up
the account.
Setting Up Email
1. Touch in the home screen and select
Email.
NOTE:
If another email account is already set up, touch
the Menu Key > Settings > ADD ACCOUNT.
2. Enter the email address and password.
3. Touch Next and follow the onscreen
instructions.
14
Page 17

Setting Up an Exchange ActiveSync®
Account
1. Tou ch i n th e ho me sc re en and s el ec t
Email.
NOTE:
If another email account is already set up, touch
the Menu Key > Settings > ADD ACCOUNT.
2. Enter the email address and password.
3. Touch Manual setup > Exchange.
4. I f ne c es sa r y, ed it Do ma in \Us ern am e,
Password, and Server information.
5. Read the onscreen activation disclaimer and, if
prompted, touch Next.
6. If prompted, touch OK to allow the server to
remotely control some of your phone’s security
features.
7. Congure the settings on the screen, such as
Days to sync, and then touch Next.
8. If prompted, touch Activate to activate the
Email app as a device administrator.
9. Identify your new account with a unique name
and then touch Next.
Contact your server administrator for more help.
15
Page 18

Google® Play Store Apps
The re ar e ten s of th ou sa nd s of ga me s and
applications in the Google® Play Store for you to
download and install in a few easy steps. Before
you begin, ensure that you are signed into your
Google Account.
1. From the home screen, touch
The first time you launc h
Ac cept to agree to Go og le Pl ay Ter ms of
Service.
2. Find the apps you need either by category or
by touching .
3. Touch the app to see more information about it.
u
For free apps, touch INSTALL.
u
For paid apps, touch the price.
4. Read the application access requirements and
touch ACCEPT to download and install the app.
CAUTION:
Once installed, some apps can access many
fu nc ti on s or a significant a mo un t of yo ur
personal data. The Play Store will show you
what the app can access. Touc h Acce pt &
download (free apps) or Accept & buy (paid
apps) to proceed, or touch the Back Key to
cancel.
5. Your phone will download and install the app
automatically. You can check the progress by
icking down the status bar.
16
> .
Play Store, touch
Page 19

The app is successfully installed when the icon
appears in the status bar. To access the app from
the home screen, touch .
NOTE:
You need a Google Wallet™ account to purchase
paid apps.
Camera and Video
Take pictures
and record
videos right from
your phone with
the camera and
camcorder and
then share them with friends and family.
1. From the home screen , touch
rotate the phone to a horizontal position.
2. Ad jus t cam era set tin gs, suc h as fla sh an d
scene mode, by touching the buttons on the
lef t s ide of the viewfinder. Touc h Auto, Pro
and Fun to choose different modes. Pinch or
spread on the screen or press the Volume Key
to zoom in or zoom out. Touch the area where
you want the camera to focus.
3. Touch
to take a picture.
> and
17
Page 20

4. Wh en you ’re f in ished ,
t ou ch t he t hu mb na il
image in the upper right
corner of the screen to
view your picture.
5. Touc h Share. You can
p o s t t h e p i c t ure on
Tw itt er®, Fa ceb ook®,
Amazon Kindle®
6. Google+, Photos, Drive,
R ec og ni ze Car ds or
you can send it through
me ssa gin g, Han gou ts,
Em ai l, GmailTM, Wi -F i
Direct, or Bluetooth® and
other apps.
NOTE:
Touch to start recording video and touch to
stop. While the recording is in progress, you can
touch to save the frame as a separate photo.
18
Page 21

Changing Language
You can chan ge the lang uage o f y our phon e’s
buttons and menus.
1. Fr om the hom e sc re en , touch
Language & input > Language.
2. Touch the language you want to use.
> >
Product Safety Information
Don’t make or receive handheld calls
while driving. Never text while driving.
Don’t use at gas stations.
Keep your phone at least 10 mm
away from your ear or body while
making calls.
Your phone may produce a bright or
ashing light.
Small parts may cause choking.
Do not dispose of your phone in re.
Your phone can produce a loud
sound.
To prevent possible hearing damage,
do not listen at high volume levels for
long periods.
19
Page 22

Avoid contact with anything magnetic.
Avoid extreme temperatures.
Keep away from pacemakers and
other electronic medical devices.
Avoid contact with liquid. Keep your
phone dry.
Turn off when asked to in hospitals
and medical facilities.
Don’t take your phone apart.
Turn off when told to in aircrafts and
airports.
Only use approved accessories.
Turn off when near explosive
materials or liquids.
Don’t rely on your phone for
emergency communications.
20
Page 23

Radio Frequency (RF) Energy
This device meets the government’s requirements
for exposure to radio waves.
Thi s devi ce is designe d a nd manufac ture d not
to exc eed the emi ssi on limits for exp osu re to
radi o frequen cy (RF) energy set by the Federal
C om mu nic at ion s Com m is si o n of t he U.S .
Government:
The exposure standard for wireless mobile devices
em plo ys a unit o f measurement kno wn as the
Specific Absorption Rate, or SAR. The SAR limit
set by the FCC is 1.6 W/k g. Tests f or SAR are
conducted u sin g s tan dar d operating po sitions
accepted by the FCC with the device transmitting
at its highest certified p ower leve l in all tes ted
frequency bands. Although the SAR is determined
at the highest certied power level, the actual SAR
lev el of the devic e w hile oper atin g c an be well
below the maximum value . This is because the
device is d esigned to operate at multiple power
levels so as to use only the poser required to reach
the network. In general, the closer you are to a
wireless base station antenna, the lower the power
output.
21
Page 24

The highest SAR value for the device as reported
to the FCC when tested for use at the ear is 0.16
W/kg and when worn on the body, as described
in t hi s us er g ui de , is 1 .1 7 W/ kg ( Bo dy -w or n
me as ur em en ts di ffer am on g de vi ce mo de ls ,
depending upon available enhancements and FCC
requirements.)
While there may be differences between the SAR
levels of various devices and at various positions,
they all meet the government requirement.
The FCC has granted an Equipment Authorization
fo r t his de vi ce wi th al l re porte d SA R le ve ls
ev aluat ed as in co mplia nc e wit h the FCC RF
ex pos ure gui del ine s. SA R i nformati on on th is
device is on file with the FCC and can be found
under the Display Grant section of http://www.fcc.
gov/oet/ea/fccid/ after searching on:
FCC ID: SRQ- Z980L
22
Page 25

For body worn ope ration, this device has bee n
tested and meets the FCC RF exposure guidelines
for use with an accessory that contains no metal
and the positions the handset a minimum of 1.0
cm fro m the body. Use of other enhancements
may not ensure compliance with FCC RF exposure
gui del in es . I f you do no t us e a bod y- wo rn
accessory and are not holding the device at the
ear, position the handset a minimum of 1.0 cm from
your body when the device is switched on.
23
Page 26

ZTE Grand™ Memo II
Guía rápida
24
Page 27

INFORMACIÓN LEGAL
Copyright © 2015 ZTE CORPORATION.
Todos los derechos reservados.
N in gu na pa rte de es te ma nu a l pu ede se r
reproducida, transmitida, traducida o utilizada de
ninguna forma ni por ningún medio, electrónico o
mecánico, incluido el fotocopiado o microlm, sin
contar con el consentimiento previo por escrito de
ZTE Corporation.
Aviso
ZTE Corporation se reserva e l derecho a hacer
mod if ica ci on es a er ror es de im pr es ió n o a
actu alizar la s especif icaciones de esta guía sin
aviso previo.
Brindamos servicio propio para nuestros usuarios
de dis po sitiv os int elige nt es te rmina le s. Pa ra
obt ener más inf orma ción sobre s ervicio pro pio
y mod elos d e prod uct os com pat ibles, visi ta el
sitio of icial de ZTE ( en www.ztedevice.com). La
información del sitio web tiene prioridad.
Descargo de responsabilidad
ZTE Corporation renuncia explícitamente a cualquier
responsabilidad por fallas y daños causados por
modicaciones no autorizadas del software.
Las imágenes y captur as de panta lla utilizadas
en esta guía pueden diferir del producto real. El
contenido de esta guía puede diferir del producto o
software real.
25
Page 28

Marcas comerciales
ZTE y los logotipos de ZTE son marcas
comerciales de ZTE Corporation.
Go ogl e y An dro id son mar cas comercial es de
Google, Inc.
La marca comercial Bluetooth® y sus logotipos son
propiedad de Bluetooth SIG, Inc. y cualquier uso
de dichas marcas comerciales por parte de ZTE
Corporation se realiza bajo licencia.
El logoti po de microSDHC es una marca
comercial de SD-3C, LLC.
Fabricado bajo la licencia de Dolby Laboratories.
Do lby y el sím bo lo de la dob le D son m arcas
comerciales de Dolby Laboratories.
Los procesadores de Qualcomm® Snapdragon™
son productos de Qualcomm Technologies, Inc.
Qualcomm y Snapdragon son marcas comerciales
de Qua lcom m Incorporated, regi stra das en los
Estado s U nidos y o tros p aíse s. Uti lizadas con
permiso.
Otras marcas comerciales y nombres comerciales
pertenecen a sus respectivos propietarios.
Versión n.º: R1.0
Fecha de edición: 28 de nov. de 2014
N.º de manual: 079584507020
26
Page 29

Conoce tu teléfono
Sensor de
proximidad y
de luz
Auricular
Pantalla
táctil
Atrás
Cámara
Luz
indicadora
Cámara
delantera
Conector para
auriculares
Flash
Altavoz
Micrófono
Cargador/conector para
micro-USB
Bandeja de
la tarjeta
microSDHC
Bandeja de
la tarjeta
micro-SIM
Tecla de
encendido
Tecla de
volumen
27
Page 30

Barra de estado y de
noticaciones
Búsqueda en Google
Fondo de pantalla
Acceso directo
Accesos directos principales
Teclas en pantalla
(Inicio)
• Toca la tecla para volver a la pantalla de inicio
desde cualquier aplicación o pantalla.
• Arrast ra a Goog le par a abri r Búsq ueda d e
Google o para navegar por Internet.
(Atrás)
Toca la tecla para ir a la pantalla anterior.
(Aplicaciones recientes)
Toca la tec la para ver las aplicaciones usa das
recientemente.
Conguración de tu teléfono
Deberás congurar tu teléfono primero para poder
explorar todas sus excelentes funciones.
28
Page 31

Instalación de la tarjeta micro-SIM
Apaga tu tel éfono ante s de inst alar o quit ar la
tarjeta micro-SIM.
1. In se rta l a herra mi enta de exp ul sión de la
bandeja o la punta de un pequeño sujetapapeles
en el orificio junto a la bandeja para tarjetas
micro-SIM (al lado de la tecla de encendido).
Extrae la bandeja de la tarjeta micro-SIM y coloca
la tarjeta micro-SIM (con los contactos hacia abajo)
en la bandeja como se muestra. Luego, vuelve a
instalar la bandeja cuidadosamente.
29
Page 32

¡ADVERTENCIA!
Para ev itar que tu teléfo no se dañe, no utilic es
ningún otro tipo de tarjeta SIM ni ningún otro tipo
de tarjeta micro-SIM de una tarjeta SIM que no
sea el estándar. Tu proveedor te proporcionará la
tarjeta SIM.
Instalación de la tarjeta microSDHC™
(no se incluye)
La tarjeta microSDHC se puede instalar y extraer
mientras tu teléfono está encendido.
1. Ins er ta la he rra mi en ta de exp ul si ón de
l a ban de ja o la p unt a de un p equ eñ o
sujetapapeles en el oricio junto a la bandeja
para tarjetas microSDHC (el superior).
2. Extrae la band eja de la tarjeta micr oSDHC
y co lo ca la ta rj eta mi cr oS DH C (c on lo s
contactos hacia abajo) en la bandeja como se
muestra. Luego, vuelve a instalar la bandeja
cuidadosamente.
30
Page 33

NOTA:
Algunas aplicaciones podrían necesitar una tarjeta
microSDHC para funcionar con normalidad o para
almacenar determinados datos. Por lo tanto, se
recomienda que mantengas instalada una tarjeta
microSDHC y que no la extraigas o cambies de
manera aleatoria.
Carga de la batería
La batería de tu teléfono debería tener la carga
suciente para encender el teléfono, encontrar una
señal y realizar algunas llamadas. Deberías cargar
completamente la batería lo antes posible.
Si la b atería est á muy baj a, quizás no puedas
encender el teléfono aun cuando se esté cargando.
En est e cas o, in tén talo despu és de car gar el
teléfono durante al menos 10 minutos.
1. Conecta el adaptador al conector del cargador.
Asegúrate de que el adaptador esté insertado
en la posición correcta. No fuerces el conector
en el conector del cargador.
31
Page 34

2. Conecta el cargador a una toma de pared de
CA estándar.
3. Desconecta el cargador cuando la batería esté
completamente cargada.
¡ADVERTENCIA!
Utiliza solo cargadores y ca bles aprobados por
ZTE. El uso de accesorios no aprobados podría
dañar tu teléfono.
PRECAUCIÓN:
No cambies la batería recargable incorporada de
tu teléfono tú mismo.
32
Page 35

Pantalla táctil y navegación
Tu te léf on o cu ent a co n una pa nt al la tá cti l
capacitiva, de modo que puedes tocar suavemente,
desl izar rápi damente o pellizcar con dos dedos
para navegar.
• Toca con suavidad los
botones, los íconos o las
aplicaciones en la pantalla
con la yema del dedo.
• Toca un elemento con
el dedo y mantenlo
presionado para ver la
opciones disponibles.
• Arrastra rápidamente la
pantalla para desplazarte
hacia arriba, abajo, a la
izquierda o la derecha.
• Pellizca con dos dedos o
toca dos veces la pantalla
para acercar una página
web, una imagen de la
galería o un mapa.
• La barra de estado que
atraviesa la parte superior
de la pantalla muestra
llamadas, recordatorios de
calendario, etc.
33
Page 36

• Toca y arrastra la barra hacia abajo para ver
más detalles. Arrastra la barra hacia arriba o
toca para cerrarla.
•
: Encuentra todas tus aplicaciones.
Personalización de las pantallas
de inicio
Agr ega ac ces os dir ec to s,
widgets y carpet as o c ambia
fondos de pantalla y los efectos
de transición de pantalla para
person alizar el telé fono a tu
gusto.
H az un a d e la s ac ci on es
siguientes, según el cambio
que desees hacer.
• Para agregar un widget, un
acceso directo o un acceso
directo de aplicación,
toca un espacio vacío y
mantenlo presionado en
la pantalla de inicio, toca
Widgets o Aplicaciones;
a continuación, toca un
elemento y mantenlo
presionado, luego
arrástralo a una miniatura
de la pantalla de inicio en
la parte inferior.
34
Page 37

• Para ordenar los accesos directos en carpetas,
toca un ícono de a cceso directo y mantenlo
presionado en la pantalla de inicio y arrástralo
a .
• Pa ra move r un wi dg et , acce so di re ct o o
una carpeta de la pantalla de inicio, tócalo y
manten lo pre sio nado, luego arr ástralo a l a
nu eva ubi cac ión . Par a e liminarl o, tócalo y
mantenlo presionado, luego arrástralo a .
• Para cambiar la pantalla de inicio o el fondo de
la pantalla de bloqueo, toca un espacio vacío y
mantenlo presionado en la pantalla de inicio, toca
Fondo de pantalla y selecciona desde Fondo
de pantalla para la pantalla de inicio o Fondo
de pantalla para la pantalla de bloqueo.
• Pa ra co nfigu rar e l e fe cto de tr ans ición de
pan talla, toc a u n espacio vac ío y mantenlo
presionado en la pantalla de inicio, toca Efecto
y luego escoge uno.
• De la pantalla de inicio, pellizca o separa dos
dedos en la pantalla. Luego puedes tocar + en
la pantalla vacía para crear nuevas pantallas
de inicio; toca x en la esquina de una pantalla
para eliminarla; toca en la parte inferior de
una pantalla para congurarla como la pantalla
de inicio principal; toca una pantalla y mantenla
pre sionada y arrástrala para ubicarla en su
lugar.
35
Page 38

Llamadas y correo de voz
Ll ama a tus ami gos y fam iliar es, y rev isa t us
correos de voz en tan solo unos simples pasos.
Hacer una llamada
1. En la pantalla de inicio,
toca .
2. Toca
3. Marca el número que
Revisión del correo de voz
1. En la pantalla de inicio, toca .
2. Toca
3. Toca la
4. Sigue las indicaciones de voz para escuchar
para abrir el marcador.
tecla 1 y mantenla presionada.
tus mensajes de voz.
para abrir el
marcador.
deseas llamar y toca
para hacer la llamada.
36
Page 39

Mensajería de texto y multimedia
Envía mens aje s a o tros t elé fon os móv ile s y a
direcciones de correo electrónico para comunicarte
de manera rápida y privada.
1. En la pantalla de inicio,
toca .
2. Toca
3. Ingresa el número del
4. Toca el campo Escribir
5. Toca
No envíes mensajes de
texto mientras conduces.
.
destinatario o comienza
a escribir el nombre de
contacto. Toca el nombre
para seleccionar el
número correspondiente.
mensaje y escribe tu
mensaje.
u
Toca para insertar
Texto Rápido, un
emoticono o un
contacto.
u
Para enviar un MMS,
toca y toca un tipo
de adjunto.
para enviar tu
mensaje.
37
Page 40

Conguración de cuentas de
correo electrónico
Conguración de Gmail
1. Toca en la pantalla de inicio y selecciona
Gmail.
NOTA:
Si ya tienes otra cuenta de Gmail congurada,
toca la Tecla Menú > Conguración >
AGREGAR CUENTA.
2. Toca Existente para iniciar sesión en tu cuenta
de Google existente. Si no tienes cuentas de
Google, toca Nueva para crear una.
3. Sigue las instruc ciones en la pant alla para
congurar la cuenta.
Conguración del correo electrónico
1. Toca en la pantalla de inicio y selecciona
Correo electrónico.
NOTA:
Si ya tienes otra cuenta de correo electrónico
congurada, toca la Tecla Menú >
Conguración > AGREGAR CUENTA.
2. Ingresa la dirección de correo electrónico y la
contraseña.
3. Toca Siguiente y sigue las instrucciones en
pantalla.
38
Page 41

Conguración de una cuenta de
Exchange ActiveSync
1. Toca en la pantalla de inicio y selecciona
Correo electrónico.
NOTA:
Si ya tienes otra cuenta de correo electrónico
congurada, toca la Tecla Menú >
Conguración > AGREGAR CUENTA.
2. Ingresa la dirección de correo electrónico y la
contraseña.
3. Toca Conguración manual > Exchange.
4. Si es nece sa ri o, ed it a la info rm ac ió n de
Dominio\Nombre de usuario, Contraseña y
Servidor.
5. Lee el descargo de activación en pantalla, y si
se te solicita, toca Siguiente.
6. Si se te solicita, toca Aceptar para permitir que
el servidor controle de manera remota algunas
de las funciones de seguridad de tu teléfono.
7. Congura los ajustes en la pantalla, como Días
para sincronizar y luego toca Siguiente.
8. Si se te solicita , t oca Acti var par a activa r
la aplicació n d e correo electrónico como un
administrador del dispositivo.
9. Identica tu nueva cuenta con un nombre único
y, a continuación, toca Siguiente.
Comunícate con el administrador del servidor si
necesitas más ayuda.
®
39
Page 42

Aplicaciones de Google® Play
Store
Existen decenas de miles de juegos y aplicaciones
en Google® Play Store que puedes descargar e
instalar siguiendo algunos pasos fáciles. Antes de
empezar, asegúrate de haber iniciado sesión en tu
cuenta de Google.
1. De la pantalla de inicio, toca
La primera vez que inicias
Aceptar para aceptar los Términos de Servicio
de Google Play.
2. Bu sca l as apl ica ci ones que n ecesi tas p or
categoría o tocando .
3. Toca la aplicación para ver más información de
esta.
u
Pa ra las ap li ca cione s gr at uitas , to ca
INSTALAR.
u
Pa ra las a pli cac iones pagadas, toc a el
precio.
4. Lee los requisitos de acceso de la aplicación
y toca ACEPTAR para descargar e instalar la
aplicación.
> .
Play Store, toca
40
Page 43

PRECAUCIÓN:
Un a vez ins ta lad as , a lg unas aplic acion es
pueden acceder a muchas funciones o a una
cantidad importante de tus datos personales.
Play Store te mostrará a qué puede acceder
la aplicac ió n. Toc a Aceptar y desca rg ar
(aplicaciones gratuitas) o Aceptar y comprar
(aplicaciones pagadas) para continuar, o toca
la tecla Atrás para cancelar.
5. Tu teléfono descargará e instalará la aplicación
automáticamente. Puedes vericar el progreso
arrastrando la barra de estado hacia abajo.
La aplicación estará instalada correctamente
cuando aparezca el ícono en la barra de
estado. Para acceder a la aplicación desde la
pantalla de inicio, toca .
NOTA:
Necesitas una cuenta de Google Wallet™ para
comprar aplicaciones pagadas.
41
Page 44

Cámara y video
Toma fotografías
y graba videos
directamente
en el teléfono
con la cámara y
videocámara, y
luego compártelos con amigos y familiares.
1. De la pantalla de inicio, toca
teléfono en posición horizontal.
2. Para cambiar la configuración de la cámara,
com o f lash y m odo de esc ena, debes toca r
los botones del lado izquierdo del visor. Toca
Automático, Profesional y Diversión para
elegir modos diferentes. Pellizca o separa la
pantalla o presiona la tecla de volumen para
acercar o alejar. Toca el área en la que desees
que la cámara se enfoque.
3. Toca
4. Cuando nalices, toca la imagen miniatura en
para tomar una foto.
la esq uina super ior izquierd a d e l a panta lla
para ver tu fotografía.
> y gira el
42
Page 45

5. Toca Compartir. Puedes
pub li car tu im ag en en
Tw itt er®, Fa ce bo ok® y
Amazon Kindle®.
6. Go og le+, Fo to s, Dr iv e,
R ec on oc er ta r je ta s o
puedes enviarla a través
de mensajería, Hangouts,
c or r e o e le c t r ó nic o ,
G ma ilTM, Wi- F i Di r ec t
o B l u e t oo t h® y o tra s
aplicaciones.
NOTA:
Toca para comenzar a grabar video y toca
para detener la grabación. Mientras la grabación
está en curso, puedes tocar para guardar el
cuadro como una foto separada.
43
Page 46

Cambio de idioma
Puedes cambiar el idioma de los botones y menús
de tu teléfono.
1. De l a p an talla de ini cio, toca
Teclado e idioma > Idioma.
2. Toca el idioma que deseas utilizar.
> >
Información de seguridad sobre
el producto
No hagas o recibas llamadas
sosteniendo el teléfono con la
mano mientras conduces. Nunca
envíes mensajes de texto mientras
conduces.
No lo utilices en gasolineras.
Mantén tu teléfono a una distancia
mínima de 10 mm del oído o del
cuerpo mientras haces llamadas.
El teléfono puede emitir una luz
brillante o parpadeante.
Las partes pequeñas pueden
generar atragantamiento.
No arrojes tu teléfono al fuego.
Tu teléfono puede emitir un sonido
fuerte.
44
Page 47

Para evitar causar daño a tu
audición, no escuches a niveles
de volumen altos durante periodos
prolongados.
Evita el contacto con cualquier
medio magnético.
Evita la exposición a temperaturas
extremas.
Mantenlo alejado de marcapasos
y otros dispositivos médicos
electrónicos.
Evita el contacto con líquidos.
Mantén tu teléfono seco.
Apágalo cuando así se te lo solicite
en hospitales e instalaciones
médicas.
No desarmes tu teléfono.
Apágalo cuando se te indica en
aeronaves y aeropuertos.
Utiliza únicamente accesorios
aprobados.
Apágalo cuando estés cerca de
materiales o líquidos explosivos.
No dependas de tu teléfono para
comunicaciones de emergencia.
45
Page 48

Energía de radiofrecuencia (RF)
Est e dis po si ti vo cu mpl e con lo s re qu is itos
gubernamentales sobre la exposición a ondas de
radio.
Este dispositivo está diseñado y fabricado para que
no supere los límites de emisión para la exposición
a la energía de radiofrecuencia (radio frequency,
RF ) est ablec ido s por la Co mis ió n F ed era l de
Comunicaciones del gobierno de EE. UU.:
La norma de exposición para dispositivos móviles
in al ám br ic os em pl ea una unidad de m ed id a
co no cid a como ta sa de abs or ción espec íf ica
(S pecif ic Abs orpti on Ra te, SAR ). El lím ite d e
la SA R estab le ci do por l a Co mi si ón Fed er al
de Comu nicacio nes (Fed eral C ommunic ati ons
Commission, FCC) es de 1,6 W/kg. Las pruebas
de SAR se llev an a cabo utili zando p osiciones
de oper aci ón est ándar ace ptadas por l a FCC,
en las que el disp ositivo tran smit e el más alto
nivel de energía certificado en todas las bandas
de fr ec ue nci a pr ob ada s. Si bi en la SA R se
determina al más alto nivel de energía certicado,
el nivel de la SAR real del dispositivo durante su
funcionamiento puede ser bastante inferior al valor
máximo. Esto se debe a que el dispositivo está
dis eñado para func ionar a d iver sos niveles de
energía, de modo que utilice solo el nivel necesario
46
Page 49

para alcanzar la red. En general, mientras más
ce rc a est és de un a a nt en a d e es tac ió n bas e
inalámbrica, menor será la salida de energía.
El valor de la SAR más alto para el dispositivo,
según se informó a la FCC cuando se realizó la
prueba en el oído, es de 0.16 W/kg, y al llevarlo
sobre el cuerpo , tal com o se desc ribe e n e sta
guía del usuario, es de 1.17 W/kg (las medidas al
llevar el dispositivo sobre el cuerpo varían según
el mode lo del disp osi tivo, dependi endo d e las
mejoras disponibles y de los requisitos de la FCC).
Si bien pueden encontrarse diferencias entre los
niveles de la SAR de los distintos dispositivos y
en dife rentes posicio nes, todos cumplen con el
requisito gubernamental.
La FCC otorg ó una autor iz aci ón de eq uip o a
este dispositivo con todos los niveles de la SAR
in fo rmado s y evalu ad os de co nform id ad co n
las pautas de exposición de RF de la FCC. La
información de la SAR sobre este dispositivo está
archivada en la FCC y se puede encontrar en la
sección sobre la concesión en http://www.fcc.gov/
oet/ea/fccid/ después de realizar una búsqueda
en:
Identicación de la FCC: SRQ- Z980L
47
Page 50

En cuanto al funcionamiento al llevarlo sobre el
cuerpo, se realizaron pruebas a este dispositivo y
cumple con las pautas de exposición de RF de la
FCC para su uso con un accesorio que no tenga
metal, y la distancia de un auricular con respecto
al cuerpo debe ser de 1,0 cm como mínimo. Es
posible que el uso de otras mejoras no garantice
el cumplimiento de las pautas de exposición de
RF de la FCC. Si no ut iliza un acces orio sobre
el cuer po y no lleva un dispositivo c olocado en
el oído, debe ubicar el auricular a una distancia
del c uerpo de 1,0 cm como m ínimo cua ndo el
dispositivo esté encendido.
48
Page 51

49
Page 52

50
 Loading...