

Page 1

ZTE-G R352
GSM Digital Mobile Phone
User Manual
Page 2

Security
To protect your mobile phone from illegal use, take the
security measures as follows:
Set PIN codes of the SIM card.
Set handset loc k code.
Set call restrictions.
Safety Precautions
Operational Precautions
Please use your phone properly. When making or
Do not touch the antenna when the phone is in use.
Some people may be susceptible to epileptic seizures or
Keep the phone out of the reach of sm all children. The
This section includes some important information on
safe and efficient operation. Please read this
information before using the phone.
receiving a call, please hold your phone as holding a
wireline telephone. Make sure that the phone is at least
one inch (about two point five centimeters) from your body
when transmitting.
Touching the antenna area affects call quality and may
cause the phone to operate at a higher power level than
needed.
blackouts when exposed to flashing lights, such as when
watching television or playing video games. If you have
experienced seizures or blackouts, o r if you hav e a fam ily
history of such occurrences, please consult your doctor
before playing video games on your phone or enabling a
flashing-light feature on your phone. (The flashing-light
feature is not available on all products.)
Page 3

phone may cause injury if used as a toy.
Precautions While Driving
Please pay attention to the traffic safety. Check the laws
and regulations on the use of your phone in the area where
you drive. Always obey them.
Use hands-free funct ion of the phone, if ava ilable.
Pull off the road and park before making or answering a
call if conditions require.
Precautions for Medical Device s and Facilities
When usin g your phone n ear pacemak ers, plea se always
keep the phone more than eight inches (about twenty
centimeters) from the pacemaker when the phone is
switched on. Do not carry the phone in the breast pocket.
Use the ear opposite the pacemaker to minimize the pot ent ial
for interference. Switch off the phone immediately if necessary.
Some phones ma y int e rf ere wit h som e he ar in g ai ds. In th e
event of such interference, you may consult your hearing
aids manufacturer to discuss alternatives.
If you use any other personal medical device, please
consult the manufacturer of your device to determine if it is
adequately shielded from RF energy.
In those f aci lit ies with s pec ial d emand , s uch as hosp ita l or
health c are f aci lit ies, p le ase pa y att ent ion t o the res tr ict ion
on the use of mobile phone. Switch off your phone if
required.
Mobile Phone
Please us e original acces sories or acces sories approv ed
Page 4

by the phone manufacturer. Using any unauthorized
accessories may affect your mobile phone’s performance,
damage your phone or even cause danger to your body
and violate related local regulations about telecom
terminals.
Turn off your phone before you clean it. Use a damp or
anti-static clo th to cl ean the p hone. Do no t use a dry cl oth
or elect rostatic ally cha rged cloth. Do not us e chemica l or
abrasive cleaners as these could damage the phone.
As your mobile phone can produce electromagnetic field,
do not place it near magnetic items such as computer
disks.
Using th e phone near elec trical applianc es such as TV,
telephone, radio and personal computer can cause
interference.
Do not expose your mobile phone to direct sunlight or store
it in hot areas. High temperatures can shorten the life of
electr onic devic es .
Keep your phone dry. Any liquid may damage your phone.
Do not drop, knock or harshly treat the phone. Rough
handling can break internal circuit boards.
Do not connect the phone with any incompatible enhancement.
Do not attempt to disassemble the mobile phone or battery.
Do not store the phone with flammable or explosi ve arti cles.
Do not charge the mobile phone without battery.
Precauti ons for P otent ia lly Explosive Atmospheres
Switch off your phone prior to entering any area with
potent ially explos ive atmospher es, such as fue ling areas,
fuel or chemical transfer or storage facilities.
Do not remov e, instal l, or charge ba tteries i n such areas.
Page 5

Spark in a potentially explosive atmosphere can cause an
explosion or fire resulting in bodily injury or even death.
To avoid possible interference with blasting operations,
switch off your phone when you are near electrical blasting
caps, in a blasting area, or in areas posted “Turn off
electr onic devic es .” Obey all s igns and instructions.
Precaut ions for Electronic De vices
Some electronic devices are susceptible to electromagnetic
interference sent by mobile phone if inadequately shielded,
such as electronic system of vehicles. Please consult the
manufacturer of the device before using the phone if
necessary.
Safety and General Use in Vehicles
Safety a irbag, brake, s peed control sys tem and oil eject
system shouldn’t be affect ed by wireless transmission. If
you do meet problems above, please contact your
automobile provider. Do not place your phone in the area
over an airbag or in the airbag deployment area. Airbags
inflate with great force. If a phone is placed in the airbag
deployment area and th e airbag inflates, the phone may be
propelled with great force and cause serious injury to
occupants of the vehicle.
Please turn off your mobile phone at a refueling point, and
the same to the place where the use of two-way radio is
prohibited.
Aircraft Safety
Please turn off your mobile phone before the airplane
takes off. In order to protect airplane’s communication
system from interference, it is forbidden to use mobile
Page 6

phone in flight. Safety regulations require you to have
permission from a crew member to use your phone while
the plane is on the ground.
If the mobi le phone has the funct ion of automatic tim ing
power-on, please check your alarm setting to make sure
that your phone will not be automatically turned on during
flight.
Batter y U se
Do not short-circuit the battery, as this can cause the unit
to overheat or ignite.
Do not store battery in hot areas or throw it into fire.
Otherwise, it will cause exp losion.
Do not disas semble or refit th e battery. Other wise, it will
cause liquid leakage, overheating, explosion and ignition
of the battery.
Please store the battery in a cool dry place if you don’t use
it for a long period.
The battery can be recharged for hundreds of times, but it
will eventually wear out. When the operating time ( talk t im e
and standby time) is notic eably short er than n ormal, it is
time to replace it with a new one.
Please stop using the charger and battery when they are
damaged or show evidence of aging.
Return the worn-out battery t o the p rov ider o r dis pos e of it
in accordance with environment regulations. Do not
dispose of it in household rubbish.
Please use original batteries or batteries approved by the
phone manufacturer. Using any unauthorized battery may
affect your handset performance or may cause danger of
explosion, etc.
Page 7

Warning: If the battery is damaged, do not discharge it. If the
leakage does come into contact with the eyes or skin, wash
thoroughly in clean water and consult a doctor.
Health and safety information
The phone with internal antenna has been tested for compliance with FCC RF Exposure (SAR) limits and is complied with FCC RF exposure compliance requirements.
Exposure to radio frequency energy
Radio wave exposure and Specific Absorption Rate (SAR)
information The handset is designed to comply with safely,
requirements for exposure to radio waves. This requirement is
based on scientific guidelines that include safety margins
designed to assure the safety of all persons, regardless of age
and health.
The radio wave exposure guidelines employ a unit of
measurement known as the Specific Absorption Rate, or SAR.
Tests for SAR are conducted using a standardized method
with the
Phone transmitting at its highest certified power level in all
used frequency bands. While there may be differences
between the SAR levels of various ZTE phone models, they
Page 8

are all designed to meet the relevant guidelines for exposure
to radio waves.
The SAR limit recommended is 1.6W/kg averaged over one
(1) gram of tissue. The highest SAR value for this device
when tested at the ear was 0.605 W/kg, and when tested at
the body it was 1.32 W/kg SAR compliance for bodyworn
operations is restricted to belt-clips, holsters, or similar
accessories that have no metallic component in the assembly
and which provide at least 1.5 cm separation between the
device, including its antenna, and the users body.
Body Worn Operation
Importa nt safety information regarding radiofrequency
radiation(RF) exposure.
To ensure compl i ance wit h RF expos u re guid eli nes the
phone must be us ed with a minimum of 15 mm separation
from the body.
Failure to observe these instructions could result in your RF
exposure exceeding the relevant guideli ne l imits .
Page 9

FCC Compliance
This device compli es with part 1 5 of t he FCC Rules. Operatio n is
subject to the following two conditions: (1) This device may not
cause har m ful interference, and (2) this device must ac cept any
interference received, including interference that may cause
undesired operation.
NOTE: This equipment has been tested and found to comply with
the limits for a Class B digital device, pursuant to part 15 of the
FCC Rules. These limits are designed to provide reasonable
protection against harmful interference in a residential
installation. This equipment generates, uses and can radiate
radio frequency energy and, if not installed and used in
accordance with the instructions, ma y cau se harmful interference
to radio communications. However, there is no guarantee that
interference will not occur in a particular installation. If this
equipment does cause harmful interference to radio or television
reception, which can be determined by turning the equipment off
and on, the user is encouraged to try to correct the interference
by one or more of the following measures:
—Reorient or relocate the receiving antenna.
—Increase the separation between the equipment and receiver.
—Connect t he equipmen t into an outlet on a circu it differ ent from
that to which the receiver is connected.
—Consult the dealer or an experienced radio/ TV technician for
help.
Caution: Changes or modifications not expressly approved
by the manufacturer could void the user’s aut hority to
operate the equipment.
Page 10

Limitation of Liability
ZTE shall not be liable for any loss of profits or indirect, special,
incidental or consequential damages resulting from or arising out
of or in connection with using this product, whether or not ZTE
had been advised, knew or should have known the possibility of
such damages. The user should refer to the enclosed warranty
card for full warranty and service information.
Note: The pictures and icons shown in the manual are just
schematic drawings for function demonstration. If they are
inconsistent with your handset, please take your handset as the
standard. If the inconsistency exits in the manual because of the
handset function updating, please refer to the follow-up public
information from ZTE CORPORATION
Page 11

Contents
1. Getting Started ....................................................... 13
1.1. Starting Up ........................................................ 13
1.2.
My Phone .......................................................... 17
1.3.
Idle screen ......................................................... 19
1.4.
Text Input .......................................................... 21
1.5.
Basic Operation ................................................. 23
2. Using the Phone .................................................... 25
2.1. Making a Call ..................................................... 25
2.2.
Answering Incoming Calls ................................. 27
2.3.
In-Call Options ................................................... 28
2.4.
Call History ........................................................ 28
2.5.
Using SIM Card Services (STK) .......................... 29
2.6.
Flight Mode ....................................................... 29
3. Messaging .............................................................. 31
3.1. Composing and Sending a Message ................. 31
3.2.
Other Actions Related to Messages ................... 32
3.3.
Voice Mail .......................................................... 35
4. Email ....................................................................... 36
4.1. Configuring Email Account ................................ 36
4.2.
Creating a New Email ........................................ 37
4.3.
Checking and Replying to Emails ...................... 38
5. Personal Information ............................................. 39
5.1. Contacts ............................................................ 39
5.2.
Calendar ............................................................ 41
5.3.
Voice Recorder .................................................. 43
Page 12

6. Settings.................................................................. 44
6.1. General Settings ............................................... 44
6.2.
Function Settings .............................................. 45
6.3.
Management ..................................................... 48
7. Experiencing Multimedia ...................................... 51
7.1. Camera ............................................................. 51
7.2.
Music Player ..................................................... 53
7.3.
Playing Videos .................................................. 55
7.4.
FM radio ........................................................... 56
8. Getting Connected ................................................ 58
8.1. Connecting to the Internet ................................. 58
8.2.
Internet Browser ................................................ 58
8.3.
Bluetooth .......................................................... 60
9. More Applications ................................................. 62
9.1. My Files ............................................................ 62
9.2.
Alarms .............................................................. 62
9.3.
Calculator ......................................................... 62
9.4.
Currency Converter ........................................... 63
9.5.
World Time ....................................................... 63
9.6.
Synchronize ...................................................... 64
9.7.
Torch ................................................................ 64
9.8.
Games and Applications ................................... 64
Page 13
1. Getting Started
1.1. Starting Up
Battery
The lithium ion battery of the mobile phone can be
immediately used after unpacking.
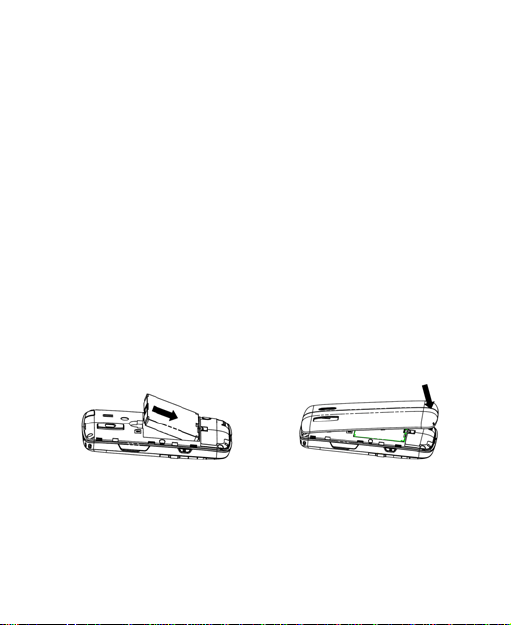
Installing the battery
1.*Remove th e b a ttery cover.
2.Insert the ba tt er y by al ign i ng th e go ld-c olored contacts with
the contacts in the battery slot.
3.Push down the upper section of the batt ery unt il it clicks into
place.
4.Replace the battery cover and close it gently until you hear a
click.
Pull down the battery Press the cover
Removing the battery
1. Make sure t hat your mob ile phone is switched of f.
2. Remove the battery co ve r.
3. Pull the battery up a nd remove it from the mobile phone.
13
Page 14
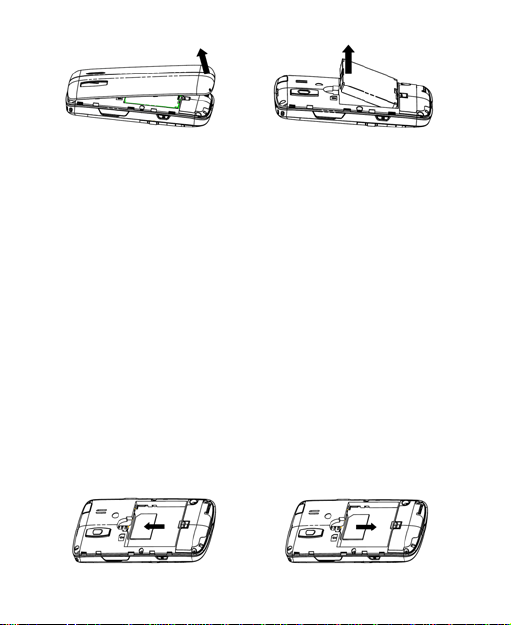
Open the cover Pull up the battery
How to insert the SIM card
You want a mobile phone that is sophisticated yet easy to
use and here it is in your hands! Naturally you are eager to
start using it, but first you need to insert the SIM card.
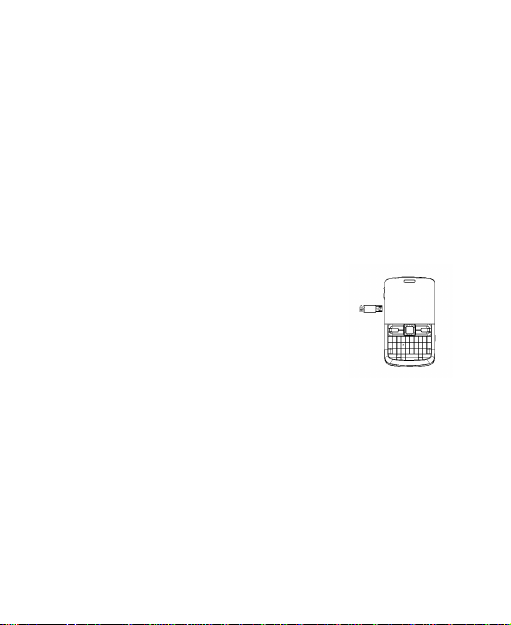
Insert the SIM card as follows:
• Make sure that the phone is switched off and the charger
is disconnected from the phone.
• Turn the phone over and remove the battery cover.
• Remove th e battery if it is already installed.
• Hold your SIM car d with the cut c orner ori ented as shown
and then slide it into the card holder with the gold-colored
contacts facing downward.
• Replace the battery first.
• Replace th e bat te r y cov er.
Insert the SIM card Pull out the SIM card
14
Page 15
What is a SIM card?
Every mobile phone has a SIM card (Subscriber Identity
Module). This is a micro-chi p that holds your personal
information such as names and phone numbers. Your phone
won’t work without it. If you already have contacts on your
SIM card, they can be transf erre d in m os t cases.
How to charge the battery
The battery needs to be charged for at least 6-8 hours before
you can make your first call.
1. Connect your travel adapter to the
left side of your mobile phone as
shown in the diagram.
Note: The side with an arrow should
be upright while connecting.
2. Connect the other end of the travel
adapter to the mains socket.
• When the battery is being charged, the display will show
the animation of a battery being filled up.
• When the battery is fully charged, disconnect the charger.
Inserting and Removing a Memory Card
ZTE-G R352 supports microSD memory cards up to 2GByte.
Please follow the instructions from your microSD card
vendor.
15
Page 16
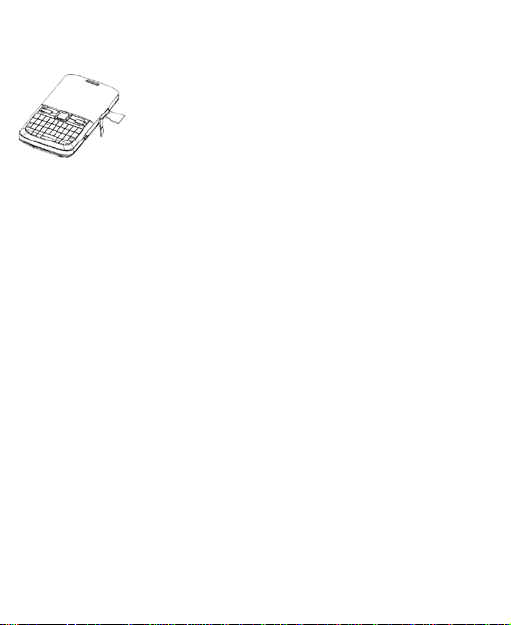
To insert a card,
1. Open the cover of the memory card slot
on the right side of the phone.
2. Insert the memory card carefully with
the metal contact s facing upwards until
it clicks into the right position.
To remove the card, press and release the card so it clicks
out. Then, remove it carefully from the slot.
Powering On/Off
Make sure that your SIM card is in your mobile phone and
that the battery is charged.
Pleas e ho l d the End/Power key to power on/off the phone.
The phone will automatically search for the network.)
16
Page 17
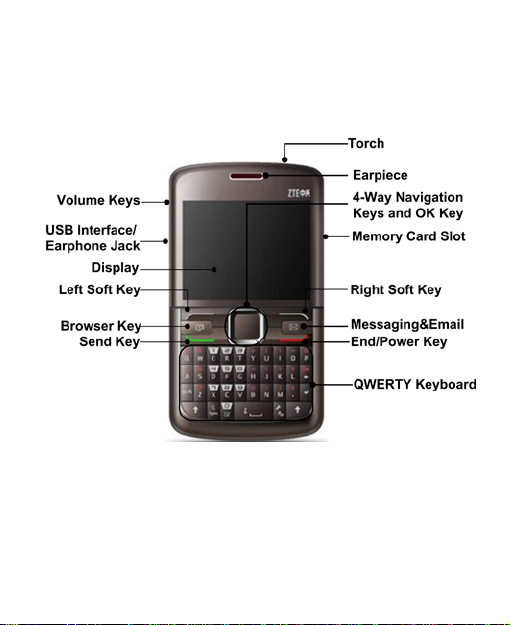
1.2. My Phone
Front View
17
Page 18
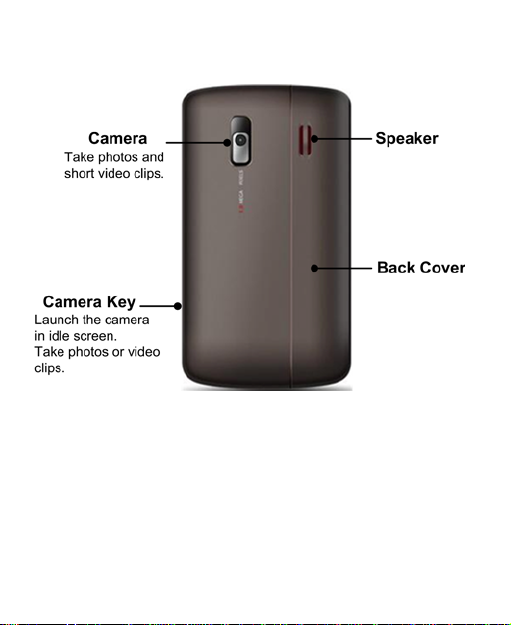
Back View
18
Page 19
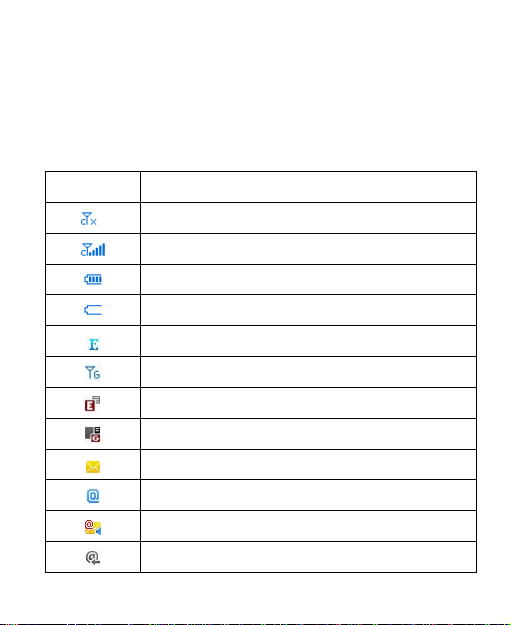
1.3. Idle screen
Indicator
What it means
No signal
Strongest signal
Battery full
Battery low
EDGE available
GPRS available
GRPS i n use
Unread Message (flashes when inbox full)
Unread Email
Unread voice mail
When you turn on the phone, it starts with the idle screen
where you can find the following Indicat ors as shown below.
Indicators
EDGE i n use
Receiving Email
19
Page 20
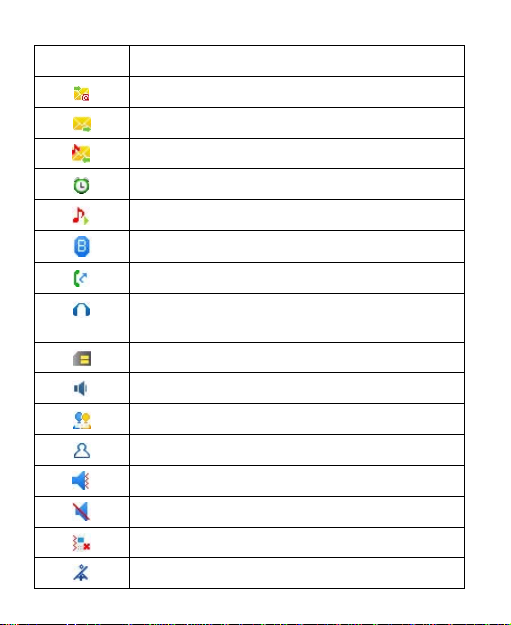
Indicator
What it means
Sending Email
Sending message
Receiving MMS
Alarm activated
Music playing
Bluetooth on
Call forwarding normal
Headset inserted (headset profile
Memory card inserted
Normal profile activated
Meeting profile activated
My profile activated
Silent profile activated
Silent profile with vibration
Offline profile activated
activated)
Outdoor profile activated
20
Page 21
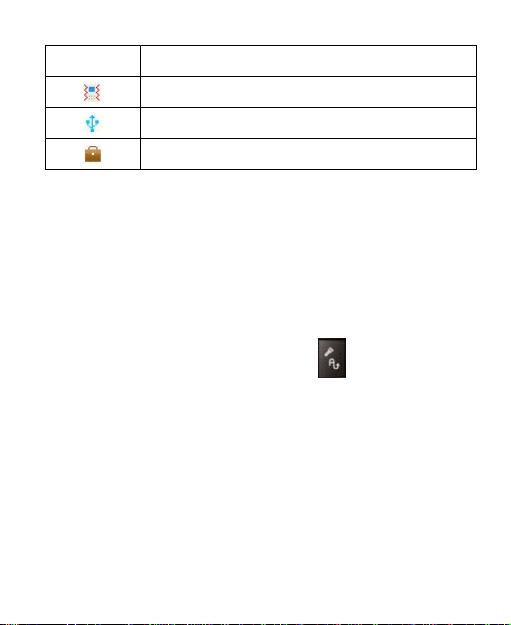
Indicator
What it means
Vibration activated
USB mode
Roaming
1.4. Text Input
Text Mode
Your mobile phone provides the following input methods:
word predictive text (Zi Abc) mode, lowercase alphabetic (abc)
mode, uppercase alphabetic (ABC) mode and numeric (123)
mode. The current input m ode is displ ayed on t he s creen
above the input field. You can p res s
input mode.
to c hange th e
Word Predictive Text Mode
Word predictive text mode is based on a built-in dictionary. It
gives wo rd c h oices for yo u f r om th e com b i na ti on of l etters
you have pressed.
• Press each key associated with the letter you want to
enter. The letters you have entered appear on the display.
The candidate words change wi t h each key you press.
When the candi date word you need i s displayed, press
21
Page 22

Navigation Key Up or Navigation Key Down to
highlight the word and press OK Key to confirm.
• Press Left Soft Key [Spell] to add new word suggestions
to the phone dictionary.
• Press
• Press
to insert space.
to delete letters left of the cursor.
Alphabetic Modes
• Press A ~ Z to enter desired characters.
• Press
• Press
• Press
to switch between uppercase and lowercase.
to enter a space.
to delete letters left of the cursor.
Numeric Mode
In numeric mode, use the numeric keys to enter numbers.
Notes: Letters cannot be entered in this mode.
Entering Symbols
In word predictive text mode and alphabetic modes, press
to enter “.” For other symbols, press first and then
press the keys with the symbols you need on it.
22
Page 23

1.5. Basic Operation
Menu Navigation
The phone features various functions and settings organized
in menus and submenus.
To select a function, first press OK Key or Left Soft Key in idle
screen to open the main menu. Use Navigation Keys to
scroll up, down , lef t or ri ght to sel ect an item . Find the
desired item and press OK Key or Left Soft Key to open the
item. If necessary, continue to use Navigation Keys to scroll
and select, OK Key or Left Soft Key to open selected items,
until you find the item you need.
Notes: In this user manual, the steps needed to access a
menu are shown in a condensed form, for example: Menu >
Settings > Display settings > Backlight time > 10
seconds.
Navigation Keys in Idle Mode
You can press the four Navi g ation Keys to access functi ons
or menus from idle mode.
Navigation Key Up: Quick Menu
Quick menu allows you to access your frequently used functions
quickly and with ease. By default, you can press Navigation
Key Up to open Quick Menu. Select the function you need
and press OK Key [Select] to launch it.
23
Page 24

You can set as many as ten items in the Quick Menu. To add
a new item,
1. Select a <New item>.
2. Press OK Key to open a short list of functions.
3. Use Navigation Keys to select a function from the short
list.
4. Press OK Key or Left Soft Key to add the function to
Quick Menu.
Notes: You can press Left Soft Key to edit, delet e or reset
the items in Quick Menu.
Navigation Key Down: Access to Contacts.
Navigation Key Left: Create a new text message.
Navigation Key Right: Access to My Files.
Keypad Lock
You can use the keypad lock to prevent the keys from being
accidentally pressed.
In idle screen, hold
To unlock the keypad, press Left Soft Key [Unlock] first and
then press
key to lock the keypad.
Key.
24
Page 25

2. Using the Phone
2.1. Making a Call
Making a Call in Idle Screen
Enter the phone number in i dl e screen and then press Send
Key, OK Key or select Options > Voice call to dial the call.
Press End Key to cancel the call or end the call.
Making a Call from Contacts
In idle screen, press Right Soft Key, select Menu > Contacts
or press Navigation Ke y Down. Use Navigation Keys to
select a contact and then press Send Key or select
Options > Call > Voice call to dial the call.
Tips: You can also select Options > Call > Edit before call
to modify the number (for instance, adding an IP call prefix
or an area code) before making the call.
If the contact has multiple phone numbers, select the number
you want to dial and press OK Key or Left Soft Key to dial
the call.
Making a Call from Call History
First, press Send Key or select Menu > Calls in idle screen
to open call log. Use Navigation Key Left/Right to select call
type, Missed/Received/Dialed and All. Then use Navigation
25
Page 26

Key Up/Down to select the number you need and press
Send Key or select Options > Call > Voice call to make the
call. You can also select Options > Cal l > Edit before ca ll to
modify the number before dialing.
Making a Call from Messages
In idle screen, select Menu > Messaging > Inbox and select
a message. Select Options > Call sender to call the sender
of the selected message.
Making a Speed Dial Call
In idle screen, hold the num ber key (2~9) co rresponding t o
the phone number in the speed dial list to make a call.
Notes:
Setting speed dial
1. In idle screen, sel ect M enu > C ont ac ts > Options >
2. Use Navigation Keys to select a number between 2 and 9.
3. Press Left Soft Key [Assign].
4. Use Navigation Keys to select a contact, OK Key or Left
Note: You can only set speed dial for contacts in your default
contact list. See “Default contact list” in Section 6.2.
is reserved for your voice mail number.
Advanced > Speed dial number.
Soft Key to confirm.
26
Page 27

Making Emergency Calls
Enter the emergency number from idle sc r een and press
Send Ke y or Select Call. It is possi ble to di al eme rge ncy
numbers when the keypad is locked.
Caution:
The available emergency numbers depend on the area
you are in and the service provider you use. Please contact
your local service provider for more information.
Do not rel y sole ly o n the p hone f or em erge nc y
communication, because you need network coverage to
make any call and connections cannot be guaranteed
every time you dial a number.
Tips: You can dial the emergency numbers when the SIM
card is not inserted.
2.2. Answering Incoming Calls
Press Send Key or OK Ke y to answer. Press End Key to
reject the call.
Tips:
Press Right Soft Key to mute the ringtone.
Select Options > Reply by message to reject the call
and send a message to the caller.
Caution: Adjust the vol ume of the e a rp i ec e t o a m od e rate
level to avoid injury to your ear.
27
Page 28

2.3. In-Call Options
After you have answered the call, the following options are
available.
• Press Right Soft Key to mute the call. The microphone
will be turned off to prevent the opposite party from hearing
your voice. To turn on the microphone, select Unmute.
• Press OK K e y to t urn on the speaker. To turn off the
speaker, press OK Key again.
Caution: To avoid damage to your hearing, do no t place the
phone close to your ears while the speaker is turned on.
• Press Left Soft Key to access more options.
Hold/Resume: Put the current call on hold or retrieve
the call.
End: End the current call.
Handsfree/Earpiece: Turn on/off the speaker.
Other ap pli ca tions: Go to Contacts, Messaging,
Calls or Calendar.
2.4. Call History
In idle screen, select Menu > Calls to check recent calls and
duration.
Use Navigation Key Left/Right to switch among Missed,
Received, Dialed and All.
28
Page 29

In each list, select a call record and press OK Key to view its
detail, including the name of the opposite party, the phone
number, the time and date of the call, and call duration. You
can press OK Key to call the number, or select Options to
find more choices.
• Send message: Send a message to the number.
• Call: Make a phone call to the number or after editing the
number.
• Save number: Save th e num ber as a n ew cont act o r
update existing contact number.
• Delete: Delete the call record.
2.5. Using SIM Card Services (STK)
To use the SIM card services, insert your SIM card into the
phone at first. SIM card information services rely on the service
provider.
Select Menu > Organizer & Tools > STK. T h e di s pl a yed
name on the STK Service is provided by your service provider.
2.6. Flight Mode
In areas where the usage of mobile devices is restricted, you
can ac ti v at e t h e f li gh t m o de to d is ab l e t h e mobile phone
function but still use other functions of your phone such as
calendar, music playback, games. You will not be able to
make/receive calls, send/receive messages, or browse to the
29
Page 30

Internet in flight mode.
To activate/deactivate the flight mode:
In idle screen, select Menu > Settings > Phone settings >
Profiles. Choose Offline to activate the flight mode. The
indicator will appear. Choose other profiles to deactivate the
flight mode.
30
Page 31

3. Messaging
Select Menu > Messaging to access your messages.
3.1. Composing and Sending a
Message
In idle screen, select Menu > Messaging > Create message
and enter the text content of the message. You can select
Options > Input options to set input mode and input language,
or select Options > Advanced to i nsert cont act, em ail or
template to the text.
If you want to compose an MMS, press Left Soft Key [Options]
in the text composing i nterfac e. Sel ect Add picture, Add
video, Add sound or Add attachment to add relevant files
to the message, or select Advanced > Add subject. The
message will switch from an SMS to an MMS automatically.
After the message has been switched to an MMS, press Left
Soft Key [Options] to add more pictures, videos, sounds or
attachment to the message. You can also select Page options
to add/delete slide pages, set page timing, go to next/previous
page, or select Preview to preview the message.
Press OK Key [Add recipient] or select Options > Add
recipient t o ent er r ecipi ents ’ num bers. You c an se lect
Options > Edit to ente r the numbers, or Options > Add
from contacts to select numbers from Contacts.
Press OK Key [Send] to send the message.
31
Page 32

3.2. Other Actions Related to
Messages
To reply a message
Open the mess age and press OK Key or select Options >
Reply to reply to the mess age sender. You can also select
Options > Forward to forward the message to someone else.
To view messages in different folders
Select Menu > Messaging and choose from the following folders:
• Inbox: Store all received messages.
• Drafts: Store message drafts.
• Outbox: Store messages that are being sent or failed to
be sent in the last attempt.
• Sent: Store sent messages.
To select messages and delete them
In each message folder, select Option s > Delete to delete
the select ed m essag e. To d elet e m ultip le messages,
select the messages and press Options > Mark/Unmark.
Then you can select Options > Delete to delete all the
marked messages.
32
Page 33

To use numbers in a message
Open a message and select Options > Extract numbers to
extract al l pos s i bl e num be rs f rom t he m es s a ge . Y ou ca n
select a number and save it to contacts, or send a message
to or make a call to.
To manage message templates
Go to Menu > Messaging > Templ ates. There are 10
preloaded text templates that you can insert to your messages.
Press OK Key or s el ect Options > Insert to create a new
message with the sel ected templates. You can also select
Options > Create template to create your own templates.
You can edit or delete the templates you created.
To configure message settings
Go to Menu > Messaging > Settings to configure various
settings for SMS and MMS.
SMS settings
• SMS message center: Set SMS message center number.
You need the correct number to send and receive SMS
normally. Your service provider may have set the number
for you. Contact your service provider if you need more
information.
• Validity period: Set the time that the message center will
attempt to deliver the message until it is received.
33
Page 34

• Delivery report: Turn on/off delivery report that informs
you if the message is delivered to the recipient.
• Save to location: Select the location to save your SMS.
• Save sent SMS: Select whether you want to save the sent
SMS.
MMS settings
• MMS accounts: Select your MMS accounts. You can also
edit these accounts by pressing Left Soft Key. Detailed
settings include Account name, MMS centre, WAP
gateway and Network Access Point. Co ntac t your
service provider if you need more information.
• MMS options: Set Validity period, Delivery report, Save
sent MMS and MMS l imit.
• Retrieval method: Choose to retrieve MMS immediately
or later.
To receive cell broadcast messages
Go to Menu > Messaging > Cell info.
• Select Subject to add the topic that you are interested in.
You can also edit or delete existing topics.
• Select Language to choose the language of the broadcast
messages that you want to receive.
• Select Service status to turn on/off the service.
34
Page 35

3.3. Voice Mail
When callers cannot reach you, they can leave voice mail
messages. This function requires network support. Please
contact your service provider for more information.
Before using the voice mail function, select Menu > Messaging
> Voice mail > Voice mail number and enter your voice
mail number obtained from your service provider.
To get voice mail, select M en u > Messagin g > Voice mail >
Get voice mail or hold
in idle screen.
35
Page 36

4. Email
The Email f unct ion al lo ws you to s et up busin ess Em ail
accounts and other personal Email accounts.
4.1. Configuring Email Account
If you want to send/receive Emails through remote servers,
you have to set up a POP3/IMAP4 Email account first. You
can set up five Email accounts on your phone.
1. In idle screen, select Menu > Email to start Email wizard.
If there is an Email account already, select a new account,
Account name, and press OK Key to open Email wizard.
2. Select your Email service provider.
3. Enter your Email address and password.
4. Press OK Key. If you have selected Gmail, the phone will
try to log in automatically. If you have selected Other email
accounts, you need to enter more user information. Select
OK and enter User nam e , Incoming server address
and Outgoing server address before the phone tries to
log in.
5. Go back to the account list and select the account you
have created.
6. Press Left Soft Key and select Edit for more options. You
can change the account n a me, enable periodic Email auto
download, select network access point, change receive
options, set signature, etc.
36
Page 37

4.2. Creating a New Email
Go to Menu > Em ai l . Choose an Email account and then
select Create email.
Initially, the To field is highlighted. Press OK Key to add Email
recipients from Contacts or enter recipients’ addresses
directly. Press OK Key [Done] to return to the Email composing
interface.
Press Navigation K e y Down to highlight the Subject field.
Press OK Key to enter the Email subject. Press OK Key to
save the subject.
Press Navigation Key Down to highlight the Message field.
Press OK Key to edit the Email text. Press OK Key to save
the text.
If necessary, press Left Soft Key [Options] to add attachments
or cc/bcc recipients. You can also select Mailbox in use to
choose the Email account that sends the Email.
Notes: To, Cc and Bcc fields can each hold 10 recipients.
When you are done with editing the Email, select Options >
Save to drafts to save the Email or Options > Send to send
the Email.
37
Page 38

4.3. Checking and Replying to
Emails
To receive and read incoming Emails
For POP3 Email accounts, go to Inbox of your Email account
and select Receive to start receiving Emails from the remote
server.
For IMAP 4 Em ai l ac c ou nts , g o to IM AP mailbox of your
Email account and open the inbox folder. Press Sync to start
receiving Emails.
By default, only the Email headers are downloaded. To read
the whole Email, select Options > Retrieve.
To reply to or forward an Email
Open the Email and s elec t Reply. You can a lso s elect
Options > Reply > Reply message to reply with an MMS, or
select Options > Reply > R ep ly all to reply to the sender
and all the recipients.
1. Enter your response.
2. Send the Email or MMS as you do after you have created
a new Email or MMS.
38
Page 39

5. Personal Information
5.1. Contacts
Select Menu > Contacts. You can create a new contact with
a name and a phone number in the SIM card, or a contact with
more inf o rm ati o n on the phone. The phone can store 500
records. The capacity of the SIM card may vary.
Creating a Contact on Your Phone
Go to Menu > Contacts and select Add new contact. If the
curre nt contac ts on the screen are your SIM card contacts,
select Options > View phone contacts first.
Enter information for the new contact and then select
Options > Save.
Creating a Contact on SIM Card
Go to Menu > Contacts and select Add new contact. If the
current contacts on the screen are your phone contacts, select
Options > View SIM card contacts first.
Enter t he name and number for the contact. Then, select
Options > Save.
Viewing and Editing Contact Information
Select Options > View phone contacts/View SIM card contacts to switch between the contacts on your phone and
39
Page 40

your SIM card.
Highlight the cont act you need. Select View to vi e w the
information. Select an item and press OK Key to edit. Press
Options > Save to save the change.
Finding a Contact
To quickly locate the contact you need from the contact list,
enter the name of the contact directly. The phone will find the
closest mat ch . You can also search for a contact by selecting
Options > Advanced > Search.
More Options
Select a contact and pres s Left Soft Key for a series of options.
You can call the contact, send a message or an Email, delete
the contac t, or s et u p spee d dial . You ca n also s end t he
contact information to someone else, copy selected contacts
between phone and SIM card, back up or restore your phone
contacts, or check the memory status.
Select Settings for contact settings. See Section 6.2.
Select Advanced > Synchronize to synchronize your contacts
with a remote server. See Section 9.6.
Notes: You can only backup or restore all contacts when a
memory card is inserted. Your important personal information,
such as backup files for contacts and calendars, will be
stored in a folder automatically created on the memory card.
40
Page 41

Groups
In the contact list, press Navigation Key Right to open Groups.
There are four preloaded group s: Family, Friends, Colleagues
and Classmate. Six additional groups, Default 1 to Default
6, are available for you to customize.
Open a group and you can view the contacts in the group.
Press Left Soft Key to add a new contact to the group,
remove the selected contact from the group, call the contact
or send a message/Email, etc. Open a contact record, you
can view the details of the contact and edit them.
Notes: If there is no contact in the group, press Left Soft
Key to select contacts and add them to the group.
In the group list, press Left Soft Key to open options. You
can send a message to all members in the group, rename the
group, set a ringtone for all calls from contacts in the group,
or remove all members from the group.
5.2. Calendar
Select Menu > Organizer & Tools > Calendar. You can use
the calendar to arrange and remind you of your schedule.
Notes: On a date for which you have arranged schedule, a
red triangle is displayed on the lower right corner of the date
on the calendar.
41
Page 42

Adding New Schedules
First, select the date for the new schedule from the calendar.
Select Options > New > Appointment/Birthday reminder/Task
and enter information about the new schedule. When you are
done, press OK.
Viewing and Editing Schedules
You can view your schedule in four different modes: Day view,
Week view and Task view. Press Options > View mode to
choose the view.
To edit a schedule, select the date and then the schedule,
and press OK Key.
Sending Schedules
Select a s c h edu l e or mark m ult ipl e s c h e dul es an d p res s
Options > Send. You can send your schedules as SMS,
MMS, Email or via Bluetooth.
Configure Calendar Options
Select Options > Settings to open the calendar settings.
You can change the save l ocat i on, default view mode and
first day of week.
42
Page 43

5.3. Voice Recorder
Select Menu > Music > Voice recorder to record voice notes.
Adding a Record
Press OK Key to start recording. Press OK Key to pause and
continue.
To stop recording and save the note, press Left Soft Key. To
stop recording without saving, press Right Soft Key and
select No.
Playing a Record
When the record is saved, press OK Key to play it, pause or
continue.
Options
Before recording voice notes, pres s Left Soft Key to open
the voice recorder options. You can start the recording, set
time limit, change save location or open the music library.
After a voice note is recorded, you can select Options to send
the note, set it as ringtone or delete it.
43
Page 44

6. Settings
Function
Description
Menu Selection
Date and
Set device time, date,
Menu > Settings >
Profiles
Select the profile for
environment.
Menu > Settings >
Profiles
Phone
Set language for the
Menu > Settings >
Phone language
Input
Set the language for
mode.
Menu > Settings >
Sound
Edit the current
Menu > Settings >
Keypad
Set keypad lock
Menu > Settings >
6.1. General Settings
time
language
language
format and time zone.
your current
phone interface.
input text. This will
influence the
dictionary used for
word predictive text
profile.
Phone settings >
Date and time
Phone settings >
Phone settings >
Phone settings >
Input language
Phone settings >
Sound
44
Page 45
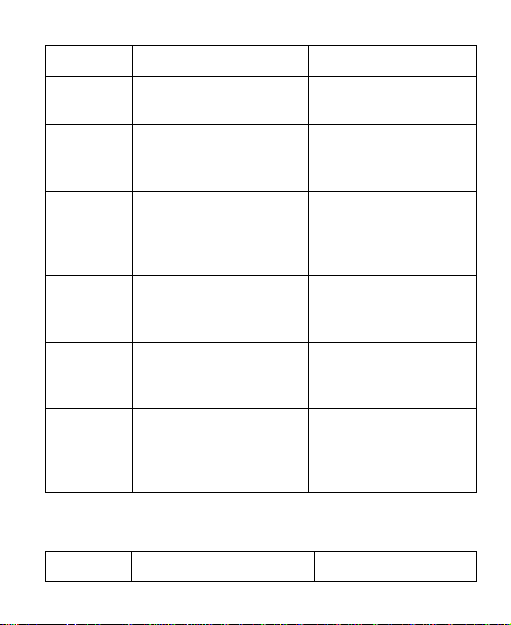
Function
Description
Menu Selection
lock
countdown or disable
automatic lock.
Phone settings >
Keypad lock period
Shortcuts
Set the functions for
the Navigation Keys
in idle screen.
Menu > Settings >
Shortcuts
Automatic
Enable/Disable
the time you set.
Menu > Settings >
Wallpaper
Select wallpaper for
Menu > Settings >
Wallpaper
Brightness
Adjust the brightness
Menu > Settings >
Backlight
Select the time
backlight.
Menu > Settings >
Function
Description
Menu Selection
Phone settings >
powering
on
time
automatic powering
on of your phone at
idle screen.
of the screen display.
countdown for the
screen and keypad
6.2. Function Settings
Phone settings >
Auto ON
Display settings >
Display settings >
Brightness
Display settings >
Backlight time
45
Page 46

Function
Description
Menu Selection
Message
settings
Settings for SMS and
3.2.
Menu > Settings >
Call
Use call forwarding by
services.
Menu > Settings >
Call
Restrict incoming or
Menu > Settings >
barring
Call
Enable/Disable call
Menu > Settings >
waiting
Auto
Enable/Disable auto
Menu > Settings >
Answer
Answer by pressing
Right Soft Key.
Menu > Settings >
Auto
answer
Enable/Disable auto
answer.
Menu > Settings >
Call settings > Auto
MMS. See Section
Message settings
forwarding
specifying forwarding
conditions and
barring
waiting
redial
mode
outgoing calls.
waiting notifications.
redial.
Send Key or any key
other than End Key,
Left Soft Key, and
Call settings > Call
forwarding
Call settings > Call
Call settings > Call
Call settings > Auto
redial
Call settings >
Answer mode
46
Page 47

Function
Description
Menu Selection
answer
Caller ID
Choose to display or
hide your number to
the party you call.
Menu > Settings >
Caller ID
My
Save your name and
SIM card.
Menu > Settings >
number
Default
list
Only default contact
you open Contacts.
Menu > Settings >
Default contact list
Default
Choose the default
Menu > Settings >
Sort
Sort the contact list by
name.
Menu > Settings >
Sort mode
Bluetooth
Use Bluetooth to
See Section 8.3.
Menu > Settings >
Call settings >
number
contact
save
location
contacts
phone number to the
list is displayed when
save location for new
contacts.
first name or last
connect your phone
with other compatible
Bluetooth devices.
Notes:
Call settings > My
Contact settings >
Contact settings >
Default save
location
Contact settings >
Connectivity >
Bluetooth
47
Page 48

Some of the services may require network support. Consult
Function
Description
Menu Selection
Network
Manage network
Menu > Settings >
Network
Select network
information display.
Menu > Settings >
Reset
Reset all the
made in Settings.
Menu > Settings >
settings
Password
Turn on/off phone
Menu > Settings >
lock
and PIN2 code.
password
your service provider for more information.
Default save location and Default contact list settings are
related. The change of one setting will affect the other.
6.3. Management
access
point
setting
setting
settings
lock
Change
password
access point for
accessing wireless
mobile network.
automatically or
manually and turn
on/off cell
changes you have
lock or PIN lock.
Change phone
password, PIN code
48
Connectivity >
Network Access
Point
Network
Security > Reset
Security > Password
Menu > Settings >
Security > Change
Page 49

Function
Description
Menu Selection
Fixed
dialer
Activate or
function.
Menu > Settings >
Fixed dialer number
Fixed
Enter the PIN2 code
Menu > Settings >
list
Delete
Delete all licenses
unusable.
Menu > Settings >
number
deactivate Fixed
dialer number
Security > Fixed
dialer number >
dialer
number list
licenses
to edit the list of
numbers that you
can dial.
on the phone.
All licen se-protected
Security > Fixed
dialer number >
Fixed dialer number
License setting >
Delete all licenses
contents will be
Notes:
You need to enter the phone password before carry out
the reset.
The default phone password is 0000. Please change it and
remember the new password. If you forget the password,
please contact your service provider.
If you turn on pas swor d lock, you must ent er t he
corresponding code (phone password or PIN code) each
time you turn on your phone.
49
Page 50

Warning: If you enter the PIN code incorrectly for three times,
the SIM car d wil l be l ocke d. Please cont act your service
provider to get the PIN Unblock (PUK) code to unlock the card.
50
Page 51

7. Experiencing Multimedia
7.1. Camera
Starting the Camera
In idle screen, select Menu > Camera or press Camera Key
to start the camera. You can capture still images and videos.
Capturing a Photo or Recording a Video Clip
The camer a is in phot o-capturing mo de when it is started. Press Navigation Key Right to switch to video recording. Aim the camera at the subject and then press OK Key or Camera Key to take the shot. To capture a video, press OK Key or Camera Key to start recording; press again to stop. During video recording process, you can pause/continue by pressing Left Soft Key.
Notes: The video recording will be stopped and saved when
reaching the preset maximum time. You can change it from
the video camera mode by selecting Options > Video
camera settings > Duration.
When you have captured a photo, you can press Left Soft
Key to send the photo, set it as Wallpaper or contact image,
delete it or go to your picture gallery.
When you have finished recording a video clip, you can press
Left Soft Key to play the record, delete it or send it. You can
also go to the video gallery.
51
Page 52

Configuring Your Camera
Before taking photos or recording videos, press Navigation
Key Up/Down to adjust brightness. Press Volume Keys to
zoom in or zoom out.
Press Left Soft Key to open more options, including:
• Switch to camera/video camera: Switch between photo
camera and video camera.
• Go to galler y: Go to the pic t ur e/video gallery on your
phone and your memory card.
• Capture mode: Select Single mode to take a single photo.
Select 2*2 or 3*3 to take 4 or 9 photos consecutively.
• Night mode on/off: You can turn on night mode when
taking photos in a low-light environment.
• Self-timer: Set countdown time. The camera starts to count
down when you press OK Key or Camera Ke y before
taking a photo.
• Camera/Video camera settings: You can set the size,
effects, white balance, shutter sound, image quality and
save location for the photos. For the videos, you can set
the duration limit, size, effects, audio, image quality, and
save location. You can also select Reset to return to default
settings.
52
Page 53

7.2. Music Player
Select Menu > M u sic > M u si c pl ayer in idle scr e en . The
supported audio file formats include mp3, mid, amr and wav.
Creating Playlists
To play music, you need to create playlists first. All playlists
are displayed in Music player menu. You can play, rename
or delete them.
Select Create new playlist to add a new playlist. You need
to enter the name of the new playlist. Press OK Key to save
the name, and then press Left Soft Key to add tracks to the
playlist.
Press OK Key to add the selected track to the playlist. You
can als o se l ec t Options > Mark/Unmark to mark multiple
tracks and then press OK Key to add them to the playlist.
Playing Music
Highlight a playlist and select Options > Pl ay, or open the
playlist and select Play. You can also select Recently played
to start playing the last playlist.
53
Page 54
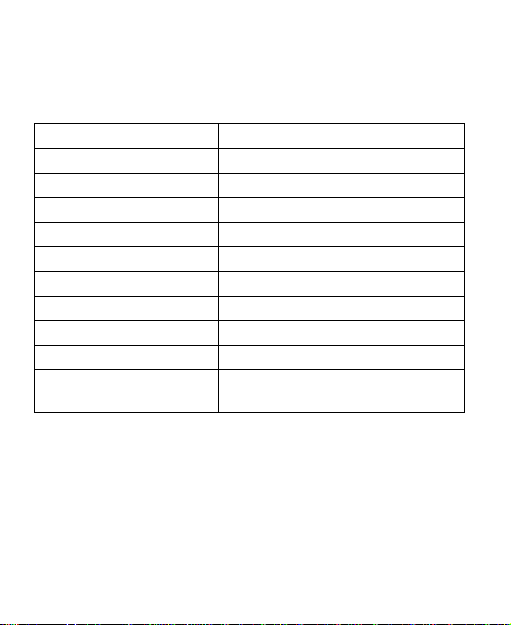
About the Controls
To
Press/Hold Key
Play or pause
Press OK Key
Stop
Press Navigation Key Down
Skip to the last track
Press Navigation Key Left
Rewind the current track
Hold Navigation Key Left
Skip to the next track
Press Navigation Key Right
Fast-forward the track
Hold Navigation Key Right
View the playlist
Press Navigation Key Up
Adjust speaker volume
Press Volume Keys
Minimize the player
Press Right Soft Key
Exit the player
Press Navigation Key Down,
then Right Soft Key
In the music player interface, control the player as instructed
below.
Tips:
When t h e pl ay er i s m i nimized, you ca n c a r ry out ot her
operations while the music continues in the background.
You can press OK Key in idle screen, or select Menu >
Music > Music player > Now playing to restore the
player.
54
Page 55
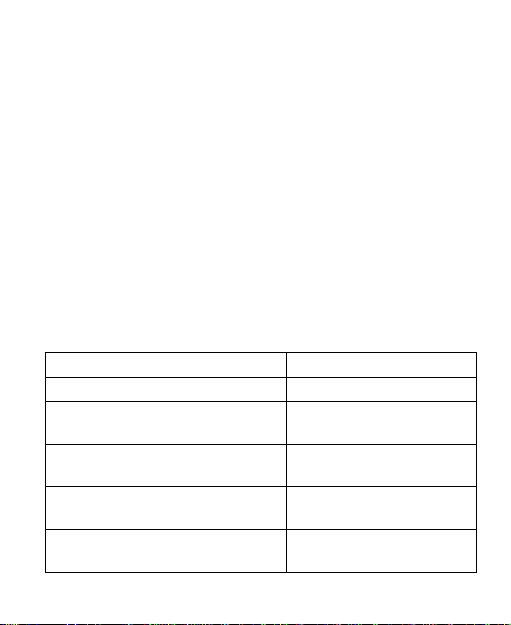
Press Left Soft Key to set repeating mode or equalizer.
To
Press/Hold Key
Play or pause
Press OK Key
Stop
Press Navigation Key
Down
the list
Navigation Key
Left
Rewind the current video
Hold Navigation Key
Left
Skip to the next video in the list
Press Navigation Key
Right
You can also mute/unmute the audio, view the file
information or exit the player.
7.3. Playing Videos
Your phone can playback videos in mp4 and 3gp format. To
play a video file, go to Menu > My Files > Videos or Menu >
My Files > Memory card and select a video file. Press OK
Key to play.
Notes: In the Videos folder, you can select Download
videos and press Left Soft Key to download video files on line.
About the Controls
When a vide o fil e is bein g play ed, c ontr ol t he player as
instructed below.
Skip to the previous video file in
Press
55
Page 56
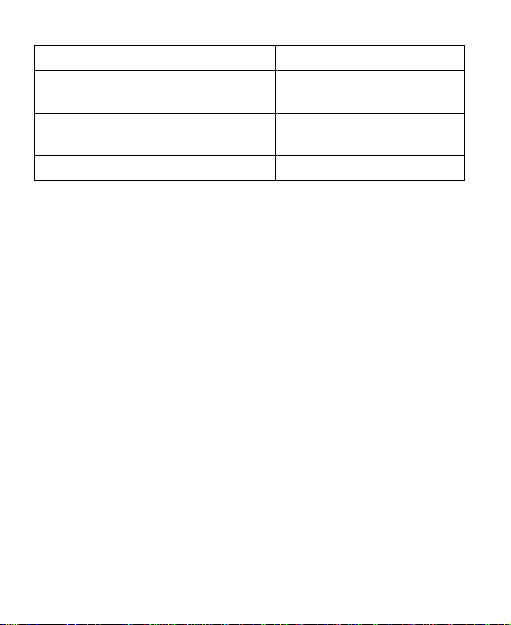
To
Press/Hold Key
Fast-forward the video Hold
Navigation Key
Right
Watch in full screen
Press Navigation Key
Up
Exit the player
Press Right Soft Key
About Licenses and Protected Files
Some media files (pictures, audio and video files) have associated
licenses that protect them from being unlawfully distributed or
shared.
Your phone supports OMA DRM 1.0. The protec ted f iles
have .dcf extension name. You can download and play/view
this type of media files, but you may not be able to copy, modify
or transfer them.
7.4. FM radio
With the radio, you can search for radio channels, listen to
them, and save them on your phone. Note that the quality of
the radio broadcast depends on the coverage of the radio
station in that particular area. The wired headset works as an
antenna, so always connect the headset when using the radio.
When you receive an incoming call while listening to the radio,
the radio will be turned off.
You can scan for channels automatically or tune them manually.
56
Page 57

The channels can also be set by inputting valid frequencies.
To adjust the volume, press Volume K eys or Navigation
Key Up/Down.
The channels can be stored in a channels list. Open the list
to view the information of the saved channels.
57
Page 58

8. Getting Connected
8.1. Connecting to the Internet
Network Access Point
You need network access point to connect to the Internet or
to send and receive MMS. If the setting is not preset on your
phone, obtain th e Access point nam e from your servic e
provider. Also, c heck with the pr ovid er if a us er nam e and
password are required.
To set up a new Network Access Point
Select Menu > Settings > Connectivity > Network Access
Point. You can press OK Key to view existing settings. Press
Left Soft Key and select Access point name to enter the
access point name obtained from your service provider.
Select other items and enter the appropriate information in
these areas, if required. Press Save to save the new setting.
8.2. Internet Browser
Your phone is preinstalled with Opera MiniTM Internet browser.
In idle screen, select Menu > Applications > Opera Mini to
launch the browser. You can also press Browser Key or select
Menu > Internet in idle screen to launch the browser.
To exit the browser, select Left Soft Key [Menu] > Exit.
58
Page 59

Internet Settings
To access the Internet with the browser, you need to set the
Internet settings for the application first.
Go to Menu > Application and highlight Opera Mini. Then
select Options > Internet settings and choose the profile you
need. You can press Options to activate/rename the profile,
or edit it by setting up gateway and network access point.
Start Page
After launching the Opera MiniTM Internet browser, you are in
the start page.
Use Navigation Keys to scroll the start page. You can enter
new address that you want to visit, search for information with
Google, go to RSS feeds, etc.
When browsing web pages, press Left Soft Key [Menu] and
select Start Page to return to the start page.
Opening Web Pages
In the browser, you can open web pages in the following ways :
• Select Menu > Bookmarks. Choose a book m ark and
open the web site.
• Select Menu > Enter Address. Enter the web address
directly, and press Menu > Go to.
• Select Menu > Tools > History. Then select a web site
you have visited.
59
Page 60

• If you are in the start page, select www. field and press
OK Key to enter the web address.
Browsing Options
While browsing the web, press Menu. The following options
are available.
• Enter Address: Enter web address and visit the web site
directly.
• Start Page: Go to the start page.
• Bookmarks: Open bookmarks. You can manage your
bookmarks or open the bookmarked web sites.
• Tools: Various selections are available. You can check
your browsing history, set up the browser or look for help
information. You can also go to the previous or next web
page, view web page information, bookmark the current
page, reload the current page, search for text in the page,
and save the web page.
• Exit: Exit the Internet browser application.
8.3. Bluetooth
Bluetooth is a short-range wireless communications technology.
When paired, devices with Bluetooth capabilities can exchange
information within a distance of about 10 meters without any
physical connection.
60
Page 61

Setting up Bluetooth on Your Phone
Go to Menu > Settings > Connectivity > Bluetooth to set
up Bluetooth. You can switch on or off the Bluetooth function,
change phone visibility, set up device name or check Bluetooth
properties of your phone.
Pairing a Bluetooth Device
To pair another Bluetooth device, you need to turn the Bluetooth
functio n of bot h de vic es on an d mak e the ot her B lue toot h
device visible.
In the Bluetooth menu, select My devices > Search for devices
and wait for the phone to search for other Bluetooth-enabled
devices.
When the search is over, select one device from the displayed
list and pr ess O K Ke y. Enter the B luet oot h pas s code as
prompted and press Left Soft Key.
After the other device verifies the pass code, the devices will
be paired successfully. The paired device will be added to
the My devices list.
Select Yes to set the device as a trusted device, or No as a n
untrusted device.
You can press Left Soft Key to rename the device, delete the
device, view device information or set the device as trusted
or untrusted.
61
Page 62

9. More Applications
9.1. My Files
In idle screen, select Menu > My Files to manage files on your
phone and your memory card. Select Pictures, Ringtones,
Music, Videos or Others to manage each type of files. Select
Memory card to manage files on your memory card. You
can also select Memory status to view used, availabl e and
total space on your phone and your memory card.
Caution: In Memory card, selecting Options > Advanced >
Format will delete all files and folders on the card.
9.2. Alarms
Select Menu > Organizer & Tools > Alarms to set up alarms.
You can set 6 alarms. The alarms can be one-time alarms or
repeating ones.
To set an ala rm , select an alarm and press OK Key. When
finished editing, press Left Soft Key to enable the alarm. You
can press Left Soft Key again to disable or enable the
selected alarm.
9.3. Calculator
Select Menu > Organizer & Tools > Calculator for simple
calculation.
62
Page 63

Press digit keys 0~9 to input numbers. As displayed on the
screen, press
square root, Navigation Keys to input +, –, ×, ÷, and OK Key
to carry out the calculation.
Press Left Soft Key to clear, and Right Soft Key to exit the
calculator.
Notes: This calculator has limited accuracy. Rounding errors
may occur especially in long division.
to enter decimal point, to calculate
9.4. Currency Converter
Select Menu > Organizer & Tools > Currency converter to
convert between different currencies.
Select Input field and enter the amount of one currency, and
Rate field to enter the exchange rate from input currency to
output currency. Use
output currency will be displayed as you enter the exchange rate.
for decimal point. The amount of
9.5. World Time
This function displays local time and date of major cities in
the world. You need to set the date and time on the phone in
order to use this function correctly. Select Menu > Organizer
& Tools > World time.
Press Navigation Key Left/Right to change the city. If you
want to set the date and time of the current city as your local
63
Page 64

date and time, press OK Key.
Select Options > DST to turn on/off daylight saving time.
9.6. Synchronize
This function allows you to synchronize your contacts with a
remote s er v er. Please co nt ac t your service provider if you
need more information on this service.
Select Menu > Organizer & Tools > Synchronize. Choose
a server and press OK Key to start synchronization.
Select a server and press Left Soft Key to edit the settings for the
selected server, create a new synchronizing server, delete/rename
the server, or view synchronization log and help information.
9.7. Torch
Select Menu > Organizer & Tools > Torch to turn on/off the
torch (See Section 1.2). You can hold
do so as well.
in idle screen to
9.8. Games and Applications
Select Menu > Games or Menu > Applications to access
the Java games and applications you have installed. Choose
one game/application and press OK Key to launch it. You can
also choose Download games or Downlo ad appli cations
and press OK Key to download from the Internet.
64
Page 65

• To download new ga mes or applications from a w ebsite with .html
end, enter the web address and select Options > Go to.
• Select Options > Save to save the web address you have
entered.
65
Page 66

Legal Information
Copyright © 2009 ZTE CORPORATION
All Rights Reserved
Your mobile phone is made by ZT E C OR PORAT ION .
No part of this manual may be reproduced or transmitted in any
form or by any means without prior written consent of ZTE
CORPORATION.
Trademarks
ZTE and the ZTE logos are trademarks of ZTE CORPORATION.
Notice
The inform at io n in th is man u al is subj ect to c han ge with ou t
notice. Every effort has been made in the preparation of this
manual to ensure accurac y of t he c ont ents , but all s tat ement s,
informatio n, an d r ecommendations in th is manual do not
constitute a warranty of any kind, expressed or implied. Please
read the safety precautions carefully to ensure the correct and safe
use of your mobile phone. For detailed information, refer to the
section “Safety Precautions”.
ZTE CORPORATION Address:
ZTE Plaza, Keji Road South, Hi-tech Industrial Park, Nanshan
District, Shenzhen, P. R. China
Postal Code: 518057
Website: http://www.zte.com.cn
66
Page 67

Release: V1.0.0
67
 Loading...