

Page 1

V2.73
Copyright © 2006 by ZTE Corporation
All rights reserved.
No part of this publication may be excerpted, reproduced, translated or
utilized in any form or by any means, electronic or mechanical, including
photocopying and microfilm, without the prior written permission of ZTE
Corporation.
ZTE Corporation reserves the right to make modifications on print errors or
update specifications in this manual without prior notice.
1
Page 2

Table of Contents
1 Before Use.............................................................................9
1.1 Introduction ...........................................................................................9
1.2 Safety Instructions.................................................................................9
1.3 Safety Warnings and Precautions.......................................................10
1.4 Parts Definition ....................................................................................15
1.5 Battery .................................................................................................17
1.5.1 Install the Battery ..................................................................17
1.5.2 Remove the Battery...............................................................18
1.5.3 Charge the Battery................................................................19
1.6 Insert and Remove R-UIM Card ..........................................................20
1.7 Power on / off .......................................................................................21
1.7.1 Power on ...............................................................................21
1.7.2 Power off ...............................................................................22
1.8 Text Input .............................................................................................22
1.9 Interface Introduction ..........................................................................24
2 Make and Receive PTT Calls.................................................25
2.1 Make Private Calls...............................................................................25
2.1.1 Direct Dial..............................................................................26
2.1.2 Dial from Book ......................................................................26
2.1.3 Dial from Call History ............................................................26
2.2 Make Group Calls................................................................................27
2.2.1 Direct Dial..............................................................................27
2.2.2 Dial from Book ......................................................................28
2.2.3 Dial from Call History ............................................................28
2
Page 3

2.3 Receive PTT Calls ...............................................................................29
2.4 End PTT Calls......................................................................................29
2.4.1 Exit from a Group Call...........................................................29
2.4.2 End a Group Call ..................................................................29
2.4.3 End a Private Call..................................................................30
2.5 PTT Emergency Calls..........................................................................30
2.6 Functions during PTT Calls.................................................................30
2.6.1 Group Members Status Query..............................................30
2.6.2 Group Members Management .............................................32
2.6.3 Upgrade Ordinary Calls to Emergency Calls .......................32
2.6.4 Downgrade Emergency Calls to Ordinary Calls...................32
2.6.5 Switch the Sound..................................................................32
3 Make and Receive Normal Calls...........................................33
3.1 Make Normal Calls ..............................................................................33
3.1.1 Direct Dial..............................................................................33
3.1.2 Dial from Book ......................................................................33
3.1.3 Dial from Call History ............................................................34
3.2 Receive Normal Calls ..........................................................................34
3.3 End Normal Calls ................................................................................34
3.4 Functions during Normal Calls ...........................................................34
3.4.1 Adjust the Volume.................................................................34
3.4.2 View the Book .......................................................................34
3.4.3 Set the Mute ..........................................................................35
3.4.4 Switch the Sound..................................................................35
3
Page 4

ZTE G650/G651/G420/G120 GoTa Digital Trunking Phone User Manual
4 Book ....................................................................................36
4.1 Personal Book .....................................................................................36
4.1.1 Add........................................................................................37
4.1.2 Search ...................................................................................38
4.1.3 View.......................................................................................39
4.1.4 Edit ........................................................................................39
4.1.5 Delete ....................................................................................39
4.1.6 Set Ringtone .........................................................................40
4.1.7 Rename.................................................................................40
4.1.8 Move......................................................................................40
4.1.9 Check Space.........................................................................42
4.1.10 Delete All .............................................................................42
4.2 Group’s Book ......................................................................................42
4.2.1 Enter Group’s Book ..............................................................43
4.2.2 Add........................................................................................43
4.2.3 View.......................................................................................43
4.2.4 Delete ....................................................................................43
4.2.5 Delete All ...............................................................................44
4.2.6 View System Book ................................................................44
4.2.7 Check Space.........................................................................44
5 PTT Functions.......................................................................45
5.1 Speed Dial No. ....................................................................................45
5.2 Call Attribute ........................................................................................46
4
Page 5

5.3 No-Disturbing ......................................................................................46
5.4 PTT Call Forwarding............................................................................47
5.5 Group Member Status Query..............................................................47
5.6 Missed PTT Call ..................................................................................48
5.7 Duty Number .......................................................................................48
5.8 PTT Call Number Identity Restriction..................................................49
5.9 Call Alert Busy .....................................................................................49
5.10 Dynamic Management ......................................................................50
5.10.1 Add / Delete .........................................................................50
5.10.2 Set Priority...........................................................................50
5.10.3 Set Talk Time.......................................................................51
5.11 Emergency.............................................................................51
6 SMS ...................................................................................52
6.1 Compose.............................................................................................52
6.1.1 Send out................................................................................52
6.1.2 Save as Draft.........................................................................53
6.2 Inbox....................................................................................................53
6.2.1 View.......................................................................................53
6.2.2 Save Number ........................................................................54
6.2.3 Receive New Message..........................................................54
6.3 Outbox.................................................................................................54
6.4 Drafts ...................................................................................................55
6.5 Settings................................................................................................55
5
Page 6

ZTE G650/G651/G420/G120 GoTa Digital Trunking Phone User Manual
7 Call History ..........................................................................56
7.1 Call Icons.............................................................................................56
7.2 View .....................................................................................................56
7.3 Delete ..................................................................................................57
7.4 Delete All .............................................................................................57
7.5 Save Number.......................................................................................58
7.6 Make Normal Calls ..............................................................................58
7.7 Make PTT Calls ...................................................................................58
7.8 Send Message ....................................................................................58
8 Profiles ................................................................................59
8.1 Activate ................................................................................................59
8.2 View .....................................................................................................59
8.3 Smart Ring...........................................................................................60
9 Assistant ............................................................................. 62
9.1 Calculator ............................................................................................62
9.2 Alarm Clock .........................................................................................62
9.2.1 Add........................................................................................62
9.2.2 View / Edit...............................................................................63
9.2.3 Delete ....................................................................................63
9.2.4 Turn off Alarm Ring ...............................................................63
9.2.5 Set Alarm Ring ......................................................................64
9.3 Calendar ..............................................................................................64
9.3.1 View Day ...............................................................................64
6
Page 7

9.3.2 Add Event..............................................................................64
9.3.3 Goto ......................................................................................64
9.3.4 Delete ....................................................................................65
9.4 World Time ..........................................................................................65
9.4.1 Check Cities ..........................................................................65
9.5 Stopwatch............................................................................................65
9.5.1 General Time Counting.........................................................65
9.5.2 Record Multiple Time Records in the Counting ...................66
10 Settings..............................................................................67
10.1 Enter Settings....................................................................................67
10.2 Phone ................................................................................................67
10.3 Call.....................................................................................................69
10.4 Security..............................................................................................70
10.5 Default Reset .....................................................................................72
11 Appendix............................................................................73
11.1 Shortcut .............................................................................................73
11.1.1 Speed Dial...........................................................................73
11.1.2 Quick Entry Function ..........................................................73
11.1.3 Quick Return to Idle Mode..................................................73
11.1.4 Delete the Current Input......................................................73
11.1.5 Quick Set Profiles................................................................74
11.1.6 Quick Entry into Menu ........................................................74
11.1.7 Quick Entry or Exit Electricity Save Mode during Calls......74
7
Page 8

ZTE G650/G651/G420/G120 GoTa Digital Trunking Phone User Manual
11.1.8 Quick Change Call Attribute in Idle Mode ..........................74
11.1.9 Quick Search by First Letter of the Names in Book ...........74
11.2 Lock the Keypad ...............................................................................74
11.3 Earphone...........................................................................................75
11.3.1 PTT Operations with Earphone ..........................................75
11.3.2 Receive or End Normal Calls with Earphone .....................75
11.4 Troubleshooting ................................................................................76
8
Page 9
Before Use 1
1.1 Introduction
Thank you for choosing ZTE G650 / G651 / G420 / G120 GoTa Digital Trunking
Phone. Based on CDMA2000-1x technology, the mobile phone provides
normal functions as well as PTT (
The Mobile phone provides the following functions:
Group Calls
Private Calls
Normal Calls
SMS
Book
Data
Communication
Push – to - Talk
Provide one-to-many voice group call service
in CDMA network service area with PTT
functions;
Provide one-to-one voice call service in CDMA
network service area with PTT functions;
Provide traditional voice communication service
based on CDMA network;
Receive, send and edit short messages;
Store up to 300 entries of contacts and 70
groups of PTT group numbers;
Provide data services based on CDMA2000 -1X
technology;
1.2 Safety Instructions
If your mobile phone is lost or stolen, notify your network service provider
immediately to prevent unauthorized use. Meanwhile you need to provide
the service provider with your phone’s ESN, which can be found on the
back of the mobile phone after the battery is removed. Keep the ESN
properly for future use.
) function.
9
Page 10

ZTE G650/G651/G420/G120 GoTa Digital Trunking Phone User Manual
To protect your mobile phone against abuse, take the following precautions:
- Set a PIN code (
modify it from time to time.
- Don’t leave your phone on the seat or other visible places when you
are away from your car. Carry the phone or lock it in the trunk.
- Set call restriction.
if your mobile phone supports R-UIM card
) and
1.3 Safety Warnings and Precautions
Precautions for using the phone
Do not use your mobile phone near TV set, radio or office automated
equipments to avoid mutual interference.
Power off your mobile phone as required when you are on airplane
or in hospital. As mobile phones may affect the normal operation of
electronic devices or medical apparatus, you are required to follow
the mobile phone usage regulations in the above cases.
Do not use your mobile phone in the place where there is weak
signal or near the high-precision electronic devices. Radio wave
interference may cause malfunction or other problems to electronic
devices, especially medical devices such as audiphone and pacemaker,
fire detector and auto-control equipments such as auto-door. For
details on the influence that your mobile phone would probably have
upon pacemaker or other medical devices, consult the manufacturer
or the local distributor.
10
Page 11

Do not use your mobile phone in gas station. Power off your mobile
phone near fuels or chemicals.
Occasionally, using phone in the vehicles of certain models might
bring negative effect to the internal electronic devices. In this case,
do not use your mobile phone to ensure safety.
Keep your mobile phone away from magnetic objects such as
magcards because radio wave of your mobile phone may erase the
information stored in floppy disks, deposit cards or credit cards.
Protect your mobile phone against dampness. Water or other kinds
of liquid entered your mobile phone might cause overheating, creepage
or failure.
Do not disassemble or reassemble your mobile phone because this
might cause damage, creepage or circuit failure.
Do not use your mobile phone if your antenna is damaged. It may
cause body injury.
Do not user your mobile phone while driving, and follow the local
corresponding rules and regulations.
Keep the phone out of the reach of children. The phone may cause
body injury if used as a toy.
Do not press keys with needles, pen points or other sharp objects to
avoid damage or misoperation.
Keep tiny metal objects such as thumb pins away from the phone.
The phone speaker is magnetic and thus magnetizes those metal
objects, which may hurt people or damage the phone.
11
Page 12

ZTE G650/G651/G420/G120 GoTa Digital Trunking Phone User Manual
Use the original accessories or those authorized by ZTE. Using any
unauthenticat ed access ories may affect your mobile phone’s performance,
damage your phone or even cause danger to your body and violate
related national regulations about telecom terminals.
Precautions for using the battery
The battery life is limited, and becomes shorter and shorter if the
battery is charged frequently. If the battery fails to be charged several
times, it shows the battery is worn out and needs to be replaced.
Do not throw the battery into household garbage but dispose it as
required in specified place.
Do not throw the battery into fire. It might cause fire or explosion.
Do not press the battery with great force. It might cause battery leakage,
overheating, explosion or fire.
Do not disassemble or reassemble the battery. It might cause battery
leakage, overheating, explosion or fire.
Replace the battery that gets heated, changed in color or deformed
during use, charging or storage.
Prevent the battery against dampness, otherwise it might cause
overheating, smoldering or erosion.
Do not expose the battery in direct sunshine, around a car or near
any place where there is high temperature, but place it in ventilated
and cool places. Otherwise it might cause leakage or overheating.
This might affect the battery‘s performance and shorten its life.
Do not keep charging the battery continuously for more than 24 hours.
12
Page 13

Precautions for using the charger
Use the power voltage between 110VAC and 220VAC. Using the
voltage beyond the range may cause leakage, fire or damage to the
phone and charger.
Do not short-circuit the charger, otherwise it might cause electric
shock, smoldering or damage.
Do not charge in the places where there is direct sunshine, dampness,
dust or vibration, or near electric apparatus such as TV set, radio.
Do not use the charger with damaged power cables. It might cause
fire or electric shock.
Do not place water containers near the charger to avoid water
splashing. If water or any other kind of liquid splashes on the charger,
immediately remove the charger from the power socket to avoid
overheating, fire, leaking, electric shock or failure.
Do not disassemble or reassemble the charger. It might cause body
injury, electric shock, fire or damage.
Do not touch any charger, power cable or power socket with wet
hands to avoid electric shock.
Do not place heavy objects onto power cables or refit power cable. It
might cause electric shock or fire.
Remove power plug from the socket before cleaning and maintenance.
Clean the accumulated dusts from the power socket in time.
Hold the charger rather than pull the power cable while removing the plug
from the socket. Otherwise it might cause damage, electric shock or fire.
13
Page 14

ZTE G650/G651/G420/G120 GoTa Digital Trunking Phone User Manual
Cleaning and maintenance
Clean the phone, battery and charger with a soft dry cloth.
Do not clean the phone with the liquor such as alcohol, dilution agent
or benzene.
Clean the socket at intervals because a dusty socket might cause
disconnection, power failure, or even charging failure.
14
Page 15
1.4 Parts Definition
15
Page 16

ZTE G650/G651/G420/G120 GoTa Digital Trunking Phone User Manual
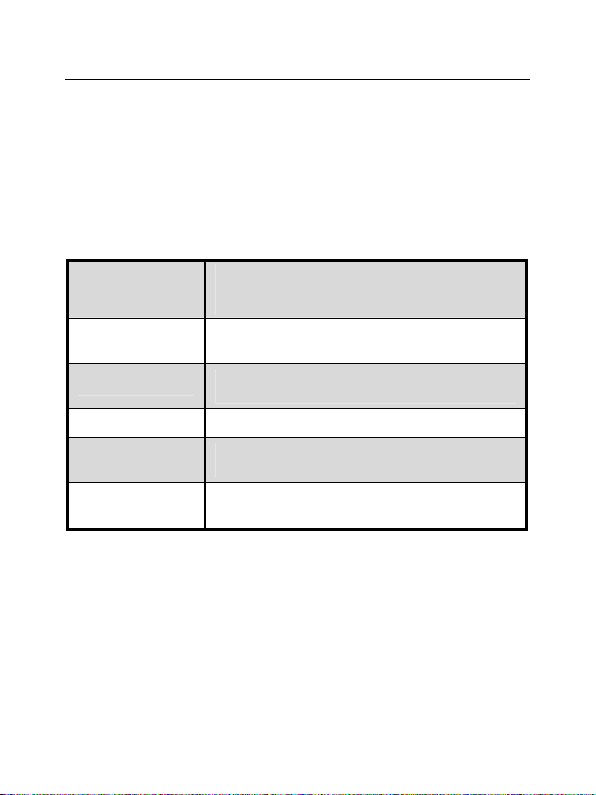
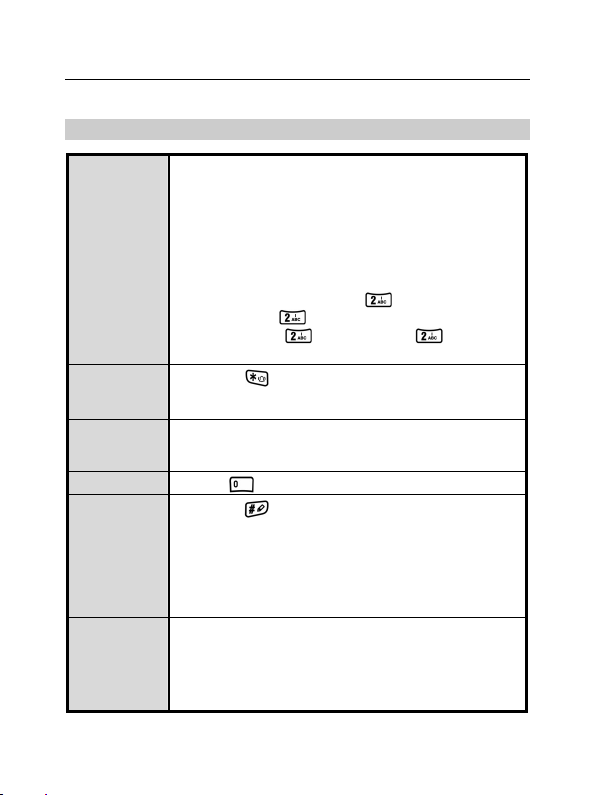
Key Definition
Name Description
PTT Key
Side Key
Left Soft Key
Right Soft Key
Navigation Key
Send Key
End Key Used to power on / off, or end a call.
0~9
Alphanumeric
keypad
Key
*
# Key
Used to make PTT calls, or as shortcut to view
PTT calls. During the conversation, hold PTT key
to speak, and release it to listen.
Used to adjust volume, or as shortcut to set call
attribute.
Correspond to the words at the bottom left corner
of the screen. Used to view menu or confirm.
Correspond to the words at the bottom right
corner of the screen. Used to return / exit, or as
shortcut of book.
Used to move up / down / left / right the highlight /
contents / cursor.
Used to dial or receive the numbers, or as shortcut
to view call history.
Used to input numbers or characters.
Used to input
profiles.
Used to input #, or as shortcut to switch between
input methods, or lock the keypad.
, or as shortcut to switch between
*
16
Page 17
1.5 Battery
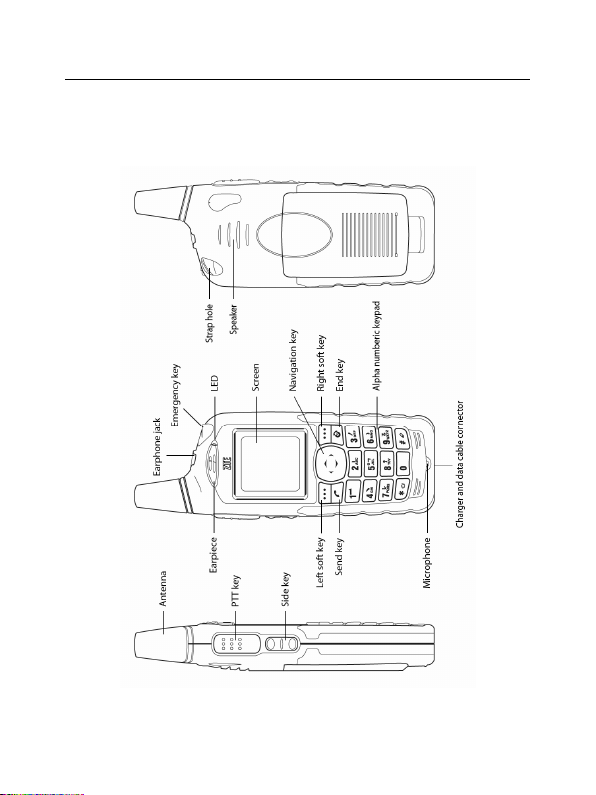
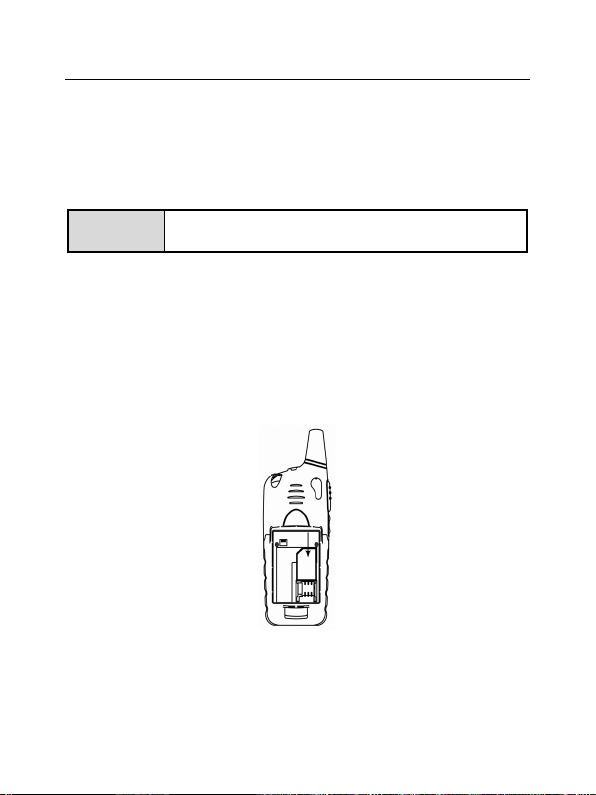
1.5.1 Install the Battery
1. Insert the battery into the slot of the phone, shown as below:
2. Push the back cover in the direction indicated by the arrow until you
hear the sound of “KA”.
17
Page 18
ZTE G650/G651/G420/G120 GoTa Digital Trunking Phone User Manual
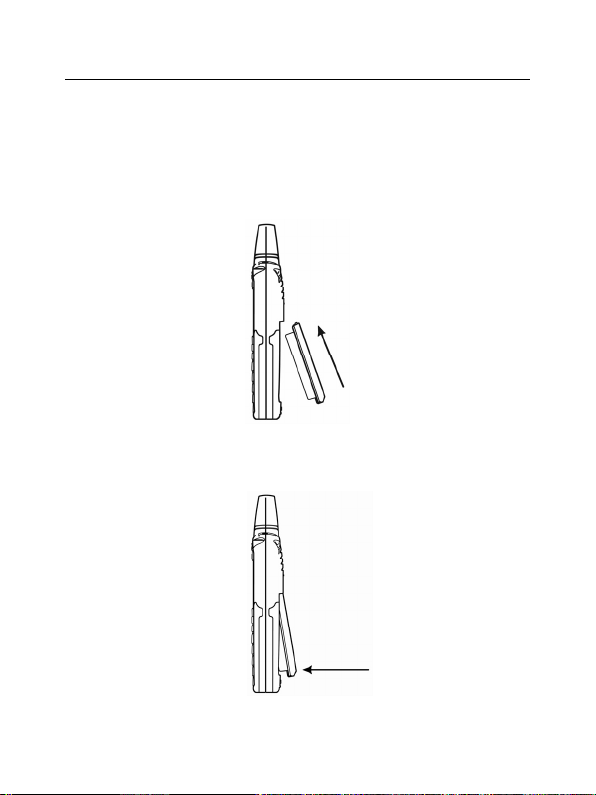
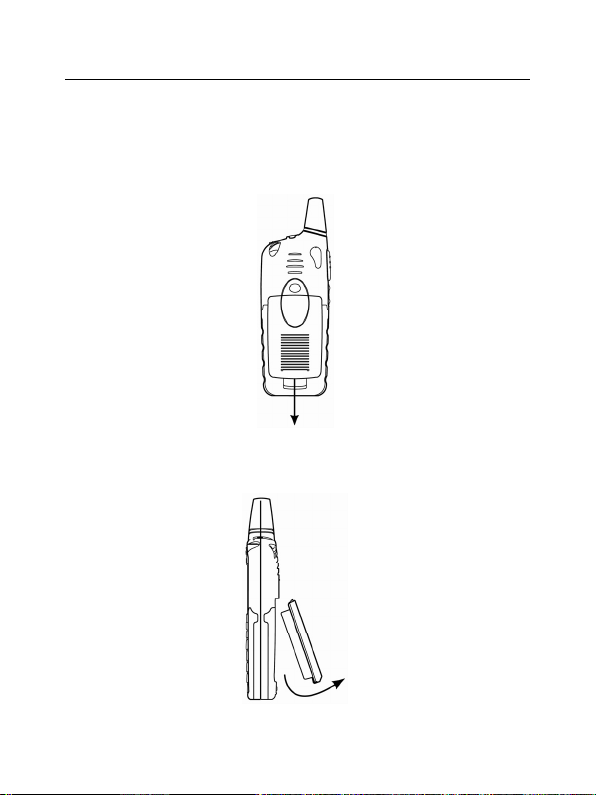
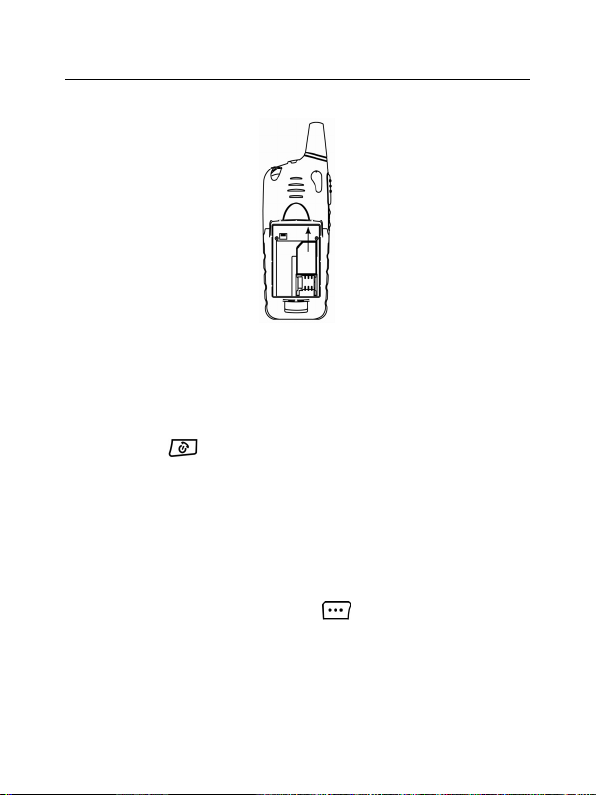
1.5.2 Remove the Battery
1. Push the separation button on the back of the phone in the direction
indicated by the arrow.
2. Pull the battery in the direction indicated by the arrow and take out the
battery.
18
Page 19
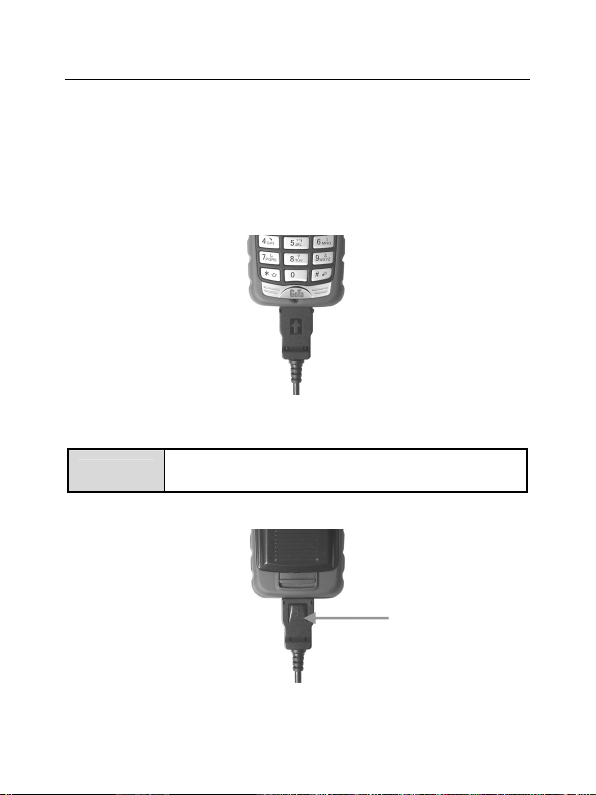
1.5.3 Charge the Battery
The new battery is not fully charged, so please fully charge it before use.
1. Insert the charger plug into the bottom of the phone (
Note
).
110V / 220V
Please press the button on the charger plug before
pulling it out.
power socket.
is upturned
2. Connect the charger to
the side with arrow
Button
19
Page 20
ZTE G650/G651/G420/G120 GoTa Digital Trunking Phone User Manual
1.6 Insert and Remove R-UIM Card
Consult your network service provider whether your phone needs R-UIM
card or not.
Note
If R-UIM card is required, then your network service provider will provide a
valid R-UIM to your mobile phone. At this point, R-UIM card is the key to
CDMA network. New R-UIM card is generally put into a piece of card, which
should be taken out carefully before installation. Follow the steps below:
1. Power off your phone to remove the charger and battery.
2. Insert R-UIM card into the socket, show as below:
3. Please power off your phone to remove the charger and battery before
taking out R-UIM card as shown in the figure below:
20
Skip this section if your phone does not need R-UIM
card.
Page 21
1.7 Power on / off
1.7.1 Power on
Press and hold until you see power-on animation on the screen.
If your phone supports R-UIM card and no R-UIM card is inserted, then
your phone will prompt with “No R-UIM card or card invalid!” At this point,
you need to power off your phone to reinsert a valid R-UIM card, and then
power on.
If your phone supports R-UIM card and the PIN code of R-UIM card is set,
your mobile phone requires inputting PIN code when powered on. Enter
correct PIN code, and press left soft key
If you set Lock Phone as Power- on in Security , the mobile phone will
prompt with “Password Verify” when powered on. Enter correct password
to unlock the phone.
to confirm.
21
Page 22
ZTE G650/G651/G420/G120 GoTa Digital Trunking Phone User Manual
The initial password is “0000”. The PIN code of R-UIM
card will be sent to you with R-UIM card together.
Note
If not, please consult your network service provider.
Generally, the default PIN code is “1234”, and it’s
recommended to change it as soon as possible.
1.7.2 Power off
Press and hold until you see power-off animation on the screen. The
screen becomes black after the phone is powered off.
1.8 Text Input
You could enter characters, numbers and symbols through standard
alphanumeric keypad.
To enter numbers, directly input digits;
To enter characters, press
To enter symbols, press
Icon descriptions for Input Methods
Icons Descriptions Icons Descriptions
abc
Abc
拼音
Lowercases
Intelligent English
Input Method
Pinyin Input Method
key to select the input method;
key;
ABC
123
笔画
Capital Letters
Numbers
Stroke Input Method
22
Page 23
Descriptions
1. Select “ABC”/ “abc” input method;
2. Each alphanumeric key corresponds to multiple
letters. Press the appropriate alphanumeric key
once to input the first letter that appears on the key,
Input
Capital
Letters
/Lowercases
Input
Symbols
Input
Numbers
Input Space Press to input
Pinyin Input
Method
Stroke Input
Method
twice for the second letter, and on the analogy of this.
Continuously Press: After you press a key, firstly a
black block appears at the cursor, and then an upright
line. “Continuously Press” means pressing the key
before the upright line appears.
e.g.: To enter letter “a”, press
letter “c”, press
letter “aa”, press
the upright line appears at the cursor.
1. Press
2. Press the appropriate alphanumeric key to input
the symbol that appears on the key.
Press the appropriate alphanumeric key to input,
or press the appropriate alphanumeric key to input
after selecting number input method;
1. Press
2. Press the appropriate alphanumeric key to input
Pinyin;
3. Use
4. Use
5. Press [OK] and the appropriate alphanumeric key
to input Chinese character.
1. Select Stroke Input Method;
2. Press the appropriate alphanumeric key to input
strokes;
3. Use
4. Press [OK] and the appropriate alphanumeric key
to input Chinese character.
key to input symbols;
key to select Pinyin Input Method;
key to select Pinyin;
key to view the characters;
▲▼
key to view the characters;
▲▼
key once; To enter
three times continuously; To enter
once, and press again after
23
Page 24
ZTE G650/G651/G420/G120 GoTa Digital Trunking Phone User Manual
g
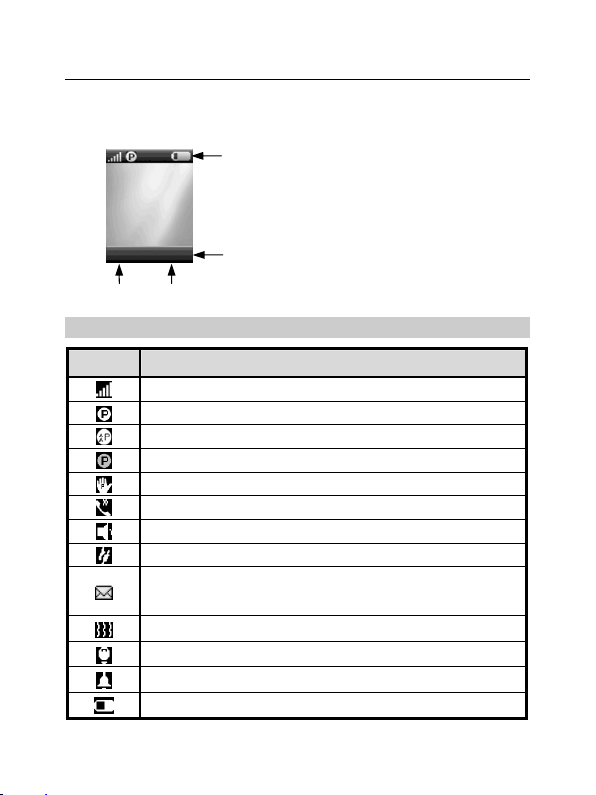
1.9 Interface Introduction
Left Soft Key Right Soft Key
ZTE
5月17
15:44
Menu Book
日[
Descriptions of Status Bar
Icons Descriptions
Network Signal Strength
GoTa Service is available; Ordinary PTT Call Status
GoTa Service is available; Pre-emptive PTT Call Status;
GoTa Service is unavailable
In PTT No-disturbing
Sound comes out from earpiece
Sound comes out from speaker
In Roaming
New Short Message
Flicker means that inbox is full, and un -useful short messages
should be deleted
Incoming Call Vibration Status
Incoming Call Flash Status
Alarm Clock is set
Battery Capacity
Status Bar: displays the status of mobile phone.
一]
Operation Bar: displays the operation instructions
See the following descriptions.
of “Left Soft Key” and “Ri
Key”.
ht Soft
24
Page 25

Make and Receive PTT Calls 2
Adopting the method of Push-to-Talk, PTT calls are different from normal
calls. PTT calls could be classified into
PTT Private Calls provide one-to-one voice call service in CDMA network
service area with PTT functions. Each PTT mobile phone has one unique
PTT number, namely PTT private number. Dialing this number in PTT mode
could make PTT private calls. You could save and view this number in
Personal Book
PTT Group Calls provide one-to-many voice group call service in CDMA
network service area with PTT functions. Each group has a unique group
number to differentiate with other groups. Dialing this number in PTT mode
could make PTT group calls. You could view this number in
According to call priority levels, PTT calls could be classified into Emergency
Calls, Pre-emptive Priority Calls and Ordinary Calls, among which Emergency
Calls have the highest priority, and Pre-emptive Priority Calls have higher
priority than Ordinary Calls. (
for the setting methods
.
)
Group Calls
Please refer to “Call Attribute” in section 5.2
2.1 Make Private Calls
You could make privates calls in any of the following three ways:
1. Direct dial;
2. Dial from book;
3. Dial from call history.
and
Private Calls
Group’s Book
.
.
25
Page 26

ZTE G650/G651/G420/G120 GoTa Digital Trunking Phone User Manual
2.1.1 Direct Dial
1. Enter the desired PTT private number in idle mode;
2. Hold PTT key
3. Release PTT key
at this point.
to start dialing, and talk after hearing a beep sound;
to release the floor. Listen to the other side to speak
2.1.2 Dial from Book
1. Press
Book
2. Press ▲/▼ key to select your desired contact;
3. Hold PTT key
4. Release PTT key
at this point.
in idle mode to access the phone book, and select
Book
;
to start dialing, and talk after hearing a beep sound;
to release the floor. Listen to the other side to speak
Note
If you can’t make a call after holding PTT key
then it means that there is no PTT private number
for your current contacts.
Personal
2.1.3 Dial from Call History
1. Press PTT key in idle mode to display PTT calls list; or press Menu and
26
Select
Call History
to enter;
,
Page 27

2. Press ▲/▼ key to select your desired private call record;
3. Hold PTT key
4. Release PTT key
at this point.
Note
to start dialing, and talk after hearing a beep sound;
to release the floor. Listen to the other side to speak
If you select [ PRESS ] as the status of [ Speed Dial No.]
in [PTT Functions],press PTT key
to directly dial PTT Speed Dial number, instead of
displaying PTT calls list.
in idle mode
2.2 Make Group Calls
You could make group calls in any of the following three ways:
1. Direct dial;
2. Dial from book;
3. Dial from call history.
2.2.1 Direct Dial
1. Enter “#” firstly, and then the desired group numbers in idle mode;
2. Hold PTT key
3. Release PTT key
to speak at this point.
and talk after hearing a beep sound;
to release the floor. Listen to the other members
27
Page 28

ZTE G650/G651/G420/G120 GoTa Digital Trunking Phone User Manual
2.2.2 Dial from Book
1. Press
2. Press ▲/▼ key to select
select
in idle mode, and select
Book
User Book / System Book
to enter; press ▲/▼ key to select the desired group;
Group’s Book
;
, and then press
3. Hold PTT key
4. Release PTT key
speak at this point.
and talk after hearing a beep sound;
to release the floor. Listen to the other members to
2.2.3 Dial from Call History
1. Press PTT key in idle mode to display PTT calls list;
2. Press ▲/▼ key to select your desired group call record;
3. Hold PTT key
4. Release PTT key
speak at this point.
Note
28
to start dialing, and talk after hearing a beep sound;
to release the floor. Listen to the other members to
If you select [PRESS] as the status of [Speed Dial No.]
in [PTT Functions], press PTT key
to directly dial PTT Speed Dial number, instead of
displaying PTT calls list.
in idle mode
Page 29

2.3 Receive PTT Calls
When receiving PTT calls, users will firstly hear a short beep sound, and
then listen to the other members to speak without any operation. After the
other members finish speaking, hold PTT key
and speak after hearing
beep sound. Release PTT key
listen to the other members to speak.
to release the floor, and at this point
2.4 End PTT Calls
2.4.1 Exit from a Group Call
During the conversation, you could exit from a group call, while others
continue the conversation.
Operation Method
Press Option and select
exit from PTT group call.
2.4.2 End a Group Call
During the conversation, all members in the group will exit from a group
call after it is ended.
Operation Method
Press Option and select
in PTT group call; or press key to
Exit Call
during the conversation;
End Call
29
Page 30

ZTE G650/G651/G420/G120 GoTa Digital Trunking Phone User Manual
Note
Only the group caller or group head has the authority
to end a group call.
2.4.3 End a Private Call
Press key to end a private call; or press Option and select
to end it during the conversation.
End Call
2.5 PTT Emergency Calls
With the highest priority, emergency calls could be made through the
emergency key. Select PTT Functions and then Emergency to set
emergency call numbers ( please refer to section 5.11 “Emergency” for details ).
2.6 Functions during PTT Calls
2.6.1 Group Members Status Query
Offline Members Status Query
During PTT calls, you could inquire the status of those uncalled members
( Offline Members ) in the group.
Operation Method
1. Press Option and then OfflMembStat to view the list of offline members;
2. Press
3. Press Back to return to the call interface.
key to turn pages;
▲/▼
30
Page 31

Group Members Status Query
During PTT calls, you could inquire the status of all members in the current group.
Operation Method
1. Press Option and then GrMembStat to view the number of both online
and offline members;
2. Select Detail and then Online Member / Offline Member to view the
detailed list of members;
3. Press Next to turn pages;
4. Press Back to return to the call interface.
Note
The icons in different colors in front of the member
names in the list represent different statuses.
Icons Descriptions
Power off
Away
Call Forwarding
No-disturbing
Out of service area
Call restricted
31
Page 32

ZTE G650/G651/G420/G120 GoTa Digital Trunking Phone User Manual
2.6.2 Group Members Management
During PTT calls, you could manage the members in the group.
Operation Method
Press Option and then Dyna Mgmt to perform corresponding operations
(
For details, please refer to section 5.10 “Dyna Mgmt”
)
2.6.3 Upgrade Ordinary Calls to Emergency Calls
During PTT calls, press Option and then Upgrade Call .
2.6.4 Downgrade Emergency Calls to Ordinary Calls
During PTT calls, press Option and then Downgrade Call .
2.6.5 Switch the Sound
During PTT calls, you could receive the call either from the speaker or from
the earpiece.
During PTT calls, press Option and select To Speaker or To Earpiece .
32
Page 33

Make and Receive Normal Calls 3
Normal calls indicate CDMA traditional voice phone calls you normally dial.
3.1 Make Normal Calls
You could make group calls in any of the following three ways:
1. Direct dial;
2. Dial from book;
3. Dial from call history.
3.1.1 Direct Dial
Enter the desired phone number in idle mode and press key to dial it.
3.1.2 Dial from Book
1. Press Book in idle mode, and select Personal Book ;
2. Press
3. If there are multiple numbers for this contact, press
between different numbers;
4. Press
key to select your desired contact;
▲/▼
to dial the number covered by the highlighted bar.
/
key to switch
Note
If the current number is PTT private number, pressing
key will not dial this number.
33
Page 34

ZTE G650/G651/G420/G120 GoTa Digital Trunking Phone User Manual
3.1.3 Dial from Call History
1. Press key in idle mode to display Normal calls list;
2. Press
3. Press
key to select your desired phone record;
▲/▼
to dial the number covered by the highlighted bar.
3.2 Receive Normal Calls
Press key to receive an incoming call, and press to end it;
3.3 End Normal Calls
When you are making a call or already in a conversation, press key to
to end it.
3.4 Functions during Normal Calls
3.4.1 Adjust the Volume
During calls, press Side key to adjust the volume of the earpiece.
3.4.2 View the Book
During calls, press Book to enter the menu. You could inquire, edit, or
delete phone numbers. For details, please refer to next chapter “Book”.
34
Page 35

3.4.3 Set the Mute
During calls, press Option and select Mute or Unmute .
If you select Mute , the word “Mute” will appear on the screen, and the
other side couldn’t hear your voice.
If you select Unmute , you will exit from Mute , and the other side could
hear your voice again.
3.4.4 Switch the Sound
During calls, you could receive the call either from the speaker or from the
earpiece.
During calls, press Option and select To Speaker or To Earpiece .
35
Page 36

4 Book
The book could be classified into: Personal Book , Group’s Book .
1. Personal Book: manages the name and phone number of the contacts;
2. Group’s Book: manages PTT group names and PTT group numbers.
4.1 Personal Book
The contacts in personal book could be saved either in phone or in R-UIM card.
There might be multiple phone numbers for each contact saved in phone,
such as PTT private number, home number, office number, mobile phone
number, other phone number. Among those phone numbers, “PTT private
number” is PTT number of the contact.
There is only one phone number for each contact saved in R-UIM card.
For easy search, you could classify your contacts into several groups:
Family , Friends , etc.
The contacts can be saved only in phone if your
Note
Icons in Personal Book
Icons Descriptions Icons Descriptions
phone doesn’t support R-UIM card. Please skip
the related contents.
PTT Private Number
Office Number
Other Phone Number
Home Number
Mobile Phone Number
Remarks
36
Page 37

4.1.1 Add
1. In idle mode, press Book to select Personal Book , and press Option
to select Add ;
2. Select location Phone or UIM and press Select to edit; (
doesn’t support R-UIM card, please skip this step
In phone
1. Press
Name: enter contact’s name;
key to scroll the highlight, and edit each highlighted item;
▲/▼
、 、 、 、 : enter the corresponding number.
:enter the remarks.
If your phone
).
Spd. Dial: Press
Office number, Mobile phone number or Other phone number ).
Location: Press
speed dialing
automatically set the storage location.
Group: Press
Schlmate, Other
When inputting contents, press
and press
1.8 “Text Input” for details on input methods.
key to input the symbols. Please refer to the previous section
key to select speed dial number ( Home number,
/
key to select storage location (
/
). If you do not select, then the phone will
key to select the group (
/
).
key to switch between input methods,
Number for
Family, VIP, Office, Friends,
37
Page 38

ZTE G650/G651/G420/G120 GoTa Digital Trunking Phone User Manual
2. Press Save to save the contents.
Note
Under the editing status, press [
the inputs on the screen one by one, and hold [
key to clear all the inputs on the screen.
] key to clear
Clear
Clear
]
In UIM
1. Press
the highlighted item;
Name: enter contact’s name.
: enter the number.
2. Press Save to save the contents.
key to scroll the highlight between Name and , and edit
▲/▼
4.1.2 Search
The phone provides three methods of searching for contacts: direct search,
search by name and search by group.
Direct search
1. Press Book and select Personal Book in idle mode;
2. All contacts in Personal Book will be listed; ress
for your desired contact.
Search by name
1. In idle mode, press Book to select Personal Book and then press
Option to select Srch by Name ;
▲/▼
key to search
38
Page 39

2. Enter the name and press Ok to search for all contacts meeting the
search conditions;
3. Press
key to select the contact you are searching for.
▲/▼
Search by group
1. In idle mode, press Book to select Personal Book and then press
Option to select Srch by Group ;
2. Press
select View to view all contacts in the group;
3. Press
key to select your desired group, and then press Option to
▲/▼
key to select the contact you are searching for.
▲/▼
4.1.3 View
1. Find the contact you want to view (
2. Press Option to select View to view the details of the contact;
3. Press
key to select the number, press key to make a normal
▲/▼
Please see “Search”
);
call, and hold
key to make a PTT call.
4.1.4 Edit
1. View the contact you want to edit (
2. Edit the contact information. The operation is the same as “Add”.
Please see “Search”
);
4.1.5 Delete
1. Firstly find the contact you want to delete (
Please see “Search”
);
39
Page 40

ZTE G650/G651/G420/G120 GoTa Digital Trunking Phone User Manual
2. Press Option to select Delete ;
3. Press Yes to confirm the deletion.
4.1.6 Set Ringtone
1. In idle mode, press Book to select Personal Book and then press
Option to select Srch by Group ;
2. Press
3. Press Option to select Set Ringtone ;
4. Press
to confirm.
key to select the group you want to set ring tone for;
▲/▼
key to select your desired group ringtone, and press Select
▲/▼
Note
If the incoming call number is saved in [
], the incoming call ringtone will be the group
Book
ringtone here, rather than the ringtone you set in
[
].
Profiles
Personal
4.1.7 Rename
1. In idle mode, press Book to select Personal Book , and then press Option
to select Srch by Group ;
2. Press
3. Press Option to select Rename ;
4. Enter the new name and press Ok .
key to select the group you want to edit;
▲/▼
4.1.8 Move
Move the record from phone to R-UIM card
1. In idle mode, press Book to select Personal Book ;
40
Page 41

2. Press
3. Press Option to select Move , and then select To UI M ;
4. Press Yes to confirm.
key to select your desired record;
▲/▼
When there are multiple numbers in the record,
Note
then each number will be saved as one single
record in R-UIM card.
Move the record from R-UIM card to phone
1. In idle mode, press Book to select Personal Book ;
2. Press
3. Press Option to select Move , and then select To Phone ;
4. Press
key to select your desired record;
▲/▼
key to select the type of number, and then press OK .
/
Move All Entries to Phone
1. In idle mode, press Book to select Personal Book ;
2. Press Option to select Move , and then select All to Phone ;
3. Press
key to select the type of number, and then press OK .
/
Move All Entries to UIM
1. In idle mode, press Book to select Personal Book ;
2. Press Option to select Move , and then select All to UIM ;
3. Press
key to select the type of number, and then press OK .
/
41
Page 42

ZTE G650/G651/G420/G120 GoTa Digital Trunking Phone User Manual
When there are multiple numbers in the record,
Note
then each number will be saved as one single
record in R-UIM card.
4.1.9 Check Space
In idle mode, press Book to select Personal Book , and then press Option
to select Check Space ;
4.1.10 Delete All
1. In idle mode, press Book to select Personal Book ;
2. Press Option to select Delete All , and select Phone or UIM ;
3. If you select Phone , press Yes to enter password, and press OK to
delete all entries in phone;
4. If you select UIM , press Yes to enter password, and press OK to delete
all entries in UIM card.
4.2 Group’s Book
Besides normal call numbers, you could also save PTT group numbers
into Group’s Book for easy searching and calling. Group’s book could be
classified into User Book and System Book . User book could contain up
to 50 entries, which could be viewed, edited, or deleted; System book
could contain up to 20 entries, which are updated automatically by the
system, and users are allowed to view the entries, but not to edit.
42
Page 43

4.2.1 Enter Group’s Book
In idle mode, press Book to select Group’s Book and then select User
Book / System Book .
4.2.2 Add
1. Enter User Book ;
2. Press Option to select Add to edit, press
highlight between Grp.Name and Grp. No. :
Grp.Name: enter the group name;
Grp. No.: enter the group number;
You could refer to section 1.8 “Text Input” when entering the above
contents.
3. Press Save to save the contents.
key to scroll the
▲/▼
4.2.3 View
1. Enter User Book and press
to edit;
2. Press Option to select View ;
3. Edit exactly the same as adding PTT group;
4. Press Save to save the contents.
key to select the PTT group you want
▲/▼
4.2.4 Delete
1. Enter User Book and press
to delete;
key to select the PTT group you want
▲/▼
43
Page 44

ZTE G650/G651/G420/G120 GoTa Digital Trunking Phone User Manual
2. Press Option to select Delete ;
3. Press Yes to confirm.
4.2.5 Delete All
1. Enter User Book ;
2. Press Option to select Delete All ;
3. Press Yes to confirm
4.2.6 View System Book
1. In idle mode, press Book to select Group’s Book , and then select
System Book ;
2. Press Option to select View to view the group names and group numbers,
and press Back to exit.
4.2.7 Check Space
1. Enter User Book or System Book ;
2. Press Option to select Check Space .
44
Page 45

PTT Functions 5
Users could operate all PTT functions and perform corresponding settings
in PTT Functions .
Enter PTT Functions : In idle mode, press Menu to enter, press
key to select , and press OK to enter.
5.1 Speed Dial No.
PTT Speed Dial No. is the number, which you could dial directly by holding
PTT key
1. Select PTT Functions , press OK to enter, and then select Speed Dial No.
2. Press
3. Press OK .
in idle mode.
Setting Method
to enter;
key to scroll the highlight and edit the highlighted item;
▲/▼
Status: PRESS / HOLD / OFF ; press
Typ e: Group / Private ; press
Dial number: enter a number or press Option to select from Book ;
/
/
to select;
to select;
▲/▼/
/
Note
If you select [
in [
PTT Functions
to directly dial PTT Speed Dial number, instead of
displaying PTT calls list.
] as the status of [
PRESS
], press PTT key
Speed Dial No.
in idle mode
]
45
Page 46

ZTE G650/G651/G420/G120 GoTa Digital Trunking Phone User Manual
5.2 Call Attribute
After Call Attribute is set, the PTT call made in the phone will be Ordinary
PTT call or Pre-emptive Priority PTT call, and the corresponding icon will
display in the status bar of the standby screen.
Setting Method
1. Press PTT Functions to select Call Attribute ;
2. Press
3. Press Select twice.
Note
key to select Normal or Pre-empty ;
/
Please refer to section 11.1.8 “Quickly Change
Call Attribute in Idle Mode” for details on call
attribute setting shortcut.
5.3 No-Disturbing
After “No-Disturbing” is activated, you will not receive any PTT call. You
could perform the corresponding settings and query in the phone.
Setting Method
1. Press PTT Functions to select Supplement Svc , and then select
No-Disturbing ;
2. Enter the phone password and press
Cancel or Query ;
3. Press Select .
key to select Setting ,
▲/▼
46
Page 47

5.4 PTT Call Forwarding
After “PTT Call Fwd.” is activated, you could forward all incoming PTT calls
to the number you set. You could perform the corresponding settings and
query in the phone.
Note
1. Setting MethodPress PTT Functions to select Supplement Svc , and
then select PTT Call Fwd. ;
2. Press
3. Press Select to enter, and press
Query ; if you select Setting , then you need to enter a forward number;
4. Press OK after the number is entered.
The forwarding number you set must be a PTT
call number.
key to select All Calls , Busy , or Off-Service ;
▲/▼
key to select Setting , Cancel or
▲/▼
5.5 Group Member Status Query
After “GrMembStatQry” is activated, you could query the status of group
members during PTT group calls. (
refer to section 2.6.1 “Group Member Status Query”
Setting Method
1. Press PTT Functions to select Supplement Svc , and then select
GrMembStatQry ;
2. Select On to activate this function;
For detailed operation method, please
).
47
Page 48

ZTE G650/G651/G420/G120 GoTa Digital Trunking Phone User Manual
3. Select Off to deactivate this function;
4. Select Query to check if the function is activated or deactivated.
5.6 Missed PTT Call
After “Msd PTT Call” is activated, you could inquire about all missed PTT
calls. A short message about all missed PTT calls will be sent to you.
Setting Method
1. Press PTT Functions to select Supplement Svc , and then select Msd
PTT Call ;
2. Press Select to enter, and press
Query ;
3. Press Select .
key to select Setting , Cancel or
▲/▼
5.7 Duty Number
After On Duty is selected and duty number is entered, you could receive
the call if other users dial this number.
Setting Method
1. Press PTT Functions to select Supplement Svc, and then select Duty
Number ; press
2. Select On Duty, enter the duty number and press OK to activate this
function;
key to select On Duty , Off Duty or Duty Query ;
▲/▼
48
Page 49

3. Select Off Duty, enter the duty number and press OK to deactivate this
function;
4. Select Duty Query to check if the function is activated or deactivated.
5.8 PTT Call Number Identity Restriction
After “PTT CNIR” is activated, other users could not see the number as
you make a PTT call.
Setting Method
1. Press PTT Functions to select Supplement Svc , and then select PTT
CNIR ; press
2. Select On to activate this function;
3. Select Off to deactivate this function;
4. Select Query to check if the function is activated or deactivated.
key to select On , Off or Query ;
▲/▼
5.9 Call Alert Busy
After “Call Alert Busy” is activated, there is a prompt on the interface if
there is a second incoming call.
Setting Method
1. Press PTT Functions to select Supplement Svc , and then select Call
Alert Busy ; press
2. Select Setting to activate this function;
key to select Setting , Cancel or Query ;
▲/▼
49
Page 50

ZTE G650/G651/G420/G120 GoTa Digital Trunking Phone User Manual
3. Select Cancel to deactivate this function;
4. Select Query to check if the function is activated or deactivated.
5.10 Dynamic Management
You could add / delete the group members, set priority of the group members,
and set the talk time.
Note
Only group head has the authority to perform
dynamic management for group members.
5.10.1 Add / Delete
Setting Method
1. Press PTT Functions to select Dyna Mgmt , and then select Add or Delete ;
2. Enter Group No. and Member No., or press Option to select from Book ;
3. Press Option and select OK .
5.10.2 Set Priority
Setting Method
1. Press PTT Functions to select Dyna Mgmt , and then select Set Priority ;
2. Enter Group No. and Member No., and press
Super , Senior , Common , Low or Lower ;
3. Press OK .
50
/
key to select
Page 51

5.10.3 Set Talk Time
Setting Method
1. Press PTT Functions to select Dyna Mgmt , and then select Set Talk Time ;
2. Enter Group No. and Member No., and press
Super , Senior , Common or Lower ; press
desired Talk Time;
3. Press OK .
/
key to select
/
key to select your
5.11 Emergency
You could hold emergency key to make emergency call when setting
emergency number.
Setting Method
1. Press PTT Functions to select Emergency ; and press Select to enter;
2. Press
3. Press
press alphanumeric keys to directly enter numbers or press Option to
select form Book ;
4. Press
key to select 0.5s , 1s , 1.5s or 2s ;
5. Press Select and then OK to save the settings.
key to select the type as Group or Private ;
/
key to move the cursor to the field of Emergency No. , and
▼
key to move the cursor to the field of Hold , and press
▼
/
51
Page 52

6 SMS
You could send, view, reply, forward, or delete short messages under SMS
menu. The received message are stored in the inbox, the sent messages
in the outbox, and the unsent messages in the drafts.
If your phone supports R-UIM card, from the inbox you can view the short
messages saved both in the phone and in the R-UIM card.
If your phone doesn’t support R-UIM card, please skip the related contents
about R-UIM card.
Enter SMS : In idle mode, press Menu to enter the main menu, press
key to select
(
), and press OK to enter.
SMS
▲/▼/
/
6.1 Compose
When composing a short message, you could immediately send it out, or
save it in the drafts.
6.1.1 Send out
1. Enter SMS , and select Compose SMS to compose a short message;
2. After entering the text, press Option and select Send to to edit the
recipient;
3. Directly enter the recipient’s number, or select from Book ; (
to select your desired recipient using
number using
4. After entering or selecting the recipient, press Option to select Send to
send the message.
,
and finally press OK
/
key, and then select desired
▲/▼
).
Press Book
52
Page 53

6.1.2 Save as Draft
1. Enter SMS , and select Compose SMS to compose a short message;
2. After entering the text, press Option and select Save as Draft to save
the message in the drafts.
6.2 Inbox
Icons in the inbox
Icons Descriptions
Unread Messages in Phone
Read Messages in Phone
Unread Messages in R-UIM Card
Read Messages in R-UIM Card
6.2.1 View
1. Enter SMS , and select Inbox ;
2. Press
Option to select View to view it;
3. During viewing, press
Option to select Reply , Forward , Delete , Save Number or Move to
UIM
key to select the message you want to view, and press
▲/▼
key to view the whole message; press
▲/▼
(
Move to Phone
) .
53
Page 54

ZTE G650/G651/G420/G120 GoTa Digital Trunking Phone User Manual
Note
[Move to UIM (
for the phones supporting R-UIM card.
Move to Phone
)] is available only
6.2.2 Save Number
You could save the recipient’s phone number or the numbers in the
message text into the phone book.
1. Enter SMS , and select Inbox ;
2. Press
select Save Number ;
3. Save into the phone book after selecting the number. For detailed
operation, please refer to the following chapter “Book”.
key to select the desired message, and press Option to
▲/▼
6.2.3 Receive New Message
1. The system will alert upon receipt of a new message. Select View to go
into the inbox directly;
2. If there are unread messages in the inbox, “
bar of the standby screen.
” will display in the status
6.3 Outbox
In the outbox, you could view all of sent messages.
1. Enter SMS , and select Outbox ;
2. Press
Option to select View to view it;
3. During viewing, press
Option to select Forward or Delete .
key to select the message you want to view, and press
▲/▼
key to view the whole message; press
▲/▼
54
Page 55

6.4 Drafts
In the drafts, you could view all of unsent messages. You could send it out
after editing.
1. Enter SMS , and select Drafts ;
2. Press
Option to select View to edit it;
3. After editing, select Send to to send it out immediately; select Save as
Draft to save it in the drafts. ( refer to “Compose” )
key to select the message you want to view, and press
▲/▼
6.5 Settings
Note
The received messages could be stored either in the phone or in the
R-UIM card. You have the priority to select the storage location.
1. Enter SMS , and select Settings ;
2. Press
3. Press Select to save the setting.
Skip this section if your phone does not support
R-UIM card.
key to select Phone First or UIM First ;
/
55
Page 56

7 Call History
Recent incoming calls, missed calls and outgoing calls are saved in Call History .
The earliest call will be deleted automatically when the records are full.
7.1 Call Icons
Icons
Descriptions
Incoming Calls
Missed Calls
Outgoing Calls
PTT Calls
7.2 V ie w
There are two methods of viewing the call history:
View from menu
1. In idle mode, press Menu to enter the main menu, press
key to select
2. Press
▲/▼
Incoming Calls, Call Timer ), and press Select to enter;
3. Press
▲/▼
to select View to view the details.
56
(
Call History
key to select the category (
key to select the record you want to view, and press Option
), and press OK to enter;
Missed Calls, Outgoing Calls,
▲/▼/
/
Page 57

Quick view
1. In idle mode, press
to view the list of PTT calls;
key
2. Press
to select View to view the details.
key to select the record you want to view, and press Option
▲/▼
key to view the list of normal calls; press PTT
Note
If you select [
] in [
No.
PTT Functions
mode to directly dial PTT Speed Dial number,
instead of displaying PTT calls list.
] as the status of [
PRESS
], press PTT key
7.3 D ele t e
1. Enter the list of call records (
2. Press
to select Delete to delete it.
key to select the record you want to delete, press Option
▲/▼
refer to section 7.2 “View”
);
7.4 Delete All
1. Enter the list of call records ( refer to section 7.2 “View” );
2. Press Option to select Delete All ;
3. Press OK to delete all call records in the current category.
Speed Dial
in idle
57
Page 58

ZTE G650/G651/G420/G120 GoTa Digital Trunking Phone User Manual
7.5 Save Number
1. Enter the list of call records ( refer to section 7.2 “View” );
2. Press
press Option to select Save Number to save the number in the phone
or in the UIM card.
key to select the record you want to save number, and
▲/▼
7.6 Make Normal Calls
1. Enter the list of call records ( refer to section 7.2 “View” );
2. Press
key to select the normal call record you want to dial, and press
▲/▼
key to call.
7.7 Make PTT Calls
1. Enter the list of call records ( refer to section 7.2 “View” );
2. Press
key
key to select the PTT call record you want to dial, hold PTT
▲/▼
, and speak after hearing a beep sound.
7.8 Send Message
1. Enter the list of call records ( refer to section 7.2 “View” );
2. Press
and press Option to select Send Message .
key to select the normal call record you want to send messages,
▲/▼
58
Page 59

Profiles 8
In profiles, you could set different sounds for different occasions. There are
several modes available in the phone, such as General, Silence, Meeting,
Outdoors, etc., and you could also set Smart Ring.
All modes could be changed, so you could select your individual mode
according to your own requirements.
Enter Profiles : In idle mode, press Menu to enter the main menu, press
▲/▼/
to enter.
key to select (
/
Profiles
8.1 Activate
1. Enter Profiles , and press
Meeting or Outdoor ;
2. Press Option to select Activate .
key to select General , Silence ,
▲/▼
8.2 View
1. Enter Profiles , press
and press Option to select View ;
2. Select the option you want to edit, and change as below:
a) Ringtone/vib: Press
to enter, press
Ringer Style, press
Vibrate Only , and finally press Save to save the
setting.
key to select the mode you want to edit,
▲/▼
key to select Ringtone / vib , press Select
▲/▼
key to select Ringtone / vib or
▲/▼
key to select LED or
/
), and press OK
59
Page 60

ZTE G650/G651/G420/G120 GoTa Digital Trunking Phone User Manual
b) SMS Alert: Press
the same as Ringtone / vib .
c) PTT Voice: Press
enter, press
Speaker or Earpiece , and finally press Save to save
the setting.
d) Volume: Press
press
tone or SMS alert , press
and finally press Save to save the setting.
e) Alert: Press
Note
▲/▼
key to select Call Connected , Call Ended , or 1
▲/▼
minute , press
Save to save the setting.
If you select PTT voice from [
phone will prompt with vibration when receiving
PTT calls.
The incoming call ringtone is just for ordinary
numbers. For those numbers in the groups of the
phone book, the incoming call ringtone is the
group ringtone you set in [
key to select SMS Alert . The operation is
▲/▼
key to select PTT Voice , press Select to
▲/▼
key to select Vol um e , press Select to enter,
▲/▼
key to select the type Ringer , Earpiece , Key
▲/▼
key to select Alert , press Select to enter, press
/
key to select PTT voice from
/
key to adjust the volume,
/
key to select On / Off, and finally press
], the
Earpiece
].
Book
8.3 Smart Ring
You could set smart ring for up to five special incoming call numbers.
1. Enter Profiles , and press
key to select Smart Ring ;
▲/▼
60
Page 61

2. Press Select to enter, press
Select again to set;
3. Enter a special Phone Number, or press Option to select number from
Book ;
4. Press
5. Press Save (or press Option to select Save ) to complete the setting.
key to enter Ringer Style, and press
▼
desired ring tone;
key to select one number, and press
▲/▼
key to select your
/
61
Page 62

9 Assistant
Enter Assistant : In idle mode, press Menu to enter the main menu, press
▲/▼/
/
OK to enter.
key to select (
Assistant
), and press
9.1 Calculator
The phone provides a calculator, which you could use to perform basic
math calculations.
1. Enter Assistant , and select Calculator ;
2. Press alphanumeric keys to input numbers, press
decimal, press
key to input calculation symbols “+/-/×/÷” ;
3. During the calculation, press Clear to clear the inputs one by one;
4. Press
to display the calculating results.
=
key to negative the numbers, and press
key to input the
▲/▼/
/
9.2 Alarm Clock
Alarm clock could be set up to five times in the phone.
9.2.1 Add
1. Enter Assistant , and select Alarm Clock ;
2. Press Option to select Add to edit;
62
Page 63

3. Press
Time: Press alphanumeric keys to enter time; press
Set: Press
Week: Press
Note
4. Press Save to save the setting.
key to scroll the highlight, and edit each highlighted item:
▲/▼
switch between hour and minute;
key to turn on/off the alarm ring;
/
key to select the date, on which alarm clock works;
/
Enter the remarks.
/
key to
9.2.2 View / Edit
1. Enter Assistant , and select Alarm Clock ;
2. Press
3. Press Option to select View to view the alarm;
4. At this time you could also edit the alarm. ( refer to “Add” )
key to select the alarm you want to view;
▲/▼
9.2.3 Delete
1. Enter Assistant , and select Alarm Clock ;
2. Press
3. Press Option to select Delete to delete the alarm.
key to select the alarm you want to delete;
▲/▼
9.2.4 Turn off Alarm Ring
If Alarm Ring is set On , the alarm clock will ring as the time is up. At this
point, press OK to turn off the ring.
63
Page 64

ZTE G650/G651/G420/G120 GoTa Digital Trunking Phone User Manual
9.2.5 Set Alarm Ring
1. Enter Assistant, and select Alarm Clock ;
2. Press Option to select Set Alarm Ring ;
3. Press
key to select your desired ring, and then press Select .
▲/▼
9.3 Calendar
9.3.1 View Day
1. Enter Assistant , and select Calendar ;
2. Press
▲/▼/
to select View Day ;
3. Press
▲/▼
select View Event to view the complete contents, and then press
Select to select Send as SMS to send the event as a short message.
9.3.2 Add Event
1. Enter Assistant , and select Calendar ;
2. Press
▲/▼/
press Option to select Add Event ,and then enter the event;
3. Press Save to save the setting.
key to select your desired date, and press Option
/
key to select the event you want to view, press Option to
key to select the date on which you add event,
/
9.3.3 Goto
1. Enter Assistant , and select Calendar ;
64
Page 65

2. Press Option to select Goto , enter your desired date, and press Goto ;
3. View the event on that day. (
Please refer to section 9.3.1 “View Day”
)
9.3.4 Delete
1. View the event on that day; (
2. Press
to select Delete ;
3. Select Delete All to delete all events.
key to select the event you want to delete, and press Option
▲/▼
Please refer to section 9.3.1 “View Day”
)
9.4 World Time
You could check the local time of major cities in the world.
9.4.1 Check Cities
1. Enter Assistant , and select World Time ;
2. Press
▲/▼/
key to check major cities in the world.
/
9.5 Stopwatch
As a time counter, the stopwatch could record up to 10 records once.
9.5.1 General Time Counting
1. Enter Assistant , and select Stopwatch ;
65
Page 66

ZTE G650/G651/G420/G120 GoTa Digital Trunking Phone User Manual
2. Press Start to start counting;
3. Press Pause to stop counting;
4. Press Continue to continue counting; press Option to select Clear to
clear the records.
9.5.2 Record Multiple Time Records in the Counting
1. Enter Assistant , and select Stopwatch ;
2. Press Start to start counting;
3. During the counting, press Record to save the record; you could press
Record up to ten times;
4. Press Pause to stop counting;
5. Press Option to select Record to view all the records;
6. Press
key to view all of the records.
▲/▼
66
Page 67

Settings 10
10.1 Enter Settings
Enter Settings : In idle mode, press Menu to enter the main menu, press
▲/▼/
to enter.
key to select (
/
10.2 Phone
Idle Display
You could change wall paper or edit banner on the standby screen.
Setting Method
1. Enter Setting to select Phone , and press Select to select Idle Display ;
2. Select Wall Paper , press
Select to select it as standby wall paper;
3. Select Banner , press Select to edit, and press OK to save the contents;
4. Select Date & Time , press
press Select to save the setting.
Backlight
Set the lasting time for backlight.
key to select the paper, and press
▲/▼
key to select your desired mode, and
▲/▼
Settings
), and press OK
LCD Contrast
Set the contrast of the screen.
67
Page 68

ZTE G650/G651/G420/G120 GoTa Digital Trunking Phone User Manual
Language
The phone supports different languages, and you could select your desired
language.
Shortcuts
Set the function of quick entry in idle mode.
Setting Method
1. Enter Setting to select Phone , and then select Shortcuts ;
2. Select any key from Up / Down / Left / Right keys, and press Select to
enter;
3. Select the corresponding function of the key;
4. Press Select .
Personal Info
Store your personal information.
Time Format
Select the displaying format of time.
DTMF Tone
Select Normal or Extended .
Elec. Save Mode
Select On , After 2 sec. , After 5 sec. or Off .
68
Page 69

1. If elec. save mode is set “On”, the phone will
automatically enter the mode during PTT calls
or normal calls.
2. After elec. save mode is set “On”, the screen is
Note
black and you could adjust the volume using
Side key.
3. You could hold
Save Mode during calls no matter whether it
has been set or not.
key to enter or exit Electricity
10.3 Call
The settings here are especially for normal calls, instead of PTT calls. The
settings for PTT calls could be performed in PTT Functions .
Call Forwarding
This function enables you to forward incoming normal calls to another phone
number. The phone provides All Calls , Busy , No Answer , Cancel All .
Note
Network support is required for this function.
Call Waiting
When this function is activated, you can switch to the second incoming call
by pressing
Note
when you are already in a call.
Network support is required for this function.
69
Page 70

ZTE G650/G651/G420/G120 GoTa Digital Trunking Phone User Manual
Call Answer
Set the answer mode for incoming calls.
Dial Restrict
When this function is activated, you couldn’t dial any number except for
emergency number and free dial numbers.
Free Dial
You could set up to five free dial numbers. If Dial Restrict is activated,
these numbers will not be restricted.
Set a free dial number:
1. Enter Setting to select Call , and then select Free Dial ;
2. Press
3. Press OK to save.
key to select, and enter the number;
▲/▼
Speed-Dial Restriction
This function enables you to turn on / off speed dial function.
10.4 Security
The phone password is needed to enter the security. Generally, the default
password is: “0000”.
70
Page 71

Once you get a new phone, it’s recommended to modify the password to
guarantee the safety of information.
Lock Phone
Set the phone lock mode. After the phone is locked, you need to input
password to unlock it.
Change Password
1. Enter old password;
2. Enter new password;
3. Enter new password again;
4. Press OK .
If your phone needs R-UIM card, please read the
Note
following contents; otherwise please skip this
section.
Require PIN
When it is set “On”, the phone requires PIN code of R-UIM card as
powering on. Enter correct PIN code to unlock the phone.
Lock UIM to Phone
When this function is activated, only the R-UIM card in the phone could be
used. If you change R-UIM card, you need to input lock code to unlock.
Note
Lock code is set by yourself as the function is
activated.
71
Page 72

ZTE G650/G651/G420/G120 GoTa Digital Trunking Phone User Manual
Chang PIN
1. Enter old PIN code;
2. Enter new PIN code;
3. Enter new PIN code again;
4. Press OK .
The R-UIM card will be locked if you enter wrong
PIN code three times. Then you need PUK code
to unlock the R-UIM card. The PIN code and PUK
Note
code may be provided together with the R-UIM
card. If not, contact your network service provider.
The default PIN code is normally 1234. Please
replace it with your own PIN code as soon as
possible.
10.5 Default Reset
After you select Default Reset , all settings will return to the factory default
settings.
72
Page 73

Appendix 11
11.1 Shortcut
11.1.1 Speed Dial
Speed Dial Normal Calls
Speed dial refers to quickly dial out the numbers in Personal Book in idle
mode. To quickly dial out numbers, you need firstly enter Settings to
select Call , then select Speed-Dial Res to enter, and finally select Off .
Operation Method
If you want to dial the number ranking 132, firstly input “13”, and then hold
the alphanumeric key “2” until the number is dialed.
Speed Dial PTT Calls
In idle mode, hold PTT key to dial PTT Speed Dial Number. You could set
PTT Speed Dial No. in PTT Functions .
11.1.2 Quick Entry Function
In idle mode, press
then select Shortcuts .
▲/▼/
11.1.3 Quick Return to Idle Mode
Press key (
rather than hold
key to enter Setting , select Phone , and
/
) to return to the idle mode quickly.
11.1.4 Delete the Current Input
During the input status, press Clear to delete the current inputs one by one,
and hold Clear to delete all the current inputs.
73
Page 74

ZTE G650/G651/G420/G120 GoTa Digital Trunking Phone User Manual
11.1.5 Quick Set Profiles
In a conference room or on other public occasions, you could conveniently
set the phone in Silence mode or other modes.
In idle, hold
and Outdoors , and release
mode.
key to scroll the highlight among General , Silence , Meeting ,
key until the highlight is at your desired
11.1.6 Quick Entry into Menu
In the main menu, there is a serial number in front of each option. Press the
serial number’s corresponding alphanumeric key to quickly enter the menu.
11.1.7 Quick Entry or Exit Electricity Save Mode during Calls
During calls, hold key to enter or exit electricity save mode.
11.1.8 Quick Change Call Attribute in Idle Mode
In idle mode, hold Side key ( upper or lower ) to switch between Normal
and Pre-emptive , and release until the desired call attribute is selected.
11.1.9 Quick Search by First Letter of the Names in Book
Press the corresponding alphanumeric key of first letter to search the
relevant names in book.
11.2 Lock the Keypad
When you don’t use your phone temporarily, you could lock your phone keypad
74
Page 75

to avoid misoperations. In this case, you are only allowed to dial emergency
numbers.
Lock the keypad
In idle mode, hold Key.
Unlock the keypad
When the keypad is locked, firstly press Unlock and then key to unlock
the keypad.
11.3 Earphone
Please follow the steps below to use the earphone:
11.3.1 PTT Operations with Earphone
During PTT calls, you could use the earphone to take or release the floor.
Hold PTT key on your earphone, start talking after hearing a beep sound,
and release PTT key to let others speak after finishing talk.
11.3.2 Receive or End Normal Calls with Earphone
With PTT key on your earphone, you could receive or end a normal call.
When there is an incoming call, you could receive it by holding PTT key on
your earphone for about 0.5 second. When you are already in a call, you
could use PTT key on the earphone to end the call.
75
Page 76

ZTE G650/G651/G420/G120 GoTa Digital Trunking Phone User Manual
11.4 Troubleshooting
Symptoms Possible Causes Solutions
Power-on
Failure
Auto Power-off
Inadequate
Standby Time
Network
Connection
Failure
PTT Call Failure
Call drop during
a call
No ring for a
incoming call
Prompt to input
PUK
Inadequate battery
capacity
Poor battery contact Re-install the battery
Seriously poor battery
capacity
Deceasing of battery
performance
Poor network signal
Poor network signal Move to other places
Out of the service area
Service unavailable Contact the operators
Network disconnected
Poor network signal Move to other places
The phone is set to
Silence, or the ring
volume is set to 0
R-UIM card is locked
due to successive
inputting false PIN
code for three times
Charge the battery
Recharge the battery
Replace the battery
Power off as network
signal is poor
Confirm whether it is
in the CDMA network
service area
Refer to “Network
Connection Failure”
Enter Profiles and
change the mode; or
check the ring volume
Contact the operators
If the problems cannot be solved after the above handling, you may contact our
customer service personnel, or feed back your information directly by sending
emails to zte_mobile@zte.com.cn. We will reply to you as soon as possible.
76
Page 77

ZTE G650/G651/G420/G120 GoTa Digital Trunking Phone User Manual
FCC Statement
Changes or modifications to this unit not expressly approved by the party
responsible for compliance will void the user’s authority to operate the
equipment. Any change to the equipment will void FCC grant.
This equipment has been tested and found to comply with the limits for a
Class B digital device, pursuant to part 15 of the FCC Rules. These limits are
designed to provide reasonable protection against harmful interference in a
residential installation. This equipment generates, uses and can radiate radio
frequency energy and, if not installed and used in accordance with the
instructions, may cause harmful interference to radio communications.
However, there is no guarantee that interference will not occur in a particular
installation. If this equipment does cause harmful interference to radio or
television reception, which can be determined by turning the equipment off
and on, the user is encouraged to try to correct the interference by one or
more of the following measures:
--Reorient or relocate the receiving antenna.
--Increase the separation between the equipment and receiver.
--Connect the equipment into an outlet on a circuit different from that to which
the receiver is connected.
--Consult the dealer or an experienced radio/TV technician for help.
Health and Safety Information – RF Exposure Information (SAR)
THIS MOBILE PHONE MEETS THE GOVERNMENT’S REQUIREMENTS
FOR EXPOSURE TO RADIO WAVES.
This phone is a radio transmitter and receiver. It is designed and
manufactured not to exceed the emission limits for exposure to radio
frequency (RF) energy set by the Federal Communications Commission of
the U.S. government. These limits are part of comprehensive guidelines and
establish permitted levels of RF energy for the general population. The
guidelines are based on standards that were developed by independent
scientific organizations through periodic and thorough evaluation of scientific
studies. The standards include a substantial safety margin designed to
assure the safety of all persons, regardless of age and health.
The exposure standard for wireless mobile phones employs a unit of
measurement known as the Specific Absorption Rate, or SAR. The SAR limit
set by the FCC is 1.6 W/kg. Tests for SAR are conducted using standard
77
Page 78

ZTE G650/G651/G420/G120 GoTa Digital Trunking Phone User Manual
operating positions accepted by the FCC with the phone transmitting at its
highest certified power level in all tested frequency bands. Although the SAR
is determined at the highest certified power level, the actual SAR level of the
phone while operating can be well below the maximum value. This is because
the phone is designed to operate at multiple power levels so as to use only
the poser required to reach the network. In general, the closer you are to a
wireless base station antenna, the lower the power output.
Before a mobile phone is available for sale to the public, it must be tested and
certified to the FCC that it does not exceed the limit established by the
government adopted requirement for safe exposure. The tests are performed
in positions and locations (e.g., at the ear and worn on the body) as required
by the FCC for each model. The highest SAR value for the mobile phone
when tested for use at the ear is 1.39
0.343W/kg.
While there may be differences between the SAR levels of various phones
and at various positions, they all meet the government requirement.
W/kg and when worn on the body is
The FCC has granted an Equipment Authorization for this mobile phone with
all reported SAR levels evaluated as in compliance with the FCC RF
exposure guidelines. SAR information on the mobile phone is on file with the
FCC and can be found under the Display Grant section of
http://www.gov/oet/fccid
phone.
Note: In the United States and Canada, the SAR limit recommended by
international guidelines for mobile phones used by the public is 1.6
watts/kilogram (W/kg) averaged over one grams of tissue. The limit
incorporates a substantial margin for safety to give additional protection for
the public and to account for any variations in measurements.
after searching on FCC ID stock on the label on the
78
 Loading...