

Page 1

ZTE BLADE A602
User Manual
1
Page 2

LEGAL INFORMATION
Copyright © 2017 ZTE Corporation.
All rights reserved.
No part of this publication may be quoted, reproduced,
translated or used in any form or by any means, electronic or
mechanical, including photocopying and microfilm, without
the prior written permission of ZTE Corporation.
ZTE Corporation reserves the right to make modifications on
print errors or update specifications in this guide without prior
notice.
Version No.: R1.0
Edition Time: 2017.8
2
Page 3

Contents
Getting Started ......................................................... 9
Getting to Know Your Phone ........................................... 9
Knowing the Keys .......................................................... 11
Installing the nano-SIM Card and the microSDXC™ Card
....................................................................................... 11
Charging the Battery ...................................................... 13
Extending the Battery Life .............................................. 15
Powering On/Off ............................................................ 15
Setting Up for the First Time .......................................... 16
Locking/Unlocking the Screen and Keys ....................... 16
Using the Touch Screen ................................................ 17
Getting to Know the Home Screen ................................ 20
Add Widgets ............................................................. 20
Remove Icons or Widgets ........................................ 20
Adjust Widget Size ................................................... 21
Organizing With Folders ........................................... 21
Applying New Wallpapers ........................................ 22
Knowing the Basics ............................................... 23
Monitoring the Phone Status ......................................... 23
Managing Notifications .................................................. 24
Notification Icons ...................................................... 24
Open/Close the Notification Panel ................................. 24
Phone Calls ............................................................ 26
Placing and Ending Calls ............................................... 26
3
Page 4

Place a Call by Dialing ............................................. 26
End a Call ................................................................ 27
Answering or Rejecting Calls ........................................ 27
Answer a Call ........................................................... 27
Reject a Call ............................................................. 28
Working With the Call History ........................................ 28
Place a Call From the Call History ........................... 28
Add a Number From Call History as a Contact ........ 28
Take Other Actions on a Call History Entry ............. 29
Calling Your Contacts .................................................... 29
Using Options During a Call .......................................... 30
Contacts ................................................................. 31
Checking Contact Details .............................................. 31
Adding a New Contact ................................................... 31
Setting Up Your Own Profile ......................................... 32
Working With Favorite Contacts .................................... 32
Add a Contact to Favorites ...................................... 32
Remove a Contact From Favorites .......................... 33
Searching for a Contact ................................................. 33
Editing Contacts ............................................................ 33
Messaging .............................................................. 35
Opening the Messaging Screen .................................... 35
Sending a Message ....................................................... 35
Replying to a Message .................................................. 36
Forwarding a Message .................................................. 37
4
Page 5

Copying a Message ....................................................... 37
Changing Message Settings .......................................... 38
Getting Connected to Network and Device ......... 39
Connecting to Cellular Networks ................................... 39
Control Cellular Data Use ......................................... 39
Select Preferred Network Type ................................ 39
Set Access Point Names .......................................... 40
Select Network Operator .......................................... 40
Connecting to Wi-Fi ....................................................... 41
Turn Wi-Fi On and Connect to a Wi-Fi Network ....... 41
Get Notified of Open Networks ................................. 41
Add a Wi-Fi Network ................................................ 42
Forget a Wi-Fi Network ............................................ 42
Connecting to Your Computer via USB ......................... 43
Connect Your Phone to a Computer via USB .......... 43
Disconnect Your Phone From the Computer ........... 44
Bluetooth ................................................................ 45
Turn Bluetooth On/Off .................................................... 45
Change the Device Name .............................................. 45
Pair With Another Bluetooth Device .............................. 46
Making the Most of Multimedia............................. 47
Taking Pictures with Your Camera ................................ 47
Recording a Video with Your Camera ........................... 47
Opening Your Gallery .................................................... 47
Listening to Your FM Radio ........................................... 48
5
Page 6

Scanning Channels ....................................................... 48
Listening to FM Radio ................................................... 48
Playing Your Music ........................................................ 49
Playing Your Music ........................................................ 49
Managing Playlists ........................................................ 50
Making Voice Memos .................................................... 50
Recording a Voice Memo .............................................. 51
Playing a Voice Memo ................................................... 51
Sorting out Your Phone Settings .......................... 52
Setting Date and Time ................................................... 52
Display Settings ............................................................. 52
Sound and Notification Settings .................................... 53
Language Settings ........................................................ 53
Disabling Data Services ........................................... 54
Switching Networks .................................................. 54
Setting Access Point Names .................................... 54
Security Settings ........................................................... 54
Protecting Your Phone with a Pattern ...................... 54
Protecting Your SIM Card with a PIN ....................... 55
Personal: Backup and Reset ......................................... 56
Apps .............................................................................. 57
Other Applications ................................................. 58
Clock.............................................................................. 58
Set a New Alarm ...................................................... 58
Check World Time ................................................... 58
6
Page 7

Use the Stopwatch and Countdown ......................... 59
Calculator ....................................................................... 59
Downloads ..................................................................... 59
File Manager .................................................................. 60
For Your Safety ...................................................... 61
General Safety ............................................................... 61
Distraction ...................................................................... 62
Driving ...................................................................... 62
Operating Machinery ................................................ 62
Product Handling ........................................................... 63
General Statement on Handling and Use ................. 63
Small Children .......................................................... 64
Demagnetization ...................................................... 64
Electrostatic Discharge (ESD) .................................. 65
Antenna .................................................................... 65
Normal Use Position ................................................. 65
Air Bags .................................................................... 65
Seizures/Blackouts ................................................... 65
Repetitive Strain Injuries .......................................... 66
Emergency Calls ...................................................... 66
Loud Noise ............................................................... 66
Phone Heat .............................................................. 66
Electrical Safety ............................................................. 67
Accessories .............................................................. 67
Connection to a Car ................................................. 67
Faulty and Damaged Products ................................. 67
7
Page 8

Radio Frequency Interference ....................................... 68
General Statement on Interference.......................... 68
Pacemakers ............................................................. 68
Hearing Aids ............................................................ 68
Medical Equipment .................................................. 69
Aircraft ...................................................................... 69
Interference in Vehicles ........................................... 69
Explosive Environments ................................................ 69
Petrol Stations and Explosive Atmosphere .............. 69
Blasting Caps and Areas ......................................... 70
8
Page 9
Getting Started
r
y
y
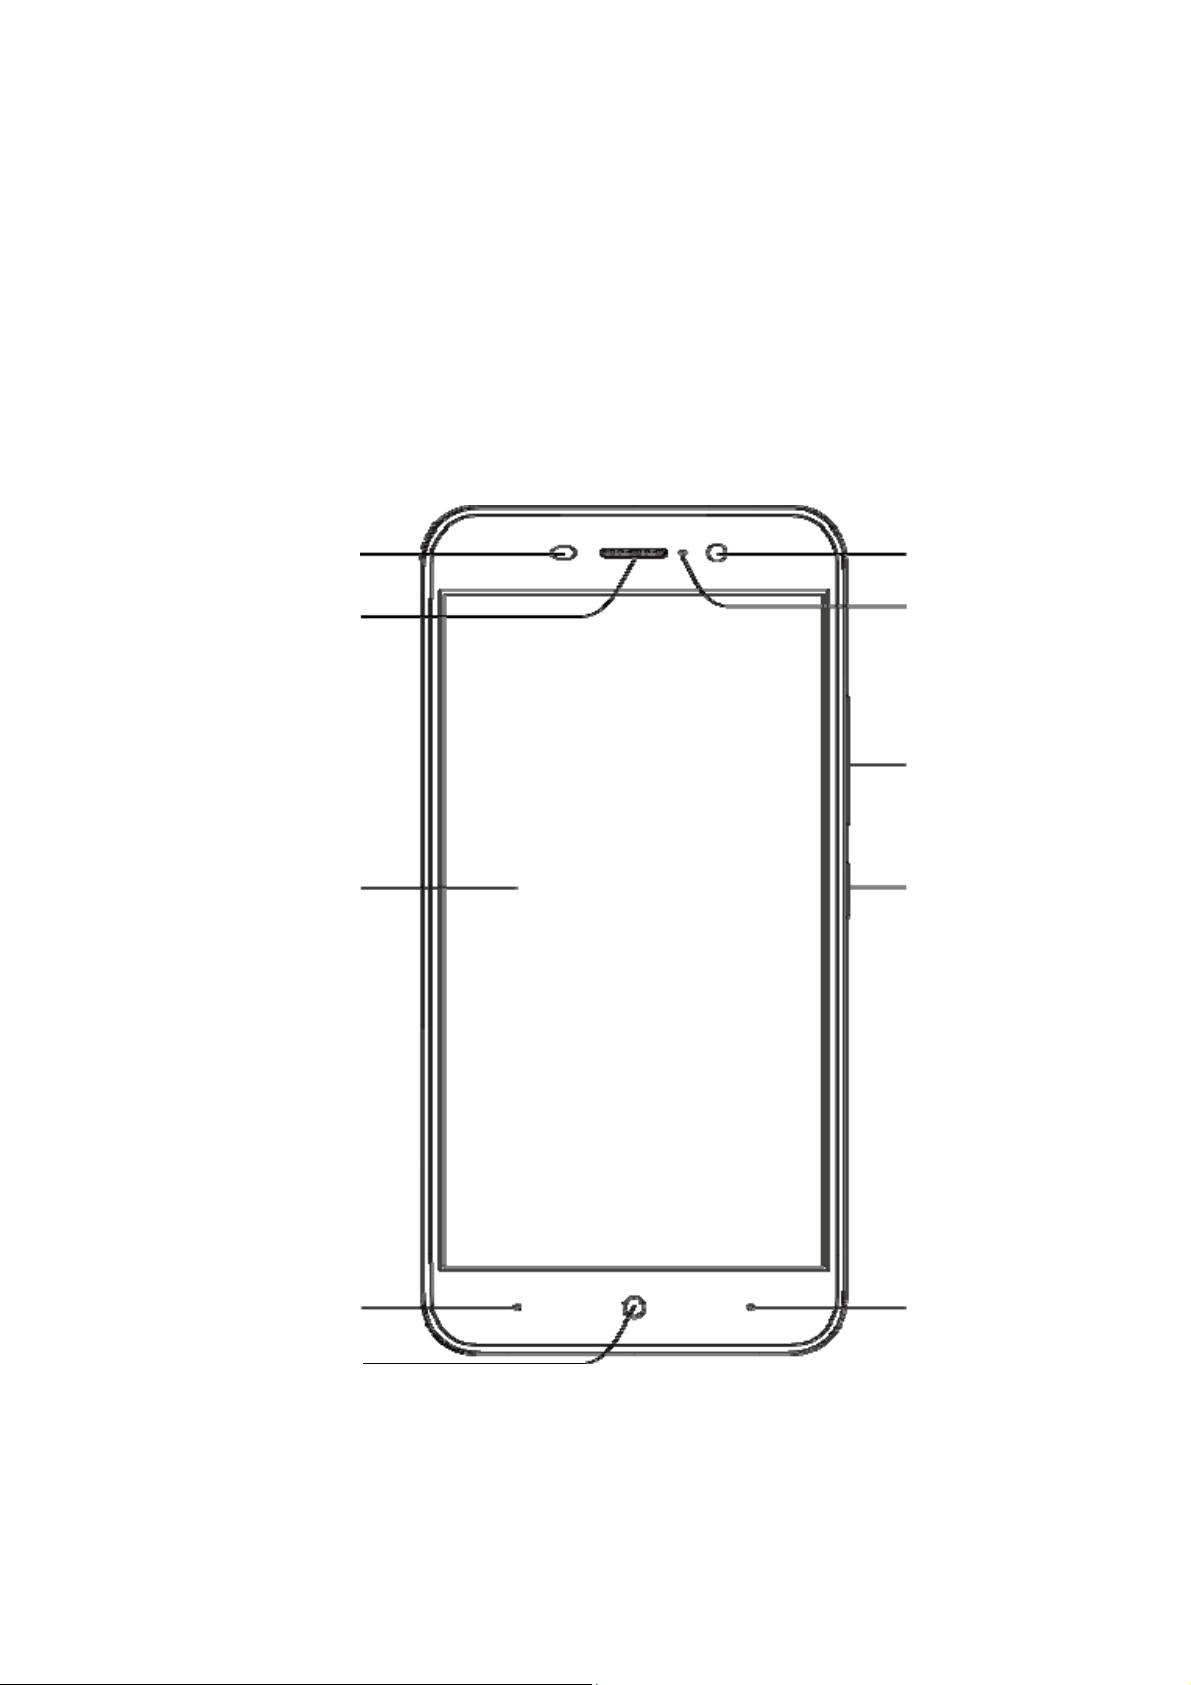
Getting to Know Your Phone
Proximity & light
senso
Earpiece
Front camera
Indicator light
Touch screen
Back ke
Volume key
Power key
Menu key
Home ke
9
Page 10
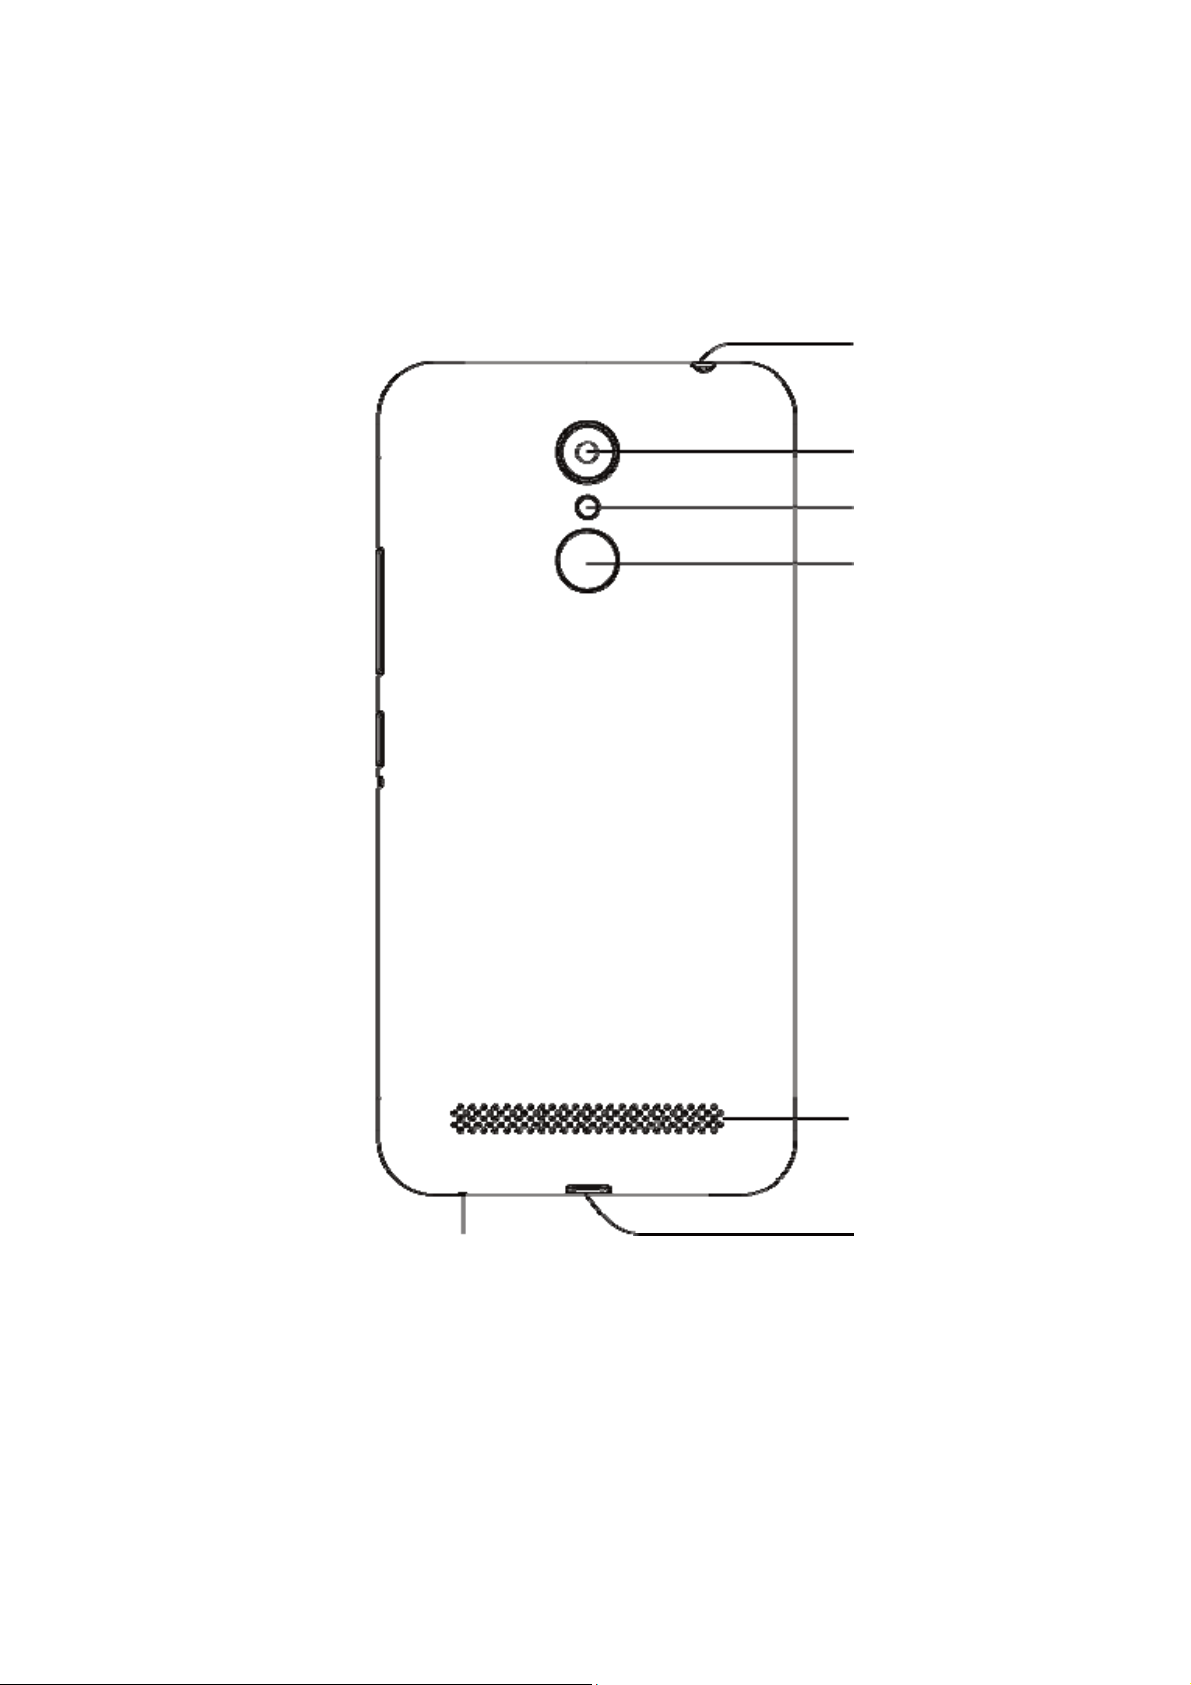
Headset jack
Back camera
Flash
Super key
Speaker
Microphone
Charging/
micro-USB jack
10
Page 11
Knowing the Keys
Key Function
Power key
Volume key
Home key
Back key
Menu key
Press and hold to turn on or off airpl ane
mode, restart, turn on or off vibration or
sound, or power off.
Press to turn off or on the screen display.
Press or hold eit her en d of t he key to tur n the
volume up or down.
Touch to return to the home screen from
any application or scr ee n.
Touch and hold to use Google Search.
Touch to go to the previous screen.
Touch and hold to see recently used apps.
Installing the nano-SIM Card and the
microSDXC™ Card
The microSDXC card (optional, not inclu ded) can be installed or
removed while the phone is turned on. You need to unmount the
microSDXC card before removing it.
11
Page 12
WARNING!
To avoid damage to the phone, do not use any other kind of SIM
cards, or any non-standard nano-SIM card cut from a SIM card.
You can get a standard nano-SIM card from your service
provider.
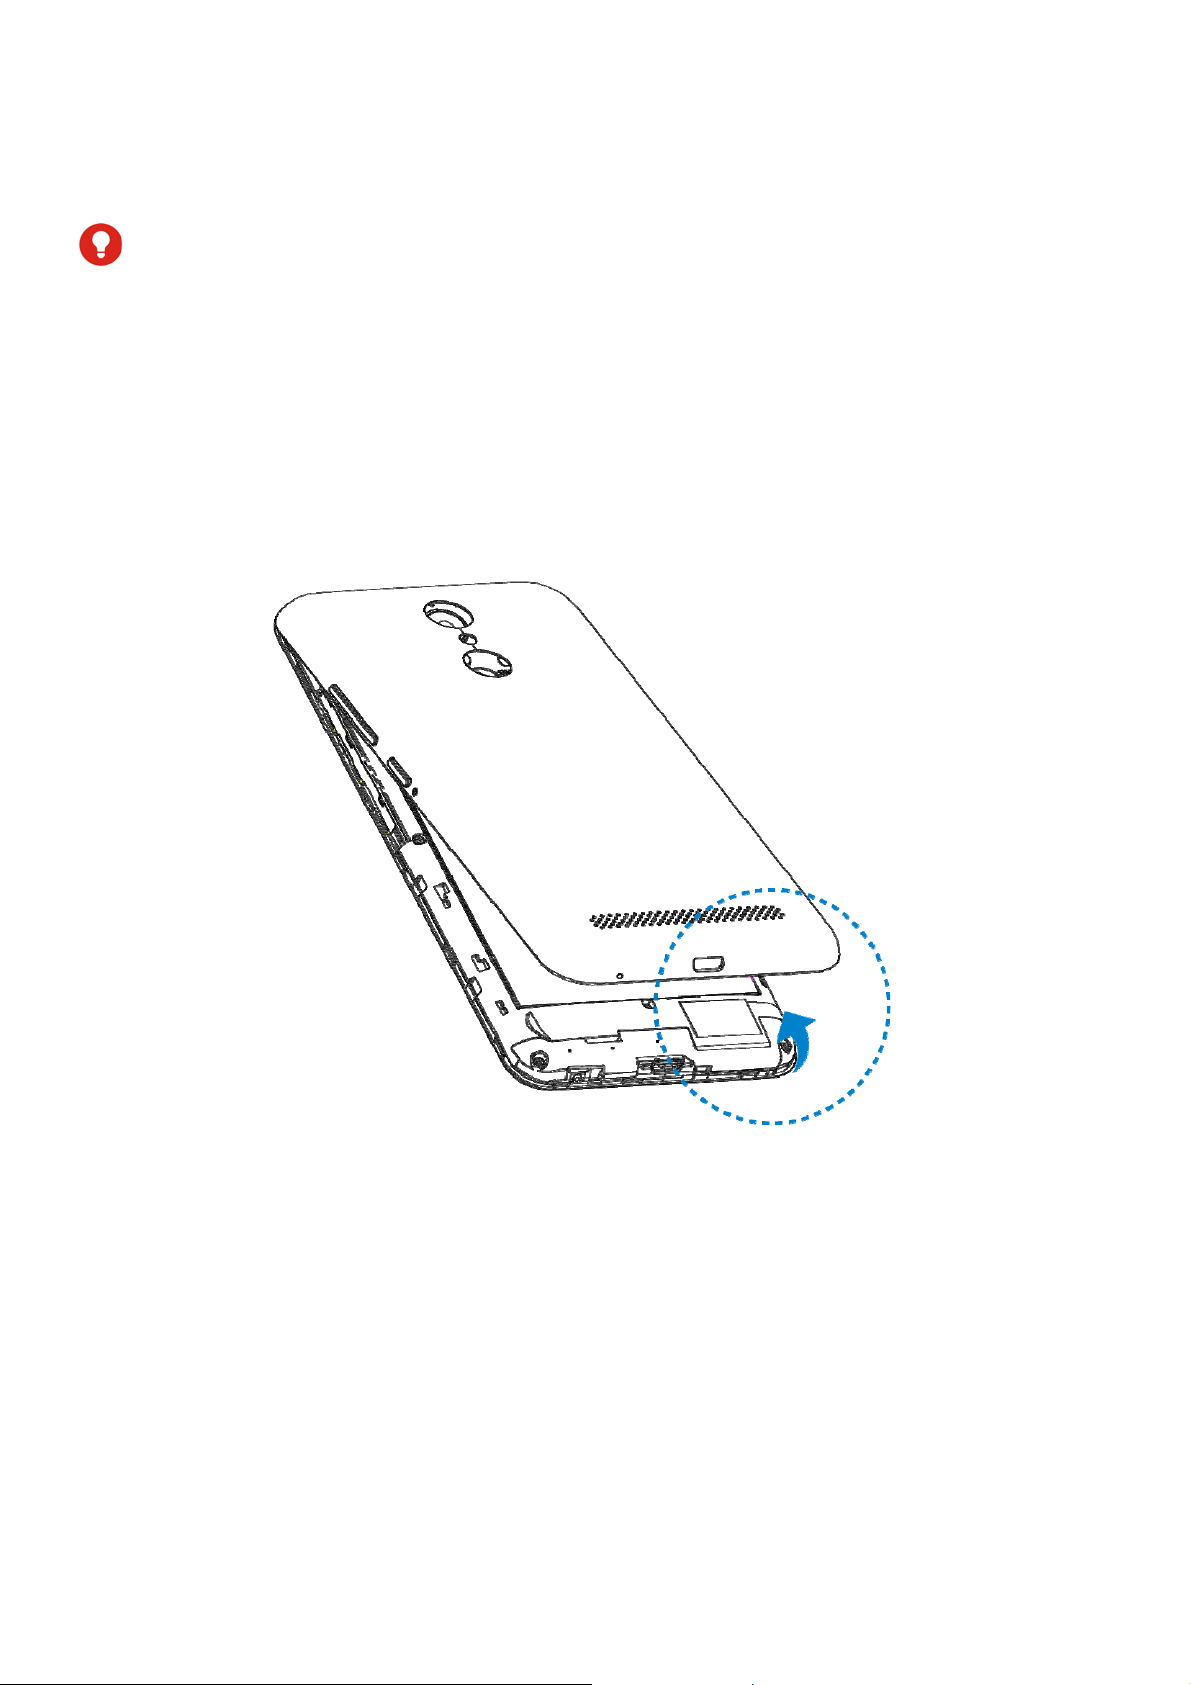
1. Insert your fingernail into the bottom of the back cover and lift
it up gently.
2. Hold the nano-SIM ca rd a nd th e m icroSDXC card w ith t he c ut
corner oriented as shown and slip them into the card slots.
12
Page 13
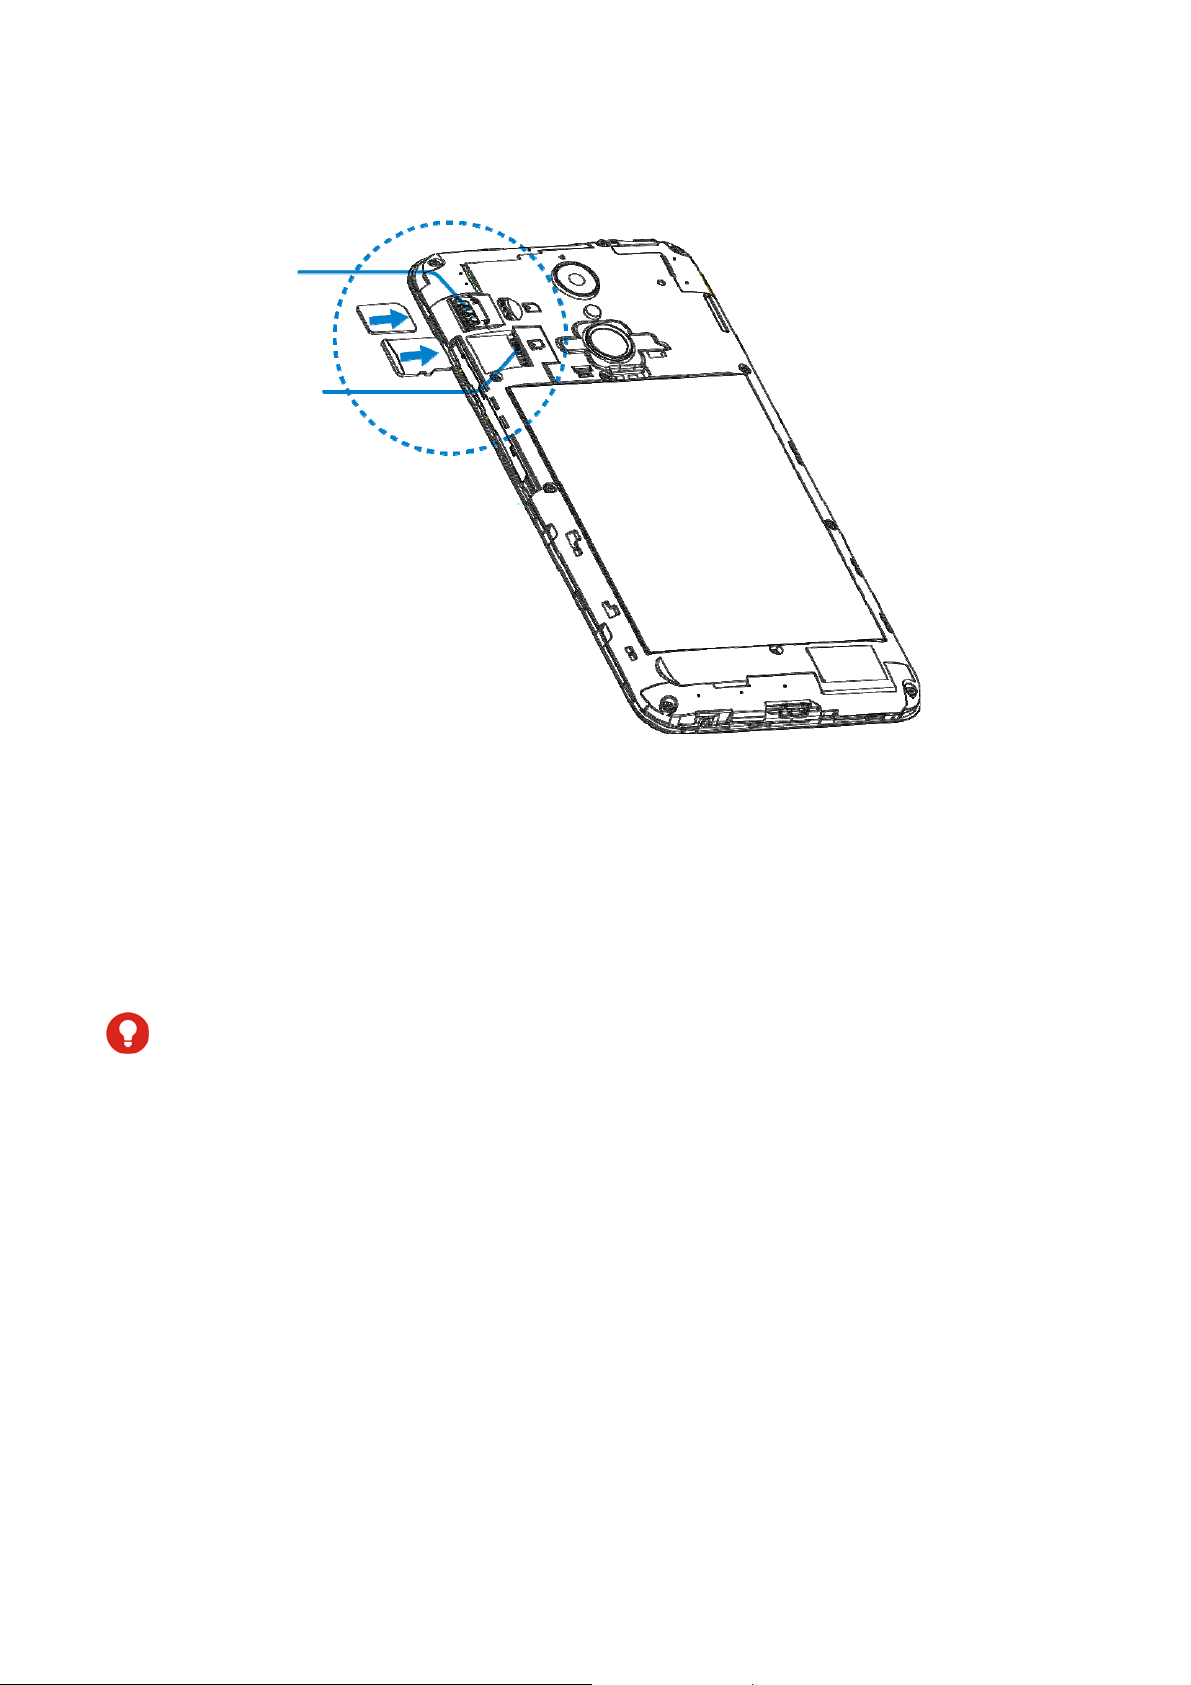
nano-SIM
t
card slot
microSDXC
card slo
Charging the Battery
Your phone’s ba ttery should have enough power for the phon e to
turn on, find a signal, and make a few calls. You should fully
charge the battery as soon as possible.
WARNING!
Use only ZTE-approved chargers and cables. The use of
unapproved acces sor ies could damage y our ph on e or cause the
battery to explode.
3. Connect the adapter to the charging jack. Ensure that the
adapter is inserted w ith the co rre ct orientation . Do not force
the connector into the charging jack.
13
Page 14
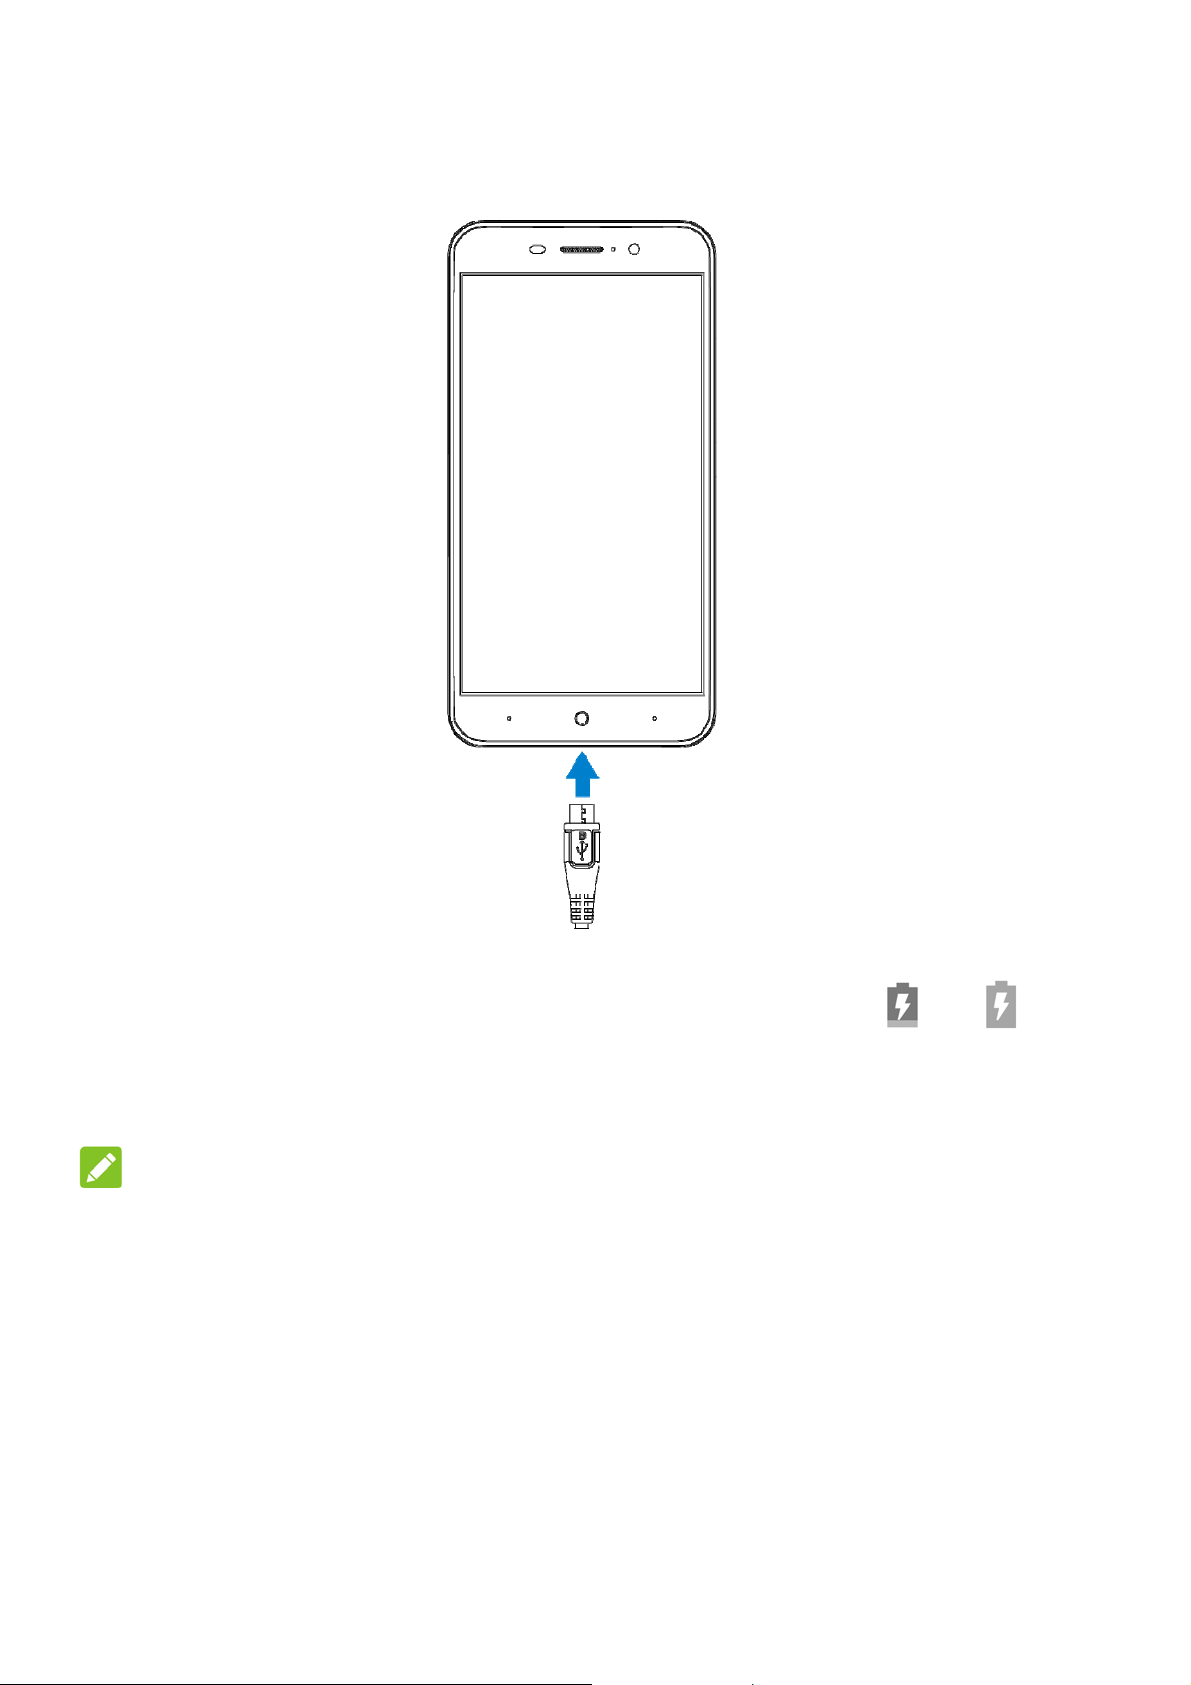
4. Connect the charger to a standard AC power outlet. If the
phone is on, you’ll see a charging icon, such as
appear on the stat us bar.
5. Disconnect the charger when the battery is fully charged.
NOTE:
If the battery is extremely low, you may be unable to power on
the phone even when it is being cha r ge d. In thi s case, try again
after charging the phone for at least 20 minutes. Contact the
customer service if you still cannot power on the phone after
prolonged charging.
or ,
14
Page 15

Extending the Battery Life
Active applications, screen brightness levels, Bluetooth and Wi-Fi
usage and GPS functionality can drain your battery. You can
follow the helpful tips below to conserve your battery power:
Reduce the sc reen backlight time.
Lower the screen brightness.
Turn Wi-Fi, Bluetooth and auto-sync off when not in use.
Disable the GPS function when not in use. Most applications
using this function will periodically query the GPS satellites
for your current location, and each query drains your battery.
Powering On/Off
Press and hold the Power key to turn on your phone.
To power off, press and hold the Power key to open the
options menu and touch Power off.
NOTE:
If the phone freezes or takes too long to respon d, you can press
and hold the Power key for about 10 seconds to restart the
phone.
15
Page 16

Setting Up for the First Time
When you first power on your phone after you purchase it or
reset it to factory settings (see Backup and R eset
do some settin gs bef o r e usi n g it.
Touch the language field to select the language. Then follow the
prompts to set up Wi-Fi, Protect your phone, Google services
and other options.
), you need to
Locking/Unlocking the Screen and
Keys
Your phone allows you to quickly lock the screen and keys (put
the phone to sleep mode) when not in use and to turn the screen
back on and unlock it when you need it.
To lock the screen and keys:
To quickly turn th e scr ee n of f and lock the keys, press the Power
key.
NOTE:
To save battery power, the phone automatically turns off the
screen after some time of inactivity. You will still be able to
receive messages and calls whil e the phone scree n is of f.
To unlock the screen and keys:
1. Press the Power key to turn the screen on.
2. Slide the ring to the right on the screen.
16
Page 17

- or Touch a notification to op en the related app.
NOTE:
If you have set an unlock pattern, a PIN or a password for your
phone, you’ll need to draw the pattern or enter the P IN/password to
unlock your screen.
Using the Touch Screen
Your phone’s touch screen enables you to control actions
through a variety of touch gestures.
Touch
When you want to type using the onscreen keyboard, select
items on the s creen such as the application and set tings
icons, or press the onscreen buttons, simply touch them with
your finger.
Touch and Hold
To open the available options for an item (for example, a
message or link in a web page), touch and hold the item.
17
Page 18

Swipe or Slide
To swipe or slide means to quickly drag your finger vertically
or horizont ally across the screen.
Drag
To drag, press and hold your finger with some pressure
before you start to move your finger. While dragging , do not
release your finger until you have reached the target position.
18
Page 19
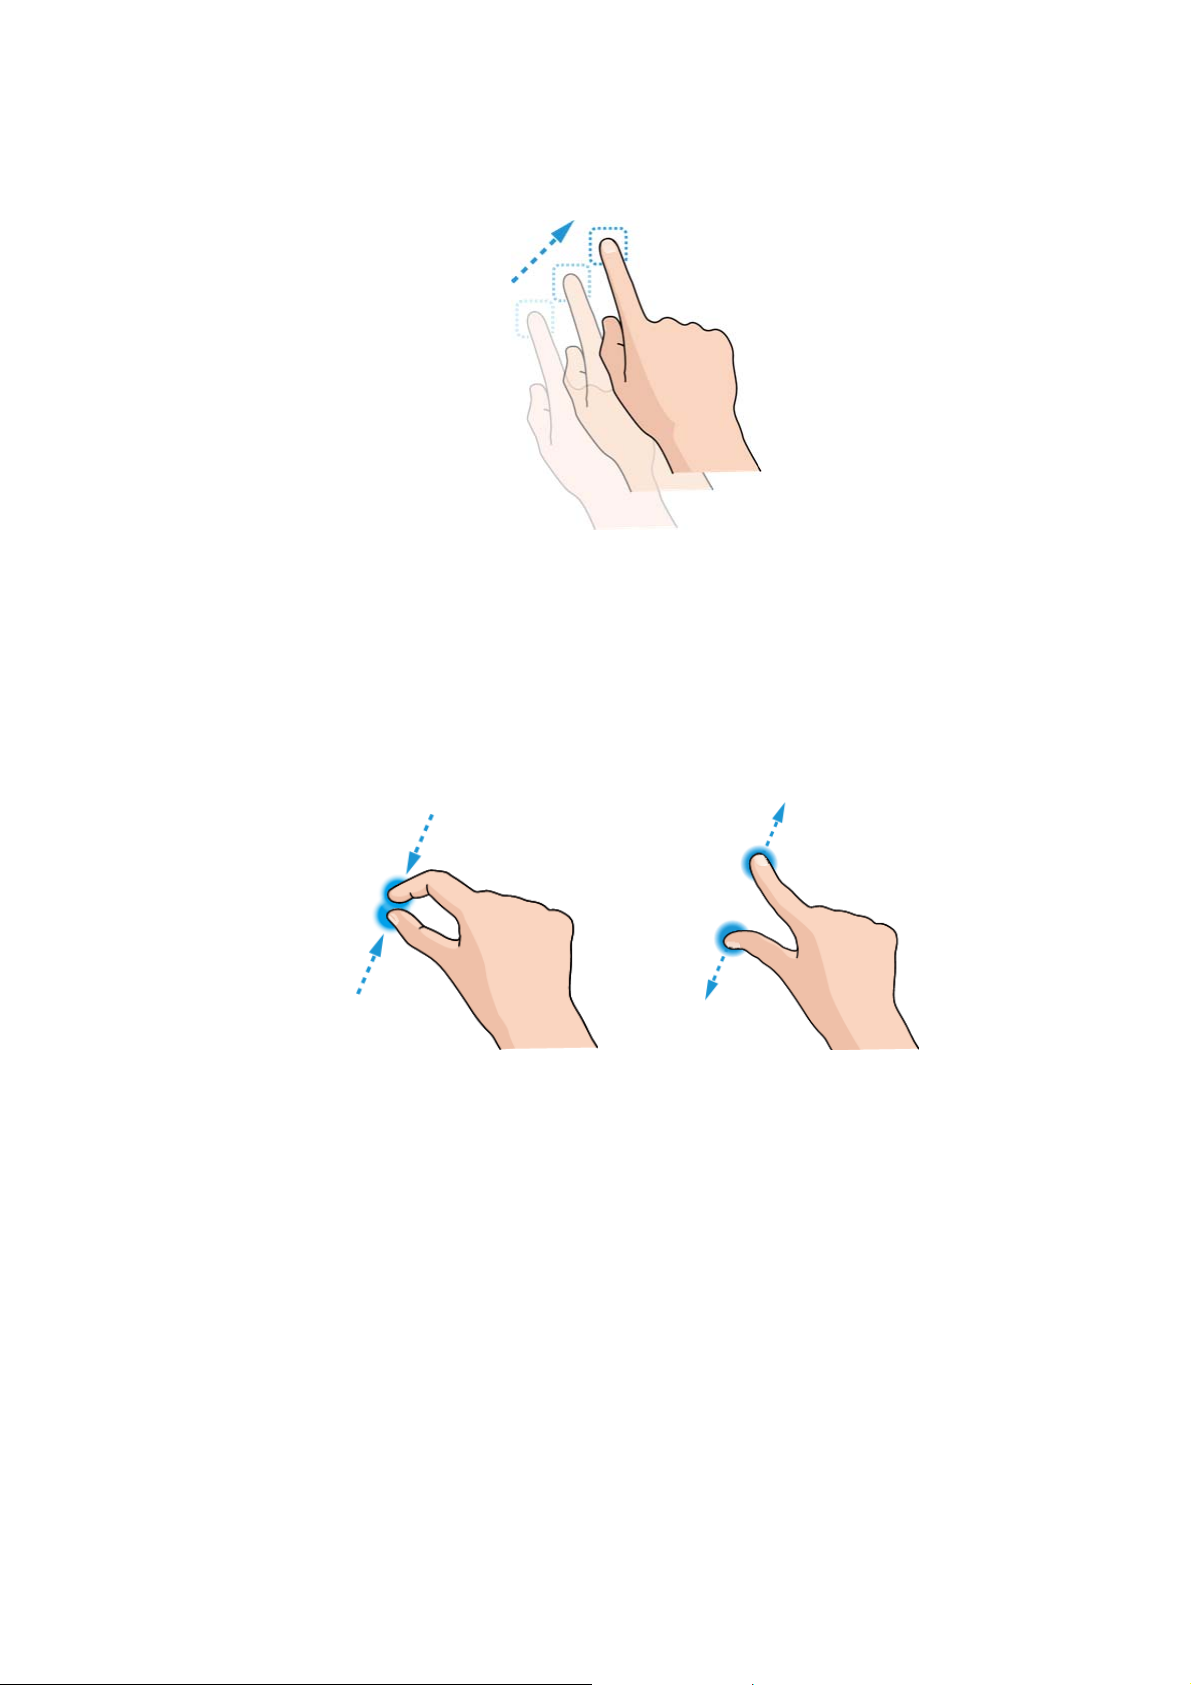
Pinch
In some apps (such as Maps, web browser, and Gallery), you
can zoom in and out by placing two fingers on the screen at
once and pinching them together (to zoom out) or spreading
them apart (to zoom in).
Rotate the screen
For most screens, you can automatically change the screen
orientation from portrait to landscape by turning the phone
sideways.
19
Page 20

NOTE:
The auto-rotate feature needs to be enabl e d fo r the screen
orientati on to au to matic ally change. Touch the Home key,
slide screen and s ele ct Settings > Display > When device
is rotated and select Rotate the contents of the screen.
You can also access the screen rotation control by sliding
down the status bar twice and touch Auto-rot ate/Port rait.
Getting to Know the Home Screen
The home screen is the starti ng point for your phone’s
applications, functions, and menus. You can customize your
home screen by adding folders, widgets, and more.
Add Widgets
1. Touch the Home key, touch and hold an empt y ar ea of the
home screen and select Add a widget.
2. Slide left or right to browse the available widgets.
3. Touch and hold a widget icon and drag it to the home screen.
NOTE:
While holding the item, you can drag it to the r ight edge of the
screen to create a new home screen panel and put the item o n it.
Remove Icons or Widgets
1. Touch and hold an icon or widget on the home screen.
2. Drag it to
Delete to remove it.
20
Page 21

3. If the icon is an application, touch OK to uninstall it.
NOTE:
Some preinstalled apps ca nn ot be uninsta lle d.
Adjust Widget Size
1. Touch and hold a widget on the home screen and then
release it.
2. An outline appears around the widget. Drag the outline to
resize the widget.
NOTE:
Not all widgets can be resized.
Organizing With Folders
You can create folders on the home screen and add several app
icons to a folder.
You can m ove or remove folders the same way as moving or
removing icons.
1. Touch and hold an icon on the home screen and drag it
quickly over another icon.
2. Release the icon. A new folder will be crea ted and both icons
are added into the folder.
3. To add more icons into the folder, touch and hold each icon
and drag it over the folder before releasing it.
21
Page 22

NOTE:
Touch the folder and th en touch the name field to rename the
folder.
Applying New Wallpapers
You can set the wallpaper for the home screen.
1. Touch the Menu key on the home screen, and then touch
Wallpaper.
2. Slide left or right on the w allpaper panel t o sele ct an im age as
the wallpaper. You can also touch Gallery or Camera to
choose or capture a pict ur e. S om e cropping may be needed
for Gallery images.
NOTE:
In addition, you can touch the Home key, slide screen
and select Settings > Display > Wallpaper to pick an
image from Gallery, or Photos, or an animation from
Live Wallpapers.
22
Page 23

Knowing the Basics
Monitoring the Phone Status
The status bar at the top of the home screen provides phone and
service status icons on the right side. Below are some of the
icons you may see.
No signal Signal strength
®
Airplane mode Bluetooth
Do not disturb mode
on (Alarms only or
Priority only)
Do not disturb mode
on (Total silence)
Vibration on
Battery low
Battery partially
drained
Connected to a Wi-Fi®
network
Speaker on
Phone microphone off
GPS on
Portable Wi-Fi hotspot on
on
/
Battery full Alarm set
Battery charging Wired headset connected
23
Page 24

Managing Notifications
Notification Icons
The status bar at the top of the home screen pr ov ides noti ficati on
icons on the left. Below are some of the icons you may see.
New SMS
New MMS
New message(s) from
the Email app
Missed call
Call in progress
Call on hold Song playing
New Wi-Fi network
detected
Downloading data
Sending data
USB tethering on
microSDXC card
mounted
Open/Close the Notification Panel
Notifications report the a rrival of new mes sages, ca lend ar
events, and a lar ms , as well as ongo ing e vents, such as whe n
you've c onf igu r ed y our p ho ne as a Wi- Fi hot s pot . Yo u c an o pe n
the notificati on p ane l to vie w the detail s o f no tifica tions .
24
Page 25

To open the notification panel, swipe your finger down on the
home screen from the top of the screen.
To close the notification panel, swipe your finger up from the
bottom of the screen or to uc h the Back key.
25
Page 26

Phone Calls
You can place calls fro m the Phone ap p, the Contacts app, or
other apps or widgets that display contact information. Wherever
you see a phone number, you can usually touch it to dial.
Placing and Ending Calls
Place a Call by Dialing
1. Touch the Home key > Phone.
2. Touch
with the dialpad. Touch
and enter the phone number or the contact name
to delete incorrect digits.
NOTE:
As you enter the phone number or the contact name, your
phone searches for matching informat ion in your contacts.
If you see the number an d co nt a ct you want to call, touch it
to place the call immediately .
3. Touch
You can also touch the search box at the top of the Phone app
screen and enter the phone number or contact name you w a nt to
call. Touch the matching contact or Call [number] to place the
call.
below the keypa d to dial.
NOTE:
To make an international call, touch and hold the 0 key to enter
the plus (+) symbol. Next, ent er the country code , followed by the
city/area code and then the phone number.
26
Page 27

NOTE:
To redial the last call you made, just touch the Home key >
Phone >
> and touch again.
End a Call
During a call, touch on the screen.
Answering or Rejecting Calls
When you receive a phone call, the incoming call screen opens,
displaying the caller ID or the information about the caller that
you've entered in the Contacts app. You can answer or reject the
call.
Answer a Call
When you receive a phone call, drag over to answer
the call.
- or If the screen is unlocked , t ou ch ANSWER to answer the call.
NOTE:
To silence the ringer before answerin g the call, press either end
of the Volume key.
27
Page 28

Reject a Call
When you receive a phone call, you can:
Drag
- or -
If the screen is unlock ed , t ouch DISMISS to reject the call.
over to reject the call.
Working With the Call History
The call history is a list of all the calls you've placed, received, or
missed. It provides a convenient way to redial a numb er, re tur n a
call, or add a number to your contacts.
To open the call history, you can touch the Home key > Phone >
(in the top search field) > Call History.
Place a Call From the Call History
1. Open the call history.
2. Touch
beside a listing to call ba ck.
NOTE:
You can touch MISSED or ALL to filter the records by call type.
Add a Number From Call History as a Con tact
1. Open the call history.
2. Touch the contact icon in front of a numb er.
3. Touch
on the contact information tab.
28
Page 29

4. To add the number to an existing contact, touch a contac t in
the list. To add a new contact, touch Create new con tact.
Take Other Actions on a Call History Entry
Open the call history, touch a listing and then touch Call details
to view more call information.
Touch
While viewing t he call details, touc h
call to edit the number in the dialer before calling it.
Touch the contact icon in fron t of the entry to open the cont act
information tab from the bottom, where you can send a
message, call back, edit the contact, or add the number to
contacts.
to delete the entry.
> Edit number before
NOTE:
Touch > Clear call history in the call history screen to delete
all history record s.
Calling Your Contacts
1. Touch the Home key > Phone. Your favourite contacts and
frequently called contacts are displayed in the
2. Touch a contact to place the call, or touch or swipe to the
tab to view all your contacts, touch a contact and then
touch its number to make a call.
tab.
29
Page 30

Using Options During a Call
During a call, you w ill see a num ber of onscreen options. Touch
an opti on to select it.
Touch to turn on or off the speaker.
Touch to mu te or unmute your microphone.
Touch to switch to the keypad when you need to enter a
code (for example, the PIN for your voicemail or bank
account) during the call.
Touch to put the call on hold .
Touch >Add call to make another call separately from the
first call, which is put on hold.
Touch >Start recording to record phone conversation.
Touch to end the current call.
WARNING!
Because of higher volume levels, do not place the phone near
your ear during speakerphone use.
30
Page 31

Contacts
You can add contacts on your phone and synchronize them with the
contacts in your Google account or other accounts that support
contact syncing.
To see your contacts, touch the Home key, slide screen and
select Contacts. From there, you can touch the tabs on the top
of the screen to quickly switch to favorite contacts.
Checking Contact Details
1. Touch the Home key, slide screen and select Contacts and
touch the ALL CONTACTS tab to access yo ur contact list.
Scroll through the list to view all your contacts.
2.
3.
Touch a contact to view its details.
NOTE:
If you have a lot of contacts s t ored, you'll see a slider on the ri ght
side of the screen. Drag the slider to the initial letter you need.
Adding a New Contact
1. Touch the Home key, slide screen and select Contacts.
2.
Touch to add a new contact.
Touch the account field above the Name field to choose
3.
where to save the contact. If a sync account is selected, the
contacts will be synced automatically with your ac count
31
Page 32

online.
Enter the contact name, p hone numbers, email addresses ,
4.
and other informat ion.
5.
Touch to save the contact.
Setting Up Your Own Profile
You can create your own name card in your phone.
1. Touch the Home key, slide screen and select Contacts and
touch the ALL CONTACTS tab.
2.
Touch Set up my profile.
If a profile has already been set up, touch the listing beside
ME and touch
3.
Edit your profile information.
.
Touch .
4.
Working With Favorite Contacts
In the favorite contacts tab, you can find your favorite contacts
and frequently contacted contacts.
Add a Contact to Favorites
You can add the contacts you use frequently to FAVORITES so
that you can find them quickly.
32
Page 33

1. Touch the Home key, slide screen and select Contacts and
touch
2. Touch a contact and then touch
the ALL CONTACTS tab.
at the top.
Remove a Contact From Favorites
1. Touch the Home key, slide screen and select Contacts and
touch the FAVOURITES tab.
2. Touch a favorite contact and th en to uch
at the top.
Searching for a Contact
1. Touch the Home key, slide screen and select Contacts.
2. Touch at the top of the screen.
3. Input the contact name or any information the contact has to
search for it. The contacts matched will be listed.
Editing Contacts
Edit Contact Details
1.
Touch the Home key, slide screen and select Contacts.
2. Touch a contact you need to edit and then touch
3. Edit the contact and touch .
Set a Ringtone for a Contact
Assign a special ringtone to a contact, so you know who is calling
when you hear the ringtone.
1. Touch the Home key, slide screen and select Contacts.
.
33
Page 34

Touch a contact you want to set a ringtone for and then touch
2.
.
3.
Touch > Set ringtone.
NOTE:
The contact must be saved on the phone, not the nano-SIM
card.
4. Select a ringtone you like and touch OK.
Touch .
5.
Delete Contacts
1. Touch the Home key, slide screen and select Contacts and
touch the ALL CONTACTS tab.
2. Touch and hold the contact you want to remove.
3. Check more contacts if needed and then touch
4. Touch OK to confirm.
> Delete.
34
Page 35

Messaging
You can use Messaging to exchange text messages (SMS) and
multimedia messages (MMS).
Opening the Messaging Screen
Touch the Home key > Messaging.
The Messaging screen opens, wher e you can create a new
message, search for messages, or open an ongoing message
thread.
Touch to write a new text or multimedia message.
Touch to search for a message using keywords.
Touch an existing message thread to open the conversation
you’ve had with a certain number.
Sending a Message
1. On the Messaging screen, touch at the top.
2. Add recipients by one of the following ways.
Touch the Type name or number field and manually
enter the recipient ’s number or the contact name. If th e
phone presents a few sugg estions, touch the one you
want to add.
Select recipients from your contacts or call history by
touching
3. Touch the Type text message field and enter the message
text.
.
35
Page 36

4. If you want to send a multimedia mess age, touch > Add
subject to add a message subject or touch
message subject, pictures, videos or other files to the
message.
5. Touch
.
to add a
NOTE:
You can also include email addresses as recipients for a
multimedia message.
NOTE:
Do not add a message subject or any attachment if you want to
send a text message. Otherwise you may be charged for a
multimedia message.
Replying to a Message
Messages you receive are appended to existing threads of the
same number. If the new message comes from a new number, a
new thread is create d.
1. On the Messaging screen, touch the thread that has the
message you want to reply to.
2. Type your reply in the text box at the bottom. You can touch
if you want to reply with an MMS.
3. Touch
.
36
Page 37

Forwarding a Message
1. On the Messaging screen, touch the thread that has the
message you want to forward.
2. Touch and hold the message and then touch Forward in the
menu that opens.
3. Enter a recipient for the message and edit the content if you
want.
4. Touch
.
Copying a Message
You can copy tex t messages betw een th e nano-SIM card and t he
phone storage.
To copy a text message from the phone storage to the
nano-SIM card:
1. On the Messaging screen, touch the thread that has the
message you want to copy.
2. Touch and hold the message and then touch Save message
to SIM card i n the menu that op ens.
To copy a text message from the nano-SIM card to the
phone storage:
1. On the Messaging screen, touch > Settings > Text
Message(SMS) > Manage SIM card messages.
2. Touch and hold a message and then touch Copy to phone
memory.
37
Page 38

Changing Message Settings
Touch > Settings in the Messaging screen to change the
messaging settings.
38
Page 39

Getting Connected to Network and
Device
Connecting to Cellular Networks
Control Cellular Data Use
To enable or disable data access:
1. Touch the Home key, slide screen and select Settings >
Data usage.
2. Touch the Cellular data switch to enable or disable Cellular
data use.
To get data services when roaming:
1. Touch the Home key, slide screen and select Settings >
More > Cellular networks.
2. Touch the Data roaming switch if it is turned off.
NOTE:
Data roaming may incur significant roaming charges.
Select Preferred Network Type
1. Touch the Home key, slide screen and select Settings >
More > Cellular networks > Preferred network t ype.
2. Touch the type of netw ork y ou p ref er th e pho ne to c onnec t t o.
39
Page 40

Set Access Point Names
To connect to the Internet you can use the default Access Point
Names (APN). And if you w ant to a dd a new AP N, please c ontac t
the service provider to get the necessary information.
1. Touch the Home key, slide screen and select Settings >
More > Cellular networks.
2. Touch Access point names and then touch
3. Touch each item to enter the information you get from your
service provider.
4. Touch
> Save to complete.
.
NOTE:
To set the APN to default settings, touch > Reset to default.
Select Network Operator
1. Touch the Home key, slide screen and select Settings >
More > Cellular n etworks > Networ k operators.
2. Touch Search networks to search for all available networks.
3. Touch a network in the network list to register manually.
You can also touch Choose automatically to select
preferred network automatically.
40
Page 41

Connecting to Wi-Fi
Wi-Fi is a wireless networki ng technology that can provide
Internet access at di st ances of up to 100 meters, depending on
the Wi-Fi router and your surr oundings.
Turn Wi-Fi On and Connect to a Wi-Fi
Network
1. Touch the Home key, slide screen and select Settings >
Wi-Fi.
2. Slide the Wi-Fi switch to the On position to turn on Wi-Fi.
3. Touch a network name to connect to it.
4. If the network is secured, enter the password and touch
CONNECT.
NOTE:
Your phone automatically connects to pre viously used Wi-Fi
networks when they are in ran ge.
Get Notified of Open Networks
1. Touch the Home key, slide screen and select Settings >
Wi-Fi.
2. Slide the Wi-Fi switch to the On position.
3. Touch
4. Slide the Net work notification switch.
> Advanced.
41
Page 42

When Wi-Fi is on, you receive notifications in the status bar when
your phone detects an open Wi-Fi ne twork. Switch off this op tion
to turn off notifications.
Add a Wi-Fi Network
You can add a Wi-Fi network if the network does not broadcast
its name (SSID), or to add a Wi-Fi network when you are out of
range.
To connect to a secured network , you fir st ne ed to ge t the
security d etails from the network's admin istrator.
1. Touch the Home key, slide screen and select Settings >
Wi-Fi.
2. Slide the Wi-Fi switch to the On position.
3. Touch
4. Enter the network SSID (name). If necessary, enter security
or other network configuration det ails.
5. Touch SAVE.
> Add network.
Forget a Wi-Fi Network
You can make your phone forget about the details of a Wi-Fi
network that y ou a dded - f or ex ample, i f y ou don’t w ant the ph one
to connect to it automatically or if it is a network that you no
longer use.
1. Touch the Home key, slide screen and select Settings >
Wi-Fi.
42
Page 43

2. Slide the Wi-Fi switch to the On position.
3. Touch the Wi-Fi network name and then touch FORGET.
Connecting to Your Computer via USB
You can conn ect y our phone to a c omput er wi th a US B ca ble an d
transfer music, pictures, and other files in both directions. Your
phone stores these files in the phone storage or on a removable
microSDXC card.
If you are using USB tethering, you must turn that off before you
can use USB to transfer files between your phone and computer.
Connect Your Phone to a Compu ter via USB
1. Connect your phone to the PC with a USB cable.
2. Open the notification panel and touch
(USB for ...).
3. Choose one of the follow i ng opt i o ns:
Chargin g : Charge your ph one via USB.
Files t ransfer (MTP): Transfer files on Windows
Mac
Photos transfer (PTP): Transfer photos using camera
®
.
software.
MIDI: Use device for MIDI input.
USB st orage: Transfer files between computer and
Android device.
Built- in CD-ROM: Select this option when features
(Connect to PC software, Media device) enabled for the
®
or
43
Page 44

first time, or when they’re un available.
Disconnect Your Phone From the Computer
To disconnect the phone from the computer, simply unplug the
USB cable when you’re finished.
44
Page 45

Bluetooth
Bluetooth is a short-range wireless communicati on technology .
Phones or other devices with Bluetooth capabilities can ex change
information wirelessly within a distance of about 10 mete rs. The
Bluetooth devices must be paired before the comm unication is
performed.
Turn Bluetooth On/Off
1. Touch the Home key, slide screen and select Settings >
Bluetooth.
2. Slide the Bluetooth switch to the On or Off position.
When Bluetooth is on, the
icon appears in the status bar.
Change the Device Name
1. Touch the Home key, slide screen and select Settings >
Bluetooth.
2. Slide the Bluetooth switch to the On position if Bluetooth is
off.
3. Touch
4. Edit the name and touch RENAME.
> Rename this device.
45
Page 46

Pair With Another Bluetooth Device
1. Touch the Home key, slide screen and select Settings >
Bluetooth.
2. Slide the Bluetooth switch to the On position if Bluetooth is
off.
Your phone auto matic ally sca ns fo r and d is play s the IDs of
all available Bluetooth devices in range. You could touch
> Refresh if you want to scan again.
3. Touch the device you want to pair with.
4. Confirm that the Bluetooth passkeys are the same between
the two devices and touch PAIR. Alternately, enter a
Bluetooth pa ss key and touch PAIR.
Pairing is successfully completed when the other device
accepts the co nnection or the same passkey is entered.
NOTE:
The Bluetooth passkey may be fixed for certain devices, such as
headsets and hands-fr ee car kits. You can try entering 0000 or
1234 (the most common passkeys), or refer to the documents for
that device.
46
Page 47

Making the Most of Multimedia
Taking Pictures with Your Camera
Your phone has camera function. Touch the Home Key, slide
screen and select Camera.
Touch
right corner of the screen.
to take a picture. To v iew it, ju st tap the pict ur e i n t he
Recording a Video with Your Camera
1. Touch {the Home Key, slide screen and select Camera.
2. Touch
to pause or resume reco rding.
3. Touch
NOTE:
While the recording is in prog ress, you can touch
save the frame as a separate photo.
to start recording, you can also touch /
to stop recording.
to
Opening Your Gallery
Touch Home key, slide screen and select Gallery. You can use
Gallery to view pictures and play videos. You can also do some
basic editing of your picture s – such as setti ng them as w allpaper
or contact photo, and s haring with friends.
47
Page 48

Listening to Your FM Radio
With the FM radio, you can search for radio channels, listen to
them, and save them on your phone. Note that the quality of the
radio broadcast depends on the coverage of the radio station in
your area. The wired headset works as an antenna, so always
connect the headset when using the radio. When you receive an
incoming call while listening to the radio, the radio will be turned
off.
Scanning Channels
1. Plug in a wired headset and touch the Home key, slide
screen and select FM Radio.
2. Touch
. Your phone scans for all available channels.
Listening to FM Radio
1. Touch the Home key , slide scr een and select FM Radio while
the headset is connected.
2. Touch
You can touch
NOTES:
Touch to add the channel to favourites. Favourite
channels are put on the FM Radio main screen .
Touch > Speaker to listen to the radio through the phone
and select a channel.
or to switch to other channels.
speaker.
48
Page 49

Touch > Start Recording to record the current radio
program. The recorded files are saved in the phone storage
or microSDXC card.
Playing Your Music
The Play Music application works with Google Music, Google’s
online music store and streaming service. You can stream via
mobile data or Wi-Fi and listen to your favorite songs that you’ve
added to your online Google Music library. You can also play
audio files you’ve copied directly to your phone from a co mputer.
NOTE:
The availability of Google Music is dependent on your region. If it
is not available, or you don’t have a mobile data or Wi-Fi
connection, you can only play music stored on your phone.
Playing Your Music
Touch the Home key > Google > Play Music. If you are
prompted, select an account to access its online music library.
The app searches your online library and your phone for music
and playlists before displaying your combined music library,
organised by PLAYLISTS, ARTISTS, ALBUMS, SONGS, and
GENRES. You can touch
music and playlists. To change views of your library, swipe left or
right.
Touch a song to play it. When the song is playing, touch the
summary information at the bottom to display the playback
> Music library to view all the
screen.
49
Page 50

Managing Playlists
Create playlists to org anize your music fil es into sets o f songs, so
that you can play the songs you like in the order you prefer.
To create a playlist or add a song to a playlist:
Touch
To remove a song from a playlist:
1.Touch
2.Touch PLAYLISTS and open a playlist.
3.Touch
4.Touch Remove from playlist.
To delete a playlist:
1.Touch
2.Touch PLAYLISTS.
3.Touch
4.Touch Delete > OK.
next to a song and select Add to playlist.
> Music library in the Play Music app.
next to a song in the playlist.
> Music library in the Play Music app.
next to the playlist you want to delete.
NOTE:
Certain automatically created playlis ts su ch as Last added
cannot be deleted.
Making Voice Memos
Sound Recorder enables you to record voice memos and listen
to them whenever you like.
50
Page 51

Recording a Voice Memo
1. Touch the Home key, slide screen and select Sound
Recorder.
2. Touch
to start recording. During recording, you can do
the following:
Touch / to paus e or continue the recording.
3. Touch
Touch > DISCARD to delet e the recording.
Touch > SAVE to save the recording.
to stop recording.
Playing a Voice Memo
To play a memo you just recorded:
Touch
To play any saved memo:
play back the voice recording.
1. Touch
at the bottom right of the screen to see all
recordings.
2. Touch the title of a memo to play it.
51
Page 52

Sorting out Your Phone Settings
Setting Date and Time
1. Touch the Home key, slide screen and select Settings >
Date & time.
2. Set the date, time, time zone, and date/time format.
To adjust the date and time automatically, turn on
Automatic date & time.
To adjust the date and time manually, turn off Automatic
date & time and touch Set date / Set time to change the
date and time.
To adjust the time zone automatically, turn on Automatic
time zone.
To adjust the time zone manually, turn off Automatic
time zone and touch Select time zone to set the correct
time zone.
To adjust the time format, turn on Use 24-hour format.
Display Settings
Touch Home key, slide screen and select Settings > Display,
you can adjust the display settings as you like:
Brightness level: Set the bright ness of the display.
Adaptive brightness: Automatically adjust screen
brightness.
52
Page 53

Wallpaper: Se lect a backgrou nd image or an imation for the
home screen and lock screen.
Sleep: Set the length of time of inactivity before the screen
turns off automatically.
Font size: Set the font size of the text on the screen.
When device is rotat ed: Select whether the screen contents
should rotate when the phone is rotated.
Cast: Connec t with TVs, projectors or other devices that
support wireless display and project your phone’s conte nt
wirelessly to that device. You need to turn on Wi-Fi first. For
detailed introduction, please refer to the dev ice manual.
Sound and Notification Settings
Touch Home key, slide screen and select Settings > Sound &
notification. Y ou can adj us t diffe ren t types of volume, set Do not
disturb options, set up ringtone and notification sound, select
system sounds, control notification display, and check the apps
that have requested notification acce ss or Do not disturb access.
Language Settings
You can change the la nguage of your phone s ystem in t wo
simple s teps.
1. Touch Home Key
Language & input > Language.
2. Select a language from the list given.
, slide screen and select Settings >
53
Page 54

Disabling Data Services
Touch Home Key, slide screen and select Settings > Data
usage > Cellular data, then tap the switch to the off position to
Close.
Switching Networks
1. Touch Home Key, slide screen and select Settings >
More > Cellular networks > Network operators.
2. Tap Search networks to register manually, or tap Choose
automatically.
Setting Access Point Names
To connect to the Internet you can use the default Access Point
Names (APN). And if you w ant to a dd a new AP N, please c ontac t
the service provider to find out more.
Touch Home Key
Cellular networks > Access Point Names.
, slide screen and select Settings > More >
Security Settings
Here’s how to protect your phone and SIM card from
unauthorize d use.
Protecting Your Phone with a Pattern
You can protect your phone by creating a screen lock. When it is
enabled, you need to swipe up on the screen, draw a pattern or
enter a numeric PIN or passw ord to unlock the phone’ s scr ee n
54
Page 55

and keys.
1. Touch the Home key, slide screen and select Settings >
Security > Screen lock.
2. Touch None, Swipe, Pattern, PIN or Password.
Touch None to disable the screen lock.
Touch Swipe to enable screen lock and allow unlocking
with a ‘swipe' gesture. You can unlock the screen by
touching the display and sliding up.
Touch Pattern to draw and redraw a pattern that you
must draw to unlock the screen.
Touch PIN or Password to set a numeric PIN or a
password that you must enter to unlock the screen.
3. For Pattern, PIN, or Password lock, select whether to protect
your phone by req uiri ng your pattern, PIN or password before
it starts up. Touch CONTINUE.
4. For Pattern, PIN, or Password lock, select how you want
notifications and their contents to show when the phone is
locked. Then touch DONE.
Protecting Your SIM Card with a PIN
Every SIM card comes with a PIN. The initial PIN is provided by
your mobile phone carrier. It’s best to lock your SIM card as soon
as you can.
1. Touch Home key, slide screen and select Settings >
Security > Set up SIM
2. Slide the Lock SIM card switch to the on position.
card lock.
55
Page 56

3. Enter the PIN you’ve been given and tap OK.
TIPS: If you enter the wr ong SIM PIN more times than allowed,
your SIM card will be locked and you cannot access the mobile
phone network. Contact your operator for a PIN Unlock Key
(PUK) to restore the SIM card.
Changing Your SIM PIN
You can change the PIN you’ve been given to one easier for you
to remembe r and harder for others to guess.
1. Touch Home key, slide screen and select Security > Set up
SIM card lock.
2. Make sure you already slide the Lock SIM card switch to the
on position.
3. Touch Change SIM PIN.
Personal: Backup and Reset
Touch the Home key, slide screen and select Settings >
Backup & reset to manage data backup and restoration options,
and to reset the network set tin g or the phone to factor y status.
Back up my data: Back up app data, Wi-Fi passwords, and
other settings to Google se rvers after you sign in to your
Google account.
Backup account: Set the Google account that the data is
backed up to.
Automatic restore: Restore previously backed up settings
and data when you reinstall an app.
56
Page 57

Network settings reset: Reset all network settings including
Wi-Fi, mobile data and Bluetooth.
Factory data res et : Reset your phone to factory default
settings. All your data in the internal storage will be erased
during the process.
Apps
See apps installed on your phone and manage them.
Touch the Home key, slide screen and select Settings > Apps.
Touch an app to see its information, you can stop the app,
uninstall the app, clear data and cache, or move the app between
the internal storage and the memory card.
NOTE: Not all applications can be moved or uninsta lle d.
57
Page 58

Other Applications
Clock
Touch the Home key, slide screen and select Clock. The Clock
app allows y ou to che ck l ocal tim e in pl aces aro und the w orld, s et
alarms, and use timers.
Set a New Alarm
1. Touch the tab in the Clock app.
2. Touch an existing alarm to config ur e it, or to uc h
bottom of the screen to creat e a n e w alarm.
3. Set the time and touch OK. Then edit repeat, alarm sound,
vibration, and label.
NOTES:
To enable or disable existing alarms directly, just touch the
switches on the righ t side.
Touch > Settings to set more alarm options in the Alarms
section.
Check World Time
Touch the tab in the Clock app to check local time around
at the
the world as well as th e next alarm.
Touch
at the bottom to add other cities.
58
Page 59

Use the Stopwatch and Countdown
Touch the or tab in the Clock app to use the stopwatch
or the countdown timer.
Stopwatch allows you to record lap times, while countdown
allows you to set a time and count down to zero.
Calculator
Touch the Home key, slide screen and select Calculator to use
the phone’s convenient built-in calculator for some basic as well
as advanced mathematical equations.
NOTE:
Slide left while holding the phone upright to access advanced
buttons.
Downloads
The Downloads app keeps a record of the files you have
downloaded using apps such as Browser or Email.
Touch the Home key, slide screen and select Downloads to
check the record.
Touch a file to open it with the appropriate applications.
Touch and hold a file to delete or share it.
59
Page 60

File Manager
Quickly access all of your images, videos, audio clips, and other
types of fi les on your internal storage and the microSDXC card.
Touch the Home key, slide screen and select File Manager.
Touch folders and files to access stored items.
Touch Internal storage / SD Card > to create a new
folder in the current directory .
60
Page 61

For Your Safety
General Safety
Don’t make or receive
handheld calls while
drivin g. Never text
while driving.
Keep your phone at
least 10 mm away
from your body while
making calls.
Small parts may
cause choking.
Your phone can
produce a loud sound.
Don’t use at gas
stations.
Your phone may
produce a b right or
flashing light.
Don’t dispose of your
phone in fire.
To prevent possible
hearing damag e, do
not listen at high
volume levels for long
Avoid contact with
anything magnetic.
Keep away from
pacemakers and oth er
electronic medical
devices.
periods.
Avoid extreme
temperatures.
Avoid contact with
liquids. Keep your
phone dry.
61
Page 62

Turn off when asked
Do not attempt to
to in hospitals and
medical facilities.
Turn off when told to
in aircrafts and
airports.
Turn off when near
explosive materials or
liquids.
Distraction
Driving
disassemble your
phone.
Only use approved
accessories.
Don’t rely on your
phone as a primary
device for emergency
communications.
Full attention must be given to driving at all times in order to
reduce the risk of an accident. Using a phone while driving (even
with a hands-free kit) can cause distraction and lead to an
accident. You must comply with local laws and regulations
restricting the use of wireless devices while driving.
Operating Machinery
Full attent ion must be given to operating t he machinery in ord er
to reduce the risk of an a c cident.
62
Page 63

Product Handling
General Statement on Handling and Use
You alone are responsible for how you use your phone and any
consequences of the use.
You must always switch off your phone wherever the use of a
phone is proh ibited. Use of your phone is subj ect to safety
measures designed to protect users and their environment.
Always treat your phone and its accessories with care and
keep them in a clean place.
Keep the screen and camera lens clean. Unclean screen or
camera lens may slow down the phone's reaction to your
operations or lower image quality.
Clean your phone and its accessories with a soft material
such as cleaning clot h for eyeglass lenses. Do not use
alcohol or other corr osive substances for clea ning or allow
them to get inside.
Do not expose your phon e or it s ac cessories to open flam e s
or lit tobacco products.
Do not expose your phone accessories to liquid, moisture or
high humidity.
Do not drop, throw or try to bend your phone or its
accessories.
Do not paint your phone or its accessories.
63
Page 64

Do not attempt to disassembl e your phone or its accessories,
only authorized personnel can do so.
Do not expose or use your phone or its accessories in an
environment with or that can reach extreme temperatures,
minimum - [5] and maximum + [50] degrees Celsius.
Do not place your phone inside or near heating equipment or
high pressure containers, such as wa ter heaters, microwave
ovens, or hot cooking uten sils. Ot herw ise, y our phone may be
damaged.
Please check local regulations for dispos al of electronic
products.
Do not carry your phone in your back pocket as it could break
when you sit down.
Small Children
Do not leave your phone and its acce ssories within the reach of
small children or allow them to play with it.
They could hurt themselves or others, or could accidentally
damage the phone.
Your phone contains small parts with sharp edges that may
cause an injury or may become detached and create a c hoking
hazard.
Demagnetization
To avoid the risk of demagnetization, do not allow electronic
devices or magnetic media close to your phone for a long time.
64
Page 65

Electrostatic Discharge (ESD)
Do not touch the metallic connectors of the nano-SIM card.
Antenna
Do not touc h the antenna unnecess arily.
Normal Use Position
When placing or receiv ing a phon e call , hol d y our ph o ne to y our
ear, with the bottom toward your mouth.
Air Bags
Do not place your phone in the area over an air bag or in the air
bag deployment area as an airbag inflates with great force and
serious injury coul d occ u r.
Place your phone safely before driving your vehicle.
Seizures/Blackouts
Your phone can produce a bright or flashing light. A small
percentage of peopl e may be susceptible to blackouts or
seizures (even if they have never had one before) when exposed
to flashing lights or light patterns such as when playing games or
watching videos. If you have experienced seizures or blackouts
or have a family history of such occurrences, please consult a
physician. To reduce the risk of blackouts or seizures, you can
use your phon e in a well-lit room and take frequen t breaks.
65
Page 66

Repetitive Strain Injuries
To minimize the risk of Repe titive Strain Injury (RSI) when texting
or playing games w ith your ph one:
Do not grip the phone too tightly.
Press the buttons lightly.
Use the special features which are designed to minimize the
times of pressing buttons, such as Message Templates and
Predictive Te xt.
Take frequent breaks to stretch and relax.
Emergency Calls
This phone, lik e an y ot her wi re less phon e, operat es usin g rad io
signals, wh ic h can no t guaran te e con nec tion in all cond i tions .
Therefore, you shou ld not re ly so le ly on an y wir e le ss phone fo r
emergency communications.
Loud Noise
This phone is ca pable of producing loud noise s, which may
damage your hearing. Turn down the volume before using
headphones, Blue too th headsets or other audio devices.
Phone Heat
Your phone may become warm during charging and normal use.
66
Page 67

Electrical Safety
Accessories
Use only approved accessories .
Do not connect with inco mpatible products or accessories.
Take care not to touch metallic objects, such as coins or key
rings, or allow them to cont act or short-cir cuit the charging jack.
Never puncture the surface of the phone with sharp objects.
Connection to a Car
Seek professional advice when connecting a phone interface to
the vehicle electrical system.
Faulty and Damaged Products
Do not attempt to disassemble the phone or its accessories.
Only qualified personnel can service or repair the phone or its
accessories.
If your phone (or its accessories) has been submerged in water ,
punctured, or subjecte d t o a severe fall, do not use it until you
have taken it to be checked at an authorized service center.
67
Page 68

Radio Frequency Interference
General Statement on Interference
Care must be taken when using your phone in close proximity to
personal medical devices, such as pacemakers and hearing aids.
Please consult your doctor and the device manufacturers to
determine if the operation of your phone may interfere with the
operation of your m edical devices.
Pacemakers
Pacemaker manufacturers recommend that a minimum
separat ion of 15 cm be maintained bet we en a mobile phone an d
a pacemaker to avoid potential interference with the pacemaker.
To achieve this, use the phone on the opposite ear to your
pacemaker and do not carry it in a breast pocket.
Hearing Aids
People with hearing aid s or other cochlear implants may
experience interfering noises when using wireless devices or
when one is nearby.
The level of interference depends on the type of the hearing
device and the di stan ce fr om t he interference source. Increasing
the separation between them may reduce the interference. You
may also consult y our hearing aid manufactu rer to discuss
alternatives.
68
Page 69

Medical Equipment
Switch off your wireless de vice when you are requ ested to do
so in hospitals , clinics or h ealth c are facilities. These requests
are designed to prevent possible interference with sensitive
medical equipment.
Aircraft
Switch off y our wi reless devi ce whenev er y ou are ins truct ed to do
so by airport or airline staff.
Consult the airline staff about the use of wireless devices on
board the aircraft and enable airplane mode of your phone when
boarding an ai rcraft.
Interference in Vehicles
Please note that because of possible interference to
electronic equipment, some vehicle manufacturers forbid the
use of mobile phones in their vehicles unless a ha nds- free kit
with an external antenna is included in the installation.
Explosive Environments
Petrol Stations and Explosive Atmosphere
In locations with potentially explosive atmosphere, obey all
posted signs to turn off wireless devices such as your phone or
other radio equipment.
69
Page 70

Areas with pot enti ally ex plosive atm osphe re incl ude fu eling areas,
below decks on boats, fu el or ch emical transfer or stor age
facilities, and area s where th e air contai ns chemical s or partic le s,
such as grain, dust, or metal powders.
Blasting Caps and Areas
Power off your mobile phone or wireless device when in a
blasting area or in areas where signs are posted to power off
“two-way radios” or “electronic devices” to avoid interfering with
blasting operatio ns.
Radio Frequency (RF) Energy
This phone is designed and manufactured not to exceed the
emission limits for exposure to radio frequency (RF) energy
set by the Federal Communications Commission of the United
States.
During SAR testi ng, this device was set to transmit at its
highest certified power level in all tested frequency bands,
and placed in positions that simulate RF exposure in usage
against the head with no separation, and near the body with
the separation of 10 mm. Although the SAR is determined at
the highest certified power level, the actual SAR level of the
device while operating can be well below the maximum value.
This is because the phone is designed to operate at multiple
power levels so as to use only the power required to reach the
network. In general, the closer you are to a wireless base
station antenna, the lower the power output.
70
Page 71

The exposure standard for wireless devices employing a unit
of measurement is known as the Specific Absorption Rate, or
SAR. The SAR limit set by the FCC is 1.6 W/kg.
This device is complied with SAR for general population
/uncontrolled exposure limits in ANSI/IEEE C95.1-1992 and
had been tested in accordance with the measurement
methods and procedures specified in IEEE1528.
The FCC has granted an Equipment Authorization for this
model phone with all reported SAR levels evaluated as in
compliance with the FCC RF exposure guidelines. SAR
information on this model phone is on file with the FCC and
can be found under the Display Grant section of
www.fcc.gov/oet/ea/fccid after searching on FCC ID:
SRQ-DL2XLB28.
For this device, the highest reported SAR value for usage
against the head is 0.734 W/kg, and for usage near the body
is 0.901W/kg.
While there may be differences between the SAR levels of
various phones and at various positions, they all meet the
government requirements.
SAR compliance for body-worn operation is based on a
separation distance of 10 mm between the unit and the
human body. Carry this device at least 10 mm away from your
body to ensure RF exposure level compliant or lower to the
reported level. To support body-worn operation, choose the
belt clips or holsters, which do not contain metallic
components, to maintain a separation of 10 mm between this
device and your body.
71
Page 72

RF exposure compliance with any body-worn accessory,
which contains metal, was not tested and certified, and using
such body-worn accessory should be avoided.
FCC Regulations
This device complies with part 15 of the FCC Rules.
Operation is subject to the following two conditions: (1) This
device may not cause harmful interference, and (2) this
device must accept any interference received, including
interference that may cause undesired operation.
CAUTION:
Changes or modifications not expressly approved by the
manufacturer could void the user’s authority to operate the
equipment.
The antenna(s) used for this transmitter must not be
co-located or operating in conjunction with any other antenna
or transmitter.
NOTE:
This equipment has been tested and found to comply with the
limits for a Class B digital device, pursuant to part 15 of the
FCC Rules.
These limits are designed to provide reasonable protection
against harmful interference in a residential installation. This
equipment generates, uses and can radiate radio frequency
energy and, if not installed and used in accordance with the
instructions, may cause harmful interference to radio
communications. However, there is no guarantee that
72
Page 73

interference will not occur in a particular installation. If this
equipment does cause harmful interference to radio or
television reception, which can be determined by turning the
equipment off and on, the user is encouraged to try to correct
the interference by one or more of the following measures:
Reorient or relocate the receiving antenna.
Increase the separation between the equipment and
receiver.
Connect the equipment into an outlet on a circuit different
from that to which the receiver is connected.
Consult the dealer or an experienced radio/TV technician
for help.
73
 Loading...