

Page 1
ZTE Chorus User Guide
Page 2

Contents
Using your phone ......................1
Getting to know your phone... 2
Onscreen icons ......................... 4
Before getting started.............. 5
Inserting a memory card......... 5
Using the battery.......................6
Power on/off............................... 9
Powering on ...............................9
Powering off ...............................9
Basic Operation........................10
Screen control ......................... 10
Enter the Launcher .................. 11
Home screen............................. 11
Display the dial keyboard..... 13
Switch to sleep mode ............ 13
Wake up your phone.............. 13
Text Input .................................. 15
Keyboard................................... 15
XT9 text input........................... 16
Care and maintenance............ 17
Consumer limited warranty ... 18
Additional safety information .22
Page 3

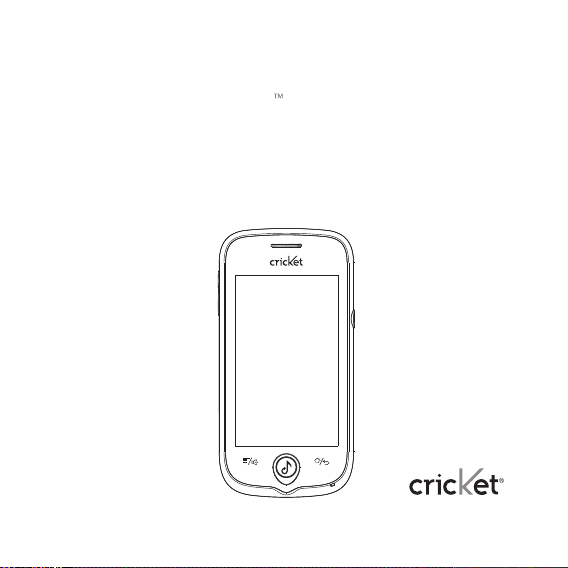
Using your phone
Thanks for choosing the ZTE® ChorusTM (Model #: D930). It’s a CDMA2000 1X
EVDO Digital Mobile Phone, which is shortly referred to as ‘phone’ from now on.
Don’t worry if the pictures we use to demonstrate your phone’s functions look a
little different from what you see on the screen. It’s the functions it shows that
matter.
For more information about how to use your phone, refer to the User Manual on
the phone.
To rea d t he User Manual, do as follows:
1. Hold the power key to turn on your phone.
2. Click
Using your phone
1
to enter the Launcher, select Settings > About phone > User
manual.
Page 4
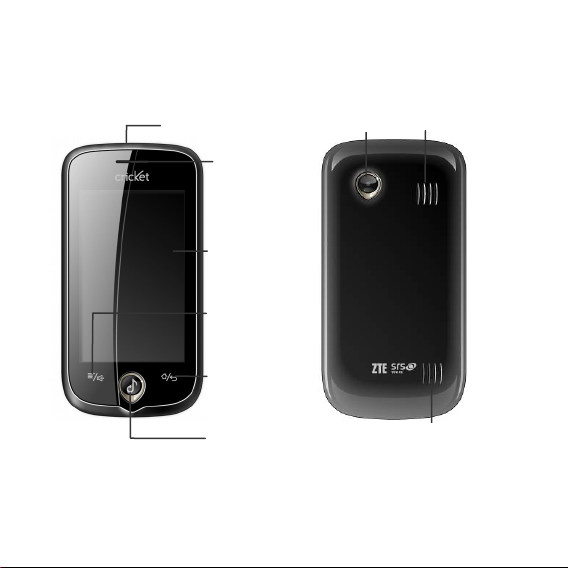
Getting to know your phone
Headset jack
Speaker
Touch screen
Menu/
Speakerphone key
Home / Back key
Camera
Speaker
Muve music key
Speaker
Getting to know your phone
2
Page 5
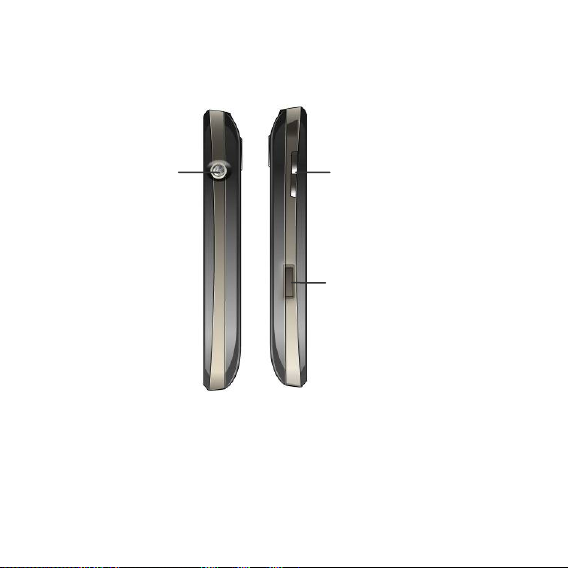
Getting to know your phone
3
Power key
Volume keys
USB port
Menu/Speakerphone key: Menu/Hold the key to enable or disable
Speakerphone mode.
Muve music key: Enter Muve music.
Home/Back key: Back/Hold the key to back to home screen.
Page 6
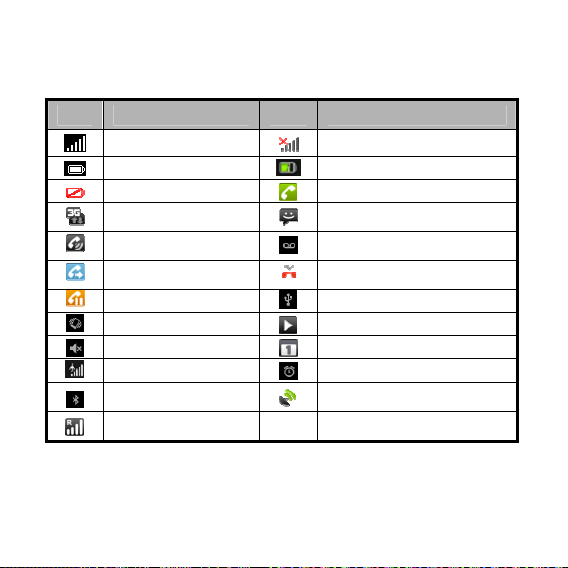
Onscreen icons
Icons Descriptions Icons Descriptions
Signal strength
Battery is full
Battery is low
Connected to 3G
Speakerphone is on
Call forwarding is on
Call on hold
Vibrate mode
Ringer is silenced
Flight mode
Bluetooth® is on
Roaming
No signal
Charging
In call
You have an unread message.
You have unheard voicemail.
Missed call
Connected to a PC
Music playing
New calendar reminder
A clock alarm is active.
Receiving location data from
GPS
Onscreen icons
4
Page 7

Before getting started
Inserting a memory card
1. Turn off your mobile phone, remove the battery and disconnect any
external power.
2. Slide the metal clasp back, and then open.
3. Insert the memory card into the slot.
4. Close the clasp and slide into place to secure the card.
Note
:
This mobile phone supports memory cards. For details on compatibility
information of memory, please consult your manufacturer or supplier.
Before getting started
5
Page 8

Using the battery
Inserting the battery
1. Open the battery cover on the back of your phone.
2. Align the battery's contact points with those of the phone and gently press
the battery down into place.
3. Replace the battery cover clicking it back into position.
Before getting started
6
Page 9
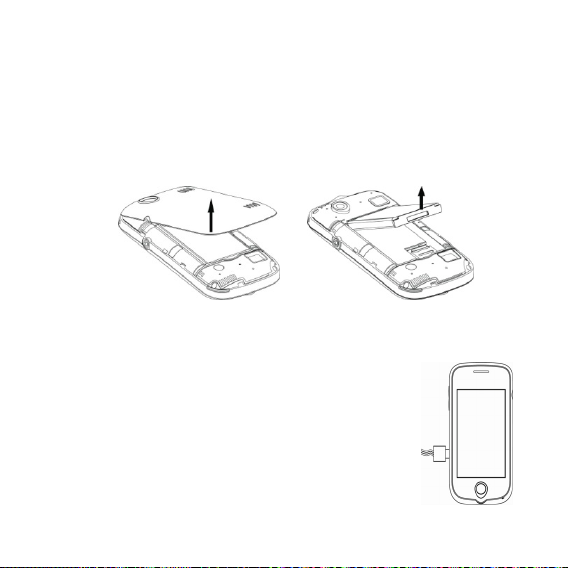
Removing the battery
1. Switch off your phone.
2. Open the battery cover.
3. Lift the battery up and out of your phone.
Charging the battery
The rechargeable Li-ion battery that comes with your
phone is ready to use, but is not charged. That’s easy to do.
We’ll show you how below.
The first three times you use the battery, make sure it’s
completely drained before recharging, then recharge it
fully. That will help to ensure its optimum performance and
a long life.
Before getting started
7
Page 10

1. Connect the charger to your phone, and plug it into an 110V/220V socket.
2. The battery indicator in the corner of the screen will scroll right and left to
show you it’s charging. If the phone’s battery has been fully drained, the
battery indicator may not immediately appear on the screen when
charging starts. Please don’t worry if the phone and charger become warm
while charging. That’s completely normal.
3. When fully charged, the battery indicator will stop scrolling right and left.
4. Disconnect the charger from your mobile, and unplug.
Before getting started
8
Page 11

Power on/off
Powering on
Press the power key until the power-on icon appears.
Powering off
Long press the power key to display the menu Phone options and select
Power off.
Power on/o ff
9
Page 12

Basic Operation
Screen control
You can control your phone through a series of operations on the screen.
z Press: you can press the items on the screen to select, open the
applications, or use the keyboard to input characters.
z Slide: you can scroll up/down the page or scroll the page left/right by
sliding vertically or horizontally on the screen.
z Long press: you can long press some items to get the item's available
menu. Long press the application icons to add the shortcuts of these
applications to the home page.
z Drag: you can drag some items on the screen to realize some operations.
z Switch between landscape mode and portrait mode: you can switch to
the landscape mode by rotating your phone. The landscape mode is only
valid under some interfaces, such as text input interface, message viewing
interface, etc.
Basic Operation
10
Page 13

Enter the Launcher
On the Home screen, touch the Launcher icon to enter the Launcher and press
the
icon to return.
After entering the Launcher, press the icon to enter the corresponding
submenu, press the Home/Back key to return to the previous menu and press
the Home/Back key to return to the home screen.
Home screen
Notification bar
Drag the notification bar
down from the top of the
screen to open
notifications panel.
Indication of three home
screens.
Phone
Basic Operation
11
Messaging Contacts
Status bar
Show the Signal strength,
battery status, etc.
Icons
Touch to open the relevant
application.
Launcher icon
Page 14

Add icons to the home screen
Long press the empty area on the home screen to pop up Add to Home
screen menu. Select Shortcuts, Widgets, Folders, Wallpapers.
You can copy icons from the Launcher to the home screen by long pressing an
icon in the Launcher until the icon enlarges and the phone vibrates.
Move icons on the home screen
1. Long press an icon until the icon enlarges and the phone vibrates.
2. Drag the icon to your desired position and then release.
Delete icons on the home screen
1. Long press an icon until the icon enlarges and the phone vibrates.
2. Drag the icon into
at the lower part of the screen to delete.
Change wallpaper
1. Long press the empty area on the home screen to pop up Add to Home
screen menu.
2. Select Wallpapers
image library.
3. Select one image and press Set wallpaper.
Gallery/Live wallpapers/Wallpapers to enter the
Basic Operation
12
Page 15

Display the dial keyboard
1. Press the icon to enter the Launcher.
2. Select Phone to display the dial keyboard.
Switch to sleep mode
Sleep mode is a kind of power-saving mode, which prevents against
inadvertent operations.
If your phone has been in the idle mode for a while, it will automatically switch
to sleep mode. You can also press the Power key to turn off the screen and
enable sleep mode.
Note
:
Within 15 minutes after the screen is switched to the sleep mode, the network
will automatically disconnect; as the screen is awakened from Sleep mode, the
network will connect again.
Wake up your phone
After the phone switches to sleep mode, the screen will be turned off and
locked. In this case please awake your phone and unlock the screen if you
want to use your phone.
1. Press the power key to turn on the screen.
Basic Operation
13
Page 16

2. Press the
you've set unlock pattern and password, you need to input the unlock
pattern or password to enter the main interface. (For details, please see
Settings > Security> Set up screen lock > Pattern /Password).
button and drag it to the right until the screen is unlocked. If
Basic Operation
14
Page 17

Text Input
Your phone supports keyboard input method and XT9 text input method.
Keyboard only supports English input.
On the text screen, touch and hold the space where you usually write your text
until the Edit text menu is displayed, touch Input method and select the input
method. The keyboard panel will be displayed automatically.
Keyboard
Change between
lowercase and
uppercase.
symbol/number
mode. Touch again
to change back.
Tex t I np ut
15
Insert space
Select input method
Input Symbol
Delete character
before the cursor.
Insert smiley Change to
Page 18

XT9 text input
Under XT9 text input method, click
Spanish input.
to switch between English input and
Switch input method
Change between
lowercase and
uppercase.
symbol/number mode.
Touch again to change
Change to
back.
Insert space
Delete character
before the cursor.
Insert smiley
Tex t In p ut
16
Page 19

Care and
maintenance
Your device is a product of superior
design and craftsmanship and
should be treated with care. The
following suggestions will help you
protect your warranty coverage.
Keep the device dry. Precipitation,
humidity, and all types of liquids or
moisture can contain minerals that
will corrode electronic circuits. If
your device does get wet, remove
the battery, and allow the device to
dry completely before replacing it.
Do not use or store the device in
dusty, dirty areas. Its electronic
components can be damaged.
Do not store the device in hot areas.
High temperatures can shorten the
life of electronic devices, damage
batteries, and warp or melt certain
plastics.
Care and maintenance
17
Do not store the device in cold
areas. When the device returns to
its normal temperature, moisture
can form inside the device and
damage electronic circuit boards.
Do not attempt to open the device
other than as instructed in this guide.
Do not drop, knock, or shake the
device. Rough handling can break
internal circuit boards and fine
mechanics.
Do not use harsh chemicals,
cleaning solvents, or strong
detergents to clean the device.
Do not paint the device. Paint can
prevent proper operation.
Unauthorized modifications, or
attachments could damage the
device and may violate regulations
governing radio devices.
Use chargers indoors.
Always create a backup of data you
Page 20

want to keep, such as contacts and
calendar notes.
To reset the device from time to
time for optimum performance,
power off the device and remove
the battery.
These suggestions apply equally to
your device, battery, charger, or any
accessory. If the device is not
working properly, take it to the
nearest authorized service facility
for service.
Consumer limited
warranty
ZTE® (‘Seller’) offers you a limited
warranty that the enclosed product
or products (the ‘Product’) will be
free from defects in material and
workmanship for a period that
expires one year from the date of
sale of the Product to you, provided
that you are the original end-user
purchaser of the Product and
provided that your purchase was
made from a supplier authorized by
the Seller. Transfer or resale of a
Product will automatically terminate
warranty coverage with respect to
that Product. This limited warranty is
not transferable to any third party,
including but not limited to any
subsequent purchaser or owner of
the Product. This limited warranty is
applicable only to end users in the
United States.
Seller will, at its sole and absolute
discretion, either repair or replace a
Product (which unit may use
refurbished parts of similar quality
and functionality) if found by Seller
to be defective in material or
Consumer limited warranty
18
Page 21

workmanship, or if Seller
determines that it is unable to repair
or replace such Product, Seller will
refund the purchase price for such
Product, provided that the subject
Product (i) is returned to a Seller
authorized service center within the
one year warranty period, and (ii) is
accompanied by a proof of
purchase in the form of a bill of sale
or receipted invoice which
evidences that the subject Product
is within the one year warranty
period. After the one year warranty
period, you must pay all shipping,
parts and labor charges. In the
event that the product is deemed
un-repairable or has been removed
from the list of products supported
Consumer limited warranty
19
by the Seller, you will only be liable
for shipping and labor charges.
This limited warranty does not
cover and is void with respect to
the following: (i) any Product which
has been improperly installed,
repaired, maintained or modified; (ii)
any Product which has been
subjected to misuse (including any
Product used in conjunction with
hardware electrically or
mechanically incompatible or used
with accessories not approved by
Seller), abuse, accident, physical
damage, abnormal operation,
improper handling, neglect,
exposure to fire or liquid; (iii) any
Product operated outside published
maximum ratings; (iv) cosmetic
damage; (v) any Product on which
warranty stickers or Product serial
numbers have been removed,
Page 22

altered, or rendered illegible; (vi)
cost of installation, removal or
reinstallation; (vii) signal reception
problems (unless caused by defects
in material and workmanship); (viii)
damage the result of fire, flood, acts
of God or other acts which are not
the fault of Seller and which the
Product is not specified to tolerate,
including damage caused by
mishandling, shipping and blown
fuses; (ix) consumables (such as
fuses); or (x) any Product which has
been opened, repaired, modified or
altered by anyone other than Seller
or a Seller authorized service
center.
USE ONLY SELLER APPROVED
ACCESSORIES WITH SELLER
PHONES. USE OF ANY
UNAUTHORIZED ACCESSORIES
MAY BE DANGEROUS AND WILL
INVALIDATE THE PHONE
WARRANTY IF SAID ACCESSORIES
CAUSE DAMAGE OR A DEFECT TO
THE PHONE.
SELLER SPECIFICALLY DISCLAIMS
LIABILITY FOR ANY AND ALL
DIRECT, INDIRECT, SPECIAL,
GENERAL, PUNITIVE, EXEMPLARY,
AGGRAVATED, INCIDENTAL OR
CONSEQUENTIAL DAMAGES,
EVEN IF ADVISED OF THE
POSSIBILITY OF SUCH DAMAGES,
WHETHER FORESEEABLE OR
UNFORESEEABLE OF ANY KIND
WHATSOEVER, INCLUDING BUT
NOT LIMITED TO LOSS OF
PROFITS,
UNANTICIPATED BENEFITS OR
REVENUE, ANTICIPATED PROFITS
ARISING OUT OF USE OF OR
INABILITY TO USE ANY PRODUCT
(FOR EXAMPLE, WASTED AIRTIME
Consumer limited warranty
20
Page 23

CHARGES DUE TO THE
MALFUNCTION OF A PRODUCT)
OR CONTRIBUTION OR
INDEMNITY IN RESPECT OF ANY
CLAIM RELATED TO A PRODUCT.
REPAIR OR REPLACEMENT OF A
DEFECTIVE PRODUCT OR REFUND
OF THE PURCHASE PRICE
RELATING TO A DEFECTIVE
PRODUCT, AS PROVIDED UNDER
THIS WARRANTY, ARE YOUR SOLE
AND EXCLUSIVE REMEDIES FOR
BREACH OF THE LIMITED
WARRANTY, AND SUBJECT TO
THIS WARRANTY, THE PRODUCTS
ARE APPROVED AND ACCEPTED
BY YOU ‘AS IS ’.
SELLER MAKES NO OTHER
WARRANTIES, REPRESENTATIONS
OR CONDITIONS OF ANY KIND,
ORAL, EXPRESS OR IMPLIED,
STATUTORY OR OTHERWISE, WITH
Consumer limited warranty
21
RESPECT TO THE PRODUCTS,
INCLUDING BUT NOT LIMITED TO
ANY IMPLIED WARRANTY OR
CONDITION OF
MERCHANTABILITY OR FITNESS
FOR A PARTICULAR PURPOSE OR
AGAINST INFRINGEMENT OR ANY
IMPLIED WARRANTY OR
CONDITION ARISING OUT OF
TRADE USAGE OR OUT OF A
COURSE OF DEALING OR COURSE
OF PERFORMANCE. NO DEALER,
DISTRIBUTOR, AGENT OR
EMPLOYEE IS AUTHORIZED TO
MAKE ANY MODIFICATION OR
ADDITION TO THIS WARRANTY. IF
SELLER CANNOT LAWFULLY
DISCLAIM STATUTORY OR IMPLIED
WARRANTIES THEN TO THE
EXTENT PERMITTED BY LAW, ALL
SUCH WARRANTIES SHALL BE
LIMITED IN DURATION TO THE
Page 24

DURATION OF THIS LIMITED
WARRANTY.
Some jurisdictions do not allow the
exclusion or limitation of incidental
or consequential damages, or allow
limitations on how long an implied
warranty lasts, so the above
limitations or exclusions may not
apply to you. This limited warranty
gives you specific legal rights, and
you may also have other rights
which vary from jurisdiction to
jurisdiction.
Additional safety
information
Unauthorized accessories
Please use only approved charging
accessories to charge your ZTE
phone.
Improper handling of the
®
accessory/charger port, as well as
the use of an incompatible charger,
may cause damage to your phone
and void the warranty.
Small children
Your device and its enhancements
may contain small parts. Keep them
out of the reach of small children.
Operating environment
This device meets RF exposure
guidelines when used either in the
normal use position against the ear
or when positioned at least 2
centimeters (4/5 inches) away from
the body. When a carry case, belt
clip, or holder is used for body-worn
operation, it should not contain
metal and should position the
device the above-stated distance
from your body.
To transmit data files or messages,
Additional safety information
22
Page 25

this device requires a quality
connection to the network. In some
cases, transmission of data files or
messages may be delayed until
such a connection is available.
Ensure the above separation
distance instructions are followed
until the transmission is completed.
Parts of the device are magnetic.
Metallic materials may be attracted
to the device. Do not place credit
cards or other magnetic storage
media near the device, because
information stored on them may be
erased.
Medical devices
Operation of any radio transmitting
equipment, including wireless
devices, may interfere with the
functionality of inadequately
protected medical devices. Consult
Additional safety informati on
23
a physician or the manufacturer of
the medical device to determine if
they are adequately shielded from
external RF energy or if you have
any questions. Switch off your
device in health care facilities when
any regulations posted in these
areas instruct you to do so.
Hospitals or health care facilities
may be using equipment that could
be sensitive to external RF energy.
Implanted medical devices
Manufacturers of medical devices
recommend that a minimum
separation of 15.3 centimeters (6
inches) should be maintained
between a wireless device and an
implanted medical device, such as
a pacemaker or implanted
cardioverter defibrillator, to avoid
potential interference with the
medical device. Persons who have
Page 26

such devices should:
Always keep the wireless device
more than 15.3 centimeters (6 inches)
from the medical device when the
wireless device is turned on.
Not carry the wireless device in a
breast pocket.
Hold the wireless device to the ear
opposite the medical device to
minimize the potential for
interference.
Turn the wireless device off
immediately if there is any reason to
suspect that interference is taking
place.
Read and follow the directions from
the manufacturer of their implanted
medical device.
If you have any questions about
using your wireless device with an
implanted medical device, consult
your health care provider.
Vehicl es
RF signals may affect improperly
installed or inadequately shielded
electronic systems in motor
vehicles such as electronic fuel
injection systems, electronic
antiskid (antilock) braking systems,
electronic speed control systems,
and air bag systems. For more
information, check with the
manufacturer, or its representative,
of your vehicle or any equipment
that has been added.
Only qualified personnel should
service the device or install the
device in a vehicle. Faulty
installation or service may be
dangerous and may invalidate any
warranty that may apply to the
device. Check regularly that all
wireless device equipment in your
vehicle is mounted and operating
Additional safety information
24
Page 27

properly. Do not store or carry
flammable liquids, gases, or
explosive materials in the same
compartment as the device, its
parts, or enhancements. For
vehicles equipped with an air bag,
remember that air bags inflate with
great force. Do not place objects,
including installed or portable
wireless equipment in the area over
the air bag or in the air bag
deployment area.
If in-vehicle wireless equipment is
improperly installed and the air bag
inflates, serious injury could result.
Using your device while flying in
aircraft is prohibited. Switch off your
device before boarding an aircraft.
The use of wireless teledevices in
an aircraft may be dangerous to the
operation of the aircraft, disrupt the
wireless telephone network, and
may be illegal.
Additional safety informat ion
25
Potentially explosive
environments
Switch off your device when in any
area with a potentially explosive
atmosphere, and obey all signs and
instructions. Potentially explosive
atmospheres include areas where
you would normally be advised to
turn off your vehicle engine. Sparks
in such areas could cause an
explosion or fire resulting in bodily
injury or even death. Switch off the
device at refueling points such as
near gas pumps at service stations.
Observe restrictions on the use of
radio equipment in fuel depots,
storage, and distribution areas;
chemical plants; or where blasting
operations are in progress. Areas
with a potentially explosive
atmosphere are often, but not
Page 28

always, clearly marked. They
include below deck on boats,
chemical transfer or storage
facilities and areas where the air
contains chemicals or particles such
as grain, dust, or metal powders.
You should check with the
manufacturers of vehicles using
liquefied petroleum gas (such as
propane or butane) to determine if
this device can be safely used in
their vicinity.
Emergency calls
Important: This device operates
using radio signals, wireless
networks, landline networks, and
user-programmed functions.
Connections in all conditions cannot
be guaranteed. You should never
rely solely on any wireless device for
essential communications like
medical emergencies.
To make an emergency call:
1. If the device is not on, turn it on.
Check for adequate signal
strength. Depending on your
device, you may also need to
complete the following:
• Remove certain call restrictions
you have activated in your
device.
2. Press the Home / Back key as
many times as needed to clear
the display and ready the device
for calls.
3. Enter the official emergency
number for your present location.
Emergency numbers vary by
location.
4. Press the
When making an emergency call,
give all the necessary information
as accurately as possible. Your
wireless device may be the only
icon.
Additional safety information
26
Page 29

means of communication at the
scene of an accident. Do not end the
call until given permission to do so.
Certification information (SAR)
This mobile device meets guidelines
for exposure to radio waves.
Your mobile device is a radio
transmitter and receiver. It is
designed not to exceed the limits
for exposure to radio waves
recommended by international
guidelines. These guidelines were
developed by the independent
scientific organization ICNIRP and
include safety margins designed to
assure the protection of all persons,
regardless of age and health.
The exposure guidelines for mobile
devices employ a unit of
measurement known as the
Specific Absorption Rate or SAR.
The SAR limit stated in the ICNIRP
Additional safety information
27
guidelines is 1.6 watts/kilogram
(W/kg) averaged over 1 grams of
tissue. Tests for SAR are conducted
using standard operating positions
with the device transmitting at its
highest certified power level in all
tested frequency bands. The actual
SAR level of an operating device
can be below the maximum value
because the device is designed to
use only the power required to
reach the network. That amount
changes depending on a number of
factors such as how close you are
to a network base station.
Use of device accessories and
enhancements may result in
different SAR values. SAR values
may vary depending on national
reporting and testing requirements
and the network band.
Your mobile device is also
designed to meet the requirements
Page 30

for exposure to radio waves
established by the Federal
Communications Commission (USA)
and Industry Canada. These
requirements set a SAR limit of 1.6
W/kg averaged over one gram of
tissue. The highest SAR value
reported under this standard during
product certification for use at the
head is 1.29 W/Kg and when
properly worn on the body is 0.714
W/Kg.
FCC compliance information
This device complies with Part 15 of
FCC Rules. Operation is subject to
the following two conditions:
(1) This device may not cause
harmful interference, and (2) This
device must accept any
interference received.
Including interference that may
cause undesired operation.
U.S.A. U.S.FEDERAL
COMMUNICATIONS
COMMISSION RADIO
FREQUENCY INTERFERENCE
STATEMENT
INFORMATION TO THE USER
Note: This equipment has been
tested and found to comply with the
limits for a Class B digital device
pursuant to Part 15 of the FCC Rules.
These limits are designed to
provide reasonable protection
against harmful Interference in a
residential installation. This
equipment generates, uses, and
can radiate radio frequency energy
and, if Not installed and used in
accordance with the instructions,
may cause harmful Interference to
radio communications. However,
Additional safety information
28
Page 31

there is no guarantee that
interference will not occur in a
particular Installation. If this
equipment does cause harmful
interference to radio or television
reception, which can be
determined by turning the
equipment off and on, the user is
encouraged to try to correct the
interference by one or more of the
following measures:
*- Reorient or relocate the receiving
antenna. Increase the separation
between the equipment and
receiver.
*- Connect the equipment into an
outlet of a circuit different from that
to which the receiver is connected.
*- Consult the dealer or an
experienced radio/TV technician for
assistance.
Changes or modification not
Additional safety information
29
expressly approved by the party
responsible for Compliance could
void the user’s authority to operate
the equipment. Connecting of
peripherals requires the use of
grounded shielded signal cables.
Hearing Aid Compatibility (HAC)
regulations for Mobile phones
In 2003, the FCC adopted rules to
make digital wireless telephones
compatible with hearing aids and
cochlear implants. Although analog
wireless phones do not usually
cause interference with hearing
aids or cochlear implants, digital
wireless phones sometimes do
because of electromagnetic energy
emitted by the phone's antenna,
backlight, or other components.
Your phone is compliant with FCC
HAC regulations (ANSI C63.19).
Page 32

While some wireless phones are
used near some hearing devices
(hearing aids and cochlear implants),
users may detect a buzzing,
humming, or whining noise.
Some hearing devices are more
immune than others to this
interference noise, and phones also
vary in the amount of interference
they generate.
The wireless telephone industry
has developed a rating system for
wireless phones, to assist hearing
device users find phones that may
be compatible with their hearing
devices. Not all phones have been
rated. Phones that are rated have
the rating on their box or a label
located on the box.
The ratings are not guarantees.
Results will vary depending on the
user's hearing device and hearing
loss. If your hearing device happens
to be vulnerable to interference, you
may not be able to use a rated
phone successfully. Trying out the
phone with your hearing device is
the best way to evaluate it for your
personal needs.
M-Ratings: Phones rated M3 or M4
meet FCC requirements and are
likely to generate less interference
to hearing devices than phones that
are not labeled.
M4 is the better/higher of the two
ratings.
T-Ratings: Phones rated T3 or T4
meet FCC requirements and are
likely to be more usable with a
hearing device’s telecoil (“T Switch”
or “Telephone Switch”) than
unrated phones. T4 is the
better/higher of the two ratings.
(Note that not all hearing devices
Additional safety information
30
Page 33

have telecoils in them.) Hearing
devices may also be measured.
Your phone meets the M4/T3 level
rating. Hearing devices may also be
rated. Your hearing device
manufacturer or hearing health
professional may help you find this
rating.
For more information about the FCC
Hearing Aid Compatibility please go
to http://www.fcc.gov/cgb/dro.
Additional safety information
31
SRS
is trademark of SRS
Labs, Inc. WOW HD technology is
incorporated under license from
SRS Labs, Inc.
TM
WOW HD
the playback quality of audio,
delivering a dynamic 3D
entertainment experience with
deep, rich bass and high frequency
clarity for crisp detail.
significantly improves
 Loading...