


Spark Pro
V7
User Guide
1

Copyrights
Copyright © 2016 by ZTE Corporation
All rights reserved.
No part of th is publication may be quoted, reproduced, translated or used in any form or by any
means, electronic or mechanical, including photocopying and microfilm, without the prior written
permission of ZTE Corporation.
ZTE Corporation reserves the right to modify technical parameters and specifications in this guide,
and promptly correct the contents in the guide that are inconsistent with the latest documents.
All modifications shall be compiled in a new version of User Manual without prio r notice.
ZTE Corporation keeps the right to make the final expla nation to this guide.
Trademarks
Android is a trademark of Google, Inc.
All other tra demarks and copyrights remain the property of their respective owners.
2

Third-party Applications Statement
During the installation process of some third-party applications, issues of repeated restart or
abnormal operation of software might be caused by incompatibility of the third-party applications
rather than the phone.
Installation of a third-party ROM or non-official operating system (commonly called ‘rooting’ your
device) might bring unwante d security risks and may make your device inoperable. Z TE
Corporation will not be liable for the security threats brought by upgrade of the operating system.
3

Contents
Getting started ................................................................................................................... 8
Key definitions ..................................................................................................... 9
Inserting and Removing the SIM card .............................................................. 10
Charging the Battery ..........................................................................................11
Getting to know your phone .......................................................................................... 12
Screen control ................................................................................................... 12
Volume Controls................................................................................................ 13
Home screen ..................................................................................................... 14
Switch to sleep mode (turn off the display) ...................................................... 17
Wake up your phone ......................................................................................... 17
Secure your device ........................................................................................... 17
Make and answer calls ................................................................................................... 18
Make a call ........................................................................................................ 18
Answer a call ..................................................................................................... 19
Reject a call ...................................................................................................... 19
End a call .......................................................................................................... 20
Adjust the volume ............................................................................................. 20
4

Turn the speaker on or off................................................................................. 20
Add a multi party or Conference call ................................................................ 20
Use touch tones during a call for automated call systems ............................... 20
Contacts ........................................................................................................................... 21
Add new contact ............................................................................................... 21
Delete contacts ................................................................................................. 22
Edit contact details ............................................................................................ 22
Search contacts ................................................................................................ 22
Add a contact to Favorites ................................................................................ 22
Import/Export contacts ...................................................................................... 23
Share a contact ................................................................................................. 23
Using Google Contacts ..................................................................................... 24
Use Contacts to block an incoming caller ........................................................ 24
Messaging ........................................................................................................................ 25
Send messages ................................................................................................ 25
Receive messages ........................................................................................... 26
Message thread ................................................................................................ 26
Message Settings ............................................................................................. 27
Gmail ................................................................................................................................. 27
5

Set up an Gmail account for the first time ........................................................ 27
Connectivity ..................................................................................................................... 28
Wi-Fi .................................................................................................................. 29
Bluetooth® ........................................................................................................ 30
Bluetooth Low Energy (Bluetooth Smart) ......................................................... 31
Connect to a Computer to transfer files ............................................................ 32
Settings ............................................................................................................................ 33
Accounts and sync ............................................................................................ 35
Language .......................................................................................................... 35
Date & time ....................................................................................................... 36
About phone ...................................................................................................... 36
Camera ............................................................................................................. 36
Gallery ............................................................................................................... 38
Music Player ..................................................................................................... 38
Sound Recorder ................................................................................................ 39
FM radio ............................................................................................................ 39
More Applications ........................................................................................................... 40
Chrome ............................................................................................................. 40
File manager ..................................................................................................... 42
6

Clock ................................................................................................................. 42
Calculator .......................................................................................................... 43
Calendar ........................................................................................................... 44
Downloads ........................................................................................................ 45
Manage applications ....................................................................................................... 45
Install new applications ..................................................................................... 46
Uninstall applications ........................................................................................ 46
Technical Specifications ................................................................................................ 48
Troubleshooting .............................................................................................................. 50
Disposal of your old phone ............................................................................................ 54
7

Getting started
8

Key definitions
Back key Touch it to open the previous screen you were working in.
If the onscreen keyboard is open, touch it to close the keyboard.
Home key Touch it to open the home screen. If you’re viewing the left or right
extended home screen, touch it to open the central home screen.
Recent Apps Touch the key to open Recent Apps list.
Touch and hold to open the Settings for your current screen
Power key Press it to turn on/off the dis play.
Long press it to open a menu with options for Flight mode, Silent
mode, Vibrate mo de, and for po wering off the phone.
TIP: Long press Power off to access Safe Mode.
Vol um e keys Adjust the volume.
Press to access the Interruptions pa nel.
Press to control in call volume.Control media and apps volume.
Screen Capture
Android Recovery
Power Restart Hold the Power key for 10 seconds to restart your device.
Press the Volume Down and Power key at the same time.
Hold the Volume U p key, then power On your device.
9

Nano SIM
microSD *
Inserting and Removing the SIM card
You must insert a valid SIM card into your pho ne before use.
Switch off your phone and disconnect any external power.
1. Open the SIM tray using the eject tool provided in the box. The eject tool can be attached to a
keyring to keep it safe and handy for f uture use.
2. Insert your SIM card face down into the card holder with the cut corner at the top lef t on the
inner slot as shown above. Make sure it s its flush i n the SIM tray.
3. microSD memory* is an optio nal extra to expand your personal storage. The phone accepts
microSD cards up to 32GB with FAT32 format.
4. Replace the SIM tray carefully and push home.
10

Charging the Battery
Connect the charger to the phone using a USB cable, and plug the charger into a standard power
soc ket. Only use the approved c harger and USB lead provided.
Always insert the charger lead carefully.
Check the plug and socke t are aligned correctly.
Do NOT use excessive force which may damage the USB port.
Be careful to avoid tripping on the lead whilst it is plugged in.
Physical damage to the USB port is not covered by warranty.
11

Getting to know your phone
Screen control
You can control your phone through a series of operations on the screen.
- Tou ch: You can touch the items on the screen to select, to open the applicatio ns or to use the
keyboard to input characters.
- Swipe or slide: Quickly move your finger across the surface of the screen, without pausing when
you first touch (so you don't drag something instead).
- Touch & hold: You can touch & hold some items to get the item’s available menu.
- Drag: You can drag some i tems on the screen to realize some operations.
- Switch between landscape mode and portrait mode: You can switch to the landscape mode by
rotating your phone. The landscape mode is only valid under some interfaces, such as the text
input interface, the message viewing interface, etc.
- Pinch: In some apps (such as Maps, Browser, and Gallery), you can zoom in a nd out by placing
two fingers on t he screen at once and pinching them together (to zoom out) or spreading them
apart (to zoom in).
12

Volume Controls
The vol ume keys work in different ways depending on which application or menu you are in.
Lock screen or Home Screen
Volume keys control the Ring Volume and the Priority Interuptions panel.
Moving the volume all the way down will enable Vibrate mode. Move one step further down for
Silent mode (with Alarms still active)
During a Call
During a call the Volume keys will control the in call (headpho nes, earpiece or speaker) volume.
Media Apps and Games
If you are using apps such as the Music, Video Players or Games then the Volume Keys will control
the current media volume le vel
Alarm Setting Application
If you are setting an Alarm, pressing the Volume keys will cha nge the Alarm volume, s o be careful
not to mute your Alarm setting as this will over ride the system volume and the Alarm will not
sound even if your System volume is on 100%. The Alarm App independantly sets its own volume.
You can also review this under Alarm > Options > Settings.
13

Home screen
Press the Home key to return to the Home Screen which is your main desktop. You can add and
remove App shortcuts, move apps around and access the default Dialler, Contacts, Messages and
Chrome buttons. The Apps tray in the bottom middle opens the Apps menu. Pull down from the
top of the screen to review any notifications, pull down again to get to the Quick Setti ngs Panel
(see later)
Manage notifications
- Open notifications panel: Drag down from the top of the screen to open the notifications panel.
- Respond to a notification: Touch it.
- Dismiss a notification: Swipe it sideways.
- Dismiss all notifications: Touch the icon.
- Configure notifications for each app: Long press (press and hold) on the notification the n touch
the (i) symbol to configure.
- Close notifications panel: Drag the notification panel up to the top of the screen to close
Display area
The home screen extends to the left and right to show more pages and returns to the centre
screen when you press the Home key.
14

Add Widgets to the home screen
Press & hold an empty area on the ho me screen, select W IDGETS.
Move icons on the home screen
Press & hold the icon you want to move, drag it to your desired position on the screen and release
it.
Press & hold the icon you want to move, and drag the icon to your desired scree n.
Delete icons on the home screen
Touch & hold the app icon, slide your finger toward the top of the screen, and drop the app over
the Remove icon.
Using Folders
You can combine several app icons in a folder. Drop one app icon over another on a Home screen,
and the two icons will be combined into a folder.
From any Home screen, you can
- Open a folder: To uch it. The folder ope ns:
- Rename a folder: To uch its name.
- Move icons around your Home screens: Touch, hold and slide.
15
Favorites tray
The favorites tray icons at the bottom of the screen remain visible on every Home screen.
- Place an app icon in the Favorites tray: Touch, hold, & slide to move one of the Favorites icons
out of the tra y. Then use the same technique to move another one into the same position.
The All Apps icon in the center is permanent and cannot be moved or dele ted.
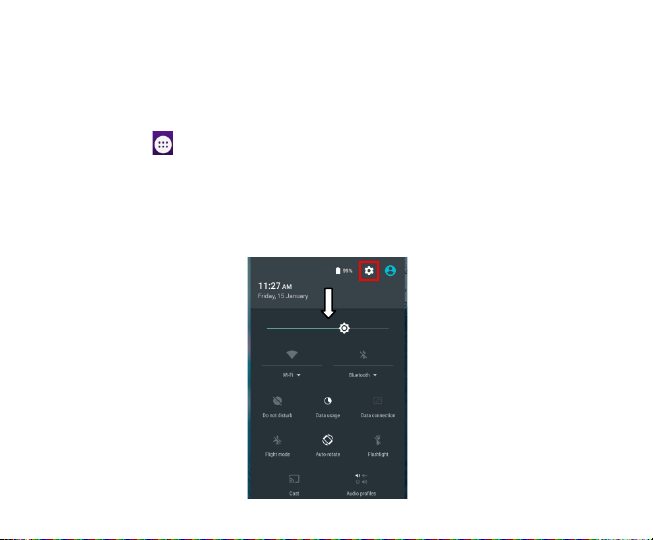
Quick Settings Panel
Pull down twice to open the quick settings panel to quickly check and control key features.
Wi-Fi and Bluetooth options can be further configured by touching the drop down settings below
the icon as shown. Touch the Settings icon as a shortcut to the Settings menu :
16

Switch to sleep mode (turn off the display)
The display will automa tically di m and turn off after a pre-set period of time (see Settings >
Display) to save power and prevent inadvertent operations such as making pho ne calls in your
poc ket. It is also good practice to ma nually switch off the display af ter use. Press the Power key to
turn your screen on or off during normal use.
Wake up your phone
After the pho ne switches to the sleep mode, the screen will be turned off and locked. In this case,
please wake up your phone and unlock the screen if you want to use your pho ne.
1. Press the Power key to turn on the screen.
2. Drag the icon to unlock the screen.
If you've set an unlock pattern or password, you need to draw the unlock pattern or input the
password to e nter the main interface. (For details, please see Settings > Security > Screen lock).
Secure your device
Go to Settings > Security > Screen Lock to apply a lock screen to your device. Locking your device
will prevent una uthorised use.
17

Make and answer calls
Make a call
Directly make a call
On the home screen, touch the button to open the Dialler. Touch a recently called number
or press to open the Dial Pad and touch to make the call.
Make a call from Contacts
On the home screen, touch the icon, touch the desired contact and touch the
phone number to dial it.
Make a call from Call logs
On the home screen, touch the button, the call log tab shows recent calls. Touch
the phone icon in a call log to return it.
Make an international call
On the home screen, touch the button to display the dialing keypad. Touch &
hold the “0” key until “+” appears on the screen, then dial the country code or region
code, city code and phone number.
Dial from Messaging
18
1. On the home screen, touch the Messaging icon
2. Select and open one message or conversation.
3. Touch the icon at the top of the phone to dial.
Answer a call
Your phone will ring or vibrate (depe nds on the current mode and settings) for an incoming call.
- Slide the icon from mi ddle to right to answer the call.
- If you are using another a pplication press the Answer or Reject button displayed at the top of the
screen. If you inadvently dismiss this panel, pull down the Notifications Panel to retrieve the
Answer Call pa nel.
- If the earphone is inserted, press the key on the earphone to answer the call.
Reject a call
Slide the icon from middle to left to reject the call.
19

End a call
Touch the button to hang up the call.
Adjust the volume
In a call, you can raise or lower the volume by using the volume keys.
Turn the speaker on or off
In a call, touch the button to turn on the speaker, and touch it again to turn off spea ker.
Add a multi party or Conference call
In a call, touch for Options then Add call. Dial a number and touch the phone icon to add one
call and put the current caller on hol d. Press Options > Merge to join the two (or more) parties
together.
Use touch tones during a call for automated call systems
Touch the button to open the dial pad to enter numbers during a call.
20

Contacts
You can place calls from the Phone app , the Contacts app , or o ther apps or widgets
that display contact information. Wherever you see a phone number or call icon, you can usually
touch it to dial.
The contacts interface can be di vided into the following tab pages:
- All Contacts: View the list of contacts.
- Favorites: Display the numbers you usually call.
All of your contacts are displayed alphabetically in a scrollable list. Slide your finger up or down to
scroll through the list.
Add new contact
1. In Contacts, touch the add contacts icon at the bottom right ha nd corner of the screen.
2. Select a memory location.
3. Input all contact information. Slide up to move to the next field or touch Next.
4. Touch the icon to save your contact.
21

Delete contacts
1. In Contacts, touch the and then select Delete contact.
2. Touch the contacts you want to delete o r touch , then touch the OK.
Edit contact details
1. In Contacts, touch the contact whose details you want to edit.
2. Touch the .
3. Edit the contact information.
Search contacts
1. In Contacts, touch the icon.
2. Type a ke y word of a contac t name. The phone wil l automatically list all matche d contacts.
Add a contact to Favorites
You can tap the contact you want to add to favorites in the contact interface, and then touch
in the upper right corner to add it to Favorites di rec t ly.
22

Import/Export contacts
1. In Contacts, touch the to select Import/export.
2. You can select SIM card, Phone, Phone storage, SD Card.
Share a contact
You can share a contact with someone.
1. In Contacts, tap the contact you want to share.
2. Touch the and the n touch Share.
®
3. Select application with which to share (Bluetooth
, Gmail, MMS, SMS and SD Card).
23

Using Google Contacts
When you are signed into your Google account (ie Gmail) all your existing Contacts are
downloaded a nd synced to your device. Also if you add a Contact to your device, for example by
importing from your SIM card or entering a new Contact manually, it is automatically synced to
your Google account and stored securely on line. You can manage your Google Contac ts through
the Gmail app on line or using the handset Contacts app as previously described.
Use Contacts to block an incoming caller
If you want to block incoming calls from a particular number you need to be signed in to your
Google account and have the Contact stored in your Contacts list.
Go to Contacts > Select the required Contact > Press the pencil icon to Edit the Contact > Press the
Options icon > Select All calls to voicemail.
24

Messaging
In Messaging, you can send or receive text messages and multimedia messages.
On the home screen or in the All Apps screen, touch the Messaging icon to open.
Send messages
1. In Messaging, touch the icon.
2. Input yo ur desired telephone number .
You can also touch the button to select a contact from the People and then to uch OK icon
to add a contact.
3. You can touch the icon attach pictures, videos or audio file, and the phone will convert
the message to a multimedia message.
4. Input some text in Type text message. You can touch the to select:
- Insert quick text : Insert a quick text.
-Insert contact: Insert a contact.
- Add subject: Add a message subject.
5. Touch the icon to send the message.
25

Receive messages
1. In idle mo de, you will be reminded about the new messages in the notification area. Slide down
to open the notificatio n panel to view.
2. Touch the message.
3. Enter text to reply to the message. Touch the icon to send the message.
4. Touch the icon at the top of the pho ne to directly call back. Touch & hold the text to pop
up the Message options menu, you can Copy, Forward, Lock/Unlock or Delete the message, etc.
Message thread
The messages from one contact or number will be aligned in one message thread in chronological
order. You can manage these threads in the messaging interface.
Touch one thread on the Messaging screen; touch the to select:
- Add subject: Add a message subject.
- Insert quick text : Insert a quick text.
- Insert contact: Inser t a new contact.
26

Message Settings
In Messaging, touch Opt ions and then touch Settings to perform re levant setting s.
Gmail
You can use Gmail to rea d and write email from any mo bile device or browser. A Gmail account is
required to access Google Play Store and other services.
On the home screen or in the All Apps screen, touch the Gmail icon to open Gmail.
Set up an Gmail account for the first time
You need to set up an Gmail account when you use Gmail for the first time.
1. If you already have a Gmail account, touch Existing, the n enter the Gmail address and
password.
2. Otherwise, touch New and follow the prompts to create a new Gmail account.
27

Connectivity
Your phone can connect to the Internet via your mobile phone operator or over a Wi-Fi network.
When a Wi-Fi network is confi gured and a vailable the device will automatically choose the Wi-Fi
connection to reduce yo ur mobile data usage.
GSM/WCDMA data connection
Different locations may have different mobile networks available. Initially, your phone is
configured to use the fastest mobile network available for data.
The icons on t he Status bar indicate whic h kind of data network you’re connected to.
In the All apps screen, touch Settings > More… > Mobile networks to perform relevant settings.
Turn Data Off
Pull down twice for the Qu ick Settings Pa nel. Touch the Network signal icon (Spark). Touch the
Cellular data s witch to switch off.
Or the same setting is also available from Settings > Data usage > Cellular
28

Wi-Fi
Turn on/off Wi-Fi
1. In the All apps screen, touch Settings > WIFI.
2. Tou ch the switch to turn it ON o r OFF
3. You can also pull down the Quick Settings Panel and touch the Wi-Fi icon to switch Wi-Fi on or
of f.
Connect to Wi-Fi
1. In the All apps screen, touch Settings.
2. Turn on Wi-Fi.
3. Your phone will automatically search for all nearby Wi-Fi networks.
4. Select the network you would like to connect to from the list.
- If you’ve selected an open network, your phone will automatically connect to it.
- If you’ve selected a security network, you need to input the password.
29

Bluetooth®
Via the Bluetooth® function, you can exchange data with other Bluetooth devices that are within a
short distance.
Turn on/off Bluetooth
1. On the home screen, touc h and then touch Settings.
2. Touc h Bluetooth
Pairing
1. Tou ch Bluetooth
display all Bluetooth
2. Touch the ID of the desired device.
Send files via Bluetooth
To send files via Bluetooth
1. Select a file or item, such as a contact or a media file from an appropriate application or File
manager.
2. Open it, c hoose then to uch the icon.
3. Search for and pair with a Bluetooth
®
®
, and slide the ON/OFF button to turn it on or off.
®
when it is on to automatically search for devices. Your phone will scan for and
®
devices it finds.
®
®
, do as follows:
®
-enabled device.
30

Change your phone’s Bluetooth
®
name
1. On the home screen, touc h and then touch Settings > Wireless & networks.
®
2. If the Bluetooth
3. Tou ch Bluetooth
function is not turne d on, turn it on.
®
, then touch > Rename this device to edit the name of your device, the n
touch Rename.
4. Touch the name of the phone to toggle it to Visibility timeout so that other Bluetooth devices
can find your device.
Bluetooth Low Energy (Bluetooth Smart)
Bluetooth LE is an optimised standard of Bluetooth that uses less power and is generally used to
connect to personal wearable devices such as fitness monitor wri st bands and watches. The 3
rd
party module and software controls t he connection to your pho ne so traditional pairing and
password exchange is not required as it is controlled using a secure key exchanged between your
personal device and your handset. The need for manual pairing (using a PIN) is reduced. Follow
your device instructions to connect it to your handset.
31

Connect to a Computer to transfer files
Transfer audio, video and picture files between your handset and your computer.
PC
Connect your handset usi ng the USB data lead supplied.
First time, select Install driver on the handset notifications window.
On your PC, use Windows Explorer to ope n the CD Drive: USB_Dr iver, then double clic k Setup to
install the handset drivers.
Subsequently, select Media Device (MTP) from the notifications window, which will open the
handset in Windows Explo rer.
MAC
On your MAC, download and install Android File Transfer.
Connect your handset usi ng the USB data lead supplied.
Select Media Device (MTP) from the notifications window, which will open the handset on your
MAC.
32

Settings
Flight mode
Use Flight mode to disa ble all radio func tions in the handset. You will not be able to make/answer
calls, send/receive messages in Flight mode.
On the home screen, you can press and hold the Power key, then select Flight mode or
Swipe down twice from the stop of the screen to see the Quick Setting for Flight Mode.
Audio profiles
Touch and then touch Settings > Sound& notification > .
Phone ringtone: Select the ringtone to sound whe n you receive a call.
Default notification sound: Selec t your default notification ringtone.
Vibrate: Enable or disable vibrate mode for incoming calls and notifications.
Dial pad touch tones: Use audible DTMF tones on the dial pad.
Touch sounds: Play a sound when you touch buttons, icons and other onscreen items.
Screen lock sounds: Check to play sounds when locking and unlocking the screen.
Vibrate on touch: Enable or disable vibrate on touch for soft keys and other user interface
interactions.
33

Display
Touch Settings > Display.
Brightness level: Adj ust the brightness of the screen.
Wallpaper: Choose a wallpaper.
Sleep: Choose the delay before the screen automatically turns off.
Using micro SD Storage
To copy files between a PC and your phone’s SD card, you should set the SD card as US B mass
storage.
1. Connect your phone to your PC with the USB cable.
2. Turn on USB storage.
During this time, you can’t access the SD card from your phone, so you can’t use applications that
rely on the SD card, such as Camera, Gallery and Music.
Check space on the SD card
1. On the home screen, touc h and then touch Settings.
2. Tou ch Storage.
Erase the SD card
1. On the home screen touch and then touch Settings.
34

2. Tou ch Storage > Erase SD card.
Accounts and sync
Adding your accounts
1. Tou ch Settings > Accounts > Add account.
2. Touch the account type you want to add.
3. Follow the onscreen instructions to enter your account information.
Most accounts require a username and password, but the details depend on the kind of account
and the configuration of the service you're connecting to.
Depending on the kind of account, you may be asked to configure what kinds of data you want to
sync, name the account, and other details.
When you're finished, the account is added to the list in Accounts & sync. Depending how you
configured the account, email, contacts, and other information may start syncing to yo ur device.
Language
Touch and then touch Settings > Language & input > Language.
35

Date & time
You can set the format of date and time.
On the home screen touc h and then touch Settings > Date & time.
About phone
You can check the phone’s status, battery use, software version, etc.
On the home screen touc h and then touch Settings > About phone.
Camera
Take pictures a nd videos us ing the camera. Share via MMS, Bluetooth or Email
Take photos
1. In the All Apps screen, touch the Camera icon to open the camera.
2. Aim the camera lens at the s ubject, touch the screen to focus on a particular area.
3. Press the shutter icon to take the picture. See camera icons shown below:
36

Swipe
37

Tap to view the last shot, or open Gallery to see all your pictures.
Use video mode to take videos.
Swipe right on the screen to access Panorama mode.
Use Settings to control camera and video settings.
Gallery
The Gallery categorizes your pictures and videos by storage location and stores these files in
folders. Tap a folder to view the pictures or videos inside.
Music Player
You can listen to music saved on the memory card with the music player.
Open the music player
First copy music files to a mounted memory card.
In the All Apps screen, touch Music to open.
Listen to music
Touch the Song you want to play to start pl aying it.
38

Sound Recorder
You can record audio files through sound recorder.
Open the sound recorder
Before opening the sound recorder, please insert a memo ry card.
In the All Apps screen, touch the Sound Recorder icon to open it.
Record audio files
1. Put the microphone close to your mouth and touch to start recording.
2. Tou ch to stop recording.
3. Tou ch the name of the recording to play back the recording.
FM radio
With the FM Radio, you can search for radio channels, listen to them, and save them on your
phone.
Note that the quality of the radio broadcast depends on the coverage of the radio station in your
area.
The wired hea dset that comes with your phone works as an antenna, so always connect the
headset when using the radio. When you receive an incoming call while listening to the radio, the
radio will be turne d off.
39

To tune in, plug your headset into your phone.
In the All Apps screen, press the FM Radio icon to open it. The FM radio scans and saves available
stations automatically.
-Slide left or right to change the frequency.
-Tap or to scan for available FM channels.
-Tap / to change the frequency by +/–0.1 MHz.
- Press the Volume Keys to adjust the volume.
- Touch to select preset list or add new list.
- Touch to switch off the radio.
- Touch to add to favorites/remove from favorites.
More Applications
Chrome
Use the Chro me browser to view web pages and to search for information on the web.
Open Chrome
1. On the home screen or in the All Apps screen, touch the icon.
40

2. First time you need to Accept and Continue, and can add an account if you want to sync and
share your browsing Bookmarks and History between different devices.
3. Touch the text field at the top to input a web address and search directly from the URL field.
You can touch the > Bookmarks to select the bookmark you want to open.
Browse web
After opening a web page, you could slide your finger on the scree n to view other parts of the
page.
Zoom in or out
You can use two fingers to zoom in or out. Spread your fingers apart or pinch them together to
zoom in or out.
Browse options
When you’re browsing web pages, touch the to select:
You can perform more operations such as Bookmarks, Save to bookmarks, Share page, Find on
page, Request desktop site, e tc.
Setting s
You can choose settings that will affect how page content is displayed and privacy and security
preferences to suit your browse style.
41

In Chrome touch the > Settings to ente r the settings interface.
File manager
In the All Apps screen, touch the File Mana ger icon. You can view a ll files saved in the pho ne or on
the memory card.
Clock
In the All Apps screen, touch the Clock icon to set Alarms, World time , Stopwatch and Timer
functions.
When Clock is running, it switches to screen saver mode after a few minutes. Simply tap the
screen or a phone button to wake the phone up again.
To return to the home screen, touch the Home ke y.
Adding an Alarm
1. Tou ch .
2. Touch the icon at t he top of the screen.
3. Tou ch Add alarm.
42

Turning on/off an Alarm
To turn it on, touch OFF and slide it to the rig ht. Touch ON and slide to the left to turn it off.
World Time
Press the Globe icon to add a new world time location (City)
Timer
Select the Timer function. Touch Play to start the timer. Press Stop to stop the alert. Press +1 to
add 1 minute, press + to add a new timer event.
Stopwatch
Select the S topwatch functio n. Touch Play to start the Stopwatch. You can Record the time, Pause
the time or S hare the resul ts.
Calculator
In the All Apps screen, touch the Calculator icon.
On the Calculator screen, slide the screen to the right or left to switch between Advanced panel
43

and Basic panel.
Calendar
Touch the Calendar icon in the All Apps screen.
Creating a new Event
1. On the cale ndar screen, touch and then touc h New event.
2. Enter the event name and location.
3. To set the duration for the event, touch From and To .
4. Enter the event time zone and description.
5. If you have more than one calendar, select the calendar where you want to save the event.
6. Select the Repetition.
7. Set the time of the reminder in Reminders.
8. Tou ch Done.
On the calendar screen, touch an event to view its details.
Changing your calendar view
On the calendar screen, touch the date at the top and choose Day, Week, Month, or Agenda.
Swipe to scroll vertically or horizontally. In the Day or Wee k views, spread your fingers apart or
pinch them together to zoom in or out.
44

Displaying and synchronizing calendars
Initially, all calendars that you create or subscribe to in Google
to synchronize and display in Calendar on your phone. You can select which Google calendars to
keep synchronized and which to show.
1. On the cale ndar screen, touch and then touc h Calendars to display.
2. Touch which calendars you would li ke to be displayed.
3. If you have more calendars you would like to synchronize and display, touch Calendars to sync,
then touch the checkbox next to the calendar(s) you would like to synchronize, touch OK, and then
you are returned to the Calendars to display screen where what you chose is now displayed and
where you can choose which to display in the calendar.
TM
Calendar on the web are available
Downloads
With Downloads, you can manage logs of files you have downloaded from the web.
Touch the Downloads icon in the All Apps screen.
Manage applications
You can view and manage applicatio ns installed in your phone.
45

Install new applications
You can install applications from the Play Store or from elsewhere. When installing applications
that are not from the Play Store, make sure the software is suitable for your phone.
Installing applications from the Play Store
1. On the home screen or i n the All A pps screen, touc h the Play Store icon.
2. Search for the applications you want to i nstall.
3. Select In stall (for free items) or Buy.
4. If you select Instal l, the item will start downloading immediately.
5. If you select Buy, enter your credit card information. Follow the on-scree n instructions.
Installing applications not in the Play Store
1. Copy the application to the SD card and find the file from File manager.
2. Check Unknown sources.
3. Touch the file and complete the installation according to the wizard.
Uninstall applications
Uninstall applications in the Play Store
1. On the Play Store screen.
2. Touch the application to uninstall.
46

3. Tou ch Uninstall and complete the uninstall process according to the wizard.
Uninstall applications not in the Play Store
1. On the home screen, touc h and then select Settings > Apps.
2. Scroll the list and touch the applicatio n you want to uninstall.
47

Technical Specifications
Size and Weight 146.2 × 72.6 × 7.2 mm. 150g with battery
Networks 4G LTE B and 1, 3, 28 (2100/1800/700)
LTE Data Rates : 150M Down / 50M Up
3G UMTS 850, 2100 MHz. HSPA+ 42Mbps data
2G 900, 1800 MHz.
Display TFT 5.2”, Full HD 10 80p, 196pi, Capacitive touch.
Camera 13MP Rear, 5MP Fro nt
CPU & Memory Octa core 1.3GHz CPU with 2GB RAM.
16GB ROM with approx 10GB user space.
Expandable external storage microSD(HC)™ up to 32GB
Operating system Android 6.0
Batter y Capacity 2200mAh Li-ion non user replaceable
48

Charge
Time
3-4 hrs with AC Charger
Standby
time
Voice
talk time
Connectivity Bluetooth 4 , Wi-fi 802.11b/g/n, 3.5mm jack NAHJ, micro US B
SIM Card Nano SIM, 4FF format.
Up to 300 hours (subject to network)
Up to 10 hours (subject to network)
49

Troubleshooting
Symptom Solution
How do I check the
software version?
How do I reset to factory
defaults?
How do I check the SMS
service centre number?
How do I configure the
MMS Settings?
How do I configure Email
settings?
How do I copy Contacts to
or from my SIM card?
How do I select Network
mode?
Menu > Settings > About phone > Buil d number
Menu > Settings > Backup & reset > Factory data reset
Messages > Options > Settings
Messages > Options > Settings
Apps > Email, or Menu > Settings > Accounts
Contacts > Options > Import/Export > Follow the directions on
screen
Menu > Settings > More > Mobile Networks > Preferred network
type
50

Symptom Solution
How do I manually select
a carrier?
How do I enable USB
tethering?
How do I configure APN’s
How do I enable Flight
Mode?
How do I clear my
Browser?
How do I check Call
forwa rding etc
How do I check for
Software U pdates?
How do I change the
Ringtone?
Symptom Solution
Menu > Settings > More > Mobile Networks > Network
operators > Search networks
Menu > Settings > More > Tethering and Portable hots pot > USB
tethering. (Connec t as CDROM to install dri vers)
Menu > Settings > More > Mobile Networks > Access Point
Names > Select + to add ne w APN
Long p ress on the power key > Flight Mode
Chrome > Options > History> Clear Browsing Data
Calls > Options > Settings > Call Settings > Call forwarding
Apps > System up dates
Menu > Settings > Sound & notifications > Edit the current
profile > Phone ringtone
51

The battery discharges
quickly
Possible network coverage issue. Check the signal level. With only
1 or 2 bars, the battery has to work harder to maintain network
contact. Limit multi-media to save power. The battery may be
worn out.
The handset turns on by
itself.
No incoming ring
or alarm tone
The handset s witches off
after charging.
I cannot charge the
phone
My data usage is
excessive
Symptom Solution
An alarm or calendar event switches the handset on
automatically.
Hold the power key to check the phone is not in silent mode.
Check the ringtone and ring volume settings.
The handset is charging in the off state. Press and hold the Red
key to switch the handset ON.
Confirm the charger is properly inserted.
Tips: Charge the phone using the suppl ied USB cable.
You can use any standard USB socket as a charger
Check Settings > Data usage to determine which apps a re
consuming your data. Google+ can use la rge amounts of backup
data. Review under Google+ > Options > Settings
52

Turn Bluetooth on. Set visibility to Show. Make sure the
I cannot connect to other
Bluetooth devices
ERROR MESS AGES
Message Solution
No SIM Card
Enter PIN code You have set a SIM PIN. Please enter your SIM PIN code.
Enter PUK code
Enter Unlock Code
pass-code is correct. Possible compatibility issues. Not all
functionality is supported between different Bluetooth devices
and standards.
Check a valid SIM card is inserted.
See the Getting Started section
Contact your Service Provider to get the PUK code
Contact your Service Provider to obtain the network unlocking
code.
53

Disposal of your old phone
1. When the wheelie bin symbol is attached to a product, it means the product is
covered by the European Directive 2002/96/CE.
2. All electr ical and electronic products should be dispose d of separately from
normal household waste via designated collection points provide d by
governme nt or local authorities.
3. The correct disposal of electrical and electronic products will help protect the
environment and human health.
54
 Loading...