

Page 1

User Manual and
Safety Information
1
Page 2

About Th is Ma nua l
Copyright
Copyright © 2015 ZTE CORPORATION
All rights reserved.
Approved Firmware Versions: No part of this publication may be quoted ,
reproduced, translated or used in any f orm or by any means, el ect ronic or
mechanical, includin g photocop ying and microfilm, without the pri or written
permission of ZTE Corporation.
ZTE Corpor ation reserves the right to corr ect typograp hi c errors, misprints or
update specification in this guide wi thout prior notice.
The Bluetooth
use of such trademarks by ZTE Corp oration is under license.
Other trad emarks and trade names are the property of their respective ow ners.
We offer self-service for our smart terminal device users. Please visit the ZTE
official website (at www.ztedevice.com) for more information on self-service and
supported pro duct models . I nformat ion on the websi te takes prec edence.
Version No.: R1.0
Edition Time: Novem ber 19, 2015
Manual No.: 081704100476
®
tradem ark and logos are owned by the Bluetooth S I G, Inc. and any
2
Page 3

Contents
Getting Started ............................................................................. 8
Getting to Know Your Phone ......................................................................... 8
Knowing the Keys ......................................................................................... 9
Installing t he Nano-SIM Card and t he Batt ery .............................................. 10
Installi ng the microSDHC™ Card ................................................................ 13
Charging the Battery ................................................................................... 14
Extending t he Battery Lif e ........................................................................... 1 5
Powering On/Off ......................................................................................... 15
Setting Up for the First Time ........................................................................ 16
Locking/Unlocking the Screen and Keys...................................................... 16
Using the Touch Screen .............................................................................. 17
Getting to Know the Home Screen .............................................................. 18
Perso naliz ing ............................................................................. 19
Changing t he System Language ................................................................. 19
Setting the Date and Time ........................................................................... 19
Changing Rin gt one and Notific ati on Soun d ................................................. 19
Turning On/Off Touch Sound ....................................................................... 20
Adjusting Volume ........................................................................................ 20
Applying Ne w Wall papers ........................................................................... 20
Changing S creen Bright ness ....................................................................... 20
Protecti ng Your Phone With Screen L ock s .................................................. 21
Protectin g Your Phone With Encrypti on ....................................................... 21
3
Page 4

Know in g the Basi c s ................................................................... 23
Monitoring the Phone Status ....................................................................... 23
Managing Notifications ................................................................................ 24
Managing Shortcuts and Widgets ................................................................ 26
Organiz ing With Folde r s .............................................................................. 27
Rearrangi ng the Primary I cons .................................................................... 28
Enterin g Text ............................................................................................... 28
Editing Tex t ................................................................................................. 30
Opening and Switc hing Apps ...................................................................... 31
Conn e c t ing to Networks and De v ic es ....................................... 32
Connecting to Mobile Networks ................................................................... 32
Connecting to Wi-Fi® ................................................................................... 33
Using Wi-Fi Direct® ..................................................................................... 37
Connecting to Bluetooth® Devices ............................................................... 37
Connecting to Your Computer via USB ........................................................ 39
Sharing Your Mobile Data Connection ......................................................... 41
Connecting to Virtual Private Networks........................................................ 43
Phone Calls ................................................................................ 45
Placing and Ending Calls ............................................................................ 45
Answering or Rejecting Calls....................................................................... 46
Working With the Call Log ........................................................................... 47
Calling Your Contacts .................................................................................. 48
Checking Voicemail..................................................................................... 48
Using Options During a Call ........................................................................ 48
Managing Multi-party Calls .......................................................................... 49
Adjusting Your Call Settings ........................................................................ 50
4
Page 5

Contacts ..................................................................................... 56
Checking Contact Details ............................................................................ 57
Adding a New Contact ................................................................................ 57
Setting Up Your Own Profile ........................................................................ 57
Importing, Exportin g, and Sharing Contacts................................................. 58
Working With Favorite Contacts .................................................................. 59
Searching for a Contact .............................................................................. 60
Editing Contacts.......................................................................................... 60
Accounts .................................................................................... 62
Adding or Removing Accounts .................................................................... 62
Configuring Account Sync ........................................................................... 63
Email .......................................................................................... 64
Setting Up the First Email Account .............................................................. 64
Checkin g Your Emails ................................................................................. 64
Respondin g to an Email .............................................................................. 65
Writing and Sendi ng an Email ..................................................................... 66
Adding and Editing Email Accounts ............................................................. 67
Changing General Email Setting s................................................................ 67
Messaging .................................................................................. 68
Opening the Messaging Screen .................................................................. 68
Sending a Message .................................................................................... 68
Replying to a Message................................................................................ 69
Forwarding a Message................................................................................ 69
Changing M essaging S ett i ngs ..................................................................... 70
5
Page 6

Calendar ..................................................................................... 70
Viewing Your Calendars and E vents ............................................................ 70
Creating an Event ....................................................................................... 71
Editing, Deleting or Sharing an Event .......................................................... 71
Changing Calendar Settings ....................................................................... 72
Capturing a Photo ....................................................................................... 73
Recording a Video ...................................................................................... 74
Opening Gallery ......................................................................... 75
Workin g With Albums .................................................................................. 75
Workin g With Picture s ................................................................................. 76
Retouch ing Your Pictures ............................................................................ 77
Playing Videos ............................................................................................ 77
More Apps .................................................................................. 78
Clock .......................................................................................................... 78
Calcula tor ................................................................................................... 79
Downloads .................................................................................................. 79
File Manager ............................................................................................... 79
Sound Record er .......................................................................................... 79
Google Ap ps ............................................................................................... 80
Settin gs ...................................................................................... 81
General Settings ......................................................................................... 81
Wireless and Netw ork ................................................................................. 83
Device ........................................................................................................ 85
Persona l ..................................................................................................... 86
System ....................................................................................................... 89
Upgrading the Phone Software .................................................. 90
6
Page 7

Troubleshooting ......................................................................... 91
For Your Safety .......................................................................... 94
General Safety ............................................................................................ 94
FCC RF Exposure Information (SAR) .......................................................... 95
FCC Regulations ........................................................................................ 96
Hearing Aid Compatibility (HAC) regulations for Mobile Phones................... 97
CTIA Requirements..................................................................................... 99
Radio Frequency Interference ....................................................................100
Explosive Environments .............................................................................101
7
Page 8

Indicator light
Vol um e key
Touch screen
Back key
Earpiece
Front camera
Power key
Recent apps key
Home key
Getting Started
Getting to Know Your Phone
8
Page 9

Key
Function
Power k e y
x Press and hold to turn on or off airplane mode, restart, or to power
x Press to turn off or on the screen display.
Home key
x Touch to return to the home screen from any application or screen.
x Touch and hold to use Google search.
Back camera
Flash
Charging/
micro-USB jack
Speaker
Headset jack
Knowing the Keys
off.
9
Page 10

Key
Function
Recent apps key
Touch to see recently used apps.
Back key
Touch to go to the previous screen.
Volume key
Press or hold either end to turn the volume up or down.
Installing the Nano-SIM Card and the Batter y
Switc h off y our phone bef ore i nstalling or replacing the battery or the Nano-SI M
card.
1. Place your finger in the slot at the bottom of the back cover to
lift and remove the cover.
10
Page 11

2. Hold the Nano-S IM card wi th the cut c orner oriented as shown and slip them
into the card holder.
WARNING!
To avoid damage to the phone, do not use any other kind of SIM card, or any
non-standard Nano-SIM card c ut from a SIM card. You can get a standard
Nano-SIM card from your service provider.
11
Page 12

3. Insert the battery by aligning the metal contacts on the battery with the metal
contacts in the battery compartment. Gently push down on the battery until it
clicks into place.
4. Align the back cover with the back of the phone and press the cover back into
pl ace. En s u re th at all t h e t abs are s ec u re an d ther e are n o g ap s arou n d th e
cover.
12
Page 13

Installing the microSDHC™ Card
The microSDHC card can be i nstalled and removed whil e the phone is tu rned on.
Unmount the microSD HC card before removing it.
1. Remove the back cover.
2. Hold your microSDHC card with the metal contacts facing down and slide it in.
NOTE: Some applic ations may require a microSDHC card to s tore certain
data on it and to work properly. Therefore, it is recomm ended that you keep a
microSDH C card inst alled and not r em ove or replace it unnecessarily.
3. R epl ace the back co ver.
13
Page 14

Charging the Battery
Your phone’s battery should have enough power for the phone to turn on, find a
signal, and make a few call s. You should fully charge the battery as soon as
possible.
If the battery is low, there will be a pop-up message on the screen.
As you charge your phone, the screen w ill t ell you the exact battery level on the
lock screen. See Locking/Unlocking the Screen and Keys.
WARNING!
Use only ZTE-approv ed charg ers and cables. T he use of unapproved acc essories
could damage your phone or cause the battery t o explode.
1. Connect the adapter to the charging jack. Ensure that the adapter is inserted
with the correct orientation. Do not force the connector into the charging jack.
14
Page 15

2. Connect the charger to a st andard AC p ower outlet. If the phone is on, you’ll
see a chargi ng i con, such as or , appea r on t h e s tat u s bar .
3. Disconnect t he charger when the battery is fully ch arged.
NOTE: If the battery is extremely low, you may be unable to power on the
phone even when it is being charged. I n this case, try again after c harging the
phone for at least 20 minutes. Contact customer service if you still cann ot power on
the phone after prolonged charging.
Extending the Battery Life
Active applications, screen bright ness levels, B l uetooth and Wi-Fi usage and GP S
functionality can drain your battery. You c an follow the helpful tips below to
conserve your batt ery p ower:
x Reduce the screen bac kli ght time.
x Lower the sc reen brightness.
x Turn aut o-sy nc, Wi-F i , and Bluetooth off w hen not in use.
x Disable the GPS function when not in use. Most applications using this function
will periodically query the GPS sat ellites for your current location; each query
drains your battery.
Powering On/Off
x Press and hold the Power key to turn on your phone.
x To power of f, press and hold t he Power key to open the options m enu. Touch
Power off.
NOTE: If the phone freezes or takes too long to respond, you can press and
hold the Power key for about 10 s econds to power the phone of f, and then t urn i t
on again.
15
Page 16

Setting Up for the First Time
When you first power on your phone after you purchase it or res et it to factory
settings (s ee Backup and Reset), you need to do some setting s before using it.
Touch the l anguage field to select the l anguage you w ant to use and then touch
Start. Then follow th e prompts t o set u p Wi-Fi, owner nam e, Google services and
other options.
Locking/Unlocking the Screen and Keys
Your phone al lows you t o quickly lock th e sc reen and key s (put the phone i nt o
sleep mode) when not in use and to turn the screen back on and unlock it when you
need it.
To lock the scr een and keys:
To quickly t urn the scr een off and lock the keys, pres s t he Power key.
NOTE: To save battery power, the phone automatically turns off the screen
after some time of inactivity. You will still be able to receive messages and calls
while the ph one screen is off.
To unlock the screen and keys:
1. Press the Power key to turn the screen on.
2. Touch and hold the screen.
- or Press and hold th e Camera i con at th e bott om r igh t to open the Camera app.
NOTE: If you have set an unlock pattern, PIN or password for your phone (see
Protecti ng Your Phone Wit h S creen Lock s), you’ll need to draw the pattern or enter
the PIN/password to u nlock your sc reen.
16
Page 17

Using the Touch Screen
Your phone’s touch screen l ets you c ontrol actions through a variety of t ouch
gestures.
x Touch
When you want to type u sing the onscreen keyboar d, select onscreen items
such as application and settings icons, or press onscreen buttons, sim pl y touch
them wit h your finger.
x Touch and Hold
To open the available options f or an item (for example, a message or link in a
web page), t ouch and hold the item.
x Swipe or Slide
To swip e or sl ide means to quickly drag your finger vertically or hori zontally
across the scr een.
x Drag
To drag, press and hold your finger with some pressure before you start to move
your finger. While dragging, do not releas e your finger until you hav e reached
the targ et position.
x Pinch
In some apps (such as Maps, B rowser, and Gallery), you can zoom in and out
by placing two fingers on t he screen at once and pinchi ng them t og eth er (to
zoom ou t ) or s prea din g them apa rt (t o z o om in ) .
x Rotate the screen
For most screens, you can automatically change the screen orientati on from
portrait to landscape by turning the phone sideways.
17
Page 18

Status bar
Wallpaper
Shortcuts
Messaging
Chrome
Widget
Folder
People
Phone
All apps
Getting to Know the Home Screen
The home screen is the starting point for your phone’s applications, functions, and
menus. You c an customize y our home screen by adding shortcuts, folders, widgets,
and more.
Extended Home Screens
Your hom e scr een is extendable, pr oviding more space for shortcut s, folders,
widgets, and more. Simply swipe l eft or ri ght on th e scr een to see the extended
panels.
See Managing H om e S creen Ic ons and Widgets for more information on how to
add or remov e addi tional h ome screen panels
18
Page 19

Personalizing
Changing the System Language
1. Touch the Home key > > Settings > Language & input > Language.
2. Select the langu age you need.
Setting the Date and Time
1. Touch the Home key > > Settings > Date & time.
2. Uncheck Automatic date & time and Automatic time zone if you want to set
the date, time and tim e zone by yoursel f.
3. Set the date, time, time zone, and date/time form at.
Changing Ringtone and Notification Sound
You can customize the default incoming call ri ngtone and t he default notific ation
sound for the micro-SIM card.
1. Touch the Home key > > S ett ings > Sound & notifications.
2. Touch Default n o tification ringtone or Phone ringtone.
3. Scroll through the ringtone list and select the ringtone you w ant to use.
4. Touch OK.
NOTE: See Set a Ringtone for a Contact for how to assign a special ringtone
to an individual contact.
19
Page 20

T urning On/Off Touch Sound
1. Touch the Home key > > Settings > Sound & notifications > Other
sounds.
2. Touch Touch sounds.
Adjusting Volume
1. Touch the Home key > > Settings > Sound & notifications.
2. Drag the sliders below Media volu me, Alarm volume, Ring volume and
Notification volume to adju st the volum e for each type of audio.
NOTE: You can adjust the media volume when a media application is in use by
pressing the Volume key. If no media application is active, press the Volume key to
adjust ringtone volume (or the earpiece volume during a call).
Applying New Wallpapers
You can set the wallpap er for the h ome screen.
1. Touch the Home key.
2. Touch and hold an empty area of the home screen.
3. Touch WALLPAPERS to pick an image as the wallpap er.
Changing Screen Brightness
1. Touch the Home key > > S ett ings > D is play > Brightness l evel.
2. Drag the slider to manuall y adjust th e scr een brightness.
20
Page 21

NOTE: W i th the proximity and light sens or, y our phone can automatically
adjust the sc reen brightness for available light. Touch Adaptive brightness in the
Display s et tings screen to turn the feature on or off.
Protecting Your Phone With Screen Locks
You can prot ect your phone by creating a sc reen lock. When it i s enabled, you
need to swi pe the screen, draw a pattern or enter a numeric PIN or a pas sword to
unlock the phone’s screen and keys.
1. Touch the Home key > > S ett ings > Sec u ri ty > Screen lock.
2. Touch None, Swipe, Pattern, PIN or Password.
x Touch None to disable the sc reen lock.
x Touch Swipe to enable screen lock and allow unlocki ng with a ‘swipe’
gesture.
x Touch Pattern to draw and redraw a patt ern that you m ust draw to unloc k
the screen.
x Touch PIN or Password to set a numeric PI N or a password that you must
enter to unlock the screen.
3. For Pattern, PIN, or Password lock, select how you want notific ations and their
contents to show when the phone is locked. Then touch DONE.
Protecting Your Phone With Encryption
You can encr ypt all the data on your phone: your accounts, appli cation data, music
and other m edi a, downloaded information, and so on. If you do, you must draw a
pattern or enter a numeric PIN or a password each tim e you power on your ph one.
21
Page 22

WARNING!
Encrypti on i s irreversible. The onl y way to revert to an unencrypted phone i s t o
perform a factory data reset whic h erases all your data.
Encrypti on provides additional pr ot ect ion in cas e your phone is stolen and may be
required or recommended in som e organizations. Consult y our system
administrator before turning it on. In many cases the PIN or password you set for
encryption is contr olled by the system administrator.
Before turning on encrypt i on, prepar e as follows:
x Set a l ock screen pattern, PIN, or password.
x Charge the battery.
x Keep the phone connected to the charger.
x Schedule an hour or mor e for the encryption process. You must not interrupt it
or you will lose some or all of your data.
When you'r e ready to turn on encryption:
1. Touch the Home key > > S ett ings > Security > Encrypt phone.
2. Touch ENCRYPT PHONE .
The ENCRYPT PHONE button is dimmed if your b attery is not charged or your
phone is not plugged in.
If you change your mind about encrypt i ng your phone, touch th e Back Key.
WARNING!
If you interrupt the encryption proc ess, you will lose data.
Read the informati on about encryption carefully.
3. Draw the lock screen pattern, or enter your l ock screen PIN or passw ord and
touch NEXT.
4. Touch ENCRYPT PHONE .
22
Page 23
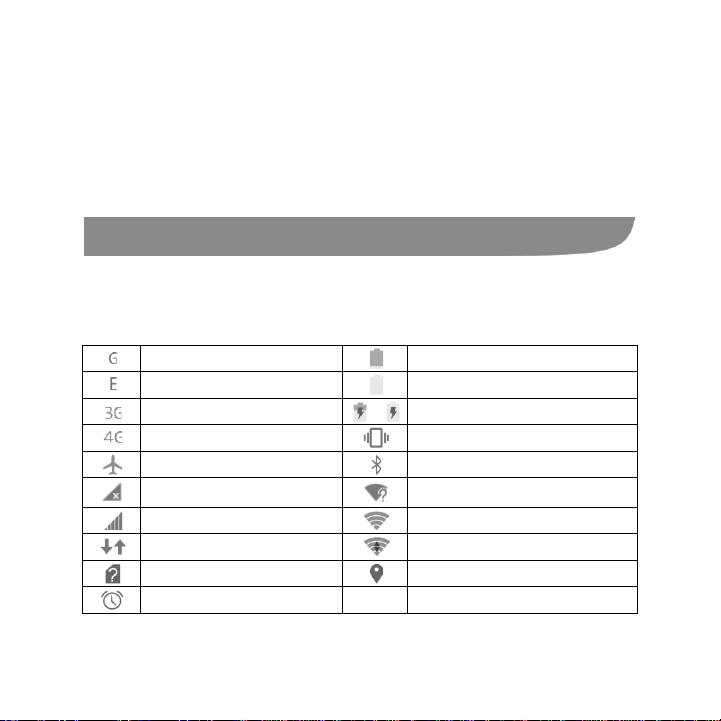
GPRS connected
Battery low
EDGE connected
Battery full
3G connected
/
Battery charging
4G connected
Vibration mode
Airplane mode
Bluetooth on
No signal
Open Wi-Fi network available
Signal strength
Connected to a Wi-Fi network
Mobile data in use
Wi-Fi in use
No SIM card installed
GPS on
Alarm set
The encryption process starts and displays its progress. En cryption can take an
hour or more, during whic h t i me your phon e m ay restart s everal tim es.
When encrypt ion is completed, you're prompted to dr aw t he pattern or enter your
PIN or password.
Subsequent l y you must draw the pattern, enter your PIN or password each time
you power on your phone i n order to decr ypt i t .
Knowing the Basics
Monitoring the Phone Status
The status b ar at the top of th e home screen provides ph one and service status
ic ons on t he rig ht s ide. Below are some of the i cons you ma y see.
23
Page 24
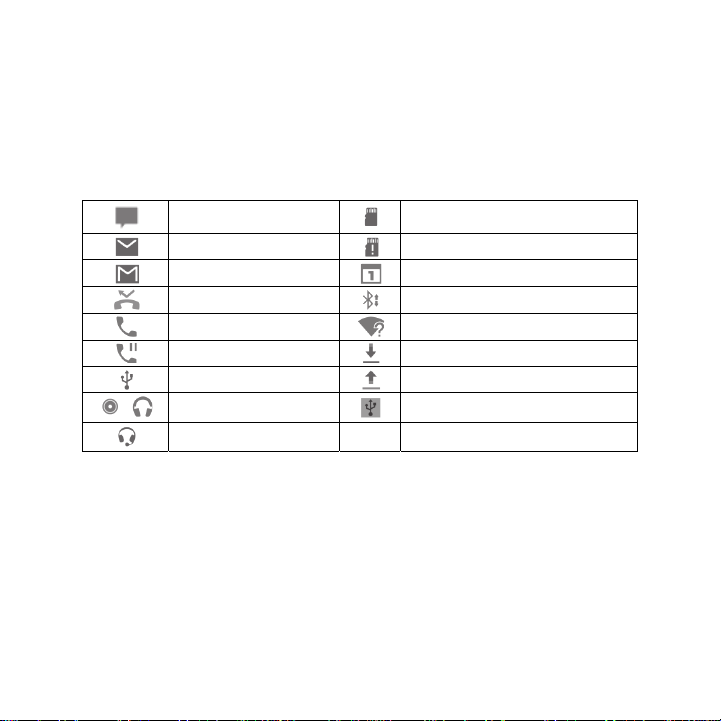
New
microSD
New email
microSDHC card removed
New Gmail message
Upcoming event
Missed call
Incoming file via Bluetooth
Call in progress
New Wi-Fi network detected
Call on hold
Downloading data
USB connected
Sending data
/
Song is playing
USB tethering is on
Wired headset connected
Mobile hotspot or Wi-Fi direct is on
Managing Notifications
Notific a tion Icons
The status bar at the top of the home screen provides notification icons on the left.
Below are some of th e icons yo u m ay s ee.
message
Open/Close the Notification Panel
Notifications report the arrival of new messag es, calend ar events, and alarms, as
well as ongoing events, such as when you'v e configur ed your phon e as a Wi-Fi
hotspot. You can open the notification panel to view the details of notifications.
x To open the notification panel, swipe your finger down from the top of the
screen.
x To close the notification panel, swipe your fing er up on t he screen or touch the
Back key.
HC card unmounted
24
Page 25

Respond to or Remove a Notification
In the notification panel, you can respond to a notification or remove the
notific ations. The notification panel also supports expandable notifications that let
you perform additional actions right from the notification itself.
x To respond to a notification, just touch it.
x To remove a notification, swipe it left or right.
x Slide down with one finger to expand certain notifications.
x To remove all notifications, touch below all the notifications.
x To manage notifications you have received, touch and hold a notification to
identify the application that creat ed i t. You can then touch and select
Sensitive to hide any sensit ive cont ent from this app’ s notifications, or touch
Priority t o show them in priority mode.
NOTE: If you turn off notific ations for an app, you may miss its important alerts
and updates. T he notifications of some apps cannot be turned of f.
Use Quick Setting s
The Quick Settings make it convenient to view or change the most common
settings for your phone.
Open the notification panel and then drag the panel downwards to find the following
Quick Setti ngs on the screen .
x Hotspot: Touch to turn on or off t he Hotspot.
x Normal: Touch to sw i t ch between Normal, Vi brate and Mute.
x Location: Touch to turn on or off th e locati on functi on.
x Airplane: Touch t o turn on or off the airplane mode.
x Auto Rota te: T ouc h to turn on or off the auto-rot ate screen feat ure.
x Flashlight: Touch to turn on or off the flashlight .
25
Page 26

x Wi-Fi: T ouch to turn on or off Wi-Fi.
x Bluetooth: T ouch to turn on or off Bluetoot h.
x Data: Touch to enable or disable data access over the mobile network.
x Brightness: Unch eck Auto and dr ag t he brightness slider to adjust the screen
brightness.
NOTE: In the Quick Settings screen, touch at the top to get to the
Settings menu.
Managing Shortcuts and Widgets
Add Shortcuts and Widgets
1. Touch the Home key.
2. To add a widget, touch and hold a blank area of the home screen and then
touch WIDGETS.
To add an application shortc ut, t ouch .
3. Slide left or rig ht to view al l avai lab le widg ets or applications.
4. Touch and hold a widget or an appl i cation icon and dr ag it to a home screen
panel.
Move Shortcuts or Widgets
1. Touch and hold a widg et or shortc ut on the hom e screen.
2. Drag it to the place you need.
Remove Shortcuts or Widgets
1. Touch and hold a widg et or sh ortcut on the hom e screen.
2. Drag it to to remove it.
26
Page 27

Adjust Widget Size
1. Touch and hold a w i dget on the home screen and then release it.
2. An outline app ears aroun d the widget. Drag the outline to resiz e th e wi dget.
NOTE:
Not all widgets can be resized.
Organizing With Folders
You can create folders on a home screen and put sev eral icons in a folder .
Create a Folder
1. Touch and hol d a shortcut on the home screen.
2. Drag the shortcut icon over another and release your finger. A new fol der is
created and both shortcuts are added into the f ol der.
3. If needed, drag more shortcuts and drop t hem into the folder.
Rename a Folder
1. Touch a folder to open it. T he ol d folder nam e is di splayed below th e icons.
2. Touch the folder name and enter a new nam e.
Add More Icons to a Folder
1. Touch and hold an i con and then drag it onto a f old er i con.
2. Release the ic on and it will be put into the folder.
27
Page 28

Remove Icons From a Folder
1. Touch a folder to open it.
2. Touch and hold the icon you want to remove and then drag it to the home
screen.
3. Release the ic on and it will be removed from the folder.
Rearranging the Primary Icons
The hom e scr een i ncludes a customiz abl e primary icons area at the bott om visibl e
from all h om e screen panels. You can keep at most fi ve items in the area. Drag
icons or folders in or out of the area to rearrange it.
NOTE:
The All apps icon can not be moved.
Entering Text
You can ent er text using the onscreen keyboard. Some apps open it automatically.
In others, you open it by touching where you want t o typ e. You can touch the Back
key to hide th e onscreen k eyboard.
28
Page 29
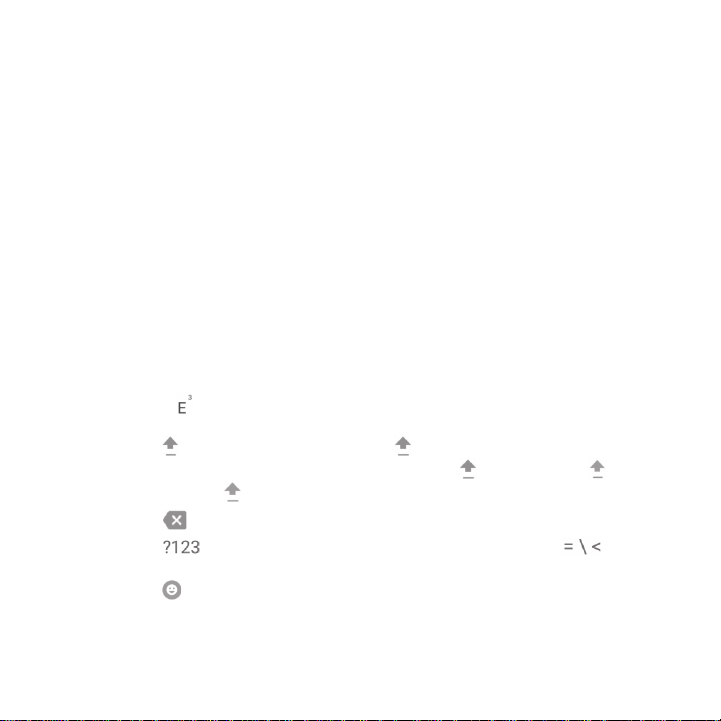
Google Keyboard
The Googl e Keyboard pr ovides a layout si milar to a des ktop computer keyboar d.
Turn the ph one sideways and the keyboard will change from portrait to landscape.
The landscape keyboard i s not supported in all applications.
x Touch t he alphabeti c keys to ent er letters. T ouch and hold some specifi c keys
to ente r ass oc iat e d ac c e n ted l et ter s or numb ers. F or e xample, t o en ter È, touch
and hold and the available accented lett ers and numb er 3 appear. Then
slide to ch oose è.
x Touch to use uppercase. D ouble-tap to lock uppercase. This key also
changes to indicate th e current case you are using: for low ercase, for
uppercase, and when locked in uppercase.
x Touch to delete the text before the cursor.
x Touch to select numbers and symb ol s. Y ou can then touch to
find more.
x Touch to enter miniatur e icons, such as expressions, horosc opes, and
animals.
29
Page 30

x Touch to use Google voic e ty pi ng.
Google Voice Typing
Google Voice typing uses the Google voice recognition service to convert speech
to text.
1. Touch to access the voice typing when you are using the Google Keyboard.
2. When you see the microphone image, speak what you want to type.
3. You can continue entering text to keep it or to delete it.
NOTE:
Say "comma," " period," "question mark," "exclamatio n mark," o r "ex cla mation point"
to enter punctuati on.
Input Settings
Choose input settings by touching Home key > > Settings > Language &
input fr om the home screen.
In the Keyboard & input methods section, you can s et the default input method
and choose th e settings for input methods.
Editin g Text
x Move the insertion point: Touch wh ere you want to type.
The cu rsor bli nks in the new position, and a tab appears below it. Dr ag the tab
to move the cursor.
x Select text: T ouch and hold or double-t ap within the t ext. The nearest word
highlights, with a tab at each end of the selection. Dr ag t he tabs t o change the
selection. Touch to select all the words.
30
Page 31

x Cut or copy: Select the text you want to manipulate. Then touch the Cut /
or Copy / button to cut or copy the text to the clipboard.
x Rep lac e text with th e clipboard text: Select the text you want to replace.
Then touch ,
or PASTE.
Opening and Switching Apps
Open an App
1. Touch the Home key > .
2. Slide left or right and touch an app to open it.
Switch Between Recen tly Op ened Apps
1. Touch the Recent apps key. The ap ps you’ ve used r ec ently are di splayed in a
series of tabs. Slide up and down to see all t he tabs.
2. Touch a tab t o open that app.
NOTE: You can swipe a t ab sideways to remove it from the screen.
31
Page 32

Connecting to Networks and Devices
Connecting to Mobile Networks
Select Network Operator
1. Touch the Home key > > S ett ings > Mobile netw orks.
2. Touch Netw ork op erat or s to search for all avail abl e network s.
3. Touch a network in the network l i st to register manual l y.
You can also t ouch Choo se automat ic ally to select preferr ed network
automatically.
Control Mobile Data Use
You can use or disable th e mobile data service of the nan o-SIM card.
To enable or di sable data ac cess:
1. Touch the Home key > > S ett ings > Data usage.
2. Touch Mobile Data to enable or disable mobil e dat a use.
To get data services when roaming:
1. Touch the Home key > > S ett ings > Mobile network s.
2. Touch Data Roaming to connect to data service when roaming.
NOTE: Data roaming may incur signi ficant roaming charges.
32
Page 33

Select Preferred Net wo rk Type
Set the preferred type of network for the nano-SIM card.
1. Touch the Home key > > S ett ings > Mobile network s.
2. Touch Preferred network type and select the network type you would prefer
the phone to connect with.
Set Access Point Names
To connect to the Internet you can use the default Access Point Names (APN). And
if you want to add a new APN, please contact the service provider to get the
necessary inform ation.
1. Touch the Home key > > S ett ings > Mobile network s.
2. Touch Access Point Names > > New APN.
3. Touch each item to enter the information you get from your servi ce provider.
4. Touch > Save to complete.
NOTE: To set the APN to default settings, touch > Reset to defau lt.
Connecting to Wi-Fi®
W i-Fi is a wi reless n etwor king techn olo gy t hat c an provide In ternet access at
distances of up to 100 m eters, dependi ng on the Wi-Fi router and your
surroundings.
Turn Wi-Fi On and Connect to a Wi-Fi Network
1. Touch the Home key > > S ett ings > W i-Fi.
2. Slide the Wi-Fi switch to the On position to turn on Wi-Fi.
33
Page 34

3. Touch a network name to connect to it.
4. If the network is secured, enter the password and touch CONNECT.
NOTE: Your phone automatic ally connects to previously used Wi-Fi networks
when they ar e in r ange.
Get Notified of Open Networks
1. Touch the Home key > > Settings > Wi-Fi.
2. Slide the Wi-Fi switch to the On position.
3. Touch > Advanced.
4. Slide the Network no tificatio n switch.
When Wi-Fi is on, you rec eive notifications in the status bar when your phone
detects an open Wi-Fi network. Switch off th e option to turn off notifications.
Add a Wi-Fi Network
You can add a Wi-Fi netw ork i f the network does not broadcast its name (SSID) or
add a Wi-F i network when you are out of range.
To connect t o a secured network, you first need to get the securit y details from the
networ k' s adm ini str at or.
1. Touch the Home key > > Settings > Wi-F i.
2. Slide the Wi-Fi switch to the On position.
3. Touch > Add network.
4. Enter the network SSID (name). If necessary, enter security or other network
configuration detail s.
5. Touch SAVE.
34
Page 35

Connect to a WPS Network
WPS (W i-Fi Protected S etup) is a feature that mak es it easy to add y our phone to
access point s which supp ort WPS.
You can use one of the followi ng two meth ods to conn ect your phone t o a wireless
network using WPS.
Method one: WPS button
1. Touch the Home key > > Settings > Wi-F i.
2. Slide the Wi-Fi switch to the On position.
3. Touch > Advanced > WPS Push Button.
4. Press the WPS button on the access point and t he access poi nt will recognise
your phone and add it to th e network.
Method two: PIN numb er
1. Touch the Home key > > Settings > Wi-F i.
2. Slide the Wi-Fi switch to the On position.
3. Touch > Advanced > WPS Pin Entry.
4. The WPS PI N number displays on the screen. Enter t he PIN number into the
access point’s setup page.
After enteri ng the PIN num ber, your phone automatic ally fi nds the access point and
configures t he connection.
NOTE:
For detailed information about the WPS feature of the access point, please refer to
its user documents.
35
Page 36

Forget a Wi-Fi Network
You can make your phone f orget about t he details of a Wi-Fi network th at y ou
added - for example, if you don’t want the phone to connect to it aut omatically or i f i t
is a network that you no longer use.
1. Touch the Home key > > Settings > Wi-F i.
2. Slide the Wi-Fi switch to the On position.
3. Touch the Wi-Fi network name and then t ouch FORGET.
Adjust Advanced Wi-Fi Settings
1. Touch the Home key > > Settings > Wi-F i.
2. Touch > Advanced to adjust the following settings.
x Scan n i n g always avai lable: Let Google’s location servic e and other apps
scan for networks ev en when Wi-Fi is off.
x Keep Wi-Fi on during sleep: Set whether to k eep Wi-Fi on in sleep mode.
x Install certific a tes: I nstall certificat es needed for connecting t o certain
Wi-Fi networks.
x Wi-F i Direc t: Us e th e Wi-Fi D irect feature.
x WPS Pu sh Bu tton: Connect to a WPS network via the push button method.
x WPS Pin Entry: Connect to a WPS network via the phone PIN method.
x MAC ad dress: C h eck the MAC ad d res s.
x IP add ress: Check the phone’s IP address.
36
Page 37

Using Wi-Fi Direct®
Wi-Fi Direct allows Wi-Fi devices to shar e files and data directly by connec ting to
each other without the need for wireless access points (h ots pots).
NOTE: Activating this feature will disconnect your current Wi -Fi network
connection.
1. Touch the Home key > > Settings > Wi-Fi.
2. Touch > Advanced > Wi-Fi Direct. Your phone will search for other devices
enabled with Wi-Fi Direct connections.
3. Touch a device name below Peer devices to connect with it. The other device
will receive a connection prompt and need to accept the request.
4. Once connected the device is displayed as “Connected” in the Wi-Fi Direct
screen.
Connecting to Bluetooth® Devices
Bluetooth® is a short -range wireless communicati on technology. P hones or other
devices with Bluetooth capabilities can exchange information wirelessly wit hin a
distance of about 10 meters (32.8 f eet). The Bluetooth devices must b e pai red
before the c om munication is performed.
Turn Bluetooth On/Off
1. Touch the Home key > > Settings > Bluetooth.
2. Slide the Bluetooth switch to the On or Off position.
W hen B lu etooth is on, the icon appears in the status bar .
37
Page 38

Change the Device Name
1. Touch the Home key > > Settings > Bluetooth.
2. Slide the Bluetooth switch to the On position if Bluetooth is of f .
3. Touch > Rename this device.
4. Edit the name and touch RENAME.
Pair With Another Bluetooth Device
1. Touch the Home key > > Settings > Bluetooth.
2. Slide the Bluetooth switch to the On position if Bluetooth is of f.
Your phone autom atically scan s f or and displ ays the IDs of all available
Bluetooth d evi ces in range. You could touch > Refresh if you want to scan
again.
3. Touch the device you want to pair with.
4. Confirm that the Bluetooth passkeys are the same between the two devices and
touch PAIR. Alt ernately, enter a Bluetooth passk ey and touch PAIR.
Pairing is successfully completed when the other device accepts the connection
or the same passkey is entered.
NOTE:
The Bluetooth pass key ma y be fixe d for c e r tain de vices such as heads ets and
handsfree car kits. You can try entering 0000 or 1234 (the most common passkeys)
or refer to the documents for that device.
38
Page 39

Send Data via Bluetooth
1. Open the appr opriate application and select th e fil e or i t em you w ant to share.
2. Select the option for s harin g via B lu etoot h. The method may vary by appli cat io n
and data typ e.
3. Touch a Bluetooth device the phone has pai red with or wait for it to search for
new devices and touch one of them.
Receive Data via Blu etooth
1. Turn Bluetooth on before trying to rec eive data via Bluetooth.
2. Flick down th e st atus bar and t ouch .
3. Touch ACCEPT to start receiving the data.
Depending on your storage setting and wheth er a m i croSDH C card is installed,
received fil es are st ored automatic al ly in a dedicat ed folder (Bluetooth, for instance)
in the phone storag e or m i croSDHC directory. You can access them w i th the File
Manager app. Recei ved cont act s (vCard fil es) are automatically imported to your
contact list.
Connecting to Your Computer via USB
You can conn ect your phone t o a computer with a USB cable and trans f er music ,
pictures, and other files in both direct ions. Y our phone stor es t hese files in i nternal
st or a g e o r on a removabl e m i c roS DHC c ar d .
If you are using USB tethering, you must turn that off before you can use USB to
transfer files between your phone and comput er.
39
Page 40

Connect Your Phone to a Computer via USB
1. C onnect your phone to the PC with a USB cable.
2. Open the notification panel and touch (Connected to/as...).
3. Ch oo s e o n e o f the foll owing op t ion s :
x Charge only: Charge yo ur phone v ia USB.
x Media device (MTP): Tr ans f er fi les on W i n dows
x Came ra (PTP): T ransfer photos using camera software.
x USB tethering: Share the mobile data of your phone with the PC so that
you can acc ess the Internet on the PC using the ph one.
®
PC or Mac®.
Connect With Windows Media® Player
You can sync music on your phone and the computer installed with Windows Media
Player.
1. Connect the ph one with your c om puter via US B and choose Media device
(MTP).
2. Open Windows M edi a P layer and synchroni ze music, pi cture, and video files.
Disconnect Your Phone From the Computer
To disconnect the phone from the com puter, simply unplug the USB cable when
you’re finished.
Remove the microSDHC Card F rom Your Phone
If you need to remove the microSDH C card whil e th e p hone is on, y ou should
unmount it first .
1. Touch the Home key > > Settings > St orage > Unmount SD card > OK.
40
Page 41

2. The i con appears in t he status bar and you can now safely remove the
microSD HC car d from the phone.
Erase microSDHC Card
1. Touch the Home key > > Settings > St orage .
2. Scroll down the screen to the SD card section and touch Erase SD card >
ERASE SD CARD > ERASE EVERYTHING.
CAUTION:
The formatti ng procedure erases all t he data on th e m i croSDHC card, after whic h
the files CANNOT be retrieved.
Sharing Your Mobile Data Connection
You can share your phone’s data capabilities through tethering or by activating the
mobile hotspot feature to create a portable Wi -Fi hotspot.
Share Your Mobile Data Connection via USB
You can access th e Int ernet on your computer via the USB tethering feature of your
phone. Th e feat ure needs data connect ion on a mobil e network and may resul t i n
data charges.
NOTE:
You cannot transfer files b etw een your phone and your computer via USB while the
phone is USB tethered.
1. Connect your ph one to your computer with a USB cable.
2. Touch the Home key > > Settings > More > Tethe r ing & portable
hotspot.
41
Page 42

3. Touch USB tethering . A new network connection will be created on your
computer.
NOTE: To stop sh ari ng your d ata connection, touch USB tethe r ing again or
dis connect the USB cable.
Share Your Mobile Data Connection as a Mobile HotSpot
You c an sh ar e your ph on e’s d at a c onnecti on wi th oth er devices b y turning your
phone int o a portable Wi-Fi hotsp ot. T he featur e needs dat a connecti on on a
mobile network and m ay result in dat a charges.
NOTE: When the portable Wi -Fi hotspot feature is enabl ed, you cannot use
your phone’s Wi-Fi capability t o access the Internet. You still remain connected to
the Internet via your mobile data network.
1. Touch the Home key > > Settings > More > T ethe ring & portable
hotspot.
2. Check Mobile HotSpot.
After a moment, the ph one starts broadcastin g i ts Wi-Fi network n ame (SSI D).
3. On another device, locate your phone via Wi-Fi and connect with it to start using
the phone’ s mobil e data.
NOTE: To stop sh ari ng your dat a connecti on, touch Mobile HotSpot again.
42
Page 43

Rename or Secure Your Wi-Fi Hotspot
You can ch ange the nam e of y our phone's Wi-Fi network (SSID) and secur e your
portable Wi-Fi hotspot.
1. Touch the Home key > > Settings > More > M obile HotSpot settings >
Conf ig ure M obile HotSpot.
2. Set your nam e and securit y opti ons as follows:
x Network name: Enter or edit a network SSID (name) that other devices see
when scanning for Wi-Fi networks.
x Channel: To avoid int erferenc e wi t h other Wi-Fi netw orks, t ry using a
different channel.
x Security: Choose a securit y opti on, Open (not recommended) or WPA2
PSK (ot her users can access your mobile hotspot only if they enter the
correct password). When you select WPA2 PSK, touch the Password field
to edit the security password.
3. Touch SAVE to save your settings.
Connecting to Virtual Private Networks
Vi rtual private network s (VPN s) all ow you to connect to t he resour ces inside a
secured local network. VPNs are c om monly deployed by c orporations, schools,
and other in st i tutions to l et people access local network resources when not on
campus, or when connected to a wireless network.
Depending on the type of VP N you are using, you may be required to enter your
login credent ials or in stall securit y certific ates before you can conn ect t o your VPN.
You can get thi s information from your network administrator.
43
Page 44

Add a VPN
1. Touch the Home key > > Settings > More > VPN.
2. Touch + and fill in the information provided by your network administrator.
3. Touch SAVE.
The VPN is added to the list on the VPN screen.
Connect to a VPN
1. Touch the Home key > > Settings > More > VPN.
2. Touch the VPN that you want to connect to.
3. When prompt ed, enter any requested credentials, and then touch CONNECT.
W hen you are co nnected, the VPN connected ic on appears in the st atu s bar.
Modify a VPN
1. Touch the Home key > > Settings > More > VPN.
2. Touch and hold th e VPN that you want to modify.
3. Touch Edit profile and edit the VPN settings you want.
4. Touch SAVE.
44
Page 45

Phone Calls
You can place calls from t he Phone app, the People app, or other apps or widget s
that display contact information. Wherever you see a phon e number, you c an
usually t ouch it to dial.
Placing and Ending Calls
Place a Call by Dialing
1. Touch the Home key > .
2. Touch , enter th e phone numb er wi t h the on-sc reen keyp ad. Touch to
delete inc orrect digits.
NOTE: As you enter digits, y our phone searc hes for contacts that m atc h. If
you see the number you w ant to dial, touch i t to place the call immediately
without enter in g the r est of t he number.
3. Touch below the keyp ad to dial.
You can also t ouch the search box at the t op of t he Phone app screen and enter
the phone num ber or contact name you want to call. Touch the matching contact or
Call [number] to place the call.
NOTE:To make an international call, touch and hold the 0 key to enter the plus
(+) symbol. Next, enter the country code, followed by the city/area code and then
the phone number.
NOTE:To redial the last call you made, just touch the Home key > > >
and touch again.
45
Page 46
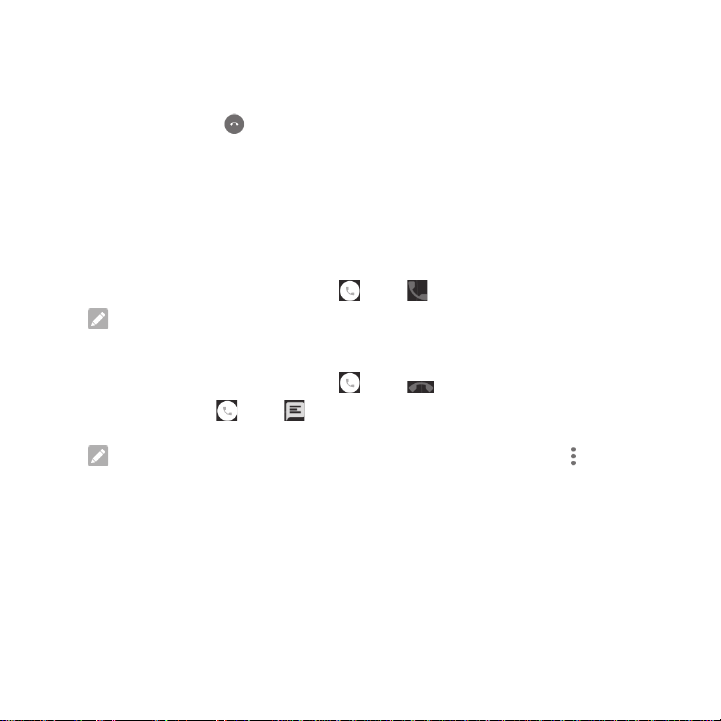
End a Call
During a c all, touch on the screen.
Answering or Rejecting Calls
When you receive a phone c all, the Incom i ng Call screen opens, displaying the
Caller ID or the information about the caller that you've entered in the Contacts app .
You can answer or reject the call, or reject it with a text message.
Answer a Call
When you receive a phone call, drag over to answer the call.
NOTE: To silence the ringer before answering the call, press the Volume Key.
Reject a Call
When you receive a phone call, drag over to reject the call.
You can also drag over to reject the call and send a preset text message
to the c aller.
NOTE: To edit the text response from within the Phone app, touch in the
top search field and select Se ttings > Genera l s ettings > Quick r e sponses .
46
Page 47

Working With the Call Log
The call history is a list of all the calls you've placed, received, or missed. I t
provides a convenient way to redial a number, return a call, or add a num ber to
your Cont act s.
To open th e call history, you can touch t he Home key > > (in the top
search fiel d ) > Call History.
Place a Call From the Call History
1. Open th e call hist ory.
2. Touch a num ber and select CALL BACK.
NOTE: You can touch th e STATISTICS tab and then touch to filter the
records by call type.
Take Other Actions on a Call History Entry
Open the call history and t ouch a number.
x Touch DETAILS to view more call information. While viewing the call details,
you can touc h > Edit number before call to edit the number in the dialer
before calling it.
x Touch the contact icon in front of the entry to open the contact information tab
from the bot tom, wh ere you can send a m ess age, call back, edit th e cont act,
add the cont act to favorites, or add the number to contacts.
NOTE: You can touch > Clear call log in the call history screen to delete
all history records.
47
Page 48

Calling Your Contacts
1. Touch the Home key > . Your favouri te contact s and frequ ently called
contacts are displayed i n the SPEED DIAL tab.
2. Touc h a contact to place the call, or touch or swipe to th e CONTACTS tab,
touch a contact and then touch to make a c all.
Checking Voicemail
If you have set the phone to divert calls to voicemail, callers can leave voicemail
messages when they cannot reach you. Here’s how to check the messages they
left.
1. Touch the Home key > > .
2. Touch and hold “1” in the dialer. If prompted, enter your voicemail password.
3. Follow th e voice prompts to listen to and manage your voicemail messages.
NOTE:
See Set Voicemail for how to set your voicemail service. For detailed information,
please c ontact the service provider.
Using Options During a Call
During a call, you will see a number of onscreen opt i ons. Touch an opti on to select
it.
x T ouch to turn on or off the speaker.
x T ouch to mute or unmute your mic rophone.
48
Page 49

Touch to make another call separately from the first call, which is put on
x
hold.
x T ouch to switch t o the keypad w hen you need to enter a code (for
example, t he PIN for your voicemail or bank account) during the call.
x Touch to put the call on hold.
x T ouch to merge the separate calls into a single conferenc e call.
x T ouch to enable or t ouch to disable the loud-speaker .
WARNING!
Because of hi gher volume levels, d o not place the ph one near your ear during
speakerphone use.
Managing Multi-party Calls
When the call waiting and three-way call features are av ailable, you c an switch
between tw o calls or set up a conference call.
NOTE: The call waiting and three-way call featu res need network supp ort and
may result in additional charges. Please contact your service provid er f or more
information.
Switch Between Current Call s
When you’re on a c all and another c all c omes in, your phone screen i nforms you
and displays the caller ID.
To respond to an incoming call while you’re on a call:
Drag over to answer the call. (T his puts the first caller on hold and
answers th e second c all. )
49
Page 50

To switch be tween two calls:
Touch the tab at the bottom (displayed as “On hold ”) to switch back to the other
call.
Set Up a Conference Call
With thi s f eatur e, you can talk to two people at the s am e time.
1. Place the f irst call.
2. Once you have established the connecti on, touch and dial the second
number. (This puts the first caller on hold.)
3. When you’r e c onnected to the second party, touch .
If one of the people you call ed hangs up duri ng your c all, you and the remaining
caller st ay c onnected. If you initiat ed t he call and are the first to h ang up, all call ers
ar e di sc onnected .
To end the conferenc e call, touch .
Adjusting Your Call Settings
Set Contact Display Options
You can set the order of the contacts displayed in the CONTACTS tab of the Phone
app.
1. Touch the Home key > > (in the top searc h field) > Settin gs > Ge neral
settings.
2. Touch Sort by or Name format to set the order of the contacts and the format
of the contact names.
50
Page 51

Set Sound and Vibration
Set the sound and vibration for incoming calls as well as dialp ad sounds.
1. Touch the Home key > > (in the top searc h field) > Settin gs > Ge neral
settings.
2. In the Sounds and vibrate section, touch th e option you w ant to configure.
x Check Dialpad tones to play sounds when you touch the dialp ad keys.
x Check Also vibrate for calls to enable vibration f or i ncoming c all
notification.
Edit Quick Response to Reject ed Cal lers
1. Touch the Home key > > (in the top search field) > Settings > General
settings > Quick resp onses.
2. Touch a text message to edit i t.
Set Speed Dials
You can touch and hold the 1 ~ 9 keys from the dialer to call the c orresponding
speed dial number.
The numb er key 1 is reserved to speed di al your voicemail.
To assign a speed dial key :
1. Touch the Home key > > (in the top search field) > S ett ings > General
settings > S p eed dial se ttings.
2. Touch a speed dial key.
3. Enter a ph o n e n u m ber or s elec t one fr om the c o ntac t li st .
4. Touch OK.
51
Page 52

Set Voicemail
1. Touch the Home key > > (in the top search field) > Settings > Call
settings.
2. Touch Voicemail t o configure voicemail settings.
x Touch Service to select the voicemail service provider. Your carrier is the
default.
x Touch Sound to select the notification sound for new voicemails.
x Check Vibrate to enable vibrati on for notific ati on.
Use Fixed Dialing Numbers
Fixed Di aling Numb ers (FDN) allows you to rest ri ct outgoin g calls to a lim i ted set of
phone numbers.
1. Touch the Home key > > (in the top search field) > Settings > Call
settings.
2. Touch Fixed Dial ing Nu m bers and the foll owing opti ons are avail able:
x Enable FDN: Input the PIN2 code to en able the FDN feature.
x Chan ge PIN2: C h ange the PIN2 code for FDN access.
x FDN list: Manage the FDN list.
NOTE: The PIN2 code is provided by y ou r carrier. En tering an incorrect P I N2
code more times than allowed can get your micro-SIM card locked. Contact the
service provider for assistance.
52
Page 53

Forwar d Inc oming Calls
Call forw ardi ng featur e allows you to forward y our i ncoming c alls to another phone
number.
1. Touch the Home key > > (in the top search field) > Settings > Call
settings > Call forwarding.
2. Touch an available option ( Always forward, Forward w hen busy, Forward
when unanswered, or Forward when unreachable) to enable it.
Bar Certain Call s
Call barrin g feature allows you to forbid cert ain types of calls from your p hone.
1. Touch the Home key > > (in the top search field) > Settings > Call
settings > Call barr ing.
2. Set the restriction of specific types of calls from your phone.
Set TTY M ode
Select a TTY mode for your phone to work with a teletypewriter, or turn TTY off.
1. Touch the Home key > > (in the top searc h field) > Settings > Call
settings > TTY mode.
2. Sel ect on e o f t h e f ol low in g opt io ns . Consult your telet ypew riter m anufac tur er ’s
manual if necessary.
x TTY Off: Users w ho can hear and talk c an di sable TTY support.
x TT Y Full: Users who cannot talk or hear may use this mode to send and
receive text messages thr o u gh a TT Y device.
x TT Y HCO: Users who can hear, but cannot talk, m ay us e this mode to listen
to convers ation of the other party and respond via text m ess ages.
53
Page 54

x TTY VCO: Users who can talk, but cannot hear, may use this mode to talk
through th e phone and receive respon ses via text messages.
Set DTMF Tones
You can set the length of Du al-tone multi-fr equency (DTMF) signal tones.
1. Touch the Home key > > (in the top search field) > Settings > Call
settings > DTMF tones .
2. Touch Normal or Long.
Set Display Duration
You can enable or disable the display durati on.
1. Touch the Home key > > (in the top search field) > Settings > Call
settings.
2. Check Display duration to enabl e or disable the displ ay duration.
Set Proximity Sensor
With proximity sens or t urned on, th e scr een will be turned off to save power when
you answer a call.
1. Touch the Home key > > (in the top search field) > Settings > Call
settings.
2. Check Turn on Pro x imit y Sens or.
54
Page 55

Set Vibrating after Connected
With vibrating after connected enabled, your phone will vibrate when answers.
1. Touch the Home key > > (in the top search field) > Settings > Call
settings.
2. Check Vibrating after connected.
Other Opt i ons
1. Touch the Home key > > (in the top search field) > Settings > Call
settings > Additional settings.
2. Touch Caller ID to choose whether your number is displayed when someone
receives y our outgoing call. Or check Call waiting to get notified of incoming
calls during a call.
NOTE:
Pl ease c ontac t the serv ice provider to c heck whether t he caller ID and call wai ting
features are avail able.
Internet Call Sett ings
To add an Intern et calling account:
1. Touch the Home key > > (in the top search field) > Settings > Call
settings > Phone account settings > S IP accounts.
2. Touch ADD ACCOUNT.
3. Follow th e instructions from your Internet calling service provider to configure
the settings for your account.
4. Touch SAVE.
To configure which calls use Internet calling:
55
Page 56

You can confi gure your phone to plac e all calls using Internet calling, just calls t o
Internet calling addresses, or t o ask each time you place a c all.
1. Touch the Home key > > (in the top search field) > Settings > Call
settings > Phone account settings.
2. Touch Use SIP cal ling.
3. Touch the Internet calling option you want.
To configure your ph one to receive Internet calls:
By default, your phone is configured to make Internet calls, but not to ensure that
you will receive them. However, you can configure your phone to listen for Internet
calls made to an Internet calling account you have added to your phone.
1. Touch the Home key > > (in the top search field) > Settings > Call
settings > Phone account settings.
2. Check Receive inc oming calls. Ch ecking this setting will reduce your battery
life between charges.
Contacts
You can put c ontacts on y our phone and sync hronize th em with the c ont acts in
your Google account or other accounts that sup port contact syncing.
To see your contact s, touch the Home key > . From there, you c an touch the
tabs on the top of the screen to quickl y sw i tch to cont act groups or f avorite
contacts.
56
Page 57

Checking Co ntact Details
1. Touch the Home key > and touch the ALL CONTACTS tab to access your
contact list.
2. Scroll through the list t o view all your contacts.
3. Touch a contact to view its detai l s.
NOTE:
If you have a lot of contacts stored, you'll see a slider on the right side of the screen.
Drag the slider to the l etter initial you need.
Adding a New Contact
1. Touch the Home key > and t ouch t he ALL CONTACTS tab.
2. Touch to add a new contact.
3. Touch the account field n ear t he top of the sc reen to choose where to save the
contact. If a sync account i s selected, t he contacts w ill be synced autom atically
with your account onlin e.
4. Enter the contact name, phone numbers , emai l ad dresses, and other
information.
5. Touch to save the contact.
Setting Up Your Own Profile
You can cr eate your own name card in your p hone.
1. Touch the Home key > and t ouch t he ALL CONTACTS tab.
2. Touch Set up my profile.
57
Page 58
3. Enter your pr ofile information. T ouch ADD ANOT HER FIEL D to add more
information if you w ant.
4. Touch .
Importing, Exporting, and Sharing Contacts
You can im port/export c ontacts from/ to your micro-SI M s or microSDHC card. This
is especi ally useful when you need to tr ansfer contacts between di fferent devices.
You can also qui ckly sh are c ontacts using B l uetooth, Googl e Drive, Email, Gmail,
or Messaging.
Import Contacts From the micro-SIM Cards
1. Touch the Home Key > .
2. Touch > Import/export > Im port from S IM card.
3. Touch to select the contacts y ou need and th en touch .
Import Contacts Fro m the micro S DHC Card
1. Touch the Home Key > .
2. Touch > Import/exp or t > Import from s torag e .
3. Select an account in which to save the contacts.
4. Select the vCard file(s) and touch OK.
Export Contacts to the micro-SIM Card
1. Touch the Home Key > .
2. Touch > Import/export > Export to SIM card.
58
Page 59

3. Touch to select the contacts y ou need and th en touch .
Export Contacts to the Storages
1. Touch the Home Key > .
2. Touch > Import/export > Export to storage.
3. The phone will prompt y ou with the name of the vCard fil e. Touch OK to create
the file on the microSDHC card or the p hone sto rage.
Working With Favorite Contacts
In the favorite contacts tab, you can find your favorite contacts and frequently
contacted contacts.
Add a Contact to Favorites
You can add th e contact s y ou use frequ ently to FAVORITES so that you can find
them quickly.
1. Touch the Home key > and t ouch t he ALL CONTACTS tab.
2. Touch a contact and t hen touch at the top.
Remove a Contact From Favori t es
1. Touch the Home key > and t ouch t he FAVORITES tab.
2. Touch a favorite contact and then touch next to the cont act name.
59
Page 60

Searching for a Contact
1. Touch the Home key > .
2. Touch at the top of the screen.
3. Input the contact name or any information the contact has to search for i t. The
contacts matched will be listed.
Editing Contacts
Edit Contact Details
1. Touch the Home key > .
2. Touch a contact you need to edit and then touch .
3. Edit the contact and touch .
Set a Ringtone for a Contact
Ass ig n a special rin gtone to a cont act , s o you know who is calli ng when you hear
the ringtone.
1. Touch the Home key > .
2. Touch a contact you want to set a ri ngtone for and th en touch > > Set
ringtone.
3. Select a ringtone you like and touch OK.
60
Page 61

Delete Contacts
1. Touch the Home key > .
2. Touch > Delete.
3. Touch to select the contacts you want to remove and then touch .
4. Touch OK to confirm.
Join Contacts
As your phon e synchronizes with m ul t i pl e onli ne account s, you may see dupli cate
entries for t he same contact. Y ou can merge all t he separat e information of a
contact into one entry in the Cont acts list.
1. Touch the Home key > .
2. Touch a contact entry to display t he c ont act’s d et ails and then touch .
3. Touch > Join.
4. Touch the cont act whose information you want to join wit h the first entry and
then touch .
The information from the second contact is added to the first, and the second
contact is n o l onger displ ayed in the ALL CONTACTS list.
You can repeat t hese steps to join another contact t o the main contact.
Separate Contact Inf ormation
If contact inf ormati on from different sources was joined i n error, y ou can separ ate
the inform ation back int o individual contacts on your phone.
1. Touch the Home key > .
2. Touch a contact entry you h ave merged and want to sep arate.
61
Page 62

3. Touch .
4. Touch > Separate.
5. Touch OK to confirm.
Accounts
Adding or Removing Accounts
You can add multiple Google Accounts and Microsoft Exchange Acti veSync®
accounts. You may also add other kinds of accounts dependi ng on the apps
installed on your phon e.
Add an Account
1. Touch the Home key > > Settings > Accounts > Add account.
2. Touch the type of account y ou want to add.
3. Follow the onscr een steps to enter th e informati on about the acc ount. Mo st
accounts r equire a username and p assword, but t he details may vary. You may
also need to obtain some in formation from IT support or your system
administrator.
When the acc ount is successfully add ed, it is displ ayed in the Accounts list.
Remove an Account
Removing an account will delete it and all information associ ated with it fr om your
phone, such as emails and cont acts.
1. Touch the Home key > > Settings > Accounts.
62
Page 63

2. Touch the account category in th e list and then t ouch the account.
3. Touch > Remove account > REMOVE ACCOUNT.
Configuring Account Sync
Configure A uto Sync Setting
1. Touch the Home key > > Settings > Accounts.
2. Touch and check or uncheck Auto-sync data.
x When automatic sync is turned on, changes you make t o in formation on
your phone or on the web are automatic ally sync ed with each other.
x When auto sync is tur ned off, you need to sync manually to coll ect emails,
updates, or other recent information.
Sync Manually
1. Touch the Home key > > Settings > Accounts.
2. Touch the account cat egory and th en the account y ou want to sync.
3. Touch > Sync now.
Change an Account’s Sync Settings
1. Touch the Home key > > Settings > Accounts.
2. Touch the account cat egory and th en the account. Th e Syn c screen appears,
showing a list of information the acc ount can sync.
3. Check or unch eck items as y ou need. Ch eck ed types of in formation on the
phone and the web will be kept in sync when auto-sync is turned on.
63
Page 64

Email
Touch Email in the hom e scr een to receiv e and send emails from your webmail or
other accounts, using P OP3 or IMAP, or access your Exchange ActiveSync
account for yo ur cor porat e email n eeds.
Setting Up the First Email Account
1. When you open Email for the first time, enter your email address and
password.
2. Touch NEXT to let the phone retrieve the network parameters automatically.
NOTE: You can also enter th ese details m anually by touchi ng MANUAL
SETUP or when automatic setup fails.
3. Follow the on- sc reen instruc tions to finish the setup.
Your phone will show the inbox of the email account and start to download email
messages.
Checking Your Emails
Your phone can automatically ch eck for new emai ls at t he i nt erval you set when
setting up th e account.
You can also check new emails manually by draggi ng down on t he message list.
To check earlier emails for your IMAP or POP3 accounts, swipe upwards to the
bottom of the message list and touch Load more.
64
Page 65

Responding to an Email
You can reply to or forward a message that you receive. You can also delet e
messages and manage t hem in other w ays.
Reply to or Forward an Email
1. Open the email you want to reply to or forward from Inbox.
2. Do the following as you need.
x To reply to the send er, touch .
x To reply to the send er and all reci pients of the ori ginal email, touch >
Reply all.
x To forward the email t o someone el se, touch > Forward.
3. Edit your message and touch .
Mark an Email as Unread
You can return a read email to the unread state—f or example, to remind your self to
read it again later. You can also mark a batch of emails as unread.
x While readi ng a message, touch .
x While in a message list (for instance, the inbox), touch the sender images
before the messages and then touch .
65
Page 66

Delete an Email
You can delete an email from its folder. You can als o delete a batch of emails.
x While readi ng a message, touch .
x While in a message list (for instance, the inbox), touch the sender images in
front of the messages and then t ouch .
Writing and Sending an Email
1. Open your email Inbox and t ouch .
NOTE: If yo u h ave mo r e t h a n on e emai l acc ou n t add ed on the p hon e,
touch the sender line t o sel ect t he account you want to us e for s ending the
message.
2. Ent er a contact name or email addr ess in th e ‘ To’ fi eld. Sep ar ate each recipient
with a comma. You can also touch to select recipient s from your contacts.
3. Enter the email subject and compose th e email text.
4. Touch t o add audio files, images, videos and oth er types of files as
attachments.
5. Touch to send the message.
66
Page 67

Adding and Editing Email Accounts
Add an Email Account
After setting up your first email account (see Setting Up the First Email Account),
you can add m ore email acc ounts and manage them separately.
1. Open Email to get the Inbox screen.
2. Touch > Settings > ADD ACCOUNT.
3. Follow the prom pts to set up th e account as y ou did with the first one.
Edit an Email Account
You can change a number of settings for an account, including how often you check
for email, how you’re notified of new mails, your email sign ature, and det ails about
the servers the account uses to send and rec eive mails.
1. Open Email to get the Inbox screen.
2. Touch > Settings and touch the account whos e setti ngs you w ant to
change.
3. Make the changes you want and touch the Back key when you finish.
Changing General Email Settings
General setting s apply to all email acc ounts you add.
1. Open Email to get the Inbox screen.
2. Touch > Settings > General settings.
3. Make the chang es and touch the Back key when you finish.
4.
67
Page 68

Messaging
You can use Messagin g t o exchange t ext messages (SMS) and multimedia
messages (MMS).
Opening the Messaging Screen
Touch in the home screen.
The Messaging screen opens where you can creat e a new message, search for
messages, or open an ongoi ng messag e thread.
x Touch to write a new text or multi media mess age.
x Touch to search for a message using keywords.
x Touch an existing message thr ead to open the conversation you’ve had with a
certain number.
Sending a Message
1. On the Messaging screen, touch at the bottom.
2. Add recipients by one of the f ollowing ways.
x Touch the To field and manually enter the recipient’s number or the cont act
name. If th e phone presents a few suggest ions, touch the one you w ant to
add.
x Select recipients from your contacts or call log by touching
3. Touch the Type message fi eld and enter the content of y our message.
68
Page 69

4. If you want to send a m ul timedia mess age, touch > Add subject to add a
mes sag e s u b j ect or t ou c h t h e p a p e r cl i p ic on to at t ac h a fi le or a
slideshow to the messag e.
5. Touch .
NOTE: You can also include email addresses as recipients for multimedia
messages.
NOTE: Do not add a message subj ect or any attachment if you w ant t o send a
text message. Otherwise you may be charged for a multimedia message.
Replying to a Message
Messages you rec ei ve are appended to existing threads for the sam e num ber. If the
new message comes from a new numb er, a new thread is created.
1. On the Messaging screen, touch th e thr ead that has the messag e you want to
reply to.
2. Type your reply in the text box at the bottom. You can touch the attach icon
if you want to reply with an M MS.
3. Touch .
Forwarding a Message
1. On the Messaging screen, touch th e thr ead that has the messag e you want to
forward.
2. Touch and h ol d t he message.
3. Touch .
69
Page 70

4. Enter a recipient for the m ess age and edit the content if y ou want.
5. Touch .
Changing Messaging Settings
Touch > Settings in the Messaging screen to change m ess ag ing settin gs.
Calendar
Calendar on the phon e works with th e web-based Google C al endar™ service for
creating and managing events, meetings, and appointments. I t also works with the
Microsoft Exchange ActiveS ync calendar once you si gn i nto your Exc hange
account on the phone.
To open Calendar, touch the Home key > > Calendar.
Viewing Your Calendars and Events
Select Visible Calendars
1. Open the Calendar app.
2. Touch > Calendars to display.
3. In the new screen, touch the calendars to check the cal endars y ou want to see
or uncheck the calendars you’d like to hide.
Events from hi dden calendars are not shown in the C al endar app.
Change Calendar Views
You can view your calendars in di ffer ent forms. The app offers four views: Month,
70
Page 71

W eek, Day, and Agenda.
To change calendar views, touch t he time period shown at the top left and sel ect
the view you prefer.
You can also change to Day view from Mont h view by touchi ng any day bloc k.
x In Month view, swipe vertically to see previous m ont hs and futur e months.
x In Week or Day view, swipe horiz ontally to see previous weeks/days and future
weeks/days.
x When you are viewing past or futur e days, weeks, or months, touch at the
top to quickly switch to today.
View Event Details
In Agenda, Day, or Week view, touch an event to view its details.
In Month view, touch a day to switch to Day view. Then touch an event to view its
details.
Creating an Event
1. In any Calendar view, touch .
You can also touch a spot in Day or W eek view twic e to add an event to th at
time spot.
2. If you have more than one cal endar acc ount, touch th e current acc ount above
the Event name b ox t o choose one.
3. Enter the event details and touch DONE.
Editing, Deleting or Sharing an Event
1. Find the event you want to edit or delete.
71
Page 72

To …
do…
Edit the event,
touch
DONE to save your
changes.
Delete the event,
touch at the top of the screen and then touch OK.
Share the event,
touch and choose how to share.
2. Open its details sc reen (see View Event Det ai l s in this chapter).
3. Do one of the followin g as you need.
at the top of the screen. Touch
Changing Calendar Settings
To change Calendar sett i ngs, open a Calendar view (Day, Week, Month, or Agenda)
and touch > Settings.
You can use your phone to take phot os and record videos. Photos and videos are
stored on the phone’s microSDHC card or in the phone’s internal storage.
72
Page 73

Number
Function
1
Change camera settings.
2
Turn on or off HDR function.
3
Switch between the front and back cameras.
4
Select color effect, only available for the back camera.
5
Change the camera modes.
6
View pictures and videos you have taken.
7
Capture a picture.
8
Switch to camcorder or panorama mode.
Capturing a Photo
1. Touch the Home key > > Camera.
2. Aim the camera at the subject and make any necessary adj ustment.
73
Page 74

WARNING!
Keep a safe distance when using th e flash. Do not point the flash towards the
eyes of people or animals.
3. Touch the area where y ou want the camera to focus, or leave t he camera t o
autofocus on the center of the image.
4. Lightly touch .
Recording a Video
1. Touch the Home key > > Snapdragon Camera and switch to the
camcorder mode.
2. Aim the camera at the subject. You can touch any area on the screen that you
want the c am corder to focus on before and durin g recording.
3. Touch to start recording.
4. Touch to stop recording.
74
Page 75

Opening Gallery
Touch th e Home key > > Gallery in the home screen to view albums of your
pictures and videos.
Working With Albums
When you open Gallery, all pictures and vid eos on your ph one are displ ayed in a
number of albums. Swi pe up and down to see them all.
To view album content s:
Touch an album t o view the pictures and videos it contains.
To share albums, pictu res, or videos:
1. Touch and hol d an album to select it or touch and hold an item after you open
an album to select a picture or a video.
2. Touch mor e items that you want to share.
3. Touch and select how you want to share the item s.
To delete albums:
1. Touch and hol d an album unt i l i t is selected.
2. Touch mor e al bums that you want to delete.
3. Touch > OK.
75
Page 76

Working With Pictures
Touch a picture in an al bum to view the picture in full screen.
When viewing a pictur e in full screen, the following f eatures are avai lable.
x Swipe hori zontally to see more pict ures or videos.
x Pi nch a pict ure or v ideo to make it smaller. You'll then see a filmstrip-style view
of all your pictures and videos in a row. Swipe left or ri ght to scan t hrough them
all.
NOTE: You can delete a picture or video by swiping it up or down in the
filmstrip view. If you accid entally delete one, touch UNDO to retrieve it.
76
Page 77
x
Double-t ap the pictur e, or pinch tw o fingers tog ether or spr ead t hem apart t o
zoom o ut or in.
x Touch to rotate the pic ture, check file details, or change slideshow setting.
x Touch to return to the album.
Retouching Your Pictures
You can edit any photos you took and some other pict ures in Gallery.
1. Touch while viewing a picture in full screen to open the Edit i nt erface.
2. Touch an edit opt ion along the bottom of the screen and edit the picture.
NOTE:
Slide left or rig ht on t he bottom of the screen to find all options.
3. To undo or redo the changes you’ve made to the picture, t ouch or .
4. Touch SAVE to save the new picture.
Playing Videos
1. Touch an alb um in the gallery and then touch the thumbnail of a video.
2. Touch at the center and select a player to start playi ng. Touch the video to
view the pl ayback contr ol s.
77
Page 78
More Apps
Clock
Touch th e Home key > > Clock. T he Cl ock app allows you to c heck loc al time
and time in oth er cities in the world, s et alarms, and use timers.
Set a New Alarm
1. Touch the tab in the Clock app.
2. Touch an exi st i ng alarm t o configure it, or touch at the bottom of the
screen t o create a new alarm.
3. Set up the alarm options, such as time, r epeat, and alarm sound.
NOTE:
To enable or disable existing alarms directl y, just sli de the switches on the right
side.
Check World Time
Touch the tab in the Clock app to check local time for cities ar ound the world.
Touch at the bottom to add a new city or country.
Use the Stopwatch and Countdown
Touch the or tab in the Clock app t o use t he countdown timer or the
stopwatch.
Stopwatch allows you t o record lap times, whil e count down timer allows you to set
a time and c ount down to zero.
78
Page 79

Calculator
Touch the Home key > > Ca lcu la tor to use the phone’s convenient built -in
calculat or f or some basic as well as advanced mathematical equations.
NOTE: Slide left or right to switch between different panels.
Downloads
The Downloads app keeps a record of the files you have downloaded usi ng apps
such as Browser or Email.
Touch th e Home key > > Downl oads to ch eck the record.
x Touch a file to open it with the appropriate applications.
x Touch and hold a file t o delete or share it.
File Manager
Quickly access all of your images, videos, audio clips, and other types of files on
your phon e storage and the microS DHC card.
Touch the Home key > > File Manager. You can find the file you need by
category.
Sound Recorder
Sound Recorder enables y ou to record voice memos and listen to them whe never
you like.
Record a Voice Memo
1. Touch the Home key > > Sound Recorder.
79
Page 80

2. Touch to start r ecording.
You can touch to pause and to continue during the recordin g.
3. Touch to stop rec ordi ng. T he memo is automaticall y s aved.
If you don’t want to save the memo after recording it, touch Discard to delete it.
Play a Voice Memo
To play a memo you just re corded:
Touch at the bottom of the screen.
Google Apps
Open the Google apps to us e Google services. Som e apps are put in the Google
folder on the home scr een.
NOTE: Some contents or Google services may not b e available in your region.
x Google: Use Google search or get information when you need it wit h Google
Now.
x Chrome: Use the Ch rome app to browse the Internet and get your b ookmarks,
browsing history, and more synced with your Google account.
x Gmail: Us e the Gmai l se r v i ce to s end an d r eceiv e emails.
x Google+: Socialize with friends on th e Google+ onli ne comm uni ty.
x Maps: Find your place and find your way in th e world.
x Play Music: Play music on the phone and on your Google account.
x Play Newsstand : Purc hase and read newspapers and magazines.
x Play Games : Buy and play g ames from the Google Play S tore.
x Drive: S tore files on t he Google servers.
80
Page 81

x YouTube: Watch video cl i ps f rom YouTube.com, or upl oad your own and shar e
with the world.
x Photos: Manag e photos on the phone and your Google account.
x Hangouts: Chat wit h Google+ friends or send text or mul t i media messages.
x Play Store: B uy and download apps, g ames, and oth er content fr om the
Go ogl e Play Store.
x Voice Search: Search for information with your voice.
Settings
Touch the Home key > > Settings. The Settings app contains m ost of the
tools for customizing and configuring your device.
General Settings
Airplane Mode
In the Settings app, touc h Airplane mode. All the phone’s radios that transmit
voi ce or d a t a are turn e d o ff .
Wi-Fi
Turn Wi-Fi on or off and configure your Wi-Fi connecti ons. See Connecting to Wi-Fi.
Bluetooth
Turn Bl uetooth on or off and confi gure your Bl uetooth connections. See Connecting
to Bluetoot h De vices.
81
Page 82

Mobile Networks
In the Settings app, touc h Mobile ne tworks to select mobile network and set
access point names. See Connecting to Mobile Networks .
Sound & notification
Adjust diff erent types of volume (see A djusting Volume), toggl e sound and m ute
(see Swit ching to Silent or Vibrati on Mode), set up ringt one and noti fication sound
(see Changing Ringtone and N otification Sound), and select sy stem sounds or
control notification display.
Display
x Brightness level: S et t he bri ghtness of t he display.
x Adap tive brightness: Automatically adjust scr een brightness.
x Wallpaper: Select a backgr ound i mage for the Home Scr een.
x Sleep: Set the lengt h of time of inact ivity bef ore the screen turns off.
x Daydream: Manage the Daydream function. When Daydream is enabled,
photos or animations will be displayed as a screensaver.
x Font size: S et t he font size of th e text on the screen.
x Auto -rotate screen: Sel ect whether the screen c ontents should rotate when
the phone is rotated.
x Pulse notifica tion light: F lash the LED light to notify you of missed call s, new
messages, and oth er event s.
x Navigation key light duration: S et the duration of navigation key light.
Date & Time
Set date, time, time zone, and how date and ti me are displayed. You can also use
network-provided data.
82
Page 83

Language and Input
x Language: Select a language and region f or your system.
x Spel l checker: Use Android Spell Checker to check for spelling errors when
entering text.
x Personal dictionary: Add new words to the phone’s dictionary or remove
words from the dictionary. The words you add are used f or spelling check and
word suggest ion.
x Keyb oa r d & input methods : Configure text input sett i ngs. See Input Setti ngs.
x Voice input: Select and c onfigure voice input ser vices.
x Text-to-spee ch outpu t:
x Preferred engine: Sel ect the speech s ynt hesis engine you want to use or
change its settings.
x Speech r ate: Select how quickly you want th e s yn thesizer to speak.
x Pitch: Select the tone of the spok en text.
x Listen to an examp le: P lay a brief sam ple of the sp eech synthesizer, using
your current settings.
x Default language status: Check whether the t ext-t o-speec h output featu re
supports the current system language.
x Pointer speed: Select how fast the pointer/mouse should scroll when you
connect the phon e to a trackpad or mouse accessor y.
Wireless and Network
Data Usage
Touch the switc hes to turn on or off mobile data and data limit.
You can check how much data has been u sed during the time cycle you set, set a
83
Page 84

mobile data limit and warni ng, see wh at apps have been using mobile dat a, or
restrict b ackground data for individual apps.
NOTE: The data usage is measured by your phone. Your carrier’s data usage
accounting may differ.
VPN
In the Settings app, touc h More > VPN to set up and con nect to virtual private
networks. See Connecting to Virt ual Privat e Networks.
Default SMS App
In the Settings app, touc h More > Default SMS app to choose the preferr ed
applicati on for sending and rec eiving S MS.
Tethering and Portable Hotspot
In the Settings app, touc h More > Tethering & portable hotspot to share your
phone’s mobil e dat a conn ect ion with PCs or oth e r devices via USB or Wi-Fi. See
Sharing Your Mobile Data Connec tion.
Wi-Fi Calling
With Wi-F i calling, you can send and receiv e calls and mess ag es over a Wi -Fi
network using your existi ng service provider.
Touch th e Home key > > Settings > More > Wi-Fi Calling > Help or co ntact
the service provider for details.
84
Page 85

Device
Storage
The Storage settings menu lets you man age the phone storage and provides
options for your mic roSDHC c ard.
Save locati on
This menu allows you to choose the default location for new data, such as files
downloaded, photos c aptured, and voice recorded.
1. Touch the Home key > > Settings > Storage > Save location .
2. Touch Phone to store items i n the phone's memory.
- or -
If a microSDHC card is present, touch SD card to store data on the card.
SD card
The external SD card storage options let you view the microSDHC card’s size and
availabl e space, unm ou nt the card for saf e removal fr om the phone, and f ormat
(erase) the card. For details, see Remov e the microSDHC Card From Your Phone
and Erase mic roS DHC Card .
Battery
Ch eck how m uch power remains for the battery and what h as been using the
battery.
Apps
See apps installed on your phone and manage them.
Touch an app in the DOWNLOADED, RUNNING, or ALL tab to see its information.
You can stop the app, uninstall th e app, c lear data and cache, or m ove the app
between th e internal storage and th e phone storage.
85
Page 86

NOTE: Not all appl i cations can be moved or uni nstalled.
Connect to PC
Select your USB connect ion type between your phone and P C. See Connecting to
Your Computer vi a US B.
Call Settings
Configur e phone call r el ated options, such as ringtone, voicemail and Internet c all.
For more inf ormati on, see Adjusting Your Call Settings.
Personal
Navigation Key
The po sitions of the Recent apps k ey and the Back key are interch ang eabl e.
Location
Activate location services to determine your location. To use location-related
applications, such as finding y our l ocation on Google Maps, you must hav e l ocation
services t urned on on your phone.
1. Touch the Home key > > Settings > L ocat i on.
2. Slide the Location switch at the top to turn location services on or off.
3. When locati on is enabled, t ouch Mode to select location sources you want to
use.
x High a ccu racy: Get accurat e l ocation u sing both GPS and Wi-Fi as well as
mobile networks.
86
Page 87

x Battery saving : Use only Wi-Fi and mobile networks to get your
approximate location. This will drain less power from your battery than using
GPS.
x Device only: Use GPS to pinpoint your loc ation.
Security
x Screen lock: Disable the screen l ock or enable it with none, long press, pattern,
PIN or password. See Protecting Your Phon e Wi t h Screen Locks.
x Ow n e r i n f o : Set the text that you may displ ay on the lock screen.
x Smar t L o ck: Keep the phone unlocked wh en connected to trusted d evi ces, in
trusted places, or unlocked by trusted faces.
NOTE:
You need to sign in to your G oogle account on the phone t o use the Smart
Lock feature.
x Encrypt phone: Encrypt your data on the ph one to protect y our privacy. See
Protectin g Your Ph one Wi th Encryption.
x Set up SIM/RUIM card lock: Touch a m i cro-SIM c ard and you can manage the
following settings.
X Lock SIM c ar d : Act i vate or deacti vate th e PI N lock to require PIN b e f or e
accessing the micro-SIM c ard.
X Change SIM PIN: Change the PIN us ed to ac cess the micr o-SIM card.
NOTE:
Put all your confidential passwords in a safe place for future use. If you enter
the wrong SIM PIN more times than allowed, your micro-SIM card will be locked
and you cannot access the mobile ph one network. C ontact your oper ator for a
PIN Unl ock Key (PUK) to rest ore the mi cro-SI M card.
87
Page 88

x Make passwords visible: Di spl ay passw ord s as you enter them.
x Device administrators: Vi ew or deactiv ate apps you have authoriz ed to be
device admini str ators.
x Unknown sources: Chec k this option to permit i nstallati on of apps from
sources other th an t he Play Store.
x Storage type: Check th e cr edential st orage type.
x Trusted credentials: Display trusted CA certificates.
x Install from SD card: Install certificates from the memory card.
x Clear credentials: Delete all certificates.
x Trust agents: Vi ew or deac tivat e t r u st ag en ts.
x Screen pinning: Keep a screen of your choice in vi ew, so that others cannot
switch t o other apps and access your personal information. Touch this option t o
see how it works.
x Apps with usage a ccess: Turn on or off some apps’ access to your phone
usage information.
Backup & Reset
x Back up my data: Back up app data, Wi -Fi password s, and other s etting s to
Google serv ers after you sign in to your Google account.
x Backup account: Set the Google account that the data is backed up to.
x Aut omatic restore: Restore previ ously backed up settings and data when you
reinstall an app.
x Factory data reset: Reset your phone to factory default settings. You can also
erase the dat a on the ph o ne storage and the microSDHC c ard during the
process.
88
Page 89

Accounts
Manage your account s and synchr oniz ati on. Touch Add account to sign in to or
create account s on your phone.
Touch an account typ e to see that type of accounts you have added and adjust the
accounts settings.
System
Accessibility
Configure accessibility plug-ins and services on your phone, such as using Color
inversion or Large text for user s with sight problems.
Printing
You can manage Google Cloud Print s ervice or other printer plug-ins installed from
the Google Play Store or your printer manufactu rer.
About Phone
View important phone information and legal information. You can also upgrade your
phone syst em from update packages c opi ed to the storage card.
About A nti-thef t
Anti-theft renders thi s smartphone inoperable when the device i s lost or stolen and
the antitheft feature i s ini tiated by an authorized user. Per the Anti-theft legislation
passed in California and Minn esota, and supporting CTIA Sm artphone An ti-theft
Voluntary comm itm ent, new models of LTE smartphones manufactured after July
2015 are req ui red to offer the Anti-t heft funct i onality.
89
Page 90

Your ZTE Avid® PLUS offers the Anti-theft functionality under the name of Android
Device Man ager. If y ou l ose your Android device, y ou can use t he Android Device
Manager to:
x Find your device: Use Android Device Manager to show your device's
location.
x Ri ng, lock, or erase a lost device: Use Android Devi ce Manag er to remotely
ring or lock y our device, erase everyt hi ng on it, or add a phone number to the
lock screen.
If you wish to utilize this feature, please confirm that you can access the
android.com/devicemanager, The url is:
https://www.google.com/android/devicemanager.
Upgrading the Phone Software
There are several ways to upgrade your phone software:
x Use the onl i ne upgrade tool for m obi le terminal products.
x Use the one-press upgrade package offered by your mobile service provider.
x Use t h e u p g rade pack age on y ou r m i c r oS DH C car d .
NOTE: Visit the ZTE official handset service support websit e
(http:// www.ztedevice.com/support) and cl i ck your countr y or region to learn m ore
about the above upgrad e methods, as w ell as which phones and methods are
supported.
90
Page 91

Problem
Possible causes
Possible solution
Poor reception
The network signal is too weak at
your current location, for example, in
a basement or near a tall building,
because wireless transmissions
cannot effectively reach it.
Move to a location where the
network signal can be properly
receiv
The network is busy at the current
time (for example, during peak
times, there may be too much
network traffic to handle additional
calls).
Avoid using the phone at such times,
or try again after waiting a short time.
You are too far away from a base
station for your service provider.
You can request a service area map
from your service provider.
Echo or noise
Poor network link quality on the part
of your service provider.
End the call and dial again. You may
be switched to a better
network link or phone line.
Poor local telephone line quality.
End the call and dial again. You may
be switched to a better
network link or phone line.
Unable to select
certain features
Your service provider does not
support these features, or you have
not applied for services that provide
these features.
Contact your service provider.
Battery not
charging
The battery or battery charger is
damaged.
Contact the dealer.
Troubleshooting
If you encou nter problems while usi ng the phone, or if it performs abnormally, you
can refer t o the chart below. If your particular problem cannot be resolved using the
information in the ch art, contact t he dealer wh ere you purchased the phone.
ed.
-quality
-quality
91
Page 92

Problem
Possible causes
Possible solution
The phone’s temperature is below
0°C
Adjust the battery charging
environment to avoid extremes of
temperature.
Poor contact between the battery
and charger.
Check all connectors to ensure that
all connections have been properly
made.
Shortened standby
time
The standby time is related to your
service provider syste
configuration. The same phone used
with different service providers’
systems will not provide exactly the
same length of standby time.
If you are located in an area where
signaling is weak, temporarily power
off the phone.
The battery is depleted. In high
temperature environments, battery
life will be shortened.
Use a new battery.
If you are not able to connect to the
network, the phone will continue to
send out signals as it attempts to
locate a base station. Doing so
consumes battery power and will
consequently shorten standby time.
Change your location to one where
the network is accessible, or
temporarily turn off your phone.
Cannot turn your
phone on
- Battery power has been depleted.
- Device is on “ Download Mode” is
activated, LED indicator li
glowing constant red
Recharge the phone’s battery.
Press power button
approximately 12 seconds to reboot
the device.
micro- S IM ca rd
error
micro-SIM card malfunction or
damage.
Take the micro-SIM card to your
service provider for testing.
micro-SIM card inserted improperly.
Insert the micro-SIM card properly.
Debris on the micro-SIM card
contacts.
Use a soft, dry cloth to clean the
micro- S IM ca r d contacts.
or higher than 45°C.
m
ght is
for
92
Page 93

Problem
Possible causes
Possible solution
Unable to connect
to the network
micro-SIM card invalid.
Contact your service provider.
You are not within the network’s
service area.
Check the service area with your
service provider.
Poor signal.
Move to an open space, or if you are
inside a building, move closer to a
window.
Cannot answer
incoming calls
You have activated the Call barring
feature.
Disable this feature. See B ar Ce rtai n
Calls.
Cannot make
outgoing calls
You have activated the Call barring
feature.
Disable this feature. See B ar Ce rtai n
Calls.
You have activated the Fix ed dial
numbers feature.
Disable this feature. See Use Fixed
Dialing Numbers.
PIN Code blocked
You have entered an incorrect PIN
code three consecutive times.
Contact your service provider. If the
service provider provides the
micro
SIM card’s PUK code, use the
PUK code to unlock the
SIM
card.
Phone crashes,
reboots, freeze, or
cannot be powered
on
Some third-party software is not
compatible with your phone.
Reset the phone to factory status.
Uninstall the software that may
cause the problem.
Upgrade the phone software.
93
micro-
Page 94

Don’t m ake or rec eive
handheld calls while driving.
Never text while driving.
Don’t use at
Keep your phone at least 15
mm away from your ear or
body while making calls.
Your phone may produce a
bright or fl ashing li
Small parts ma y caus e
choking.
Don’t dispose of your phone in
fire.
Your phone can produc e a
loud sound.
To prevent possible hearing
damage, do not listen at high
volume l evels for long
periods.
Avoid cont act with anything
magnetic.
Avoid extreme temp eratur es.
Keep away from pac emakers
and other electronic medic al
devices.
Avoid cont act with liquids.
Keep your phone dry.
Turn off when ask ed to in
hospitals and medical
facilities.
Don’t take your phone apart.
Turn off when told to in
aircrafts and airp orts.
Only use approved
accessories.
For Your Safety
General Safety
gas stations.
ght.
94
Page 95

Turn off when near explosive
mat e r i als or li qui d s .
Don’t rely on you r phone for
emergency communicati ons.
FCC RF Exposure Information (SAR)
This phone is designed and manufact ured not to exc eed the emission limit s f or
exposure t o radio frequency (RF) en ergy set by th e F ederal Communications
Commi ssion of the Unit ed S tates.
During SAR testing, t hi s device was set to transmit at its highest certi fied power
level in all t ested frequency bands, and placed in p ositions th at simulate RF
exposure in usage again st t he head with no separati on, and near th e body with t he
separation of 10 mm. Although the SAR is determined at the highest certified power
level, the act ual SAR level of the d evice while operating can be well bel ow the
maximum value. This is because the phon e i s designed t o operate at mult i pl e
power levels s o as to use only the power required to reach the net work. In general ,
the closer you are to a wireless base statio n ante nna, t he lower the powe r outp ut.
The exposu re standard for wireless d evi ces employi ng a unit of measurement is
known as the Specific Absorption Rate, or SAR.
The SAR limit set by the FC C is 1.6W/kg.
This device is complied with SAR for general population /uncontrolled exposure
limit s i n A NSI/IEEE C95.1 -1992 and had been tested in accordance with the
measurement method s and procedur es specified in IEEE1528.
The FCC has granted an Equi pment Aut horizati on f or this m odel p hone with all
reported SAR levels evaluated as in compliance with the FCC RF exposure
guidelines. SAR information on this model phone is on file with the FCC and can be
found under the Display Grant section of www.fcc.gov/oet/ea/fccid after searching
on FCC ID: SRQ-Z828.
For this device, the highest reported SAR value for usage against the head is 1.04
95
Page 96

W/kg, for usage near the body is 1.19 W/kg.
While there may be diff erences bet ween the SAR levels of v arious phones and at
various p ositions, they all meet the governm ent r equirement s.
SAR compliance for body-worn operation is based on a sep aration distance of 10
mm between t he unit and th e human body. Carry thi s device at least 10 mm away
from your body to ensure RF exposure level compliant or lower to the reported level.
To support body-w orn operation, choose the bel t clips or hol sters, which do
not contain metallic components, to maintain a separation of 10 mm between this
device and your body.
RF exposure compliance with any body-worn accessory, which contains metal, was
not tested and certified, and use such b ody-worn acc essory, shoul d be avoided.
FCC Regulations
This mobile phone complies with p art 15 of the FCC Rules. Operation is subject t o
the following two conditions: (1) This devic e may not cause harmful interference,
and (2) this device must accept any int erferenc e rec ei ved, includi ng interf erence
that may c ause undesired operation.
This mobile phone has been tested and found to comply wit h the limits for a Class
B digital device, pursuant to Part 15 of the FCC Rules. These limits are designed to
provide reason able prot ecti on against harm ful interf erence in a residential
installation. This equipment generates, uses and can radiated r adio frequency
energy and, if not installed and used in accordance with the instructions, may cause
harmful interference to radio com municati ons. However, there is no guarantee that
interference will not occur in a particul ar installation If this equipment does cause
harmful interference to radio or television r eception, whi ch can be det ermined by
turning the equipment off and on, the user is encouraged to try to correct t he
interference by one or more of the foll owing measu res:
96
Page 97

x
Reorient or reloc ate the recei ving ant enna.
x Increase t he separati on between the equipment and receiver.
x Connect t he equipment into an outl et on a circuit different fr om that to which
the receiver is connected.
x Consult the dealer or an experienced radio/TV technici an for help.
CAUTION:
Changes or modific ations not expr essly appr oved by the party responsible for
com plian ce c ould void the use r‘ s aut hority to operat e the equipment.
Hearing Aid Compatibility (HAC) regulations for
Mobile Phones
In 2003, the FCC adopted rules to make digital wireless telephones compatible with
hearing aids and cochlear implants. Although analog wireless phones do not
usually c ause interf erence with h earing aids or c ochlear im plants, digit al wireles s
phones som etimes do because of electr omagnetic energy emitted by th e phone's
antenna, b acklight , or oth er com ponents. Y our ph one is c ompliant with FCC HAC
regulations (ANSI C63.19- 2011). While some wireless phones are used near some
hearing devices (hearin g aids and cochl ear im pl ants), u s ers may det ec t a buzzing,
humm i ng, or whining noise. Som e heari ng devices are more immune than oth ers to
this interf erence noise and phon es also vary in the am ount of int erference the y
generate. The wireless telephone industry has developed a rating system for
wireless phones to assist hearing device users in finding phones that may be
compatible with their hearing devices. Not all phon es have been rated. Phones that
are rated have the r ating on their box or a label located on the box. T he ratings are
not guarantees. Results will vary depending on the user's hearing device and
hearing los s. If your h earing d evic e happens t o be vulner able t o interfer ence, y ou
may not be able to use a rated phone successfully.
97
Page 98

Trying out the phone with your hearing device is the best way to evaluate it for your
personal n eeds.
This phone has b een tested and rated for us e with hearing aids for s ome of the
wireless technologies that it uses. However, there m ay be some newer wireless
technologi es us ed in thi s ph on e that h ave not been t est ed yet for us e with h earin g
aids. It is important to try the different features of this phone thoroughly and in
different l ocati ons, usin g your h earing aid or c ochlear i mplant , to d etermi ne if you
hear any interfering noi se. Consult your servic e provider or the manuf act urer of this
phone for information on hearing aid compatibility. If you have questions about
return or exc hange polic ies, consult your service provider or phone retailer.
M-Ratings: Phones rated M3 or M4 meet FCC requirements and are likely to
generate l ess interference t o hearing d evices than phones th at are not labeled. M4
is the better/higher of the two ratings.
T-Ratings: P hones rated T3 or T4 meet FCC requir em ent s and are likely t o b e
more usable with a hearing device’s telecoil (“T Switch” or “Telephone Switch”)
than unrat ed ph ones. T4 is t he bett er/ high er of th e tw o ratings. ( Note t hat not all
hearing devices have telecoils in t hem.)
Your phone meets the M3/ T3 level rating.
Hearing devices may also be rated. Your hearing device manufacturer or heari ng
health professional may help you find this rating.
For more information about FCC Hearing Aid Compatibility, please go to
http://www.fcc.gov/cgb/dro.
98
Page 99

CTIA Requirements
x Do not disass emble or open crush, bend or deform, puncture or shred .
x Do not modify or remanufacture, attempt to insert foreign objects into the
battery, immerse or expose to water or other liquid s, expose to fire, explosion or
other hazard.
x Only use the battery for the system for which it is specified .
x Only use the bat tery with a charging system that has been quali fied with th e
system per CTIA Certification Requirements for Battery System C ompliance to
IEEE 1725. Use of an unqualifi ed battery or charger m ay present a ris k of fire,
explosion, leakage, or other hazard.
x Do not short circuit a battery or allow m etallic conductive object s to contac t
battery terminals.
x Replace the battery onl y with anoth er battery th at has been qu alified with t he
system per t hi s standard, I EEE-Std-1725. U se of an unquali fied batt ery may
present a risk of fire, explosi on, leakag e or other hazard.
x Promptl y dispose of used batteries in accordance with local r egulations.
x Battery usage by children should be supervis ed.
x Avoid droppi ng the phone or battery. If the phone or battery is dropped,
especially on a h ard surface, and th e user suspects d am age, take it to a servic e
center for inspection.
x Improper b attery use m ay result in a fire, explosion or other hazard.
x The phone shall only be c onnected to CT IA certified adapt ers, products that
bear the USB-IF logo or products that have completed the USB-IF compliance
program.
99
Page 100

Radio Frequency Interference
General Statement on Interf erence
Care must be taken wh en using the phone in close proximity to per sonal medic al
devices, such as pacemakers and h eari ng aids.
Pacemakers
Pacemaker manufact urers recommend that a m i ni mum separation of 15 cm be
maintained between a mobile phone and a pac emaker to avoid potential
interference with the pacemaker. To achieve t hi s, use the phon e on the opposite
ear to your pacemaker and do not c arry it in a breast p ocket.
Hearing Aids
People with hearing aids or othe r cochlear im plants m ay exp erienc e interfering
noises when using wir el ess devic es or w hen one is nearby.
The level of interference will depend on the type of hearing device and the distance
from the interference source. Increasing the separati on between them may reduce
the interf erence. You m ay also consult your hearing aid manuf act urer to disc uss
alternatives.
Medical Devices
Please consult your doctor and the device manufacturer to determine if operation of
your phone m ay i nterfere with the operation of y our medical device.
Hospitals
Turn off your wireless device when r equested to do so in hospitals, clinics or health
care facilities. These requests are designed to prevent possible interference with
sensitive medical equipment.
100
 Loading...