

Page 1

1
LEGAL INFORMATION
Copyright © 2012 ZTE CORPORATION.
All rights reserved.
No part of this publication may be quoted, reproduced, translated
or used in any form or by any means, electronic or mechanical,
including photocopying and microlm, without the prior written
permission of ZTE Corporation.
ZTE Corporation reserves the right to make modifications on
print errors or update specifications in this guide without prior
notice.
We offer self-service for our smart terminal device users. Please
visit the ZTE ofcial website (at www.zte.com.cn) for more infor-
mation on self-service and supported product models. Informa-
tion on the website takes precedence.
Version No. : R1.0
Edition Time : 20121022
Manual No. : 079584505074
Page 2

2
is a trademark
of SRS Labs, Inc. SRS TruMedia
TM
technology is incorporated
under license from SRS Labs, Inc.
SRS TruMediaTM, a feature-rich audio solution tuned specically
for mobile devices, provides a cinema-like surround headphone
performance with deep, rich bass.
Page 3

3
Table of Contents
Getting to Know Your Device ....................................................... 4
Starting Up...................................................................................6
Charging the Battery....................................................................8
Powering On/Off Your Phone ......................................................8
Getting to Know the Home Screen .............................................. 9
Locking/Unlocking the Screen & Keys.......................................10
Going Through the Initial Setup ................................................. 11
Entering Text .............................................................................. 12
Adding Accounts ........................................................................14
Making and Answering Calls ..................................................... 15
Adding Contacts ........................................................................16
Sending a Message ...................................................................18
Browsing or Searching the Web ................................................19
Using the Google Play Store .....................................................20
Taking a Photo ........................................................................... 21
Capturing a Panoramic Photo ...................................................22
Recording a Video .....................................................................23
For Your Safety .......................................................................... 24
Page 4
4
Getting to Know Your Device
Page 5

5
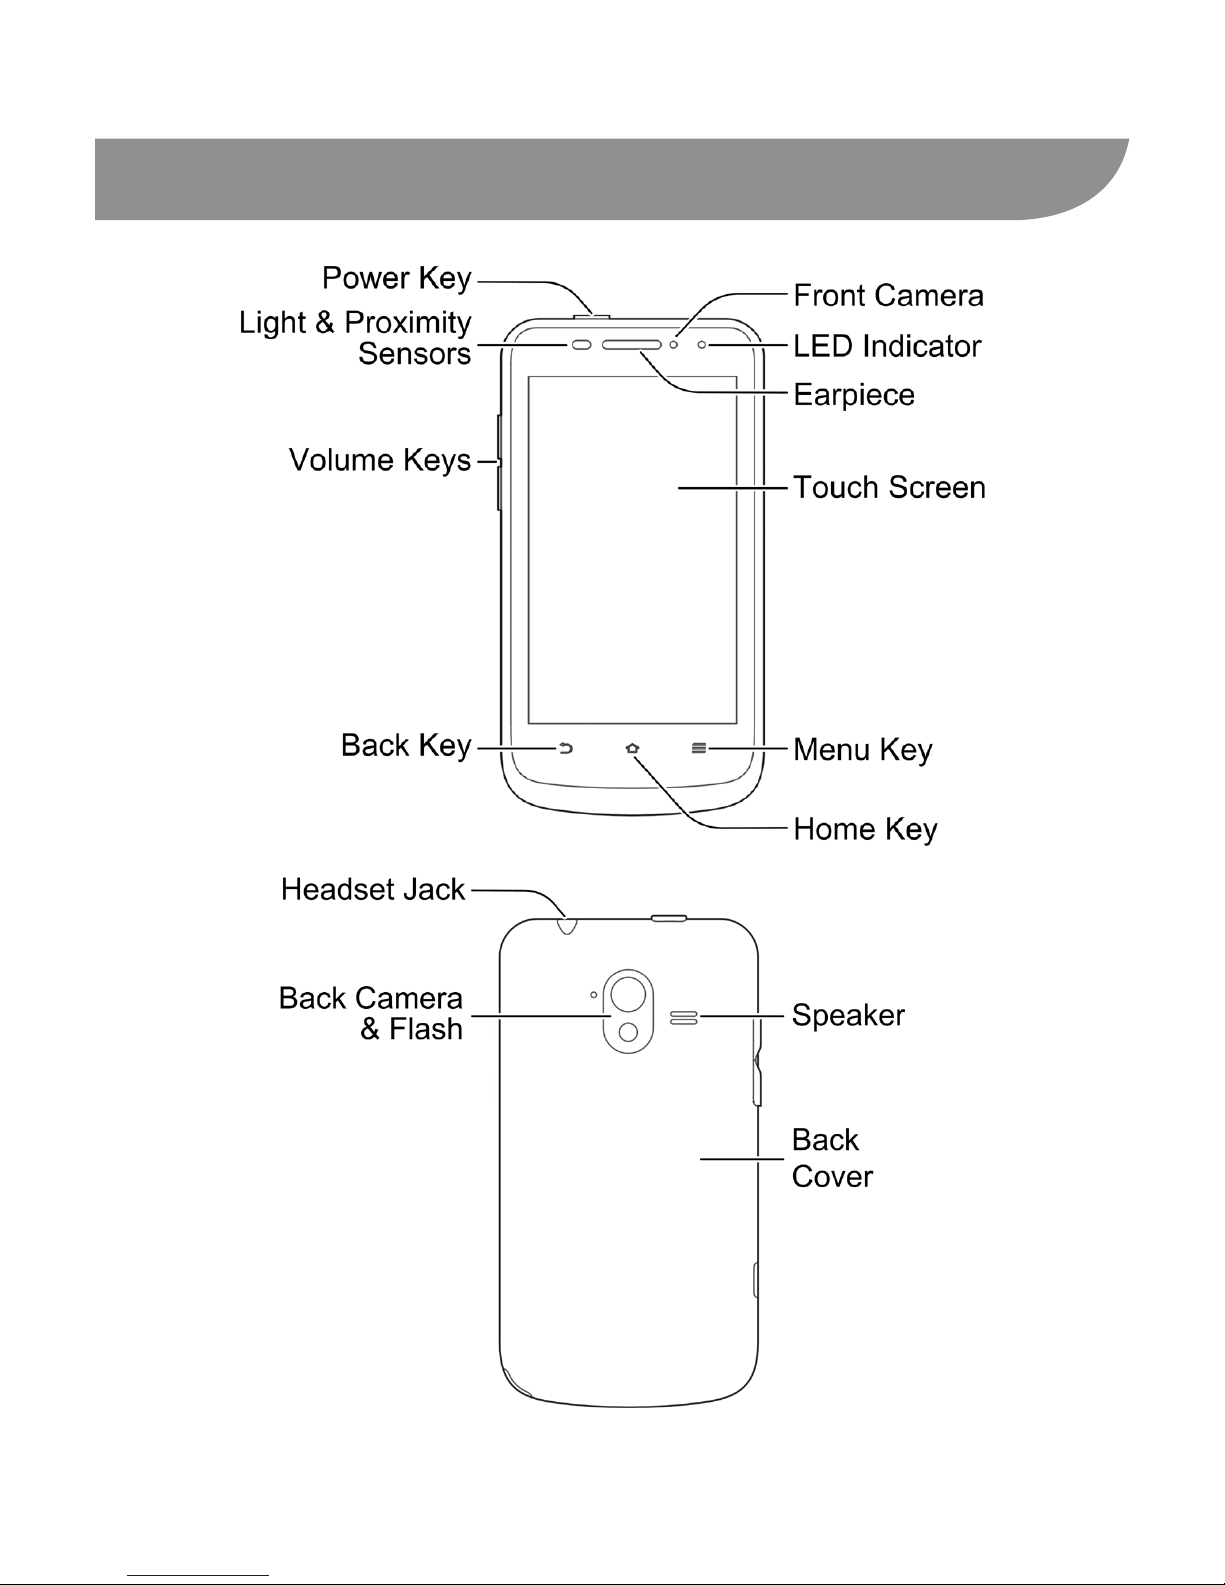
Power Key
• Press and hold to power on, select phone modes, turn on/off
airplane mode, restart, or power off.
• Press to turn off or on the touch screen.
Home Key
• Touch to return to the home screen from any application or
screen.
• Touch and hold to see recently used applications.
Menu Key
Touch to get the options for the current screen.
Back Key
Touch to go to the previous screen.
Volume Keys
Press or hold to turn the volume up or down.
Page 6
6
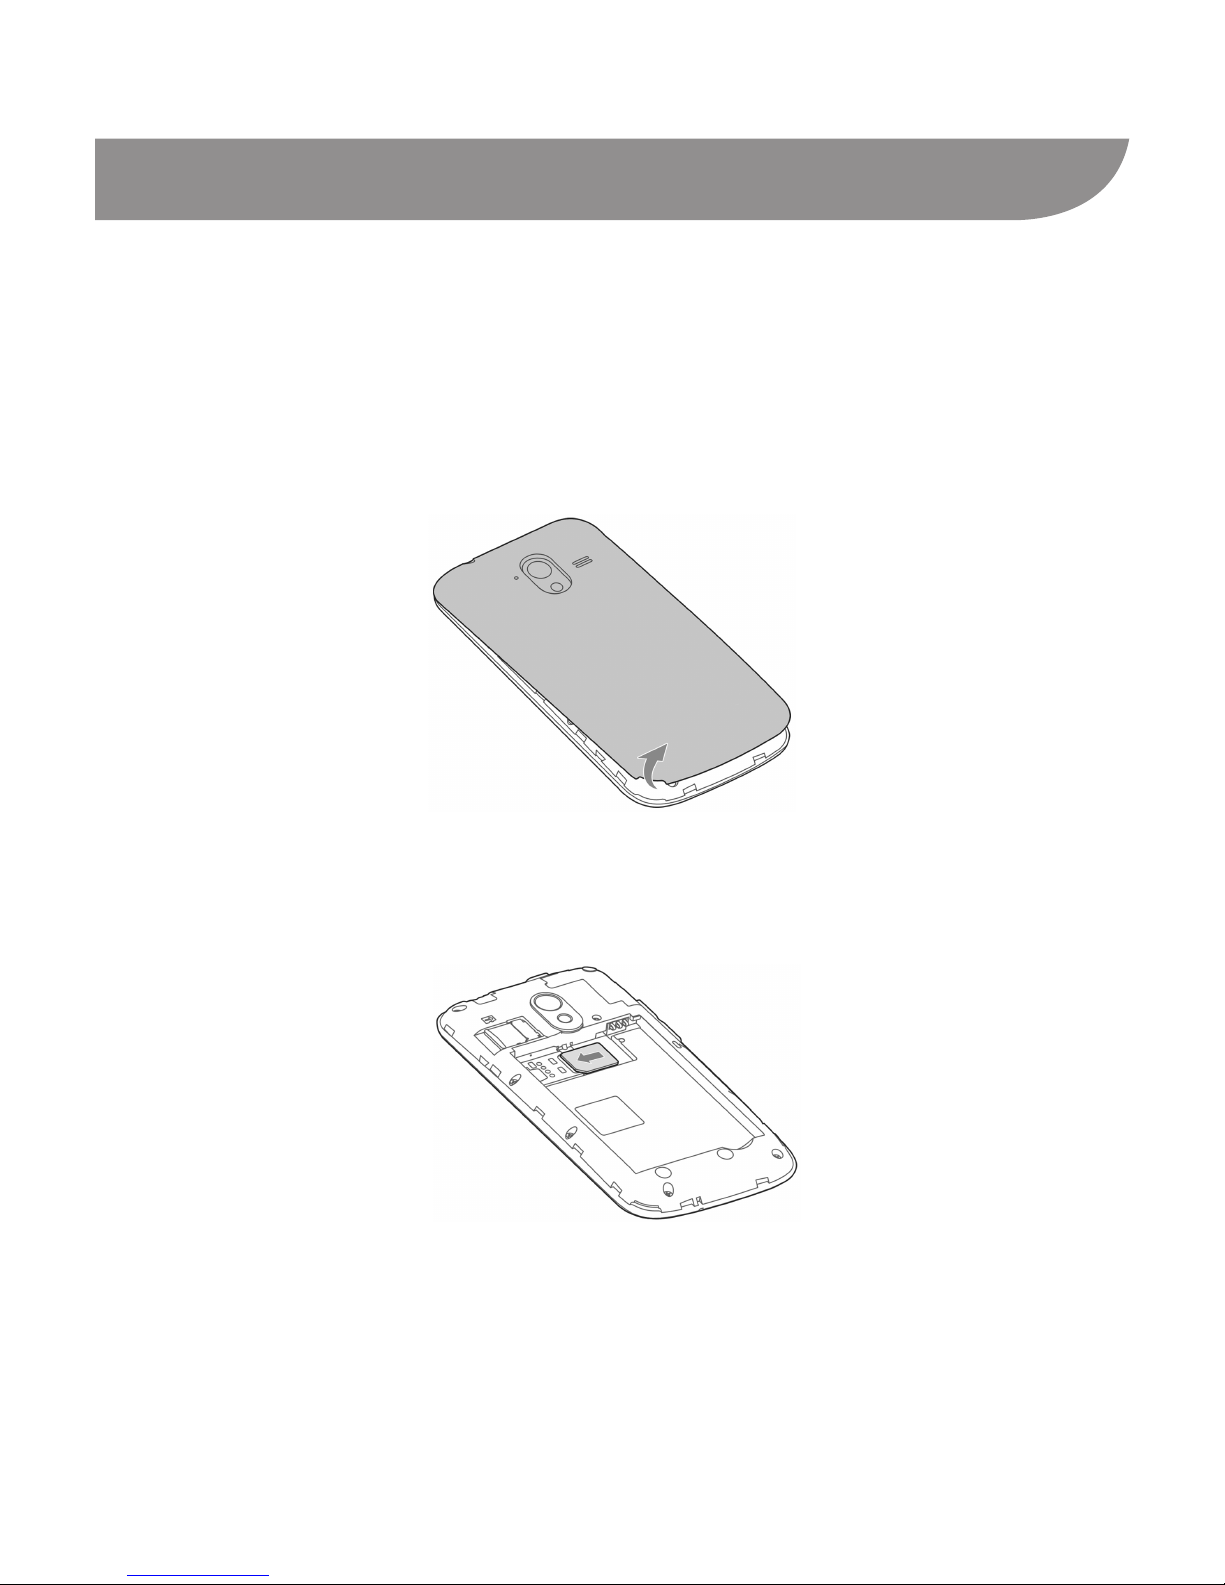
Starting Up
Switch off your phone before installing or replacing the battery
or the UICC card. The microSD card is optional and can be
installed and removed while the phone is turned on. Unmount
the microSD card before removing it.
1. Remove the back cover.
2. To use the 4G LTE network, insert the UICC card with the
gold-colored contacts facing down.
TIP: A soft block beside the UICC card bracket keeps the card
in place. You may need to gently press the block down when re-
moving the card from the phone.
Page 7
7
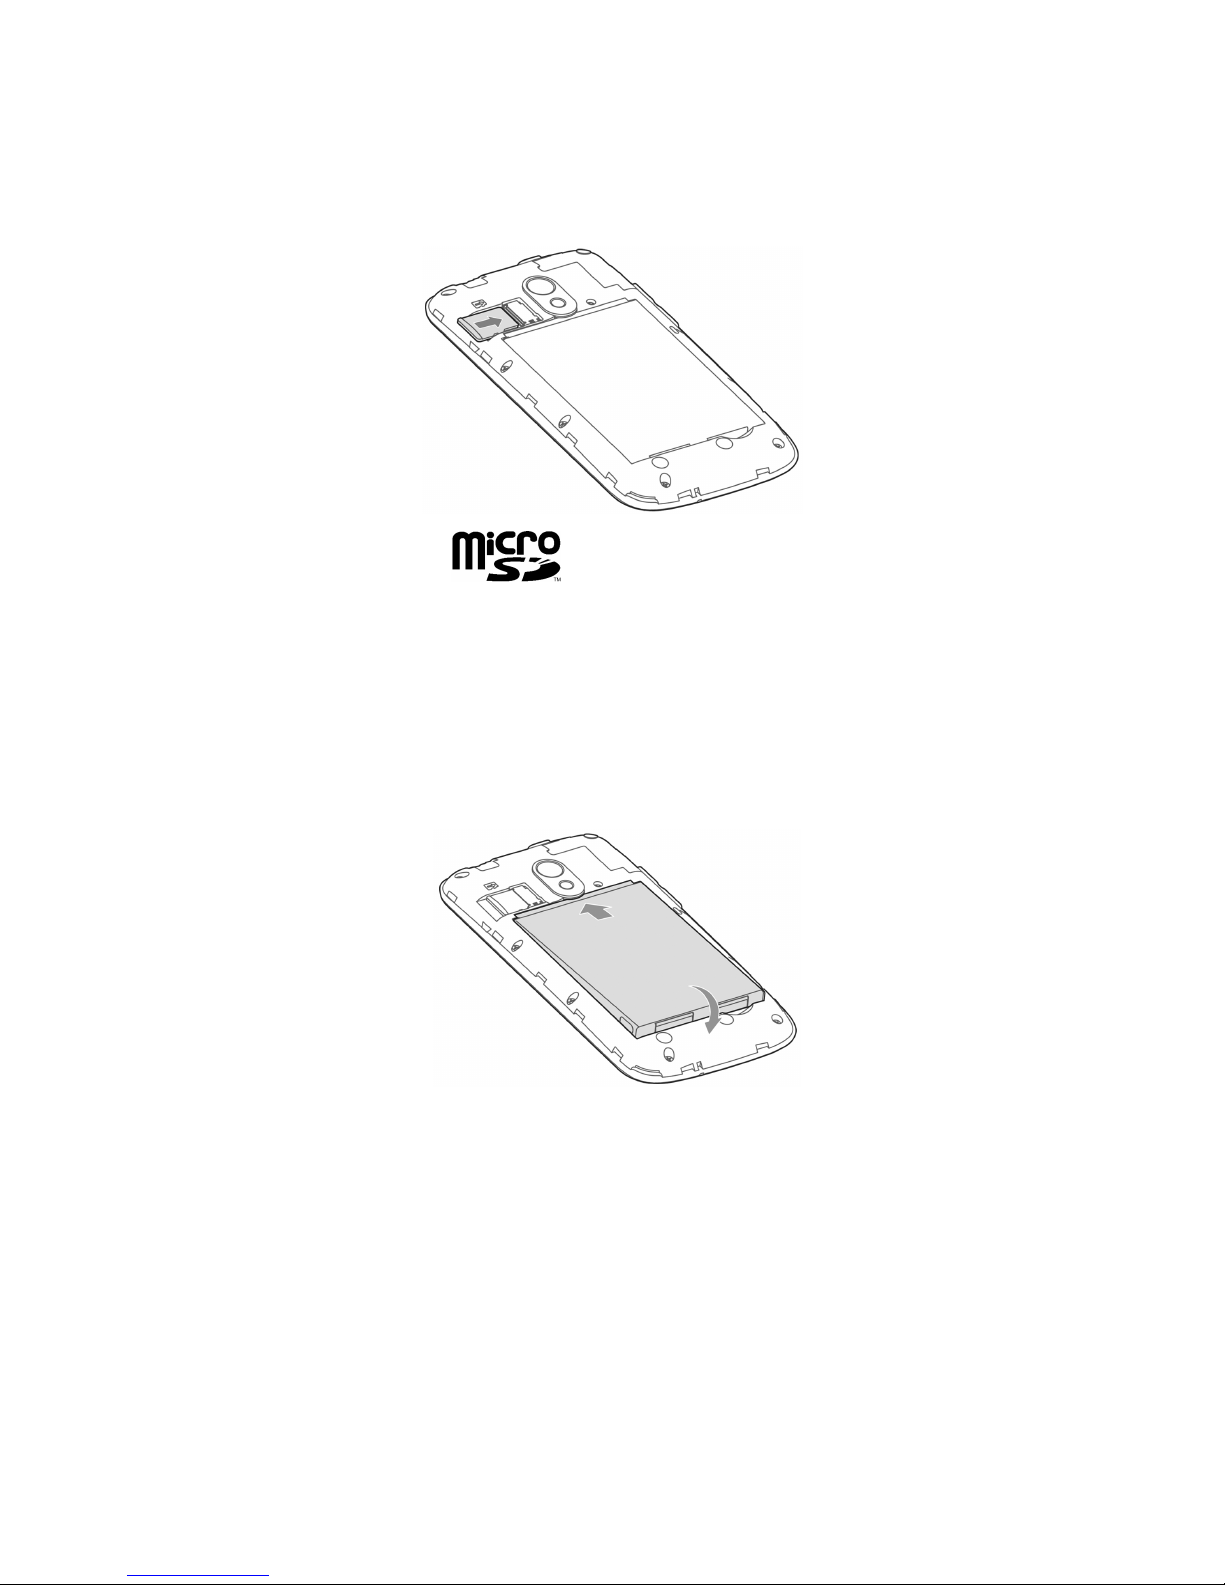
3. Hold your microSD card with the metal contacts facing down
and slide it in.
NOTE: microSD logo is a trademark of the SD Card As-
sociation.
4. Insert the battery by aligning the gold contacts on the battery
with the gold contacts in the battery compartment. Gently
push down the battery until it clicks into place.
5. Press the cover gently back into place until you hear a click.
Page 8
8
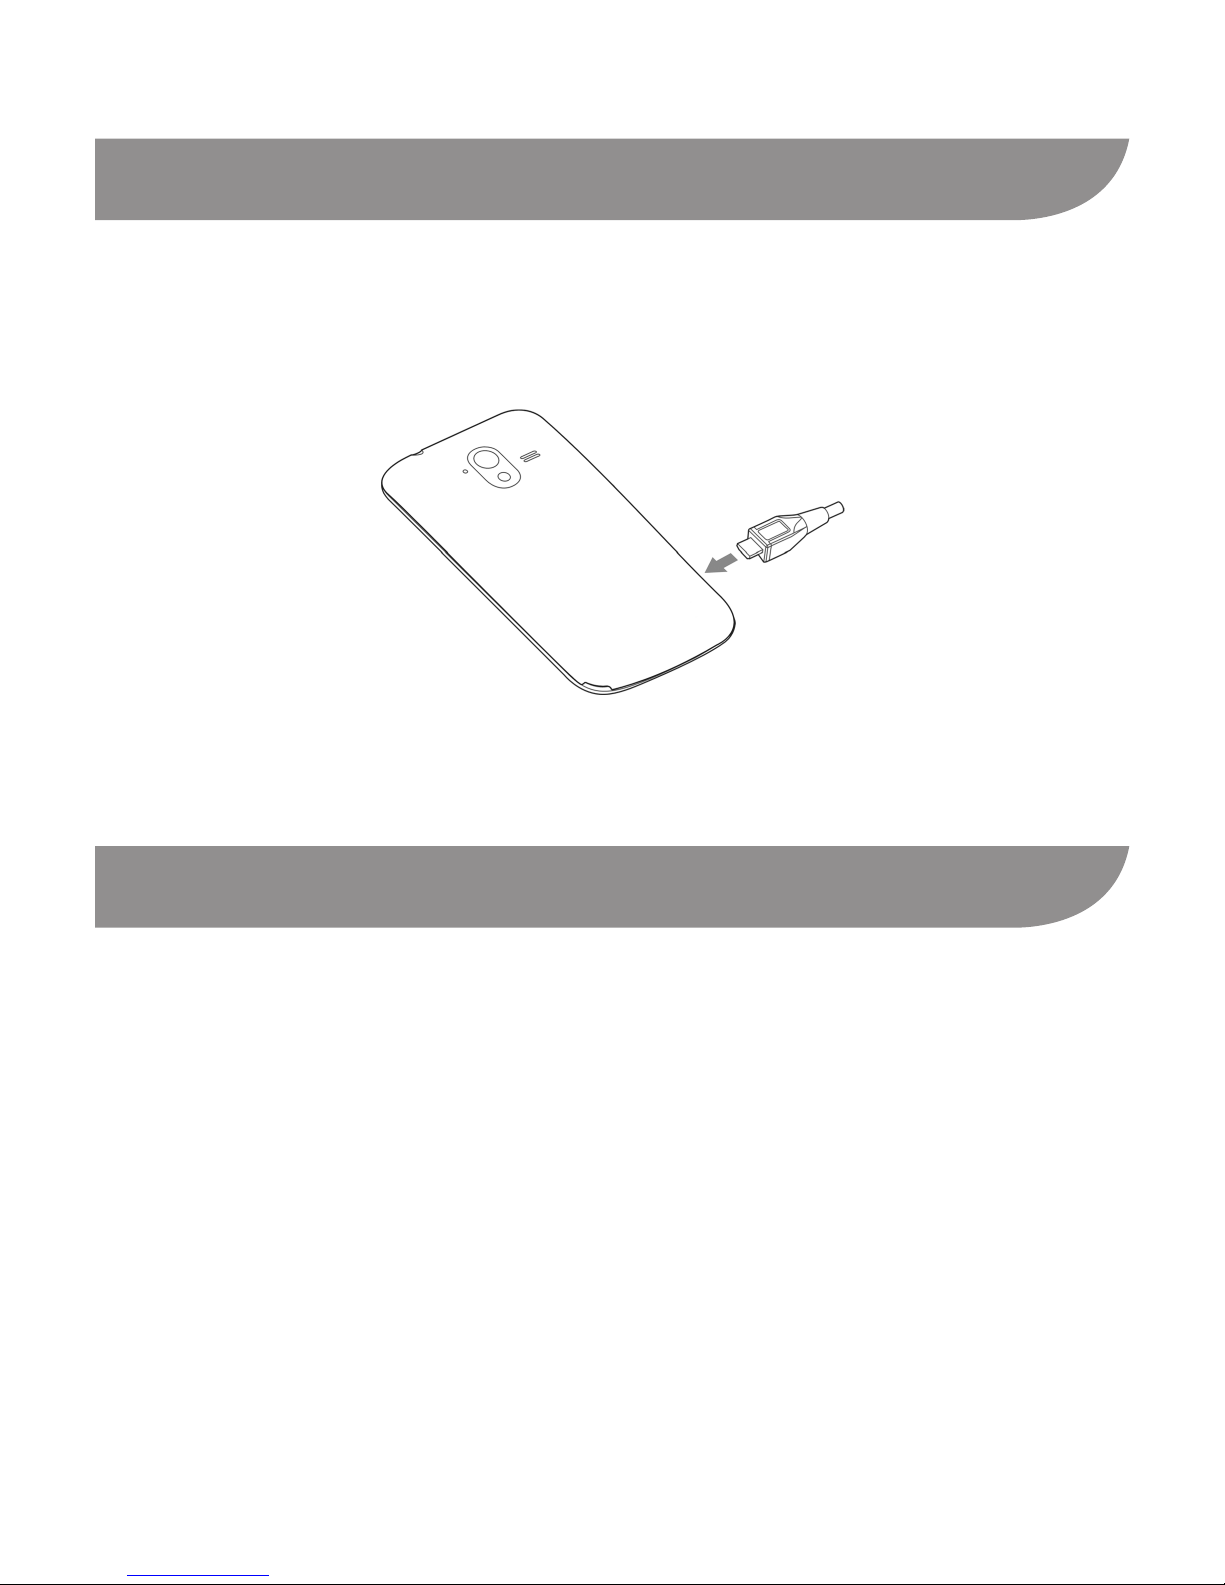
Charging the Battery
1. Connect the adapter to the charger jack. Ensure that the
adapter is inserted with the correct orientation. Do not force
the connector into the charger jack.
2. Connect the charger to a standard AC wall outlet.
3. Disconnect the charger when the battery is fully charged.
Powering On/Off Your Phone
Make sure the battery is charged before powering on.
• Press and hold the Power Key to turn on your phone.
• To turn it off, press and hold the Power Key to open the op-
tions menu. Touch Power off > OK.
Page 9
9
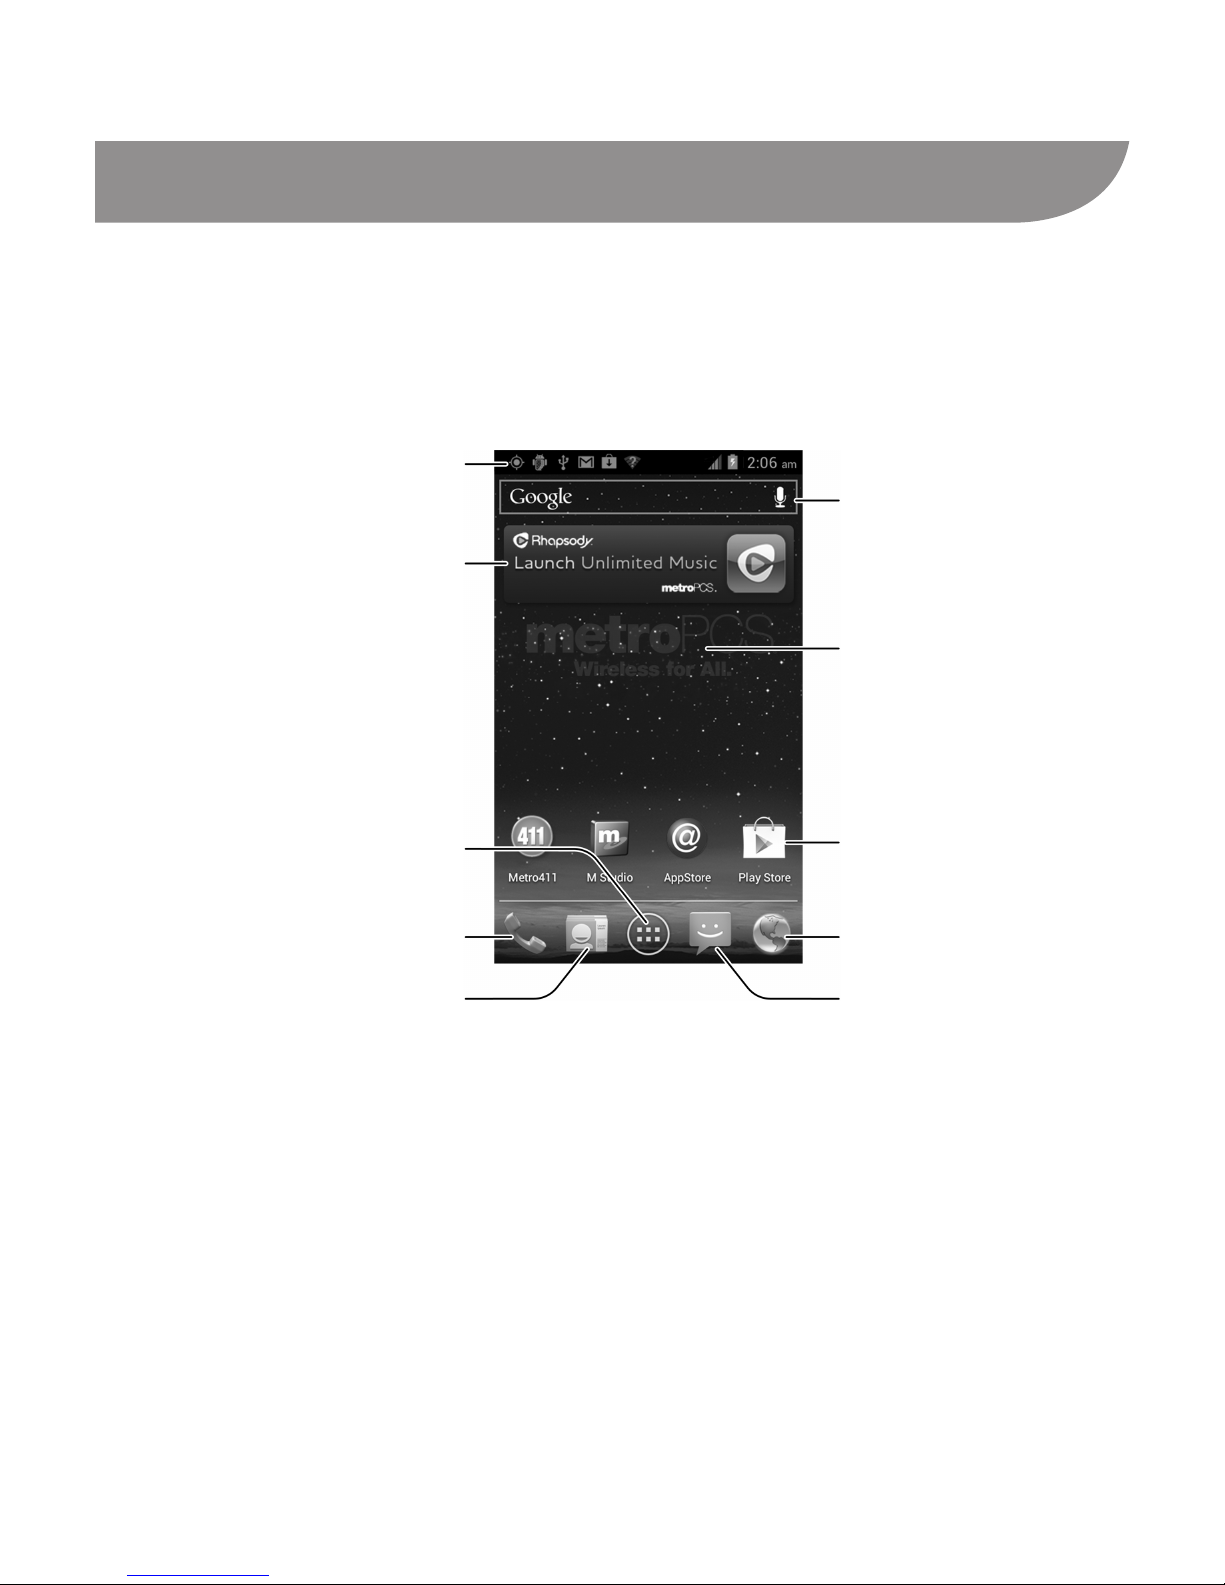
Getting to Know the Home Screen
The home screen is the starting point for your phone’s
applications, functions, and menus. You can customize your home
screen by adding application shortcuts, folders, widgets, and
more.
Google Search
Status & Notications
Widgets
All apps
Phone
People
Wallpaper
Shortcuts
MetroWEB
Messaging
NOTE: Your home screen extends beyond the initial screen,
providing more space for shortcuts, widgets, and folders. Simply
swipe left or right to see the extended home screens.
Page 10

10
Locking/Unlocking the Screen & Keys
You can quickly lock the screen and keys to prevent unwanted
operations and to protect your privacy.
To lock the screen and keys:
Press the Power Key, or leave the phone idle for a while before
it automatically gets locked.
To unlock the screen and keys:
1. Press the Power Key to turn the screen on.
2. Drag
over and release your nger.
NOTE: If you have set a long press lock, a face unlock, an un-
lock pattern, a PIN or password for your phone, you’ll need to
touch and hold the lock icon, look at your phone, draw the pat-
tern or enter the PIN/password to unlock.
Page 11

11
Going Through the Initial Setup
When you first power on your phone after you purchase it or
reset it to factory settings, follow the onscreen instructions to set
it up.
1. Touch the language eld to select the language you want to
use and then touch Start.
2. Touch Get an account to create a Google Account or touch
Sign in to sign in to your account.You can also touch Not
now to set up an account later.
After signing in, congure the Google backup and restore op-
tions and touch Next. If you are prompted and would like to
make any purchase from the Google Play Store, enter your
credit card information and touch Save.
3. Congure the Google location options and touch Next.
4. Enter your name which the phone uses to personalize some
apps and touch Next.
5. Touch Finish to complete the setup.
NOTE: If the phone cannot connect to a mobile network, it would
prompt you to connect to a Wi-Fi network.
Page 12
12
Entering Text
You can enter text using onscreen keyboards. Touch a text eld
to display the keyboard.
Changing Input Methods
1. Touch a text eld to display an onscreen keyboard. The icon
appears on the status bar.
2. Swipe your nger down from the top of the screen to open
the notication panel and touch Select input method.
3. Touch the input method you need.
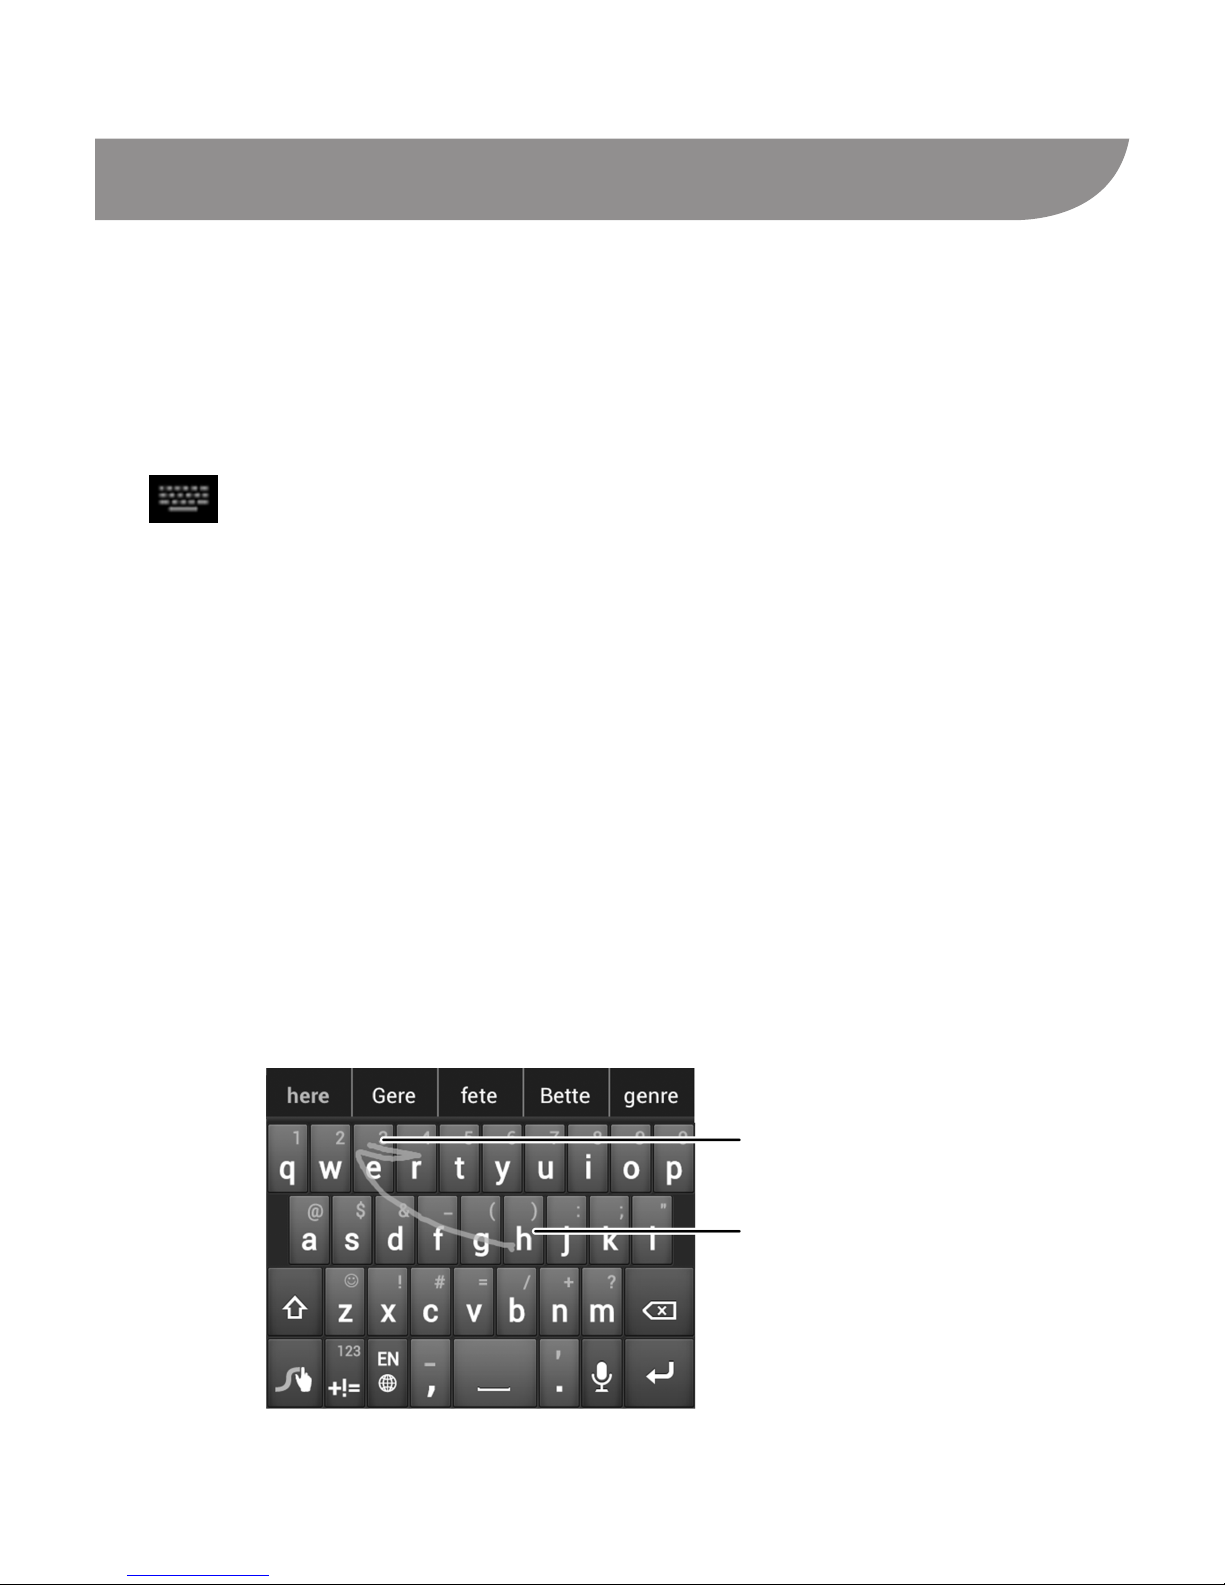
Swype Text Input
While you can touch the onscreen keyboard to enter text (similar
to the Android Keyboard), Swype Text Input can also speed up
text input by recognizing your tracing gestures. Just slide your
nger on the screen from letter to letter without lifting the nger,
until you reach the end of the word.
End of the word
Start of the word
Page 13

13
Android Keyboard
The Android Keyboard provides a layout similar to a desktop
computer keyboard. In some applications, you can turn the
phone sideways to use a larger keyboard in landscape display.
TIPS:
• Touch
to select numbers and symbols.
• Touch
to use Google’s networked voice input.
• Touch and hold a key to nd more input options.
Page 14

14
Adding Accounts
You can add multiple Google Accounts, email accounts, and
Microsoft Exchange ActiveSync accounts. You may also add
other accounts, depending on the apps installed on your
phone. These accounts may allow you to sync emails, calendar
schedules, contacts, or other information between your device
and the web.
1. From the home screen, touch the Menu Key > System set-
tings > Accounts & sync.
2. Touch ADD ACCOUNT.
3. Touch the type of account you want to add.
4. Follow the onscreen steps to enter the information about the
account. Most accounts require a username and password,
but the details may vary. You may also need to obtain some
information from IT support or your system administrator.
When the account is successfully added, it is displayed in the
Accounts & sync list.
To remove an account you have added, touch it in the Accounts
& sync list and then touch the Menu Key > Remove account >
Remove account.
Page 15

15
Making and Answering Calls
Making a Call
1. Touch the Home Key, then touch .
2. In the dialer tab
, enter the phone number with the on-
screen keypad. Touch
to delete incorrect digits.
3. Touch the
icon below the keypad to place the call.
Ending a Call
Touch to end the call.
Answering a Call
When you receive a phone call, drag over to answer the
call.
NOTE: To silence the ringer before answering the call, press the
Volume Keys up or down.
Rejecting a Call
When you receive a phone call, drag over to reject the
call.
You can also drag over to reject the call and send a
preset text message to the caller.
TIP: You can edit the content of the preset message. Touch the
Home Key >
> Menu Key > Settings > Excuse Messages
and then touch the message you want to edit.
Page 16

16
Adding Contacts
Importing Contacts From the microSD Card
This feature allows you to copy the contacts information in a
vCard le on the microSD card to the phone. Before that, you
may need to export contacts on another device to a vCard le
(see the device’s instructions on how to export) and copy it to the
phone’s microSD card.
1. Touch the Home Key, then touch
.
2. Touch the Menu Key > Import/export > Import from SD
card.
3. Select an account in which to save the contacts.
4. If there are more than one vCard les on the microSD card,
choose whether to import one, multiple, or all of them, then
touch OK.
5. Select the vCard le(s) on the microSD card and touch OK to
begin importing.
Page 17

17
Creating a New Contact
1. Touch the Home Key, then touch and touch the all con-
tacts tab
.
2. Touch
, or Create a new contact (if there are no con-
tacts).
3. Touch the account eld near the top of the screen to choose
where to save the contact. If a sync account is selected, the
contacts can be synced automatically with your account on-
line.
4. Enter the contact name, phone numbers, email addresses,
and other information.
5. Touch DONE to save the contact.
Page 18

18
Sending a Message
1. Touch in the home screen and select Messaging, then
touch
.
2. Touch the To eld and enter the recipient’s number or, if the
recipient is stored in People as a contact, the rst letters of
the recipient’s name. As matching contacts appear, you can
touch a suggested recipient.
3. Touch the Type message field, and enter the text of your
message.
4. If you want to send a multimedia message, touch the Menu
Key > Add subject to add a message subject, or touch the
paper clip icon
beside the message text box to attach
various types of media les to the message (such as pictures,
videos, or audio).
5. Touch
to send the message.
NOTE: You can also touch a conversation in the Messaging
screen to write a message to the number you have the conversa-
tion with.
Page 19

19
Browsing or Searching the Web
1. Touch in the home screen and select MetroWEB. The
home page opens or the web page you opened last time is
displayed (if you used the app recently and did not exit from it).
2. Touch the address box at the top of the browser screen. If the
address box isn’t visible, swipe down a little to show it.
3. Enter the address (URL) of a web page. Or enter terms you
want to search for. You can also touch the microphone icon
to search by voice.
4. Touch a suggestion or touch Go on the keyboard to open the
web page or search results.
TIP: Touch the Menu Key > Stop if you want to stop opening the
page.
Page 20

20
Using the Google Play Store
Touch in the home screen and select Play Store to buy
music, books, magazines, movies, TV shows, and apps and
download them to your phone.
NOTE: The content you can access in Play Store depends on
your region and your service provider.
Browsing and Searching for Apps
You can browse apps by category and sort them in different
ways. Touch a top-level category, such as Games and touch the
app from any subcategory.
You can also search for apps using an app’s name or descrip-
tion, or the developer’s name. Just touch
and enter the
search terms.
Downloading and Installing Apps
When you nd the app you are interested in through browsing or
searching, touch it to open its details screen, where more infor-
mation about the app is displayed.
1. Touch Download (free apps) or the price (paid apps) in the
app details screen.
2. If the app is not free, you need to sign in to your Google Wal-
let account and select a payment method.
Page 21

21
3. Touch Accept & download (free apps) or Accept & buy (paid
apps) to accept the permissions for the app. Your app will
start downloading immediately or once payment is success-
fully authorized.
Taking a Photo
1. Touch in the home screen and select Camera.
2. Aim the camera at the subject and make any necessary ad-
justment.
Number Function
Touch and slide to adjust brightness (Appears only
when Brightness is turned on in Camera settings).
Touch and slide to adjust zoom level.
Page 22

22
Select camera settings.
Switch to camcorder or panorama mode.
Capture a photo.
View photos and videos captured.
Switch between the front camera and the back
camera.
Displays the current ash mode.
3. If Touch AF/AEC is turned on in camera settings, touch the
area where you want the camera to focus. Green brackets
appear around the area you touched.
4. Lightly touch the blue button
.
Capturing a Panoramic Photo
You can take wide panoramic photos in panorama mode.
1. Touch
in the home screen and select Camera.
2. Touch
> to switch to panorama mode.
3. Touch
to start capturing the photo.
4. Slowly move the phone in any direction.
5. Touch
when you reach the end point of the panoramic
photo.
Page 23

23
Recording a Video
1. Touch in the home screen
and select Camcorder, or
switch to the camcorder from
the camera screen.
2. Aim the camera at the
subject and make any
necessary adjustment.
Number Function
Hold the circle and slide to zoom in or out.
Change the camcorder settings.
Switch to camera or panorama mode.
Record a video.
View photos and videos you have captured.
Switch between the front and the back cameras.
3. Touch
to start and to stop recording.
TIP: While the recording is in progress, you can touch the pre-
view screen to save the frame as a photo.
Page 24

24
For Your Safety
General Safety
Don’t make or receive
handheld calls while
driving. Never text
while driving.
Don’t use at gas sta-
tions.
Keep your phone at
least 15 mm away from
your ear or body while
making calls.
Your phone may
produce a bright or
ashing light.
Small parts may cause
choking.
Don’t dispose of your
phone in re.
Your phone can pro-
duce a loud sound.
Avoid contact with
anything magnetic.
Keep away from pace-
makers and other elec-
tronic medical devices.
Avoid extreme tem-
peratures.
Turn off when asked to
in hospitals and medi-
cal facilities.
Avoid contact with
liquids. Keep your
phone dry.
Page 25

25
Turn off when told to in
aircrafts and airports.
Don’t take your
phone apart.
Turn off when near
explosive materials or
liquids.
Only use approved
accessories.
Don’t rely on your phone for emergency communica-
tions.
FCC Compliance
This device complies with part 15 of the FCC Rules. Operation is
subject to the following two conditions: (1) This device may not
cause harmful interference, and (2) this device must accept any
interference received, including interference that may cause un-
desired operation.
CAUTION! Changes or modications not expressly approved by
the manufacturer could void the user’s authority to operate the
equipment.
NOTE: This equipment has been tested and found to comply
with the limits for a Class B digital device, pursuant to part 15 of
the FCC Rules. These limits are designed to provide reasonable
protection against harmful interference in a residential installa-
tion. This equipment can generate, use and radiate radio fre-
quency energy and, if not installed and used in accordance with
Page 26

26
the instructions, may cause harmful interference to radio com-
munications. However, there is no guarantee that interference
will not occur in a particular installation. If this equipment does
cause harmful interference to radio or television reception, which
can be determined by turning the equipment off and on, the user
is encouraged to try to correct the interference by one or more of
the following measures:
• Reorient or relocate the receiving antenna.
• Increase the separation between the equipment and receiver.
• Connect the equipment into an outlet on a circuit different
from that to which the receiver is connected.
• Consult the dealer or an experienced radio/ TV technician for
help.
Radio Frequency (RF) Energy
This model phone meets the government’s requirements for ex-
posure to radio waves.
This phone is designed and manufactured not to exceed the
emission limits for exposure to radio frequency (RF) energy set
by the Federal Communications Commission of the U.S. Govern-
ment:
The exposure standard for wireless mobile phones employs a
unit of measurement known as the Specic Absorption Rate, or
SAR. The SAR limit set by the FCC is 1.6 W/kg. *Tests for SAR
Page 27

27
are conducted using standard operating positions accepted by
the FCC with the phone transmitting at its highest certied power
level in all tested frequency bands. Although the SAR is deter-
mined at the highest certied power level, the actual SAR level
of the phone while operating can be well below the maximum
value. This is because the phone is designed to operate at mul-
tiple power levels so as to use only the power required to reach
the network. In general, the closer you are to a wireless base
station antenna, the lower the power output.
The highest SAR value for the model phone as reported to the
FCC when tested for use at the ear is 1.12 W/kg, when worn on
the body as described in this user guide is 1.45 W/kg (body-worn
measurements differ among phone models, depending upon
available enhancements and FCC requirements), and during si-
multaneous transmission (for example, making a phone call and
using Wi-Fi at the same time) is 1.58 W/kg.
While there may be differences between the SAR levels of vari-
ous phones and at various positions, they all meet the govern-
ment requirement.
The FCC has granted an Equipment Authorization for this model
phone with all reported SAR levels evaluated as in compliance
with the FCC RF exposure guidelines. SAR information on this
model phone is on le with the FCC and can be found under the
Display Grant section of http://www.fcc.gov/oet/ea/fccid/ after
Page 28

28
searching on
FCC ID: Q78-ZTEN9120.
For body worn operation, this phone has been tested and meets
the FCC RF exposure guidelines for use with an accessory that
contains no metal and the positions the handset a minimum of 1.5
cm from the body. Use of other enhancements may not ensure
compliance with FCC RF exposure guidelines. If you do not use
a body-worn accessory and are not holding the phone at the ear,
position the handset a minimum of 1.5 cm from your body when
the phone is turned on.
HAC
Hearing Aid Compatibility (HAC) Regulations for Mo-
bile Phones
In 2003, the FCC adopted rules to make digital wireless tele-
phones compatible with hearing aids and cochlear implants. Al-
though analog wireless phones do not usually cause interference
with hearing aids or cochlear implants, digital wireless phones
sometimes do because of electromagnetic energy emitted by the
phone's antenna, backlight, or other components.
Your phone is compliant with FCC HAC regulations (ANSI
C63.19).
While some wireless phones are being used near some hearing
Page 29

29
devices (hearing aids and cochlear implants), users may detect a
buzzing, humming, or whining noise. Some hearing devices are
more immune than others to this interference noise and phones
also vary in the amount of interference they generate.
The wireless telephone industry has developed a rating system
for wireless phones to assist hearing device users in finding
phones that may be compatible with their hearing devices. Not
all phones have been rated. Phones that are rated have the rat-
ing on their box or a label located on the box. The ratings are not
guarantees. Results will vary depending on the user's hearing
device and hearing loss. If your hearing device happens to be
vulnerable to interference, you may not be able to use a rated
phone successfully. Trying out the phone with your hearing de-
vice is the best way to evaluate it for your personal needs.
M-Ratings: Phones rated M3 or M4 meet FCC requirements and
are likely to generate less interference to hearing devices than
phones that are not labeled. M4 is the better/higher of the two
ratings.
T-Ratings: Phones rated T3 or T4 meet FCC requirements and
are likely to be more usable with a hearing device’s telecoil (“T
Switch” or “Telephone Switch”) than unrated phones. T4 is the
better/ higher of the two ratings. (Note that not all hearing de-
vices have telecoils in them.)
Your phone meets the M4/T3 level rating.
Page 30

30
Hearing devices may also be rated. Your hearing device manu-
facturer or hearing health professional may help you nd this rat-
ing.
For more information about FCC Hearing Aid Compatibility,
please go to http://www.fcc.gov/cgb/dro.
Turn on HAC
Touch the Home Key > > Settings > Call, and then check
Hearing aids to turn the hearing aid compatibility on.
When the HAC setting is on, your phone sends the audio from
your phone calls to the telecoil rather than to the microphone
of your hearing aid. You are likely to hear calls much better be-
cause volume is increased and background noise and feedback
are diminished. The HAC setting improves only the calls you lis-
ten to through the earpiece. It does not affect calls heard on the
speakerphone or a headset. It’s better to turn off the Bluetooth
function when the HAC setting is on. HAC requires extra battery
power, so watch your battery consumption when it’s turned on.
NOTE: Do not turn on the HAC setting unless you use a hearing
aid with a telecoil. Using this setting without a hearing aid or with
a hearing aid without a telecoil may be harmful to your hearing.
Page 31

31
Distraction
Driving
Full attention must be given to driving at all times in order to re-
duce the risk of an accident. Using a phone while driving (even
with a hands free kit) can cause distraction and lead to an acci-
dent. You must comply with local laws and regulations restricting
the use of wireless devices while driving.
Operating Machinery
Full attention must be given to operating the machinery in order
to reduce the risk of an accident.
Product Handling
General Statement on Handling and Use
You alone are responsible for how you use your phone and any
consequences of its use.
You must always turn off your phone wherever the use of a
phone is prohibited. Use of your phone is subject to safety mea-
sures designed to protect users and their environment.
• Always treat your phone and its accessories with care and
keep it in a clean and dust-free place.
• Do not expose your phone or its accessories to open ames
or lit tobacco products.
Page 32

32
• Do not expose your phone or its accessories to liquid, mois-
ture or high humidity.
• Do not drop, throw or try to bend your phone or its accesso-
ries.
• Do not use harsh chemicals, cleaning solvents, or aerosols to
clean the device or its accessories.
• Do not paint your phone or its accessories.
• Do not attempt to disassemble your phone or its accessories,
only authorized personnel can do so.
• Do not expose your phone or its accessories to extreme tem-
peratures, minimum - 23 and maximum + 122 degrees Fahr-
enheit.
• Please check local regulations for disposal of electronic prod-
ucts.
• Do not carry your phone in your back pocket as it could break
when you sit down.
Small Children
Do not leave your phone and its accessories within the reach of
small children or allow them to play with it.
They could hurt themselves or others, or could accidentally dam-
age the phone.
Page 33

33
Your phone contains small parts with sharp edges that may
cause an injury or may become detached and create a choking
hazard.
Demagnetization
To avoid the risk of demagnetization, do not allow electronic
devices or magnetic media to be close to your phone for a long
time.
Electrostatic Discharge (ESD)
Do not touch the UICC card’s metal connectors.
Antenna
Bluetooth & Wi-Fi
antenna
LTE Antenna
Secondary antenna
CDMA Antenna
Do not touch the antenna unnecessarily.
Normal Use Position
When placing or receiving a phone call, hold your phone to your
ear, with the bottom towards your mouth.
Page 34

34
Antenna
Antenna
Air Bags
Do not place a phone in the area over an air bag or in the air bag
deployment area as an airbag inates with great force and seri-
ous injury could result.
Store the phone safely before driving your vehicle.
Seizures/Blackouts
The phone can produce a bright or ashing light. A small per-
centage of people may be susceptible to blackouts or seizures
(even if they have never had one before) when exposed to ash-
ing lights or light patterns such as when playing games or watch-
Page 35

35
ing video. If you have experienced seizures or blackouts or have
a family history of such occurrences, please consult a physician.
Repetitive Strain Injuries
To minimize the risk of Repetitive Strain Injury (RSI) when texting
or playing games with your phone:
• Do not grip the phone too tightly.
• Press the buttons lightly.
• Use the special features which are designed to minimize the
times of pressing buttons, such as Message Templates and
Predictive Text.
• Take many breaks to stretch and relax.
Emergency Calls
This phone, like any wireless phone, operates using radio
signals, which cannot guarantee connection in all conditions.
Therefore, you must never rely solely on any wireless phone for
emergency communications.
Phone Heating
Your phone may become warm during charging and during nor-
mal use.
Page 36

36
Electrical Safety
Accessories
Use only approved accessories.
Do not connect with incompatible products or accessories.
Take care not to touch or allow metal objects, such as coins or
key rings, to contact or short-circuit in the battery terminals.
Connection to a Car
Seek professional advice when connecting a phone interface to
the vehicle electrical system.
Faulty and Damaged Products
Do not attempt to disassemble the phone or its accessory.
Only qualied personnel can service or repair the phone or its
accessory.
If your phone or its accessory has been submerged in water,
punctured, or subjected to a severe fall, do not use it until you
have taken it to be checked at an authorized service center.
Radio Frequency Interference
General Statement on Interference
Care must be taken when using the phone in close proximity
to personal medical devices, such as pacemakers and hearing
aids.
Page 37

37
Medical Devices
Please consult your doctor and the device manufacturer to
determine if operation of your phone may interfere with the
operation of your medical device.
Aircraft
Switch off your wireless device whenever you are instructed to
do so by airport or airline staff.
Consult the airline staff about the use of wireless devices
onboard the aircraft. Enable airplane mode prior to boarding an
aircraft.
Interference in Cars
Please note that because of possible interference with electronic
equipment, some vehicle manufacturers forbid the use of mobile
phones in their vehicles unless a hands-free kit with an external
antenna is included in the installation.
Explosive Environments
Gas Stations and Explosive Atmospheres
In locations with potentially explosive atmospheres, obey all
posted signs to turn off wireless devices such as your phone or
other radio equipment.
Areas with potentially explosive atmospheres include fueling
areas, below decks on boats, fuel or chemical transfer or storage
Page 38

38
facilities, and areas where the air contains chemicals or particles,
such as grain, dust, or metal powders.
Blasting Caps and Areas
Power off your mobile phone or wireless device when in a
blasting area or in areas posted power off “two-way radios” or
“electronic devices” to avoid interfering with blasting operations.
 Loading...