

ZKTeco US922 User Manual
User Guide
US922 Series | Time & Attendance Terminal
This guide provides User instructions only. For information regarding actual installation, refer to the US922 Installation Guide

US922 USER GUIDE | 2016
2
User Guide Disclaimer
All functions described in this document are current as of January 2009. Every eort has been made to ensure the information in this document is complete and
consistent with the US922 you have purchased. Since the US922 is constantly being improved, it is remotely possible that this document may not precisely coincide
with the US922 you have purchased. ZK Software will not assume liability for any direct or indirect nancial loss resulting from any inaccuracies or omissions found
in this document.

US922 USER GUIDE | 2016
3
Step 1: Install the US922 and power it up.
Step 2: Enroll users by registering his/her ngerprints or passwords.
If the US922 is operating in stand-alone mode, (where no 3rd party access con-
trol panel exists) assign users’ security privileges directly on the US922.
Note: If using the US922 with a 3rd party Wiegand access control panel, users’
security privileges will be maintained by the access control panel and NOT the
US922.
Step 3: After enrolling user(s), verify that his/her enrolled ngerprint or password
is recognized by the US922.
Step 4: Congure the US922 communication settings and then download the
users’ newly enrolled ngerprints from the US922 onto a computer. Data can be
transmitted via TCP/IP or by using a USB ash drive.
Step 5: Verify that US922 displays the correct day and time
Note: Always back up the ngerprint templates on a computer or removable
media source. Having a “template backup” can potentially save you a lot of time.
If the US922 fails or is vandalized, having a “backup” eliminates the need of hav-
ing to re-enroll all your users.
Operating | Brief Overview
US922 USER GUIDE | 2016
4
Prior to operating the US922, it is essential to understand how ngerprint recognition
technology works.
Adding and verifying ngerprints are the core functions of the US922. Once you ac-
quire a thorough understanding of ngerprint recognition technology, you will nd
your experience with the US922 to be very productive and rewarding
How Fingerprint Recognition Technology Works
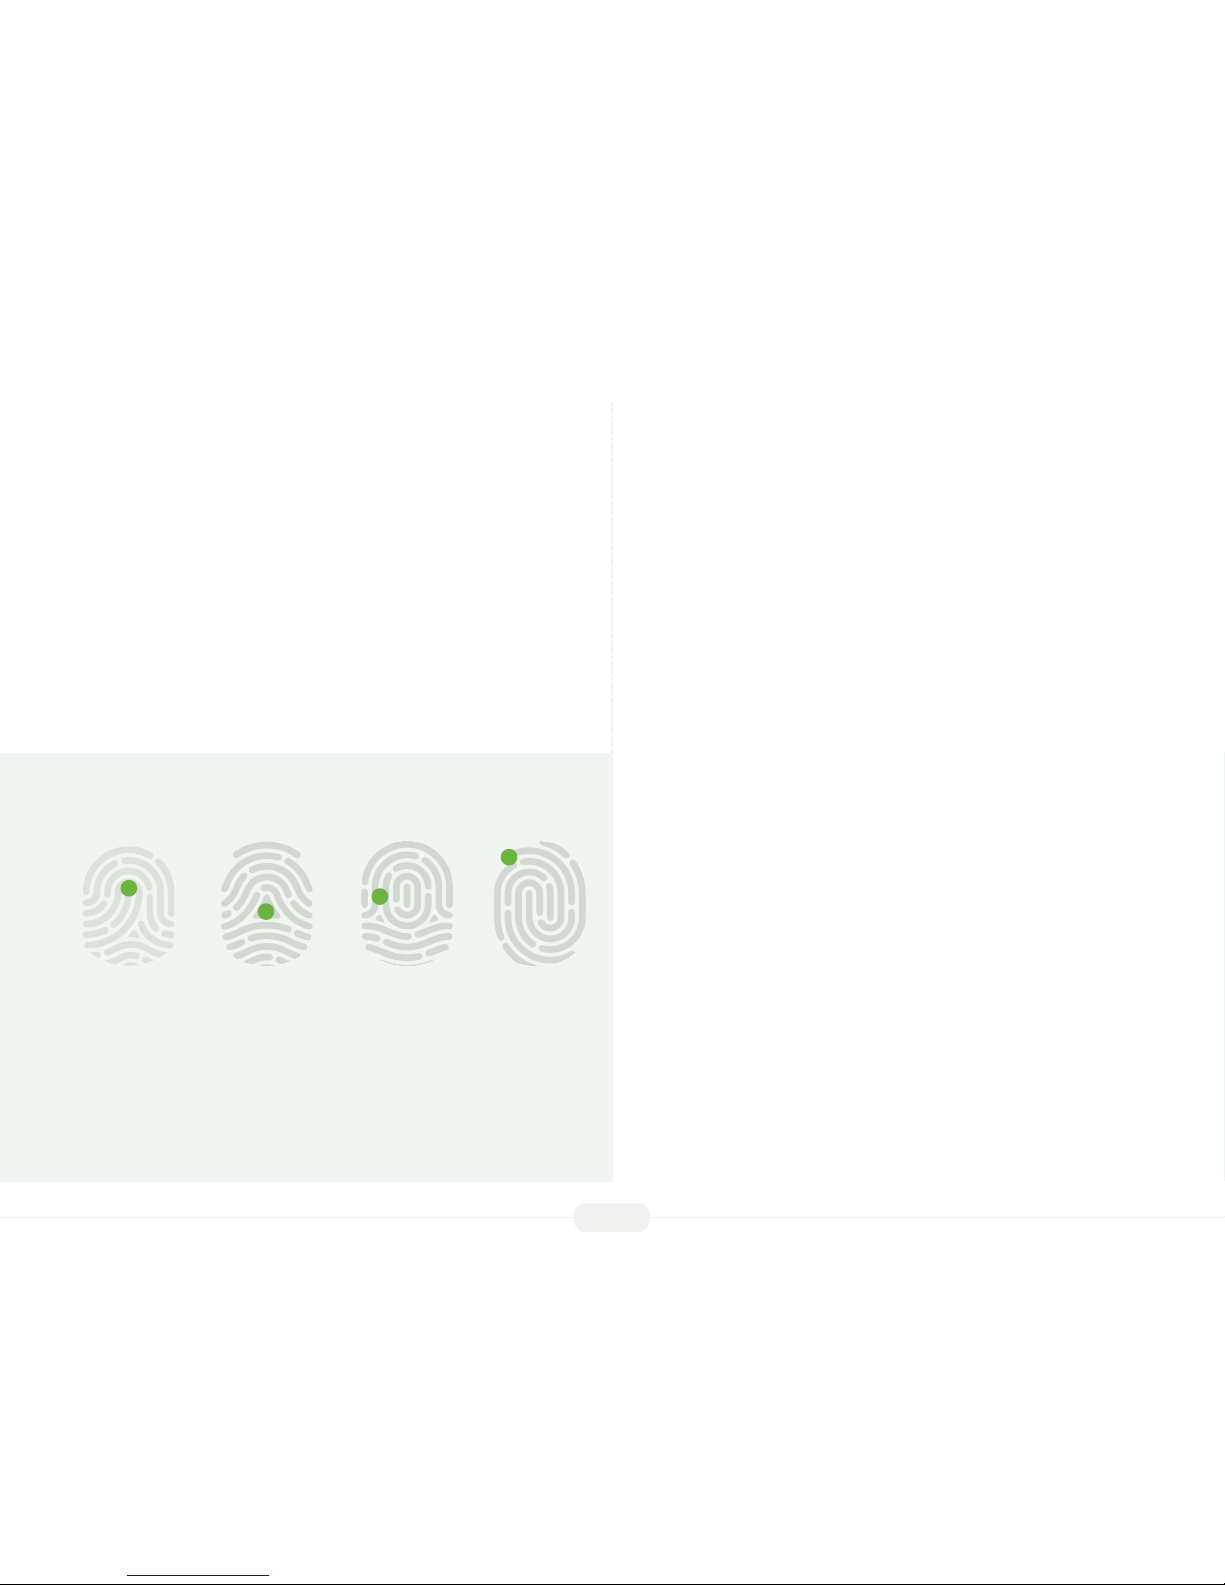
All ngerprints contain a number of unique physical characteristics called minutiae.
Minutia includes certain visible aspects of ngerprints such as ridges, ridge endings,
and bifurcation (forking) of ridges. Most of the minutiae are found in the core points
of ngerprints, which are found near the center of the ngerprint on the eshy pad
of the nger.
Figure below shows the positions of core points within ngerprints. The core points
are represented by the green dots in the gure below
Fingerprint Recognition Technology
Island Dot Bifurcation Ending Ridges
A core point is dened as the topmost point on the innermost upward recurring
ridge line.
A user is considered “enrolled” in the US922 after his/her ngerprint(s) or password
has been successfully registered in the US922.
When the user places his/her nger(s) on the US922 ngerprint sensor during the
enrollment process, the US922 takes a picture of that user’s nger’s key minutiae
points. Then the US922 uses its proprietary mathematical algorithm and converts
that picture into a unique mathematical template which is comparable to a 60-digit
password. This unique template is then encrypted and stored in the US922 database
IMPORTANT NOTE
Privacy issues should never be a concern when using the US922 because NO REAL
IMAGE OF A USER’S FINGERPRINT IS STORED. ONLY the minutiae-based tem-
plates are stored.
Each time a user’s ngerprint is scanned, the US922 searches its database for a
matching ngerprint. If the US922 nds the user’s ngerprint, then his/her “atten-
dance/door access” is recorded in the US922 “audit log” and will be noted in subse-
quent reports.

US922 USER GUIDE | 2016
5
Getting Good Fingerprint Images
The quality of ngerprint images is relative to the number of minutiae points cap-
tured by the US922’s sensor. Fingerprint images not possessing an adequate number
of minutiae points may be unreadable. It is advised to issue a secret password for
those users whose ngerprint images lack sucient minutia points and cannot be
read by the sensor. Also, you may consider purchasing an US922 with an integrated
card reader if you do not intend to assign passwords
Figure A-2 shows poor-quality ngerprints, characterized by smudged, faded or dis-
torted areas on the ngerprint. These conditions can be caused by excessive dryness,
wetness, insucient pressure or scarring of the skin at the ngertip..
Dry Wet Scarred
The US922 ngerprint matching algorithm is capable of extracting the correct minu-
tiae without the benet of a perfect print. However, the positioning of the nger and
the moisture and pressure of the ngerprint are signicant factors to consider when
it is placed on the sensor. This will help achieve a good consistent ngerprint match.
Correcting Wet or Dry Fingerprint Images
When the temperature is rigid or when hands have just been washed, ngerprints
often become very dry. In this case, the user should moisturize his/her ngerprint
simply by breathing on the eshy pad of his/her ngertip prior to placing his/her n-
ger on the sensor. The moisture from his/her breath should improve the recognition
of his/her ngerprint.
Conversely, if the ngerprint is too wet, the ridges and valleys are rendered indistin-
guishable. The lack of recognizable minutiae causes wet ngerprints to be rejected
by the US922. This can be remedied simply by swiping the nger on a clean dry
towel or cloth.
How much pressure is required for a good-quality
ngerprint?
If too much pressure is applied when pressing down on the sensor, the nger’s
ridges become pressed together and create an unrecognizable image. Applying too
much pressure (similar to ngerprints that are too wet) will create a “blurred” image
which the US922 sensor might not recognize.
If too little pressure is applied, the resulting image will be similar to the dry ngerprint
and unidentiable. Issues related to moisture and pressure can easily be addressed
with practice and users getting a feel of the sensor.
Be sure to maintain contact with the ngerprint sensor for 2 full seconds, until
the US922 responds.
The US922 has both audio and visual indicators which respond when the US922
senses a nger.
Fingerprint Recognition Technology
US922 USER GUIDE | 2016
6
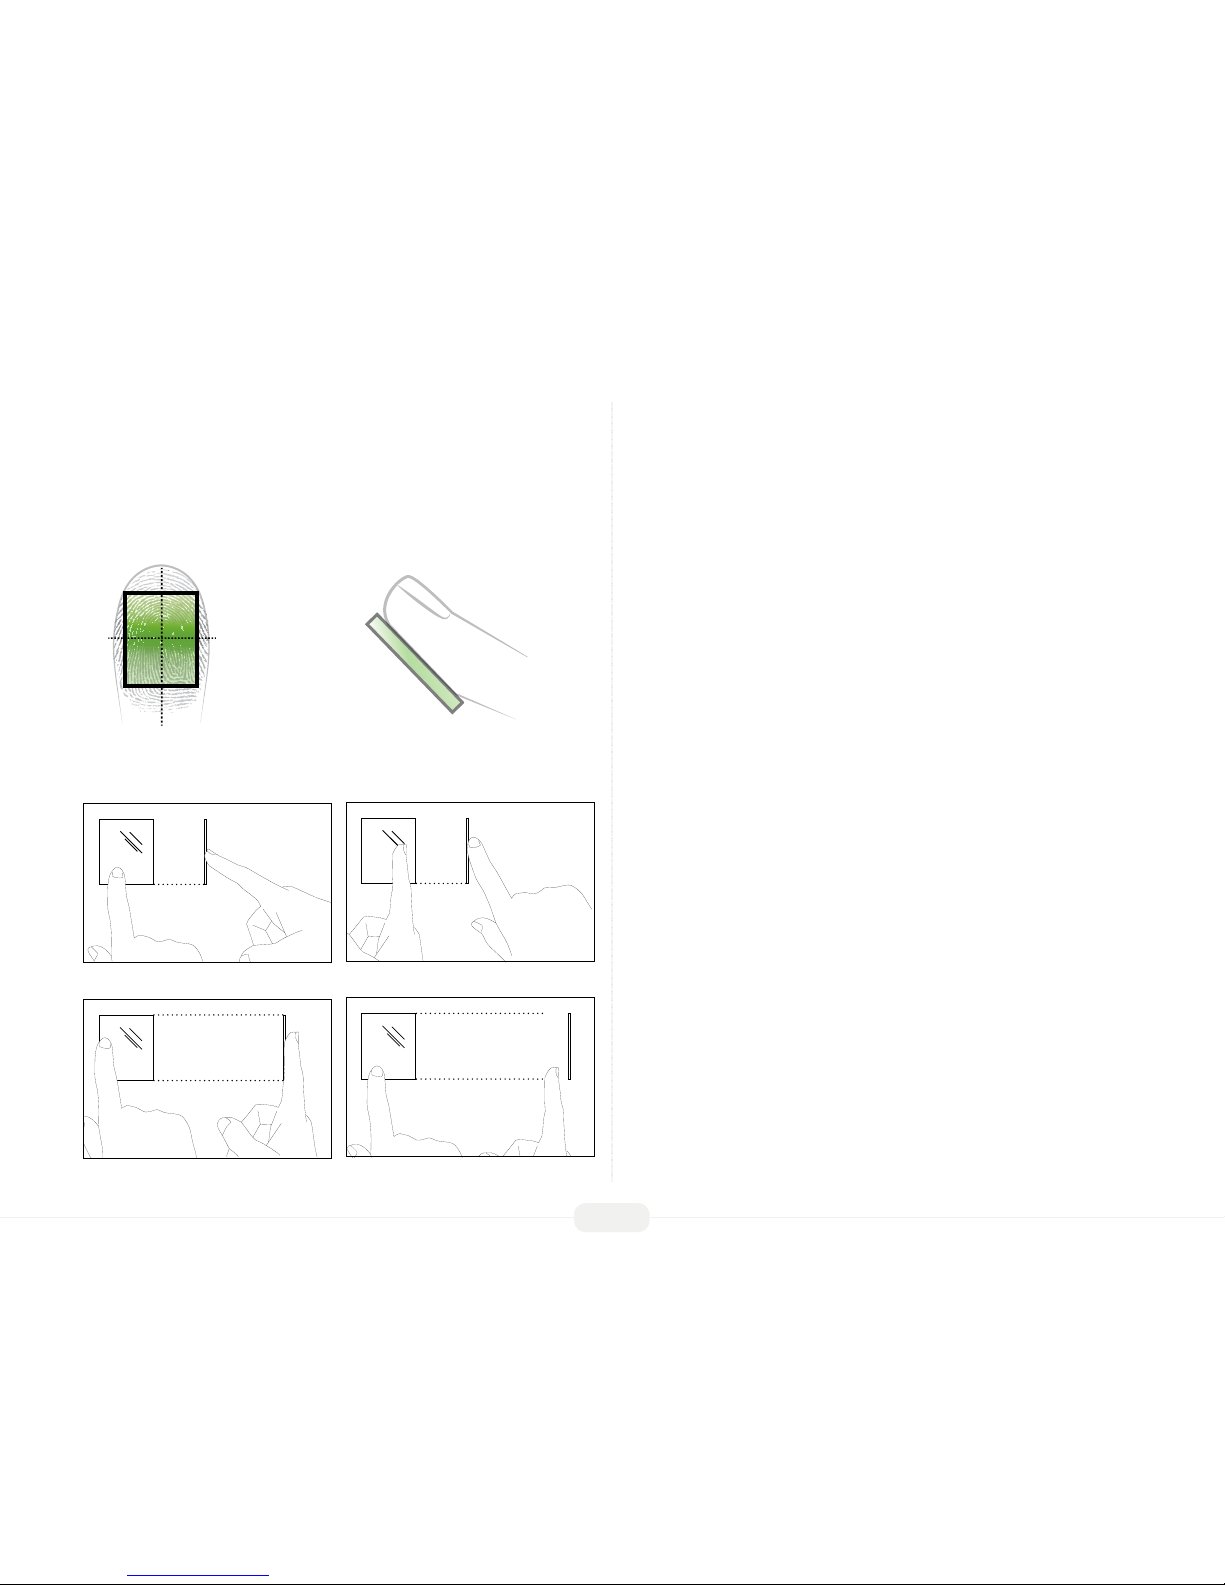
Proper Finger Placement
The user’s nger should completely cover the sensor. The nger should be placed at
and in the center of the sensor. The nger should cover at least 80% of the sensor as
shown below
Identity Verication
The US922 will NOT record an employee’s attendance OR allow door access UNTIL
the individual’s identity is veried.
The US922 uses various methods to verify a user’s identity:
• Fingerprint Matching
• Password Matching
• Card Matching (optional)
Fingerprint Matching
The US922 supports two methods of ngerprint matching, 1:N and 1:1.
1: N Fingerprint Matching
When using 1:N Fingerprint Matching, the US922 will place the ngerprint (“1”) in its
temporary memory and then compare it to ALL (“N”) ngerprint templates stored in
the US922 database (up to 2800 templates).
By using 1:N matching, the user enjoys the convenience of not entering his/her User
ID number prior to placing his/her nger on the sensor. 1:N is principally a 1-touch
matching. It is the FASTEST and EASIEST method of ngerprint matching.
The nger should NOT be placed in the following positions:
Upright
Sideways
Skewed
Partial
Fingerprint Recognition Technology

US922 USER GUIDE | 2016
7
Start from the Check/Clock-
In Screen:
If the US922 responds
“Please try again,” the pro-
cess must be repeated.
1: 1 Fingerprint Matching (ID. NO +ngerprint)
When too many users’ ngerprints are not easily recognized by the US922, it can be
set to perform 1:1 ngerprint matching.
1:1 matching requires an added step of entering the user’s ID. number rst. However,
1:1 matching is more consistent than 1:N matching.
How to Use 1:1 Fingerprint Matching
PRIOR to placing his/her nger on the US922 ngerprint sensor, the user must FIRST
enter his/her ID number and press . If the ngerprint template registered with
his/her user ID number (“1”) matches his/her nger (“1”), the user’s identity has
successfully been veried using 1:1 ngerprint matching.
From the Check/Clock-In
screen, properly place nger
on sensor.
When the US922 responds,
“Thank you,” the user has
successfully veried his/
her identity by using 1:N
matching.
How to Use 1:N Fingerprint Matching

US922 USER GUIDE | 2016
8
If ngerprint matching
becomes too problematic
for too many users, they can
register with passwords
instead of ngerprints.
How to Use Password Matching
Start at the Check/Clock-In
Screen:
At the Check/Clock-In
screen, enter the employ-
ee’s User ID. number and
press
After a users ID number
is entered and the user is
NOT prompted to enter his/
her password (“PWD”), this
means that NO password
has been registered to that
ID number.
If the US922 prompts “Error Enroll NO(number)” ,this means the user has mistak-
enly entered an incorrect ID number. If this is the case, the user should reattempt
entering his/her correct user ID number.
After entering the user ID.
number, the user will enter
his/her password (“PWD”).
If the US922 responds with
“Thank You”, then the user
has successfully veried his/
her identity using Password
verication.
Password Matching

US922 USER GUIDE | 2016
9
If the US922 prompts the
user with “Error Pwd”, then
the user should re-attempt
entering his/her correct
password.
If the US922 veries the us-
er’s identity BUT determines
the user is NOT permitted
door access AT THAT PAR-
TICULAR TIME, the door will
NOT release and the US922
displays the following:
Door-Access Considerations
The US922 is designed to
work as an Access Control
terminal and a Time &
Attendance recorder.
Door Access Control deci-
sions are based upon “Who”
the user is and “When” the
user is permitted door
access.
The US922 will verify “who” the user is. When the user is granted door access, it can be
decided EITHER by the US922 OR a 3rd party Access Control panel.
If the US922 validates the identity of the user AND determines the user is permitted
door access AT THAT PARTICULAR TIME, the door will release and the US922 displays
the following:
Password Matching
 Loading...