

Page 1

BioTime 8.0 User Manual
User Manual
BioTime 8.0
Date: December 2020
Software Version: 8.0.4 & above
Doc Version: 4.0
English
Thank you for choosing our product. Please read the instructions
carefully before operation. Follow these instructions to ensure that the
product is functioning properly. The images shown in this manual are
for illustrative purposes only.
For further details, please visit our Company’s website
www.zkteco.com.
Page | 1 Copyright©2020 ZKTECO CO., LTD. All rights reserved.
Page 2

Page 3

BioTime 8.0 User Manual
Copyright © 2020 ZKTECO CO., LTD. All rights reserved.
Without the prior written consent of ZKTECO CO., LTD, no portion of this manual can be copied or
forwarded in any way or form. All parts of this manual belong to ZKTeco and its subsidiaries
(hereinafter the "Company" or "ZKTeco").
Trademark
is a registered trademark of ZKTECO CO., LTD. Other trademarks involved in this manual
are owned by their respective owners.
Disclaimer
This manual contains information on the operation and maintenance of the ZKTeco product. The
copyright in all the documents, drawings, etc. in relation to the ZKTeco supplied product vests in and
is the property of ZKTeco. The contents hereof should not be used or shared by the receiver with any
third party without express written permission of ZKTeco.
The contents of this manual must be read as a whole before starting the operation and maintenance
of the supplied product. If any of the content(s) of the manual seems unclear or incomplete, please
contact ZKTeco before starting the operation and maintenance of the said product.
It is an essential pre-requisite for the satisfactory operation and maintenance that the operating and
maintenance personnel are fully familiar with the design and that the said personnel have received
thorough training in operating and maintaining the machine/unit/product. It is further essential for
the safe operation of the machine/unit/product that personnel have read, understood, and followed
the safety instructions contained in the manual.
In case of any conflict between terms and conditions of this manual and the contract specifications,
drawings, instruction sheets or any other contract-related documents, the contract
conditions/documents shall prevail. The contract specific conditions/documents shall apply in priority.
ZKTeco offers no warranty, guarantee or representation regarding the completeness of any
information contained in this manual or any of the amendments made thereto. ZKTeco does not
extend the warranty of any kind, including, without limitation, any warranty of design,
merchantability, or fitness for a particular purpose.
ZKTeco does not assume responsibility for any errors or omissions in the information or documents
which are referenced by or linked to this manual. The entire risk as to the results and performance
obtained from using the information is assumed by the user.
Page | 1 Copyright©2020 ZKTECO CO., LTD. All rights reserved.
Page 4

BioTime 8.0 User Manual
ZKTeco in no event shall be liable to the user or any third party for any incidental, consequential,
indirect, special, or exemplary damages, including, without limitation, loss of business, loss of profits,
business interruption, loss of business information or any pecuniary loss, arising out of, in connection
with, or relating to the use of the information contained in or referenced by this manual, even if
ZKTeco has, of the possibility of such damages.
This manual and the information contained therein may include technical, other inaccuracies or
typographical errors. ZKTeco periodically changes the information herein which will be incorporated
into new additions/amendments to the manual. ZKTeco reserves the right to add, delete, amend, or
modify the information contained in the manual from time to time in the form of circulars, letters,
notes, etc. for better operation and safety of the machine/unit/product. The said additions or
amendments are meant for improvement /better operations of the machine/unit/product and such
amendments shall not give any right to claim any compensation or damages under any circumstances.
ZKTeco shall in no way be responsible (i) in case the machine/unit/product malfunctions due to any
non-compliance of the instructions contained in this manual (ii) in case of operation of the
machine/unit/product beyond the rate limits (iii) in case of operation of the machine and product in
conditions different from the prescribed conditions of the manual.
The product will be updated from time to time without prior notice. The latest operation procedures
and relevant documents are available on http://www.zkteco.com
.
If there is any issue related to the product, please contact us.
ZKTeco Headquarters
Address ZKTeco Industrial Park, No. 32, Industrial Road,
Tangxia Town, Dongguan, China.
Phone +86 769 - 82109991
Fax +86 755 - 89602394
For business related queries, please write to us at: sales@zkteco.com
.
To know more about our global branches, visit www.zkteco.com.
Page | 2 Copyright©2020 ZKTECO CO., LTD. All rights reserved.
Page 5

BioTime 8.0 User Manual
About the Company
ZKTeco is one of the world’s largest manufacturer of RFID and Biometric (Fingerprint, Facial, Finger-
vein) readers. Product offerings include Access Control readers and panels, Near & Far-range Facial
Recognition Cameras, Elevator/floor access controllers, Turnstiles, License Plate Recognition (LPR)
gate controllers and Consumer products including battery-operated fingerprint and face-reader Door
Locks. Our security solutions are multi-lingual and localized in over 18 different languages. At the
ZKTeco state-of-the-art 700,000 square foot ISO9001-certified manufacturing facility, we control
manufacturing, product design, component assembly, and logistics/shipping, all under one roof.
The founders of ZKTeco have been determined for independent research and development of
biometric verification procedures and the productization of biometric verification SDK, which was
initially widely applied in PC security and identity authentication fields. With the continuous
enhancement of the development and plenty of market applications, the team has gradually
constructed an identity authentication ecosystem and smart security ecosystem, which are based on
biometric verification techniques. With years of experience in the industrialization of biometric
verifications, ZKTeco was officially established in 2007 and now has been one of the globally leading
enterprises in the biometric verification industry owning various patents and being selected as the
National High-tech Enterprise for 6 consecutive years. Its products are protected by intellectual
property rights.
About the Manual
This manual introduces the operations of BioTime 8.0 software.
All figures displayed are for illustration purposes only. Figures in this manual may not be exactly
consistent with the actual products.
Page | 3 Copyright©2020 ZKTECO CO., LTD. All rights reserved.
Page 6
BioTime 8.0 User Manual
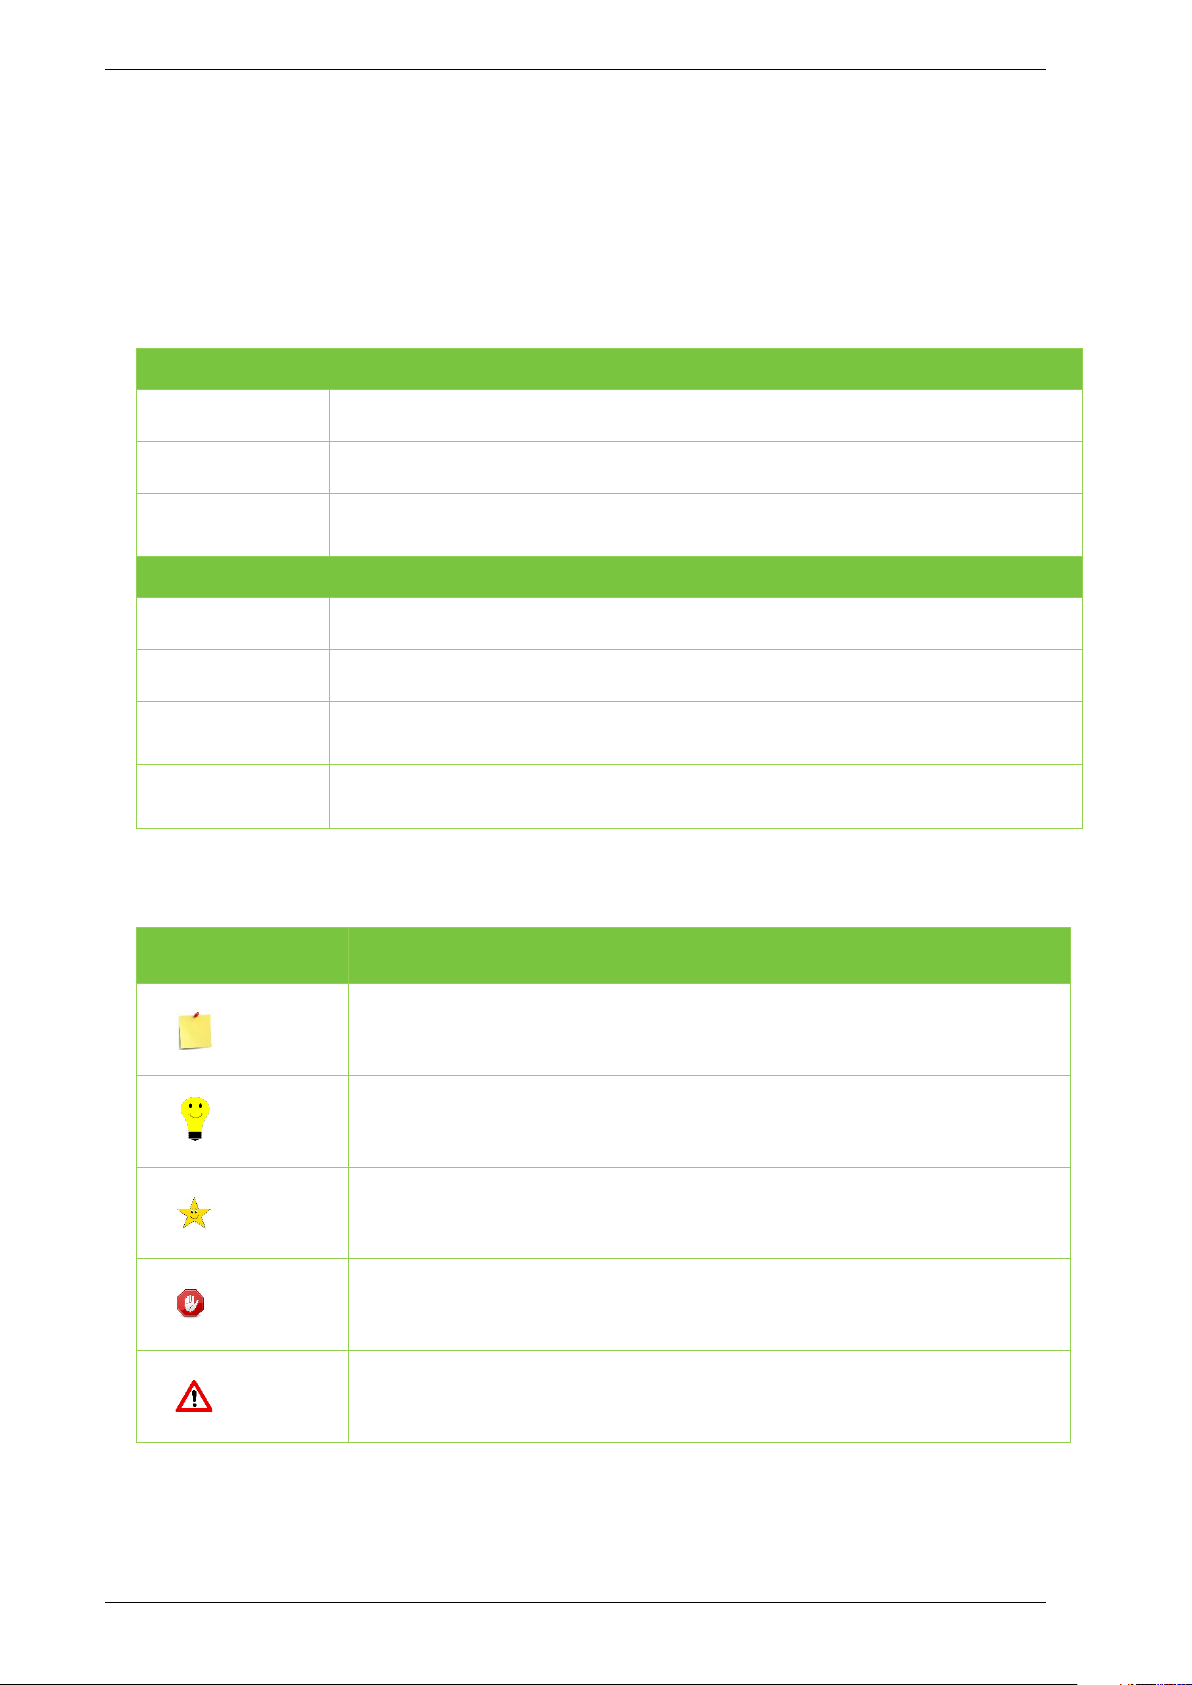
Document Conventions
Conventions used in this manual are listed below:
GUI Conventions
For Software
Convention Description
Bold font Used to identify software interface names e.g., OK, Confirm, Cancel
>
Convention Description
< >
[ ]
/
Multi-level menus are separated by these brackets. For example, File >
Create > Folder.
For Device
Button or key names for devices. For example, press <OK>
Window names, menu items, data table, and field names are inside square
brackets. For example, pop up the [New User] window
Multi-level menus are separated by forwarding slashes. For example,
[File/Create/Folder].
Symbols
Convention Description
This implies about the notice or pays attention to, in the manual
The general information which helps in performing the operations
Page | 4 Copyright©2020 ZKTECO CO., LTD. All rights reserved.
faster
The information which is significant
Care taken to avoid danger or mistakes
The statement or event that warns of something or that serves as a
cautionary example.
Page 7

BioTime 8.0 User Manual
Table of Contents
1 INTRODUCTION ................................................................................................................... 13
1.1 BIOTIME8.0 MODULES ........................................................................................................................ 14
1.2 FUNDAMENTAL PROCEDURE ................................................................................................................ 15
2 SYSTEM MANAGEMENT ...................................................................................................... 17
2.1 LOGIN ................................................................................................................................................. 17
2.2 LOGOUT .............................................................................................................................................. 19
2.3 CHANGE PASSWORD ............................................................................................................................ 19
3 PERSONNEL MANAGEMENT ............................................................................................... 20
3.1 DEPARTMENT MANAGEMENT ............................................................................................................... 20
3.1.1 ADD A DEPARTMENT ................................................................................................................................................ 20
3.1.2 EDIT A DEPARTMENT ................................................................................................................................................. 21
3.1.3 DELETE A DEPARTMENT ............................................................................................................................................ 22
3.1.4 PERSONNEL TRANSFER .............................................................................................................................................. 22
3.2 POSITION MANAGEMENT ..................................................................................................................... 23
3.2.1 ADD A POSITION........................................................................................................................................................ 24
3.2.2 EDIT A POSITION ........................................................................................................................................................ 24
3.2.3 DELETE A POSITION ................................................................................................................................................... 24
3.2.4 PERSONNEL TRANSFER .............................................................................................................................................. 25
3.3 AREA MANAGEMENT ........................................................................................................................... 26
3.3.1 ADD AN AREA ............................................................................................................................................................ 26
3.3.2 EDIT AN AREA ............................................................................................................................................................ 27
3.3.3 DELETE AN AREA ....................................................................................................................................................... 28
3.3.4 PERSONNEL TRANSFER .............................................................................................................................................. 28
3.4 EMPLOYEE MANAGEMENT ................................................................................................................... 29
3.4.1 ADD AN EMPLOYEE ................................................................................................................................................... 30
3.4.2 EDIT AN EMPLOYEE ................................................................................................................................................... 37
3.4.3 DELETE AN EMPLOYEE .............................................................................................................................................. 38
3.4.4 PERSONNEL TRANSFER .............................................................................................................................................. 38
3.4.5 APP ENABLE/DISABLE SETTINGS .............................................................................................................................. 40
3.4.6 RE-SYNCHRONIZE TO DEVICE ................................................................................................................................... 40
3.4.7 RE-UPLOAD FROM DEVICE ........................................................................................................................................ 41
3.4.8 DELETE BIOMETRIC TEMPLATE ................................................................................................................................. 41
3.5 PERSONNEL RESIGNATION ................................................................................................................... 42
Page | 5 Copyright©2020 ZKTECO CO., LTD. All rights reserved.
Page 8

BioTime 8.0 User Manual
3.5.1 ADD A RESIGNATION ................................................................................................................................................. 42
3.5.2 DELETE RESIGNATION ............................................................................................................................................... 43
3.5.3 REINSTATE .................................................................................................................................................................. 43
3.5.4 DISABLE ATTENDANCE .............................................................................................................................................. 43
3.6 WORKFLOW ........................................................................................................................................ 44
3.6.1 ROLE ........................................................................................................................................................................... 44
3.6.2 WORKFLOW BUILDER ................................................................................................................................................ 46
3.6.3 DELETE WORKFLOW .................................................................................................................................................. 49
3.7 CUSTOM ATTRIBUTES .......................................................................................................................... 50
3.7.1 CREATE A NEW ATTRIBUTE ....................................................................................................................................... 50
3.8 DOCUMENT MANAGEMENT.................................................................................................................. 50
3.8.1 ADD DOCUMENT TYPE ............................................................................................................................................. 50
3.8.2 DELETE CERTIFICATE TYPE ........................................................................................................................................ 51
4 DEVICE MANAGEMENT ....................................................................................................... 52
4.1 DEVICE MANAGEMENT ........................................................................................................................ 52
4.1.1 ADD A T&A DEVICE .................................................................................................................................................. 53
4.1.2 EDIT A DEVICE ............................................................................................................................................................ 55
4.1.3 DELETE A DEVICE ....................................................................................................................................................... 55
4.1.4 NEW AREA ................................................................................................................................................................. 56
4.1.5 DATA CLEAN .............................................................................................................................................................. 56
4.1.6 DATA TRANSFER ........................................................................................................................................................ 57
4.1.7 DEVICE MENU ............................................................................................................................................................ 59
4.2 DEVICE COMMAND .............................................................................................................................. 63
4.3 DEVICE SHORT MESSAGE MANAGEMENT ............................................................................................. 64
4.3.1 ADD A PUBLIC MESSAGE .......................................................................................................................................... 64
4.3.2 ADD A PRIVATE MESSAGE ........................................................................................................................................ 65
4.3.3 SEND MESSAGE ......................................................................................................................................................... 66
4.3.4 DELETE SHORT MESSAGE ......................................................................................................................................... 66
4.4 WORK CODE ........................................................................................................................................ 67
4.4.1 ADD WORK CODE ..................................................................................................................................................... 67
4.4.2 ISSUE WORK CODE TO DEVICE ................................................................................................................................. 68
4.4.3 REMOVE WORK CODE ............................................................................................................................................... 68
4.4.4 DELETE WORK CODE................................................................................................................................................. 69
4.5 BIO-TEMPLATE .................................................................................................................................... 69
4.6 BIO-PHOTO ......................................................................................................................................... 70
4.6.1 REGISTER BIO-PHOTO ............................................................................................................................................... 70
4.6.2 IMPORT BIO-PHOTO .................................................................................................................................................. 72
Page | 6 Copyright©2020 ZKTECO CO., LTD. All rights reserved.
Page 9

BioTime 8.0 User Manual
4.6.3 DELETE BIO-PHOTO APPLICATION .......................................................................................................................... 73
4.7 TRANSACTION ..................................................................................................................................... 73
4.7.1 TRANSACTION TABLE ................................................................................................................................................ 73
4.7.2 UPLOAD USB TRANSACTION ................................................................................................................................... 74
4.7.3 DOWNLOAD ATTENDANCE PHOTO ......................................................................................................................... 75
4.8 DEVICE LOG ........................................................................................................................................ 75
4.9 ERROR LOG ......................................................................................................................................... 76
4.10 UPLOAD LOG....................................................................................................................................... 76
4.11 COMMAND LOG .................................................................................................................................. 77
4.12 MOBILE APP ........................................................................................................................................ 79
4.12.1 APP ACCOUNT .......................................................................................................................................................... 79
4.12.2 ANNOUNCEMENT ...................................................................................................................................................... 81
4.12.3 NOTICE ....................................................................................................................................................................... 83
4.12.4 OPERATION LOG ........................................................................................................................................................ 83
4.13 GEO-FENCE ......................................................................................................................................... 84
4.13.1 GPS LOCATION ......................................................................................................................................................... 84
4.13.2 EMPLOYEE SETUP ...................................................................................................................................................... 85
4.13.3 DEPARTMENT SETUP ................................................................................................................................................. 87
4.14 CONFIGURATION ................................................................................................................................. 88
5 ATTENDANCE MANAGEMENT ............................................................................................ 90
5.1 ATTENDANCE PARAMETERS ................................................................................................................. 90
5.1.1 PAY CODE .................................................................................................................................................................. 90
5.1.2 FIXED CODE ............................................................................................................................................................... 93
5.1.3 GROUP ........................................................................................................................................................................ 94
5.2 RULE ................................................................................................................................................... 96
5.2.1 GLOBAL RULE ............................................................................................................................................................ 96
5.2.2 DEPARTMENT RULE ................................................................................................................................................ 100
5.2.3 GROUP RULE ........................................................................................................................................................... 102
5.3 BREAK TIME ....................................................................................................................................... 103
5.3.1 ADD A BREAK TIME ................................................................................................................................................ 103
5.3.2 EDIT A BREAK TIME ................................................................................................................................................. 106
5.3.3 DELETE A BREAK TIME ............................................................................................................................................ 106
5.4 TIMETABLE ........................................................................................................................................ 107
5.4.1 ADD A TIMETABLE .................................................................................................................................................. 107
5.4.2 ADD A FLEXIBLE TIMETABLE .................................................................................................................................. 111
5.4.3 EDIT A TIMETABLE .................................................................................................................................................. 113
Page | 7 Copyright©2020 ZKTECO CO., LTD. All rights reserved.
Page 10

BioTime 8.0 User Manual
5.4.4 DELETE A TIMETABLE ............................................................................................................................................. 113
5.5 SHIFT MANAGEMENT ......................................................................................................................... 113
5.5.1 ADD A SHIFT ........................................................................................................................................................... 114
5.5.2 EDIT A SHIFT ........................................................................................................................................................... 115
5.5.3 DELETE A SHIFT ...................................................................................................................................................... 115
5.6 DEPARTMENT SCHEDULE ................................................................................................................... 116
5.6.1 ADD DEPARTMENT SCHEDULE .............................................................................................................................. 116
5.6.2 DELETE SCHEDULE RECORDS ................................................................................................................................ 117
5.7 GROUP SCHEDULE ............................................................................................................................. 117
5.7.1 ADD GROUP SCHEDULE......................................................................................................................................... 117
5.7.2 DELETE SCHEDULE RECORDS ................................................................................................................................ 118
5.8 EMPLOYEE SCHEDULE ........................................................................................................................ 118
5.8.1 EMPLOYEE SCHEDULE ............................................................................................................................................ 119
5.8.2 QUERYING SCHEDULE DETAILS ............................................................................................................................. 120
5.8.3 IMPORT EMPLOYEE SCHEDULE .............................................................................................................................. 120
5.8.4 DELETE SCHEDULE RECORDS ................................................................................................................................ 120
5.9 TEMPORARY SCHEDULE ..................................................................................................................... 121
5.9.1 ADD A TEMPORARY SCHEDULE ............................................................................................................................. 121
5.9.2 IMPORT TEMPORARY SCHEDULE ........................................................................................................................... 122
5.9.3 DELETE TEMPORARY SCHEDULE ........................................................................................................................... 122
5.10 SCHEDULE PREVIEW ........................................................................................................................... 122
5.10.1 SCHEDULE VIEW ..................................................................................................................................................... 122
5.10.2 VIEW BY PERSON .................................................................................................................................................... 124
5.11 ATTENDANCE APPROVAL ................................................................................................................... 128
5.11.1 MANUAL LOG ......................................................................................................................................................... 128
5.11.2 LEAVE ...................................................................................................................................................................... 131
5.11.3 OVERTIME ................................................................................................................................................................ 134
5.11.4 TRAINING ................................................................................................................................................................. 136
5.11.5 SCHEDULE ADJUSTMENT ....................................................................................................................................... 138
5.12 HOLIDAYS ......................................................................................................................................... 139
5.12.1 ADD A HOLIDAY FOR ATTENDANCE ..................................................................................................................... 139
5.12.2 EDIT A HOLIDAY FOR ATTENDANCE ...................................................................................................................... 141
5.12.3 DELETE A HOLIDAY FOR ATTENDANCE ................................................................................................................. 141
5.13 ATTENDANCE REPORT ....................................................................................................................... 141
5.14 CONFIGURATIONS .............................................................................................................................. 147
5.14.1 CALCULATION ......................................................................................................................................................... 147
5.14.2 REPORT SETTING ..................................................................................................................................................... 149
Page | 8 Copyright©2020 ZKTECO CO., LTD. All rights reserved.
Page 11

BioTime 8.0 User Manual
6 ACCESS CONTROL ............................................................................................................. 150
6.1 DEVICE .............................................................................................................................................. 150
6.1.1 OPEN DOOR ............................................................................................................................................................ 150
6.1.2 CANCEL ALARM ...................................................................................................................................................... 151
6.1.3 SET PARAMETER ..................................................................................................................................................... 151
6.2 DEVICE COMMAND ............................................................................................................................ 154
6.3 TIME PERIOD ..................................................................................................................................... 155
6.3.1 ADD A NEW TIME PERIOD ..................................................................................................................................... 155
6.3.2 EDIT TIME PERIOD .................................................................................................................................................. 156
6.3.3 DELETE TIME PERIOD ............................................................................................................................................. 157
6.3.4 CLONE TO AREAS .................................................................................................................................................... 157
6.4 HOLIDAY ........................................................................................................................................... 158
6.4.1 ADD A HOLIDAY ..................................................................................................................................................... 158
6.4.2 EDIT HOLIDAY ......................................................................................................................................................... 158
6.4.3 DELETE HOLIDAY .................................................................................................................................................... 159
6.4.4 CLONE TO AREAS .................................................................................................................................................... 159
6.5 GROUP .............................................................................................................................................. 160
6.5.1 ADD NEW GROUP .................................................................................................................................................. 160
6.5.2 CLONE TO AREAS ................................................................................................................................................... 162
6.5.3 PERSONNEL TRANSFER ........................................................................................................................................... 162
6.5.4 MOVE TO GROUP 1 ................................................................................................................................................ 163
6.6 UNLOCK COMBINATION ..................................................................................................................... 163
6.6.1 EDIT UNLOCK COMBINATION ................................................................................................................................ 164
6.6.2 CLONE TO AREA ..................................................................................................................................................... 165
6.7 PRIVILEGE .......................................................................................................................................... 165
6.7.1 EDIT EMPLOYEE’S ACCESS PRIVILEGE ................................................................................................................... 166
6.7.2 ADJUST EMPLOYEE’S ACCESS PRIVILEGE.............................................................................................................. 167
7 PAYROLL MODULE ............................................................................................................ 168
7.1 EMPLOYEE PROFILE ........................................................................................................................... 168
7.2 FORMULA .......................................................................................................................................... 168
7.2.1 OVERTIME FORMULA .............................................................................................................................................. 169
7.2.2 EXCEPTION FORMULA ............................................................................................................................................ 170
7.2.3 LEAVE FORMULA .................................................................................................................................................... 171
7.2.4 INCREASE FORMULA ............................................................................................................................................... 172
7.2.5 DEDUCTION FORMULA .......................................................................................................................................... 173
7.3 EXTRA FUND ..................................................................................................................................... 174
Page | 9 Copyright©2020 ZKTECO CO., LTD. All rights reserved.
Page 12

BioTime 8.0 User Manual
7.3.1 EXTRA INCREASE ..................................................................................................................................................... 174
7.3.2 EXTRA DEDUCTION ................................................................................................................................................ 174
7.4 PAYROLL STRUCTURE ........................................................................................................................ 175
7.4.1 ADD NEW PAYROLL STRUCTURE .......................................................................................................................... 175
7.4.2 DELETE PAYROLL STRUCTURE ............................................................................................................................... 176
7.5 LOAN ................................................................................................................................................ 176
7.6 SALARY ADVANCE ............................................................................................................................. 178
7.7 REIMBURSEMENT ............................................................................................................................... 179
7.8 SALARY CALCULATION ....................................................................................................................... 180
7.9 SALARY REPORT ................................................................................................................................ 181
8 VISITOR MODULE (OPTIONAL) ......................................................................................... 184
8.1 REGISTRATION ................................................................................................................................... 184
8.1.1 REGISTER THE VISITOR APPOINTMENT .................................................................................................................. 185
8.1.2 DELETE A REGISTRATION ........................................................................................................................................ 188
8.1.3 EXIT A VISITOR ........................................................................................................................................................ 188
8.2 VISITOR ............................................................................................................................................. 189
8.2.1 DISABLE A VISITOR ................................................................................................................................................. 189
8.2.2 ENABLE .................................................................................................................................................................... 190
8.3 RESERVE AN APPOINTMENT ................................................................................................................ 191
8.3.1 CREATE A RESERVATION......................................................................................................................................... 192
8.3.2 QR CODE ................................................................................................................................................................ 193
8.3.3 APPROVE/ REJECT/ REVOKE A RESERVATION ....................................................................................................... 195
8.3.4 DELETE A RESERVATION ......................................................................................................................................... 195
8.4 CONFIGURATION ............................................................................................................................... 195
8.4.1 PARAMETER SETTING ............................................................................................................................................. 196
8.4.2 VISITOR REASON ..................................................................................................................................................... 196
8.4.3 DELETE A VISIT REASON ......................................................................................................................................... 197
9 MEETING MODULE ............................................................................................................ 198
9.1 SETTING UP THE MEETING ROOM ....................................................................................................... 198
9.1.1 ADD A MEETING ROOM ......................................................................................................................................... 199
9.1.2 TO DELETE A MEETING ROOM .............................................................................................................................. 200
9.1.3 VIEW THE MEETING ROOM DEVICES ..................................................................................................................... 201
9.2 SCHEDULE A MEETING ....................................................................................................................... 201
9.2.1 CREATE A MEETING SCHEDULE ............................................................................................................................. 202
9.2.2 APPROVE/ REJECT/ REVOKE A MEETING SCHEDULE ........................................................................................... 205
Page | 10 Copyright©2020 ZKTECO CO., LTD. All rights reserved.
Page 13

BioTime 8.0 User Manual
9.2.3 TO DELETE A MEETING SCHEDULE ....................................................................................................................... 206
9.2.4 ADD PERSONNEL TO THE MEETING ...................................................................................................................... 207
9.2.5 SYNC THE MEETING INFORMATION ....................................................................................................................... 207
9.2.6 CALCULATE MEETING ATTENDANCE .................................................................................................................... 208
9.3 UPDATE ATTENDANCE MANUALLY..................................................................................................... 208
9.3.1 CREATE A MANUAL LOG ........................................................................................................................................ 209
9.3.2 TO DELETE A MANUAL LOG REQUEST .................................................................................................................. 210
9.3.3 APPROVE/ REJECT/ REVOKE A MANUAL LOG REQUEST ...................................................................................... 211
9.4 TRANSACTION ................................................................................................................................... 212
9.5 MEETING REPORTS ............................................................................................................................ 212
9.5.1 MEETING ROOM SCHEDULED ................................................................................................................................ 213
9.5.2 ATTENDANCE DETAIL ............................................................................................................................................. 214
10 MTD MODULE .................................................................................................................... 215
10.1 REAL-TIME MONITORING ................................................................................................................... 215
10.2 DASHBOARD ..................................................................................................................................... 216
10.3 TRANSACTION ................................................................................................................................... 218
10.4 REPORT ............................................................................................................................................. 219
10.5 CONFIGURATION ............................................................................................................................... 222
11 SYSTEM SETTINGS ............................................................................................................. 226
11.1 SYSTEM USER MANAGEMENT............................................................................................................. 226
11.1.1 PRIVILEGE GROUP MANAGEMENT ........................................................................................................................ 226
11.1.2 USER MANAGEMENT .............................................................................................................................................. 227
11.1.3 NOTIFICATION ......................................................................................................................................................... 229
11.2 DATA MANAGEMENT ......................................................................................................................... 230
11.2.1 DATABASE BACKUP ................................................................................................................................................ 230
11.2.2 DATA MIGRATION .................................................................................................................................................. 233
11.3 INTEGRATION .................................................................................................................................... 234
11.3.1 AUTO EXPORT ......................................................................................................................................................... 234
11.3.2 AUTO ATTENDANCE EXPORT................................................................................................................................. 237
11.4 MIDDLE TABLE .................................................................................................................................. 239
11.5 LOG .................................................................................................................................................. 239
11.5.1 USER LOG ................................................................................................................................................................ 239
11.5.2 SYSTEM LOG ........................................................................................................................................................... 240
11.6 CONFIGURATION SETTINGS ................................................................................................................ 241
Page | 11 Copyright©2020 ZKTECO CO., LTD. All rights reserved.
Page 14

BioTime 8.0 User Manual
11.6.1 COMPANY SETTING ................................................................................................................................................ 241
11.6.2 EMAIL SETTING ....................................................................................................................................................... 242
11.6.3 EMAIL TEMPLATE .................................................................................................................................................... 243
11.6.4 ALERT SETTINGS ..................................................................................................................................................... 244
11.6.5 LDAP SETUP .......................................................................................................................................................... 244
11.6.6 FTP SETTINGS ......................................................................................................................................................... 246
11.6.7 PDF EXPORT ........................................................................................................................................................... 247
11.6.8 BOOKMARKS ........................................................................................................................................................... 247
11.6.9 SECURITY SETTING .................................................................................................................................................. 248
APPENDICES ............................................................................................................................................ 255
APPENDIX: 1 ......................................................................................................................................................... 255
PERSONNEL SELECTION ............................................................................................................................................................ 255
DATE SELECTION ....................................................................................................................................................................... 256
TIME SELECTION ........................................................................................................................................................................ 257
IMPORT ...................................................................................................................................................................................... 258
EXPORT ...................................................................................................................................................................................... 259
CUSTOM DISPLAY FIELDS......................................................................................................................................................... 260
ADAPTIVE COLUMN WIDTH ..................................................................................................................................................... 261
MULTI-LABEL FUNCTION ......................................................................................................................................................... 262
CUSTOM THEME ........................................................................................................................................................................ 263
FILTER SEARCH FUNCTION ....................................................................................................................................................... 263
CUSTOM BOOKMARK ................................................................................................................................................................ 266
LOG VIEW .................................................................................................................................................................................. 267
APPENDIX: 2 ......................................................................................................................................................... 268
END-USER LICENSE AGREEMENT ................................................................................................................................... 268
GLOSSARY ............................................................................................................................................... 270
Page | 12 Copyright©2020 ZKTECO CO., LTD. All rights reserved.
Page 15

BioTime 8.0 User Manual
1 Introduction
BioTime 8.0 provides unified management to customers in terms of time management and
operational safety. It helps the customers to continuously improve safety management by affording
a simple and efficient platform that can manage all the time and security-related aspects at a single
instance.
Features
• With a powerful data handling capacity, the system can manage the attendance data of
10,000 employees.
• The visual and reliable operating procedure gives you years of attendance management
experience.
• Automatic user management makes the system simpler and more efficient.
• The hierarchical management ensures user data security.
• The real-time data processing system ensures data availability to the administrators at any
time.
Requirements of Server Hardware Configuration
CPU: Frequency of more than 2.0 GHz;
Memory: 4 GB available or above;
Hard Disk: Available space of 100 GB and above. It is recommended to use an NTFS hard disk partition
as the software installation directory. (An NTFS hard disk partition provides better performance and
higher security).
Software Operating Environment
Supported Operating System: (64-bits) Windows 7/8/8.1/10, Windows Server 2008/2008
R2/2012/2012 R2/2016/2019;
Supported Database: PostgreSQL (Default), MSSQL Server 2005/2008/2012/2014/2016/2017, Oracle
10 g/ 11 g/ 12 c, MySQL 5.0/ 5.6/ 5.7;
Supported Mainstream Browser: IE 11+, Google Chrome 33+, Firefox 27+.
Page | 13 Copyright©2020 ZKTECO CO., LTD. All rights reserved.
Page 16

BioTime 8.0 User Manual
1.1 BioTime8.0 Modules
The software mainly consists of the following functional modules:
Personnel module
The personnel module includes four parts: Department Management to set the Company's main
architecture; Employee Management to enter employee’s information into the system, allocating
employees to various Departments and to maintain employee details; Workflow Management to
create a systematic structure with multi-level management; Configurations to add document details
to each employee.
Device Module
The Device module sets the communication parameters to connect the devices. The communication
with the devices will be successful only after the communication parameters are set properly. Once
the communication is successful, you can view information about connected devices and perform
operations such as remote monitoring, upload, and download.
Attendance Module
The Attendance module collects and processes attendance data of all the employees, manages their
work schedules, leaves, requests, and generates all transactions and schedule reports.
Access Control Module
The Access Control module sets Time period, Holidays, Access Groups, Unlock combinations, etc. Also,
it manages the access control parameters such as Door Lock Delay, Door Sensor, Anti-Passback,
Duress options, etc.
Payroll Module
The Payroll module helps to calculate the salary of each employee by considering the allowances,
deduction, expenses, loan, and salary advance. Payroll formulas can be assigned so that salary can be
incremented/deducted based on the variables.
Visitor Module (Optional)
Visitor Module is integrated with Access Control Module to provide a way to easily control, record and
track visitors. It implements entry registration, exit registration, visitor reservation and so on.
Page | 14 Copyright©2020 ZKTECO CO., LTD. All rights reserved.
Page 17

BioTime 8.0 User Manual
Meeting Module
Simple meeting management helps users to manage meeting devices, meeting rooms, meeting
applications, meeting attenders and attendance of attenders.
MTD Module
The MTD Module obtains verification records from the mask & body temperature detection devices
and generates statistics and reports about mask and body temperature. If there is personnel who has
higher body temperature or does not wear a mask, an email notification will be sent to the personnel
himself, the system superuser and system user who has permission to access the department which
the personnel belongs to. And also, if the personnel’s APP status is enabled, the software will also
push notification to corresponding personnel APP account.
System Module
The System Module assigns System Users and configures their roles. It sets the system parameters
and manages the system operation logs.
1.2 Fundamental Procedure
• Follow the below procedure for a smoother interface experience. It takes Superuser as an
example. Different users have different access rights, so the procedure changes for each role.
• Log in to the system and modify the default password of your account.
• Assign user accounts and roles for the users using the system (such as Company Management
Personnel, Registrars, and Attendance Administrators).
• Set the common System information such as System parameters, Announcements, and Alerts.
• Set the organization architecture according to the company’s structure and set the
corresponding position details.
• Enter the employee information.
• Set the regional structure of the company. Add T&A devices for the system and configure the
devices.
• Set the attendance parameters. You can use the default settings or modify the settings as per
your company’s regulations.
• Set the attendance timetables to predefine the working hours and related parameters.
• Set the shifts for employees.
Page | 15 Copyright©2020 ZKTECO CO., LTD. All rights reserved.
Page 18

BioTime 8.0 User Manual
• Schedule the shifts and assign employees to the shifts. Assign temporary schedules if there is
any requirement.
• Set Leave, Holiday, Compensatory Leave based on the attendance parameters.
• Set time period, access group, unlock combination and so on for each area for lock control.
• Set the payroll formula for overtime, leave, exception and so on. Set the payroll structure for
the personnel.
• Manage the use of meeting room and the access of visitors.
• Generate the attendance report, payroll report and meeting attendance report. The system
collects statistics and generates reports for the specified period
.
Page | 16 Copyright©2020 ZKTECO CO., LTD. All rights reserved.
Page 19
BioTime 8.0 User Manual
2 System Management
2.1 Login
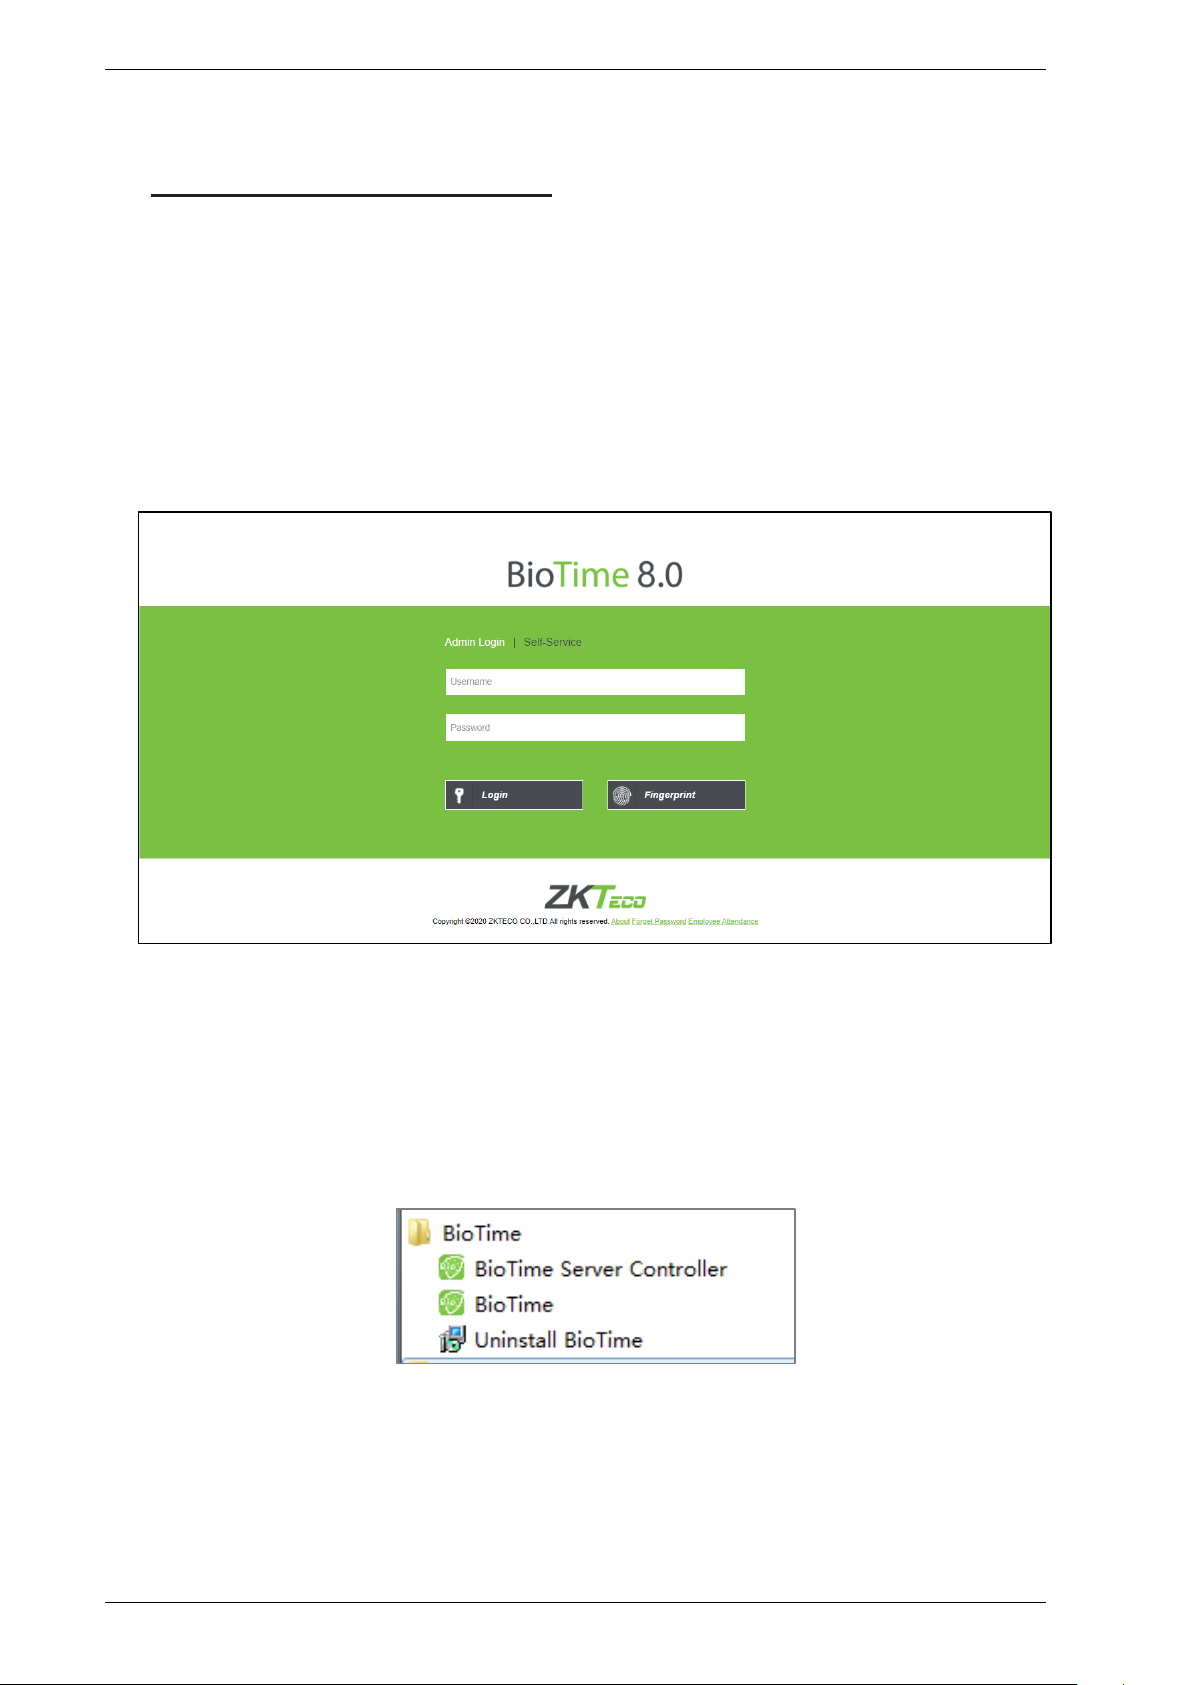
(1) Once the program is installed on the system, double-click the program icon on the desktop to view
the system login interface. Other systems can access the application through the network.
(2) Open the browser, enter the Server IP Address and the Port number in the address bar. Click Enter
to login.
To use the system on a server, select Program > BioTime > BioTime Server Controller and start the
service.
Then, double-click the shortcut icon of BioTime Home Page on the desktop. The system login interface
pops up.
Note: In Windows 7/Vista, right-click BioTime Server Controller and select Run as administrator
from the shortcut menu.
(3) When you log in to the system, authentication is required to guarantee the system security. A
Page | 17 Copyright©2020 ZKTECO CO., LTD. All rights reserved.
Page 20
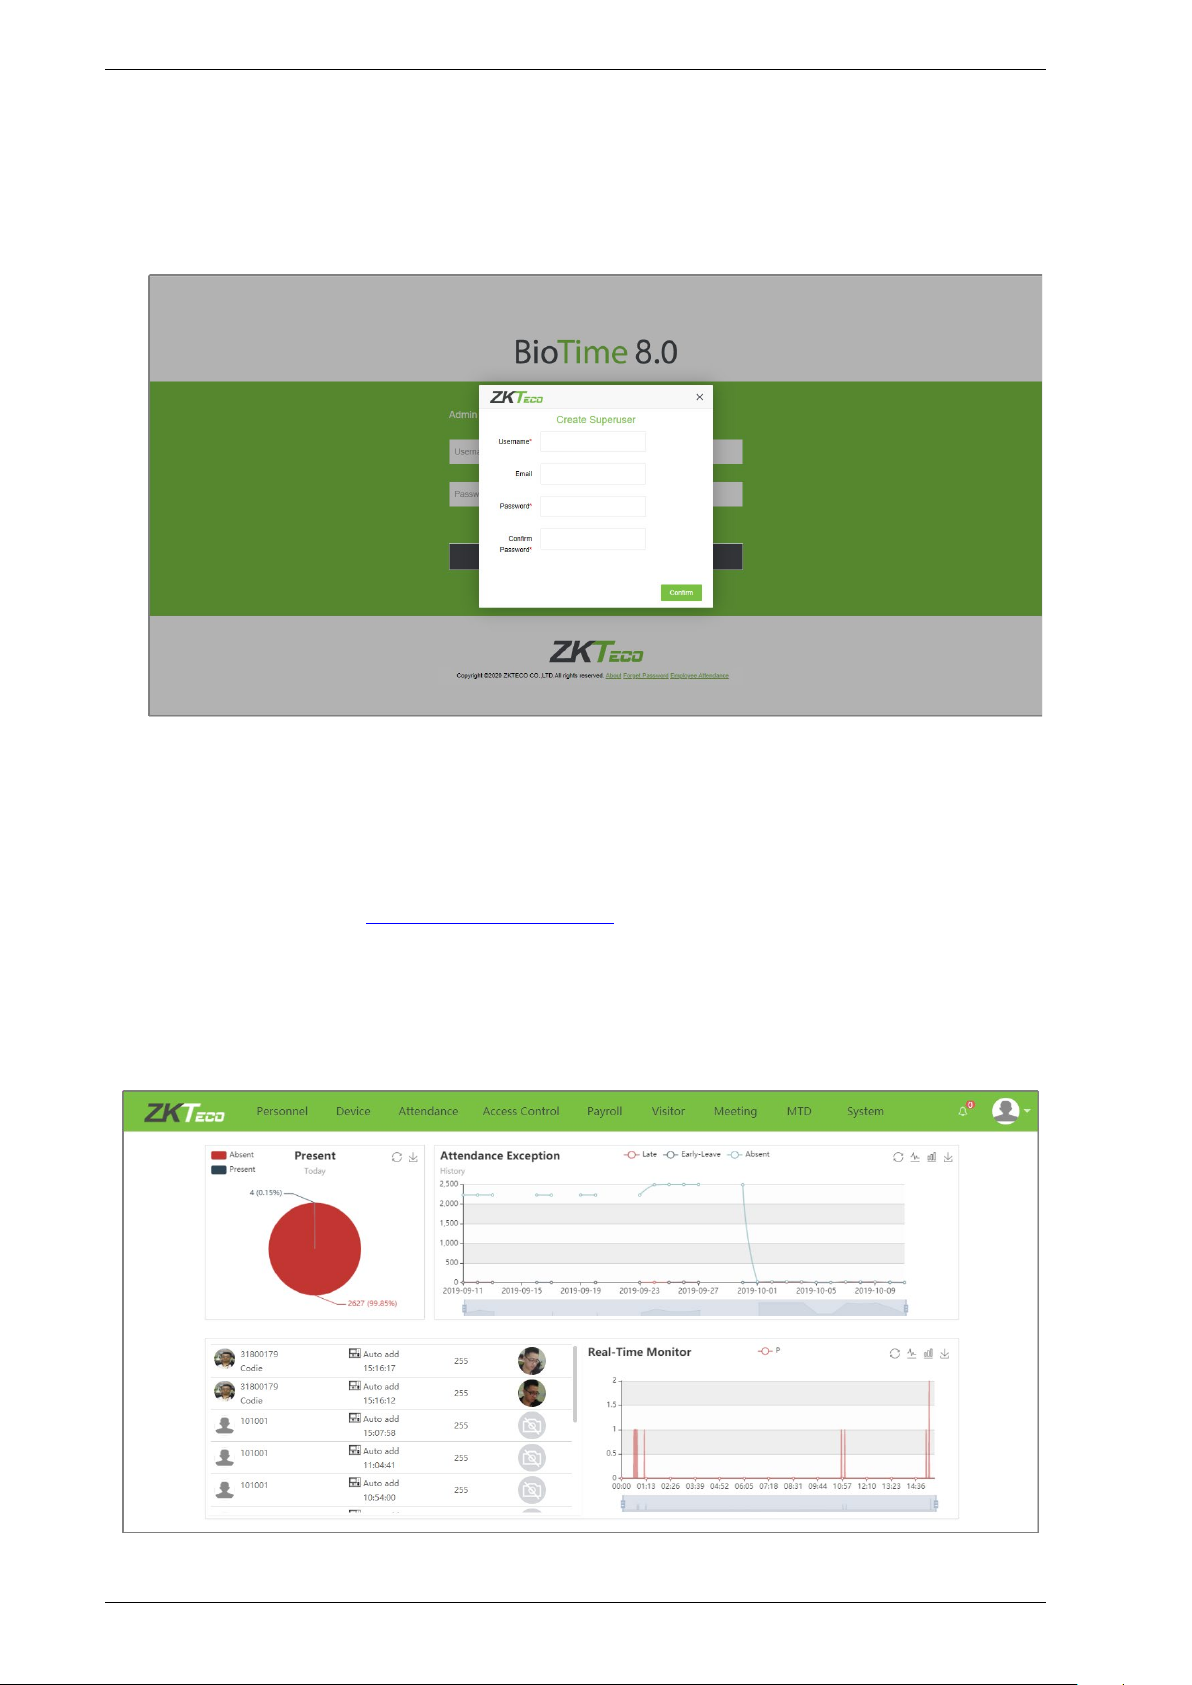
BioTime 8.0 User Manual
superuser account (with all operational permissions) need to be created for a user who is using the
system for the first time.
Enter the Username, Email, Password, click [Confirm] to create a superuser.
The superuser can assign employees (such as Company Management Personnel, Registrars, and
Statistics Clerks) as new users and they can configure the corresponding user roles. For detailed
operation, please refer to 11.1.2 "User Management"
.
(4) Enter the Username and Password. Click Login to view the user interface.
(5) After the user logs in, the system displays the dashboard as shown in the below figure.
Page | 18 Copyright©2020 ZKTECO CO., LTD. All rights reserved.
Page 21
BioTime 8.0 User Manual
On the Dashboard, you can see night modules namely Personnel, Device, Attendance, Access Control,
Payroll, Visitor, Meeting, MTD and System. Click the related module to perform the related
functionalities.
2.2 Logout
Click the User button on top-right of the interface, select Logout and click Confirm to log out
from the application.
After logging out, stop the service in BioTime Server Controller and quit the service counter.
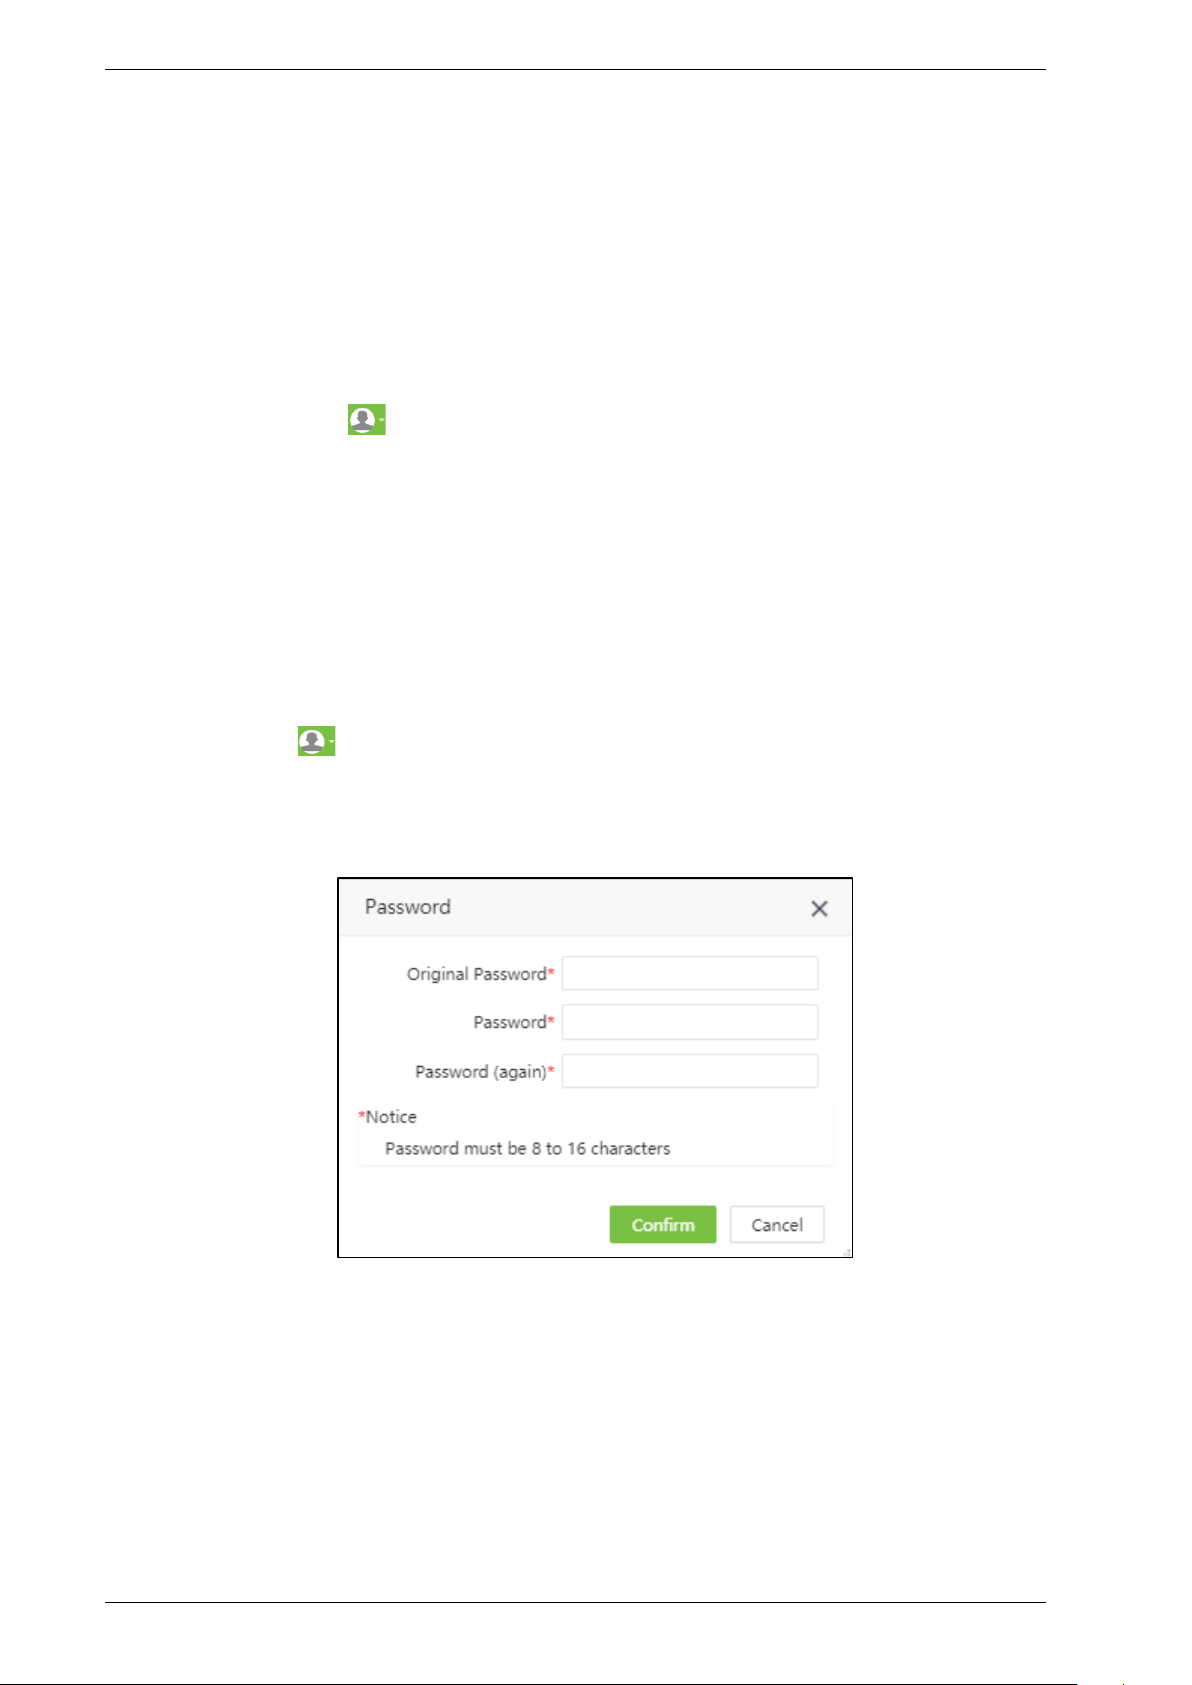
2.3 Change Password
A Superuser or new users can change their passwords to guarantee the safe system operation. Click
the User button on top-right and select Password. Enter the old password, new password, and
confirm the new password. Click Confirm to change the password.
Page | 19 Copyright©2020 ZKTECO CO., LTD. All rights reserved.
Page 22
BioTime 8.0 User Manual
3 Personnel Management
The Personnel management module allows you to set the main architecture of the company. It
includes adding employees to the system, allocating employees to departments maintaining the
employees and so on.
3.1 Department Management
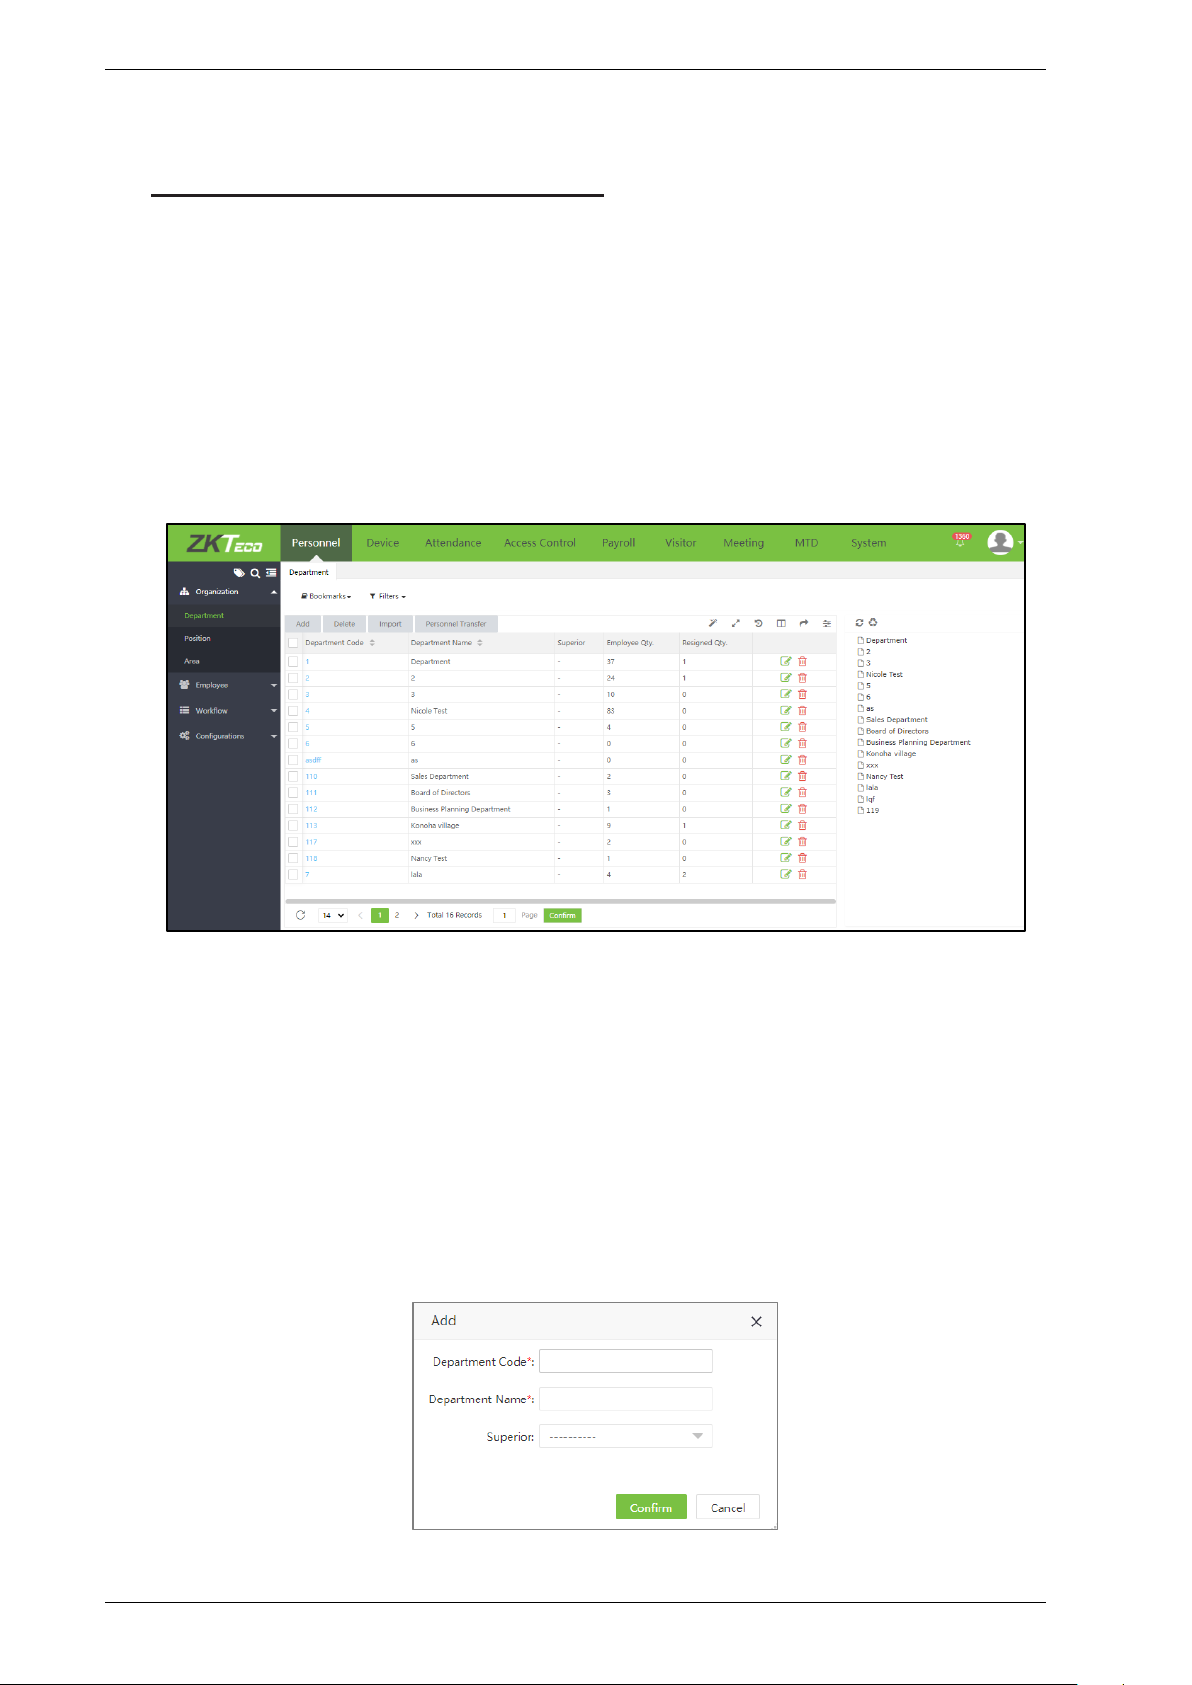
Select [Personnel] > [Department] to view the Department management interface, as shown in the
figure below.
Before adding the employees, set the organizational structure of the company. When the module is
used for the first time, a level 1 department with department name as “Department” and Department
Code as “1” will be created as a default.
Note: This Department can be edited (modified) but cannot be deleted.
3.1.1 Add a Department
1. Select [Personnel] > [Department] > [Add] to add a new Department, as shown in the figure below.
Page | 20 Copyright©2020 ZKTECO CO., LTD. All rights reserved.
Page 23
BioTime 8.0 User Manual
Set the parameters as shown below:
Department Code: Enter a unique Department code maximum of 50 digits.
Department Name: Enter the corresponding Department Name maximum of 100 characters.
Superior: Click and select a superior Department of this Department from the drop-down list.
2. After entering the required details, click [Confirm] to save the new Department. Click to
refresh the Department tree.
Note:
1. You can click [Import] to import the Department information to another software or system. For
detailed operation, please refer to 4."Import" in Appendix 1.
2. You can click to export the Department data locally. For detailed operation, please refer to 5.
"Export" in Appendix 1.
3.1.2 Edit a Department
If you want to change the organization’s structure, you can modify the Department Name,
Department Code, and the Superior Department. Click the Department Code of the Department to
be modified or, click icon in the same row of the Department to be modified. After modifications,
click [Confirm] to save the modified Department information.
Page | 21 Copyright©2020 ZKTECO CO., LTD. All rights reserved.
Page 24
BioTime 8.0 User Manual
3.1.3 Delete a Department
Select the Department to be deleted and click [Delete] on the upper left of the Department list.
Or directly click in the same row of the Department to be deleted. Click [Confirm] to delete the
Department.
Note:
Deleting or modifying a Department causes the employees belonging to the particular Department
to belong to none of the Departments. This also leads to the failure of generating some reports.
If deletion or modification is indeed required, transfer the personnel in the particular Department to
other Departments, and then delete the Department. That is, the Department which is currently being
used cannot be deleted.
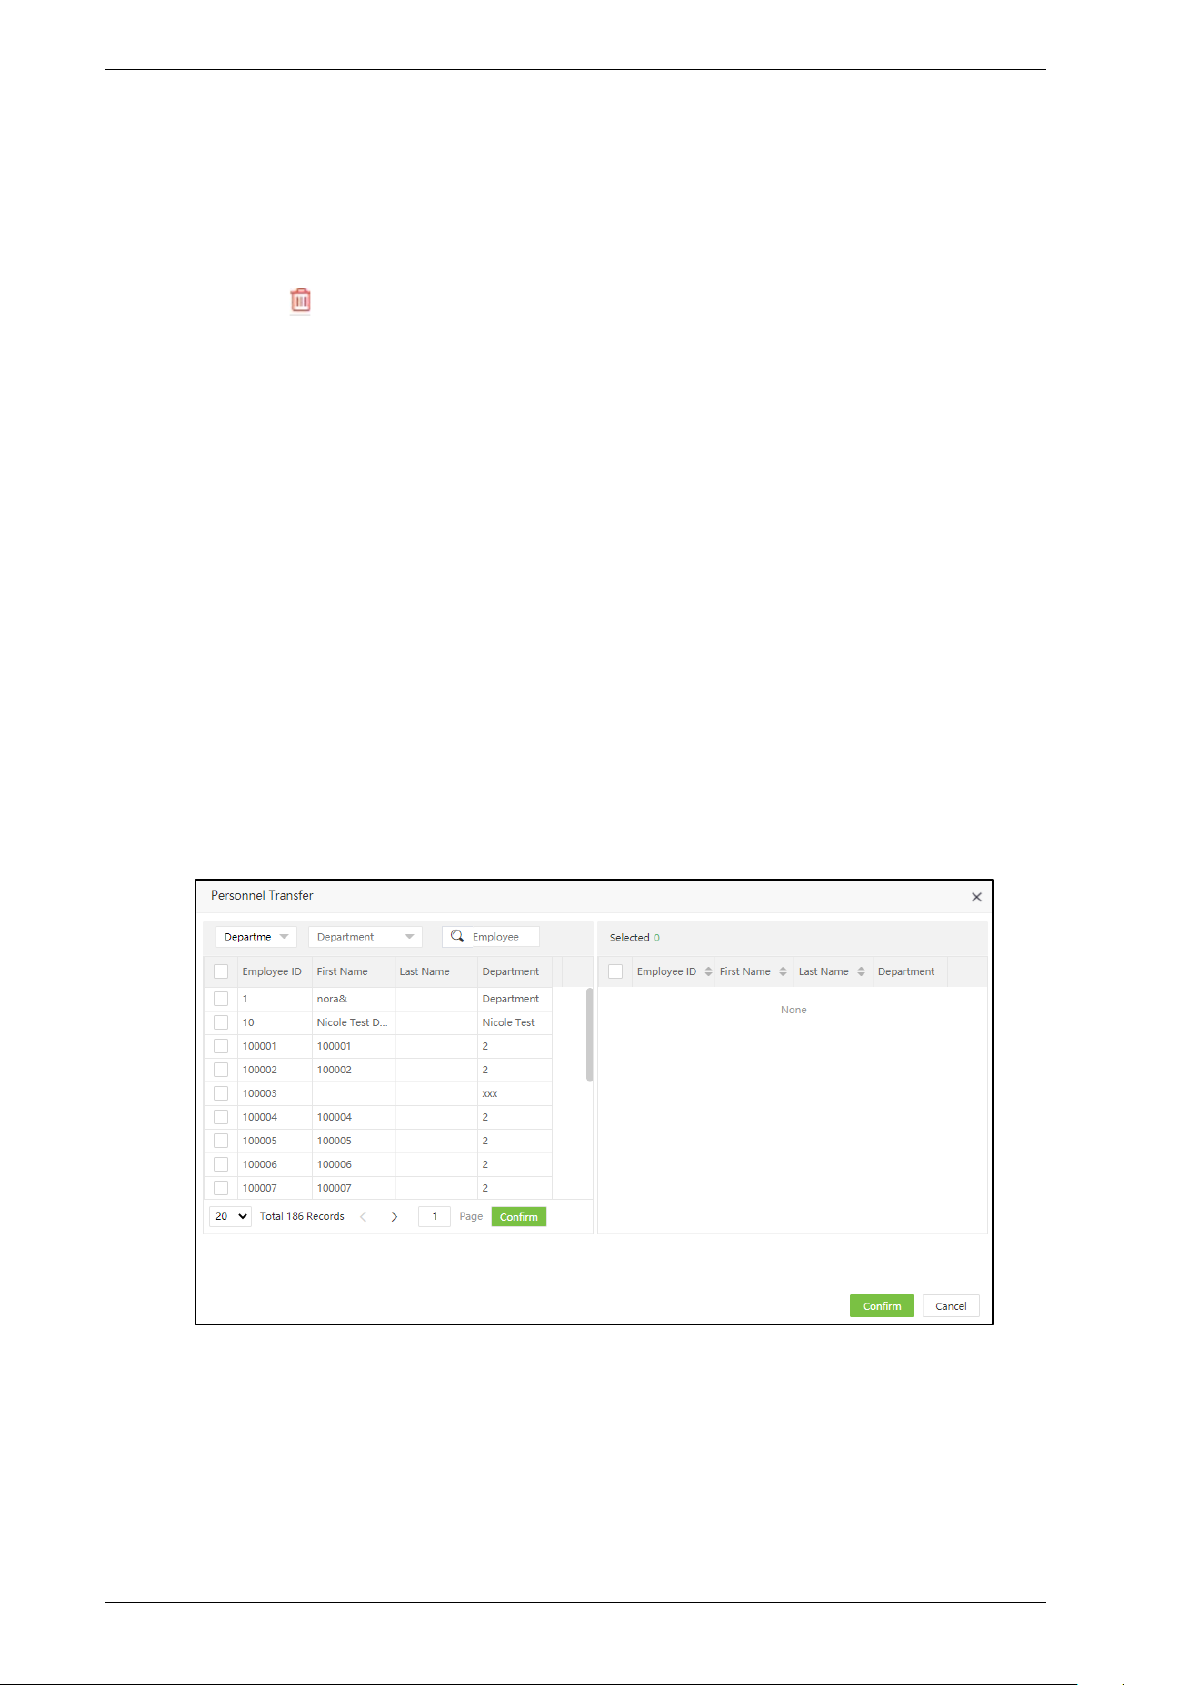
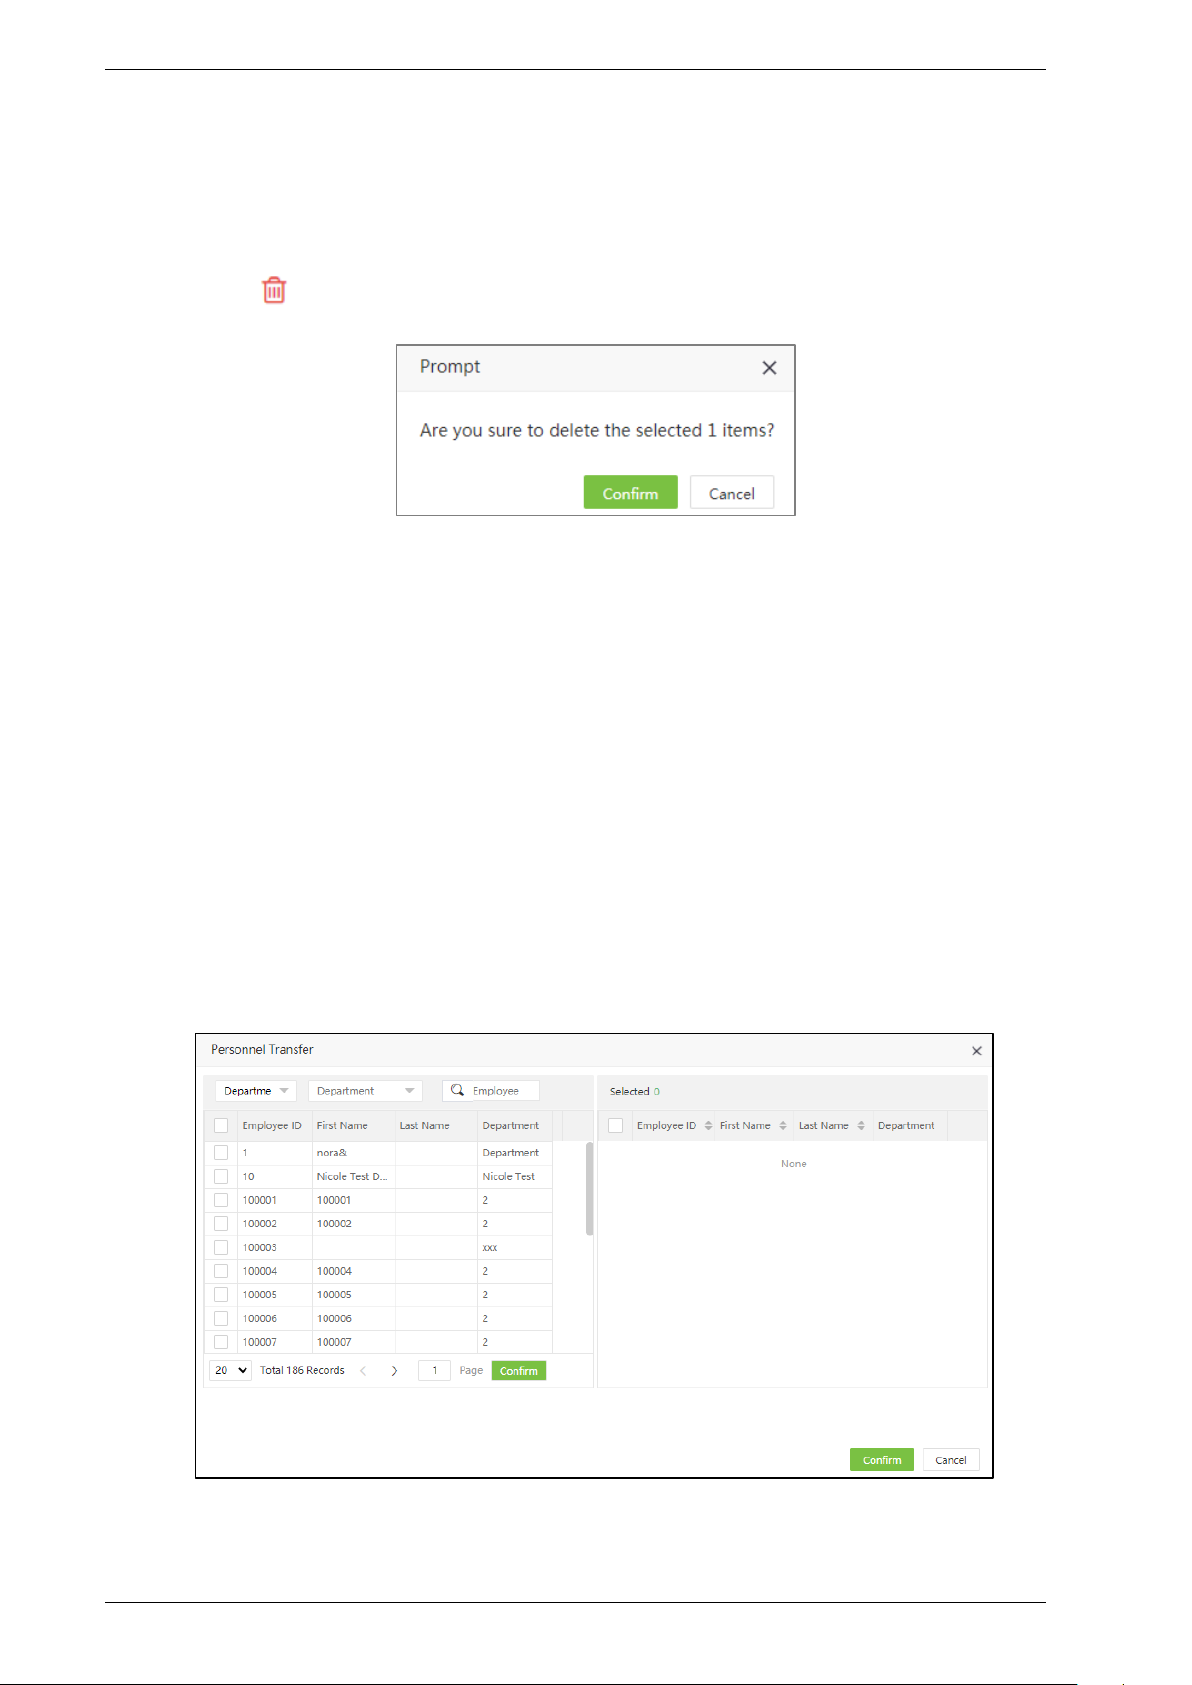
3.1.4 Personnel Transfer
You can adjust employees to the selected Department in batches.
1. Select [Personnel] > [Department]. Select the corresponding Department and click [Personnel
Transfer].
2. In the employee’s s list, select the employee(s) whom you want to adjust to the selected
Department in batches (You can search employees by Department, Name or Employee ID).
Page | 22 Copyright©2020 ZKTECO CO., LTD. All rights reserved.
Page 25
BioTime 8.0 User Manual
3. Select the Employee and click [Confirm]. The Departments of the selected employee will be
changed.
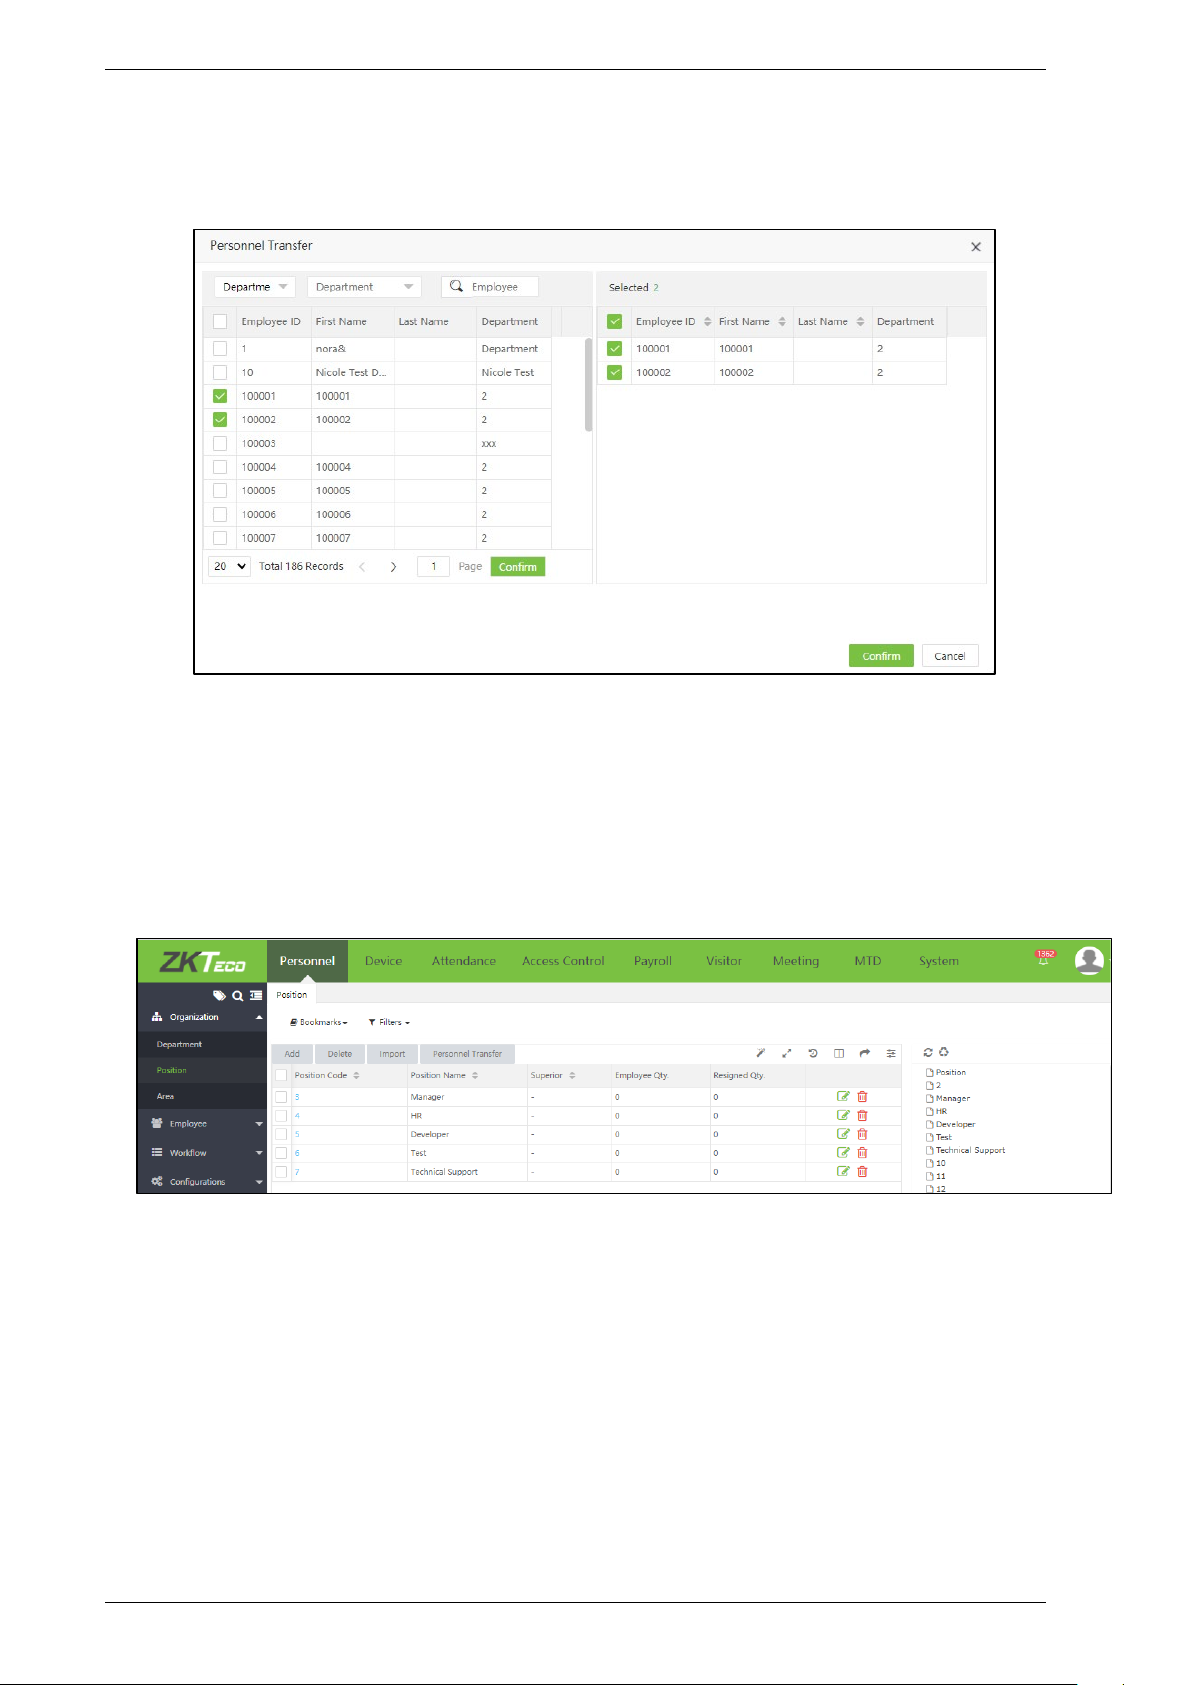
3.2 Position Management
It is necessary to add the position details while adding the employee details.
Select [Personnel] > [Position] to view the Position interface, as shown in the figure below.
Page | 23 Copyright©2020 ZKTECO CO., LTD. All rights reserved.
Page 26
BioTime 8.0 User Manual
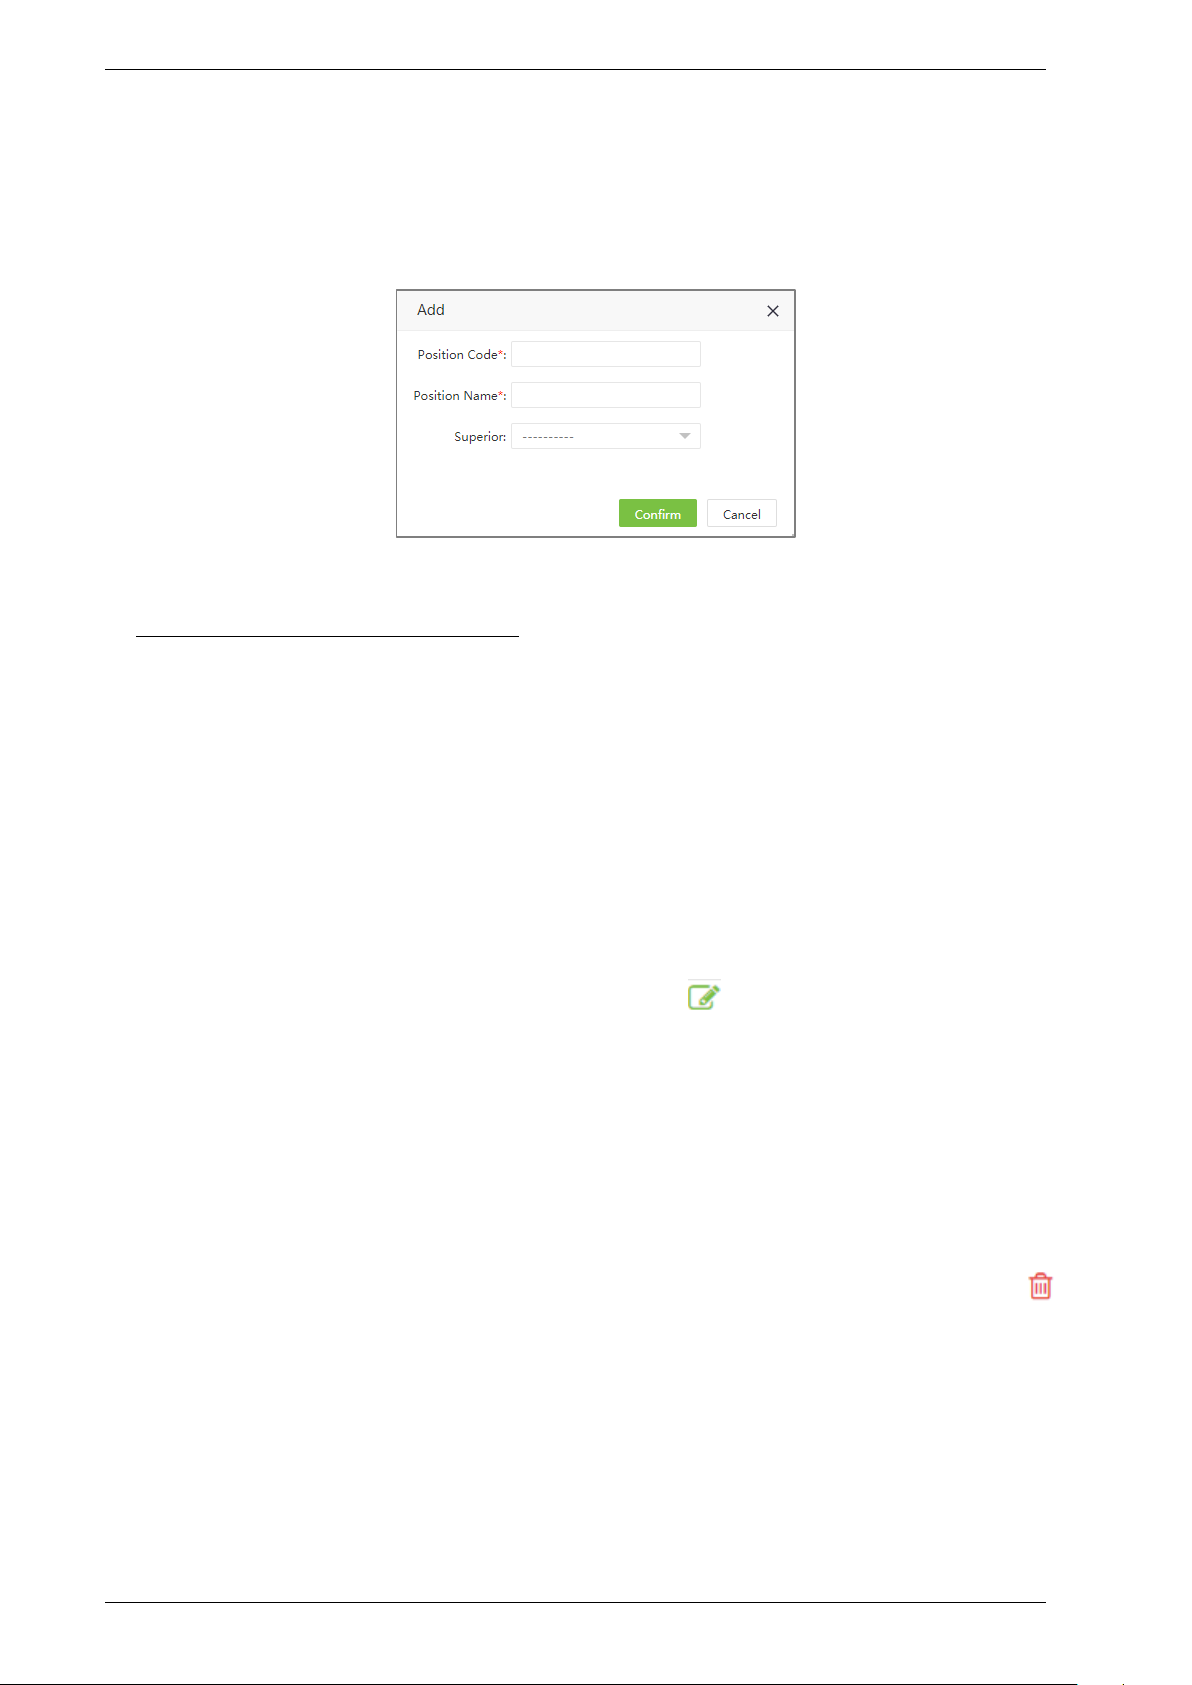
3.2.1 Add a Position
1. Select [Personnel] > [Position] > [Add] to add a new position
Set the parameters as shown below:
Position Code: Enter a unique Position Code.
Position Name: Enter Position Name.
Superior: Select a Superior Position.
2. After entering the required details, click [Confirm] to save the new position.
3.2.2 Edit a Position
If you want to edit the position details, click the Position or icon in the same row of the position
to be edited.
After modifications, click [Confirm] to save the modified position details.
3.2.3 Delete a Position
Select the position to be deleted and click [Delete] on the upper left of the position list or click
icon in the same row of the position to be deleted. Click [Confirm] to delete the position.
Page | 24 Copyright©2020 ZKTECO CO., LTD. All rights reserved.
Page 27
BioTime 8.0 User Manual
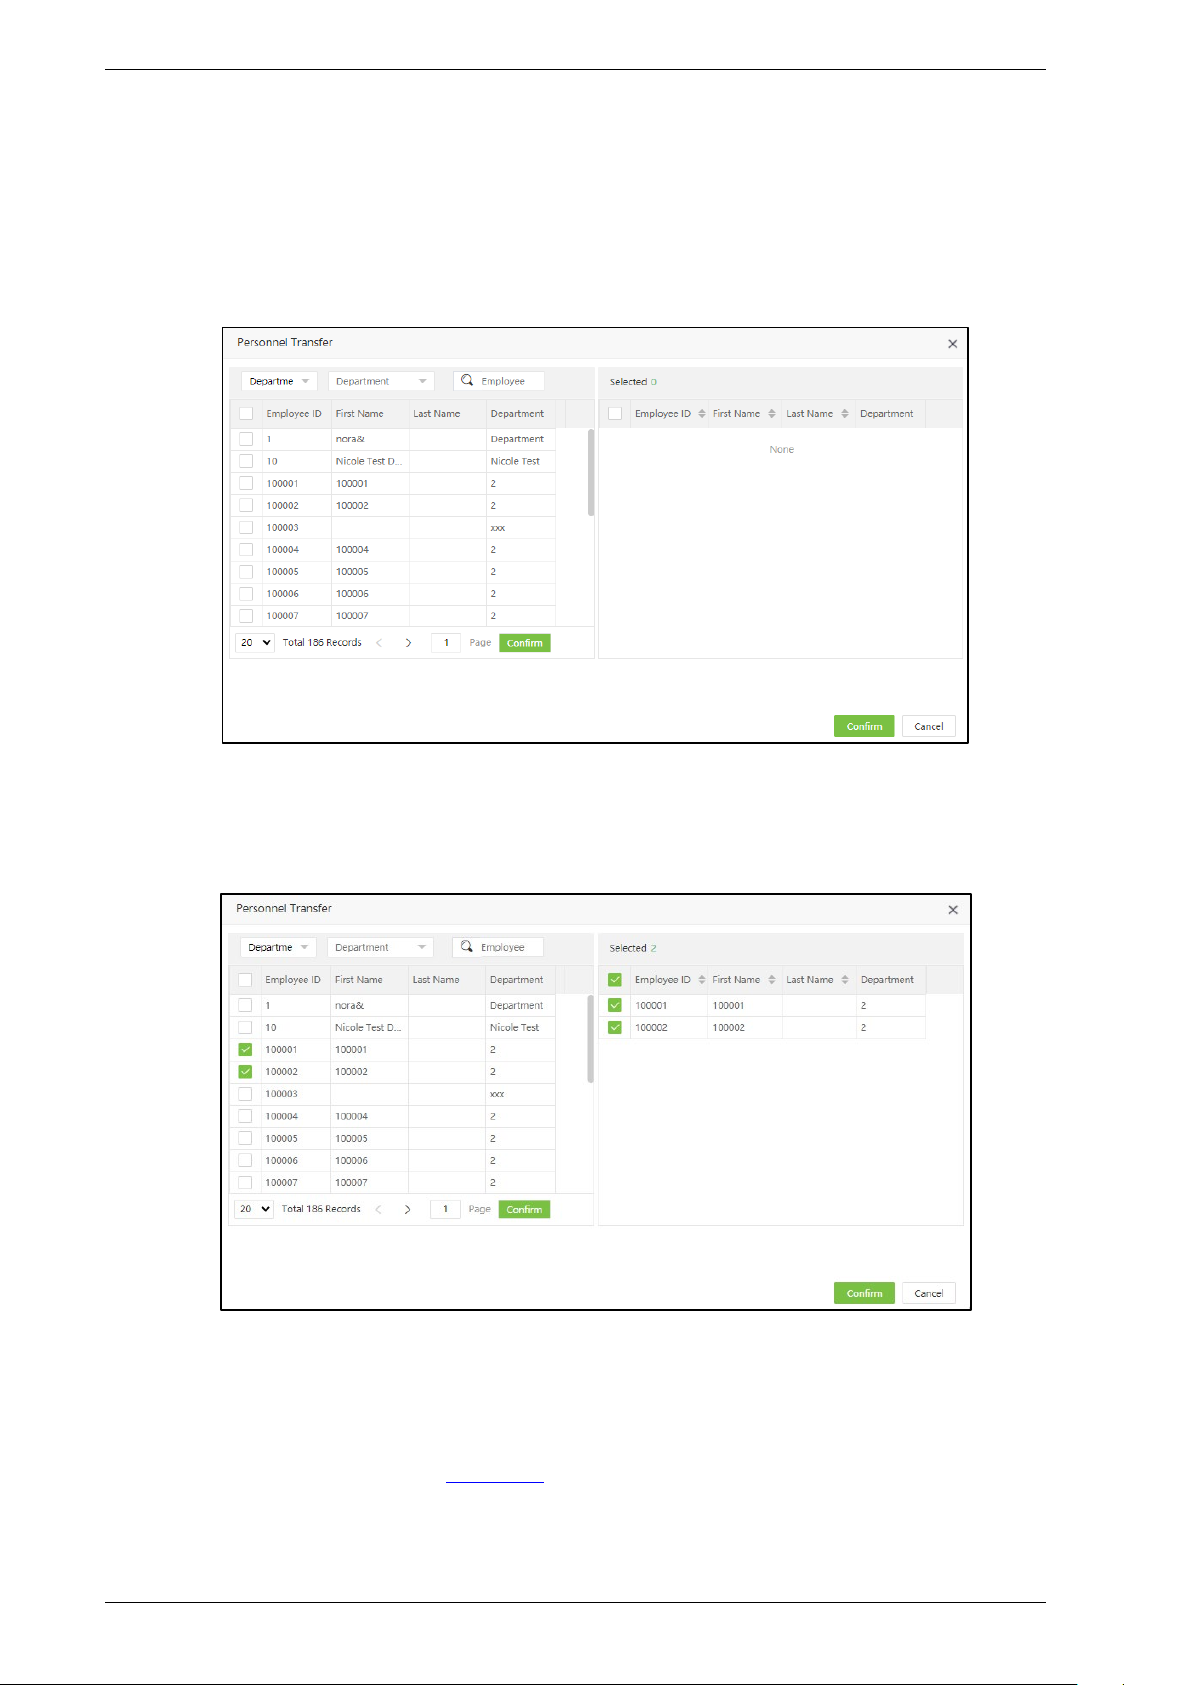
3.2.4 Personnel Transfer
You can adjust the employee’s positions in batches.
1. Select [Personnel] > [Position]. Select the corresponding position and click [Personnel Transfer].
2. In the employee’s list, select the employees whom you want to change the position. (You can search
employees by Department, Name or Employee ID).
3. Select the employee(s) and click [Confirm]. The position of the selected employee will be changed.
Note:
1. You can click [Import] to import the position information in another software or system. For
detailed operation, please refer to 4."Import" in Appendix 1.
Page | 25 Copyright©2020 ZKTECO CO., LTD. All rights reserved.
Page 28
BioTime 8.0 User Manual
2. You can click to export the position data locally. For detailed operation, please refer to 5.
"Export" in Appendix 1.
3.3 Area Management
Area Management allows you to manage the employee’s details in a device within the designated
area. (One device can belong to only one area) The system will automatically send the employee’s
information to the devices in real-time.
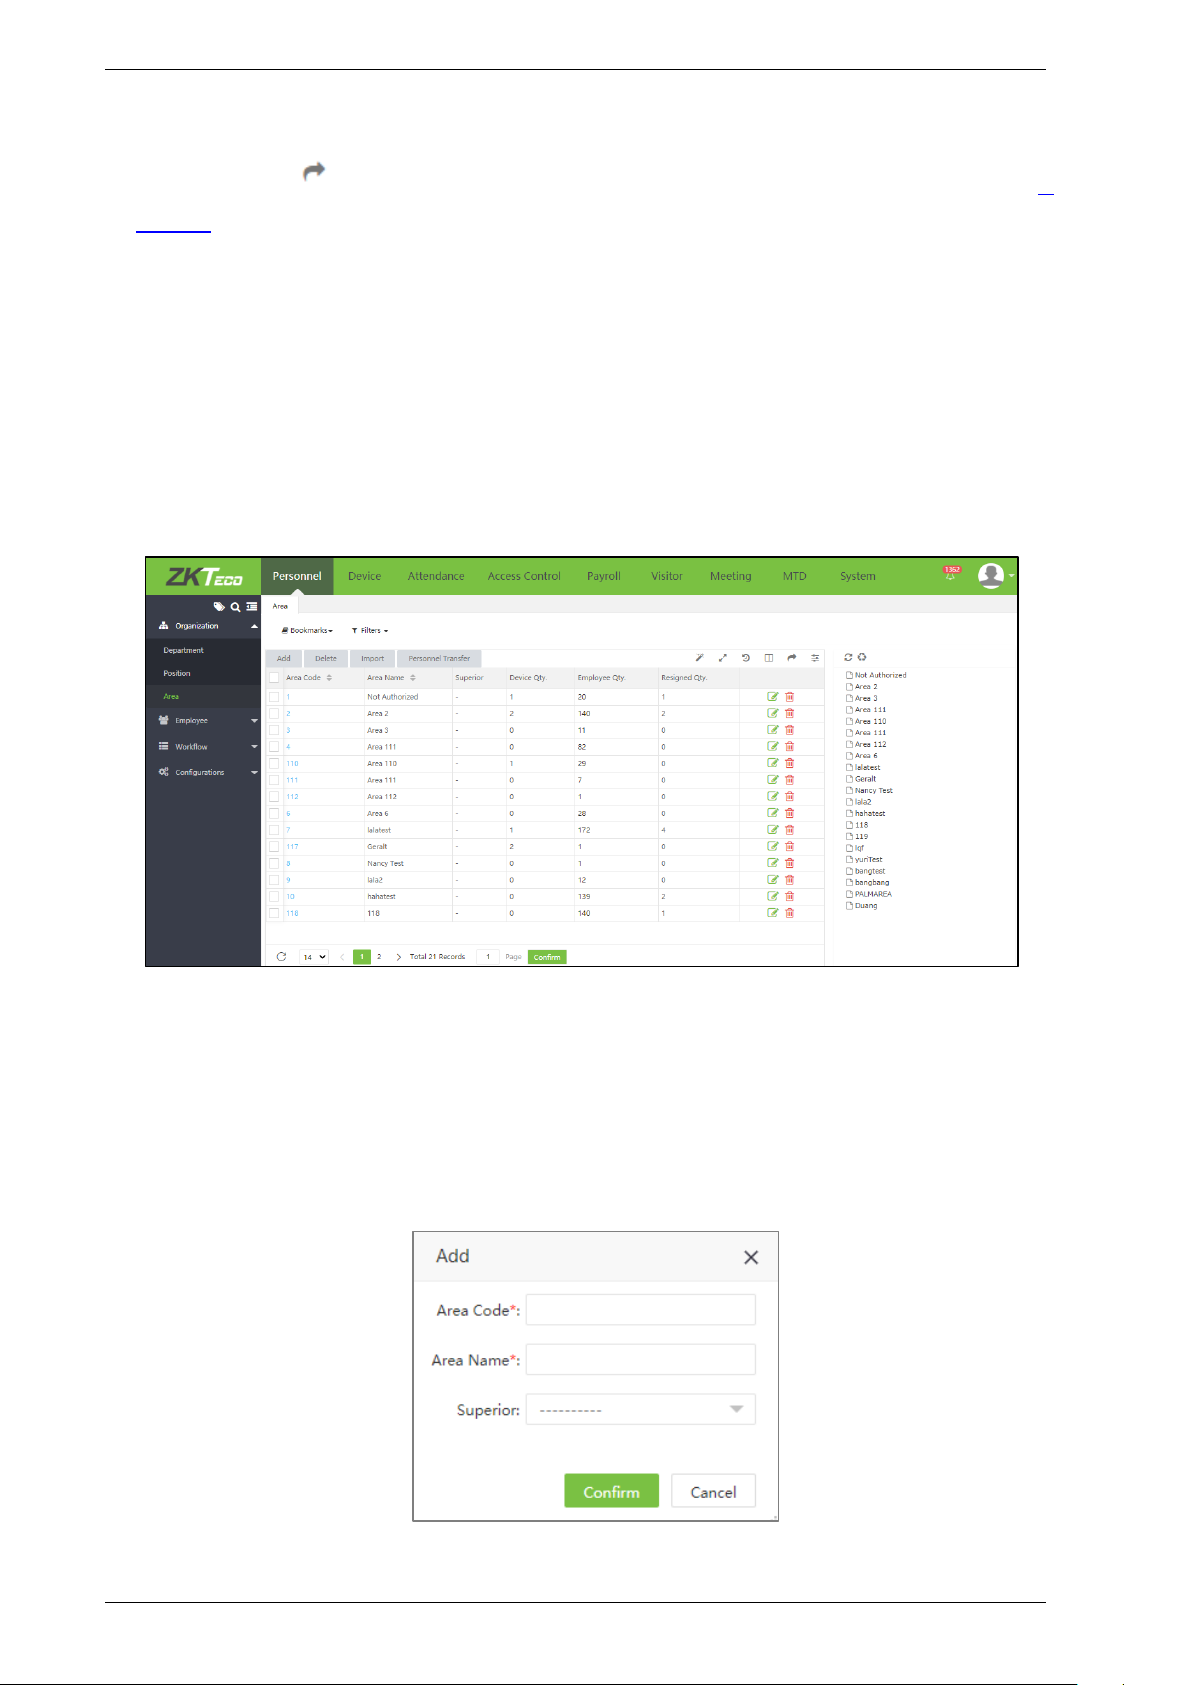
Select [Personnel] > [Area] to view the area settings.
The system will set a default area named [Not Authorized] whose area code is 1.
3.3.1 Add an Area
1. Select [Personnel] > [Area] > [Add] to add a new area.
Page | 26 Copyright©2020 ZKTECO CO., LTD. All rights reserved.
Page 29
BioTime 8.0 User Manual
Set the parameters as shown below:
Area Code: Enter a unique area code.
Area Name: Enter an area name.
Superior: Select a superior area of this area from the drop-down list.
2. After entering the required details, click [Confirm] to add the new area.
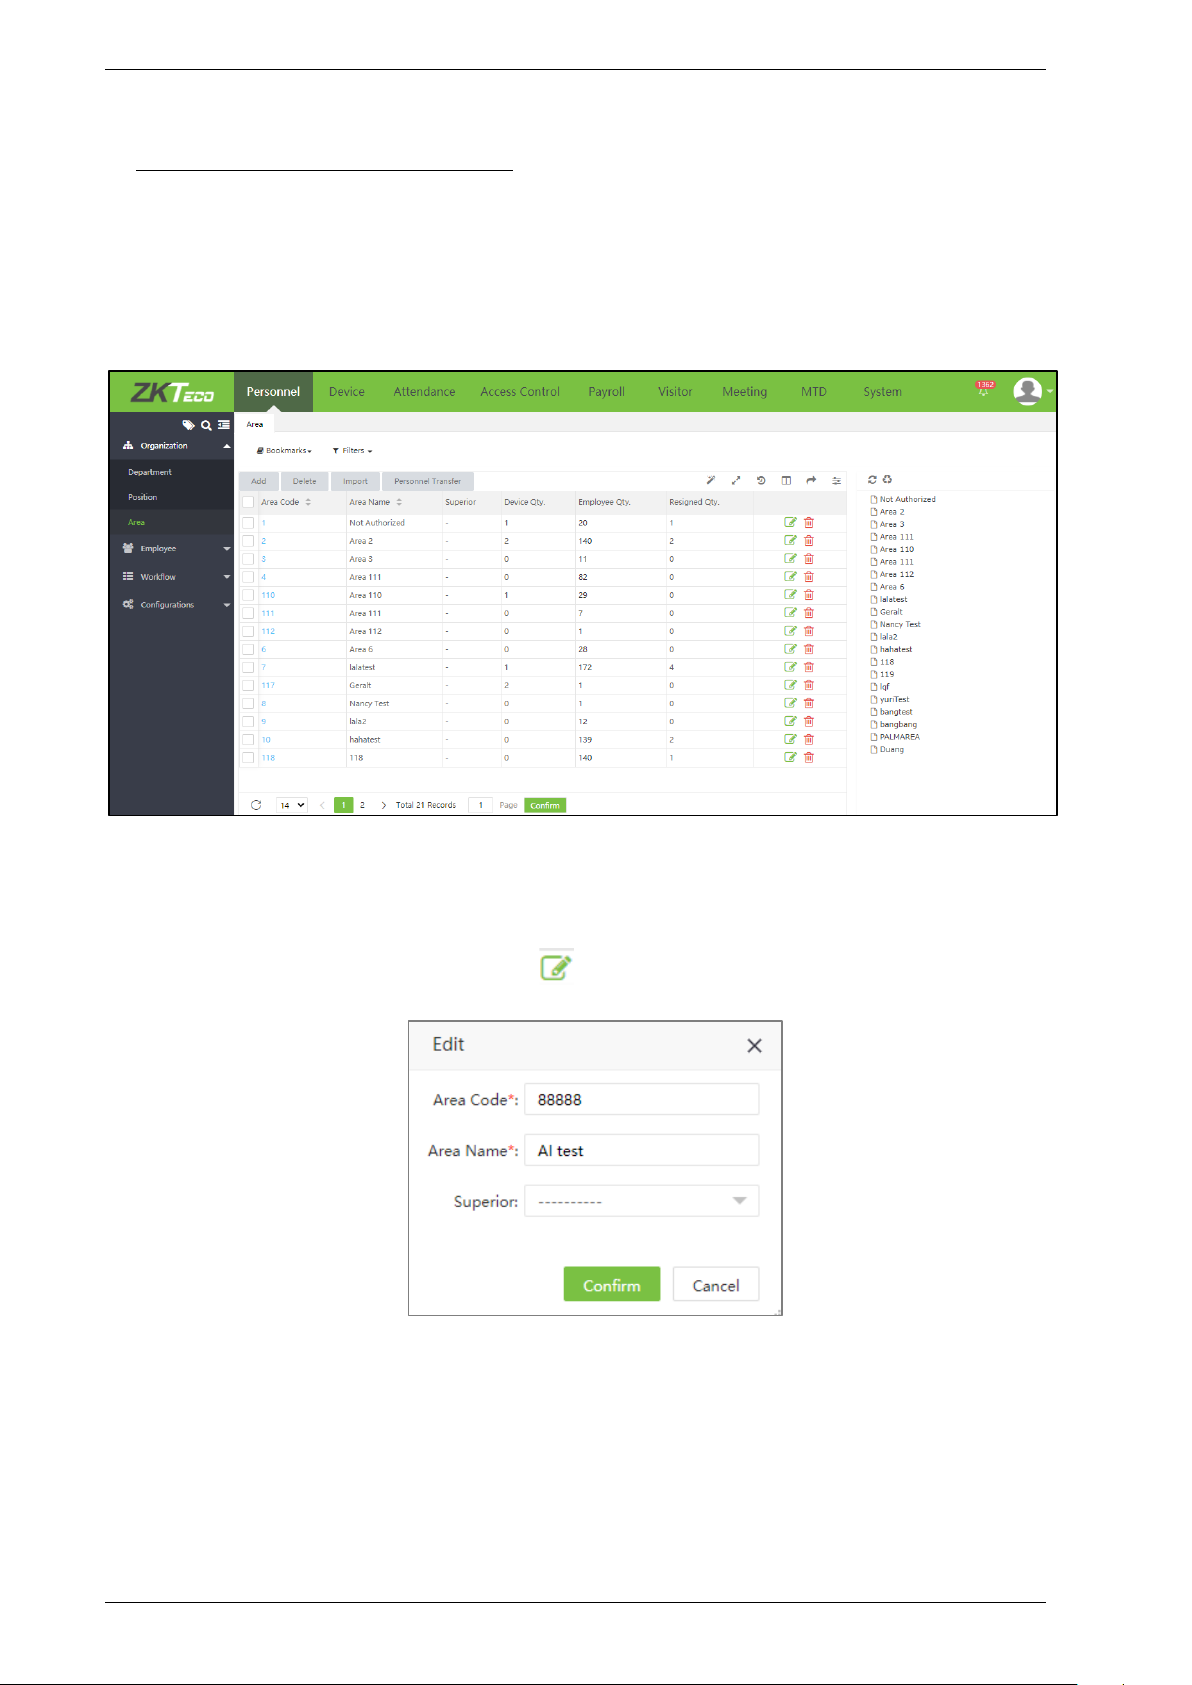
3.3.2 Edit an Area
1. In the area list, click an area code, or click icon in the same row of the area to be edited.
2. After modifications, click [Confirm] to save the modified area.
Page | 27 Copyright©2020 ZKTECO CO., LTD. All rights reserved.
Page 30
BioTime 8.0 User Manual
3.3.3 Delete an Area
In the area list, select the area to be deleted and then click [Delete] on the upper of the area list or
directly click in the same row of the area to be deleted.
Click [Confirm] to delete the selected area.
Note:
1. The default area cannot be deleted.
2. Areas that are being currently used by employees or devices cannot be deleted.
3. Areas with subordinates cannot be deleted.
3.3.4 Personnel Transfer
You can adjust the area of employees in batches.
1. Select [Personnel] > [Area]. Select the corresponding area and click [Personnel Transfer].
2. In the employee’s list, select the employees whom you want to change the area (You can search
Page | 28 Copyright©2020 ZKTECO CO., LTD. All rights reserved.
Page 31

BioTime 8.0 User Manual
employees by Department, Name or Employee ID).
3. Select the employee and click [Confirm]. The area of the selected employees will be changed.
Note:
1. You can click [Import] to import the position information in another software or system. For
detailed operation, please refer to 4."Import" in Appendix 1.
2. You can click to export the position data locally. For detailed operation, please refer to 5.
"Export" in Appendix 1.
3.4 Employee Management
1. In Employee management, you can add the employee details or import the employee information.
For detailed operation, please refer to 4. Import
2. You can click to export the personnel data locally. For detailed operation, please refer to 5.
"Export" in Appendix 1.
in Appendix 1.
Page | 29 Copyright©2020 ZKTECO CO., LTD. All rights reserved.
Page 32

BioTime 8.0 User Manual
3.4.1 Add an Employee
Select [Personnel] > [Employee] > [Employee] > [Add] to add an Employee.
• Profile
Set the parameters as shown below:
Employee ID: Enter the Employee ID maximum of 20 digits. Digital ID increments based on the
maximum value in the system.
First Name: Enter the Employee’s first name.
Last Name: Enter the Employee’s last name.
Department: Select the Employee’s Department from the drop-down list. (If no Department has been
set, only the default Department existing in the system can be chosen)
Position: Select the position from the drop-down list.
Area: Select an area from the drop-down list. (If no area has been set, only the default area existing in
the system can be chosen).
Employment Type: Select the employment type from the drop-down list. It can be set as Official,
Temporary and Probation. If Temporary or Probation is selected, then users can set the valid period
for the personnel.
Page | 30 Copyright©2020 ZKTECO CO., LTD. All rights reserved.
Page 33

BioTime 8.0 User Manual
After the valid period, the personnel will be deleted from corresponding device(s).
Hired Date: It is set to the current date by default. The employment date is considered as the starting
date of attendance calculation. The employee’s attendance before this date is not calculated in the
statistical result.
Employee Photo:
Click [Photo] and select the photo to be uploaded. After selection, the photo is displayed, as shown
in the figure below.
Click [OK] to save the profile details.
Note:
While HTTPS is enabling, users can access the system with https address and enroll personnel photo
with USB camera or the camera comes with the computer.
Page | 31 Copyright©2020 ZKTECO CO., LTD. All rights reserved.
Page 34

BioTime 8.0 User Manual
• Private Information
Click [Private Information] to enter the employee’s personal information.
Set the parameters as shown below:
SSN: Enter the Social Security Number.
Local Name: Enter employee’s local name.
Gender: Select the gender of the employee.
Passport No.: Enter the employee’s passport number.
Automobile License: Enter the employee’s automobile license number.
Motorcycle License: Enter the employee’s motorcycle License number.
Contact Tel: Enter the employee’s Contact Telephone number.
Office Tel: Enter the employee’s Office Telephone number.
Mobile: Enter the employee’s Mobile Phone number.
National: Enter the employee’s Nationality.
Religion: Enter the employee’s Religion.
City: Enter the employee’s City.
Address: Enter the employee’s Address.
Postcode: Enter the employee’s Postcode.
Email: Enter the employee’s Email Address.
Birthday: Enter the employee’s Date of Birth.
Page | 32 Copyright©2020 ZKTECO CO., LTD. All rights reserved.
Page 35

BioTime 8.0 User Manual
• Device Access Setting
Click [Device Access Setting] to add the device details.
Verify Mode: Select the verification mode when the employee punches for attendance.
Device Privilege: Select the privilege of a user in the device from the following options.
These four device privileges are the default device privileges. Some devices only display “Employee”
and “Super Administrator”.
Once the personnel device privilege is set as "Registrar", "System Administrator" or "Super
Administrator", all the persons corresponding to the devices in that area, and the personnel with
"Employee" privilege can only make verification on the device, and cannot enter and operate the
device menu.
Only "Registrar", "System Administrator" or "Super Administrator" can enter the device and operate
the corresponding device menu.
Card NO.: Enter the card number manually, assign card numbers to employees to verify attendance.
PIN: Set the employee’s password. The black-and-white T&A devices support a password maximum
of 5 digits. The color-screen T&A devices support passwords of 8 digits. Password digits exceeding the
specified length are cut out by the system automatically. When you change the password, clear the
old password in the text box and enter the new password.
Enroll Device: Enroll the employee in the T&A device.
FP Qty.: Click [Enroll] to register the employee’s fingerprints with a fingerprint scanner.
Palm Qty.: Click [Enroll] to register the employee’s palm with a palm scanner (e.g., PV10R).
Face Qty.: Click [Enroll] to register the employee’s face with a face scanner (e.g., FA10R).
Bio-Photo: Upload the bio photo of the employee.
Page | 33 Copyright©2020 ZKTECO CO., LTD. All rights reserved.
Page 36

BioTime 8.0 User Manual
• Attendance Settings
Click [Attendance Setting] to set the attendance parameters.
Self-Password: Enter employee’s login password.
Workflow Role: Set the employee’s workflow role.
Enable Attendance: It is enabled by default. If it is disable, the employee’s attendance details are not
included in the result of attendance statistics. (For some exceptions and temporary employees, it can
be set to No)
Enable Schedule: It is enabled by default. If it is disable, then the system will not calculate the
personnel’s attendance, even if these personnel has been assigned a time schedule in Attendance
Module.
Enable Holiday: It decides whether to enable the holiday function or not. The default value is Yes. If
it is set to No, the employee’s attendance will not be calculated on holiday.
Enable Overtime: It is enabled by default. If it is disable, then the system will not calculate this
personnel’s overtime, even if the overtime rule has been set in Attendance Module.
Attendance Group: Set the employee’s attendance group.
• Document (This option is only available in the edit mode, but not in the add mode)
1. Set the parameters of the certificate expiration reminder.
Page | 34 Copyright©2020 ZKTECO CO., LTD. All rights reserved.
Page 37

BioTime 8.0 User Manual
Click [Add]. A window to add a new certificate will appear as shown in the below image:
Document: Select the type of document.
Expire Date: Enter the expiration date of the document. An email alert will be sent before the expiry
date.
Email Alert: Select whether to send an alert via email or not.
Alert Before: Set the number of days to alert before the document expires.
Click [Confirm] after entering the required details.
Note:
Consider the following example which describes the alerting system for document expiration.
(1) The expiry date of the document is set as follows:
a. Expiry date: 2020-01-20
b. Alert before 2 days
c. Needs an email alert
(2) An email alert will be sent to the employee on 202-01-18 at 00:00 in the morning regarding the
expiry of the document.
(3) If the expiry date of the document is not modified in the system, the person will receive an email
reminder every day at 00:00 after the date 2020-01-18.
To edit the existing reminder, click icon of the corresponding column of the reminder.
2. To delete the certificate expiration reminder, click icon in the same row of the reminder.
Click [Confirm] to delete the certificate.
Page | 35 Copyright©2020 ZKTECO CO., LTD. All rights reserved.
Page 38

BioTime 8.0 User Manual
• App Settings
Click [App Settings] to set the App settings.
APP Status: The default value is No. If it is set to Yes, then the user can use the mobile App.
APP Role: Set the employee’s mobile App role.
• Payroll Settings
1. Click [Payroll Settings] to enter the payroll details.
Payment Period: Set the payment period of the employee. Currently, payment period can be set as
Monthly, Weekly, Daily.
Payment Type: Set the payment type for an employee. The payment types are given below:
Bank Name: Enter the bank name of the employee.
Bank Account: Enter the bank account number of the employee.
Agent ID: Enter the agent ID of the employee.
Agent Account: Enter the Agent account number of the employee.
Page | 36 Copyright©2020 ZKTECO CO., LTD. All rights reserved.
Page 39

BioTime 8.0 User Manual
Custom Attribute
Click [Custom Attribute] to enter the other specific data of the Employee.
After entering the required details, click [Confirm] to save and update the details.
Note: Click here to edit or manually create an attribute.
3.4.2 Edit an Employee
1. In the employee’s list, click the Employee ID or click icon in the same row of the employee to
be edited.
Page | 37 Copyright©2020 ZKTECO CO., LTD. All rights reserved.
Page 40

BioTime 8.0 User Manual
2. After modifications, click Confirm to save the modified details.
3.4.3 Delete an Employee
Select the employee(s) and click [Delete] on the upper left of the employee’s list or click icon in
the same row of the employee to be deleted.
Click [Confirm] to delete the employee.
Note: When you delete an employee, the information of the employee in the database is also deleted.
3.4.4 Personnel Transfer
1. Personnel Transfer
This includes Department Transfer, Position Transfer, Area Transfer and Pass Probation.
(1) In the employee’s list select the employee(s) and click [Personnel Transfer] > [Department
Transfer] to adjust the department.
Page | 38 Copyright©2020 ZKTECO CO., LTD. All rights reserved.
Page 41

BioTime 8.0 User Manual
(2) In the Department drop-down list, select the Department to which the employee is to be
moved and enter the remarks.
(3) Click [Confirm] to save the details.
Note: The operation of Adjust Position, Adjust Area and Pass probation are the same as the
operation of Department adjustment.
2. Pass Probation
(1) Select the employee who is qualified to pass probation, and click [Personnel Transfer]->[Pass
Probation]
(2) Click [Confirm] to complete the operation.
3. Personnel Resignation
Personnel resignation includes resignation and disabling attendance.
(1) In the employee’s list, select the employee (s), and click [Personnel Transfer] > [Resignation] to
add the resignation details.
Enter the details as shown below:
Resignation Date: Select the date of resigning.
Resignation Type: Select the resignation type. The types are Suspension, Dismissal, Resignation,
Page | 39 Copyright©2020 ZKTECO CO., LTD. All rights reserved.
Page 42

BioTime 8.0 User Manual
Transfer and Unpaid retention.
Attendance: Enable if the attendance needs to be closed for the employee (The Employee details will
be deleted from the attendance device as well)
Reason: Enter the reason for resignation.
(2) Click [Confirm] to save the resignation details.
3.4.5 App Enable/Disable Settings
1. In the employee’s list, select the employee(s) and click [App] > [Enable/Disable] to enable the
Mobile App.
2. Click [Confirm] to enable the user's access to the Mobile App.
3.4.6 Re-synchronize to Device
It synchronizes the employee details on the software to the devices in the corresponding area.
1. In the employee’s list, select the employee(s) and click [More] > [Re-synchronize to Device] to
synchronize the data.
2. Click [Confirm], to synchronize the employee data to the device.
Page | 40 Copyright©2020 ZKTECO CO., LTD. All rights reserved.
Page 43

BioTime 8.0 User Manual
3.4.7 Re-upload from Device
It re-uploads the employee’s details from the device to the software.
1. In the employee’s list, select the employee(s) and click [More] > [Re-upload from Device] to reupload the employee details from the specified devices.
2. Click [Confirm] to re-upload the employee details from the device to the software.
3.4.8 Delete Biometric Template
In the employee’s list, select the employee(s) and click [More] > [Delete Biometric Template] to
delete the biometric templates.
Select the type of biometric template and click [Confirm]. The biometric template of the employee
will be deleted from the device.
Page | 41 Copyright©2020 ZKTECO CO., LTD. All rights reserved.
Page 44

BioTime 8.0 User Manual
3.5 Personnel Resignation
3.5.1 Add a resignation
1. Select [Personnel] > [Employee] > [Resign] > [Add] to add the employee’s resignation details.
Enter the details as shown below:
Employee: Select the employee to enter the resignation details. (You can filter the employees by
Department, Name or Employee ID).
Resign Date: Select the date of resignation.
Resign Type: Select the type of resignation. The types are Quit, Dismissed, Resign, Transfer, Retain
Job Without Salary.
Resign Reason: Enter the reason for resignation.
Attendance: Enable if attendance needs to be closed. (if it is enabled, the employee details will be
deleted from the attendance device as well)
2. After entering the details, click [Confirm] to save the details.
Page | 42 Copyright©2020 ZKTECO CO., LTD. All rights reserved.
Page 45

BioTime 8.0 User Manual
3.5.2 Delete Resignation
Select the employee(s) to be deleted and click [Delete] on the upper left of the personnel list or click
in the same row of the employee to be deleted.
Click [Confirm] to delete the resignation details.
3.5.3 Reinstate
It restores a resigned employee from the resigned employee’s list. The details of the employee will be
deleted from the resigned employee’s list.
1. In the resigned employee’s list, select the employee whom you want to restore from resignation.
Click [Reinstate] to restore the employee.
2. Click [Confirm] to reinstate the resigned employee.
3.5.4 Disable Attendance
To disable the attendance for a resigned employee, perform the following steps:
1. Select the resigned employee whose attendance needs to be disabled. Click [Disable Attendance].
Page | 43 Copyright©2020 ZKTECO CO., LTD. All rights reserved.
Page 46

BioTime 8.0 User Manual
2. Click [Confirm] to disable the attendance of the selected employee.
Note:
1. You can click [Import] to import the employee’s resignation details in another software or system.
For detailed operation, please refer to 4."Import"
2. You can click to export the employee’s resignation details locally. For detailed operation,
in Appendix 1.
please refer to 5. "Export" in Appendix 1.
3.6 Workflow
3.6.1 Role
Add a Role
1. Select [Personnel] > [Workflow] > [Workflow Role] > [Add] to add a user role.
Enter the details as shown below:
Code: Enter a unique code for the user role.
Role Name: Enter a unique name for the user role.
Description: Enter the description of the role.
2. Click [Confirm] after entering the details.
Page | 44 Copyright©2020 ZKTECO CO., LTD. All rights reserved.
Page 47

BioTime 8.0 User Manual
Delete a Role
Select the role (or roles). Click [Delete] on the upper left of the list or click in the same row of the
role to be deleted.
Click [Confirm] to delete the role.
Note: A role cannot be deleted when it is being used by employees or workflow.
Assign Employee
1. Select the corresponding workflow role and click [Assign Employee] to assign user role to
employee(s).
2. Select the employee in the employee’s list to whom you want to assign the user roles in batches
(you can filter by Department, Name, Code, etc).
3. Click [Confirm] to assign the employee role.
Page | 45 Copyright©2020 ZKTECO CO., LTD. All rights reserved.
Page 48

BioTime 8.0 User Manual
3.6.2 Workflow Builder
Add a Workflow Builder
Take [Add For Employee] as example.
1. Select [Personnel] > [Workflow] > [Workflow Builder] > [Add For Employee] to set a workflow for
employee.
Enter the details as shown below:
Code: Enter the code for the workflow.
Name: Enter the name of the workflow.
Content-Type: Select the type of workflow, including the following type:
Page | 46 Copyright©2020 ZKTECO CO., LTD. All rights reserved.
Page 49

BioTime 8.0 User Manual
Employee: Enter employee ID or employee name to search the employee that executes the workflow.
Start Date/End Date: Enter the Start Date and End Date of the workflow.
Set up the workflow node. There will be one default workflow node, users can click [Add] to add
more workflow nodes.
Enter the details as shown below:
Approver
• Click the drop-down button to select the role that approves the node.
Approver Scope
• If the "Own Department" is selected, then the employee in the selected role can approve the
applications from the own Department only.
• If "All" is selected, then the employee in the selected role can approve the application from all
the Departments.
Notifier
• Click the drop-down button to select the role to receive the notifications.
Notifier Scope
• If the "Own Department" is selected, then the employee in the selected role can receive the
application notifications from the own Department.
• If "All" is selected, then the employee in the selected role can receive the application
notifications from all the Departments.
After entering the details, click [Confirm] to save the workflow.
Page | 47 Copyright©2020 ZKTECO CO., LTD. All rights reserved.
Page 50

BioTime 8.0 User Manual
For example:
The user with ID 1 belongs to the HR Department.
The user with ID 2 belongs to the HR Department, the role is a Manager.
The user with ID 3 belongs to the HR Department, the role is Boss.
The manual log workflow for the user with ID 1 is shown below:
The application for manual log of the employee should go through two nodes. One is the Manager
and the other is the Boss. The workflow of the nodes is shown in the figure below.
Page | 48 Copyright©2020 ZKTECO CO., LTD. All rights reserved.
Page 51

BioTime 8.0 User Manual
One is the Manager and the other is the Boss. The workflow of the nodes is shown in the figure
below.
Select the Workflow Role and scope for Approve and Notifier. The scope approval of the above
example is selected as the Own Department. The first node is the Manager and the approver is also
the same. The second node is the Boss and the notifier is also the Boss.
Click [Confirm] and the node list will be displayed as shown in the below image:
When user No. 1 submits the application for manual log, user No. 2 will receive the application
notification. When user No. 2 approves the application, user No. 3 will receive the application
notification. When every node approves the application, user No. 1 will receive the email notification
for approval. (The application approval by ordinary users can be performed within the self-service and
mobile app of the employees)
3.6.3 Delete Workflow
On the workflow interface, select the workflow(s) and click [Delete] on the upper left of the list or
directly click in the same row of the workflow to be deleted.
Click [Confirm] to delete the workflow.
Note: The Workflow that is currently being used cannot be deleted.
Page | 49 Copyright©2020 ZKTECO CO., LTD. All rights reserved.
Page 52

BioTime 8.0 User Manual
3.7 Custom Attributes
This function lets you manually create a personalized field based on the Organizational requirement.
And the created attribute will get reflected in the Employee module.
3.7.1 Create a New Attribute
• On the Personnel module, click [Configurations] > [Custom Attribute] > [Add] to manually
create a field.
On the Add window, enter the following:
Attribute Name: Enter the required attribute name.
Input Type: Select the format type from the drop-down list (default format: Text)
Enable: Select the Enable check box to activate the field.
• And then, click Confirm to save and update the new attribute.
3.8 Document Management
3.8.1 Add Document Type
1. Select [Personnel] > [Configurations] > [Document] > [Add] to add a document type.
Page | 50 Copyright©2020 ZKTECO CO., LTD. All rights reserved.
Page 53

BioTime 8.0 User Manual
Enter the details as shown below:
Cert Code: Enter the Certificate Code.
Cert Name: Enter the Certificate Name.
2. Click [Confirm] to save the document details.
Note:
1. You can click [Import] to import the document type in another software or system. For detailed
operation, please refer to 4."Import" in Appendix 1.
2. You can click to export the document type locally. For detailed operation, please refer to 5.
"Export" in Appendix 1.
3.8.2 Delete Certificate Type
Select the certificate type(s) to be deleted and click [Delete] on the upper left of the list or click
in the same row of the document to be deleted.
Click [Confirm] to delete the document details.
Note: The document which is being currently used cannot be deleted.
Page | 51 Copyright©2020 ZKTECO CO., LTD. All rights reserved.
Page 54

BioTime 8.0 User Manual
4 Device Management
Device Management includes the installation of devices and setting the device parameters. It allows
you to manage the connected devices from the system, thereby implementing virtual management.
It also includes uploading the user attendance data, downloading the configuration information, and
exporting various reports.
4.1 Device Management
Initially, communication parameters must be set to connect the devices. Once the communication is
successful, you can view the information on the connected devices and perform operations such as
remote monitoring, uploading, and downloading.
Select [Device] > [Device] to view the Device Management interface. All the connected T&A devices
are displayed in a list as shown in the below image.
The details of the interface are given below:
Device Name: Displays the name of the device. For automatically connected devices, it will be
displayed as Auto_add.
Area: Displays the area in which the device is defined in the software.
Serial Number: Displays the Device Serial Number.
Device IP: Displays the IP address of the device.
Device Model: Displays the model of the device.
Firmware/Push Version: the build firmware/push version.
Page | 52 Copyright©2020 ZKTECO CO., LTD. All rights reserved.
Page 55

BioTime 8.0 User Manual
State: indicates that the device is connected,
indicates that the device is not connected,
indicates that the user needs to assign an area except for the default area to the device.
Last Activity: Represents the last time the command was executed.
User Qty: Displays the number of employees already registered on the device.
FP Qty: Displays the number of Fingerprints registered.
Face Qty: Displays the number of Faces registered.
Palm Qty: Displays the number of Palms registered.
Transaction Qty: Displays the total number of attendance records.
Last Sync: Displays the time in which the system issued data to the device last time.
4.1.1 Add a T&A Device
There are two ways to add a T&A device: manually adding a T&A device and automatically adding a
T&A device.
Manually Add a T&A Device
1. Select [Device] > [Device] > [Add] to add a device manually.
Enter the details as shown below:
Device Name: Enter the device name maximum of 50 characters.
Serial Number: Enter the serial number of the device.
Page | 53 Copyright©2020 ZKTECO CO., LTD. All rights reserved.
Page 56

BioTime 8.0 User Manual
Device IP: Enter the IP address of the device.
Area: In the drop-down list, select the area to which the T&A device belongs.
Time Zone: When a time zone is selected, the time on the T&A device will be automatically
synchronized to the standard time in the particular time zone.
Registration Device: Select whether the device is a registration device or not. If yes, then only the
employees registered from the device will be uploaded to the software automatically.
Attendance Device: Select whether the device is an attendance device or not
Heartbeat Request: Set the time for the device to automatically transmit the data to the system.
Transfer Mode: Select the data transfer mode between software and devices. The Transfer mode can
be real-time or at a specified time.
2. Click [Confirm] to add the device.
Note: When an employee is added to a device, the employee information will be uploaded to the
server automatically. It will be synchronized with other devices in the same area.
Automatically Add a T&A device
It is unnecessary to manually add T&A devices of certain models. You can connect such devices to the
system via HTTP by completing the settings on the devices. Once the devices are connected to the
Internet, the device list will display all the T&A devices. Please refer to the relevant user manuals for
the detailed operating procedures.
Note: The devices added automatically must be assigned to custom areas to communicate with the
software.
Page | 54 Copyright©2020 ZKTECO CO., LTD. All rights reserved.
Page 57

BioTime 8.0 User Manual
4.1.2 Edit a Device
Click a device name or click icon in the same row of the device to be edited.
Access Control Device: Set whether the device is an access control device or not. if yes, then the
device will be added to the Access Control Module automatically. This menu will appear only when
you assign an area (except area whose area code is 1) to the device.
Note: Serial Number and Device IP are read-only. The device name must be unique.
4.1.3 Delete a Device
1. Select the device and click [Delete] above the device list or click in the same row of the device
to be deleted.
2. Click [Confirm] to delete the selected device.
Page | 55 Copyright©2020 ZKTECO CO., LTD. All rights reserved.
Page 58

BioTime 8.0 User Manual
4.1.4 New Area
Select [Device] > [Device] > [New Area] to create a new area. For detailed operation, please refer to
3.3.1 Add an Area.
Clear Pending Command
Select the device and click [Device Menu] > [Clear Pending Command]. Click [Confirm] to clear all
the pending commands.
4.1.5 Data Clean
Clear Attendance Data
1. Select a device and click [Data Clean] > [Clear Attendance Data].
2. Click [Confirm] to delete all transactions from the device.
Clear Capture Photo
You can clear the attendance photos on a T&A device.
1. Select a device and click [Data Clean] > [Clear Capture Photo] (It is mainly used to clear the
attendance photos and the blacklisted photos):
Page | 56 Copyright©2020 ZKTECO CO., LTD. All rights reserved.
Page 59

BioTime 8.0 User Manual
2. Click [Confirm] to delete the captured photos.
Clear All Data
You can clear all the data on a T&A device.
1. Select a device and click [Data Clean] > [Clear All Data].
2. Click [Confirm] to delete all the data.
4.1.6 Data Transfer
Upload User Data
It is used to upload the user data from the device to the software.
1. Select a device and click [Data Transfer] > [Upload User Data].
Here you can select to upload all or specified user data to the software.
2. Click [Confirm] to upload the user data.
Note: You can upload the personal information on a T&A device to the server in batches by
uploading it again. If time is out, uploading will be interrupted and you need to perform the upload
operation again.
Page | 57 Copyright©2020 ZKTECO CO., LTD. All rights reserved.
Page 60

BioTime 8.0 User Manual
Upload Transaction
You can upload the attendance transactions from the device to the software.
1. Select a device and click [Data Transfer] > [Upload Transaction].
Here you can select to upload all transactions or set the start time and end time to upload the
transactions within the specified time.
2. Click [Confirm] to upload transactions.
Sync Data to Device
Synchronize data from the server to all the devices. Generally, this operation needs to be performed
only when the data in devices are inconsistent with those in the server due to Internet abnormalities
or other conditions.
In the device list, select the device to which data needs to be synchronized and click [Data Transfer] >
[Sync Data to Device]. Select the data to synchronize.
Click [Confirm] to synchronize the data.
Note: Synchronizing the data to the devices will delete the existing data (excluding event records)
in the devices and then the setting details will be re-downloaded. Ensure that the internet connection
is smooth and there is no power failure while performing this operation.
Page | 58 Copyright©2020 ZKTECO CO., LTD. All rights reserved.
Page 61

BioTime 8.0 User Manual
4.1.7 Device Menu
Reboot
Reboots a device through the system remotely.
In the device list, select a device to reboot, and click [Device Menu] > [Reboot].
Click [Confirm] to reboot the device.
Read Information
Reads the number of persons, attendance records, and the firmware version on a device.
Select a device and click [Device Menu] > [Read Information] and click [Confirm] to download the
information.
Enroll Remotely
This function is applicable when the device administrator is not available to operate the device and
enroll the fingerprint.
1. Select the corresponding device, and click [Device] > [Device] > [Enroll Remotely] to access the
enroll remotely interface:
Page | 59 Copyright©2020 ZKTECO CO., LTD. All rights reserved.
Page 62

BioTime 8.0 User Manual
Enter the details as shown below:
Bio Type: Select the biometric type. Currently, it supports fingerprint only.
Employee ID: Enter the Employee ID.
Finger: Select the corresponding finger which needs to be enrolled remotely.
2. Click [Confirm]. The software will issue a command to the device, and the device will open the
fingerprint enrolling menu. The employee just needs to enroll the fingerprint.
Duplicate Punch Period
Set the duplicate punch period on the device.
1. Select a device and click [Device Menu] > [Duplicate Punch Period].
2. Click [Confirm] to save the duplicate punch period.
Page | 60 Copyright©2020 ZKTECO CO., LTD. All rights reserved.
Page 63

BioTime 8.0 User Manual
Capture Setting
Set the capture mode of attendance photos during verification.
1. Select a device and click [Device Menu] > [Capture Setting] to set the capture mode.
2. Click [Confirm] to set the capture mode.
Upgrade Firmware
Upgrades the firmware for the corresponding device.
1. Select a device and click [Device Menu] > [Upgrade Firmware].
2. Click [Choose File] to upload the corresponding firmware (emfw.cfg) file. Click [Confirm] to
upgrade the firmware for the device.
Page | 61 Copyright©2020 ZKTECO CO., LTD. All rights reserved.
Page 64

BioTime 8.0 User Manual
Daylight Saving Time
1. Select corresponding device(s), click [Device Menu] > [Daylight Saving Time] to open the setting
page of daylight-saving time.
2. Users can set the Daylight-Saving Mode as By date/time or By week/day. Confirm the setting, the
daylight-saving time will be issued to the device(s).
3. Click [Confirm] to issue the daylight-saving time to the device.
Page | 62 Copyright©2020 ZKTECO CO., LTD. All rights reserved.
Page 65

BioTime 8.0 User Manual
4.2 Device Command
Select [Device] > [Device] > [Device Command]. The commands to be executed will be displayed.
Check the commands issued by the software to a device during communication.
If you want to clear the command issued by the software to a device during communication, click
to access the device command clearing interface:
Page | 63 Copyright©2020 ZKTECO CO., LTD. All rights reserved.
Page 66

BioTime 8.0 User Manual
4.3 Device Short Message Management
The software supports short messages which can be sent to the designated device from the system.
4.3.1 Add a Public Message
1. Select [Device] > [Message] > [Public] > [Add].
Enter the details as shown below:
Device: Select a device to which the message is to be sent.
Start Time: Select the start time for issuing the short message.
Duration: Enter the message display duration.
Content: Enter the short message content.
2. Click [Confirm] to save the details.
Page | 64 Copyright©2020 ZKTECO CO., LTD. All rights reserved.
Page 67

BioTime 8.0 User Manual
4.3.2 Add a Private Message
1. Select [Device] > [Message] > [Private] > [Add].
Enter the details as shown below:
Employee: Select the employee to whom the message is to be sent.
Start Time: Select the start time for sending the short message.
Duration: Enter the message display duration.
Content: Enter the short message content.
2. Click [Confirm] to save the details.
Page | 65 Copyright©2020 ZKTECO CO., LTD. All rights reserved.
Page 68

BioTime 8.0 User Manual
4.3.3 Send Message
1. Select the short message to be sent and click [Send Message].
2. Click [Confirm] to send public messages to the designated devices and private messages to the
devices to which the particular employees are added.
4.3.4 Delete Short Message
When a short message is deleted on the software, it will be deleted in the device also.
1. Select the short message and click [Delete] to delete it.
2. Click [Confirm] and the message will be deleted from the list and the device.
Page | 66 Copyright©2020 ZKTECO CO., LTD. All rights reserved.
Page 69

BioTime 8.0 User Manual
4.4 Work Code
Adds different work codes and uploads them to a single device or multiple devices.
Select [Device] > [Data] > [Work Code] to assign work code.
4.4.1 Add Work Code
1. Select [Device] > [Work Code] > [Add] to access the adding work code interface:
Enter the details as shown below:
Code: Enter the Work Code number.
Name: Enter the name of the Work Code.
2. Click [Confirm] to save the details.
Page | 67 Copyright©2020 ZKTECO CO., LTD. All rights reserved.
Page 70

BioTime 8.0 User Manual
4.4.2 Issue Work Code to Device
Issues work code to the device.
1. Select [Device] > [Work Code] > [Send to Device].
2. Click [Confirm] to send the work code to the device.
4.4.3 Remove Work Code
1. Select [Device] > [Work Code] > [Remove From Device].
2. Click [Confirm] to remove the work code from the device.
Page | 68 Copyright©2020 ZKTECO CO., LTD. All rights reserved.
Page 71

BioTime 8.0 User Manual
4.4.4 Delete Work Code
Deletes the work code from the software.
1. Select the work code and click [Delete]
2. Click [Confirm] to delete the work code.
4.5 Bio-Template
Displays detailed information about employees' biometric templates.
Page | 69 Copyright©2020 ZKTECO CO., LTD. All rights reserved.
Page 72

BioTime 8.0 User Manual
4.6 Bio-Photo
4.6.1 Register Bio-Photo
Registers the visible light comparison photos to verify on the visible light device.
1. Select [Device] > [Data] > [Bio-photo] > [QR Code].
2. Scan the QR code and register the bio-photo of the user on the mobile phone (the user details must
be saved in the software), the following interface will be displayed after scanning.
Page | 70 Copyright©2020 ZKTECO CO., LTD. All rights reserved.
Page 73

BioTime 8.0 User Manual
3. Take the photo, enter the employee's ID Number. First Name and Last Name are optional. Click
[Enroll] to complete the registration.
Click [Approve] to approve the bio-photo.
4.
5. Select the Approve State and click [Confirm] to complete the approval process. After approval, the
user can use the face to verify on the visible light device.
Page | 71 Copyright©2020 ZKTECO CO., LTD. All rights reserved.
Page 74

BioTime 8.0 User Manual
4.6.2 Import Bio-Photo
1. Select [Device] > [Data] > [Bio-Photo] > [Import Bio-Photo] to import the bio-photo.
2. Click [Upload] to select the photos in batch.
Overwrite: If it is Yes, then the existed bio photo will be overwritten.
Ignore Error: If it is set as Yes, then the software will automatically ignore the error that happened
during the importation.
3. Click [Confirm] to complete the import process.
Note:
(1) The name of the photo must be the employee ID.
(2) The maximum size of the photo is 25 Kb.
Page | 72 Copyright©2020 ZKTECO CO., LTD. All rights reserved.
Page 75

BioTime 8.0 User Manual
4.6.3 Delete Bio-Photo Application
Select the application(s) and click [Delete] on the upper left of the list or click in the same row
of the bio-photo to be deleted.
Click [Confirm] to delete the bio-photo.
4.7 Transaction
4.7.1 Transaction Table
The transaction table displays the attendance records of all employees, including the logs from the
software and the devices.
Select [Device] > [Data] > [Transaction] to view the transaction table.
(1) Users can export the transaction table in .xls, PDF, CSV or .txt file formats based on the
requirements. Please refer to 5. “Export”
Page | 73 Copyright©2020 ZKTECO CO., LTD. All rights reserved.
in Appendix 1 for detailed operation.
Page 76

BioTime 8.0 User Manual
(2) Users can select the fields to be displayed in the transaction table based on requirements (the fields
are displayed if the columns are checked).
(3) Users can change the column width by dragging the column border to the left or right.
(4) Users can define the number of records to be displayed on each interface in the transaction table.
(5) Click any row of the attendance record and view the corresponding photo and employee’s
information on the right side.
4.7.2 Upload USB Transaction
You can import the attendance records to the software from the USB disk.
1. Click [Upload USB Transaction]
Upload File: Click [Choose File] and select the attendance record file to be uploaded.
2. Click [Confirm] to upload the attendance records to the software.
Page | 74 Copyright©2020 ZKTECO CO., LTD. All rights reserved.
Page 77

BioTime 8.0 User Manual
4.7.3 Download Attendance Photo
You can import the attendance records to the software from the USB disk.
1. Click [Device] > [Data]->[Transaction]->[Download Attendance Photo] to open the download
setting page.
2. Set the start time and end time, select the device. Click [Confirm] to download the captured
attendance pictures of corresponding time period from software.
4.8 Device Log
Displays device operation logs i.e., what are the actions performed by the admin with time details.
Page | 75 Copyright©2020 ZKTECO CO., LTD. All rights reserved.
Page 78

BioTime 8.0 User Manual
4.9 Error Log
Displays all error logs uploaded from the visible light devices.
4.10 Upload Log
Displays the device operation log, content, and number of records uploaded by the corresponding
device at a specific time.
Page | 76 Copyright©2020 ZKTECO CO., LTD. All rights reserved.
Page 79

BioTime 8.0 User Manual
4.11 Command Log
This interface displays the executed commands delivered by the software to a device.
Delete a specific Command
• Select the required log from the list and click on button or click on the trash
button to clear the required log.
• Click Confirm to ensure and delete the selected log from the Command History interface.
Page | 77 Copyright©2020 ZKTECO CO., LTD. All rights reserved.
Page 80

BioTime 8.0 User Manual
Bulk Delete
This function lets you delete the old records in bulk by setting the log retention period. Hence, except
for the logs, which fall within the specified retention time, all the old logs will get deleted.
To delete the records in bulk:
• On the History Command interface, click Bulk Delete to set the retention time for the logs.
• On the Bulk Delete interface, click on the Retention Time field, and a calendar window pops
up.
• On the Calendar window, select the required date, click Select Time to update the necessary
time, and click Confirm to save the selected date and time.
• And then click Confirm to save and revise the records until the specified retention time.
Page | 78 Copyright©2020 ZKTECO CO., LTD. All rights reserved.
Page 81

BioTime 8.0 User Manual
4.12 Mobile App
4.12.1 APP Account
Displays the Mobile APP accounts enabled by the employees. The employee can log into the APP by
entering the employee ID and self-service login password. The interface displays the User name, Login
time, Last active time, Client ID, Device token, Client category, Run status(whether the user is online
or not), APP status(whether the APP is enabled or not).
Push Notification
1. Select [Device] > [Mobile APP] > [Account] and select the corresponding account. Click [Push
Notification].
2. Enter the notification content. Click [Confirm] to send the push notification.
Page | 79 Copyright©2020 ZKTECO CO., LTD. All rights reserved.
Page 82

BioTime 8.0 User Manual
Note:
This feature is only used to test whether the notification can be successfully pushed to the mobile app
or not. The content of the notification will not be displayed on the mobile app.
Force Offline
If a user is active in multiple mobile phones, you can use Force Offline Function to make the other
mobile apps inactive.
1. Select [Device] > [Mobile APP] > [Account] and select the corresponding account. Click [Force
Offline].
2. Click [Confirm], to make the mobile app inactive.
Note:
Forced offline accounts can be still logged in with the Employee ID and self-login password.
Disable
1. Select [Device] > [Mobile APP] > [Account] and select the corresponding account. Click [Disable].
2. Click [Confirm] to disable the account.
Note:
A disabled account cannot be logged in unless the account is enabled.
Enable
1. Select [Device] > [Mobile APP] > [Account] and select the corresponding account. Click [Enable].
Page | 80 Copyright©2020 ZKTECO CO., LTD. All rights reserved.
Page 83

BioTime 8.0 User Manual
2. Click [Confirm] to enable the account.
Delete Account
1. Select [Device] > [Mobile APP] > [Account] and select the corresponding account. Click [Delete].
2. Click [Confirm] to delete the account.
4.12.2 Announcement
The software supports pushing announcements to the App.
Push Public Notice
1. Select [Device] > [Mobile APP] > [Announcement] > [Push Public Notice].
Enter the details as shown below.
Subject: Enter the subject of the notice.
Content: Enter the content of the notice.
Page | 81 Copyright©2020 ZKTECO CO., LTD. All rights reserved.
Page 84

BioTime 8.0 User Manual
2. After entering the details, click [Confirm] to send the push notification to all mobile app users.
Push Private Notice
1. Select [Device] > [Mobile APP] > [Announcement] > [Push Private Notice].
2. In the employee’s list, select the employees in batches (You can filter by Department, Name and
Employee ID).
3. Enter the notification subject and content and click [Confirm]. The notification will be sent to the
corresponding mobile client.
Delete Announcement
1. Select [Device] > [Mobile APP] > [Announcement] and select the announcement to be deleted.
Then click [Delete] or icon in the announcement list.
2. Click [Confirm] to delete the selected announcement.
Page | 82 Copyright©2020 ZKTECO CO., LTD. All rights reserved.
Page 85

BioTime 8.0 User Manual
4.12.3 Notice
Displays all the announcements pushed to the APP (Approvals, Leave, Overtime, Manual log) and the
reminder messages.
4.12.4 Operation Log
Displays the operation records of all the APP clients.
Page | 83 Copyright©2020 ZKTECO CO., LTD. All rights reserved.
Page 86

BioTime 8.0 User Manual
4.13 Geo-fence
This function facilitates setting up a geographical boundary using GPS or RFID technology which
limits the Employee to access the Attendance Punch via mobile devices.
4.13.1 GPS Location
Add GPS Location
Add function lets you set the attendance punch limit for the Employees to access Attendance Punch
from the mobile device based on the work location.
• Select [Device] > [Geo-fence] > [Location Setup] > [Add], to add the required location for
the employee attendance via mobile phone.
On the Add window, enter the following details:
Alias: Enter an alternative name for the location.
• This function is integrated with Google Map to facilitate positioning.
Location: The address of the location gets updated through the Map
• On the [Location] field, enter the required address and press the [Enter] key or on the Google
Map interface, enter the specific location name in the [Please enter location] field.
• And the software will automatically update the location information, including the exact
location name, longitude, and latitude details.
Longitude: The Longitude gets automatically updated through the Map.
Latitude: The Latitude gets automatically updated through the Map.
Page | 84 Copyright©2020 ZKTECO CO., LTD. All rights reserved.
Page 87

BioTime 8.0 User Manual
• Users can also drag the icon to the required position on the google map; hence, the
software will automatically update the location information, including the exact location
name, longitude, and latitude details
• Click [Confirm] to save the location information.
Delete GPS Location
• Select [Device] > [Geo-fence] > [GPS Location] and select the required location address to
be deleted. Then click [Delete] or the icon corresponding to that location.
• Click [Confirm] to delete the selected location.
4.13.2 Employee Setup
This function facilitates setting the location range for specific employees, which means the employees
can punch for attendance in the Mobile APP only within the specified range.
• On the [Device] interface, click [Geo-fence] > [Employee Setup] > [Add] to add the
Employees to the specific Geo Location.
Page | 85 Copyright©2020 ZKTECO CO., LTD. All rights reserved.
Page 88

BioTime 8.0 User Manual
On the Add window, enter the following details:
Employee: Select the required employees who needs to punch within the same range.
• On the Add window, select the required Employees' names from the list on the left.
• The selected Employees' names will reflect on the right side of the Add window.
• Select from the Department drop-down list or use the Employee search option (search by
Employee name or Employee ID) to search for the required Employees.
Location: Select the required access location from the drop-down list.
• Please note, Employees can have more than one access location if there is a necessity to
punch-in/out for attendance during their on-duty period or business trips in more than one
place.
Distance: Enter the required perimeter distance to provide access to the attendance punch on the
mobile device, for the selected geographical area.
Start Date / End Date: Set the valid period for the mobile attendance punch.
• Click [Confirm] to save the details. When the employee punches out of range on APP, it will
show the following prompt on the APP:
Page | 86 Copyright©2020 ZKTECO CO., LTD. All rights reserved.
Page 89

BioTime 8.0 User Manual
4.13.3 Department Setup
This function eases you to set a geographical boundary using GPS or RFID technology to a
Department. It limits the Employees of that specific Department to access Attendance Punch via
mobile devices only within the specified range.
1. Select [Device] > [Geo-fence] > [Department Setup] > [Add].
Enter the details as shown below:
Department: Select the Department.
Location: Select the required access location from the drop-down list.
• Please note, a Department can have more than one access location if there is a necessity for
the Employees to punch-in/out for attendance during the on-duty period or business trips in
more than one place.
Distance: Enter the range for the APP punches (unit is meters).
Start Date / End Date: Set a valid time period for this setting.
• Click [Confirm] to save the details. While the employee belonging to the specified
Department punches out of range on the APP, it will display the following prompt on APP:
Page | 87 Copyright©2020 ZKTECO CO., LTD. All rights reserved.
Page 90

BioTime 8.0 User Manual
4.14 Configuration
Device Communication Setting
Registration Device: Toggle Yes to update the device as a registration device.
Resigned Filter: Toggle Yes to filter the resigned employees.
Allow Auto Add: Toggle Yes to enable adding of the device automatically.
Allow Upload Card: Toggle Yes to enable uploading of employee’s card number from the device.
Allow Upload Name: Toggle Yes to enable uploading of employee names from the device.
Allow Download Name: Set whether to allow to upload employee’s names from the device.
Data Sync Mode: This function facilitates syncing of employee data from the software to the device(s).
• Select the required data sync mode from the drop-down list (Real-Time, Timing, and Manual).
• And if Timing is selected, then set the required time on the [Data Sync Time].
Data Transfer Setup: When Data Transfer Setup is enabled, the heartbeat and transfer mode set in
here will be applied to all devices. If users want to set different heartbeat and transfer mode for
different devices, users may disable this data transfer setup first.
Page | 88 Copyright©2020 ZKTECO CO., LTD. All rights reserved.
Page 91

BioTime 8.0 User Manual
Default Timezone: Set the default timezone for new added device(s).
Bio-Photo Approval Policy
Set the Bio-Photo approval policy. It can be [Pending] or [Auto Approved]. If it is set as [Pending],
then the Bio-Photo must be approved by the administrator. Only the approved Bio-Photo will be
displayed on the visible light device during verification.
Data Retention Setting
Set the retention days for data, including transactions, command, device log and upload log. It is set
as 9999 to keep all data by default.
Page | 89 Copyright©2020 ZKTECO CO., LTD. All rights reserved.
Page 92

BioTime 8.0 User Manual
5 Attendance Management
The system can exchange the data with the T&A devices and collect the attendance records. The
primary functions implemented by the attendance system include User management, management
of Attendance parameters, Shift timetables, Scheduling, Daily maintenance, Attendance calculation,
Attendance reports, and Attendance devices.
5.1 Attendance Parameters
As the attendance system may vary from company to company, it is necessary to manually set the
attendance parameters to ensure the accuracy of the final attendance calculation.
5.1.1 Pay Code
Pay Code can be customized according to the actual situation of the company.
Page | 90 Copyright©2020 ZKTECO CO., LTD. All rights reserved.
Page 93

BioTime 8.0 User Manual
Add a Pay Code
1. Click [Attendance] > [Setup] > [Pay Code] > [Add] to add new pay code.
Enter details as shown below:
Code: Enter the code number of the pay code.
Name: Enter the name of the pay code.
Type: Select the type of pay code from the drop-down list. It can be set as Regular, Overtime, Leave,
Exception and Training.
Unit: Select the unit of pay code from the drop-down list.
Symbol: Enter the symbol of pay code that shows on the report.
Page | 91 Copyright©2020 ZKTECO CO., LTD. All rights reserved.
Page 94

BioTime 8.0 User Manual
Round Off: Select the rounding rule of pay code from the drop-down list. It can be set as Round Off,
Round Up, Round Down.
Round-down: Omit the decimal part if it is smaller than the minimum unit.
Round-off: Count the decimal part if it reaches half of the minimum unit.
Round-up: Count the decimal part if it is smaller than the minimum unit.
Minimum:
Set the minimum value for rounding rule.
Display: Toggle Yes if the pay code need to be displayed on the attendance report.
Order: Set the order of the pay code to be displayed on the attendance report.
Color Setting: Select the color of the pay code to be displayed on the attendance report.
1. Click [Confirm] to save the pay code.
Delete a Pay Code
1. Select the pay code and click [Delete] or click in the same row of the pay code to be deleted.
2. Click [Confirm] to delete the pay code.
Page | 92 Copyright©2020 ZKTECO CO., LTD. All rights reserved.
Page 95

BioTime 8.0 User Manual
5.1.2 Fixed Code
Click [Attendance] > [Setup] > [Fixed Code], there are 19 fixed pay code defined by the system, can
be modified, but cannot be added or deleted.
Edit Fixed Code
1.
Click the name of fixed pay code or click in the same row of the pay code to be edited.
2. Edit corresponding fields and click [Confirm] to save the modification.
Page | 93 Copyright©2020 ZKTECO CO., LTD. All rights reserved.
Page 96

BioTime 8.0 User Manual
5.1.3 Group
For the personnel to have the same attendance rule, but are from different departments, users can
assign them to the same attendance group, it will be convenient to make time schedule and
attendance calculation for them.
Create a New Group
1. Click [Attendance] > [Setup] > [Group] > [Add] to add a new group.
Enter the fields as shown below:
Code: Set the code of group.
Name: Set the name of group.
2. Click [Confirm] to complete adding a group.
Personnel Transfer
1. Select corresponding group and click [Personnel Transfer].
Page | 94 Copyright©2020 ZKTECO CO., LTD. All rights reserved.
Page 97

BioTime 8.0 User Manual
2. In the employee’s s list, select the employee(s) whom you want to adjust to the selected group in
batches (You can search employees by Department, Name or Employee ID).
3. Select the Employee and click [Confirm]. The group of the selected employee will be changed.
Remove Personnel from Group
1. Click to select corresponding group, and the personnel belonging to this group will show on the
right personnel list.
2. Select the personnel need to be removed from the group and click [Remove].
3. Click [Yes] to complete removing personnel.
Page | 95 Copyright©2020 ZKTECO CO., LTD. All rights reserved.
Page 98

BioTime 8.0 User Manual
Delete a Group
1. Select the group and click [Delete] or click in the same row of the group to be deleted.
2. Click [Confirm] to delete the group.
5.2 Rule
5.2.1 Global Rule
General rules can be applied to all the Departments. All the general attendance parameters can be set
here.
Basic Setting
Weekend1/Weekend2: Set the weekend of the week.
Color Setting: Select the color of weekend to be displayed on the attendance report.
Duplicate Punch Interval: Set the interval (in minutes) for duplicate punch. If it is set to 1 minute and
the user tries to punch several times within a minute, the system will only accept the first punch.
Page | 96 Copyright©2020 ZKTECO CO., LTD. All rights reserved.
Page 99

BioTime 8.0 User Manual
Rule for Non-scheduled Days
This setting is for the personnel who do not have a time schedule but have the attendance punch
records and need to make time and attendance calculation.
Max Work Hours: Set the maximum work hours.
Day Change Time: Set the time point to distinguish the punch records belonging to which day.
Example, Day Change Time is set as 8:00 am, then the punch records before 8:00 am will belong to
the previous day.
Paring Rule: Set the paring rule of punch records.
·First And Last: Take the first punch record as Check-In, and the last punch record as Check-Out.
·Odd Even: Pick the Check-In and Check-Out record according to odd even.
·Punch State: Pick the Check-In and Check-Out record according to the punch state of the records.
Daily Overtime: Enable it to set the overtime rule for the no schedule day. Users can assign the work
hours as the pay code which type is overtime.
Example: the Rule for Non-scheduled Days is as following:
If the actual work hour is 12 hours, then:
(1) First, the software will compare actual work hour with Work Hour Range 11 hours - 13 hours, 12
Page | 97 Copyright©2020 ZKTECO CO., LTD. All rights reserved.
Page 100

BioTime 8.0 User Manual
hours is in this range, so OT3 = 12 hours – 11 hours = 1 hours, the remaining actual work hour is 12
hours – 1 hour = 11 hours.
(2) Second, the software will compare the remaining actual work hour with Work Hour Range 10 hours
– 11 hours, so OT1 = 11 hours - 10 hours = 1 hour. The remaining actual work hour is 11 hours – 1 hour
= 10 hours.
(3) And Finally, the software will compare the remaining actual work hour with Work Hour Range 8
hours – 9 hours, so Normal OT = 9 hours - 8 hours = 1 hour. The remaining actual work hour is 10 hours
– 1 hour = 9 hours.
Note:
The overtime matching rule is to match from bottom to top and sort the overtime that matches the
duration for overtime calculation.
What are Overtime levels?
When an employee works more than the needed hours, the company management sets overtime
levels such that, the employee gets paid according to his worked overtime level. Overtime levels must
be in hours and must be set in such a way that OT Level 3> OT Level 2 > OT Level 1.
E.g.: OT Level 1 - 3 hours
OT Level 2 - 5 hours
OT Level 3 – 7 hours
For each OT level, you may set distinct pay levels. Consider an employee A works for 3 hours and
employee B works for 5 hours. The worked hours of employee A falls under Level 1. The worked hours
of employee B falls under both Level 1 and Level 2. So, employee B gets consolidated pay by
considering both levels.
Overtime Setting
Page | 98 Copyright©2020 ZKTECO CO., LTD. All rights reserved.
 Loading...