

Zinwell ZW-N5800 User Manual

Wireless LAN Device Series
IEEE 802.11 b/g/n Wireless Router
ZW-N5800 S/C User’s Manual
Version. 1 (Draft. 2009.1.9)
1

Notice
FCC Warning
Changes or modifications to this unit not expressly approved by the party responsible for
compliance could void the user authority to operate the equipment.
This device complies with Part 15 of the FCC Rules. Operation is subject to the following
two conditions: (1) This device may not cause harmful interference, and (2) this device
must accept any interference received, including interference that may cause undesired
operation.
The user’s manual or instruction manual for an intentional or unintentional radiator shall
caution the user that changes or modifications not expressly approved by the party
responsible for compliance could void the user’s authority to operate the equipment.
FCC Statement
This equipment has been tested and found to comply with the limits for a Class B digital
device, pursuant to Part 15 of the FCC Rules. These limits are designed to provide
reasonable protection against harmful interference in a residential installation. This
equipment generates uses and can radiate radio frequency energy and, if not installed and
used in accordance with the instructions, may cause harmful interference to radio
communications.
However, there is no guarantee that interference will not occur in a particular installation. If
this equipment does cause harmful interference to radio or television reception, which can
be determined by turning the equipment off and on, the user is encouraged to try to correct
the interference by one or more of the following measures:
z Reorient or relocate the receiving antenna.
z Increase the separation between the equipment and receiver.
z Connect the equipment into an outlet on a circuit different from that to which the receiver
is connected.
z Consult the dealer or an experienced radio/TV technician for help.
FCC RF Radiation Exposure Statement
This equipment complies with FCC radiation exposure limits set forth for an uncontrolled
environment. This equipment should be installed and operated with minimum distance
20cm between the radiator & your body. For product available in the USA/Canada market,
only channel 1~11 can be operated. Selection of other channels is not possible. The
antenna(s) used for this transmitter must not be co-located or operating in conjunction with
any other antenna or transmitter. Shielded interface cables must be used in order to comply
with emission limits.
2

CE Statement
ZINWELL, hereby declares that this device is in compliance with the essential requirement
and other relevant provisions of the R&TTE Directive 1999/5/EC.
This device will be sold in the following EEA countries:Austria, Italy, Belgium, Liechtenstein,
Denmark, Luxembourg, Finland, Netherlands, France, Norway, Germany, Portugal, Greece,
Spain, Iceland, Sweden, Ireland, United Kingdom, Cyprus, Czech Republic, Estonia,
Hungary, Latvia, Lithuania, Malta, Slovakia, Poland, Slovenia, Bulgaria, Romania.
3

Preface
This guide is for the experienced user who installs and manages the Zinwell ZW-N5800S
product hereafter referred to as the “device”. To use this guide, you should have experience
working with the TCP/IP configuration and be familiar with the concepts and terminology of
wireless local area networks.
4

TABLE OF CONTENTS
NOTICE ..............................................................................................................................................................................2
PREFACE............................................................................................................................................................................4
CH 1. ZW-N5800S INSTALLATION.................................................................................................................................7
PACKING LIST ................................................................................................................................................................. 7
CONNECTORS, BUTTONS AND LEDS............................................................................................................................... 7
HARDWARE INSTALLATION ............................................................................................................................................ 8
CH 2. FIRST TIME CONFIGURATION.........................................................................................................................9
BEFORE START TO CONFIGURE .......................................................................................................................................9
KNOWING THE NETWORK APPLICATION ....................................................................................................................... 10
CH 3. DETAIL CONFIGURATION...............................................................................................................................10
TCP/IP SETTINGS .........................................................................................................................................................10
Configuring WAN Interface............................................................................................... 10
Static IP.............................................................................................................................. 10
DHCP Client (Dynamic IP) ...............................................................................................11
PPPoE ................................................................................................................................ 11
Configuring LAN Interface................................................................................................ 13
Advanced LAN Routing ....................................................................................................15
WIRELESS SETTINGS..................................................................................................................................................... 17
Basic................................................................................................................................... 17
Advanced ...........................................................................................................................19
Security ..............................................................................................................................20
WPS ...................................................................................................................................23
Station List .........................................................................................................................25
FIREWALL .....................................................................................................................................................................26
MAC/IP/Port Filtering Settings .........................................................................................26
Port Forwarding / Virtual Server Settings ..........................................................................27
DMZ Settings.....................................................................................................................28
System Security Settings.................................................................................................... 29
Content Filter .....................................................................................................................29
MANAGEMENT.............................................................................................................................................................. 29
Status..................................................................................................................................29
Statistic............................................................................................................................... 30
System Management.......................................................................................................... 31
Upgrade Firmware .............................................................................................................31
Save/Reload Settings .........................................................................................................32
System Command .............................................................................................................. 32
5

System Log ........................................................................................................................32
CHANNEL N UMBER......................................................................................................................................................33
SPECIFICATION.............................................................................................................................................................34
6
Ch 1. ZW-N5800S Installation
Packing List
Before starting the installation of the device, please make sure the package contains the
following items:
● ZW-N5800S AP/Router unit x 1
● Power Adapter x 1
● RJ-45 Cable x 1
Connectors, Buttons and LEDs
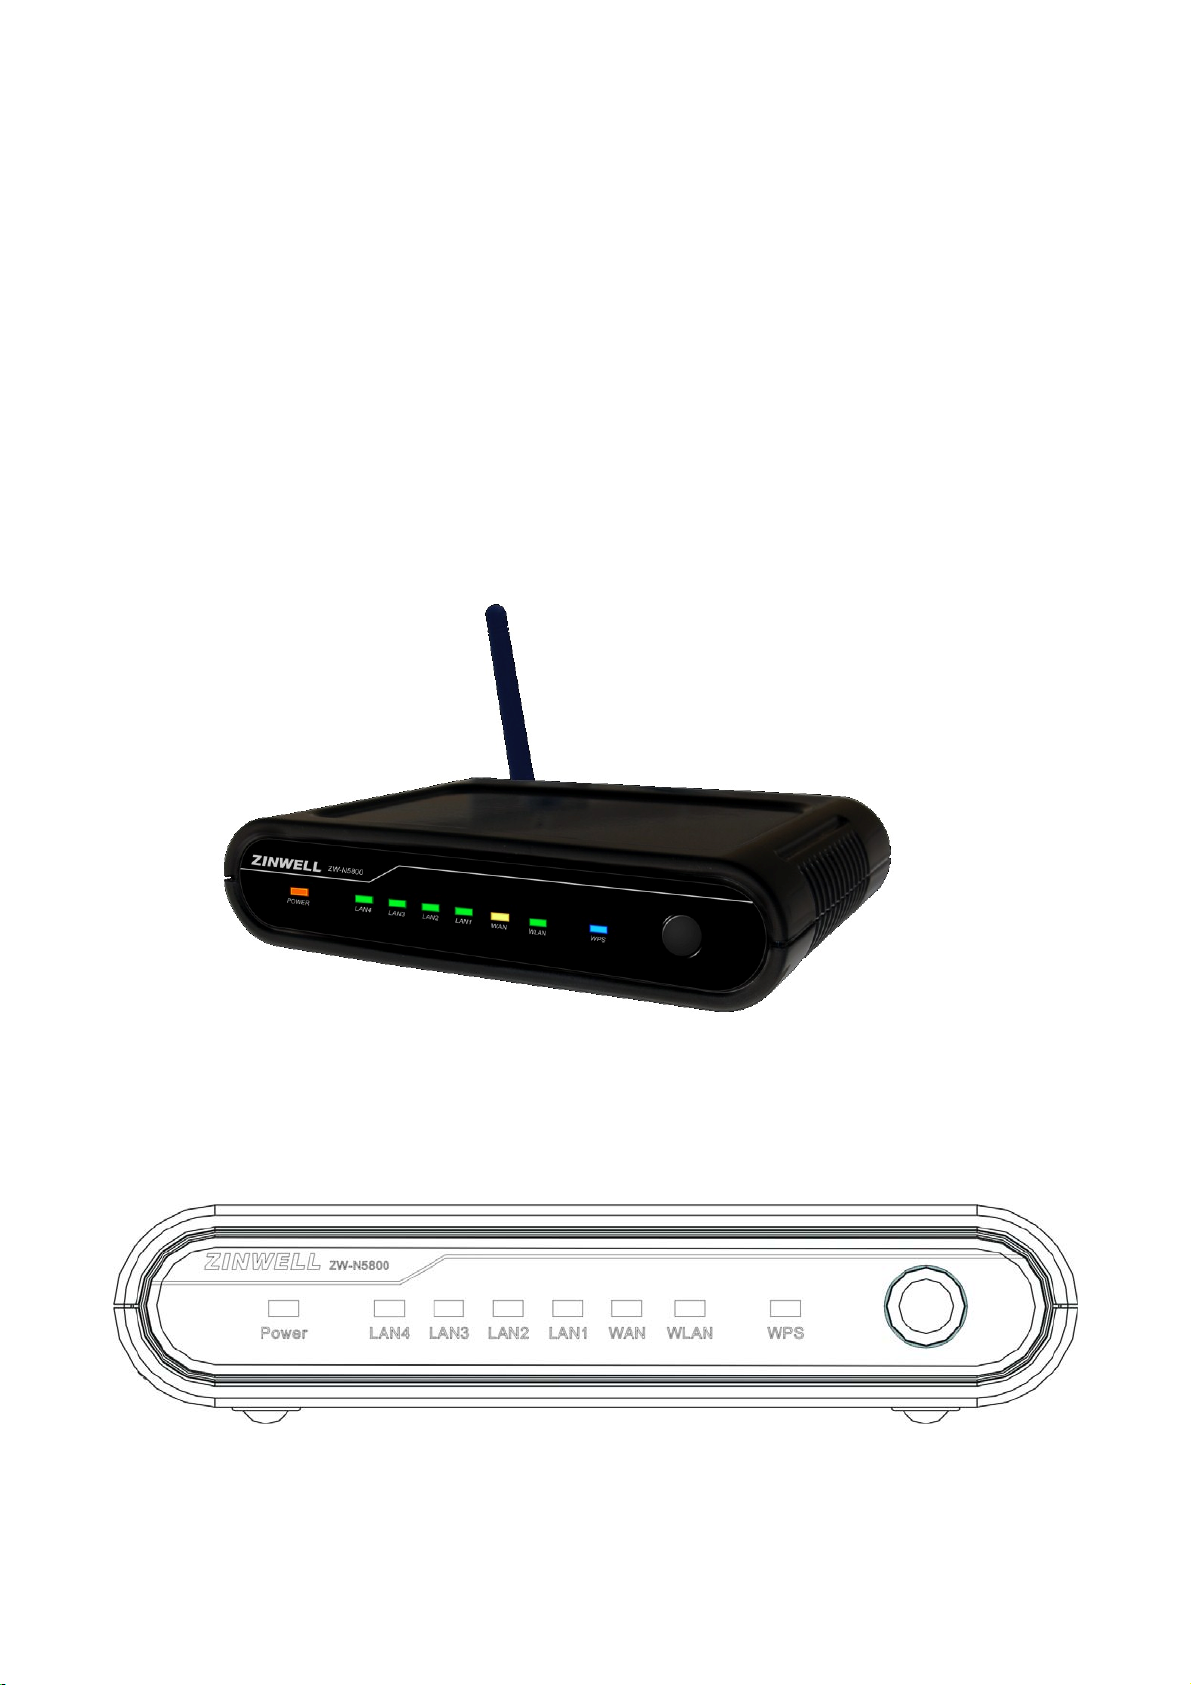
Front Panel
From Left to right:
Power LED: The LED lights when power on.
7
LAN 4/3/2/1: The LED lights when the respective Ethernet port is plugged and flashes
when it is transmitting.
WAN: The LED lights when the Ethernet port is plugged and flashes when it is transmitting.
WLAN: The LED flashes when WLAN is working.
WPS LED: The LED lights when the WPS button is pushed.
WPS Button: Press it to enable PBC (Press Button Communication) for WPS
authentication.
Back Panel
From left to right:
WAN: You can connect the Ethernet port from ISP such as ADSL ITU-R, Cable MODEM.
LAN 1/2/3/4: 4 Ethernet ports for the LAN connection.
POWER: Please supply the power in 12V and 1A.
Reset Button: Press Reset button to revert it to factory default.
Antenna port: For ZW-N5800S, there is an antenna port (RP-SMA type) in the left side.
Connect the antenna into the port.
For ZW-N5800C, the antenna is fixed to the device. Please adjust the angle
of antenna for the better radio receives.
Hardware Installation
Once you check everything from the package, you can start to install the device. You can
use the wall mount hole on the bottom of the device to mount the device on the wall, or
just put the device on the desktop. The administrator can refer to the figure below while in
the process of constructing your WLAN environment.
8
Ch 2. First Time Configuration
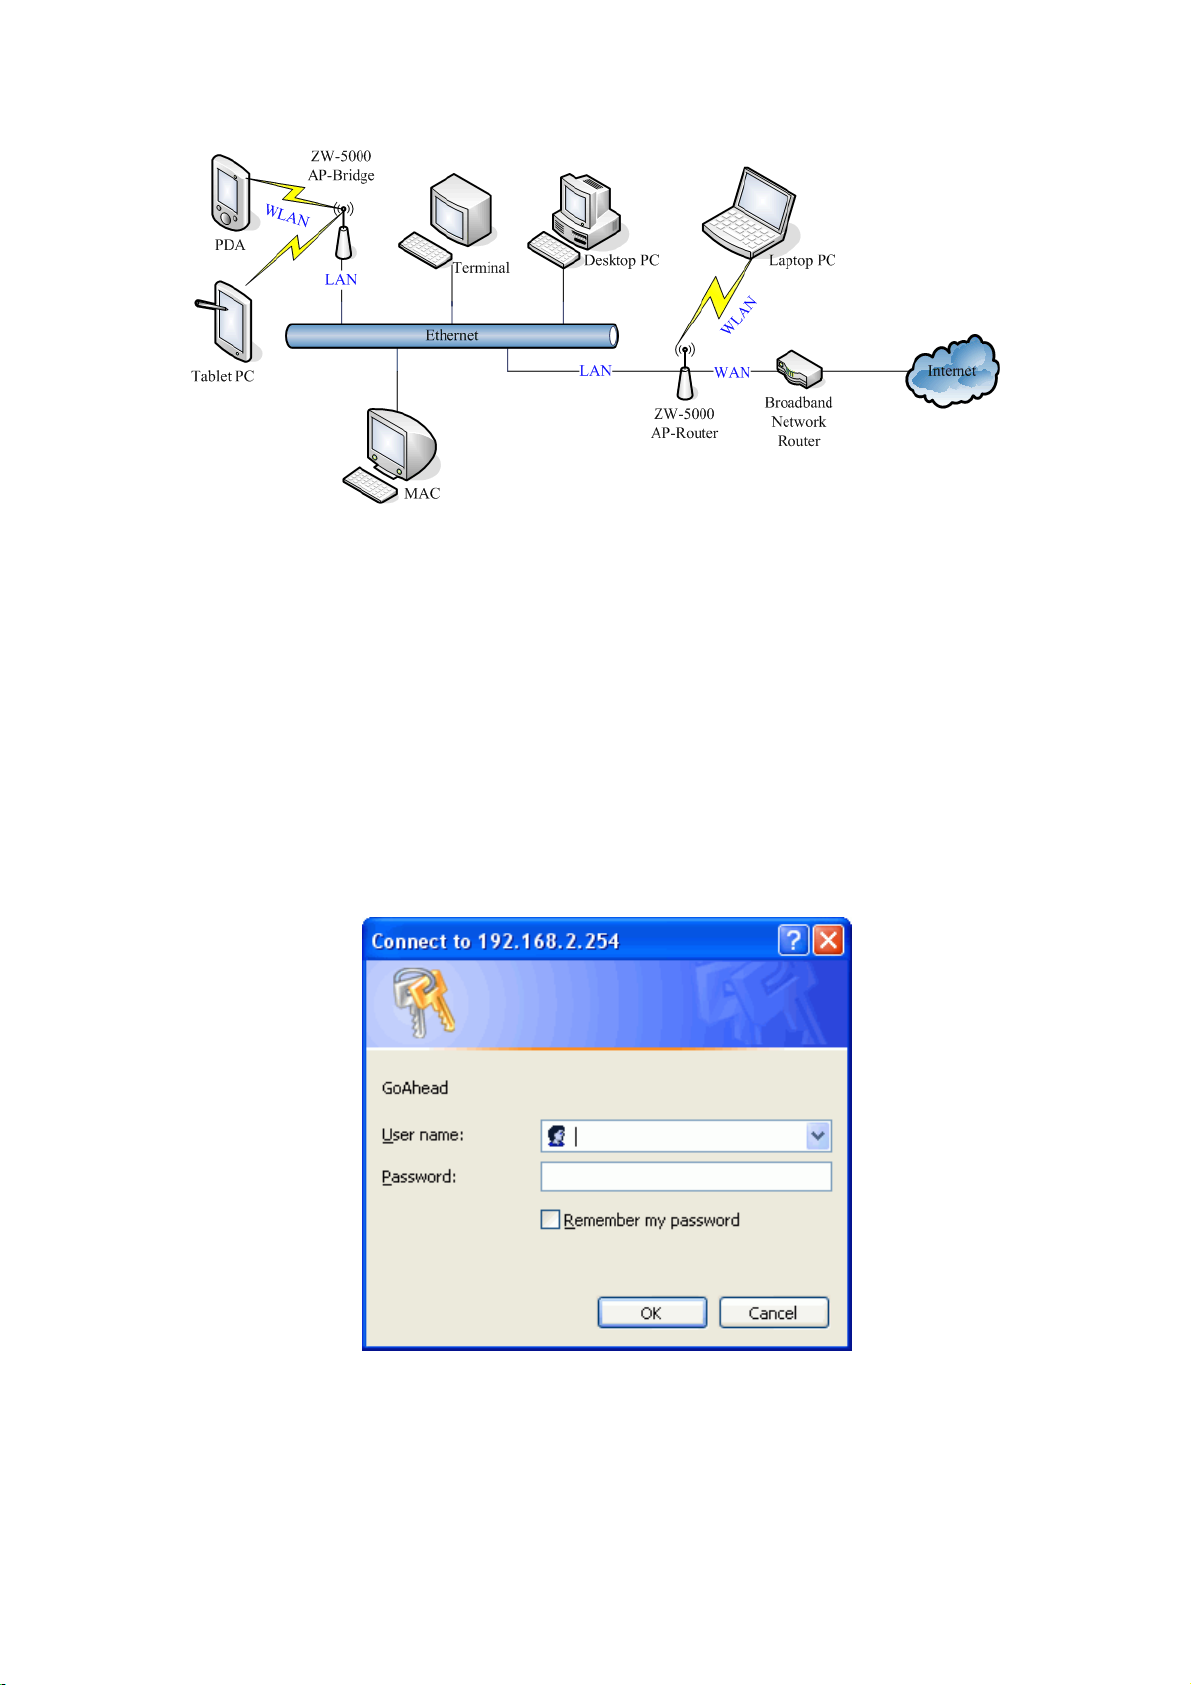
Before Start to Configure
The configuration of this device is through web-browser. To access the configuration
interfaces, make sure you are using a computer connected to the same network as the
device. The default IP address of the device is 192.168.2.254, and the subnet-mask is
255.255.255.0. For the first time configuration, please login with username: root and
password: root.
Please note that the DHCP server inside the device is default to up and running. Do not
have multiple DHCP servers in your network environment, otherwise it will cause
abnormal situation.
9

Knowing the Network Application
The device is a WLAN Access Point and also a Network Address Translator (residential
gateway/router). The WLAN stations (Client) can connect to this device and then go
through the Internet.
Router mode:
The wired Ethernet (WAN) port is used to connect with ADSL/Cable modem and the
wireless NIC is used for your private WLAN. The other wired Ethernet (LAN) port bridges
to the private WLAN. The NAT is existed between WAN and WLAN/LAN and all the
wireless and wired clients share the same public IP address through the WAN port to ISP.
The default IP configuration for WAN port is static IP. You can access the web server of
device through the default WAN IP address 172.1.1.1 and modify the setting base on
your ISP requirement.
Ch 3. Det ail Configuration
TCP/IP Settings
Configuring WAN Interface
The device supports four kinds of IP configuration for WAN interface, including Static IP,
DHCP Client, PPPoE and PPTP/L2TP. You can select one of the WAN Access Types
depend on your ISP required. The default WAN Access Type is “Static IP”.
Static IP
You can get the IP configuration data of Static-IP from your ISP. You will need to fill the
fields of IP address, subnet mask, gateway address, and one of the DNS addresses.
Item
IP Address:
Subnet Mask:
Description
The Internet Protocol (IP) address of WAN interface provided by
your ISP or MIS. The address will be your network identifier
besides your local network.
The number used to identify the IP subnet network, indicating
whether the IP address can be recognized on the LAN or if it
must be reached through a gateway.
10

Default
Gateway:
Primary &
Secondary DNS:
MAC Clone:
The IP address of Default Gateway provided by your ISP or MIS.
Default Gateway is the intermediate network device that has
knowledge of the network IDs of the other networks in the Wide
Area Network, so it can forward the packets to other gateways
until they are delivered to the one connected to the specified
destination.
The IP addresses of DNS provided by your ISP.
DNS (Domain Name Server) is used to map domain names to IP
addresses. DNS maintain central lists of domain name/IP
addresses and map the domain names in your Internet requests
to other servers on the Internet until the specified web site is
found.
Clone device MAC address to the specify MAC address required
by your ISP.
Fill my MAC button: You can manually input the MAC Address
for MAC clone, or click the button to input the MAC Address of
the PC which you are using it to configure the device.
DHCP Client (Dynamic IP)
All IP configuration data besides DNS will obtain from the DHCP server when
DHCP-Client WAN Access Type is selected.
Item Description
Host Name:
MAC Clone:
Input the host name for the device. This value is
optional and not required for the general case.
Clone device MAC address to the specify MAC
address required by your ISP
PPPoE
When the PPPoE (Point to Point Protocol over Ethernet) WAN Access Type is selected,
you must fill the fields of User Name, Password provided by your ISP. The IP
configuration will be done when the device successfully authenticates with your ISP.
Item
Description
User Name:
Password/
Verify
Password:
The account provided by your ISP.
The password for your account. It is required to input again to verify.
11
 Loading...