

Zinwell ZIN-5003 User Manual

0

1
Safety Instructions
This product has been engineered and manufactured with the highest priority
on safety. However, improper use can result in electric shock or fire. In
order to prevent potential danger or damage, please adhere to the following
instructions when installing, operating and cleaning the product.
Power Warning
A marking label attached on the rear side of the adapter (supplied)
indicated the correct power requirement. Operate this product only
from an electrical outlet with the voltage and frequency indicated on the
product’s label. If power source falls outside the system’s compatible
range, it may result in electric shock. If you are uncertain of the type of
power supplied to your home, consult your local power company or
appliance dealer.
Only use the power cord and adapter provided by the manufacturer.
Internal component may be damaged if you use a different adapter to
power this product. To avoid electric shock and fire hazard, match the
plug and outlet connections carefully, then fully insert. If the plug fails to
fit the outlet, please contact an electrician to update your power outlets.
Do not overload electrical outlets, extension cords, or integral
convenience receptacles as this can result in a risk of f ire or electric shock.
And to prevent power cord damage, arrange all power cords so that
people cannot walk on the cords. Do not place objects on the cords.
Place this product in a location that is close enough to an electrical outlet
and where the power cord is easily accessible to be disconnected from
the wall outlet.

2
Usage Warning
To reduce the risk of electrical shock, do not remove the cover or attempt
to disassemble this product. There are no user-serviceable parts inside,
please refer all servicing to qualified service personnel.
Protect this product from foreign objects. Never shove anything into this
product through openings as they may touch dangerous voltage points or
shot-out part that could result in a fire or electric shock.
Do not expose this product to liquids, rain or moisture.
This product has openings for ventilation that protect it from overheating.
Never block or cover these openings. And do not place this product near
heat sources such as radiators, heat registers, stoves or other products
producing heat.
Before cleaning or wiping this product, check your power cord is already
unplugged from the electrical outlet. Only use damp cloth to clean this
product, and never use a liquid cleaner or an aerosol cleaner.
During a thunderstorm, or when this product is unused for long periods of
time, unplug power cord from the wall outlet. This will prevent damage
to the product due to lightning and power-line surges.
Service Warning
Refer all servicing to qualified service personnel. For damage that
requires service, please unplug your power cord from the AC outlet firstly,
and contact your dealer or servicing personnel to obtain service for the
following conditions.
- If there is damage to the adapter, power cord or plug.
- If liquid enters this product.
- If you drop this product, a heavy object falls on this product, or
damage occurs to the cover of this product.
- If you expose this product to rain or water.
- If this product does not operate normally by following the operating
instructions.
- If this product exhibits a distinct change in performance.

3
Copyright Notice
No part of this user’s manual may be copied, translated, or reproduced
including electronic form without permission from the copyright owner.
We have made effort to ensure the accuracy and completeness of this
document.
However, as ongoing development is continually improving the capabilities
of our products and the content described in this manual may be changed
at any time, we cannot guarantee the accuracy of the content of this
document. We disclaim liability for errors, omissions, or future changes.
The information of this document is subject to change without notice.
This device complies with Part 15 of the FCC Rules. Operation is subject to
the following two conditions:
(1) This device may not cause harmful interference.
(2) This device must accept any interference received, including
interference that may cause undesired operation.

4
Table of Contents
Safety Instructions................................................................................. 0
Table of Contents ...................................................................................4
Introduction ............................................................................................5
The content of package .........................................................................5
Front panel ..............................................................................................6
Setting up Peer 2 Player ZIN-5003 ..................................................... 8
Identifying the remote control button .............................................13
OSD Main Menu instructions .............................................................. 14
Setup Menu............................................................................................ 15
Network Setting.................................................................................... 15
System Menu......................................................................................... 17
Default Setting...................................................................................... 18
System Information .............................................................................18
Online Update .......................................................................................19
PC Media ................................................................................................20
Music.......................................................................................................21
Video ....................................................................................................... 22
Photo ......................................................................................................23
USB Media.............................................................................................. 24
Download Media ................................................................................... 25
Info Push................................................................................................ 26
Troubleshooting.................................................................................... 27
Specifications ........................................................................................ 28
5
Introduction
Peer 2 Player ZIN-5003 is the perfect media entertainment center for living
room, linking your PC, external USB hard disc, MP3 player and much more.
With peer-to peer protocol, it can connect all seeds through LAN or USB
devices and allows you to download media files over the internet. You can
play stored favorite media files without running your personal computer. It
supports most video/audio/image formats to save your trouble to convert
downloaded media format. You can also access the shared folders of nearby
PCs thru the intranet (local area network) and play the digital media files from
your desktop/ laptop to your TV. Besides connecting your PC with the
network, you can simply plug in your USB devices to access and play the
media files via user-friendly On-Screen Display (OSD) menu.
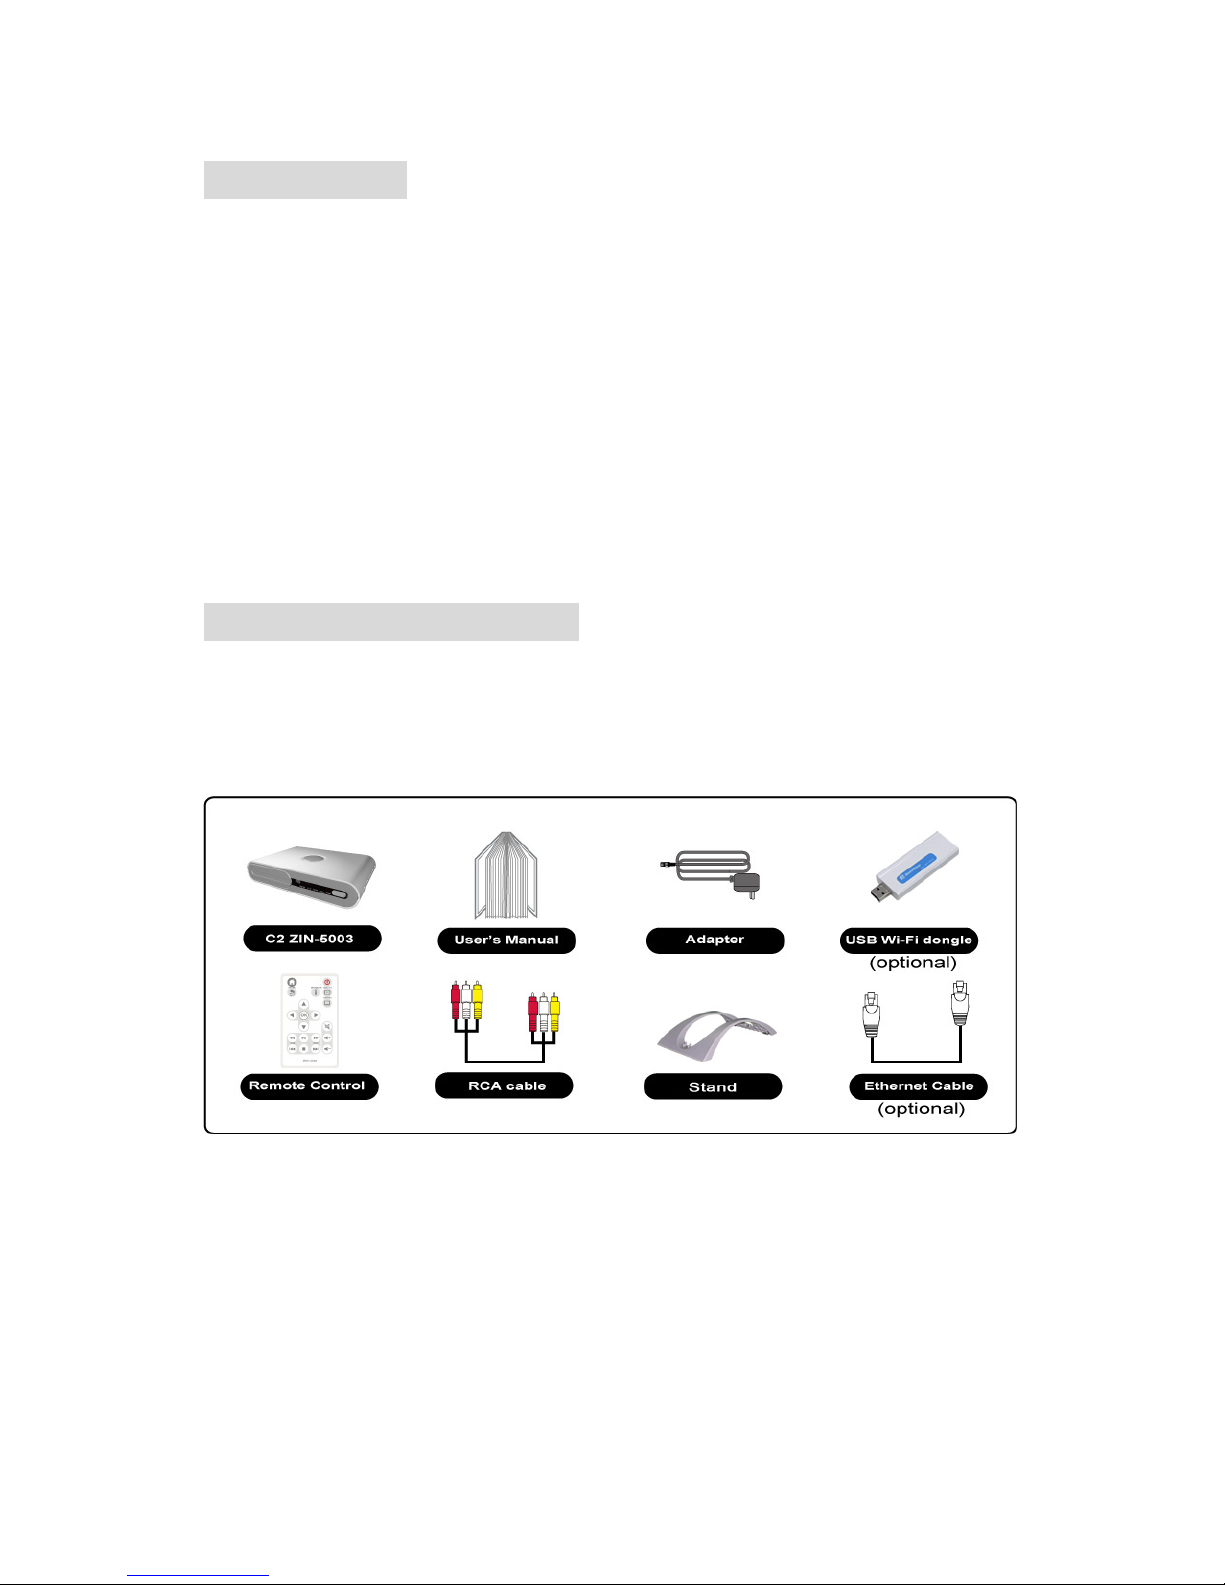
The content of package
Please make sure the following items are included within your new Peer 2
Player package. If any items missed or damaged, please call your dealer.
The peer 2 player might not be compatible with all optional accessories. We
highly recommend you use the specific accessories we suggest.

6
Interface Information
Front panel
X Power button and Power LED
Press to turn the peer 2 player on and LED indicator next to the
lights up in blue. Or LED indicator lights on with red color represent the
standby/sleep mode. Light off when the system is power off.
Y HDMI
The HDMI LED indicator lights up in green to indicate the HDMI output
you switch.
Z YPbPr
The YPbPr LED indicator lights up in green to indicate the component
video output you switch.
[ VIDEO
The VIDEO LED indicator lights up in green to indicate the
VIDEO/S-VIDEO output you switch.
\ LAN
The LAN LED indicator illuminate in green when you are connected to the
wired LAN (Local area network) or wireless network. The LED indicator
blinks when the data is transmitted via LAN.
] USB port
Remove the plastic cover on the front panel to connect to the supported
Universe serial Bus devices, such as USB hard disc, and wireless USB
dongle.
X
YZ
[
\
]
7
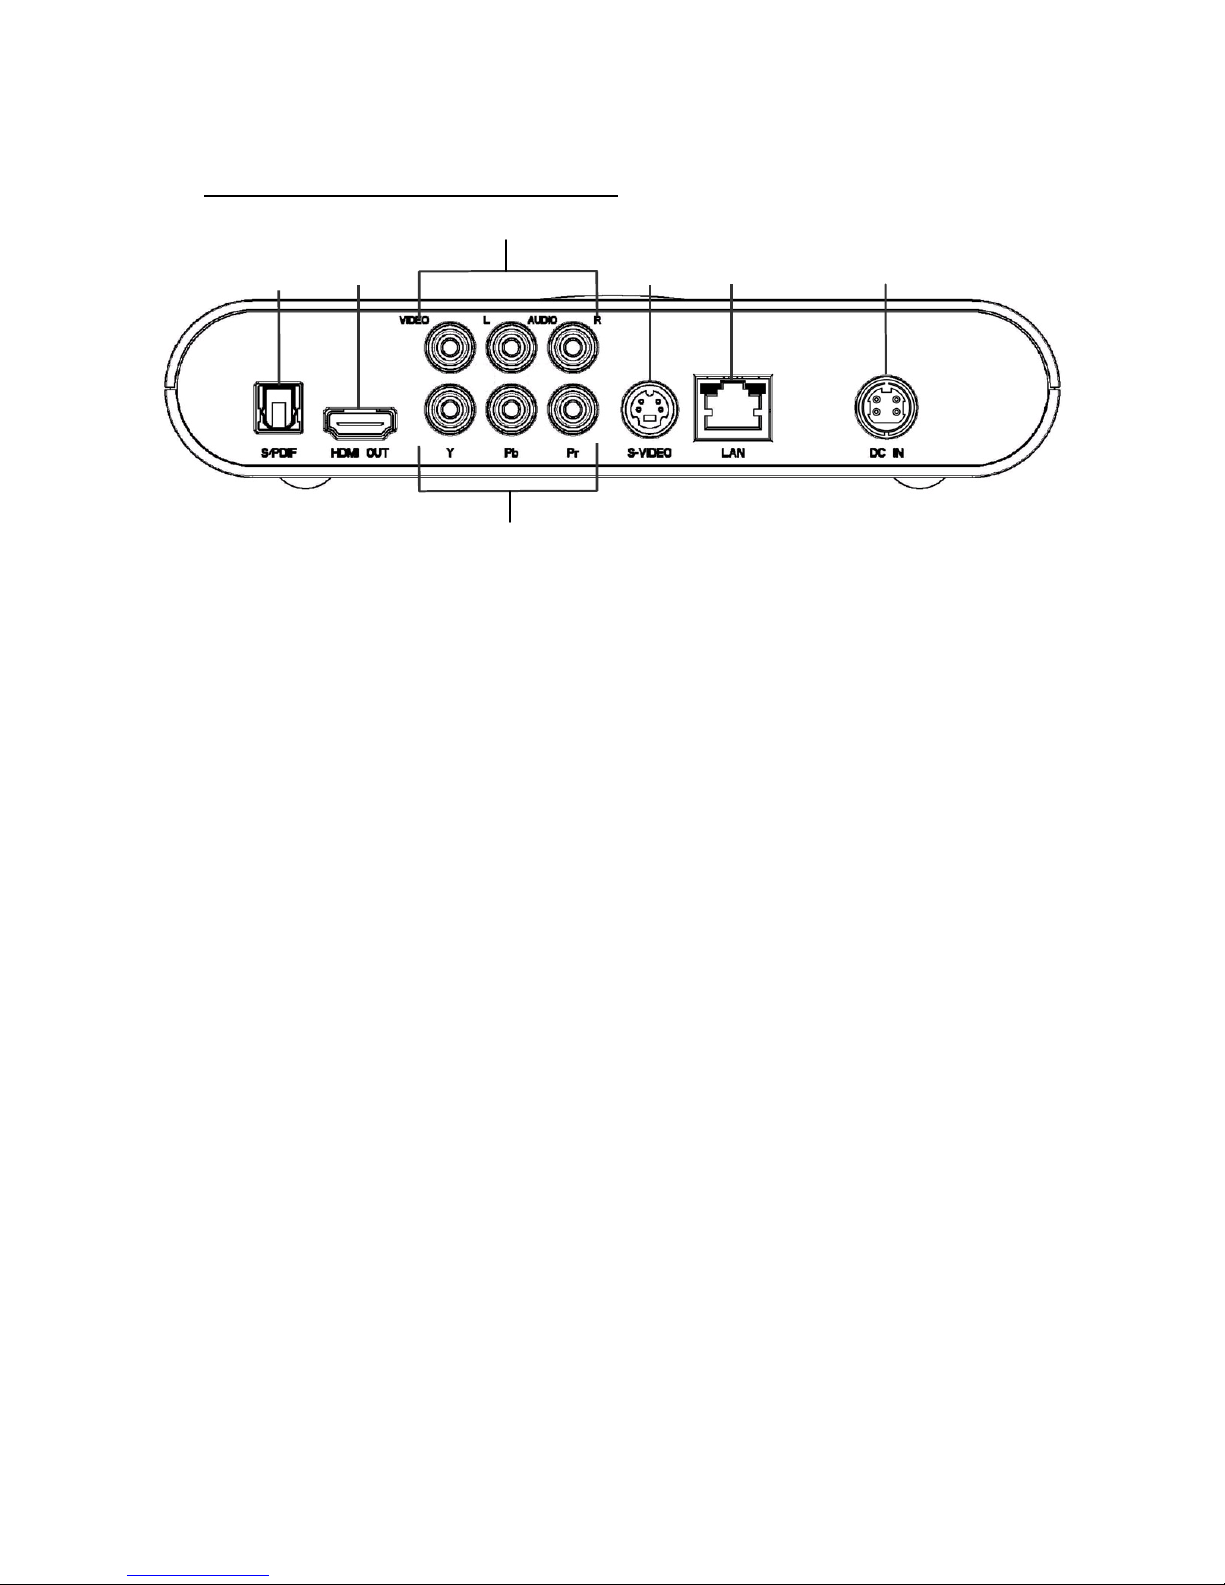
Connection Port of rear panel
X DC IN
Connect to the DC output of power adapter.
Y LAN
Connect to the RJ-45 Ethernet 10/100 based network. Be careful not to
plug the telephone line into the LAN connector.
Z S-VIDEO
Connect to the display with the S-VIDEO IN/ AUDIO L/R IN jacks on the
display using S-VIDEO/ AUDIO L (White)/R (Red) cables. For better
quality picture connection, use the S-VIDEO jack if it is available.
[ VIDEO OUT
Connect to the display with the VIDEO IN/ AUDIO L/R IN jacks on the
display using VIDEO (Yellow)/ AUDIO L (White)/R (Red) cables.
\ Y/Pb/Pr
Component port is used to connect to a Y/Pb/Pr-compatible display.
Three video and two audio jacks (AUDIO L/R) for a Y/Pb/Pr display need
to be connected using a component video cable with green, blue, and red
connectors.
] HDMI OUT
Connect it with display’s HDMI input connector. Since HDMI transmit both
video and audio information, there is only one cable without connecting
the audio jack.
^ S/PDIF
Connect Peer 2 Player to a display that has an optical digital audio port,
using an optical digital audio (also called S/PDIF) cable.
Note: After connecting the cables,
the Video Output item of the Setup
menu must be set to CVBS/S-VIDEO/ COMPONENT/HDMI position.
X
Y
Z
]
^
[
\
8
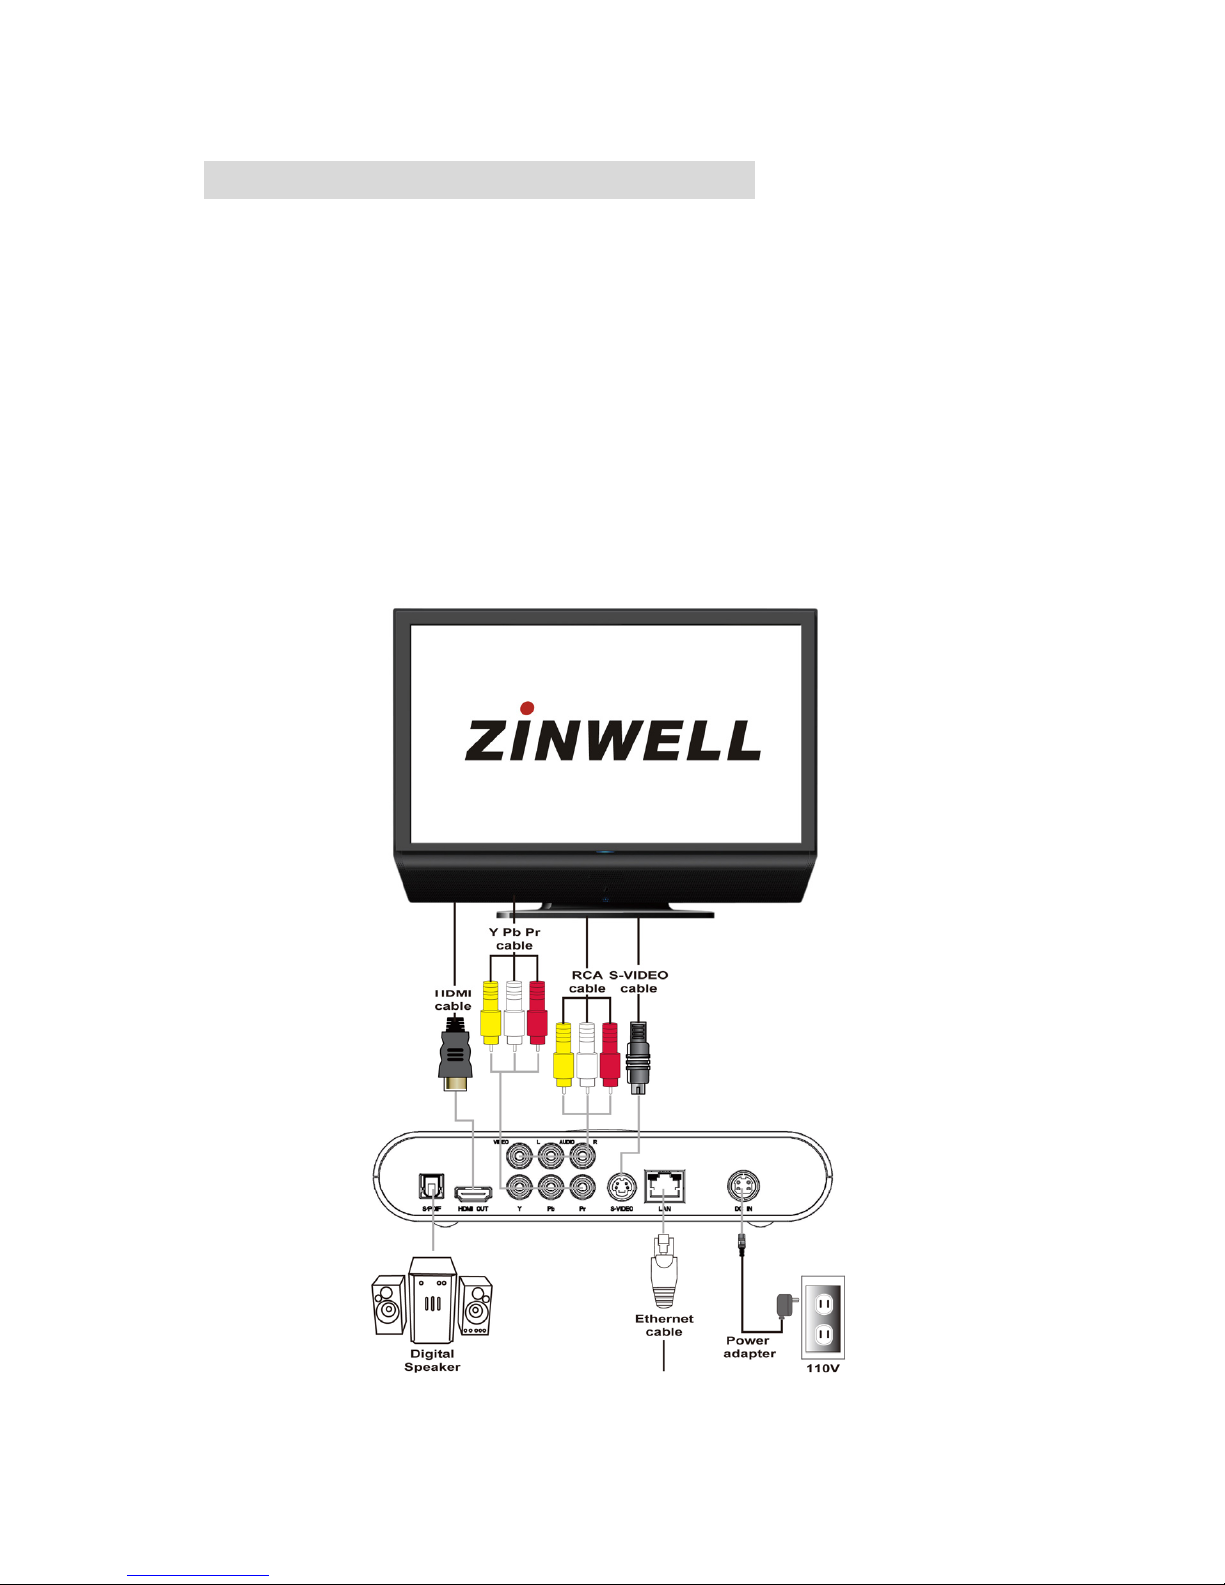
Setting up Peer 2 Player ZIN-5003
Step1: Cable connections.
Choose the connection that match the input jack of your display with the
appropriate cables.
A. To connect display with HDMI port.
B. Digital sound system connection with S/PDIF jack.
For digital output, we recommend to use S/PDIF optical audio cable to
connect your amplifier or digital home theater system.
C. To connect display with three component VIDEO and AUDIO L/R
jacks.
D. To connect display with AUDIO L/R and S-VIDEO/VIDEO jacks.
 Loading...