

Zinwell ZAT-332 Owner's Manual

Manual Number: 081203D

SAFETY INSTRUCTIONS
Please review the following safety precautions. If this is the first time using this model of terrestrial TV
tuner, then read this manual before installing or using the tuner. If the tuner is not functioning properly,
please contact your local distributor or system installer.
The lightning symbol in the triangle is used to alert you to the presence of dangerous voltage
inside the tuner that may be sufficient to constitute a risk of electric shock to anyone opening the
case. It is also used to indicate improper installation or handling of the tuner that could damage
the electrical system in the tuner or in other equipment attached to the tuner.
The exclamation point in the triangle is used to alert you to important operating and maintenance
instructions. Failure to follow these instructions could result in injury to you or damage to the
tuner.
Be careful with electricity:
z Power outlet: To prevent electric shock, be sure the electrical plug used on the tuner’s power cord matches
the electrical outlet used to supply power to the tuner.
z Power cord: Be sure the power cord is routed so that it will not be stepped on or pinched by heavy items.
z Power overloading: Avoid overloading electrical outlets or extension cords which otherwise could result in
electric shock or fire.
z Lightning: For protection from lightning or when the tuner is left unattended for a long period, disconnect it
from the power source.
z Protect other equipment: Unplug the tuner before connecting any other equipment, especially the TV
antenna. Connect all equipment to the tuner before plugging in any power cords to the power source.
z Power line: Be sure your TV antenna is not located near overhead power lines, or where it might fall into any
power lines. Also be careful to avoid touching any such power lines when installing the TV antenna.
z Antenna Grounding: Be sure that the antenna is grounded to provide protection from lightning and build-up of
static electricity. Also, be sure that the power has been turned off before connecting any of the RF connectors.
Also follow these precautions:
z Ventilation: Do not block the ventilation slots on the tuner or place any heavy object on top of it.
Blocking the air flow could damage the tuner. Arrange components so that air can flow freely around the tuner.
Ensure that there is adequate ventilation if the tuner is placed in a stand. Put the tuner in a properly ventilated
area, away from direct sunlight or any source of heat.
z Overheating: Avoid stacking the tuner on top of a hot component such as a power amplifier.
z Risk of Fire: Do not place the tuner on top of any easily combustible material, such as carpet or fabric.
z Proper Connections: Be sure all cables and equipment are connected to the tuner as described in this
manual.
z Object Entry: To avoid electric shock, never stick anything in the slots on the case or remove the cover.
z Water Exposure: To reduce the risk of fire or electric shock, do not expose the tuner to rain or moisture.
z Keep the tuner out of the reach of children or it may fall, causing injury or damage to the tuner.
z Always disconnect the power cord from the power outlet when you are not using the tuner. This reduces your
risk of electric shocks or fire.
z Always turn off the tuner, disconnect it from the power outlet, and unplug all other cables from before moving
the tuner. This reduces your risk of electric shocks or fire.
This device complies with Part 15 of the FCC Rules. Operation is subject to the following two conditions:
(1) This device may not cause harmful interference.
(2) This device must accept any interferences received, including interference that may cause undesired
operation.
z "HDMI, the HDMI logo and High-Definition Multimedia Interface are trademarks or registered
trademarks of HDMI Licensing LLC."
EMI (Electro Magnetic Interference) tested
z Manufactured under license from Dolby Laboratories. “Dolby” and the double-D symbol are trademarks of
Dolby Laboratories.
WARNING!
RISK OF ELECTRICAL SHOCK
DO NOT OPEN
WARNING:
TO REDUCE THE RISK OF ELECTRICAL SHOCK
DO NOT REMOVE THE COVER
NO USER-SERVICEABLE PARTS ARE INSIDE
REFER SERVICING TO QUALIFIED PERSONNEL

TABLE OF CONTENTS
INTRODUCTION..........................................................................................................................1
Package Contents .................................................................................................................................1
Front Panel Buttons and LEDs..............................................................................................................1
Rear Panel Jacks ..................................................................................................................................1
INSTALLATION ...........................................................................................................................2
Connections...........................................................................................................................................2
Identifying the Remote Control Buttons ................................................................................................3
SETTING UP THE TUNER..........................................................................................................4
Channel Setup.......................................................................................................................................4
Auto Scan.......................................................................................................................................................... 4
Manual Scan...................................................................................................................................................... 5
IP Program Setting ............................................................................................................................................ 5
Edit .................................................................................................................................................................... 6
Caption (Closed-Caption Options) ........................................................................................................7
Setup .....................................................................................................................................................8
Output Resolution.............................................................................................................................................. 8
OSD Opacity...................................................................................................................................................... 8
I-Plate ................................................................................................................................................................ 8
Power Saving ....................................................................................................................................................8
Time Zone ......................................................................................................................................................... 8
Sound ................................................................................................................................................................ 9
Network Settings ...............................................................................................................................................9
System ..............................................................................................................................................................9
Resetting to the factory defaults ........................................................................................................................ 9
Software Upgrade............................................................................................................................................ 10
Parental Control Setting ...................................................................................................................... 11
Explanation of the MPAA and TV Rating Systems........................................................................................... 11
Parental Control............................................................................................................................................... 12
Advanced Rating ............................................................................................................................................. 12
Change Password ........................................................................................................................................... 12
APPENDIX 1 DTV Channel Table Information...................................................................13
APPENDIX 2 RF System Guidelines ..................................................................................13
APPENDIX 3 Troubleshooting............................................................................................15
APPENDIX 4 Technical Specifications...............................................................................16
1
INTRODUCTION
Package Contents
Please make sure the following items are included within your package. Contact your dealer if any items
are missing or damaged.
Tuner x 1
Remote Control (with 2 AAA batteries) x 1
Audio/Video cable x 1
This user’s guide x 1
Power adaptor x 1
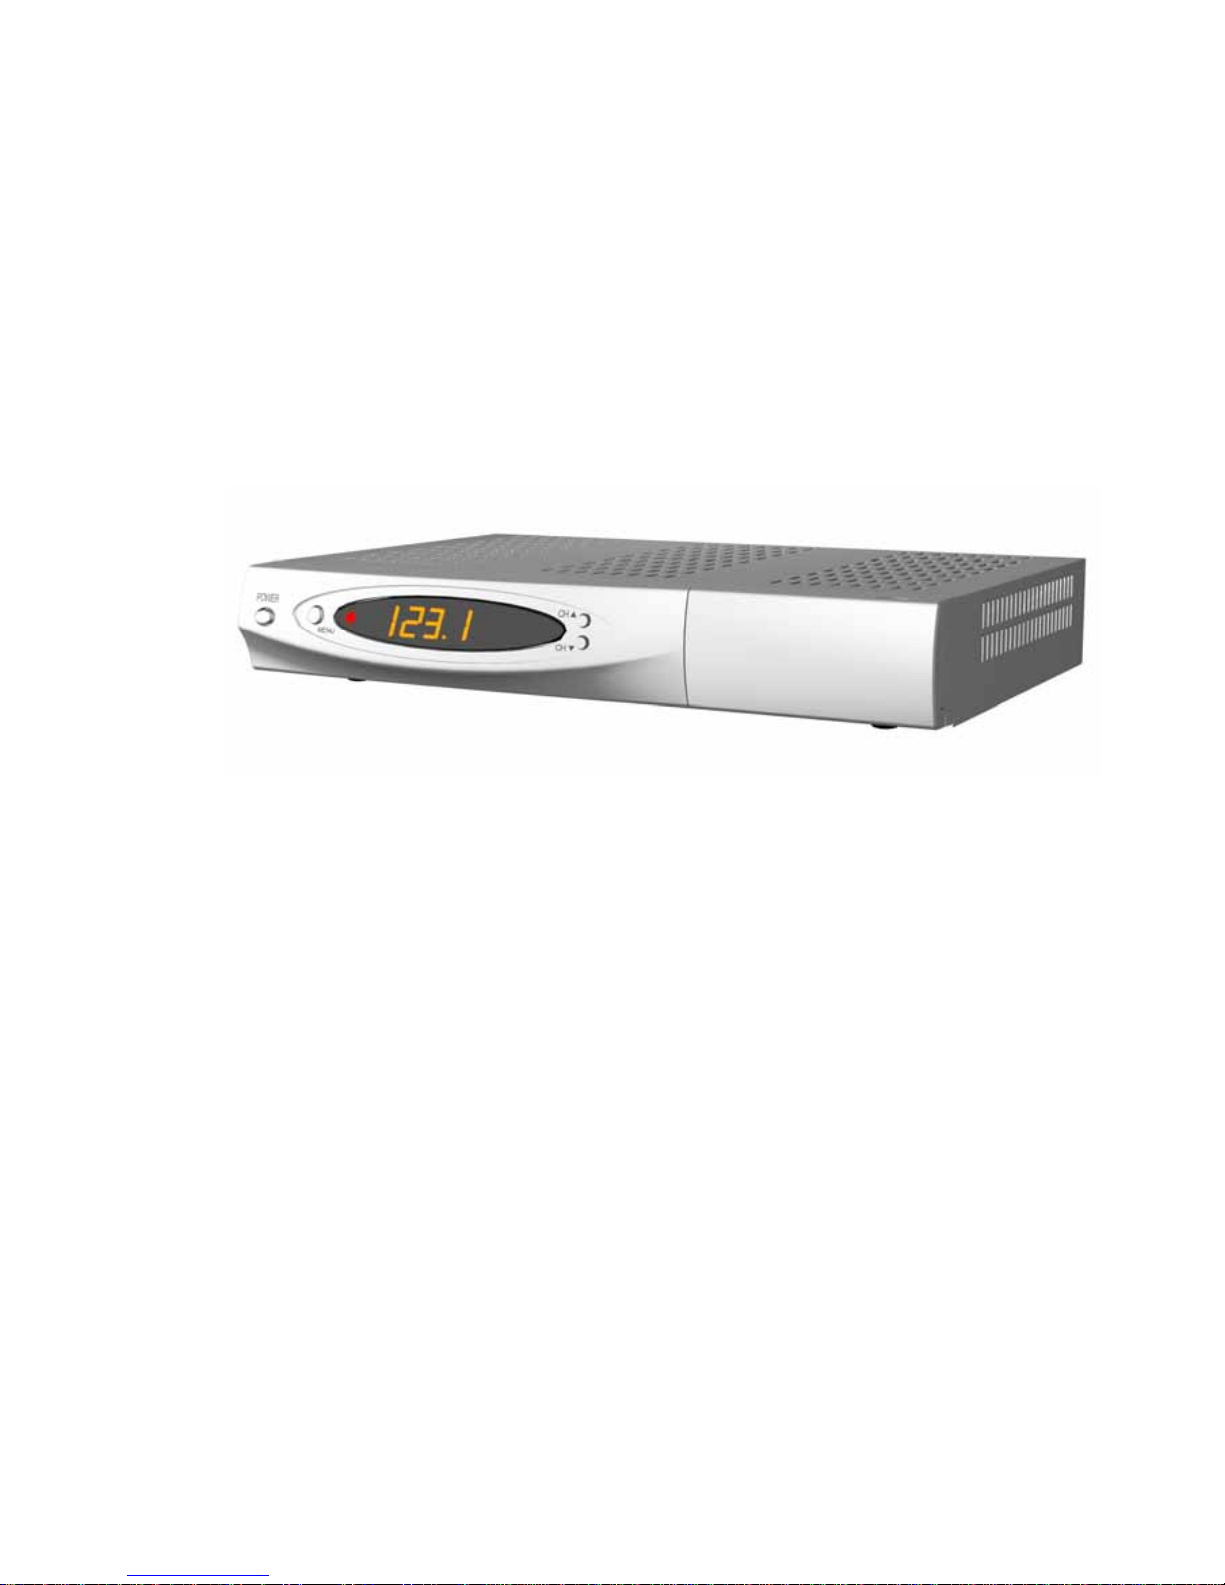
Front Panel Buttons and LEDs
POWER
Press to turn the tuner ON or OFF.
MENU (Enter)
Press to launch OSD menu and confirm selected adjustments throughout the menu.
The OSD menu will disappear automatically after 30 seconds without any command.
/ Channel +/-
Press to change channels or highlight items on the On-Screen Display (OSD) menu screen.
LED Display
¾ Power/Stand by: shows current power status – green LED for power ON, red LED for stand by
¾ IR: blinks to confirm that commands from the remote control are being received.
¾ 4 digit
numeric LED display: 3 digits for the main channel and 1 digit for the subchannel (digital
sources only)
.
1
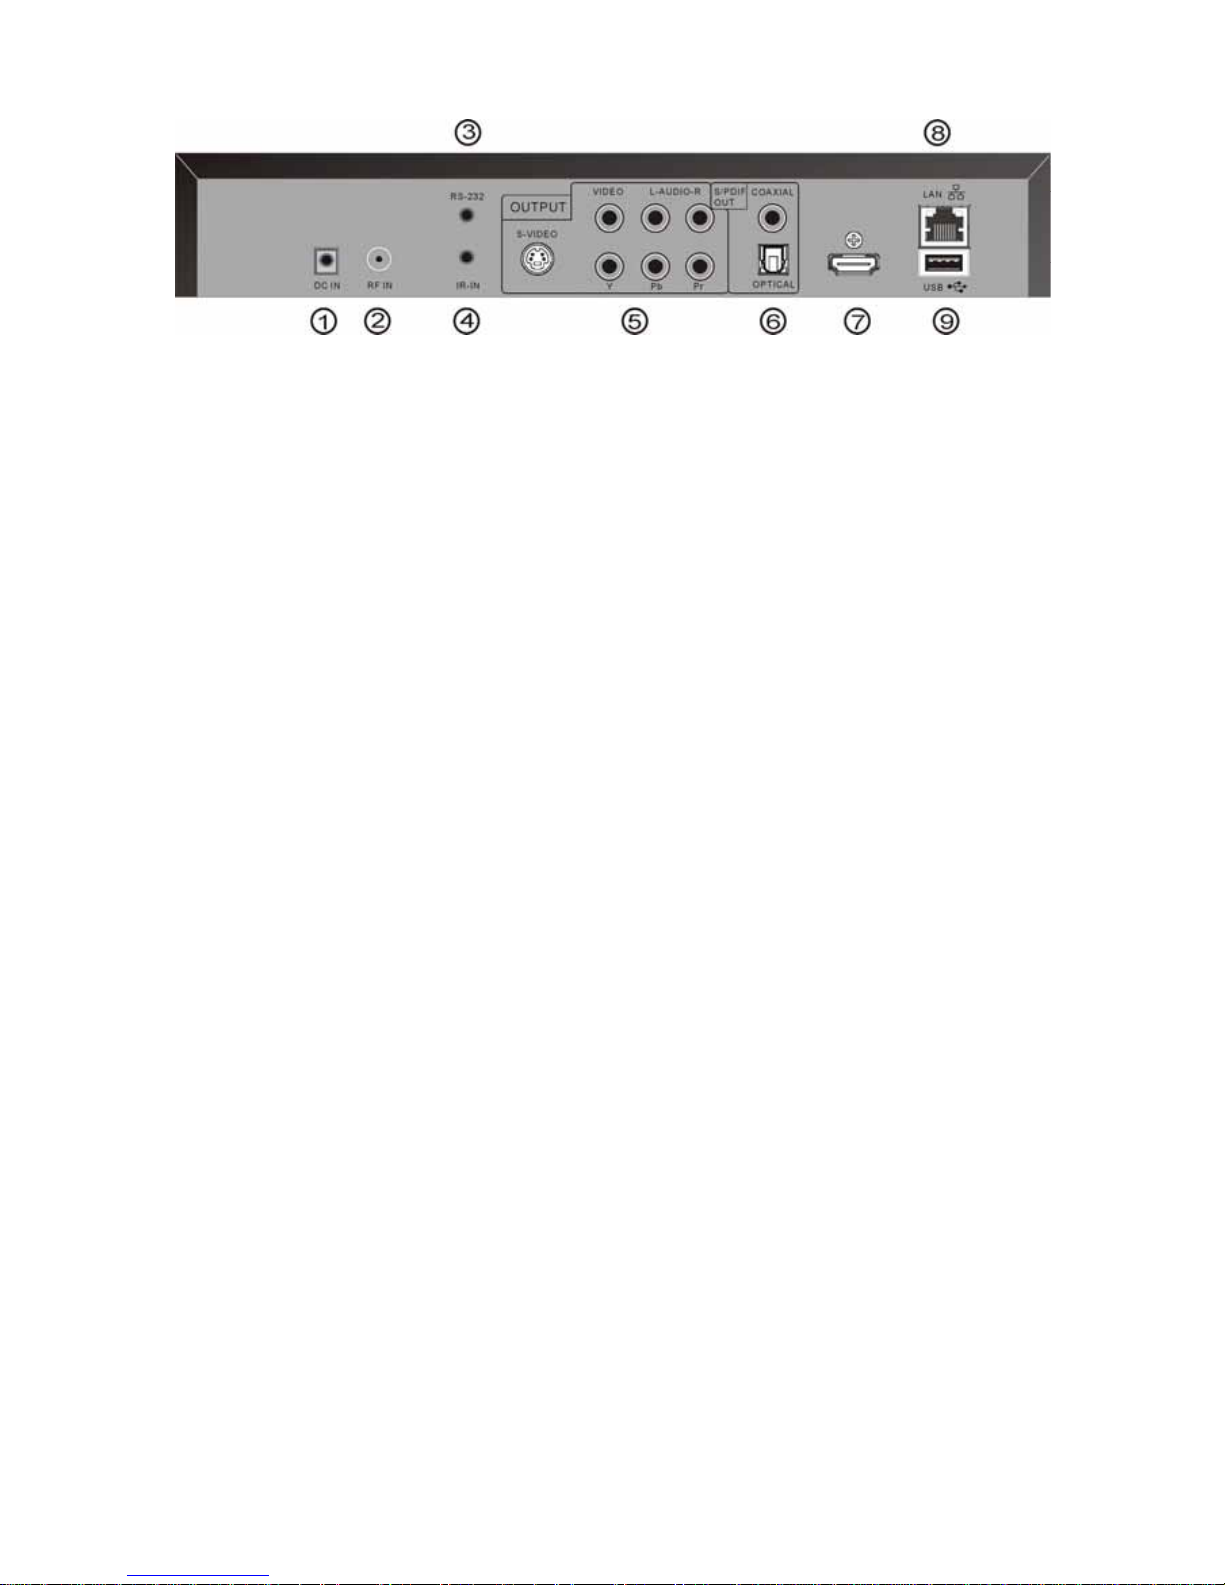
Rear Panel Jacks
①
. DC IN
Connect the supplied 12V / 2A power adapter's output plug here.
②
.
RF IN
Connect a VHF/UHF/ATSC coaxial RF antenna cable to this port for signal input.
③
. RS-232
Connection for remote monitoring or control via external system (for specific requirement only)
④
. IR IN
Connection for external IR extender.
⑤
. YPbPr/S-VIDEO/VIDEO with AUDIO OUT
Analog video and audio outputs for connection to audio/video switchers or displays. Choices
are, in order of signal quality: Component (YPbPr), S-Video, composite (Video). Note:
S-Video and composite are 480i only.
⑥
. S/PDIF OUT
Digital audio outputs (optical and RCA type) for connection to external digital audio system.
⑦
.
HDMI OUT
HDMI output comprised of digital video and audio signals, for connection to compatible
displays or switching/routing devices.
⑧
.
LAN
RJ-45 Ethernet port for used for control, IPTV input and firmware updates.
(Caution: DO NOT plug a telephone line into the network connector!)
⑨
.
USB
Alternate method for installing firmware updates.
2
INSTALLATION
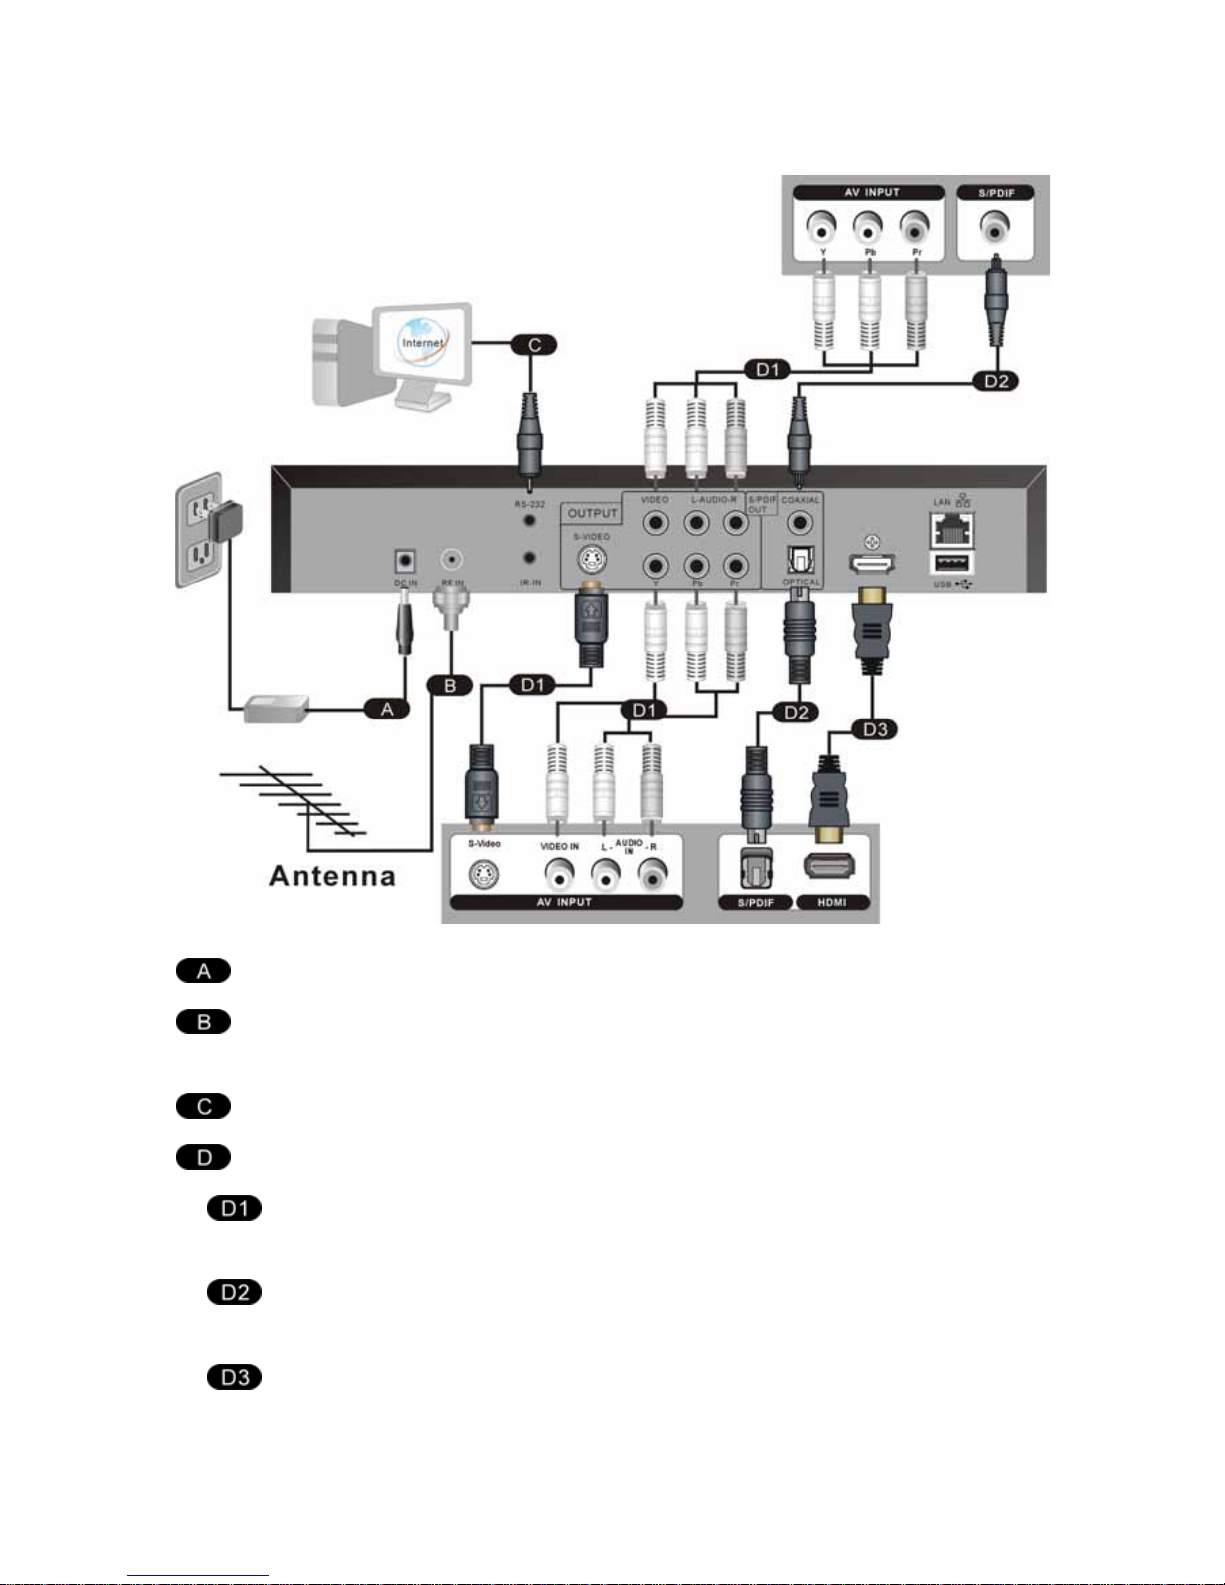
Connections
Plug power adapter into AC power outlet, then connect adapter plug into DC IN port
Connect antenna or cable source to RF Input port using coaxial RF cable with F-type
connector
Connect to external control system (if applicable)
Select output format:
For analog output, connect the YPbPr, S-VIDEO or VIDEO outputs to the AV INPUT
jacks on your display, switcher or router. Connect the L/R AUDIO outputs for audio.
For multichannel digital audio, connect a digital audio cable (optical or RCA type) to
an external digital audio system.
For combined digital video/audio output, connect an HDMI cable (not included)
between the tuner's HDMI output and HDMI input of your display, switcher or router.
3
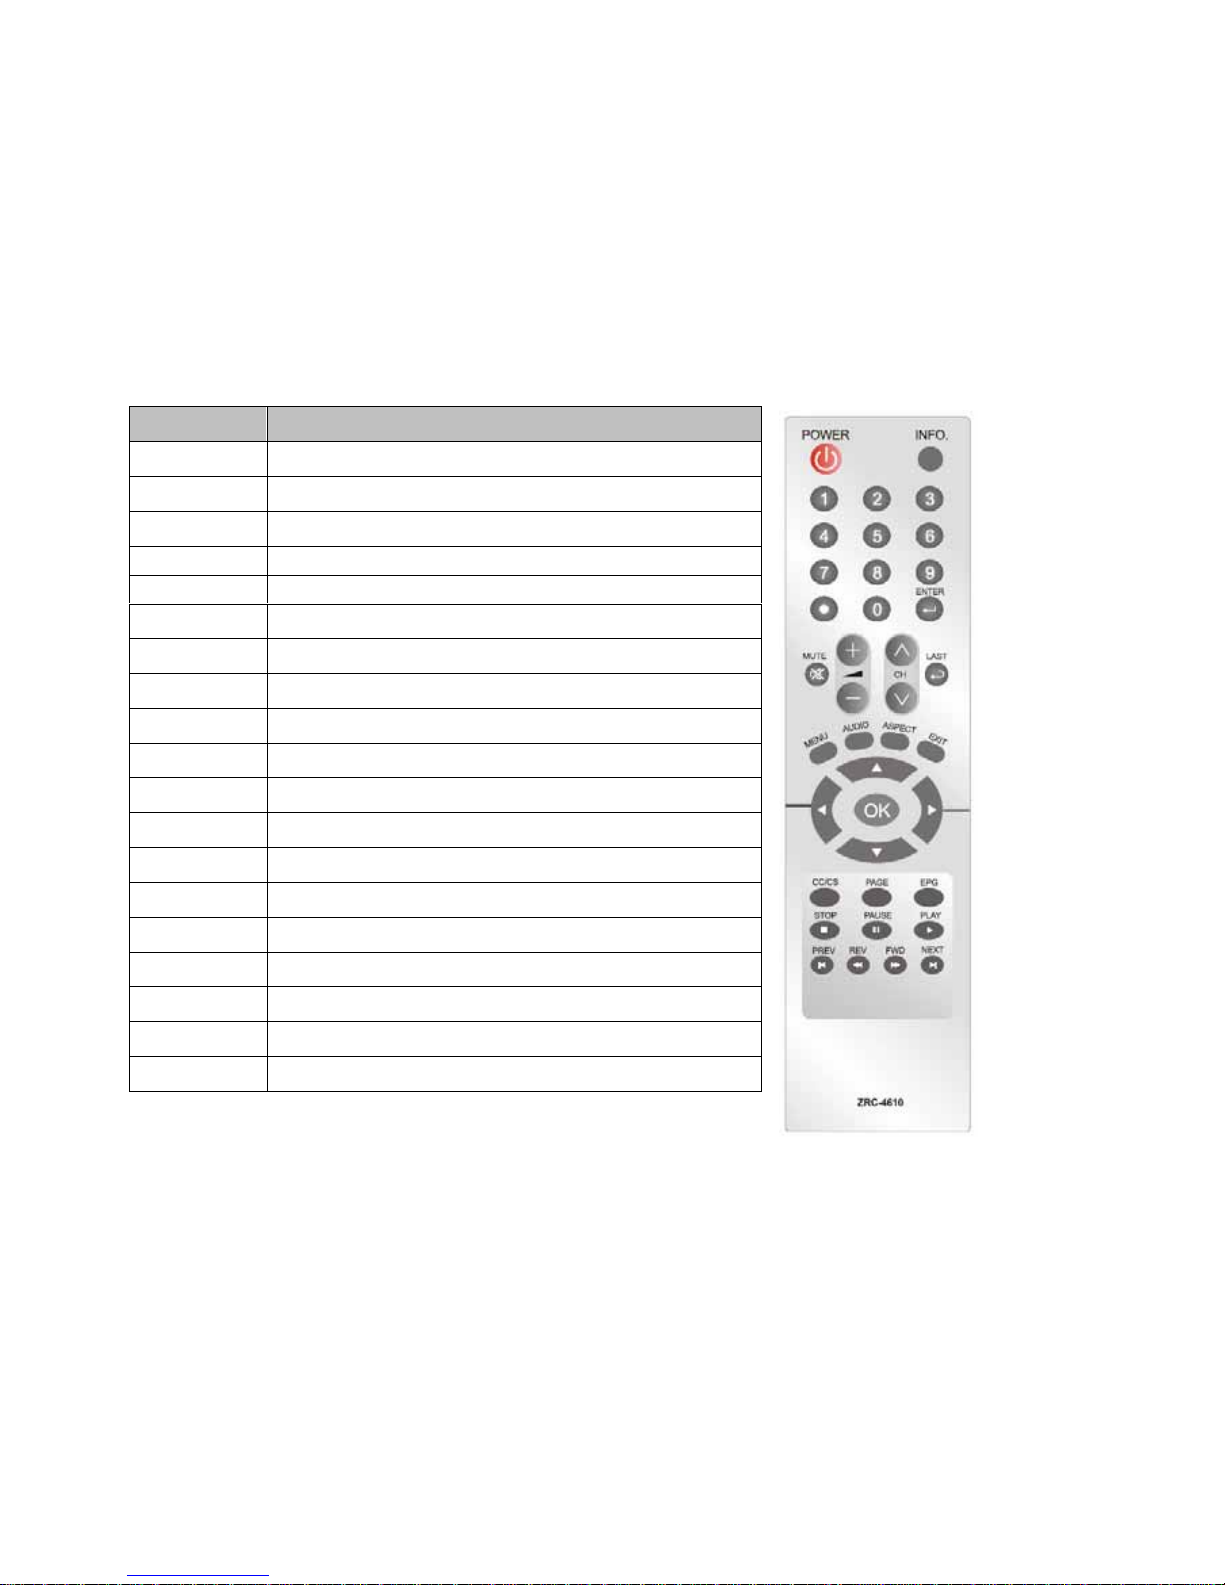
Identifying the Remote Control Buttons
Battery Installation
Open the battery lid behind the remote control and insert the two AAA batteries (included). Be sure to observe
correct polarity (+/-) when placing the batteries into the compartment.
Note: Never mix old and new batteries as this may result in leakage or crac king, possibly causing injuries to users.
Caution: A risk of explosion can result if batteries are replaced with an incorrect type. Always dispose of used
batteries in accordance with local regulations.
*For future use
Note: The remote control has a range of about 20 feet (6 meters) at a left to right angle of about 60° off center.
Always point the remote control directly at the tuner. The remote control unit may not work properly if the
remote control sensor on the tuner is under direct sunlight or subjected to other strong lighting. In such
cases, suppress or change the angle of the lighting on the tuner, or operate the remote control unit closer to
the tuner.
Button Description
POWER Turns tuner ON and OFF
INFO. Press to display information about the current channel
Numeric Buttons For entering channel number or password
PERIOD For digital channel number ”-“
ENTER Selects channel currently keyed
MUTE Press to toggle audio output on and off
VOL+ / VOL- Press + to increase or – to decrease audio volume
CH Λ / CH V
Press to change channels up or down
Last Press to return to previous channel viewed
MENU Press to view or clear the OSD (On-Screen Display) menu
AUDIO
Select multi-lingua
ASPECT Press to toggle through predefined aspect ratio modes
EXIT Press to return to the previous menu page or exit On-Screen Menu
Use to highlight a desired menu item on the screen
OK Press to select a highlighted menu item
CC/CS Press to select CC (Closed Caption) and CS (Caption Service) feeds
PAGE Change to next page on EPG (Electronic Program Guide)
EPG Press to display Electronic Program Guide
Multi-Media key* Multi-Media function
 Loading...